

Page 1

1
Expose the watch dial to light and charge the watch fully
before use. (See page 50)
• For optimum performance, expose the watch dial to
direct sunlight for several hours at least once a month.
Thank you for your purchase of this Citizen watch.
Before using the watch, please read this instruction manual carefully to ensure
correct use.
After reading the manual, store it in a safe place for future reference.
Special notice
Due to special technologies, with the exception of the band, this watch must be
repaired only at an Authorized CITIZEN Service Center.
All requests for repairs must be directed to
an Authorized CITIZEN Service Center
.
Page 2

2
Contents
Features ......................................... 4
Safety precautions ...................... 6
Using your watch
—quick start guide ................... 12
Part names and their main
functions ..................................... 14
How to use the screw down crown and
screw down push button ................... 16
How to use the unidirectional rotating
bezel ..................................................... 18
Receiving the time signal to set
the time and calendar ............... 20
Before receiving the signal
(Reference position check) ............... 20
Radio controlled watch ..................... 22
Receiving range of the signal ............ 23
Placement for better reception ......... 24
Receiving the signal
............................ 26
Interrupting reception
of the signal ......................................... 29
Movement of the hands during signal
reception ............................................. 30
Checking signal reception ................ 32
Adjusting the time/
calendar manually .....................34
Perpetual calendar ............................. 37
Changing the daylight saving
time (DST) setting......................39
Setting to the local (travel) time
(time difference correction
function) ...................................... 40
Page 3

3
Precautions ................................. 62
Water-resistance performance ......... 62
Handling the rechargeable cell ......... 64
Keep your watch clean ....................... 64
Caution about charging ..................... 65
To avoid malfunction ........................ 66
Maintenance ...............................68
Daily maintenance ............................. 68
Storage ................................................. 69
Luminous dials and hands
................. 69
Specifications ............................. 70
Functions list ..............................72
Using the watch during diving
—Dive mode...............................42
Using the dive mode .......................... 48
Charging your watch ................ 50
Charging your watch ......................... 50
When the watch reaches a low charge
state—insufficient charge warning
function ............................................... 51
Charging time ..................................... 52
Power save feature .................... 54
Troubleshooting ........................ 56
Adjusting the reference
position ....................................... 60
Page 4

4
Features
Receives a time signal and adjusts the time
automatically when in Europe (see page 22)
• When you adjust the time and calender
in an area where you cannot receive the
signal, see pages 34 to 38.
Dive mode assures accurate
time indication while diving
(see page 42)
Perpetual calendar—no need
for date correction at the end of
each month (see page 37)
Solar-powered—no need for
battery replacement
Page 5

5
To avoid hand misalignment by impacts
or magnetism
❏
Impact detection function: This function prevents
unwanted movement of the hour, minute and
second hands when the watch receives an impact.
❏
Hand correction function (hand reference
position auto-correction function): The
reference position of the hands is checked at
regular intervals, and if there is any misalignment,
the hour, minute and second hands are rapidly
corrected to maintain the correct time.
Time difference
correction function—
easy adjustment to
the local time overseas
(see page 40)
Page 6

6
Safety precautions
Diving is a potentially dangerous sport. When using this watch for diving,
make sure you have a proper understanding of the procedures for handling
the watch as described in this manual and observe proper procedures.
Handling of this watch in a manner contrary to that described in this user’s
manual may prevent the watch from functioning properly.
THIS WATCH IS NOT INTENDED FOR USE AS A PRIMARY DIVE INSTRUMENT.
Page 7

7
To avoid injury
• DO NOT wear the watch where the temperature becomes extremely high—such as
in a sauna. The watch may become hot and burn the skin.
• Be careful when engaged in strenuous exercise or work, to avoid injury to yourself
or others.
• Be particularly careful when holding a small child with your watch on.
• The case and band of the watch come into direct contact with the skin. Wearing
this watch may cause itching or rashes if you have sensitive skin or certain physical
conditions. If you think there is something wrong, take off the watch immediately
and consult your physician.
Possible causes of rashes include
• Allergy to certain metal or leather
• Rust, dirt or perspiration present on the watch’s body or band
• Build up of foreign matter in the band and case
Page 8

8
Safety precautions
General diving precautions
• In the case of using this watch for diving, always make sure you receive the
proper diving training from a licensed instructor to acquire the experience and
skills required for safe diving.
• Make sure you have completely mastered the handling and operation of this
watch.
Even recreational diving can be potentially dangerous. Diving without the proper or
adequate training can lead to a fatal or serious accident.
THIS WATCH IS NOT INTENDED FOR USE AS A PRIMARY DIVE INSTRUMENT.
Page 9

9
• Each diver must take responsibility for planning and executing his or her own
diving plan to ensure safe diving.
This watch is not equipped with a function that prevents decompression sickness.
In addition, this watch is also unable to check differences in physiological functions
of individual divers or differences in physical condition on that day.
Since the occurrence of decompression sickness is greatly affected by physical
condition, the degree of the risk of decompression sickness varies depending on
your physical condition on that day. It is recommended to avoid diving whenever
you are in poor physical condition such as when you are ill, fatigued, have not had
enough sleep or have a hangover.
Precautions relating to use of this watch
• This watch is not equipped with a function that indicates decompression diving.
Do not engage in decompression diving while using this watch.
Page 10

10
Safety precautions
Precautions relating to use of this watch (continued)
• When using this watch for diving, always make sure to use the watch in
combination with other diving instruments (dive table, divers’ watch, residual
pressure gauge or water depth gauge).
Sudden atmospheric fluctuations and changes in water temperature may have an
effect on the display and performance of the watch. In addition, always make sure
to use the watch in combination with other diving instruments in case the watch
should happen to malfunction. This watch is not intended for use as a primary dive
instrument.
• Always make sure to check all functions of the watch before each dive to prevent
malfunctions and accidents caused by the use of improper settings.
In particular, make sure to check whether the watch is sufficiently charged and
that there are no insufficient charge warning (see page 51) on the display.
Page 11

11
• The use of this watch for diving is limited to recreational diving (nondecompression diving) at a water temperature of 0˚C/32˚F to +50˚C/122˚F.
Do not use this watch for the following types of diving:
– Diving outside the above temperature range
– Decompression diving
– Saturation diving using helium gas
– Freshwater diving (this watch is calibrated for saltwater diving)
• Allow a sufficient margin during diving with respect to non-decompression
diving limit time.
• Do not engage in skin diving after scuba diving since this can have a serious
effect on your health.
This watch has no function to distinguish between scuba diving and skin diving.
Page 12
12
Using your watch—quick start guide
Check your watch as follows before
using it:
Checking the power reserve
Charge the watch. (See page 50)
Second hand
Day of the
week hand
Date
When exposing your watch to the light after a period of darkness, the hands may
turn rapidly. That is indicating the watch is exiting power save feature. (See page
54) This is not a malfunction. Allow the watch to return to fully normal operation
before using for diving or other function. Wait until the rapid movement stops.
The second hand is moving at
1-second intervals.
The second hand is moving at
2-second intervals or has stopped.
Check the movement of the second
hand.
Page 13

13
Checking the time and calendar
Start using the watch!
Adjust the time and calendar
using either of the two following
methods:
• On demand reception of the time
signal (see page 28)
• Manual correcting of the time and
calendar (see pages 34 to 38)
Time and calendar are correct.
Time and calendar are not correct.
Check the time and calendar.
• See page 34 to check the calendar.
Page 14
WED
TUE
MON
SUN
SAT
FRI
THU
14
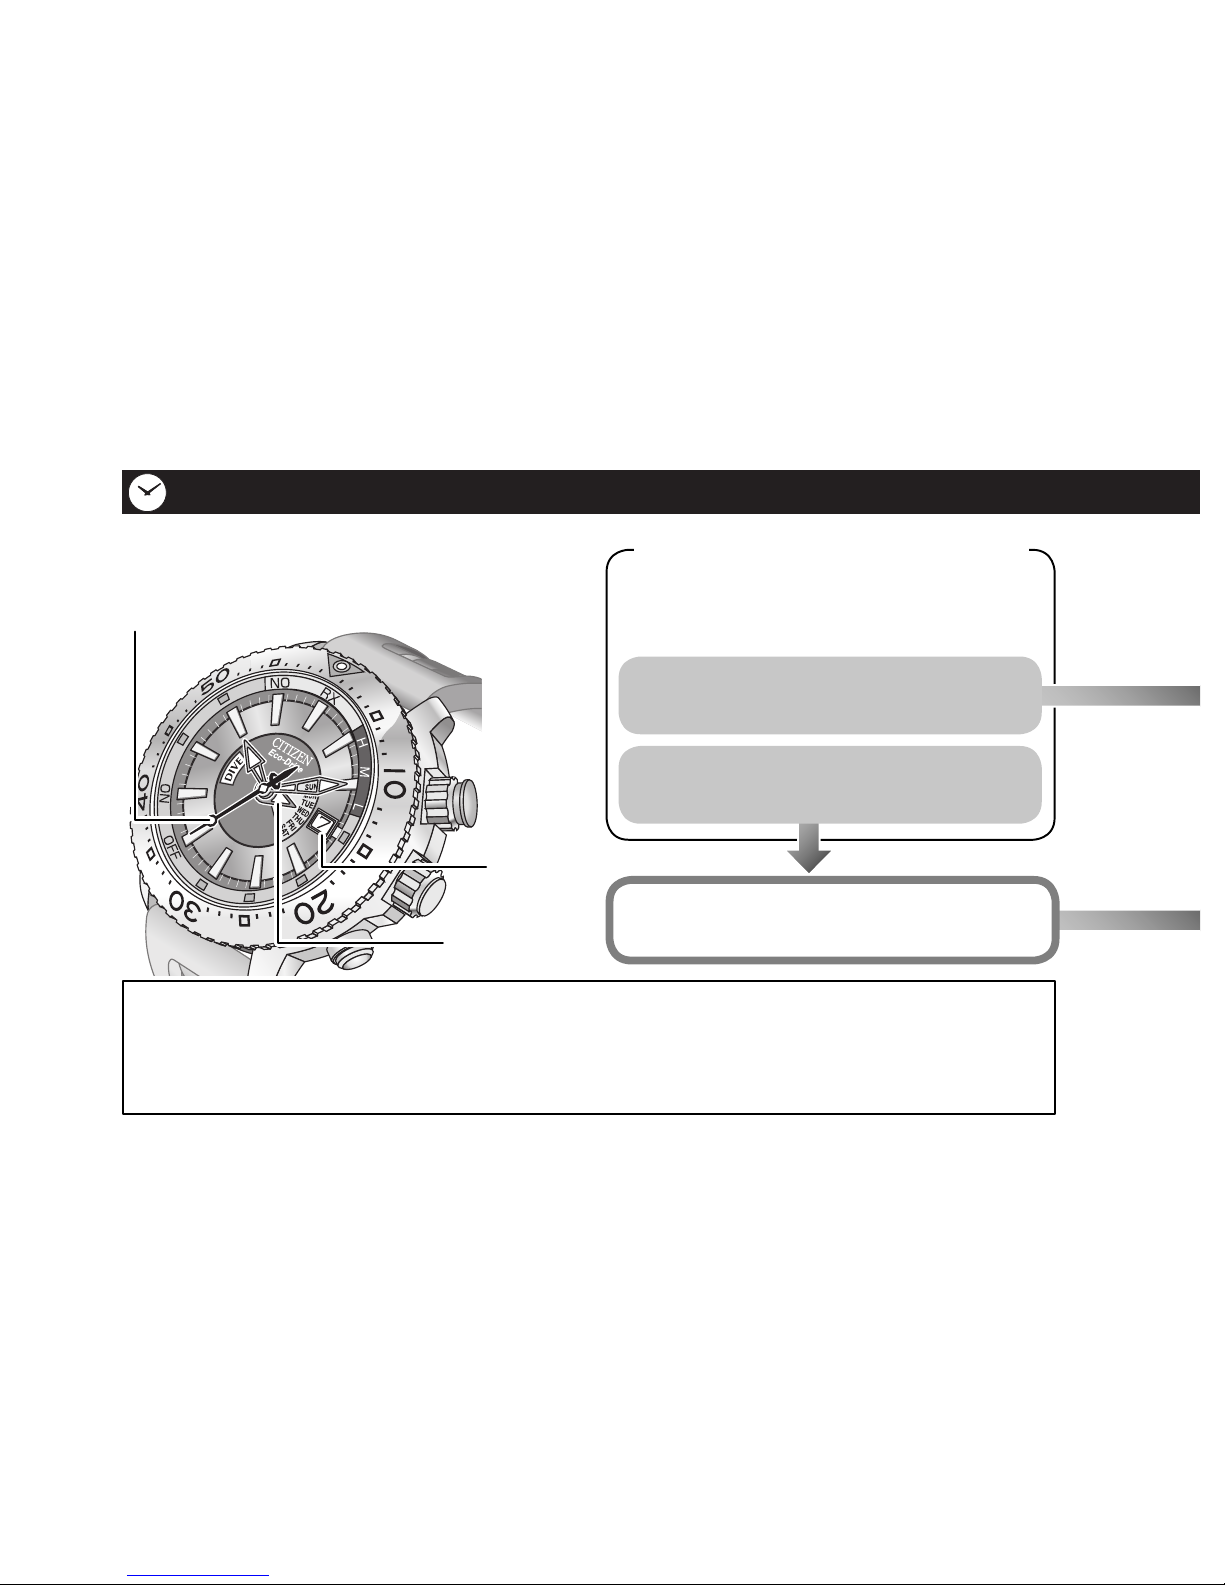
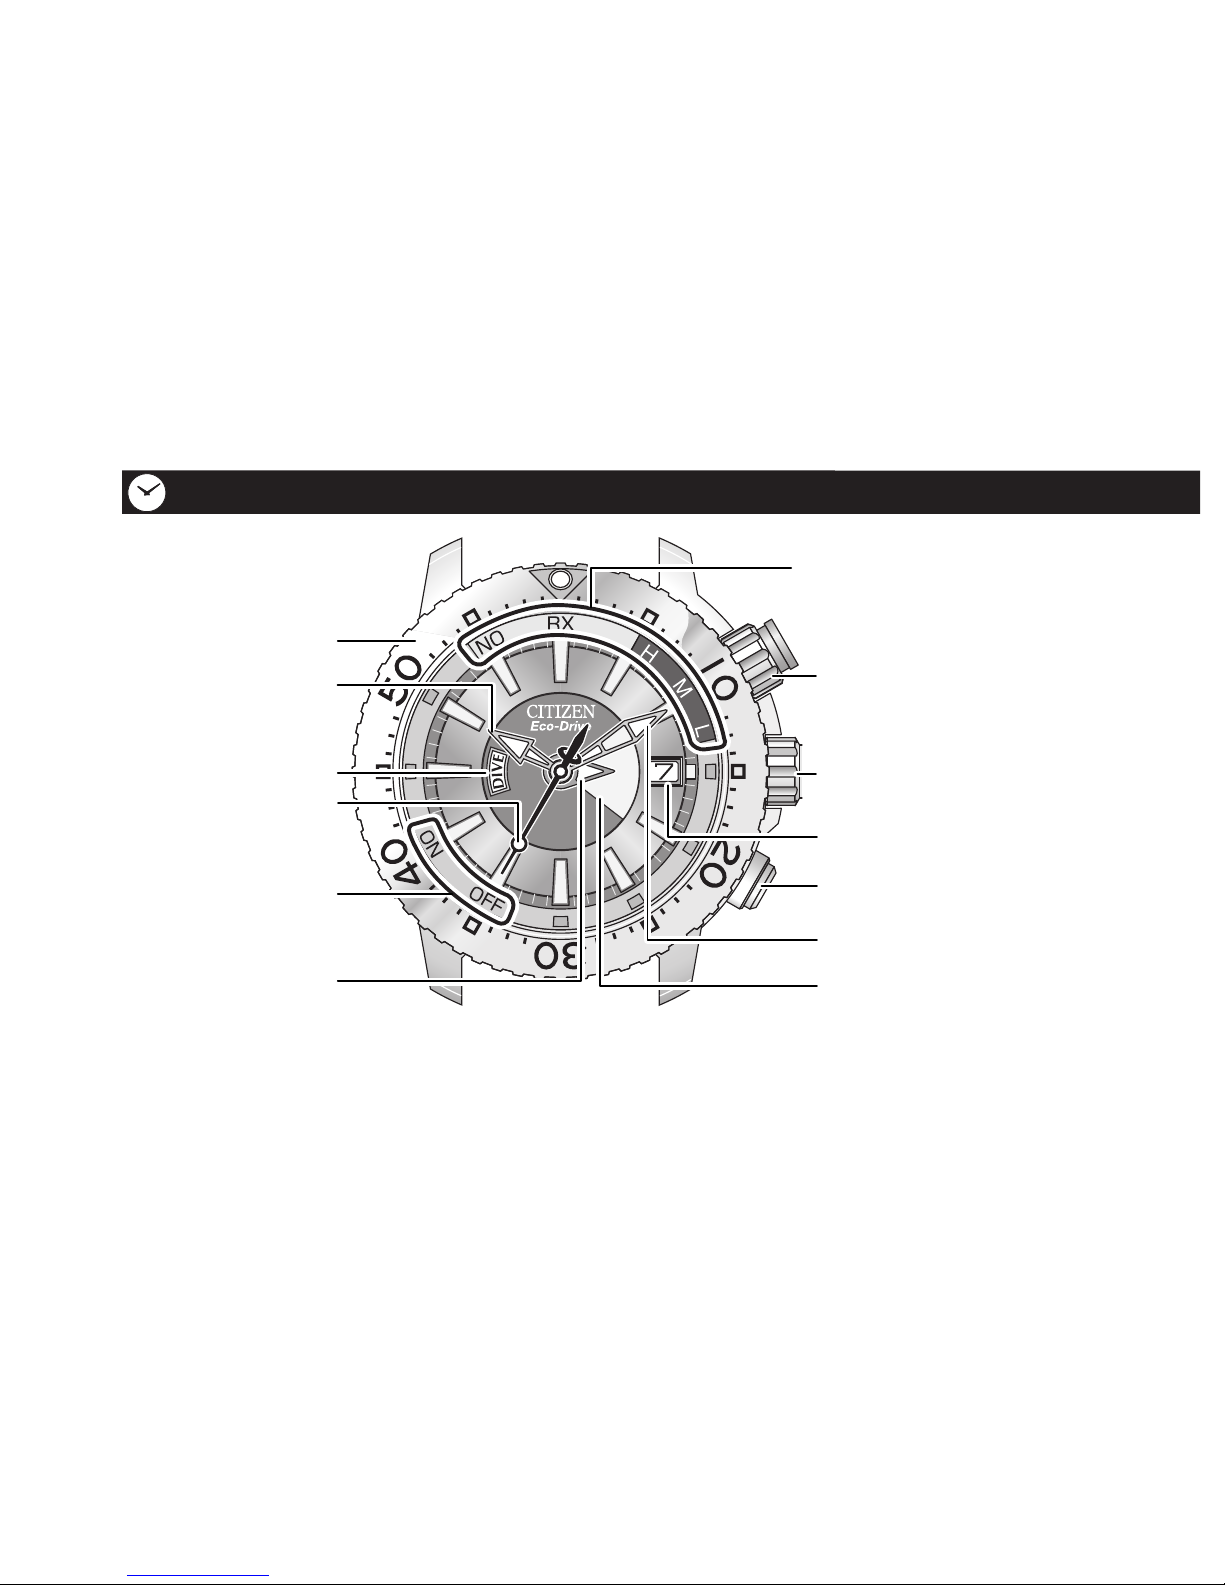
Date
Hour hand
DIVE (dive mode
indication)
(see page 48)
Lower right button (A)
Part names and their main functions
The illustrations in this instruction manual may differ from the actual appearance of your
watch.
Day of the week
Signal reception
indication—RX/
NO/H/M/L
*
1
(see pages
30 and 33)
Upper right button
(B)
*
2
Crown*
2
Minute hand
Second hand
Day of the week/
dive mode hand
Rotating bezel (see
page 18)
Daylight saving time
indication
Page 15

15
*1 Some models indicate the time signal reception status using the tip of the second
hand, and others use the tail.
Indicating with the tip of
the second hand
Indicating with the tail of
the second hand
*
2
There are two types of crowns and buttons: normal and screw down. Refer to page
16 to see how to use the screw down crown and button.
Page 16

16
Part names and their main functions
7 How to use the screw down crown and screw down push button
Some models feature a screw down crown and screw down push button. Locking
the crown and button prevents accidental operation. Unlock them when you want to
operate the watch.
Button
Crown
Page 17

17
Unlock Relock
Screw down
crown
Rotate the crown
counterclockwise
(left) until it
releases from the
case.
Push the crown in to
the case. With gentle
pressure towords the
case, rotate the crown
clockwise to secure it
to the case. Be sure to
tighten firmly.
Screw
down push
button
Rotate the
locking screw
counterclockwise
(left), and loosen
until it stops.
Rotate the locking
screw clockwise
(right), and tighten
firmly.
• Unlocking is not required when a standard crown and button are equipped.
Page 18

18
Part names and their main functions
7 How to use the unidirectional rotating bezel
You can easily check the elapsed time or remaining time from or to a certain point of
time by rotating the bezel. It is useful for checking the diving duration.
<To determine the elapsed time>
Set the
mark to the current position
of the minute hand.
• You can see the elapsed time from that
point of time.
Ex.: 10 minutes elapsed after setting
Setting time
(8:40)
Elapsed time
(10 minutes)
Page 19

19
<To determine the remaining time>
Set the mark to the scheduled time.
• You can see the remaining time until
the time scheduled.
Ex.: 10 minutes remaining to the
scheduled time
Current time (8:40)
Remaining time (10 minutes)
Scheduled time (8:50)
The unidirectional rotating bezel turns only counterclockwise or left) for safety
when diving.
Page 20

20
Receiving the time signal to set the time and calendar
7 Before receiving the signal
(Reference position check)
Ensure the reference position is correct or not
before receiving the signal.
The correct reference position for the time and
calendar is “SUN (Sunday),” “12:00:00,” “1 (1st
day).” If the reference position is incorrect, the
watch will not display the time and calendar
correctly even after receiving the signal.
• The reference position may become incorrect
if the watch is exposed to strong magnetism,
static or shock. Adjust the reference position
(see page 60) if the time and calendar are not
displayed correctly after receiving the signal.
Correct reference position
• Day of the week hand points
to “SUN.”
• Hour, minute and second
hands point to “12:00.”
• Date window displays “1.”
Page 21

21
<Check the reference position>
1. Pull the crown out to position 1.
The second hand indicates the current
setting for the time difference.
2. Press and hold the upper right
button (B) for five or more
seconds.
The current reference position is
indicated. (This process can take up to
7 minutes.)
3. Check the reference position.
• Go to step 3 on page 60 if the
reference position is incorrect.
4. Push the crown in to position 0
to finish the check.
All hands move to indicate the current
time.
B
Second hand
Crown
Page 22

22
Receiving the time signal to set the time and calendar
7 Radio controlled watch
This watch receives the time signal from the signal station and automatically adjusts
the time and calendar. This watch also feature a function to show the reception result
(success/failure) and the condition of reception (reception level).
• The signal is normally broadcast continuously 24-hours a day, but may occasionally
be interrupted due to maintenance.
• Even when this watch receives the signal successfully, the time indication may be
off a little bit depending on the reception environment and internal processing.
• Without reception of the signal, the watch will continue to be accurate to within
±15 seconds per month.
• The time signal has no effect on the human body or medical equipment.
Page 23

DCF77:
Mainflingen
station
23
7 Receiving range of the
signal
Frankfurt station broadcasts the
time signal in Europe. This watch
automatically receives the signal from
only this location.
• This watch can receive only the
German signal (DCF77), and
cannot receive those from any other
area.
Even in the receivable area
illustrated, the watch may not be
able to receive the time signal
depending on the weather, radio
wave conditions, or reception
environment (see page 25).
Page 24

24
7 Placement for better reception
Remove the watch and place it on a stable
surface where it can receive time signal
better, such as next to a window.
• The reception antenna is located at the
9:00 position of the watch. Place the
watch with the 9:00 position facing
toward the station. (See page 23)
• Do not move the watch during the time
signal reception otherwise reception
may be interrupted.
Receiving the time signal to set the time and calendar
The reception may be unstable depending on the environment. Check the
reception level of the watch (see page 33) and find the direction and place
which provides the best reception.
Page 25

25
<Poor reception areas>
It may be difficult to receive the time signal properly under certain environmental
conditions or in areas susceptible to radio noise.
❏ Extremely hot or cold
locations
❏
Near high-tension
electrical lines, railway
overhead wires or
communication facilities
❏ Inside vehicles ❏ Near electrical equipment
or office appliances
❏
Near cellular phones
that are in use
❏ Inside reinforced concrete
buildings, between tall
buildings, mountains, or
underground
It is recommended to try the signal reception at night, when there is less radio
interference to the time signal.
Page 26

26
Receiving the time signal to set the time and calendar
7 Receiving the signal
There are two ways to receive the signal:
❏ Automatic reception: automatically receiving the signal on time (see page 27)
❏ On demand reception: receiving the signal when you want to adjust the time and
calendar (see page 28)
• The reception is automatically done while charging the watch after it has stopped
due to a low charge. (See page 50)
Caution
Be sure to deactivate the dive mode (DIVE) before starting the
reception. (See page 49)
Page 27

27
Automatic reception
Place the watch according to
“Placement for better reception.”
(See page 24)
The watch automatically receives the time
signal at 3 a.m. every day.
• If the time signal cannot be received at 3
a.m., it will automatically try again at 4
a.m.
• See page 30 for how the watch hands
moves when receiving the time signal.
Page 28

28
On demand reception
1. Push the crown in to position 0.
2. Press and hold the lower right
button (A) for two or more
seconds.
The second hand indicates the last
reception result (NO, H, M or L), then
points to RX.
3. Place the watch according to
“Placement for better reception.”
(See page 24)
• Do not move the watch until all hands
start to move again.
• See page 30 for how the watch hands
moves when receiving the time signal.
Receiving the time signal to set the time and calendar
A
Second Hand
Reception standby indication (RX)
Crown
Page 29

29
Caution
The watch cannot receive the time signal while the date and day are changing.
Perform the on-demand reception after they have changed.
7 Interrupting the reception of the signal
1. Press and hold the lower right button (A) for two or more seconds.
Signal reception will be canceled and all hands move to indicate the current time.
Caution
If reception is interrupted for any reason, the time and calendar will not be
automatically updated.
Page 30

30
7 Movement of the hands during signal reception
When receiving the signal, the watch moves as follows:
<Preparing reception>
The second hand points
to RX.
<During reception>
The second hand indicates the
reception level by pointing to H,
M or L. (See page 33)
• It may take time depending
on the situation (max. 13
minutes).
All hands start to move.
<Reception completed>
Receiving the time signal to set the time and calendar
Page 31

31
Caution
When you operate the watch during reception, the reception is interrupted.
When the reception has been completed...
When the reception has been successfully completed, the hands will resume
indicating the correct time.
If the signal reception fails, the time is not adjusted.
• See page 32 to check the reception result.
Page 32

32
7 Checking signal reception
You can check whether the last reception of the time signal succeeded or not. You can
also see the reception level if it succeeded.
1. Push the crown in to position 0.
2. Press the lower right button (A).
The second hand moves to indicate
the result of the last reception and the
reception level. (See page 33)
• The result indicated is that of the most
recent completed reception. Interrupted
reception attempts are ignored.
Receiving the time signal to set the time and calendar
A
Reception result/Reception level
Second
hand
Crown
Caution
You cannot check the reception while
the date and day indications are in the
process of changing. Check it after the
change has completed.
Page 33

33
<Result of the reception>
H/M/L: reception succeeded
NO: reception failed
• If NO is indicated, find a location and
direction where the reception is better
and perform reception again. (See
page 28)
<Reception level>
H (High) Very good condition
for reception.
M (Middle) Good condition for
reception.
L (Low) Not good condition for
reception.
•
H, M and L only indicate the condition
for reception, and are not related to
the performance of the watch.
• If the time is not indicated properly even after successful reception, correct the
reference position. (See page 60)
To return to the usual time indication
Press the lower right button (A) again.
• The current time will be indicated automatically 10 seconds after indicating the
reception result.
Page 34

34
Adjusting the time/calendar manually
1. Pull the crown out to position
2.
The second hand indicates the
daylight saving time setting.
2. Press the lower right button
(A).
• You can change the daylight saving
time setting by rotating the crown.
(See page 39)
3. Press the lower right button
(A) again.
The second hand indicates the 12:00
position.
Hour hand
Minute hand
Second
hand
Crown
While the dive mode is activated, the crown and buttons do not work until the dive
mode hand indicates the current day of the week.
A
Page 35

35
Now, you can adjust the time.
• You can skip the time adjustment to adjust the calendar by pressing the lower
right button (A).
4. Rotate the crown to adjust the time.
The hour, minute and second hands move.
• If you quickly spin the crown continuously, the three hands start to move
continuously. To stop the hands, rotate the crown.
• When you set the time to 12:00 a.m., the indications for the date and day start
to change. Go to step
5 after the
movement of the date indication
and day of the week hand stops.
5. Press the lower right button
(A).
Now, you can adjust the calendar.
Each time you press the lower right
button (A), the adjustable item
changes as follows:
Date indication moves: Date
Day of the week hand slightly
moves: Day of the week
Second hand turns around
once: Month and year
Time adjustment
Page 36

36
Adjusting the time/calendar manually
6. Rotate the crown to adjust the
selected item.
• See page 38 to check the month and year.
• If you quickly spin the crown
continuously, the date starts to move
continuously. To stop the date, rotate the
crown.
A
Second hand
Day of the
week hand
Date
Crown
Date
Day of the
week
Month and
year
Page 37

37
7. Repeat steps 5 and 6 when you need to adjust the other items.
8. Push the crown in to position 0 on the signal on a radio, TV, etc. to
finish adjusting the time/calendar.
All hands move to indicate the current time.
Caution
While the indication is moving, you cannot go to the next step.
The date is automatically adjusted 28
February, 2100. So you do not need to
correct it at the end of each month.
Perpetual calendar
Page 38

38
Quick reference chart for number of
years passed since leap year
Year
Passed
years
The second
hand points to:
2012 2016
0 year
(leap year)
hour marker
2009 2013 1 year 1st min. marker
2010 2014 2 years 2nd min. marker
2011 2015 3 years 3rd min. marker
<Month and year indication>
You can check the year (years passed since
leap year) and month at the position where
the second hand points.
• You can see the number of years past
a leap year by checking which minute
marker the second hand points to.
Adjusting the time/calendar manually
e.g. When it is March in the leap
year
Page 39

39
1. Pull the crown out to position
2.
The second hand indicates the
daylight saving time setting.
• When you want to check the setting
only, go to step
4 to finish the
checking.
2. Press the lower right button
(A).
3. Rotate the crown to change the
setting.
4. Push the crown in to position
0 to finish the setting.
All hands move to indicate the
current time.
Second hand
Crown
Changing the daylight saving time (DST) setting
Daylight saving
time indication
A
Page 40

40
When you go to a different time zone, you can easily set to the local (travel) time
temporarily.
Setting to the local (travel) time (time difference correction function)
1. Pull the crown out to position
1.
The second hand indicates the
current setting for the time
difference.
• When you want to check the
setting only, go to step
4 to finish
the checking.
2. Press the lower right button
(A).
B
Second
hand
Crown
While the dive mode is activated, the crown and buttons do not work until the dive
mode hand indicates the current day of the week.
A
Page 41

41
<Time difference indication>
3. Move the second hand by
rotating the crown.
• You can set the time difference
in the range of ±27 hours from
Germany time (see page 41).
4. Push the crown in to position
0 to finish the time difference
setting.
The local (travel) time (using the
time difference set) is indicated.
To return to Germany time
Set the second hand to the 0 second (±0
hour) position at step
3.
• You can adjust time difference ±1
hour per step of the second hand.
Page 42

42
Using the watch during diving—Dive mode
Using the watch when diving
Diving is a potentially dangerous sport. When using this watch for diving, always
make sure you receive proper diving instruction and training from a licensed
instructor and obey the rules after having acquired the experience and skills
required for safe diving. Even recreational diving can be potentially dangerous.
Diving without proper or adequate training may lead to a fatal or serious accident.
• When using this watch for diving, make sure you have a proper understanding of
the procedures for handling and operating the watch and observe those procedures.
Handling of this watch in a manner contrary to that described in this user’s manual
may prevent the watch from functioning properly.
• Always make sure to inspect all functions of this watch before diving to make sure
they operate properly.
This watch is not intended to be used as a primary dive instrument.
Page 43

43
• In the case of using the watch, always make sure to use the watch in combination
with other diving instruments (such as a dive table, residual pressure gauge or water
depth gauge).
• The use of this watch for diving is limited to recreational diving (nondecompression diving) at a water temperature of 0˚C/32˚F to +50˚C/122˚F.
Do not use this watch for the following types of diving:
– Diving outside the above temperature range
– Decompression diving
– Saturation diving using helium gas
– Freshwater diving (this watch is calibrated for saltwater diving)
• Allow a sufficient margin during diving with respect to the non-decompression
diving limit time.
• Make sufficient safety stops and decompression stops.
• Make sure that the rotating bezel moves properly.
Page 44

44
Using during diving—Dive mode
Prohibited matters when using during diving
Do not use this watch for diving in the following cases:
• When the second hand moves every 2 seconds due to inadequate charge of the
watch.
When the insufficient charge warning function is active, you cannot change to Dive
mode.
• When the watch has stopped or malfunctioned.
• When out of range of the guaranteed temperature.
• During dangerous behavior or life-threatening situations.
• In a helium gas atmosphere (such as during saturation diving).
• Freshwater diving (this watch is calibrated for saltwater diving).
Page 45

45
Precautions before diving
Be sure to check the following:
• Always make sure to inspect all functions of this watch prior to diving.
• Is the band securely attached to the watch case?
• Are there any cracks, scratches or chips on the band or glass?
• Are the time and date set correctly?
• Are the screw down crown and screw down push button(s) locked?
• Is the watch sufficiently charged to ensure proper operation?
• Is the insufficient charge warning function (see page 51) inactive?
Page 46

46
Using during diving—Dive mode
Precautions during diving
• Avoid ascending too rapidly.
A rapid ascent can cause decompression sickness and other detrimental effects on
the body. Maintain a safe ascent rate.
• Do not use the watch when there is a malfunction or physical damage to the watch.
• Dive while allowing a sufficient margin for the non-decompression limit time to
ensure safety.
• When ascending, always make sure to make decompression stops according to a
dive table to ensure safety.
• Do not operate any buttons or the crown of the watch during diving.
Page 47

47
Precautions after diving
• Make sure to rest sufficiently after diving.
• It is recommended to avoid flying for at least 24 hours following the completion of
diving.
• Carefully rinse off any seawater, mud or sand adhered to the watch and then wipe
off any excess moisture with a dry cloth.
Page 48

48
Using during diving—Dive mode
7 Using the dive mode
Be sure to activate the dive mode when diving to prevent the watch from stopping
the hands for the time signal reception.
1. Set the crown to position 0.
2. Press and hold the upper right
button (B) for seven or more
seconds.
The dive mode
hand points to
DIVE and the dive
mode is activated.
• It takes about 1 minute for the dive
mode hand to move to DIVE.
B
Dive mode hand
Crown
Page 49

49
You cannot use the time signal reception function when the dive mode is
activated.
• Reception of the signal (see page 26)
• Checking the results of the reception (see page 32)
To deactivate the dive mode
Set the crown to position 0, then press and hold the upper right button (B) for
seven or more seconds.
The dive mode hand moves to indicate the current day of the week.
Caution
• You cannot activate/deactivate the dive mode while the insufficient charge
warning function (see page 51) is active. Use the watch only after charging it
fully.
• You cannot activate/deactivate the dive mode while the indications for the
date and day are changing. Activate/deactivate it after they have changed.
• Make sure to deactivate the dive mode after diving.
Page 50

50
7 Charging your watch
This watch has a rechargeable cell which is charged by exposing the watch dial to
light such as direct sunlight or fluorescent lamps.
Do not charge the watch at a high temperature (about 60˚C/140˚F or higher).
To obtain optimum performance:
•
Expose the watch with the watch dial towards direct sunlight for
several hours at least once a month.
• After taking off the watch, put it in a position so that the watch
dial is exposed to bright light, such as by a window.
• Before storing the watch in a dark place for an extended period
of time, be sure to charge it fully.
When the watch is not exposed light sufficient for charging such as when covered with
long sleeves, the watch may not be charged sufficiently for normal operation. Try to keep
the watch exposed to light sufficient for charging.
Charging your watch
While you are charging the watch after it has stopped due to inadequate charge, the watch
automatically receives the time signal once (recovery automatic reception). To make the
reception surer, place the watch according to “Placement for better reception” (see page 24)
while recharging it.
Page 51

WED
TUE
MON
SUN
S
A
T
FRI
THU
51
When the power reserve becomes low, the second hand moves once every two
seconds—This is the insufficient charge warning function. Charge the watch by
exposing the watch dial to light.
7 When the watch reaches a low charge state—insufficient charge
warning function
• After the watch is charged, the second hand
will move normally. (See pages 52 and 53)
• If you have not charged the watch for two
days or more since the insufficient charge
warning movement began, the watch will run
out power and stop.
NOTICE:
You cannot check or adjust the settings
while the warning movement continues,
though you can see the time.
The twosecond interval
movement
Page 52

52
Charging your watch
Illuminance
(Lx)
Environment Charging time to
work for one day
(approx.)
Charging time to start
working normally when
the rechargeable cell is
empty (approx.)
500 Interior lighting 4 hours 13 hours
1,000 60-70 cm under a
fluorescent lamp (30 W)
2 hours 6 hours
3,000 20 cm under a
fluorescent lamp (30 W)
40 minutes 2.5 hours
10,000 Under cloudy weather 11 minutes 1 hour
100,000 Under direct sunlight in
summer
5 minutes 40 minutes
Power reserve duration after fully charging (without further
charging)
About 6 months
7 Charging time
Below are the approximate times needed for changing when exposing the watch dial
to light continuously. Use the table below only as a reference.
Page 53

53
<After the watch is fully charged—Overcharge
prevention function>
After the watch is fully charged, charging automatically
stops to prevent overcharging, which may damage the
rechargeable cell, or affect the accuracy, functions and
performance of the watch.
Time for charging fully
when the rechargeable
cell is empty (approx.)
—
—
110 hours
45 hours
30 hours
Page 54

54
Power save feature
When the watch is not exposed to light for more than 7 days such as when you store
it in a dark place such as in a case, all hands automatically stop to save the power.
(Power save feature)
During the power save feature...
Hour, minute and
second hands stop at
the 12:00 position.
Date and day of the
week advance by
1 day at 12:00 a.m.
every day.
Page 55

55
To cancel the power save feature
Expose the watch to light sufficient for charging.
• All hands start to move and indicate the current time as the power save feature is
canceled.
• Keep exposing the watch to light sufficient for charging if the second hand is
moving once every 2 seconds. (See page 50)
Caution
• You cannot cancel the power save feature by operating the crown and
buttons.
• If the indicated time is not correct after canceling power save feature, perform
on-demand reception or adjust the time and calendar manually.
Page 56

56
56
Troubleshooting
If you have a problem with your watch, check the table below.
Symptoms Remedies Page
Problems with time signal reception.
Cannot start reception/cannot
check the reception result.
Deactivate the dive mode.
49
Reception is unsuccessful in a
receivable area.
Avoid things likely to interfere with a time
signal and place the watch with the 9:00
position facing toward the station.
24
Do not move the watch until the reception
is finished.
24
The correct time and calendar
are not indicated after
successful reception.
Check the time difference setting.
40
Check and correct the reference position.
60
Check the daylight saving time setting.
39
Page 57

57
57
Symptoms Remedies Page
Cannot activate the dive mode.
The dive mode hand does not
move to “DIVE.”
Activate the mode after the reference
position check or the change of date and
day of the week has finished.
48
Charge the watch if the second hand is
moving once every 2 seconds.
51
The hands do not work properly.
The second hand moves once
every 2 seconds.
Charge the watch.
51
All hands stop moving.
Push the crown in to position 0.
—
Charge the watch.
50
The hands start turning rapidly
as you take it out of the case.
The watch is canceling the power save
feature. Wait until the rapid movement
stops.
55
Page 58

58
58
Troubleshooting
Symptoms Remedies Page
The calendar is not correct
The date and/or day of the
week is wrong.
Receive the time signal to adjust the time and
calendar.
28
Set the year, month, date and day of the week
correctly.
34
Check the time difference setting.
40
Check and correct the reference position.
60
The day of the week is not
indicated.
Deactivate the dive mode.
49
The date changes at
around 12:00 p.m.
Receive the time signal to adjust the time and
calendar.
28
Adjust the time by 12 hours.
34
Page 59

59
59
Symptoms Remedies Page
Others
The watch does not work properly
even if you have tried the remedies
stated in “Troubleshooting” (see
pages 56 to 59).
Contact your nearest Authorized
Citizen Service Center.
—
The watch does not move even if the
watch is fully charged. (See page 52)
Page 60

60
1.
Pull the crown out to position 1.
The second hand moves to indicate the
month and year.
2. Press and hold the upper right
button (B) for five or more
seconds.
The current reference position is
indicated. (This process can take up to 7
minutes.)
• Go to step
7 when the reference position
is correct (“SUN,” “0:00:00” and “1”).
3. Pull the crown out to position 2.
The second hand points to the 0 second
position, and you can adjust the reference
position.
A
Second
hand
Day of the
week hand
Crown
If the time and calendar are not indicated correctly even after the reception of the
time signal, adjust the reference position.
Adjusting the reference position
Date
B
Page 61

61
4. Press the lower right button
(A) repeatedly to select the item
you want to adjust.
Each time you press the lower right
button (A), the adjustable item
changes as follows:
5. Rotate the crown to adjust the selected item.
• If you quickly spin the crown continuously, the selected
item (day of the week hand, second hand, or date) starts
to move continuously. To stop the item, rotate the crown.
6. Repeat steps 4 and 5 to adjust the items to “SUN,”
“0:00:00” and “1” respectively.
7.
Push the crown in to position 0 to finish the reference position
adjustment.
All hands move to indicate the current time.
Date moves: Date
Day of the week hand moves
slightly: Day of the week
Second hand moves: Time
Page 62

62
Examples of use
Minor
exposure
to water
(washing face,
rain, etc.)
Moderate
exposure to
water (washing,
kitchen work,
swimming,
etc.)
Skin diving,
marine sports
Scuba diving
using an air
tank
Saturation
diving using
helium gas
Indication
Case
(case back)
AIR DIVER’s
200m
OK OK OK OK NO
Precautions
Water-resistance performance
This watch is water resistant to 200 meters. Although it can be used for diving using
an air tank (scuba diving), it cannot be used for saturation diving involving the use
of helium gas.
Page 63

63
• The rubber gaskets and other seals used in this watch will deteriorate over time and use. If the
gaskets and seals are not checked at regular intervals, their condition may not be sufficient
to guard against the entrance of moisture. In order to maintain the water resistant quality of
your watch, we recommend that you have the gaskets and seals of your watch inspected by a
CITIZEN Authorized Service Center every two to three years. More frequent inspections may
be necessary if the watch is used in environments such as chlorinated pools or if the watch is
not rinsed with clear water after use in salt water. Gaskets and seals used to guard against the
entrance of moisture are considered consumable supplies that are not covered under the terms
of the warranty. Inspections and any components that need to be replaced in order to maintain
the water resistant quality of the timepiece are at the expense of the consumer.
• If moisture has entered the watch, or if the inside of the glass is fogged up and does not become
clear for an extended period of time, do not leave the watch in that state; instead, immediately
take the watch to the Citizen Consumer Help Desk or your nearest Customer Support Center
for inspection and repair.
• If sea water enters the watch, place the watch in a box or plastic bag, and immediately take it
in for repair. Otherwise, the pressure inside the watch will increase and parts (such as the glass
and buttons) may come off.
• Be sure to use the watch with the crown pressed in fully (normal position) to ensure the
water resistance. If the crown of your watch is the screw down crown, be sure to tighten it
completely.
• Do not operate the crown or buttons when the watch is wet.
Page 64

64
Handling the rechargeable cell
• Do not remove the rechargeable cell. If it is removed, keep the rechargeable cell out
of the reach of children to prevent ingestion.
• If the rechargeable cell is swallowed, consult a doctor and seek medical treatment.
Keep your watch clean
• Keep your watch clean to prevent rust or dirt building up as this may stain your
clothes, damage the watch or appear as black residue on your wrist. Depending on
use, occasional cleaning of the exterior of your watch may be necessary.
• DO NOT wear the band too tightly. Leave enough space between the band and
your skin to allow adequate ventilation.
• Wipe dirt off the leather band with a soft and dry cloth to prevent it from
discoloring.
Precautions
Page 65

65
Caution about charging
• Excessively high temperature when charging watch may cause discoloration and
deformation of the components, and result in malfunction of the movement.
• Do not charge the watch at a high temperature (about 60˚C/140˚F or higher).
Example:
– charging the watch too close to light such as an
incandescent lamp or halogen lamp (Halogen
lights are not recommended for charging due to
their high heat output.)
– charging the watch in locations where the
temperature may become extremely high—such
as on the dashboard of a vehicle
Page 66

66
To avoid malfunction
• DO NOT use the watch where the temperature is lower or higher than the
operating temperature specified in this manual. Doing so may cause the watch to
malfunction or stop.
• DO NOT place the watch nearby any materials generating a strong magnetic field
such as:
– magnetic health equipment such as a magnetic necklace
– a magnetic latch of a refrigerator door
– a magnetic clasp on a handbag
– a magnetic coin tray
– speakers of a mobile phone
– electromagnetic cooking devices
They may interfere with function of the movement in the watch causing it to stop
or operate erratically.
Precautions
Page 67

67
• DO NOT place the watch on or nearby household appliances that generate static
electricity such as Televisions or computer monitors. The timekeeping may be
affected.
• DO NOT apply any strong shock, for example, by dropping it onto a hard floor.
• Avoid using the watch where it may be exposed to chemicals or corrosive gases. If
solvents, such as thinners or benzine, or substances containing such solvents come
in contact with the watch, discoloration, melting, cracking, etc. may occur.
The case, band, or other parts may become discolored if the watch comes
into contact with some household chemicals mercury that may be found in
thermometers.
• The rubber (urethane) band may be stained by dyes or soil present in or on clothing
or other accessories. Since these stains may not be removable, caution is required
when wearing your watch with items that tend to easily transfer color (articles of
clothing, purses, etc.).
• Be careful when putting on and taking off your watch, since there is a risk of
damaging your fingernails, depending on the manner in which the band is fastened.
Page 68

68
Daily maintenance
• Rotate the crown while it is pressed in fully and press the buttons periodically so
they do not become stuck due to accumulations of foreign matter.
• Wipe off dirt, perspiration, and water from the case and glass with a clean soft cloth
occasionally.
• To clean a metal, plastic, or rubber watchband, wash away dirt with water. Use a
soft brush to remove dust and dirt stuck in the gaps in a metal band.
• Do not use a polishing type of cloth as this may damage the surface and certain
treatments.
• Do not use solvents (thinner, benzine, etc.), as they may damage the finish.
Maintenance
Page 69

69
Storage
• If you will not be using your watch for an extended period of time, carefully wipe
off any perspiration, dirt or moisture. Then store in a cool, dry location, avoiding
locations subject to excessively high or low temperatures and high humidity.
• If you will not be using your watch for an extended period of time, it is
recommended to store it in a place that is well lit to avoid insufficient battery
charge.
Luminous dials and hands
The paint on the dial and hands helps you with reading the time in a dark place. The
luminous paint stores light (daylight or artificial light) and glows in a dark place.
It is free from any radioactive substance or any other material harmful to a human
body or environment.
• The light emission gradually becomes weaker as time passes.
• The duration of the light (“glow”) will vary depending on the brightness, types of
and distance from a light source, exposure time, and the amount of the paint.
• The paint may not glow and/or may dissipate quickly if exposure to light was not
sufficient.
Page 70

70
Model H162
Type Analog solar-powered watch
Timekeeping accuracy Within ±15 seconds per month on average (when
worn at normal temperatures between +5˚C/41˚F
and +35˚C/95˚F without the time signal reception)
Display functions Time: Hours, minutes, seconds
Calender: Years passed since the last leap year,
Month, Date, Day of the week
Battery duration
without recharging
Fully charged to empty: Approx. 6 months
(When the power save feature is active: Approx. 2.5
years)
Two seconds interval movement to stopping:
Approx. 2 days
Battery Rechargeable cell, 1pc.
Specifications
Page 71

71
Additional
functions
• Time signal reception function (automatic reception, ondemand reception, recovery automatic reception)
• Reception standby indication function (RX)
• Reception level indication function (H, M, L)
• Reception status confirmation function (H, M, L or NO)
• Time difference checking/correction function
• Daylight saving time function
• Dive mode
• Energy save function (power save feature)
• Overcharge prevention function
• Insufficient charge warning function
• Impact detection function/Automatic hand correction
function
• Perpetual calendar (until February 28, 2100)
• Reference position checking/correction function
Specifications are subject to change without prior notice.
Page 72

72
Functions list
Function
Activate/deactivate the dive mode.
Receive the time signal manually.
Check the time signal reception
result.
Set to the local time temporarily
(time difference correction).
Adjust the time/calendar manually.
Set the daylight saving time
manually.
A
B
Second
hand
Crown
Page 73

73
Position of
the crown
Operation using button/crown Page
0
Press and hold the upper right button (B) for seven or
more seconds.
48
0
Press and hold the lower right button (A) for two or more
seconds.
28
0
Press the lower right button (A).
32
1
Rotate the crown after pressing the lower right button
(A).
40
2
Press the lower right button (A) repeatedly to select the
item to set (time date, day of the week, month and year),
and turn the crown.
34
2
Rotate the crown after pressing the lower right button
(A).
39
Page 74

74
 Loading...