

Citizen E660 Owner's Manual

INSTRUCTION MANUAL

ENGLISH
FRANÇAIS
ESPAÑOL
DEUTSCH
ITALIANO
PORTUGUÊS
中文(繁体字)
中文(简体字)
China BPC Europe DCF77
Japan JJY North A merica WWVB
EN
Time signals ava ilable to this watch a re as
shown on the t able.
FR
Les signa ux d’heure disponi bles sur cette
montre son t indiqués dans le t ableau.
ES
Las seña les horarias disp onibles para es te reloj
aparec en en la tabla.
DE
Die für di ese Armbanduhr ve rfügbaren
Zeitsign ale sind in der Tabelle auf geführt.
IT
Nella tabe lla vengono ragurati i segna li orari
disponibili p er questo orolo gio.
PO
Os sinais horár ios disponíveis para es te relógio
são os exibido s na tabela.
CT
本款手錶的可用時間訊號如表格所示。
CS
本款手表的可用时间信号如表格所示。

Thank you for your purchase of this Citizen watch.
Before using the watch, read this instruction manual carefully to ensure
correct use.
After reading the manual, store it in a safe place for future reference.
Be sure to visit the Citizen website at http://www.citizenwatch-global.com/ .
Here you will find a variety of information such as electronic setting guides,
answers to frequently asked questions, Eco-Drive recharging information and
more.
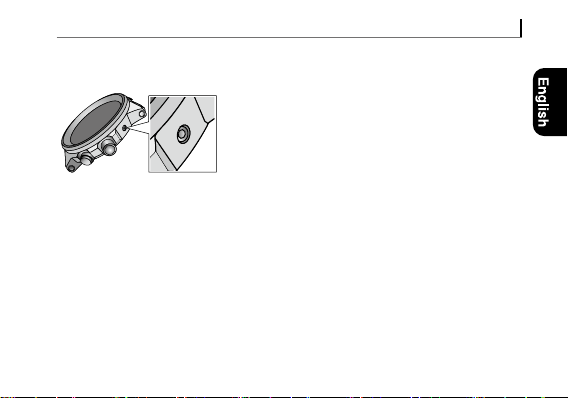
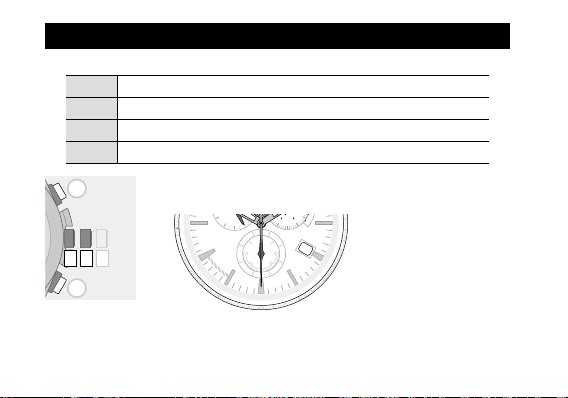
To check the movement number
A case number—4 alphanumeric characters and 6 or
more alphanumeric characters—is engraved on the
case back. (Figure on the right)
The first 4 characters of the case number represent
the movement number of the watch. In the example
on the right, “
” is the movement number.
Engraving position example
The engraving position may
differ depending on watch
model.
1
Safety precautions — IMPORTANT
This manual contains instructions that should be strictly followed at all times
not only for optimal use, but to prevent any injuries to yourself, other persons or
property. We encourage you to read the entire booklet (especially, pages 70 to 83)
and understand the meaning of the following symbols:
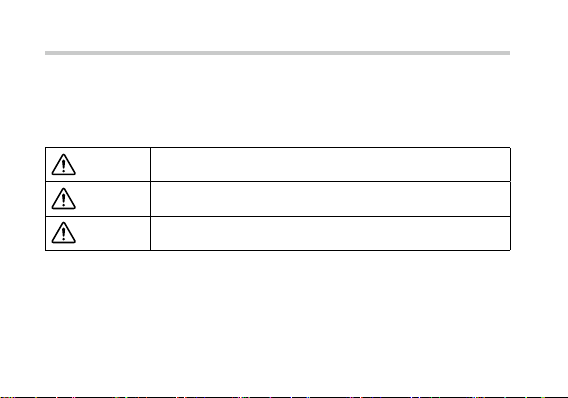
■ Safety advisories are categorized and depicted in this manual as follows:
DANGER
WARNING
CAUTION
2
Highly likely to cause death or serious injury
Can cause serious injury or death
Can or will cause minor or moderate injury or damage

Safety precautions
■ Important instructions are categorized and depicted in this manual as follows:
(Following symbols are examples of Pictograms.)
Warning (caution) symbol followed by prohibited matters.
Warning (caution) symbol followed by instructions that should be
followed or precautions that should be observed.
3

Features
■
Radio controlled watch
Receives time signals from one of the
five signal stations in four regions in
the world and automatically adjusts the
time and calendar.
12
■
Alarm
39
Sounds at the time set.
6
■
Chronograph
Measures up to 60 minutes
by 1 second.
4
■
World time
Easy to see the time
for a second time zone,
anywhere in the world.
■
Eco-Drive
No periodical battery
replacement is needed.
This watch is fueled by
light.
■
Perpetual calendar
No need for monthly and
leap-year date correction
until February 28, 2100.
* "Eco-Drive" is an original technology of Citizen.

CONTENTS
Before using this watch ...........................
Band adjustment ........................................
Protective stickers .......................................
How to use a specially designed crown/button ...........
Component identification ........................
Changing the mode .............................
Checking the power reserve ......................
Checking the previous signal reception result .......
Checking the current world time setting ...........
Setting the world time ..........................
Continued on the next page
8
9
9
10
12
14
16
20
22
24
➡
5

CONTENTS
Receiving the signal manually
(on-demand reception) .........................
Setting summer time (DST) ......................
Using the chronograph ..........................
Using alarm ....................................
Charging your watch ............................
About signal reception ..........................
When receiving the time signal ..........................
Note on the time signal .................................
Poor reception areas ....................................
Adjusting the time and calendar manually .........
6
29
32
38
40
44
49
50
51
55
56

CONTENTS
Troubleshooting ................................
Checking and correcting the reference position ..........
Symptom and Remedies ................................
Eco-Drive watch handling precautions .............
Water resistance ................................
Precautionary items and usage limitations .........
Specifications ..................................
60
60
64
70
74
77
84
7

Before using this watch
This watch has a rechargeable cell which is charged by exposing
the dial to light.
Expose the dial to direct sunlight regularly to charge the watch.
For details of charging, see page 44 -.
After unpacking, follow the steps below when starting time and calendar
adjustment.
1
Checking the current power reserve (page 16 )
2
Changing the world time setting (page 24 )
3
Receiving the time signal (page 29 )
8

Before us ing this watc h
Band adjustment
We recommend seeking the assistance of an experienced watch technician
for sizing of your watch. If adjustment is not done correctly, the bracelet may
unexpectedly become detached leading to loss of your watch or injury.
Consult an authorized service center.
Protective stickers
Be sure to remove any protective stickers that may be on your watch (case back,
band, clasp, etc.). Otherwise, perspiration or moisture may enter the gaps between
the protective stickers and the parts, which may result in a skin rash and/or
corrosion of the metal parts.
Continued on the next page
➡
9

Before us ing this watc h
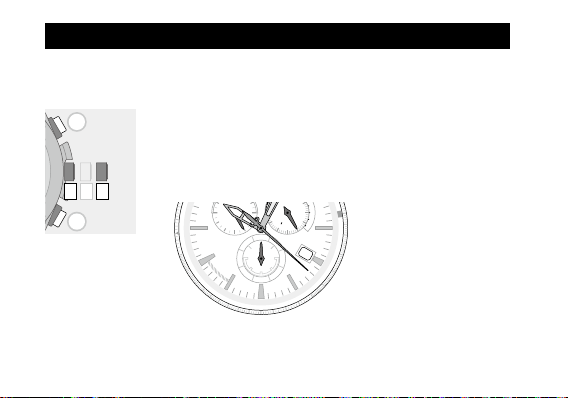
How to use a specially designed crown/button
Some models are equipped with a specially designed crown and/or push button to
prevent accidental operation.
Screw down crown/button
Unlock the crown/button prior to operate your watch.
Unlock Lock
Push the crown in to the
Screw down
crown
Screw down
push button
Rotate the crown
counterclockwise
until it releases from
the case.
Rotate the
locking screw
counterclockwise,
and loosen until it
stops.
case. With gentle pressure
towards the case, rotate
the crown clockwise to
secure it to the case. Be
sure to tighten firmly.
Rotate the locking screw
clockwise, and tighten
fi rml y.
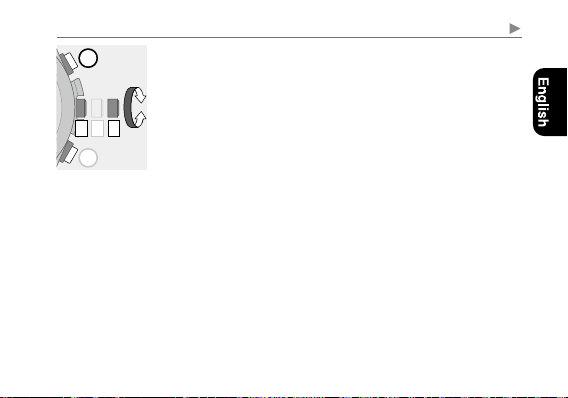
10
Recessed button
Press the button with a non-marring narrow-tipped object.
• Metal objects may cause marring or scratching of
the button.
Before using this watch
11
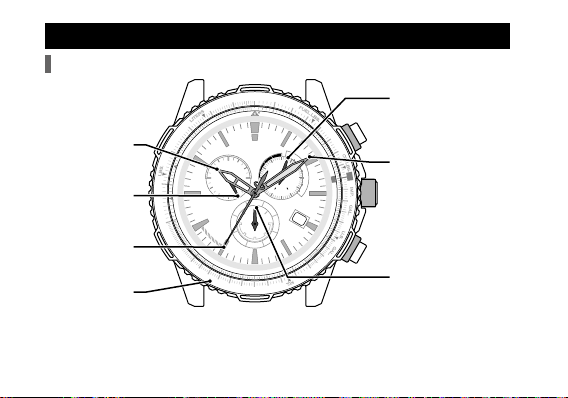
Component identification
Hands and buttons
60
Hour hand
24-hour hand
Second hand
Rotating bezel
55
50
NO
PDL
50
45
FEN
45
RIO
40
40
MAO
24
STAT.
NYC
35
35
CHI
DEN
NAUT.
30
30
LAX
ON
ALM
ANC
OFF
25
HNL
24
23
MDY
25
22
24
23
22
70
RX
KM.
55
21
OK
70
LON
TME
ALM
CHR
SET
TME
21
AKL
20
20
80
PAR
ATH
80
RUH
DXB
90
S
M
T
60
W
KHI
10
T
F
DAC
ON OFF
SMT
S
SET
ALM
NOU
18
19
18
19
11
BKK
12
CHR
7
13
BJS
14
TYO
15
14
16
SYD
15
17
16
17
• The illustrations in this instruction manual may differ from the actual appearance
of your watch.
12
90
13
10
11
12
Function hand
Button
Minute hand
Crown
Button
Mode hand
B
A
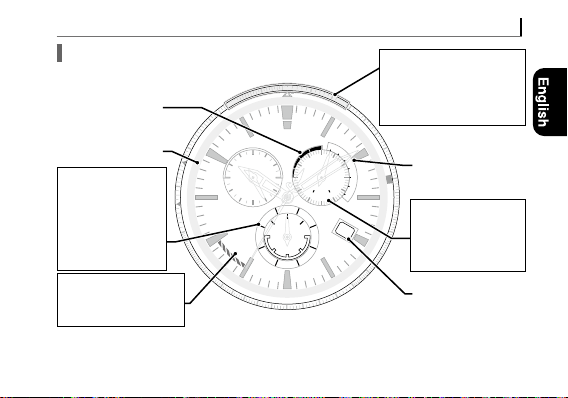
Indication
Power reserve level
40
Area name display
Mode indication
TME
ALM
CHR
SET
Alarm indication
ALM ON/OFF
(
• A solar cell is under the dial.
MAO
STAT.
NYC
35
CHI
DEN
NAUT.
30
LAX
)
Component identification
Reception-in-progress
RX
KM.
55
LON
NO
50
FEN
45
RIO
24
ON
ALM
ANC
OFF
25
HNL
24
23
MDY
22
PAR
PDL
60
ON OFF
SMT
TME
SET
ALM
CHR
CHR
SET
ALM
TME
17
NOU
21
AKL
18
20
19
indication (RX)
OK
70
Reception result indication
ATH
OK/NO
(
80
RUH
DXB
90
S
S
M
M
T
T
W
W
KHI
10
T
T
F
F
DAC
S
S
11
BKK
12
7
13
BJS
14
TYO
15
16
SYD
)
Day of week
indication
Summer time (DST)
indication
SMT ON/OFF
(
Date indication
)
13
Changing the mode
60
S
F
M
T
T
W
24
RX
NO
OK
LON
PAR
ATH
RUH
DXB
KHI
PDL
FEN
RIO
MAO
NYC
KM.
STAT.
70
80
90
10
55
50
45
40
B
This watch features the four different modes as follows:
Shows ordinary time.
TME
Mode for using the chronograph.
CHR
Mode for setting the alarm.
ALM
Mode for setting time and calendar manually.
SET
1
Pull the crown out to position 1.
The second hand points to 30 seconds and stops.
0 1 2A1
14
35
CHI
DEN
NAUT.
30
LAX
TME
SET
ALM
ON
CHR
ALM
SET
ANC
25
ALM
OFF
TME
HNL
24
23
MDY
22
21
AKL
20
19
ON OFF
CHR
NOU
18
DAC
SMT
S
11
BKK
12
7
13
BJS
14
TYO
15
16
SYD
17
60
S
M
T
T
W
24
RX
NO
OK
LON
HNL
PAR
ATH
RUH
DXB
KHI
PDL
FEN
KM.
70
80
90
10
55
50
24
Changing the mode
B
2
Rotate the crown to change the mode.
F
DAC
ON OFF
SMT
S
0 1 2A1
11
TME
SET
ALM
CHR
CHR
ALM
SET
OFF
23
MDY
22
7
13
BJS
14
ALM
TME
TYO
15
16
SYD
17
NOU
21
AKL
18
20
19
BKK
12
Mode indication
TME
SET
ALM
CHR
CHR
SET
ALM
TME
• Turn the crown so that the mode hand will point to a
marker of the mode indication securely.
3
Push the crown in to position 0 to finish the
procedure.
Indication of the watch changes into that of the mode
selected.
• It may take a moment to change indication.
15
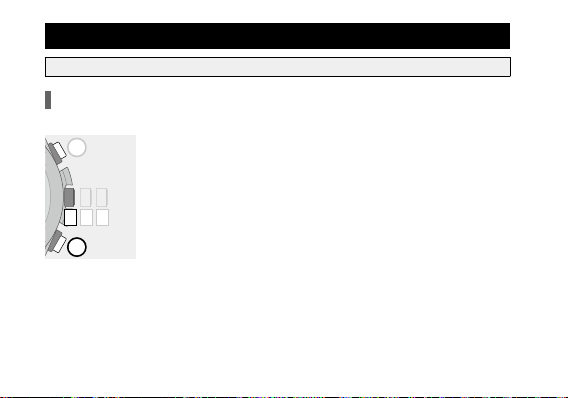
Checking the power reserve
B
For details of charging, see “Charging your watch” (page 44).
Checking the power reserve
• See page
16
for instructions on how to read power reserve indication.
18
0 1 2
AA
1
Change the mode to [
crown in to position
2
Press and release the lower right button A.
The function hand indicates power reserve and the second
hand indicates the previous reception result.
TME
0
] (page
.
14
) and push the

Checki ng the power res erve
ALM
NO
BKK
50
12
B
AA
RX
KM.
0 1 2
55
PDL
FEN
24
OK
70
LON
PAR
ATH
80
RUH
DXB
S
M
T
60
W
T
F
ON OFF
SMT
S
TME
SET
90
KHI
10
DAC
11
Power reserve
indication
ON OFF
SMT
S
S
M
M
T
T
W
W
T
T
F
F
S
S
• Press button A to return to normal indication. It returns
to normal indication automatically in about 10 seconds
without pressing the button.
Continued on the next page
➡
17

Checki ng the power res erve
S
M
T
T
W
S
M
T
T
W
S
M
T
T
W
S
M
T
T
W
S
M
T
T
W
S
M
T
T
W
SS
S
M
T
T
W
S
M
T
T
W
S
M
T
T
W
S
M
T
T
W
SS
S
M
T
T
W
S
M
T
T
W
SS
SS
Indication of power reserve in levels
Level 3 2 1 0
Power reserve
indication
Duration
(approx.)
Meaning
10 - 7 months 7 - 1 month 1 month - 3 days 3 days or shorter
Power reserve is
sufficient.
Power reserve is
OK.
Power reserve is
getting low.
Insufficient
charge warning
has started.
OK for normal use. Charge immediately.
18

Checking the power reserve
CAUTION
• At the level “0”, the second hand starts to move once every two seconds
(insufficient charge warning function, page
the upper right sub dial always indicates the power reserve in this mode. In
addition, functions other than time indication stop and become unavailable.
). The function hand on
46
19
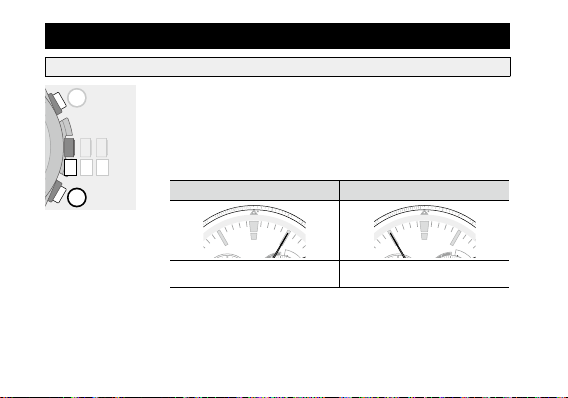
Checking the previous signal reception result
S
M
RUH
DXB
80
90
S
M
RX
NO
OK
LON
PAR
ATH
RUH
PDL
FEN
KM.
70
80
55
50
S
M
RUH
80
B
For details of signal reception, see “About signal reception” (page 49).
0 1 2
AA
1
Change the mode to [
crown in to position
2
Press and release the lower right button A.
The function hand indicates power reserve and the second
hand indicates the previous reception result.
55
NO
PDL
50
FEN
TME
] (page 14 ) and push the
.
0
OK NO
RX
KM.
OK
70
LON
PAR
ATH
55
NO
PDL
50
FEN
RX
LON
KM.
OK
70
PAR
ATH
20
The reception was successful. The reception failed.

Checking the previous signal reception result
B
AA
• Press button A to return to normal indication. It returns
to normal indication automatically in about 10 seconds
without pressing the button.
0 1 2
21

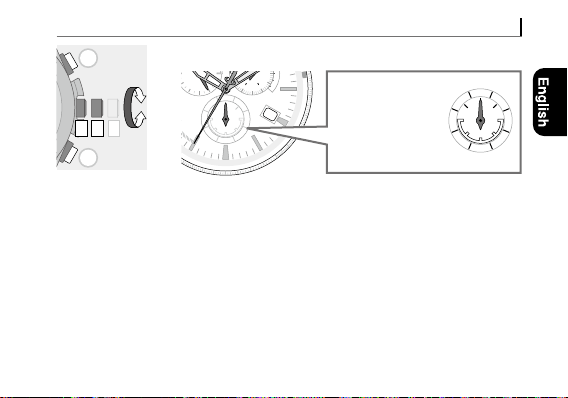
Checking the current world time setting
60
S
M
T
W
24
RX
NO
OK
LON
PAR
ATH
RUH
DXB
PDL
FEN
RIO
MAO
KM.
70
80
90
55
50
45
40
B
A
B
For details of the world time, see “Setting the world time” (page 24).
1
Change the mode to [
crown in to position
2
Press and release the upper right button B.
The second hand indicates the current time zone setting and
0 1 2
the function hand indicates the current summer time (DST)
setting (page 32).
STAT.
NYC
35
CHI
DEN
NAUT.
30
LAX
ON
CHR
ALM
SET
ANC
OFF
25
HNL
24
23
MDY
22
22
TME
] (page 14 ) and push the
.
0
KHI
10
T
Ex.:
F
DAC
ON OFF
SMT
TME
SET
ALM
CHR
ALM
TME
SYD
17
NOU
21
AKL
18
20
19
When the time zone setting is
S
11
“TYO” and the summer time
BKK
12
7
(DST) setting is “SMT OFF”
13
BJS
14
TYO
15
16

Checking the current world time setting
B
A
B
• Press button B to return to normal indication. It returns
to normal indication automatically in about 10 seconds
without pressing the button.
0 1 2
23
Setting the world time
60
S
M
T
W
24
RX
NO
OK
LON
PAR
ATH
RUH
DXB
PDL
FEN
RIO
MAO
KM.
70
80
90
55
50
45
40
B
This watch can indicate the time around the world according to which of 24 time
zones (offsets from UTC — Coordinated Universal Time) is chosen.
• See page 22 to check which time zone is currently indicated.
1
Change the mode to [
crown out to position
The second hand indicates the current time zone setting and
the function hand indicates the current summer time (DST)
setting (page 32).
STAT.
NYC
35
CHI
DEN
NAUT.
30
LAX
ON
CHR
ALM
SET
ANC
OFF
25
HNL
24
23
MDY
22
0 1 2A2
24
TME
] (page
14
.
2
KHI
10
T
F
DAC
ON OFF
SMT
S
TME
SET
ALM
ALM
TME
21
AKL
20
19
BKK
12
CHR
7
13
BJS
14
TYO
15
16
SYD
17
NOU
18
) and pull the
11
Ex.:
When the time zone setting is
“TYO” and the summer time
(DST) setting is “SMT OFF”
Setti ng the world tim e
B
A
B
2
Rotate the crown to select an area.
The hour and minute hands start moving as you finished to
select an area.
• For details of areas and time zones, see “Table of time
0 1 2
2
zones and representative places” (page 26).
• Pressing button
summer time (DST) setting.
3
Push the crown in to position 0 to finish the
while the hands stops changes the
B
procedure.
Continued on the next page
➡
25
 Loading...