

Page 1

Page 2

Before Operation
FCC COMPLIANCE STATEMENT
FOR AMERICAN USERS
This equipment has been tested and found to comply with the limits for a Class A digital
device, pursuant to Part 15 of the FCC Rules. These limits are designed to provide
reasonable protection against harmful interference when the equipment is operated in a
commercial environment. This equipment generates, uses, and can radiate radio frequency
energy and, if not installed and used in accordance with the instruction manual, may cause
harmful interference to radio communications. Operation of this equipment in a residential
area is likely to cause harmful interference in which case the user will be required to correct
the interference at his own expense.
COMPLIANCE STATEMENT
FOR EUROPEAN USERS
1
Page 3
Before Operation
EMI COMPLIANCE STATEMENT
FOR CANADIAN USERS
This equipment generates and uses radio frequency energy and if not installed and used
properly, that is, in strict accordance with the manufacturer's instructions, may cause
interference to radio and television reception. This digital apparatus does not exceed the
Class A limits for radio noise emissions from digital apparatus set out in the Radio
Interference Regulations of the Canadian Department of Communications. This equipment
is designed to provide reasonable protection against such interference in a residential
installation. However, there is no guarantee that interference will not occur in a particular
installation. If this equipment does cause interference to radio or television reception, which
can be determined by turning the equipment off and on, the user is encouraged to try to
correct the interference by one or more of the following measures:
• Reorient or relocate the receiving antenna.
• Increase the separation between the equipment and receiver.
• Connect the equipment into an outlet on a circuit different from that to which the receiver
is connected.
• Consult the dealer or an experienced radio/TV technician for help.
CAUTION: Use shielded cables to connect this device to computers.
Any changes or modifications not expressly approved by the grantee of this
device could void the user's authority to operate the equipment.
2
Page 4

Before Operation
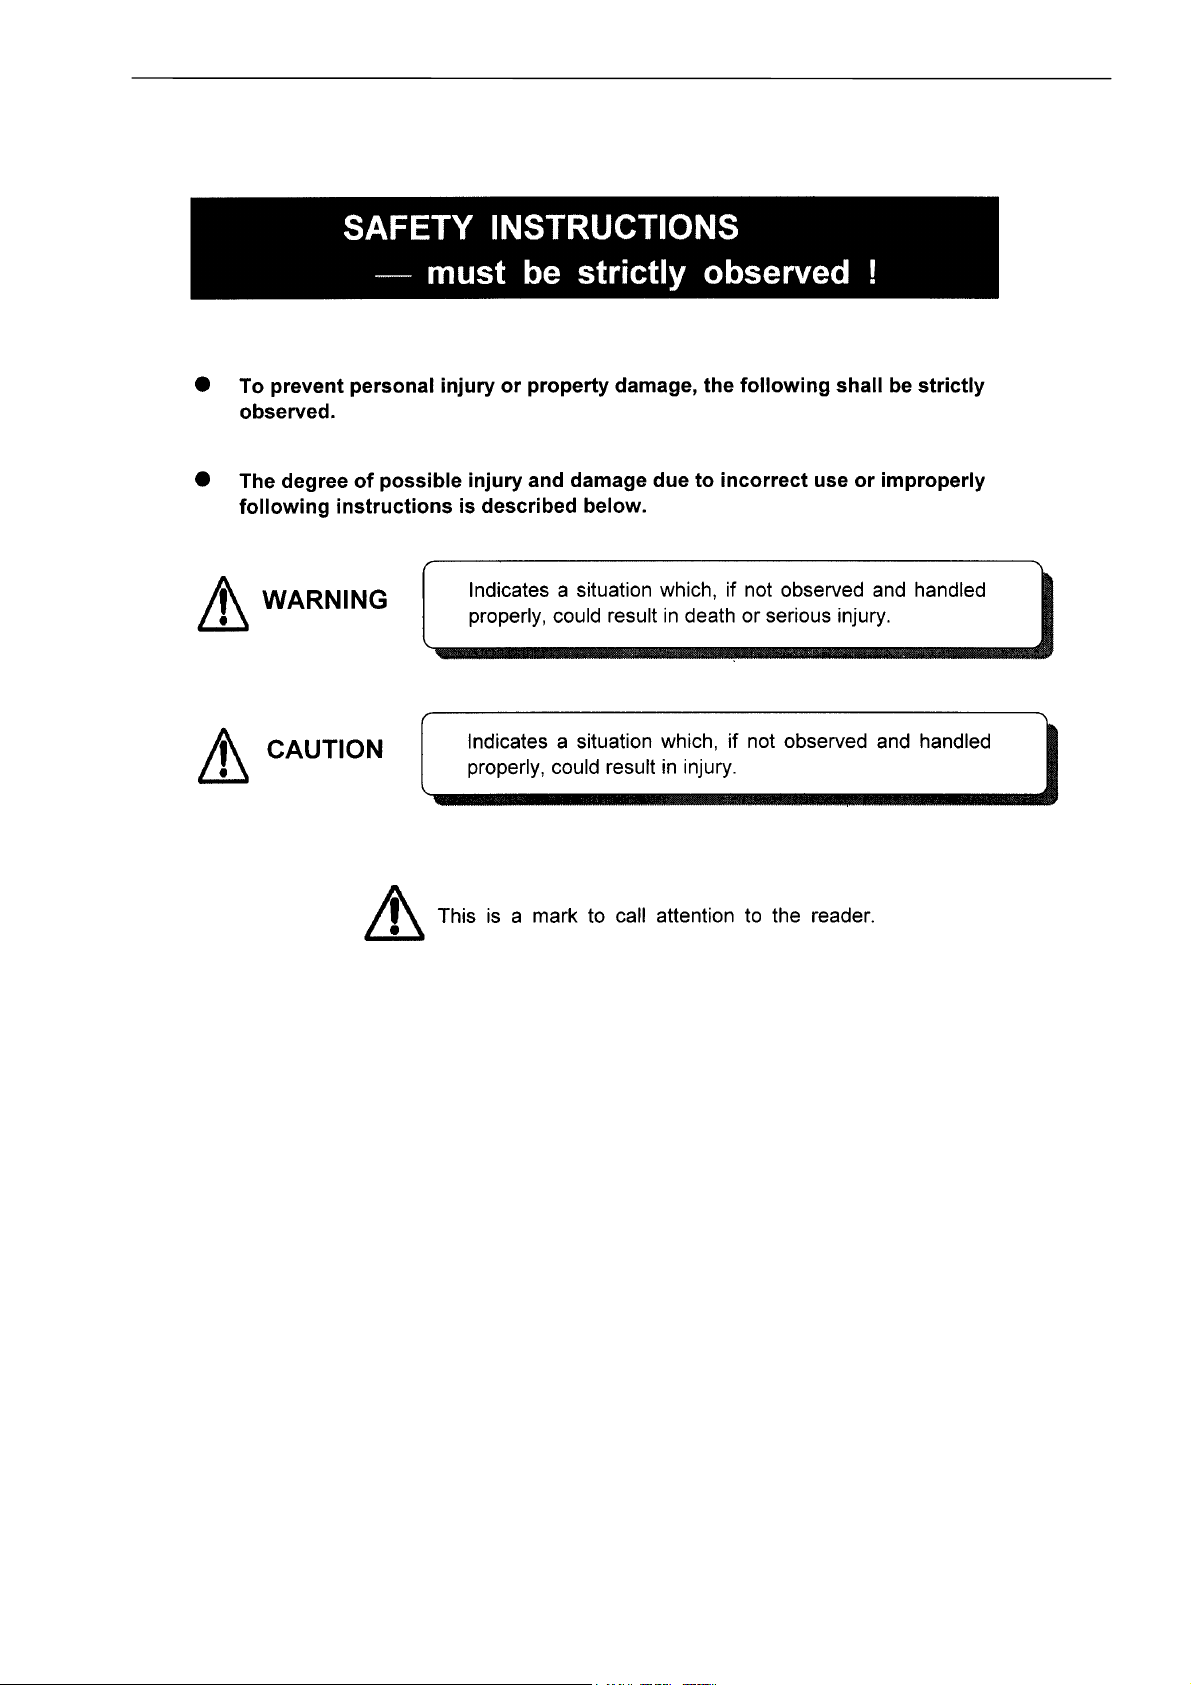
Important Safety Instructions
1. Read all of these instructions and save them for later reference.
2. Follow all warnings and instructions marked on the product.
3. Unplug this product from the wall outlet before cleaning. Do not use liquid or aerosol cleaners. Use a
damp cloth for cleaning.
4. Do not use this product near water.
5. Do not place this product on an unstable cart, stand or table. The product may fall, causing serious
damage to the product.
6. Slots and openings on the cabinet and the back or bottom are provided for ventilation.
To ensure reliable operation of the product and to protect it from overheating, do not block or cover these
openings. The openings should never be blocked by placing the product on a bed, sofa, rug or other
similar surface. This product should never be placed near or over a radiator or heat register. This product
should not be placed in a built-in installation unless proper ventilation is provided.
7. This product should be operated from the type of power source indicated on the marking label.
If you are not sure of the type of power available, consult your dealer or local power company.
8. This product is equipped with a three-pronged plug, a plug having a third (grounding) pin. This plug will
only fit into a grounding-type power outlet. This is a safety feature. If you are unable to insert the plug into
the outlet, contact your electrician to replace your obsolete outlet. Do not defeat the safety purpose of the
grounding-type plug.
9. Do not allow anything to rest on the power cord. Do not locate this product where the cord will be walked
on.
10. If an extension cord is used with this product, make sure that the total of the ampere ratings on the
products plugged into the extension cord do not exceed the extension cord ampere rating. Also, make sure
that the total of all products plugged into the wall outlet does not exceed 15 amperes for 120V outlet and
7.5 amperes for 220V(240V outlet.
11. Never push objects of any kind into this product through cabinet slots as they may touch dangerous
voltage points or short out parts that could result in a risk of fire or electric shock. Never spill liquid of any
kind on the product.
12. Except as explained elsewhere in this manual, don't attempt to service this product yourself. Opening and
removing those covers that are marked "Do Not Remove" may expose you to dangerous voltage points or
other risks. Refer all servicing on those compartments to service personnel.
13. The mains plug on this equipment must be used to disconnect mains power. Please ensure that the socket
outlet is installed near the equipment and shall be easily accessible.
14. Unplug this product from the wall outlet and refer servicing to qualified service personnel under the
following conditions:
A. When the power cord or plug is damaged or frayed.
B. If liquid has been spilled into the product.
C. If the product has been exposed to rain or water.
D. If the product does not operate normally when the operating instructions are followed. Adjust only
those controls that are covered by the operating instructions since improper adjustment of other
controls may result in damage and will often require extensive work by a qualified technician to restore
the product to normal operation.
E. If the product has been dropped or the cabinet has been damaged.
F. If the product exhibits a distinct change in performance, indicating a need for service.
3
Page 5

Before Operation
Notice
1. Before use, be sure to read this manual. And keep it handy for
2. The contents of this manual may change without prior notice.
3. Reproduction, transfer, or transmission of the contents of this manual
4. We are not liable for any damage resulting from the use of the
5. We are not liable for any problems resulting from the use of optional
reference when needed.
without prior consent is strictly prohibited.
information contained herein, regardless of errors, omissions, or
misprints.
products and consumable supplies other than the designated products
contained herein.
6. Do not handle, disassemble or repair the parts other than those
specified in this manual.
7. We are not liable for any damage caused by user's erroneous use of
the printer and inadequate environment.
8. Data residing in the printer is temporary. Therefore, all data will be lost
if power is lost. We are not liable for any damage or loss of profits
caused by data loss due to failures, repairs, inspections, etc.
9. Please contact us if there are any mistakes or ambiguities within this
manual.
10. If there are missing or incorrectly collated pages in this manual, contact
us to obtain a new manual.
4
Page 6
Before Operation
5
Page 7
Before Operation
6
Page 8

General Precautions
1. Prior to operation, read the safety instructions carefully and observe them.
2. Do not drop or put foreign matter such as clips and pins into the printer. This may
cause problems.
3. Be careful when moving or carrying the printer. Dropping the printer may cause injury
or property damage.
4. Make sure if you open the top cover, it is opened all the way. If only partially open, the
cover could slam shut, possibly causing injury.
5. When the cover is open, be careful of the corners of the cover. They could cause
injury.
6. Do not open the printer during printing.
7. When cleaning the surface of the printer case, do not use the cloth that is soaked in
thinner, trichloroethylene, benzine, ketone or similar chemicals.
Before Operation
8. Do not use the printer where there is a lot of oil, iron particles, or dust.
9. Do not spill liquids or spray insecticide on the printer.
10. Do not jolt or impact to the printer by stepping on, dropping or hitting the printer.
11. Operate the control panel properly. A careless, rough handling may cause problems or
malfunction. Do not use such sharp-edged tool as a ballpoint pen for operation.
12. Be careful of the edges of the plates so injury or property damage is possible.
13. If a problem occurs during printing, stop the printer immediately and unplug the power
cord from the outlet.
14. When printer trouble occurs, do not try to dissemble it. Instead, consult our service
personnel.
7
Page 9

Before Operation
Precautions When Installing the Printer
1. Prior to operation, read the safety instructions carefully and observe them.
2. Do not use or store the printer near fire, excessive moisture, in direct sunlight, near an
air conditioner or heater or other source of unusually high or low temperature or
humidity or excessive dust.
3. Do not place the printer where chemical reactions occur, such as in a laboratory.
4. Do not place the printer where air is mixed with salt or gas.
5. The printer must sit on a firm, level surface where there is ample ventilation. Never
allow the printer's air vent to be blocked by a wall or other object.
6. Do not put anything on the top of printer.
7. Do not place the printer near a radio or television, and do not use the same wall outlet
for the printer and radio or television. Radio or television reception could be adversely
affected.
8. Do not use a power voltage or frequency other than those specified.
9. Do not put anything on the power cord or step on it.
10. Do not drag or carry the printer with the power cord or interface cable.
11. Avoid plugging the power cord into an outlet with many loads.
12. Do not bundle the power cord when inserting the plug.
13. Always grip the plug housing, not the cord, to plug/unplug the power cord.
14. Make certain the power is turned off before connecting/disconnecting the interface
cable.
15. Avoid lengthening the signal cable or connecting it to any noise-producing device. If it
is unavoidable, use the shielded cable or twisted pair for each signal.
16. Place the printer near the outlet where the power cord can be unplugged easily to shut
off power.
17. Use the AC outlet that accepts a three-pronged plug. Otherwise, static electricity may
be generated and there will be danger of electric shock.
8
Page 10

Before Operation
Contents
Before Operation
FCC Compliance Statement for American Users----------------------------------------------1
Compliance Statement for European Users ----------------------------------------------------1
EMI Compliance Statement for Canadian Users ----------------------------------------------2
Important Safety Instructions -----------------------------------------------------------------------3
Notice ----------------------------------------------------------------------------------------------------4
Safety Instructions ------------------------------------------------------------------------------------5
Warning--------------------------------------------------------------------------------------------------6
General Precautions----------------------------------------------------------------------------------7
Precautions When Installing the Printer ---------------------------------------------------------8
Contents -------------------------------------------------------------------------------------------------9
Main Features------------------------------------------------------------------------------------------11
Model Description -------------------------------------------------------------------------------------12
Chapter 1 Setup
1 Confirmation of Carton Contents-----------------------------------------------------------14
2 Part Names and Functions ------------------------------------------------------------------15
3 Connection to Power--------------------------------------------------------------------------18
4 Connection to a Computer-------------------------------------------------------------------19
Chapter 2 Printer Operation
1 Power On/Off -----------------------------------------------------------------------------------22
2 Normal Operating Mode----------------------------------------------------------------------24
3 Printer Configuration Setting Mode-------------------------------------------------------- 25
4 Self-Test Mode & Hex Dump Mode--------------------------------------------------------30
5 System Maintenance Mode -----------------------------------------------------------------32
6 Returning to Factory Setting ----------------------------------------------------------------35
9
Page 11

Before Operation
Contents
Chapter 3 Media and Ribbon
1 Kinds of Approved Media-------------------------------------------------------------------- 38
2 Configuration of Approved Media (When Using Front Sensors)------------------- 39
3 Configuration of Approved Media (When Using Adjustable Sensor)-------------- 40
4 Media Setting----------------------------------------------------------------------------------- 41
5 Kinds of Approved Ribbons----------------------------------------------------------------- 43
6 Ribbon Setting --------------------------------------------------------------------------------- 44
Chapter 4 Printer Adjustments
1 Use of Media Other Than the Recommended
(Printhead Offset Adjustments) ------------------------------------------------------------ 48
2 Use of Narrow Media/Ribbons
(Printhead Pressure Adjustments) -------------------------------------------------------- 49
3 Use of Narrow Media/Ribbons (Ribbon Tension Adjustments)--------------------- 50
4 Adjustable Sensor (For CLP-7201e) ----------------------------------------------------- 52
5 Cleaning ----------------------------------------------------------------------------------------- 53
Chapter 5 Troubleshooting
1 Error Messages-------------------------------------------------------------------------------- 56
2 Power Troubleshooting ---------------------------------------------------------------------- 60
3 Media Feed troubleshooting ---------------------------------------------------------------- 61
4 Ribbon Feed Troubleshooting-------------------------------------------------------------- 62
5 Print Troubleshooting------------------------------------------------------------------------- 63
6 Interface Troubleshooting ------------------------------------------------------------------- 64
Appendixes
1 Options------------------------------------------------------------------------------------------- 66
2 Specifications----------------------------------------------------------------------------------- 68
10
Page 12

Before Operation
Main Features
Optimum ribbon tension
The Active Ribbon Control & Positioning technology used in this printer gives improved print
quality with a wide range of media and ribbon combinations. ARCP is designed to eliminate
ribbon wrinkling and slippage. Thus print registration and positioning especially with small labels
are improved.
When a ribbon is initially installed, the source ribbon spool is considerably larger than the
destination spool. By the end of the ribbon, this situation is reversed leading to noticeable
variations in ribbon tension. Our new ARCP technology is designed specifically to eliminate this
effect by equalizing the ribbon tension throughout the print run.
High-speed, high-quality printing
This printer adopts both a direct-thermal and thermal-transfer printing system with the line
thermal head and its unique control IC enables high-speed and high-quality printing.
Powerful control language
A powerful yet simple to use control language is standard to all of Citizen's label printers
allowing easy design of labels and bar codes. Alternatively, Citizen provides printer drivers for
popular operating systems such as Windows(tm).
Easy operation
Thanks to the clam-shell mechanism, labels, media and ribbons are loaded easily and
maintenance such as head cleaning is carried out smoothly.
IEEE1284 Parallel, serial and USB ports as the standard
The enhanced parallel, serial and USB ports are provided as the standard to enable
high-speed data transmitting and industry compatible connectivity.
Adjustable sensor
The adjustable, moveable sensor, standard on the CLP-7201e, allows irregularly cut labels
and tags to be used with ease. The sensor can also detect black registration marks that are
not at the edge of the media.
LAN Ethernet and WiFi (optional)
The LAN Ethernet and WiFi interfaces are optionally available to meet the variety of needs of
computer-printer network.
Trademark Acknowledgement:
Windows: Microsoft Corporation
11
Page 13

Before Operation
Model Description
The following two models are available. The main different points between the two models are
shown below.
Model Print resolution Printing speed
CLP-7201e 200dpi 2−7 IPS Standard Standard on-board
CLP-7202e 200dpi 2−7 IPS Optional Via PCMCIA card
Adjustable
media sensor
Flash Memory
12
Page 14

Chapter 1 Setup
Chapter 1
Setup
1 Confirmation of Carton Contents
2 Part Names and Functions
3 Connection to Power
4 Connection to a Computer
13
Page 15
Chapter 1 Setup
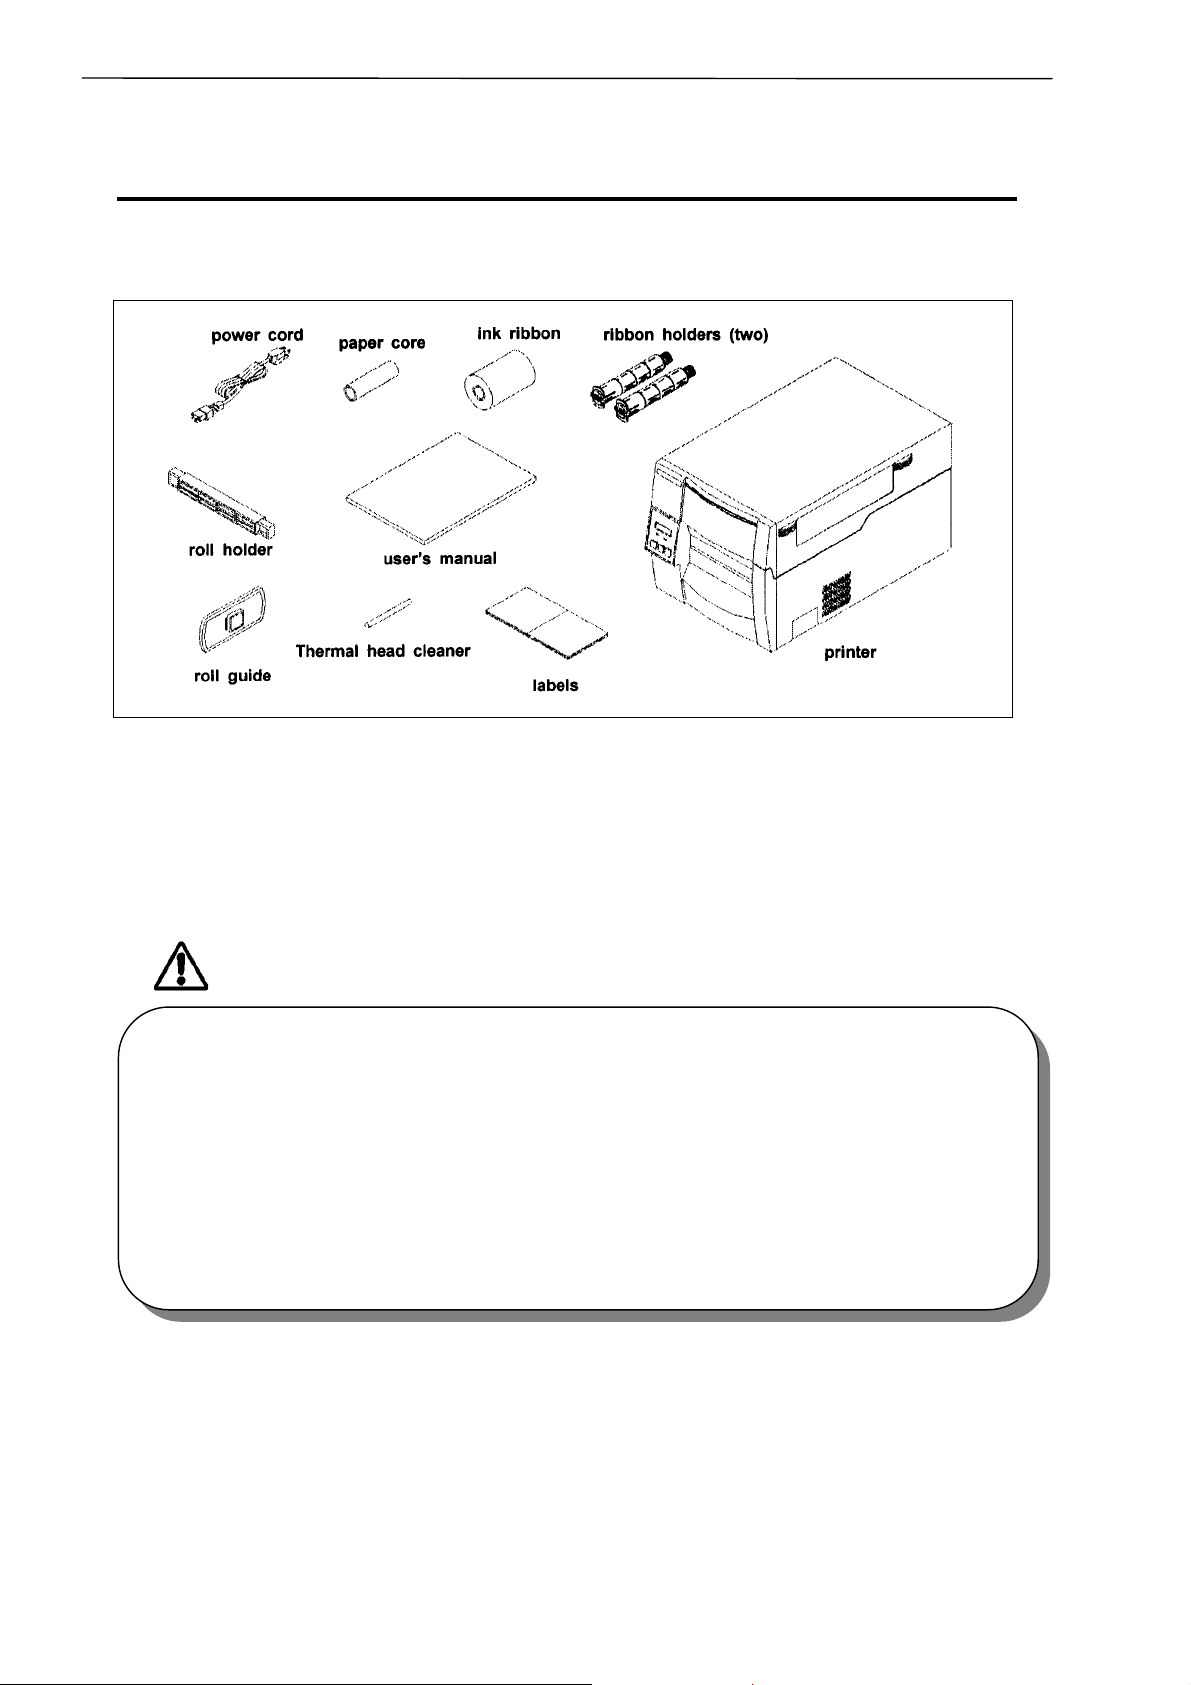
1 Confirmation of Carton Contents
1 Confirmation of Carton Contents
Check that the following accessories are included with the printer in the carton.
The empty carton and packing materials should be stored for future shipping of the printer.
CAUTION
• Be careful when moving or carrying the printer and when taking the printer out of the
carton. The printer may cause injury or property damage if dropped. Be sure to grip the
printer housing firmly when taking it out of the carton. Do not grip the printe r by the foam
packing material which may break, causing the printer to drop.
• When opening the cover, open it all the way. If only part way open, the cover could slam
shut, possibly causing injury.
• Be careful of the edge of the cover when the cover is opened. It may cause injury or
property damage.
• Be careful of the edges of the metal plates so injury or property damage is possible.
14
Page 16
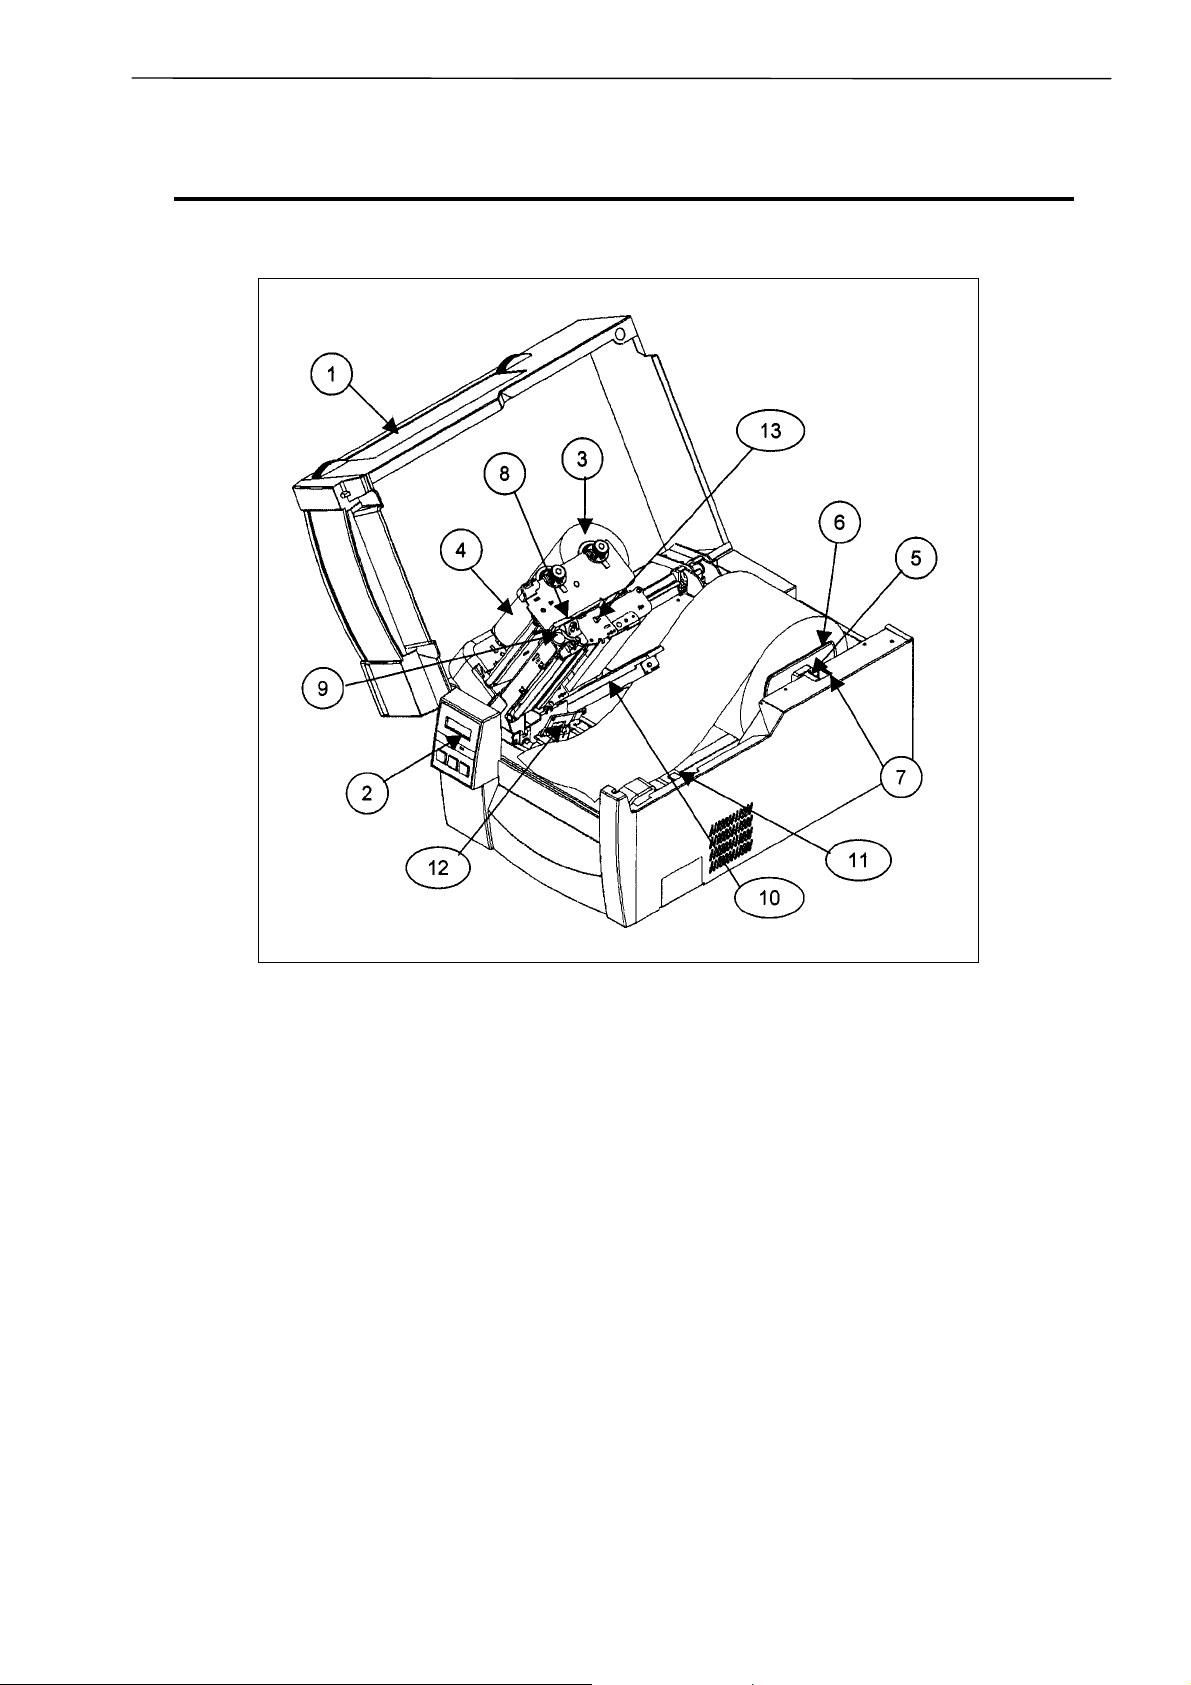
2 Part Names and Functions
s
Front view
Chapter 1 Setup
2 Part Names and Function
(1) Cover
Opens to allow loading of the media and
ribbon.
(2) Control panel
To set the printer configuration settings. (See
Chapter 2.)
(3) Ribbon holder
To attach the ribbon. (See Chapter 3.)
(4) Ribbon winder
To wind the ribbon after printing.
(See Chapter 3.)
(5) Roll holder
Holds the roll of media.
(6) Roll guide
Guides the roll of media. This is adjusted
according to the width of the media. (See
Chapter 3.)
(7) Media holder
Holds the roll holder. (See Chapter 3.)
(8) Open lever
To swing the printhead out of the way when
loading the media or cleaning the printhead.
(See Chapter 3.)
(9) Printhead pressure adjustment knob
(See Chapter 4.)
(10) Open guide
Holds down the media. The adjustable,
movable media sensor inside (available for
the model CLP-7201e) detects the media
position. (See Chapter 3.)
(11) Open guide lever
Pressing this opens the open guide to
replace the media. (See Chapter 3.)
(12) Front sensors
Detect the label or tag position. (See
Chapter 3.)
(13) Offset check window
Allows you to check the optimum position of
the printhead. (See Chapter 4.)
15
Page 17
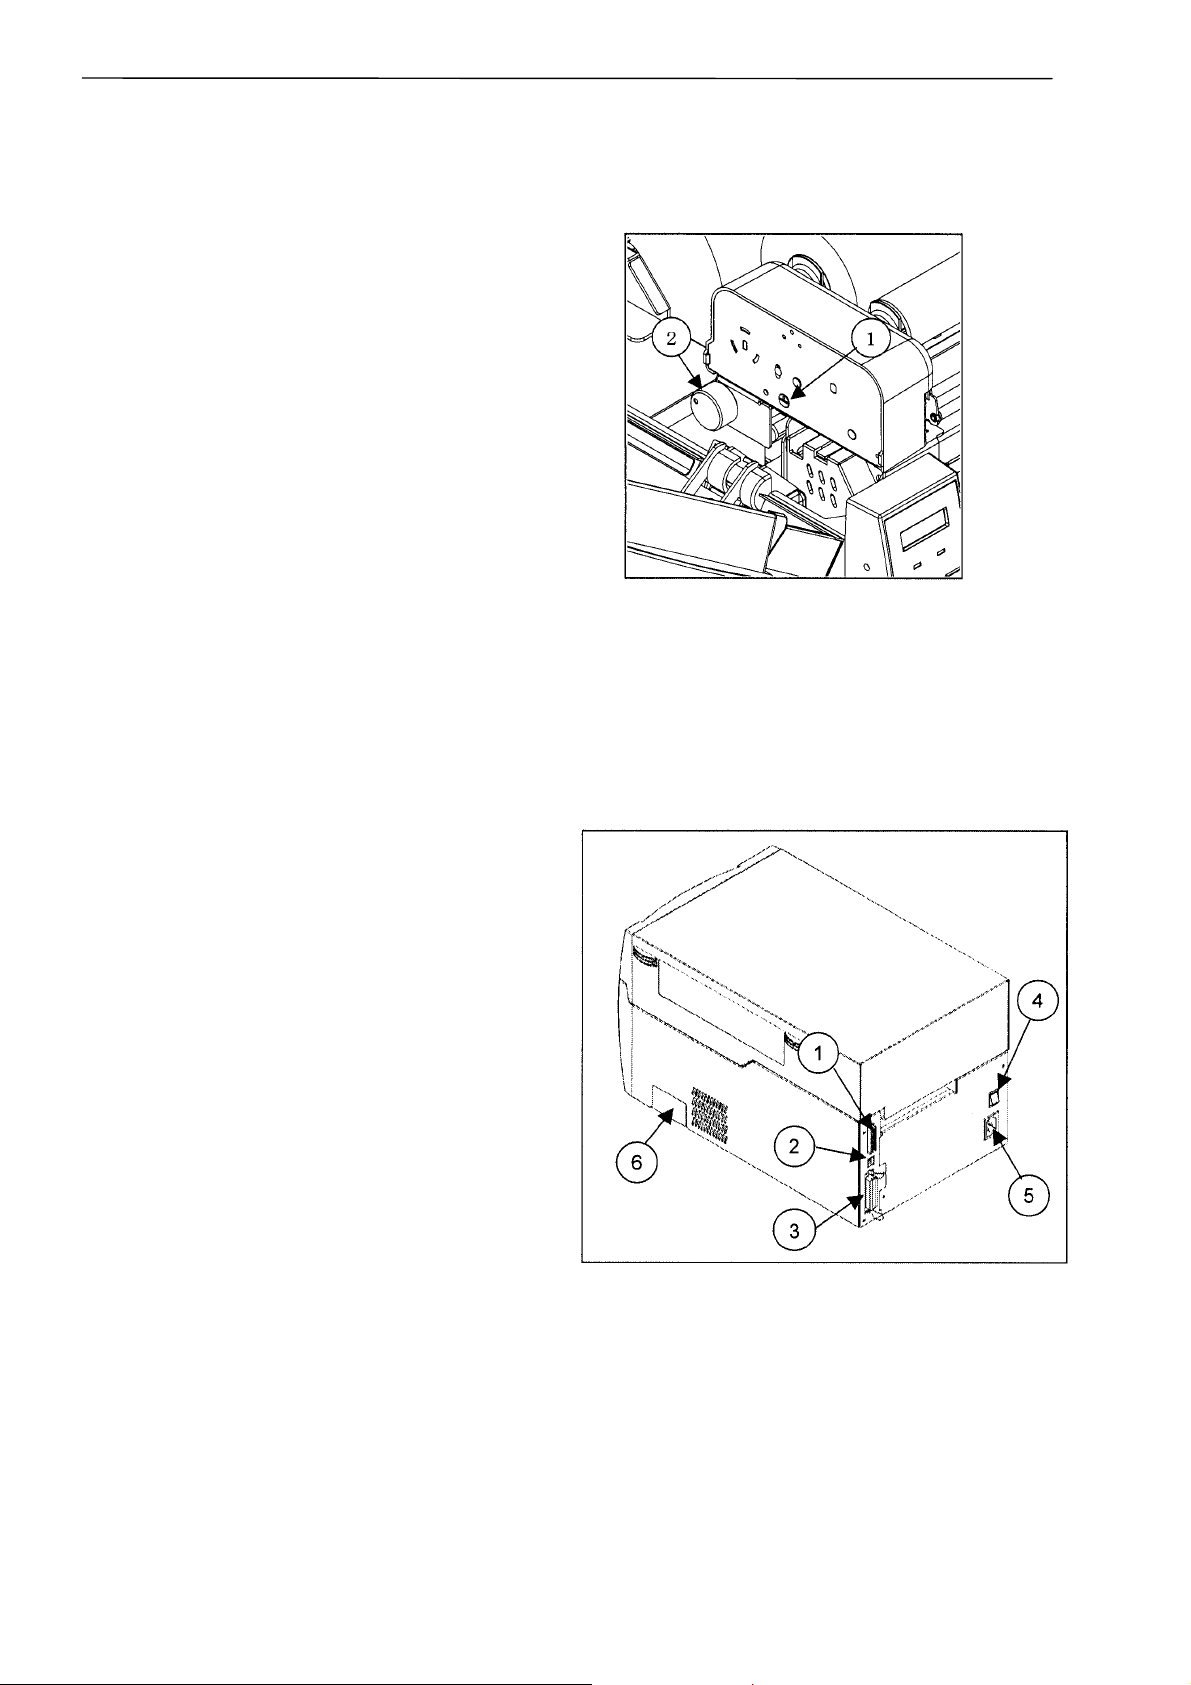
Chapter 1 Setup
2 Part Names and Functions
Side view
(1) Adjust-screw
To change the ribbon tension setting on the
winding side. (See Chapter 4.)
(2) Rear tension knob
To change the ribbon tension setting on the
feeding side. (See Chapter 4.)
Rear view
(1) Serial interface connector
To connect the serial interface cable.
(2) USB interface connector
To connect the USB interface cable.
(3) Parallel interface connector
To connect the parallel interface cable.
(4) Power switch
To turn on or off the power.
(See Chapter 2.)
(5) Power inlet
To connect the power cord.
(6) PCMCIA memory card cover
To protect the PCMCIA memory card from
exposure to dust and foreign matter. To install
a PCMCIA memory card, first unhook this
cover, then slide it out. (See Appendixes.)
16
Page 18
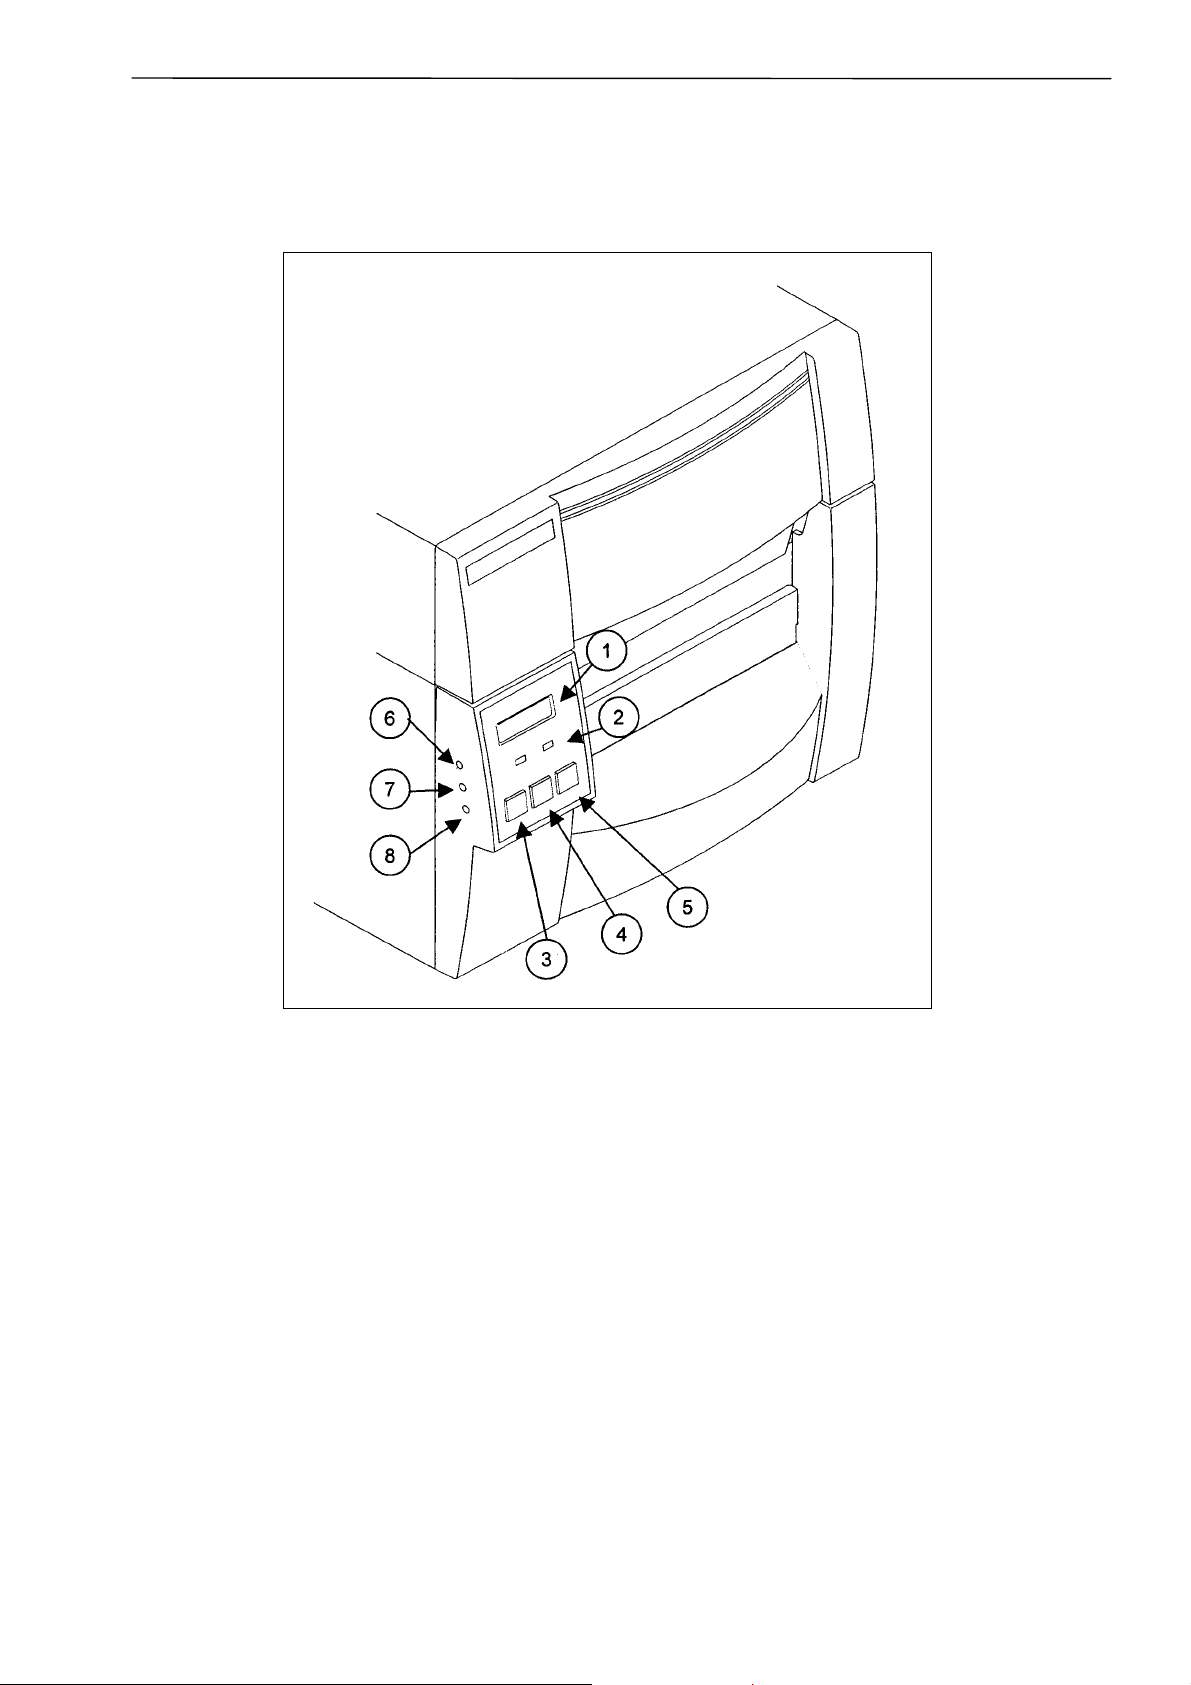
s
Control panel
Chapter 1 Setup
2 Part Names and Function
(1) LCD
Displays the current printer status,
configuration settings, or an error message.
(2) LEDs
One LED is the power indicator and the other
the error indicator.
(3) PAUSE key
Temporarily pauses printing.
(4) FEED key
Feeds the media.
(5) STOP key
Stops the printer operating.
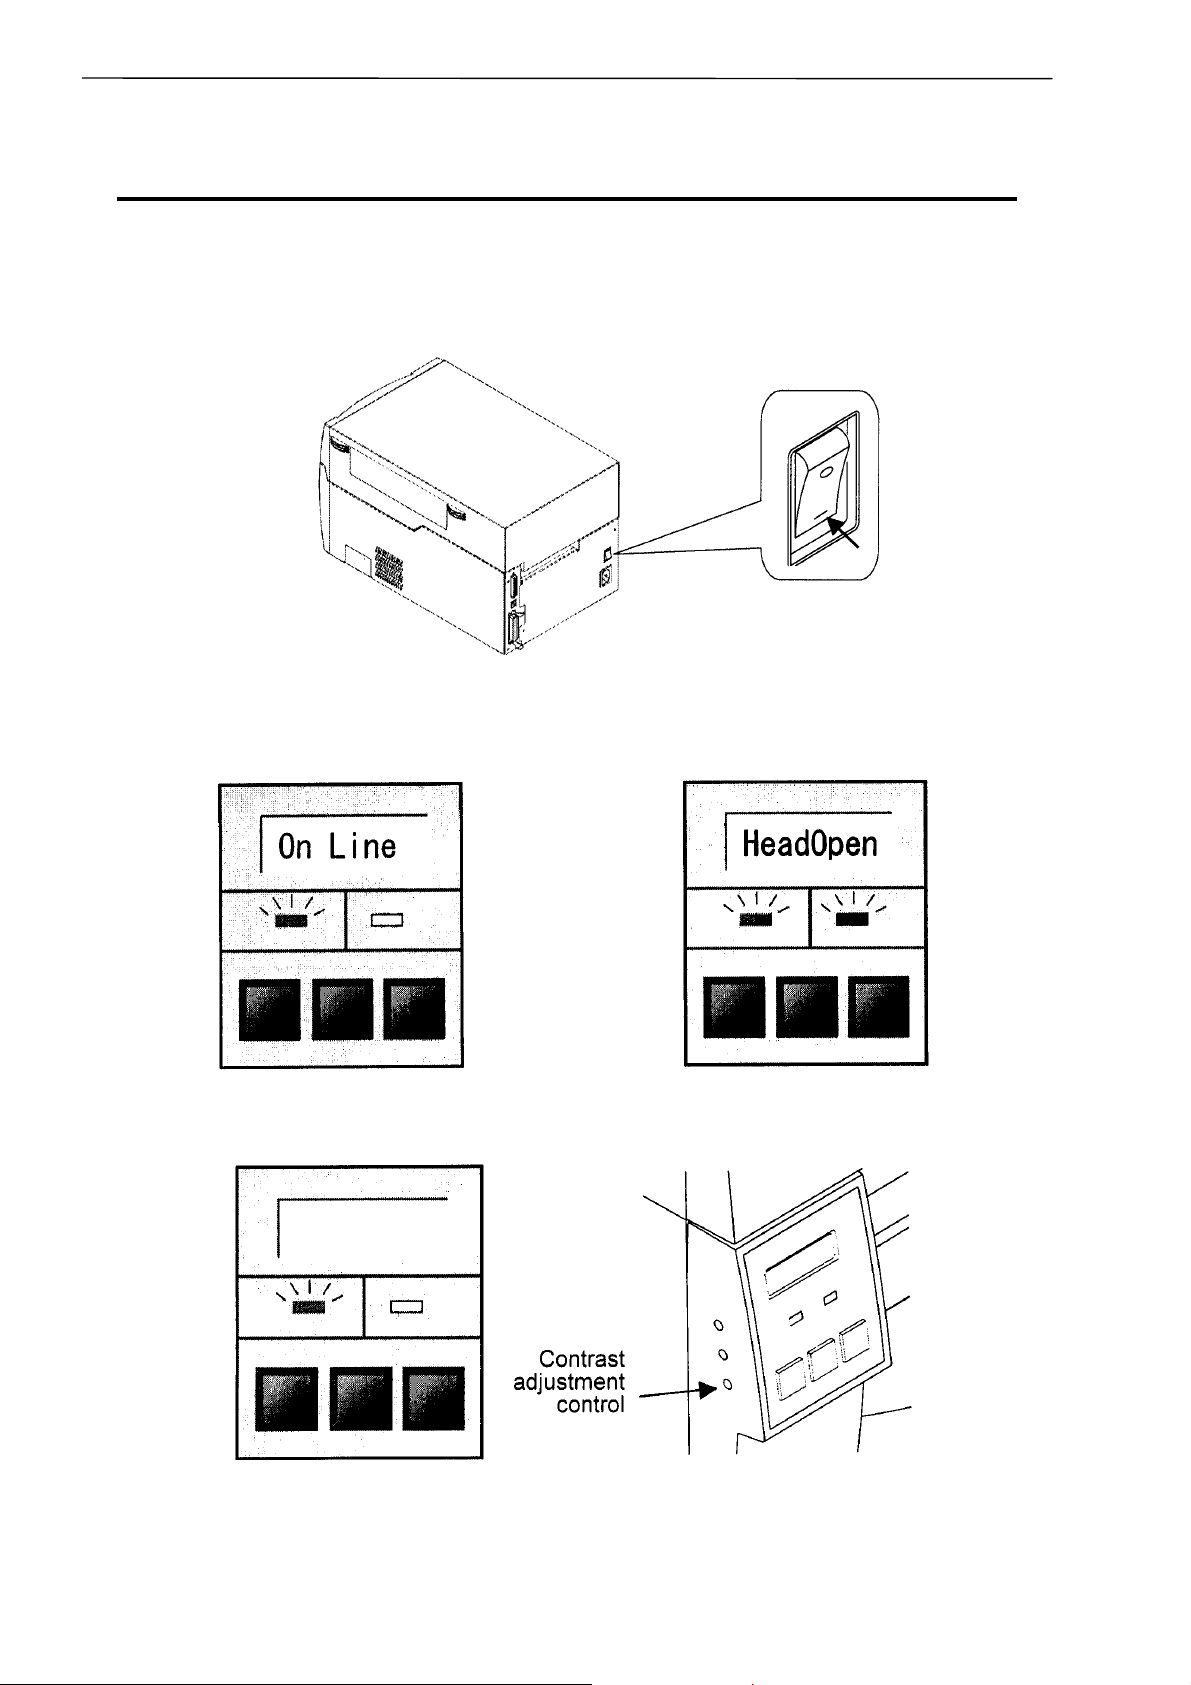
(6) Media gap adjustment control
To adjust the media gap sensor sensitivity.
(7) Black mark adjustment control
To adjust the black mark sensor sensitivity.
(8) LCD contrast adjustment control
To adjust the LCD contrast.
17
Page 19
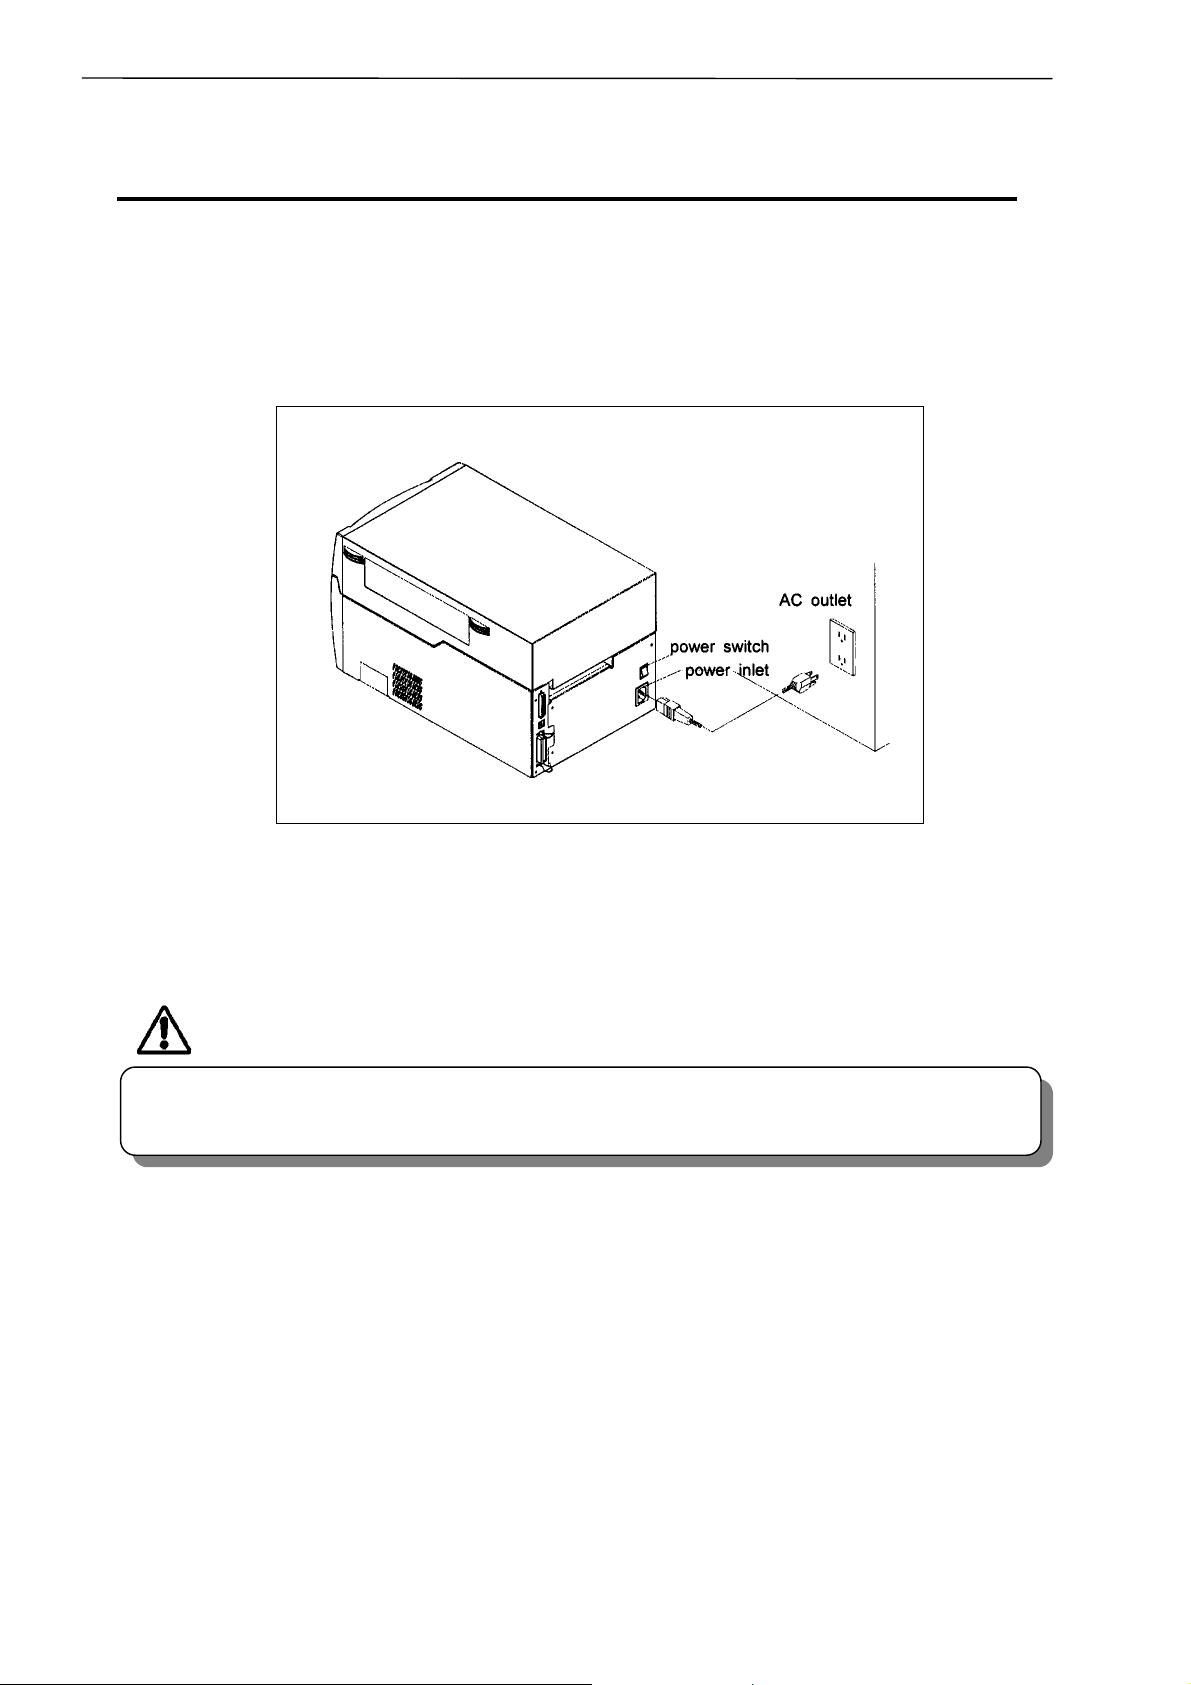
Chapter 1 Setup
3 Connection to Power
3 Connection to Power
1. Check that the power switch to the printer is turned OFF.
2. Connect the connector of the power cord to the power inlet on the printer.
3. Insert the plug of the power cord in the AC outlet.
CAUTION
• Use an AC outlet that accept s a three-pronged plug. Otherwise, static electricity may be
generated and there will be danger of electric shock.
18
Page 20
Chapter 1 Setup
r
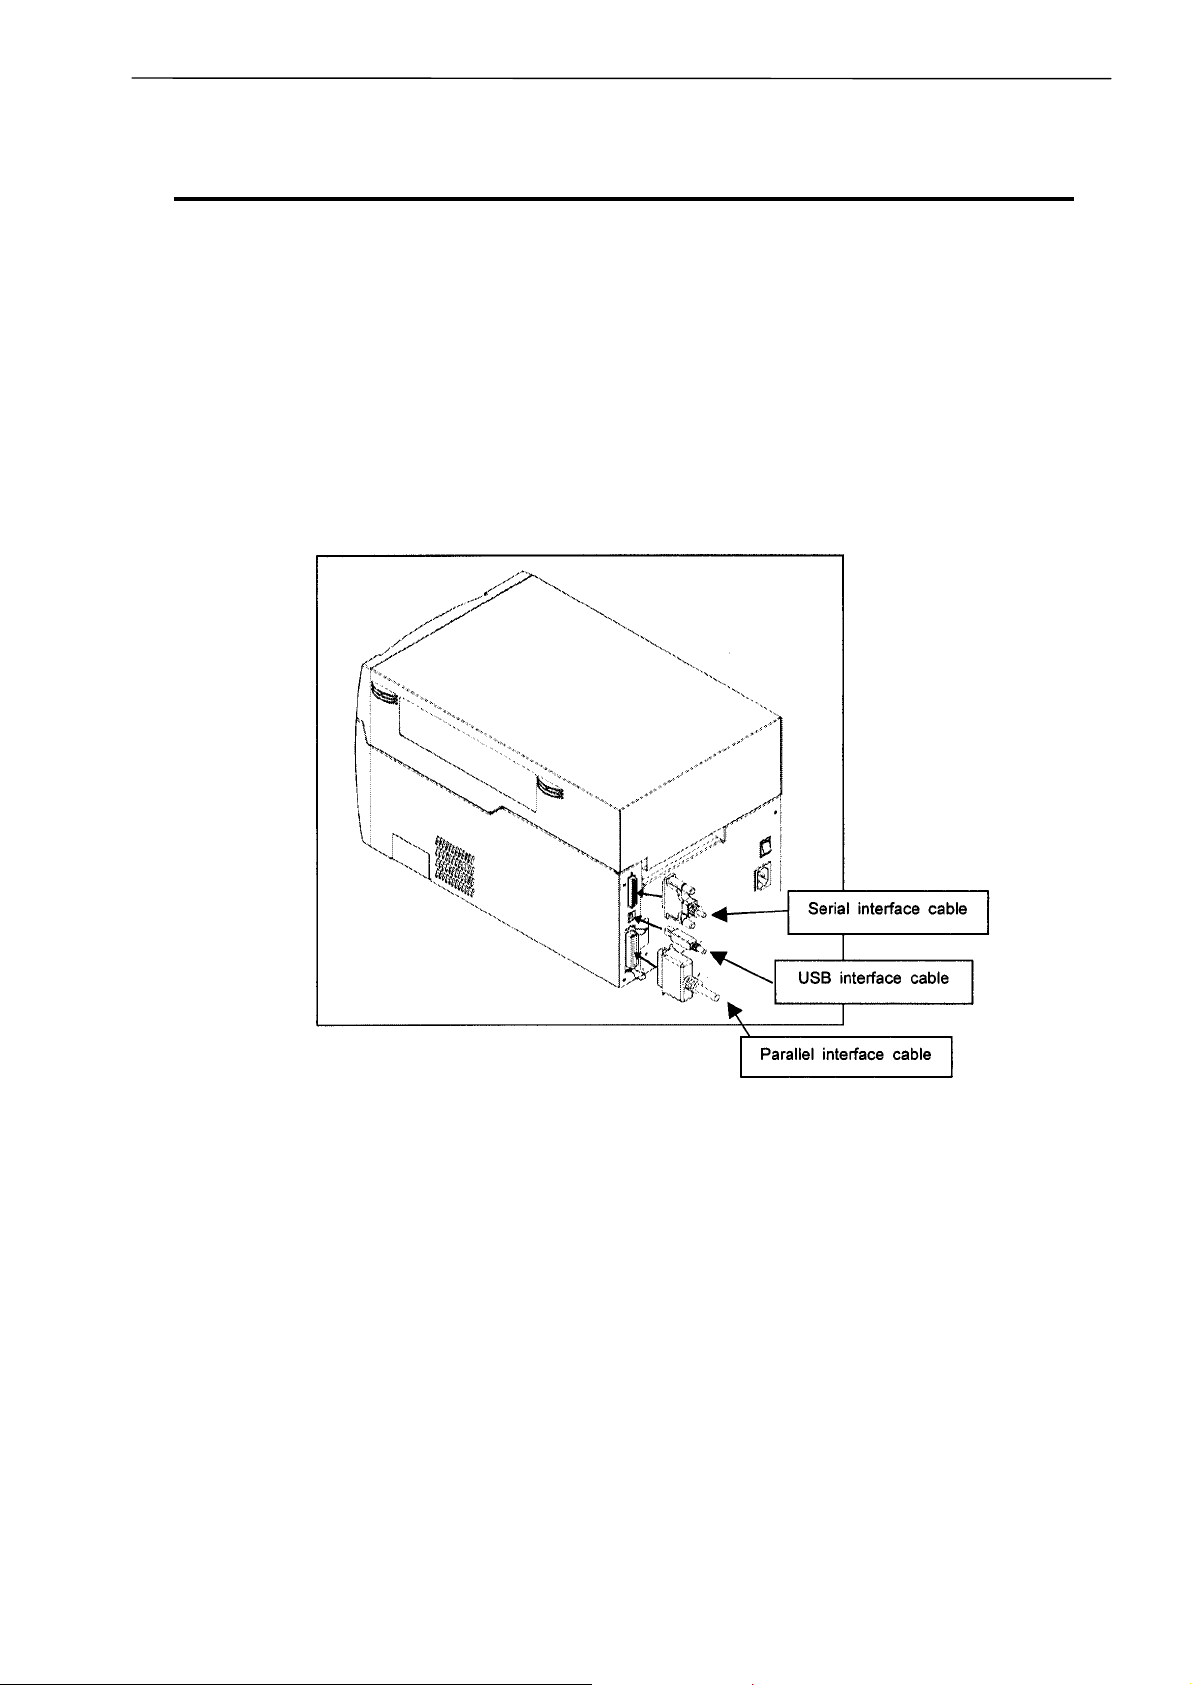
4 Connection to a Compute
4 Connection to a Computer
An interface cable is necessary to connect the printer to a computer.
To connect the cable, proceed as follows:
1. Turn OFF both power switches of the printer and the computer.
2. Connect the connector of one end of the interface cable to the interface connector on the back of
the printer and secure it with locks or locking screws.
3. Connect the connector of the other end of the interface cable to the interface connector on the
computer and secure it with locks or locking screws.
19
Page 21

Chapter 1 Setup
20
Page 22

Chapter 2 Printer Operation
Chapter 2
Printer Operation
1 Power On/Off
2 Normal Operating Mode
3 Printer Configuration Setting Mode
4 Self-Test Mode & Hex Dump Mode
5 System Maintenance Mode
6 Returning to Factory Setting
21
Page 23
Chapter 2 Printer Operation
1 Power On/Off
1 Power On/Off
Turning on the power
1. Turn on the power switch on the back of the printer.
2. The green LED is lit. Check that the LCD screen displays 'On Line.'
22
Page 24
f
Turning off the power
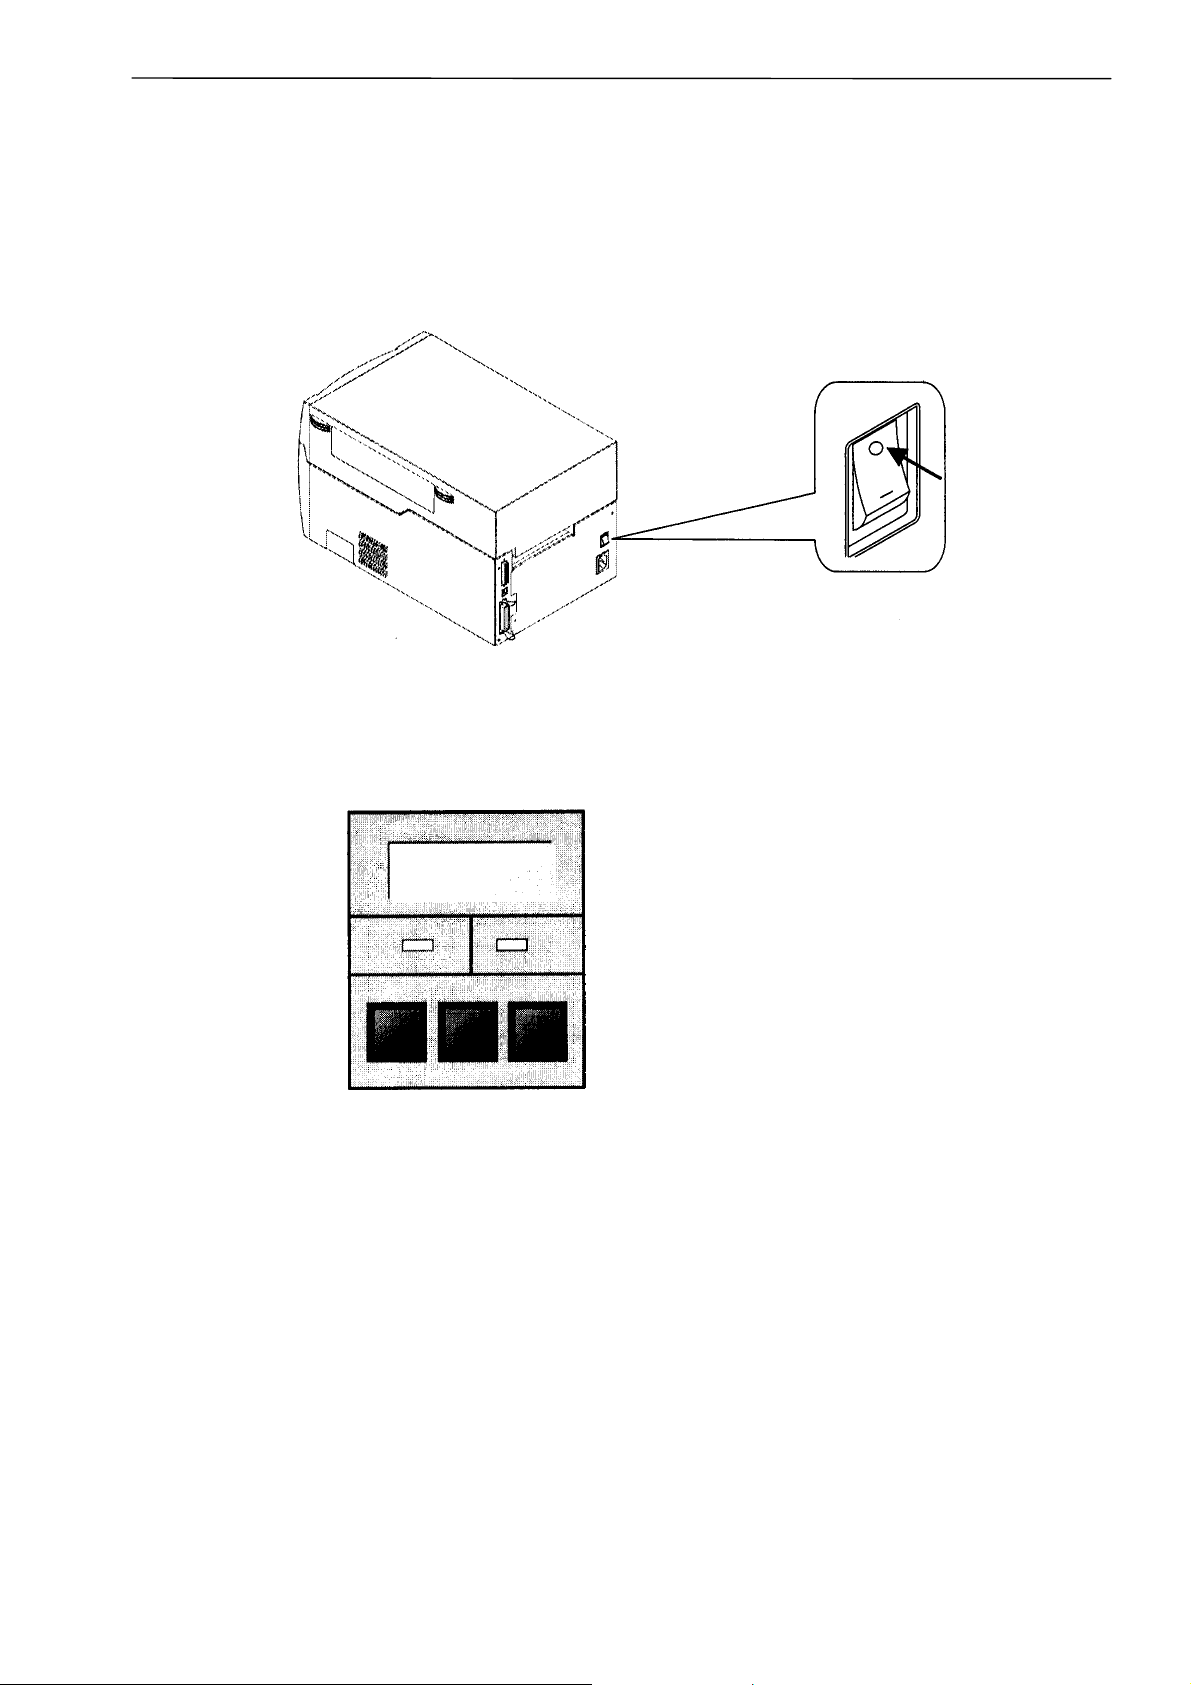
1. Turn off the power switch on the back of the printer.
Chapter 2 Printer Operation
1 Power On/Of
2. The green LED goes off and any message on the LCD screen disappears.
23
Page 25
Chapter 2 Printer Operation
2 Normal Operating Mode
2 Normal Operating Mode
When the power is turned on, the printer enters the normal operating mode, which allows normal
printing. The control key functions are as follows:
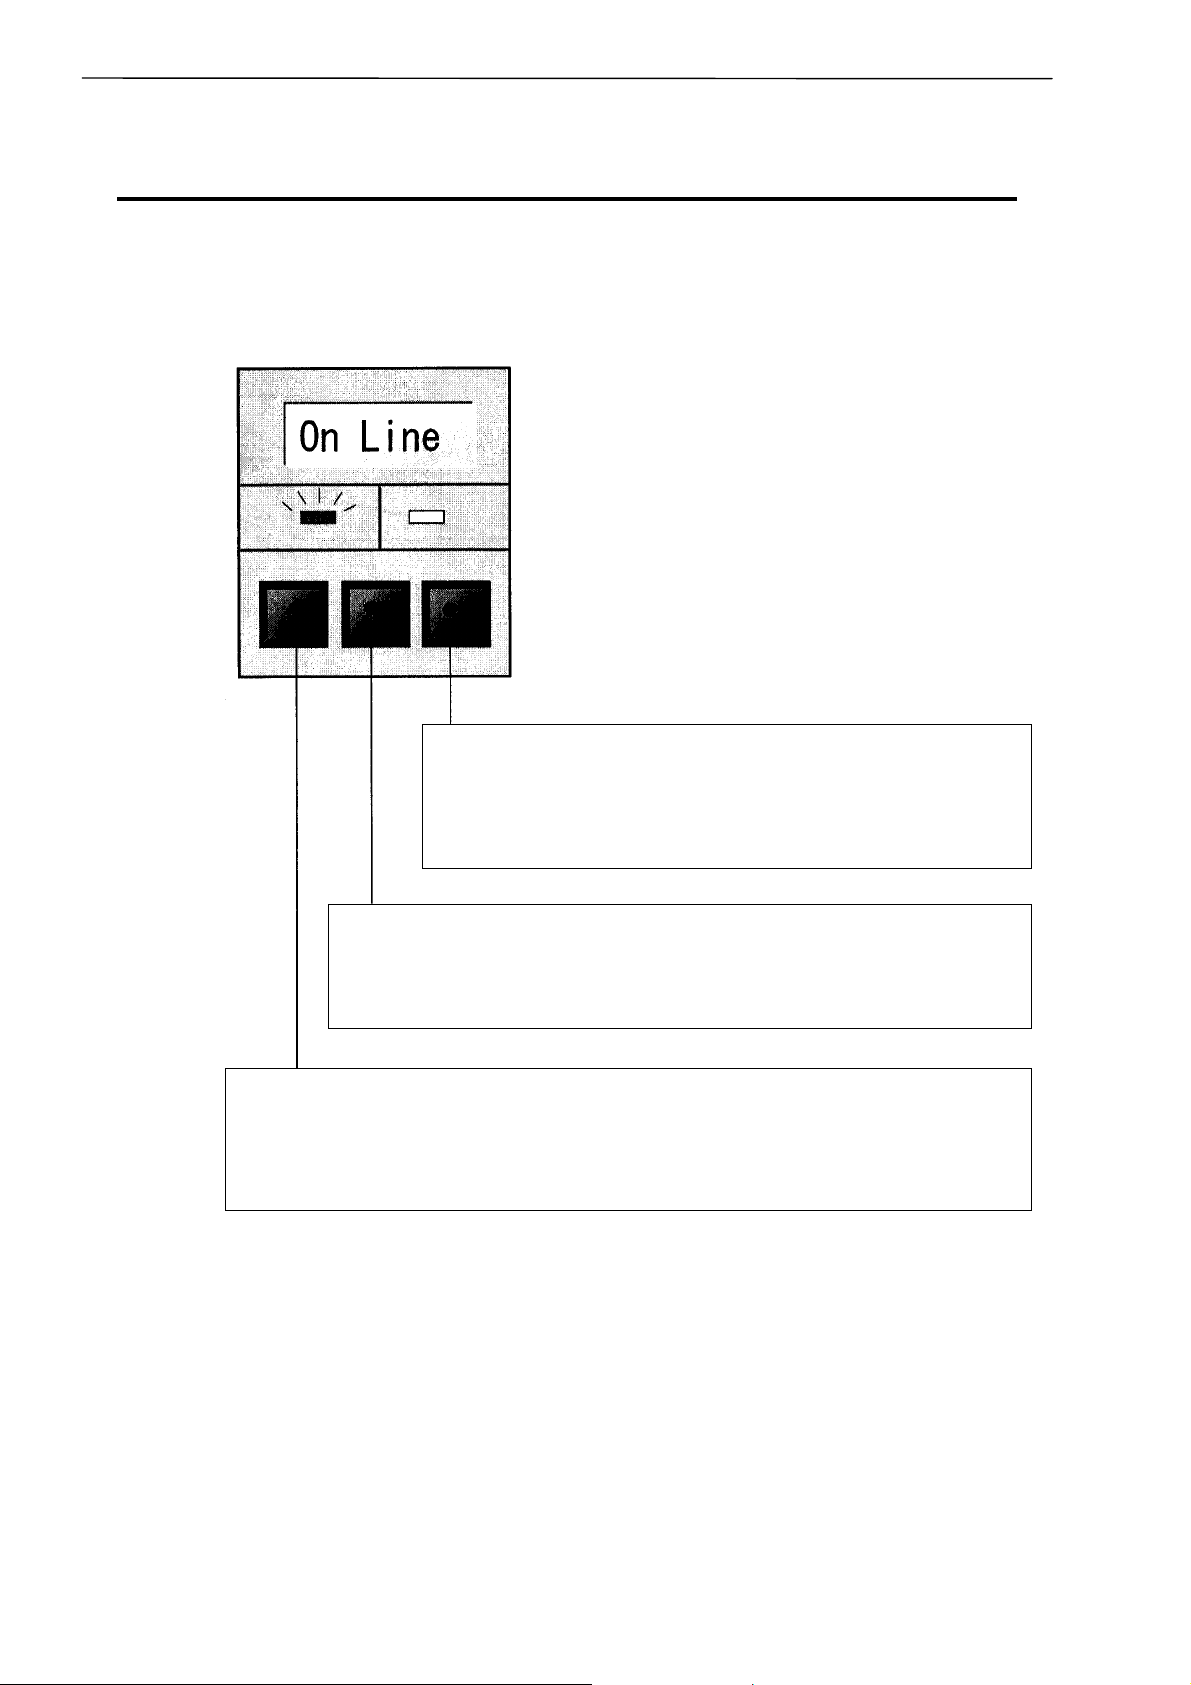
PAUSE key
Temporarily pauses printing. 'Pause' is displayed on the LCD screen. If pressed during
printing, printing will stop after the current label is printed. Press the PAUSE key again
to resume printing.
FEED key
Advance to the top of the next label. When Using continuous media, make
sure the Sensor selection is set to ContinuP or a Media error will result.
STOP key
With this key, the operator can stop and cancel the current print
job. Pressing the STOP key during printing stops the printing
immediately. Pressing it again cancels the print job.
24
Page 26

Chapter 2 Printer Operation
3 Printer Configuration Setting Mode
3 Printer Configuration Setting Mode
In this menu, the print mode, the 'after printing function' such as cutting or peeling, media
sensor selection and print quality settings such as print speed or de nsity are configured. Control
key functions are shown below. The printer configuration settings are stored in memory so they
are maintained even after the power is turned off.
Example: Changing the media gap sensor to the black mark sensor
1. First check the printer goes On Line, then press and hold down the PAUSE key and press the
FEED key .
2. Change the print mode (direct-thermal or thermal transfer printing) to the sensor selection with the
PAUSE key.
25
Page 27

Chapter 2 Printer Operation
3 Printer Configuration Setting Mode
3. Change the media gap sensor to the black mark sensor with the FEED key.
4. Return to normal operating mode with the STOP key.
26
Page 28

Display Indications
Chapter 2 Printer Operation
3 Printer Configuration Setting Mode
27
Page 29

Chapter 2 Printer Operation
3 Printer Configuration Setting Mode
List of Mode Items
Note: When the printer is switched off and on, the initial values for these menu items selected by the
printer configuration setting mode will be retrieved from the flash memory.
28
Page 30

3 Printer Configuration Setting Mode
Notes when setting print start position and media stop position
Chapter 2 Printer Operation
• When the "AfterPnt" menu item is set to "AutoCut", the relation between print start position and
media stop position should be set to [(O ( (f]. If the value is set so that [(O < (f], the media may be out
of platen.
• If the absolute value to O value is larger than the absolute value to f value as the set value of [(O]
increases, the media stop position may change. However, if the absolute value to f value is smaller
than the absolute value to O value as the set value of [(f] decreases, the media stop position may
not change.
• When the "AfterPnt" menu item is set to "PeelWait", the set value of [(f] should be limited; the larger
value causes labels to unexpectedly peel off.
29
Page 31

Chapter 2 Printer Operation
4 Self-Test Mode & Hex Dump Mode
4 Self-Test Mode & Hex Dump Mode
In this mode, self-test printing is performed, and you can check the current printer configuration
settings and print quality. After loading the media and ribbon, operate the printer in the following
way:
1. Turn ON the power switch while pressing and holding the FEED key.
When labels are used, hold down the FEED key for two seconds and the printer will feed the
media and print samples 1 and 2 (see below) and stop.
When continuous media is used, hold down the FEED key for four seconds and the printer will
feed the media and print samples 1 and 2 (see below) and stop.
30
Page 32

Check the following items in the self-test mode.
Check item Cause Remedy
Printhead disconnected Replace printhead Dot missing
Dust adhered Clean printhead
(see Section 5, Chapter 4)
Chapter 2 Printer Operation
4 Self-Test Mode & Hex Dump Mode
Totally blurred
Partially blurred Printhead pressure unbalanced Adjust printhead pressure
Ribbon wrinkling and slipping Ribbon tension improper Adjust ribbon tension
Printhead offset changed in
position
Printing energy low Adjust printing energy
Adjust printhead offset
(see Section 1, Chapter 4)
(see Command Reference)
(see Section 2, Chapter 4)
(see Section 3, Chapter 4)
2. After self-test printing, the printer enters the data dump mode (hex dump mode).
The contents of communication can be checked with the communication data printed in ASCII
code.
3. Return to normal operating mode after turning OFF the power switch and turning ON again.
31
Page 33

Chapter 2 Printer Operation
5 System Maintenance Mode
5 System Maintenance Mode
In system maintenance mode, the communication, adjustable sensor ON/OFF and sensor voltage
selections are set up. The printer configuration settings are stored in memory so they are
maintained even after the power is turned off. Control key functions are shown in the following:
Example: Setting the black mark sensor voltage
1. First turn OFF the power switch, then press and hold the PAUSE, FEED and STOP keys
simultaneously and at the same time turn ON the power switch.
2. Change the baud rate to the sensor voltage setting with the PAUSE key pressed.
32
Page 34

Chapter 2 Printer Operation
5 System Maintenance Mode
3. Change the media gap sensor voltage to the black mark sensor voltage with the FEED key
pressed.
4. Return to normal operating mode with the STOP key pressed.
33
Page 35

Chapter 2 Printer Operation
5 System Maintenance Mode
List of Mode Items
Note: When the printer is switched off and on, the initial values for these menu items selected by the
system maintenance mode will be retrieved from the flash memory.
34
Page 36

Chapter 2 Printer Operation
g
6 Returning to Factory Settin
6 Returning to Factory Setting
To return all the contents already made in the printer configuration setting mode or system
maintenance mode to the factory setting, proceed as follows:
First turn OFF the power switch, then press and hold the PAUSE, FEED and STOP keys
simultaneously and at the same time turn ON the power switch, and continue hol ding down tho se keys.
Factory setting
35
Page 37

Chapter 2 Printer Operation
36
Page 38

Chapter 3 Media and Ribbon
Chapter 3
Media and Ribbon
1 Kinds of Approved Media
2 Configuration of Approved Media
(When Using Front Sensors)
3 Configuration of Approved Media
(When Using Adjustable Sensor)
4 Media Setting
5 Kinds of Approved Ribbons
6 Ribbon Setting
37
Page 39

Chapter 3 Media and Ribbon
1 Kinds of Approved Media
1 Kinds of Approved Media
38
Page 40

Chapter 3 Media and Ribbon
2 Configuration of Approved Media (When Using Front Sensors)
2 Configuration of Approved Media
(When Using Front Sensors)
The front sensors consist of the transparent and reflective type photosensors that detect the position of
the labels or tags:
Transparent type photosensor: Detects gaps between labels and notches of tags.
Reflective type photosensor: Detects black marks.
Note: Make sure that the adjustable sensor is set to 'AJSensOF.' (See Chapter 2.)
• Dimensions of media
For gaps between labels, notches of tags (labels) and black marks, see the size of media below.
39
Page 41

Chapter 3 Media and Ribbon
3 Configuration of Approved Media (When Using Adjustable Sensor)
3 Configuration of Approved Media
(When Using Adjustable Sensor)
The adjustable sensor is the standard for CLP-7201e but it is the optional for CLP-7202e.
Make sure that the adjustable sensor is set to 'AJSensON.' (See Chapter 2.)
40
Page 42

Chapter 3 Media and Ribbon
g
4 Media Setting
The printer is designed to easily load media. Open the printer cover and set media in the
following:
1. Push down the open lever to open the printhead.
2. Push down the open guide lever to lift the open guide up.
4 Media Settin
3. Insert the roll holder with the roll guide in the core of roll media. Load this onto the media holder and
push against the left side wall and secure roll media.
CAUTION
Be careful of the edges of the plates so injury or property damage is possible.
41
Page 43

Chapter 3 Media and Ribbon
4 Media Setting
4. (1) Push media against the fixed media guide on the left side.
(2) Guide media positively with the movable media guide.
(3) Align the left top edge of media with the notch of the tearing plate.
5. Holding media so as to ensure it cannot skew, push down the open guide to close it.
6. Push down the green part of the push button to close the printer mechanism; at this time, continue
pushing until it clicks closed.
Note: Make sure the green part of the push button
is pressed properly. Otherwise, the printer
mechanism may fail to close.
7. Close the printer cover.
8. Turn ON the power switch of the printer. The LCD screen on the control panel will show 'On Line.'
Then press the FEED key and media will advance to the next label position and stop.
42
Page 44

5 Kinds of Approved Ribbons
s
Chapter 3 Media and Ribbon
5 Kinds of Approved Ribbon
43
Page 45

Chapter 3 Media and Ribbon
6 Ribbon Setting
6 Ribbon Setting
This printer is designed for easy ribbon loading. Open the printer cover and install the ribbon as
follows:
1. Push down the open lever to open the printhead.
2. Insert the ribbon shaft in the core of ribbon so that it is in its deepest position.
3. Set the ribbon holder on the transfer mechanism.
4. Pull the ribbon from under the transfer mechanism to the ribbon winding side.
CAUTION
Be careful of the edges of the plates so injury or property damage is possible.
44
Page 46

Chapter 3 Media and Ribbon
g
6 Ribbon Settin
5. Wind the ribbon being pulled out around the ribbon holder and fix it to the core with adhesive tape.
Set the ribbon holder on the transfer mechanism. Then turn its knob in the direction of arrow to
remove the slack or wrinkle of the ribbon. Also any slack or wrinkle of the ribbon must be removed
from the bottom of the transfer mechanism.
6. Push down the green part of the push button to close the printer mechanism until it clicks.
CAUTION
Make sure the green part of the push button is pressed properly. Otherwise, the printer
mechanism may fail to close.
7. Close the printer cover.
8. Turn ON the power switch of the printer. The LCD screen on the control panel will show 'On Line.'
Then press the FEED key and media will advance to the next label position and stop.
45
Page 47

Chapter 3 Media and Ribbon
46
Page 48

Chapter 4 Printer Adjustments
Chapter 4
Printer Adjustments
1 Use of Media Other Than
the Recommended (Printhead Offset
Adjustments - Media Thickness Adjustments)
2 Use of Narrow Media/Ribbons
(Printhead Pressure Adjustments)
3 Use of Narrow Media/Ribbons
(Ribbon Tension Adjustments)
4 Adjustable Sensor
(For CLP-7201e)
5 Cleaning
47
Page 49

Chapter 4 Printer Adjustments
1 Use of Media Other Than the Recommended (Printhead Offset Adjustments - Media Thickness Adjustments)
1 Use of Media Other Than the Recommended
(Printhead Offset Adjustments - Media Thickness Adjustments)
The printer is already factory-set to the requirements of proper print quality while using the
recommended labels. If the print quality is inferior because of the different type of media, adjust the
printhead offset in the following manner:
(a) When using standard
labels, or thermal media
(1) Looking in at the offset
check window, reset the
printhead offset so that it
comes to the center line
(middle of the three lines)
by turning the offset
adjustment screw with a
screwdriver.
Then turn the offset
adjustment screw two to
four times counterclockwise
with a screwdriver. (Factory
setting: two turns.)
(2) Make fine adjustments by
checking the self-test print.
(b) When using thick media
(tags or other media)
(1) Looking in at the offset
check window, reset the
printhead offset so that it
comes to the center line
(middle of the three lines)
by turning the offset
adjustment screw with a
screwdriver.
(2) Then turn the offset
adjustment screw two to
four times clockwise with a
screwdriver.
(3) Make fine adjustments by
checking the self-test print.
48
Page 50

Chapter 4 Printer Adjustments
2 Use of Narrow Media/Ribbons (Printhead Pressure Adjustments)
2 Use of Narrow Media/Ribbons
(Printhead Pressure Adjustments)
The printer is already factory-set to the value of media width: 112 mm (4.4 in). When you use narrow
media, adjust the printhead pressure in the following:
1. Looking in at the check window on the upper frame, align the mark (the left end of white plastic)
with the width of media by turning the printhead pressure adjustment knob. (The printhead must be
closed.)
2. Make fine adjustments by checking the self-test print.
(a) When the print on right side is too light:
Move the mark (white) to the right side by turning the printhead pressure adjustment knob
clockwise.
(b) When the print on the left side is too light:
Move the mark to the left side by turning the printhead pressure adjustment knob counterclockwise.
49
Page 51

Chapter 4 Printer Adjustments
3 Use of Narrow Media/Ribbons (Ribbon Tension Adjustments)
3 Use of Narrow Media/Ribbons
(Ribbon Tension Adjustments)
Ribbon tension of this printer is already adjusted to the recommended ink ribbon and media. Ribbon
and media, however, may slip du e to imperfect com bination of ink ribbon a nd media, where a message
'RibonOut' will be shown on the LCD display. To resolve this problem and obtain the optimum printing
condition, make adjustments in the following manner (this should be done after the printhead pressure
adjustments on the previous page are made):
1. Adjusting Places
2. Adjusting Method
(1) General ribbon and media
Factory setting: both marks on winding and
feeding sections are set to STANDARD so
as to obtain the optimum printing condition
for the recommended ink ribbon and
media.
50
Page 52

Chapter 4 Printer Adjustments
3 Use of Narrow Media/Ribbons (Ribbon Tension Adjustments)
(2) Easy-to-slip ribbon and media
If a message 'RibonOut' is shown, set the
mark on the feeding section to LOW by
turning the adjust-knob.
(3) Especially-easy-to-slip ribbon and
media
If a message 'RibonOut' is still shown,
although Step (2) has been performed, set
the mark on the feeding section to SUPER
LOW by turning the adjust-knob.
(4) When ribbon is broken during
printing
Ribbon may be broken if it is narrow in width
and printhead heat temperature is high. In
that case, set the mark on the feeding
section to SUPER LOW and set the mark on
the winding section to LOW by turning the
adjust-knob and adjust-screw respectively.
Note: If the problem is still not resolved,
please contact our service personnel.
51
Page 53

Chapter 4 Printer Adjustments
4 Adjustable Sensor (For CLP-7201e)
4 Adjustable Sensor (For CLP-7201e)
Note: The adjustable sensor is optional for CLP-7202e.
Operating procedure
1. Measure your required detection position beforehand, using the scale on the upper guide rail. Move
the adjustable sensor to the required detection position by tuning the adjustable kno b; it is useful to
align the mark (yellow) on the top of the adjustable sensor with the scale showing the required
detection position.
For the movable range of the adjustable sensor , see figure below.
2. Set media with liner. Then close the upper guide rail and set the voltage to 3V.
Note: For voltage setting, see Section 5 System Maintenance Mode, Chapter 2.
52
Page 54

Chapter 4 Printer Adjustments
g
5 Cleanin
5 Cleaning
Wipe off any foreign matter such as ribbon or media dust, dirt and adhesive substa nces built up around
the printhead, ribbon guide roller, platen etc with the accessory thermal head cleaner or a soft cloth
soaked in ethyl alcohol. It is particularly important to clean the printhead af ter printing on thermal medi a
for long periods, which will guarantee the print quality and extend the life of the printhead.
Note: Always use the thermal head cleaner when cleaning the printhead.
CAUTION
Do not use any solvent other than ethyl alcohol. Solvents such as benzene, acetone and
thinner will dissolve plastic parts and destroy the printhead, platen and much of the printer!
53
Page 55

Chapter 4 Printer Adjustments
54
Page 56

Chapter 5 Troubleshooting
Chapter 5
Troubleshooting
1 Error Messages
2 Power Troubleshooting
3 Media Feed Troubleshooting
4 Ribbon Feed Troubleshooting
5 Print Troubleshooting
6 Interface Troubleshooting
55
Page 57

Chapter 5 Troubleshooting
1 Error Messages
1 Error Messages
When there is a problem with the printer:
- A buzzer sounds.
- The error indicator lights up.
- An error message is shown on the LCD screen.
Errors and corrective actions are shown below.
1 Errors indications
56
Page 58

s
2 Errors and corrective actions
Chapter 5 Troubleshooting
1 Error Message
57
Page 59

Chapter 5 Troubleshooting
1 Error Messages
58
Page 60

Chapter 5 Troubleshooting
s
1 Error Message
59
Page 61

Chapter 5 Troubleshooting
2 Power Troubleshooting
2 Power Troubleshooting
60
Page 62

3 Media Feed Troubleshooting
g
Chapter 5 Troubleshooting
3 Media Feed Troubleshootin
61
Page 63

Chapter 5 Troubleshooting
4 Ribbon Feed Troubleshooting
4 Ribbon Feed Troubleshooting
62
Page 64

5 Print Troubleshooting
g
Chapter 5 Troubleshooting
5 Print Troubleshootin
63
Page 65

Chapter 5 Troubleshooting
6 Interface Troubleshooting
6 Interface Troubleshooting
64
Page 66

Appendixes
Appendixes
1 Options
2 Specifications
65
Page 67

Appendixes
1 Options
1 Options
z Factory and dealer (reseller) options
66
Page 68

s
z User options
Note: Some versions of this printer have flash memory installed on the main PCB as standard.
You may not need to use a PCMCIA card in this case. Please contact the dealer from where
you purchased the printer for further details.
Appendixes
1 Option
Installation
1. Turn OFF the power switch of the printer.
2. Remove the PCMCIA memory card cover at the bottom of the printer (see figure).
3. Insert the memory card.
4. Replace the PCMCIA memory card cover.
CAUTION
• Before use, carefully read and understand the instructions regarding the PCMCIA memory card.
• Do not insert or remove the PCACIA memory card before the power to the printer is turned off.
• Always close the PCMCIA memory card cover to keep out foreign matter such as particles of
dust.
• If the PCMCIA memory card write failure occurs, check it with the test command (STX.w).
67
Page 69

Appendixes
2 Specifications
2 Specifications
z Main Specifications
68
Page 70

Appendixes
s
2 Specification
69
Page 71

Appendixes
2 Specifications
70
Page 72

Appendixes
s
2 Specification
z Interfaces
The printer is connected to a computer and prints l abels a ccording t o the comma nd from th e computer.
Two systems of interface connection to a computer are shown below.
1. Serial interface: RS-232C
2. Parallel interface: IEEE1284 compatible and nibble modes
71
Page 73

Appendixes
2 Specifications
3. USB Interface
USB Interface
Specifications USB1.1
4. RS-232C loopback test
After connector wiring as shown in the figure, place the printer into self-test mode. The printer will
receive data that has been transmitted by printer itself and the test of receiving and transmitting data
will be performed.
72
Page 74

Appendixes
s
2 Specification
5. RS-232C protocol
(1) X-ON/X-OFF system (see figure)
This is a control system in which the data transmitting request signal (X-ON (11H) code) and the data
transmitting stop signal (X-OFF (13H) code) are output.
Requirements of output of X-ON code:
• When the power is switched to ON.
• When the receive buffer has less than 2K bytes available, the X-OFF code is output, and the receive
buffer has at least 4K bytes available.
Requirements of output of X-OFF code:
• When the receive buffer has less than 2K bytes available.
Note: Even if each code is ready for output, the same code will not be transmitted twice successively
(except when the power is turned on or the printer is reset from the control panel).
(2) Ready/Busy system (see figure)
This is a control system in which the DTR is output at Ready (High) or Busy (Low) level. The DTR,
however, is always output at Ready (High) level except the following:
Requirements of output of DTR 'Low':
• When the receive buffer has less than 2K bytes available. When this condition is detected, the
printer keeps a 'Low' level until the receive buffer has at least 4K bytes available.
73
Page 75

Appendixes
2 Specifications
6. Interface pin assignment
The serial and parallel pin assignment tables are shown below.
Serial interface pin assignment table
74
Page 76

s
Parallel interface pin assignment table
Appendixes
2 Specification
75
Page 77

Appendixes
2 Specifications
z Example of Connection to a Computer
When RS-232C is used:
(IBM PC compatible)
Communication control: XON/XOFF or CTS/DTR
76
Page 78

Appendixes
s
2 Specification
z Tear-Off Function
The tear-off function eliminates the waste of labels when tearing manually. It allows media to
automatically advance to the tear position after printing.
When this function is turned on, media will be fed to the manual tear position after printing. The printer
will feed back media to the start print position when the next print job is sent.
If data is transmitted continuously from the computer, the tear-off function will be suppressed to
increase throughput.
1. Turning Tear ON/OFF
Tear can be turned to ON or OFF from the control panel. Default is OFF.
Indications on the control panel are as follows
LCD screen
Tear-off invalid Tear-off valid
'NoAction' 'TearBar'
77
Page 79

Appendixes
2 Specifications
2. Tear-off when printing
• If set, the tear-off feature will start if no dat a is tran smitted from the computer af te r printing. If dat a i s
transmitted continuously from the computer, the tear-off function will be suppressed. Tear-off is only
performed for the final label of each batch processing. (The tear-off is not performed until the
specified number of print sheets is completed.)
• Media is fed to the tear position
• When manual tearing is needed, tear the label at this time.
• Performs next label printing.
When next print data is transmitted form the computer, the printer feeds back media to the previous
print completed position and resumes printing.
78
Page 80

s
3. Tear-off when feeding
• Media are fed to the tear position.
Appendixes
2 Specification
• When the manual tearing is needed, tear the label at this time.
• Perform next feeding or label printing.
If the Feed key is pressed or next print data is transmitted from the computer, the printer will feed
back media to the previous print completed position and resume feeding or printing.
79
Page 81

Appendixes
2 Specifications
z Cut Position Adjustments
• The cut position can be specified with the 'fnnn' of the system-level commands. When the tear-off
function is turned on, the following initialization value is set in the printer.
Initialization value: fnnn = f735 (73.5 mm)
The values higher or lower will increase or decrease the amount of feed in the tear-off.
• Parameter initialization values
Initialization values of print and feed positions by each operating mode are described below.
If values lower than the minimum values are set, the initialization values will be set instead. (When
the virtual distance between the print and feed positions' mode is on.)
80
Page 82

Page 83

363 Van Ness Way, Suite 404
Torrance, CA 90501. USA
Tel: (310) 781-1460
Fax: (310) 781-9152
http://www.citizen-systems.com
Mettinger Strasse 11 Park House, 643-651 Staines Road
D-73728, Esslingen Feltham, Middlesex, TW14 8PA
Germany United Kingdom
Tel: +49 (0) 711 3906 420 Tel: +44 (0) 20 8893 1900
Fax: +49 (0) 711 3906 405 Fax: +44 (0) 20 8893 0080
http://www.citizen-europe.com
6-1-12, Tanashi-cho, Nishi-Tokyo-shi
Tokyo, 188-8511. Japan
Tel: +81 (0) 42 468 4608
Fax: +81 (0) 42 468 4996
http://www.citizen-systems.co.jp
JE99716-51F
(70904036)
BT6012-1102
Printed in Japan
 Loading...