

Page 1

User’s Manual
English
1
Page 2

Contents
Product Warranty ............................................................................................................................. 4
English
User Safety Instructions ................................................................................................................. 5
Introduction ...................................................................................................................................... 6
About This Printer Manual .............................................................................................................. 6
What to do if you have problems .................................................................................................... 7
For the latest information ................................................................................................................ 7
Chapter 1 - Installation and setup for first use .......................................................................... 8
Unpacking........................................................................................................................................ 8
Installing the Platten Knob ............................................................................................................. 8
Parts of the Printer ........................................................................................................................... 9
Connecting to a Computer ........................................................................................................... 10
Installing Ribbon Cassette .......................................................................................................... 11
Chapter 2 - Paper Handling ......................................................................................................... 12
Paper Head Gap Adjustment ....................................................................................................... 12
Paper Feed Selection - Paper Source ......................................................................................... 13
Fanfold Paper (Rear Tractor Mode) ............................................................................................. 13
Fanfold Paper (Bottom Tractor Mode) ......................................................................................... 14
Single Sheets and Envelopes (Friction Mode) ........................................................................... 16
Tearing Off Paper .......................................................................................................................... 17
Chapter 3 - The Control Panel Keys ........................................................................................... 18
Selecting a Character Font ........................................................................................................... 18
Selecting a Character Pitch .......................................................................................................... 19
High Speed Draft Mode ................................................................................................................. 19
Quiet Mode ..................................................................................................................................... 20
Line Feed / Form Feed (LF/FF) .................................................................................................... 20
Top Of Form ................................................................................................................................... 20
Micro Line Feed and Reverse Micro Line Feed .......................................................................... 20
Saving Top Of Form....................................................................................................................... 21
Paper Parking (LOAD/PARK) ........................................................................................................ 21
Chapter 4 - Initial Setup Mode..................................................................................................... 22
Factory Initialisation ...................................................................................................................... 22
Entering Initial Setup Mode .......................................................................................................... 22
Interface Setup Mode (Parallel and Serial) ................................................................................. 24
Chaper 5 - Driver Installation ...................................................................................................... 25
Setting Up Your Printer To Work With Your Software .................................................................. 25
Microsoft® Windows
IBM PCs Or Compatibles ............................................................................................................. 25
Choosing A Suitable Emulation ................................................................................................... 25
Windows 95 Driver Installation .................................................................................................... 26
Windows 98 Driver Installation .................................................................................................... 26
Manually Installing a Windows 95 or 98 Driver. .......................................................................... 26
2
®
................................................................................................................................................................................................... 25
Page 3

Windows NT4 Driver Installation ................................................................................................. 27
Window NT4 Single User ............................................................................................................. 27
Windows NT4 in the Network Environment ................................................................................ 27
Chapter 6 - Maintenance and Troubleshooting ........................................................................ 28
Printer Self Test ............................................................................................................................. 28
Periodic Maintenance ................................................................................................................... 28
Troubleshooting Guide .................................................................................................................28
Chapter 7 - Specifications .......................................................................................................... 30
Printer Specificaitons .................................................................................................................... 30
Paper Specifications ..................................................................................................................... 31
Fanfold Paper ................................................................................................................................ 31
Continuous Labels ....................................................................................................................... 31
Single Sheet .................................................................................................................................. 31
Envelopes ...................................................................................................................................... 31
Printing Area ................................................................................................................................... 32
English
3
Page 4

Product Warranty
This product is covered by Citizen’s warranty for manufacturing defects. Please note that items
regarded as consumables, for example ribbons, where faults develop due to normal opera-
English
tional wear are not included. To obtain service under this warranty please return the product in
its original packaging to your supplier along with your purchase receipt.
The Citizen warranty is additional to your normal consumers rights.
Trademark Acknowledgements
Citizen: Citizen Watch Co. Ltd. Japan, Citizen Systems Europe GmbH
Epson EX, FX, LQ: Seiko Epson Corporation
IBM Personal Computer, IBM PC, IBM Proprinter:
International Business Machines Corporation
Microsoft, Windows: Microsoft Corporation
OKI: Oki Electric Industry Co. Ltd.
All other trademarks are acknowledged.
All rights reserved. No part of this publication may be reproduced, stored in a retrieval system or
transmitted in any form or by any mean, mechanical, photocopying, recording or otherwise,
without the prior written permission of Citizen Systems Europe. No liability is assumed with
respect to the use of the information contained herein. While every precaution has been taken
in the preparation of this manual, Citizen Systems Europe assumes no responsibility for errors
or omissions. Neither is any liability assumed for any damages resulting from the use of the
information contained herein.
Copyright 2000 © Citizen Systems Europe
http://www.citizen-europe.com
4
Page 5

User Safety Instructions
1 Read all the enclosed unpacking and operating instructions and keep them for future
reference.
2 Follow all warnings and instructions marked on the product.
3 Do not use liquid or aerosol cleaners. Use a damp cloth with a small amount of detergent
to remove marks from the covers. For more persistent marks refer to your dealer for a
suitable cleaner.
4 Do not use this product near water. Switch the product off immediately if liquid is spilt
into it or if it has been exposed to rain or water.
5 The slots and openings on the product are provided for ventilation. To ensure reliable
operation of the product and to protect it from overheating, observe the following:
• Do not block or cover the ventilation openings
• Do not operate the product on a surface such as a bed, sofa or blanket as this may block
the openings and lead to overheating
• Do not operate the product on or near a radiator or similar heat source
• Do not enclose the product within an enclosure such as an acoustic hood without providing proper ventilation
6 Never push objects of any sort through the openings in the cover as they may touch
dangerous voltage points or short out parts which may result in a fire risk or an electric
shock.
7 Ensure that the local power supply is 220-240V at 50 Hz standards. If you are in any
doubt contact your dealer or a registered electrician.
8 Ensure that the power cable supplied with your printer matches the power cables of your
other computer equipment. If it does not, please contact your dealer or a registered
electrician.
9 Do not allow anything to rest on the power cable and do not position the product where
the power cable may be walked on.
10 Except as explained elsewhere in this manual, do not attempt to service the product
yourself. Opening or removing the covers may expose you to dangerous voltage points
or other risks and may invalidate your warranty. Refer all servicing to registered service
personnel. .
11 The mains plug on this equipment must always be used to disconnect the mains power
for servicing or repair. Please ensure that the socket outlet is installed near the equipment and is easily accessible.
12 Unplug this product from the power supply and refer servicing to registered personnel if:
• The power cable or plug is damaged or frayed
• The product has been exposed to rain or water or if liquid has been spilt into it
• The product has been dropped or the cabinet damaged
• The product exhibits a distinct change in performance, indicating a need for service
English
Warning: Attempts to service the printer yourself can be extremely dangerous and may also
further damage and invalidate the warranty.
Det matande vägguttaget skall placerat nära apparaten och vara lattátkomligt.
Stikkontakten skal placeres per apparatet og vare lettilgzngeligt.
5
Page 6

Introduction
Thank you for purchasing this Citizen printer - you have made the right decision.
English
Citizen ranks amongst the top European printer manufacturers, producing innovative, high
quality printers backed by a worldwide organisation renowned for its reliable, precision engineered products.
About This Printer Manual
Chapter 1 tells you how to unpack and assemble your printer.
Chapter 2 describes the various paper handling facilities of the printer.
Chapter 3 describes the control panel and its functions.
Chapter 4 deals with the configuration of the initial settings of the printer.
Chapter 5 explains the installation of the driver software and using the printer with your applica-
tions and software.
Chapter 6 covers routine maintenance procedures and fault-finding, helping you to solve
common printer problems.
Chapter 7 details the full technical specifications of your printer.
We think you’ll find the manual and the printer functional and easy to use, but we will always be
glad to hear your comments so that we can improve our product where necessary.
6
Page 7

What to do if you have problems
If you have any problems with your printer or require assistance in setting it up with your software we advise you to do the following:-
• Read Chapter 6 of this user manual
• Read the software driver documentation (if applicable)
• Contact your local dealer from whom you purchased the printer.
• Please visit our web site and take a look at the technical support pages. Details of this
are shown below
For the latest information
http://www.citizen-europe.com
Our web site contains the latest information on all our products. This will include updates
printer drivers, details of codepages currently supported by our printers and a comprehensive
FAQ (frequently asked questions) list.
In addition, there is a full distributor directory giving you details of a supplier nearest to you
and also details of suitable e-mail addresses or web sites that can provide and answer to your
enquiry.
English
7
Page 8
Chapter 1 - Installation and setup for first use
Unpacking
English
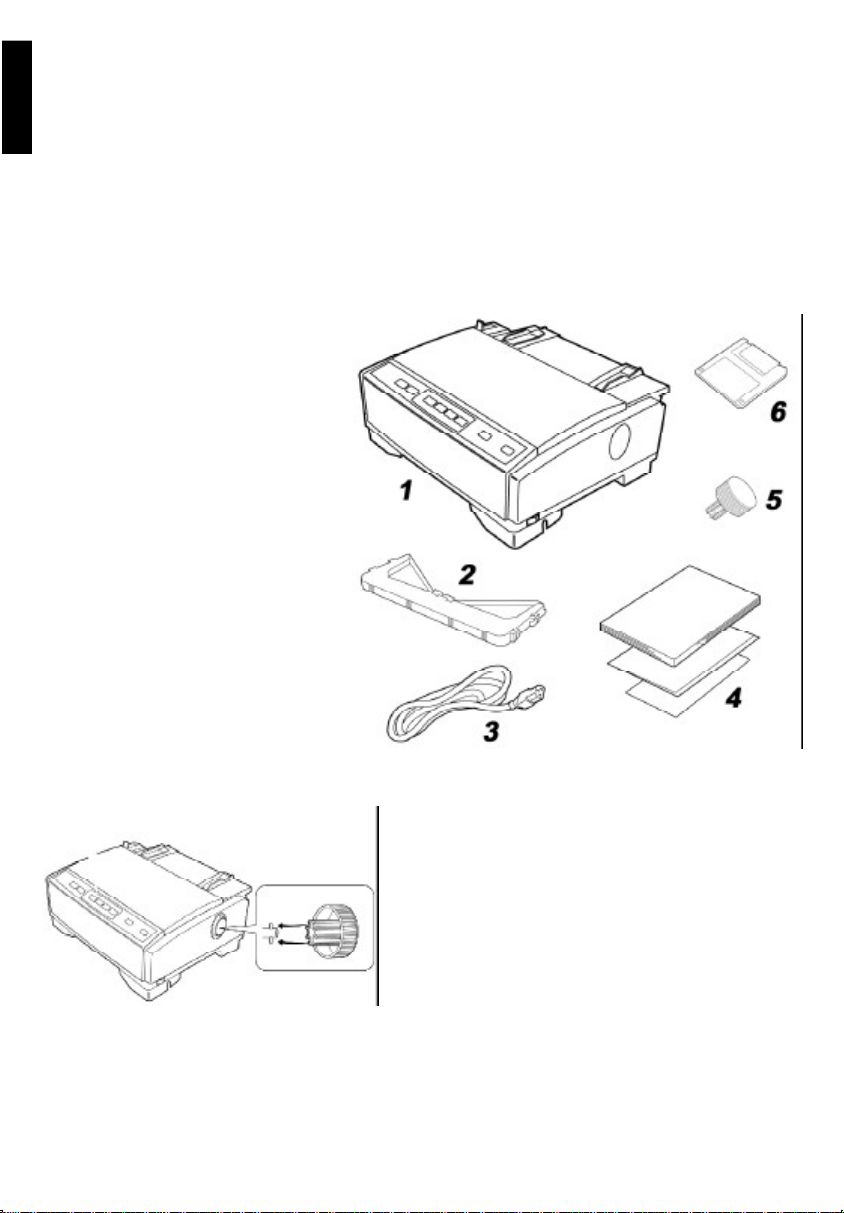
Having unpacked the printer, make sure none of the contents shown below are missing or
damaged. Report damages or shortages to the store from which the unit was purchased.
Please remember to save the original carton and packing materials for future shipping and
transporting of the unit. They have been specifically designed to protect the equipment during
shipment.
The disk supplied with the printer
contains printer drivers for PC compatible computers running
Microsoft® Windows® 95, 98 or NT4.
If the you need a driver for an alternative operating system or an update to the driver supplied, please
refer to the section of the manual titled “For the latest information”.
1 Printer
2 Ribbon Cassette
3 Power Cord
4 User Documentation
5 Platen Knob
6 Software Diskette
8
Installing the Platen Knob
After unpacking the printer, you must remove the
sticky tape that holds the rear paper guides secure during transit. Additionally, the platen knob,
which is packaged separately, must be installed
on the right side of the printer. Please refer to the
adjacent diagram.
Page 9
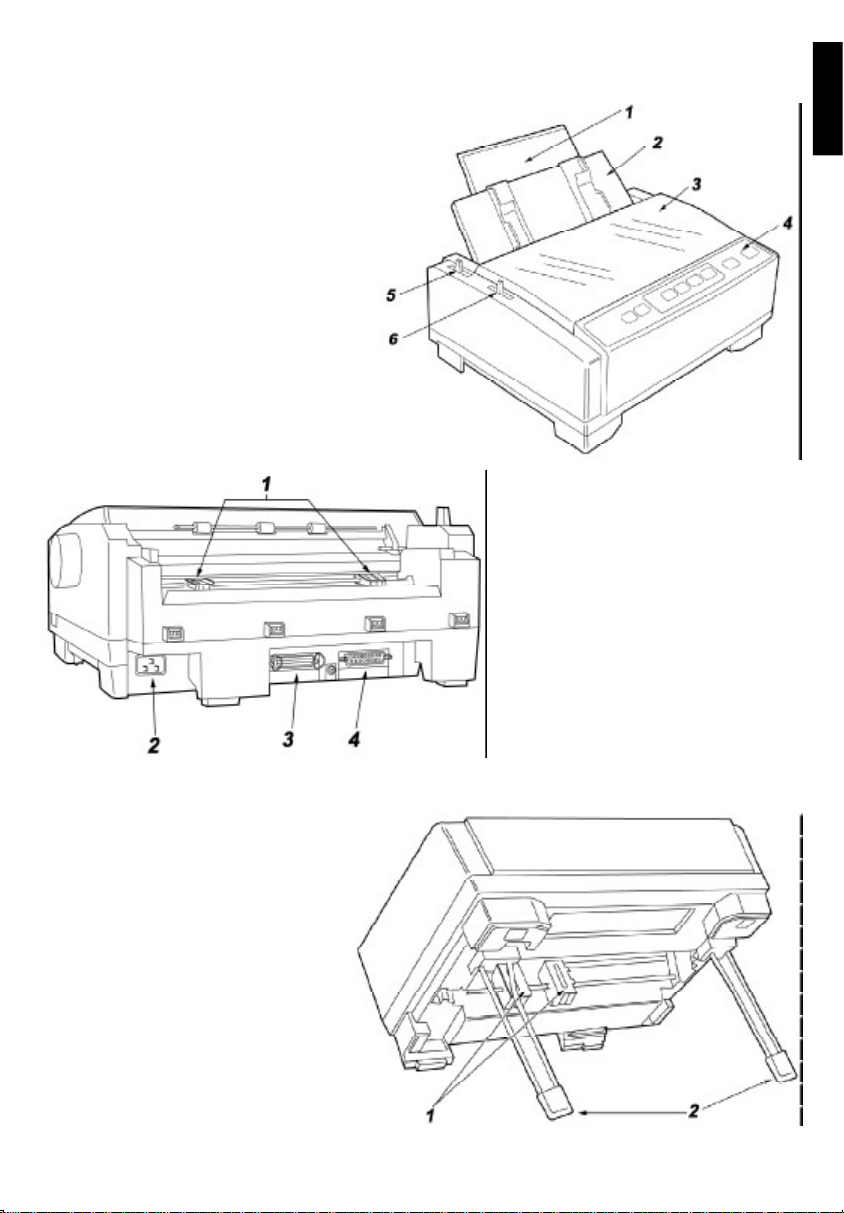
Parts of the Printer
Front View
1 Paper support
2 Top cover
3 Smoked upper cover
4 Control panel
5 Paper feed selector
6 Head gap lever
English
Rear View
1 Rear tractors
2 AC Power inlet
3 Parallel interface
Bottom View
1 Lower push tractors
2 Paper stands
4 Serial Interface
9
Page 10
Connecting to a Computer
We recommend that you disconnect your printer from the mains and switch of any computers
before attaching your printer to a computer system.
English
Refer to your computer’s manual for details and locations for connection to the printer port on
your system and install the cable on to the computer system.
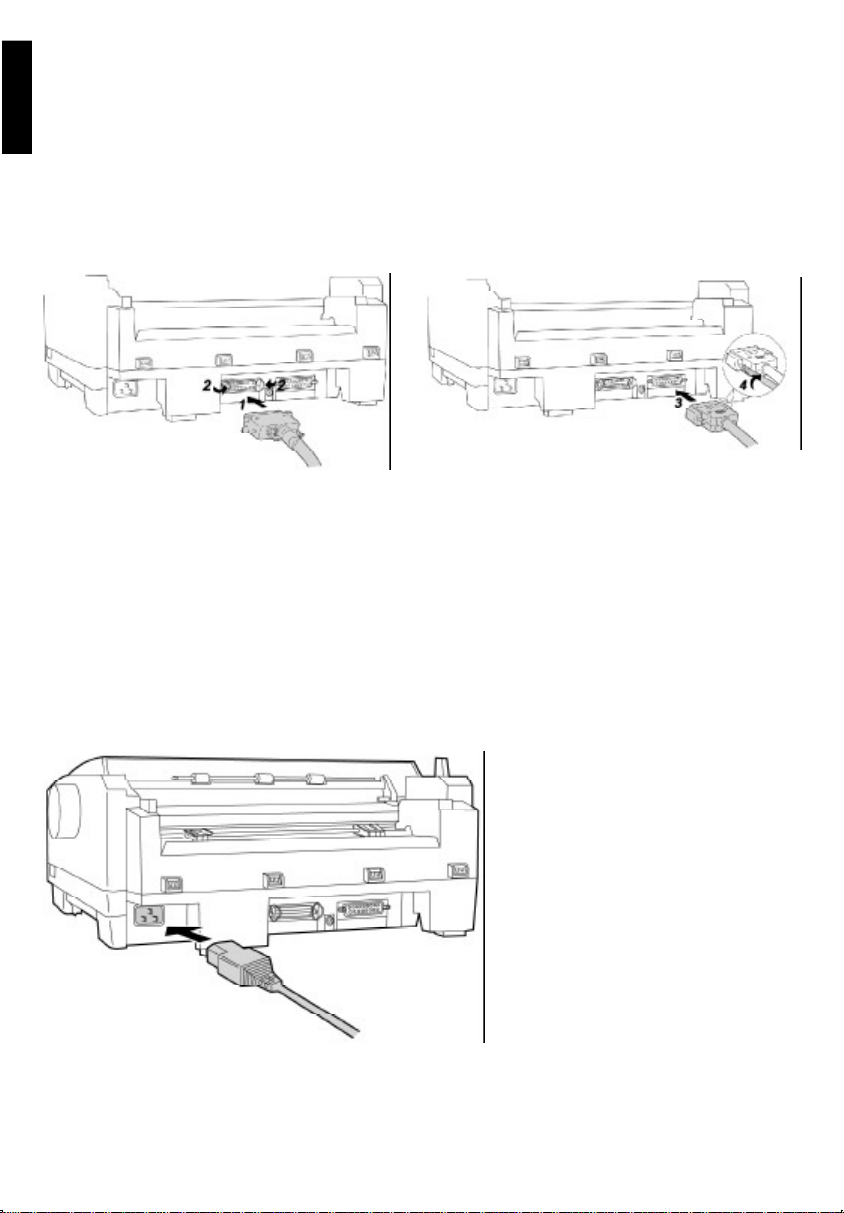
Attach the other end of the cable to the printer as follows:
Connection can be made to the parallel port (1 & 2) or the serial port (3 & 4) or to both ports at
the same time.
Take care not to drop the printer if you slant the printer to connect the cable. Use a shielded
cable 2 m or less in length for both of parallel and serial.
If you do not already have an interface cable, you will need to purchase one from your local
computer store or dealer. If the cable has a frame ground wire, connect it to the frame ground
terminal between the parallel and serial interfaces.
Connect the power cord firmly into the
printer’s power connector plug. Plug
the power cord into a grounded 3prong AC socket.
Take care not to drop the printer if you
slant the printer to connect the power
cord.
If the printer is not going to be used
for an extended period, unplug the
power cord. Insert the plug completely, otherwise it may become hot.
10
Page 11

Installing Ribbon Cassette
This is the same procedure for installing a replacement ribbon cassette as for installing the
ribbon for the first use. Removal of a used ribbon cassette is the reverse of the process detailed
below.
Turn the power on (1) and the carriage will automatically
move to the centre of the printer.
Open the smoked plastic cover (2) by holding the tabs on
the both sides.
Move the head gap lever (3) to position 7.
Lift the roller cover (2) before starting to install the ribbon
Insert the ribbon cassette (3) in to the printer and push
down on the 4 arrows (1) until they click into place.
English
Lift the blue ribbon guide from the “storage” position (1) on the
ribbon cassette.
Slide the blue ribbon guide (4) between the printhead nose (5)
and the platen, and push it down as shown in item (2). It
should click in to place in the ribbon guide holder (6).
Warning: if the printer has previously been used for recent
printing, the top of the printhead (3) may be extremely hot and
you should avoid touching the surface.
Make sure the ribbon is not twisted and rotate the
knob to remove any slack. Close the pull up roller
cover, then the smoked plastic cover.
Adjust the head gap lever for the thickness of paper
you are using. (See the paper handling section,
later in the manual.)
11
Page 12

Chapter 2 - Paper Handling
Your printer has three paper feed choices:
English
Rear Tractor Mode
Fanfold Paper
Friction Feed Mode
Cut Sheets
Single Sheets
Envelopes
Bottom Tractor Mode
Fanfold Paper
Continuous Labels
Paper Head Gap Adjustment
There are seven settings on the paper gap adjustment lever on the left of the printer.
Positions 1 - 2 are for regular, thinner paper
Positions 3 - 5 are for thicker, multi-copy stationary
Positions 6 - 7 are for the thickest multi-part paper.
12
Note: When using bottom feed mode, do
not feed the paper from the front of the
printer.
Allow enough space between the stack of
paper and the bottom of the printer to ensure smooth operation. If the paper stand
doesn’t have enough height, it is recommended to place the paper in front of the
printer.
Page 13

Paper Feed Selection - Paper Source
There are three settings on the paper feed
selector level on the rear-left of the printer:
1 Rear Tractor Mode: Fanfold tractor paper from the rear tractor feeder unit.
2 Friction Feed Mode: Cut sheet paper
from the top sheet guide
3 Bottom Tractor Mode: Fanfold tractor
paper from the bottom tractor feeder unit.
Fanfold Paper (Rear Tractor Mode)
Turn the power on and the PAPER OUT indicator will flash indicating that no paper is installed
in the printer.
Adjust the head gap lever for the thickness of paper that you are
using, then set the paper feed selector to the rear tractor mode
position.
Then lift off the top cover at the rear of the printer to expose the
rear tractor guides
English
Unlock the tractors by pulling the tractor clamping levers (1) forward. Slide the tractors to accommodate
the width of paper being used (2).
Lift the tractor covers (3) to expose the sprocket holes
with the tractor pins
Align the paper on the sprocket holes then close the
tractor covers
Adjust the tractors to remove any slack on the paper
and then lock the tractor clamping levers once again.
13
Page 14

Press the LOAD/PARK key on the front panel to load
English
Slide the paper support upwards until it stops to provide
additional guidance and separation of the inbound and
outbound paper.
If the ON LINE indicator light is not lit, press the ON LINE
key to ensure the printer is ready to print.
the paper in to the printer. The paper will stop at the
first line of printing, or “top of form”.
Insert the top cover again and raise it to the upright
position.
This is done by inserting the side pins of the top
cover into the slots in the upper case.
Fanfold Paper (Bottom Tractor Mode)
Turn the power off to the printer. Adjust the head gap lever for the thickness of paper that you are
using, then set the paper feed selector to the bottom tractor mode position.
While lifting up the printer on its back edge, pull out the
paper stand shafts (1) and lock them in the forward
position.
The pull tractors are
shown in (2)
Unlock the pull tractors by pushing the tractor clamping levers (1) upwards.
Slide the tractors (2) to approximate width of paper. The
plastic rib (3) moulded in to the lower case will give you an
indication of the left-most print position.
14
Page 15

Re-lock the tractor clamping levers
While holding the printer up, fold up the printer
stand shafts and place unit on a stable work
surface with the paper suitably stacked.
Turn the power to the printer on and the PAPER
OUT indicator will flash indicating that there is
no paper installed in the printer.
Press the LOAD/PARK key on the front panel to load
the paper in to the printer. The paper will stop at the
first line of printing, or “top of form”.
Adjust the tractors (1) to the correct width of
paper and ensure the sprocket holes in the
paper match with the tractor pins (2).
Close the tractor covers back down on to
the paper and adjust the tractors to ensure
any slack in the paper is taken up.
English
Insert the top cover again and raise it to the upright
position.
This is done by inserting the side pins of the top
cover into the slots in the upper case.
If the ON LINE indicator light is not lit, press the ON
LINE key to ensure the printer is ready to print.
15
Page 16

Single Sheets and Envelopes (Friction Mode)
Turn the power on and the PAPER OUT indicator will flash indicating that no paper is installed
English
in the printer.
Adjust the head gap lever for the thickness of paper
that you are using, then set the paper feed selector
to friction mode position.
Insert the top cover and raise it to the upright position.
This is done by inserting the side pins of the top
cover into the slots in the upper case.
Slide the paper support upwards until it stops to provide
additional support for the sheets or paper or envelopes.
Separate the paper guides (1) to the approximate width
of your paper or envelope.
Insert a sheet of paper (2) through the paper guides.
The paper will be automatically loaded to the first print
line.
If the ON LINE indicator light is not lit, press the ON LINE
key to ensure the printer is ready to print.
To disable the AUTO LOADING option, you will need to use the control panel configuration
system. Please refer to the details later in this manual
16
Page 17

Tearing Off Paper
With fanfold paper installed, this function allows you to advance your paper to the “tear off”
position.
Press the TEAR OFF button (1) once to advance the
paper to the tear position.
Tear off the page using the top cover as a cutter.
After tearing off the page you can return your paper to the
first printer line by pressing TEAR OFF button (1) again.
If the TEAR OFF button is not pressed a second time,
the printer will automatically reverse to the first print line
upon receiving data from the computer and start printing
from this position.
English
17
Page 18

Chapter 3 - The Control Panel Keys
English
The printer’s control panel allows you to change many different settings including the font size,
character pitch as well as paper loading and movement.
In addition, the control panel allows you to make adjustments to the start-up settings of the
printers such as the character languages available and the general operation of the printer.
This chapter will explain how to take advantage of these printer functions.
Selecting a Character Font
This printer contains resident fonts which are accessible through the Control Panel. You can
select any one of the character fonts by pressing the FONT button on the Control Panel.
This information is
printed on the control panel and is for
reference only
When the HIGH SPEED DRAFT function is enabled (using the button to the left of the control
panel), only Draft font can be selected.
The two indicator lights
illuminate or blink according to the settings of
the printer
Each time the FONT button is pressed, the printer will select the
next available font from the list.
The combination of FONT indicators lights shows the
current character font selected, as shown on the
Control Panel.
You must be in PROGRAM (both FONT indicators are off) to allow your software to control your
font selection. If any one of the font lights are lit, then the printer will remain locked in this font.
18
Page 19

Selecting a Character Pitch
This printer contains resident pitches which are accessible through the Control Panel. You can
select any one of the character pitches by pressing the PITCH button on the Control Panel.
This information is
printed on the control panel and is for
reference only
The two indicator lights
illuminate or blink according to the settings of
the printer
Each time the PITCH button is pressed, the printer will select the
next available font size from the list.
The combination of PITCH indicators lights shows the
current character size selected, as shown on the
Control Panel.
English
When the HIGH SPEED DRAFT function is enabled (using the button to the left of the control
panel), only Program, 10 cpi and 12 cpi fonts can be selected.
You must be in PROGRAM (both PITCH indicators are off) to allow your software to control your
font size. If any one of the pitch lights are lit, then the printer will remain locked in this size of
character printing.
High Speed Draft Mode
This printer contains the built-in High Speed Draft font which are accessible through the Control
Panel by pressing the HI-SPEED DRAFT button.
Each time the button is pressed, it will enable or disable the high speed draft mode. If the
indicator is lit, the printer is running at the higher speed.
Please note that when enabled, this feature will lower the print density.
19
Page 20

Quiet Mode
The Quiet mode is a useful feature for further reducing print noise.
English
Each time the button is pressed, it will enable or disable the quiet mode. If the indicator is lit, the
printer is running more quietly than in standard mode.
Please note that when enabled, this feature will lower the print speed.
Line Feed / Form Feed (LF/FF)
When the printer is OFF LINE, you can adjust the paper’s position using the LF/FF key.
When pressing LF/FF, the amount of paper which is fed is determined by the current setting for
lines per inch and page length as specified by the control panel (Initial Setup mode) or your
application software.
With paper installed, pressing LF/FF once advances the paper one line.
With paper installed, holding LF/FF moves the printhead to the centre and advances the paper
to the top of the next page.
Top Of Form
This printer has a Top of Form (TOF) function which stores the first print line position and loads
the paper to the designated position automatically. The first print line position will be stored
even after the power is turned off.
You can adjust the Top of Form position using the Micro Line Feed or Reverse Micro Line Feed
function from the Control Panel.
Do not rotate the platen knob, otherwise the printer will not be able to count the number of lines
properly.
All adjustments must be made on the first sheet of paper. If you decide to change the setting and
save it, remove the paper from the tractors, then reset and reload the paper.
If necessary, redefine the page length of the paper you are using through the Control Panel or
your application software.
Micro Line Feed and Reverse Micro Line Feed
To feed the paper forward or up:
While pressing and holding down the ON LINE button, press the TEAR OFF button. This
advances the paper UP one micro line of 0.12 mm. This is also indicated by the “TOF SET”
markings on the control panel.
20
Page 21

To feed the paper backwards or down:
While pressing the ON LINE button, press the LOAD/PARK button. This reverses the paper
DOWN one micro line 0.12 mm. This is also indicated by the “TOF SET” markings on the
control panel.
The printer cannot reverse the paper past the “printable area”
Saving Top Of Form
At your desired position within 125 mm (5”) from the top of your paper, release the switches.
The paper position will be stored automatically as the new Top of Form position.
Paper Parking (LOAD/PARK)
This function moves the fanfold paper to the park position, enabling you to use single sheets or
envelopes without removing or wasting your fanfold paper.
Tear off the printed page(s) of the fanfold paper being used
Press LOAD/PARK to reverse the fanfold paper to the park position.
Move the paper feed selector to the friction mode.
Load single sheets or envelopes in to the printer.
English
When you have finished printing, remove the sheet (or envelope) from the printer.
Move the paper feed selector to tractor mode position for either rear or bottom feeding.
Press LOAD/PARK to reload the fanfold paper to the first print line.
21
Page 22

Chapter 4 - Initial Setup Mode
Many of the functions and settings of the printer can be set in the Initial Setup Mode, through the
control panel.
English
These settings are stored in the printer and will be remembered when the printer is switched
off. This can include settings such as the standard page length, the language or character set
used, etc.
Details of these options are shown in the following section. You can also reset the printer to its
factory settings using the Factory Initialisation function.
Factory Initialisation
To return all current settings to the standard “factory settings”, follow the steps below.
- While pressing LOAD/PARK , turn the power on, then release.
- Press TEAR OFF .
- Press LOAD/PARK to exit the Initial Setup mode.
Entering Initial Setup Mode
With the printer switched ON, load a sheet of paper. Then turn the printer off.
While pressing LOAD/PARK, turn the power on to enter the Initial Setup mode. When you
release the LOAD/PARK key, the current printer settings will be printed automatically.
The QUIET indicator, POWER indicator, ON LINE indicator and FONT indicators will be blinking.
Press and release the FONT button (5) and / or ON LINE (4) to select the item.
Each time you press FONT and/or ON LINE, you will advance to the next item.
22
Page 23

1. Select the desired item according to the status of the ON LINE (1) and FONT (2) indicators
(on, off, blinking) by referring to the following table or to the printout produced by the printer.
2. Press and release the PITCH button (6) to set the item’s status. The item’s status will
change each time you press the PITCH button. The status of the item is shown by the pitch
indicators (3) will be either on, off or blinking. By referring to the following table or to the printout
produced by the printer the status can be selected.
To change additional settings, repeat steps 1 and 2 above for each item required.
Press LOAD/PARK to exit the Initial Setup mode. The FONT indicator will go off and the current
conditions will print.
English
23
Page 24

*1
Depending on the Emulation, different characters sets are available:
EPSON emulation: Italic, Graphic 1 or Graphic 2
IBM emulation: Graphic 1 or Graphic 2
English
OKI emulation: Standard, Line G or Block G
*2
If the current Country or Code Page setting is not a setting available from the control panel but
throught software selection then both PITCH indicators will blink.
Interface Setup Mode (Parallel and Serial)
With the printer switched ON, load a sheet of paper. Then turn the printer off.
While pressing the PITCH button, turn the power on to enter the Initial Setup mode. When you
release the PITCH button, the current printer settings will be printed automatically.
The QUIET indicator, POWER indicator, ON LINE indicator and FONT indicators will be blinking.
Press and release the FONT button to select the item. Each time you press FONT, you will
advance to the next item.
1. Select the desired item according to the status of the FONT indicators (on, off, blinking) by
referring to the following table or to the printout produced by the printer.
2. Press and release the PITCH button to set the item’s status. The item’s status will change
each time you press the PITCH button. The status of the item is shown by the pitch indicators
will be either on, off or blinking. By referring to the following table or to the printout produced by
the printer the status can be selected.
To change additional settings, repeat steps 1 and 2 above for each item required.
Press LOAD/PARK to exit the Initial Setup mode. The FONT indicators will go off and the current
conditions will print.
24
Page 25

Chapter 5 - Driver Installation
Setting Up Your Printer To Work With Your Software
Your printer emulates three different types of printer. That is to say it understands three different
types of printer language. Depending upon the printer that you own, you will need to select an
emulation that is most suitable for your printer.
In many situations, a “printer driver” (the piece of software specifically designed to allow your
computer and printer to communicate) is available either with the printer when you purchased
it or from the dealer after purchase. If you cannot get a driver for your particular software
package, please visit our web site, details of which are given at the front of this manual in the
section titled “For The Latest Information”.
English
Microsoft® Windows
Microsoft regularly release new versions of it highly successful Windows operating system.
Printer drivers for your printer are supplied on a disk included with your printer and this is the first
place you should look for a driver.
If you cannot find a suitable driver on the disk supplied, you should initially speak to the dealer
who supplied you with the printer. Alternatively, please visit our web site, details of which are
given at the front of this manual in the section titled “For The Latest Information”.
®
IBM PCs Or Compatibles
Most IBM and compatibles now use Windows operating systems as standard. Please refer to
the section above for more information on using your printer with Windows.
There are still, however, a number of other operating systems where printer drivers are not
readily available because the software was not designed with this method of printing in mind.
However, it is normally possible to use a “compatible emulation” (and alternative language)
instead of one of our specific drivers. Please read the following section for more information.
Choosing A Suitable Emulation
If you cannot find the specific driver for your printer, choose an alternative from the list below.
This further up the list you choose from, the more features of your printer will be available:
Citizen 500
Epson FX-880
Epson FX-850
Citizen Swift 90
Citizen Swift 9
IBM Proprinter III
Epson FX series
Panasonic KX-P3196
OKI Microline 320 Turbo
25
Page 26

Windows 95 Driver Installation
Follow the steps below for installation.
English
1 Connect interface cable to printer and computer, then power on printer.
2 Start computer using Windows 95.
3 Insert the “Printer Driver for Windows 95, 98 and NT4” disk into drive A (or B).
4a When “New Hardware Found” dialogue is displayed:
Click OK , then click OK again
4b When “Update Device Driver Wizard” dialogue is displayed:
Click Next then click Finish .
5 Select “Yes” and click Next .
6 Click Finish .
7 Follow the instructions on your computer screen.
If you cannot install the Printer Driver using Plug & Play, follow the in the section “Manually
Installing a Windows Driver”.
Windows 98 Driver Installation
1 Connect interface cable to printer and computer, then power on printer.
2 Start computer using Windows 98.
3 Insert the “Printer Driver for Windows 95, 98 and NT4” disk into drive A (or B).
4 When “Add New Hardware Wizard” dialogue is displayed, click Next .
5 Select “Search for the best driver for your device”, then click Next .
6 Select “Floppy disk drives”, then click Next .
7 Click Next .
8 Select “Yes” and click Next .
9 Click Finish .
10 Follow the instructions on your computer screen.
If you cannot install the Printer Driver using Plug & Play, refer to the following section called
“Manually Installing a Windows Driver”.
Manually Installing a Windows 95 or 98 Driver.
If your system doesn’t automatically detect the printer using the Plug & Play system, you can still
easily install the drivers manually:
1 Insert the “Printer Driver for Windows 95, 98 and NT4” disk into drive A (or B).
2 Click Start , point to “Settings” and “Printers”, then click.
3 Double click Add Printer , and click Next .
4 When the option “Local printer” or “Network printer” appears, select Local then Next.
5 Click Have Disk .
6 Click OK .
7 Click Next .
8 Click Next to set up.
9 Select “Yes” and click Next .
10 Click Finish .
11 Follow the instructions on your computer screen
26
Page 27

Windows NT4 Driver Installation
Window NT4 Single User
1 Click Start , point to “Settings” and click “Printers”.
2 Double click the Add Printer icon.
3 Click Next> .
4 Select “LPT1:” by clicking on the check box.
5 Click Next> .
6 Click Have Disk... .
7 Insert the “Printer Driver for Windows 95, 98 and NT4” disk into drive A (or B).
8 Type A:\nt40 (or B:\nt40), then click OK .
9 Click Next> four times.
10 Click Finish and the printer test page will be printed out.
11 Click YES.
Windows NT4 in the Network Environment
To share the Printer as Server:
1 Install the Printer Driver to your computer as described above.
2 Double click the My Computer icon.
3 Double click the Printers icon.
4 Select the Citizen 500 printer.
5 Click “File” menu and “Sharing...” .
6 Click “Shared”.
7 Enter the printer name (ex. “Citizen500”).
8 Click OK .
English
Using the Printer as Client
To use the printer connected to the server computer, follow the steps below.
1 Double click the Add Printer icon.
2 Select “Network printer server”.
3 Click Next> .
4 Select the Citizen 500 printer in the “Shared Printers” box.
5 Click OK and follow the instruction on the screen.
If the server computer does not have the Printer Driver for Windows NT 4.0, the install dialogue
will
be displayed on the screen. Then insert the “Printer Driver for Windows 95, 98 and NT4” disk
into drive A (or B) and enter the path name A:\nt40 (or B:\nt40), then click OK .
The procedures for sharing printer may depend on the version of Windows NT. Refer to your
Microsoft documentation for details, or consult an administrator of the computer network
27
Page 28

Chapter 6 - Maintenance and Troubleshooting
Printer Self Test
English
The printer has a self test feature which allows you to test the printer. When activated, this
feature will print 5 lines of each resident font. When complete, it will return to the draft font and
continue for approximately 8 minutes.
Install the ribbon cassette and paper, then turn the power off. While pressing LF/FF, turn the
power on, then release. A sample printout will begin, which serves as a self test. Once you see
that the printer is functioning properly, you may turn the power off during the self test, or you may
run the entire test.
Periodic Maintenance
The printer does not require routine maintenance. However, reasonable care of the printer will
extend its life. Most problems associated with the printer can be traced to improper setup,
installation, or cabling. The following should assist you in identifying and correcting some of the
more common problems. If you need additional help, contact the reseller from which the unit
was purchased or refer to the information at the beginning of this manual about obtaining
technical support.
Cleaning the unit is the most important action you can perform. The frequency of cleaning is will
depend upon the environment in which the printer is being used.
Turn the power off and unplug the AC power cord. Clean the case and covers with a soft cloth.
Use any mild commercial cleaner on the cloth, do not spray directly on to the printer.
Raise the top cover and pull up the roller cover. Vacuum or dust the inside area of the unit. Be
very careful not to damage the printhead ribbon cable or the carriage drive belt.
The platen should be cleaned with denatured alcohol only. The carriage guide bar can be
lubricated with a very light oil. Contact your Authorized Service Centre for advice when lubrication
will be needed.
If the ribbon begins to catch, snag, or tear from the printhead, your printer requires servicing.
Caution: The printhead may be hot; use caution when the cover is open.
Troubleshooting Guide
Ink Smears
- The head gap lever is not in proper position. Move the lever toward the position “7”.
Printhead moves but there is no printing
- Ribbon is not installed correctly. Re-insert ribbon and ribbon guide.
Paper out detector inoperative
- PAPER OUT DETECT is to OFF on the Initial Setup Mode. Set the PAPER OUT DETECT to ON
28
Page 29

Printer does not power up
- No AC power. Check the AC power cord
Paper slips around platen
- The paper feed selector is set probably set to a tractor mode. This disengages the friction
rollers stopping the printer from gripping the paper.
Power is on but printer does not print
- Printer is not ON LINE. Press the ON LINE button. Check cables are securely connected.
- Out of paper. If the PAPER OUT light is flashing, the printer won’t print. Check for obstructions
causing the paper not to feed in correctly.
- Printhead has become overheated. Allow the printhead some time to cool down and the
printer will automatically resume printing.
- Interface setting is incorrectly set. Set interface setting to match the computer’s interface
Carriage stops moving, all indicators start blinking
- The path of printhead is blocked. Turn the power off, open the top cover and clear the path.
Ensure that the fault cannot re-occur. Turn the power back on to resume printing.
Printout is faint
- Head gap lever is not in proper position. Adjust the lever to the proper position
- Ribbon used up. Replace ribbon.
Paper wrinkles when using tractor feed
- No reverse tension on paper. Set paper supply lower than printer
Printer cannot load single sheet through the top
- Ensure CSF MODE is OFF when not using a Cut Sheet Feeder
- Set paper feed selection lever to middle Friction Feed Mode.
English
Unexpected characters appear in printing
- EMULATION is set incorrectly. Check printer driver of your software package and set emulation
of the printer accordingly. Check that the data cable is correctly connected and secure.
Fanfold paper is jamming
- Paper is not installed correctly in tractor. Set paper feed selector to the correct tractor position
and rotate platen knob manually to remove jammed paper. Reinstall paper correctly into tractor
Printout is double-spaced or keeps printing on the same line.
- The AUTO LF setting is incorrect for your system. Change this value.
When using serial interface, printer does not print or data loss occurs
- Parallel interface is selected on your printer. Set INTERFACE to AUTO or SERIAL
- Ensure Serial interface settings match those of your computer.
When printing is completed, paper is not advanced automatically.
- TEAR OFF, PAGE LENGTH, TOP MARGIN and BOTTOM MARGIN are set incorrectly. Set these
values to meet your software package. The printer will not feed to the tear off position automatically unless it is at the end of a page (top of form).
29
Page 30

Chapter 7 - Specifications
Printer Specifications
English
Power requirements: 220 - 240 Volts AC, 50 - 60 Hz, 1.5 Amps
Interface: Centronics parallel, RS-232C/Serial
Print fonts: High speed draft, Draft, Roman, Sans Serif, Courier, Prestige,
Script, Bold PS, Bar Code (Code 39, UPC A, UPC E, EAN 8, EAN
13, Int 2 of 5, Code 128, PostNet)
Software emulation: Epson FX-880, IBM Proprinter III,
OKI MICROLINE 320 Turbo (without Scalable)
Buffer: Selectable [0 KB / 8 KB / 32 KB (default) / 64 KB (max.)]
Character sets: EPSON mode ONE Italic, 18 characters set tables, 17
International characters and Legal Set
IBM mode 18 character set tables
OKI mode Line Graphics, Block Graphics, 18 character set
tables, 17 International characters and Legal Set
Characters per line (max): Pica (10 cpi): 80 characters
Elite (12 cpi): 96 characters
Micron (15 cpi): 120 characters
Compressed (17 cpi): 137 character
Elite compressed (20 cpi) : 160 characters
Printing speed (cps): 15 cpi 12 cpi 10 cpi
Draft 500 400 333
Near Letter Quality 67 80 67
High Speed Draft - 475 396
Paper feed: Push tractor feed (Rear and Bottom: user selectable) [with
fanfold paper]
Friction feed [with single sheets or envelopes]
Printing direction: Uni-directional / Bi-directional (user selectable)
Line feed time: Approx. 52 msec
Noise level: Less than 58 dB (A) in Normal Mode NLQ
Less than 56 dB (A) in Quiet Mode NLQ
Operating environment: Temperature: 5°C to 40°C (41°F to 104°F)
Humidity: 20% to 80% RH
Power consumption: Max 190 W
Stand by – 10 W
Self Test – 70 W
Storage environment: Temperature: -20°C to 60°C (-4°F to 140°F)
Humidity: 10% to 90% RH
Printer MTBF 10,000 hours
Head service life: Approx. 200 million strokes in DRAFT mode
Ribbon: Endless fabric ribbon
Ribbon life: Approx. 12 million characters (standard ribbon)
Detectors: Paper out detector
Printhead Overheat detector
Overload detector
Dimensions: 450 (W) x 383 (D) x 184 (H) mm
Mass (Weight): Approx. 8.5 kg
30
Page 31

Paper Specifications
It is recommended that paper which may be used with this unit is within the specification
provided below.
Fanfold Paper
Width: 3 to 10 inches, 76.2 to 254 mm
To insure optimum print quality, 60-82.5 g/m2 is recommended for graphic printing. In multilayered paper with carbon, the carbon is equivalent to a sheet of paper.
When Bottom Feeding, the printer will handle multi-part forms up to 0.43 mm thick. Up to 6
copies of 53 g/m2 chemical release paper can be used.
When Rear Feeding, the printer will handle multi-part forms up to 0.36 mm thick. Up to 5 copies
of 53 g/m2 chemical release paper can be used.
Continuous Labels
Width of the backing sheet: 76.2-254 mm
Thickness of the backing sheet: 0.07-0.09 mm
Total thickness: 0.16-0.19 mm
Label weight: 68 g/m
Quality: fine-quality paper
Label size: 63.5 mm minimum width
2
23.8 mm minimum height
English
Use only labels mounted on continuous backing sheets in bottom tractor mode only. Depending on the thickness of the label or a kind of the glue, some labels may not be usable.
Single Sheet
Width: 102 - 297 mm
Height: 127 - 363 mm
Weight: 52.5 - 90 g/m
Paper should be within operating temperature and humidity ranges at least 24 hours prior to
use. Due to letter head varying in paper weight and construction, we cannot guarantee print
quality and paper handling for all types.
2
Envelopes
Since envelopes vary in size, paper weight and construction, print quality cannot be guaranteed
for all types of envelopes.
To ensure good print quality, printing should not occur in areas where the edges overlap.
Envelope
Printing Area
31
Page 32

Printing Area
Fanfold Paper and Continuous Labels
English
A: 25.4 mm B: 17.8 mm
C: 2.0 mm D: 15.0 mm
A: The area near the paper perforations (2) where
the print quality may not be optimum.
B: The minimum distance between the sprockets and first printable character (1), when the left
tractor is set on the left end and the margin is set
to 0.
C: The area from the top edge of the paper to the
top of the first printed character.
D: The area from the bottom edge of the paper
where the print quality may not be optimum.
Single Sheet and Envelopes
32
B: 3.0 mm C: 2.0 mm
D: 15.0 mm
B: The minimum distance between the edge of
the paper and first printable character (1), when
the left paper guide is set to the 0 position and
the margin is set to 0.
C: The area from the top edge of the paper to the
top of the first printed character.
D: The position where paper out is detected and
printing may not be optimum. (When printing on
envelopes, do not print on area where edges
overlap. Print quality may not be optimum.)
 Loading...