


 Loading...
2 0 2 0 Pacifica and Voyager
O W N E R ’ S M A N U A L

This Owner’s Manual illustrates and describes the operation of features and equipment that are either standard or optional on this vehicle. This manual may also include a description of features and equipment that are no longer available or were not ordered on this vehicle. Please disregard any features and equipment described in this manual that are not on this vehicle. FCA US LLC reserves the right to make changes in design and specifications, and/or make additions to or improvements to its products without imposing any obligation upon itself to install them on products previously manufactured.
With respect to any vehicles sold in Canada, the name FCA US LLC shall be deemed to be deleted and the name FCA Canada Inc. used in substitution therefore.
If you are the first registered retail owner of your vehicle, you may obtain a complimentary printed copy of the Warranty Booklet by calling 1-800-247-9753 (U.S.) or 1-800-387-1143 (Canada) or by contacting your dealer.
This Owner’s Manual is intended to familiarize you with the important features of your vehicle. Your most up-to-date Owner’s Manual, Navigation/Uconnect manuals and Warranty Booklet can be found by visiting the website on the back cover. U.S. residents can purchase replacement kits by visiting www.techauthority.com and Canadian residents can purchase replacement kits by calling 1-800-387-1143.
 WARNING: Operating, servicing and maintaining a passenger vehicle or off-highway motor vehicle can expose you to chemicals including engine exhaust, carbon monoxide, phthalates, and lead, which are known to the State of California to cause cancer and birth defects or other reproductive harm. To minimize exposure, avoid breathing exhaust, do not idle the engine except as necessary, service your vehicle in a well-ventilated area and wear gloves or wash your hands frequently when servicing your vehicle. For more information go to www.P65Warnings.ca.gov/passenger-vehicle.

The driver’s primary responsibility is the safe operation of the vehicle. Driving while distracted can result in loss of vehicle control, resulting in an accident and personal injury. FCA US LLC strongly recommends that the driver use extreme caution when using any device or feature that may take their attention off the road. Use of any electrical devices, such as cellular telephones, computers, portable radios, vehicle navigation or other devices, by the driver while the vehicle is moving is dangerous and could lead to a serious accident. Texting while driving is also dangerous and should never be done while the vehicle is moving. If you find yourself unable to devote your full attention to vehicle operation, pull off the road to a safe location and stop your vehicle. Some states or provinces prohibit the use of cellular telephones or texting while driving. It is always the driver’s responsibility to comply with all local laws.
This Owner’s Manual has been prepared to help you get acquainted with your new Chrysler brand vehicle and to provide a convenient reference source for common questions.
Not all features shown in this manual may apply to your vehicle. For additional information, visit www.mopar.com (U.S.), www.mopar.ca (Canada) or your local Chrysler brand dealer.
DRIVING AND ALCOHOL
Drunk driving is one of the most frequent causes of accidents. Your driving ability can be seriously impaired with blood alcohol levels far below the legal minimum. If you are drinking, don’t drive. Ride with a designated non-drinking driver, call a cab, a friend or use public transportation.
WARNING!
Driving after drinking can lead to an accident. Your perceptions are less sharp, your reflexes are slower and your judgment is impaired when you have been drinking. Never drink and then drive.

TABLE OF CONTENTS
1 |
INTRODUCTION ............................................................................................................................. |
9 |
1 |
2 |
GETTING TO KNOW YOUR VEHICLE ................................................................................... |
11 |
2 |
3 |
GETTING TO KNOW YOUR INSTRUMENT PANEL ...................................................... |
126 |
3 |
4 |
SAFETY ......................................................................................................................................... |
152 |
4 |
5 |
STARTING AND OPERATING ............................................................................................... |
216 |
5 |
6 |
IN CASE OF EMERGENCY .................................................................................................... |
296 |
6 |
7 |
SERVICING AND MAINTENANCE ..................................................................................... |
340 |
7 |
8 |
TECHNICAL SPECIFICATIONS ............................................................................................ |
383 |
8 |
9 |
MULTIMEDIA ............................................................................................................................... |
391 |
9 |
10 |
CUSTOMER ASSISTANCE ..................................................................................................... |
493 |
10 |
11 |
INDEX............................................................................................................................................. |
497 |
11 |

2 
INTRODUCTION
HOW TO USE THIS MANUAL.................................. |
9 |
Essential Information .................................... |
9 |
Symbols.......................................................... |
9 |
WARNINGS AND CAUTIONS ............................... |
10 |
VEHICLE MODIFICATIONS/ALTERATIONS......... |
10 |
GETTING TO KNOW YOUR VEHICLE |
|
VEHICLE USER GUIDE — IF EQUIPPED............... |
11 |
KEYS ...................................................................... |
12 |
Key Fob......................................................... |
12 |
IGNITION SWITCH................................................. |
16 |
Keyless Enter-N-Go — Ignition..................... |
16 |
REMOTE STARTING SYSTEM — |
|
IF EQUIPPED ......................................................... |
18 |
How To Use Remote Start ........................... |
18 |
Remote Start Cancel Message — |
|
If Equipped ................................................... |
19 |
To Enter Remote Start Mode ...................... |
19 |
To Exit Remote Start Mode Without |
|
Driving The Vehicle ..................................... |
19 |
To Exit Remote Start Mode And Drive |
|
The Vehicle................................................... |
20 |
Remote Start Comfort Systems — |
|
If Equipped ................................................... |
20 |
General Information .................................... |
20 |
SENTRY KEY.......................................................... |
20 |
Key Programming ....................................... |
21 |
Replacement Keys....................................... |
21 |
General Information .................................... |
21 |
VEHICLE SECURITY ALARM — IF EQUIPPED..... |
22 |
To Arm The System ..................................... |
22 |
To Disarm The System ................................ |
22 |
Rearming Of The System............................. |
23 |
DOORS................................................................... |
23 |
Manual Lock ................................................ |
23 |
Central Lock/Unlock — If Equipped............ |
24 |
Unlock Doors Automatically On Exit — |
|
If Equipped ................................................... |
25 |
Keyless Enter-N-Go — Passive Entry........... |
25 |
Manual Sliding Side Door............................ |
28 |
Power Sliding Side Door — If Equipped ...... |
28 |
Hands-Free Sliding Doors — If Equipped.... |
29 |
Child Locks................................................... |
30 |
SEATS ................................................................... |
31 |
Manual Adjustment (Front Seats) — |
|
If Equipped ................................................... |
31 |
Manual Adjustment (Rear Seats) ............... |
33 |
Power Adjustment (Front Seats) — |
|
If Equipped ................................................... |
45 |
Power Adjustment (Rear Seats) — |
|
If Equipped .................................................. |
46 |
Driver Memory Seat — If Equipped............. |
48 |
Heated Seats ............................................... |
50 |
Ventilated Seats — If Equipped................... |
51 |
Adjustable Armrest (Front Seats) — |
|
If Equipped ................................................... |
52 |
Plastic Grocery Bag Retainer Hooks........... |
52 |
HEAD RESTRAINTS .............................................. |
52 |
Head Restraints — Front Seats................... |
53 |
Head Restraints — Second Row Quad |
|
Seats ............................................................ |
54 |
Head Restraints — Second Row Bench...... |
54 |
Head Restraints — Third Row ..................... |
55 |
STEERING WHEEL ............................................... |
56 |
Tilt/Telescoping Steering Column .............. |
56 |
Heated Steering Wheel — If Equipped ....... |
56 |
MIRRORS............................................................... |
57 |
Inside Day/Night Mirror — If Equipped....... |
57 |
Automatic Dimming Mirror — |
|
If Equipped .................................................. |
57 |
Outside Mirrors ........................................... |
57 |
Driver's Outside Automatic Dimming |
|
Mirror — If Equipped.................................... |
57 |
Conversation Mirror..................................... |
58 |
Power Mirrors — If Equipped ...................... |
58 |
Outside Mirrors Folding Feature................. |
58 |
Heated Mirrors — If Equipped..................... |
58 |
Tilt Side Mirrors In Reverse (Available With |
|
Memory Seat Only) — If Equipped .............. |
59 |
Power Folding Mirrors — If Equipped ......... |
59 |
Illuminated Vanity Mirrors — |
|
If Equipped .................................................. |
60 |

EXTERIOR LIGHTS................................................. |
60 |
Multifunction Lever...................................... |
60 |
Headlight Switch.......................................... |
60 |
Daytime Running Lights (DRLs) — |
|
If Equipped ................................................... |
61 |
High/Low Beam Switch ............................... |
61 |
Automatic High Beam — If Equipped ......... |
61 |
Flash-To-Pass ............................................... |
61 |
Automatic Headlights — If Equipped .......... |
62 |
Headlights On With Wipers — |
|
If Equipped ................................................... |
62 |
Headlight Delay — If Equipped.................... |
62 |
Lights-On Reminder ..................................... |
62 |
Front Fog Lights — If Equipped .................. |
62 |
Turn Signals ................................................. |
63 |
Lane Change Assist — If Equipped ............. |
63 |
Battery Protection ....................................... |
63 |
INTERIOR LIGHTS ................................................ |
63 |
Courtesy/Interior Lighting .......................... |
63 |
WINDSHIELD WIPER AND WASHERS .............. |
65 |
Windshield Wiper Operation ....................... |
65 |
Rain Sensing Wipers — If Equipped............ |
66 |
Rear Wiper And Washer .............................. |
67 |
CLIMATE CONTROLS ........................................... |
68 |
Manual Climate Controls Overview ............ |
68 |
Automatic Climate Control Overview .......... |
80 |
Climate Control Functions........................... |
91 |
Automatic Temperature Control (ATC) — |
|
If Equipped .................................................. |
92 |
Operating Tips ............................................. |
92 |
WINDOWS............................................................. |
94 |
Power Windows............................................ |
94 |
PANORAMIC SUNROOF — IF EQUIPPED ........... |
96 |
Opening Sunroof.......................................... |
96 |
Closing Sunroof............................................ |
97 |
Wind Buffeting ............................................. |
97 |
Power Sunshade — If Equipped.................. |
97 |
Pinch Protect Feature.................................. |
98 |
Sunroof Maintenance.................................. |
98 |
Ignition Off Operation .................................. |
98 |
HOOD..................................................................... |
98 |
Opening ........................................................ |
98 |
Closing.......................................................... |
99 |
LIFTGATE............................................................... |
99 |
Opening ........................................................ |
99 |
Closing........................................................ |
100 |
Power Liftgate — If Equipped .................... |
100 |
Hands-Free Liftgate — If Equipped ........... |
101 |
Cargo Area Features.................................. |
103 |
GARAGE DOOR OPENER — IF EQUIPPED ...... |
109 |
Before You Begin Programming |
|
HomeLink®................................................ |
109 |
Canadian/Gate Operator |
|
Programming.............................................. |
111 |
Using HomeLink®...................................... |
112 |
Security....................................................... |
112 |
Troubleshooting Tips ................................. |
112 |
General Information .................................. |
113 |
|
3 |
INTERNAL EQUIPMENT..................................... |
114 |
Storage....................................................... |
114 |
Sun Screens — If Equipped....................... |
118 |
Power Outlets ............................................ |
119 |
Power Inverter — If Equipped ................... |
120 |
Cigar Lighter — If Equipped ...................... |
121 |
Smoker's Package Kit — If Equipped ....... |
121 |
Overhead Sunglass Storage ..................... |
121 |
STOW ‘N PLACE ROOF RACK — |
|
IF EQUIPPED ...................................................... |
122 |
Deploying The Crossbars .......................... |
122 |
Stowing The Crossbars.............................. |
123 |
GETTING TO KNOW YOUR INSTRUMENT PANEL
INSTRUMENT CLUSTER..................................... |
126 |
Instrument Cluster Descriptions............... |
127 |
INSTRUMENT CLUSTER DISPLAY ................... |
128 |
Instrument Cluster Display Location |
|
And Controls............................................... |
129 |
Oil Life Reset.............................................. |
130 |
Fuel And Oil Refresh Mode ....................... |
131 |
KeySense Cluster Messages — |
|
If Equipped................................................. |
132 |
Instrument Cluster Display Menu |
|
Items .......................................................... |
133 |
Battery Saver On/Battery Saver Mode |
|
Message — Electrical Load Reduction |
|
Actions — If Equipped ............................... |
138 |
Instrument Cluster Display |
|
Programmable Features Screen Setup.... |
139 |

4 |
|
TRIP COMPUTER ............................................... |
140 |
WARNING LIGHTS AND MESSAGES ............... |
140 |
Red Warning Lights.................................... |
141 |
Yellow Warning Lights ............................... |
144 |
Yellow Indicator Lights............................... |
147 |
Green Indicator Lights ............................... |
147 |
Blue Indicator Lights.................................. |
149 |
White Indicator Lights................................ |
149 |
ONBOARD DIAGNOSTIC SYSTEM — OBD II.... |
150 |
Onboard Diagnostic System (OBD II) |
|
Cybersecurity.............................................. |
150 |
EMISSIONS INSPECTION AND MAINTENANCE |
|
PROGRAMS........................................................ |
151 |
SAFETY |
|
SAFETY FEATURES ............................................ |
152 |
Anti-Lock Brake System (ABS) ................. |
152 |
Electronic Brake Control (EBC) System ... |
153 |
AUXILIARY DRIVING SYSTEMS........................ |
159 |
Blind Spot Monitoring (BSM) — |
|
If Equipped ................................................. |
159 |
Forward Collision Warning (FCW) With |
|
Mitigation — If Equipped............................ |
164 |
Tire Pressure Monitoring |
|
System (TPMS)........................................... |
167 |
OCCUPANT RESTRAINT SYSTEMS .................. |
171 |
Occupant Restraint Systems Features .... |
171 |
Important Safety Precautions................... |
171 |
Seat Belt Systems ..................................... |
172 |
Supplemental Restraint |
|
Systems (SRS)............................................ |
182 |
Child Restraints ......................................... |
196 |
Transporting Pets ..................................... |
213 |
SAFETY TIPS ...................................................... |
213 |
Transporting Passengers .......................... |
213 |
Exhaust Gas ............................................... |
213 |
Safety Checks You Should Make |
|
Inside The Vehicle ..................................... |
214 |
Periodic Safety Checks You Should |
|
Make Outside The Vehicle ........................ |
215 |
STARTING AND OPERATING |
|
STARTING THE ENGINE ..................................... |
216 |
Normal Starting ......................................... |
216 |
Cold Weather Operation |
|
(Below –22°F Or −30°C) ......................... |
220 |
After Starting — Warming Up The |
|
Engine......................................................... |
220 |
If Engine Fails To Start ............................. |
220 |
To Turn Off The Engine Using |
|
ENGINE START/STOP Button .................... |
221 |
ENGINE BLOCK HEATER — IF EQUIPPED ....... |
221 |
ENGINE BREAK-IN RECOMMENDATIONS ...... |
222 |
PARK BRAKE...................................................... |
222 |
Electric Park Brake (EPB) ......................... |
222 |
AUTOMATIC TRANSMISSION ........................... |
225 |
Ignition Park Interlock ............................... |
226 |
Brake/Transmission Shift Interlock |
|
System........................................................ |
226 |
Nine-Speed Automatic Transmission ...... |
226 |
Gear Ranges .............................................. |
227 |
ACTIVE NOISE CANCELLATION ........................ |
230 |
POWER STEERING............................................. |
231 |
STOP/START SYSTEM — IF EQUIPPED ........... |
231 |
Auto Stop/Start.......................................... |
231 |
Possible Reasons The Engine Does |
|
Not Autostop .............................................. |
232 |
To Start The Engine While In Auto |
|
Stop/Start .................................................. |
233 |
To Manually Turn Off The Stop/Start |
|
System........................................................ |
233 |
To Manually Turn On The Stop/Start |
|
System........................................................ |
234 |
System Malfunction................................... |
234 |
SPEED CONTROL — IF EQUIPPED.................... |
234 |
To Activate.................................................. |
235 |
To Set A Desired Speed ............................ |
235 |
To Vary The Speed Setting........................ |
235 |
To Accelerate For Passing......................... |
236 |
To Resume Speed .................................... |
236 |
To Deactivate ............................................ |
236 |

ADAPTIVE CRUISE CONTROL (ACC) — |
|
IF EQUIPPED ...................................................... |
236 |
Adaptive Cruise Control (ACC) |
|
Operation.................................................... |
238 |
Activating Adaptive Cruise |
|
Control (ACC).............................................. |
238 |
To Activate/Deactivate.............................. |
238 |
To Set A Desired ACC Speed..................... |
239 |
To Cancel.................................................... |
239 |
To Turn Off.................................................. |
239 |
To Resume ................................................. |
239 |
To Vary The Speed Setting ........................ |
240 |
Setting The Following Distance In ACC..... |
241 |
Overtake Aid............................................... |
243 |
ACC Operation At Stop............................... |
243 |
Adaptive Cruise Control (ACC) Menu ........ |
243 |
Display Warnings And Maintenance......... |
244 |
Precautions While Driving With ACC......... |
245 |
General Information .................................. |
247 |
Normal (Fixed Speed) Cruise Control |
|
Mode........................................................... |
248 |
PARKSENSE REAR PARK ASSIST — |
|
IF EQUIPPED ...................................................... |
250 |
ParkSense Sensors ................................... |
251 |
ParkSense Visual Alert .............................. |
251 |
ParkSense Display..................................... |
251 |
Enabling And Disabling ParkSense .......... |
254 |
Service The ParkSense Rear Park Assist |
|
System........................................................ |
254 |
Cleaning The ParkSense System.............. |
254 |
ParkSense System Usage Precautions .... |
254 |
PARKSENSE FRONT AND REAR PARK |
|
ASSIST — IF EQUIPPED ..................................... |
256 |
ParkSense Sensors ................................... |
257 |
ParkSense Visual Alert .............................. |
257 |
ParkSense Display..................................... |
257 |
Enabling And Disabling ParkSense .......... |
262 |
Service The ParkSense Park Assist System.... |
|
262 |
|
Cleaning The ParkSense System.............. |
262 |
ParkSense System Usage Precautions .... |
263 |
PARKSENSE ACTIVE PARK ASSIST SYSTEM — |
|
IF EQUIPPED ....................................................... |
264 |
Enabling And Disabling The ParkSense |
|
Active Park Assist System ......................... |
264 |
Parallel Parking Space Assistance |
|
Operation/Display...................................... |
265 |
Perpendicular Parking Space Assistance |
|
Operation/Display...................................... |
270 |
LANESENSE — IF EQUIPPED ............................ |
275 |
LaneSense Operation................................ |
275 |
Turning LaneSense On Or Off ................... |
275 |
LaneSense Warning Message .................. |
276 |
Changing LaneSense Status..................... |
277 |
PARKVIEW REAR BACK UP CAMERA ............. |
278 |
SURROUND VIEW CAMERA SYSTEM — |
|
IF EQUIPPED ...................................................... |
279 |
REFUELING THE VEHICLE.................................. |
282 |
VEHICLE LOADING ............................................ |
283 |
Certification Label ..................................... |
283 |
|
5 |
TRAILER TOWING .............................................. |
284 |
Common Towing Definitions..................... |
284 |
Trailer Hitch Classification ........................ |
286 |
Trailer Towing Weights (Maximum Trailer |
|
Weight Ratings) ........................................ |
286 |
Vehicle Loading Chart ............................... |
287 |
Trailer And Tongue Weight ....................... |
289 |
Towing Requirements .............................. |
289 |
Towing Tips ............................................... |
292 |
RECREATIONAL TOWING |
|
(BEHIND MOTORHOME, ETC.) ......................... |
293 |
Towing This Vehicle Behind Another |
|
Vehicle........................................................ |
293 |
Recreational Towing — All Models............ |
293 |
DRIVING TIPS..................................................... |
294 |
Driving On Slippery Surfaces .................... |
294 |
Driving Through Water ............................. |
294 |
IN CASE OF EMERGENCY |
|
HAZARD WARNING FLASHERS....................... |
296 |
ASSIST AND SOS MIRROR — |
|
IF EQUIPPED....................................................... |
296 |
General Information .................................. |
300 |
BULB REPLACEMENT........................................ |
300 |
Replacement Bulbs .................................. |
300 |
Replacing Exterior Bulbs........................... |
302 |
FUSES.................................................................. |
306 |
General Information .................................. |
306 |
Fuse Location ............................................ |
307 |
Underhood Fuses ...................................... |
307 |

6 |
|
JACKING AND TIRE CHANGING — |
|
IF EQUIPPED ...................................................... |
314 |
Jack And Spare Tire Location.................... |
314 |
Equipment Removal ................................. |
314 |
Preparations For Jacking .......................... |
315 |
Jacking Instructions................................... |
316 |
Road Tire Installation ................................ |
319 |
Portable Air Compressor — |
|
If Equipped ................................................. |
321 |
Tire Service Kit For Inflating Tire — |
|
If Equipped ................................................. |
322 |
Return Inflatable Spare Tire...................... |
324 |
TIRE SERVICE KIT — IF EQUIPPED................... |
324 |
JUMP STARTING................................................. |
331 |
Preparations For Jump Start ..................... |
331 |
Jump Starting Procedure........................... |
332 |
REFUELING IN EMERGENCY ............................ |
333 |
IF YOUR ENGINE OVERHEATS.......................... |
333 |
MANUAL PARK RELEASE ................................ |
334 |
FREEING A STUCK VEHICLE ............................ |
335 |
TOWING A DISABLED VEHICLE........................ |
336 |
ENHANCED ACCIDENT RESPONSE |
|
SYSTEM (EARS) ................................................. |
339 |
EVENT DATA RECORDER (EDR)....................... |
339 |
SERVICING AND MAINTENANCE |
|
SCHEDULED SERVICING .................................. |
340 |
Maintenance Plan ..................................... |
341 |
Heavy Duty Use Of The Vehicle................. |
343 |
ENGINE COMPARTMENT................................... |
344 |
3.6L Engine................................................ |
344 |
Checking Oil Level ..................................... |
345 |
Adding Washer Fluid ................................. |
345 |
Maintenance-Free Battery ....................... |
346 |
Pressure Washing...................................... |
346 |
DEALER SERVICE .............................................. |
346 |
Engine Oil .................................................. |
347 |
Engine Oil Filter.......................................... |
348 |
Engine Air Cleaner Filter ........................... |
348 |
Accessory Drive Belt Inspection ............... |
348 |
Air Conditioner Maintenance .................... |
349 |
Body Lubrication........................................ |
351 |
Windshield Wiper Blades .......................... |
351 |
Exhaust System ........................................ |
355 |
Cooling System .......................................... |
356 |
Brake System ............................................ |
359 |
Automatic Transmission ........................... |
360 |
RAISING THE VEHICLE ...................................... |
361 |
TIRES .................................................................. |
361 |
Tire Safety Information ............................. |
361 |
Tires — General Information .................... |
369 |
Tire Types ................................................... |
373 |
Spare Tires — If Equipped ........................ |
374 |
Wheel And Wheel Trim Care .................... |
376 |
Tire Chains (Traction Devices) ................. |
377 |
Tire Rotation Recommendations.............. |
377 |
DEPARTMENT OF TRANSPORTATION |
|
UNIFORM TIRE QUALITY GRADES .................. |
378 |
Treadwear .................................................. |
378 |
Traction Grades ......................................... |
378 |
Temperature Grades ................................. |
379 |
STORING THE VEHICLE ..................................... |
379 |
BODYWORK........................................................ |
380 |
Protection From Atmospheric Agents....... |
380 |
Body And Underbody Maintenance.......... |
380 |
Preserving The Bodywork.......................... |
380 |
INTERIORS ......................................................... |
381 |
Seats And Fabric Parts.............................. |
381 |
Plastic And Coated Parts........................... |
382 |
Leather Parts ............................................. |
382 |
Glass Surfaces .......................................... |
382 |

TECHNICAL SPECIFICATIONS |
|
IDENTIFICATION DATA...................................... |
383 |
Vehicle Identification Number .................. |
383 |
BRAKE SYSTEM ................................................. |
383 |
WHEEL AND TIRE TORQUE |
|
SPECIFICATIONS................................................ |
383 |
Torque Specifications................................ |
383 |
FUEL REQUIREMENTS ...................................... |
384 |
3.6L Engine ............................................... |
384 |
Reformulated Gasoline ............................ |
384 |
Materials Added To Fuel ........................... |
385 |
Gasoline/Oxygenate Blends...................... |
385 |
Do Not Use E-85 In Non-Flex Fuel |
|
Vehicles ...................................................... |
385 |
CNG And LP Fuel System |
|
Modifications ............................................. |
386 |
MMT In Gasoline........................................ |
386 |
Fuel System Cautions................................ |
386 |
Carbon Monoxide Warnings...................... |
386 |
FLUID CAPACITIES ............................................ |
387 |
FLUIDS AND LUBRICANTS................................ |
388 |
Engine......................................................... |
388 |
Chassis ...................................................... |
390 |
MULTIMEDIA |
|
UCONNECT SYSTEMS ....................................... |
391 |
CYBERSECURITY ............................................... |
391 |
UCONNECT SETTINGS........................................ |
392 |
Customer Programmable Features — |
|
Uconnect 4 Settings ................................. |
392 |
Customer Programmable Features — |
|
Uconnect 4C/4C NAV Settings ................ |
410 |
SAFETY AND GENERAL INFORMATION........... |
432 |
Safety Guidelines....................................... |
432 |
UCONNECT 4 WITH 7-INCH DISPLAY .............. |
433 |
Introduction................................................ |
433 |
Radio Mode................................................ |
434 |
Media Mode ............................................... |
441 |
Phone Mode............................................... |
449 |
|
7 |
STEERING WHEEL AUDIO CONTROLS — |
|
IF EQUIPPED ...................................................... |
461 |
Radio Operation......................................... |
461 |
Media Mode............................................... |
461 |
AUX/USB/MP3 CONTROL ............................... |
461 |
UCONNECT THEATER — IF EQUIPPED............. |
462 |
Uconnect Theater Overview...................... |
462 |
Getting Started .......................................... |
463 |
Accessing The System From The Uconnect |
|
System........................................................ |
463 |
Uconnect Theater Controls ....................... |
463 |
Accessing The System From The Uconnect |
|
Theater Rear Screens ............................... |
464 |
Pairing The Remote................................... |
464 |
Unpairing The Remote .............................. |
465 |
Media Sources........................................... |
465 |
Uconnect Theater Remote Control........... |
466 |
Uconnect Theater Home Screen And |
|
Controls...................................................... |
467 |
General Information .................................. |
468 |
8 
Play A DVD/Blu-ray™ Or USB Media |
|
File From Uconnect System ...................... |
468 |
Disc Menu .................................................. |
470 |
Blu-ray™ Controls – Disc Specific |
|
Functions.................................................... |
470 |
Uconnect Theater Apps ............................. |
470 |
Using The Rear Video USB Port ................ |
472 |
Play Video Games ...................................... |
472 |
Headphones Operation ............................. |
473 |
Display Settings ......................................... |
474 |
Listening To Audio With The Screen |
|
Closed......................................................... |
475 |
Rear Climate Controls ............................... |
475 |
Accessibility — If Equipped........................ |
477 |
Wireless Streaming — If Equipped............ |
477 |
BD And DVD Region Codes ....................... |
479 |
Product Agreement.................................... |
480 |
General Information .................................. |
483 |
FCC/IC Regulatory Notices........................ |
483 |
RADIO OPERATION AND |
|
MOBILE PHONES................................................ |
485 |
Regulatory And Safety Information........... |
485 |
UCONNECT VOICE RECOGNITION |
|
QUICK TIPS ......................................................... |
486 |
Introducing Uconnect ................................ |
486 |
Get Started................................................. |
487 |
Basic Voice Commands............................. |
487 |
Radio .......................................................... |
488 |
Media.......................................................... |
488 |
Phone ......................................................... |
488 |
Voice Text Reply......................................... |
489 |
Climate ....................................................... |
489 |
Navigation (4C NAV) .................................. |
490 |
Siri® Eyes Free — If Equipped ................. |
490 |
Using Do Not Disturb ................................ |
490 |
Android Auto™ — If Equipped ................... |
490 |
Apple CarPlay® — If Equipped ................. |
491 |
General Information .................................. |
492 |
Additional Information............................... |
492 |
CUSTOMER ASSISTANCE |
|
SUGGESTIONS FOR OBTAINING SERVICE |
|
FOR YOUR VEHICLE .......................................... |
493 |
Prepare For The Appointment .................. |
493 |
Prepare A List............................................. |
493 |
Be Reasonable With Requests................. |
493 |
IF YOU NEED ASSISTANCE............................... |
493 |
FCA US LLC Customer Center ................... |
494 |
FCA Canada Inc. Customer Center........... |
494 |
In Mexico Contact...................................... |
494 |
Puerto Rico And US Virgin Islands............ |
494 |
Customer Assistance For The Hearing Or |
|
Speech Impaired (TDD/TTY) ..................... |
494 |
Service Contract ....................................... |
494 |
WARRANTY INFORMATION.............................. |
495 |
MOPAR PARTS................................................... |
495 |
REPORTING SAFETY DEFECTS ........................ |
495 |
In The 50 United States And |
|
Washington, D.C. ....................................... |
495 |
In Canada................................................... |
495 |
PUBLICATION ORDER FORMS ........................ |
496 |

Dear Customer,
Congratulations on selecting your new vehicle. Be assured that it represents precision workmanship, distinctive styling, and high quality. This Owner's Manual has been prepared with the assistance of service and engineering specialists to acquaint you with the operation and maintenance of your vehicle. It is supplemented by Warranty Information, and customer-oriented documents. Within this information, you will find a description of the services that FCA US LLC offers to its customers, the vehicle's warranty coverage, and the details of the terms and conditions for maintaining its validity. Please take the time to read all of these publications carefully before driving your vehicle for the first time. Following the instructions, recommendations, tips, and important warnings in this manual will help assure safe and enjoyable operation of your vehicle.
INTRODUCTION
This Owner's Manual describes all versions of this vehicle. Options and equipment dedicated to specific markets or versions are not expressly indicated in the text. Therefore, you should only consider the information which is related to the trim level, engine, and version that you have purchased. Any content introduced throughout the Owner's Information, that may or may not be applicable to your vehicle, will be identified with the wording “If Equipped”. All data contained in this publication are intended to help you use your vehicle in the best possible way. FCA US LLC aims at a constant improvement of the vehicles produced. For this reason, it reserves the right to make changes to the model described for technical and/or commercial reasons. For further information, contact an authorized dealer.
When it comes to service, remember that authorized dealers know your vehicle best, have factory-trained technicians and genuine MOPAR® parts, and care about your satisfaction.
|
9 |
HOWTOUSETHISMANUAL |
1 |
Essential Information
Consult the Table of Contents to determine which section contains the information you desire.
Since the specification of your vehicle depends on the items of equipment ordered, certain descriptions and illustrations may differ from your vehicle's equipment.
The detailed Index at the back of this Owner's Manual contains a complete listing of all subjects.
Symbols
Some vehicle components have colored labels whose symbols indicate precautions to be observed when using this component. Refer to “Warning Lights and Messages” in “Getting To Know Your Instrument Panel” for further information on the symbols used in your vehicle.

10 INTRODUCTION
WARNINGSANDCAUTIONS
This Owner’s Manual contains WARNINGS against operating procedures that could result in a collision, bodily injury and/or death. It also contains CAUTIONS against procedures that could result in damage to your vehicle. If you do not read this entire Owner’s Manual, you may miss important information. Observe all Warnings and Cautions.
VEHICLEMODIFICATIONS/ALTERATIONS
WARNING!
Any modifications or alterations to this vehicle could seriously affect its roadworthiness and safety and may lead to a collision resulting in serious injury or death.
WARNING!
To prevent SERIOUS INJURY or DEATH when using “Track-Use” parts and equipment:
NEVER use any “Track-Use” equipment on public roads. FCA US LLC does not authorize the use of “Track-Use” equipment on public roads.
The intended use of “Track-Use” parts is for race vehicles on race tracks. To help ensure the safety of the race driver, engineers should supervise the installation of “Track-Use” parts.
FCA US LLC does not authorize the installation or use of any part noted as “Track-Use” on any new vehicle prior to its first retail sale.
WARNING!
To prevent SERIOUS INJURY or DEATH:
ALWAYS remove any “Track-Use” equipment before driving on public roads.
ALWAYS properly use your three-point seat belts when driving on public roads.
In a collision, you and your passengers can suffer much greater injuries if you are not properly buckled up. You can strike the interior of your vehicle or other passengers, or you can be thrown out of the vehicle.
11
GETTING TO KNOW YOUR VEHICLE
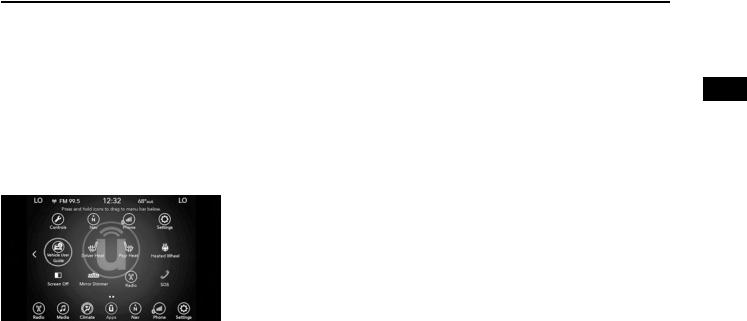
VEHICLEUSERGUIDE—IFEQUIPPED
Access your Owner’s Information right through your Uconnect 4C or 4C NAV touchscreen system (if equipped).
To access the Vehicle User Guide on your Uconnect Touchscreen: Press the Uconnect Apps button. From there, press the Vehicle User Guide icon on your touchscreen. No Uconnect registration is required.
Uconnect 4C NAV With8.4–inch Display VehicleUser
Guide TouchscreenIcon
NOTE:
Vehicle User Guide features are not available while the vehicle is moving. If you try to access
while the vehicle is in motion, the system will display: Feature not available while the vehicle is in motion.
Pre-Installed Features
Your User Guide — Updated in real-time
Touchscreen convenience
Maintenance schedules and information
Comprehensive icon and symbol glossary
Available when and where you need it
Customizable interface
Multilingual
Once you launch your Vehicle User Guide, you will be able to explore your warranty information and radio manual when and where you need them. Your Uconnect system displays the Vehicle User Guide on your touchscreen radio to assist in better understanding your vehicle. There’s no app to download, no phone to connect and no external device needed for playback. Plus, it’s updated throughout the year, in real-time, so it never goes out of date.
Features/Benefits |
|
Pre-installed on your Uconnect touchscreen |
|
radio |
2 |
|
Enhanced search and browsing capability
Robust NAV application (if equipped)
Add selected topics to a fast-access Favorites category
Icon and symbol glossary
Warranty information
Crucial driver information and assistance:
Operating Instructions
Warranty Information
Fluid Level Standards
Maintenance Schedules
Emergency Procedures
911 Contact and More
TIP:
When viewing a topic, tap the star icon to add it to your Favorites, for easy access in the future.
12 GETTING TO KNOW YOUR VEHICLE
KEYS
Key Fob
Your vehicle uses a keyless ignition system. The ignition system consists of a key fob with Remote Keyless Entry (RKE) and a START/STOP push button ignition system. The RKE system uses a receiver module in the vehicle that wirelessly links with the key fob.
NOTE:
The key fob may not be found if it is located next to a mobile phone, laptop or other electronic device; these devices may block the key fob’s wireless signal.
This system allows you to lock or unlock the doors and liftgate, activate the Panic Alarm, optional power liftgate, left power sliding door, and right power sliding door from distances up to approximately 66 ft (20 m) using a key fob. When any button on the key fob is pushed, or when any signal is being transferred between the key fob and the vehicle, an LED light on the key fob will flash as an indicator. The key fob does not need to be pointed at the vehicle to activate the system.
NOTE:
The emergency key allows for entry into the vehicle should the battery in the vehicle or the key fob become depleted. The emergency key is also for locking/unlocking the glove compartment. You can keep the emergency key with you when valet parking.
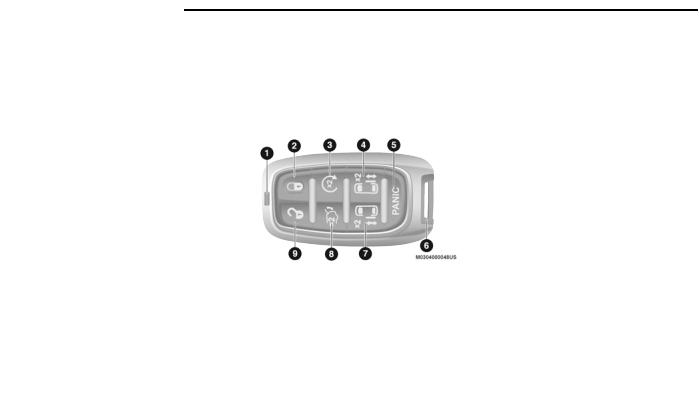
KeyFob
1 — LED Light
2 — Lock
3 — Remote Start
4 — Right Power Sliding Side Door
5 — PANIC Alarm
6 — Emergency Key
7 — Left Power Sliding Side Door
8 — Liftgate
9 — Unlock
In case the ignition switch does not change with the push of a button, the key fob may have a low or fully depleted battery. A low key fob battery can be verified by referring to the instrument cluster, which will display directions to follow.
NOTE:
A low key fob battery condition may be indicated by a message in the instrument cluster display, or by the LED light on the key fob. If the LED key fob light no longer illuminates from key fob button pushes, then the key fob battery requires replacement.
The key fob LED light brightness is designed for indoor light viewing, so the LED light may not be visible in direct sunlight.
In a situation where the battery is low or fully depleted, a back up method can be used to operate the ignition switch. Put the nose side of the key fob (side opposite of the Emergency Key) against the START/STOP ignition button and push to operate the ignition switch.

To Unlock The Doors
NOTE:
Uconnect Settings lets you program the system to unlock either the driver's side doors on the first push (default) or unlock all doors on the first push of the unlock button on the key fob. To change the default setting, refer to “Uconnect Settings” in “Multimedia” for further information.
1st Push Of Key Fob Unlocks
Push and release the unlock button on the key fob once to unlock the driver front door and sliding door or twice within five seconds to unlock all doors and liftgate. The hazard lights will flash to acknowledge the unlock signal. The illuminated entry system will be activated.
2nd Push Of Key Fob Unlocks
Push and release the unlock button on the key fob twice within five seconds to unlock all doors and liftgate. The turn signal lights will flash to acknowledge the unlock signal. The illuminated entry system will be activated.
This feature lets you program the system to unlock either the driver's side doors or all doors on the first push of the unlock button on the key fob. To change the current setting, refer to “Uconnect Settings” in “Multimedia” for further information.
NOTE:
Your vehicle is equipped with Passive Entry; refer to “Keyless Enter-N-Go — Passive Entry” in this chapter for further information.
Emergency Key Feature
The key fob also contains an emergency key. The emergency key is stored in the bottom of the key fob.
Mechanical LatchToRelease Emergency Key
The emergency key allows for entry into the vehicle should the battery in the vehicle or the key become depleted. The emergency key is also for locking/unlocking the glove compartment. You can keep the emergency key with you when valet parking.
GETTING TO KNOW YOUR VEHICLE 13 |
|
To remove the emergency key, press the |
|
mechanical button on the side of the key fob |
|
with your thumb and pull the emergency key out |
|
with your other hand while pushing the mechan- |
|
ical button. |
2 |
|
To Lock The Doors And Liftgate
Push and release the lock button on the key fob to lock all doors and liftgate. The hazard lights will flash once and the horn will chirp once to acknowledge the signal. Settings in radio can change to lights only, chirp only, or both.
Refer to “Keyless Enter-N-Go — Passive Entry” in this chapter for further information.
Key Fob With Remote Control And Integrated Vehicle Key
If one or more doors are open or the liftgate is open, the doors can be locked. This is signaled by a quick flash of the turn signals.
Vehicles Equipped With Keyless Enter-N-Go — Passive Entry
If one or more doors are open, or the liftgate is open, the doors can be locked. The doors will unlock again only if the key is inside the passenger compartment.
14 GETTING TO KNOW YOUR VEHICLE
Key Fob Battery Replacement
The recommended replacement battery is one CR2032 battery.
NOTE:
Batteries contain harmful chemicals. Dispose old batteries by placing them in correct containers according to the law or by taking them to a dealership, where they will be handled appropriately.
Perchlorate Material — special handling may apply. See www.dtsc.ca.gov/ hazardouswaste/perchlorate for further information.
Do not touch the battery terminals that are on the back housing or the printed circuit board.
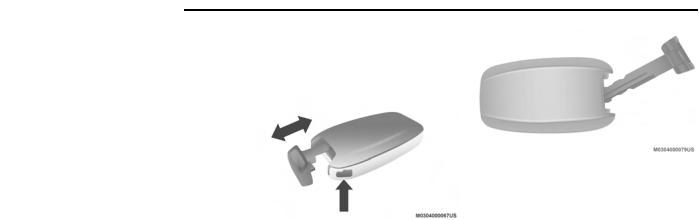
1.Remove the emergency key by pushing the mechanical release button on the side of the key fob with your thumb and then pull the key out with your other hand.
EmergencyKeyRemoval
2.Insert a coin, a flat blade screw driver, or the tip of your emergency key into the now exposed slot and carefully pry on both sides to disengage the snaps. Gently remove the back cover from the fob, being careful not to damage any of the snaps.
Separating The KeyFob Case
3.Remove the battery by sliding the battery rearward in its pocket until the battery lifts up. Remove the depleted battery from the battery pocket and dispose appropriately.
4.Fit a new CR2032 battery ensuring that the positive (+) side is facing upwards. Push the battery into the pocket until it is firmly seated in place and secured under both tabs.
5.Align the back cover into its original position and snap it back in place by pushing it against the fob until it is seated all around.

Programming Additional Key Fobs
Programming the key fob may be performed by an authorized dealer.
NOTE:
Once a key fob is programmed to a vehicle, it cannot be repurposed and reprogrammed to another vehicle.
Request For Additional Remote Controls
NOTE:
Only key fobs that are programmed to the vehicle electronics can be used to start and operate the vehicle. Once a key fob is programmed to a vehicle, it cannot be programmed to any other vehicle.
CAUTION!
Always remove the key fobs from the vehicle and lock all doors when leaving the vehicle unattended.
For vehicles equipped with Keyless Enter-N-Go — Ignition, always remember to place the ignition in the OFF position.
Duplication of key fobs may be performed at an authorized dealer. This procedure consists of
programming a blank key fob to the vehicle electronics. A blank key fob is one that has never been programmed.
NOTE:
When having the Sentry Key Immobilizer System serviced, bring all vehicle keys with you to an authorized dealer.
KeySense Features — If Equipped
This feature provides the vehicle owner with the ability to customize vehicle settings that can be applied to determine the driving experience for other drivers of the vehicle. The vehicle settings are protected by a unique 4-digit PIN, which the vehicle owner creates when accessing the specific settings for the first time.
KeySense also has additional features that are always enabled when the specific key is in use that cannot be set by the vehicle owner. While this specific key fob is in use, the vehicle will respond accordingly to the customized vehicle settings and mandatory features. This includes enhanced driving assistance features, increased driver alerts, and the locking of certain optional features.
GETTING TO KNOW YOUR VEHICLE  15
15
2
KeySense Key Fob
KeySense Unique Splash Screen
At start-up the KeySense splash screen should inform the driver that the vehicle will be functioning in KeySense mode when the KeySense key is in use.
Start Up Display Features
Unique splash screen graphic
Telltale  illuminated
After unique splash screen, and after stored messages are cycled, then start-up KeySense messages (Range & Max Speed) are displayed

16 GETTING TO KNOW YOUR VEHICLE
The following features are always enabled when this key is in use:
Entertainment audio muted if 1st row occupied seat belts are not fastened
Consistent seat belt unfastened chime
Maximum radio volume limited to 15 out of 39
Daytime Running Lights
Headlights On With Wipers
Rain Sensing Wipers
Automatic High Beams
Refer to “Uconnect Settings” in “Multimedia” for further information.
General Information
The following regulatory statement applies to all Radio Frequency (RF) devices equipped in this vehicle:
This device complies with Part 15 of the FCC Rules and with Innovation, Science and Economic DevelopmentCanada license-exempt RSS standard(s). Operation is subject to the following two conditions:
1.This device may not cause harmful interference, and
2.This device must accept any interference received, including interference that may cause undesired operation.
Le présent appareil est conforme aux CNR d`Innovation, Science and Economic Development applicables aux appareils radio exempts de licence. L'exploitation est autorisée aux deux conditions suivantes:
1.l'appareil ne doit pas produire de brouillage, et
2.l'utilisateur de l'appareil doit accepter tout brouillage radioélectrique subi, même si le brouillage est susceptible d'en compromettre le fonctionnement.
La operación de este equipo está sujeta a las siguientes dos condiciones:
1.es posible que este equipo o dispositivo no cause interferencia perjudicial y
2.este equipo o dispositivo debe aceptar cualquier interferencia, incluyendo la que pueda causar su operación no deseada.
NOTE:
Changes or modifications not expressly approved by the party responsible for compliance could void the user’s authority to operate the equipment.
IGNITIONSWITCH
Keyless Enter-N-Go — Ignition
If applicable, refer to the “Hybrid Supplement” for additional information.
This feature allows the driver to start the vehicle with the push of a button, as long as the key fob is in the passenger compartment, and the drivers foot is on the brake pedal.
The Keyless Push Button Ignition has four operating positions; three of which are labeled and will illuminate when in position. The three positions are OFF, ACC, and ON/RUN. The fourth position is START; during START, RUN will illuminate.

Engine START/STOPButton
1 — OFF
2 — ACC
3 — ON/RUN
The ignition can be placed in the following positions:
OFF
The engine is stopped
Some electrical devices are available
ACC
The engine is stopped
Some electrical devices are available
ON/RUN
Driving position
All the electrical devices are available
START
Start the vehicle
The engine only runs in the ON/RUN ignition position or from a remote start request.
In case the ignition switch does not change with the push of a button, the key fob may have a low or depleted battery. In this situation, a back up method can be used to operate the ignition switch. Put the nose side (side opposite of the emergency key) of the key fob against the START/STOP ignition button and push to operate the ignition switch.
GETTING TO KNOW YOUR VEHICLE  17
17
NOTE:
The key fob may not be able to be detected by the vehicle keyless-go system if it is located next to a mobile phone, laptop or other electronic device; these devices may block the key fob’s
wireless signal and prevent the keyless-go 2 system from starting the vehicle.
WARNING!
When leaving the vehicle, always remove the key fob from the vehicle and lock your vehicle.
Never leave children alone in a vehicle, or with access to an unlocked vehicle.
Allowing children to be in a vehicle unattended is dangerous for a number of reasons. A child or others could be seriously or fatally injured. Children should be warned not to touch the parking brake, brake pedal or the gear selector.
(Continued)
BackupStarting Method
18 GETTING TO KNOW YOUR VEHICLE
WARNING! (Continued)
Do not leave the key fob in or near the vehicle, or in a location accessible to children, and do not leave the ignition of a vehicle equipped with Keyless Enter-N-Go in the RUN mode. A child could operate power windows, other controls, or move the vehicle.
Do not leave children or animals inside parked vehicles in hot weather. Interior heat build-up may cause serious injury or death.
CAUTION!
An unlocked car is an invitation. Always remove the key fobs from the vehicle and lock all doors when leaving the vehicle unattended.
NOTE:
For further information, refer to "Starting The Engine" in "Starting And Operating."
REMOTESTARTINGSYSTEM—IFEQUIPPED
If applicable, refer to the “Hybrid Supplement” for additional information.
This system uses the key fob to start the engine conveniently from outside the vehicle while still maintaining security. The system has a range of
328 ft (100 m).
The Remote Starting System also activates the Climate Control, vented seats (if equipped) in temperatures above 80°F (26.7°C), and the optional heated seats, and optional heated steering wheel in temperatures below 40°F (4.4°C).
NOTE:
The vehicle must be equipped with an automatic transmission to be equipped with Remote Start.
Obstructions between the vehicle and key fob may reduce this range.
How To Use Remote Start
If applicable, refer to the “Hybrid Supplement” for additional information.
Push Remote Start button on the key fob twice within five seconds. Pushing the Remote Start button a third time shuts the engine off.
To drive the vehicle, push the unlock button, and place the ignition in the ON/RUN position.
With remote start, the engine will only run for 15 minutes (timeout) unless the ignition key is placed in the ON/RUN position.
The vehicle must be started with the key after two consecutive timeouts.
All of the following conditions must be met before the engine will remote start:
Gear selector in PARK
Doors closed
Hood closed
Liftgate closed
Hazard switch off

Brake switch inactive (brake pedal not pushed)
Battery at an acceptable charge level
Key fob PANIC button not pushed
System not disabled from previous remote start event
Vehicle alarm system indicator flashing
Ignition in STOP/OFF position
Fuel level meets minimum requirement
WARNING!
Do not start or run an engine in a closed garage or confined area. Exhaust gas contains Carbon Monoxide (CO) which is odorless and colorless. Carbon Monoxide is poisonous and can cause serious injury or death when inhaled.
Keep key fobs away from children. Operation of the Remote Start System, windows, door locks or other controls could cause serious injury or death.
Remote Start Cancel Message — If Equipped
The following messages will display in the instrument cluster if the vehicle fails to remote start or exits remote start prematurely:
Remote Start Cancelled — Door Open
Remote Start Cancelled — Hood Open
Remote Start Cancelled — Fuel Low
Remote Start Cancelled — Liftgate Open
Remote Start Cancelled — Too Cold
Remote Start Cancelled — Time Expired
Remote Start Disabled — Start Vehicle To Reset
The message will stay active until the ignition is placed in the ON/RUN position.
To Enter Remote Start Mode
If applicable, refer to the “Hybrid Supplement” for additional information.
Push and release the Remote Start button on the key fob twice within five seconds. The vehicle doors will lock, the turn signals will flash twice, and the horn will chirp twice. Then the engine will start, and the vehicle will remain in the Remote Start mode for a 15 minute cycle.
GETTING TO KNOW YOUR VEHICLE  19
19
NOTE:
If an engine fault is present or fuel level is low, the vehicle will start and then shut down in 10 seconds.
The park lamps will turn on and remain on |
2 |
during Remote Start mode. |
|
For security, power window operation is disabled when the vehicle is in the Remote Start mode.
The engine can be started two consecutive times (two 15 minute cycles) with the key fob. However, the ignition must be placed in the ON/RUN position before you can repeat the start sequence for a third cycle.
To Exit Remote Start Mode Without Driving The Vehicle
If applicable, refer to the “Hybrid Supplement” for additional information.
Push and release the Remote Start button one time or allow the remote start cycle to complete the entire 15 minute cycle.
NOTE:
To avoid unintentional shutdowns, the system will disable for two seconds after receiving a valid Remote Start request.

20 GETTING TO KNOW YOUR VEHICLE
To Exit Remote Start Mode And Drive The Vehicle
Before the end of 15 minute cycle, push and release the unlock button on the key fob to unlock the doors, or unlock the vehicle using Keyless Enter-N-Go — Passive Entry via the door handles, and disarm the vehicle security alarm (if equipped). Then, prior to the end of the
15 minute cycle, push and release the START/ STOP ignition button.
NOTE:
For vehicles equipped with the Keyless Enter-N-Go
— Passive Entry feature, the message “Remote Start Active — Push Start Button” will display in the instrument cluster display until you push the START/STOP ignition button.
Remote Start Comfort Systems — If Equipped
When Remote Start is activated, the Climate Control, vented seats (if equipped) are also activated in temperatures above 80°F (26.7°C), and the optional heated seats, and optional heated steering wheel in temperatures below 40°F (4.4°C). These features will stay on through the duration of Remote Start, or until the ignition switch is placed in the ON/RUN position.
General Information
The following regulatory statement applies to all Radio Frequency (RF) devices equipped in this vehicle:
This device complies with Part 15 of the FCC Rules and with Innovation, Science and Economic DevelopmentCanada license-exempt RSS standard(s). Operation is subject to the following two conditions:
1.This device may not cause harmful interference, and
2.This device must accept any interference received, including interference that may cause undesired operation.
Le présent appareil est conforme aux CNR d`Innovation, Science and Economic Development applicables aux appareils radio exempts de licence. L'exploitation est autorisée aux deux conditions suivantes:
1.l'appareil ne doit pas produire de brouillage, et
2.l'utilisateur de l'appareil doit accepter tout brouillage radioélectrique subi, même si le brouillage est susceptible d'en compromettre le fonctionnement.
La operación de este equipo está sujeta a las siguientes dos condiciones:
1.es posible que este equipo o dispositivo no cause interferencia perjudicial y
2.este equipo o dispositivo debe aceptar cualquier interferencia, incluyendo la que pueda causar su operación no deseada.
NOTE:
Changes or modifications not expressly approved by the party responsible for compliance could void the user’s authority to operate the equipment.
SENTRYKEY
The Sentry Key Immobilizer system prevents unauthorized vehicle operation by disabling the engine. The system does not need to be armed or activated. Operation is automatic, regardless of whether the vehicle is locked or unlocked.
The system uses a key fob, keyless push button ignition and a Radio Frequency (RF) receiver to prevent unauthorized vehicle operation. Therefore, only key fobs that are programmed to the vehicle can be used to start and operate the vehicle. The system cannot reprogram a key fob obtained from another vehicle.

After placing the ignition switch in the ON/RUN position, the vehicle security light will turn on for three seconds for a bulb check. If the light remains on after the bulb check, it indicates that there is a problem with the electronics. In addition, if the light begins to flash after the bulb check, it indicates that someone attempted to start the engine with an invalid key fob. In the event that a valid key fob is used to start the engine but there is an issue with the vehicle electronics, the engine will start and shut off after two seconds.
If the vehicle security light turns on during normal vehicle operation (vehicle running for longer than 10 seconds), it indicates that there is a fault in the electronics. Should this occur, have the vehicle serviced as soon as possible by an authorized dealer.
CAUTION!
The Sentry Key Immobilizer system is not compatible with some aftermarket remote starting systems. Use of these systems may result in vehicle starting problems and loss of security protection.
All of the key fobs provided with your new vehicle have been programmed to the vehicle electronics.
Key Programming
Key fob programming is performed at an authorized dealer.
Replacement Keys
NOTE:
Only key fobs that are programmed to the vehicle electronics can be used to start and operate the vehicle. Once a key fob is programmed to a vehicle, it cannot be programmed to any other vehicle.
CAUTION!
Always remove the key fobs from the vehicle and lock all doors when leaving the vehicle unattended.
NOTE:
Duplication of key fobs may be performed at an authorized dealer. This procedure consists of programming a blank key fob to the vehicle electronics. A blank key fob is one that has never been programmed.
GETTING TO KNOW YOUR VEHICLE  21
21
When having the Sentry Key Immobilizer System serviced, bring all vehicle keys with you to an authorized dealer.
General Information
The following regulatory statement applies to all 2 Radio Frequency (RF) devices equipped in this vehicle:
This device complies with Part 15 of the FCC Rules and with Innovation, Science and Economic DevelopmentCanada license-exempt RSS standard(s). Operation is subject to the following two conditions:
1.This device may not cause harmful interference, and
2.This device must accept any interference received, including interference that may cause undesired operation.

22 GETTING TO KNOW YOUR VEHICLE
Le présent appareil est conforme aux CNR d`Innovation, Science and Economic Development applicables aux appareils radio exempts de licence. L'exploitation est autorisée aux deux conditions suivantes:
1.l'appareil ne doit pas produire de brouillage, et
2.l'utilisateur de l'appareil doit accepter tout brouillage radioélectrique subi, même si le brouillage est susceptible d'en compromettre le fonctionnement.
La operación de este equipo está sujeta a las siguientes dos condiciones:
1.es posible que este equipo o dispositivo no cause interferencia perjudicial y
2.este equipo o dispositivo debe aceptar cualquier interferencia, incluyendo la que pueda causar su operación no deseada.
NOTE:
Changes or modifications not expressly approved by the party responsible for compliance could void the user’s authority to operate the equipment.
VEHICLESECURITYALARM—IFEQUIPPED
The vehicle security alarm monitors the vehicle doors for unauthorized entry and the ignition switch for unauthorized operation. When the alarm is activated, the interior switches for door locks, power sliding doors and power liftgate are disabled. The vehicle security alarm provides both audible and visible signals. If something triggers the alarm, the vehicle security alarm will provide the following audible and visible signals: the horn will pulse, the park lamps and/or turn signals will flash, and the vehicle security light in the instrument cluster will flash.
To Arm The System
Follow these steps to arm the vehicle security alarm:
1.Make sure the vehicle’s ignition is placed in the OFF position. Refer to "Starting The Engine" in "Starting And Operating" for further information.
For vehicles equipped with Keyless Enter-N-Go — Passive Entry, make sure the vehicle ignition system is OFF.
2.Perform one of the following methods to lock the vehicle:
Push lock on the interior power door lock switch with the driver and/or passenger door open.
Push the lock button on the exterior Passive Entry Door Handle with a valid key fob available in the same exterior zone. Refer to "Keyless Enter-N-Go — Passive Entry" in “Doors” in this chapter for further information.
Push the lock button on the key fob.
3.If any doors are open, close them.
To Disarm The System
The vehicle security alarm can be disarmed using any of the following methods:
Push the unlock button on the key fob.
Grasp the Passive Entry Unlock Door Handle (if equipped). Refer to "Keyless Enter-N-Go — Passive Entry" in “Doors” in this chapter for further information.
Hands Free Liftgate Passive Entry activation (if equipped).
Cycle the vehicle ignition system out of the OFF position.
For vehicles equipped with Keyless Enter-N-Go — Passive Entry, push the keyless ignition START/STOP ignition button (requires at least one valid key fob in the vehicle).
NOTE:
The driver's door key cylinder and the liftgate button on the key fob cannot arm or disarm the vehicle security alarm.
The vehicle security alarm remains armed during power liftgate entry. Pushing the liftgate button will not disarm the vehicle security alarm. If someone enters the vehicle through the liftgate and opens any door, the alarm will sound.
When the vehicle security alarm is armed, the interior power door lock switches will not unlock the doors.
The vehicle security alarm is designed to protect your vehicle. However, you can create conditions where the system will give you a false alarm. If one of the previously described arming sequences has occurred, the vehicle security
alarm will arm regardless of whether you are in the vehicle or not. If you remain in the vehicle and open a door, the alarm will sound. If this occurs, disarm the vehicle security alarm.
If the vehicle security alarm is armed and the battery becomes disconnected, the vehicle security alarm will remain armed when the battery is reconnected; the exterior lights will flash, and the horn will sound. If this occurs, disarm the vehicle security alarm.
Rearming Of The System
If something triggers the alarm, and no action is taken to disarm it, the vehicle security alarm will turn the horn off after 29 seconds, 5 seconds between cycles, up to 8 cycles if the trigger remains active and then the vehicle security alarm will rearm itself.
DOORS
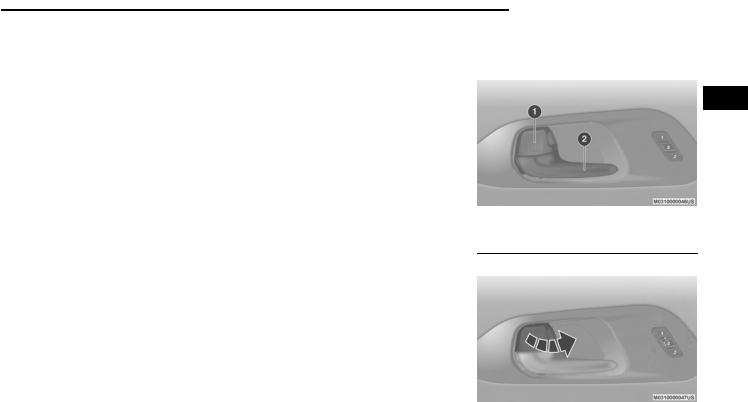
Manual Lock
To lock each door, rotate the door lock knob on each door trim panel forward. To unlock the front doors, pull the inside door handle to the first detent or rotate the door lock button until
GETTING TO KNOW YOUR VEHICLE  23
23
the ribbing is visible. To unlock the rear doors, rotate the door lock button until the red indicator is visible.
2
Manual Front Door Lock Location
1 — Manual Door Lock
2 — Door Handle
ManualDoor Lock Knob

24 GETTING TO KNOW YOUR VEHICLE
ManualRear Door Lock Location
1 — Door Handle
2 — Manual Door Lock
If the door lock button is locked (no ribbing is visible) when you shut the door, the door will lock. Therefore, make sure the key fob is not inside the vehicle before closing the door.
NOTE:
The manual door locks will not lock or unlock the liftgate.
WARNING!
For personal security and safety in the event of a collision, lock the vehicle doors before you drive as well as when you park and leave the vehicle.
(Continued)
WARNING! (Continued)
Never use the PARK position as a substitute for the parking brake. Always apply the parking brake fully when parked to guard against vehicle movement and possible injury or damage.
When exiting the vehicle, always make sure the keyless ignition node is in the “OFF” mode, remove the key fob from the vehicle and lock the vehicle.
Never leave children alone in a vehicle, or with access to an unlocked vehicle. Allowing children to be in a vehicle unattended is dangerous for a number of reasons. A child or others could be seriously or fatally injured. Children should be warned not to touch the parking brake, brake pedal or the gear selector.
Do not leave the key fob in or near the vehicle, or in a location accessible to children, and do not leave the ignition of a vehicle equipped with Keyless Enter-N-Go in the ACC or ON/RUN mode. A child could operate power windows, other controls, or move the vehicle.
Central Lock/Unlock — If Equipped
A power door lock switch is on each front door trim panel. Use this switch to lock or unlock the doors.
Driver Power Door Lock Switches
1 — Power Unlock Switch
2 — Power Lock Switch
If you push the power door lock switch while the ignition is in the ACC or ON/RUN position, and any front door is open, the power locks will not operate. This prevents you from accidentally locking your keys in the vehicle. Placing the ignition in the OFF position or closing the door will allow the locks to operate. A chime will sound if the ignition is in the ACC or ON/RUN position and a door is open, as a reminder to place the ignition in the OFF position and remove the key fob.

Unlock Doors Automatically On Exit — If Equipped
The Unlock Doors Automatically On Exit feature unlocks all of the vehicle doors when any door is opened. This will occur only after the gear selector has been placed into the PARK position, after the vehicle has been driven (the gear selector has been placed out of PARK and all doors closed).
The Unlock Doors Automatically On Exit feature will not operate if there is any manual operation of the door locks (lock or unlock).
For further information, refer to “Uconnect Settings” in “Multimedia”.
Keyless Enter-N-Go — Passive Entry
The Passive Entry system is an enhancement to the vehicle’s Remote Keyless Entry (RKE) system and a feature of Keyless Enter-N-Go. This feature allows you to lock and unlock the vehicle’s door(s) without having to push the key fob lock or unlock buttons.
NOTE:
Passive Entry may be programmed on/off. Refer to “Uconnect Settings” in “Multimedia” for further information.
If wearing gloves on your hands, or if it has been raining/snowing on the Passive Entry door handle, the unlock sensitivity can be affected, resulting in a slower response time.
If the vehicle is unlocked by Passive Entry and no door is opened within 60 seconds, the vehicle will re-lock and will arm the security alarm (if equipped).
The sliding side doors can be unlocked from the outside using the hands free or Passive Entry system.
The key fob may not be able to be detected by the vehicle passive entry system if it is located next to a mobile phone, laptop, or other electronic device; these devices may block the key fob’s wireless signal and prevent the passive entry handle from locking/unlocking the vehicle.
If set by the customer in the Uconnect Settings, unlocking with Passive Entry will initiate illuminated approach (low beams, license plate lamp, position lamps) for the time 0, 30 (default), 60 or 90 seconds. Passive Entry also initiates two flashes of the turn lamps.
GETTING TO KNOW YOUR VEHICLE  25
25
To Unlock From The Driver's Side:
With a valid key fob within 5 ft (1.5 m) of the driver’s door handle, grab the driver’s front door handle to unlock the drivers side doors (driver/ sliding door) automatically. The interior door 2 panel lock knob will rotate when the door is unlocked.
GrabThe DoorHandle To Unlock
NOTE:
If “Unlock All Doors 1st Press” is programmed, all doors and liftgate will unlock when you grab hold of the driver’s front door handle. To select between “Unlock Driver Door 1st Press” and “Unlock All Doors 1st Press,” refer to “Uconnect Settings” in “Multimedia” for further information.

26 GETTING TO KNOW YOUR VEHICLE
To Unlock From The Passenger Side:
With a valid key fob within 5 ft (1.5 m) of the passenger door handle, grab the front passenger door handle to unlock all four doors and the liftgate automatically. The interior door panel lock knob will rotate when the door is unlocked.
NOTE:
All doors will unlock when the front passenger door handle is grabbed regardless of the driver’s door unlock preference setting (“Unlock Driver Door 1st Press” or “Unlock All Doors 1st Press”).
Preventing Inadvertent Locking Of Key Fob In Vehicle (FOBIK-Safe)
To minimize the possibility of unintentionally locking a key fob inside your vehicle, the Passive Entry system is equipped with an automatic door unlock feature.
FOBIK-Safe only executes in vehicles with Passive Entry. There are three situations that trigger a FOBIK-Safe search in any Passive Entry vehicle:
A lock request is made by a valid key fob while a door is open.
A lock request is made by the Passive Entry door handle while a door is open.
A lock request is made by the door panel switch while the door is open.
When any of these situations occur, after all open doors are shut, the FOBIK-Safe search will be executed. If it finds a key fob inside the car, and it does not find any key fob outside the car, then the car will unlock and alert the customer.
NOTE:
The vehicle will only unlock the doors when a valid key fob is detected inside the vehicle, and no valid key fob is detected outside the vehicle. The vehicle will not unlock the doors when any of the following conditions are met:
The doors are manually locked using the door lock knobs.
There is a valid key fob outside the vehicle and within 5 ft (1.5 m) of either Passive Entry door handle.
Three attempts are made to lock the doors using the door panel switch and then close the doors.
NOTE:
On the third attempt ALL doors will lock and the key fob can be locked in the vehicle.
To Enter The Liftgate
With a valid key fob within 5 ft (1.5 m) of the liftgate, cycle the handle to open the liftgate and pull the liftgate open with one fluid motion.
NOTE:
If “Unlock Driver Door 1st Press” is programmed, only the liftgate will unlock when the liftgate release handle is pulled. If “Unlock All Doors 1st Press” is programmed, all doors and the liftgate will unlock when the liftgate release handle is pulled. To select between “Unlock Driver Door 1st Press” and “Unlock All Doors 1st Press,” refer to “Uconnect Settings” in “Multimedia” for further information.
To Lock The Vehicle’s Doors
With one of the vehicle’s key fobs within 5 ft (1.5 m) of the driver or passenger front door handle, push the door handle lock button to lock all four doors and the liftgate.

PushThe Door Handle ButtonToLock
Do NOT grab the door handle, when pushing the door handle button. This could unlock the door(s).
Do NOT GrabThe Door Handle WhenLocking
NOTE:
After pushing the door handle button, you must wait two seconds before you can lock or
unlock the doors, using either Passive Entry door handle. This is done to allow you to check if the vehicle is locked by pulling the door handle, without the vehicle reacting and unlocking.
The Passive Entry system will not operate if the key fob battery is depleted.
The vehicle doors can also be locked by using the key fob lock button, or the lock button located on the vehicle’s interior door panel.
General Information
The following regulatory statement applies to all Radio Frequency (RF) devices equipped in this vehicle:
This device complies with Part 15 of the FCC Rules and with Innovation, Science and Economic DevelopmentCanada license-exempt RSS standard(s). Operation is subject to the following two conditions:
1.This device may not cause harmful interference, and
2.This device must accept any interference received, including interference that may cause undesired operation.
GETTING TO KNOW YOUR VEHICLE 27 |
|
Le présent appareil est conforme aux CNR |
|
d`Innovation, Science and Economic Develop- |
|
ment applicables aux appareils radio exempts |
|
de licence. L'exploitation est autorisée aux deux |
|
conditions suivantes: |
2 |
|
1.l'appareil ne doit pas produire de brouillage, et
2.l'utilisateur de l'appareil doit accepter tout brouillage radioélectrique subi, même si le brouillage est susceptible d'en compromettre le fonctionnement.
La operación de este equipo está sujeta a las siguientes dos condiciones:
1.es posible que este equipo o dispositivo no cause interferencia perjudicial y
2.este equipo o dispositivo debe aceptar cualquier interferencia, incluyendo la que pueda causar su operación no deseada.
NOTE:
Changes or modifications not expressly approved by the party responsible for compliance could void the user’s authority to operate the equipment.
Loading...