


SECTION
TABLE OF CONTENTS
PAGE
1
2
3
4
5
6
7
8
9
10
. . . . . . . . . . . . . . . . . . . . . . . . . . . . . . . . . . . . . . . . . . . . . . . . . . . . . . . . . . .INTRODUCTION |
. . 3 |
1 |
|
|
|
THINGS TO KNOW BEFORE STARTING YOUR VEHICLE . . . . . . . . . . . . . . . . . . . . . . . . . |
. . 7 |
2 |
|
|
|
UNDERSTANDING THE FEATURES OF YOUR VEHICLE . . . . . . . . . . . . . . . . . . . . . . . . . . . |
. 47 |
3 |
|
|
|
UNDERSTANDING YOUR INSTRUMENT PANEL . . . . . . . . . . . . . . . . . . . . . . . . . . . . . . . . . |
. 87 |
4 |
|
|
|
STARTING AND OPERATING . . . . . . . . . . . . . . . . . . . . . . . . . . . . . . . . . . . . . . . . . . . . . . . . |
117 |
5 |
|
|
|
WHAT TO DO IN EMERGENCIES . . . . . . . . . . . . . . . . . . . . . . . . . . . . . . . . . . . . . . . . . . . . . |
157 |
6 |
|
|
|
MAINTAINING YOUR VEHICLE . . . . . . . . . . . . . . . . . . . . . . . . . . . . . . . . . . . . . . . . . . . . . . |
175 |
7 |
|
|
|
MAINTENANCE SCHEDULES . . . . . . . . . . . . . . . . . . . . . . . . . . . . . . . . . . . . . . . . . . . . . . . . |
225 |
8 |
|
|
|
IF YOU NEED CONSUMER ASSISTANCE . . . . . . . . . . . . . . . . . . . . . . . . . . . . . . . . . . . . . . . |
235 |
9 |
|
|
|
INDEX . . . . . . . . . . . . . . . . . . . . . . . . . . . . . . . . . . . . . . . . . . . . . . . . . . . . . . . . . . . . . . . . . . . |
243 |
10 |

|
INTRODUCTION |
|
|
|
|
|
|
|
1 |
||
|
|
|
|
|
|
CONTENTS |
|
|
|
|
|
m Introduction . . . . . . . . . . . . . . . . . . |
. . . . . . . . . 4 |
m Warnings And Cautions . . . . . . . . . . . . . . . . . . |
6 |
|
|
m How To Use This Manual . . . . . . . . |
. . . . . . . . . 4 |
m Vehicle Identification Number . . . . . . . . . . . . . . |
6 |
|
|

4 INTRODUCTION
INTRODUCTION
This manual has been prepared with the assistance of service and engineering specialists to acquaint you with the operation and maintenance of your Crossfire. It is supplemented by a Warranty Information Booklet and various customer-oriented documents. You are urged to read these publications carefully. Following the instructions and recommendations in this manual will help assure safe and enjoyable operation of your vehicle.
NOTE: After you read the manual, it should be stored in the vehicle for convenient reference and remain with the vehicle when sold.
When it comes to service, remember that your authorized dealer knows your vehicle best, has the factory-trained technicians and genuine Mopart parts, and is interested in your satisfaction.
WARNING!
Engine exhaust, some of its constituents, and certain vehicle components contain or emit chemicals known to the State of California to cause cancer and birth defects or other reproductive harm.
HOW TO USE THIS MANUAL
Consult the table of contents to determine which section contains the information you desire.
The detailed index, at the rear of this manual, contains a complete listing of all subjects.
Consult the following table for a description of the symbols that may be used on your vehicle or throughout this owner's manual:

INTRODUCTION 5
1
6 INTRODUCTION
WARNINGS AND CAUTIONS
This manual contains WARNINGS against operating procedures which could result in an accident or bodily injury. It also contains CAUTIONS against procedures which could result in damage to your vehicle. If you do not read this entire manual you may miss important information. Observe all Warnings and Cautions.
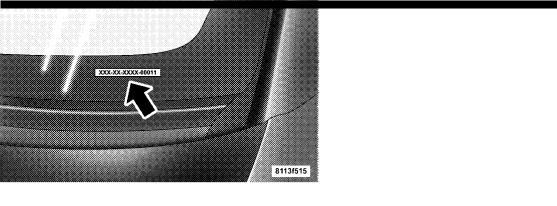
VEHICLE IDENTIFICATION NUMBER
The vehicle identification number (VIN) is located beneath the left front corner of the instrument panel, visible through the windshield. This number also appears on the Automobile Information Disclosure Label affixed to a window on your vehicle. Save this label as a convenient record of your vehicle identification number and optional equipment.

THINGS TO KNOW BEFORE STARTING YOUR VEHICLE
2
CONTENTS
m A Word About Your Keys . . . . . . . . . . . . . . . . . |
9 |
N Keys . . . . . . . . . . . . . . . . . . . . . . . . . . . . . . . |
9 |
N Obtaining Replacement Keys . . . . . . . . . . . . . . |
9 |
N Ignition Key Removal . . . . . . . . . . . . . . . . . . . |
10 |
N Key-In-Ignition Reminder . . . . . . . . . . . . . . . . |
10 |
m Glove Compartment Lock . . . . . . . . . . . . . . . . . |
10 |
m Door Locks . . . . . . . . . . . . . . . . . . . . . . . . . . . |
11 |
N Central Locking Switch . . . . . . . . . . . . . . . . . . |
12 |
N Automatic Central Locking . . . . . . . . . . . . . . . |
12 |
N General Notes On The Central Locking |
|
System . . . . . . . . . . . . . . . . . . . . . . . . . . . . . . |
13 |
N Emergency Unlocking Feature . . . . . . . . . . . . . |
13 |
N Start Lockout . . . . . . . . . . . . . . . . . . . . . . . . . |
13 |
m Remote Keyless Entry . . . . . . . . . . . . . . . . . . . . |
14 |
N To Unlock The Doors . . . . . . . . . . . . . . . . . . . |
14 |
N To Lock The Doors . . . . . . . . . . . . . . . . . . . . . |
14 |
N Panic Alarm . . . . . . . . . . . . . . . . . . . . . . . . . . |
15 |
N To Use The Panic Alarm . . . . . . . . . . . . . . . . . |
15 |
N General Information . . . . . . . . . . . . . . . . . . . . |
15 |
N Transmitter Battery Service . . . . . . . . . . . . . . . |
16 |
m Security Alarm System . . . . . . . . . . . . . . . . . . . |
17 |
N Tow-Away Alarm . . . . . . . . . . . . . . . . . . . . . . |
17 |

8 THINGS TO KNOW BEFORE STARTING YOUR VEHICLE
m Power Windows . . . . . . . . . . . . . . . . . . . . . . . .18
m Rear Liftgate Release . . . . . . . . . . . . . . . . . . . .19
m Occupant Restraints . . . . . . . . . . . . . . . . . . . . .20
N Lap/Shoulder Belts . . . . . . . . . . . . . . . . . . . . .21
N Seat Belts And Pregnant Women . . . . . . . . . . . .25
N Seat Belt Extender . . . . . . . . . . . . . . . . . . . . . .25
N Supplemental Restraint System (SRS) - Airbag . .26
N Child Restraint . . . . . . . . . . . . . . . . . . . . . . . .36
m Engine Break-In Recommendations . . . . . . . . . . |
43 |
m Safety Tips . . . . . . . . . . . . . . . . . . . . . . . . . . . . |
44 |
N Exhaust Gas . . . . . . . . . . . . . . . . . . . . . . . . . . |
44 |
N Safety Checks You Should Make Inside The |
|
Vehicle . . . . . . . . . . . . . . . . . . . . . . . . . . . . . . |
44 |
N Periodic Safety Checks You Should Make |
|
Outside The Vehicle . . . . . . . . . . . . . . . . . . . . |
45 |
A WORD ABOUT YOUR KEYS
You can insert the double-sided keys into the locks with either side up.
The dealer that sold you your new vehicle has the key code numbers for your vehicle locks. These numbers can be used to order duplicate keys only from an authorized dealer. Ask your dealer for these numbers and keep them in a safe place.
CAUTION!
An unlocked car is an invitation to thieves. Always remove the key from the ignition and lock all the doors when leaving the vehicle unattended.
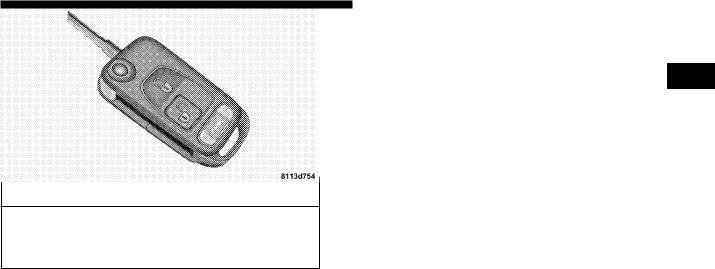
Keys
Included with your vehicle are two remote controls with folding keys. The remote control operates all locks on the vehicle, including the locking fuel filler door.
To release the key from the folded position, press the button. The key unfolds from the fob.
THINGS TO KNOW BEFORE STARTING YOUR VEHICLE 9
The transmitter for the remote control is located in the key fob.
2
Obtaining Replacement Keys
Your vehicle is equipped with a theft deterrent locking system requiring a special key manufacturing process. For security reasons, replacement keys can only be obtained from your authorized dealer.
Important!
Removing the key from the steering lock activates the start lock-out. The engine cannot be started.
10 THINGS TO KNOW BEFORE STARTING YOUR VEHICLE
Turning the key in the steering lock to the ON/RUN position deactivates the start lock-out.
NOTE: In case the engine cannot be started, and START and ERROR are shown in the odometer display field, the system is not operational. Contact an authorized dealer.
Ignition Key Removal
Turn the key to the LOCK position and remove the key.
NOTE: For vehicles with automatic transmissions, if you try to remove the key before you place the shift lever in PARK, the key may become trapped temporarily in the
key cylinder. If this occurs, turn the key clockwise slightly, then remove the key as described.
Key-In-Ignition Reminder
Opening the driver's door when the key is in the ignition sounds a signal to remind you to remove the key.
GLOVE COMPARTMENT LOCK
The glove compartment can be locked by turning the key straight up to the vertical or right position, and then removing the key.
To unlock the glove compartment, turn the key to the horizontal or left position, and then remove the key.
DOOR LOCKS
The vehicle doors can be locked when the doors are closed by either manually pressing the button down at the top of the door panel, pressing and releasing the bottom portion of the central locking switch located in the console, or by pressing and releasing the Lock transmit button on the key fob. Also, by turning the key clockwise in the driver's door, both doors, liftgate and fuel door will lock.
THINGS TO KNOW BEFORE STARTING YOUR VEHICLE 11
The doors can be unlocked by pulling on the inside door handle, pressing and releasing the top portion of the central locking switch located in the console, or by pressing and releasing the Unlock transmit button on the 2 key fob. Both doors can also be unlocked by turning the key counterclockwise in the driver's door.
NOTE: If the key in the ignition switch is in the ON/RUN position, the vehicle cannot be locked or unlocked with the remote control.
When you lock the vehicle, both door lock buttons should move down. If either one stays up, the respective door is not properly closed. You should then unlock the vehicle, open and reclose the door, and lock the vehicle again.
Each individual door can be locked with the respective door lock button - the driver's door can only be locked when it is closed. If the vehicle has previously been locked from the outside, only the door being opened from the inside will unlock, and the alarm will come on. The other door, the rear liftgate, and fuel filler door will remain locked.

12 THINGS TO KNOW BEFORE STARTING YOUR VEHICLE
NOTE: In case of a malfunction in the central locking system, the doors can be locked and unlocked individually. To lock, turn the key in the driver's door lock clockwise, or push down the lock buttons. To unlock, turn the key in the driver's door lock counterclockwise, or pull the inside door handles.
WARNING!
For personal security and safety in the event of an accident, lock the vehicle doors as you drive and when you park and leave the vehicle.
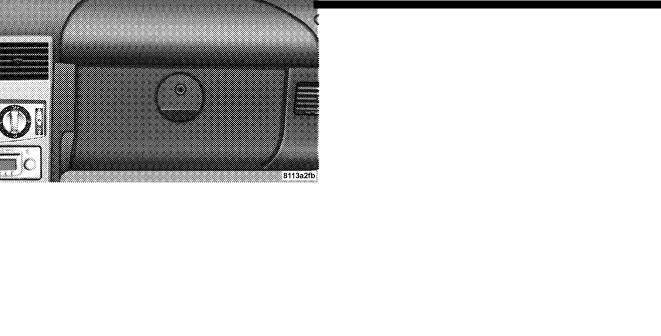
Central Locking Switch
The central locking switch is located in the console. The doors and rear liftgate can only be locked with the central locking switch if both doors are closed.
If the vehicle was previously locked with the remote control or key, the doors and rear liftgate cannot be unlocked with the central locking switch. If the vehicle
was previously locked with the central locking switch, the complete vehicle is unlocked when a door is opened from the inside.
NOTE: The fuel filler door cannot be locked or unlocked with the central locking switch.
Automatic Central Locking
The central locking switch also operates the automatic central locking feature. With the automatic central locking feature activated, the doors and rear liftgate are locked at vehicle speeds of approximately 9 mph (15 km/h) or more; however, the fuel filler door remains unlocked.
To activate this feature, turn the key to the ON/RUN position and hold the upper portion of the switch for a minimum of five seconds. To deactivate, turn the key to the ON/RUN position and hold the lower portion of the switch for a minimum of five seconds.
NOTE: If the doors are unlocked with the central locking switch after activating the automatic central

locking feature and neither door is opened, the doors remain unlocked even at vehicle speeds of approximately 9 mph (15 km/h) or more.
NOTE: If you attempt to lock the doors with the key in the ignition and the driver's door open, the doors will not lock.
General Notes On the Central Locking System
If the key in the ignition switch is in the ON/RUN position, the vehicle cannot be locked or unlocked with the remote control.
If the vehicle cannot be locked or unlocked at any time with the remote control, it may be necessary to change the batteries in the remote.
NOTE: To help prevent the vehicle battery from discharging during short periods of inactivity, perform the following:
1.Make sure that the rear liftgate, hood and doors are completely closed.
2.Make sure that remote transmitter is operating and that the battery is good.
THINGS TO KNOW BEFORE STARTING YOUR VEHICLE 13
3. Make sure that the hood, rear liftgate and door switches are in adjustment.
Perform the quick system check which follows: Use 2 the remote transmitter to set the alarm. If the parking lamps flash three times, the system is operating properly. If not, there is a problem with a switch or the system. See your authorized dealer for service.
Emergency Unlocking Feature
In the case of an accident, the doors unlock automatically a short time after a strong deceleration is detected, such as in a collision (this is intended to aid rescue and exit). However, the key must still be in the ignition.
Start Lockout
Removing the key from the ignition switch activates the start lockout. The engine cannot be started. Turning the key to the ON/RUN position deactivates the start lockout. If the engine cannot be started, and the messages START and ERROR are shown in the odometer display field, the system is not operational. Contact an authorized dealer.
14 THINGS TO KNOW BEFORE STARTING YOUR VEHICLE
REMOTE KEYLESS ENTRY
This feature allows you to lock or unlock the vehicle from remote locations using a hand-held transmitter located in the key fob. You don't have to point the transmitter at the vehicle to activate the system. The vehicle doors, rear liftgate, and fuel filler door can be locked and unlocked using the remote control.
To Unlock the Doors:
Press and release the unlock button on the key fob.
NOTE: If within 40 seconds of unlocking with the key fob, neither door is opened, the key is not inserted in the ignition switch, or the central locking switch is not activated, the vehicle will automatically lock.
Press the Unlock transmit button on the key fob once to unlock driver's door, rear liftgate, and fuel filler door. Press the Unlock transmit button twice to unlock both doors, rear liftgate, and fuel filler door.
To Lock The Doors:
Press the Lock button on the key fob once. All turn signal lights blink three times to indicate that the vehicle is locked. If the turn signal lights do not blink, a door or rear liftgate is not closed properly.
The entire vehicle, including the fuel filler door, may be locked or unlocked by using the key in the driver's door. The doors and liftgate can be locked or unlocked by pressing the central locking switch located in the center console.

If the vehicle cannot be locked or unlocked by pressing the transmit button, then it may be necessary to change the batteries in the remote control.
Panic Alarm
The panic alarm unlocks the driver's door, turns on the interior lights, flashes the foglights and sounds the horn for about three minutes or until the alarm is turned off. The vehicle can be driven while in the Panic mode.
THINGS TO KNOW BEFORE STARTING YOUR VEHICLE 15
To Use the Panic Alarm:
Press and hold the Panic button to activate the alarm. Press and hold the Panic button or unlock the door with the key to deactivate the alarm. The alarm will also shut 2 off after three minutes or when vehicle speed reaches 15 mph (24 km/h).
General Information
This transmitter complies with FCC rules part 15. Operation is subject to the following conditions:
1. This device may not cause harmful interference.
16 THINGS TO KNOW BEFORE STARTING YOUR VEHICLE
2. This device must accept any interference that may be received, including interference that may cause undesired operation.
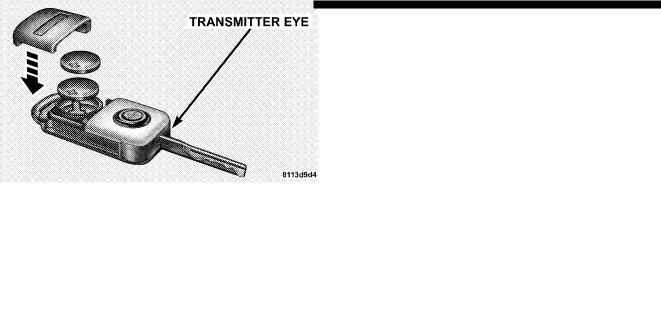
Transmitter Battery Service
The recommended replacement Lithium battery is Panasonict CR 2025 or equivalent.
To change the batteries:
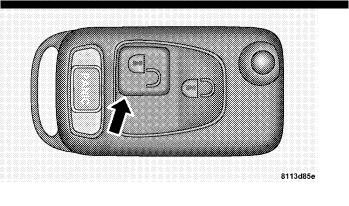
²Press release button (2) on the key fob. The key folds out.
²Press the battery cover (1) in the direction of the arrow.
² Remove the old batteries.
²Insert the new batteries in the direction of the arrow with the positive symbol facing upwards.
²Replace the battery cover and press on it until you feel it engage.
NOTE: Only replace the batteries in pairs.
The system may have to be resynchronized if the transmitter is without voltage for several minutes. To synchronize, aim the transmitter eye at the vehicle and briefly press either the Lock or the Unlock button twice. Within

approximately 30 seconds, insert the key in the ignition and turn it to the ON/RUN position. The remote control should once again be operational.
SECURITY ALARM SYSTEM
The system monitors the doors, rear liftgate, hood, and ignition for unauthorized operation. The security alarm system is automatically armed or disarmed with the remote control or any of your vehicle's keys by locking or unlocking the vehicle.
The antitheft alarm is armed within approximately 10 seconds after locking the vehicle. A blinking light in the tow away alarm switch indicates that the alarm is armed. Once the alarm system has been armed, the exterior vehicle lights will flash and an alarm will sound when a door, the rear liftgate, the hood, or the glove compartment is opened, or if someone attempts to raise the vehicle for towing. The alarm will flash the exterior lamps for approximately three minutes and sound an audible alarm for 30 seconds. The alarm will stay on even if the activating element is immediately closed.
THINGS TO KNOW BEFORE STARTING YOUR VEHICLE 17
Tow-Away Alarm
The tow-away alarm switch is located on the console. To deactivate for towing or jacking up the vehicle, press and release the upper portion of the switch. Press and release 2 the lower portion to activate it again.
After the alarm system has been armed, the exterior vehicle lights will flash and an alarm will sound when someone attempts to raise the vehicle. The alarm will flash the exterior lamps for approximately three minutes and sound an audible alarm for 30 seconds. The alarm will stay on even if the vehicle is immediately lowered.
To cancel the alarm, insert the key into the ignition switch or press a transmit button on the key fob.
To prevent triggering the tow-away alarm feature when parking on a surface subject to movement (such as a ferry), switch off the tow-away alarm. To do so, turn the key in the ignition switch to the OFF/LOCK or ACC position, or remove the key from the ignition switch. Press the tow-away alarm switch and the indicator light will illuminate briefly. Exit the vehicle, and lock the vehicle with the key or the remote control.

18 THINGS TO KNOW BEFORE STARTING YOUR VEHICLE
The tow-away alarm remains switched off until the vehicle is locked again with the key or the remote control, at which time it is automatically reactivated.
POWER WINDOWS
The power window switches are located in the console.
To operate, turn the key in the ignition switch to the ACC or ON/RUN position. Press the switch in to the resistance point to open; release the switch when the window is in the desired position.
For express opening of windows, press the switch past the resistance point and release; the window lowers to the fully open position. To interrupt the procedure, briefly press the switch again and release.
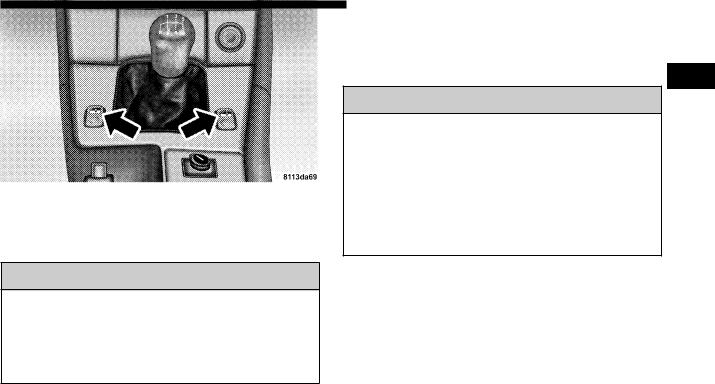
When closing the windows, be sure that there is no danger of anyone being harmed by the closing procedure.
WARNING!
When leaving the vehicle, always remove the key from the ignition switch, and lock the vehicle. Do not leave children unattended in the vehicle, or with access to an unlocked vehicle. Unsupervised use of vehicle equipment can cause serious personal injury.
THINGS TO KNOW BEFORE STARTING YOUR VEHICLE 19
REAR LIFTGATE RELEASE
You can open the rear liftgate by using the handle located
on the liftgate just above the rear license plate pocket.
2
WARNING!
Do not allow children to have access to the rear cargo area by climbing into the rear cargo area from outside, or through the inside of the vehicle. Always close the liftgate when your vehicle is unattended. Once in the cargo area, young children may not be able to escape, even if they entered through the rear seat. If trapped in the cargo area, children can die from suffocation or heat stroke.

20 THINGS TO KNOW BEFORE STARTING YOUR VEHICLE
OCCUPANT RESTRAINTS
Some of the most important safety features in your vehicle are the restraint systems. These include the lap/ shoulder seat belts for the driver and passenger, emergency tensioning retractors for the seat belts, and front and side airbags for the driver and passenger. If you will be carrying children too small for adult-size belts, the passenger side seat belt also can be used to hold infant and child restraint systems.
Please pay close attention to the information in this section. It tells you how to use your restraint system properly to keep you and your passengers as safe as possible.
WARNING!
In a collision, you and your passengers can suffer much greater injuries if you are not properly buckled up. You can strike the interior of your vehicle or other occupants, or you can be thrown out of the vehicle. Always be sure you and others in your vehicle are buckled up properly.
Buckle up even though you are an excellent driver, even on short trips. Someone on the road may be a poor driver and cause a collision that includes you. This can happen far away from home or on your street.
Research has shown that seat belts save lives. They also can reduce the seriousness of injuries in a collision. Some of the worst injuries happen when people are thrown from the vehicle. Seat belts provide protection from that, and they reduce the risk of injury caused by striking the inside of the vehicle. Everyone in a motor vehicle needs to be buckled up all the time.
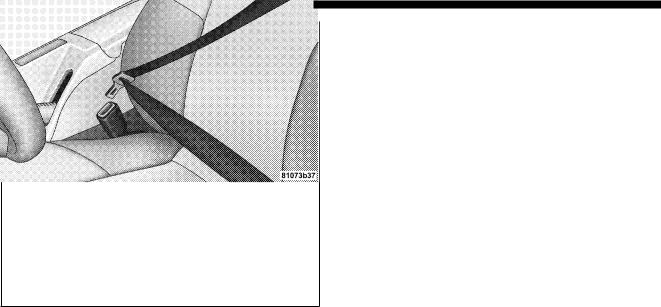
Lap/Shoulder Belts
Each seating position is equipped with a combined lap/shoulder belt system.
The belt webbing retractor will lock only during very sudden stops or impacts. This feature allows the shoulder part of the belt to move freely with you under normal conditions. But, in a collision, the belt will lock and reduce the risk of your striking the inside of the vehicle or being thrown out. The seat belts are also equipped with emergency tensioning retractors. These tensioning retractors are located in each belt's inertia reel and become operationally ready with the key in the ignition switch turned to the ACC or ON/RUN positions. The emergency tensioning retractors are designed to activate during frontal and rear impacts. They remove slack from the belts in such a way that the seat belts fit more snugly against the body, restricting its forward movement as much as possible.
THINGS TO KNOW BEFORE STARTING YOUR VEHICLE 21
In cases of other frontal impacts, rollovers, certain side impacts, rear collisions or other accidents without sufficient frontal or rear impact forces, the emergency tensioning retractors will not be activated. The driver and 2 passenger will then be protected by the fastened seat belts and inertia reel in the usual manner.
22 THINGS TO KNOW BEFORE STARTING YOUR VEHICLE
WARNING!
²Wearing a seat belt incorrectly is dangerous. Seat belts are designed to go around the large bones of your body. These are the strongest parts of your body and can take the forces of a collision the best. Wearing your belt in the wrong place could make your injuries in a collision much worse. You might suffer internal injuries, or you could even slide out of part of the belt. Follow these instructions to wear your seat belt safely and to keep your passengers safe, too.
²Two people should never be belted into a single seat belt. People belted together can crash into one another in an accident, hurting one another badly. Never use a lap/shoulder belt or a lap belt for more than one person, no matter what their size.
Lap/Shoulder Belt Operating Instructions
1. Enter the vehicle and close the door. Sit back and adjust the seat.

2. The seat belt latch plate is above the back of your seat. Grasp the latch plate and pull out the belt. Slide the latch plate up the webbing as far as necessary to make the belt go around your lap.
3.When the belt is long enough to fit, insert the latch plate into the buckle until you hear a ªclick.º
4.Position the lap belt across your thighs, below your abdomen. To remove slack in the lap belt portion, pull up a little on the shoulder belt, as shown.
THINGS TO KNOW BEFORE STARTING YOUR VEHICLE 23
2
5.To loosen the lap belt if it is too tight, tilt the latch plate away from you and pull on the lap belt. Remember that a snug belt reduces the risk of sliding under the belt in a collision.
6.Position the shoulder belt on your chest so that it is comfortable and not resting on your neck. The retractor will withdraw any slack in the belt.
7.To release the belt, push the red button on the buckle. The belt will automatically retract to its stowed position. If necessary, slide the latch plate down the webbing to allow it to retract fully.
24 THINGS TO KNOW BEFORE STARTING YOUR VEHICLE
WARNING!
²A belt that is buckled into the wrong buckle will not protect you properly. The lap portion could ride too high on your body, possibly causing internal injuries. Always buckle your belt into the buckle nearest you.
²A belt that is too loose will not protect you as well. In a sudden stop you could move too far forward, increasing the possibility of injury. Wear your seat belt snugly.
²A belt that is worn under your arm is very dangerous. Your body could strike the inside surfaces of the vehicle in a collision, increasing head and neck injury. A belt worn under the arm can cause internal injuries. Ribs aren't as strong as shoulder bones. Wear the belt over your shoulder so that your strongest bones will take the force in a collision.
²A shoulder belt placed behind you will not protect you from injury during a collision. You are more likely to hit your head in a collision if you do not wear your shoulder belt. The lap and shoulder belt are meant to be used together.
WARNING!
²A lap belt worn too high can increase the risk of internal injury in a collision. The belt forces won't be at the strong hip and pelvic bones, but across your abdomen. Always wear the lap belt as low as possible and keep it snug.
²A twisted belt can't do its job as well. In a collision it could even cut into you. Be sure the belt is straight. If you can't straighten a belt in your vehicle, take it to an authorized dealer and have it fixed.
WARNING!
Seat belt systems must always be replaced after an impact severe enough to fire the emergency locking retractors. If there is any question about the condition of your seat belt system, take the vehicle to an authorized dealer for an inspection.

WARNING!
A frayed or torn belt could rip apart in a collision and leave you with no protection. Inspect the belt system periodically, checking for cuts, frays, or loose parts. Damaged parts must be replaced immediately. Do not disassemble or modify the system. Seat belt assemblies must be replaced after an accident if they have been damaged (bent retractor, torn webbing, etc.)
Seat Belts and Pregnant Women
We recommend that pregnant women use the seat belts throughout their pregnancy. Keeping the mother safe is the best way to keep the baby safe.
Pregnant women should wear the lap part of the belt across the thighs and as snug across the hips as possible. Keep the belt low so that it does not come across the abdomen. That way the strong bones of the hips will take the force if there is a collision.
THINGS TO KNOW BEFORE STARTING YOUR VEHICLE 25
Seat Belt Extender
If a seat belt is too short even when fully extended, an authorized dealer can provide you with a seat belt extender. This extender should be used only if the 2 existing belt is not long enough. When it is not required, remove the extender and store it.
WARNING!
Using a seat belt extender when not needed can increase the risk of injury in a collision. Only use the extender when the lap belt is not long enough when it is worn low and snug, and in the recommended seating positions. Remove and store the extender when not needed.
26 THINGS TO KNOW BEFORE STARTING YOUR VEHICLE
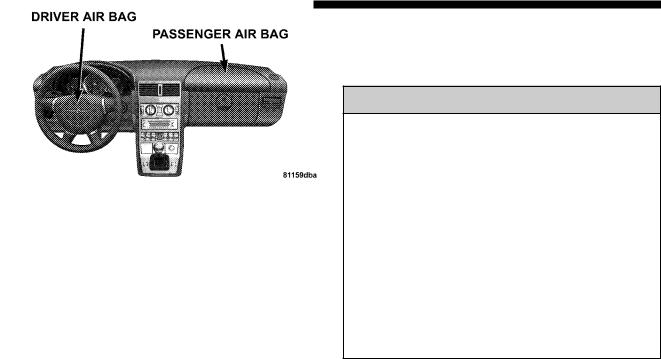
Supplemental Restraint System (SRS) - Airbag
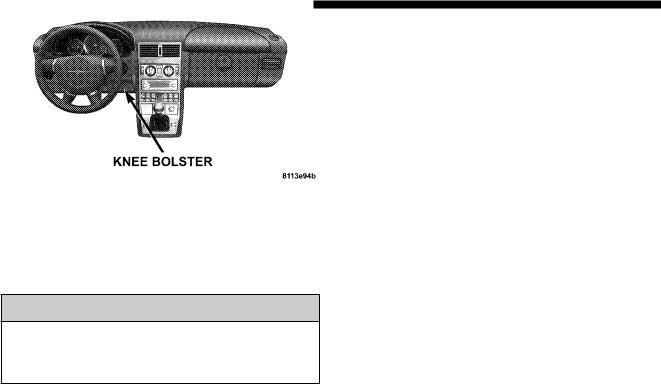
This vehicle has airbags for the driver and passenger as a supplement to the seat belt restraint systems. The driver's airbag is mounted in the steering wheel. The passenger frontal airbag is mounted in the instrument panel, under a cover marked SRS/AIRBAG.
These airbags inflate in higher speed frontal impacts. They work with the instrument panel knee bolster and the seat belts to provide improved protection for the driver and passenger.
The vehicle is also equipped with side airbags, located in the driver and passenger doors. Side airbags also work with seat belts to improve occupant protection.
WARNING!
²Do not put anything on or around the front airbag covers or attempt to manually open them. You may damage the airbags and you could be injured because the airbags are not there to protect you. These protective covers are designed to open only when the airbags are inflated.
²Do not place objects between you and the side airbags; the performance could be adversely affected and/or objects could be pushed into you, causing serious injury.
²Do not attach cup holders or any other objects on or around the door. The inflating side airbag could drive objects into occupants, causing serious injury.

The seat belts are designed to protect you in many types of collisions. The front airbags deploy only in moderate to severe front collisions. In certain types of collisions, both the front and side airbags may be triggered. But even in collisions where the airbags work, you need the seat belts to keep you in the right position for the airbags to protect you properly.
Here are some simple steps you can take to minimize the risk of harm from a deploying airbag.
1. Infants in rear-facing child safety seats should NEVER ride in the front seat of a vehicle with a passenger frontal airbag unless the airbag is shut OFF. See ªPassenger Airbag On/Off Switchº and ªTo Shut Off the Passenger Airbag.º The rear-facing seat places them too close to the passenger air bag in the event of a crash. An airbag deployment can cause severe injury or death to infants in this position.
Children that are not big enough to properly wear the vehicle seat belt (see section on ªChild Restraintº) should be secured in child safety seats or booster seats that are appropriate for the child's age, height, and weight.
THINGS TO KNOW BEFORE STARTING YOUR VEHICLE 27
Older children who do not use child safety seats or |
|
booster seats should ride properly buckled. Never allow |
|
children to place the shoulder belt behind them or under |
2 |
the arm. |
If a child from 1 to 12 years old must ride in the vehicle, move the seat as far back as possible, shut off the passenger airbag, and use the proper child restraint. See the section on ªChild Restraint.º
You should read the instructions provided with your child restraint or belt-positioning booster seat to make sure that you are using it properly.
2.All occupants should wear their lap and shoulder belts properly.
3.The driver and passenger seats should be moved back as far as practical to allow the front airbags room to inflate.
4.Do not lean against the door, as the side airbags will inflate forcefully into the space between you and the door. (See the section on ªSide Airbags.º)

28 THINGS TO KNOW BEFORE STARTING YOUR VEHICLE
WARNING!
²Relying on the airbags alone could lead to more severe injuries in a collision. The airbags work with your seat belt to restrain you properly. In some collisions the airbags won't deploy at all. Always wear your seat belts even though you have airbags.
²Being too close to the steering wheel or instrument panel during airbag deployment could cause serious injury.
²Airbags need room to inflate. Sit back, comfortably extending your arms to reach the steering wheel or instrument panel.
²The side airbags also need room to inflate. Do not lean against the door. Sit upright in the center of the seat.
Airbag System Components
The airbag system consists of the following:
² Airbag control module and internal crash sensor
²AIRBAG readiness light
²Driver and passenger frontal airbag/inflator units
²Driver and passenger side airbag/inflator units
²Passenger airbag On/Off switch and indicator light
²Unique steering wheel and column
²Unique instrument panel
²Interconnecting wiring
²Knee impact bolster
²Side impact sensors
How the Front Airbag System Works
²A crash sensor in the occupant compartment determines if a frontal impact is severe enough to require the airbag. The sensor will not detect side, roll over, or rear impacts. The sensor is connected to the diagnostic unit and to the airbag/inflator unit.
²The Occupant Restraint Controller monitors the readiness of the electronic parts of the system whenever the ignition switch is in the START or ON/RUN positions.
These include all of the items listed above except the knee bolster, the instrument panel, and the steering wheel and column.
²The Occupant Restraint Controller also turns on the AIRBAG light in the instrument panel for four seconds when the ignition is first turned on, then turns the light off. If it detects a malfunction in any part of the system, it turns on the light either momentarily or continuously depending on the condition that is present at the time.
²The airbag/inflator units are in the center of the steering wheel and in the instrument panel. The words SRS/AIRBAG are embossed on the airbag covers.
WARNING!
Ignoring the AIRBAG light in your instrument panel could mean you won't have the airbags to protect you in a collision. If the light does not come on, stays on after you start the vehicle, or if it comes on as you drive, have the airbag system checked right away.
THINGS TO KNOW BEFORE STARTING YOUR VEHICLE 29
WARNING!
Do not put anything on or around the airbag covers
or attempt to manually open them. You may damage 2 the airbags and you could be injured because the airbags are not there to protect you. These protective covers are designed to open only when the airbags
are inflated.
²When the crash sensor detects an impact requiring the airbags, it signals the inflator units. A large quantity of nontoxic nitrogen gas is generated to inflate the airbags. The airbag covers separate and fold out of the way as the airbags inflate to their full size. The airbags then quickly deflate while helping to restrain the driver and passenger. The airbag gas is vented through the airbag material towards the instrument panel. In this way the airbags do not interfere with your control of the vehicle.
30 THINGS TO KNOW BEFORE STARTING YOUR VEHICLE
²The knee impact bolster helps protect the knees and working with the seat belts, position you for the best interaction with the airbags.
If a Deployment Occurs
WARNING!
Deployed airbags can't protect you in another collision. Have the airbags replaced by an authorized dealer as soon as possible.
The airbag system is designed to deploy when the impact sensors detect a moderate-to-severe frontal collision, to help restrain the driver and passenger, and then to immediately deflate.
NOTE: A frontal collision that is not severe enough to need airbag protection will not activate the system. This does not mean something is wrong with the airbag system.
If you do have a collision which deploys the airbags, any or all of the following may occur:
²The nylon airbag material may sometimes cause abrasions and/or skin reddening to the driver and passenger as the airbags deploy and unfold. The abrasions are similar to friction rope burns or those you might get sliding along a carpet or gymnasium floor. They are not caused by contact with chemicals. They are not permanent and normally heal quickly. However, if you haven't healed significantly within a few days, or if you have any blistering, see your doctor immediately.
²As the airbags deflate, you may see some smoke-like particles. The particles are a normal by-product of the
 Loading...