


B35

1
Cat
®
B35
User Manual

2
• Please read this manual and the recommended safety precautions carefully to ensure the correct use of this device.
• Despite its rugged nature; avoid hitting, throwing, crushing, puncturing or bending the device.
• Do not switch on the device in a circumstance when it is prohibited to use devices, or when it may cause interference
or danger.
• Never use your device while driving.
• Always follow any device use rules in hospitals and health care facilities, and switch off near medical apparatus.
• Switch off the device or activate aeroplane mode when in an aircraft, as it may cause interference to the vessel’s control
equipment.
• Switch off your device near high-precision electronic devices as it may affect their performance.
• Do not attempt to disassemble your device or its accessories; only qualied personnel should service or repair it,
if needed.
• Do not place the device or its accessories in containers with a strong electromagnetic eld.
• Do not place magnetic storage media near the device. Radiation from the device may erase the information stored on it.
• Do not use the device in an environment with ammable gas, such as a gas station, or put the device in a high
temperature place.
• Keep the device and its accessories away from young children. Do not allow children to use the device without guidance.
• Only use approved chargers to avoid the risk of explosion.
• Observe any laws or regulations on the use of wireless devices, respecting others’ privacy and legal rights.
• For medical implant patients (heart, joints, etc), keep the device 15cm away from the implant and positioned on the
opposite side of the implant.
• Strictly follow the relevant instructions of this manual while using the USB cable, otherwise your device or PC may be
damaged.
PLEASE READ BEFORE FIRST USE
SAFETY PRECAUTIONS

3
LEGAL NOTICE
© 2018 Caterpillar.
CAT, CATERPILLAR, their respective logos, “Caterpillar Yellow,” the “Power Edge” trade dress as well as corporate
and product identity used herein, are trademarks of Caterpillar and may not be used without permission.
www.cat.com / www.caterpillar.com
Bullitt Mobile Ltd a licensee of Caterpillar Inc.
BULLITT and third-party trademarks are the property of their respective owners.
No part of this document may be reproduced or transmitted in any form or by any means without prior written
consent of Caterpillar Inc.
The product described in this manual may include copyrighted software and possible licensors. Customers shall
not in any manner reproduce, distribute, modify, decompile, disassemble, decrypt, extract, reverse engineer, lease,
assign, or sublicence the said software or hardware, unless such restrictions are prohibited by applicable laws or
such actions are approved by respective copyright holders under licences.
The Bluetooth® word mark and logos are registered trademarks owned by the Bluetooth SIG, Inc. and any use of
such marks by Bullitt Group Ltd is under licence. All other third-party trademarks and trade names are those of their
respective owners.
Wi-Fi® is a registered trademark of Wi-Fi Alliance®.
NOTICE
Some features of the product and its accessories described herein rely on the software installed, capacities and
settings of local network, and may not be activated or may be limited by local network operators or network service
providers. Therefore, the descriptions in this manual may not exactly match the purchased product or its accessories.
The manufacturer reserves the right to change or modify any information or specications contained in this manual
without prior notice or obligation.
The manufacturer is not responsible for the legitimacy and quality of any products that you upload or download
through this device including text, pictures, music, movies, and non-built-in software with copyright protection. Any
consequences arising from the installation or usage of the preceding products on this device is accountable to you.
IMPORT AND EXPORT REGULATIONS
Customers shall comply with all applicable export or import laws and regulations. Customers must obtain all
necessary governmental permits and licences to export, re-export or import the product mentioned in this manual
including the software and technical data.

4
CONTENTS
WELCOME TO THE CAT B35 6
RUGGED CREDENTIALS 6
WHAT’S IN THE BOX 7
KEY FUNCTIONS 7
GETTING STARTED 8
INSTALLING A NANO SIM CARD 8
INSTALLING A MEMORY CARD 8
CHARGING THE BATTERY 9
IMPORTANT INFORMATION REGARDING FUTURE USE OF BATTERY 9
POWERING YOUR DEVICE ON/OFF 9
HOME SCREEN 10
APP TRAY 10
THE GOOGLE ASSISTANT 10
LOCKING AND UNLOCKING THE SCREEN 10
KAIOS ACCOUNT 11
KAI STORE 11
NOTIFICATION PANEL 11
WALLPAPERS 13
TRANSFERRING MEDIA TO AND FROM YOUR DEVICE 13
USING AEROPLANE MODE 13
MAKING A PHONE CALL 14
CONTACTS 15
SMS AND MMS 16
WI-FI 17
BLUETOOTH 17
TAKING PHOTOS AND RECORDING VIDEOS 18
EDITING IMAGES 19
MUSIC 20
LISTENING TO THE FM RADIO 20
USING OTHER APPS 20
EMAIL 20
INTERNET BROWSER 21
CALENDAR 21
CLOCK 21

5
CALCULATOR 22
MANAGING THE DEVICE 22
SETTING YOUR RINGTONE 22
SHORTCUT KEYS 23
SETTING PHONE SERVICES 23
PROTECTING THE DEVICE 23
RESETTING THE DEVICE 24
HARDWARE RESET 24
APPENDIX 25
PREVENTION OF HEARING LOSS 28
CE SAR COMPLIANCE 28
DISPOSAL AND RECYCLING INFORMATION 28
B35 SPECIFICATION 30
DECLARATION OF CONFORMITY 31

6
WELCOME TO THE CAT
®
B35
The truly rugged Cat B35 mobile phone is built to handle the challenging conditions you face every day at work
and play. Packed with ultra-tough features and a battery that lasts for longer, the Cat B35 won’t let you down.
Your new mobile phone is certied to the industry standard for ruggedness, water and dust resistance.
It’s drop proof onto concrete from an impressive height of 1.8m; waterproof in depths of 1.2 metres for up to 35
minutes and tough enough to handle thermal shocks and troubling salt mist spray. Packed with useful features to
help you get the most out of your day, its high capacity battery and expandable storage of up to 32GB guarantee
that performance won’t be compromised.
RUGGED CREDENTIALS
DROPPING YOUR DEVICE:
• Do: Use your device up to a height of 1.8 metres – it’s drop proof within this height range.
• Don’t: Throw it with force, or drop from above the 1.8 metre range – it’s durable, but not indestructible.
WATERPROOFING:
• Do: Use your device in damp and wet conditions. Ensure all components and covers are properly closed before using in
water. The device can withstand a depth of 1.2 metres, for up to 35 minutes.
• Don’t: Attempt to use it for longer than 35 minutes in 1.2 metres depth or beyond a 1.2 metre depth.
DUSTPROOF AND SCRATCHPROOF:
• Do: Use your device in dirty, dusty environments. The Cat B35 is certied IP68, an industry standard measure
for durability.
EXTREME TEMPERATURES:
• Do: Use your device within the temperature range of -25º C to + 55º C. It can also handle extreme changes in temperature:
shifting between cold and hot, or vice versa very quickly.
• Don’t: Use it outside the operational range of -25º C to + 55º C.
7
WHAT’S IN THE BOX
• Device
• Quick start guide
• USB power cable and charging power adapter
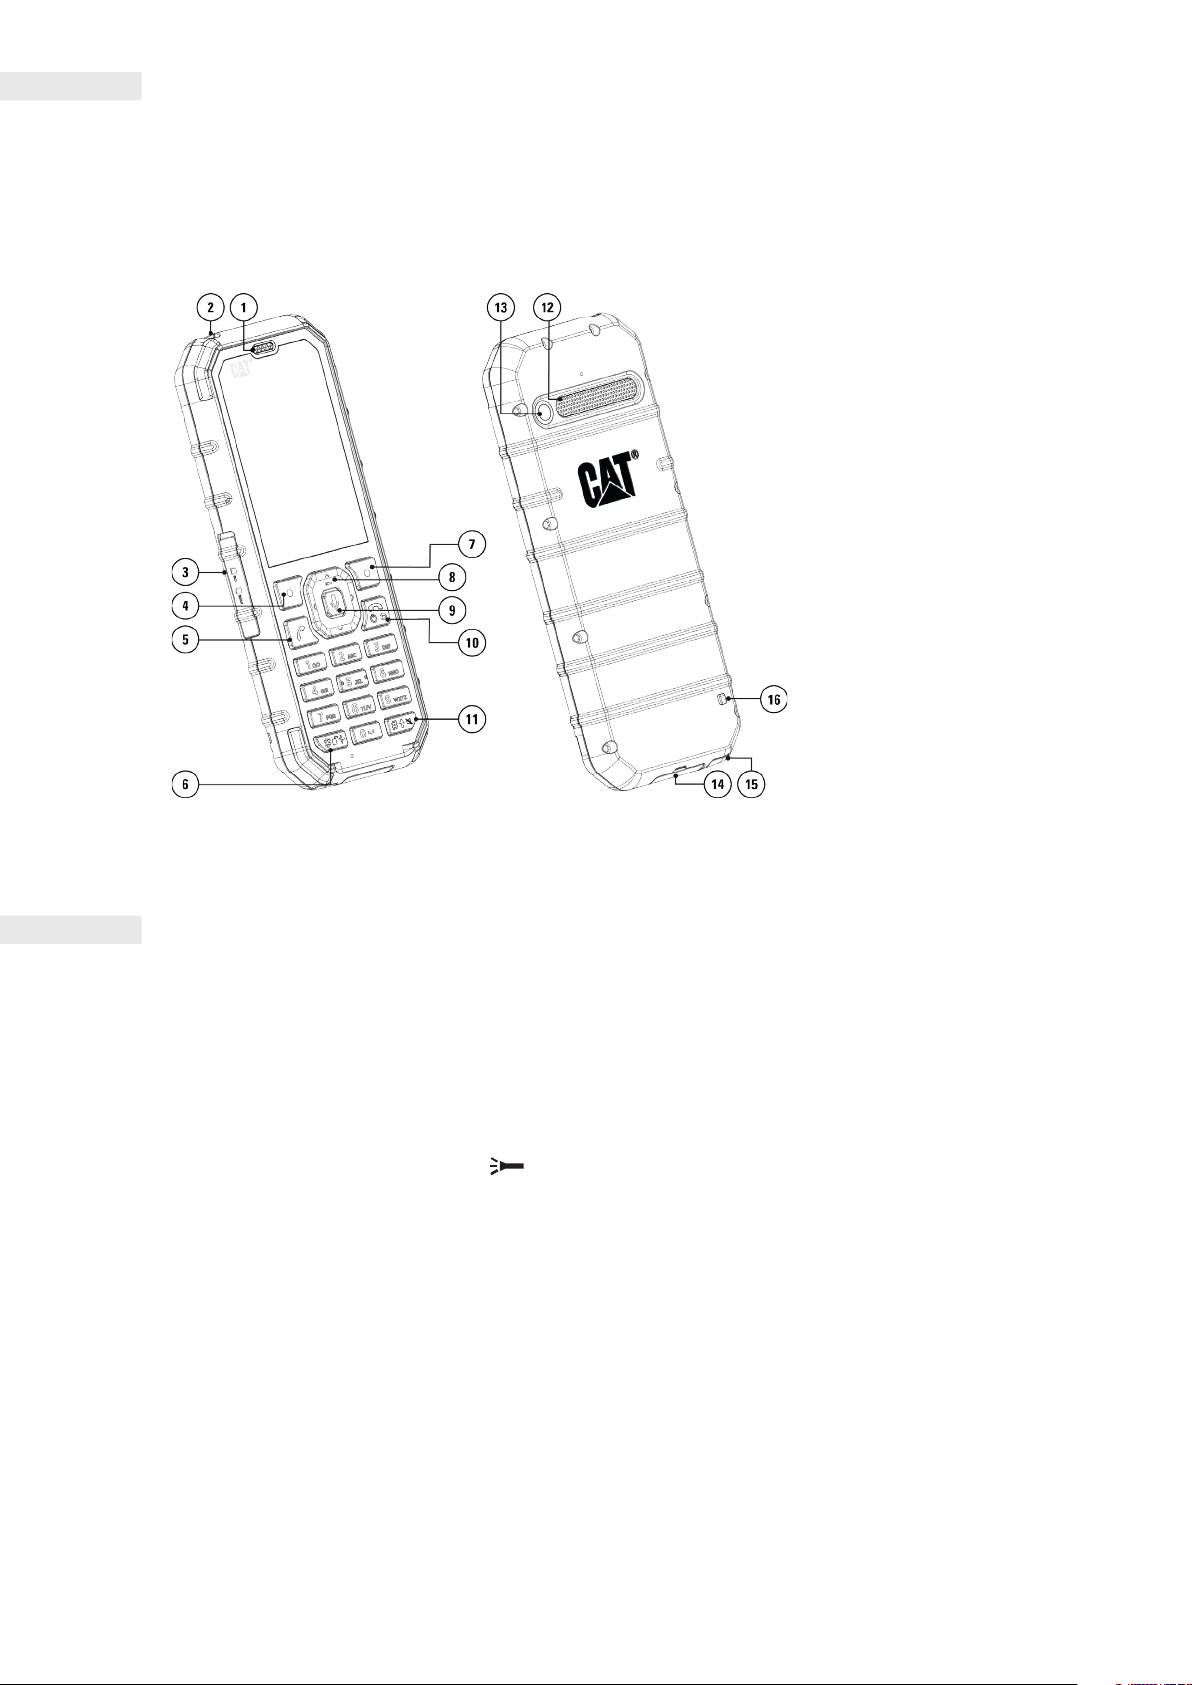
KEY FUNCTIONS
POWER KEY
• Press and hold to turn on the device.
• Press and hold to open the Power off options (Power off / Restart) when the device is on.
• Press once to wake the screen when the device is idle.
NAVI-KEY
• Use the multi-directional Navi-key to move around menus.
• Press and hold Navi-key (Up) for 3 seconds to turn Torch On/Off.
LEFT AND RIGHT SOFT KEYS
• These buttons correspond to options shown at the bottom of the screen (left and right).
• The function of these buttons will change depending on the menu.
OK BUTTON
• Press to make a selection.
• Press and hold for 3 seconds to wake up the Google Assistant.
1. EARPIECE
2. TORCH
3. SIM/SD COVER
4. LEFT SOFT KEY
5. CALL/ANSWER KEY
6. KEYBOARD LOCK
7. RIGHT SOFT KEY
8. NAVI-KEY/TORCH ON/OFF
9. OK/GOOGLE ASSISTANT KEY*
10.POWER/BACK/ HANGUP KEY
11. SILENT MODE/SHIFT KEY
12. SPEAKER
13. CAMERA
14. USB PORT
15. HEADSET JACK
16. LANYARD HOLE*
*Variant dependent, some devices
may not have the microphone icon.
8
GETTING STARTED
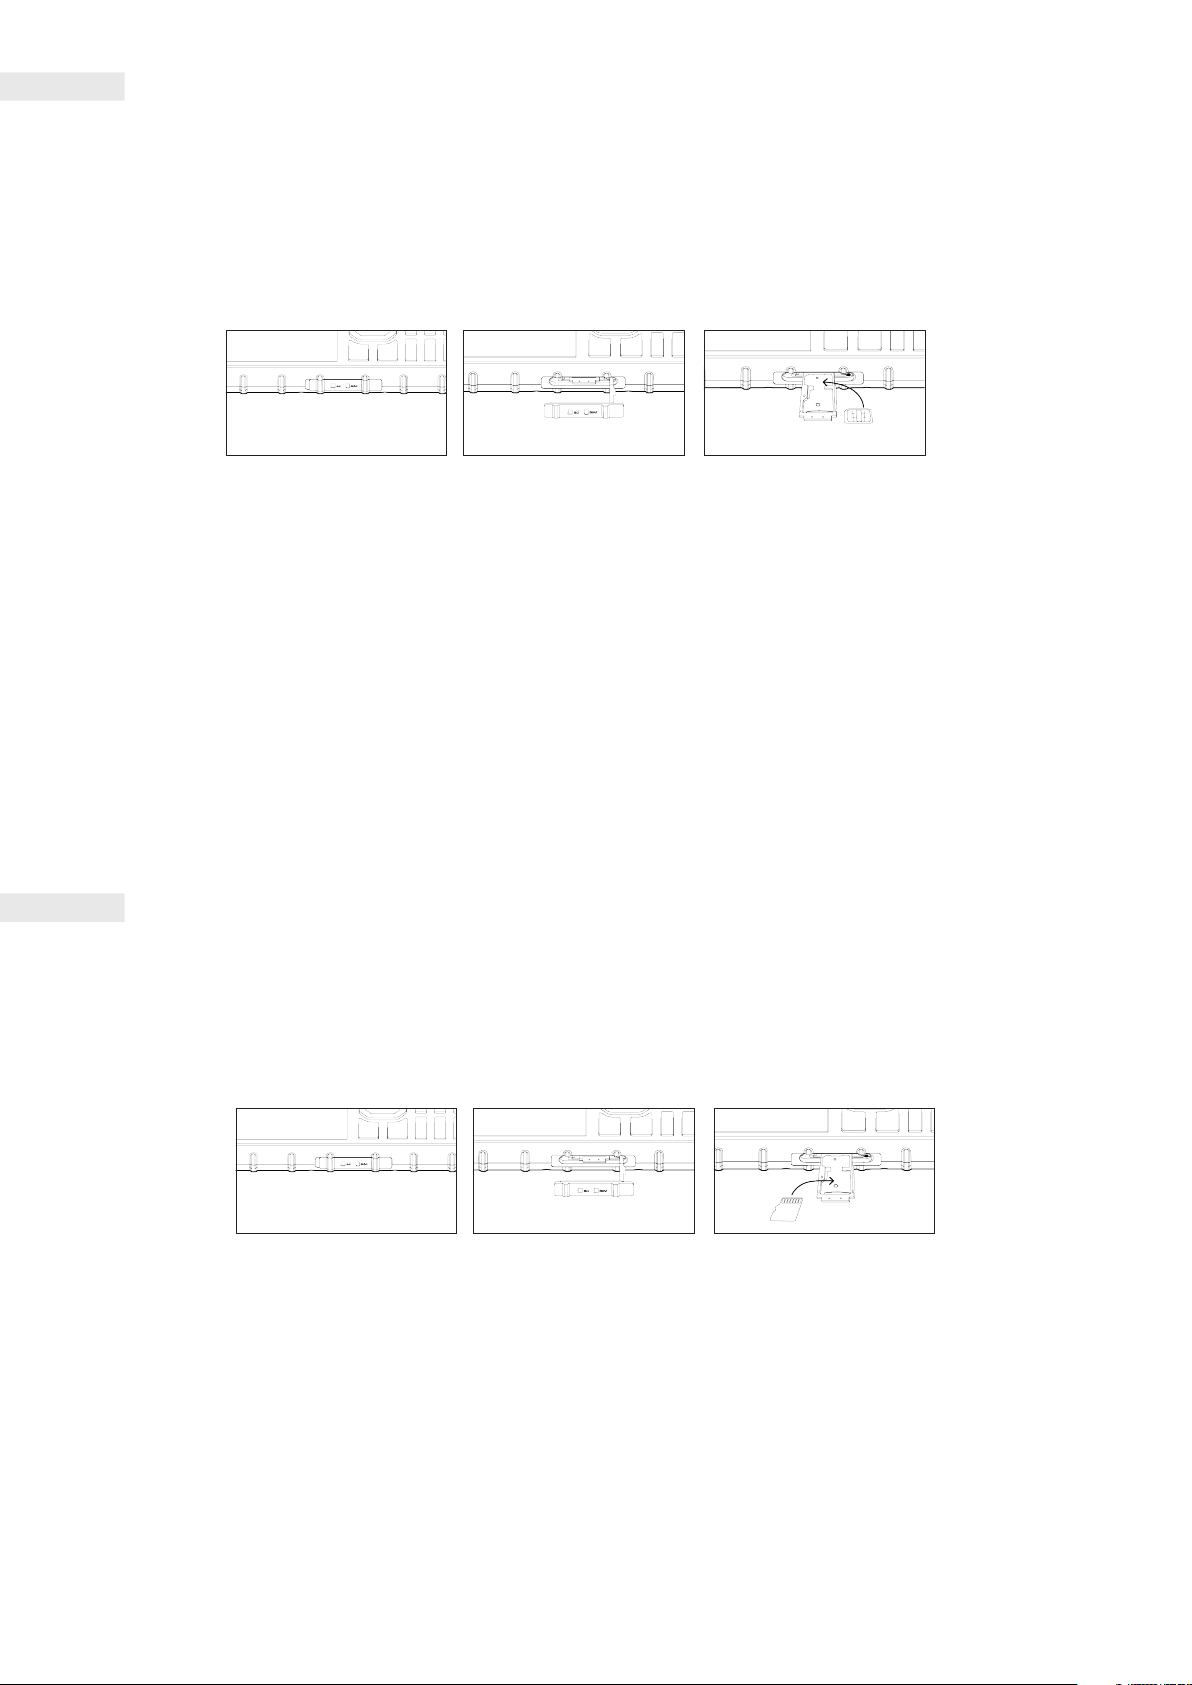
INSTALLING A NANO SIM CARD
1. Place your device on a at, clean surface with the display facing upwards.
2. Remove the SD/SIM cover, then use your ngertip to pull out the SIM/SD tray.
3. Place the Nano SIM card in the SIM 1/ SIM 2 tray with gold pins facing upwards.
4. Carefully insert the SIM/SD tray back into the SIM/SD card slot.
NOTE:
• Ensure the SIM card is xed securely in the SIM tray before inserting.
• Push the SIM tray back in until it is xed securely and ensure the sim door cover is fully closed.
SINGLE SIM DEVICE:
Supports 1x SIM card and 1x microSD Card.
DUAL SIM DEVICE:
Supports 1x SIM card and 1x microSD Card or 2x SIM Cards.
NOTE:
When 2 SIM cards are in use, the primary SIM card supports 4G, 3G and 2G connections, the secondary SIM card supports
2G connections only.
INSTALLING A MEMORY CARD
1. Place your device on a at, clean surface with the display facing upwards.
2. Remove the SD/SIM cover, then use your ngertip to pull out the SIM/SD tray.
3. Place the microSD card in the SD tray with gold pins facing upwards.
4. Carefully insert the SIM/SD tray back into the SIM/SD card slot.
NOTE:
• Do not force the microSD card as this could damage the memory card or slot.
• When you insert the microSD card, your SIM 2 location will be occupied, and you will not be able to install the
SIM 2 card.
9
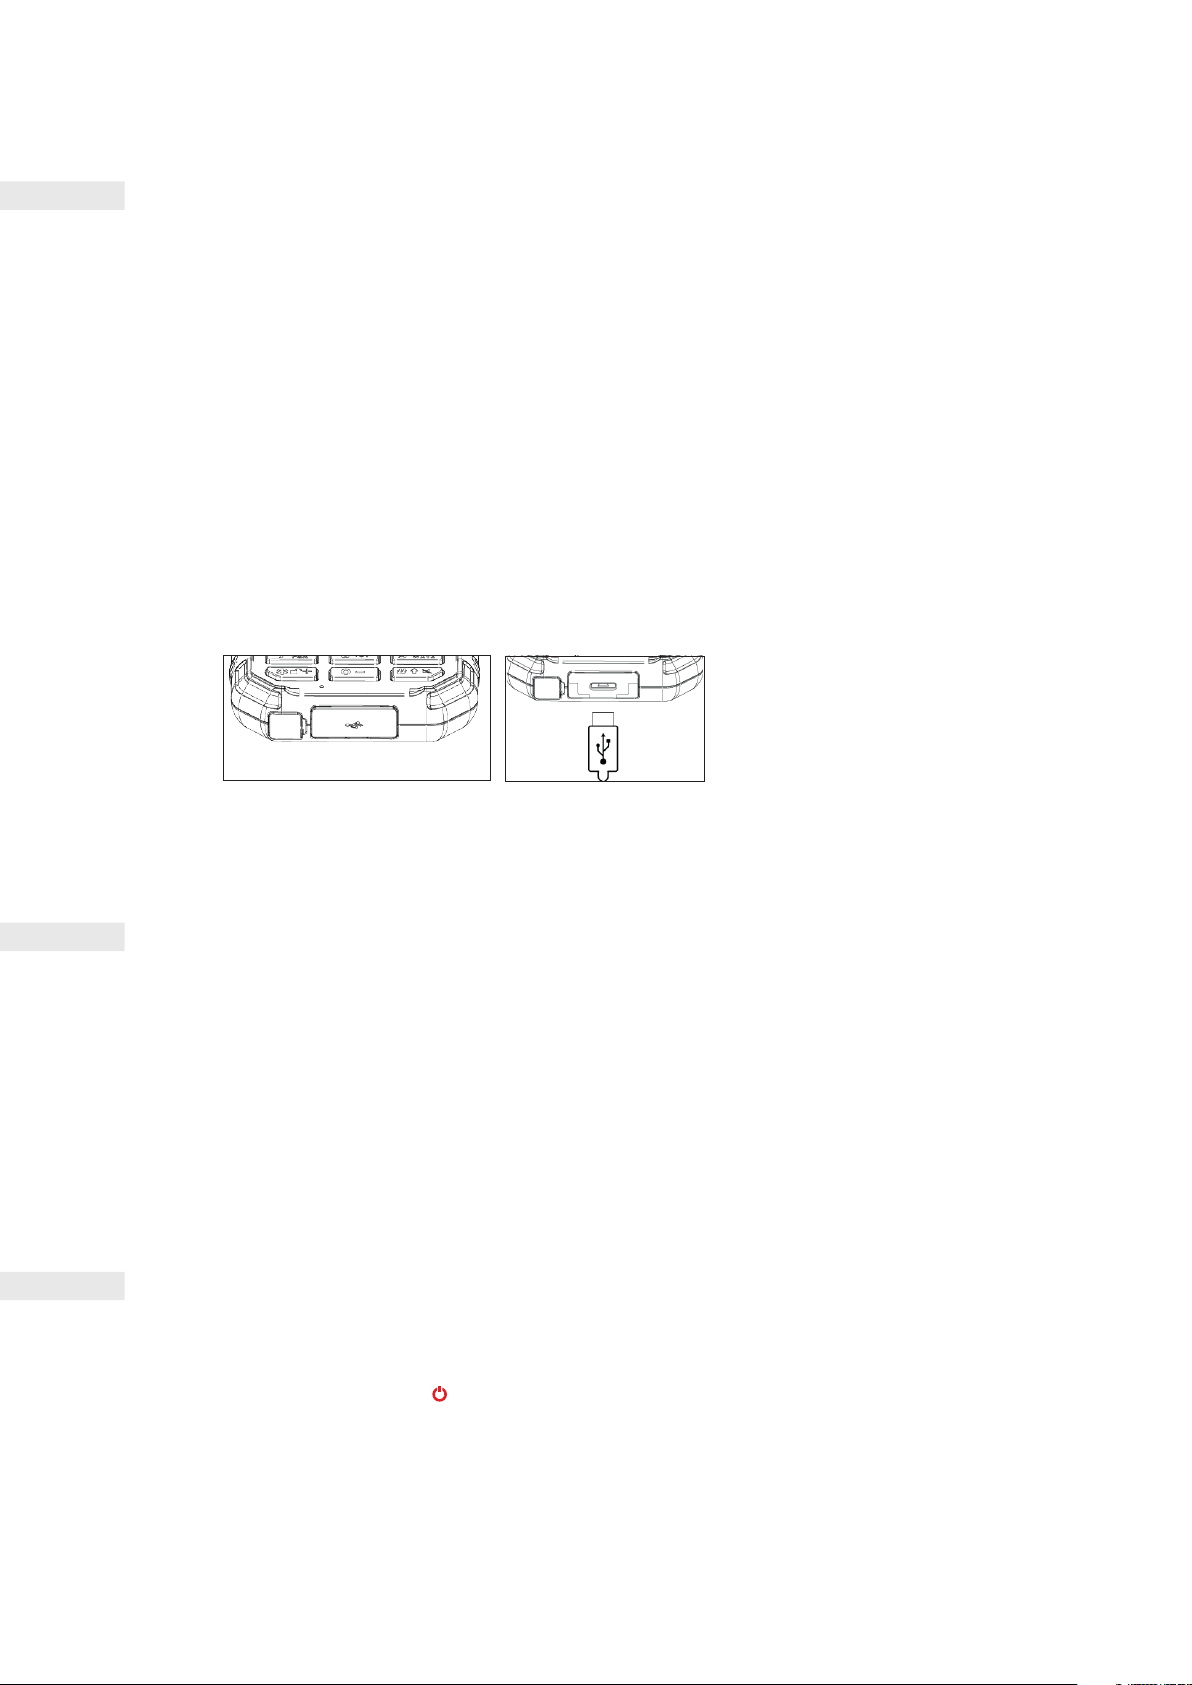
CHARGING THE BATTERY
Before using your device for the rst time you’ll need to charge its battery.
1. Connect the USB power cable to the charging power adapter.
Only use Cat® phone approved chargers and cables. Unapproved equipment may cause damage to the device or cause
batteries to explode.
2. Open the USB port cover and connect the USB power cable to the USB port.
Be careful not to use excessive force when plugging the USB cable. Any damage caused by attempting to insert the
connector incorrectly is not covered by the warranty.
3. Plug the charger into an AC mains socket.
4. When charging is complete remove the USB cable from the device, then unplug the power adapter from the mains
socket. Close the USB port cover on the device.
NOTE:
• Avoid leaving the device plugged in once it is fully charged.
IMPORTANT INFORMATION REGARDING FUTURE USE OF
BATTERY
If the battery is completely exhausted, your device may not power on immediately after charging starts. Allow the battery
to charge for a few minutes before attempting to turn it on. The on-screen charge animation may not be displayed during
this period.
When the battery power level is low, your device will display a prompt. When the battery power is almost exhausted, your
device will power off automatically. The time required to charge the battery depends on its age and the environmental
temperature.
POWERING YOUR DEVICE ON/OFF
POWER ON
• Press and hold Power .
The rst time you turn on your phone, you will see a Welcome Screen. Select your preferred language to continue the set-up.
NOTE:
• A Wi-Fi or Data connection is required to access certain services. You can skip set-up and complete at another time. A
KaiOS account is required to use some of the KaiOS services on this device.

10
POWER OFF
1. Press and hold Power .
2. Select Power off.
HOME SCREEN
The Home Screen is the starting point for accessing your device’s features. From here you can access Notices, Contacts,
App Tray and the Google Assistant.
This is what your Home Screen looks like:
APP TRAY
From the Home Screen, press OK to display the App Tray . Use the multi-directional Navi-key to select your chosen app.
You can press Right Soft Key (Options) to choose from:
• Move: Allows you to move app icons around. Select an app, press Right Soft Key (Options), select ‘Move’, then use
the Navi-key to move its position. Select SET to x the position.
• List View: Select to view app icons in a list.
• Single View: Select to view large app icons.
• Grid view: Select to return to default grid view for app icons.
THE GOOGLE ASSISTANT
From the Handset, press and hold OK for 3 seconds. The Google Assistant will answer and allow you to search the web.
LOCKING AND UNLOCKING THE SCREEN
LOCKING THE SCREEN
1. If your device is turned on, press and hold for 3 seconds to lock/unlock the screen. You will still receive messages
and calls if the screen is locked.
2. If the device is left idle for a certain period, the screen will lock automatically.
• To adjust the length of this period, select > Settings.
 Loading...