


PX-780M

ES
PX
-
780M
USER’S GUIDE
GUÍA DEL USUARIO
Please keep all information for future reference.
Guarde toda información para tener como referencia futura.
EnglishEspañol
PX780-ES-1A
Safety Precautions
Before trying to use the Digital Piano, be sure to
read the separate “Safety Precautions”.
Precauciones de seguridad
Antes de intentar usar el piano digital, asegúrese de
leer las “Precauciones de seguridad” separadas.

TO REDUCE THE RISK OF FIRE OR ELECTRIC SHOCK, REFER SERVICING TO QUALIFIED SERVICE PERSONNEL.
IMPORTANT SAFETY INSTRUCTIONS
1. Read these instructions.
2. Keep these instructions.
3. Heed all warnings.
4. Follow all instructions.
5. Do not use this apparatus near water.
6. Clean only with dry cloth.
7. Do not block any ventilation openings. Install in accordance with the manufacturer’s instructions.
8. Do not install near any heat sources such as radiators, heat registers, stoves, or other apparatus (including amplifiers) that produce heat.
9. Do not defeat the safety purpose of the polarized or grounding-type plug. A polarized plug has two blades with one wider than the other.
A grounding type plug has two blades and a third grounding prong. The wide blade or the third prong are provided for your safety. If the
provided plug does not fit into your outlet, consult an electrician for replacement of the obsolete outlet.
10. Protect the power cord from being walked on or pinched particularly at plugs, convenience receptacles, and the point where they exit
from the apparatus.
11. Only use attachments/accessories specified by the manufacturer.
12. Use only with the cart, stand, tripod, bracket, or table specified by the manufacturer, or sold with the
apparatus. When a cart is used, use caution when moving the cart/apparatus combination to avoid injury
from tip-over.
*2
Bank select
Modulation
Portamento Time
Data entry LSB, MSB
Volume
Pan
Expression
DSP Parameter0*2DSP Parameter1*2DSP Parameter2*2DSP Parameter3*2Damper
Portamento Switch
13. Unplug this apparatus during lightning storms or when unused for long periods of time.
14. Refer all servicing to qualified service personnel. Servicing is required when the apparatus has been damaged in any way, such as
power-supply cord or plug is damaged, liquid has been spilled or objects have fallen into the apparatus, the apparatus has been
exposed to rain or moisture, does not operate normally, or has been dropped.
The apparatus shall not be exposed to dripping or splashing and that no objects filled with liquids, such as vases, shall be placed on the apparatus.
The P (POWER) indicator being unlit does not mean the apparatus is completely disconnected from the MAINS.
When you need to have the apparatus completely disconnected from the MAINS, you must unplug the power cord. For that purpose, locate
the apparatus in a way that secures easy access to the power cord.
1 - 16
1 - 16
X
Mode 3
1True voice
*
0 - 127
**
X
O
9nH v = 1 - 127
O
9nH v = 0, 8nH v =
X
OOOOOOOOOOOOO
Declaration of Conformity
Model Number: PX-780M
Trade Name: CASIO COMPUTER CO., LTD.
Responsible party: CASIO AMERICA, INC.
Address: 570 MT. PLEASANT AVENUE, DOVER, NEW JERSEY 07801
Telephone number: 973-361-5400
This device complies with Part 15 of the FCC Rules, Operation is subject to the following two conditions:
(1) This device may not cause harmful interference, and (2) this device must accept any interference received, including interference that
may cause undesired operation.
1 - 16
1 - 16
NOTICE
This equipment has been tested and found to comply with the limits for a Class B digital device, pursuant to Part 15 of the FCC Rules.
These limits are designed to provide reasonable protection against harmful interference in a residential installation. This equipment
generates, uses and can radiate radio frequency energy and, if not installed and used in accordance with the instructions, may cause
harmful interference to radio communications. However, there is no guarantee that interference will not occur in a particular installation. If
this equipment does cause harmful interference to radio or television reception, which can be determined by turning the equipment off and
on, the user is encouraged to try to correct the interference by one or more of the following measures:
• Reorient or relocate the receiving antenna.
• Increase the separation between the equipment and receiver.
• Connect the equipment into an outlet on a circuit different from that to which the receiver is connected.
• Consult the dealer or an experienced radio/TV technician for help.
X
Mode 3
0 - 127 0 - 127
9nH v = 1 - 127
O
X
X
8nH v = 64
X
X
X
O
OO
1
5
0,32
XXXXX
O
O
7
10111617181964
6, 38
XOX
65
FCC WARNING
Changes or modifications not expressly approved by the party responsible for compliance could void the user’s authority to operate the
equipment.
Important!
Please note the following important information before using this product.
• Before using the AD-E24250LW Adaptor to power the product, be sure to check the AC Adaptor for any damage first. Carefully check the
power cord for breakage, cuts, exposed wire and other serious damage. Never let children use an AC adaptor that is seriously damaged.
• The product is not intended for children under 3 years.
• Use only the CASIO AD-E24250LW adaptor.
• The AC adaptor is not a toy.
• Be sure to disconnect the AC adaptor before cleaning the product.
This mark applies in EU countries only.
Model PX-780M Version : 1.0
Function Transmitted Recognized Remarks
Declaration of Conformity According to EU Directive
Default
Changed
Basic
Channel
Manufacturer:
CASIO COMPUTER CO., LTD.
6-2, Hon-machi 1-chome, Shibuya-ku, Tokyo 151-8543, Japan
Responsible within the European Union:
CASIO EUROPE GmbH
Casio-Platz 1, 22848 Norderstedt, Germany
Default
Messages
Altered
Mode
Note
Number
Note ON
Velocity
Key’s
Note OFF
After
Ch’s
Touch
Pitch Bender
Control
Change

Contents
Assembling the Stand...........................................................................................E-59
Unpacking.................................................................... E-59
Assembling the Stand .................................................. E-59
To connect the cable ................................................... E-62
To install the music stand ............................................ E-62
English
General Guide ..................................E-2
Saving Settings and Using Panel Lock.......................... E-4
Returning the Digital Piano to Its
Factory Default Settings ................................................ E-4
Power Outlet.....................................E-5
Using an AC Adaptor..................................................... E-5
Turning Power On or Off ............................................... E-5
Connections.....................................E-6
Connecting Headphones............................................... E-6
Connecting Audio Equipment or an Amplifier................ E-6
Bundled and Optional Accessories................................ E-7
Using Built-in Tones........................ E-8
Selecting a Tone............................................................ E-8
Layering Two Tones ...................................................... E-8
Splitting the Keyboard between Two Tones.................. E-9
Using Octave Shift....................................................... E-10
Adjusting the Brilliance of a Tone ................................ E-11
Adding Reverb to the Tone.......................................... E-11
Adding the Chorus Effect to the Tone ......................... E-12
Using the Metronome .................................................. E-12
Using the Pitch Bend Wheel........................................ E-13
Using the Digital Piano’s Pedals.................................. E-14
Playing a Duet ............................................................. E-14
Using Auto Accompaniment.........E-16
Playing an Auto Accompaniment................................. E-16
Using One-Touch Presets ........................................... E-19
Using Auto Harmonize................................................. E-19
Creating Your Own Original Rhythms ......................... E-20
Playing Back Built-in Songs .........E-23
Playing Tone Demo Songs.......................................... E-23
Playing Back a Specific Music Library Song ............... E-24
Listening to Songs Loaded
from an External Source.............................................. E-25
Playing Back Audio Data Stored
on a USB Flash Drive .................................................. E-27
Other Settings ................................E-44
Configuring Settings .................................................... E-44
USB Flash Drive.............................E-48
Storing Standard Audio Data (WAV Files)
to a USB Flash Drive ................................................... E-49
Connecting a USB Flash Drive to and
Detaching It from the Digital Piano .............................. E-49
Formatting a USB Flash Drive..................................... E-50
Saving Digital Piano Data to a USB Flash Drive ......... E-50
Loading Data from a USB Flash Drive to
Digital Piano Memory................................................... E-51
Deleting Data from a USB Flash Drive ........................ E-52
Renaming a USB Flash Drive File............................... E-52
Playing Back a Song on a USB Flash Drive ................ E-53
Error Messages ........................................................... E-54
Connecting to a Computer............E-55
Minimum Computer System Requirements................. E-55
Connecting the Digital Piano to Your Computer.......... E-55
Using MIDI ................................................................... E-56
Transferring Data between the Digital Piano
and a Computer ........................................................... E-56
Reference........................................E-63
Troubleshooting ........................................................... E-63
Product Specifications ................................................. E-65
Operating Precautions ................................................. E-67
Appendix.......................................... A-1
Tone List........................................................................ A-1
Drum Assignment List.................................................... A-4
Rhythm List.................................................................... A-5
Song List........................................................................ A-7
Music Preset List ........................................................... A-8
Fingering Guide ........................................................... A-10
Chord Example List ..................................................... A-11
MIDI Implementation Chart
Music Presets.................................E-28
Selecting a Music Preset ............................................. E-28
Creating an Original User Preset................................. E-29
Registering Tone and
Rhythm Setups ..............................E-33
Recording Your Keyboard Play....E-35
Recording to Built-in Song Memory
(Song Recorder).......................................................... E-35
Recording or Playing Back Multiple Songs.................. E-36
Recording to a Specific Track (Part)............................ E-37
Deleting Data Recorded with the Song Recorder........ E-38
Re-recording Part of a Recorder Song
(Punch-in Recording)................................................... E-39
Recording to a USB Flash Drive (Audio Recorder)..... E-41
Company and product names used in this
manual may be registered trademarks of others.
E-1
General Guide
5 6 7 8 9 bk bl bm32 4
dt
1
bn bo bp bq br bs bt
cmcl cn co cp cq cr cs ct
dk dl dm dn do dp dq dr ds
ck
Bottom
ek
el em
en eo
Rear
eq
Front
ep
es
er
E-2

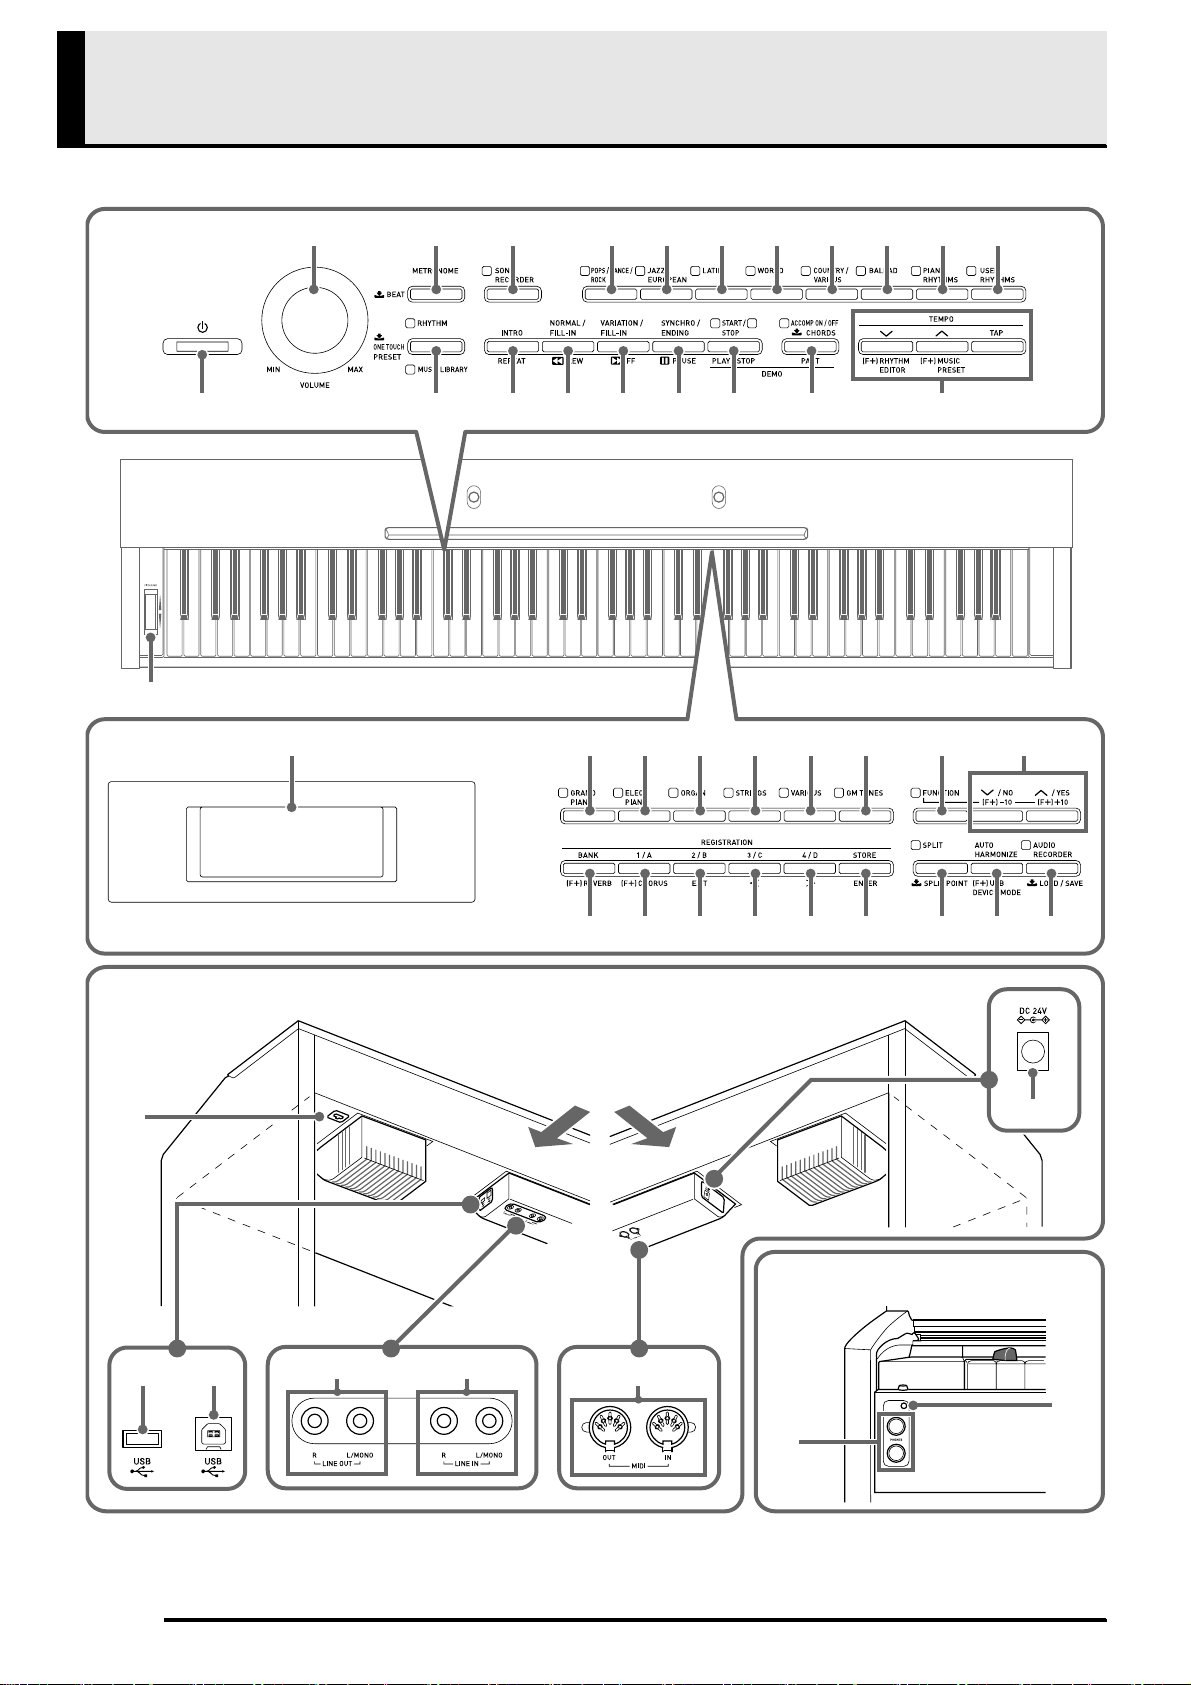
• This manual uses the numbers and names below to refer to buttons and controllers.
General Guide
P (POWER) button
1
VOLUME controller
2
METRONOME button
3
SONG RECORDER button
4
POPS/DANCE/ROCK button
5
JAZZ/EUROPEAN button
6
LATIN button
7
WORLD button
8
COUNTRY/VARIOUS button
9
BALLAD button
bk
PIANO RHYTHMS button
bl
USER RHYTHMS button
bm
RHYTHM, MUSIC LIBRARY button
bn
INTRO, REPEAT button
bo
STRINGS button
cp
VARIOUS button
cq
GM TONES button
cr
FUNCTION button
cs
w/NO, q/YES buttons
ct
BANK, REVERB button
dk
REGISTRATION 1/A, CHORUS button
dl
REGISTRATION 2/B, EXIT button
dm
REGISTRATION 3/C, u button
dn
REGISTRATION 4/D, i button
do
STORE, ENTER button
dp
SPLIT, SPLIT POINT button
dq
AUTO HARMONIZE, USB DEVICE MODE button
dr
AUDIO RECORDER, LOAD/SAVE button
ds
English
NORMAL/FILL-IN, sREW button
bp
VARIATION/FILL-IN, dFF button
bq
SYNCHRO/ENDING, PAUSE button
br
START/STOP, PLAY/STOP button
bs
ACCOMP ON/OFF, PART button
bt
TEMPO, RHYTHM EDITOR, MUSIC PRESET
ck
buttons
Display
cl
GRAND PIANO button
cm
ELEC PIANO button
cn
ORGAN button
co
PITCH BEND wheel
dt
Pedal connector
ek
USB flash drive port
el
USB port
em
LINE OUT R, L/MONO jacks
en
LINE IN R, L/MONO jacks
eo
MIDI OUT/IN terminals
ep
DC 24V terminal
eq
PHONES jacks
er
Power lamp
es
E-3
General Guide
Saving Settings and Using
Panel Lock
Your Digital Piano lets you save its current settings,
and lock its buttons to protect against operation errors.
For details, see “Setting Backup” (page E-47) and
“Panel Lock” (page E-47).
Returning the Digital Piano to
Its Factory Default Settings
Perform the following procedure when you want to
return the Digital Piano’s stored data and settings to
their initial factory defaults.
1.
Turn off the Digital Piano.
2.
While holding down both the cr (GM TONES)
and
(P) button.
• The Digital Piano will turn on and initialize its
(FUNCTION) buttons, press the 1
cs
internal system. You will be able to use the Digital
Piano in a short while.
NOTE
• See “Turning Power On or Off” (page E-5) for
information about turning power on and off.
E-4
Power Outlet
Your Digital Piano runs on standard household power.
Be sure to turn off power whenever you are not using
the Digital Piano.
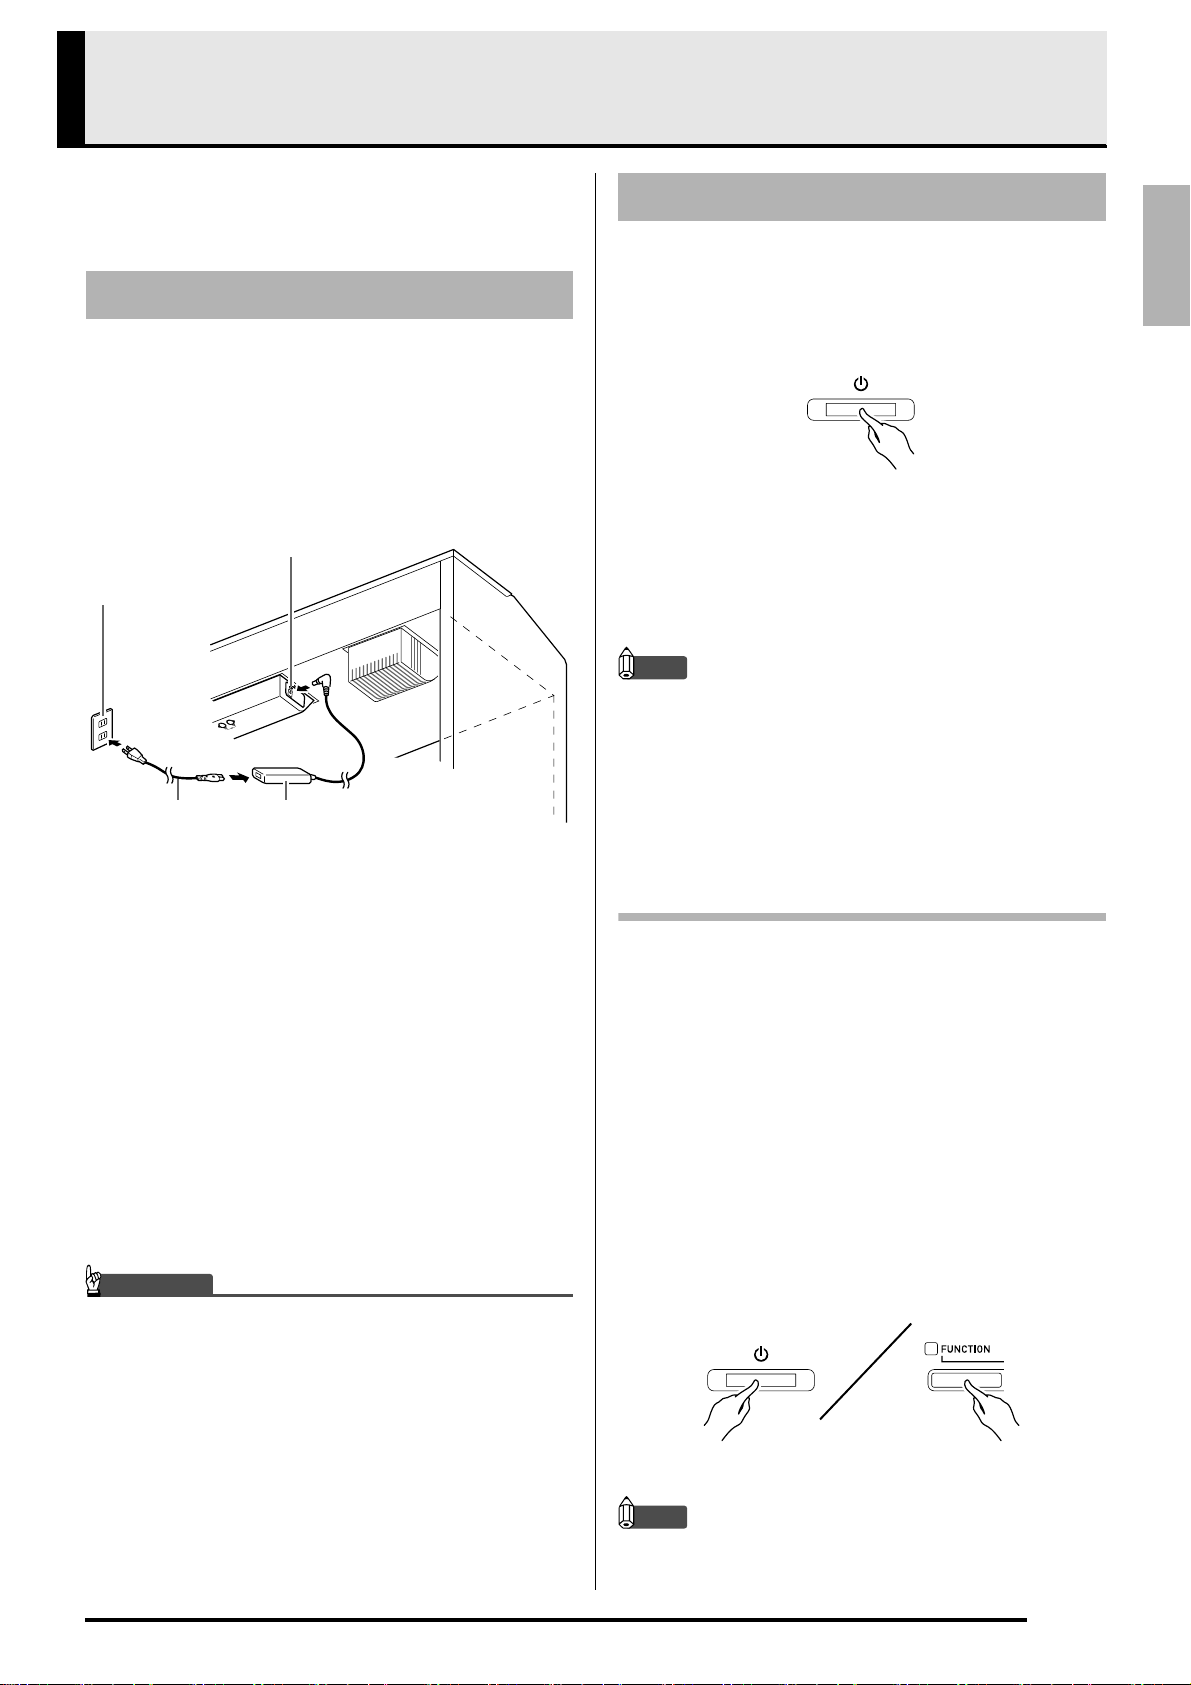
Using an AC Adaptor
Use only the AC adaptor (JEITA Standard, with unified
polarity plug) that comes with this Digital Piano. Use
of a different type of AC adaptor can cause
malfunction of the Digital Piano.
Specified AC Adaptor: AD-E24250LW
Turning Power On or Off
1.
Press the 1 (P) button to turn on Digital
Piano power.
• Do not touch the keyboard, pedal, or buttons while
the “Please wait...” message is on the display. Doing
so will cause malfunction.
English
• Use the supplied power cord to connect the AC
adaptor as shown in the illustration below.
DC 24V terminal
Household power outlet
Power cord
Note the following important precautions to avoid
damage to the power cord.
During Use
• Never pull on the cord with excessive force.
• Never repeatedly pull on the cord.
• Never twist the cord at the base of the plug or
connector.
During Movement
• Before moving the Digital Piano, be sure to unplug
the AC adaptor from the power outlet.
During Storage
• Loop and bundle the power cord, but never wind it
around the AC adaptor.
IMPORTANT!
• Never connect the AC adaptor (JEITA Standard,
with unified polarity plug) that comes with this Digital
Piano to any other device besides this Digital Piano.
Doing so creates the risk of malfunction.
• Make sure the Digital Piano is turned off before
plugging in or unplugging the AC adaptor.
• The AC adaptor will become warm to the touch after
very long use. This is normal and does not indicate
malfunction.
AC adaptor
• Configuration and type depends on
your geographic location.
• Use the Digital Piano’s VOLUME controller (
adjust the volume.
2.
To turn off the Digital Piano, hold down the 1
2
) to
(P) button until the Digital Piano’s display
goes blank.
NOTE
• Pressing the 1 (P) button to turn off power
actually puts the Digital Piano into a standby state.
Minute amounts of current continue to flow within
the Digital Piano in the standby state. If you do not
plan to use the Digital Piano for a long time or if
there is a lightning storm in your area, be sure to
unplug the AC adaptor from the power outlet.
Auto Power Off
This Digital Piano is designed to turn off automatically
to avoid wasting power after no operation is
performed for a preset amount of time. The Auto
Power Off trigger time is about four hours.
• You also can use the procedure below to temporarily
suspend Auto Power Off.
■ To disable Auto Power Off
1.
While the Digital Piano is turned on, press the
(P) button to turn it off.
1
2.
While holding down the cs (FUNCTION)
button, press the
Digital Piano.
• Auto Power Off will be disabled at this time.
NOTE
• Turning off the Digital Piano after performing the
above steps will re-enable Auto Power Off.
(P) button to turn on the
1
E-5
Connections
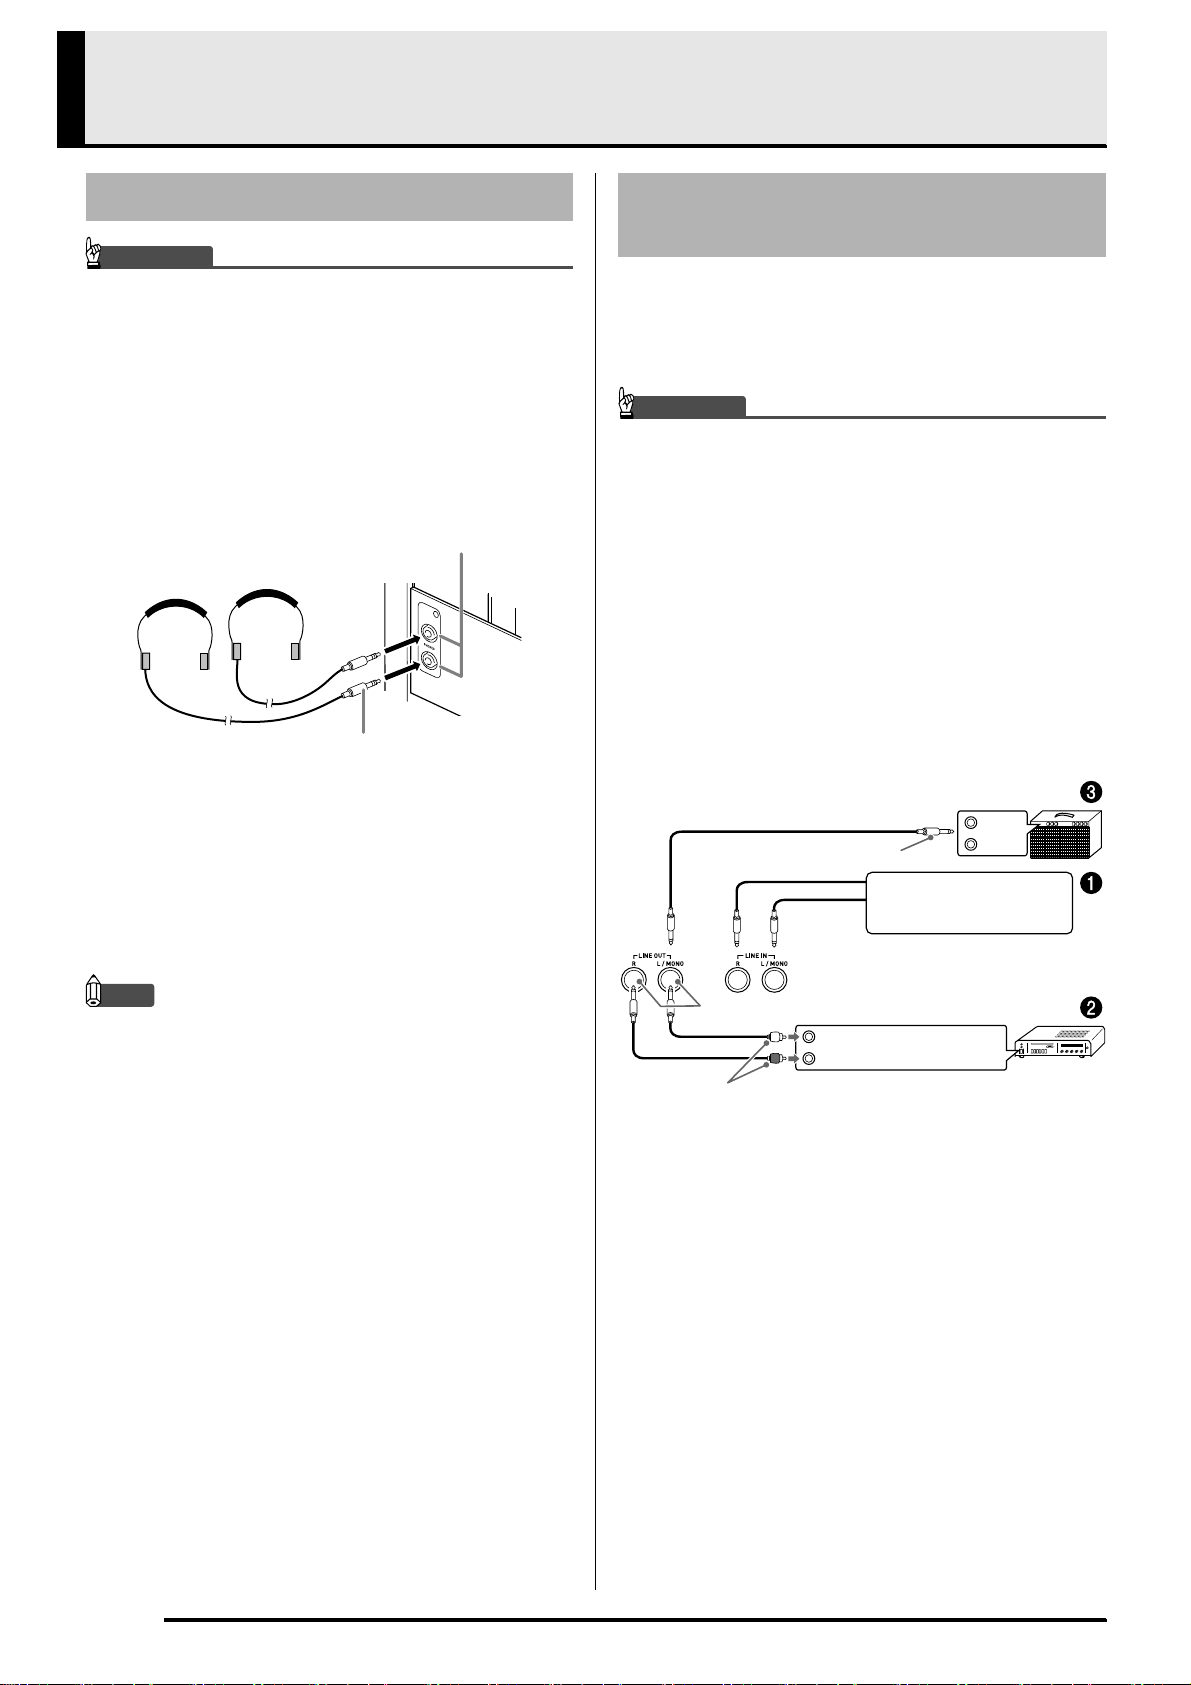
Connecting Headphones
IMPORTANT!
• Before connecting headphones, be sure to use the
Digital Piano’s VOLUME controller to turn the
volume down to a low level. After connecting, you
can adjust the volume to the level you want.
• The Digital Piano automatically adjusts sound output
to optimize for headphones (when headphones are
connected) or the built-in speakers (when
headphones are not connected).
Front
PHONES jacks
Stereo standard plug
Connect commercially available headphones to the
PHONES jacks. Connecting headphones to either of
the PHONES jacks cuts off output to the speakers,
which means you can practice even late at night
without bothering others. To protect your hearing,
make sure that you do not set the volume level too high
when using headphones.
Connecting Audio Equipment
or an Amplifier
You can connect audio equipment or a music amplifier
to the Digital Piano and then play through external
speakers for more powerful volume and better sound
quality.
IMPORTANT!
• The Digital Piano automatically adjusts sound output
to optimize for headphone output (when headphones
are connected) or built-in speaker output (when
headphones are not connected). This also will cause
a change in the output quality from the Digital
Piano’s LINE OUT R and L/MONO jacks.
• Whenever connecting a device to the Digital Piano,
first use the VOLUME controller to set the volume to
a low level. After connecting, you can adjust the
volume to the level you want.
• Whenever you connect any device to the Digital
Piano, be sure to read the user documentation that
comes with the device.
Guitar amplifier
Keyboard amplifier, etc.
INPUT 1
Standard plug
Tape recorder,
MIDI sound source, etc.
INPUT 2
NOTE
• Be sure to push the headphones plug into the
PHONES jacks as far as it will go. If you don’t, you
may hear sound from only one side of the
headphones.
• If the plug of the headphones you are using does not
match the PHONES jacks, use the applicable
commercially available adaptor plug.
• If you are using headphones that require an adaptor
plug, make sure you do not leave the adaptor
plugged in when you unplug the headphones. If you
do, nothing will sound from the speakers when you
play.
Standard jack
Pin plug
Audio amplifier AUX IN jack, etc.
LEFT (White)
RIGHT (Red)
E-6
Connections
Playing Output from External Equipment
through the Digital Piano’s Speakers
Use commercially available cables to connect the
external audio equipment to the Digital Piano’s
LINE IN jacks as shown in Figure
LINE IN R jack input sounds through the Digital
Piano’s right speaker, while LINE IN L/MONO jack
input sounds through the left speaker. Connecting to
the LINE IN L/MONO jack only causes the same
output to be produced from both speakers. It is up to
you to purchase connecting cables that are compatible
with the equipment you are connecting.
1
.
Connecting to Audio Equipment
Use commercially available cables to connect the
external audio equipment to the Digital Piano’s
LINE OUT jacks as shown in Figure
jack output is right channel sound, while LINE OUT
L/MONO jack output is left channel sound. It is up to
you to purchase connecting cables like the ones shown
in the illustration for connection of audio equipment.
Normally in this configuration you must set the audio
equipment’s input selector to the setting that specifies
the terminal (such as AUX IN) to which the Digital
Piano is connected. Use the Digital Piano’s VOLUME
controller to adjust the volume level.
. LINE OUT R
2
1
2
Bundled and Optional
Accessories
Use only accessories that are specified for use with this
Digital Piano.
Use of unauthorized accessories creates the risk of fire,
electric shock, and personal injury.
NOTE
• You can get information about accessories that are
sold separately for this product from the CASIO
catalog available from your retailer, and from the
CASIO website at the following URL.
http://world.casio.com/
English
Connecting to a Musical Instrument
Amplifier
Use commercially available cables to connect the
amplifier to the Digital Piano’s LINE OUT jacks as
shown in Figure
channel sound, while LINE OUT L/MONO jack
output is left channel sound. Connecting to the
LINE OUT L/MONO jack only outputs a mixture of
both channels. It is up to you to purchase connecting
cable like the one shown in the illustration for
connection of the amplifier. Use the Digital Piano’s
VOLUME controller to adjust the volume level.
IMPORTANT!
• When using the LINE OUT jacks, also connect
headphones to the PHONES jacks. This will switch
the LINE OUT output to appropriate sound quality.
3
. LINE OUT R jack output is right
3
E-7
Using Built-in Tones
3
bt dn do dpdk dl
ckbn
Selecting a Tone
Your Digital Piano has 250 tones, divided into six
groups.
• For more information, see the “Tone List” (page
A-1).
• The Digital Piano has built-in demonstration tunes
that highlight the different characteristics of tones.
For more information, see “Playing Tone Demo
Songs” (page E-23).
1.
Use the “Tone List” (page A-1) to look up the
group and the number of the tone you want to
select.
cm cn co cp cq cr ct
NOTE
• Pressing q and w at the same time will jump to
tone 001 of the currently selected group. Holding
down either button changes the tone number at high
speed.
• See page E-44 for more information about scrolling.
cs
dq
Layering Two Tones
You can layer two different tones so they play at the
same time when you press a keyboard key.
• The first tone you select is called the “main tone”,
while the second tone is called the “layered tone”.
2.
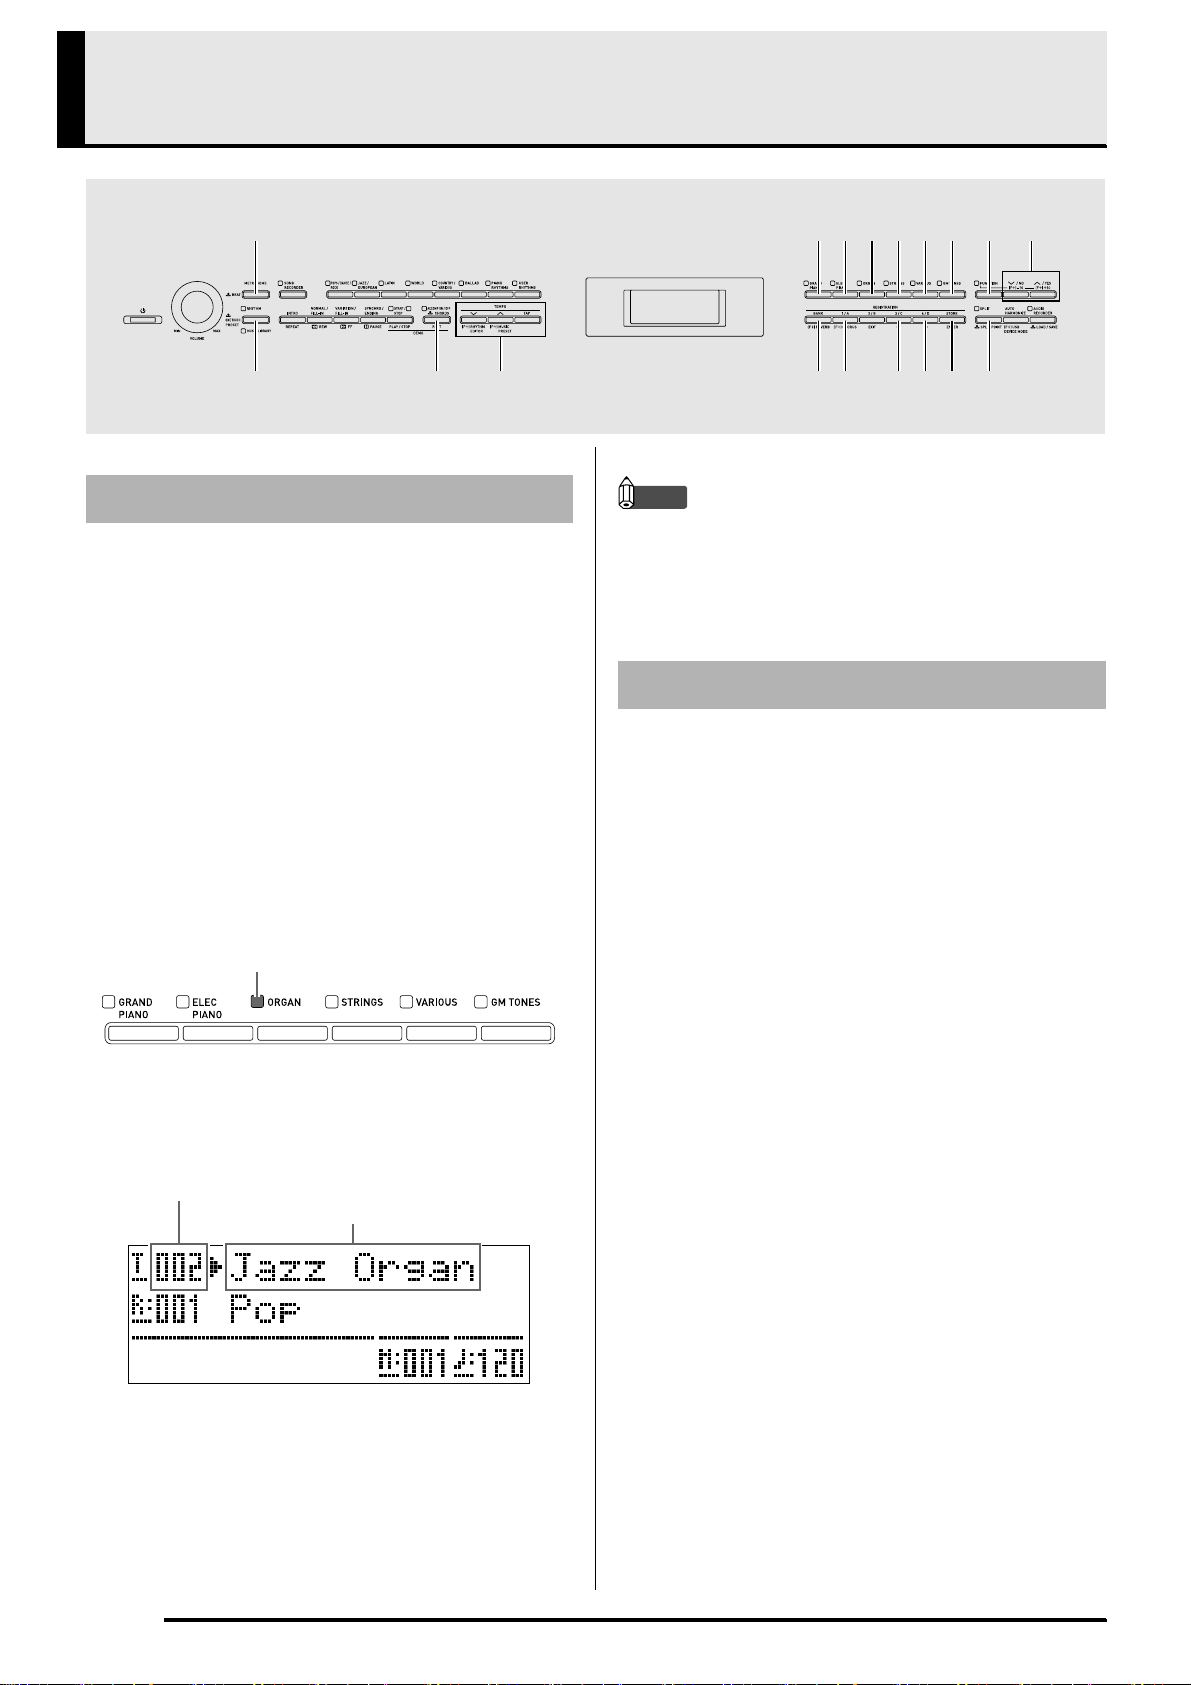
Use the cm to cr (tone groups) buttons to
select the group you want.
Example: To select the ORGAN group
Lit
3.
Use the ct (w, q) buttons to select the
tone you want.
Example: To select “002 Jazz Organ”
Tone number
Tone name
1.
Select the main tone.
Example: To select GRAND PIANO MELLOW in the
GRAND PIANO group, press the
(GRAND PIANO) button and then use the
(w, q) buttons to select “006 GRAND
ct
PIANO MELLOW”.
cm
E-8
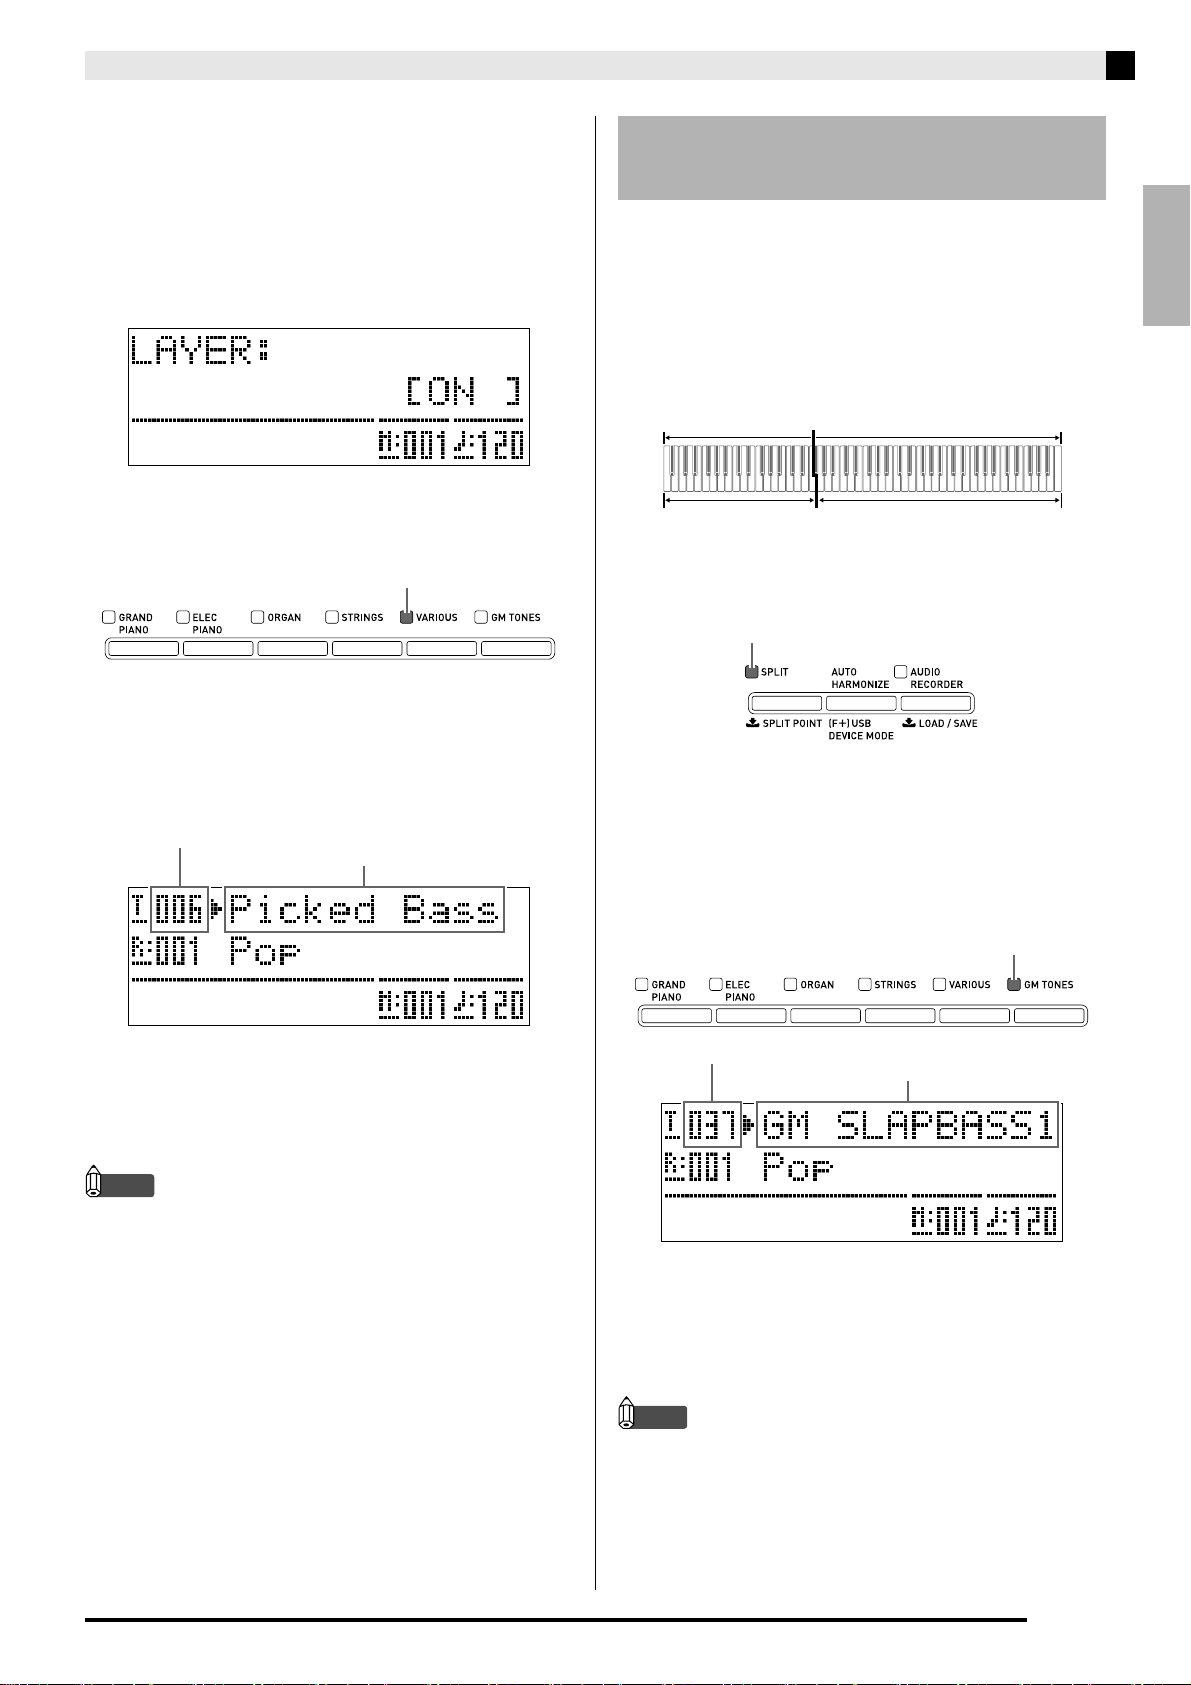
2.
Hold down the button of the group that
contains the tone you want to select as the
layered tone until “LAYER ON” appears on
the display as shown below for a few
moments.
This will layer the tones currently selected in the two
groups.
The button you held down in step 2 will light to
indicate that it is selected.
Example: When VARIOUS group is selected
Lit
Using Built-in Tones
Splitting the Keyboard
between Two Tones
You can split the keyboard so the left side (lower
range) plays one tone and the right side (upper range)
plays a different tone.
Example: To split the keyboard between the GM SLAP
BASS 1 tone on the left (lower range) and the
GRAND PIANO CONCERT tone on the right
(upper range).
Left (Lower Range)
Tone: GM SLAP BASS 1
1.
Press the dq (SPLIT) button.
This causes the SPLIT lamp to light, indicating that the
keyboard is split between two tones.
Lit
Right (Upper Range)
Tone: GRAND PIANO CONCERT
English
3.
Use the ct (w, q) buttons to select the
tone you want in the group you selected in
step 2.
Example: When “006 Picked Bass” is selected
Layered tone number
4.
To unlayer the tones and return the keyboard
Layered tone name
to a single tone, press any one of the tone
group buttons.
NOTE
• You can adjust the balance between the main tone
and layered tone. For details, see “Layered Tone
Volume (Layer Balance)” (page E-45).
2.
Select the tone you want to assign to the left
side (lower range) of the keyboard.
Example: To select GM SLAP BASS 1 in the GM TONES
group, press the
then use the ct (w, q) buttons to select
“037 GM SLAP BASS 1”.
Left tone number
3.
To unsplit the keyboard and return it to a
single tone, press the
The SPLIT lamp will go out, indicating that the
keyboard is no longer split.
(GM TONES) button and
cr
Left tone name
(SPLIT) button.
dq
Lit
NOTE
• If the keyboard is set up with layered tones (page
E-8) when you perform the above split operation,
the layered tones will play on the right (upper
range) side of the keyboard.
E-9
Using Built-in Tones
Moving the Keyboard Split Point
You can use the procedure below to specify the
location on the keyboard where it splits between the
left side and the right side. That location is called the
“split point”.
Left (Lower Range) side Right (Upper Range) side
Split point
1.
Hold down the dq (SPLIT) button until the
split point setting screen appears on the
display as shown below.
Current split point key name
Using Octave Shift
After you split the keyboard (page E-9), you may find
out that the lower range notes on the left are too low or
that the upper range notes on the right are too high.
You can use octave shift to shift the octaves of the
upper range and lower range upwards or downwards
in octave units.
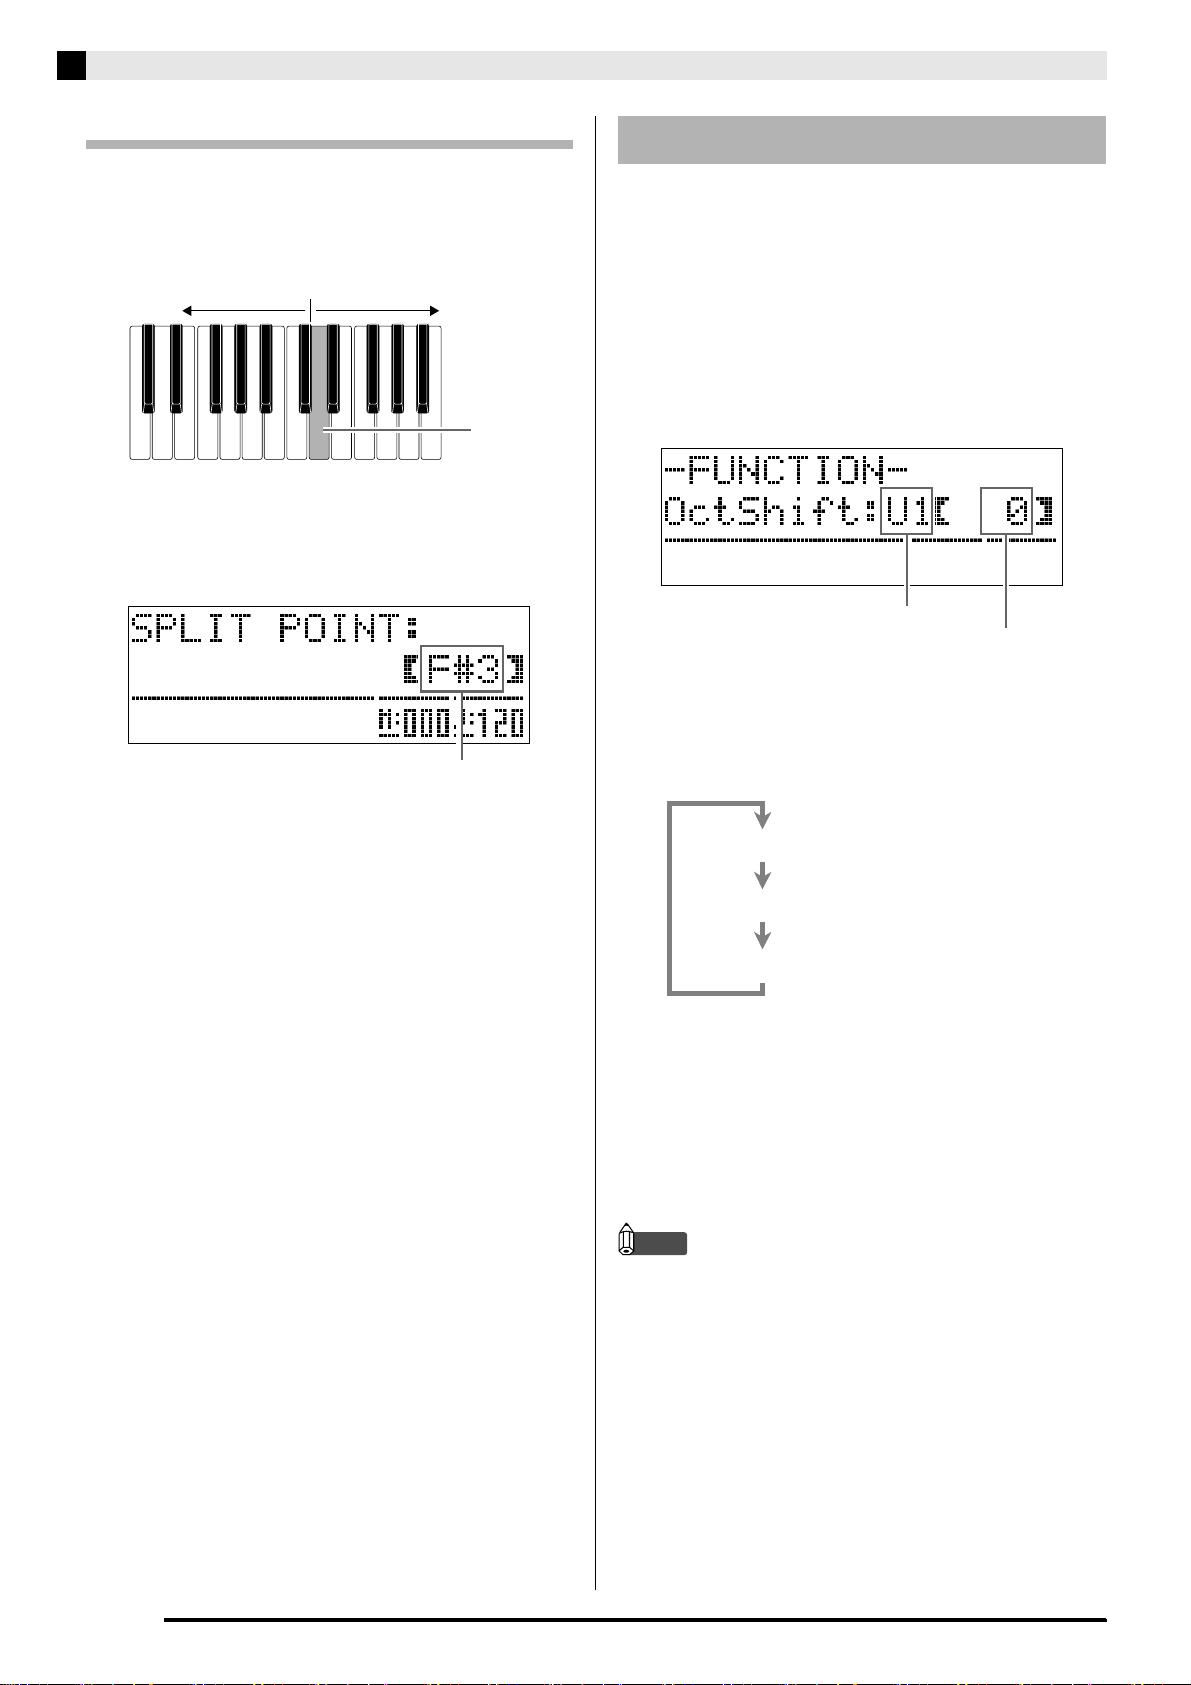
1.
While holding down the cs (FUNCTION)
button, press the
This displays the octave shift screen.
2.
Use the bt (PART) button to select the range
whose octave you want to change.
• Each press of bt (PART) cycles through the ranges
below.
(GRAND PIANO) button.
cm
Currently selected range
Shift amount
2.
Press the keyboard key where you want to
specify as the leftmost key of the right (upper
range) tone.
This specifies the split point.
3.
Press the dq (SPLIT) button.
This exits the split point screen.
U1 (Upper1): Main tone
U2 (Upper2): Layered tone
L1 (Lower1): Left (lower range) tone
3.
Use the ct (w, q) buttons to shift the
octave of the currently selected range.
• You can shift the octave within the range of –2 to 0 to
2.
4.
Press the cs (FUNCTION) button.
This exits the octave shift screen.
NOTE
• Octave shift also can be performed as described for
“Octave Shift” (page E-45).
E-10
Using Built-in Tones
Adjusting the Brilliance of a
Tone
1.
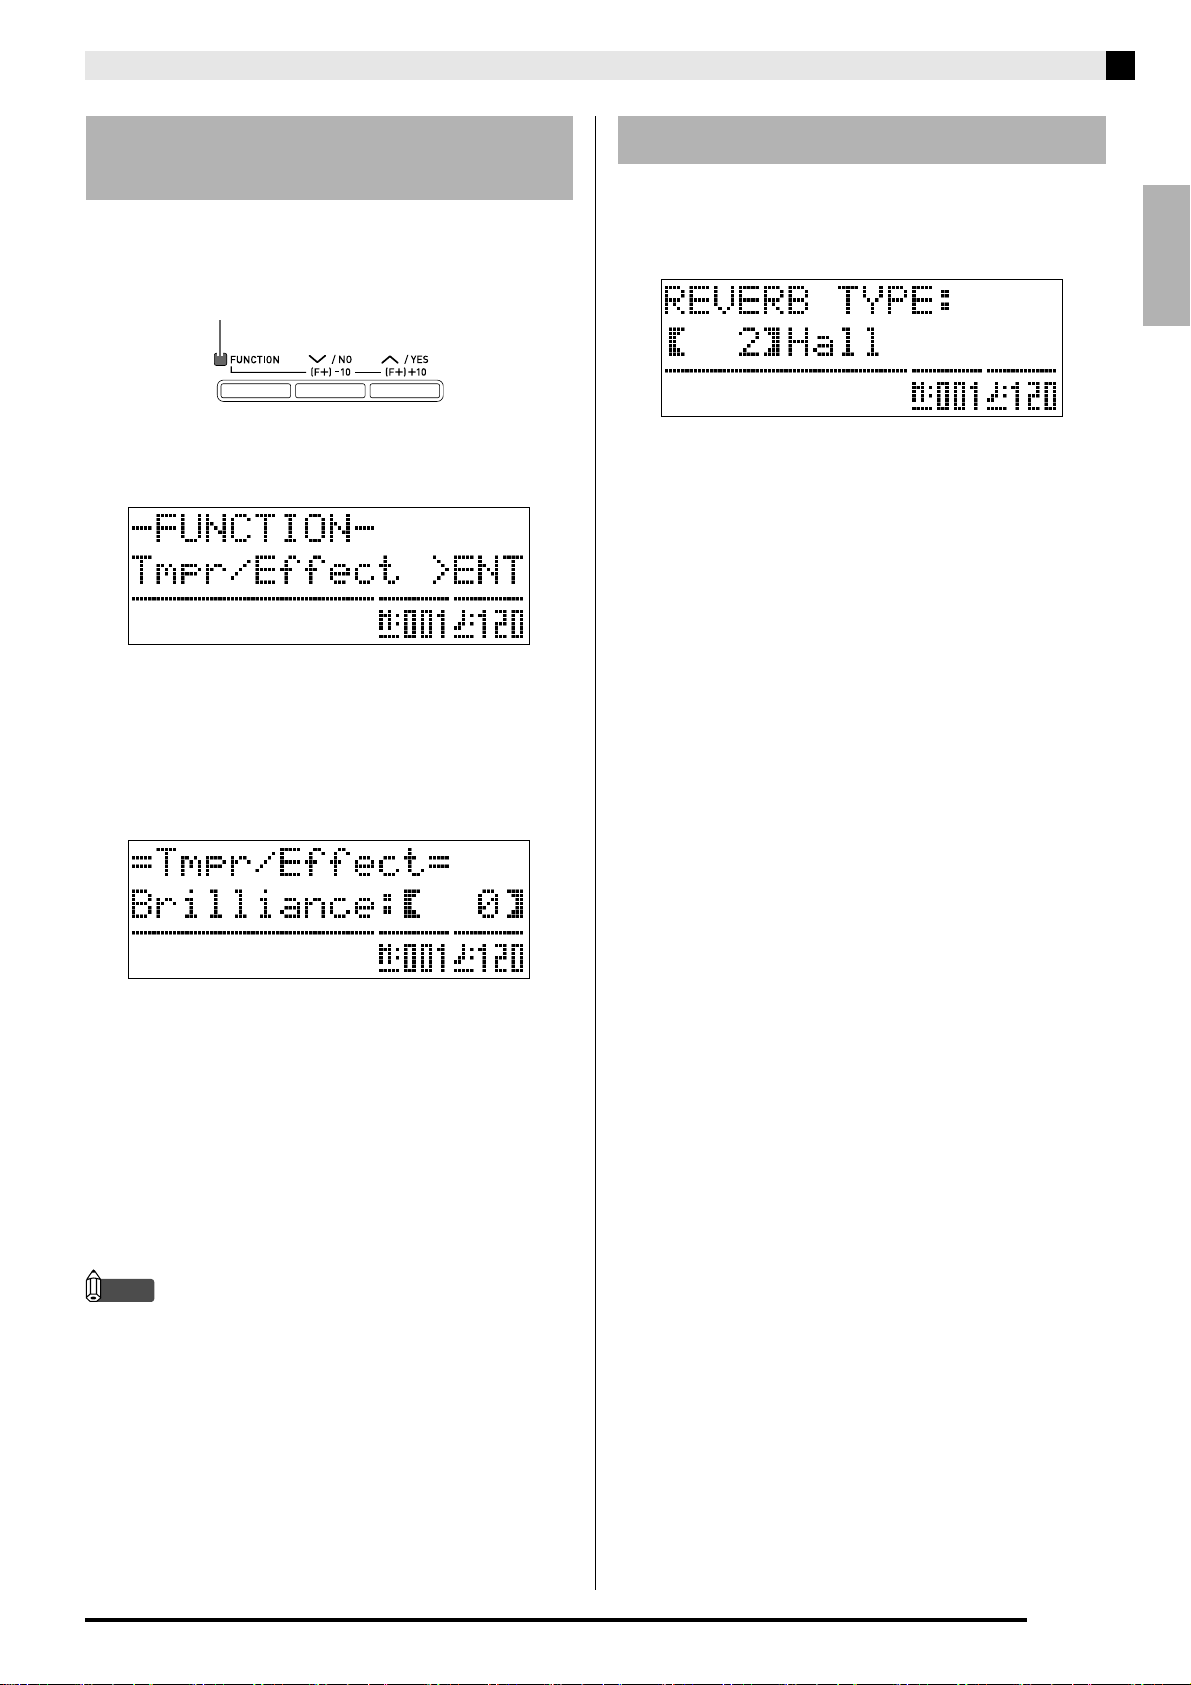
Press the cs (FUNCTION) button.
The FUNCTION lamp will light and the function screen
will appear on the display.
Lit
2.
Use the do (i) and dn (u) buttons to select
the Tmpr/Effect screen.
3.
Press the dp (ENTER) button.
This will display a screen for selecting settings in the
Tmpr/Effect group.
Adding Reverb to the Tone
1.
While holding down the cs (FUNCTION)
button, press the
This will display a reverb type selection screen.
2.
Use the ct (w, q) buttons to select the
reverb type you want.
• The following shows the five available reverb type
settings.
0: OFF (no reverb)
1: Room
2: Hall
3: Large Hall
4: Stadium
3.
Press the cs (FUNCTION) button.
This exits the reverb type selection screen.
(REVERB) button.
dk
English
4.
Use the do (i) or dn (u) button to select
the brilliance screen shown below.
5.
Use the ct (w, q)
brilliance of the currently selected tone. You
can adjust brilliance in the range of –3 to 0 to 3.
w : Mellower and softer
q : Brighter and harder
6.
Press the cs (FUNCTION) button.
This will exit the brilliance screen and cause the
FUNCTION lamp to go out.
NOTE
• See “Other Settings” (page E-44) for details about
using the
(FUNCTION) button.
cs
buttons to adjust the
E-11
Using Built-in Tones
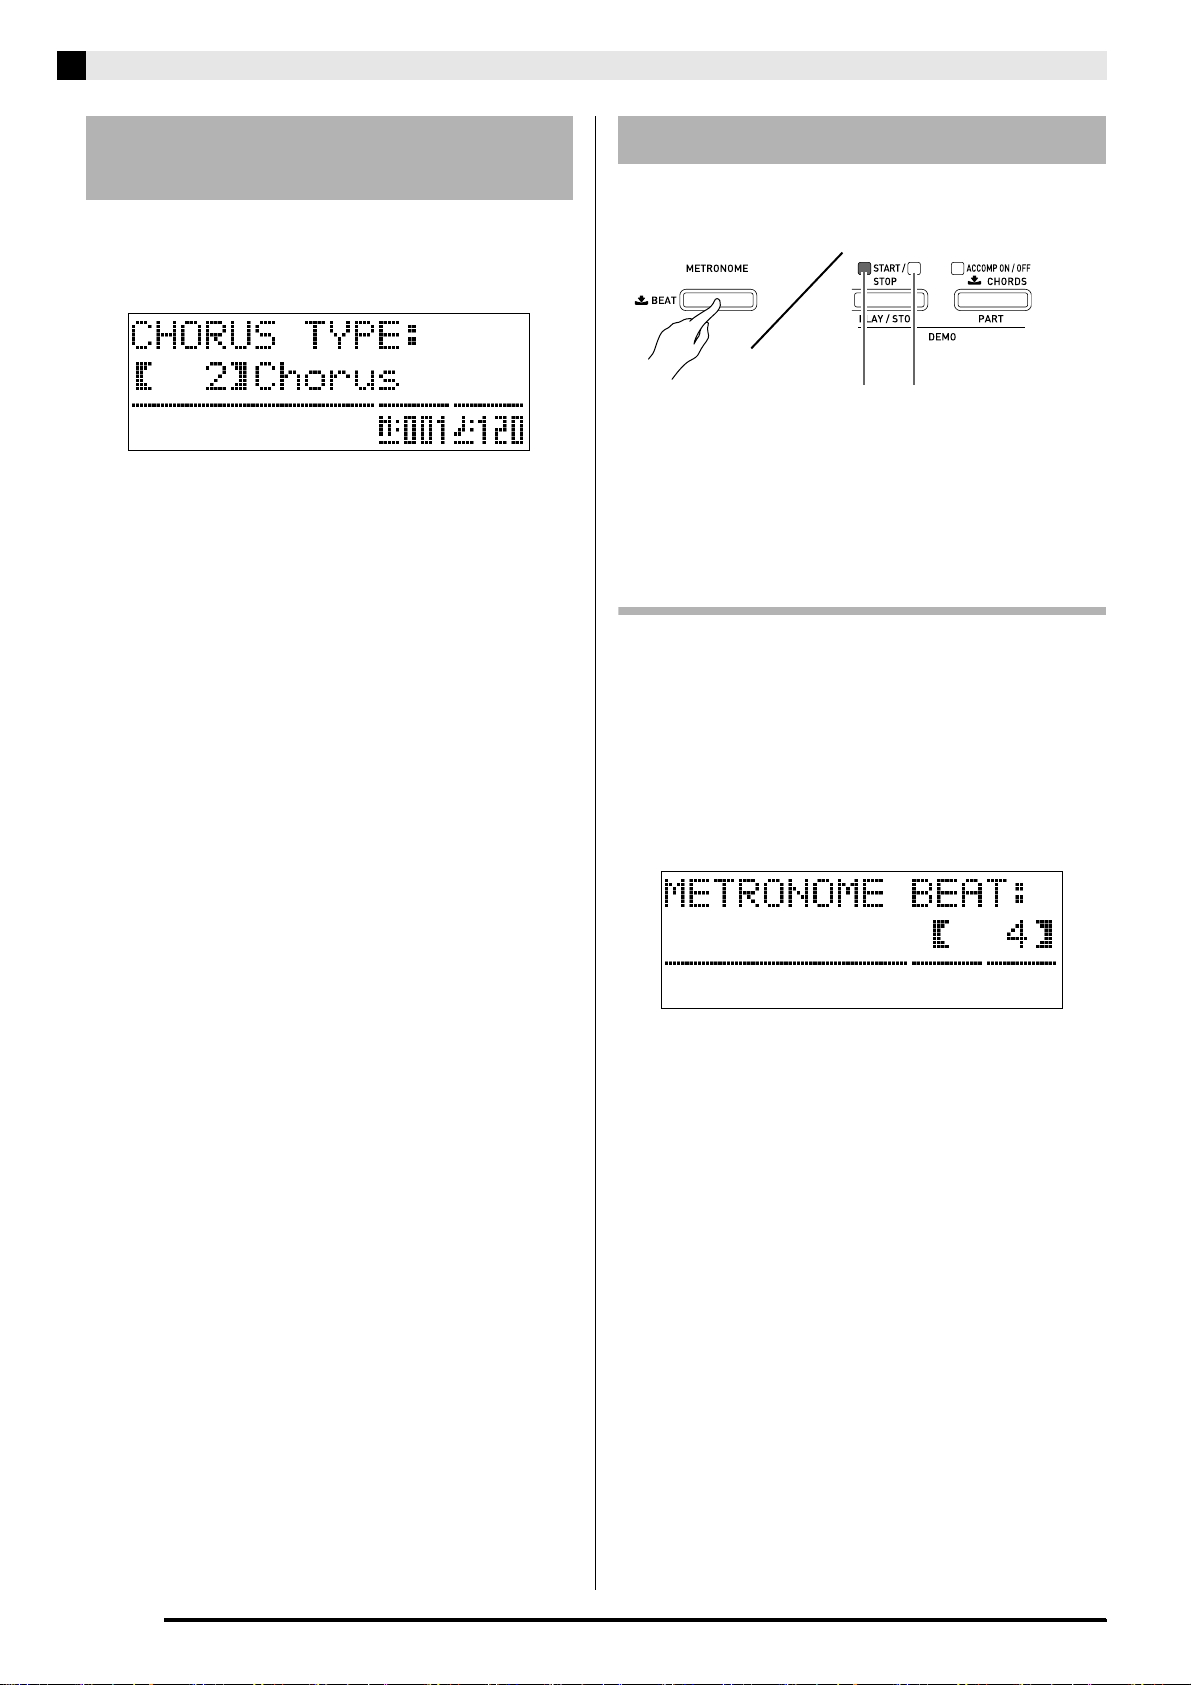
Adding the Chorus Effect to
the Tone
1.
While holding down the cs (FUNCTION)
button, press the
This will display a chorus type selection screen.
2.
Use the ct (w, q) buttons to select the
chorus type you want.
• The following shows the five available chorus type
settings.
0: OFF (no chorus)
1: Light Chorus
2: Chorus
3: Deep Chorus
4: Flanger
3.
Press the cs (FUNCTION) button.
This exits the chorus type selection screen.
(CHORUS) button.
dl
Using the Metronome
1.
Press the 3 (METRONOME) button.
This will start the metronome.
Lights with the first beat
of each measure
2.
Press the 3 (METRONOME) button again to
stop the metronome.
Changing the Beats Per Measure
You can specify from two to six beats per measure for
the metronome. After you do, a chime will sound at the
beginning of each measure. Specifying 0 for this setting
will sound a straight beat, without a chime. This setting
lets you practice with a steady beat.
1.
Hold down the 3 (METRONOME) button
until the number of beats per measure screen
shown below appears on the display.
Lights with each
subsequent beat of
each measure
E-12
2.
Use the ct (w, q) buttons to select the
beats per measure value you want.
3.
Press the 3 (METRONOME) button to exit
the number of beats per measure screen.
Using Built-in Tones
Changing the Tempo Setting
There are two different methods you can use to change
the tempo setting: by pressing
(w) (slower) buttons or by tapping a beat with a
button.
■
To adjust the tempo using ck (TEMPO, w,
buttons
q)
1.
Use the ck (TEMPO, w, q) buttons to
adjust the tempo setting.
Each press of a button increases or decreases the beats
per minute value by one.
• Holding down either button changes the value at
high speed.
• You can specify a tempo value in the range of 20 to
255.
■ To adjust the tempo by tapping a beat
1.
Tap the ck (TEMPO, TAP) button four times
in time with the beat you want to specify.
• The tempo setting will change in accordance with the
timing of your tapping.
(q) (faster) and ck
ck
Tempo value
Tap four times
Adjusting the Metronome Volume
You can use the following procedure to adjust the
volume level of the metronome, without affecting the
volume of Digital Piano output.
1.
While holding down the cs (FUNCTION)
button, press the
This displays the metronome volume screen.
2.
Use the ct (w, q) buttons to adjust the
(METRONOME) button.
3
Metronome volume
metronome volume.
3.
Press the cs (FUNCTION) button.
This will exit the metronome volume screen and cause
the FUNCTION lamp to go out.
NOTE
• You also can use the procedure under “Metronome
Volume” (page E-45) to adjust the metronome
volume.
Using the Pitch Bend Wheel
You can use the pitch bend wheel to slide the pitch of
notes smoothly upwards and downwards. This
capability makes it possible to reproduce saxophone
and electric guitar choking effects.
English
• After you use this method to specify the approximate
tempo, you can then use the procedure under “To
adjust the tempo using
buttons” to adjust the setting to a more exact value.
(TEMPO, w, q)
ck
Adding a Pitch Bend Effect
1.
While playing a note on the
keyboard, rotate the pitch bend
wheel on the left of the keyboard
upwards or downwards.
The amount the note bends depends on
how much you rotate the pitch bend
wheel.
• Do not have the pitch bend wheel
rotated as you turn on the Digital Piano.
NOTE
• You also can configure pitch bend wheel operation
by specifying the amount of pitch change at
maximum rotation in either direction. See “Pitch
Bend Range” (page E-47) for more information.
E-13
Using Built-in Tones
6
Using the Digital Piano’s
Pedals
Your Digital Piano comes equipped with three pedals:
damper, soft, and sostenuto.
Soft pedal
Sostenuto pedal
Pedal Functions
z Damper Pedal
Pressing the damper pedal while playing will cause the
notes you play to reverberate for a very long time.
• When a GRAND PIANO tone (tone numbers 001
through 012) is selected as the tone, pressing this
pedal will cause notes to reverberate (Damper
Resonance) just like the damper pedal on an acoustic
grand piano. Half-pedal operation (pressing the
pedal part way) is also supported.
Damper pedal
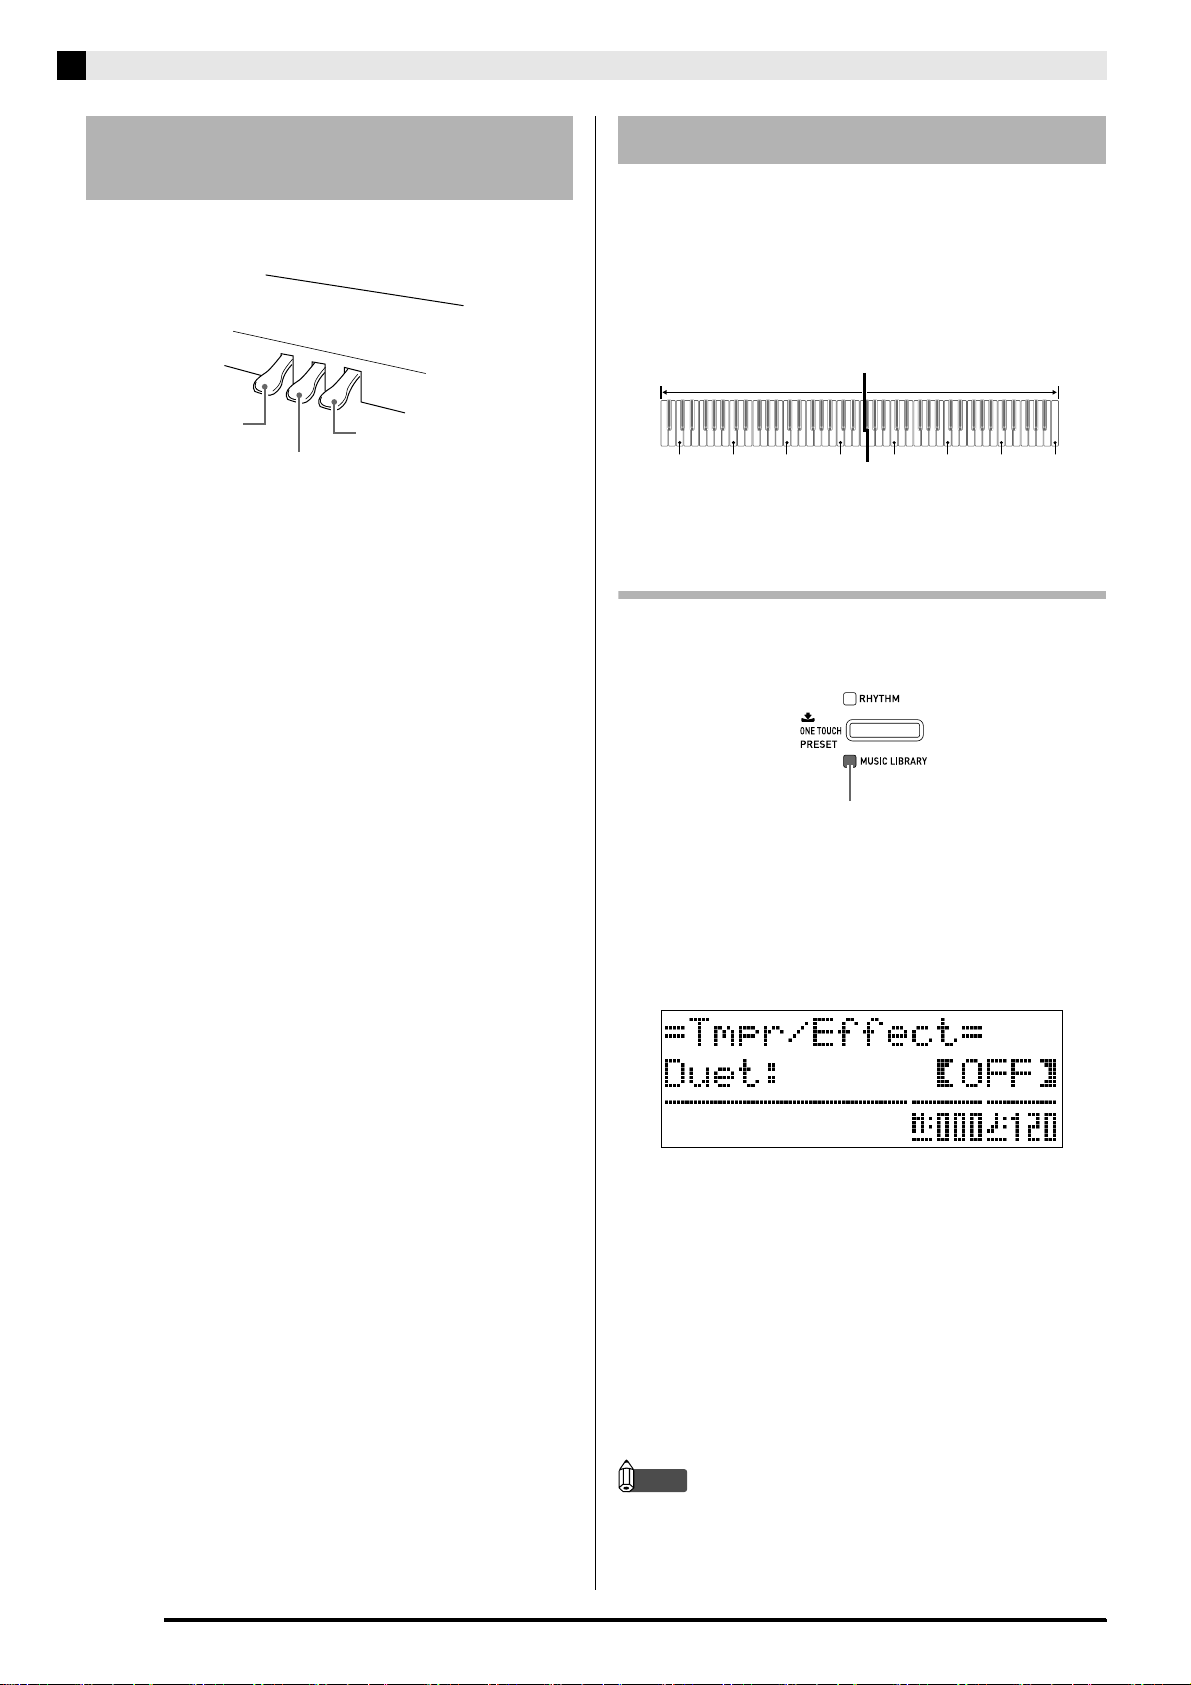
Playing a Duet
You can use the Duet Mode to split the Digital Piano’s
keyboard in the center so two people can play a duet.
This makes it possible to configure the keyboard so, for
example, the teacher can play on the left and the
student can follow along on the right. Or one person
can play the left hand part on the left, while another
plays the right hand part on the right.
Right keyboardLeft keyboard
C3 C4 C5 C6 C3 C4 C5 C
(Middle C) (Middle C)
Configuring the Digital Piano for Duet
Play
1.
Press the bn (MUSIC LIBRARY) button so its
lower lamp is lit.
z Soft Pedal
Pressing this pedal while playing suppresses notes
played on the keyboard after the pedal was pressed,
and makes them sound softer.
z Sostenuto Pedal
Only the notes of the keys that are depressed when this
pedal is pressed are sustained until the pedal is
released.
Lit
2.
While holding down the cs (FUNCTION)
button, press the
This causes the Duet Mode on/off screen to appear.
• The keyboard keys are disabled while this screen is
displayed.
3.
Press the ct (q) button to turn on the Duet
(SPLIT) button.
dq
Mode.
This will cause the dq (SPLIT) button lamp to flash.
4.
Press the cs (FUNCTION) button.
This exits the Duet mode on/off screen and configures
the Digital Piano’s keyboard for duet play.
E-14
5.
To turn off the Duet Mode, press the dq
(SPLIT) button so the SPLIT lamp goes out.
NOTE
• You also can use the procedure under “Duet Mode”
(page E-45) to turn the Duet Mode on or off.
Changing the Octave of a Duet Mode
Keyboard
You can use the following procedure to change the
octave of the left and right Duet Mode keyboards.
1.
While holding down the cs (FUNCTION)
button, press the
This displays the Duet Mode on/off screen shown in
step 2 under “Configuring the Digital Piano for Duet
Play” (page E-14). If the Duet Mode is currently turned
off, press the
2.
Of the four C keys in the left keyboard, press
(q) button to turn it on.
ct
the one that you want to have located at
middle C.
• This will sound the note assigned to C4 and change
the octave of the left keyboard.
Example: To change the configuration so the leftmost C
key is middle C as shown below.
Leftmost C key (Pressed key)
(SPLIT) button.
dq
Using Built-in Tones
English
C4 C5 C6 C7 C3 C4 C5 C6
1 octave higher than initial setting Unchanged
3.
You can use the same procedure as step 2 to
select one of the C keys in the right keyboard
to shift its octave as well.
4.
Press the cs (FUNCTION) button.
This exits the Duet Mode on/off screen and causes the
(FUNCTION) button lamp to go out.
cs
The left and right keyboards will be configured
according to your settings.
NOTE
• Turning off the Duet Mode will clear your octave
shift settings and return the keyboard to its initial
default settings.
E-15
Using Auto Accompaniment
5 6 7 8 9 bk bl bm ct
bn
bo bp bq dm dp
With Auto Accompaniment, simply select the
accompaniment rhythm you want and the matching
accompaniment (drums, guitar, etc.) will play
automatically when you play a chord with your left
hand. It’s like having your own personal backup group
along with you wherever you go.
This Digital Piano has 180 built-in Auto
Accompaniment patterns, which are divided into
seven groups. You can edit built-in rhythms to create
your own original rhythms (called “user rhythms”),
which you can save in a eighth group. For more
information, see the “Rhythm List” (page A-5).
ckbtbr bs dr
cm cn co cp
dn do
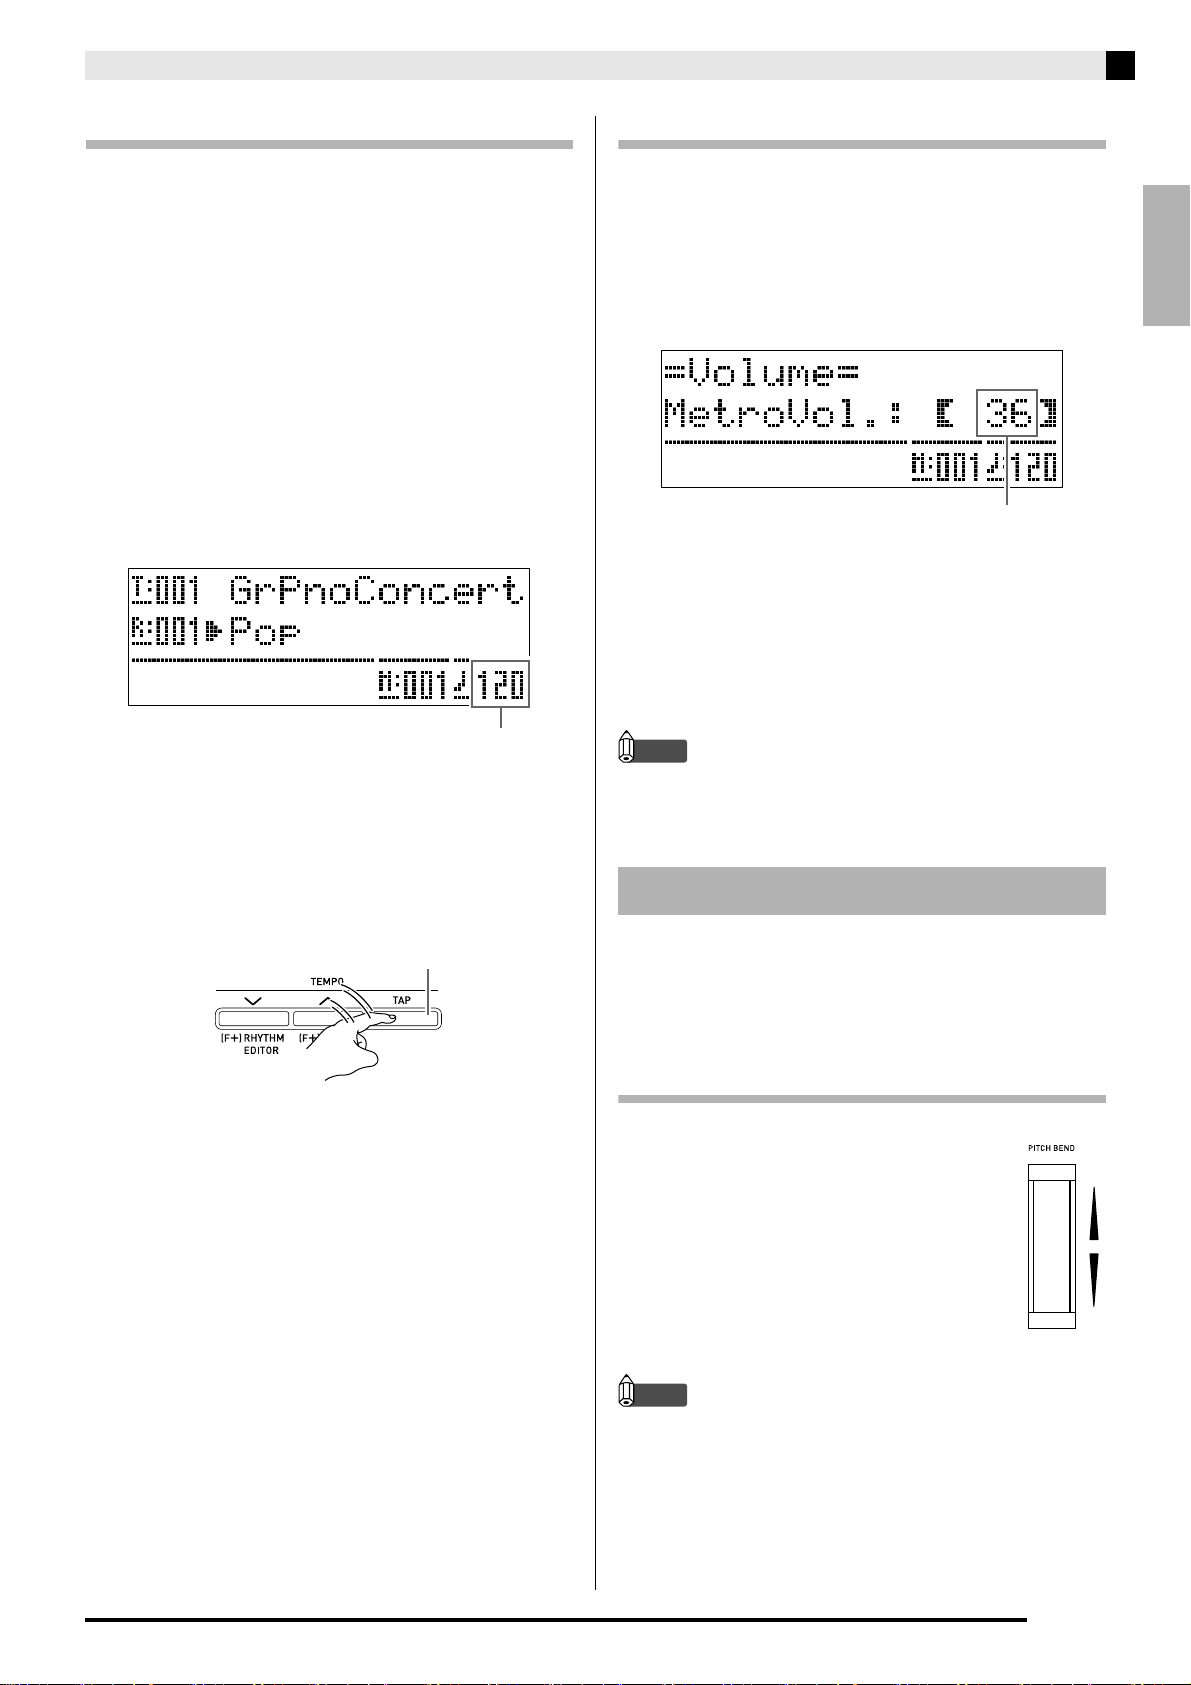
4.
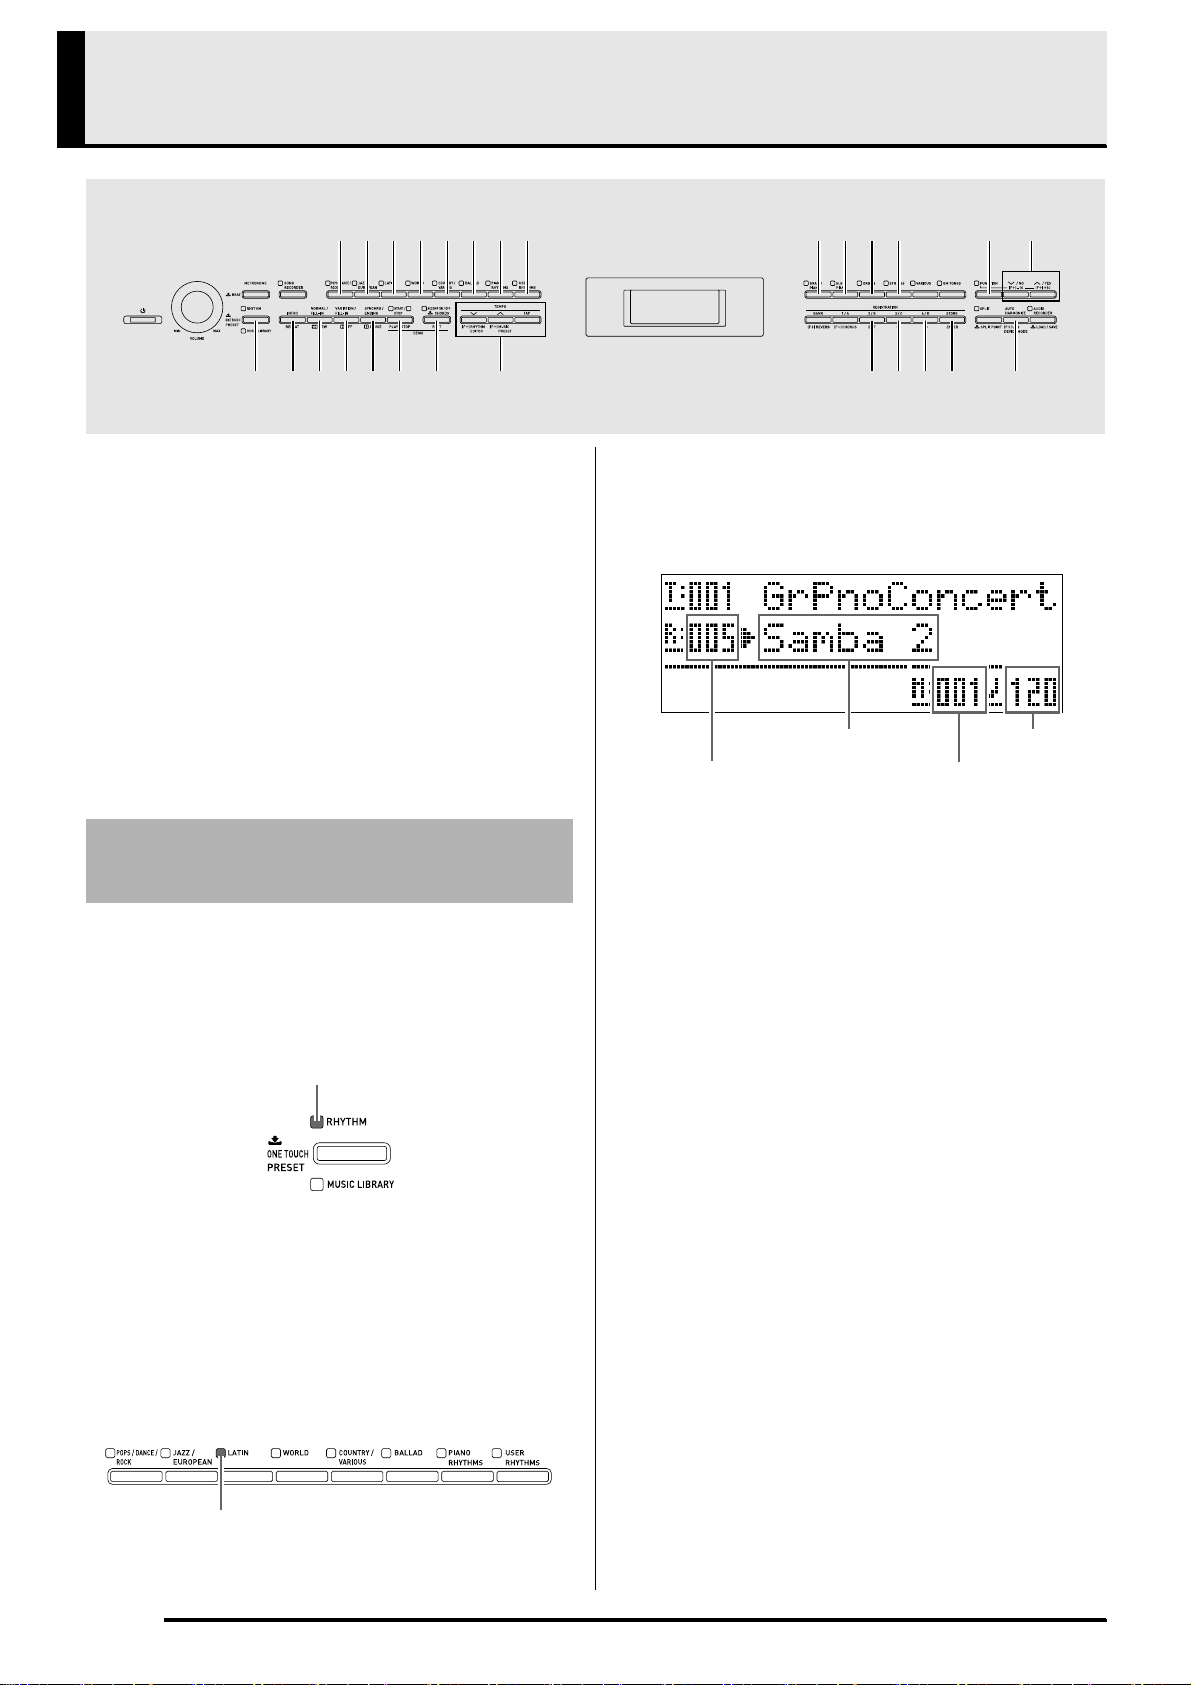
Use the ct (w, q) buttons to select the
rhythm you want.
Example: When “005 Samba 2” is selected
Rhythm name
Rhythm number
Measure
cs
Tempo
Playing an Auto
Accompaniment
1.
Press the bn (RHYTHM) button so its upper
lamp is lit.
This enables Auto Accompaniment.
• Each press of the button toggles between the
RHYTHM and MUSIC LIBRARY lamps.
Lit
2.
Use the “Rhythm List” (page A-5) to look up
the group and the number of the rhythm you
want to select.
3.
Use the 5 to bm (rhythm groups) buttons to
select the group you want.
Example: When the LATIN group is selected
5.
Use the ck (TEMPO, w, q) buttons to
adjust the tempo setting.
• This is the same as metronome tempo adjustment
(page E-12).
• To return the rhythm to its standard tempo setting,
press the
time.
(TEMPO, w, q) buttons at the same
ck
E-16
Lit
6.
Press the bt (ACCOMP ON/OFF) button so
its lamp is lit.
This turns ACCOMP on, so all accompaniment parts
sound.
• Turning ACCOMP off so the ACCOMP lamp is unlit
causes only the percussion instrument parts to sound.
• Each press of the
toggles ACCOMP on and off.
7.
Press the br (SYNCHRO/ENDING) button.
This puts Auto Accompaniment into “synchro
standby”. Playing a chord during synchro standby will
cause Auto Accompaniment to start to play
automatically.
• Pressing the bo (INTRO) button while Auto
Accompaniment is in synchro standby will enter
intro standby. Pressing the
will enter variation standby. For details about intro
and variation patterns, see “Modifying Auto
Accompaniment Patterns” (page E-19).
(ACCOMP ON/OFF) button
bt
Lit
(VARIATION) button
bq
Flashing
Using Auto Accompaniment
9.
Play other chords with left hand as you play
the melody with your right hand.
• You can use “CASIO Chord” or other simplified
chord fingering modes to play chords. For details, see
“Selecting a Chord Fingering Mode” in the following
section.
• You can use the bp (NORMAL) and bq
(VARIATION) buttons to modify accompaniment
patterns. For details, see “Modifying Auto
Accompaniment Patterns” (page E-19).
10.
When you are finished, press the bs (START/
STOP) button again to stop Auto
Accompaniment.
• Pressing the br (SYNCHRO/ENDING) button
instead of the
ending pattern before stopping Auto
Accompaniment play. For details about ending
patterns, see “Modifying Auto Accompaniment
Patterns” (page E-19).
NOTE
• You can use the following procedure to adjust the
volume level of the Auto Accompaniment, without
affecting the volume of Digital Piano output. For
details, see “Auto Accompaniment Volume” (page
E-45).
• You can change the size of the chord keyboard by
using the split feature to move the split point (page
E-10). The keyboard keys to the left of the split point
make up the chord keyboard.
(START/STOP) button will play an
bs
English
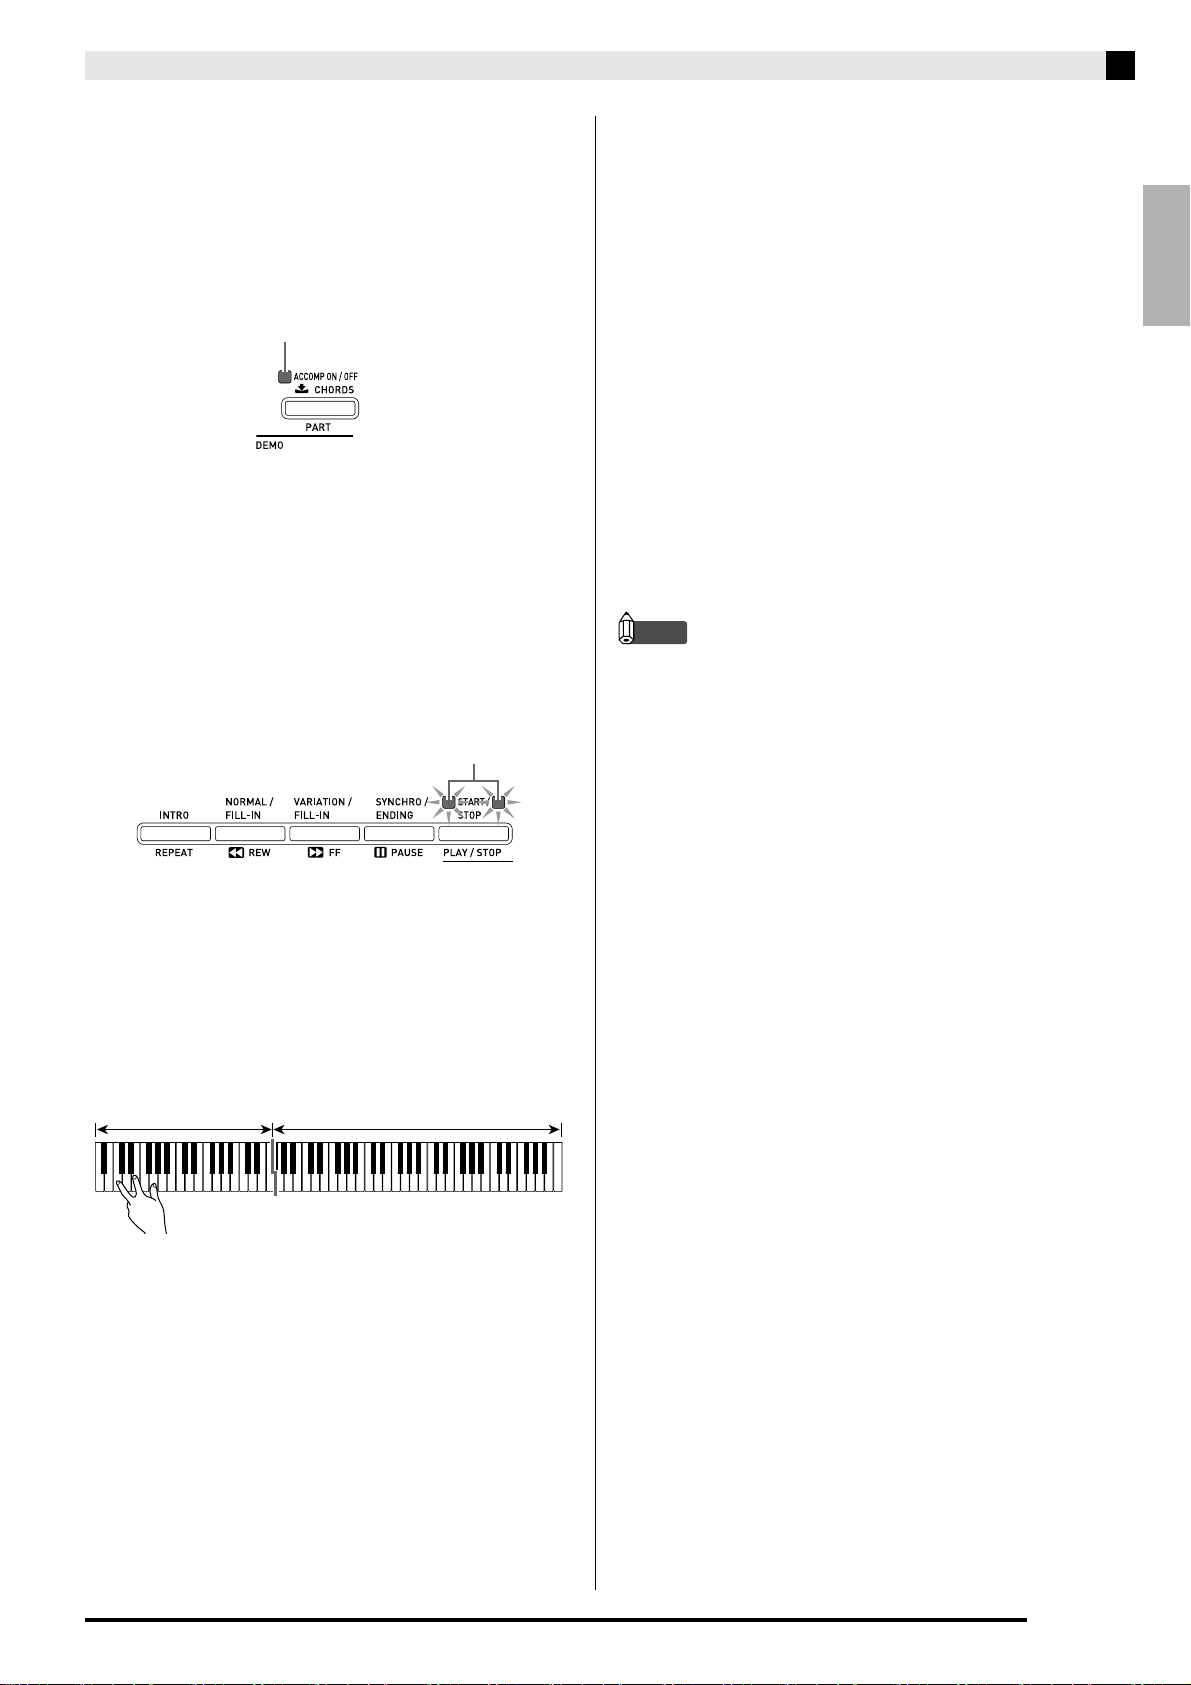
8.
Play the chord you want on the chord
keyboard (left keyboard keys).
Auto Accompaniment will start playing when you play
the chord.
• To start percussion part play without playing a
chord, press the bs (START/STOP) button.
Example: To play a C chord
Chord keyboard Melody keyboard
E-17
Using Auto Accompaniment
Selecting a Chord Fingering Mode
You can select from among the following five chord
fingering modes.
1: Fingered 1
2: Fingered 2
3: Fingered 3
4: CASIO Chord
5: Full Range
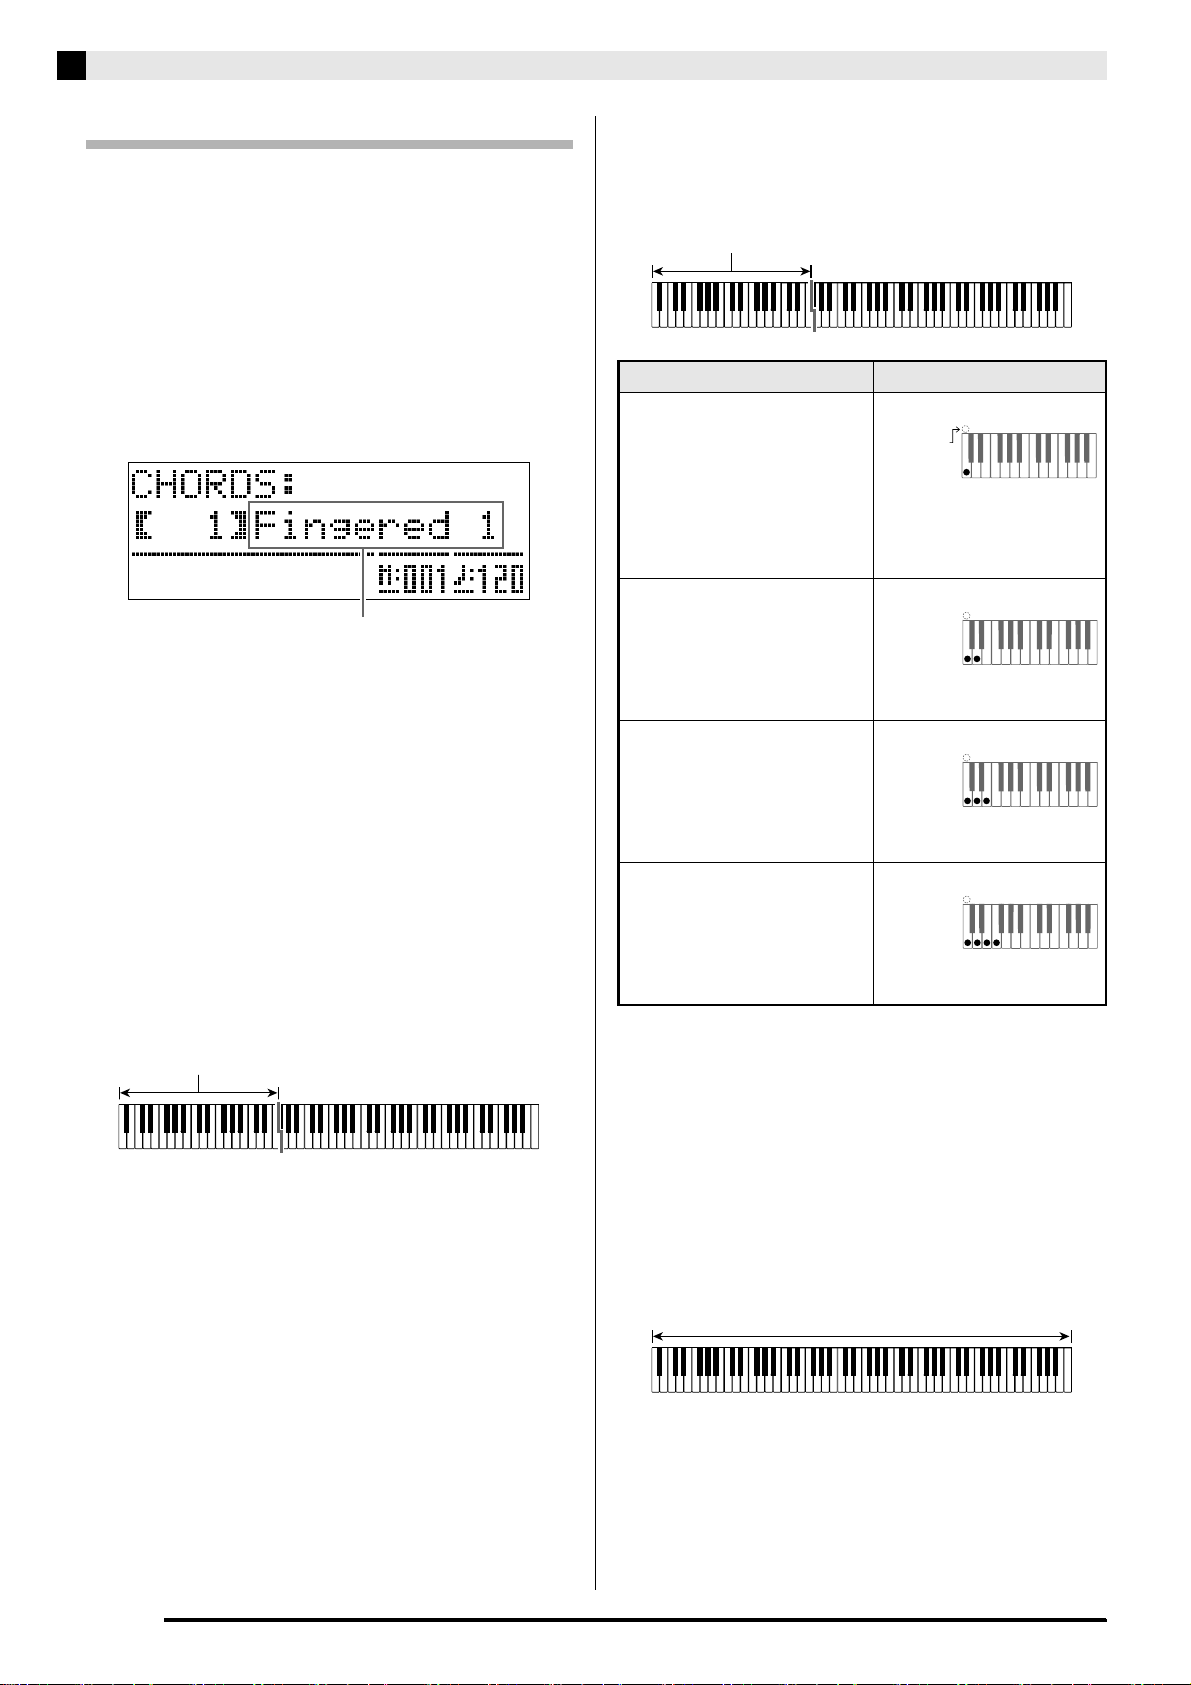
1.
Hold down the bt (ACCOMP ON/OFF) button
until the chord type selection screen appears
on the display.
Chord fingering mode
2.
Use the ct (w, q) buttons to select the
chord fingering mode you want.
3.
Press the bt (ACCOMP ON/OFF) button.
This exits the chord fingering screen.
■ Fingered 1, 2, 3
With these three chord fingering modes, you play
chords on the chord keyboard using their normal
chord fingerings. Some chord forms are abbreviated,
and can be fingered with one or two keys.
For information about the types of chords you can
finger and their fingerings, see the “Fingering Guide”
(page A-10).
Chord keyboard
■ CASIO CHORD
With “CASIO Chord”, you can use simplified
fingerings to play the four types of chords described
below.
Chord keyboard
Chord Type Example
Major Chords
Press one key, whose note
corresponds to the chord
name.
• To play C Major, press any
C key in the chord
keyboard. The octave of the
note does not matter.
Minor Chords
Press the chord keyboard key
that corresponds to the major
chord, while also pressing one
other chord keyboard key to
the right.
Seventh Chords
Press the chord keyboard key
that corresponds to the major
chord, while also pressing
two other chord keyboard
keys to the right.
Minor Seventh Chords
Press the chord keyboard key
that corresponds to the major
chord, while also pressing
three other chord keyboard
keys to the right.
When pressing more than one chord keyboard key,
makes no difference whether the additional keys are
white or black.
C (C Major)
Note name
Cm (C minor)
C7 (C seventh)
Cm7 (C minor seventh)
b
#
E
DE F
C
C
b
#
E
DE F
C
C
b
#
E
DE F
C
C
b
#
E
DE F
C
C
b
b
b
#
#
G
A
DE F
A
F
C
B
C
B
b
b
b
#
#
G
A
DE F
A
F
C
B
C
B
b
b
b
#
#
G
A
A
DE F
F
C
B
C
B
b
b
b
#
#
G
A
A
DE F
F
C
B
C
B
E
E
E
E
Fingered 1: Play the component notes of the chord on the
keyboard.
Fingered 2: Unlike Fingered 1, 6th input is not possible with
this mode.
Fingered 3: Unlike Fingered 1, this mode allows input of
fraction chords with the lowest keyboard note as
the bass note.
E-18
■ FULL RANGE CHORD
With this chord fingering mode, you can use the full
range of the keyboard to play chords and the melody.
For information about the types of chords you can
finger and their fingerings, see the “Fingering Guide”
(page A-10).
Melody keyboard
Chord keyboard
Using Auto Accompaniment
Modifying Auto Accompaniment Patterns
There are six different Auto Accompaniment patterns,
shown below. You can switch between patterns during
accompaniment play and even modify patterns. Use
buttons
through br to select the pattern you want.
bo
bo bp bq br
1
Intro *
*1 Press at the beginning of a song.
Accompaniment play proceeds with the normal
pattern after the intro pattern is complete. Pressing
the
(VARIATION/FILL-IN) button before
bq
pressing this button will proceed with the variation
pattern after the intro pattern is complete.
*2 Press while a normal pattern is playing to insert a
fill-in pattern.
*3 Press while a variation pattern is playing to insert a
fill-in variation pattern.
*4 Press at the end of a song.
This will play an ending pattern and then stop Auto
Accompaniment.
Normal Variation Ending *
Normal fill-in *2Variation fill-in *
3
4
Using One-Touch Presets
One-Touch Preset gives you one-touch access to tone
and tempo settings that go well with the currently
selected Auto Accompaniment rhythm pattern.
1.
Hold down the bn (RHYTHM) button for at
least two seconds.
This will configure tone, tempo, and other settings to
match the currently selected rhythm pattern. At this
time, Auto Accompaniment play also will go into
synchro standby, which means that Auto
Accompaniment will start to play automatically when
you finger a chord.
2.
Play a chord on the keyboard.
This will start Auto Accompaniment play.
NOTE
• One-Touch Presets are not supported for user
rhythms (001 through 010 of the USER RHYTHMS
group).
Using Auto Harmonize
Auto Harmonize lets you add harmony to melody
notes you play with your right hand. You can select
any one of 12 Auto Harmonize settings.
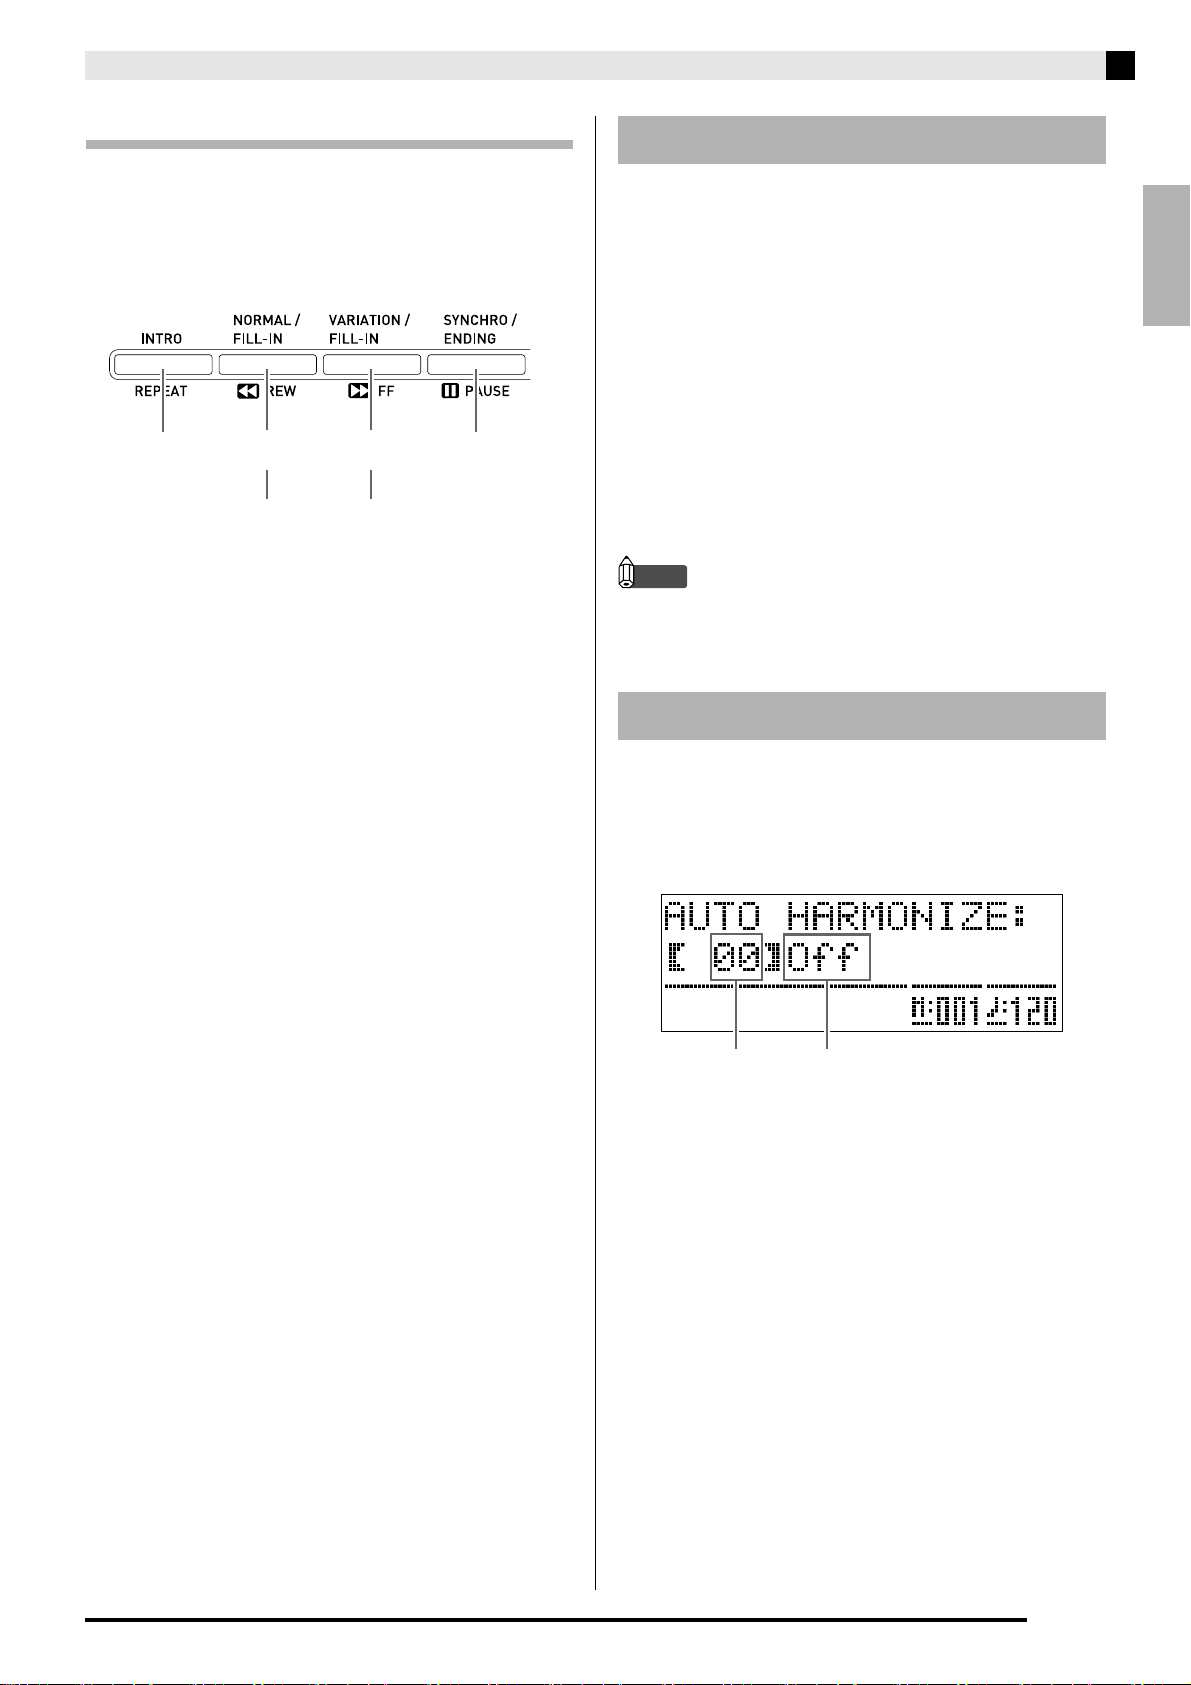
1.
Press the dr (AUTO HARMONIZE) button.
English
Type number Type name
E-19

Using Auto Accompaniment
2.
Use the ct (w, q) buttons to select the
Auto Harmonize type you want.
Type
Number
00 Off Turns off Auto Harmonize.
01 Duet 1
02 Duet 2
03 Country Adds country style harmony.
04 Octave
05 5th Adds the fifth degree note.
06 3-Way Open
07 3-Way Close
08 Strings
09 4-Way Open
10 4-Way Close
11 Block Adds block chord notes.
12 Big Band Adds big band style harmony.
3.
4.
Type Name Description
Adds close (separated by two to
four degrees) one-note harmony
below the melody note.
Adds open (separated by more
than 4 to 6 degrees) 1-note
harmony below the melody
note.
Adds the note from the next
lower octave.
Adds 2-note open harmony, for
a total of three notes.
Adds 2-note close harmony, for
a total of three notes.
Adds harmony that is optimal
for strings.
Adds 3-note open harmony, for
a total of four notes.
Adds 3-note close harmony, for
a total of four notes.
Press the dr (AUTO HARMONIZE) button.
This will exit the auto harmonize screen.
While playing chords, play the melody on the
keyboard.
Harmony will be added to your melody notes based on
the chords you play.
Creating Your Own Original
Rhythms
You can use rhythm editing to modify a built-in Auto
Accompaniment rhythm to create an original “user
rhythm” of your own. You can select a part (drum,
bass, etc.) of a normal, intro, or other pattern (page
E-19) and turn it on or off, adjust its volume level, and
perform other operations.
1.
Select the number of the Auto
Accompaniment rhythm you want to edit.
2.
At the same time, press the cs (FUNCTION)
and
This displays the rhythm editor screen.
3.
Use the accompaniment pattern buttons (bo
through
intro, ending, etc.) you want to edit.
The button you press will light, indicating that the
pattern is being edited.
• Each press of
Example: When intro is selected
(RHYTHM EDITOR) buttons.
ck
) to select the pattern (normal,
br
(NORMAL/FILL-IN) toggles
between NORMAL and FILL-IN, and each press of
(VARIATION/FILL-IN) toggles between
bq
VARIATION and FILL-IN. The applicable button
flashes while the fill-in pattern is selected.
bp
bo bp bq br
E-20
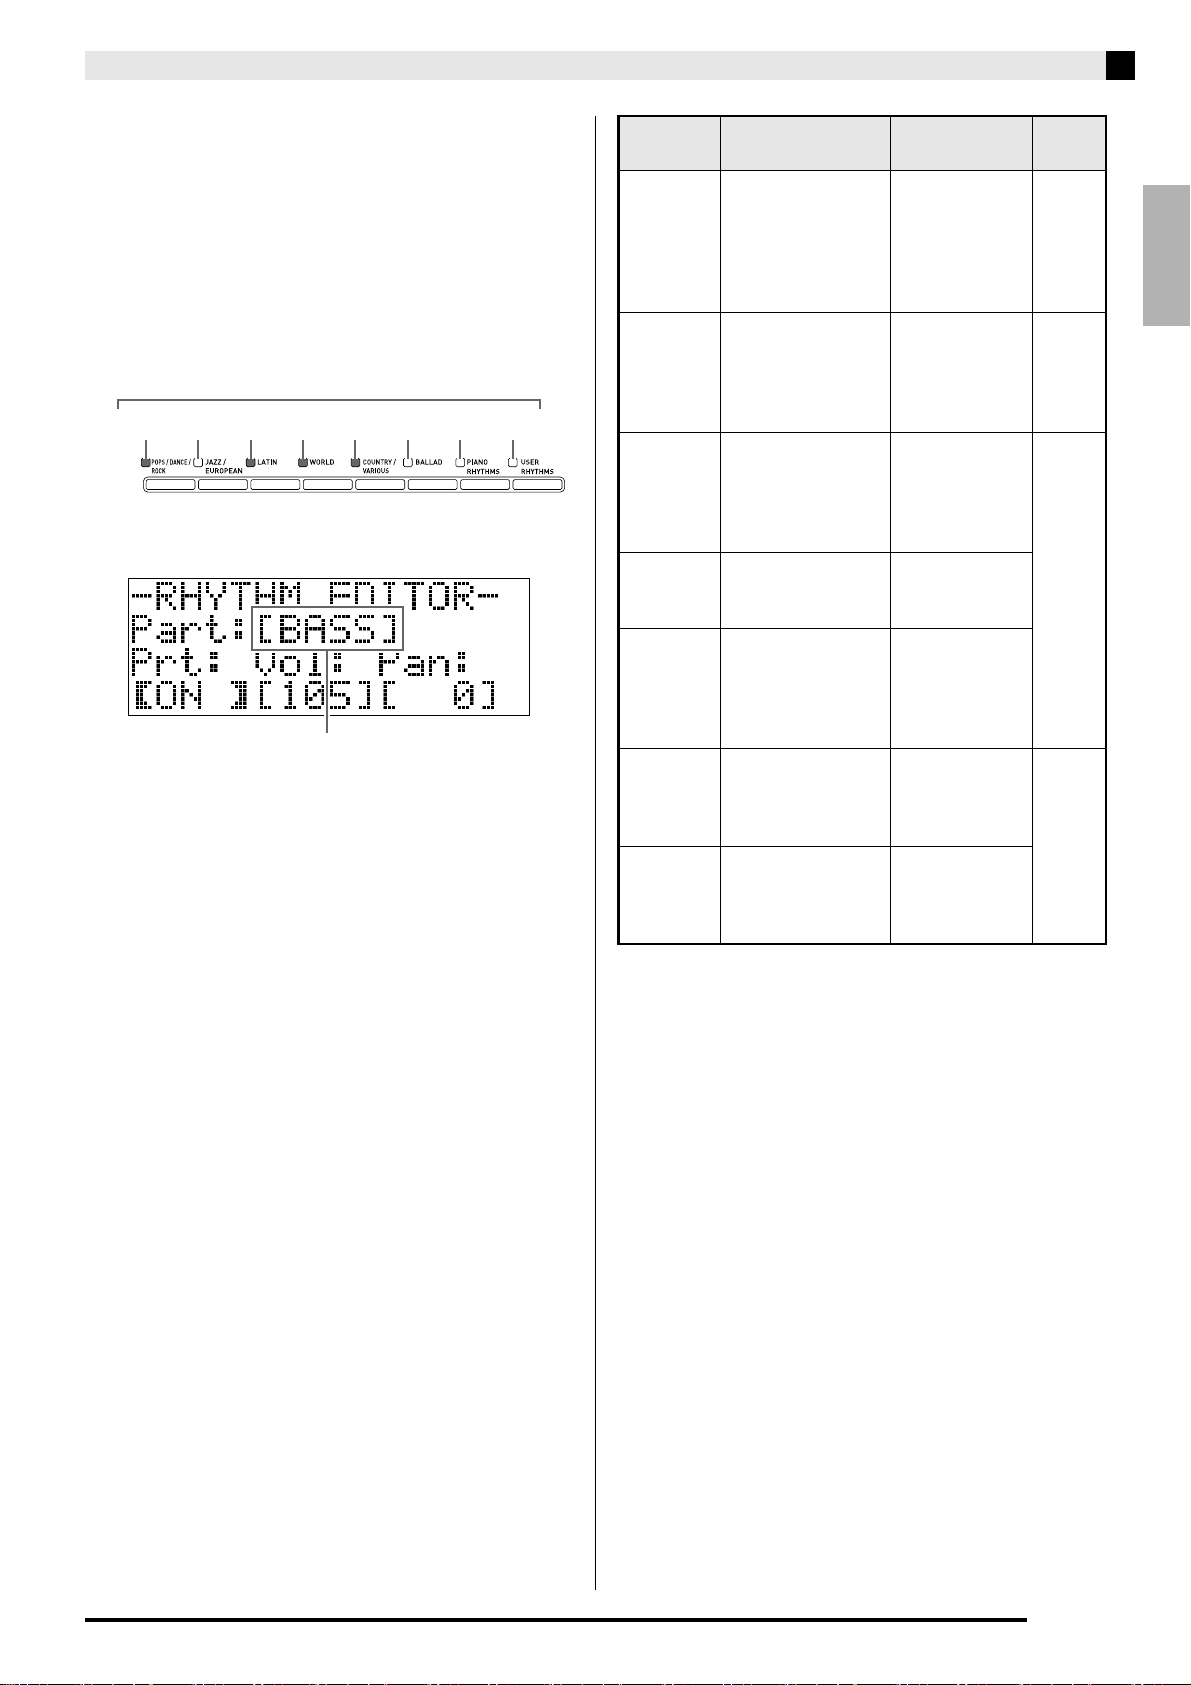
4.
Use the instrument part buttons (5 through
) to select the part (drums, bass etc.) you
bm
want to edit.
The name of the part you select will appear on the
display. Rhythm patterns are made up of the eight parts
shown below.
• Button illumination does not change when you press
the instrument part buttons (5 through bm). Button
illumination indicates whether there is
accompaniment data corresponding to each part.
Parts
Drums Percus-
56789bkblbm
Example: When bass is selected
5.
Edit the selected part as desired.
The table below describes the parameters you can edit.
• Use the
parameter, and the ct (w, q) buttons to change its
setting. You also can use shortcut buttons (see table
below) to select parameters.
• Pressing the ct (w, q) buttons at the same time
will return the currently selected parameter to its
initial default setting.
• Pressing the bs (START/STOP) button during an
edit operation will sound the accompaniment pattern
with the edits you have made up to that point.
Pressing the
sound only the instrument part you are editing.
Procedure continues on page E-22.
Bass Chord 1 Chord 2 Chord 3 Chord 4 Chord 5
sion
Instrument part name
(u) and do (i) buttons to select a
dn
(ACCOMP ON/OFF) button will
bt
Using Auto Accompaniment
Parameter Description Setting
Replaces the part
Rhythm
Select:
Rhythm
Tone
Select:
Tone
Prt:
Part on/
off
Vol:
Volume
level
Pan:
Panning
(position)
Reverb:
Reverb
Chorus:
Chorus
*1 Replacing part accompaniment data clears all edits to the
currently selected accompaniment data made up to that
point.
*2 Sequential numbers starting from 001, which is the first
rhythm of the first group (POPS/DANCE/ROCK). See
the “Tone List” (page A-1) and “Rhythm List” (page A-5)
for information on the numbering system.
*3 In the case of the intro and ending, specifying a rhythm
for one part (drum, bass, etc.) will cause the same rhythm
to be specified automatically for all of the other parts of
the pattern.
*4 Only drum set sounds (tone numbers 237 through 250)
can be selected for drum parts and percussion parts.
Drum set sounds cannot be selected for the bass and the
chord 1 through chord 5 parts.
*5 A smaller value shifts leftward, while a larger value shifts
rightward. A value of zero specifies center.
(drum, bass, etc.)
accompaniment
data with that of
the specified
rhythm number.
Switches the part
tone (instrument)
to that of the
specified tone
number.
Toggles each part
on or off.
Controls the
volume level of
each part.
Controls whether
the sound of the
part can be heard
from the left side or
right side.
Controls the level
of the reverb effect
(page E-11) applied
to the part notes.
Controls the level
of the chorus effect
(page E-12) applied
to the part notes.
*1
001 to 190:
Rhythm
number
001 to 250: Tone
Numbers
OFF:
Mutes the part.
ON:
Sounds the
part.
000 to 127
–64 to 0 to 63
000 to 127
000 to 127
*2 *3
*2 *4
Shortcut
Button
cm
cn
co
*5
cp
English
E-21

Using Auto Accompaniment
6.
Repeat steps 3 through 5 to edit all of the
accompaniment patterns and parts you want.
7.
After editing is complete, adjust the tempo of
the rhythm as desired.
• The tempo you set here becomes the initial default
tempo of the rhythm.
8.
Press the dm (EXIT) button.
This causes a confirmation message to appear asking if
you want to save your edits.
9.
Press the ct (YES) button.
This displays a screen for specifying the user rhythm
number and rhythm name.
• If you want to exit the editing operation without
saving, press the ct (NO) button instead of the ct
(YES) button.
10.
Decide on the user rhythm number where you
want to save the rhythm and a rhythm name.
• Use the dn (u) and do (i) buttons to move the
cursor to the user rhythm number and rhythm name
character you want to change. Use the ct (w, q)
buttons to select the number or character you want.
• The rhythm name characters you can select are
shown below. To input a space, press both of the ct
(w and q) buttons at the same time.
11.
Press the dp (ENTER) button.
This saves the data.
• If the rhythm number where you are saving the data
already has data saved to it, a message (Replace?) will
appear on the display to confirm whether you want
to replace the existing data with the new data.
Destination user rhythm number
Rhythm name
IMPORTANT!
• Saving user rhythm data to a user rhythm number
that already has data will cause the existing data to
be replaced by the new data.
NOTE
• If the size of the accompaniment pattern or
instrument part data is too large to be edited, a
memory full message (Memory Full) will appear on
the display. If that happens, select a different
accompaniment pattern or instrument part for
editing.
E-22
Playing Back Built-in Songs
bl bm
btbsbnctbo ds
Playing Tone Demo Songs
Your Digital Piano comes with six built-in demo tunes,
which demonstrate the characteristics of each of the six
tone groups.
No. Tone Group Name Tune Name
001 GRAND PIANO
002 ELEC PIANO Original
003 ORGAN Original
004 STRINGS Nessun Dorma [Turandot]
005 VARIOUS Original
006 GM TONES Original
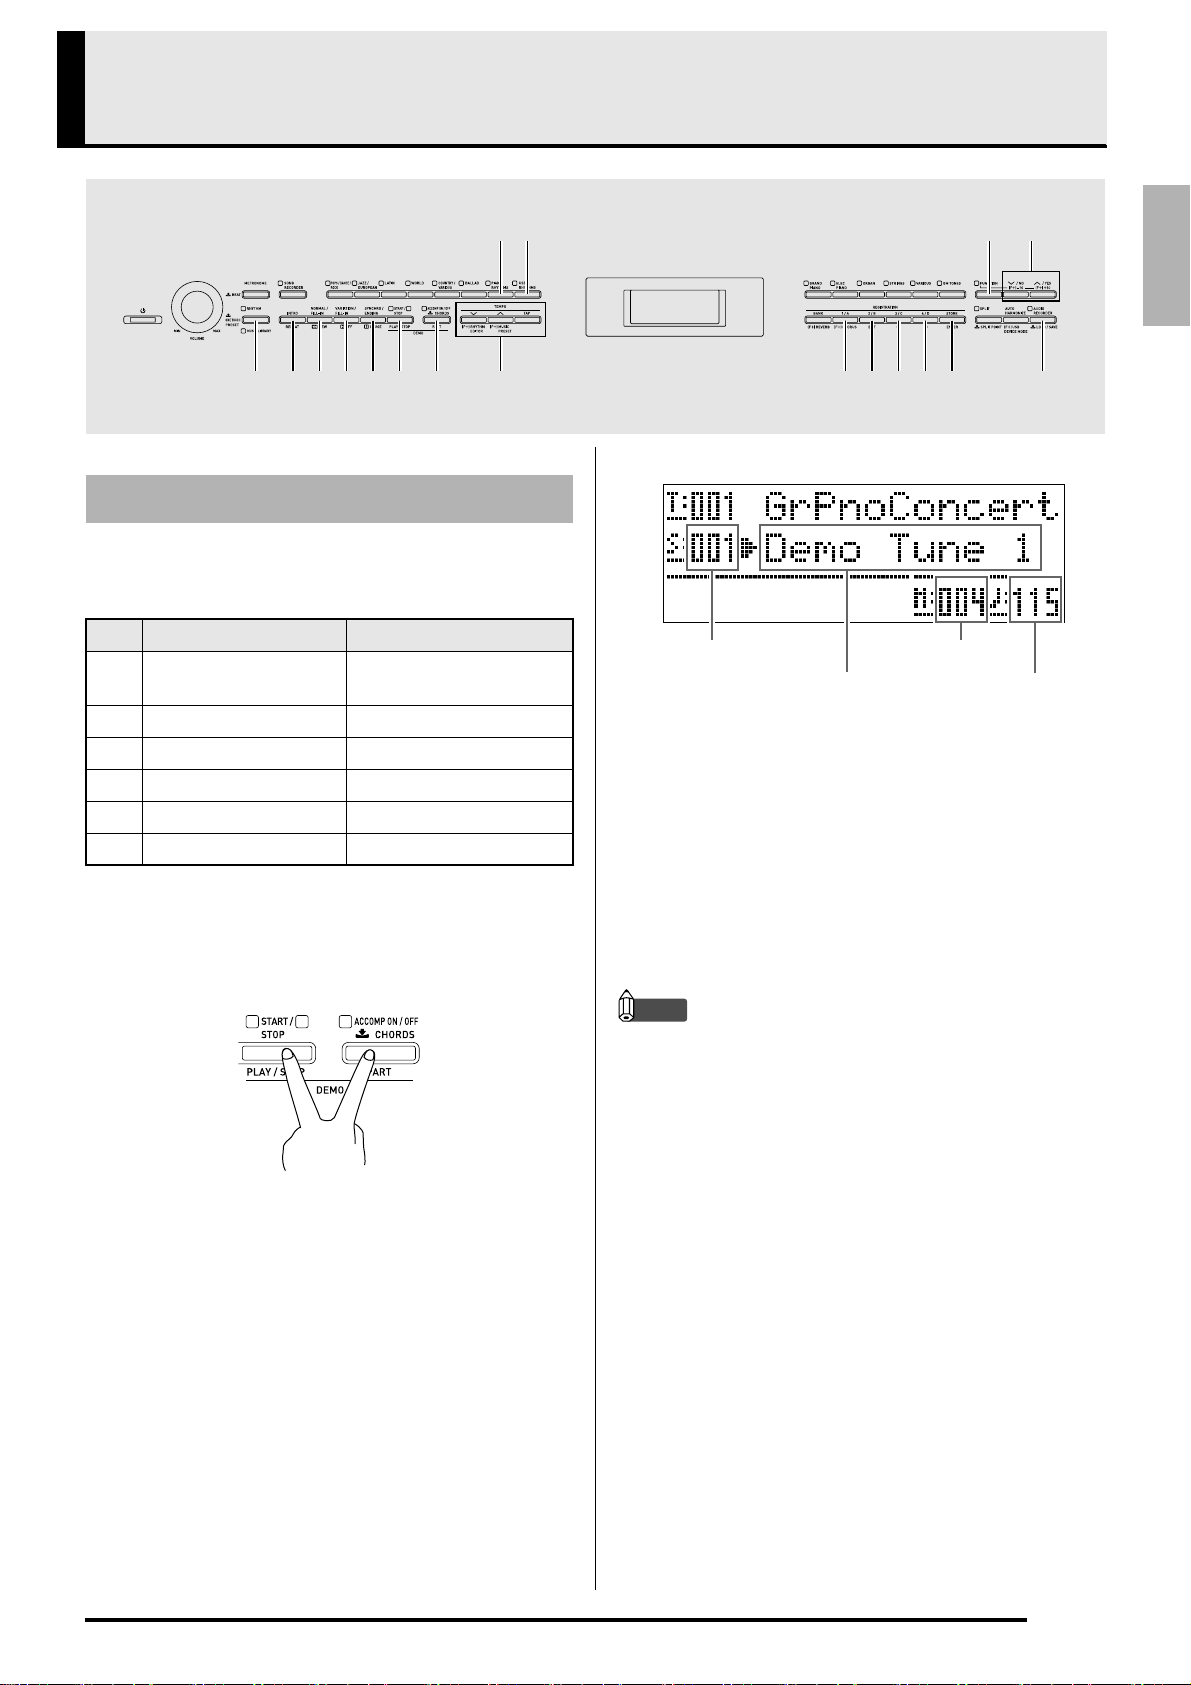
1.
While holding down the bt (PART) button,
press the
This will start sequential playback from the demo song 1,
up to the last Music Library song 60.
(PLAY/STOP) button.
bs
Piano Concert No.1 Op.23
1st Mov. (P.I.Tchaikovsky)
cs
dmbp bq br ck
dn do dpdl
Song number
Song name
• Pressing a tone group button (cm through cr) while
demo song playback is in progress will switch to the
demo song of that group’s tone. Also, you can scroll
through songs manually with the
buttons.
2.
Press the bs (PLAY/STOP) button.
This stops demo song playback.
Playback of the demo songs will continue in an endless
loop until you press the bs (PLAY/STOP) button to
stop it.
NOTE
• Only the operations described above can be
performed while demo song playback is in progress.
Current measure
(w, q)
ct
Song tempo
English
E-23
Playing Back Built-in Songs
Playing Back a Specific Music
Library Song
You can use the procedure below to select a Music
Library song for listening or practice.
1.
Press the bn (MUSIC LIBRARY) button so its
lamp is lit.
• Each press of the button toggles between the upper
and lower lamps.
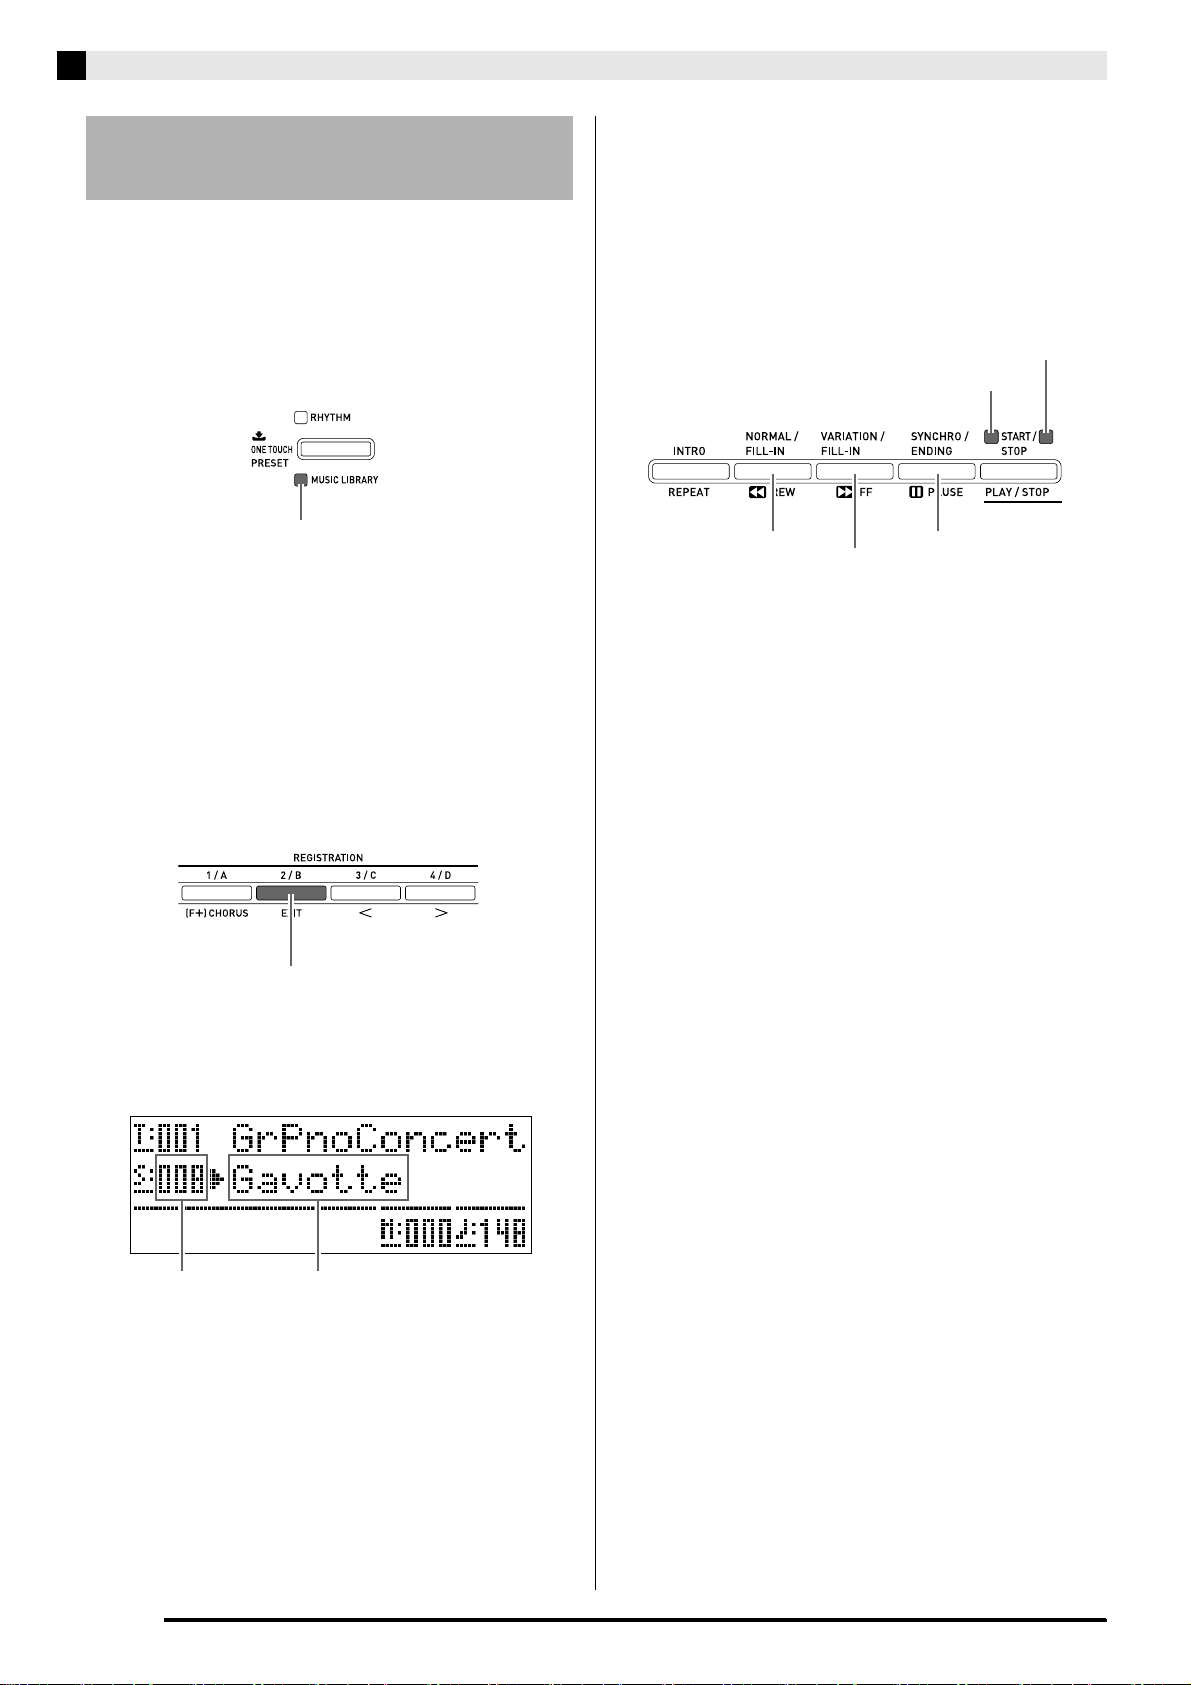
5.
Press the bs (PLAY/STOP) button.
This starts playback of the song.
• Press the
operation or the bp (REW) button for rewind.
Pressing and releasing either button moves one
measure, while holding down a button scrolls at high
speed.
• Pressing the br (PAUSE) button pauses playback.
Press again to resume song playback.
bo bp bq br bs
(FF) button to perform a fast forward
bq
Lights with each subsequent beat of each measure
Lights with the first beat of each measure
Lit
2.
In the “Song List” (page A-7), find the group
and group number of the song you want.
• User songs are in Group D.
3.
Use the dl to do (Song group A to D) buttons
to select the group you want.
• Press button do (Group D) if you want to select a user
song.
Example: When Group B is selected
dl dm dn do
Lit
4.
Use the ct (w, q) buttons to select the
song you want.
Example: When “008 Gavotte” is selected
Rewind
Fast forward
6.
Press the bs (PLAY/STOP) button again.
This stops song playback.
• Song playback also will stop automatically when the
end of the song is reached. To configure the Digital
Piano to loop song playback without stopping, turn
on “Song Repeat” (page E-46).
Pause
Song number Song name
E-24
 Loading...