


File
+ vers. SW
mek_5.doc
SW:
k3soft23.mot
k3shake23.mot
mek3_6.doc
SW:
k3soft23.mot
k3shake23.mot
Ita-Eng-Fra-Deu
mek3_7.doc
k3soft23.mot
k3shake23.mot
Ita-Eng-Fra-Deu
mek3_7.doc
SW:
k3soft23.mot
k3shake23.mot
Ita-Eng-Fra-Deu
mek3_8.doc
SW:
k3soft32.mot
k3shake32.mot
Ita-Eng-Fra-Deu
mek3_10.doc
SW:
k3soft32.mot
k3shake32.mot
Ita-Eng-Fra-Deu
mek3_11.doc
SW:
k3soft32.mot
k3shake32.mot
Ita-Eng-Fra-Deu
mek3_12.doc
SW:
k3soft37.mot
k3shake37.mot
mek3_13.doc
SW:
k3soft37.mot
k3shake37.mot
mek3_14.doc
SW:
k3soft42.mot
k3shake42.mot
mek3_15.doc
SW:
k3soft48.mot
k3shake45.mot
mek3_16.doc
SW:
k3soft49.mot
k3shake49.mot
Date Changes
06/07/2007
Ita-Eng-Fra-Deu
27/09/2007
Ita-Eng-Fra-Deu
18/10/2007
Ita-Eng-Fra-Deu
24/10/2007
Ita-Eng-Fra-Deu
12/02/2008
Ita-Eng-Fra-Deu
12/05/2008
Ita-Eng-Fra-Deu
05/06/2008
Ita-Eng-Fra-Deu
23/04/2009
Ita-Eng-Fra-Deu
28/09/2009
Ita-Eng-Fra-Deu
22/01/2010
Ita-Eng-Fra-Deu
16/03/2012
Ita-Eng-Fra-
Deu-Rus
17/05/2012
Ita-Eng-Fra-
Deu-Rus
- Tables HOT Settings as of for European markets updated
- “Black” decal K3 also inserted
- Updating of versions sw 22
- Daily cones not zeroed in blackout
- Blackout stored in Events
- Setup sensors: new procedure
- Note: with cards 116 the inductive sensor led does not fully switch off.
- solenoid valves position updated. Pages 5 and 66
- keypad names upgraded
03/01/08 : wienerschnitzel becomes GM
Pages:
- 42: Step U11 inserted (not used)
18,80,81 : Pasteurization IMS and autosetup
Pages:
- 11,72 : corrections to temperature checks
Pages:
- 36, 97 : Timeout Prd and Alarm ICE adjusted. Only stored in the Events and
immediately restored.
- Cleaning updated, Alarm Belt, T85, MP in pasto break 10”ON/10’OFF, 5
interventions of timeout prd, Programming Table updated M, T46 and
description, revisions in black-out and alarms inserted.
- 83, 122: Automatic calibration
- 13, 77: TEV and W displayed on the first production page and Lev (ms)
- 32, 95: Pasto inhibited in Wash today
- 51: TET offset
- 46,111: tab prog.
- 107, 108: user prog.
- 116: delay level
- 44, 45, 47, 109, 110, 113: Russian and modifications to the programming
table + corrections
- 49, 114: note about trimmer hot
- 64, 131: correction to reprogramming
- 58-63 and 125-130: corrections
- 139: index
- 47, 113: sw version
- 45: U12
- 49: corrections
KK 33
““EELLEECCTTRROONNIICCSS HHAANNDDBBOOOOKK”
”

This handbook gives information and procedures to assist technicians in setting up and
repairing the machine. This is the reason why this handbook is reserved for
TECHNICIANS, only.
When turning power on to the machine, it carries out an operating self-test of the
display and all leds light up.
The monitor displays a software version and the machine sets back at the function it
was in when power was switched off (see BLACKOUT).
ABBREVIATIONS
For the sake of convenience some abbreviations have been included in this manual,
namely:
EVRC
EVFC
EVRV
EVFV
EVRT
MA
MC
MP
Solenoid valve Cylinder Heating
1=shake 2=soft
Solenoid valve Cylinder Cooling
1=shake 2=soft
Solenoid valve Tank Heating
1=shake 2=soft
Solenoid valve Tank Cooling
1=shake 2=soft
Solenoid valve Topping Heating
(soft side, only)
Beater Motor
1=shake 2=soft
Compressor Motor
1=shake 2=soft
Pump Motor
1=shake 2=soft
TEV
TEC
TGV
TE
TET
MMV
MIR-SF
MV
Tank Thermostat
1=shake 2=soft
Cylinder Thermostat
1=shake 2=soft
Tank Ice Thermostat
1=shake 2=soft
Evaporator Thermostat
1=shake 2=soft
Topping Thermostat
(soft side, only)
Tank Mixer Motor
(one)
Micro Spigot – Photoelectric Sensor
Fan Motor
1=shake 2=soft
2

SOFT SIDE
SOFTWARE VERSION
When turning on to the machine, the display indicates the software version.
FOR EXAMPLE
If the machine fails to work, your Technician will always have to specify this number
(software version), as well as the machine serial number you will find on the data
plate, so as to take the best advantage of Carpigiani Technical Service.
K3 Soft
ver.k3soft23
meaning sw version = 23
3
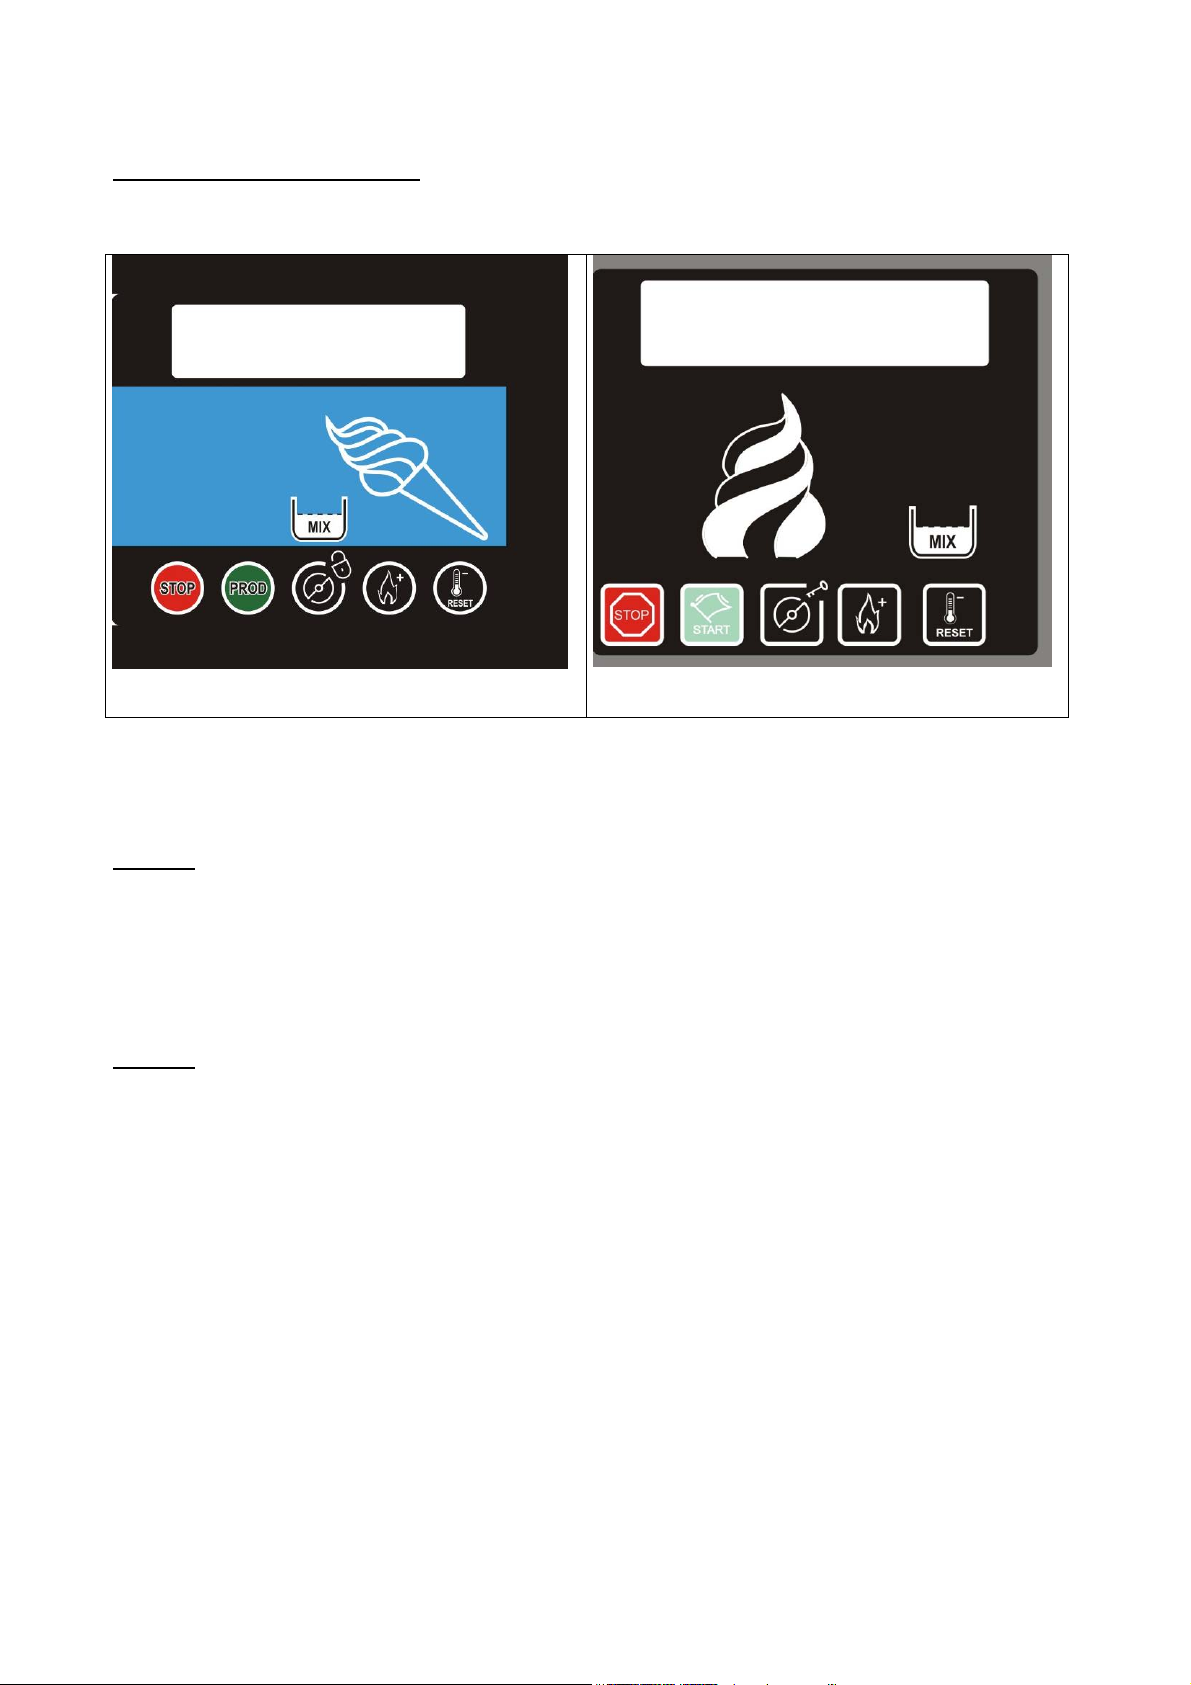
AVAILABLE CONTROLS
KA configuration
General Market configuration
Note 1
When pressing a key and relevant function is accepted, the machine keyboard block
will emit a sound signal (beep).
Note 2
This handbook refers to machine standard configuration. As far as General Market
version is concerned, we beg you to make reference to relevant keyboard.
4
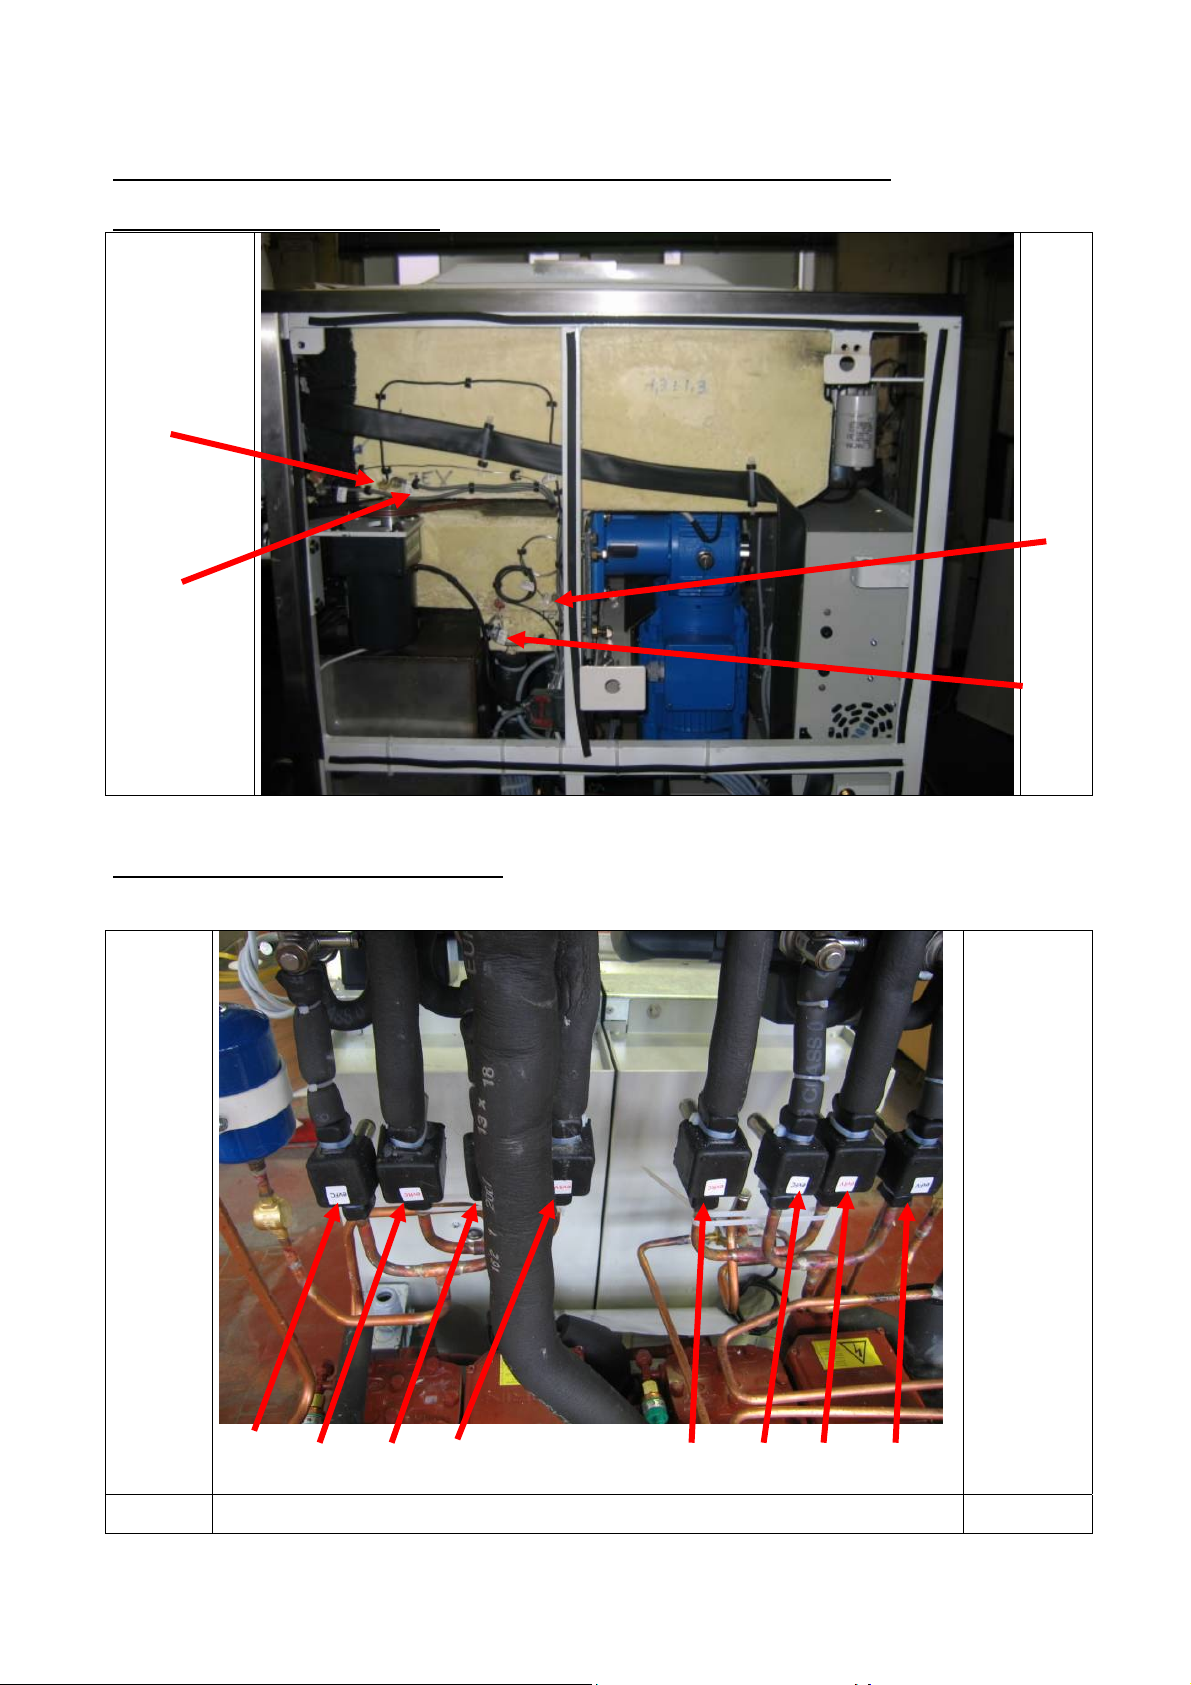
POSITION FOR SENSORS and SUNDAE SOLENOID VALVES
TEV2 – TEC2 – TGV2 – TE2
FRONT
TGV2
TEV2
TEC2
TE2
SOLENOID VALVES - front sight
SHAKE
EVFC1 EVRC1 EVFV1 EVRV1 EVRC2 EVFC2 EVRV2 EVFV2
SOFT
5
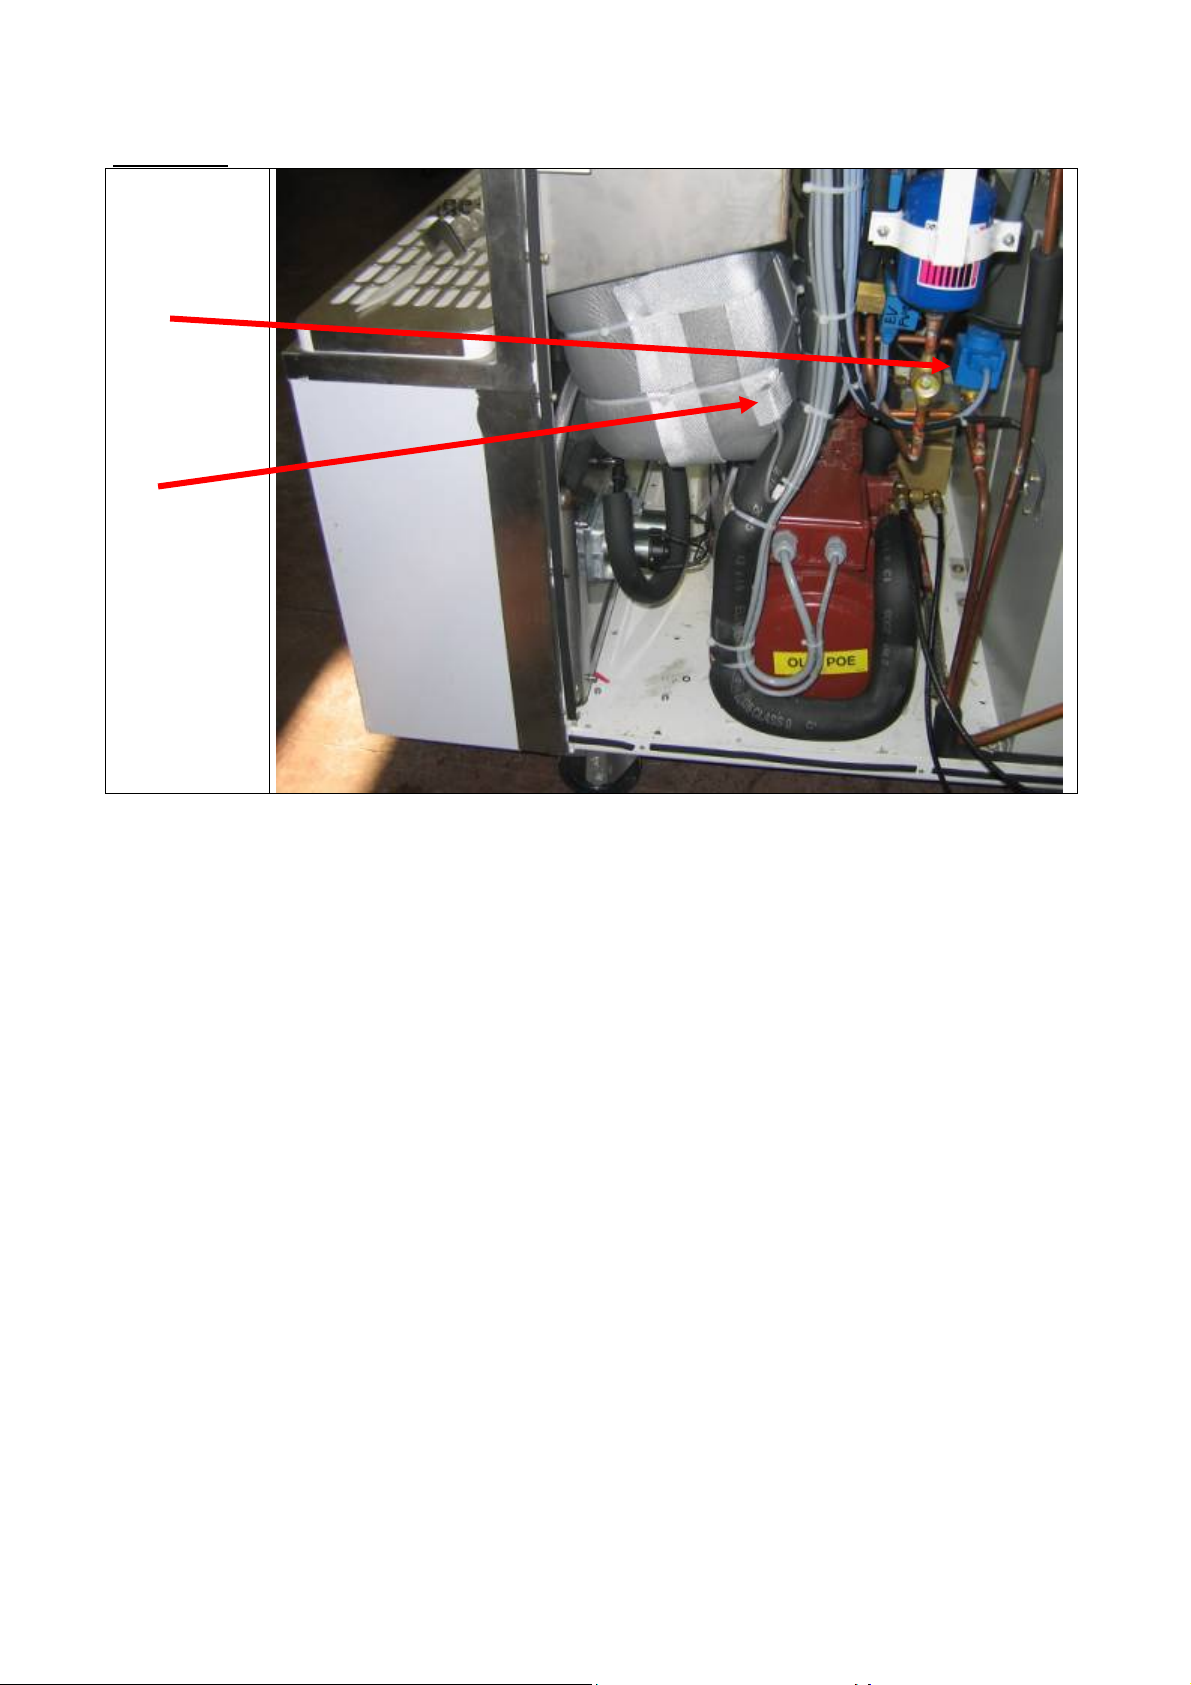
TOPPING
FRONT
EVRT
TET
6

DAYLIGHT TIME
From MARCH 30th to OCTOBER 30
The machine clock will automatically be moved ahead 1 hour for the daylight savings
time change over
02:00 a.m. on 30
. This means that when passing from 01:59 a.m. on 30
th
March, the clock will automatically be moved ahead 1 hour. 1
minute after 01:59 a.m. the display will show 03:00 a.m. (summer time).
Passing from 01:59 a.m. on October 30
be set back to normal for the end of daylight savings time. One minute after the clock
reaches 01:59 a.m. on October 30th it will move back by 1 hour and the time
displayed will be 01:00 a.m.
Clock time will then remain this way until next March 30
th
included, daylight time is active.
th
to 02:00 a.m. on October 30th, the time will
th
th
March to
Daylight time is only active when the step Ora Legale (Daylightsav Time) is set to
Yes.
7
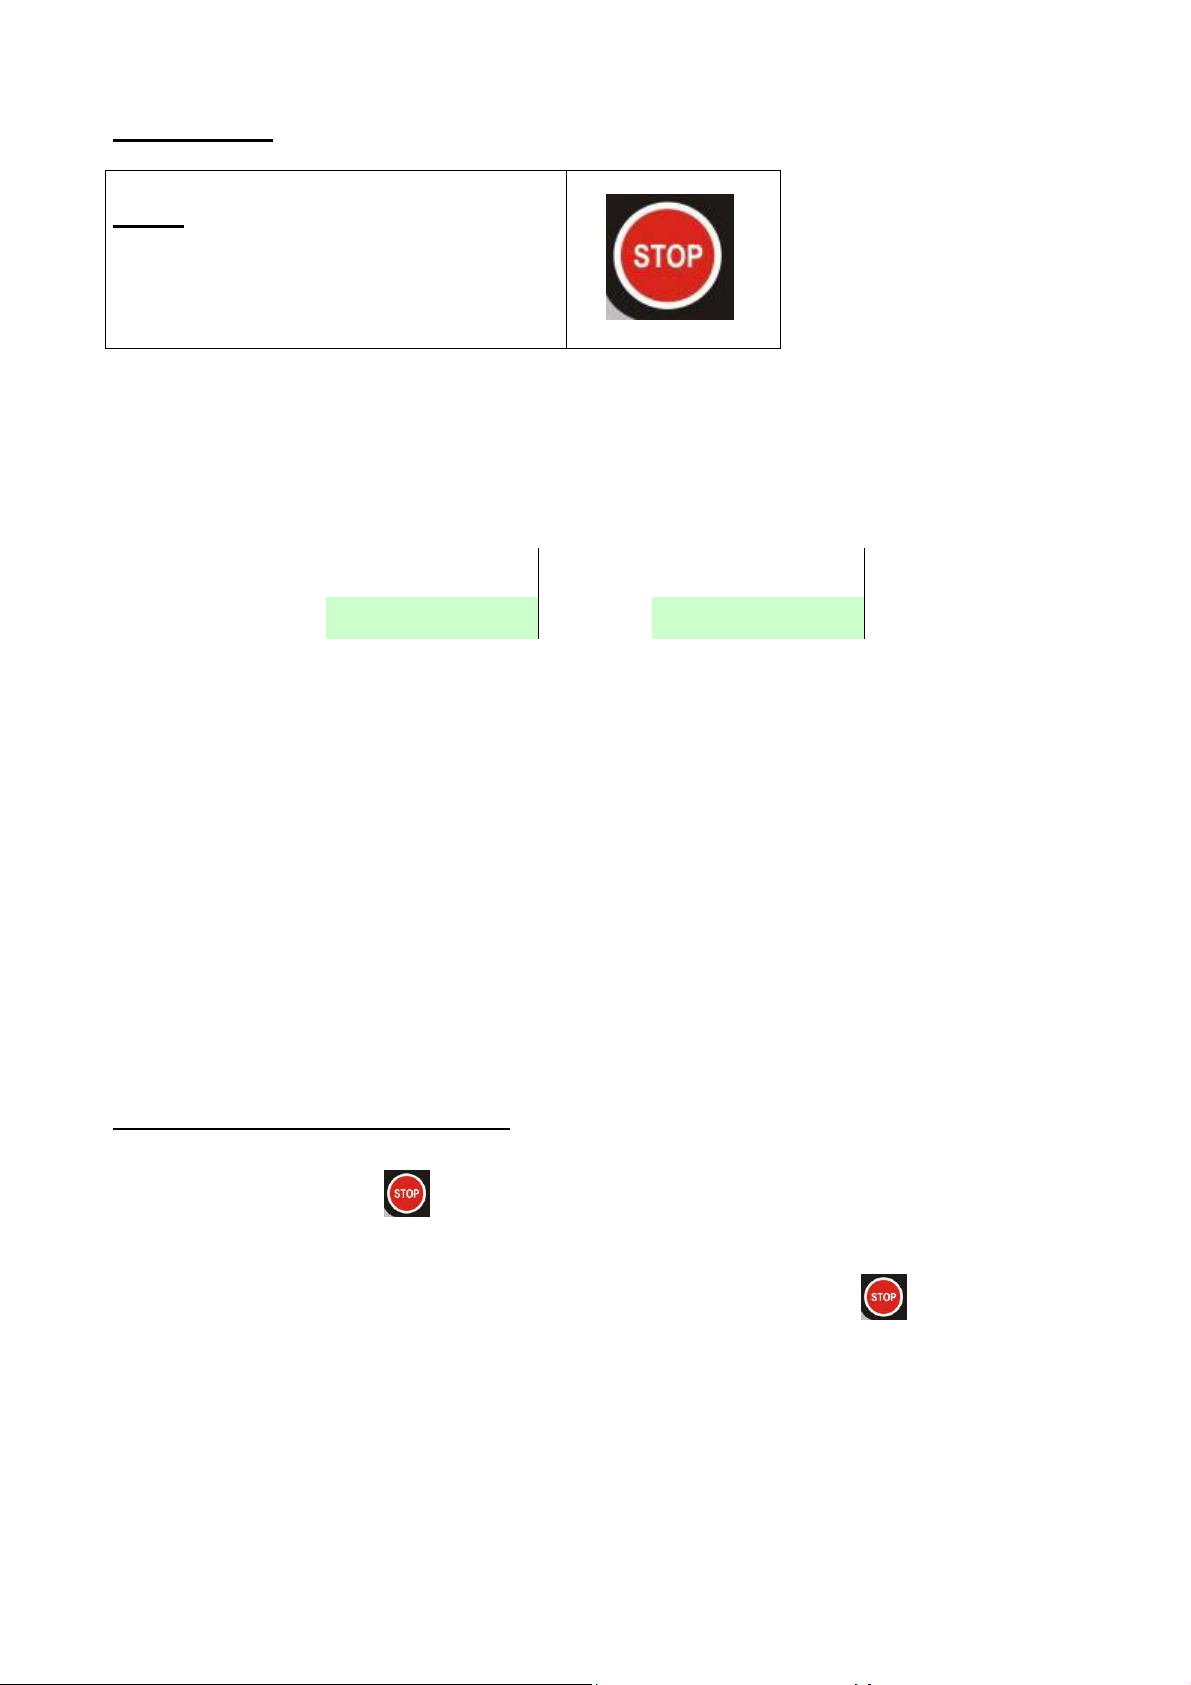
FUNCTIONS
STOP
In this function the machine is OFF and relative led is ON (stop button lights up).
From the Stop position any other function may be selected. In order to change a
function, IT IS ALWAYS NECESSARY to press the stop button for 2 seconds first.
The display shows the following:
- ENGLISH - - ITALIAN -
10:33:21 Fri
10:33:21 Ven
In order to set the machine at Stop from Production, Pasteurization and Storage, push
the stop key and hold it down for 2 seconds. The machine will not recognize the stop
command if the button is not held for at least 2 seconds, this helps avoid accidentally
hitting the button and stopping the machine.
If the machine is left at Stop with mix above the level sensor, the writing “Why in
STOP??” will be displayed flashing and with an intermittent beep after 30’’; it warns
the user to set the machine at Production, Pasteurization or Storage.
MA – MP HOUR COUNTER RESET
If you continue to press
for 20 seconds, after the display changes to “read
events”, MP counter will be reset. The display now shows “Reset hrs Count”.
In order to reset MA counter, it is not only necessary to press Stop
for 20
seconds, but also to have the MIR (photoelectric sensor) in a busy condition (Photocell
concealed); the display shows “Reset hrs Count”.
8

TOTAL AND PARTIAL CONE COUNTER RESET
If you press Stop
within 1 second of turning the machine’s power on and hold it
down for at least 5 seconds, total and partial (daily) cones will be reset.
Display as follows:
- ENGLISH - - ITALIAN -
Reset Cone Count
Azzeramento Coni
Cone count is measured in groups of 5.
9
EVENTS
The machine is provided with a large memory that helps us store most of the events
(historian).
To read the events stored in memory, you must have the machine in STOP
Press Stop
and keep it pressed for 3 seconds. the monitor will display the
following sequence:
- ENGLISH- - ITALIAN -
**READ EVENTS***
Log Number 00014
Year 2006
09:00:08 15 Feb
Stop
*LETTURA EVENTI*
Numero Ev.00014
Anno 2006
09:00:08 15 Feb
Stop
total events
The last screen shows the stored event, in this example it shows the STOP button was
pressed at 8 seconds after 9 a.m. on Feb. 15
th
.
Events can then be scrolled with Increment
(next event) and Decrement keys
(the event before).
In order to leave the “Read events” mode, either press the Stop button for 2 seconds
or do not touch any key for 30 seconds.
Stored events are Pasteurization steps, alarms, function changes, blackouts.
An Autosetup procedure does not cancel events from memory
10

TEMPERATURE CONTROLS
When the machine is in STOP with the mix in the tank at a low level (low level
uncovered), the TEV temperature control is actuated.
If the TEV is greater than 15°C, the display visualises “Pasteurise !”.
Therefore, pressing the Production key, the machine passes automatically to the
Pasteurisation mode.
This control is not active during the successive 60 seconds after gaining access to the
STOP function or during the successive 60 seconds after the spigot head has been
closed.
If in all these cases, TEV<15°C, then all functions without any time limits are
permitted.
From Stop, a time will be computed if the mix level is covering the level sensor.
If down time exceeds 24 hours, the display will be as follows:
10:33:21 Fri
Wash Today !!!
10:33:21 Ven
Lavare oggi !!!
and Wash procedure must be executed: machine wash is forced and Production
inhibited.
Reset conditions are the same as those for Wash (IMS- Safety Magnetic Switch
opening and reclosing).
11

SOFT ICE PRODUCTION
The access to Production is only enabled if the mix is above the minimum
level sensor.
The product is cooled down in the cylinder till Hot programmed in step HOT 1 (see
programming table) has been reached.
After the desired consistency has been reached (Hot), the beater goes on running for
3 more seconds (or a time programmed in step Ritardo Agitat.1 - Delay Beater 1)
and it will then switch off
If necessary, tank storage will take place, now, provided that
TEV2 (tank Thermostat 2) Temp. Conserv. - Storage Temp.
After reaching Hot, if no cone is dispensed, the beater will start every 10 minutes
(Timer Ciclico - Cyclic Timer) and will run for 10 seconds, in order to control ice
cream consistency: should this be below HOT 1 – Different Hot 1 (Hot 1
Different.), the compressor and relevant solenoid valve EVFC2 (Solenoid Valve
Cylinder Cooling) will also start so as to bring ice cream back to the programmed
consistency.
If HOT has already been reached and your machine is in stand-by mode of Production,
when you dispense a cone, the beater motor will restart and run for 15 seconds to
control the consistency.
During ice cream distribution, when mix in the tank is below the minimum level
sensor, the display will show the message
Aggiungere Mix - Add Mix , and only allow
you to distribute the number of cones set in step Ultimi Coni - Last Cones.
MP runs for 6’’ (programmable in step T41) every 10’ (fix).
12

Once in Production mode, display shows the following:
- ENGLISH- - ITALIAN -
Sundae Ready !
TEV +19°C W -14
The first line on top refers to ice cream ready for distribution (
yet at right consistency (
The display
set in step Blocco Hot 1 - Hot Block 1 and you must thus wait.
For further details, see paragraph DO NOT SERVE.
The second line refers to the number of days to next wash. The example above shows that there are still 14 days to
wash day.
The second line concerns the TEV temperature, followed by the days (W=Wash) until the next wash.
Non Estrarre ! - Do not Serve ! means that ice cream has not yet reached HOT
Non Estrarre ! - Do not Serve !).
Gelato Pronto !
TEV +19°C W -14
Gelato Pronto ! - Sundae Ready !) or not
By pressing Production, you move to the different “windows” or screens described
below:
Key
In this window, the first line (on top) displays the hopper temperature:
= ON, when the hopper is cooled +014°C=sundae hopper temperature (TEV2)
The second line displays the cylinder temperature:
= ON, when the cylinder is cooled +013°C=sundae cylinder temperature (TEC2)
In this window, the first line (top) displays:
Set=100: Set HOT SOFT HOT=085: soft cylinder current consistency reading
In this window the display shows Cones of the day (starting from 0:00 to 23.59) :
12345 = number of cones relevant to SUNDAE side.
Daily cones are reset:
- on midnight switching
- by pressing Stop on switching on (see paragraph STOP)
- ENGLISH - - ITALIAN - Notes
Hopper +014°C
Cylinder +013°C
Set=100 Hot=085
Vasca +014°C
Cilindro +013°C
Set=100 Hot=085
TEV2
TEC2
Cones Today
12345
Coni Odierni
12345
13
Total Cones
0923456780
Coni Totali
0923456780
In this window, the display shows total Cones:
0923456780= number of cones relevant to Sundae side.
To reset them, switch machine off and then on. Soon after switching power on (within 1 minute), press
Stop
and hold the key down for 5 seconds.
TEV+010 TGV-022
TEC+013 TE1-012
TEV+010 TGV-022
TEC+013 TE1-012
TEV2 TGV2
TEC2 TE2
In this window the display shows all sensors relevant to SUNDAE side (no display of °C nor °F):
TEV = Sundae side Hopper Thermostat
TEC = Sundae side Cylinder Thermostat
TGV = Sundae side Hopper Ice Thermostat
TE1 = Sundae side Cylinder Evaporator Thermostat
Topping +057
Set Topping +055
Topping +057
Set Topping +055
TET
In this window the display shows the Topping sensor (no display of °C nor °F) with relevant temperature set:
Topping = Topping Thermostat
Set Topping = Topping Temperature Set
By pressing Production again, machine returns to its starting display.
14

DO NOT SERVE
When selecting Production, the display will be Non Estrarre ! - Do Not Serve !
meaning that the ice cream needs to reach an ideal consistency and therefore do not
serve till the message switches off:
- ENGLISH - - ITALIAN -
Do Not Serve !
TEV +19°C W -14
Non Servire !
TEV +19°C W -14
The first time when is accessed the Production the machine has to reach the Set HOT
to extinguish the writing, the following times it will be had the standard operation
through Hot Block
Once Hot Block has been reached, the routine operation starts.
Message on the display will be as follows:
Sundae Ready !
TEV +19°C W -14
Gelato Pronto !
TEV +19°C W -14
In particular:
If the consistency decreases below the value programmed in step Blocco Hot 1 - Hot
Block 1,
Non Servire ! - Do Not Serve ! will light up on the display. This means that
ice cream is not ready for distribution.
Writing will become
Gelato Pronto ! - Sundae Ready ! ONLY after that Blocco Hot 1 is
reached.
If a cone is dispensed (MIR-Photoelectric sensor activated) while
Not Serve !
is lit up on the display, all outputs will switch off (MA, MC, EVFC OFF; MP,
Non Servire ! - Do
will also turn OFF if it was ON).
If the hopper needs to cool for storage, MC + EVFV will be left ON.
As soon as the photocell is deactivated (no longer covered), Production restarts, so
restarting MA and MC + EVFC.
If the consistency value goes below Hot Block – 5 points hysteresis, the message
Non Servire ! - Do Not Serve ! will again light up on the display.
15

MIX OUT
When mix is low (below the medium level sensor), the first line on display will show
the blinking message
the keyboard will light up
Aggiungere Mix ! - Add Mix ! and hopper medium level led on
.
When the mix is below the medium level sensor, an intermittent acoustic warning
(beep) will also be activated.
- ENGLISH - - ITALIAN - Notes
Add Mix !
TEV +19°C W -14
Aggiungere Mix !
TEV +19°C W -14
low med. level
When mix is out (below the low level sensor) the first line on display will show a fixed
message
light up
The second line displays the number of cones you can still distribute (
Last Cones
Note:
With messages Aggiungere Mix ! - Add Mix ! and Mix Esaurita ! - Mix Out ! on
display, the access to next Production screens is not allowed.
Mix Esaurita ! - Mix Out ! and hopper low level led on the keyboard will
.
Ultimi Coni -
) before the machine automatically sets at Storage mode.
- ENGLISH - - ITALIAN - Notes
Mix Out
Last Cones 5
Mix Esaurita !
Ultimi Coni 5
Low level out
Nr of remaining cones
16

ICE IN THE CYLINDER
In Production, if the temperature TE2 reaches a value less than or equal to the one set
in step Ghiaccio Cilin. - Ice Cylinder, alarm
Ghiaccio Cilind. - Ice Cylinder will
activate and will be stored among the events, ONLY.
This alarm is not displayed.
Under the said condition, all outputs to the cylinder will be deactivated and the
machine will set to hopper cooling, if need be.
When Production timeout ends, consistency will be tested again in order to check
whether TE2 has risen in the meantime higher than Ghiaccio Cilin. - Ice Cylinder.
TIMEOUT PRD
In Production, if consistency does not reach its set point within the time programmed
in step Timeout Prd., the cycle will be forced to end as if HOT had been reached and
the alarm will be stored among the events (not on display).
If Hot Block is not reached within 15 minutes after production starts, the machine will
set to Stop and alarm Timeout Prd. will be displayed.
17

PASTEURIZATION
No Pasteurization process will ever start if the mix inside the tank is below
medium level sensor.
Pasteurization process is automatically executed every day at 2:00am
(provided that time has been programmed in step Ora Avvio Pasto - Start Pasto
Time).
The machine is normally in Production and at the appointed Pasteurization time, it will
automatically enter into the Pasteurization program and carry out the cycle.
Warning: if the front lid is open at the automatic Pasteurization time (Pasto
Start Time), your machine will allow Production only after closing it.
If, step Ora Avvio Pasto - Start Pasto Time is set to “no” in the program,
automatic Pasteurization is disabled and it can only be executed manually (General
Market).
In order to activate Manual Pasteurization, press the Pasteurization key
and
hold it down for 5 seconds.
Warning: 5 seconds after the access to Pasteurization, the cycle must be completed.
If the Pasteurization is not
successfully completed, your machine will NOT enter
Production, till the execution of a full Pasteurization cycle.
To force the access to Pasteurization even though the machine is in reserve (medium
level low mix), it is necessary for you to press the Storage key
and hold it down
30 seconds.
By this, you will “skip” hopper level control block and you can now press the
Pasteurization button for 5 seconds to enter in Manual Pasteurization.
18

The product in both the hopper and the cylinder is heated up to 149°F (65°C), kept at
this temperature for 30 minutes (fixed time), and then cooled down to reach the
storage temperature.
At the end of the cycle, the monitor displays “Fine Pasto- Pasto End -”, followed
by date and time, meaning that the pasteurization process has been correctly
executed
.
The beater in the cylinders turns cyclically during Heating, pause, Cooling (149°F
(65°C) down to 68°F (20°C) in the cylinder) and since the moment when the cylinder
reaches the storage temperature; whereas, during cooling, from 68°F (20°C) down to
cylinder storage temperatures, beating is continuous.
The beater inside the cylinder normally runs 15 seconds and stops 30 seconds
Even in the event that the tank reaches the storage temperature earlier than the
cylinder and TE>68°F (20°C), the beater is ON (continuous).
19
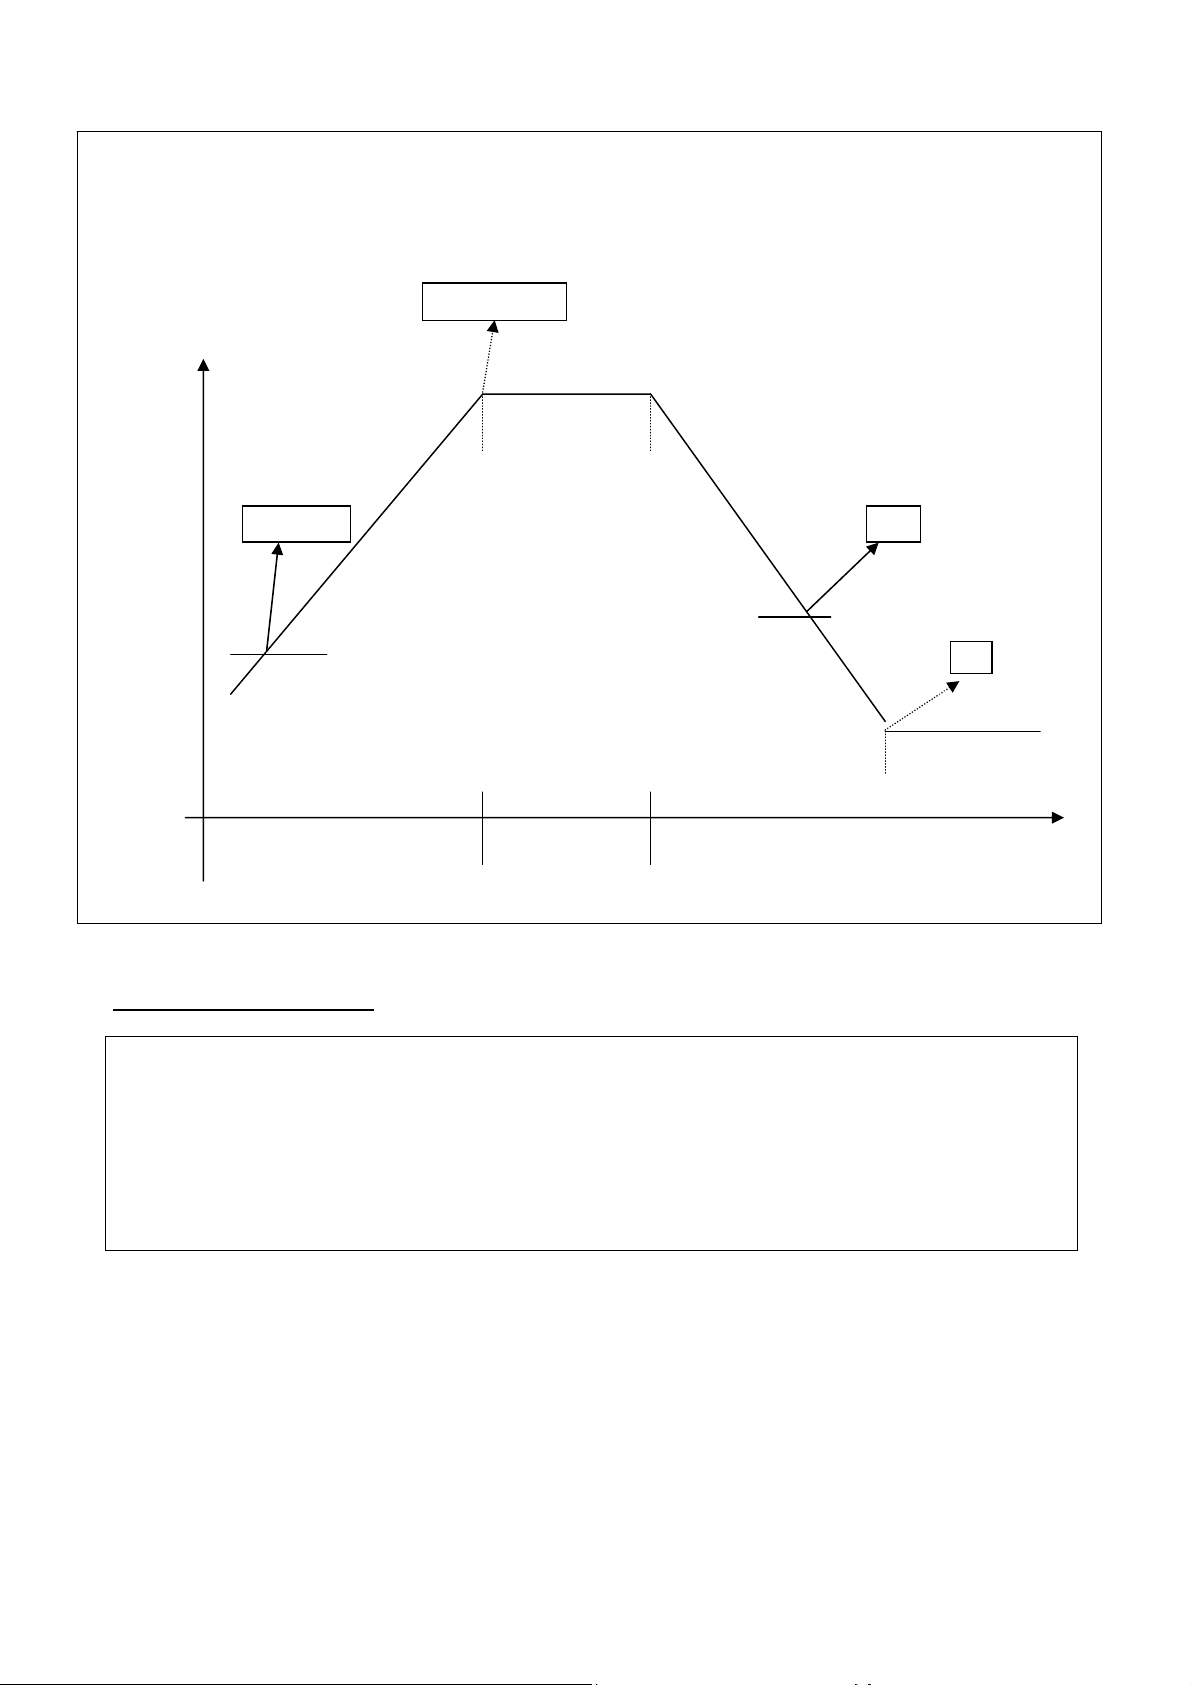
Pasteurization Sundae side
55°65°85°
°C
TEC= 10°C 20°
MA+MC+EVRC 15” ON
MC+EVRV 70” ON
MA+MC+EVRC 15” ON
MC+EVRV 70” ON
MA+MC+EVFC 15” ON
MC+EVFV 90” ON
30’
Pasteurization Graph
Cycle Description
On heating cycle start between cylinder and hopper:
MA+MC+EVRC 15”ON and MC+EVRV 70”ON.
In Cooling, operation till TEC=20°C as follows:
MA+MC+EVFC 15”ON and MC+EVFV 90”ON.
When TEC reaches 20°C MA is always ON, also in hopper cooling:
MA+MC+EVFC 15”ON and MC+EVFV 90”ON.
MA+MC+EVFC 15” ON
MC+EVFV 90” ON
2°
Time
20
HEATING
Heating is executed with “positive hysteresis”, meaning that if a temperature of 149°F
(65°C) has been set, heating will be deactivated at 156.2°F (69°C) and will then
restart at 149°F (65°C).
If you want to skip heating and 30 minute pause, press the Storage key
for 3
seconds (at least 5 seconds after the Pasteurization is initiated); by doing this
you will set the machine at the Cooling cycle without a previous pause of 30 minutes.
Once entering Pasteurization, the display is as follows:
In this window, first line (on top) displays:
-Riscaldamento- - Heating – i.e., heating step of Pasteurization process.
On the second line:
Non Servire ! - Do Not Serve ! meaning that ice cream must not be dispensed.
- ENGLISH - - ITALIAN - Notes
- Heating Do Not Serve !
-Riscaldamento Non Servire !
Pressing Pasteurization
leads to the screens described here below:
Key
- ENGLISH - - ITALIAN - Notes
Hopper +023°C
In this window, the first line (on top) displays the Hopper temperature (TEV2) whilst the second line displays the
Cylinder temperature (TEC2).
: The arrow indicates what side is heated.
Cylinder -013°C
Vasca +023°C
Cilindro -013°C
TEV2
TEC2
Key
In this window all sensor temperatures are displayed.
- ENGLISH - - ITALIAN - Notes
TEV+066 TGV+070
TEC+067 TE1+068
TEV+066 TGV+070
TEC+067 TE1+068
TEV2 TGV2
TEC2 TE2
During Heating process, the compressor heats cylinder and hopper in turns.
Default times in heating step are normally 15 seconds for cylinders and 70 seconds for
hopper.
21

ACTIVATED UNITS
On start, MP is activated for a fixed time of 30 seconds, where as MMV runs for the
duration of the entire cycle.
In Cylinder Heating, the following units are activated: MA, MC, EVRC for 15 seconds
(see the table below). The following units are activated: MC, EVRV, for 70 seconds
(see the table below).
By EVRC, MP and MA it is always meant SUNDAE side.
If the hopper reaches the Pasteurization temperature earlier than the cylinder, beating
in the cylinder will begin to run continuously.
Following checks are also executed:
If TEV < TEC by : >= 4°C ON EVRV 86” / ON EVRC 15”
If TEV < TEC by : >=3°C and <4°C ON EVRV 78” / ON EVRC 15”
If TEV < TEC by : >=2°C and <3°C ON EVRV 74” / ON EVRC 15”
If TEV < TEC by : >=1°C and <2°C ON EVRV 72” / ON EVRC 15”
DELTA TGV-TEV
(Alarm Belt)
Conditions for belt alarm are monitored under the following parameters:
- TEV and TGV sensors cannot already be in an alarm state of their own
- machine must be in Heating or Pasteurization Pause
In Heating of Pasteurization program, if TGV temperature turns > than the TEV
temperature by the value programmed in step Delta TGV-TEV,
Alarm Belt
will be displayed and machine will set to Stop.
Allarme Cinghia -
Check driving belt or whether the rotor is in its seat.
22
PAUSE
If you want to skip the 30 minute pause after the temperature of 149°F (65°C) has
been reached, press the Storage key
2 seconds; by doing this you will set the
machine to the Cooling cycle without the 30 minute pause.
- ENGLISH - - ITALIAN - notes
-Heating Pause Do Not Serve !
In this window the first line (on top) displays:
-Pausa Pasto Non Servire !
-Pausa Pasto- -Heating Pause- i.e., Pasteurization pause (or break).
On second line:
Non Servire ! - Do Not Serve ! meaning that it must not be served in this step.
Pressing Pasteurization leads to the screens described below:
Key
In this window the first line (on top) displays the Hopper temperature (TEV2) whilst the second line displays the
Cylinder temperature (TEC2).
: The arrow indicates what side is heated.
- ENGLISH- - ITALIAN - Notes
Hopper +065°C
Cylinder +066°C
Vasca +065°C
Cilindro +066°C
TEV2
TEC2
Key
In this window, Pause decreasing Time is displayed.
- ENGLISH - - ITALIAN - Notes
Pause Time 30:00 Tempo Pausa30:00
Key
In this window all sensor temperatures are displayed.
- INGLESE - - ITALIANO - Note
TEV+066 TGV+070
TEC+067 TE1+068
TEV+066 TGV+070
TEC+067 TE1+068
TEV2 TGV2
TEC2 TE2
23

ACTIVATED UNITS
MMV runs for the duration of the entire cycle.
If the Pasteurization temperature is reached either by the cylinder or by the hopper,
MMV will run continuously, whilst MA runs for 15 seconds and stops for 2 minutes,
until pause time has finished.
If the cylinder needs be heated during the pasteurization pause, MA (will run
continuously) MC and EVRC will start.
If the hopper, alone, needs be heated during the pasteurization pause, MC and EVRV
will be activated.
If both the cylinder and hopper need to be heated at the same time during the
pasteurization pause, heating will begin to cycle: 15sec. MA, MC and EVRC and 70 sec.
MC and EVRV (still applicable times given in previous table relevant to ON-OFF times
in relation to TEC and TEV temperatures).
MP will be activated in pause for 10” every 10’.
24
COOLING
The product is cooled down to the cylinder and hopper Storage temperatures
(Temp.Conservaz. – Storage Temp.).
- ENGLISH - - ITALIAN - Notes
- Cooling -
Do Not Serve !
In this window the first line (on top) displays
-RaffreddamentoNon Servire !
-Cooling- - Cooling - : i.e., Pasteurization cooling step.
On the second line:
Non Servire ! Do Not Serve ! : that it must not be served in this step.
Pressing Pasteurization
Key
In this window the first line (on top) displays
Cylinder temperature (TEC2).
: The arrow indicates what side is cooled.
- ENGLISH - - ITALIAN - Notes
Hopper +065°C
Cylinder +066°C
leads to the screens described here below:
Vasca +065°C
Cilindro +066°C
the Hopper temperature (TEV2) whilst the second line displays the
TEV2
TEC2
Key
In this window all sensor temperatures are displayed.
- ENGLISH - - ITALIAN - Notes
TEV+066 TGV+070
TEC+067 TE1+068
TEV+066 TGV+070
TEC+067 TE1+068
TEV2 TGV2
TEC2 TE2
ACTIVATED UNITS
MMV runs for the duration of the entire cycle, till TEV reaches the Storage
temperature.
In Cylinder Cooling, following units are activated: MA, MC, EVFC, MV 15 sec. (see
table).
In Hopper Cooling, following units are activated: MC, EVFV, MV 90 sec. (see table).
On cycle end, the machine sets at Storage and
- Fine Pasto –
25

(- Pasto End -)
with time and relevant day of the week are displayed.
In this window the first line (on top) displays
- Fine Pasto – (- Pasto End -): i.e., Pasteurization (Storage) holding step.
On the second line:
- time and day of the week
- ENGLISH- - ITALIAN - notes
- Pasto End 10:17:50 Mon
- Fine Pasto 10:17:50 Mon
:
ACTIVATED UNITS
When the Storage setpoint has been reached and the hopper needs to be cooled, MMV
is activated for the duration of hopper cooling (in parallel with EVFV).
In Cylinder Cooling the following units are activated: MA, MC, EVFC, MV.
In Hopper Cooling the following units are activated: MC, EVFV, MV.
Anti-icing
When the temperature TGV reaches a value smaller/same as –0.4°F (-18°C) (step
Antigh.Vasca – Hopper Defrost) EVRV energizes (and EVFV goes on being
energized). The display indicates an upward arrow. When TGV increases by the value
programmed in the step Ist.Antig.Vasca – Hop.Defrost Hys, EVRV switches off.
26
STORAGE
The Storage program has the function to bring the product which is both inside the
hopper and inside the cylinder to the temperature of 39.2°F (4°C) (this value can be
programmed in step Temp.Conservaz. – Storage Temp.).
As far as the hopper is concerned, storage is controlled by TEV2 whereas, as to the
cylinder, it is controlled by sensor TEC2.
Every time you set the machine at the function Storage, values of sensors TEC2
(temperature in the cylinder) and TEV2 (temperature in the hopper) are read.
If both the cylinder and hopper need be cooled at the same time, the hopper has
priority over the cylinder.
Storage in that case takes place on a cyclic basis.
When storing the hopper EVFV + MC are activated for 90 seconds.
When storing the cylinder MA + MC + EVFC are activated for 15 seconds.
When entering the Storage mode, you will have the following display:
In this window the first line (on top) displays the Hopper temperature (TEV2) whilst the second line displays the
Cylinder temperature (TEC2).
: The arrow indicates what side is cooled
- ENGLISH - - ITALIAN - Notes
Hopper +015°C
Cylinder +012°C
Vasca +015°C
Cilindro +012°C
TEV2
TEC2
Pressing Storage leads to the screens described here below:
Tasto
In this window all sensor temperatures are displayed.
- ENGLISH - - ITALIAN - Notes
TEV+066 TGV+070
TEC+067 TE1+068
TEV+066 TGV+070
TEC+067 TE1+068
TEV2 TGV2
TEC2 TE2
27

ACTIVATED UNITS
MMV runs during the entire cycle, till TEV reaches the Storage temperature.
Active units in Cylinder Cooling: MA, MC, EVFC, MV for 15 seconds.
Active units in Hopper Cooling: MC, EVFV, MV for 90 seconds.
MP runs for 6’’ (programmable in step T41) every 10’ (fix).
28

TOPPING
This function is automatically activated in Production if:
- the topping tank has a sufficient quantity of water to cover topping level sensor,
- in Programming mode, step Set Topping is not = 0
-Hot has not been reached (when EVFC is off)
If the above conditions are met, MC and EVRT will start and heat topping water up to
the temperature set in the Programming (usually 131°F (55°C)) and hold it at that
temperature through thermostatic control.
If you exit from Production, warm gas will deactivate.
29
CLEANING
In this function MA and MP will be activated for 30”, after that, the machine will
automatically return to Stop, so as to avoid a severe wear of the cylinders.
When entering Cleaning, the display will be as follows:
In this window, the first line (on top) displays HOT1 and TEC2
The second line shows how to enable/disable the outlets:
- will be activated (Beater and Pump) for 30”.
- ENGLISH- - ITALIAN - Notes
HOT=058 TEC+014
Beater + Pump ON
HOT=058 TEC+014
HOT2 TEC2
Agita + Pompa ON
Pressing Cleaning leads to the screens described here below:
HOT=058 TEC+014
Pump ON
In this window, the first line (on top) displays HOT2 and TEC2.
MA will be deactivated and only does MP run for 30”.
HOT=058 TEC+014
Pompa ON
By pressing Cleaning again MA is activated again:
HOT=058 TEC+014
Beater ON
In this window, the first line (on top) displays HOT2 and TEC2.
MP will be deactivated and only does MA run for 3 minutes.
HOT=058 TEC+014
Agitatore ON
By pressing Cleaning again :
HOT2 TEC2
HOT1 TEC2
HOT=058 TEC+014
In this window, the first line (on top) displays HOT2 e TEC2.
MA and MC+EVRC will be activated till the Set TEC Cleaning (T85).
Beater + Heating
HOT=058 TEC+014
Agitat + Riscald
By pressing Cleaning again initial display will be shown.
HOT2 TEC2
30

MA AND MP HOUR COUNTER
By pressing the Pasteurization key from Cleaning, you will get the access to MA and
MP hour counter display.
MP hours 00000
MA hours 00002
Ore MP 00000
Ore MA 00002
To exit from Hour Counter display and return to Cleaning, press Pasteurization
To reset the Hour Counters, see paragraph STOP.
.
31

WEEKLY CLEANING WASH DAYS
In Production, the first screen displays the number of days to next wash:
Second line refers to the number of days to next wash. The example shows that wash is in 14 days.
The day the machine must be washed, the function Ice cream Production is inhibited
and the machine will not accept the function. Display will be as follows:
- ENGLISH - - ITALIAN -
Do Not Serve !
TEV +19°C W -14
Non Servire !
TEV +19°C W -14
08:10:05 Wed
Wash today!
08:10:05 Mer
Lavare oggi !
In this condition, automatic Pasteurization is inhibited.
In order to set the number of days back to the programmed value (Giorni Lavaggio
– Wash Days) it is thus necessary to wash your machine or to remove the front lid
and mount it back (or yet, disconnect and re-connect IMS).
Note
Wash day starts decrementing 23.53 to 23.56.
32

CLEANING THE DISPLAY
Keyboard block
By pressing the Cleaning key
disabled and Cleaning led will blink.
This will enable you to clean the capacitive keyboard without causing any casual
function changes.
The machine will remain in the same function.
In order to enable the keys back, press the Cleaning key
for 3 seconds from any function, all keys are
again for 3 seconds.
33

ALARMS
The machine issues possible alarm messages on the display and makes the writing
blink.
In case of alarm which has reset, the writing will be on display in a fixed way (it will
not blink).
To reset the writing, press Storage/Reset key
.
The machine can be used in ice cream production even if an alarm is active; if it is a
critical alarm, the machine will not allow you to select ice cream production program;
should this be the case, press STOP and do not use the machine till it is repaired.
Here below is the alarm list:
ALARM
Aggiungere Mix
Add Mix
The display indicates Aggiungere Mix Add Mix when the
mix is below the MEDIUM level sensor. An intermittent beep
will be activated (only if step Abilita Beep Liv in
DESCRIPTION
Programming User is set to YES and the machine is not in
Stop).
Mix Esaurita
Mix Out
The display indicates Mix Esaurita-Mix Out when the mix
is below the LOW level sensor. When the mix is below the
low level sensor and in Production you distribute a number
of cones same as/or higher than the value set in step Ultimi
Coni- Last Cones, not only will Mix Esaurita- Mix Out be
displayed, but also your machine will move to Storage
mode.
Term.Sicur.Cil
Safety Therm.Cyl
(TESC2)
Term.Sicur.Vasca
Safety Therm.Hop
(TESV2)
Cylinder Safety Thermostat SUNDAE tripped.
Machine sets at Stop.
Hopper Safety Thermostat SUNDAE tripped.
Machine sets at Stop.
Termico Agitator Overload beater (bimetallic) motor SUNDAE tripped.
34

Overload Beater
(PTMA2)
Machine sets at Stop.
Pressostato
Pressure Switch
(PR2)
Termico Compres.
Overload Compres
(PTMC2)
All. Sonda Vasca
Al. Hopper Probe
(TEV2)
Pressure Switch SUNDAE tripped.
Machine sets at Stop:
- after the 3
rd
tripping occurring within 1 hour
- if pressure switch contact is opened 2 minutes running.
If the machine was in Pasteurization mode, Pasteurization
program shall be re-executed.
Check cooling water flow (in water cooled units).
Overload Compressor Motor SUNDAE.
Machine sets to Stop.
Hopper sensor SUNDAE faulty.
This is a critical alarm: consequently, the machine sets to
Stop, either from Production or from Storage and
Pasteurization modes.
All. Sonda Cilin
Al. Cylind.Probe
(TEC2)
All.Sonda Gh.Vas
Al. IceHop.Probe
(TGV2)
Portello Aperto
Spigot Opened
(IMS2)
Cylinder sensor SUNDAE faulty.
This is a critical alarm: consequently, the machine sets to
Stop, from the Storage and Pasteurization modes, it does
not however, se to Stop from production because
consistency is controlled.
Tank evaporator sensor SUNDAE faulty.
This alarm does not cause a machine (which is in the
running function) to stop.
In Pasteurizing Heating mode the alarm is eliminated.
Safety Magnet Switch SUNDAE.
If opened 10 sec., it resets Wash message (Wash).
IMS opening also resets Pasteurization flag, so that if the
machine was in Pasteur. mode, you can directly enter
Production by opening and closing the front lid.
35

All. Sonda Evap.
Alarm Cylinder evaporator sensor SUNDAE.
Al. Evapor.Probe
(TE2)
Ritorno tensione
Power On
Ghiaccio Cilin.
Ice Cylinder
(ICE2)
This alarm does not cause a machine (which is in the
running function) to stop.
In Pasteurization Heating mode the alarm is eliminated.
Power return after a blackout.
Check blackout table in Pasteurization and Production.
Event stored in all functions except STOP.
Anti-icing cylinder SUNDAE read by sensor TE2.
In Production, when TE2 temp. gets lower than the value set
in step Ghiaccio cilin. Ice Cylinder, machine sets to
reached-HOT state and stores the alarm Ghiaccio Cilin. Ice
Cylinder in the events.
This alarm can be caused by an insufficient mix feeding to
the cylinder.
Check pump efficiency.
If the alarm occurs in Stop, it is necessary to check/replace
the sensor TE2 because temperature is not being “read”
properly by the CPU.
36

Timeout Prd.
In Production, starting time of the beater motor is checked.
Timeout Prd.
Allarme cinghia
Belt Alarm
(DELTA TGV-TEV)
If the beater motor is ON for 6 minutes (Timeout Prd.) and
Hot has not been reached, the machine sets to a “reachedHOT state” with alarm “Timeout Prd.” in the events.
The Timer will be reset on MIR and on MA starting.
After 5 interventions the alarm remains on the display and
the machine sets at Storage mode.
Check mix charge in cylinder, pump in the hopper and
freezing unit.
In Heating Pasteurization, if the temperature TGV2 becomes
> than TEV2 value programmed in step DELTA TGV-TEV,
“Allarme cinghia- Belt alarm“ is displayed and the
machine sets to Heating mode.
Check the driving belt or if the rotor is in its seat.
The alarm automatically resets.
W -n gg
W -n days
(Wash)
Warning: this alarm is not active if TEV or TGV probe is
inhibited.
In Production, “TEV +19°C W –n” Wash in n days is
displayed: this means that n days remain until machine
wash. Alarm Wash might also be caused by leaving machine
in stop for 24 hours mix above the level sensor
See WEEKLY CLEANING.
37

T
Non Servire !
In Production, every time consistency value goes below the
Do Not Serve !
No Acqua Topping
No Topping Water
(AL16)
All.Sonda Topping
Al.Topping Probe
AL17 (TET)
one programmed in step Blocco Hot, cone red led lights up
to indicate wait until ice cream is ready and “Non Servire
!” Do not Serve shows on the display. If, in such a case,
you try to distribute cones, all units stop (MA and MC) till
the photocell is no longer busy. As soon as it is set free,
both MA and MC re-start in order to bring ice cream to its
proper consistency.
When the Topping led is on, the level sensor in the topping
tank must be covered with water, otherwise, heating will
automatically switch off and “No Acqua Topping” No
Water Topping will be shown on the display.
Alarm Topping (TET) sensor.
TET is the sensor indicating the temperature of topping tank.
In case of trouble, All.Sonda Topping. Al. Topping Probe
Invertire Fasi
Invert Phases!
Pastorizzare !
Pasto needed !
will be displayed.
It is necessary to exchange 2 phases on the threephase line
in order to get the correct beater rotation direction. The
alarm resets by switching power off and on again (after
exchanging the phases).
When machine has been set to Stop with mix above low
level sensor for over 60 minutes, TEV temperature is
checked and if it is 59°F (15°C) or higher, Pasteurization is
needed. So pressing the Production key, will cause the
machine to automatically set to Pasteurization, unless you
open its front lid and close it again. In this case, test on
EV
≥ 59°F (15°C) will be cancelled for a time of 60 minutes
and Production will be accepted.
If in all these cases, TEV<59°F (15°C), all functions will be
accepted with no time limits.
38

Why in STOP ?? If the machine is left in the Stop position with mix covering
the level sensor, the message “Why in STOP?” will be
displayed 30 seconds later and an intermittent beep will be
emitted. All this to warn the user to set the machine to
Production, Pasteurization or Storage.
Above mentioned message will be deleted by entering
Production, having low mix level, or pressing Reset (Stor.)
key.
To have the message back on the display, it is necessary to
first enter Production, Storage or Pasteurization.
Temp Vasca calda
Hopper Temp Warm
Temp Cilindro calda
Barrel Temp Warm
Temp Vasca Boll
A 4-hour timer is enabled in Production and Storage modes.
If the TEV stays above 5°C for more than 4 hours
consecutively or if, when power returns after a blackout,
TEV>5°C, the message “Hopper Temp Warm” is displayed.
This can be cancelled by pressing the Storage key.
Signal only.
A 4-hour timer is enabled in Production and Storage modes.
If the TEC stays above 5°C for more than 4 hours
consecutively or if, when power returns after a blackout,
TEV>5°C, the message “Barrel Temp Warm” is displayed.
This can be cancelled by pressing the Storage key.
Signal only.
A 1-hour timer is enabled in Production and Storage modes.
Hopper Temp High
If the TEV stays above 5°C for more than 1 hour
consecutively or if, when power returns after a blackout,
TEV>15°C, the message “Hopper Temp High” is displayed.
This can be cancelled by pressing the Storage key.
Signal only.
39

Temp Cilindr Bollen
A 1-hour timer is enabled in Production and Storage modes.
Barrel Temp High
If the TEC stays above 5°C for more than 1 hour
consecutively or if, when power returns after a blackout,
TEC>15°C, the message “Barrel Temp Hight” is displayed.
This can be cancelled by pressing the Storage key.
Signal only
40

BLACKOUT
In the event of blackout, if the machine was in Cleaning, on power return, it sets to
STOP.
While if it was in Heating mode in Pasteurization or in Pause mode during
Pasteurization program, on power return, the machine is again in the function where it
was before power failure (Power On on display).
If the machine was in:
Soft ice production, Storage or Cooling in Pasteurization, on power return, the
machine checks the temperature TEV and how long the power failure lasted; if a
blackout lasts more
than what indicated in the table below, the machine will repeat
the pasteurization completely and alarm “Ritorno Tensione” or “Power On” will be
stored in the “events list“.
Otherwise, if blackout time is shorter
than the one indicated in the table below, the
machine will return to the function where it was before blackout.
Temperature TEV
68°C 50°C
49°C 15°C
14°C 10°C
9°C 4°C
Timer
30 minutes
10 minutes
20 minutes
2 hours
41

AUTOSETUP
If necessary, autosetup is only to be done after Carpigiani service’ authorization.
CAUTION: After an autosetup, sensor offset values are zeroed. Before executing it, it
is consequently advisable to always carry out a Download for Programming Table.
The procedure sets all programmable values according to the one indicated in the
column of relevant model.
To do that, switch machine off and then on again.
WAIT for 1 second after switching on and then press
Hold
pressed till the following will be on display:
K3 Soft
ver.K3Soft23
Autosetup Done
.
followed by a beep.
Release the key
, now.
The machine is now programmed according to the values indicated in the
corresponding column (see programming table).
42

EVENT LIST
The machine is provided with a large memory that helps us store most of the
events (function you select, alarms,...).
To read the events stored in the memory you must have the machine in STOP,
then press
and keep pushing it 5 seconds.
On the display you’ll get the last event occurred with relevant date and time.
Es.:
First line is relevant to date/time and the second one to the event.
- ENGLISH- - ITALIAN -
12:10:36 22 May
Start Pasteur.
12:10:36 22 May
Avvio Pasto
Events are scrolled with Increment
(next event) and Decrement keys
(previous event).
If you don’t push any button for 30 sec. or you push STOP, the machine will go to
STOP.
The events list helps us understand when and how many times a certain alarm has
occurred.
Moreover, we can have a report that tells us about the pasteurization cycle and check:
Pasteurization Start
Pause Start (End Heating)
Pause End (Start Cooling)
Pasteurization End
Blackout events
NB: The highest number of storable events is 1000.
A further event will cancel the last one (the thousandth).
While reading the events you can also delete them, holding Cleaning key down for 3’’.
43

PROGRAMMING USER SUNDAE
1) For access to the Programming User (Manager Menu) press the
Stop and Storage keys at the same time and soon release them.
The first step of programming User is now displayed.
The first line is relevant to the description and the second one to the step number (U=User) and to the value.
- ENGLISH - - ITALIAN -
Hours
Step U01 10
Ora
Step U01 10
2) Press Increment or Decrement keys to change the value.
Press Stop
to enter the next step.
See programming table.
3) To exit from programming, do not press any key for 30 seconds or
press Production or Cleaning.
Machine returns to Stop, now.
Step
U01
U02
U03
U04
U05
U06
U07
U08
U09
U10
U11
U12
Display ITA Display ENG Min Max Default
Ora Hours
Minuti Minutes
Giorno Settimana Day of Week
Giorno del Mese Day of Month
Mese Month
Anno Year
Linguaggio Language
Ora Avvio Prod. Start Prod. Time
Ora Avvio Pasto Start Pasto Time
Abilita Beep Liv Lev. Beep Enable
Ora Avvio CIP Start CIP Time
Tempo Mixer Mixer Timer
00 23
00 59
Sun Sat
01 31
Jan Dec
2000 2099
Eng Eng Eng
00 23+no 08
00 23+no 02
No Yes Yes
No No No
-01 60 05
/
44

Step
U01 Hour/time
Hour setting
U02 Minutes
Minutes setting
U03 Day of the Week
Week day setting.
U04 Day of the Month
Month day setting.
U05 Month
Month setting.
U06 Year
Year setting
U07 Language
Language setting ITA – ENG – FRA – DEU - RUS
Note
U08 Distr. Start time
Setting of Automatic Distribution Starting time.
When setting at no, no automatic Distribution will ever start.
When setting at auto, automatic Distribution will start as soon as
Pasteurization is completed.
U09 Past. Start time
Setting of automatic Pasteurization start time. When set at no, no automatic
Pasteurization will ever start.
U10 Beep Liv Enable
When setting at YES, an intermittent beep will be emitted as soon as the mix
is below the medium low level sensor, alarm not active when in Stop, being
OFF, or if the alarm is disabled.
U11 Start CIP Time
Not used.
U12 Mixer Timer
= -1: the output is utilised to activate the fan of the electrical enclosure and
therefore the mixer is deactivated.
= 0: Mixer management (active whilst the key is pressed)
> 0: Mixer management with delay. On releasing the mixer activation key,
the mixer remains ON for the time set in seconds at this step.
45

PROGRAMMING TECHNICIAN SUNDAE
A technician may change some machine parameters.
In order to enter the Technician Programming mode, it is necessary to press Stop and
Storage at the same time, and hold them down for 10 seconds.
The monitor now displays:
Release the keys.
The first step of Programming Technician is now displayed:
14:10:22 Mon
******PROG******
- ENGLISH - - ITALIAN -
HOT 1
Step T01 +100
HOT 1
Step T01 +100
The first line is relevant to the description and the second one to the step number
(T=Technician) and to the value
In order to leave the Programming mode, do not press any push-button 30 seconds or
press Production or Cleaning.
When a programming table value is changed, the event “Table Updated M” is
registered to point out the manual updating of the table.
46

PROGRAMMING TABLE SUNDAE
Eprom flash version: k3soft49 SOFT part
Step
T01 HOT 1 HOT 1 N 000 120 100
T03 Isteresi Hot 1 Hot 1 Different. N 000 020 014
T05 Gas Caldo 1 Hot Gas 1 sec/10 002 020 003
T07 Ritardo Agit. 1 Delay Beater 1 sec 001 020 003
T09 Blocco Hot 1 Hot Block 1 N 000 120 020
T11 Timer Ciclico Cyclic Timer min 001 015 010
T12 Trimmer Hot 1 Trimmer HOT 1 N 010 255 121
T14 Ritardo Monofase Single Phase Del msec 000 500 000
T15 Ghiaccio Cilind. Ice Cylinder °C -033 010 -023
T16 Timeout Prd Timeout Prd min 001 059 010
T17 Ultimi Coni Last Cones N 001 099 005
T19 Set Topping Set Topping °C 000 070 055
T23 Temp. Conservaz. Storage Temp °C 001 006 003
T25 Antighiac. Vasca Hopper Defrost °C -030 000 -018
T26 Ist.Antig.Vasca Hop. Defrost Hys °C 002 010 006
T27 Ritar. Mixer Vas Delay Hop. Mixer min 001 099 001
T28 Pasto Vasca Pasto Hopper °C 065 085 065
T29 Pasto Cilindro Pasto Cylinder °C 065 085 065
T30 Delta TGV-TEV Delta TGV-TEV °C 010 099 035
T33 Regolazione TEV Offset TEV °C TEV-9 TEV+9 to be set
T34 Regolazione TEC Offset TEC °C TEC-9 TEC+9 to be set
T35 Regolazione TGV Offset TGV °C TGV-9 TGV+9 to be set
T36 Regolazione TE1 Offset TE1 °C TE1-9 TE1+9 to be set
T39 Giorni Lavaggio Wash Days N 001 042 014
T40 Fahrenheit Fahrenheit Y/N No Yes No
T41 Tempo MP Ciclico MP Cyclic Time sec 000 010 006
T42 Setup TET Setup TET °C TET-20 TET+20 to be set
T43 Ora Legale Daylightsavtime Y/N No Yes Yes
T46 Tempo MP Time MP sec 000 090 15
T62 Setup TEV Setup TEV N 450 650 557
T63 Setup TEC Setup TEC N 450 650 553
T64 Setup TVM Setup TVM N 300 500 408
T65 Setup TCM Setup TCM N 300 500 406
T66 Allarme RTA1 Alarm RTA1 Y/N No Yes Yes
T68 Allarme RTC1 Alarm RTC1 Y/N No Yes Yes
T70 Allarme TESC1 Alarm TESC1 Y/N No Yes Yes
T72 Allarme TESV1 Alarm TESV1 Y/N No Yes Yes
T73 Setup PZV Setup PZV N -20 90 005
T74 Setup PZC Setup PZC N -20 90 005
T75 Allarme PR1 Alarm PR1 Y/N No Yes Yes
T77 Al. Timeout Prd Al Timeout Prd Y/N No Yes Yes
T78 Post Freddo Vas Post Hopper Stor Y/N No Yes Yes
T84 LON LON Y/N No Yes No
T85 Set TEC Pulizia Set TEC Cleaning °C 000 050 020
T86 Reset Ore Motori Reset Hours N 000 004 000
Display ITA Display ENG U.M. Min Max K3
400/50/3
Test value
47

48

NOTES TO PROGRAMMING TABLE SUNDAE
Step
T01 HOT 1
When increasing this number, one gets harder ice cream and also an increase
in value of beater motor absorption
T03 Hot 1 Different. (Hysteresis)
A minor value makes HOT more sensitive by ice cream dispensing. With
machine in Production and MIR being energized, after the compressor cuts
out by HOT, the compressor is cut in again when consistency displayed is
lower than HOT minus value set in this step
T05 Hot Gas 1
Warm gas solenoid valve excitation time (EVRC2).
Every time EVFC2 de-energizes, EVRC2 will be energized for a time that can
NOTE
be program in this step.
Time is programmable according to tenths of the second.
T07 Delay Beater 1
It is the amount of time the beater will continue running after the compressor
stops for HOT.
T09 Hot Block 1
Hot SUNDAE value under which everything stops (MA and MC OFF) if you try
to dispense a cone.
As soon as MIR reopens, Production starts again and MA and MC are ON
again.
Keyboard displays:” Do not serve!”.
If consistency raises over Block Hot , “Ice cream Ready!” will be displayed.
If consistency lowers below Block Hot – 5 points hysteresis, you return to the
block condition with message “Do not serve!”.
49

T11 Cyclic Timer
Cyclic timer in Ice cream Production.
Every 10 minutes (programmed in this step) the beater goes ON for ice
cream consistency control
T12 Trimmer Hot 1
It’s a number automatically
If the number is increased, ice cream consistency at the end of a production
cycle will decrease.
Caution: to change this number, it is necessary to make certain that beater
motor current DOES NOT exceed 100% of rating value
N.B. The value shown in the Programming table is indicative. This parameter
is calibrated differently for each machine and normally shown on an adhesive
label in the electrical enclosure.
T14 Single Phase Del
Lag Singlephase programming is necessary for a HOT value of “000” on
display when the product is completely liquid in SINGLEPHASED machines.
.
set after Auto-set-up procedure.
Lag Singlephase is already set in machines supplied by Carpigiani; when the
electronic card of a machine must be replaced, it is necessary to program the
Lag Singlephase again at relevant value.
By threephased machines, value shall be 000.
T15 Ice Cylinder.
When the temperature read through TE2 reaches a value which is less than or
equal to the one programmed in this step, the machine sets at the “reached
HOT” and cuts out the cylinder cooling compressor.
This can only occur if the machine is in Production.
Alarm Ice Cylinder is stored in event list.
T16 Timeout Prd
In Production, a time that can be programmed in this step is activated. If
HOT setpoint is not reached within the programmed time, the machine will
react as if HOT has been reached anyway and alarm “Timeout Prd.” Will be
stored in the event list.
50

T17 Last Cones
It’s the number of cones the machine can dispense in Production after led of
low level sensor switches on.
The machine will then automatically set at Storage.
T19 Set Topping
Sets the temperature at which the hot topping well will be kept by
thermostat.
If step is set at 0, topping option and its alarms will be disabled
T23 Storage Temp.
Cylinder/hopper temperature storage.
It is controlled in Storage, Production and Pasteurization.
T25 Hopper Defrost
When the temperature TGV reaches a value which is less than or equal to the
one programmed, the warm gas solenoid valve energizes (EVRV) to defrost
the hopper (EVFV still ON).
T26 Hop. Defrost Hys
Hysteresis defrost hopper.
In hopper cooling, When the temperature TGV reaches a value which is less
than or equal to the one programmed in step Defrost Hopper, warm gas
solenoid valve energizes for tank defrosting, till the temperature TGV raises
by the value set in this step.
See step Defrost Hopper.
T27 Delay Hop. Mixer
Time in minutes during which the hopper mixer motor continues running after
cooling the hopper.
This step is used to achieve a better thermal exchange and to prevent icing
around the hopper walls
T28 Paso Hopper
Hopper pasteurization temperature.
.
51

T29 Pasto Cylinder
Cylinder pasteurization temperature.
T30 Delta TGV-TEV
In Heating of Pasteurization program, if TGV2 temperature turns > than TEV2
by value programmed in step Delta TGV-TEV “Alarm Belt” will be displayed
and machine will set to Stop.
Check driving belt or whether the rotor is in its seat
T33 Offset TEV
Setting hopper temperature TEV2.
In this step you can set the real temperature of the mix in the hopper.
It is necessary to set the sensor after setting your machine at Storage mode,
at a temperature of 39.2°F (4°C).
Thanks to this electronic CPU, your machine shall not
temperature for the sensor setting.
With an accurate thermometer check the temperature in the hopper; if the
reading is not 39.2°F (4°C) (value indicated on display), press the increment
or decrement keys till the temperature agrees with the one read through the
thermometer.
NB: When replacing a sensor it is important to cover the sensor with a
conductive paste before inserting it into its bulb-holder.
T34 Offset TEC
Cylinder temperature TEC2 setting.
See Setting TEV2.
have a room
T35 Offset TGV
Hopper evaporator temperature TGV2 (for hopper defrosting).
This temperature must be adjusted with the sensor of a precise thermometer
into the bulb-holder which you find in hopper evaporator.
See Setting TEV2.
52

T36 Offset TE1
Cylinder evaporator temperature (Sundae side) TE2
See Setting TEV2.
T39 Wash days
It indicates the number of days until the machine must be washed.
Machine needs be cleaned or it will jam up (production not accepted).
T40 Fahrenheit
Display of temperature in °C (No) or in °F (Yes).
Relevant temperatures displayed will be marked by °C or °F.
T41 MP Cyclic Time
In Production and Storage MP is activated for a time programmed in this step
every 10’ (fix).
T42 Setup TET
.
TET topping cylinder temperature calibration.
See TEV2 Adjustment.
T43 Daylightsavtime
Enabling (Yes) or disabling (No) Daylight Time. See relevant paragraph.
T46 Time MP
Activation time of MP in Production.
T62 Setup TEV
See the paragraph “SENSORS SETTING in case of CPU REPLACEMENT”
T63 Setup TEC
See the paragraph “SENSORS SETTING in case of CPU REPLACEMENT”
T64 Setup TVM
See the paragraph “SENSORS SETTING in case of CPU REPLACEMENT”
53

T65 Setup TCM
See the paragraph “SENSORS SETTING in case of CPU REPLACEMENT”
T66 Alarm RTA1
Enabling (YES) or disabling (NO) alarm for beater motor overload relay:
“Termico Agitator”.
T68 Alarm RTC2
Enabling (YES) or disabling (NO) alarm for compressor motor overload relay:
“Termico Compres.”.
T70 Alarm TESC1
Enabling (YES) or disabling (NO) Cylinder Safety thermostat alarm.
T72 Alarm TESV1
Enabling (YES) or disabling (NO) Tank Safety thermostat alarm.
T73 Setup PZV
See the paragraph “SENSORS SETTING in case of CPU REPLACEMENT”
T74 Setup PZC
See the paragraph “SENSORS SETTING in case of CPU REPLACEMENT”
T75 Alarm PR1
Enabling (YES) or disabling (NO) the high-pressure switch alarm: “Pressure
switch ”.
T77 Al. Timeout Prd
Enabling (YES) or disabling alarm “Timeout Prd”.
T78 Post Hopper Stor
Enabling (YES) or disabling (NO) Hopper post-cooling.
If set at Yes, when in Production, EVFV switches off after reaching the storage
temperature; and a Hot cycle is carried out in the cylinder.
54

T84 LON
Enables Echelon alarm operation.
Only active on machines with LON devices.
T85 Set TEC Cleaning
When the Heated Cleaning function is selected, the EVRC is enabled with MA
until it reaches the setting entered for this step.
If the temperature has already been reached when the function is selected,
the machine will set itself in Stop mode.
T86 Reset Hour
1 = MP hour reset.
2 = MA hour reset.
3 = MA+MP hour reset.
4 = total cone counter reset.
Once set, this enables the reset at the closure of the programming function,
resetting itself then to 000 (no reset) automatically.
If an alarm is enabled, the machine will be protected by that alarm.
When an alarm is disabled, the machine will not
be protected by the alarm and you
will be working on your own risk.
Disabling an alarm can be useful when a component is broken, for example, if safety
thermostat is broken and its contacts are opened, the machine will never heat up.
To bypass that temporarily, disable alarm TESV : the machine will not care about the
safety thermostat.
Caution: after replacing a safety thermostat, do not forget to enable
the alarm so as
to protect your machine.
55

HOT SETTING
In order to set the machine, fill the cylinder with mix and select the Production
function. With ammetric pliers check beater motor input.
Once the compressor has been activated, provide a short circuit between earth
(yellow/green) and pin8 of the 18-pin terminal board 3 (see card layout).
Pin8 of MRS3
An increasing number will be on display . Intermittent beep sound.
When current read through the ammetric pliers (Amp Meter) is same as the beater
motor rated value, eliminate the short circuit in order to complete HOT setting
procedure and store the “TRIMMER HOT” setting value in programming step
Trimmer Hot1.
WARNING: NEVER EXCEED MOTOR INPUT RATING VALUE.
USA K3
208-230/60/3
Soft side
Beater motor current LOADLESS 2,93 A
Display
30 120
Step
Trimmer Hot 1
402 W
Beater motor current in PRODUCTION
HOT
4,42 A
1430 W
100 120
56

GM K 3
400/50/3
Sundae side
Beater motor (no load value)
2.05 A
331 W
Current Beater motor in PRODUCTION
HOT
2.82 A
1390 W
Display
22
100
Step
Trimmer Hot 1
106
128
57

CARD LAYOUT
The machine electronics consists of a two-deck CPU (573700115).
On the base you find the CPU, whilst on upper deck connected through “needle beds”
there are all terminal boards.
The compatible alternative always with code 573700115 is on a single layer.
ELECTRONIC CARD
Code 573.700.115
2 layers
As an alternative
ELECTRONIC CARD
Code 573.700.115
1 layer
58

TRANSFORMER
The electric transformer is a
multivoltage one
59

Connectors
573.700.115 2
layers
MRS1
(230V output)
MRS2
(24V output)
MRS6
(feed)
MRS5
(not used)
MRS4
(PTC sensor)
MRS3
(inputs)
LCD keypad
Not used
LED keypad
Serial port
60

Connectors
573.700.115 1
layer
MRS1
(230V output)
MRS2
(24V output)
MRS6
(feed)
MRS5
(not used)
MRS4
(PTC sensor)
MRS3
(inputs)
Not used
LCD keypad
LED keypad
Serial port
61

J1, J2
(European
ammeter scale)
Both jumpers are
positioned towards
the outside of the
card
For T/A red
Jumper 573.700.115 2 layers
J3, J4
(American
ammeter scale)
Both jumpers are
positioned towards
the inside of the
card
For T/A black
62

J10, J8
(European
ammeter scale)
Both jumpers are
positioned towards
the inside of the card
For T/A red
Jumper 573.700.115 1 layer
J9, J7
(American
ammeter scale)
Both jumpers are
positioned towards
the outside of the
card
For T/A black
63

SOFTWARE UPGRADE
For a CPU software upgrade, it is necessary to use the special serial cable supplied by
Carpigiani, connect it to the CPU through the Serial access (see electronic card layout)
and to serial port RS232 of any Personal Computer (PC).
The software Upgrade can be done by transferring the new software from the
computer to the CPU using M16C Flasher.
Once you have connected your PC (RS 232) to the CPU (Serial access ) with the
special cable code 577.400.032, connect the machine to the mains.
After installing theM16C Flasher it is necessary:
- to start the program and press the push-button Settings
- shape settings as follows
Configuration shall be executed for the first time, only.
- Close Settings window
- Press the arrow next to Settings push-button and select Prog new file…
- Select Program K3Soft*.mot
After a software upgrade offsets relevant to sensors and Trimmer Hot shall be
programmed again
64

TABLE °C-OHM
The table here below shows the relation between the temperature read by a PTC
sensor and relevant resistance in OHM, as read by a tester.
It is useful to check right sensor readings.
TEMPERATURE °C OHM
-50 503,5
-45 528,9
-40 555,2
-35 582,5
-30 610,6
-25 639,6
-20 669,6
-15 700,5
-10 732,2
-5 764,9
0 798,5
5 832,9
10 868,3
15 904,6
20 941,8
25 980
30 1019
35 1058,9
40 1099,7
45 1141,5
50 1184,1
55 1227,6
60 1272,1
65 1317,5
70 1363,7
75 1410,9
80 1459
85 1508
90 1557,9
95 1608,7
100 1660,4
105 1713
110 1766,5
115 1820,9
65

SENSORS SETTING in case of CPU REPLACEMENT
This procedure enables you to reset the calibration of sensors TEV and TEC from old
CPU to the new one in case of CPU replacement.
(First of all it is necessary to check whether feeding the old CPU, its display is still
legible).
Only in this case can you go ahead with the following procedure of sensor setting.
1) Set the machine at Stop
2) Press simultaneously Production and Storage and hold them 10’’ down.
3) The display shows “Setup Sensors”, release the keys now. You will see the figures
relevant to the sensors TEV and TEC for about 13’’. For example:
TEV+562 TEC+542
TVM+408 TCM+406
And then you will see the following figures for about 7’’
PZV+005 PZC+005
4) Take note of these figures to program them on the new CPU
5) Replace the CPU and do the autosetup.
6) Enter the programming and set the 6 figures read before in steps T62(Setup TEV),
T63(Setup TEC), T64(Setup TVM), T65(Setup TCM), T73(Setup PZV), T74(Setup PZC).
7) Leave the programming mode.
8) Press Production and Storage simultaneously for 10’’ to enter “Setup Sensors”
again.
9) Release the keys and press them again until you see
Setup Sensors
Release the keys and then it you will see
Setup Sensors OK!
for a few seconds. The procedure is finished.
SHAKE SIDE
66

SOFTWARE VERSION
As soon as power is turned on to the machine, the monitor displays
the software
version.
For example:
K3 Shake
ver.K3shake23
means version sw = 23
In case of machine malfunction, your Technician will have always to specify this
number (software version), as well as the machine serial number you can find on the
data plate, so as to take best advantage of Carpigiani Technical Service.
67

AVAILABLE CONTROLS
KA configuration
General Market configuration
Note 1
When pressing a key and the functions is accepted, the machine keyboard block will
emit a sound signal (beep).
Note 2
This handbook refers to machine standard configuration. As far as General Market
version, we beg you to make reference to relevant keyboard
68

POSITION FOR SENSORS and SHAKE SOLENOID VALVES
TEV1 – TEC1 – TGV1 – TE1
BACK
TEV1
TEC1
TGV1
TE1
SOLENOID VALVES – front sight
SHAKE
EVFC1 EVRC1 EVFV1 EVRV1 EVRC2 EVFC2 EVRV2 EVFV2
SOFT
69

DAYLIGHT TIME
From MARCH 30th to OCTOBER 30
The machine clock will automatically be set forward by 1 hour. This means that when
passing from 01:52 a.m. on March 30
th
included, daylight time is active.
th
to 01.53 a.m. on March 30th, the clock will
automatically move ahead of 1 hour
. The display on the changeover at 01:53 a.m. will
show 02:53 (summer time).
Shifting from 01:52 a.m. to 01:53 a.m. on October 30
th
, the time will automatically be
set back by 1 hour for the end of daylight savings time. When the clock reaches
01:53, it will move back by 1 hour and time displayed will be 00:53 (from this point it
will count normally). The clock time will remain tin this setting until the next March
th
30
when the next changeover occurs.
Checking occurs during 3 minutes between 01:53 a.m. and 01:56 a.m.
Daylight time is only active when the step Ora Legale (Daylightsav Time) is set to
Yes.
70

FUNCTIONS
STOP
In this function the machine is OFF and relative led is ON (stop button lights up).
From the Stop position any other function may be selected. In order to change a
function, IT IS ALWAYS NECESSARY to press the stop button for 2 seconds first.
The display shows the following:
- ENGLISH- - ITALIAN -
10:33:21 Fri
10:33:21 Ven
In order to set the machine at Stop from Production, Pasteurization and Storage, push
the stop key and hold it down for 2 seconds. The machine will not recognize the stop
command if the button is not held at least 2 seconds, this helps avoid accidentally
hitting the button and stopping the machine.
If the machine is left at Stop with mix above the level sensor, the writing “Why in
STOP??” will be displayed flashing and with an intermittent beep after 30’’; it warns
the user to set the machine at Production, Pasteurization or Storage.
DEPRESSURIZING THE CYLINDER
In Stop,
by pressing , the piston will open to its maximum setting in order to
allow cleaning and depressurizing of the cylinder. The display shows “Piston Open”.
By pressing
again, the piston will return to its closed position.
71

DRYING AND CLEANING THE SYRUP LINES
In Stop:
colored keys are used to portion the syrup quantity.
- Press a colored key once and the display will show a message similar to the one in
the following example:
- INGLESE - - ITALIANO -
16:29:27 Tue
Syrup 1 145
16:29:27 Tue
Sciroppo 1 145
- Relevant peristaltic pump (in this case pump 1) will start and run for 5 seconds (step
Syrup Calib Time ) at the speed displayed beside the pump number (in the example
speed is 145).
- Check the quantity of syrup with the small calibration measuring cylinder
(“calibration cup”). After 5 seconds (or amount of time programmed) the Increasing
and Decreasing keys will blink (8”) in order to allow you to change pump
speed in case the syrup quantity is too low or too high.
- Press Stop when you want to stop the distribution earlier than the calibration time.
- By pressing the same colored key a second time while the Pump is activated, the
pump will operate at its maximum speed for 3 minutes in order to clean the syrup
pipe.
On the display:
- ENGLISH - - ITALIAN -
16:29:27 Tue
Syrup 1 cleaning
16:29:27 Tue
Sciroppo1 puliz.
In this case, too, press Stop if you want to stop syrup pipe cleaning.
To store speed values, pass to Production, Cleaning, Storage or
Pasteurization modes, before disconnecting the machine from main.
72

MA – MP HOUR COUNTER RESET
If you continue to press
for 20 seconds, after the display changes to “read
events”, MP counter will be reset. The display now shows “Reset hrs Count”.
In order to reset MA counter, it is not only necessary to press Stop
for 20
seconds, but also to have the rotor cap open IMSB (for this case, first press the stop
button and then while holding it down open the rotor cap). The display shows “Reset
hrs Count”.
TOTAL AND PARTIAL CONE COUNTER RESET
If you press Stop
within 1 second of turning the machine’s power on and hold it
down for at least 5 seconds, total and partial (daily) cones will be reset.
Display as follows:
- ENGLISH - - ITALIAN -
Reset Cone Count
Azzeramento Coni
Cone count is measured in group of 5.
73

EVENTS
The machine is provided with a large memory that helps us store most of the events
(history).
To read the events stored in memory, you must have the machine in STOP
Press Stop
and keep it pressed some 3 seconds. The monitor will display the
following sequence:
- ENGLISH - - ITALIAN -
**READ EVENTS***
Log Number 00014
Year 2006
09:00:08 15 Feb
Stop
*LEGGI EVENTI*
Num.Evento 00014
Anno 2006
09:00:08 15 Feb
Stop
total events
Last screen shows the stored event, in this example it shows the STOP button was
pressed at 8 seconds after 9 a.m. on Feb. 15
th
.
Events can then be scrolled with Increment
(next event) and Decrement keys
(the event before).
In order to leave the “read events” mode, either press the Stop button for 2 seconds
or do not touch any key for 30 seconds.
Stored events are Pasteurization steps, alarms, function changes, blackouts.
An Autosetup procedure does not cancel events from memory.
74

TEMPERATURE CONTROLS
When the machine is at STOP with the mixture in the tank at a low level (low level
uncovered), the TEV temperature control is actuated.
If the TEV is greater than 15°C, the display visualises “Pasteurise !”.
Therefore, pressing the Production key, the machine passes automatically to the
Pasteurisation mode.
This control is not active during the successive 60 seconds after gaining access to the
STOP function or during the successive 60 seconds after the closure of the door.
If in all these cases, TEV<15°C, then all functions without any time limits are
permitted.
From Stop, a time will be computed if mix level is covering the level sensor.
If down time exceeds 24 hours, the display will be as follows:
10:33:21 Fri
Wash Today !!!
10:33:21 Ven
Lavare oggi !!!
and Wash procedure will be executed: machine wash is forced and Production
inhibited.
Reset conditions are the same as those for Wash (IMS opening and reclosing).
75

SHAKE PRODUCTION
Access to Production is only possible when the mix is above the minimum
level sensor.
The machine is provided with a "start up" device which operates whenever the Shake
production program is selected from Stop position. During start up process the Shake
production button blinks. Start up time is usually set at 15 minutes and it can be
modified in program step (Tempo Messa Reg. - Start Up Time).
Hot value, too, during the start up can be modified in program step (Hot Messa a
Reg. - Start Up Hot: this value is a number that is added to the programmed Hot
setting).
No shake portion will be dispensed until the machine completes start up process.
The start up procedure is composed of 3 phases:
1) If TEC value is inferior to (Storage Temp – 2°) the cylinder will be heated (EVRC
and MA ON) up to the attainment of Set Storage (step T23 Storage Temp).
2) Self-setting of product is activated for 3 minutes. If instead the cylinder had
previously been heated (point 1) the time becomes 1’ 30”. In this phase the value
noticed in automatic way is stored in the step T12.
3) The real start up procedure begins.
76

For a few seconds the display shows:
On startup, the display will show “
- ENGLISH - - ITALIAN -
Start up
Procedure
Messa a Regime – Start Up Procedure” on the first line.
Messa a Regime
the display will then changes to:
On the left, the Set to be reached as consistency; on the right current consistency (Hot). Led
- ENGLISH - - ITALIAN -
Set=065 Hot=043
Set=065 Hot=043
blinks.
When the Set + Hot Messa a Reg. (Start Up Hot) is reached, cooling unit switches
off (MC, EVFC, MV OFF) and only will MA runs.
Cooling will be activated again at Set Hot – HOT1 Differential (T03).
When startup is over, the Production key will be stop blinking and stay constantly lit,
from this point the product is held at the programmed Hot consistency value.
In order to skip the “startup” procedure, press
. If a blackout occurs or even the
start up procedure is not executed the steps 1 and 2 (see previous page) are not
performed.
Intelligent startup control
When your machine is in Production and you press Stop, “start up” will NOT be
reexecuted if you press Production again WITHIN 60 minutes.
If you set the machine to Stop while it is running in Production after having completed
“start-up”, and a blackout occurs, when power returns the machine WILL re-execute
the “start-up” procedure the next time you set it to Production.
After startup procedure
77

The product is cooled in the cylinder till the Hot value programmed in step HOT 1 (see
programming table) is reached.
When the desired consistency (Hot) is reached, the beater goes on running for 10
more seconds (or the time programmed in step Delay Beater 1 – Ritardo Agitat.1)
and then it switches off.
The hopper will be now cooled to storage, if need be (in particular if TEV1 Temp.
Conservaz – Storage Temp).
If no portion is dispensed after Hot has been reached, the beater will start every 4
minutes (Timer Ciclico - Cyclic Timer) and run for 5 seconds (programmable in step
T24), in order to control the product consistency: should it be below HOT 1 –
Differenz. Hot 1 (Hot 1 Different.), the compressor and relevant solenoid valve
(EVFC1) will also start so as to bring the product back to its programmed consistency.
If HOT has already been reached and your machine is in the stand-by mode of
production, the beater motor will restart as soon as a portion is dispensed and it will
run for 15 seconds to control the consistency.
In production, when the mix in the hopper is below the minimum level sensor, the
display will show the message Aggiungere Mix - Add Mix and only allow you to
distribute the number of cups set in step Ultimi Coni - Last Cones.
The machine will then automatically set from shake Production to Storage and is
not allowed to return to shake Production mode until the hopper is refilled with mix.
MP runs for 6’’ (programmable in step T41) every 10’ (fix).
Once startup has been completed after entering Production, the display will show the
78

following:
- INGLESE - - ITALIANO -
The first line on top refers to shake if ready for distribution (
in right consistency (
The display
set at step Blocco Hot - Hot Block and you must thus wait.
For further details, see paragraph DO NOT SERVE.
The second line refers to the number of days to next wash. The example above shows that there are still 14 days to
wash day.
The second line concerns the TEV temperature, followed by the days (W=Wash) until the next wash.
Non Servire ! - Do not Serve ! means that the shake has not yet reached HOT
Shake Ready !
TEV +19°C W -14
Non Servire ! - Do not Serve !).
Shake Pronto !
TEV +19°C W -14
Shake Pronto ! - Shake Ready !) or not yet
By pressing Production, you move to the different “windows” or screens described
below:
Key
In this window, the first line (on top) displays the hopper temperature:
= ON, when the hopper is cooled +014°C=shake hopper temperature (TEV1)
The second line displays the cylinder temperature:
= ON, when the cylinder is cooled +013°C=shake cylinder temperature (TEC1)
In this window, the first line (top) displays:
Set=065: Set HOT SHAKE HOT=035: shake cylinder current consistency reading
Duration of the glass level sensor activation in hundredths of a second.
In this window the display shows Cups of the day (starting from 0:00 to 23.59) :
12345 = number of portions relevant to SHAKE side.
Daily cups are reset :
- on midnight switching
- by pressing Stop on switching on (see paragraph STOP)
- ENGLISH - - ITALIAN - Notes
Hopper +014°C
Cylinder +013°C
Set=100 Hot=035
Liv=00000
Cones Today
12345
Vasca +014°C
Cilindro +013°C
Set=100 Hot=035
Liv=00000
Coni Odierni
12345
TEV1
TEC1
79

Total Cones
0923456780
Coni Totali
0923456780
In this window, the display shows total Cones:
0923456780= number of portions relevant to Shake side.
To reset them, switch machine power off and then on. Soon after switching power on (within 1 minute),
press Stop
and hold the key down for 5 seconds.
TEV+010 TGV-022
TEC+013 TE1-012
TEV+010 TGV-022
TEC+013 TE1-012
In this window the display shows all sensors relevant to SHAKE side (no display of °C nor °F):
TEV = Shake side Hopper Thermostat
TEC = Shake side Cylinder Thermostat
TGV = Shake side Hopper Ice Thermostat
TE1 = Shake side Cylinder Evaporator Thermostat
By pressing Production again, machine returns to its starting display
TEV1 TGV1
TEC1 TE1
80

DO NOT SERVE
When selecting Production, the display will be Non Estrarre ! - Do Not Serve !
meaning that the shake needs to reach an ideal consistency and therefore do not
serve till the message switches off:
- EMGLISH - - ITALIAN -
Do Not Serve !
TEV +19°C W -14
Non Servire!
TEV +19°C W -14
Once Hot Block has been reached, the routine operation starts.
Message on the display will be as follows:
Shake Ready !
TEV +19°C W -14
Shake Pronto !
TEV +19°C W -14
In particular:
If the consistency decreases below the value programmed in step Blocco Hot 1 - Hot
Block 1, the message
Non Servire ! - Do Not Serve ! will light up on the display.
This means that shake is not ready for distribution.
Writing will become
Shake Pronto ! - Shake Ready ! ONLY after that Blocco Hot 1 is
reached.
If a cup is dispensed when
Non Servire ! - Do Not Serve ! is lit up on the display
(MIR busy), all outputs will switch off (MA, MC, EVFC OFF; MP, too will turn OFF if it
was ON).
If the hopper needs to cool for storage, MC + EVFV will instead be left activated.
As soon as the photocell is deactivated (no longer covered), Production restarts, so
restarting MA and MC + EVFC.
If the consistency value goes below Hot Block – 5 points hysteresis, the message
Non Servire ! - Do Not Serve ! will again light up on the display.
81

MIX OUT
When mix is low (below the medium level sensor), the first line on display will show
the blinking message
the keyboard will light up
Aggiungere Mix ! - Add Mix ! and hopper medium level led on
.
When the mix is below the medium level sensor, an intermittent acoustic warning
(beep) will also be activated..
- ENGLISH - - ITALIAN - Notes
Add Mix !
TEV +19°C W -14
Aggiungere Mix !
TEV +19°C W -14
mix below medium
level
When mix is out (below the low level sensor) the first line on display will show a fixed
message
light up
The second line displays the number of cups you can still distribute (
Last Cones
Mix Esaurita ! - Mix Out ! and hopper low level led on the keyboard will
.
Ultimi Coni -
) before the machine automatically sets to Storage mode.
Note:
With messages Aggiungere Mix ! - Add Mix ! and Mix Esaurita ! - Mix Out ! on
display, the access to next Production screens is not allowed.
- ENGLISH - - ITALIAN - Notes
Mix Out
Last Cones 5
Mix Esaurita !
Ultimi Coni 5
mix below low level
Last cups
82

ICE IN THE CYLINDER
In Production, if the temperature TE1 reaches a value less then or equal to the one set
in step Ghiaccio Cilin. - Ice Cylinder, alarm
Ghiaccio Cilind. - Ice Cylinder will
activate and will be stored among the events, ONLY.
This alarm is not displayed.
Under the said condition, all outputs to the cylinder will be deactivated and the
machine will set at hopper cooling, if need be.
When Production timeout ends, consistency will be tested again in order to check
whether TE1 has risen in the meantime higher than Ghiaccio Cilin. - Ice Cylinder.
TIMEOUT PRD
In Production, if consistency does not reach its set point within the time programmed
in step Timeout Prd., the cycle will be forced to end as if HOT had been reached and
the alarm will be stored among the events (not on display).
If Hot Block is not reached within 15 minutes after production starts, the machine will
set at Stop and alarm Timeout Prd. will be displayed.
SHAKE DISTRIBUTION and TASTE
In Production, shake is dispensed with syrup through the colored shake keys or the
White (Open) key. If, while serving, a Shake key is pressed, distribution stops and the
piston closes back without giving the automatic full portion.
This function is called “taste”.
83

PASTEURIZATION
No Pasteurization process will ever start if the mix inside the tank is below
medium level sensor.
Pasteurization process is automatically executed every day at 2:00 a.m.
(provided that time has been programmed in step Ora Avvio Pasto - Start Pasto
Time).
The machine is normally in Production and at the appointed Pasteurization time, it will
automatically enter into the Pasteurization program and carry out the cycle.
Warning: if the front lid is open at the automatic Pasteurization time (Pasto
Start Time), your machine will allow Production only after closing it.
If step Ora Avvio Pasto - Start Pasto Time is set to “no” in the program,
automatic Pasteurization is disabled and it can only be executed manually (General
Market).
In order to activate Manual Pasteurization, press Pasteurization key
and hold it
down for 5 seconds.
Warning: 5 seconds after the access to Pasteurization, the cycle must be completed.
If the Pasteurization is not
successfully completed, your machine will NOT enter
Production, till the execution of a full Pasteurization cycle.
To force the access to Pasteurization even though the machine is in reserve (medium
level low mix), it is necessary for you to press the Storage key
and hold it down
30 seconds. By this, you will “skip” the hopper level control block and you can now
press the Pasteurization button for 5 seconds to enter Manual Pasteurization.
84

The product in both the hopper and the cylinder is heated up to 149°F (65°C), kept at
this temperature for 30 minutes (fixed time), and then cooled down to reach the
storage temperature.
At the end of the cycle, the monitor displays “- Pasto End -”, followed by the date
and time, meaning that the pasteurization process has been correctly executed
.
The beater in the cylinders turns cyclically during Heating, pause, Cooling (+149°F
(65°) down to +68°F (20°C) in the cylinder) and since the moment when the cylinder
reaches the storage temperature; whereas, during cooling, from +68°F (20°C) down
to cylinder storage temperatures, beating is continuous.
The beater inside the cylinder normally runs 15 seconds and stops 70 seconds
Even in the event that the tank reaches the storage temperature earlier than the
cylinder and TE>68°F (20°C), the beater is ON (continuous).
In case of malfunctioning of tank medium level sensor, relevant led will start blinking
and, as a consequence, it is not possible to start Production. An intermittent beep will
now be emitted and the message “Aggiungere Mix – Add Mix” will appear on the
display.
You may not enter Shake Production till the Pasteurization process ends.
85

Pasteurization Shake side
55°65°85°
°C
TEC= 10°C 20°
MA+MC+EVRC 15” ON
MC+EVRV 30” ON
MA+MC+EVRC 15” ON
MC+EVRV 30” ON
MA+MC+EVFC 15” ON
MC+EVFV 90” ON
30’
Pasteurization Graph
Cycle description
MP ON cycle start for 15”.
On heating cycle start between cylinder and hopper:
MA+MC+EVRC 15”ON and MC+EVRV 30”ON.
In Cooling, operation till TEC=20°C with MP off:
MA+MC+EVFC 15”ON and MC+EVFV 30”ON.
When TEC reaches 20°C MA is always ON, also in hopper cooling:
MA+MC+EVFC 15”ON and MC+EVFV 30”ON.
MA+MC+EVFC 15” ON
MC+EVFV 30” ON
2°
Time
86

HEATING
Heating is executed with “positive hysteresis”, meaning that if a temperature of 149°F
(65°C)has been set, heating will be deactivated at 156.2°F (69°C) and will then
restart at 149°F (65°C).
If you want to skip heating and 30 minute pause, press the Storage key
some 3
seconds (at least 5 seconds after the Pasteurization is initiated); by doing this
you will set the machine to the Cooling cycle without a previous pause of 30 minutes.
Once entering Pasteurization, the display is as follows:
In this window, first line (on top) displays:
-Riscaldamento- - Heating – i.e., heating step of Pasteurization process.
On the second line:
Non Servire ! - Do Not Serve ! meaning that shake must not be dispensed.
- ENGLISH - - ITALIAN - Notes
- Heating Do Not Serve !
-RiscaldamentoNon Servire !
Pressing Pasteurization leads to the screens described here below:
Key
In this window, the first line (on top) displays the Hopper temperature (TEV1) whilst the second line displays the
Cylinder temperature (TEC1).
: The arrow indicates what side is heated.
Key
In this window all sensor temperatures are displayed.
- ENGLISH - - ITALIAN - Notes
Hopper +023°C
Cylinder -013°C
Vasca +023°C
Cilindro -013°C
TEV1
TEC1
- ENGLISH - - ITALIAN - Notes
TEV+066 TGV+070
TEC+067 TE1+068
TEV+066 TGV+070
TEC+067 TE1+068
TEV1 TGV1
TEC1 TE1
During Heating process, the compressor heats cylinder and hopper by turns.
Default times in heating step are normally 15 seconds by cylinders and 30 seconds by
hopper.
87

ACTIVATED UNITS
On start, MP is activated for fixed time of 15 seconds, where as MMV runs for the
duration of entire cycle.
In Cylinder Heating, the following units are activated: MA, MC, EVFC, MV for 15
seconds (see table here below).
The following units are activated: MC, EVFV, MV for 30 seconds.(see table here
below).
By EVRC, MP and MA it is always meant SHAKE side.
If the hopper reaches the Pasteurization temperature earlier that the cylinder, beating
in the cylinder will begin to runs continuously, and MC, EVRC and MMV will steadily be
active.
Following checks are also executed:
If TEV < TEC than : >= 4°C ON EVRV 46” / ON EVRC 15”
If TEV < TEC than : >=3°C and <4°C ON EVRV 38” / ON EVRC 15”
If TEV < TEC than : >=2°C and <3°C ON EVRV 34” / ON EVRC 15”
If TEV < TEC than : >=1°C and <2°C ON EVRV 32” / ON EVRC 15”
DELTA TGV-TEV
(Alarm Belt)
Conditions for belt alarm are monitored under the following parameters:
- TEV and TGV sensors cannot already be in an alarm state of their own
- machine must be in Heating or Pasteurization Pause
In Heating of Pasteurization program, if TGV temperature turns > than TEV by value
programmed in step Delta TGV-TEV (usually 35°C),
Allarme Cinghia - Alarm Belt
will be displayed and machine will set to Stop.
Check driving belt or whether the rotor is in its seat.
88

PAUSE
If you want to skip the 30 minute pause after the temperature of 149°F (65°C) has
been reached, press the Storage key
for 2 seconds; you will by this set the
machine to the Cooling cycle without the 30 minute pause.
In this window the first line (on top) displays:
-Pausa Pasto- -Heating Pause- i.e., Pasteurization pause (or break).
On second line:
Non Servire ! - Do Not Serve ! meaning that it must not be served in this step.
- ENGLISH - - ITALIAN - notes
-Heating Pause Do Not Serve !
-Pausa Pasto Non Servire !
Pressing Pasteurization
leads to the screens described below:
Key
In this window the first line (on top) displays the Hopper temperature (TEV1) whilst the second line displays the
Cylinder temperature (TEC1).
: The arrow indicates what side is heated.
- ENGLISH- - ITALIAN - Notes
Hopper +065°C
Cylinder +066°C
Vasca +065°C
Cilindro +066°C
TEV1
TEC1
Key
In this window, Pause decreasing Time is displayed.
- ENGLISH - - ITALIAN - Notes
Pause Time 30:00 Tempo Pausa30:00
Key
In this window all sensor temperatures are displayed.
- ENGLISH - - ITALIAN - Note
TEV+066 TGV+070
TEC+067 TE1+068
TEV+066 TGV+070
TEC+067 TE1+068
TEV1 TGV1
TEC1 TE1
89

ACTIVATED UNITS
MMV runs for the duration of the entire cycle.
If the Pasteurization temperature is reached either by the cylinder or by the hopper,
MMV will run continuously, whilst MA runs 15 seconds and stops 2 minutes, till pause
time has finished.
If the cylinder needs to be heated during the pasteurization break, MA (always ON)
MC and EVRC will start.
If the hopper, alone, needs be heated during the pasteurization pause, MC and EVRV
will be activated.
If both the cylinder and hopper need to be heated at the same time during the
pasteurization pause, heating will begin to cycle: 15 sec. MA, MC and EVRC and 30
sec. MC and EVRV (still applicable times given in previous table relevant to ON-OFF
times in relation to TEC and TEV temperatures).
MP will be activated during the pause for 10” every 10’.
90

COOLING
The product is cooled down to the cylinder and hopper Storage temperatures
(Temp.Conservaz. – Storage Temp.).
- ENGLISH - - ITALIAN - Notes
- Cooling Do Not Serve !
In this window the first line (on top) displays
-RaffreddamentoNon Servire !
-Cooling- - Cooling - : i.e., Pasteurization cooling step.
On the second line:
Non Servire ! Do Not Serve ! : that it must not be served in this step.
Pressing Pasteurization
Key
In this window the first line (on top) displays
Cylinder temperature.
: The arrow indicates what side is cooled.
- ENGLISH - - ITALIAN - Notes
Hopper +065°C
Cylinder +066°C
leads to the screens described here below:
Vasca +065°C
Cilindro +066°C
the Hopper temperature (TEV2) whilst the second line displays the
TEV1
TEC1
Key
In this window all sensor temperatures are displayed.
- ENGLISH - - ITALIAN - Notes
TEV+066 TGV+070
TEC+067 TE1+068
TEV+066 TGV+070
TEC+067 TE1+068
TEV1 TGV1
TEC1 TE1
ACTIVATED UNITS
MMV runs for the duration of the entire cycle, till TEV reaches the Storage
temperature.
In Cylinder Cooling, following units are activated: MA, MC, EVFC, MV 15 sec. (see
table).
In Hopper Cooling, following units are activated: MC, EVFV, MV 30 sec. (see table).
91

On cycle end, the machine sets at Storage and
- Fine Pasto –
(- Pasto End -)
along with time and relevant day of the week are displayed.
In this window the first line (on top) displays
- Fine Pasto – (- Pasto End -): i.e., Pasteurization (Storage) holding step.
On the second line:
- time and day of the week
- ENGLISH- - ITALIAN - notes
- Pasto End 10:17:50 Mon
- Fine Pasto 10:17:50 Mon
:
ACTIVATED UNITS
When the Storage set has been reached and the hopper needs be cooled, MMV is
activated for the duration of hopper cooling (in parallel with EVFV).
In Cylinder Cooling the following units are activated: MA, MC, EVFC, MV.
In Hopper Cooling the following units are activated: MC, EVFV, MV.
Anti-icing
When the temperature TGV reaches a value less or equal to –0.4°F (-18°C) (step
Antigh.Vasca – Hopper Defrost) EVRV energizes (and EVFV goes on being
energized). The display indicates an upward arrow. When TGV increases by the value
programmed in the step Ist.Antig.Vasca – Hop.Defrost Hys, EVRV switches off.
92

STORAGE
The Storage program has the function to bring the product which is both inside the
hopper and inside the cylinder to the temperature of 39.2°F (4°C) (this value can be
programmed in step Temp.Conservaz. – Storage Temp.).
As far as the hopper is concerned, storage is controlled by TEV1 whereas, as to the
cylinder, it is controlled by sensor TEC1.
Every time you set the machine to the function Storage, the values of sensors TEC1
(temperature in the cylinder) and TEV1 (temperature in the hopper) are read.
If both the cylinder and hopper need to be cooled at the same time, the hopper has
priority over the cylinder.
Storage in that case takes place on a cyclic basis.
When storing the hopper EVFV + MC are activated for 30 seconds.
When storing the cylinder MA + MC + EVFC are activated for 15 seconds.
When entering the Storage mode, you will have following display:
In this window the first line (on top) displays the Hopper temperature (TEV1) whilst the second line displays the
Cylinder temperature (TEC1).
: The arrow indicates what side is cooled
- ENGLISH - - ITALIAN - Notes
Hopper +015°C
Cylinder +012°C
Vasca +015°C
Cilindro +012°C
TEV1
TEC1
Pressing Storage leads to the screens described here below:
Tasto
In this window all sensor temperatures are displayed.
- ENGLISH - - ITALIAN - Notes
TEV+066 TGV+070
TEC+067 TE1+068
TEV+066 TGV+070
TEC+067 TE1+068
TEV1 TGV1
TEC1 TE1
93

ACTIVATED UNITS
MMV runs during the entire cycle till TEV reaches the Storage temperature.
Active units in Cylinder Cooling: MA, MC, EVFC, MV for 15 seconds.
Active units in Hopper Cooling: MC, EVFV, MV for 30 seconds.
MP runs for 6’’ (programmable in step T41) every 10’ (fix).
94

CLEANING
In this function MA and MP will be activated for 30”, after that, the machine will
automatically return to Stop, so as to avoid a severe wear of the cylinders.
When entering Cleaning, the display will be as follows:
In this window, the first line (on top) displays HOT1 and TEC1
The second line displays how to activate/deactivate the outlets:
- they are activated (Beater and Pump) for 30”.
- ENGLISH- - ITALIAN - Notes
HOT=058 TEC+014
Beater + Pump ON
HOT=058 TEC+014
HOT1 TEC1
Agita + Pompa ON
Pressing Cleaning
In this window, the first line (on top) displays HOT1 and TEC1.
MA will be deactivated and only does MP run for 30”.
leads to the screens described here below:
HOT=058 TEC+014
Pump ON
HOT=058 TEC+014
Pompa ON
HOT1 TEC1
By pressing Cleaning again MA is activated again:
HOT=058 TEC+014
Beater ON
In this window, the first line (on top) displays HOT1 and TEC21
MP is deactivated and MA runs for 3 minutes.
HOT=058 TEC+014
Agitatore ON
By pressing Cleaning again :
HOT=058 TEC+014
In this window, the first line (on top) displays HOT1 and TEC1.
MA and MC+EVRC are activated till Set TEC Cleaning (T85).
Beater + Heating
HOT=058 TEC+014
Agitat + Riscald
By pressing Cleaning again the initial display is shown.
HOT1 TEC1
HOT1 TEC1
95

MA AND MP HOUR COUNTER
By pressing the Pasteurization key from Cleaning, you will get the access to MA and
MP hour counter display.
MP hours 00000
MA hours 00002
Ore MP 00000
Ore MA 00002
To exit from Hour Counter display and return to Cleaning, press Pasteurization
To reset the Hour Counters, see paragraph STOP.
.
96

WEEKLY CLEANING - WASH DAYS
In Production, the first screen displays the number of days to next wash:
Second line refers to the number of days to next wash. The example shows that wash is in 14 days.
The day the machine must be washed, the function Ice cream Production is inhibited
and the machine will not accept the function. Display will be as follows:
- ENGLISH - - ITALIAN -
Do Not Serve !
TEV +19°C W -14
Non Servire
TEV +19°C W -14
08:10:05 Wed
Wash today!
08:10:05 Mer
Lavare oggi !
In this condition, automatic Pasteurization is inhibited.
In order to set the number of days back to the programmed value (Giorni Lavaggio
– Wash Days) it is necessary to wash your machine or to remove the front lid and
mount it back (or disconnect and re-connect IMS).
Note
Wash day starts decrementing 23.53 to 23.56.
97

CLEANING THE DISPLAY
Keyboard block
By pressing the key Cleaning
disabled and Cleaning led will blink.
This will enable you to clean the capacitive keyboard without causing any casual
function changes.
The machine will be in the same function it was.
In order to enable the keys back, press the Cleaning key
for 3 seconds from any function, all keys are
again for 3 seconds.
98

ALARMS
The machine issues possible alarm messages on display and makes the writing blink.
In case of alarm which has reset, the alarm message will be on display in a fixed way
(it will not blink).
To reset the writing, press Storage/Reset key
.
The machine can be used in shake production even if an alarm is active; however if it
is a critical alarm, the machine will not allow you to select the shake production
program; should this be the case, press STOP and do not use the machine till its
repair.
Here below is the alarm list:
ALARM
Aggiungere Mix
Add Mix
The display indicates Aggiungere Mix Add Mix when the
mix is below the MEDIUM level sensor. An intermittent beep
will be activated (only if step Abilita Beep Liv in
DESCRPTION
Programming User is set YES and the machine is not in
Stop)
Mix Esaurita
Mix Out
The display indicates Mix Esaurita Mix Out when the mix
is below the LOW level sensor. When the mix is below the
Term.Sicur.Cil
Safety Therm.Cyl
(TESC1)
Term.Sicur.Vasca
Safety Therm.Hop
(TESV1)
low level sensor and in Production you distribute a number
of cup same as/or higher than the value set in step Ultimi
Coni Last Cones, not only will Mix Esaurita Mix Out be
displayed, but also your machine will move to Storage
mode.
Cylinder Safety Thermostat SHAKE tripped.
Machine sets at Stop.
Hopper Safety Thermostat SHAKE tripped.
Machine sets at Stop.
99

Termico Agitator
Overload beater (bimetallic) motor SHAKE tripped.
Overload Beater
(PTMA1)
Pressostato
Pressure Switch
(PR1)
Termico Compres.
Overload Compres
(PTMC1)
All. Sonda Vasca
Al. Hopper Probe
(TEV1)
Machine sets at Stop.
Pressure Switch SHAKE tripped.
Machine sets at Stop:
- after the 3
rd
tripping occurring within 1 hour
- if pressure switch contact is opened 2 minutes running.
If the machine was in Pasteurization mode, Pasteurization
program shall be re-executed.
Check cooling water flow (on water cooled units).
Overload compressor motor SHAKE.
Machine sets to Stop.
Hopper sensor SHAKE faulty.
This is a critical alarm: consequently, machine sets at Stop,
either from Production or from Storage and Pasteurization
modes.
All. Sonda Cilin
Al. Cylind.Probe
(TEC1)
All.Sonda Gh.Vas
Al. IceHop.Probe
(TGV1)
Portello Aperto
Spigot Opened
(IMS1)
All. Sonda Evap.
Cylinder sensor SHAKE faulty.
This is a critical alarm: consequently, machine sets to Stop,
from Storage and Pasteurization modes, it does not
however, set to stop form Production because consistency is
controlled.
Tank evaporator sensor SHAKE faulty.
This alarm does not cause a machine (which is in the
running function) to stop.
In pasteurization heating mode the alarm is eliminated.
Safety Magnet Switch SHAKE.
If opened 10 sec., it resets Wash message (Wash).
IMS opening also resets Pasteurization flag, so that if the
machine was in Pasteur. mode, you can directly enter
Production by opening and closing the front lid.
Alarm Cylinder evaporator sensor SHAKE.
Al. Evapor.Probe
(TE1)
This alarm does not cause a machine (which is in the
running function) to stop.
In pasteurization heating mode the alarm is eliminated.
100
 Loading...