


Canon
Photo
Printer
PI}(MA
i
P6320D
Ii
P631
OD
Series
Quick
Start
Guide
'"
t(
• •
Exit
Ptint
PictBridge
-~7~J~~
'-'
~
•...........
~
AiIlIl1IiIIf:
•...••.•...•...
_
illl!l8
_
JJIIIIIIIIIf·.AlIIIIIIIIIIIf_
JI1fI1fff
..
~_
..,-
........
.-
.4iii!iIr .
......,
.-
~
.-
~~
~
~~
~~~
~~~
Getting
Help
from
Canon
Help
Us
Help
You
Better
Before
you
contact
Canon,
please
record
the
following
information.
Serial Number (locatedonthe insideofthe product): _
Model Number (located on the top
of
the product): _
Setup
CD-ROM
number
(locatedontheCD-ROM): _
Purchase Date:
--------------------------
Customer
Technical
Support
Sequence*
1.
Internet -
www.canontechsupport.com
For
quick and comprehensive self-help inanintuitivelyguided interactive troubleshooting
environment, the place to start is our helpful tech support web site.
In
addition, the latest
driver downloads, answers to frequently asked questions, product information, and
"where to buy" instructions
are
found here.
2.
Email
Tech
Support
-
www.canontechsupport.com
For
individual attention to a special issue, try emailingourfriendly technical support
representatives, speciallytrained to communicate quick, easy, and logical solutions to your
inquiries within
24 hours.
3.
ToU-Free
Live
Tech
Support
- (1-800-828-4040)
This option provides live telephone technical support, freeofservice charges, Monday-
Saturday (excluding holidays), during your product's
1year limited warranty period.
Telephone Device forthe Deaf
(TOO)
support is available at (1-866-251-3752).
4.
Extended
Service
and
Support
-
www.canonesp.com
Canon
CarePAK
Extended Service
Plan
is a cost-attractive and easy-to-use extended service
program that provides up to three full years
of
service and support coverage at a very
attractive price.
CarePAK
offers toll-free Canon technical support and includes Canon's
superb InstantExchange product replacement program.
For
further information about
extending your Canon service and support, call
(1-800-385-2155), orvisit our
Web
site at
www.canonesp.com.
CarePAK
must be purchased duringyour product's warranty period.
For
more information and updated program specifics, please visit our web site at
www.canontechsupport.com.
* Support program specifics are subject to change without notice.

Canou
PI}{MA
iP6320D/iP6310D
Photo
Printer
Quick Start
Guide
Canon
PIXMA
iP6320D/iP63100
Photo Printer Quick Start Guide
The diagrams and computer screens in
this
guide refertothe iP6320D.
The
operations are the
exactly the same
with
the iP6310D, unless otherwise described.
Copyright
This manual is copyrighted by Canon U.S.A., Inc. with
aU
rights reserved. Underthe copyright laws,
this
manual may not be reproduced in any form, in wholeorin part,
without
the prior written
consent
of
Canon U.S.A., Inc.
©
2006
Canon U.S.A., Inc.
Disclaimer
Canon U.S.A., Inc. has reviewed
this
manual thoroughly in order
thatitwillbean
easy-to-use
guide
to
your Canon PIXMA iP6320D/iP6310D Photo Printer.AUstatements, technical information
and recommendations in
this
manual and in any guides or related documents are believed reliable,
but
the accuracy and completeness thereof are not guaranteedorwarranted, and
they
are not-
intended to be, nor should they be understood
to
be, representationorwarranties concerning the
products described.
Specifications are subject
to
change
without
notice.
•
AsanENERGY
STAR
partner, Canon U.S.A., Inc., has determined
that
this
product meets the
IBlilIBI
ENERGY
STAR
guidelines for energy efficiency.
AU
information regarding non-Canon products was compiled from publicly available information.
No
representation is made regarding the accuracy thereof.
About
Consumables
Consumables (ink tanks /
FINE
cartridges) are available
for
5 years after production has stopped.
Trademarks
• IIWindows
ll
and "Internet Explorerllare trademarksofMicrosoft Corporation, registered in the
United States and
other
countries.
• IIMacintosh
ll
and IIMacllare trademarksofApple Computer, Inc., registered in the U.s. and other
countries.
• t1SmartMedia" is a trademark
of
Toshiba Corporation.
• "MEMORY
STICKII, IIMemory Stick
PROII, "MEMORY
STICK
Duo" and "Memory Stick
PRO
Ouollare
trademarks
of
Sony Corporation.
•
II
xO-Picture
Cardllis a trademarkofFuji Photo Film Co.,
ltd.
• IIMultiMediaCardllis a trademarkofInfineon Technologies
AG.
•
IISD
card" and
II
m
iniSO
Cardllare trademarksofSO
Association.
• IIlrDA Feature Trademark
ll
is owned by the Infrared Data Association and used under license
therefrom.
• IIBluetooth
ll
is a trademarkofBluetooth
SIG,
Inc.,U.s.A. and are licensed to Canon Inc.
• IIAdobe
ll
and IIAdobe
RGB
(1998)11
are either registered trademarks or trademarksofAdobe
Systems Incorporated in the United States
and/or
other countries.
Canon U.S.A., Inc.
One Canon Plaza
Lake Success,
NY
11042
Bluetooth
10:
B02165
Contents
Contents
Basic
Printing
Turning on
the
Printer
•.•.•.•.•..••..•••.••.•..•.••.••.•....•.•••.•..••..•.•••••.•...
2
Turning
off
the
Printer
..........•..................•.••...•.......•.......•......•...
3
Loading Paper
.••..•....•............••....•..•.................•.•................
4
Using Specialty Media
...••••.•..•.••.•..•...••..••.•.•.....••.••.••.••.••••..•••.•.
9
Printing
with
Windows.
. . . . . . . . . . . . . •• . . . •. • . • . . . . . . . . . • . . . . . . . . . . • . . • . . . . . . . . • •.
..
11
Printing
with
Macintosh
....•............•...•...•..................•.•...•........•
13
Cancel Printing
..•..•..•..•..•.•...•••.•..•••....•.••••..•..•....•............•..•
15
Accessing the Printer Driver (Windows)
.......•...........•.......•...•....•..........
16
Usingthe Bundled Software. . . . . . . . . . . . . • •. . . • •. • . . . . . . . . . . . . . . . •. . . . . . . •. . . . • . . . .
.•
17
Printing
Maintenance
When
Printing
Becomes FaintorColors are Incorrect
.•.•.•....•..................
'.'
...•.
18
Troubleshooting
Cannot
Install
the
Printer Driver.
..............•..............................•.......
20
Cannot ConnecttoPC
Properly
•..•....•.•..•............•...•..•............•.......
21
Print Quality is Poor or Contains Errors
•...................•.........................•.
22
Printer Does Not StartorStops During Print Jobs
.••..•...•..........•..............•...
25
Paper Does Not
Feed
Properly
...............................•.........•.......•.....
26
Paper
Jams
.......•.••....••.......•....•..........•.••.•..•..•...............•...
26
An
Error Message Appears on
the
Screen. . . . • . . •. . . . • . . •. . . . . . . . . . . . . . . . . . . . . . . . . . . .
..
27
POWER
lamp
and Alarm
lamp
Flash Alternately
...........••.......•...................
28
Appendix
Specifications
......•.•.........•...........................•••••..•••..•.........
29
Safety Precautions
..•.............•....•..............••.•......•.••..............
3
2
Regulatory Information
..•.•...•......•.....•.•.....................................
34
CANON
U.S.A.,
INC.
LIMITED
WARRANTY
---
(USA
Only)
...........•.......................
35
Index
37
1
Basic Printing
Basic Printing
W Note
This
Quick
Start
Guidedescribes some
of
the
featuresofyour
printer
and
howtouse them.
For
more information, view
the
iP6320D/iP6310D
User's Guide, PrinterDriverGuide, and Photo Application Guide
installed
on
your computer,oruse the online help
within
your
printer
driver interface:
,~,~-,
~
While in the printer's properties dialog box, press the
F1
key,
or
click 6
in
the
upper right corner. Then click the feature you wanttoknow more
about, or clickthe Help button when displayed.
While in
the
Page Setup
dialog
box or Print
dialog
box, click in the
lower
left
corner.
Clicking provides detailed information about each setting.
When
the
Help
window
appears, select your desired topic.
Turningon
the
Printer
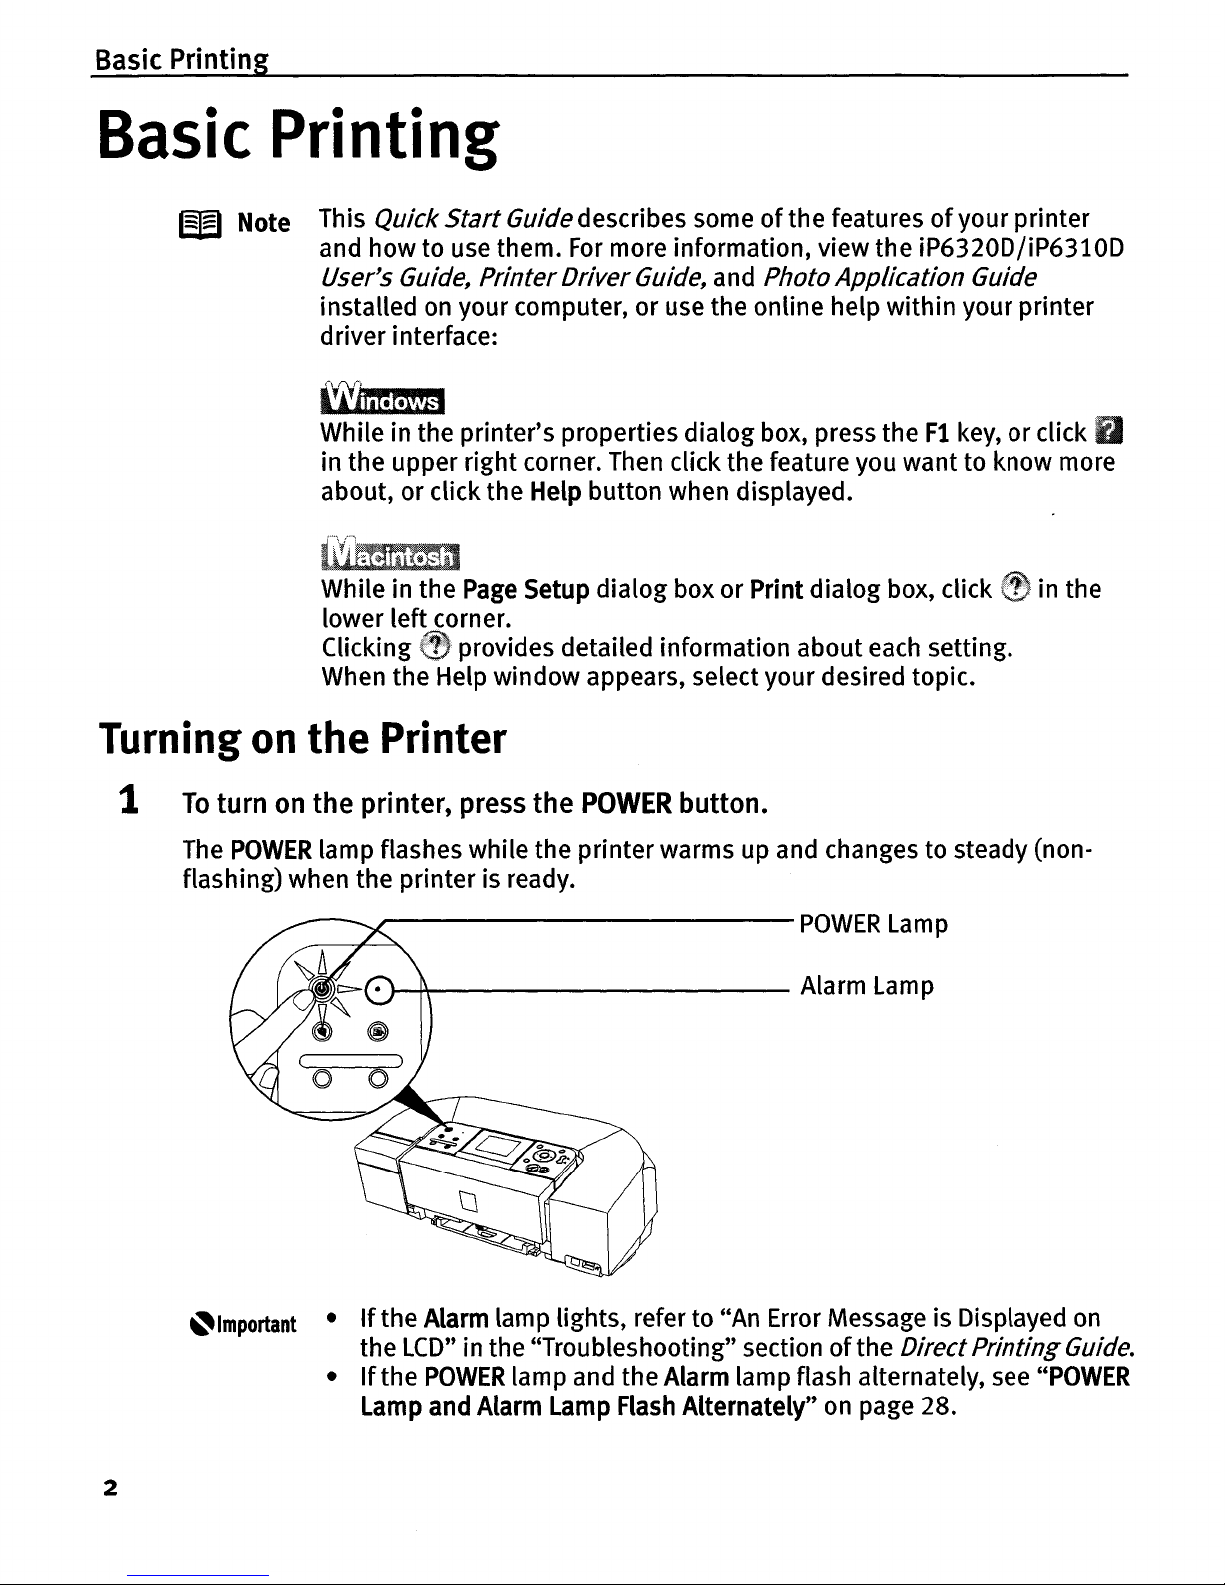
1
To
turn on the printer, press the
POWER
button.
The
POWER
lamp flashes while the
printer
warms up and changes to steady (non·
flashing) when the printer is ready.
POWER
Lamp
~~----------
Alarm Lamp
~Important
•
If
the Alarm lamp lights, referto"An Error Message is Displayed on
the
LCD"
in the "Troubleshooting" sectionofthe
DirectPrintingGuide.
•
If
the
POWER
lamp and the Alarm lamp flash alternately, see
"POWER
Lamp and Alarm Lamp Flash Alternately" on page 28.
2
Basic Printing
Turning
off
the
Printer
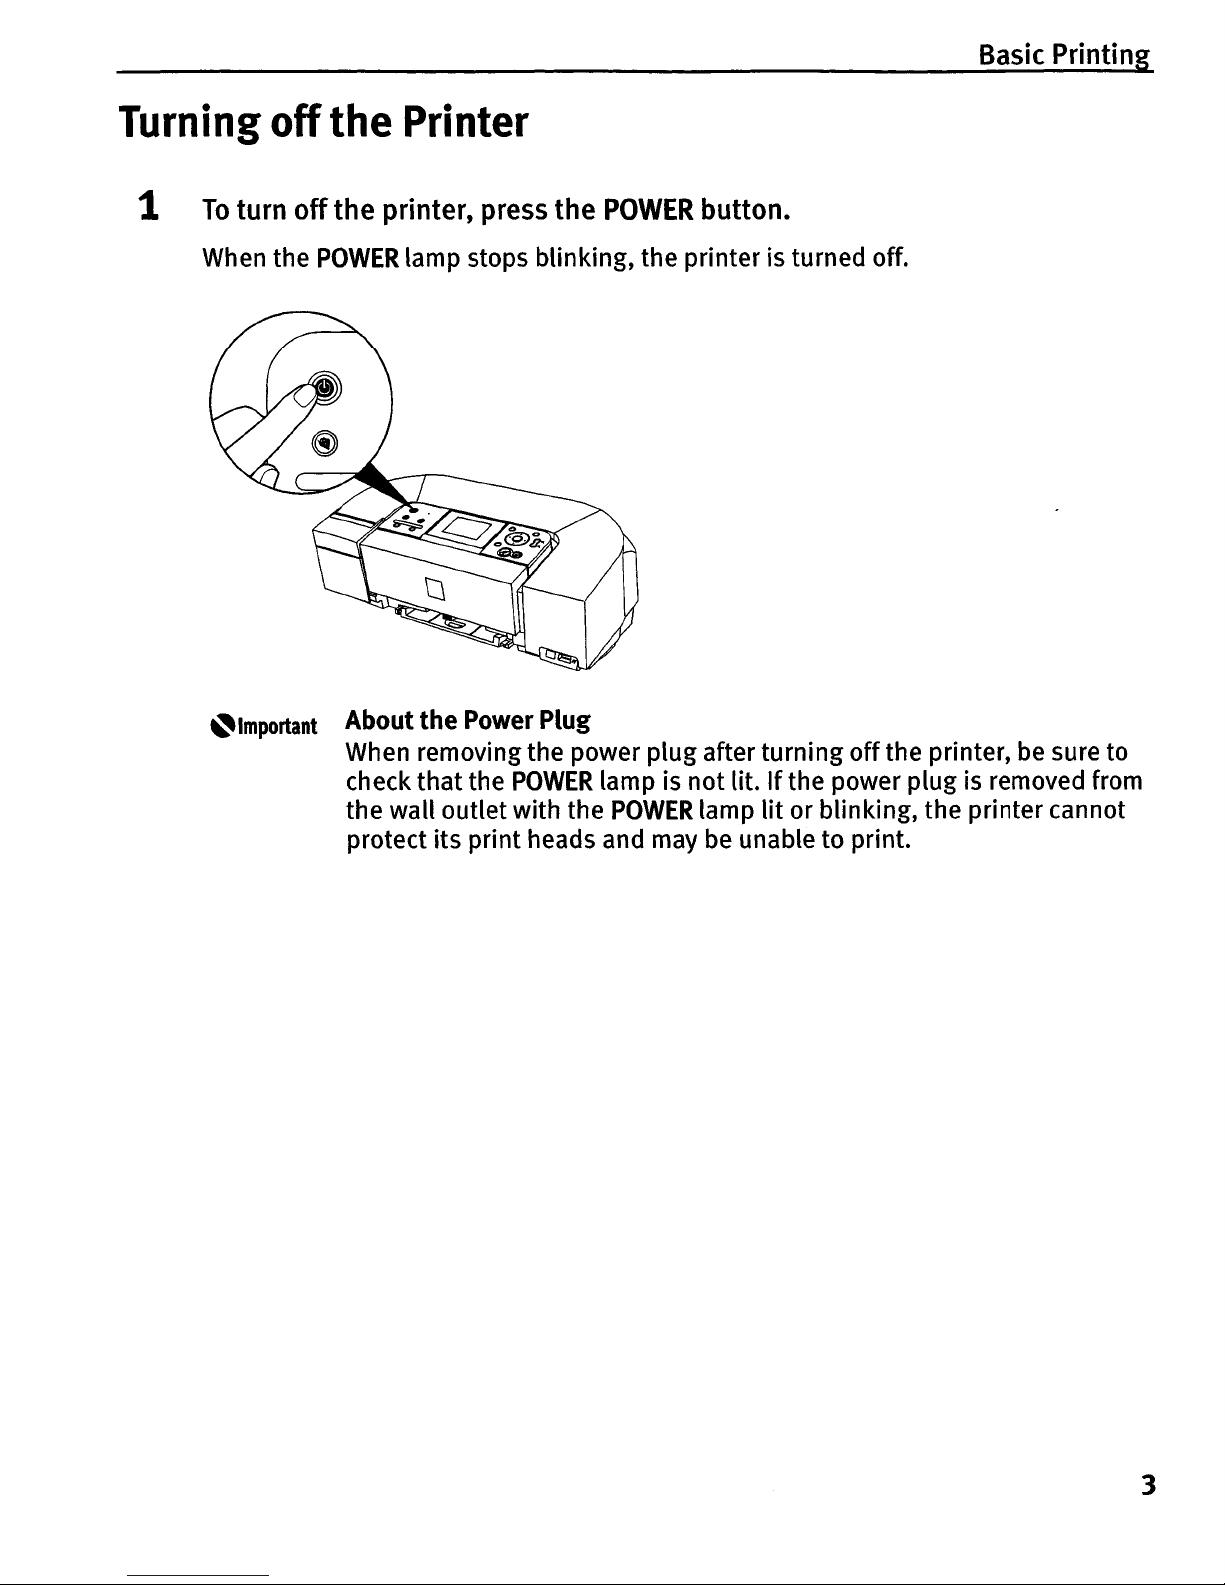
1
To
turn
off
the
printer, press
the
POWER
button.
When the
POWER
lamp stops blinking, the printer is turned off.
~Important
About
the
Power
Plug
When removing the power plug after turning
off
the printer, be sure to
check
that
the
POWER
lamp is
not
lit.Ifthe power plug is removed from
the wall outlet with the
POWER
lamp
lit
or blinking, the printer cannot
protect
its
print heads and may be unable to print.
3

Basic Printing
Loading
Paper
•
Print
Media
to
Avoid
Do
not use the following typesofpaper. Using such paper
will
not only produce
unsatisfactory results, but
can
also cause the printer to jam or malfunction.
• Folded, curled or wrinkled paper
• Damp paper
• Paper that is too thin (less than 64
gsm/17
lb)
• Paper that is too
thick
(more than 105
gsm/28Ib)*
• Paper with holes
• Picture postcards
• Postcards with
an
affixed photo or sticker
• Envelopes with double flaps
• Envelopes with pressure seals
• Envelopes with
an
em
bossed or treated surface
*Non-Canon genuine paper
Also, do not
use
a cut paper or memo pad, when printingona paper smaller than
AS
size.
4
Basic Printing
•
Preparing
the
Printer
W Note
•
For
detailed information
on
the specialty media Canon provides for
use with itsvarious printers,
see
"UsingSpecialtyMedia" on page 9.
• Consult "PrintingMedia" in the
User's
Guide
for detailed
instructions
on
how to load specialty media into the printer.
1 Flatten the four corners
of
the paper before loadingit.
W Note When paper is curled, gently bend
it
in the opposite directionofthe curl
(withoutcurlingthe reverse side) and then load the paper. How to flatten
paper curl, refer to "Paper is curled"
on
page 24.
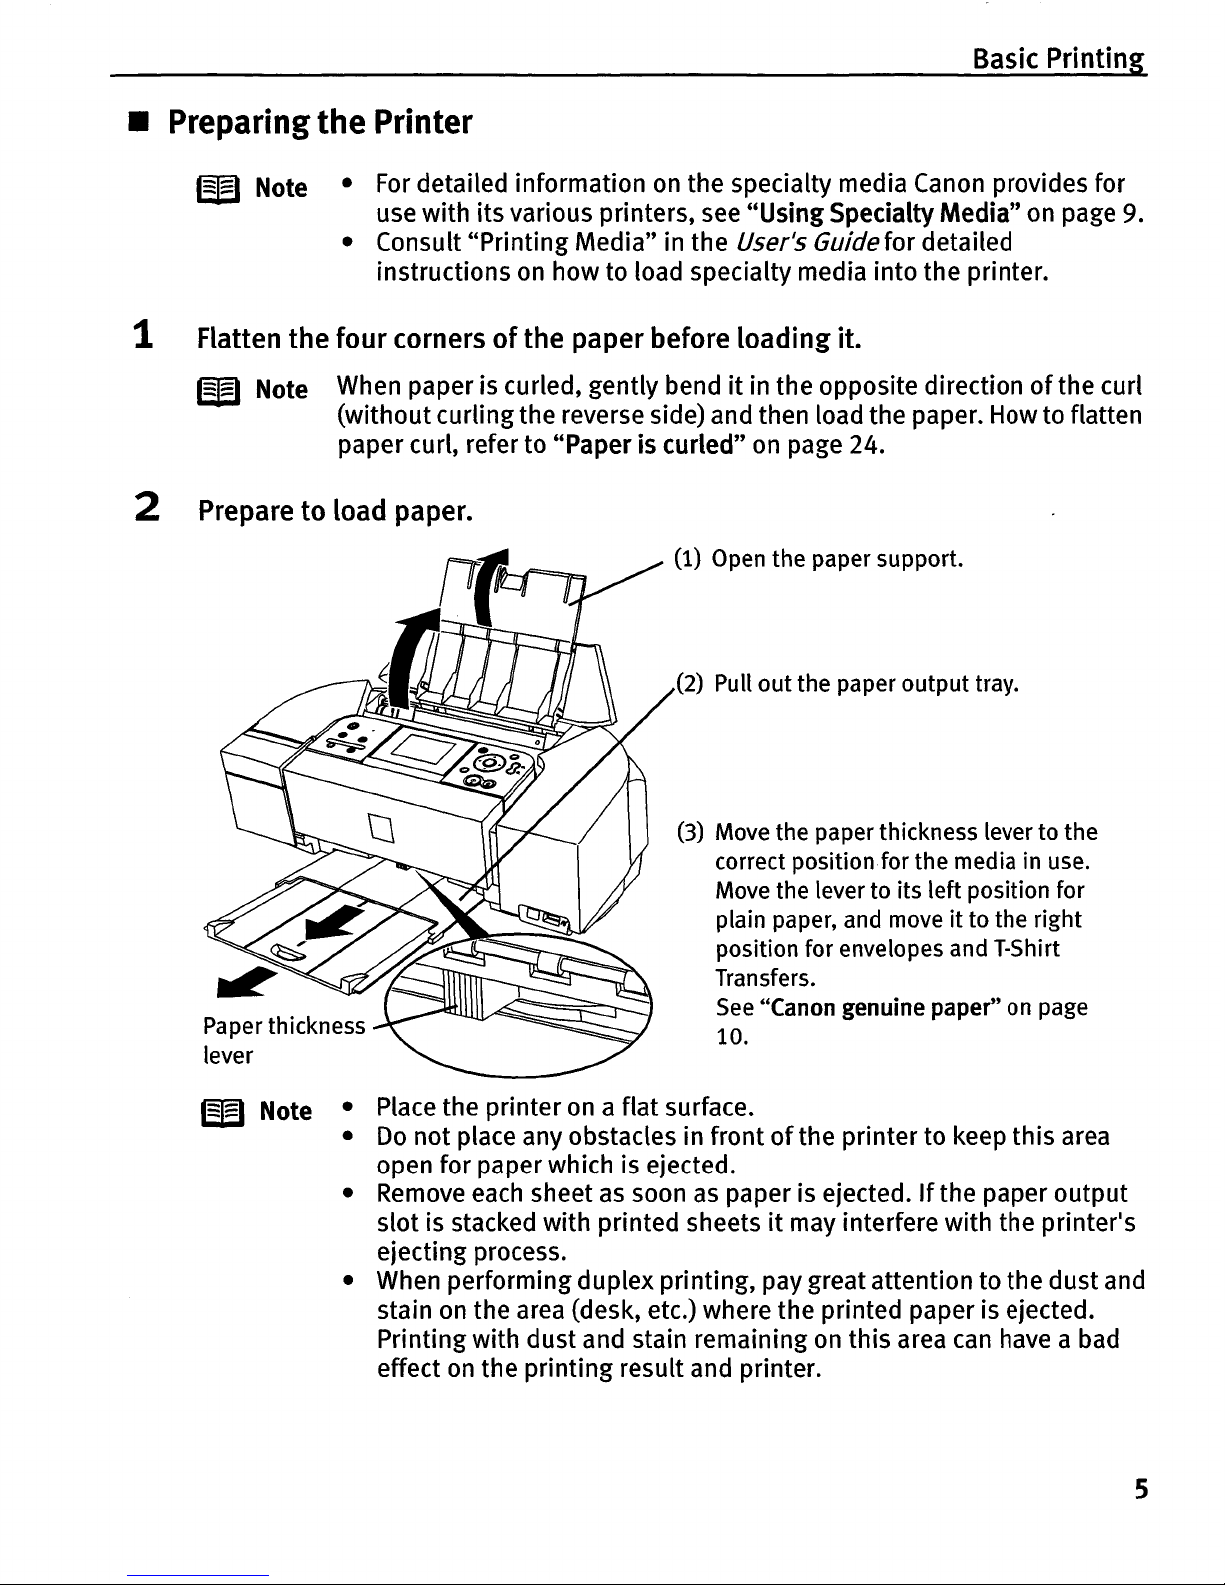
2 Prepare to load paper.
Paper thickness
lever
(1) Open the paper support.
(2) Pull
out
the paper
output
tray.
(3) Move the paper thickness lever to
the
correct position for
the
media in use.
Move the lever to
its
left
position for
plain paper, and move
ittothe
right
position
for
envelopes and T-Shirt
Transfers.
See
"Canon genuine
paper"
on page
10.
W Note
• Place the printer
on
a flat surface.
•
Do
not place any obstacles in frontofthe printer to keep this area
open for paper which is ejected.
•
Remove
each
sheetassoon
as
paper is ejected. Ifthe paper output
slot is stacked with printed sheets
it
may interfere with the printer's
ejecting process.
• When performingduplex printing, pay great attention to the dust and
stain
on
the area (desk, etc.) where the printed paper is ejected.
Printingwith dust and stain remaining
on
this area
can
have a bad
effect
on
the printing result and printer.
5

Basic Printing
3
Load
the paper.
• Loading Plain
Paper
Load
limit
mark
Do
not load beyond this load
limit
mark.
(3) Pinch the paper guide and slide
it
against the left
side
of
the paper stack.
(1) Insert the paper into the auto sheet
feeder with the print side facing up.
When loading the 4" x
6"
paper, load
sheets in the portrait position (short
side facing down).
(2)
Align the paperstack againstthe right
side
of
the auto sheet feeder.
6
W Note
•
You
can
use general copy paper or Canon's Super White Paper.
•
You
can
load up to
100
sheetsofplain paper (64 gsm or
17lb,
10
mm
or
0.39
inches in height) in the auto sheet feeder.
•
Do
not touch the printed surfaces until the
ink
dries.
For
specific
dryingtimes, refer to the instructions packaged with your media.
Basic Printing
•
Loading
Envelopes
Use
either European
DLorUS
Comm.
#10
size envelopes.
The
address is automatically rotated and printed out.
~Important
•
Do
not use envelopes with embossed or treated surface, with a
double flap or pressure seals, with sticker flaps.
• Select either
DL
Env.
or Comm.
Env.
#10
in the printer driver
according to the envelope size you are using.
•
If
you do not select Media
Type
correctly, the print out results in the
wrong way round.
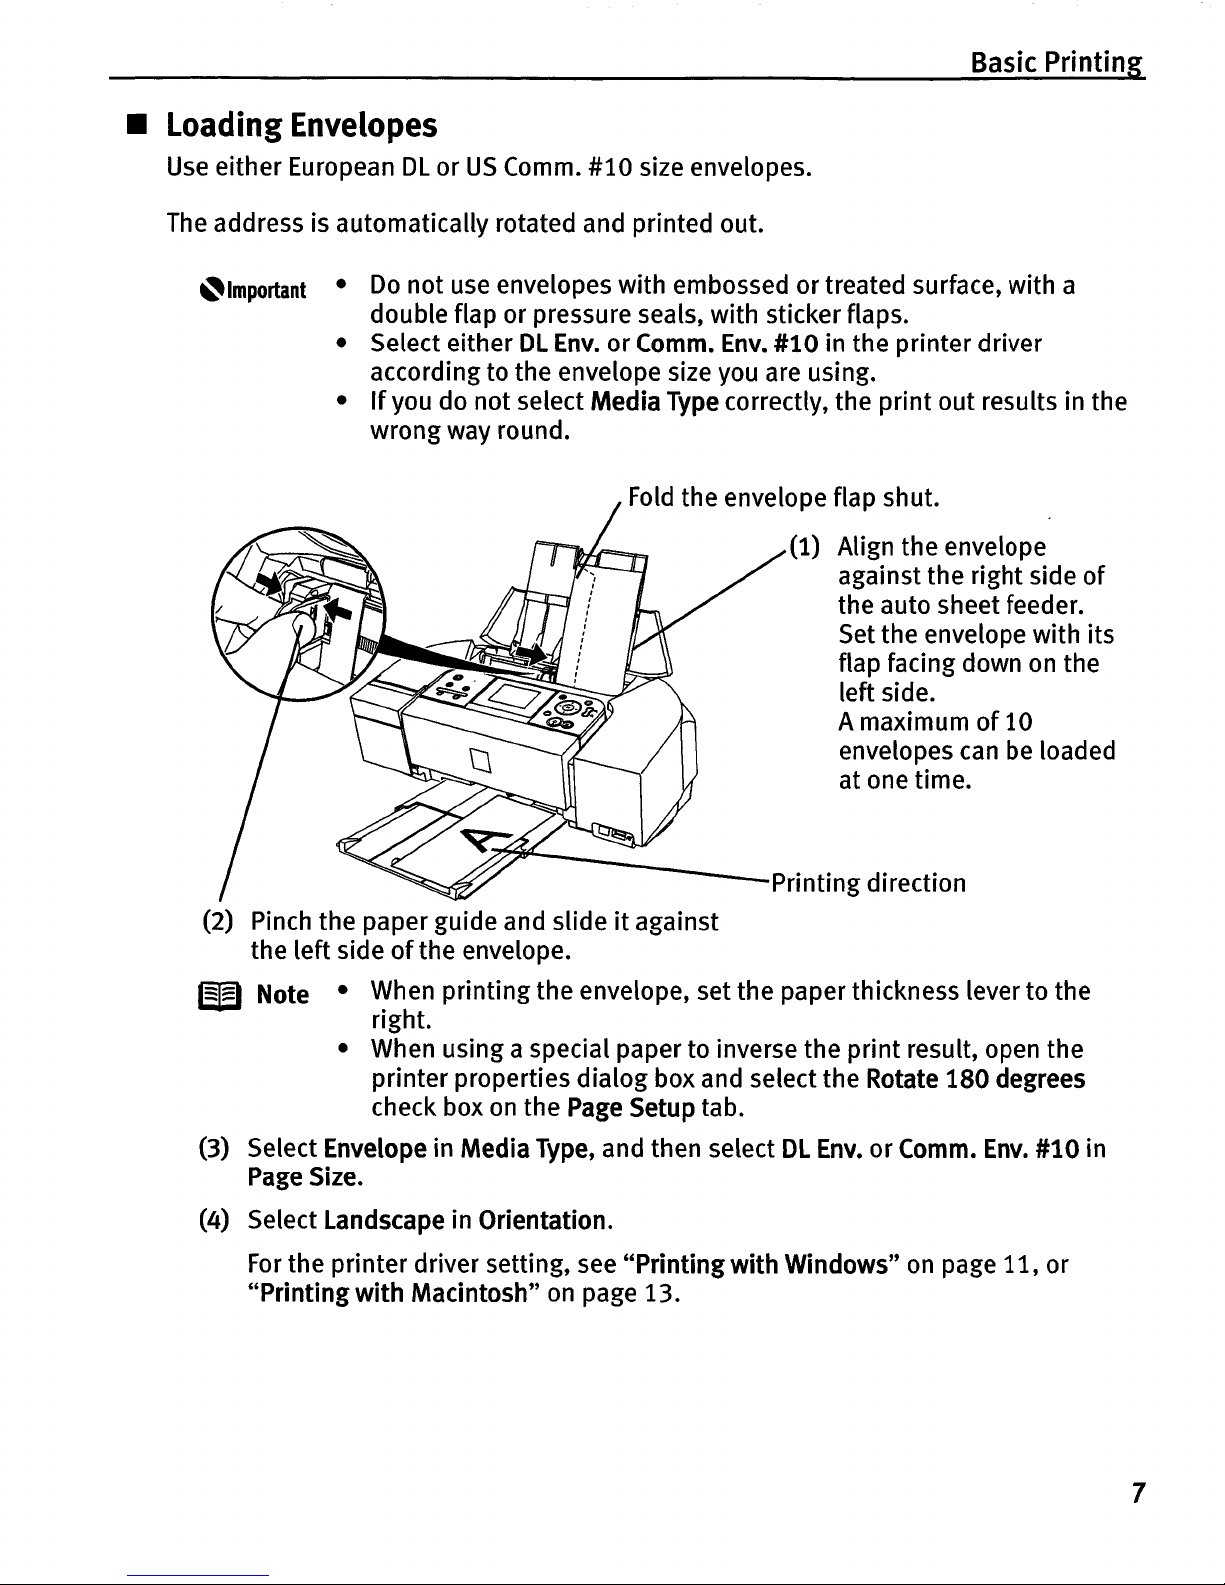
Fold
the envelope flap shut.
(1) Align the envelope
against the right side
of
the auto sheet feeder.
Set the envelope with its
flap facing down
on
the
left side.
A maximum
of
10
envelopes
can
be loaded
at one time.
Printing direction
(2) Pinch the paper guide and slide
it
against
the left side
of
the envelope.
W Note • When printing the envelope, set the paper thickness lever to the
right.
• When using a special paper to inverse the print result, open the
printer properties dialog box and select the Rotate
180
degrees
check box
on
the
Page
Setup tab.
(3) Select Envelope in Media Type, and then select
DL
Env.
or Comm.
Env.
#10 in
Page
Size.
(4) Select Landscape in Orientation.
For
the printer driver setting, see "Printingwith Windows"
on
page
11,
or
"Printingwith Macintosh"
on
page 13.
7
Basic Printing
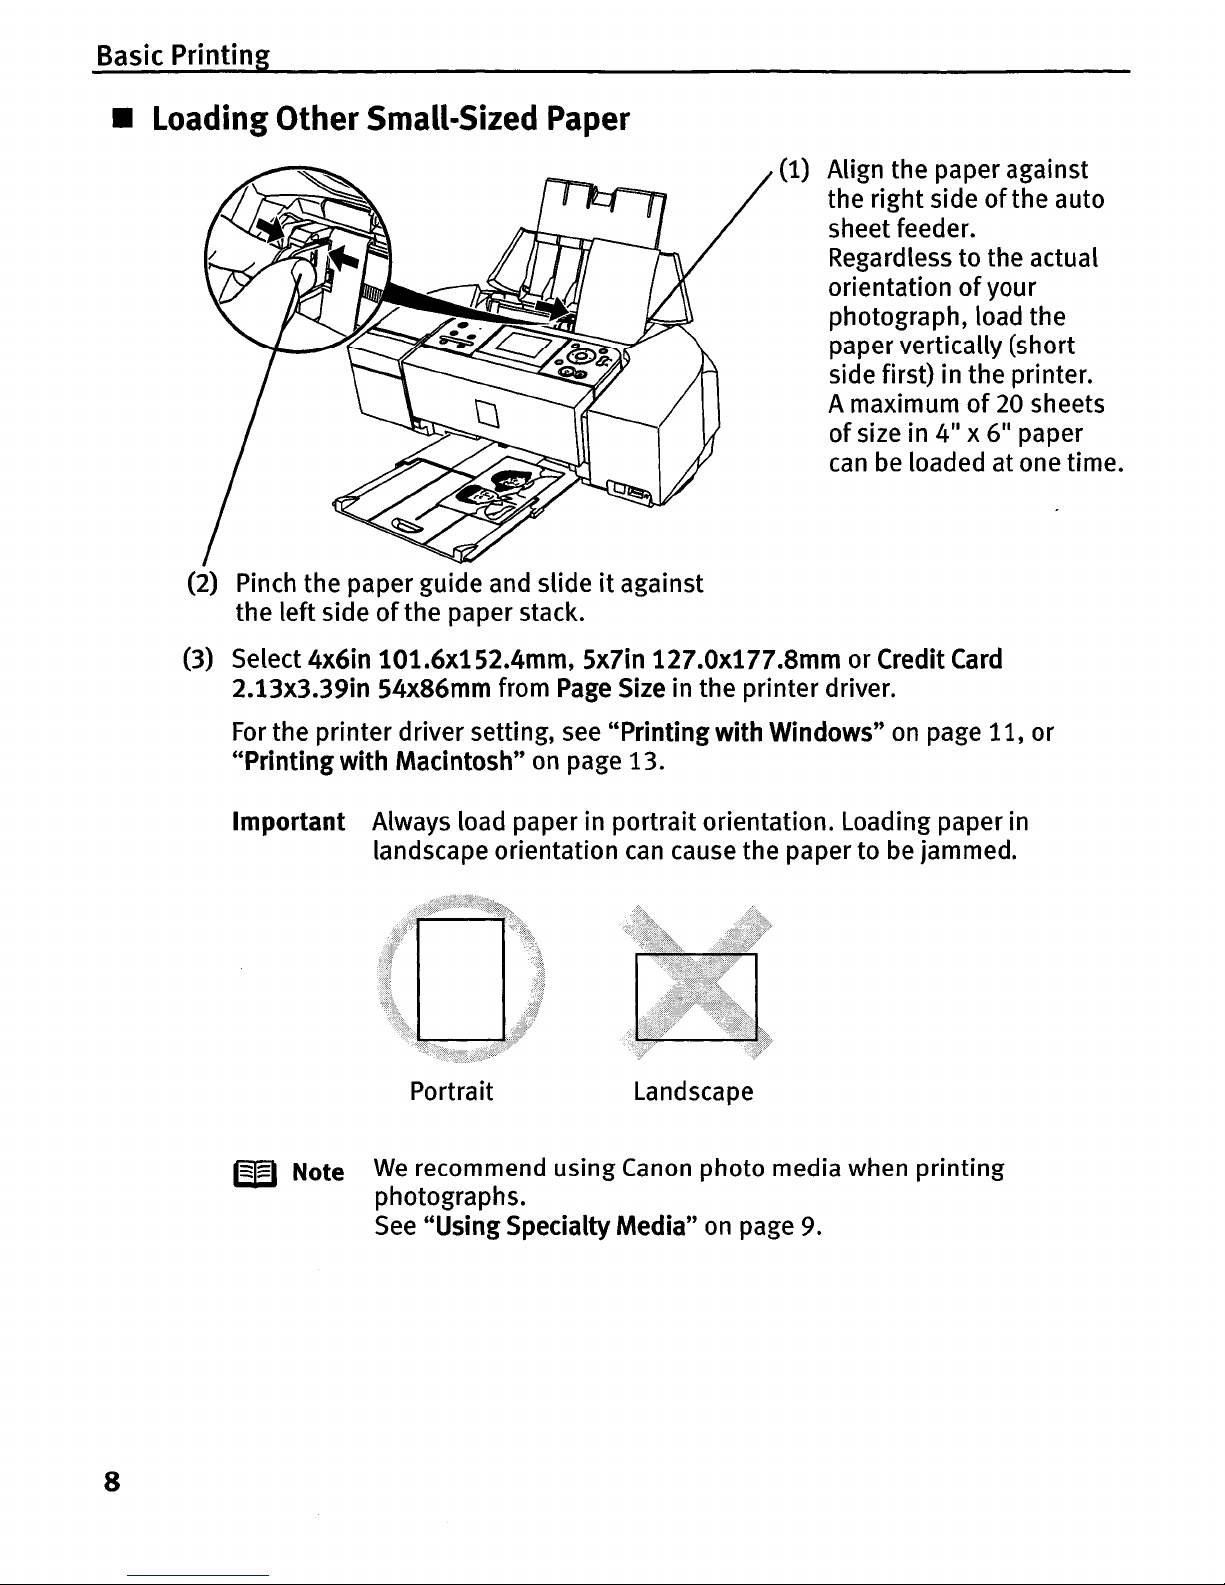
• LoadingOtherSmall-Sized Paper
(1) Align the paper against
the
right
sideofthe auto
sheet feeder.
Regardless to the actual
orientation
of
your
photograph, load the
paper vertically (short
side first) in the printer.
A maximum
of
20 sheets
of
size in
4"
x 611paper
can
be
loaded at one time.
(2) Pinch the paper guide and slide
it
against
the left side
of
the paper stack.
(3) Select 4x6in 101.6x152.4mm, 5x7in 127.0x177.8mm or Credit
Card
2.13x3.39in 54x86mm from
Page
Size in the printer driver.
For
the printer driver setting, see "Printingwith Windows"
on
page 11, or
"Printingwith Macintosh"
on
page 13.
Important Always load paper in portrait orientation. Loading paper in
landscape orientation
can
cause the paper to be jammed.
Portrait Landscape
W Note
We
recommend using Canon photo media when printing
photographs.
See
"UsingSpecialty Media"
on
page 9.
8
Basic Printing
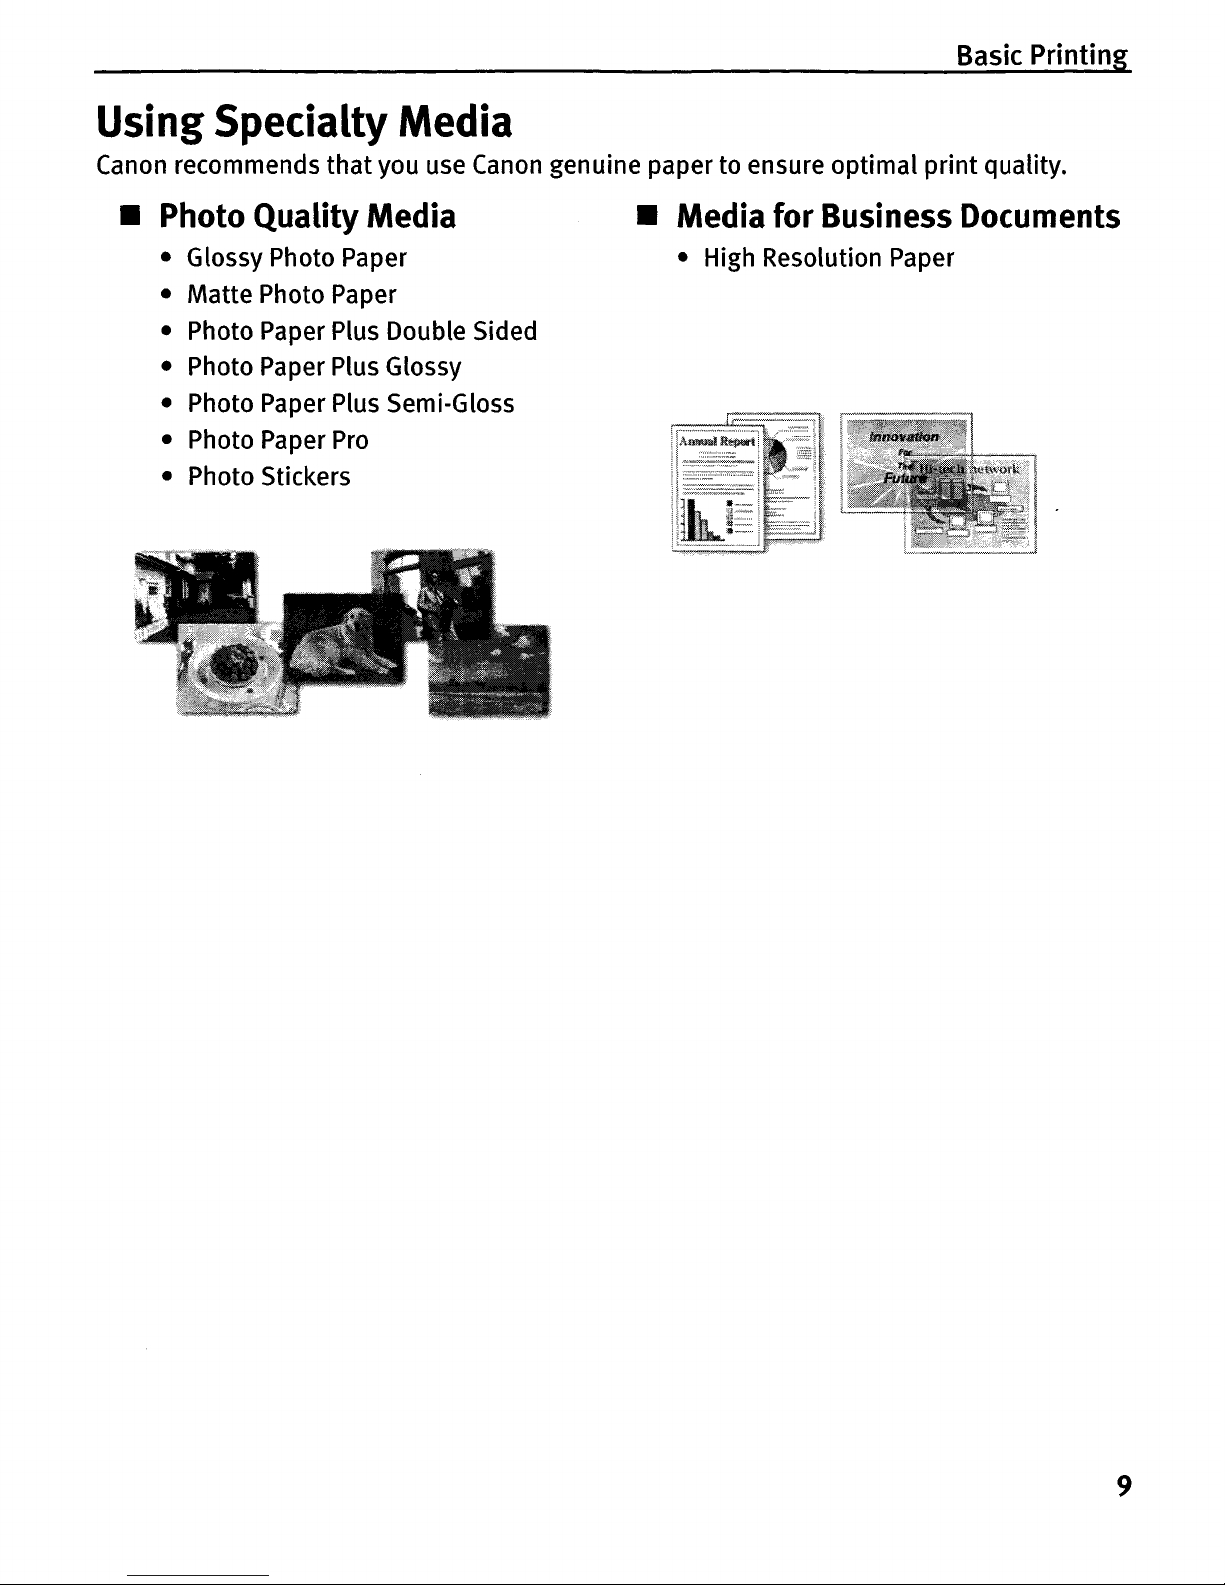
Using
Specialty
Media
Canon recommends
that
you use Canon genuine paper to ensure optimal
print
quality
.
•
Photo
Quality
Media
• Glossy Photo Paper
• Matte Photo Paper
• Photo Paper Plus Double Sided
• Photo Paper Plus Glossy
• Photo Paper Plus Semi-Gloss
• Photo Paper Pro
• Photo Stickers
•
Media
for
Business
Documents
• High Resolution Paper
9
Basic Printing
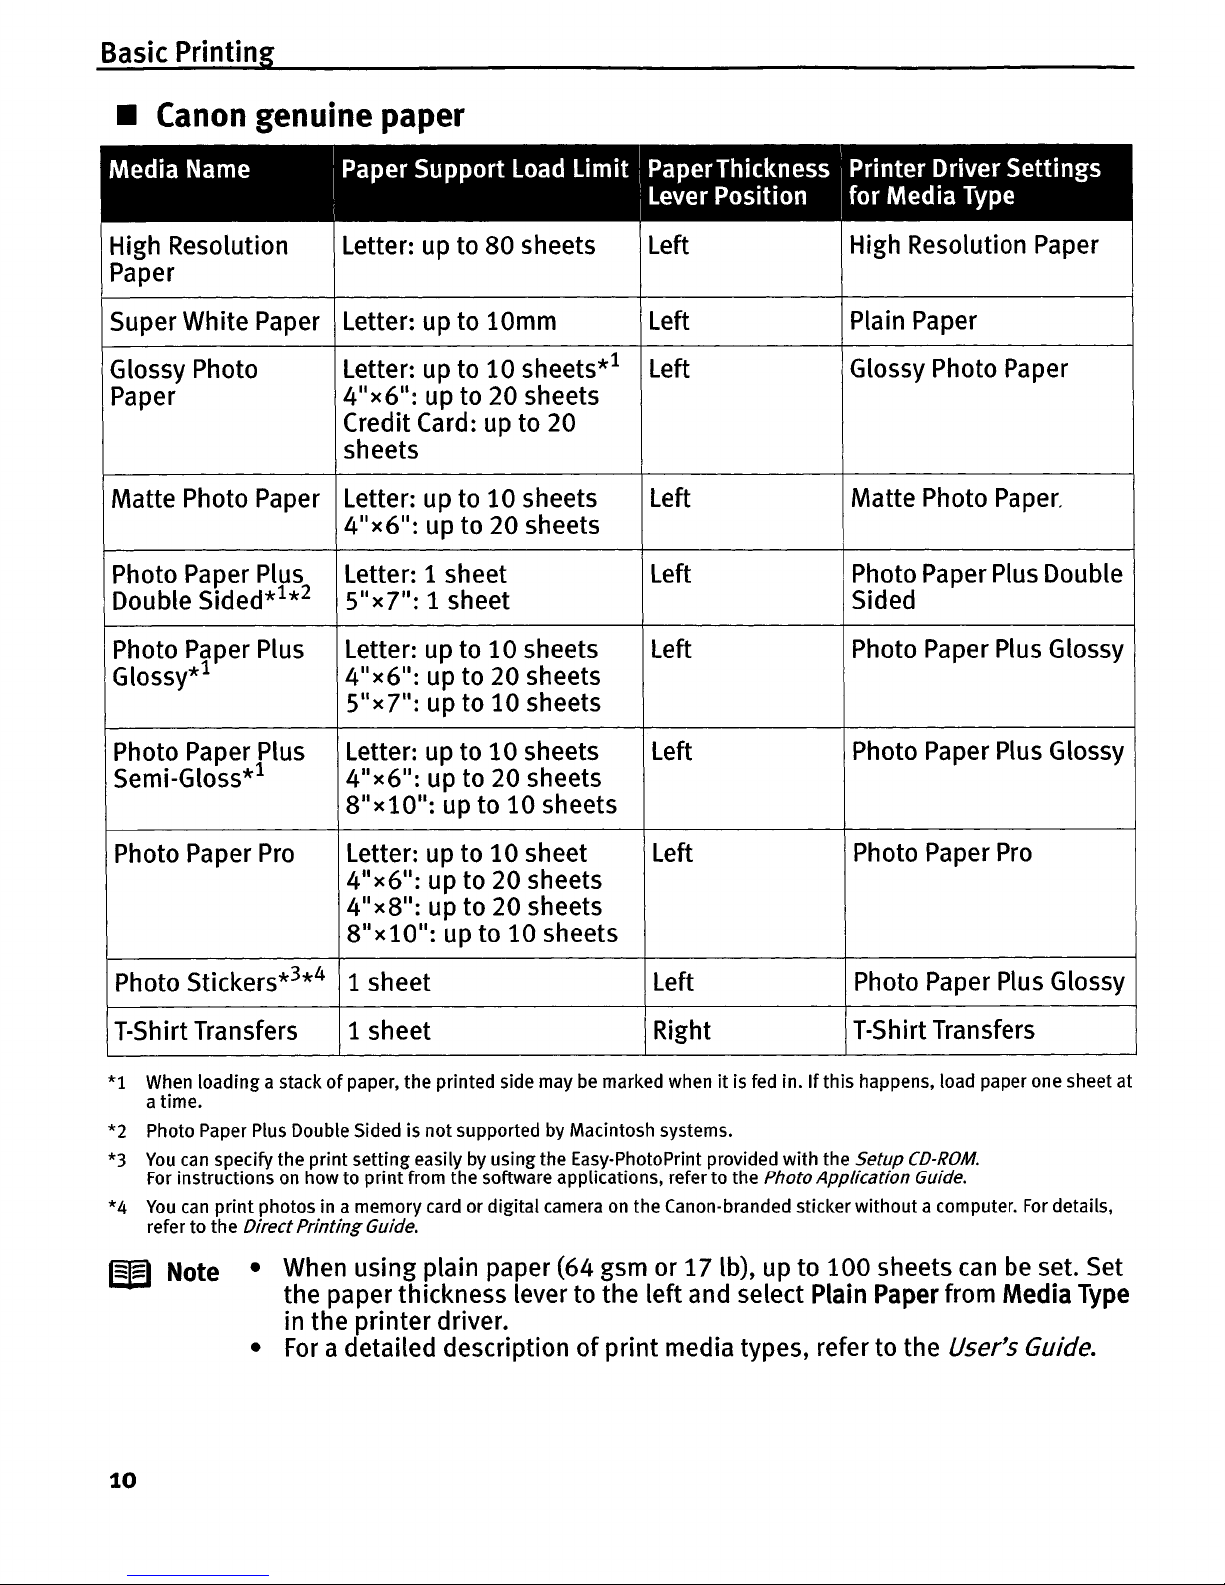
• Canon genuine paper
Media Name
iPaper Support
load
limit
IPaperThickness iPrinter Driver Settings
i I Lever Position for Media Type
High Resolution Letter: up to 80 sheets
Left
High Resolution Paper
Paper
Super White Paper
Letter: up to 10mm Left
Plain Paper
Glossy Photo
Letter: up to
10
sheets*l
Left Glossy Photo Paper
Paper
4
11x611
: up to 20 sheets
Credit Card: up to 20
sheets
Matte Photo Paper Letter: up to
10
sheets
Left Matte Photo Paper.
4"x6":
up to 20 sheets
Photo Paper Plus
Letter: 1 sheet Left Photo Paper Plus Double
Double Sided*1*2 Sllx7": 1 sheet
Sided
Photo Paper Plus
Letter: up to
10
sheets Left
Photo Paper Plus Glossy
Glossy*l
4Ix6":
up to 20 sheets
S"
x
7": up to
10
sheets
Photo Paper Plus
Letter: up to
10
sheets Left
Photo Paper Plus Glossy
Semi-Gloss*l
4
I
x6":
up to 20 sheets
8"xl0
1l
: up to
10
sheets
Photo Paper
Pro
Letter: up to
10
sheet Left
Photo Paper
Pro
4"x6
11
: up to 20 sheets
4
I
x8":
upto20 sheets
8
I1
x10":
up to
10
sheets
Photo Stickers*3*4
1 sheet
Left
Photo Paper Plus Glossy
T-Shirt Transfers
1 sheet
Right
T-Shirt Transfers
*1
When
loading a stackofpaper, the printed side maybemarked whenitis
fed
in.Ifthis happens, load paper one sheet at
a time.
*2
Photo Paper Plus Double Sided is not supportedbyMacintosh systems.
*3
You
can
specify the print setting easilybyusing the Easy-PhotoPrint provided with the Setup
CD-ROM.
For
instructionsonhow to printfrom the software applications, referto the PhotoApplication Guide.
*4
You
can
print photos in a memory card or digital cameraonthe Canon-branded sticker without a computer.
For
details,
refer to the
Direct
Printing
Guide.
W Note
10
• When using plain paper (64 gsm or
17Ib),
up to
100
sheets
can
be
set. Set
the paper thickness lever to the left and select Plain Paper from Media
Type
in the printer driver.
•
For
a detailed descriptionofprint
media types, referto the User's Guide.

Basic Printing
Wlrimm
Printing with
Windows
W Note
• The menu screens and
dialog
boxes
that
appear may vary
dependingonthe
application you are using.
• The steps described in
this
section are for
printing
using a computer
with
Windows®
XP
Service Pack 2 installed (hereafter called Windows
XP
SP2).
•
You
can use Easy-PhotoPrint to easily do
print
operations when
printing
photographs. Easy-PhotoPrint is provided on
the
Setup
CD-ROM.
For
details
on how to use Easy-PhotoPrint, refer
to
the
PhotoApplication Guide.
1 Turn your printer on, then set papers.
2 Create a document or open a file
to
print.
3 Open the printer properties
dialog
box.
(1) Select Print from
the
application1s File menu.
The
Print
dialog
box opens.
~2~~~~~~~~~~~
(2)
Ensure
that
your
printer
is
selected.
Status:
Offline
.~~..........--
(3) Click Preferences or
Location:
..Co..m..
ment: L
..
~i~..~.L
..~..
,}
~~
~..,~
..
E..:..::
.J..........
Prope
rties.
W Note
In
Windows
2000,
click
on
the Main tab in the Print dialog box.
11
Basic Printing
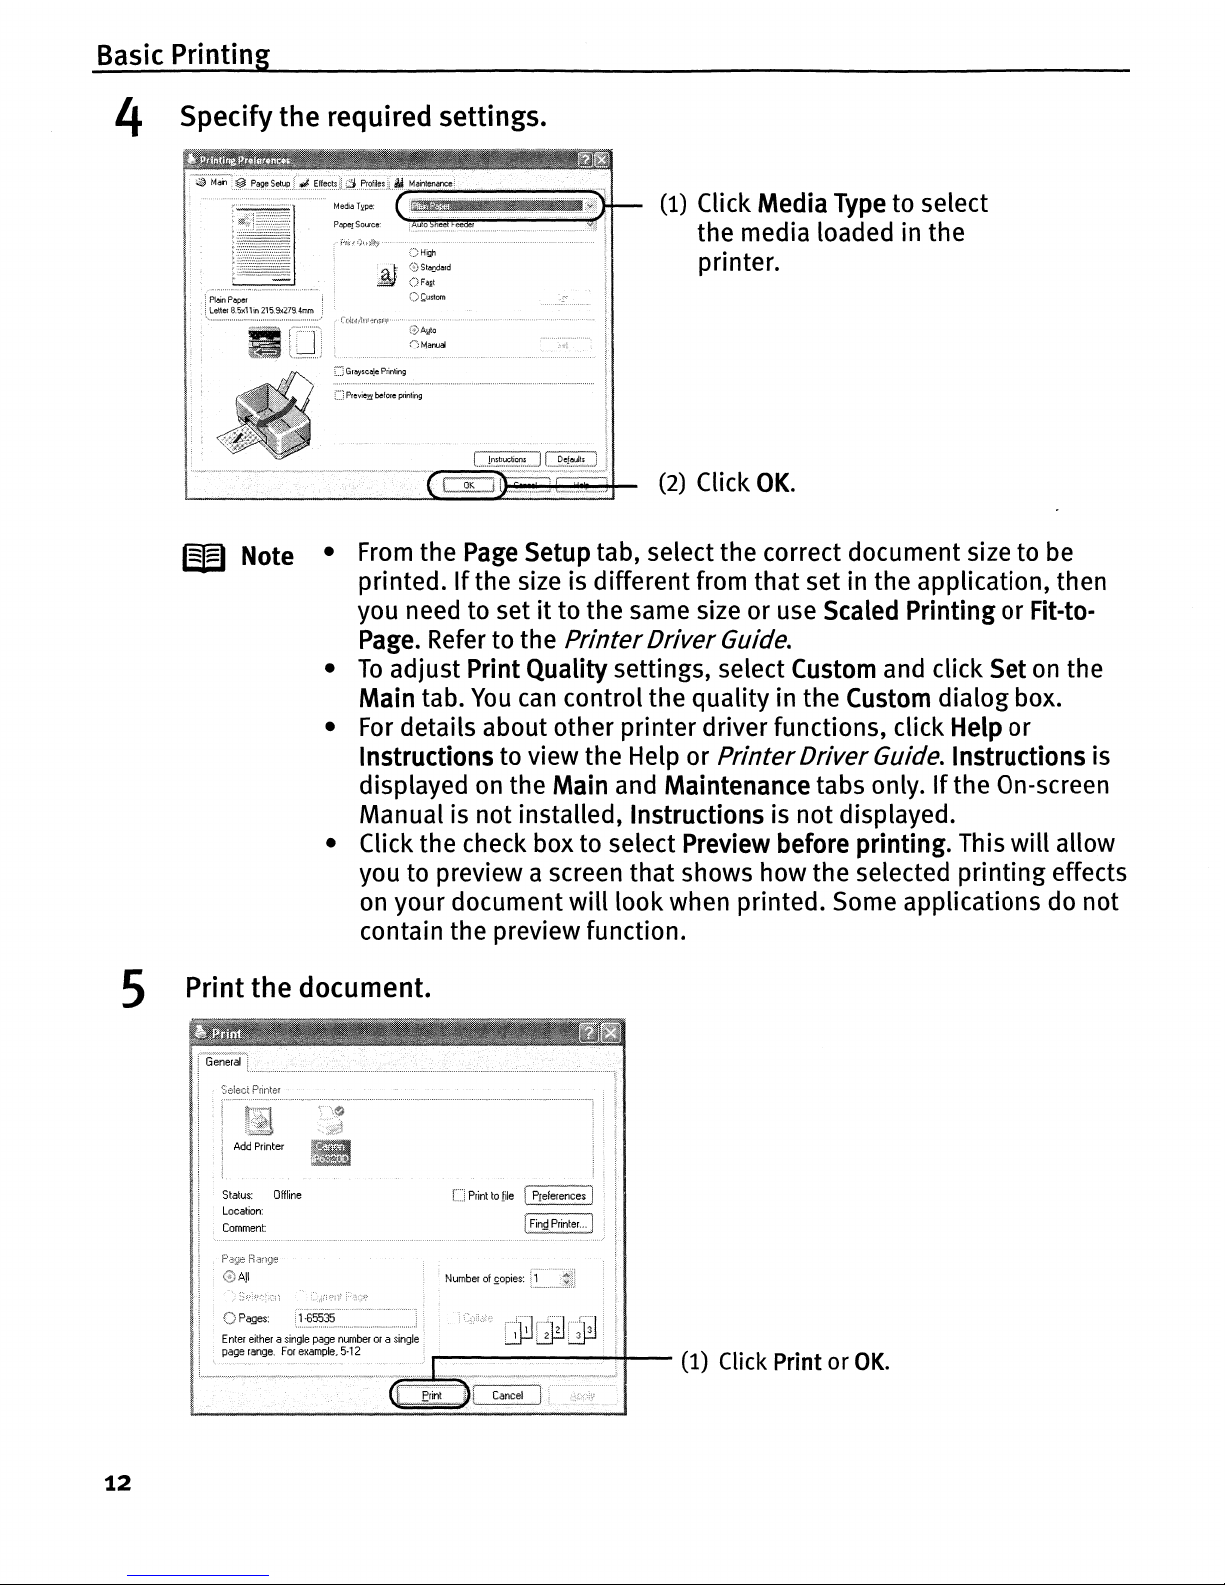
4 Specify the required settings.
/)High
~.
:~~~
~::~d~rd
C>£ustom
CDA.!dto
o
Manual
(1) Click Media Type to select
the media loaded in the
printer.
(2) Click
OK.
W Note •
From
the
Page
Setup tab, select the correct document size to be
printed.Ifthe size is different from
that
set in the application, then
you need to setitto the same size or use Scaled Printing or Fit-to-
Page. Refer to the PrinterDriverGuide.
•
To
adjust Print Quality settings, select Custom and click Setonthe
Main tab.
You
can
control the
quality
in the Custom
dialog
box.
•
For
details about other printer driver functions, click Help or
Instructions to view the Help or PrinterDriverGuide. Instructions is
displayed on the Main and Maintenance tabs only.Ifthe On-screen
Manual is not installed, Instructions is
not
displayed.
• Click the check box to select Preview before printing. This
will
allow
you to preview a screen
that
shows how the selected
printing
effects
on
your document
will
look
when printed. Some applications do
not
contain the preview function.
S Print the document.
r:::i
Printtofile!Preferences
I
I
fin,gpri/'lter.~..
J
...........................................................................
~~~~~~t--
(1)
Click
Print or
OK.
12
Basic Printing
W Note
You
can cancel a
print
job in progress by simply pressingthe Stop/Reset
button
on
the printer.
See
"Cancel Printing" on page 15.
Printingwith Macintosh
W Note
•
The
menu screens and dialog boxes
that
appear may vary depending
on
the
software application you are using.
•
The
steps described in
this
section are for
printing
using a computer with
Mac®
as
x
v.l0.4.x
installed (hereafter called Macintosh®). '
•
You
can
use Easy-PhotoPrint to easily do
print
operations when
printing
photographs. Easy-PhotoPrint is provided
on
the Setup
CD-ROM.
For
details
on
how to use Easy-PhotoPrint, refer to the Photo Application Guide.
1 Turn your printer on, then set papers.
2 Create a document
or
open a file to print.
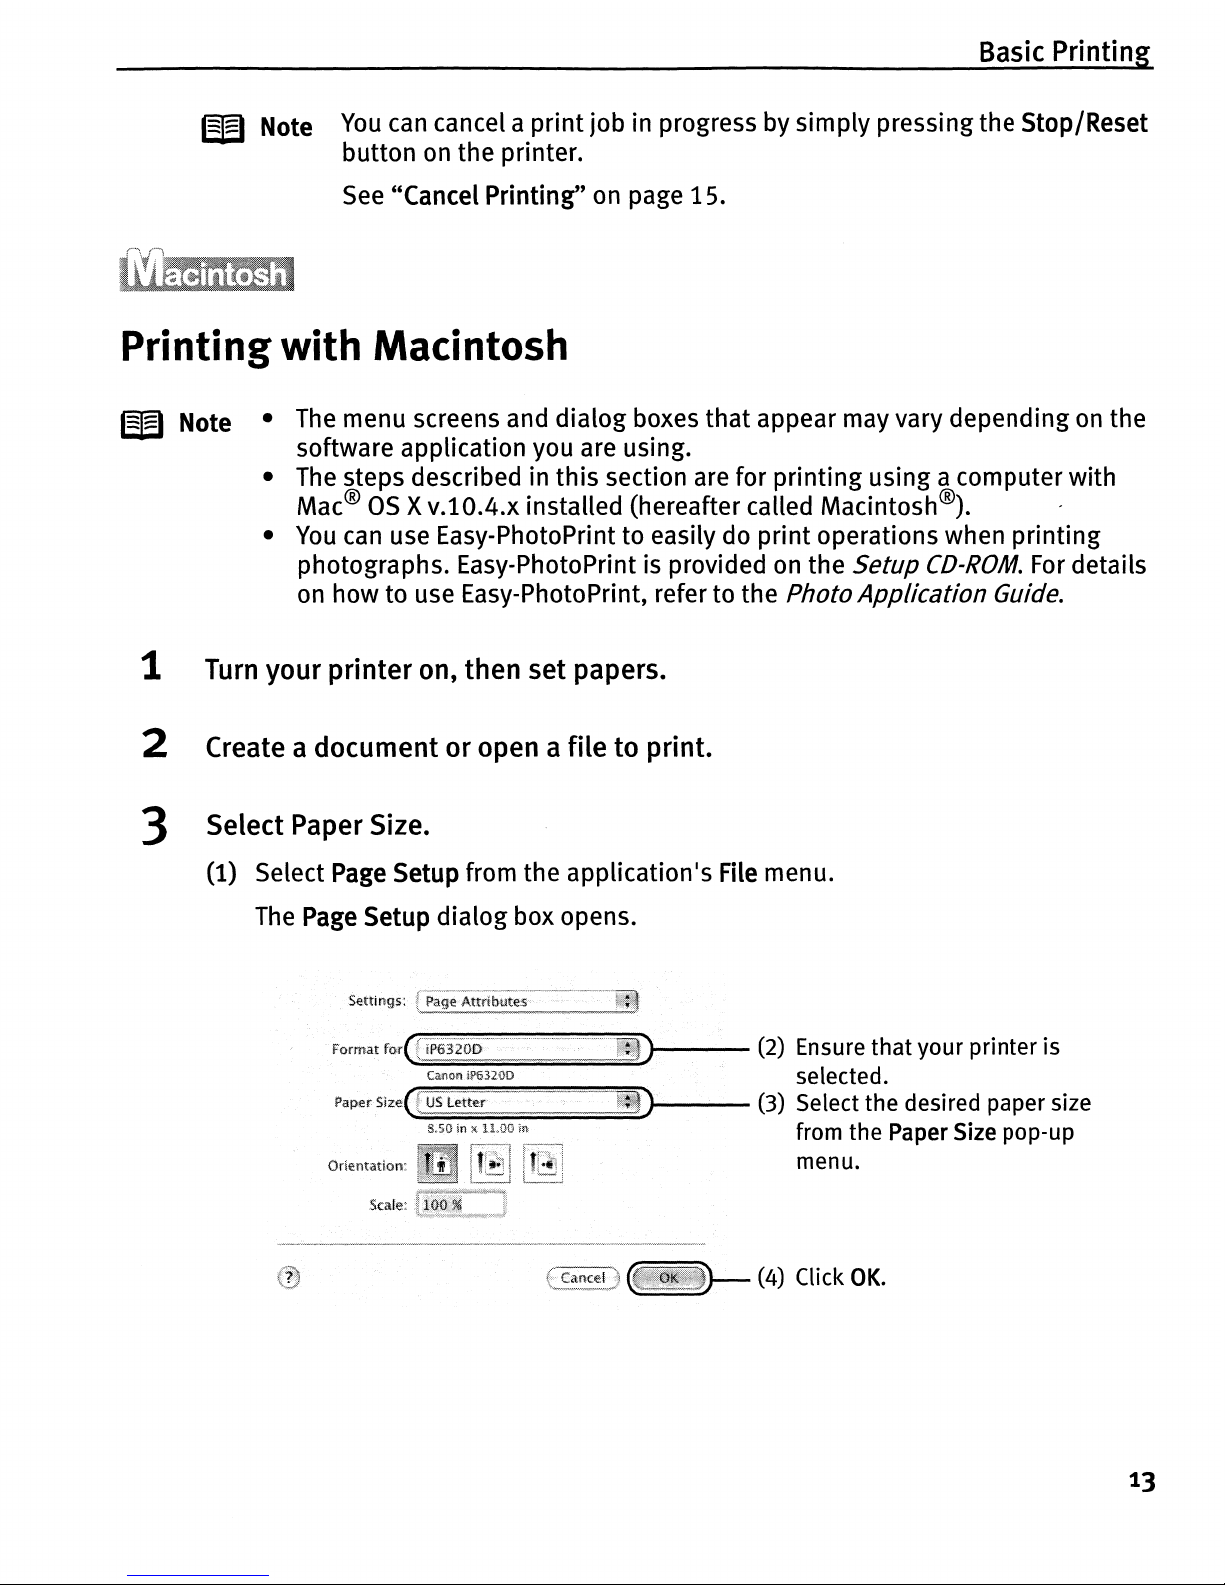
3 Select Paper Size.
(1) Select
Page
Setup from the application1s File menu.
The
Page
Setup dialog box opens.
Format
fu{fii>63¥O~~mmm
mmm..)
~
(2)
Ensure
that
your printer is
Canont?5320D selected.
PaperSlz¢(fu~=--·
==--.)
(3) Select the desired paper size
from the Paper Size pop-up
menu.
13
Basic Printing
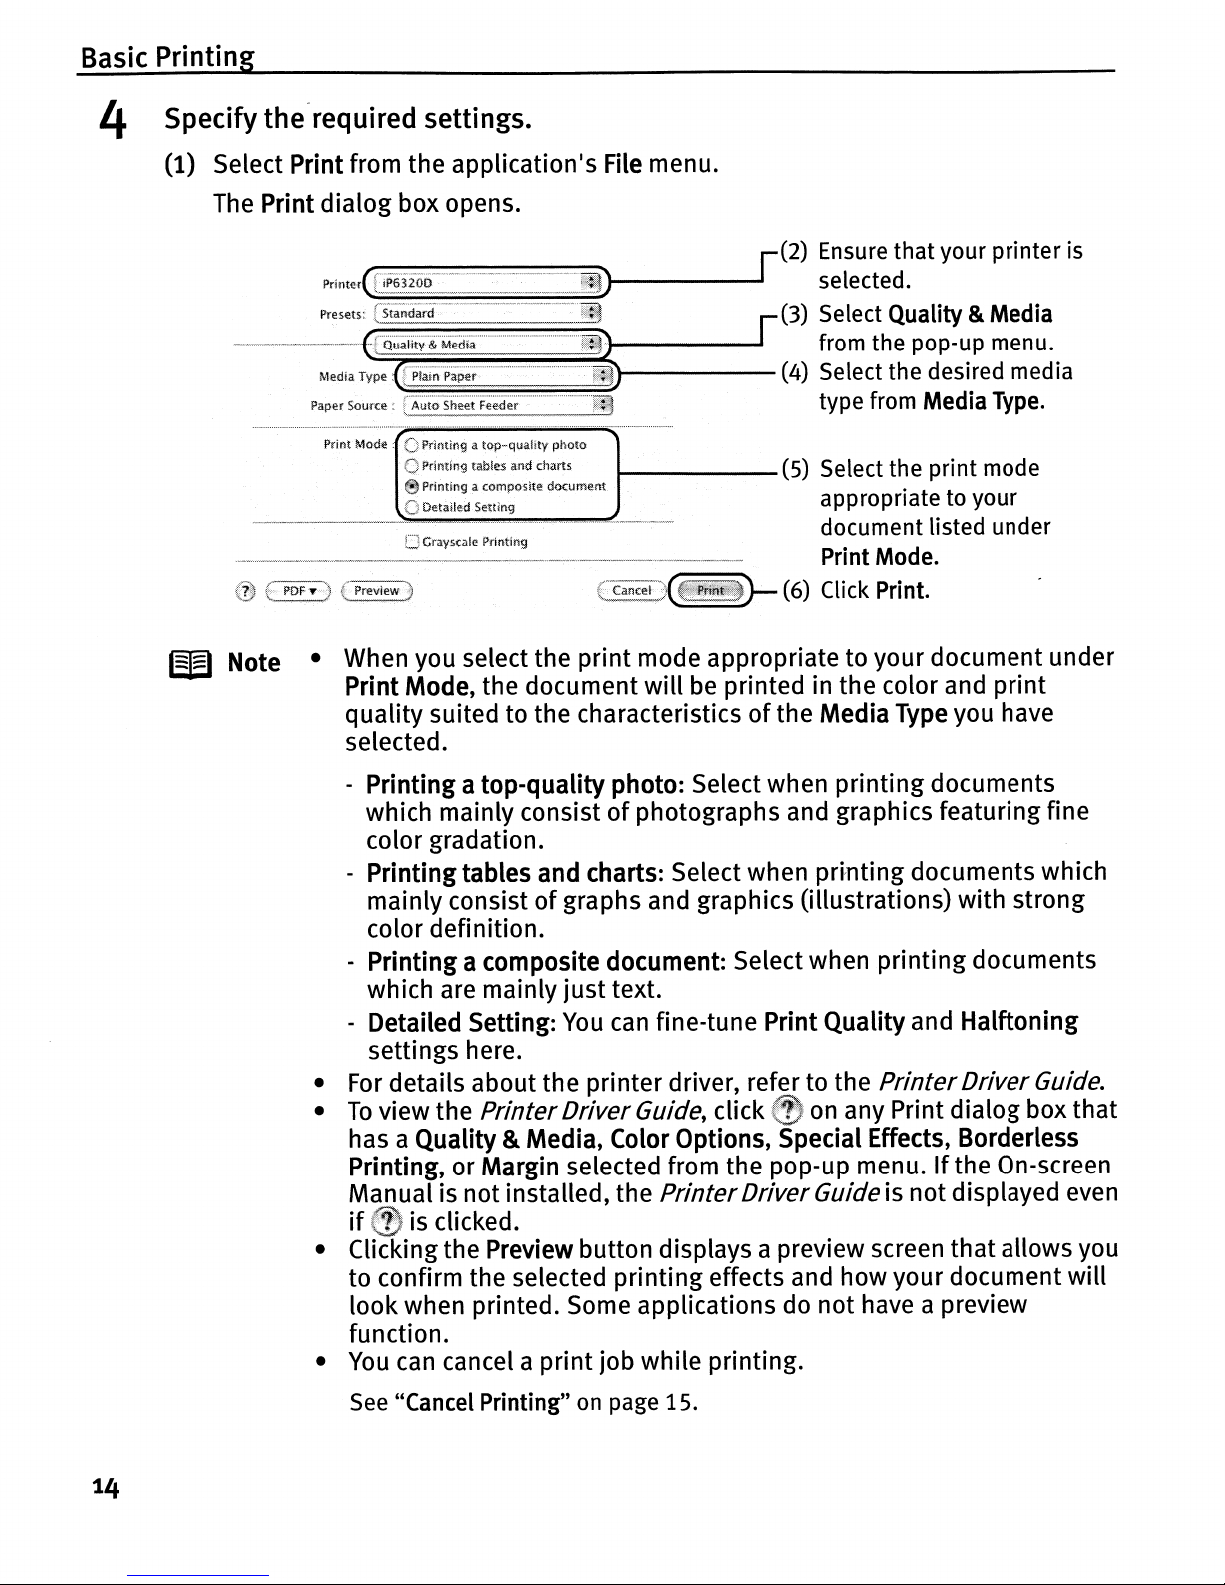
4 Specifythe-required settings.
(1) Select Print from the application1s
File
menu.
The Print
dialog
box opens.
1------
(5) Select the print mode
appropriate to your
document listed under
Print Mode.
fc;;~:(_}-
(6) Click Print.
W Note • When you select the
print
mode appropriatetoyour document under
Print Mode, the document
will
be printed in the color and
print
quality
suited to the characteristicsofthe Media
Type
you have
selected.
- Printing a top-quality photo: Select when
printing
documents
which mainly consistofphotographs and graphics featuring fine
color gradation.
- Printingtables and charts: Select when pri,nting documents which
mainly consistofgraphs and graphics (illustrations) with strong
color definition.
- Printing a composite document: Select when
printing
documents
which are mainly
just
text.
- Detailed Setting:
You
can
fine-tune Print Quality and Halftoning
settings here.
•
For
details about the printer driver, refer to the
Printer
DriverGuide.
•
To
view the PrinterDriverGuide,
click:~~:1J~
on
any Print
dialog
box
that
has a Quality & Media, Color Options, Special Effects, Borderless
Printing, or Margin selected from the pop-up menu.
If
the On-screen
Manual is notinstalled, the Printer DriverGuideis
not
displayed even
if
:;~
is clicked.
• Clie'king the Preview button displays a preview screen
that
allows you
to confirm the selected
printing
effects and how your document
will
look
when printed. Some applications do
not
have a preview
function.
•
You
can cancel a
print
job while printing.
See
"Cancel Printing"onpage 15.
14
Basic Printing
Cancel Printing
(\fi¥~-
..
You
can cancel a
print
job
while
printing
by
pushing
the Stop/Reset button on
the
printer.
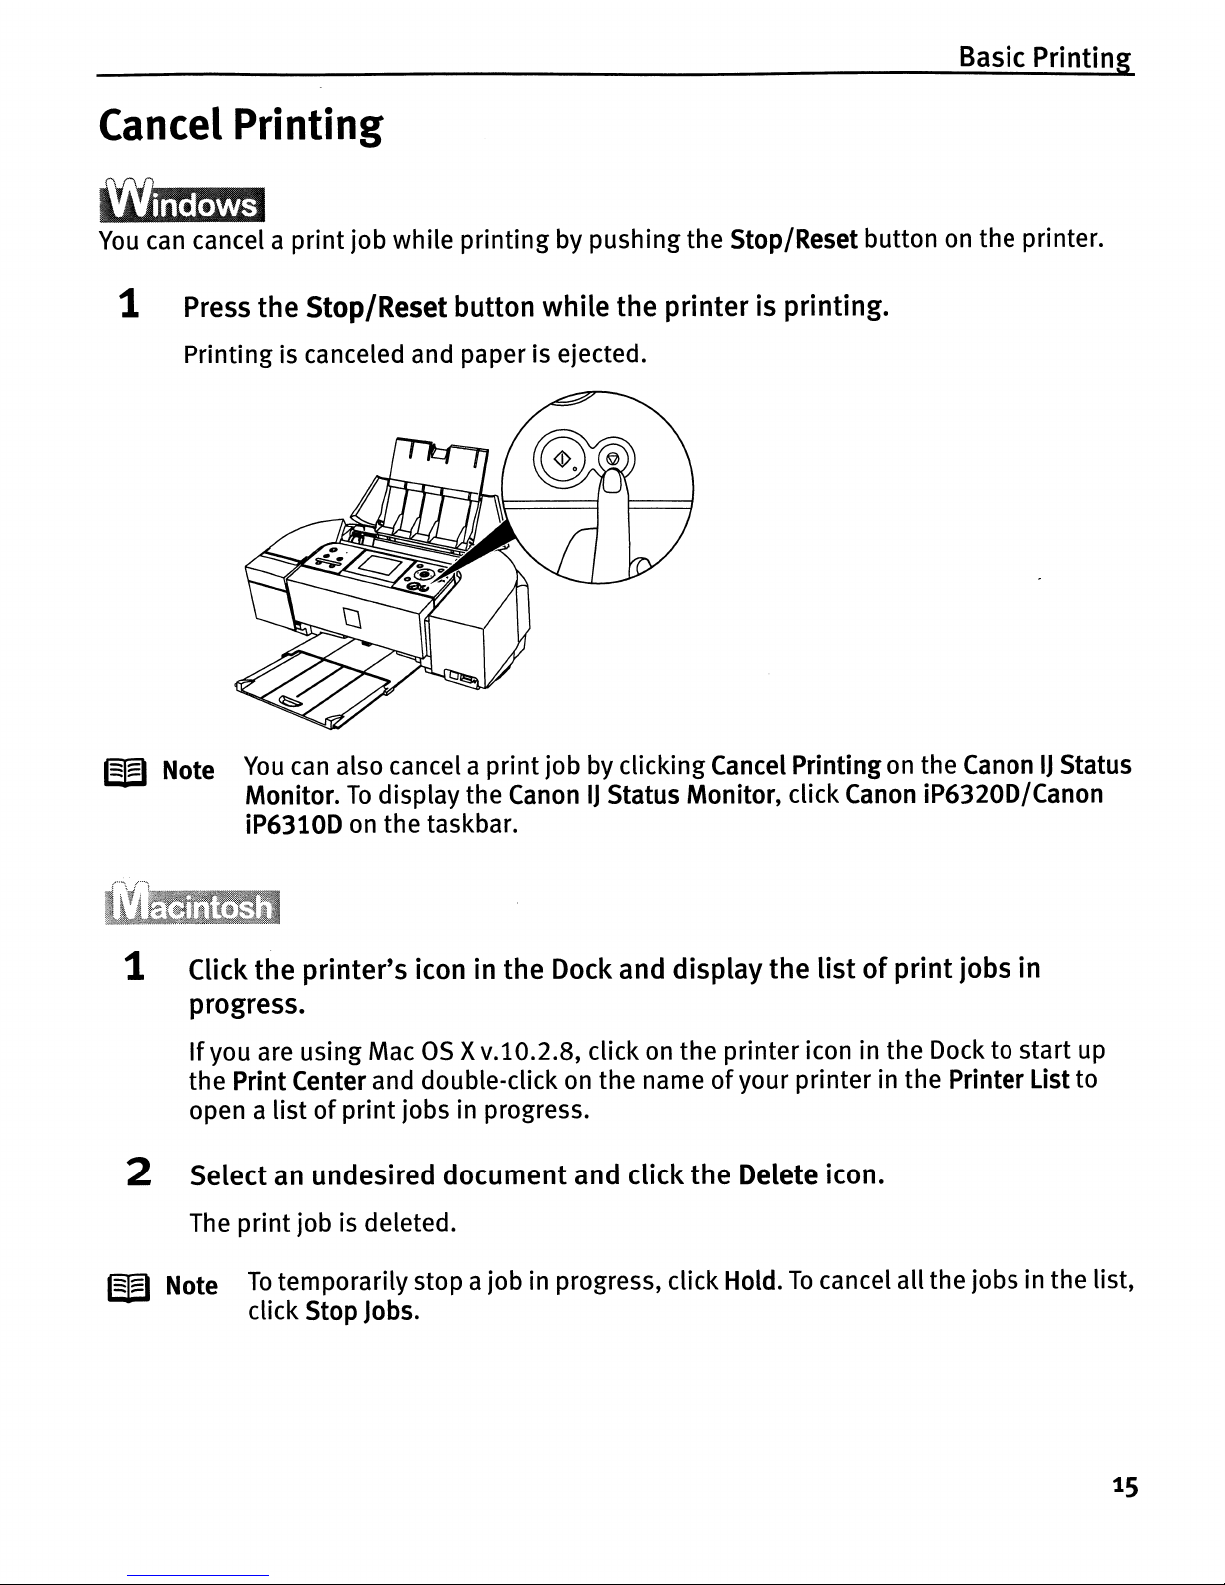
1 Press the Stop/Reset button while the printer is printing.
Printing is canceled and paper is ejected.
W Note
You
can also cancel a
print
job
by clickingCancel
Printing
on the CanonIJStatus
Monitor.
To
display the CanonIJStatus Monitor, click Canon iP6320D/Canon
iP6310D on the taskbar.
1 Click the printer's icon in the Dock and displaythe
listofprint
jobs in
progress.
If
you are using Mac
OS
X
v.l0.2.8,
click on
the
printer
icon in the Docktostart
up
the
Print Center and double-click on the nameofyour
printer
in the Printer List
to
open a
listofprint
jobs in progress.
2 Select
an
undesired document and click the Delete icon.
The
print
job is deleted.
W Note
To
temporarily
stop a job in progress, click Hold.Tocancel
all
the jobs in
the
list,
click Stop Jobs.
15
Basic Printing
Accessing
the
Printer Driver(Windows)
The
printer properties dialogbox
can
be
opened from eitherwithin
an
application or directly
from the Windows Start menu.
W Note This manual refers to operations in Windows
XP
SP2.
These operations may vary dependingonthe versionofyour Windows
operating system you use.
• Opening the Printer Properties Dialog Box from your Application
Program
W Note Depending
on
your application program, the command and menu names may
differ and there may
be
more steps involved in openingthe printer properties
dialog box.
For
more details, see the
user1s
manual regarding your application.
1 In your application program, select the command
to
print
a document.
The
Print dialog box
can
usually
be
opened by selecting Print from the
File
menu.
2 Ensure
that
your printeris selected. Then click Preferences (or Properties).
The
printer properties dialog box opens.
• Openingthe Printer Properties Dialog Box Directly from the Start
Menu
This method is used for printer maintenance and configuring shared print settings for
all application programs.
1 Click Start and select Control Panel, Printers and Other Hardware, and then
Printers and
Faxes.
For
non-Windows
XP
users, click Start, select Settings, and then Printers.
2 Select
the
iconofyour printer.
3 Open the File menu and select Printing Preferences (or Properties).
The
printer properties dialog box opens.
When openingthe printer properties dialog box from Properties, the tabs related to
the Windows function (e.g., the Ports tab, or the Details tab) are displayed. These
tabs are not displayed, when the printer properties dialog box is opened from
PrintingPreferences or application programs.
For
details about these tabs, refer to
the Windows documentation.
W Note
For
details
on
how to set
each
function, refer to the Printer
DriverGuide
or Help.
16
Basic Printing
Using
the
Bundled
Software
The
Setup
CD-ROM
includes photo applications designed to edit the photographstaken by a
digital
camera and
print
them
as
photo-lab
quality
prints
withou~
standard
white
borders.
Use
the
application(s) suitable for your
print
purposes.
W Note
•
To
install applications, refer to Easy Setup Instructions.
•
For
details about photo applications, refer to the PhotoApplication Guide.
• Easy-PhotoPrint (Windows/Macintosh)
You
can make a Borderless Print easily and quickly,
just
by selecting a photograph
taken with a
digital
camera and the paper type on which to
print
it.Inaddition,
it
has tools to correct red eye caused bythe camera's flashorsmooth and beautifythe
facial skin.
It
is compatible with ExifPrint*.
• PhotoRecord (Windows)
You
can
create fun and unique photo albums
with
decorative themes suchasframe,
background, and clip-art.
You
can also copy or move the decorated photos.
It
is compatible
with
ExifPrint*.
• Easy-WebPrint (Windows)
You
can easily
print
out
homepages displayed
on
Internet Explorer@ in full size
without
its right-hand side being cropped. This application is automatically added
to the Internet Explorertoolbar. Internet Explorer 6.0 is recommended.
* ExifPrint is the worldwide standard. Under ExifPrint, the
digital
camera
can
record data tags for specific camera
settings and functions such as whether the flash was on or off,
if
the camera was in portrait or night scene mode,
etc.
Canon
PIXMA
Printers support ExifPrint and use a suitable photo application to read the camera data precisely,
producing optimal prints. This enables you to create prints
that
reproduce color more accurately.
17
Printing Maintenance
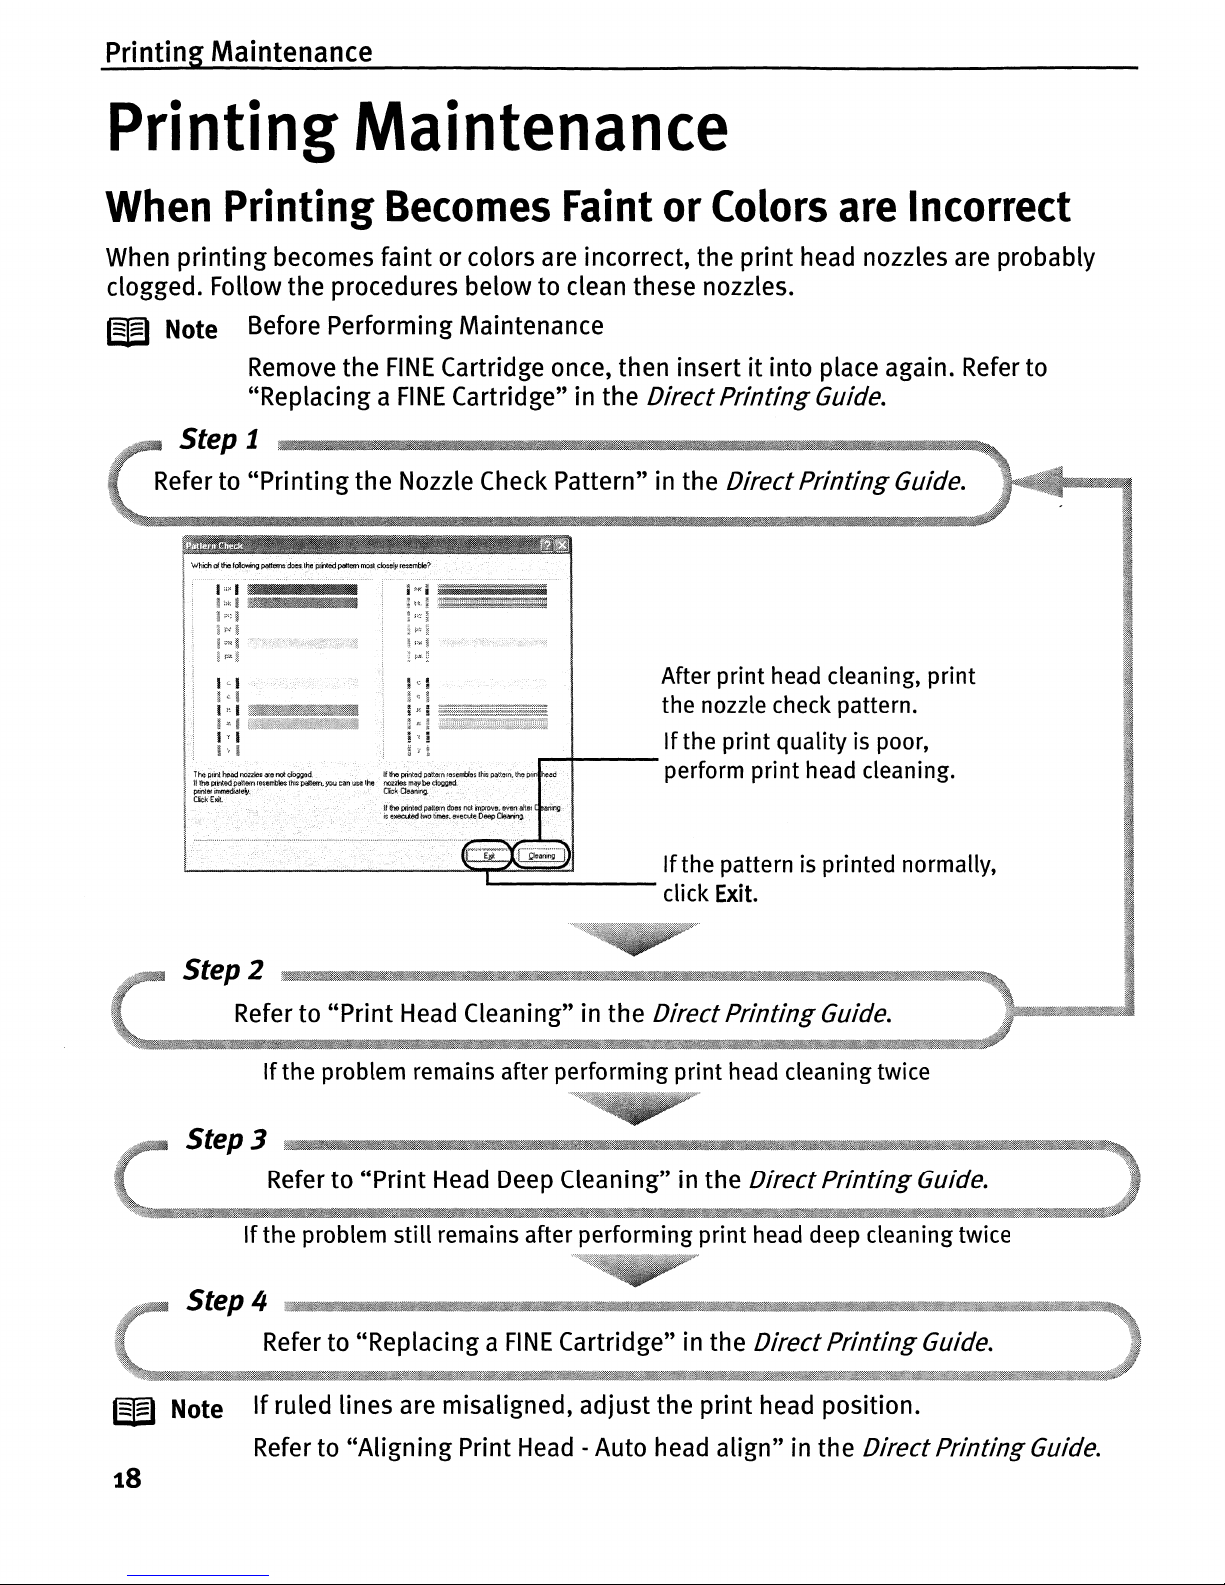
PrintingMaintenance
When
Printing
Becomes Faint
or
Colors are Incorrect
When
printing
becomes faint or colors are incorrect, the
print
head nozzles are probably
clogged. Follow the procedures below to clean these nozzles.
W Note Before Performing Maintenance
Remove the
FINE
Cartridge once, then insertitinto place again. Refer to
"Replacing a
FINE
Cartridge" in the
Direct
Printing
Guide.
Step 1
Refer to
"Printing
the
Nozzle Check Pattern" in the
Direct
Printing
Guide.
I;;;'.
\~~
>~~
\~
.~
;'1>'
i
••·•··
•••••
···<i.i·.·
....
·i»·..··
..
·>
•••••·•••
<.·.•··
..•.)....•.....}..
?
~~
~;;r.
:j~
After print head cleaning, print
the nozzle check pattern.
If
the print quality is poor,
........--11-----
perform print head cleaning.
If
the patternisprinted normally,
---------
click Exit.
Step 2
Refer to
"Print
Head Cleaning" in the
Direct
Printing
Guide.
If
the problem remains after performing print head cleaning twice
Step 3
Referto"Print
Head Deep Cleaning" in the
Direct
Printing
Guide.
If
the problem
still
remains after performing print head deep cleaning twice
Step 4
Refer to "Replacing a
FINE
Cartridge" in the
Direct
Printing
Guide.
W Note
If
ruled lines are misaligned, adjust the
print
head position.
Refer to
"Aligning
Print
Head
-Auto head
align"
in the
Direct
Printing
Guide.
18
Troubleshooting
Troubleshooting
This section provides troubleshooting
tips
for the most common
printing
problems.
Troubleshooting usually falls into oneofthe
following
categories.
Refer to the User's Guide for additional information
on
topics
not
covered in this section.
When an error message is displayed
on
the
LCD,
refer to "An Error Message is Displayed
on
the
LCD"
in the "Troubleshooting" sectionofthe DirectPrintingGuide. When photos cannot
be printed properly from a
digital
camera, refer to "Cannot Print Properly from the Digital
Camera" in
the
"Troubleshooting" sectionofthe DirectPrinting Guide.
• "Cannot Install the Printer Driver" on page
20
• "Cannot Connect to
PC
Properly"
on
page 21
• "PrintQuality is
Poor
or Contains Errors" on page 22
• "Printer
Does
Not Start or Stops During Print
Jobs"
on
page
25
• "Paper
Does
Not
Feed
Properly"
on
page 26
• "Paper
Jams"
on page 26
• "An Error Message Appears
on
the Screen"
on
page
27
•
"POWER
Lamp
and
Alarm
Lamp
Flash
Alternately" on page 28
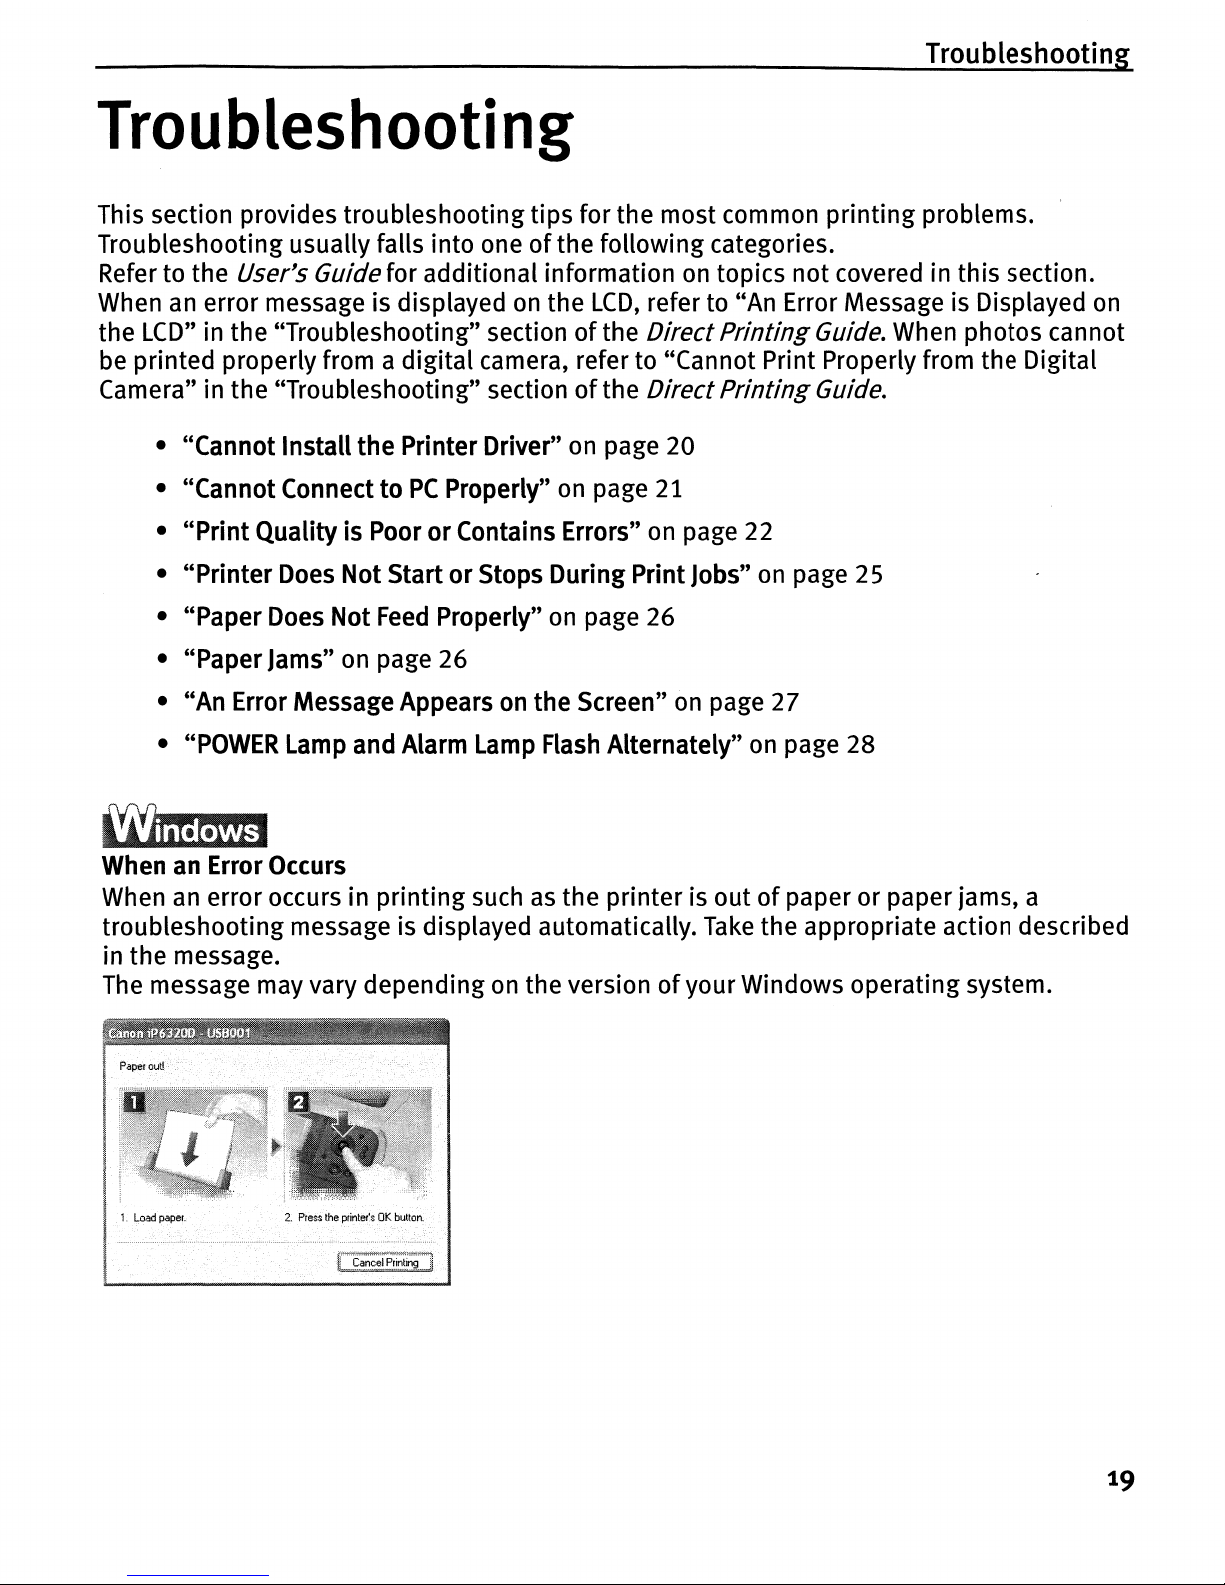
When
an
Error
Occurs
When
an
error occurs in
printing
such
as
the
printer
is outofpaper or paper jams, a
troubleshooting
message is displayed automatically.
Take
the appropriate action described
in the message.
The message may vary depending on the versionofyour Windows operating system.
19
Troubleshooting
Cannot
Install
the
Printer
Driver
Problem I Possible
Cause
I
Try
This
Cannot Install the Installation
Printer Driver procedure not
followed correctly
Follow the Easy Setup Instructionspackaged with your printer for proper printer
driver installation.
liiflrnmm
If
the installerwas forced tobeterminated due toanerror, Windows may be
unstable.
Remove
the
CD-ROM
from the
CD-ROM
drive and restart your computer.
Reinstall the printer driver.
If
this
problem persists, refer to your Windows
documentation for more information.
Installation does
~~~~~a;:icallY
whenIfprinter driver installation did not start automatically when you inserted the
the Setup
CD-ROM
Setup
CD-ROM
into the
CD-ROM
drive:
is inserted into the
1.
Click
Start
and select
My
Computer.
drive 2. Double-click the
CD-ROM
icon.
For
non-WindowsXPusers, open the
My
Computer
window and then doubl.e-click
the
CD-ROM
icon.
1~1~jS!m~
Double-click the
CD-ROM
icononyour desktop to start installation.
If
the
CD-ROM
icon is notdisplayedonthe desktop, there is a problem with the
CD-
ROM.
Contact the Customer
Care
Center.
20
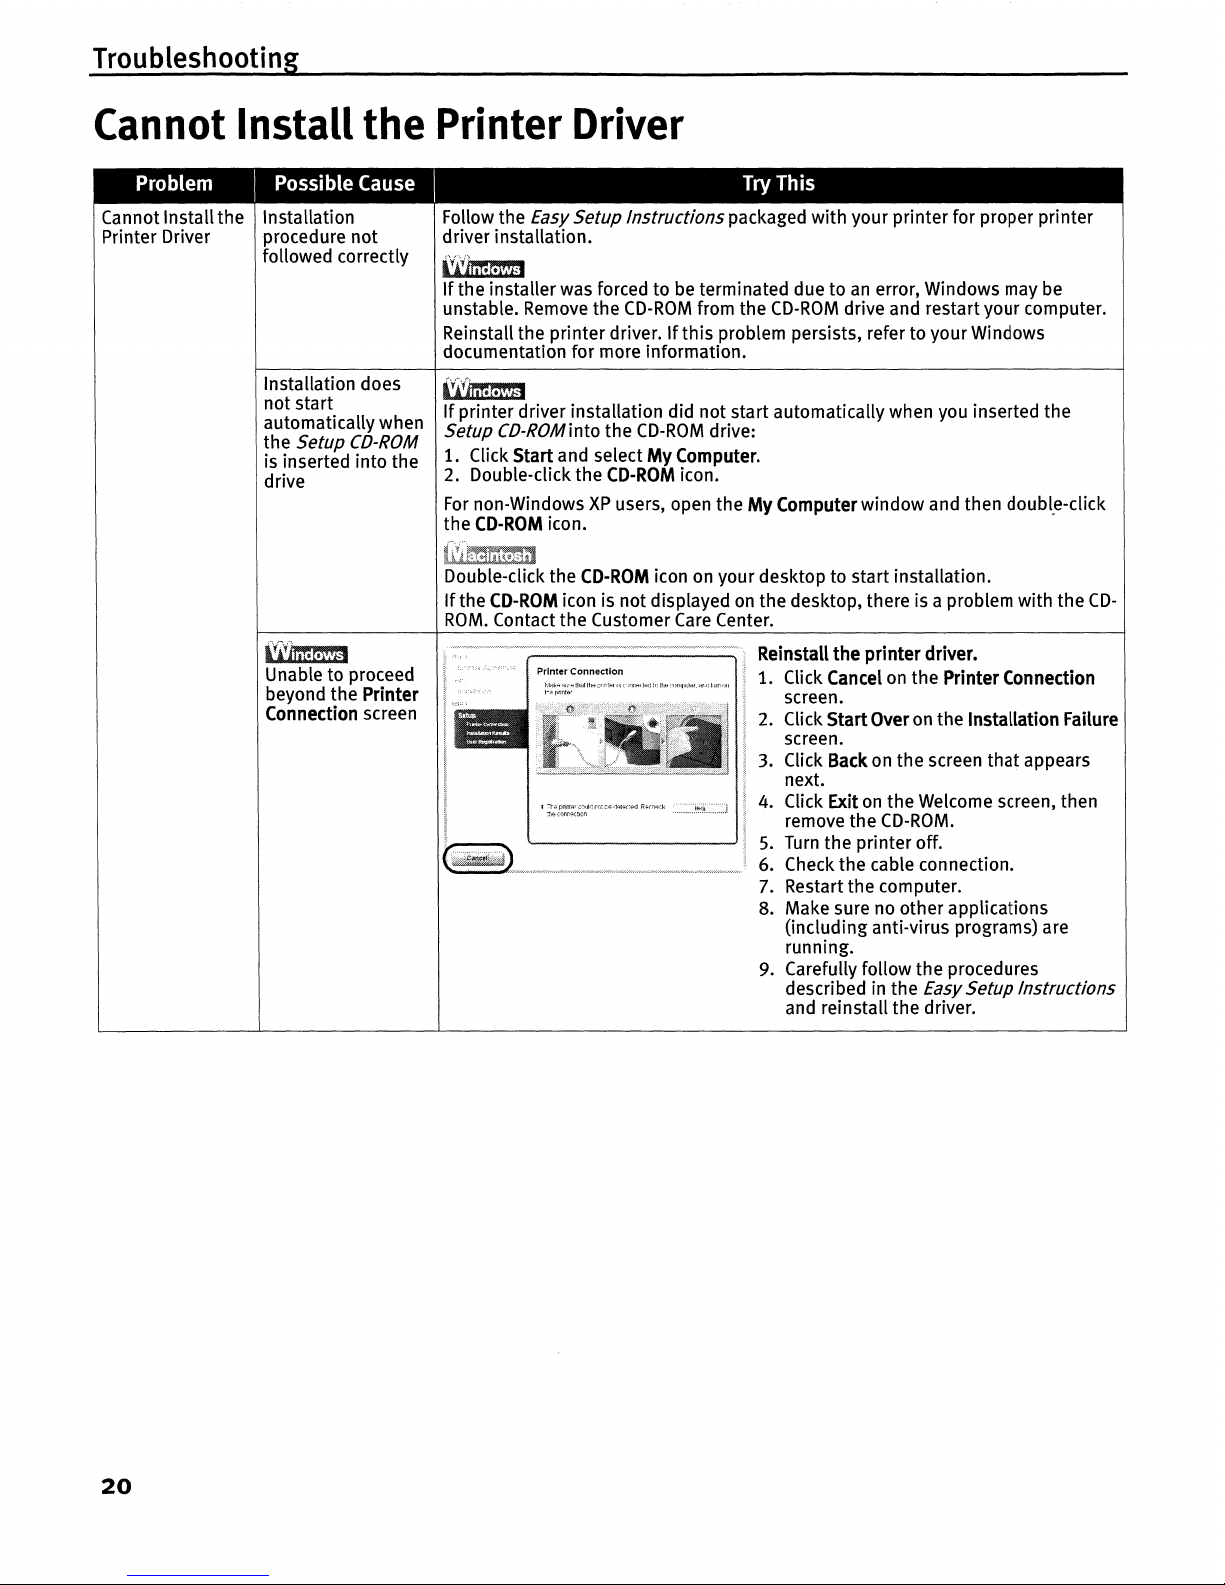
lVf1I;mm
Unable to proceed
beyond the
Printer
Connection
screen
f"7teprintercnlJllirorce,ieteC"dR"(heck
118
(1)fl!18(tlOn
Reinstall
the
printer
driver.
1. Click
Cancel
on
the
Printer
Connection
screen.
2. Click
Start
Over
on
the
Installation
Failure
screen.
3. Click
Back
on the screen that appears
next.
4. Click
Exit
on
the Welcome screen, then
remove the
CD-ROM.
5.
Turn
the printer off.
6. Check the cable connection.
7.
Restart the computer.
8. Make sure no other applications
(including anti-virus programs) are
running.
9. Carefully follow the procedures
described
in
the Easy Setup Instructions
and reinstall the driver.

Cannot
Connect
to
PC
Properly
Troubleshooting
Problem
I
Possible Cause
I
Try This
Printing Speed
Is
Your environment is
If
your environment is not fully compatible with
USB
2.0, the printer
will
operate at
Slow fUSB 2.0 Hi-
notfully compatible
a lower speed provided under
USB
1.1.
Speed
with
USB
2.0.
Check the following to ensure
that
yourPCenvironment supports
USB
2.0
Hi-
Connection Does
Speed connection.
Not Work.
•
The
USB
port
on yourPCsupports
USB
2.0 Hi-Speed connection.
•
Both the
USB
cable and
USB
hub support
USB
2.0 Hi-Speed connection.
Be
sure to use a certified
USB
2.0 Hi-Speed cable.
You
are recommended to use
the cable no longer than 3 meters.
•
YourPCsupports the
USB
2.0 Hi-Speed connection.
Obtain the latest versionoftheOSupdate program and installiton
your
PC.
•
The
USB
2.0 Hi-Speed driver operates properly.
Obtain the latest versionofthe
USB
2.0 Hi-Speed driver and installiton
your
PC.
~Important
For
details on checking the above, contact the makerofyour
computer,
USB
cable, or
USB
hub.
l,,1hmWM
Your environmentis
See
"Printing
SpeedIsSlow/USB
2.0
Hi-Speed
Connection
Does
Not
Work."
When
You
not
fully compatible above.
Connect to a
with
USB
2.0.
Computer
Running
Windows
XP,
the
Screen Shows
the Warning
Message IIHispeed
USB
device plugged
intonon-hi-speed
USB
hub"
or
IIThis device
can
perform faster
ll
•
21
Troubleshooting
Print Quality
is
Poor
or
Contains Errors
Problem I Possible Cause I Try This
Cannot Print to
End
The
Page
Size setting
of
Job
does not match the
size
of
the paper
loaded in the printer
'~'iilmmm
The
sizeofthe print
data is too large
First, check the
Page
Size
setting in the application.
Then, check the
Page
Size
setting in the
Page
Setup
tabofthe printer driver
for Windows or the
Page
Setup
dialog boxofthe printer driver for Macintosh.
Check the size
of
the print data.
For
WindowsXPand Windows 2000,ifthe
size
of
the data is too large, partofit
may be lost. When the spool format is
EMF,
follow the procedure below.
1. Open the printer properties dialog box.
See
"Openingthe Printer Properties Dialog
Box
Directly
from
the Start
Menu"
on
page 16.
2.
On
the
Page
Setup
tab, click Print Options.
3.
Select the
Reduce
spool
data
size
check box and click
OK.
When
Reduce
spool data
size
is selected, the print quality maybedegraded.
II
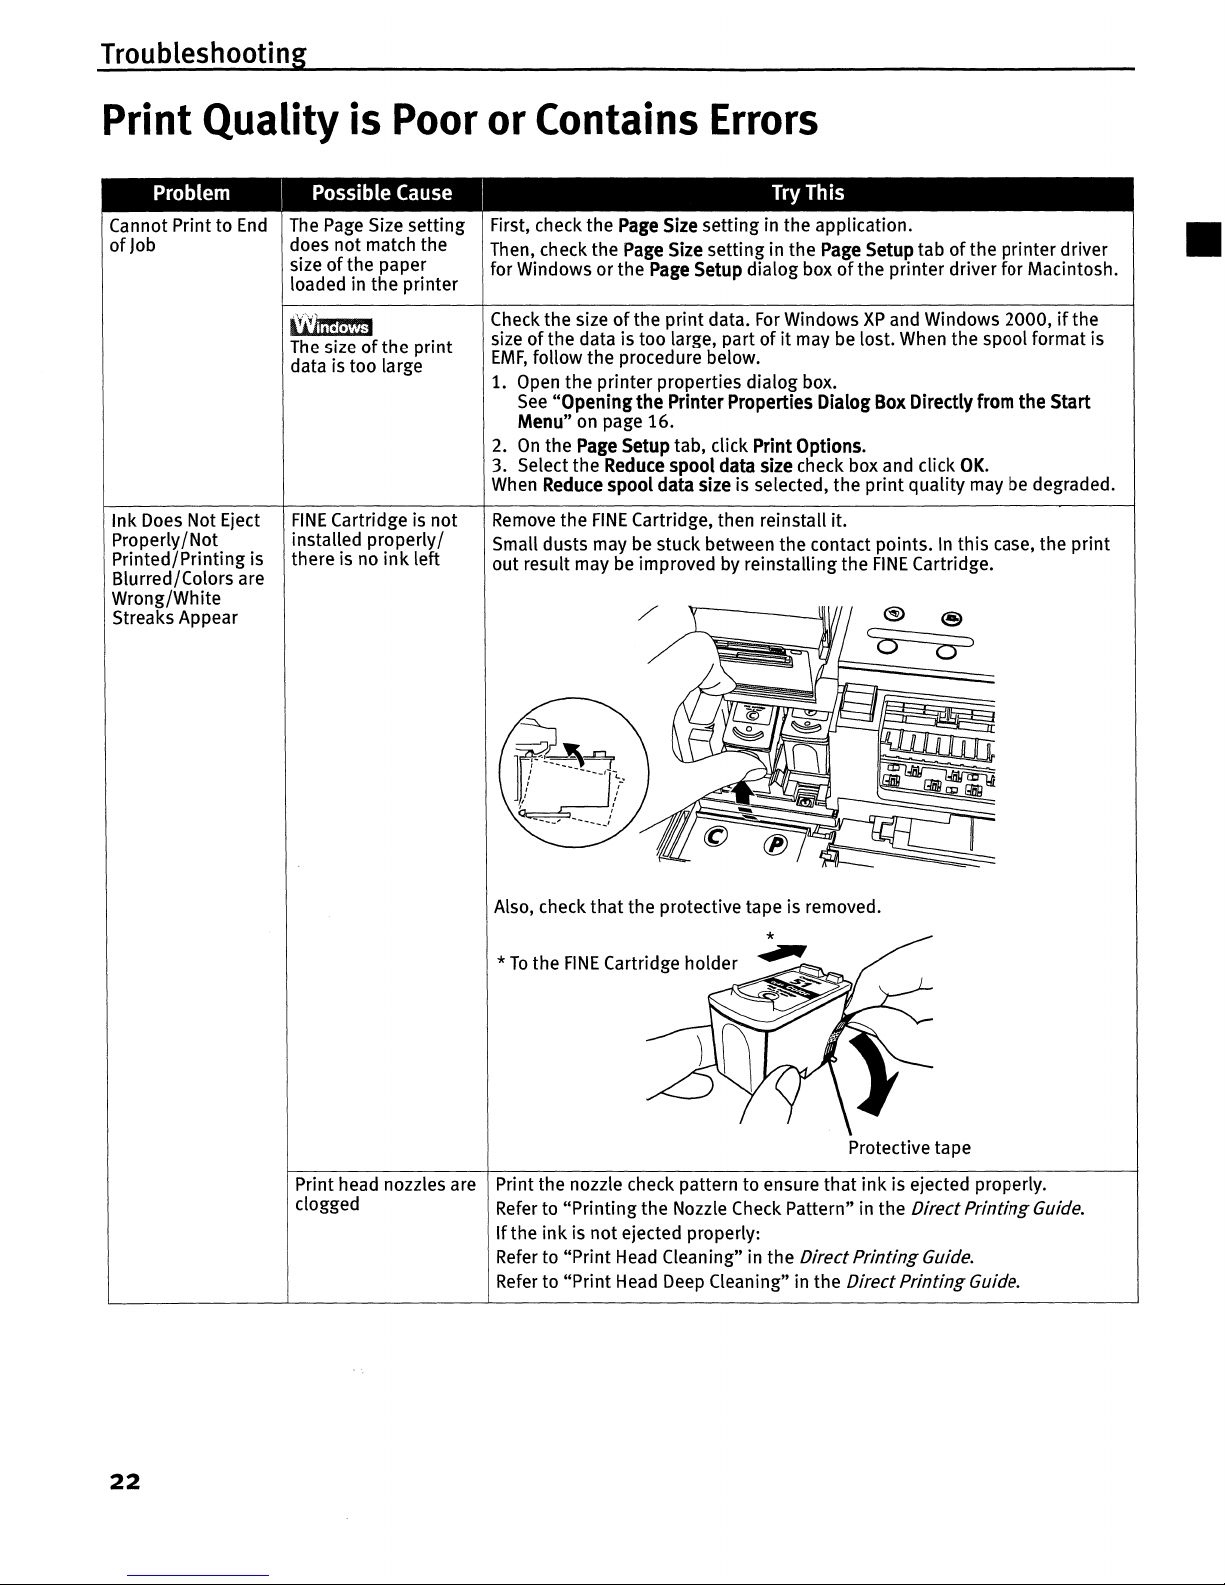
Ink Does Not Eject
Properly
/Not
Printed/Printing is
Blurred/Colors are
Wrong/White
Streaks Appear
FINE
Cartridge is not
installed properly /
there is no
ink
left
Remove
the
FINE
Cartridge, then reinstall it.
Small dusts may
be
stuck between the contact points.Inthis case, the
print
out result may be improved by reinstalling the
FINE
Cartridge.
Also, check
that
the protective tape is removed.
*
To
the
FINE
Cartridge holder
Protective tape
Print head nozzles are Print the nozzle check pattern to ensure that
ink
is ejected properly.
clogged
Refer
to "Printing the Nozzle Check Pattern" in the
Direct
Printing
Guide.
If
the
ink
is notejected properly:
Refer
to "Print
Head
Cleaning" in the
Direct
Printing
Guide.
Refer
to "Print Head
Deep
Cleaning" in the
Direct
Printing
Guide.
22

Troubleshooting
Problem
I
Possible Cause
I
Try This
Incorrect papertype
('i'bmtm
On
the
Main
tabofthe printer driver, ensure that the Media
Type
selected
matches the media being used.
Ifl~~m:mm
In
the Print dialog boxofthe printer driver, select Quality &
Media
from the
pop-up menu, and then ensure that the
Media
Type
selected matches the
paper loaded.
Glossy photo paper
Select
Other
Photo
Paper
from
Media
Type,
which may resolve the problem.
other than
Canon
Load
one sheet at a time and remove each sheetassoonasit
is printed.
genuine paper is used
Print Quality is not set
Be
suretoset the Print Quality settingto
High
for Windows or
Fine
for
properly
Macintosh.
l¥!"~
1. Open the printer properties dialog box.
See
"Openingthe Printer Properties Dialog
Box
from
your
Applic~tion
Program"
on
page
16.
2.
On
the
Main
tab, click
High
for the Print Quality setting.
If
you cannot select
High
or the problem is not solved, select
Custom,
click
Set,
and select the higher quality.
1:<1:Jl!~
1.
Open
the Print dialog box.
You
can
generally select Printinthe
File
menu from you application
program.
2.
In
the Print dialog box, select Quality &
Media
from the pop-up menu, and
then click
Detailed
Setting.
3.
Drag the Print Quality slide bar towards the
Fine
side.
Media is not loaded Check that your paper is loaded with the correct print side facing up.
with print-side up Consult "Printing Media" in the User's Guidefor detailed instructions
on
how
to load and use your media.
Printed Ruled Lines Print head is
Align the
print
head. Refer to "Aligning Print Head-Auto head
align"
in the
are Misaligned misaligned
DirectPrintingGuide.
Paper thickness lever Set the paper thickness lever in suitable position for your media.
position is not proper
See
"Canon
genuine paper"
on
page
10.
Print Quality is not set
Be
sure to set the Print Quality setting to
High
for Windows or
Fine
for
properly
Macintosh.
~
........
"
')
BAAIi**fj;lII
1.
Open
the printer properties dialog box.
See
"Openingthe Printer Properties Dialog
Box
from
your Application
Program"
on
page
16.
2.
On
the
Main
tab, click
High
for the Print Quality setting.
If
you cannot select
High
or the problem is not solved, select
Custom,
click
Set,
and select the higher quality.
~v·
1.
Open
Print dialogbox.
You
can
generally select Printinthe
File
menu from you application
program.
2.
In
the Print dialog box, select Quality &
Media
from the pop-up menu, and
then click
Detailed Setting.
3.
Drag the Print Quality slide bar towards the
Fine
side.
23
Troubleshooting
Problem I Possible Cause I Try This
Printed Paper Curls Paper being used is
or has Ink Blots too thin
Incorrect papertype
Use
photo paper suchasCanon's Photo Paper
Pro
to print photos or pictures
in deep color that have high color saturation.
On
the
Main
tabofthe printer driver, ensure that the
Media
Type
selected
matches the media being used.
l/l~m~J!dJ~
In
the Print dialog boxofthe printer driver, select Quality &
Media
from the
pop-up menu, and then ensure that the
Media
Type
selected matches the
paper loaded.
Back
of
Paper is
Smudged
Inside
of
the printer isIfthe insideofthe printer is dirty, printed paper may become smudged.
dirty Periodically clean the insideofthe printer.
Refer
to "Cleaning the Insideofthe Printer"inthe User's Guide.
Printed Surface is
Scratched
Paper feed roller is
dirty
Inappropriate type
of
paper is being used
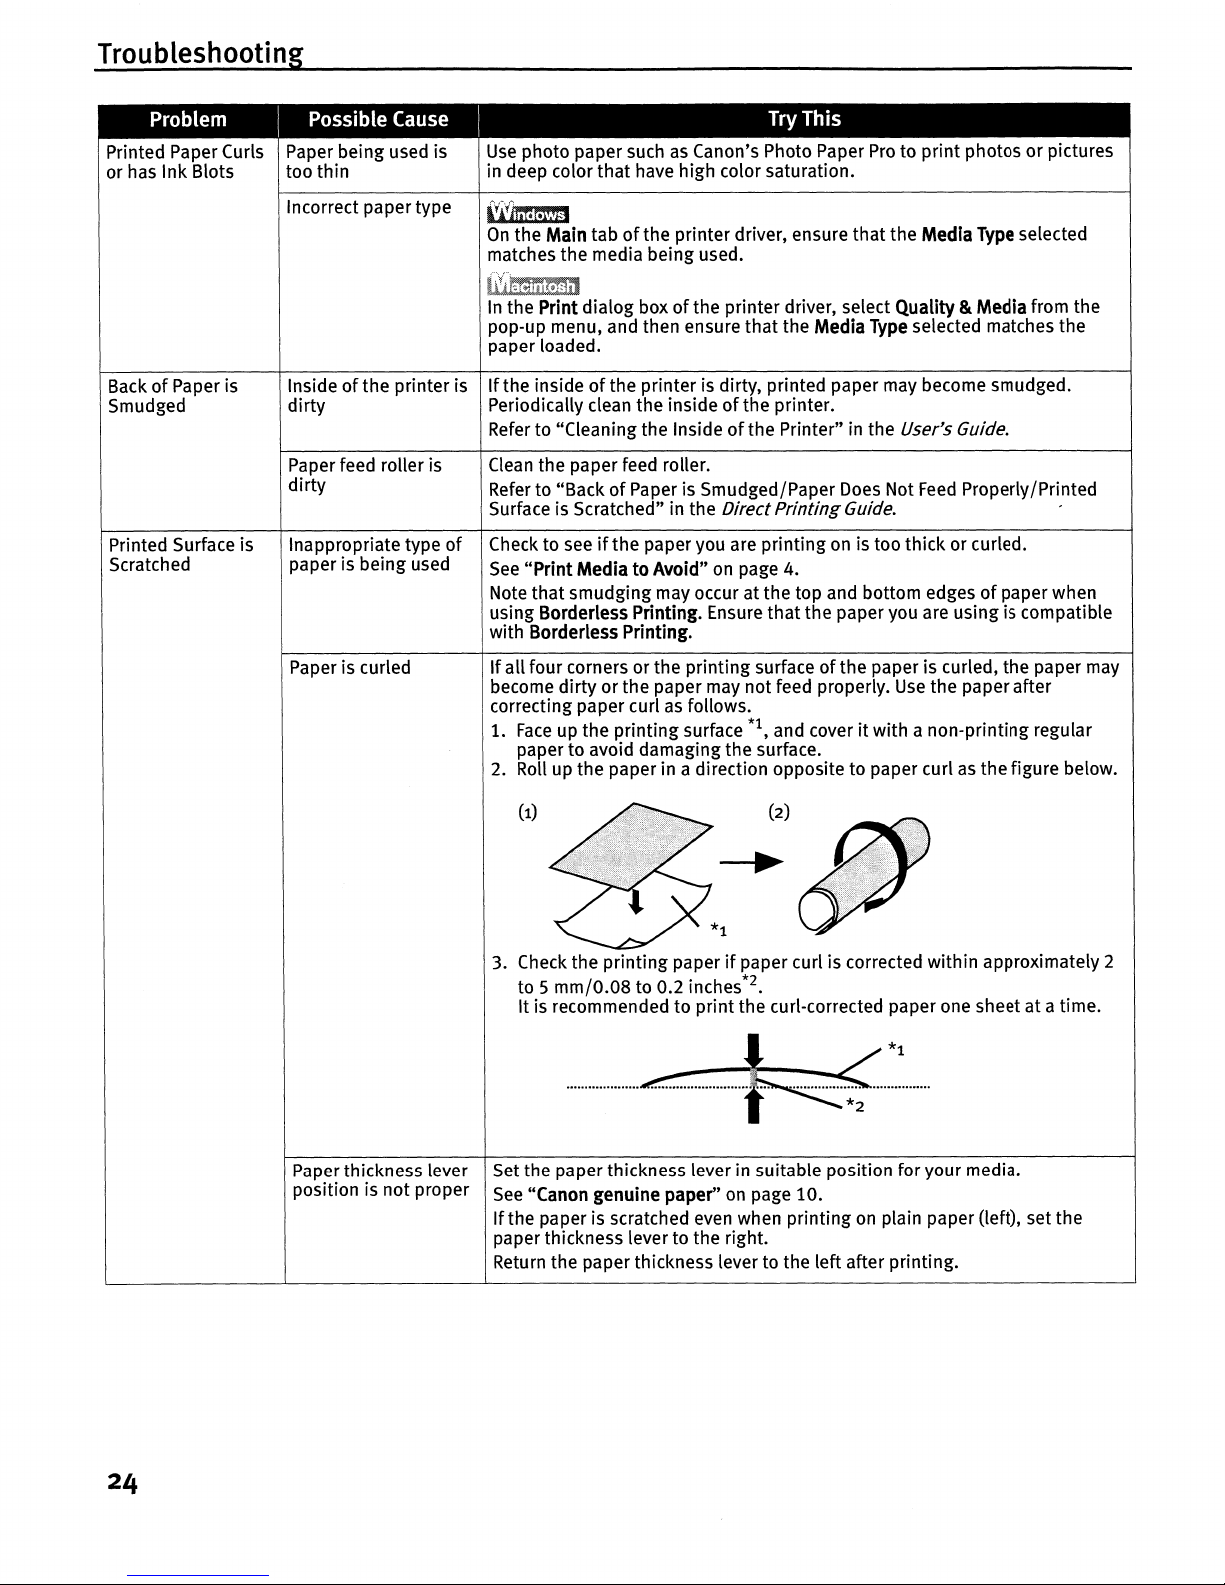
Paper is curled
Clean
the paper feed roller.
Refer
to "BackofPaper is Smudged/Paper
Does
Not
Feed
Properly/Printed
Surface is Scratched" in the
DirectPrinting Guide. .
Check to
seeifthe paper you are printingonis too thick or curled.
See
"Print
MediatoAvoid"onpage 4.
Note that smudging may occur at the top and bottom edges
of
paper when
using Borderless Printing. Ensure thatthe paper you are using is compatible
with Borderless Printing.
If
all four corners or the printing surfaceofthe paper is curled, the paper may
become dirty orthe paper may not feed properly.
Use
the paper after
correcting paper curl
as
follows.
1.
Face
up the printing surface
*1,
and coveritwith a non-printing regular
paper to avoid damaging the surface.
2.
Roll
up the paper in a direction opposite to paper curlasthe figure below.
24
Paper thickness lever
position is not proper
3. Check the printing paper
if
paper curl is corrected within approximately 2
to 5
mm/0.08
to 0.2 inches*2.
It is recommended to print the curl-corrected paper one sheet at a time.
I
*1
....................
~
~
...
Set the paper thickness lever in suitable position for your media.
See
"Canon genuine paper"onpage 10.
If
the paper is scratched
even
when printingonplain paper (left), set the
paper thickness lever to the right.
Return the paper thickness lever to the left after printing.

Troubleshooting
Printer Does Not Start
or
Stops During PrintJobs
Problem
I
Possible
Cause
I
Try
This
Printer Does Not
There may be
Restart your computer. It may solve the problem.
Start or Printer problems with your
Delete
an
undesired
print
job,ifthere is any.
Use
CanonIJStatus Monitor in
Stops During
operating system
Windows or
Printer
Setup
Utility(or Print
Center)
in Macintosh for the deletion.
Print
Jobs
i;irJmw!g
1. Open the printer properties dialog box.
See
"Openingthe Printer Properties Dialog
Box
Directly from the Start Menu"
on
page 16.
2.
Click the Maintenance tab and then
View
Printer Status.
3.
Click
Display Print
Queue.
4.
Select
Cancel
All
Documents
in the Printer menu.
W
Note
In
WindowsXPand
Windows
2000
The
print
jobs may notbeselected.
5.
When the confirmation message is displayed, click
Yes.
The
print job is deleted.
W
Note
In
WindowsMeand
Windows 98
Click to selectanundesired document and select
Purge
Print
Documents
in the Printer menu.
I;,~~
1. Select Applications from theGomenu.
2. Double-click the Printer
Setup
Utility icon in the Utilities folder.
When using Mac
as
x
v.
10.
2, double-click the Print
Center
icon.
3. Double-click the name
of
your printer displayed upder
Name
in the Printer
List.
4. Click to select
an
undesired document and click
~.
The
print job is deleted.
Cannot Print to
Incorrect page size Ensure that the page size setting matches the size
of
the paper loaded in the
EndofJob
is selected printer:
•
Check the
Page
Size
setting from within your application to ensure that
it
matches the sizeofthe paper loaded.
•
Check
Page
Size
on
the
Page
Setup
tab in the printer properties dialog box
of
the printer driver (Windows) or the
Page
Setup
dialog boxofthe printer driver
(Macintosh) to ensure that
it
matches the sizeofthe paper loaded.
,Yiyf1nmm
Check the sizeofthe print data.
For
WindowsXPand Windows
2000,
if
the size
of
The
sizeofthe
print
the data is too large, part
ofitmaybelost. When the spool format is
EMF,
follow
data is too large
the procedure below.
1. Open the printer properties dialog box.
2.
On
the
Page
Setup
tab, click Print Options.
3. Select the
Reduce
spool data
size
check box, and click
OK.
W
Note
When
Reduce
spool data
size
is set, the print quality may
be
degraded.
25
Troubleshooting
Paper
Does
Not
Feed
Properly
Problem
I
Possible Cause
I
Try This
Paper Does Not
Inappropriate type
•
Check to seeifthe paper you are
printingonis too
thick
or curled.
Feed
Properly
of
paper is being
See
"PrintMedia to Avoid"
on
page 4.
used
•
Checkifthe paper exceeds the load
limit
mark.Ifit
exceeds, load less paper.
See
"Loading Plain
Paper"
on
page 6.
Paper feed roller is
Clean the paper feed rollers.
dirty
Refer to "BackofPaper is Smudged/Paper Does Not
Feed
Properly/Printed Surface
is Scratched" in the
Direct
Printing
Guide.
Paper is loaded
Load
in the
portrait
orientation regardlessofthe
print
directionofthe auto sheet
incorrectly feed.
Ensure
that
paper is loaded correctly. Pinch the paper guide and slideitagainst
the
paper stack.
See
"loading
Paper"
on
page 4.
Paper
Jams
Problem
I
Possible Cause
I
Try This
Paper
Jams
Landscape credit
Remove the paperinside
of
the printer. Refer to "Paper Jams" in "Troubleshooting"
card-sized paper
section
of
the
Direct
Printing
Guide.
jams inside the
printer
Paper jams in the
paper
output
slot/
auto sheet feeder
Paper is loaded
Check to see
if
the paper is loaded correctly, and set the paper guide for the
incorrectly loaded paper correctly.
See
"loading
Paper"
on
page 4.
26
 Loading...