

Page 1

Setup Guide
BE
QA7-3632-V01
Page 2

Exif Print
This printer supports ExifPrint.
Exif Print is a standard for enhancing the communication between digital cameras and printers. By
connecting to an Exif Print-compliant digital camera, the camera’s image data at the time of shooting is
used and optimized, yielding extremely high quality prints.
Canadian Radio Interference Regulations
This digital apparatus does not exceed the Class B limits for radio noise emissions from a digital
apparatus as set out in the interference-causing equipment standard entitled “Digital Apparatus,”
ICES-003 of the Industry Canada.
Cet appareil numérique respecte les limites de bruits radioélectriques applicables aux appareils
numériques de Classe B prescrites dans la norme sur le matériel brouilleur NMB-003 d'Industrie
Canada intitulée « Appareils numériques ».
International ENERGY STAR® Program
As an ENERGY STAR® Partner, Canon Inc. has determined that this product meets the ENERGY
STAR guidelines for efficiency.
The International ENERGY STAR
that promotes energy saving through the use of computer and other office equipment.
The program backs the development and dissemination of products with functions
that effectively reduce energy consumption. It is an open system in which business
can participate voluntarily. The targeted products are office equipment such as computers, monitors, printers, faxes and copiers.
Their standards and logos are uniform among participating nations.
®
Office Equipment Program is a global program
Power Requirements
Never use a power supply voltage other than that supplied in the country of purchase. Using the incorrect voltage could cause a fire or electric shock. The correct power supply voltages and frequencies are
as follows:
AC 110-120V, 50-60Hz
AC 220-240V, 50-60Hz
Conformity declaration for R&TTE
We, Canon hereby declare that this equipment (printer) PIXMA iP5200R is in compliance with the
essential requirements and other relevant provisions of Directive 1999/5/EC.
FCC Radiation Exposure Statement
This equipment complies with FCC radiation exposure limits set forth for at uncontrolled equipment.
This equipment should be installed and operated with minimum distance at least 20cm between the
radiator and persons body (excluding extremities: hands, wrists, feet and legs) and must not be
co-located or operated with any other antenna or transmitter.
Printer Model: K10253 (iP5200R)
N118
Page 3

Table of Contents
Preface . . . . . . . . . . . . . . . . . . . . . . . . . . . . . . . . . . . . . . . . . . . . . . . . . . . . . . 2
Introduction . . . . . . . . . . . . . . . . . . . . . . . . . . . . . . . . . . . . . . . . . . . . . . . . . . . . . . . . . . . . . . . . . . . 2
Setup Outline . . . . . . . . . . . . . . . . . . . . . . . . . . . . . . . . . . . . . . . . . . . . . . . . . . . . . . . . . . . . . . . . . . 3
Confirming Your Connection Type. . . . . . . . . . . . . . . . . . . . . . . . . . . . . . . . 4
Connecting over Wireless LAN via an Access Point . . . . . . . . . . . . . . . . . . . . . . . . . . . . . . . . . . . . 5
Connecting over Wired LAN . . . . . . . . . . . . . . . . . . . . . . . . . . . . . . . . . . . . . . . . . . . . . . . . . . . . . . 6
Connecting with USB Connection . . . . . . . . . . . . . . . . . . . . . . . . . . . . . . . . . . . . . . . . . . . . . . . . . . 6
Combination of USB Connection and LAN (Wireless or Wired) . . . . . . . . . . . . . . . . . . . . . . . . . . . 7
Setting Up . . . . . . . . . . . . . . . . . . . . . . . . . . . . . . . . . . . . . . . . . . . . . . . . . . . . 9
Preparing the Printer . . . . . . . . . . . . . . . . . . . . . . . . . . . . . . . . . . . . . . . . . . . . . . . . . . . . . . . . . . . . 9
Installing the Print Head. . . . . . . . . . . . . . . . . . . . . . . . . . . . . . . . . . . . . . . . . . . . . . . . . . . . . . . . . . 9
Installing the Ink Tanks . . . . . . . . . . . . . . . . . . . . . . . . . . . . . . . . . . . . . . . . . . . . . . . . . . . . . . . . . 12
Loading Paper . . . . . . . . . . . . . . . . . . . . . . . . . . . . . . . . . . . . . . . . . . . . . . . . . . . . . . . . . . . . . . . . 13
Confirming the Setup Environment . . . . . . . . . . . . . . . . . . . . . . . . . . . . . . 15
On Firewalls. . . . . . . . . . . . . . . . . . . . . . . . . . . . . . . . . . . . . . . . . . . . . . . . . . . . . . . . . . . . . . . . . . 16
Confirming Settings of your Access Point . . . . . . . . . . . . . . . . . . . . . . . . . . . . . . . . . . . . . . . . . . . 17
Setting Up the Printer and the Computer (Windows) . . . . . . . . . . . . . . . . 18
Installing the Software . . . . . . . . . . . . . . . . . . . . . . . . . . . . . . . . . . . . . . . . . . . . . . . . . . . . . . . . . . 18
First-time Setup for Use over Wireless LAN . . . . . . . . . . . . . . . . . . . . . . . . . . . . . . . . . . . . . . . . . 20
First-time Setup for Use over Wired LAN . . . . . . . . . . . . . . . . . . . . . . . . . . . . . . . . . . . . . . . . . . . 24
Setting Up for Use with USB Connection . . . . . . . . . . . . . . . . . . . . . . . . . . . . . . . . . . . . . . . . . . . 27
Setting Up an Additional Computer to Use a Printer Already Connected to a Network. . . . . . . . . 28
Aligning the Print Head . . . . . . . . . . . . . . . . . . . . . . . . . . . . . . . . . . . . . . . . . . . . . . . . . . . . . . . . . 30
Setting Up the Printer and the Computer (Macintosh) . . . . . . . . . . . . . . . 32
Installing the Software . . . . . . . . . . . . . . . . . . . . . . . . . . . . . . . . . . . . . . . . . . . . . . . . . . . . . . . . . . 32
First-time Setup for Use over Wireless LAN . . . . . . . . . . . . . . . . . . . . . . . . . . . . . . . . . . . . . . . . . 34
First-time Setup for Use over Wired LAN . . . . . . . . . . . . . . . . . . . . . . . . . . . . . . . . . . . . . . . . . . . 38
Setting Up for Use with USB Connection . . . . . . . . . . . . . . . . . . . . . . . . . . . . . . . . . . . . . . . . . . . 41
Setting Up an Additional Computer to Use a Printer Already Connected to a Network. . . . . . . . . 43
Aligning the Print Head . . . . . . . . . . . . . . . . . . . . . . . . . . . . . . . . . . . . . . . . . . . . . . . . . . . . . . . . . 45
Basic Operations . . . . . . . . . . . . . . . . . . . . . . . . . . . . . . . . . . . . . . . . . . . . . 47
Printing with Windows . . . . . . . . . . . . . . . . . . . . . . . . . . . . . . . . . . . . . . . . . . . . . . . . . . . . . . . . . . 47
Printing with Macintosh . . . . . . . . . . . . . . . . . . . . . . . . . . . . . . . . . . . . . . . . . . . . . . . . . . . . . . . . . 48
Replacing an Ink Tank . . . . . . . . . . . . . . . . . . . . . . . . . . . . . . . . . . . . . . . . . 49
Troubleshooting. . . . . . . . . . . . . . . . . . . . . . . . . . . . . . . . . . . . . . . . . . . . . . 50
Cannot connect to the access point (the access point is not detected). . . . . . . . . . . . . . . . . . . . . 51
How to set a network key/network password. . . . . . . . . . . . . . . . . . . . . . . . . . . . . . . . . . . . . . . . . 53
Cannot connect to the printer (the printer is not detected) . . . . . . . . . . . . . . . . . . . . . . . . . . . . . . 55
The following screen is displayed during setup . . . . . . . . . . . . . . . . . . . . . . . . . . . . . . . . . . . . . . . 56
Re-setting the printer . . . . . . . . . . . . . . . . . . . . . . . . . . . . . . . . . . . . . . . . . . . . . . . . . . . . . . . . . . . 61
The admin password set to the printer was forgotten . . . . . . . . . . . . . . . . . . . . . . . . . . . . . . . . . . 61
Changing the port name . . . . . . . . . . . . . . . . . . . . . . . . . . . . . . . . . . . . . . . . . . . . . . . . . . . . . . . . 61
Checking information about the network . . . . . . . . . . . . . . . . . . . . . . . . . . . . . . . . . . . . . . . . . . . . 61
Printing Photographs Directly from a PictBridge Compliant Device . . . 63
Connecting to a PictBridge Compliant Device. . . . . . . . . . . . . . . . . . . . . . . . . . . . . . . . . . . . . . . . 63
Printing Photographs Directly from a PictBridge Compliant Device . . . . . . . . . . . . . . . . . . . . . . . 65
Printing Photographs Directly from a Canon Bubble Jet Direct
Compatible Digital Camera . . . . . . . . . . . . . . . . . . . . . . . . . . . . . . . . . . . . . 68
Printing and Initializing Network Settings . . . . . . . . . . . . . . . . . . . . . . . . . 69
Printing Out Network Setting Information . . . . . . . . . . . . . . . . . . . . . . . . . . . . . . . . . . . . . . . . . . . 69
Initializing Network Settings . . . . . . . . . . . . . . . . . . . . . . . . . . . . . . . . . . . . . . . . . . . . . . . . . . . . . . 69
1
Page 4
Preface
Introduction
Thank you for purchasing a Canon Inkjet Printer.
This
Setup Guide
instructions indicated by these symbols.
Instructions that, if ignored, could result in death or serious personal injury caused by incorrect
operation of the equipment. These must be observed for safe operation.
Instructions that, if ignored, could result in personal injury or material damage caused by incorrect
operation of the equipment. These must be observed for safe operation.
Instructions that must be observed for safe operation.
uses the following symbols to indicate important information. Always observe the
Also read the Safety Precautions in the
personal injury or damage to the printer.
Trademark Notices
• “Windows” and “Internet Explorer” are trademarks of Microsoft Corporation, registered in the United
States and other countries.
• “Macintosh”, “Mac”, and “AirPort” are trademarks of Apple Computer, Inc., registered in the U.S. and
other countries.
• “Wi-Fi” is a registered trademark of the Wi-Fi Alliance. The “Wi-Fi CERTIFIED” logo is a
certification mark of the Wi-Fi Alliance.
• “Ethernet” is a trademark of Xerox Corporation.
Copyright ©2005 CANON INC.
All rights reserved. No part of this publication may be transmitted or copied in any form whatsoever
without the express written permission.
User’s Guide
. Observe the warnings and cautions to avoid
2
Page 5
Setup Outline
Follow the steps below to start using the printer.
Step 1
Confirming Your Connection Type. (see page 4)
There are several ways to connect the printer and your computer.
Decide on a connection type that matches your network setup.
Step 2
Setting Up. (see page 9)
Place the printer and install the print head and the ink tanks.
Step 3
Confirming the Setup Environment. (see page 15)
Setup procedure differs depending on the type of your connection.
Make sure you know which setup procedure to perform.
Step 4
Set Up the Printer and the Computer.
(for Windows
Install the driver to use the printer and the software to connect it to a network.
®
see page 18, for Macintosh® see page 32)
Setup complete
The printer is now ready for use.
3
Page 6
Confirming Your Connection
Type
If your printer is connected to a network, it can be shared by multiple computers.
This printer can be used over wireless or wired LAN, as well as with USB connection.
Connection types available for this printer are as follows.
• wireless LAN via an access point (see page 5)
• wired LAN (see page 6)
• USB connection (see page 6)
• combination of USB connection and LAN (wireless or wired) (see page 7)
Before starting setup, make sure you know the type of connection available to your computer, and decide on
a connection type for your printer.
• Choose a connection method based on how you intend to connect to the printer.
For example, if the connection between the computer and access point is wireless and the printer
and access point are connected by LAN cable, the printer connection method becomes wired LAN.
• We recommend that you do not use the printer over a wired and wireless LAN at the same time
since advanced network knowledge is required.
Refer to the manuals of your network devices for necessary information. In an office setup, consult
your network administrator.
4
Page 7
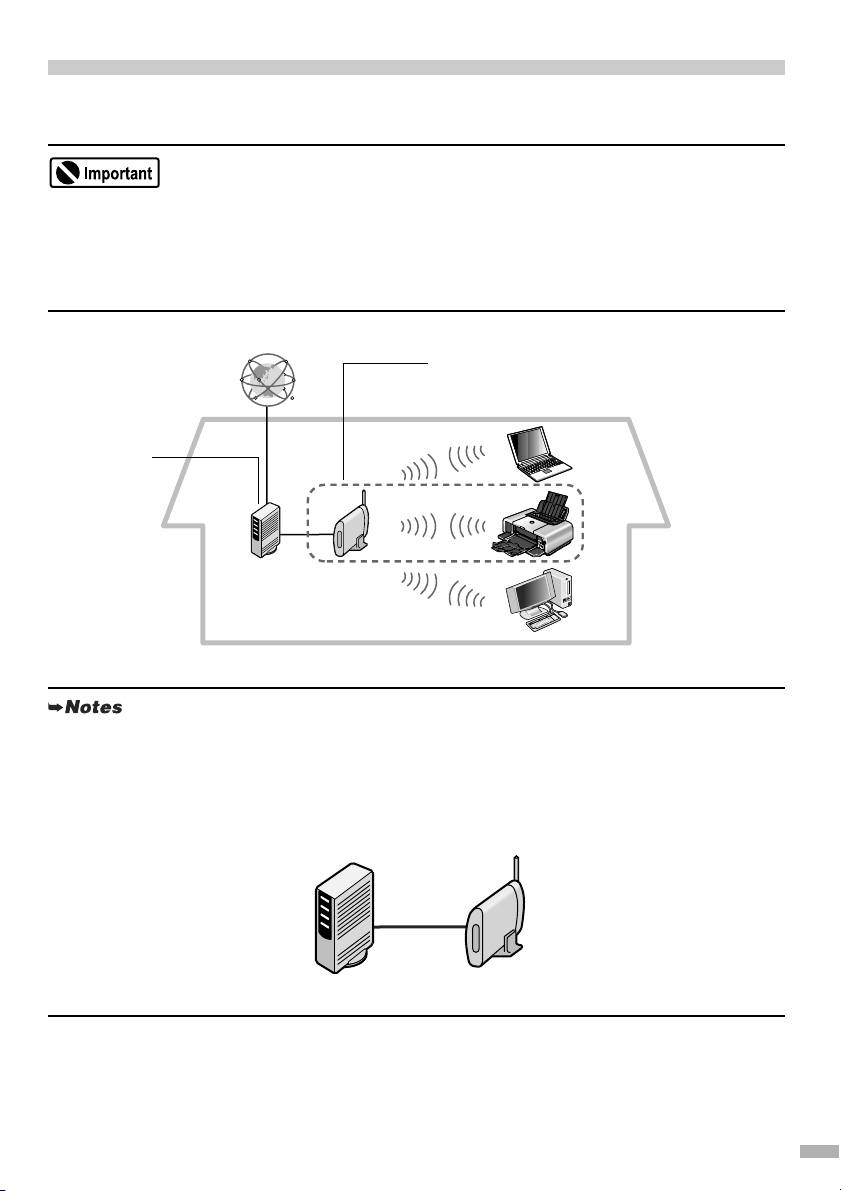
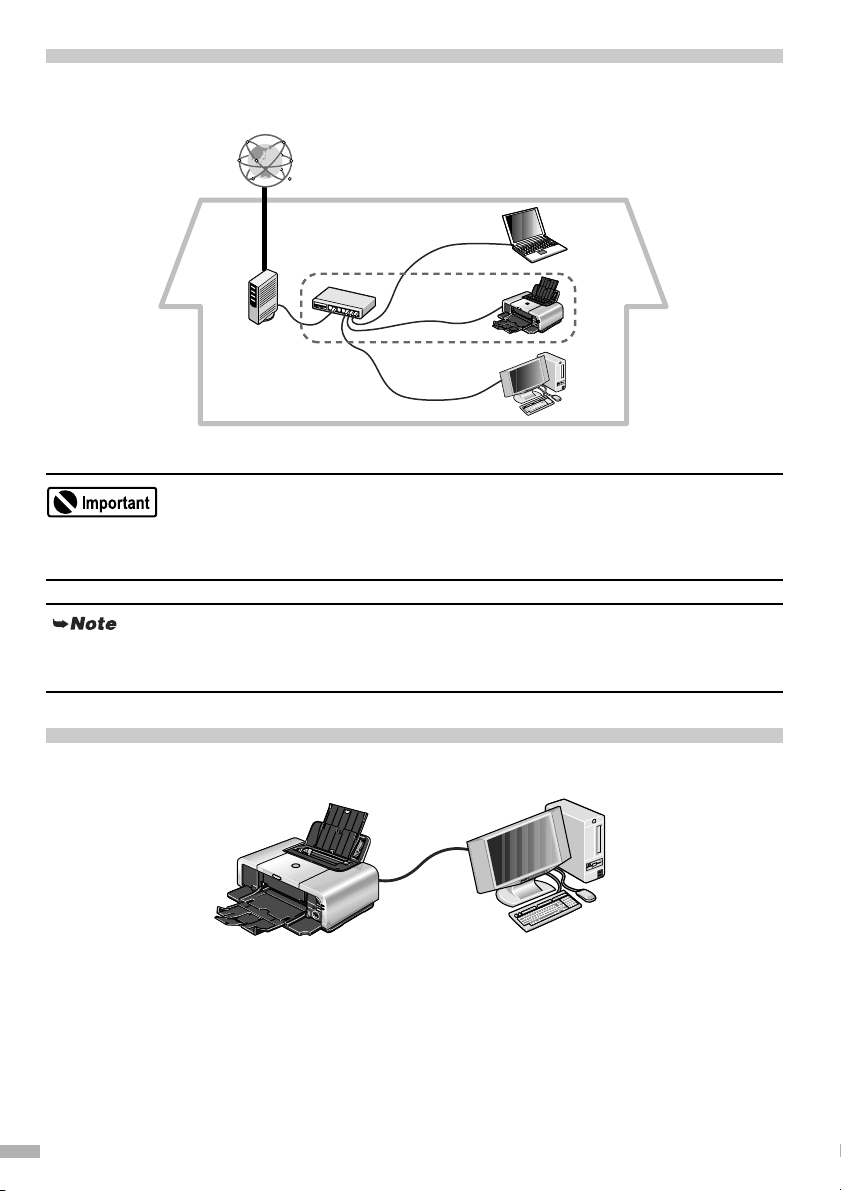
Connecting over Wireless LAN via an Access Point
Your computer communicates with the printer via an access point (the infrastructure mode). To share the
printer among multiple computers, connect them to the access point.
• When using this printer in a wireless LAN setup, use the infrastructure mode. It does not support
the ad-hoc mode.
• An access point is needed to set up the infrastructure mode.
• If you connect to a network that is not protected with security measures, there is a risk of disclosing
data such as your personal information to a third party.
Connects to
the Internet
The Internet
Broadband
modem with
router
Wireless LAN
access point
(without router)
The printer communicates
with your computer(s) via
the access point
Wireless LAN
• A wireless LAN card or adapter must be installed in your computer to connect your computer to the
wireless LAN.
• A variant is the wireless LAN setup shown below, where your wireless LAN access point has the
router function, instead of your Internet connection device, such as a broadband modem. The type
of device in use in your network may vary. Refer to the manual of your device or contact its
manufacturer for details.
Broadband
modem without
router
Wireless LAN
access point
(with router)
• The printer and the router need to be in the same network.
5
Page 8
Connecting over Wired LAN
Your computer communicates with the printer via an Ethernet network.
The Internet
LAN cable
Broadband
modem with
router
A hub and LAN cable are required to connect this printer to a wired LAN. These must be purchased
separately.
Hub
The type of device in use in your network may vary. Refer to the manual of your device or contact its
manufacturer for details.
Connecting with USB Connection
Your computer communicates with the printer via a USB cable.
USB Cable
6
Page 9
Combination of USB Connection and LAN
(Wireless or Wired)
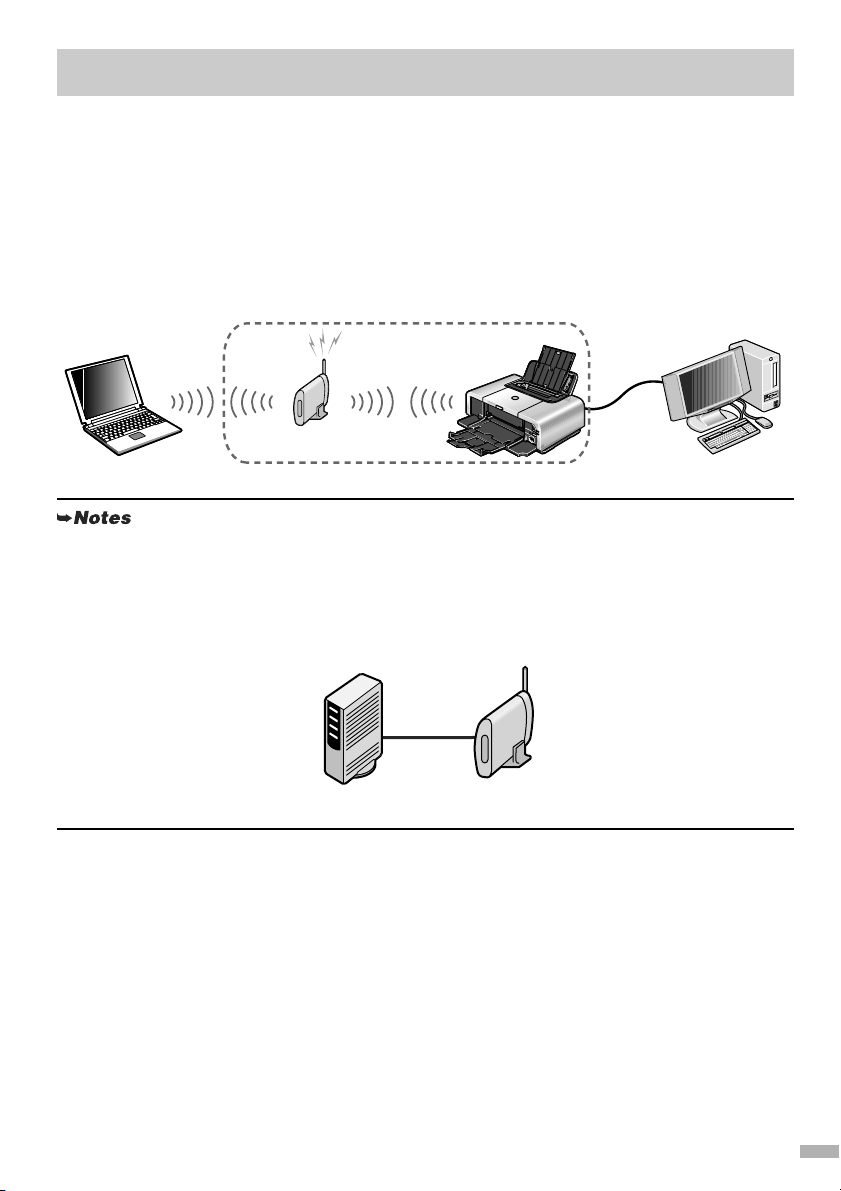
Using both USB Cable and Wireless LAN Connections
A computer communicates directly with the printer with a USB cable, while other computers are
connected over a wireless LAN (infrastructure mode).
You can exploit this configuration by setting up the printer over either a USB connection first, or
over a wireless connection first.
You can connect to a USB-connected printer from another computer over wireless LAN, and
connect another computer by USB to a wireless LAN-connected printer.
Wireless LAN
Wireless LAN
access point
• A wireless LAN card or adapter must be installed in your computer to connect your computer to the
wireless LAN.
• A variant is the wireless LAN setup shown below, where your wireless LAN access point has the
router function, instead of your Internet connection device, such as a broadband modem. The type
of device in use in your network may vary. Refer to the manual provided with your device or
contact its manufacturer for details.
Broadband
modem without
router
• The printer and the router need to be in the same network.
You need to perform setup both on the computer to be used with USB connection and on the
computers to be used over wireless LAN.
USB cable
Wireless LAN
access point
(with router)
7
Page 10
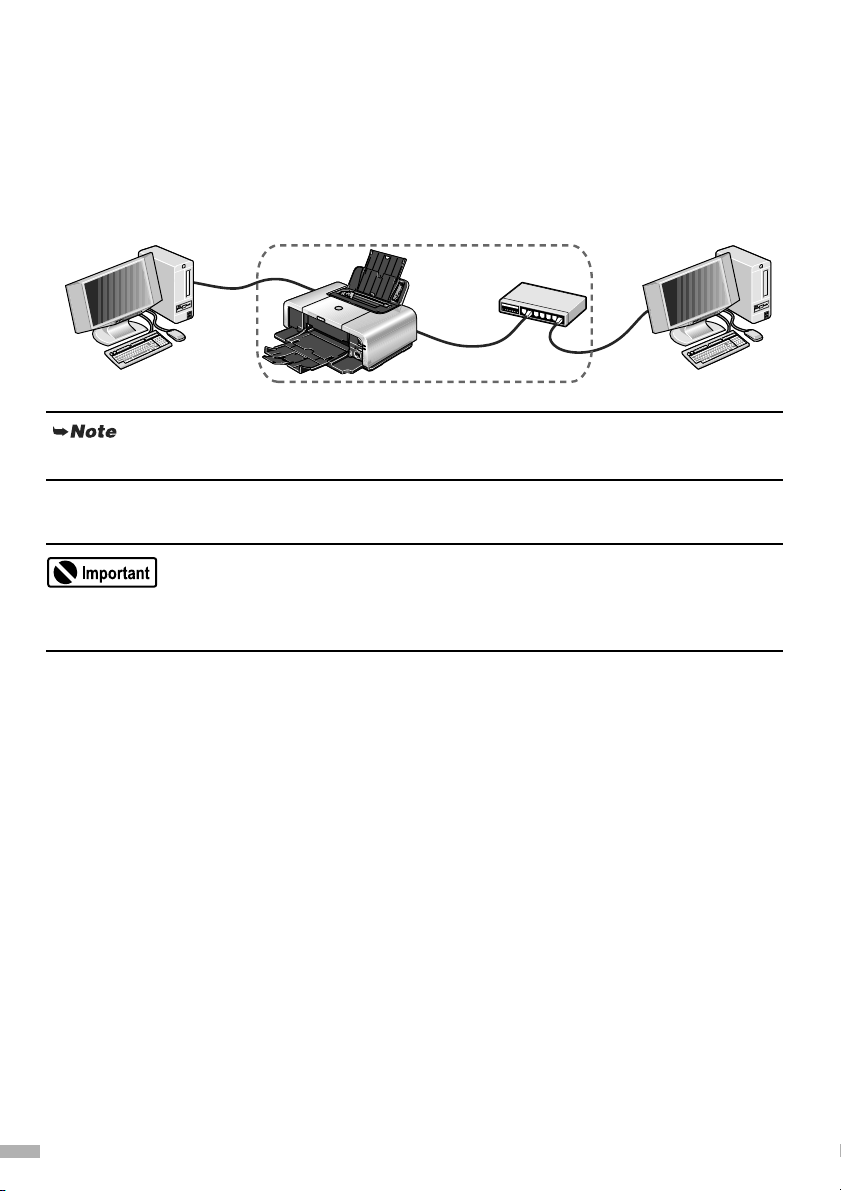
Using both USB Cable and Wired LAN Connections
A computer communicates directly with the printer with a USB cable, while other computers are
connected over wired LAN.
You can exploit this configuration by setting up the printer over either a USB connection first, or
over a wired connection first.
You can connect to a USB-connected printer from another computer over wired LAN, and connect
another computer by USB to a wired LAN-connected printer.
USB
cable
Wired LAN
Hub
To connect over wired LAN, your printer needs to be connected to a hub or a similar network device.
You need to perform setup both on the computer to be used with USB connection and on the
computers to be used over wired LAN.
We recommend that you do not use the printer over a wired and wireless LAN at the same time since
advanced network knowledge is required.
8
Page 11

Setting Up
Preparing the Printer
Although wireless communication between rooms or floors is possible, the wireless communication
quality may become poor. The wall must be made of a material that allows radio waves to pass
through. If the wall material prevents communication, set the printer in the same room as the access
point.
1
Place the printer on a flat surface.
2
Remove the tape from the printer.
3
Before turning on the printer, open the
Top Cover and remove the protective
material and tape from the printer.
Be sure to remove the protective material before you turn
on the printer.
The tape position is subject to change.
4
Close the Top Cover.
Installing the Print Head
• Never attempt to plug the power cord into the power outlet or unplug the power cord when your
hands are wet.
• Never damage, modify, stretch, or excessively bend or twist the power cord. Do not place heavy
objects on the power cord.
• Never use any power supply other than the standard power supply available in the country of
purchase. Using the incorrect voltage and frequency could cause a fire or electric shock.
• Always push the plug all the way into the power outlet.
If you do not intend to use the printer for a long period of time, unplug the power cord from the
power outlet after turning off the printer.
9
Page 12
1
Plug the printer in.
2
Turn on the printer. Do NOT turn on the
computer yet.
The POWER lamp flashes green and the printer begins
to operate. Wait until the POWER lamp remains lit
green.
3
Open the Paper Output Tray and the
Top Cover, and then pull down the Inner
Cover.
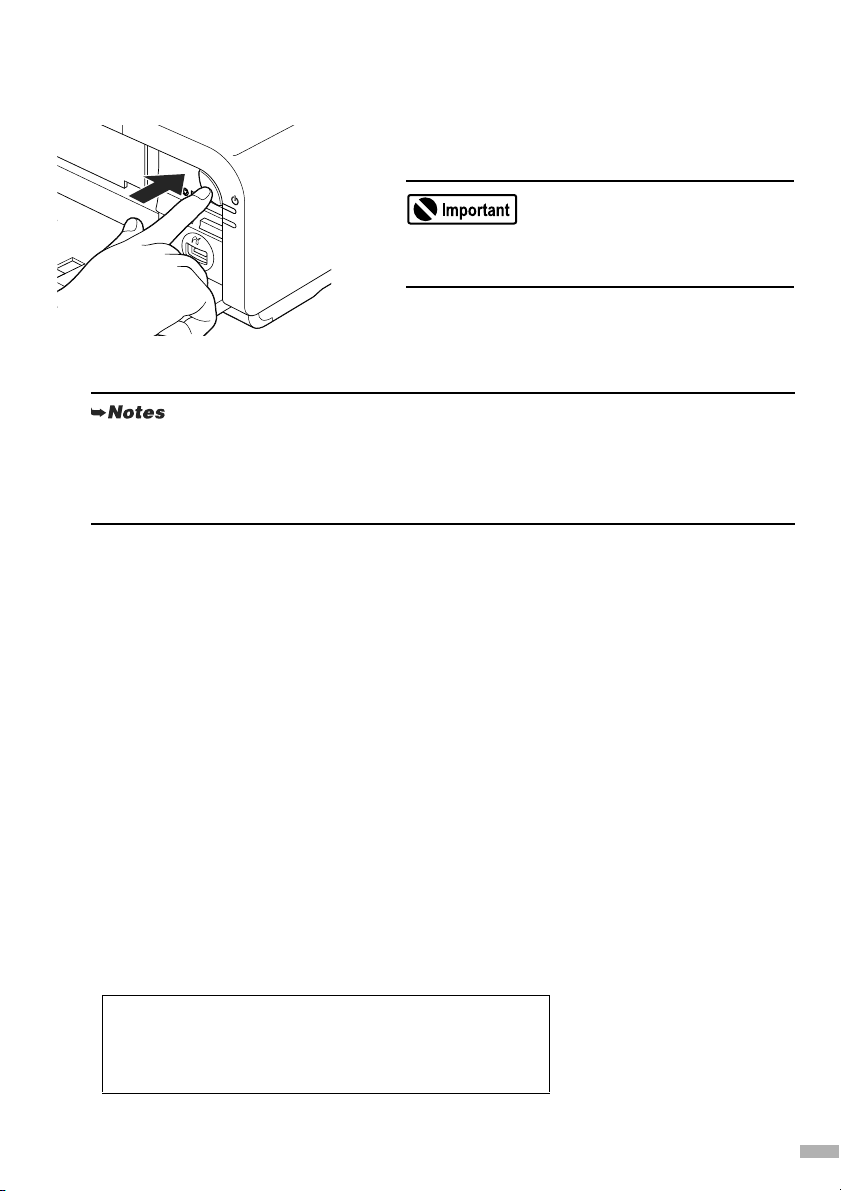
Push the Open Button above the Paper Output Tray. The
Paper Output Tray automatically opens.
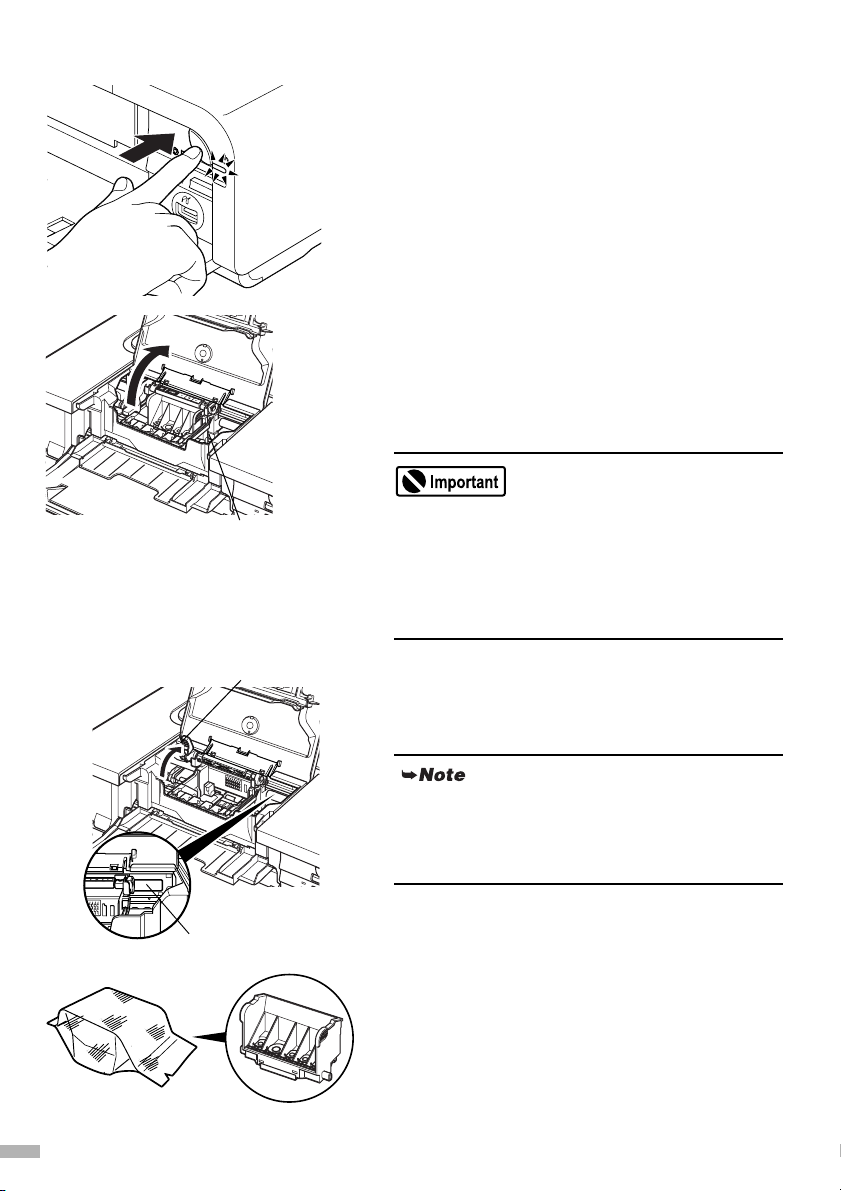
Print Head Holder
Print Head Lock Lever
Serial number location
• The Print Head Holder moves to the center when
the Top Cover is opened. Be careful not to touch it
while it is moving.
• If the Top Cover is opened more than ten minutes,
the Print Head Holder moves to the right side. If
this occurs, close the Top Cover, and open it again.
4
Raise the Print Head Lock Lever.
Do not touch internal parts other than the Print Head
Lock Lever.
For the customers in the United States
Write down the serial number located inside the
printer. You will need this later to register the
product.
5
Remove the print head from its
package.
10
Page 13
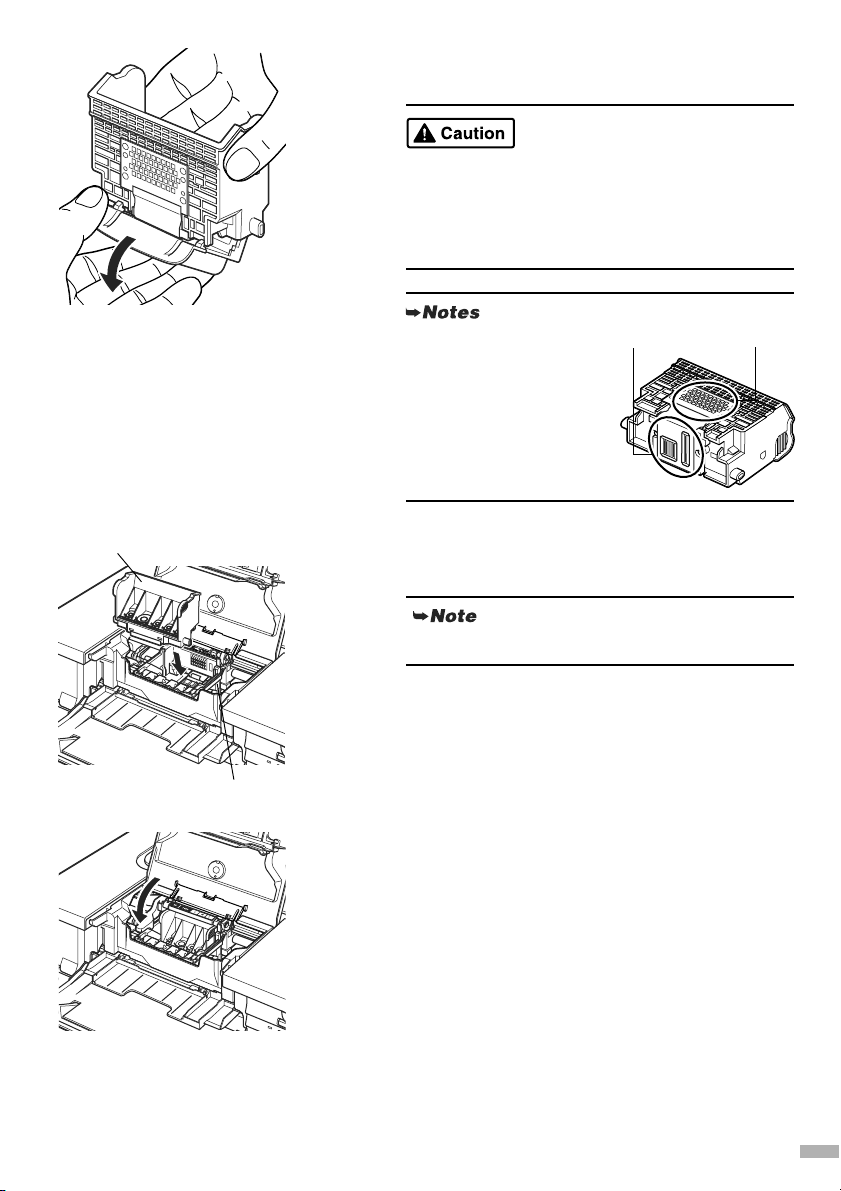
6
Remove the protective cap from the
Print Head.
There might be some transparent or light blue ink on
the inside of the bag the print head comes in, or the
inside of the protective cap - this has no effect on
print quality. Be careful not to get ink on yourself
when handling these items.
Print Head
Print Head Holder
Print Head
• Do not touch the Print
Head Nozzles or
Electrical Contacts.
• Do not attempt to
reattach the protective
cap once it has been
removed.
7
Place the Print Head in the holder.
The print head will rest at a slight angle.
Be careful not to touch any parts inside the printer.
8
Lock the Print Head into place by
Nozzles
carefully lowering the lever.
Do not touch the lever once the Print Head has been
installed.
Electrical
Contacts
11
Page 14
Installing the Ink Tanks
• For safety reasons, store ink tanks out of the reach of small children.
• Do not drop or shake ink tanks as this may cause the ink to leak out and stain your clothes and hands.
• Be sure to remove the clear film from the ink tank in the exact order as shown in step 2.
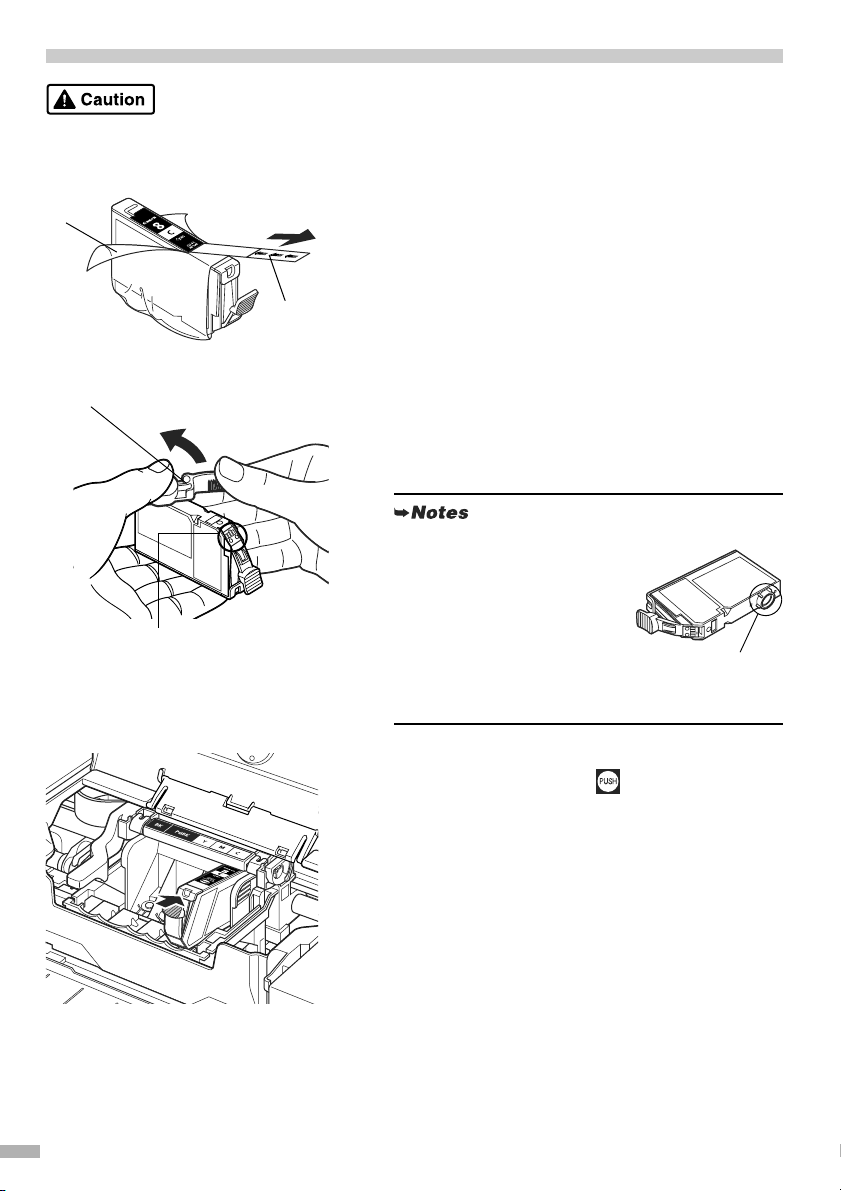
1
(B)
(A)
Unpack the cyan ink tank.
2
Pull the orange tape (A) off in the
direction of the arrow and remove the
clear film. Then, remove the film (B).
Protective cap
Do not touch the
electrical contacts.
3
Hold the ink tank as shown in the
diagram and remove the orange
protective cap located on the bottom of
the ink tank.
• Do not squeeze the side of
ink tanks as this may cause
the ink to leak out and stain
your clothes and hands.
• Do not touch the open ink
port.
• Do not reattach the protective
cap once you have removed
it.
4
Insert the cyan ink tank into the righthand slot. Press the mark on the ink
tank until it clicks into place and then its
red lamp lights.
ink port
12
Page 15
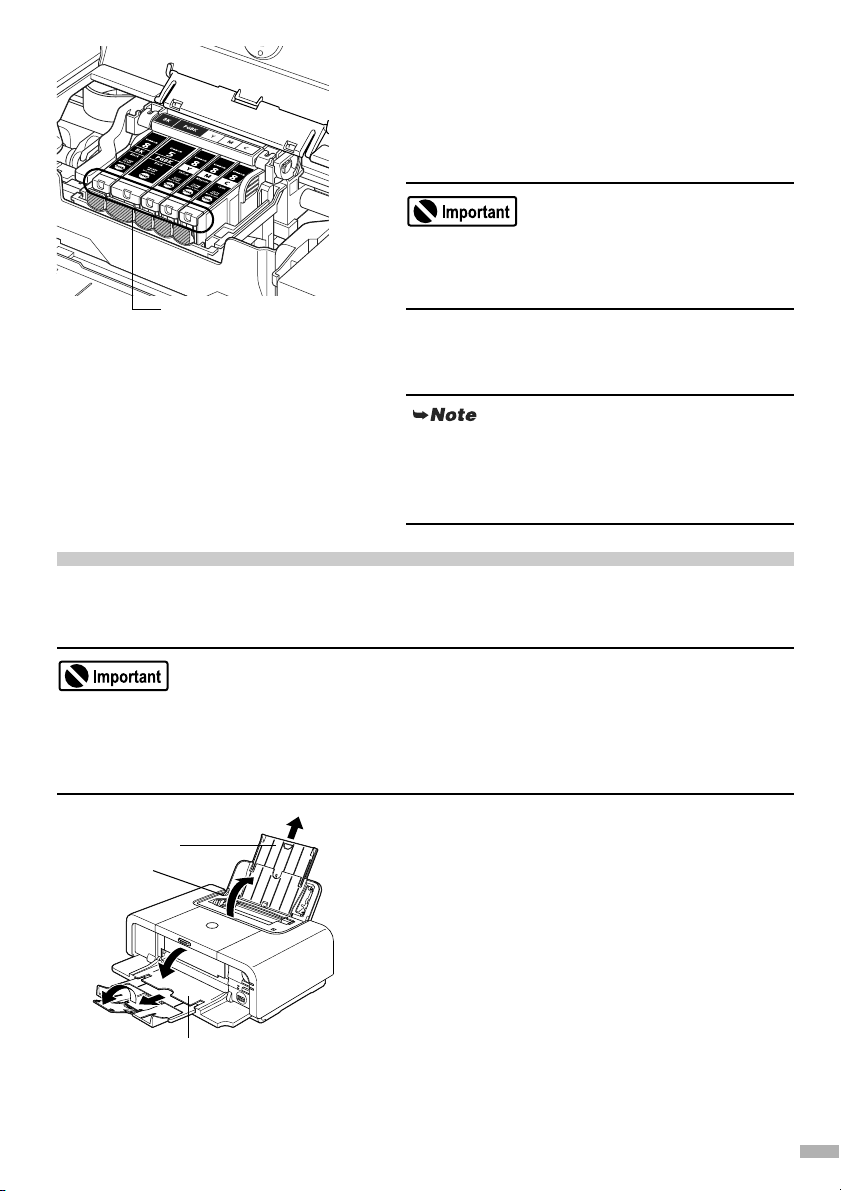
5
Use the same procedure to install the
other ink tanks into their appropriate
slots.
Check the labels to make sure that each tank is in the
correct position.
Ensure that all the ink tanks are installed in the order
directed by the label. The printer cannot be used
unless all the ink tanks are installed.
Ensure that all the ink
tank lamps light red.
6
Put back the Inner Cover and close the
Top Cover.
The ALARM lamp still flashes orange if an ink tank
is not installed properly. Open the Top Cover and
make sure that all the ink tanks are installed in the
correct order directed on the label.
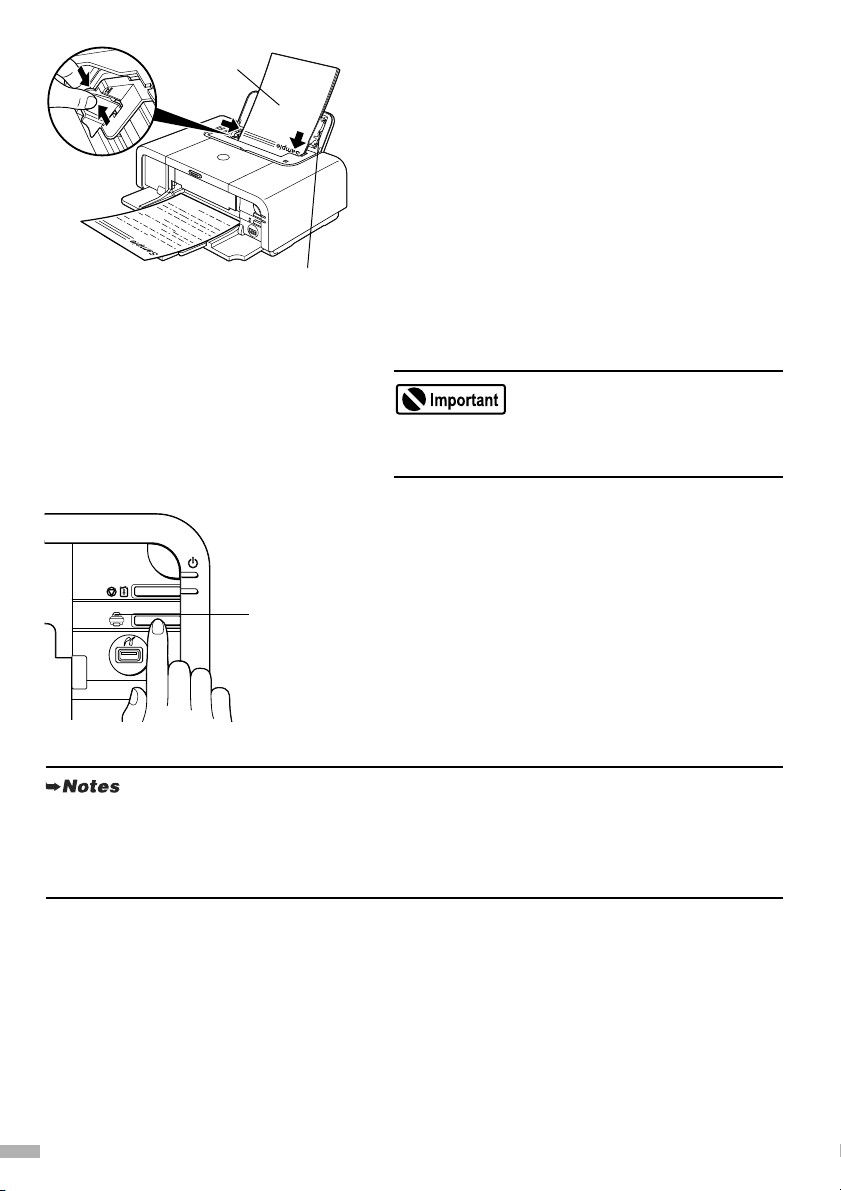
Loading Paper
This section describes how to load A4 (Letter) size plain paper in the Auto Sheet Feeder. When performing
the print head alignment, you need to load paper in the Auto Sheet Feeder.
• Always load paper in portrait orientation. Loading paper in landscape orientation can cause the
paper to be jammed.
• Cutting plain paper to 4" x 6" / 101.6 mm x 152.4 mm, 5" x 7" / 127.0 x 177.8 mm, or 2.13" x 3.39"
/ 54.0 x 86.0 mm (Credit Card) size for a trial printing can cause paper jams.
1
Paper Support
Auto Sheet
Feeder
Paper Output Tray
Pull out the Paper Support and open the
Paper Output Tray completely as
shown.
Push the Open Button above the Paper Output Tray. The
Paper Output Tray automatically opens.
13
Page 16
Print side
Cover Guide
Auto Sheet
Feeder Lamp
2
Load the paper and align it with the
Cover Guide on right side of the Paper
Support.
You can load up to 150 sheets of plain paper (64 gsm/17
lb). Do not exceed this limit.
3
Slide the Paper Guide against the left
side of the paper stack.
Ensure that the Cover Guide stands when you load
paper in the Auto Sheet Feeder.
4
Ensure that the Auto Sheet Feeder
Lamp is lit. If not, press the Paper Feed
Switch.
• Other than the Auto Sheet Feeder, you can load paper in the Cassette. For information on loading
the print media in the Cassette, refer to the User’s Guide.
• You can select the paper source also from the printer driver. For details, refer to the Printer Driver
Guide.
14
Page 17
Confirming the Setup Environment
1
Ensure that the printer and the
computer are turned off.
If the Power lamp is flashing, wait until it stops
flashing before turning off the power.
2
Turn on the computer.
• When using Windows XP, you must log on as the administrator. When using Windows 2000,
you must log on as a member of the administrators group. Do not switch users during setup.
• Close any open software applications including anti-virus, computer security and other
software.
If using over a USB connection, preparation is now complete. See “Setting Up the Printer and the
Computer (Windows)” on page 18 or “Setting Up the Printer and the Computer (Macintosh)” on
page 32.
3
Before setting up on a wired or wireless LAN, confirm the network
environment.
Confirm the following before setting up on a wireless LAN:
• Turn the firewall function off. For details on the firewall function, see “On Firewalls” on
page 16.
• Make sure that configuration of computers and the access point is complete, and check that
computers can connect to the network.
• Check the access point settings. For details, see “Confirming Settings of your Access Point” on
page 17.
Confirm the following before setting up on a wired LAN:
• Turn the firewall function off. For details on the firewall function, see “On Firewalls” on
page 16.
• Make sure that configuration of computers, hubs, and other network devices is complete, and
check that computers can connect to the network.
You now need to set up the printer and your computer:
Windows: Go to page 18
®
Mac
OS X: Go to page 32
15
Page 18
After setup is complete, turn back on any security functions you disabled for setup.
If you connect to a network that is not protected with security measures, there is a risk of disclosing
data such as your personal information to a third party.
For details on security functions and configuring network devices like access points, refer to the
manuals provided with those products, or contact their manufacturers.
On Firewalls
A firewall is a system that prevents unauthorized access to a local network from the outside.
When setting up the printer for a use over a network, disable the firewall of your security software during the
setup. Any firewall feature provided by security software may prevent proper setup or communication over
a network.
Infrastructure
Personal firewall
Personal firewall
The Internet
Broadband router with wireless
access point function
Firewall
Personal firewall
• If you disabled a firewall feature, disconnect your network from the Internet. You can do this by
configuring your access point or router not to connect to the Internet or WAN.
• For information on the firewall feature of your security software, refer to its manual. In an office
setup, consult your network administrator.
16
Page 19
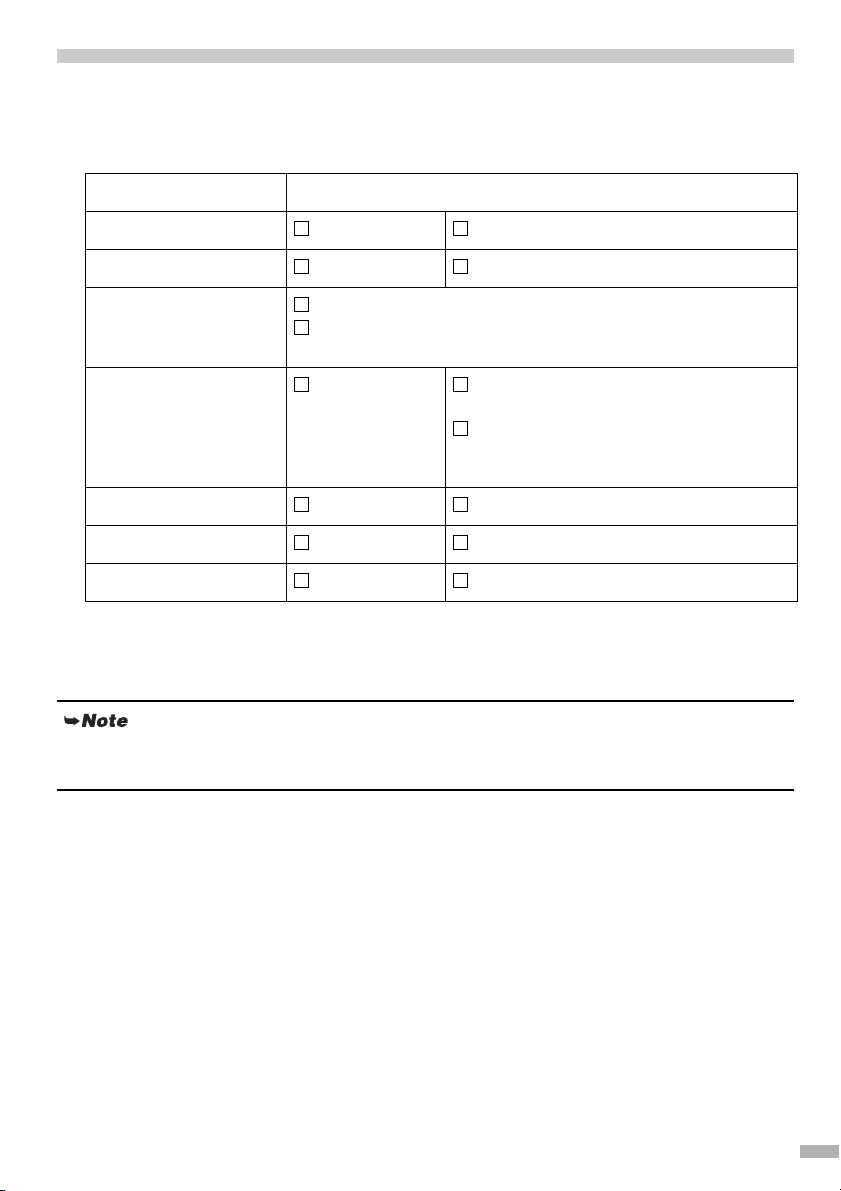
Confirming Settings of your Access Point
When setting up the printer to be used over wireless LAN, the printer’s network settings are configured to
match those of the access point. Therefore, if you are using wireless LAN, we recommend that you confirm
the necessary information on the access point before entering the setup process. Check and fill in the table
below.
SSID/network name
Stealth/closed network Disabled Enabled
ANY-Rejection Disabled Enabled
Radio channel Automatic
Channel ( )
: The printer can communicate in channels 1 to 11.
Encryption Disabled WEP Enabled
MAC address filtering Disabled Enabled
IP address filtering Disabled Enabled
Client-to-Client Blocking Disabled Enabled
key ( )
WPA Enabled*
key ( )
Encryption (TKIP · AES)
* This printer supports the methods below. If you are using another method, change the WPA
settings on the access point to match these.
Authentication method: WPA-PSK (WPA Personal)
Encryption method: TKIP or AES
For information on how to confirm the settings of the access point, refer to the manual provided with the
access point or contact its manufacturer.
• If Stealth (closed network) or ANY-Rejection feature is enabled
We recommend you to disable it before entering setup.
• If MAC address filtering is enabled
We recommend that you register the printer’s MAC address to the access point before entering setup. To
confirm the MAC address of the printer, print the printer’s network information. See “Printing Out
Network Setting Information” on page 69.
• If IP address filtering is enabled
Disable the access point’s IP address filtering feature while setting up the printer. After setup is complete,
configure the printer to communicate with other devices and then turn back the IP address filtering feature
on.
• If Client-to-Client Blocking is enabled
An access point may be capable of blocking all direct transmission among clients associated to it. If such
feature is enabled, disable this feature while using the printer.
• Some access points are capable of automatically switching between wireless channels. This printer may
not be able to connect an access point if its channel is set to automatic or the equivalent, or to a channel
outside of the range 1 to 11. Configure the access point to use any channel between 1 and 11.
17
Page 20
Setting Up the Printer and
the Computer (Windows)
Installing the Software
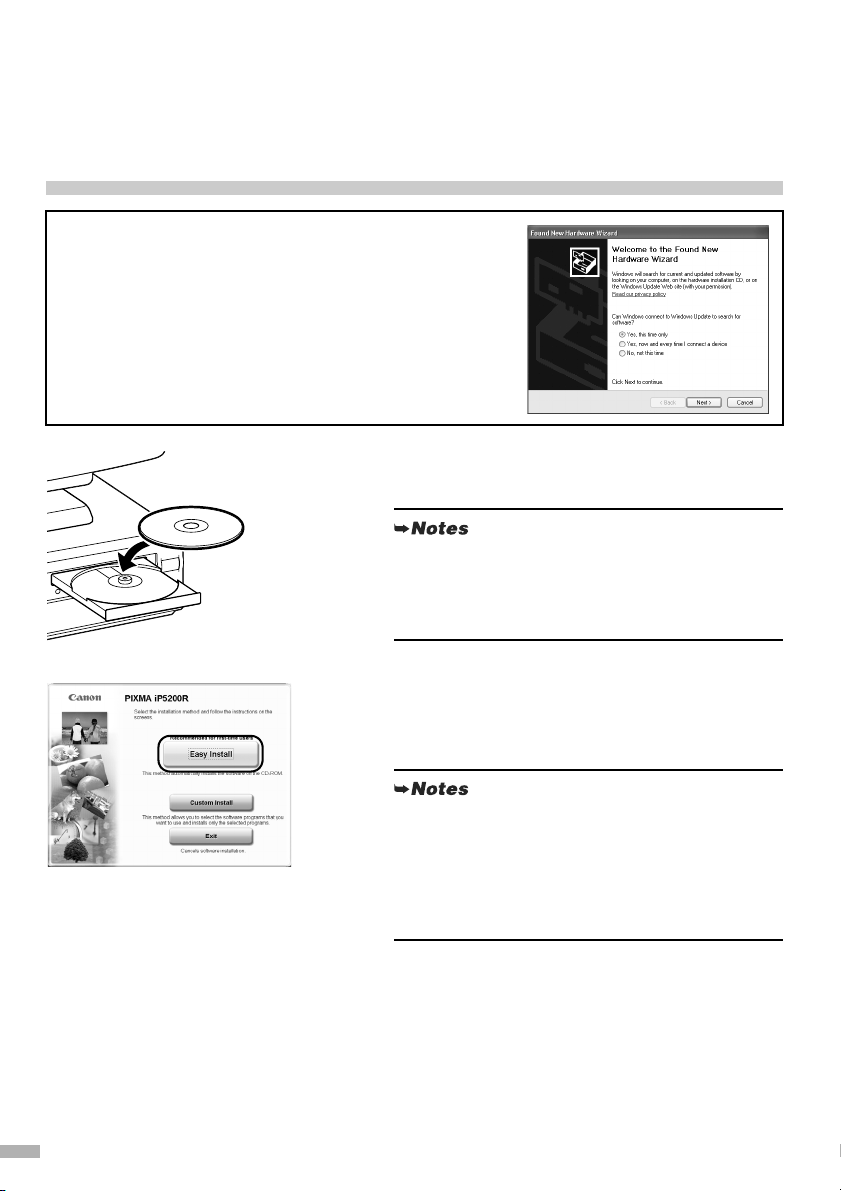
If the following screen appears automatically, click
the screen, turn off the printer, and remove the USB cable, then
resume setup. Re-insert the
.
ROM
Setup Software & User’s Guide CD-
Cancel
to quit
1
Place the Setup Software & User’s
Guide CD-ROM in the CD-ROM drive.
• If the language selection screen appears, select the
language, then click OK.
• If the location selection message appears, select
your place of residence, then click Next.
2
Follow the instructions displayed on
screen. When the screen shown on the
left is displayed, click Easy Install.
18
• When you select Easy Install, the items included
in the CD-ROM are installed automatically.
To select particular items to install, click Custom
Install and follow the instruction on the screen.
• To install PhotoRecord, click Custom Install and
follow the instructions on the screen.
Page 21
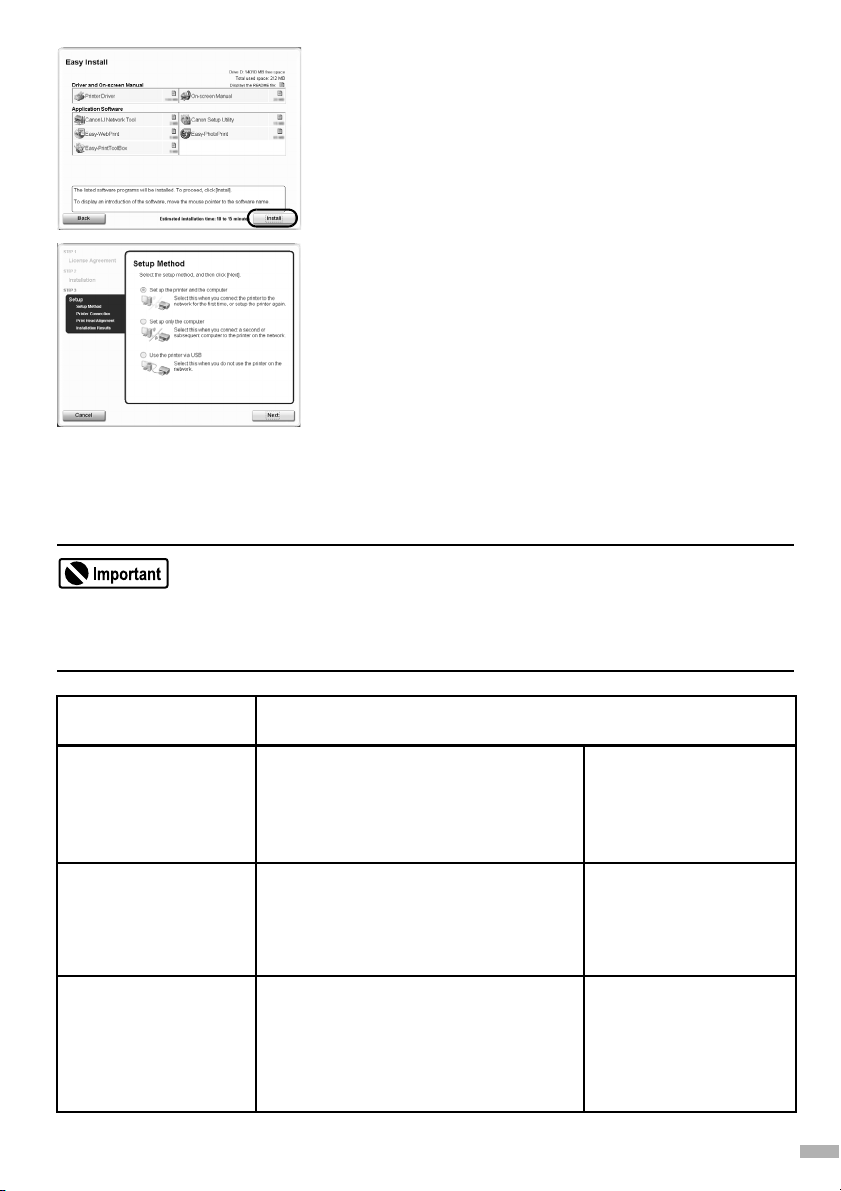
3
When the list of applications to install
appears, verify the contents, click
Install, then follow the instructions on
the screen.
Move the cursor over items to display explanations of
each application below.
4
Read the License Agreement carefully
and click Yes.
Installation of the printer driver, On-screen manual, and
application software will begin. The
Setup Method
dialog box displays after installation is complete.
When a message asking you for your confirmation to
restart your computer appears on the screen, click OK.
The next step depends on whether using the printer for the first time and how to connect the printer:
Set up procedures
Choose a connection method based on how you intend to connect to the printer.
For example, if the connection between the computer and access point is wireless and the printer and
access point are connected by LAN cable, the printer connection method becomes wired LAN.
How is the printer
currently being used ?
Not being used
(not set up)
Used over a wired or
wireless LAN
Used over a USB
connection
Which connection type do you intend to use ?
To use a wired or wireless LAN connection
• “First-time Setup for Use over Wireless
LAN” on page 20.
• “First-time Setup for Use over Wired LAN”
on page 24.
To enable to use the printer from another
computer over a LAN
• “Setting Up an Additional Computer to Use
a Printer Already Connected to a Network”
on page 28.
To also enable to use over a wired or wireless
LAN
• “First-time Setup for Use over Wireless
LAN” on page 20.
• “First-time Setup for Use over Wired LAN”
on page 24.
To use a USB connection
• “Setting Up for Use with
USB Connection” on
page 27.
To also enable to use a
USB connection
• “Setting Up for Use with
USB Connection” on
page 27.
19
Page 22
First-time Setup for Use over Wireless LAN
When you are setting up the printer to be used over wireless LAN (infrastructure mode), follow these steps
to set up the printer and your computer.
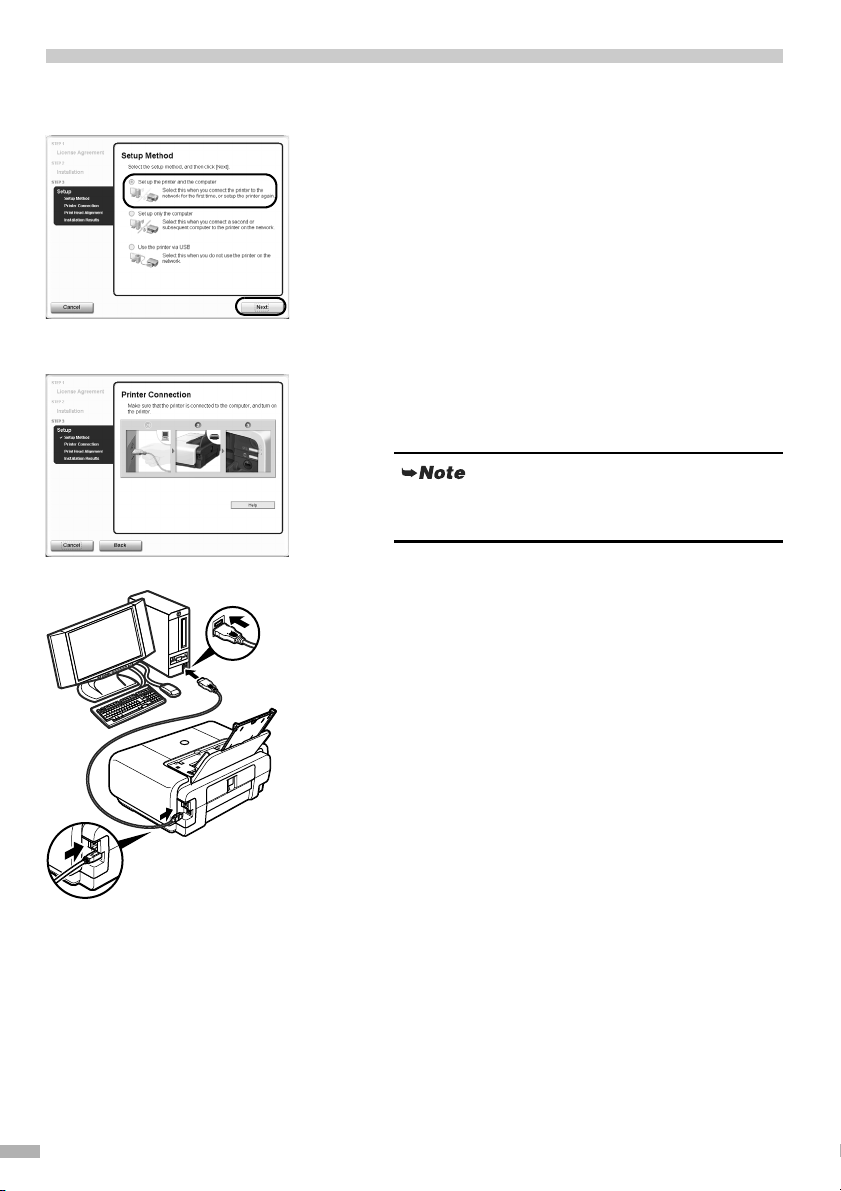
1
In the Setup Method screen, select Set
up the printer and the computer and
click Next.
2
When the screen shown on the left
appears, connect the printer with a USB
cable.
To set up a printer that is not yet connected to a LAN,
connect to it by USB.
20
Page 23
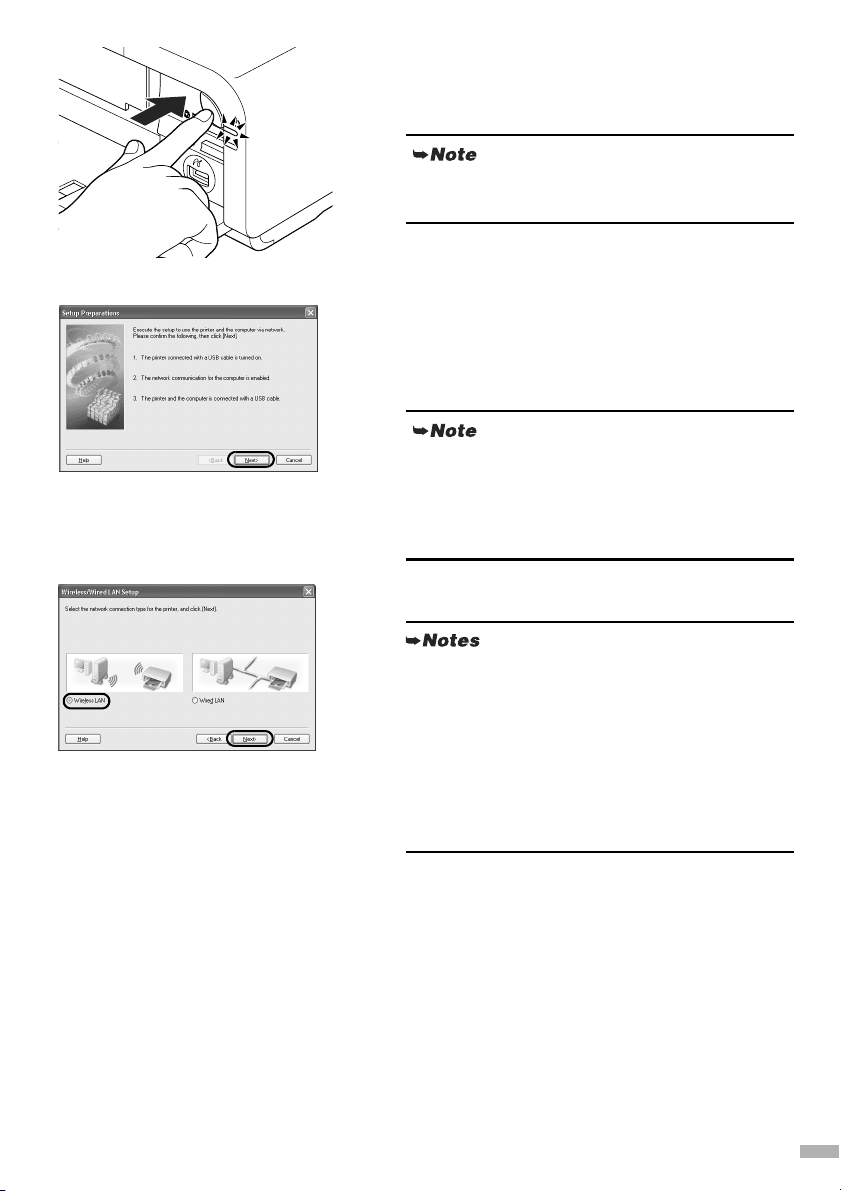
3
Turn on the printer.
If the printer is recognized, the next screen will appear
automatically.
If the connection is not recognized, click Help and
follow instructions on how to solve the problem.
4
When the Setup Preparations dialog
box is displayed, confirm that
preparation is complete, then click
Next.
If the printer’s network settings are already configured,
the
Setup Environment Confirmation
appears asking you for confirmation to use the printer
with the current settings. To reconfigure the network
settings, click
5
Select Wireless LAN and click Next.
Reconfigure
.
dialog box
• If the wired LAN settings are already configured,
the Note on Network Settings dialog box is
displayed. Generally, click Wireless connection
only to enable only wireless LAN.
• If the printer’s network settings have been set
before, the Printer Network Setup dialog box is
displayed. For details, see “The Printer Network
Setup dialog box is displayed during setup” in
“Troubleshooting” on page 60.
21
Page 24

6
Setup automatically detects your
access point.
If you connect to a network that is not protected with
security measures, there is a risk of disclosing data
such as your personal information to a third party.
When an access point is detected automatically
The access point is detected automatically if no
operation is required for connecting to the access point.
Setup proceeds to step 7.
If the
Access Points
1. Select the target access point in the
dialog box.
If the target access point is not displayed in the list,
see “The target access point is not detected” in
“Troubleshooting” on page 52.
The printer may communicate with other access
points used in the vicinity.
dialog box is displayed
Access Points
22
2. Confirm the
access point.
If the
WEP
If
column, the access point is configured to use the
encryption.
Enter the Network Key (WEP key or Passphrase) set
to the access point and click
For details, see “About Network Key (Windows)/
Network Password (Macintosh)” in
“Troubleshooting” on page 53.
If
An access point could not be detected
OK
Click
details, see “The target access point is not detected” in
“Troubleshooting” on page 52.
Encryption
Encryption
or
WPA
to display
column of the selected
column is blank, click
is displayed in the
Access Points
Encryption
Connect
.
dialog box. For
Connect
is displayed
.
Page 25

7
Setup automatically detects the printer.
The iP5200R connected with a USB cable is detected
automatically.
When the printer is detected automatically
The printer is detected automatically if no operation is
required for connecting to the printer. Setup proceeds to
step 8.
If the
Set Printer IP Address
If the printer is not detected automatically, the
Printer IP Address
Connect
not detected, see
IP Address Setup dialog box is displayed during
setup” in “Troubleshooting” on page 58
8
When the screen shown on the left
to connect to the printer. If the printer is still
dialog box is displayed. Click
“The Set Printer IP Address / Printer
dialog box is displayed
.
appears, remove the USB cable, and
click Next.
Set
To change the port name, click
details, see “Changing the port name” in
“Troubleshooting” on page 61.
9
Place the printer in the location where
Set Port Name
you will use it, then turn it on.
10
Click Next in the Connection
Performance Measurement dialog
box.
Measuring of the communication status starts, and the
results are displayed.
Measuring takes a few minutes. You can cancel
measuring by clicking
You also examine the detailed status of the
communication link after setup by using the Canon IJ
Network Tool.
Cancel
.
. For
23
Page 26

11
Confirm the measurement results, then
click Finish.
Ensure that is displayed in
performance between the printer and the access
point
.
• If any symbol other than is displayed, refer to
displayed comments and Help for improving the
status of communication link.
• To check whether the new location is better, click
Remesurement. Measurement of the
communication status is performed again.
• When any message on Overall network
performance appears in the measurement results,
rearrange the printer and other network devices
following the instructions on the screen.
12
Perform print head alignment before
Connection
you start using your printer.
See “Aligning the Print Head” on page 30.
When a message asking for your confirmation to restart
your computer appears on the screen, click OK.
First-time Setup for Use over Wired LAN
When you are setting up the printer to be used over wired LAN, follow these steps to set up the printer and
your computer.
24
1
In the Setup Method screen, select Set
up the printer and the computer and
click Next.
Page 27

2
When the screen shown on the left
appears, connect the printer with a USB
cable.
To set up a printer that is not yet connected to a
LAN, connect to it by USB.
3
Turn on the printer.
If the printer is recognized, the next screen will appear
automatically.
If the connection is not recognized, click Help and
follow its instructions.
4
When the Setup Preparations dialog
box is displayed, confirm that
preparation is complete, then click
Next.
If the printer’s network settings are already configured,
the
Setup Environment Confirmation
appears asking you for confirmation to use the printer
with the current settings. To reconfigure the network
settings, click
Reconfigure
.
dialog box
25
Page 28

5
Select Wired LAN.
• If the wireless LAN settings are already
configured, the Note on Network Settings dialog
box is displayed. Generally, click Wired
connection only to enable only wired LAN.
• If the printer’s network settings have been set
before, the Printer Network Setup dialog box is
displayed. For details, see“The Printer Network
Setup dialog box is displayed during setup” in
“Troubleshooting” on page 60.
6
When the screen shown on the left
appears, connect the printer to the
network devices such as hubs with a
LAN cable and click Yes. Then click
Next.
Connection may vary depending on your network
setup.
26
7
Setup automatically detects the printer.
The iP5200R connected with a USB cable is detected
automatically.
If the printer was not detected, the
Address
dialog box appears. Ensure that the printer is on
and connected to your computer with a USB cable, then
click
Connect
to retry detection. If the printer is still not
detected, refer to “The Set Printer IP Address / Printer IP
Address Setup dialog box is displayed during setup” in
“Troubleshooting” on page 58.
8
When the screen shown on the left
Set Printer IP
appears, remove the USB cable, and
click Finish.
To change the port name, click
details, see “Changing the port name” in
“Troubleshooting” on page 61.
Set Port Name
. For
Page 29

9
Perform print head alignment before
you start using your printer.
See “Aligning the Print Head” on page 30.
When a message asking for your confirmation to restart
your computer appears on the screen, click OK.
Setting Up for Use with USB Connection
When you are setting up the printer to be used as a standalone printer with USB connection, follow these
steps.
1
In the Setup Method screen, select
Use the printer via USB and click
Next.
2
When the screen shown on the left
appears, connect the printer with a USB
cable.
27
Page 30

3
Turn on the printer.
If the printer is recognized, the next screen will appear
automatically.
If the connection is not recognized, click Help and
follow its instructions.
4
Perform print head alignment before
you start using your printer.
See “Aligning the Print Head” on page 30.
When a message asking for your confirmation to restart
your computer appears on the screen, click OK.
Setting Up an Additional Computer to Use a Printer
Already Connected to a Network
This section describes how to enable a client to use a printer that is already connected to a wireless or wired
LAN (setup from another computer is complete). This setup procedure only requires settings to be made on
the client computer.
Perform this setup procedure after installing the software.
• If MAC or IP address filtering is configured to restrict access to the printer, make sure beforehand
that the details of the client computer you are setting up are also registered.
To do this, use the Canon IJ Network Tool on a computer that is already set up.
• Make sure the computer you are setting up is NOT connected to the printer via a USB cable. This
setup procedure does not involve connecting the USB cable.
• For wired LAN connections, confirm that the printer is connected to the network with a LAN cable.
1
Turn on the printer.
28
Page 31

2
In the Setup Method screen, select Set
up only the computer and click Next.
3
Setup automatically detects the printer.
The iP5200R connected to the network is detected
automatically.
If the printer was not detected, confirm the following
and click
• Ensure that the printer is on.
• Ensure that the firewall of any security software is
• When using wireless LAN, confirm that the
• When using wired LAN, confirm that the printer is
• Ensure that the printer is not set to use access
If the firewall function is turned on in Windows XP
with Service Pack 1 installed, a message asking
whether to turn the firewall off is displayed during
setup. If it is displayed, click
firewall is automatically turned back on after setup is
complete.
• For how to confirm Windows XP Service Pack
• Some programs that switch the network
Update
.
turned off. For details on firewalls, see “On
Firewalls” on page 16.
computer can communicate with the access point.
connected to the hub.
control.
Ye s
to turn it off. The
versions, see “Confirming the version of Windows
XP” in “Troubleshooting” on page 62.
environment depending on your environment will
enable a firewall by default. Check the settings of
any such software.
29
Page 32

Aligning the Print Head
4
Select the printer in the Printers dialog
box, and click Next.
5
Click Finish in the Setup Completion
dialog box.
If you changed the port name when setting up the printer
from another computer, that name is displayed in
Printer Model
name” in “Troubleshooting” on page 61.
The
Print Head Alignment
print head alignment was already performed, there is no
need to do it again. For what to do next, see page 30,
“Aligning the Print Head”, step 3.
When a message asking for your confirmation to restart
your computer appears on the screen, click OK.
. For details, see “Changing the port
dialog box is displayed. If
Aligning the print head allows you to print without shifting the color registration, and is a necessary step to
print properly.
If you have already performed print head alignment, proceed to step 3.
1
When the screen shown on the left
appears, load a sheet of A4 or Lettersized plain paper in the Auto Sheet
Feeder and click Execute.
• Print head alignment cannot be performed from
the Cassette.
• Ensure that the Inner Cover is closed.
30
Page 33

2
Read the message and click Print Head
Alignment.
It takes about six minutes to finish printing. Do not open
the Top Cover while printing.
Ensure the pattern shown on the left is
printed.
The Print Head is aligned automatically. The printer is
now ready to use.
• If the pattern is not printed successfully, refer to
“Eleven Flashes” in “The ALARM Lamp Flashes
Orange” of the User’s Guide.
• The pattern is printed in black and blue.
3
After print head alignment is completed,
click Next.
4
When the Installation Results screen
appears, click Next.
For the customers in the United States
When the online registration dialog box appears,
follow the on-screen instructions to register your
product.
5
When the screen shown on the left
appears, click Exit.
If the screen shows a check box for restarting
system, you can restart the system instead of the
program. To restart the system, ensure that box is
selected, and then click Restart.
• To view the On-screen Manual, double-click the iP5200R On-screen Manual shortcut icon on the
desktop, or click Start and select All Programs (or Programs), Canon iP5200R Manual and
iP5200R On-screen Manual.
• Microsoft Internet Explorer
®
5.0 or later must be installed to view the On-screen Manuals.
31
Page 34

Setting Up the Printer and
the Computer (Macintosh)
Installing the Software
1
Place the Setup Software & User’s
Guide CD-ROM in the CD-ROM drive.
If the CD-ROM does not run automatically, doubleclick the CD-ROM icon on the desktop.
2
Double-click the Setup icon.
3
When the Authenticate screen
appears, enter your administrator name
and password, and then click OK.
• If you do not know your administrator name or
password, click on the lower-left corner of the
screen, then follow the on-screen instructions.
•If the Select Language screen appears, select a
language, then click Next.
• If the place selection message appears, select your
place of residence, then click Next.
32
4
Follow the instructions displayed on the
screen. When the screen shown on the
left is displayed, click Easy Install.
When you select
CD-ROM are installed automatically.
To select particular items to install, click
Install
and follow the instruction on the screen.
Easy Install
, the items included in the
Custom
Page 35

5
When the list of applications to install
appears, verify the contents, click
Install, and then follow the instructions
on the screen.
Move the cursor over items to display explanations of
each application below.
6
Read the License Agreement and click
Yes.
For the customers in the United States
When the online registration dialog box appears,
follow the on-screen instructions to register your
product.
When the Print Head Alignment Recommended
screen appears, click Next.
7
When the screen shown on the left
appears, click Restart.
When the computer restarts, Canon IJ Network Tool will start up.
The next step depends on whether using the printer for the first time and how to connect the printer:
33
Page 36

Setup procedures
Choose a connection method based on how you intend to connect to the printer.
For example, if the connection between the computer and access point is wireless and the printer and
access point are connected by LAN cable, the printer connection method becomes wired LAN.
How is the printer
currently being used ?
Not being used
(not set up)
Used over a wired or
wireless LAN
Used over a USB
connection
To use a wired or wireless LAN connection
• “First-time Setup for Use over Wireless
LAN” on page 34.
• “First-time Setup for Use over Wired LAN”
on page 38.
To enable to use the printer from another
computer over a LAN
• “Setting Up an Additional Computer to Use
a Printer Already Connected to a Network”
on page 43.
To also enable to use over a wired or wireless
LAN
• “First-time Setup for Use over Wireless
LAN” on page 34.
• “First-time Setup for Use over Wired LAN”
on page 38.
Which connection type do you intend to use ?
To use a USB connection
• “Setting Up for Use with
USB Connection” on
page 41.
To also enable to use a
USB connection
• “Setting Up for Use with
USB Connection” on
page 41.
First-time Setup for Use over Wireless LAN
When you are setting up the printer to be used over wireless LAN (infrastructure mode), follow these steps
to set up the printer and your computer.
1
Connect the printer with a USB cable.
34
To set up a printer that is not yet connected to a LAN,
connect to it by USB.
2
Turn on the printer.
Page 37

3
Select Setup from the Canon IJ
Network Tool pop-up menu and
iP5200R in Printers, then click OK.
If Canon IJ Network Tool does not start automatically,
select
Library
-
Printers
-
Canon
-
IJPrinter
-
Canon IJ Network Tool
• If the The printer could not be detected message
is displayed, check that your printer is connected
with a USB cable and turned on, then click
Update.
• If the printer’s network settings are already
configured, the Setup Environment
Confirmation dialog box is displayed for your
confirmation to use the printer with the current
settings. To reconfigure the network settings, click
Reconfigure.
4
Select Wireless LAN and click OK.
• If the wired LAN settings are already configured,
the Note on Network Settings dialog box is
displayed. Generally, click Wireless Connection
Only to enable only wireless LAN.
• If the printer’s network settings have been set
before, the Printer Network Setup dialog box is
displayed. For details, see “The Printer Network
Setup dialog box is displayed during setup” in
“Troubleshooting” on page 60.
.
-
Utilities
5
Setup automatically detects your
access point.
If you connect to a network that is not protected with
security measures, there is a risk of disclosing data
such as your personal information to a third party.
35
Page 38

When an access point is detected automatically
The access point is detected automatically if no
operation is required for connecting to the access point.
Setup proceeds to step 6.
If the
Access Points
1. Select the target access point in the
dialog box.
If the target access point is not displayed in the list,
see “The target access point is not detected” in
“Troubleshooting” on page 52.
The printer may communicate with other access
points used in the vicinity.
dialog box is displayed
Access Points
2. Confirm the
access point.
If the
WEP
If
column, the access point is configured to use the
encryption.
Enter the Network Password (WEP key or
Passphrase) set to the access point and click
For details, see “About Network Key (Windows)/
Network Password (Macintosh)” in
“Troubleshooting” on page 53.
If
An access point could not be detected
OK
Click
details, see “The target access point is not detected” in
“Troubleshooting” on page 52.
6
Setup automatically detects the printer.
The iP5200R connected with a USB cable is detected
automatically.
When the printer is detected automatically
The printer is detected automatically if no operation is
required for connecting to the printer. Setup proceeds to
step 7.
If the
Printer IP Address Setup
If the printer is not detected automatically, the
IP Address Setup
Connect
not detected, see
IP Address Setup dialog box is displayed during
setup” in “Troubleshooting” on page 58
Encryption
Encryption
or
WPA
to display
dialog box is displayed. Click
to connect to the printer. If the printer is still
“The Set Printer IP Address / Printer
column of the selected
column is blank, click
is displayed in the
Access Points
Encryption
dialog box. For
dialog box is displayed
is displayed
.
Connect
Connect
Printer
.
.
36
Page 39

7
When the screen shown on the left
appears, remove the USB cable and
click Next.
8
Place the printer in the location where
you will use it, then turn it on.
9
Click Next in the Connection
Performance Measurement dialog
box.
Measuring of the communication status starts, and the
results are displayed.
Measuring takes a few minutes. You can cancel
measuring by clicking Cancel.
You also examine the detailed status of the
communication link after setup by using the Canon
IJ Network Tool.
10
Confirm the measurement results, then
click Finish.
Ensure that is displayed in
performance between the printer and the access
point
.
• If any symbol other than is displayed, refer to
displayed comments and Help for improving the
status of the communication link.
• To check whether the new location is better, click
Remesurement. Measurement of the
communication status is performed again.
• When any message on Overall network
performance appears in the measurement results,
rearrange the printer and other network devices
following the instructions on the screen.
The Printer Setup Utility (Printer Center on Mac OS X
v.10.2) will start up.
Connection
37
Page 40

11
Click Add.
12
Select CANON IJ Network from the
pop-up menu, select iP5200R from the
list of printers, and click Add.
The alphanumeric string after the printer name is its
MAC address.
13
Confirm that your printer is added to the
list of printers.
14
Perform print head alignment before
you start using your printer.
See “Aligning the Print Head” on page 45.
First-time Setup for Use over Wired LAN
When you are setting up the printer to be used over wired LAN, follow these steps to set up the printer and
your computer.
1
Connect the printer with a USB cable.
To set up a printer that is not yet connected to a LAN,
connect to it by USB.
38
Page 41

2
Turn on the printer.
3
Select Setup from the Canon IJ
Network Tool pop-up menu and
iP5200R in Printers, then click OK.
If Canon IJ Network Tool does not start automatically,
select
Library
-
Printers
-
Canon
-
Canon IJ Network Tool
-
• If the The printer could not be detected message
is displayed, check that your printer is connected
with a USB cable and turned on, then click
Update.
• If the printer’s network settings are already
configured, the Setup Environment
Confirmation dialog box is displayed for your
confirmation to use the printer with the current
settings. To reconfigure the network settings, click
Reconfigure.
.
IJPrinter
-
Utilities
4
Select Wired LAN.
• If the wireless LAN settings are already
configured, the Note on Network Settings dialog
box is displayed. Generally, click Wired
Connection Only to enable only wired LAN.
• If the printer’s network settings have been set
before, the Printer Network Setup dialog box is
displayed. For details, see “The Printer Network
Setup dialog box is displayed during setup” in
“Troubleshooting” on page 60.
39
Page 42

5
When the screen shown on the left
appears, connect the printer to the
network devices such as hubs with a
LAN cable and click Yes. Then click
Next.
Connection may vary depending on your network
setup.
6
Setup automatically detects the printer.
The iP5200R connected with a USB cable is detected
automatically.
If the printer was not detected, the
Setup
dialog box appears. Ensure that the printer is on
and connected to your computer with a USB cable, then
click
Connect
to retry detection. If your printer is still
not detected, refer to “The Set Printer IP Address /
Printer IP Address Setup dialog box is displayed during
setup” in “Troubleshooting” on page 58.
Printer IP Address
40
7
When the screen shown on the left
appears, remove the USB cable and
click Finish.
The Printer Setup Utility (Print Center on Mac OS X
v.10.2) will start up.
8
Click Add.
Page 43

9
Select CANON IJ Network from the
pop-up menu, select iP5200R from the
list of printers, and click Add.
The alphanumeric string after the printer name is its
MAC address.
10
Confirm that your printer is added to the
list of printers.
11
Perform print head alignment before
you start using your printer.
See “Aligning the Print Head” on page 45.
Setting Up for Use with USB Connection
When you are setting up the printer to be used as a standalone printer with USB connection, follow these
steps.
1
Connect the printer with a USB cable.
2
Turn on the printer.
41
Page 44

3
Select Setup from the Canon IJ
Network Tool pop-up menu, and click
Printer Setup Utility (Print Center on
Mac OS X v.10.2).
If Canon IJ Network Tool does not start automatically,
Applications
select
the
Utilities
Utility
icon, and then proceed to step 5.
When using Mac OS X v.10.2.x, double-click the
Utilities
folder, double-click the
and then proceed to step 5.
4
Click Cancel.
5
Confirm that your printer is added to the
from the Go menu, double-click
folder, double-click the
Print Center
Printer Setup
list of printers.
icon,
42
If the printer does not appear on the list, click
select
USB
from the pop-up menu. Select
from the list of printers and click
After confirming that the printer is added to the list, exit
Printer Setup Utility (Print Center
6
Perform print head alignment before
Add
iP5200R
.
).
you start using your printer.
See “Aligning the Print Head” on page 45.
Add
and
Page 45

Setting Up an Additional Computer to Use a Printer
Already Connected to a Network
This section describes how to enable a client to use a printer that is already connected to a wireless or wired
LAN (setup from another computer is complete). This setup procedure only requires settings to be made on
the client computer.
Perform this setup procedure after installing the software.
• If MAC or IP address filtering is configured to restrict access to the printer, make sure beforehand
that the details of the client computer you are setting up are also registered.
• Make sure the computer you are setting up is NOT connected to the printer via a USB cable. This
setup procedure does not involve connecting the USB cable.
• For wired LAN connections, confirm that the printer is connected to the network with a LAN cable.
1
Turn on the printer.
2
Select Setup from the Canon IJ
Network Tool pop-up menu.
If Canon IJ Network Tool does not start automatically,
select
Applications
the
Utilities
icon, and then proceed to step 6.
Utility
When using Mac OS X v.10.2.x, double-click the
Utilities
folder, double-click the
and then proceed to step 6.
3
When a message appears notifying that
from the Go menu, double-click
folder, double-click the
Print Center
Printer Setup
no printer was detected, click OK.
icon,
43
Page 46

4
Click Printer Setup Utility (Print
Center on Mac OS X v.10.2).
5
When the screen shown on the left
appears, click Cancel.
6
Click Add.
7
Select CANON IJ Network from the
pop-up menu, select iP5200R from the
list of printers, and click Add.
44
• The alphanumeric string after the printer name is
its MAC address.
• If the printer was not detected, confirm the
following.
- Ensure that the printer is on.
- Ensure that the firewall of any security software
is turned off.
- When using wireless LAN, confirm that the
computer can communicate with the access
point.
- When using wired LAN, confirm that the printer
is connected to the hub.
- Ensure that the printer is not set to use access
control.
8
Ensure that your printer is added to the
list of printers.
Page 47

Aligning the Print Head
Aligning the print head allows you to print without shifting the color registration, and is a necessary step to
print properly.
If print head alignment was already performed, there is no need to do it again.
1
Load a sheet of A4 or Letter-sized plain
paper in the Auto Sheet Feeder.
• Print head alignment cannot be performed from
the Cassette.
• Ensure that the Inner Cover is closed.
2
Select Applications from the Go menu.
Double-click the Utilities folder, and
then double-click the Printer Setup
Utility icon.
When using Mac OS X v.10.2, double-click the
folder and then the
3
Select your printer from the Name list
Print Center
icon.
and click Utility.
If your printer name is not displayed in
Add
click
Printer Setup Utility Help in the Mac Help.
When using Mac OS X v.10.2, select your printer from
the
4
Select your printer from the Product list
to add the printer. For details, refer to the
Name
list and click
Configure
Printer List
.
and click Maintenance.
Canon IJ Printer Utility appears.
Utilities
,
45
Page 48

5
Select Test Print from the pop-up
menu, and click Print Head Alignment.
6
Read the message and click Print Head
Alignment.
It takes about six minutes to finish printing. Do not open
the Top Cover while printing.
7
Ensure that the pattern on the left is
printed.
The Print Head is aligned automatically. The printer is
now ready to use.
• If the pattern is not printed successfully, refer to
“Eleven Flashes” in “The ALARM Lamp Flashes
Orange” of the User’s Guide.
• The pattern is printed in black and blue.
To view the On-screen Manual, double-click the iP5200R On-screen Manual alias on the desktop.
46
Page 49

Basic Operations
Adjusting the print settings according to your needs allows you to produce better quality prints.
• If you detect smoke, unusual smells or strange noises around the printer, immediately switch the
printer off and always unplug the printer. Contact your local Canon service representative.
• To avoid injury, never put your hand or fingers inside the printer while it is printing.
If prints are unclear or specific colors are not reproduced even if there is plenty of ink, print head
nozzles may be clogged. Print the nozzle check pattern, check the results, then perform print head
cleaning. For details about maintenance, refer to the User’s Guide.
Printing with Windows
1
From your application’s File menu,
select Print.
2
Ensure that your printer is selected,
then click:
• Windows XP → Preferences
• Windows Me/Windows 98 → Properties
• Windows 2000 → Main tab
Auto Sheet
Feeder Lamp
Cassette
Lamp
3
Specify the required settings and click
OK.
• For details about the printer driver, refer to the
Printer Driver Guide.
•Click Instructions to view the Printer Driver
Guide. If the On-screen Manual is not installed,
Instructions is not displayed.
4
Ensure that the proper lamp of the
paper source is lit.
If not, press the Paper Feed Switch on the printer.
If you cannot select the paper source, refer to the
Driver Guide
5
To start printing, click Print.
Printing will start in a few moments.
.
Printer
47
Page 50

Printing with Macintosh
1
From your application’s File menu,
select Page Setup.
2
Select your printer name from Format
for.
3
Select the paper size to be used.
4
Click OK.
5
From your application’s File menu,
select Print.
6
Select Quality & Media from the popup menu.
7
Specify the printing settings according
to your requirements.
• For details about the printer driver, refer to the
Printer Driver Guide.
• Click to view the Printer Driver Guide. If the
On-screen Manual is not installed, the Printer
Driver Guide is not displayed even if is
clicked.
10
48
Auto Sheet
Feeder Lamp
Cassette
Lamp
8
Ensure that the proper lamp of the
paper source is lit.
If not, press the Paper Feed Switch on the printer.
If you cannot select the paper source, refer to the
Driver Guide
9
Click Print.
Printing will start in a few moments.
.
Printer
Page 51

Replacing an Ink Tank
When the printer runs out of ink, replace the empty ink tank with a new one. Specify the following ink tanks
when purchasing.
Black : CLI-8BK Black : PGI-5BK
Yellow : CLI-8Y Magenta : CLI-8M Cyan : CLI-8C
If the Top Cover is opened more than ten minutes, the Print Head Holder moves to the right side. If this
occurs, close the Top Cover, and open it again.
Print Head Lock Lever
1
Open the Paper Output Tray and Top
Cover, and then pull down the Inner
Cover.
Push the Open Button above the Paper Output Tray. The
Paper Output Tray automatically opens.
2
Remove the empty ink tank.
Do not touch the Print Head Lock Lever.
3
Install the new ink tank. Press the
mark on the ink tank until it clicks into
place and then its red lamp lights.
Ensure that all the ink tanks are installed in the order
directed by the label. The printer cannot be used
unless all ink tanks are installed.
4
Put back the Inner Cover and close the
Top Cover when finished.
The ALARM lamp flashes orange if an ink tank is
not installed properly. Open the Top Cover and
make sure that all the ink tanks are installed in the
correct order directed on the label.
49
Page 52

Troubleshooting
Cause and measures on possible troubles in the setup procedure are explained here.
If you do not find a description for your trouble here, refer to “Troubleshooting” on the
the
Network Guide
Troubles in setup/connections
Cannot connect to the access point (the access point is not detected), page 51
• The target access point is not detected, page 52
• Cannot connect to the target access point, page 52
• Using the printer in a multiple access point setup, page 53
How to set a network key/network password, page 53
• About Network Key (Windows)/Network Password (Macintosh), page 53
• How to set a WEP/WPA key, page 54
Cannot connect to the printer (the printer is not detected), page 55
• The printer is not detected, page 55
• No printer is detected after the network settings are changed in Windows, page 55
The following screen is displayed during setup, page 56
• The Access Points dialog box is displayed during setup, page 56
• The An access point could not be detected is displayed during setup, page 57
• The Printer could not be connected to the specified access point is displayed during setup,
page 58
• The Another access point with the same SSID exists is displayed during setup, page 58
• The Set Printer IP Address / Printer IP Address Setup dialog box is displayed during setup,
page 58
• The Printer Network Setup dialog box is displayed during setup, page 60
• The Enter Password / Password Input dialog box is displayed during setup, page 60
• The You have connected the printer to an unsecured wireless network is displayed during setup,
page 60
Re-setting the printer, page 61
• Re-setting the printer, page 61
The admin password set to the printer was forgotten, page 61
• The admin password was forgotten, page 61
Changing the port name, page 61
• Changing the port name, page 61
Checking information about the network
Checking information about the network, page 61
• Checking the IP address or the MAC address of the printer, page 61
• Checking the IP address or the MAC address of the computer, page 62
• Checking the network setting information, page 62
• Confirming the version of Windows XP, page 62
.
User’s Guide
and
50
Page 53

Cannot connect to the access point (the access point is
not detected)
Before you proceed to Troubleshooting, confirm the following:
• The USB cable is securely connected to the correct port.
• The printer driver is already installed.
• The printer is turned on. If it is, turn it off and then turn it on again.
• There is no barrier or obstacle between the access point and the printer.
Although wireless communication between rooms or floors is possible, the wireless communication
quality may become poor. The wall must be made of a material that allows radio waves to pass through.
If the wall material prevents communication, set the printer in the same room as the access point.
• Printing via USB connection is possible.
• The firewall feature of security software may prevent proper setup or communication over a network.
When setting up the printer for use over a network, disable the firewall of your security software during
the setup.
If you are using Windows XP Service Pack 1 or earlier and you have Internet Connection Firewall
enabled, a dialog box asking you for confirmation to disable the firewall will appear during setup. Click
Ye s
to disable the firewall. When setup is complete, the firewall will be re-enabled automatically.
To confirm the version of your Windows XP, see “Confirming the version of Windows XP” on page 62.
• When using a router, connect the printer and computer to the LAN side (same network segment).
51
Page 54

Problem Possible Cause and Measures
The target access point
is not detected
Cannot connect to the
target access point
If the printer or your computer cannot communicate with the target access
point, follow the procedure below.
1
Ensure that the access point is on and then click Update in the Access
Points dialog box.
2
If the access point is still not detected, move your printer closer to the
access point and remove possible obstructions, then click Update.
3
Ensure that your computer can communicate with the access point.
For details, see “Checking if the computer and the printer (access point) can
communicate with each other” in the
4
Unplug the access point from the power outlet and plug it in, then click
Update.
• Using your access point’s utility software, check if your access point is
set to the stealth mode, i.e., set not to broadcast its SSID, or is set to
reject clients whose SSID is set to ANY. If so, click
enter the access point’s SSID in
Points dialog box is displayed during setup” on page 56.
• The wireless channel to be used may be limited depending on wireless
network devices installed in the computer. Confirm the wireless channels
available for the network device. For details, refer to the manual provided
with your computer or your wireless network device.
Make sure that the channel set to the access point is valid to
communicate with the computer, confirmed above. If not, change the
channel set to the access point.
• Some access points are capable of automatically switching between
wireless channels. This printer may not be able to connect an access
point if its channel is set to automatic or the equivalent, or to a channel
outside of the range 1 to 11. Configure the access point to use any
channel between 1 and 11.
• Make sure that there is no barrier or obstacle between the access point
and the printer.
• Confirm the network name/SSID of the target access point and set the printer
to use the identical network name/SSID. If the network name/SSID is different
in the printer and the access point, the printer cannot connect to the access
point. For details, see “The Access Points dialog box is displayed during
setup” on page 56.
Network Guide
SSID
.
. For details, see “The Access
Manual Setup
and
52
This printer does not support WPA-Enterprise. When you select an access point set to
use WPA-Enterprise, it is grayed out and cannot be set up.
• Make sure that the printer and the access point can communicate with each
other under this setting. When encryption is set to the access point, set up the
encryption of the printer to match the settings of the access point. If the WEP/
WPA (encryption key) is different in the printer and the access point, the
printer cannot communicate with the access point. For details, see “How to
set a WEP/WPA key” on page 54.
Page 55

Problem Possible Cause and Measures
Using the printer in a
multiple access point
setup
Confirm the following;
• The access point to be used can communicate with the printer and the
computer.
• The wireless channel of the access point is far enough away with those of
other access points.
Windows XP may automatically connect to an unintended access point. Follow
the steps below to make your access point the highest priority.
1
Select Start and Connect To.
2
Right click Wireless Network Connection and select Properties.
3
Click Wireless Networks tab and confirm that Use Windows to
configure my wireless network settings is checked.
4
Confirm that the target access point is displayed in the Preferred
networks list.
If the access point is not set to the top in the list, select and move the
access point to the top of the list using the
If multiple networks are available when using Macintosh, select
Preferences
change the priority of the network port that you want to use. If the network port
is not set to the highest priority, select and move it to the top of the list (the
highest priority).
, select
Network
, select
Move up
Network Port Configuration
How to set a network key/network password
Problem Possible Cause and Measures
About Network Key
(Windows)/Network
Password (Macintosh)
An encryption key used in wireless networks. As using passwords, settings
must match among the access point, the printer, and the computer. A WEP key
is used in the WEP authentication method, while Passphrase or Pre-Shared
Key is used in the WPA authentication method.
button.
System
, then
Names of network keys vary depending on your access point or application software.
• Enter the network key in the same format and length as the access point.
• Besides the encryption, settings of access control and SSID/network name must
match between the printer and the access point in order to set up the printer to
communicate with the access point.
53
Page 56

Problem Possible Cause and Measures
How to set a WEP/
WPA key
• When using WEP
The key length, key format, the key to use (out of 1 to 4), and the
authentication method must match among the access point, the printer, and
the computer.
For access points that use automatically generated WEP keys, use the
hexadecimal key format for the printer.
If you do not know the access point WEP key, refer to documentation
provided with the access point or contact its manufacturer.
Example:
Using 64 bit key length, when the string “canon” is entered, an access
point generates the following codes.
Key 1: C9 42 28 B8 AE
Key 2: 87 C0 FB 05 6B
Key 3: 9A 15 FB F6 F3
Key 4: 62 56 67 58 44
In order to communicate with such an access point, you must configure the
printer to use the key generated by the access point by entering it in
hexadecimal format.
Auto
for the
Normally, select
or
System
Shared Key
When entering a
Access Points
Auto
set to
. The key length and format are based upon value of the entered
WEP key
screen, the key number is set to 1 and the
Authentication
according to the setting of the access point.
in
Network Key
key.
. Otherwise, select
or
Network Password
Authentication
Open
on the
is
54
When using AirPort, confirm the settings in
• Select
64 bit
if
Stat ion.
• Select 1 for
printer via the access point.
40 bit WEP
Key ID
is selected for the
. Otherwise the computer will not be able to communicate with the
Wireless Security
Key Length
of
AirPort Admin Utility
in the AirPort Base
• When using WPA
The authentication method, passphrase, and dynamic encryption type must
match on the access point, the printer, and the computer.
Enter the passphrase configured on the access point (a sequence of
between 8 and 63 alphanumeric characters, or a 64-character hexadecimal
number). If you do not know the passphrase, refer to the manual provided
with the access point, or consult its manufacturer. Select either
or
Encryption)
AES (Secure Encryption)
for the dynamic encryption
TKIP (Basic
method.
This printer supports WPA-PSK (WPA-Personal). WPA-Enterprise is not supported.
.
Page 57

Cannot connect to the printer (the printer is not detected)
Problem Possible Cause and Measures
The printer is not
detected
No printer is detected
after the network
settings are changed in
Windows
• Confirm that the printer is turned on.
• Move the printer closer to the access point or remove any obstacles.
• Firewall features provided by security software may prevent proper setup or
communication over a network. When setting up the printer for use over a
network, disable any firewall provided by security software during the setup.
For details on firewalls, see “On Firewalls” on page 16.
If you are using Windows XP Service Pack 1 or earlier and you have Internet
Connection Firewall enabled, a dialog box asking you for confirmation to
disable the firewall will appear during setup. Click
When setup is complete, the firewall will be re-enabled automatically.
To confirm the version of your Windows XP, see “Confirming the version of
Windows XP” on page 62.
• If the access point is configured to use access control, register the IP address
or the MAC address of the printer or disable the access control.
• Confirm the network name/SSID of the target access point and set the printer
to use the identical network name/SSID. If the network name/SSID is different
in the printer and the access point, the printer cannot connect to the access
point. For details, see “The Access Points dialog box is displayed during
setup” on page 56.
• Make sure that the printer and the access point can communicate with each
other under this setting. When encryption is set to the access point, set up the
encryption of the printer to match the settings of the access point. If the WEP/
WPA (encryption key) is different in the printer and the access point, the
printer cannot communicate with the access point. For details, see “How to
set a WEP/WPA key” on page 54.
• The wireless channel to be used may be limited depending on wireless
network devices installed in the computer. Confirm the wireless channels
available for the network device. For details, refer to the manual provided with
your computer or your wireless network device.
Make sure that the channel set to the access point is valid to communicate
with the computer, confirmed above. If not, change the channel set to the
access point.
• Some access points are capable of automatically switching between wireless
channels. This printer may not be able to connect an access point if its
channel is set to automatic or the equivalent, or to a channel outside of the
range 1 to 11. Configure the access point to use any channel between 1 and
11.
Wait until the IP address is assigned to the computer. You may need to restart
your computer. When you are using Windows Me or Windows 98, you need to
restart the computer. Search for the printer again after confirming a valid IP
address is assigned to the computer.
Yes
to disable the firewall.
55
Page 58

The following screen is displayed during setup
Problem Possible Cause and Measures
The
Access Points
dialog box is displayed
during setup
The Access Points dialog box is displayed when:
- No access point is detected.
- Multiple access points are detected.
- Entry of a network key is necessary to communicate with the target access
point.
Select the target access point, then perform necessary operation such as
setting of encryption.
If you want to specify access point manually, click
Access Points
Manual Setup
dialog box. Enter the settings for the target access point in the
dialog box, then click
Connect
Manual Setup
. The target access point is
searched with the specified settings.
For changing settings of the access point, refer to the manual provided with the
access point or contact its manufacturer.
If you connect to a network that is not protected with security measures, there is a risk of
disclosing data such as your personal information to a third party.
in the
56
SSID
Enter the SSID set to the access point. The SSID is case sensitive. When
using AirPort, enter the network name (SSID) in alphanumeric characters.
SSID is also called ESS-ID. For details, refer to the manual provided with your
access point or contact its manufacturer.
Encryption Method
Do not use
Select to disable encryption.
Use WEP
Transmission is encrypted using the WEP key you specified.
Use WPA
Transmission is encrypted using the passphrase (WPA key) you specified.
The actual encryption key is renewed automatically at a certain time
interval, making the transmission harder to break.
If a WEP key/Passphrase (WPA key) has not been set, a detailed settings dialog box is
displayed. To change the settings, click the
dialog box. For details, refer to “About Network Key (Windows)/Network Password
(Macintosh)” on page 53.
Configuration
button in the
Manual Setup
Page 59

Problem Possible Cause and Measures
The
Access Points
dialog box is displayed
during setup
(Continued)
Configuration
The detailed settings dialog box is displayed. The network password (WEP) or
the network key (WPA) selected in
Encryption Method
changed.
Connect
Connects to the specified access point.
Network (SSID)
Enter the Network (SSID) set to the access point. The Network (SSID) is case
sensitive. When using AirPort, enter the Network (SSID) in alphanumeric
characters.
SSID is also called ESS-ID. For details, refer to the manual provided with your
access point or contact its manufacturer.
Encryption Method
Do not use
Select to disable encryption
Use WEP
Transmission is encrypted using the password (WEP key) you specified.
Use WPA
Transmission is encrypted using the passphrase (WPA key) you specified.
The actual encryption key is renewed automatically at a certain time
interval, making the transmission harder to break.
can be confirmed and
The
An access point
could not be detected
is displayed during
setup
If a password (WEP key)/passphrase (WPA key) has not been set, a detailed settings
dialog box is displayed. To change the settings, click the
Manual Setup
Password (Macintosh)” on page 53.
dialog box. For details, see “About Network Key (Windows)/Network
Configuration
button in the
Configuration
The detailed settings dialog box is displayed. The password (WEP key) or the
passphrase (WPA key) selected in
Encryption Method
can be confirmed and
changed.
Connect
Connects to the specified access point.
This message is displayed when no access point is detected. Clicking the
button displays the
Access Points
dialog box. For details, see “The target
OK
access point is not detected” on page 52.
57
Page 60

Problem Possible Cause and Measures
The
Printer could not
be connected to the
specified access
is displayed
point
during setup
Another access
The
point with the same
SSID exists
is
displayed during setup
Set Printer IP
The
Address / Printer IP
Address Setup
dialog
box is displayed during
setup
This message is displayed when the printer could not connect to the target
OK
access point. Clicking the
button displays the
For details, see “The target access point is not detected” on page 52.
Cancel the current setup and change the SSID of the access point, then start
the setup again.
The following dialog box is displayed if no printer was detected on the network.
Specify the IP address of the printer and click the
detection of the target printer.
(1) Get IP address automatically
Select to use an IP address provided by a DHCP server. This requires that
the DHCP function is enabled on the router or access point.
(2) Use next IP address
Select to manually specify an IP address, for example if there is no DHCP
server functionality in the network environment in which you are using the
printer.
IP Address/Subnet Mask/Default Gateway
Enter each value to specify a fixed IP address when
is selected.
(3) Network Information
Displays the
Network Information
dialog box. Click this button to confirm
network settings when your access point or your printer cannot be detected
automatically during setup for use over the network. This button is enabled
when an access point was not detected or could not be connected.
(4) Connect
Searches for the printer with the specified settings. If the printer is still not
be detected with a specified IP address, see “Cannot connect to the printer
(the printer is not detected)” on page 55.
Access Points
Connect
button to retry the
(1)
(2)
(3)
(4)
Use next IP Address
dialog box.
58
Clicking the
Back
button displays the
Access Points
dialog box.
Page 61

Problem Possible Cause and Measures
The
Set Printer IP
Address / Printer IP
Address Setup
box is displayed during
setup
(Continued)
dialog
(1) TCP/IP Setting
Select
Get IP address automatically
IP address automatically
to search for the target printer automatically. If it
or
fails, check the network settings and the network connection.
IP Address/Subnet Mask/Router
Enter each value to specify a fixed IP address when
is selected.
(2) Network Information
Displays the
Network Information
dialog box. Click this button to confirm
network settings when your access point or your printer cannot be detected
automatically during setup for use over the network. This button is enabled
when an access point was not detected or could not be connected.
(3) Connect
Searches for the printer with the specified settings. If the printer is still not
be detected with a specified IP address, see “Cannot connect to the printer
(the printer is not detected)” on page 55.
(1)
(2)
(3)
Use next IP address
Use next IP address
. Select
Get
Clicking the
Back
button displays the
Access Points
dialog box.
59
Page 62

Problem Possible Cause and Measures
The
Printer Network
dialog box is
Setup
displayed during setup
Printer Network Setup
The
dialog box is displayed in the following cases.
- when you are re-setting a printer whose setup was canceled halfway
- when you changed the network settings
- when you are already using a printer over a wireless or wired LAN
If you canceled setup or changed the network settings, perform network setup
again. When you intend to use the printer connected to the network with the
current settings, do not change the network settings.
Change printer settings
The printer network settings will be changed to enable communication under
the current network settings.
Do not change printer settings
Continues computer setup with the settings specified to the printer.
Select this when you are not currently connected to a network but want to set
up the computer with the settings specified to the printer.
The
Enter Password /
Password Input
box is displayed during
setup
You have
The
connected the printer
to an unsecured
wireless network
displayed during setup
60
After setup, confirm that the printer and the computer (or the access point, when using
wireless LAN) can communicate with each other. If not, perform network setup again.
The following dialog box is displayed if an administrator password is set to the
dialog
printer which has already been set up.
Admin Password
Enter the administrator password you have set. The administrator password
consists of alphanumeric characters and is no longer than 32 characters. The
password is case sensitive.
For security, your entry will be displayed by “*” (asterisks) for Windows and “•”
(bullets) for Macintosh.
Security is not configured on the access point.
The printer can still be used, so continue the setup procedure to complete it.
is
If you connect to a network that is not protected with security measures, there is a risk of
disclosing data such as your personal information to a third party.
Page 63

Re-setting the printer
Problem Possible Cause and Measures
Re-setting the printer Restore the printer to the factory default and set up the printer again. For
details, see “Printing and Initializing Network Settings” on page 69. For setup
procedures, see “Confirming the Setup Environment” on page 15.
The admin password set to the printer was forgotten
Problem Possible Cause and Measures
The admin password
was forgotten
Restore the printer setting to factory default. All settings previously set will be
lost after initialization. Set up the printer again to use it. For details, see
“Initializing using printer buttons” in “Printing and Initializing Network Settings”
on page 69.
Changing the port name
Problem Possible Cause and Measures
Changing the port
name
To change the port name, click
dialog box.
The
Set Port Name
By changing the port name, you can change the name of the printer. When you
set up an additional computer to use the printer whose port name you
changed, the printer is displayed with the changed port name.
When two or more computers are set up, the changed name is displayed.
When multiple computers or printers are present, this can be used to change
the name to one that is easy to remember.
dialog box is displayed, where you specify the port name.
Set Port Name
in the
Setup Completion
Port Name
Port names should consist of alphanumeric characters and be no longer than
24 characters (12 characters under Windows Me or Windows 98), excluding
the prefix. The port name includes the fixed prefix “CNBJNP_”, which you do
not need to enter.
Checking information about the network
Problem Possible Cause and Measures
Checking the IP
address or the MAC
address of the printer
To check the IP address or the MAC address of the printer, print out the printer
setup information or use Canon IJ Network Tool.
For information on how to print out the printer network setting information,
“Printing and Initializing Network Settings” on page 69.
To display the
Network Information
select
Network Information
dialog box, in the Canon IJ Network Tool,
from the
View
menu.
61
Page 64

Problem Possible Cause and Measures
Checking the IP
address or the MAC
address of the
computer
Checking the network
setting information
Confirming the version
of Windows XP
To check the IP address or MAC address assigned to the computer, follow the
procedure below.
•
When using Windows XP/Windows 2000
1
From the Start menu, select (All) Programs, Accessories, and then
Command Prompt.
2
Enter “ipconfig /all” and press the Enter key. The IP addresses and the
MAC addresses of the network devices installed in your computer are
displayed. When the network device is not connected to the network,
the IP address is not displayed.
•
When using Windows Me/Windows 98
1
From the Start menu, select Run.
2
Enter “winipcfg” in the Name text box and click OK.
Select the network device to display the IP address and the MAC address.
1
From the Apple menu, select System Preferences, and then Network.
2
From the Show pop-up menu, select Built-in Ethernet.
Selecting the
Ethernet
See “Printing and Initializing Network Settings” on page 69 to print out printer
setting information. If it fails, use Canon IJ Network Tool or Network
Configuration to confirm the network settings from the computer.
If you are using Windows XP, you may need to confirm your system version to
configure the network setting of your computer.
To check the version of Windows XP, follow these steps.
1
Right click My Computer from the Start menu and select Properties.
System Properties
2
Confirm that the General tab is displayed.
3
Confirm your Windows XP version under System.
TCP/IP
in the case of a wired LAN) displays the MAC address.
buttons displays the IP address. Selecting
will be displayed.
AirPort
(or
62
Page 65

Printing Photographs Directly
from a PictBridge Compliant
Device
Connecting a PictBridge compliant device such as a digital camera, camcorder or mobile phone to the
printer allows you to print recorded images directly without using a computer.
• PictBridge is an industry standard enabling a range of digital photo solutions, including the direct
printing of photos from a digital still camera, camcorder or mobile phone* without the need to use
a computer.
• Canon Bubble Jet Direct allows you to print photos from a Canon Bubble Jet Direct compatible
(PictBridge incompatible) digital camera or digital video camcorder without a computer by simply
connecting the digital camera or digital video camcorder to this printer.
For details, refer to “Printing Photographs Directly from a Canon Bubble Jet Direct Compatible
Digital Camera” on page 68.
• The Print Head cannot be aligned using the controls of the digital device. You can align the print
head from the controls of the printer. If the printer driver is not installed in the computer, align the
print head in this way.
With the printer on, load a sheet of A4 (Letter) size plain paper in the Auto Sheet Feeder. Hold the
RESUME/CANCEL button until the POWER lamp flashes four times.
* Hereafter, the PictBridge compliant digital camera, digital camcorder, or camera-equipped mobile
phone are collectively called a PictBridge compliant device.
Connecting to a PictBridge Compliant Device
Do not connect any equipment other than PictBridge compliant devices or Canon Bubble Jet Direct
compatible cameras to the Direct Print Port of the printer. If you do so, electric shock, fire, or damage
to the device could result.
When producing photos with the digital device connected to the printer, it is advisable to use the AC
adapter supplied with the device. If you use the device battery, be sure to charge it fully.
1
Turn on the printer.
2
Load the paper in the printer.
63
Page 66

3
Connect the PictBridge compliant device to the printer.
Depending on the model or brand of your device, you may have to select a mode of
producing photos compliant with PictBridge before connecting the device.
You may also have to turn on the device or select Play mode manually after connecting the
device to the printer.
Perform necessary operations according to the instruction manual supplied with your device.
(1) Ensure that the device is turned off.
(2) Connect the device to the printer using the USB cable (for connection to a computer) supplied with
the device.
The PictBridge compliant devices turn on automatically when connected to the printer. If the
device does not turn on automatically, turn it on manually.
(3) Turn on and set up the device for direct printing.
When the connection between the device and printer has been established, the
printer flashes twice.
* The power-on sequence may differ depending on the model or brand of the device.
Either of the following icons will appear on the LCD display of the device when the printer is
correctly connected.
A PictBridge compliant device.
A Canon Bubble Jet Direct compatible digital camera.
POWER
64
lamp on the
Page 67

Printing Photographs Directly from a PictBridge Compliant
Device
Checking or Changing PictBridge Print Settings From Your Camera
To change the PictBridge print setting, operate your device to select the PictBridge print setup
mode and confirm or change the settings.
When a PictBridge compliant device is connected and printing is started with no printing option
selected, this printer operates based on the following default settings:
- Paper size ...................... 10 x 15 cm / 4" x 6"
- Paper type ..................... Photo (Photo Paper Plus Glossy)
- Layout ........................... Borderless
- Trimming ...................... Off (No trimming)
- Image optimize ............. ExifPrint
- Date/File No. print ........ Off (No printing)
About the Settings Explained Below
The settings explained on the following pages cannot be made on some devices. If any setting
cannot be made, the default setting explained above is used.
Names of settings that are displayed on Canon PictBridge compliant device are used in the
description given below.
Different names may be displayed on your device depending on the brand or model.
For details, refer to your device’s instruction manual.
About Image Data Format for Printing
This printer accepts images* taken with a camera compatible with the Design rule for Camera File
system and PNG files.
* Exif2.21 compliant
About “Paper size” and “Paper type”
To print on Photo Paper Pro, select Fast Photo from Paper type on the display of the device.
Select Photo for Photo Paper Plus Glossy.
The following sizes and types of paper can be loaded in the printer by selecting options from
Paper size and Paper type.
“Paper size” setting “Paper type” setting Paper loaded in printer
10 x 15 cm / 4" x 6" (Default) Photo (Default) Photo Paper Plus Glossy
Fast Photo Photo Paper Pro
Photo Photo Paper Plus Semi-gloss
Photo Glossy Photo Paper
Photo Glossy Photo Paper “Everyday Use”
Photo Photo Stickers*
13 x 18 cm / 5" x 7"*
3 *4
A4*
5.4 x 8.6 cm / Credit Card Photo Glossy Photo Paper
2
Photo Photo Paper Plus Glossy
Photo Photo Paper Plus Glossy
Fast Photo Photo Paper Pro
Photo Photo Paper Plus Semi-gloss
Photo Glossy Photo Paper
Photo Glossy Photo Paper “Everyday Use”
1
65
Page 68

*1This paper is exclusively used to print photo stickers. When printing on sticker paper, select 10
x 15 cm / 4" x 6" in Paper size.
2
This size can be selected only for Canon PictBridge compliant devices (note that it cannot be
*
selected for some models).
3
*
Plain Paper can be selected for Paper type when A4 is selected for Paper size. When Plain
Paper is selected for Paper type, bordered printing will be performed even when Borderless is
selected for Layout.
4
*
When A4 is selected for Paper size, you can print in 4-up layout.
About “Layout” and “Trimming”
By default, Borderless is selected for Layout and Off (No trimming) is selected for Tr immi ng.
When printing onto Photo Stickers (PS-101) (16-up), use the following settings.
(1) Select the Auto Sheet Feeder as the paper source. For details, see “Basic Operations” on
page 47.
Always load Photo Stickers (PS-101) in the Auto Sheet Feeder.
(2) Select
(3) Select
10 x 15 cm / 4" x 6"
N-up
for
Layout
for the
Paper size
, then select 16.
Some PictBridge compliant devices display the
this case always select
16-up
.
, and
Layout
Photo
option;
for the
Paper type
2-up,4-up,9-up
.
, and
16-up
. In
If there are no options on the PictBridge compliant device that correspond to 2-up, 4-up, 9-up,
or 16-up, printing on stickers is not possible.
About “Image optimize”
By default, ExifPrint is selected for this printer.
If you use a Canon PictBridge-compliant device, you can select VIVID, NR, VIVID+NR, or
Face. (Note that these options cannot be selected for some models.)
• When VIVID is selected, green and blue portions of photos are printed vividly.
• When NR (Noise Reduction) is selected, noise in blue portions, such as the sky, and dark
portions is removed.
• When VIVID+NR is selected, functions of both VIVID and NR are performed.
• When Face is selected, backlit images are corrected.
About “Date/File No. print”
By default, Off is selected for this printer.
If you select an image which has had the shooting date embedded in it using a camera with print
mode, select Off for this function. If you select Date, File No., or Both, the date and/or file
number will be printed over the embedded date.
66
Page 69

Other Settings
If you use a Canon PictBridge-compliant device, you can use the following print settings. (Note
that these print settings cannot be used for some models.) For details, refer to your device’s
instruction manual.
• Shooting Info (Exif Data)
You can print shooting info (Exif data) on photos in list format, or in the margins of specified
photos.
Select Layout, then select the item displayed with the [i] icon.
• 35 mm Film Style Layout (Contact Printing Layout)
You can print selected photos or index-specified photos in 35 mm film style layout (contact
printing layout).
Select Layout then select the item displayed with the film icon.
• Never disconnect the USB cable during printing.
• When disconnecting the USB cable between the device and printer, follow the instructions
given in the device’s instruction manual.
• Controls of the device cannot be used for the following:
- Print quality setting
- Printer maintenance
• For the device operation method and troubleshooting, refer to your device’s manual.
• For print error messages, refer to the User’s Guide.
Checking or Changing PictBridge Print Settings From the Printer
You can change the printer’s default PictBridge print settings, such as paper size and type. To do
this, install the Canon Setup Utility from the included CD-ROM and connect the printer to a
computer. For details, refer to the User’s Guide.
67
Page 70

Printing Photographs Directly
from a Canon Bubble Jet Direct
Compatible Digital Camera
The following is a list of media types that can be set on a Canon Bubble Jet Direct compatible digital camera
along with their limitations when connected to this printer.
Media Types for Digital Camera
When you connect a digital camera, you can use the following media:
Digital Camera Setting Media Type
Card #1 Photo Paper Pro 4" x 6" / 101.6 x 152.4 mm
Card #2 Photo Paper Plus Glossy 4" x 6" / 101.6 x 152.4 mm
Photo Paper Plus Semi-gloss 4" x 6" / 101.6 x 152.4 mm
Glossy Photo Paper 4" x 6" / 101.6 x 152.4 mm
Glossy Photo Paper “Everyday Use” 4" x 6" / 101.6 x 152.4 mm
Card #3 Photo Paper Plus Glossy 5" x 7" / 127.0 x 177.8 mm
LTR Photo Paper Pro Letter size
Photo Paper Plus Glossy Letter size
Photo Paper Plus Semi-gloss Letter size
Glossy Photo Paper Letter size
A4 Photo Paper Pro A4 size
Photo Paper Plus Glossy A4 size
Photo Paper Plus Semi-gloss A4 size
Glossy Photo Paper A4 size
Glossy Photo Paper “Everyday Use” A4 size
• For the digital camera operation method and troubleshooting, refer to your digital camera’s manual.
• For print error messages, refer to the User’s Guide.
• By operating the digital camera, you can make the following prints:
- You can make a standard print from the image displayed in the single display mode or in the
index display mode.
- You can print specified numbers of images, or make an index print by editing the DPOF.
- For the images taken with an ExifPrint-compatible digital camera, the ExifPrint function can be
used.
- If date printing is set from the digital camera, the date when the photograph was taken is to be
printed (excluding the index print).
- Images will be scaled automatically according to the image size set on the digital camera and the
size of the media set on the printer.
• The digital camera does not support the following functions:
- Print quality setting
- Printer maintenance
• Images other than Exif may not be index printed.
68
Page 71

Printing and Initializing
Network Settings
Printing Out Network Setting Information
To print the current network settings of the printer, ensure that the printer is turned on then hold
down the RESUME/CANCEL button until the POWER lamp flashes six times, then release it.
The information as follows is printed out. For details on the network setting information, refer to
“Printing Out Network Setting Information” in the Network Guide.
• Printer name
• Firmware version
• Wireless LAN information
• Wired LAN information
This printout contains valuable information about your computer. Handle it with care.
• Printer access control
• Admin password
• Device status
Initializing Network Settings
To initialize the network settings of the printer, follow these steps.
Note that initialization erases all connection settings with computers, disabling printing. After
initializing the network settings, connect the printer and your computer with a USB cable and
set up the printer again.
69
Page 72

Initializing using printer buttons
1
Hold down the RESUME/CANCEL button until the POWER lamp flashes
10 times, then release it.
Initializing with Canon IJ Network Tool
1
Connect the printer and your computer with a USB cable.
2
Turn on the printer.
3
Start Canon IJ Network Tool.
How to start up Canon IJ Network Tool
On Windows, double-click the Canon IJ Network Tool shortcut icon on the desktop.
Otherwise, follow the procedure below.
(1) Click
(2) Select
On Macintosh, follow the procedure below.
(1) Start up
(2) Select the target printer and click the
(3) Select
(4) Select the target printer and click the
4
For Windows, select the printer to be initialized.
Start
and select
Canon IJ Network Tool
Printer Setup Utility
Network
of
Canon IJ Network Tool
from the pop-up menu.
All programs
is displayed.
(or
Programs
, and then
(when using Mac OS X v.10.2.x,
Canon IJ Network Tool
Utility
button.
Network Settings
).
button. The
.
Print Center
Configuration
).
dialog box
5
Select Maintenance from the Settings menu.
6
Click Initialize under Setting Initialization in the Maintenance dialog
box.
7
Click Yes in the Initialize Settings dialog box (Windows) or OK in the
Setting Initialization dialog box (Macintosh).
70
Page 73

Conformity declaration for R&TTE
Czech Canon tímto prohlašuje, že tento PIXMA iP5200R je ve shodě se
základními požadavky a dalšími příslušnými ustanoveními směrnice
1999/5/ES.
Danish Undertegnede Canon erklærer herved, at følgende udstyr PIXMA
iP5200R overholder de væsentlige krav og øvrige relevante krav i
direktiv 1999/5/EF.
German Hiermit erklärt Canon, dass sich das Gerät PIXMA iP5200R in
Übereinstimmung mit den grundlegenden Anforderungen und den
übrigen einschlägigen Bestimmungen der Richtlinie 1999/5/EG
befindet.
English Hereby, Canon, declares that this PIXMA iP5200R is in compliance
with the essential requirements and other relevant provisions of
Directive 1999/5/EC.
Spanish Por medio de la presente Canon declara que el PIXMA iP5200R
cumple con los requisitos esenciales y cualesquiera otras
disposiciones aplicables o exigibles de la Directiva 1999/5/CE.
Greek ΜΕ ΤΗΝ ΠΑΡΟΥΣΑ Canon ∆ΗΛΩΝΕΙ ΟΤΙ PIXMA iP5200R
ΣΥΜΜΟΡΦΩΝΕΤΑΙ ΠΡΟΣ ΤΙΣ ΟΥΣΙΩ∆ΕΙΣ ΑΠΑΙΤΗΣΕΙΣ ΚΑΙ ΤΙΣ
ΛΟΙΠΕΣ ΣΧΕΤΙΚΕΣ ∆ΙΑΤΑΞΕΙΣ ΤΗΣ Ο∆ΗΓΙΑΣ 1999/5/ΕΚ.
French Par la présente Canon déclare que l'appareil PIXMA iP5200R est
conforme aux exigences essentielles et aux autres dispositions
pertinentes de la directive 1999/5/CE.
Italian Con la presente Canon dichiara che questo PIXMA iP5200R è
conforme ai requisiti essenziali ed alle altre disposizioni pertinenti
stabilite dalla direttiva 1999/5/CE.
Dutch Hierbij verklaart Canon dat het toestel PIXMA iP5200R in
overeenstemming is met de essentiële eisen en de andere relevante
bepalingen van richtlijn 1999/5/EG.
Hungarian Alulírott, Canon nyilatkozom, hogy a PIXMA iP5200R megfelel a
vonatkozó alapvetõ követelményeknek és az 1999/5/EC irányelv
egyéb elõírásainak.
71
Page 74

Portuguese Canon declara que este PIXMA iP5200R está conforme com os
requisitos essenciais e outras disposições da Directiva 1999/5/CE.
Slovenian Canon izjavlja, da je ta PIXMA iP5200R v skladu z bistvenimi
zahtevami in ostalimi relevantnimi določili direktive 1999/5/ES.
Slovak Canon týmto vyhlasuje, že PIXMA iP5200R spĺňa základné
požiadavky a všetky príslušné ustanovenia Smernice 1999/5/ES.
Finnish Canon vakuuttaa täten että PIXMA iP5200R tyyppinen laite on
direktiivin 1999/5/EY oleellisten vaatimusten ja sitä koskevien
direktiivin muiden ehtojen mukainen.
Swedish Härmed intygar Canon att denna PIXMA iP5200R står I
överensstämmelse med de väsentliga egenskapskrav och övriga
relevanta bestämmelser som framgår av direktiv 1999/5/EG.
Icelandic Hér með lýsir Canon yfir því að PIXMA iP5200R er í samræmi við
grunnkröfur og aðrar kröfur, sem gerðar eru í tilskipun 1999/5/EC.
Norwegian Canon erklærer herved at utstyret PIXMA iP5200R er i samsvar med
de grunnleggende krav og øvrige relevante krav i direktiv 1999/5/EF.
Polish Canon niniejszym oświadcza, że PIXMA iP5200R spełnia
zasadnicze wymogi oraz inne istotne postanowienia dyrektywy
1999/5/EC.
72
Page 75

Regulatory Information
For 110-120V, 50/60Hz model
Color Printer Model: K10253 (Contains IC 498C-K30254)
This device complies with Part 15 of the FCC Rules and RSS-210 of the IC Rules. Operation is subject
to the following two conditions: (1) This device may not cause harmful interference, and (2) this device
must accept any interference received, including interference that may cause undesired operation.
Note: This equipment has been tested and found to comply with the limits for a Class B digital device,
pursuant to Part 15 of the FCC Rules. These limits are designed to provide reasonable protection against
harmful interference in a residential installation. This equipment generates, uses and can radiate radio
frequency energy and, if not installed and used in accordance with the instructions, may cause harmful
interference to radio communications.
However, there is no guarantee that interference will not occur in a particular installation. If this
equipment does cause harmful interference to radio or television reception, which can be determined by
turning the equipment off and on, the user is encouraged to try to correct the interference by one or more
of the following measures:
Reorient or relocate the receiving antenna.
Increase the separation between the equipment and receiver.
Connect the equipment into an outlet on a circuit different from that to which the receiver is connected.
Consult the dealer or an experienced radio/TV technician for help.
Use of a shielded cable is required to comply with Class B limits in Subpart B of Part 15 of the FCC
Rules.
Do not make any changes or modifications to the equipment unless otherwise specified in the manual. If
such changes or modifications should be made, you could be required to stop operation of the equipment.
Canon U.S.A., Inc.
One Canon Plaza
Lake Success, NY 11042
1-516-328-5600
Page 76

The following ink tanks are compatible with this printer.
For details on ink tank replacement, refer to “Replacing an Ink Tank” in this guide.
QA7-3632-V01 XXXXXXXX ©CANON INC.2005 PRINTED IN THAILAND
 Loading...