

Page 1

MG2500 series
Online Manual
Read Me First
Useful Functions Available on the Machine
Overview of the Machine
Troubleshooting
Printing
Copying
Scanning
English
Page 2

Contents
Read Me First. . . . . . . . . . . . . . . . . . . . . . . . . . . . . . . . . . . . . . . . . . . . . . . . . . . 11
How to Use the Online Manual. . . . . . . . . . . . . . . . . . . . . . . . . . . . . . . . . . . . . . 12
Trademarks and Licenses. . . . . . . . . . . . . . . . . . . . . . . . . . . . . . . . . . . . . . . . . . 13
Search Tips. . . . . . . . . . . . . . . . . . . . . . . . . . . . . . . . . . . . . . . . . . . . . . . . . . . . . 14
Window Used in Operation Explanation. . . . . . . . . . . . . . . . . . . . . . . . . . . . . . . 16
Useful Functions Available on the Machine. . . . . . . . . . . . . . . . . . . . . . . . . . . . . 17
Useful Functions Available from Applications and the Main Unit. . . . . . . . . . . . . . . . . . . . 18
Overview of the Machine. . . . . . . . . . . . . . . . . . . . . . . . . . . . . . . . . . . . . . . . . . . 21
Safety Guide. . . . . . . . . . . . . . . . . . . . . . . . . . . . . . . . . . . . . . . . . . . . . . . . . . . . . . . . . . . . 22
Safety Precautions. . . . . . . . . . . . . . . . . . . . . . . . . . . . . . . . . . . . . . . . . . . . . . . . . . . . . . . . . . . . . . . . . . 23
Regulatory and Safety Information. . . . . . . . . . . . . . . . . . . . . . . . . . . . . . . . . . . . . . . . . . . . . . . . . . . . . 24
Main Components and Basic Operations. . . . . . . . . . . . . . . . . . . . . . . . . . . . . . . . . . . . . . 27
Main Components. . . . . . . . . . . . . . . . . . . . . . . . . . . . . . . . . . . . . . . . . . . . . . . . . . . . . . . . . . . . . . . . . . 28
Front View. . . . . . . . . . . . . . . . . . . . . . . . . . . . . . . . . . . . . . . . . . . . . . . . . . . . . . . . . . . . . . . . . . . . 29
Rear View. . . . . . . . . . . . . . . . . . . . . . . . . . . . . . . . . . . . . . . . . . . . . . . . . . . . . . . . . . . . . . . . . . . . 31
Inside View. . . . . . . . . . . . . . . . . . . . . . . . . . . . . . . . . . . . . . . . . . . . . . . . . . . . . . . . . . . . . . . . . . . 32
Operation Panel. . . . . . . . . . . . . . . . . . . . . . . . . . . . . . . . . . . . . . . . . . . . . . . . . . . . . . . . . . . . . . . . 33
About the Power Supply of the Machine. . . . . . . . . . . . . . . . . . . . . . . . . . . . . . . . . . . . . . . . . . . . . . . . . 35
Confirming that the Power Is On. . . . . . . . . . . . . . . . . . . . . . . . . . . . . . . . . . . . . . . . . . . . . . . . . . . 36
Turning the Machine On and Off. . . . . . . . . . . . . . . . . . . . . . . . . . . . . . . . . . . . . . . . . . . . . . . . . . . 37
Notice for the Power Plug/Power Cord. . . . . . . . . . . . . . . . . . . . . . . . . . . . . . . . . . . . . . . . . . . . . . 39
Notice for Unplugging the Power Cord. . . . . . . . . . . . . . . . . . . . . . . . . . . . . . . . . . . . . . . . . . . . . . 40
Loading Paper / Originals. . . . . . . . . . . . . . . . . . . . . . . . . . . . . . . . . . . . . . . . . . . . . . . . . . 41
Loading Paper. . . . . . . . . . . . . . . . . . . . . . . . . . . . . . . . . . . . . . . . . . . . . . . . . . . . . . . . . . . . . . . . . . . . . 42
Loading Plain Paper / Photo Paper. . . . . . . . . . . . . . . . . . . . . . . . . . . . . . . . . . . . . . . . . . . . . . . . . 43
Loading Envelopes. . . . . . . . . . . . . . . . . . . . . . . . . . . . . . . . . . . . . . . . . . . . . . . . . . . . . . . . . . . . . 46
Media Types You Can Use. . . . . . . . . . . . . . . . . . . . . . . . . . . . . . . . . . . . . . . . . . . . . . . . . . . . . . . 49
Paper Load Limit. . . . . . . . . . . . . . . . . . . . . . . . . . . . . . . . . . . . . . . . . . . . . . . . . . . . . . . . . . . 51
Media Types You Cannot Use. . . . . . . . . . . . . . . . . . . . . . . . . . . . . . . . . . . . . . . . . . . . . . . . . . . . . 52
Printing Area. . . . . . . . . . . . . . . . . . . . . . . . . . . . . . . . . . . . . . . . . . . . . . . . . . . . . . . . . . . . . . . . . . 53
Printing Area. . . . . . . . . . . . . . . . . . . . . . . . . . . . . . . . . . . . . . . . . . . . . . . . . . . . . . . . . . . . . . 54
Other Sizes than Letter, Legal, Envelopes. . . . . . . . . . . . . . . . . . . . . . . . . . . . . . . . . . . . . . . 55
Letter, Legal. . . . . . . . . . . . . . . . . . . . . . . . . . . . . . . . . . . . . . . . . . . . . . . . . . . . . . . . . . . . . . . 56
Page 3

Envelopes. . . . . . . . . . . . . . . . . . . . . . . . . . . . . . . . . . . . . . . . . . . . . . . . . . . . . . . . . . . . . . . . 57
Loading Originals. . . . . . . . . . . . . . . . . . . . . . . . . . . . . . . . . . . . . . . . . . . . . . . . . . . . . . . . . . . . . . . . . . . 58
Loading Originals on the Platen Glass. . . . . . . . . . . . . . . . . . . . . . . . . . . . . . . . . . . . . . . . . . . . . . 59
Originals You Can Load. . . . . . . . . . . . . . . . . . . . . . . . . . . . . . . . . . . . . . . . . . . . . . . . . . . . . . . . . . 61
Replacing a FINE Cartridge. . . . . . . . . . . . . . . . . . . . . . . . . . . . . . . . . . . . . . . . . . . . . . . . 62
Replacing a FINE Cartridge. . . . . . . . . . . . . . . . . . . . . . . . . . . . . . . . . . . . . . . . . . . . . . . . . . . . . . . . . . . 63
Checking the Ink Status. . . . . . . . . . . . . . . . . . . . . . . . . . . . . . . . . . . . . . . . . . . . . . . . . . . . . . . . . . . . . . 69
Checking the Ink Status with the Ink Lamps on the Operation Panel. . . . . . . . . . . . . . . . . . . . . . . 70
Maintenance. . . . . . . . . . . . . . . . . . . . . . . . . . . . . . . . . . . . . . . . . . . . . . . . . . . . . . . . . . . . 72
When Printing Becomes Faint or Colors Are Incorrect. . . . . . . . . . . . . . . . . . . . . . . . . . . . . . . . . . . . . . 73
Maintenance Procedure. . . . . . . . . . . . . . . . . . . . . . . . . . . . . . . . . . . . . . . . . . . . . . . . . . . . . . . . . . 74
Printing the Nozzle Check Pattern. . . . . . . . . . . . . . . . . . . . . . . . . . . . . . . . . . . . . . . . . . . . . . . . . . 77
Examining the Nozzle Check Pattern. . . . . . . . . . . . . . . . . . . . . . . . . . . . . . . . . . . . . . . . . . . . . . . 78
Cleaning the Print Head. . . . . . . . . . . . . . . . . . . . . . . . . . . . . . . . . . . . . . . . . . . . . . . . . . . . . . . . . . 79
Cleaning the Print Head Deeply. . . . . . . . . . . . . . . . . . . . . . . . . . . . . . . . . . . . . . . . . . . . . . . . . . . 80
Aligning the Print Head. . . . . . . . . . . . . . . . . . . . . . . . . . . . . . . . . . . . . . . . . . . . . . . . . . . . . . . . . . 81
Performing Maintenance from a Computer. . . . . . . . . . . . . . . . . . . . . . . . . . . . . . . . . . . . . . . . . . . . . . . 84
Cleaning the Print Heads from Your Computer. . . . . . . . . . . . . . . . . . . . . . . . . . . . . . . . . . . . . . . . 85
Cleaning the Paper Feed Rollers from Your Computer. . . . . . . . . . . . . . . . . . . . . . . . . . . . . . . . . . 87
Aligning the Print Head. . . . . . . . . . . . . . . . . . . . . . . . . . . . . . . . . . . . . . . . . . . . . . . . . . . . . . . . . . 88
Aligning the Print Head Position from Your Computer. . . . . . . . . . . . . . . . . . . . . . . . . . . . . . . . . . . 89
Aligning the Print Head Position Automatically from Your Computer. . . . . . . . . . . . . . . . . . . . . . . 93
Use Your Computer to Print a Nozzle Check Pattern. . . . . . . . . . . . . . . . . . . . . . . . . . . . . . . . . . . 95
Cleaning Inside the Machine. . . . . . . . . . . . . . . . . . . . . . . . . . . . . . . . . . . . . . . . . . . . . . . . . . . . . . 96
Cleaning the Machine. . . . . . . . . . . . . . . . . . . . . . . . . . . . . . . . . . . . . . . . . . . . . . . . . . . . . . . . . . . . . . . 97
Cleaning the Exterior of the Machine. . . . . . . . . . . . . . . . . . . . . . . . . . . . . . . . . . . . . . . . . . . . . . . . 98
Cleaning the Platen Glass and Document Cover. . . . . . . . . . . . . . . . . . . . . . . . . . . . . . . . . . . . . . 99
Cleaning the Paper Feed Roller. . . . . . . . . . . . . . . . . . . . . . . . . . . . . . . . . . . . . . . . . . . . . . . . . . 100
Cleaning the Inside of the Machine (Bottom Plate Cleaning). . . . . . . . . . . . . . . . . . . . . . . . . . . . 102
Cleaning the Protrusions inside the Machine. . . . . . . . . . . . . . . . . . . . . . . . . . . . . . . . . . . . . . . . 104
Changing the Machine Settings. . . . . . . . . . . . . . . . . . . . . . . . . . . . . . . . . . . . . . . . . . . . 105
Changing Machine Settings from Your Computer. . . . . . . . . . . . . . . . . . . . . . . . . . . . . . . . . . . . . . . . . 106
Changing the Print Options. . . . . . . . . . . . . . . . . . . . . . . . . . . . . . . . . . . . . . . . . . . . . . . . . . . . . . 107
Registering a Frequently Used Printing Profile. . . . . . . . . . . . . . . . . . . . . . . . . . . . . . . . . . . . . . . 109
Setting the Ink Cartridge to be Used. . . . . . . . . . . . . . . . . . . . . . . . . . . . . . . . . . . . . . . . . . . . . . . 111
Managing the Machine Power. . . . . . . . . . . . . . . . . . . . . . . . . . . . . . . . . . . . . . . . . . . . . . . . . . . . 112
Reducing the Machine Noise. . . . . . . . . . . . . . . . . . . . . . . . . . . . . . . . . . . . . . . . . . . . . . . . . . . . . 114
Page 4

Changing the Machine Operation Mode. . . . . . . . . . . . . . . . . . . . . . . . . . . . . . . . . . . . . . . . . . . . 116
Changing the Machine Settings Using the Operation Panel. . . . . . . . . . . . . . . . . . . . . . . . . . . . . . . . . 118
About Quiet setting. . . . . . . . . . . . . . . . . . . . . . . . . . . . . . . . . . . . . . . . . . . . . . . . . . . . . . . . . . . . 119
Turning on/off the Machine Automatically. . . . . . . . . . . . . . . . . . . . . . . . . . . . . . . . . . . . . . . . . . . 120
Tips for Ensuring Optimal Printing Quality. . . . . . . . . . . . . . . . . . . . . . . . . . . . . . . . . . . . 121
Useful Information about Ink. . . . . . . . . . . . . . . . . . . . . . . . . . . . . . . . . . . . . . . . . . . . . . . . . . . . . . . . . 122
Key Points to Successful Printing. . . . . . . . . . . . . . . . . . . . . . . . . . . . . . . . . . . . . . . . . . . . . . . . . . . . . 123
Be Sure to Make Paper Settings after Loading Paper. . . . . . . . . . . . . . . . . . . . . . . . . . . . . . . . . . . . . . 124
Canceling a Print Job. . . . . . . . . . . . . . . . . . . . . . . . . . . . . . . . . . . . . . . . . . . . . . . . . . . . . . . . . . . . . . . 125
Storing Printed Images. . . . . . . . . . . . . . . . . . . . . . . . . . . . . . . . . . . . . . . . . . . . . . . . . . . . . . . . . . . . . 126
Machine Handling Precautions. . . . . . . . . . . . . . . . . . . . . . . . . . . . . . . . . . . . . . . . . . . . . . . . . . . . . . . 127
Key to Enjoying Consistent Printing Quality. . . . . . . . . . . . . . . . . . . . . . . . . . . . . . . . . . . . . . . . . . . . . . 128
Precautions for Safe Transport of the Machine. . . . . . . . . . . . . . . . . . . . . . . . . . . . . . . . . . . . . . . . . . . 129
Legal Limitations on Use of Your Product and Use of Images. . . . . . . . . . . . . . . . . . . . . 131
Specifications. . . . . . . . . . . . . . . . . . . . . . . . . . . . . . . . . . . . . . . . . . . . . . . . . . . . . . . . . . 132
Troubleshooting. . . . . . . . . . . . . . . . . . . . . . . . . . . . . . . . . . . . . . . . . . . . . . . . . 135
Problems with Printing. . . . . . . . . . . . . . . . . . . . . . . . . . . . . . . . . . . . . . . . . . . . . . . . . . . 136
Printing Does Not Start. . . . . . . . . . . . . . . . . . . . . . . . . . . . . . . . . . . . . . . . . . . . . . . . . . . . . . . . . . . . . 137
Paper Jams. . . . . . . . . . . . . . . . . . . . . . . . . . . . . . . . . . . . . . . . . . . . . . . . . . . . . . . . . . . . . . . . . . . . . . 139
Paper Does Not Feed Properly/"No Paper" Error Occurs. . . . . . . . . . . . . . . . . . . . . . . . . . . . . . . . . . . 140
Copying/Printing Stops Before It Is Completed. . . . . . . . . . . . . . . . . . . . . . . . . . . . . . . . . . . . . . . . . . . 142
Problems with Printing Quality. . . . . . . . . . . . . . . . . . . . . . . . . . . . . . . . . . . . . . . . . . . . . 143
Print Results Not Satisfactory. . . . . . . . . . . . . . . . . . . . . . . . . . . . . . . . . . . . . . . . . . . . . . . . . . . . . . . . 144
Cannot Print to End of Job. . . . . . . . . . . . . . . . . . . . . . . . . . . . . . . . . . . . . . . . . . . . . . . . . . . . . . . 145
No Printing Results/Printing Is Blurred/Colors Are Wrong/White Streaks. . . . . . . . . . . . . . . . . . . 146
Colors Are Unclear. . . . . . . . . . . . . . . . . . . . . . . . . . . . . . . . . . . . . . . . . . . . . . . . . . . . . . . . . . . . 149
Lines Are Misaligned. . . . . . . . . . . . . . . . . . . . . . . . . . . . . . . . . . . . . . . . . . . . . . . . . . . . . . . . . . . 150
Line Does Not Print or Prints Partially. . . . . . . . . . . . . . . . . . . . . . . . . . . . . . . . . . . . . . . . . . . . . . 151
Image Does Not Print or Prints Partially. . . . . . . . . . . . . . . . . . . . . . . . . . . . . . . . . . . . . . . . . . . . 152
Printed Paper Curls or Has Ink Blots. . . . . . . . . . . . . . . . . . . . . . . . . . . . . . . . . . . . . . . . . . . . . . . 153
Paper Is Smudged/Printed Surface Is Scratched. . . . . . . . . . . . . . . . . . . . . . . . . . . . . . . . . . . . . 154
Back of the Paper Is Smudged. . . . . . . . . . . . . . . . . . . . . . . . . . . . . . . . . . . . . . . . . . . . . . . . . . . 157
Colors Are Uneven or Streaked. . . . . . . . . . . . . . . . . . . . . . . . . . . . . . . . . . . . . . . . . . . . . . . . . . . 158
Ink Is Not Ejected. . . . . . . . . . . . . . . . . . . . . . . . . . . . . . . . . . . . . . . . . . . . . . . . . . . . . . . . . . . . . . . . . . 160
Problems with Scanning. . . . . . . . . . . . . . . . . . . . . . . . . . . . . . . . . . . . . . . . . . . . . . . . . . 161
Problems with Scanning. . . . . . . . . . . . . . . . . . . . . . . . . . . . . . . . . . . . . . . . . . . . . . . . . . . . . . . . . . . . 162
Page 5

Scanner Does Not Work. . . . . . . . . . . . . . . . . . . . . . . . . . . . . . . . . . . . . . . . . . . . . . . . . . . . . . . . 163
ScanGear (Scanner Driver) Does Not Start. . . . . . . . . . . . . . . . . . . . . . . . . . . . . . . . . . . . . . . . . . 164
Error Message Appears and the ScanGear (Scanner Driver) Screen Does Not Appear. . . . . . . 165
Cannot Scan Multiple Items at One Time. . . . . . . . . . . . . . . . . . . . . . . . . . . . . . . . . . . . . . . . . . . 166
Cannot Scan Properly with Auto Scan. . . . . . . . . . . . . . . . . . . . . . . . . . . . . . . . . . . . . . . . . . . . . . 167
Slow Scanning Speed. . . . . . . . . . . . . . . . . . . . . . . . . . . . . . . . . . . . . . . . . . . . . . . . . . . . . . . . . . 168
"There is not enough memory." Message Is Displayed. . . . . . . . . . . . . . . . . . . . . . . . . . . . . . . . . 169
Computer Stops Operating during Scanning. . . . . . . . . . . . . . . . . . . . . . . . . . . . . . . . . . . . . . . . . 170
Scanner Does Not Work after Upgrading Windows. . . . . . . . . . . . . . . . . . . . . . . . . . . . . . . . . . . . 171
Scanned Image Does Not Open. . . . . . . . . . . . . . . . . . . . . . . . . . . . . . . . . . . . . . . . . . . . . . . . . . 173
Scan Results Not Satisfactory. . . . . . . . . . . . . . . . . . . . . . . . . . . . . . . . . . . . . . . . . . . . . . . . . . . . . . . . 174
Scan Quality (Image Displayed on the Monitor) Is Poor. . . . . . . . . . . . . . . . . . . . . . . . . . . . . . . . 175
Scanned Image Is Surrounded by Extra White Areas. . . . . . . . . . . . . . . . . . . . . . . . . . . . . . . . . . 177
Cannot Scan at the Correct Size. . . . . . . . . . . . . . . . . . . . . . . . . . . . . . . . . . . . . . . . . . . . . . . . . . 178
Item Is Placed Correctly, but the Scanned Image Is Slanted. . . . . . . . . . . . . . . . . . . . . . . . . . . . 179
Scanned Image Is Enlarged (Reduced) on the Computer Monitor. . . . . . . . . . . . . . . . . . . . . . . . 180
Software Problems. . . . . . . . . . . . . . . . . . . . . . . . . . . . . . . . . . . . . . . . . . . . . . . . . . . . . . . . . . . . . . . . . 181
The E-mail Client You Want to Use Does Not Appear in the Screen for Selecting an E-mail Client. .
. . . . . . . . . . . . . . . . . . . . . . . . . . . . . . . . . . . . . . . . . . . . . . . . . . . . . . . . . . . . . . . . . . . . . . . . . . . . 182
Problems with the Machine. . . . . . . . . . . . . . . . . . . . . . . . . . . . . . . . . . . . . . . . . . . . . . . . 183
The Machine Cannot Be Powered On. . . . . . . . . . . . . . . . . . . . . . . . . . . . . . . . . . . . . . . . . . . . . . . . . . 184
The Machine Turns Off Unintendedly. . . . . . . . . . . . . . . . . . . . . . . . . . . . . . . . . . . . . . . . . . . . . . . . . . 185
Cannot Connect to Computer Properly. . . . . . . . . . . . . . . . . . . . . . . . . . . . . . . . . . . . . . . . . . . . . . . . . 186
FINE Cartridge Holder Does Not Move to the Position for Replacing. . . . . . . . . . . . . . . . . . . . . . . . . . 187
Printer Status Monitor Is Not Displayed. . . . . . . . . . . . . . . . . . . . . . . . . . . . . . . . . . . . . . . . . . . . . . . . . 188
Problems with Installation/Downloading. . . . . . . . . . . . . . . . . . . . . . . . . . . . . . . . . . . . . . 189
Cannot Install the MP Drivers. . . . . . . . . . . . . . . . . . . . . . . . . . . . . . . . . . . . . . . . . . . . . . . . . . . . . . . . 190
Easy-WebPrint EX Does Not Start Up or Easy-WebPrint EX Menu Does Not Appear. . . . . . . . . . . . . 192
About Errors/Messages Displayed. . . . . . . . . . . . . . . . . . . . . . . . . . . . . . . . . . . . . . . . . . 193
If an Error Occurs. . . . . . . . . . . . . . . . . . . . . . . . . . . . . . . . . . . . . . . . . . . . . . . . . . . . . . . . . . . . . . . . . . 194
A Message Is Displayed. . . . . . . . . . . . . . . . . . . . . . . . . . . . . . . . . . . . . . . . . . . . . . . . . . . . . . . . . . . . 197
If You Cannot Resolve the Problem. . . . . . . . . . . . . . . . . . . . . . . . . . . . . . . . . . . . . . . . . 201
Support Code List. . . . . . . . . . . . . . . . . . . . . . . . . . . . . . . . . . . . . . . . . . . . . . . 202
Support Code List (When Paper Is Jammed). . . . . . . . . . . . . . . . . . . . . . . . . . . . . . . . . . 203
1300. . . . . . . . . . . . . . . . . . . . . . . . . . . . . . . . . . . . . . . . . . . . . . . . . . . . . . . . . . . . . . . . . . . . . . . . . . . . 204
Paper Is Jammed inside the Machine. . . . . . . . . . . . . . . . . . . . . . . . . . . . . . . . . . . . . . . . . . . . . . . . . . 206
5
Page 6

In Other Cases. . . . . . . . . . . . . . . . . . . . . . . . . . . . . . . . . . . . . . . . . . . . . . . . . . . . . . . . . . . . . . . . . . . . 209
1000. . . . . . . . . . . . . . . . . . . . . . . . . . . . . . . . . . . . . . . . . . . . . . . . . . . . . . . . . . . . . . . . . 210
1200. . . . . . . . . . . . . . . . . . . . . . . . . . . . . . . . . . . . . . . . . . . . . . . . . . . . . . . . . . . . . . . . . 211
1203. . . . . . . . . . . . . . . . . . . . . . . . . . . . . . . . . . . . . . . . . . . . . . . . . . . . . . . . . . . . . . . . . 212
1401. . . . . . . . . . . . . . . . . . . . . . . . . . . . . . . . . . . . . . . . . . . . . . . . . . . . . . . . . . . . . . . . . 213
1403. . . . . . . . . . . . . . . . . . . . . . . . . . . . . . . . . . . . . . . . . . . . . . . . . . . . . . . . . . . . . . . . . 214
1485. . . . . . . . . . . . . . . . . . . . . . . . . . . . . . . . . . . . . . . . . . . . . . . . . . . . . . . . . . . . . . . . . 215
1682. . . . . . . . . . . . . . . . . . . . . . . . . . . . . . . . . . . . . . . . . . . . . . . . . . . . . . . . . . . . . . . . . 216
1684. . . . . . . . . . . . . . . . . . . . . . . . . . . . . . . . . . . . . . . . . . . . . . . . . . . . . . . . . . . . . . . . . 217
1686. . . . . . . . . . . . . . . . . . . . . . . . . . . . . . . . . . . . . . . . . . . . . . . . . . . . . . . . . . . . . . . . . 218
1687. . . . . . . . . . . . . . . . . . . . . . . . . . . . . . . . . . . . . . . . . . . . . . . . . . . . . . . . . . . . . . . . . 219
1688. . . . . . . . . . . . . . . . . . . . . . . . . . . . . . . . . . . . . . . . . . . . . . . . . . . . . . . . . . . . . . . . . 220
1700. . . . . . . . . . . . . . . . . . . . . . . . . . . . . . . . . . . . . . . . . . . . . . . . . . . . . . . . . . . . . . . . . 221
1701. . . . . . . . . . . . . . . . . . . . . . . . . . . . . . . . . . . . . . . . . . . . . . . . . . . . . . . . . . . . . . . . . 222
1890. . . . . . . . . . . . . . . . . . . . . . . . . . . . . . . . . . . . . . . . . . . . . . . . . . . . . . . . . . . . . . . . . 223
2900. . . . . . . . . . . . . . . . . . . . . . . . . . . . . . . . . . . . . . . . . . . . . . . . . . . . . . . . . . . . . . . . . 224
2901. . . . . . . . . . . . . . . . . . . . . . . . . . . . . . . . . . . . . . . . . . . . . . . . . . . . . . . . . . . . . . . . . 225
4100. . . . . . . . . . . . . . . . . . . . . . . . . . . . . . . . . . . . . . . . . . . . . . . . . . . . . . . . . . . . . . . . . 226
4102. . . . . . . . . . . . . . . . . . . . . . . . . . . . . . . . . . . . . . . . . . . . . . . . . . . . . . . . . . . . . . . . . 227
5011. . . . . . . . . . . . . . . . . . . . . . . . . . . . . . . . . . . . . . . . . . . . . . . . . . . . . . . . . . . . . . . . . 228
5012. . . . . . . . . . . . . . . . . . . . . . . . . . . . . . . . . . . . . . . . . . . . . . . . . . . . . . . . . . . . . . . . . 229
5100. . . . . . . . . . . . . . . . . . . . . . . . . . . . . . . . . . . . . . . . . . . . . . . . . . . . . . . . . . . . . . . . . 230
5200. . . . . . . . . . . . . . . . . . . . . . . . . . . . . . . . . . . . . . . . . . . . . . . . . . . . . . . . . . . . . . . . . 231
5400. . . . . . . . . . . . . . . . . . . . . . . . . . . . . . . . . . . . . . . . . . . . . . . . . . . . . . . . . . . . . . . . . 232
5B00. . . . . . . . . . . . . . . . . . . . . . . . . . . . . . . . . . . . . . . . . . . . . . . . . . . . . . . . . . . . . . . . . 233
5B01. . . . . . . . . . . . . . . . . . . . . . . . . . . . . . . . . . . . . . . . . . . . . . . . . . . . . . . . . . . . . . . . . 234
6000. . . . . . . . . . . . . . . . . . . . . . . . . . . . . . . . . . . . . . . . . . . . . . . . . . . . . . . . . . . . . . . . . 235
6800. . . . . . . . . . . . . . . . . . . . . . . . . . . . . . . . . . . . . . . . . . . . . . . . . . . . . . . . . . . . . . . . . 236
6801. . . . . . . . . . . . . . . . . . . . . . . . . . . . . . . . . . . . . . . . . . . . . . . . . . . . . . . . . . . . . . . . . 237
6930. . . . . . . . . . . . . . . . . . . . . . . . . . . . . . . . . . . . . . . . . . . . . . . . . . . . . . . . . . . . . . . . . 238
6931. . . . . . . . . . . . . . . . . . . . . . . . . . . . . . . . . . . . . . . . . . . . . . . . . . . . . . . . . . . . . . . . . 239
6932. . . . . . . . . . . . . . . . . . . . . . . . . . . . . . . . . . . . . . . . . . . . . . . . . . . . . . . . . . . . . . . . . 240
6933. . . . . . . . . . . . . . . . . . . . . . . . . . . . . . . . . . . . . . . . . . . . . . . . . . . . . . . . . . . . . . . . . 241
6936. . . . . . . . . . . . . . . . . . . . . . . . . . . . . . . . . . . . . . . . . . . . . . . . . . . . . . . . . . . . . . . . . 242
Page 7

6937. . . . . . . . . . . . . . . . . . . . . . . . . . . . . . . . . . . . . . . . . . . . . . . . . . . . . . . . . . . . . . . . . 243
6938. . . . . . . . . . . . . . . . . . . . . . . . . . . . . . . . . . . . . . . . . . . . . . . . . . . . . . . . . . . . . . . . . 244
6940. . . . . . . . . . . . . . . . . . . . . . . . . . . . . . . . . . . . . . . . . . . . . . . . . . . . . . . . . . . . . . . . . 245
6941. . . . . . . . . . . . . . . . . . . . . . . . . . . . . . . . . . . . . . . . . . . . . . . . . . . . . . . . . . . . . . . . . 246
6942. . . . . . . . . . . . . . . . . . . . . . . . . . . . . . . . . . . . . . . . . . . . . . . . . . . . . . . . . . . . . . . . . 247
6943. . . . . . . . . . . . . . . . . . . . . . . . . . . . . . . . . . . . . . . . . . . . . . . . . . . . . . . . . . . . . . . . . 248
6944. . . . . . . . . . . . . . . . . . . . . . . . . . . . . . . . . . . . . . . . . . . . . . . . . . . . . . . . . . . . . . . . . 249
6945. . . . . . . . . . . . . . . . . . . . . . . . . . . . . . . . . . . . . . . . . . . . . . . . . . . . . . . . . . . . . . . . . 250
6946. . . . . . . . . . . . . . . . . . . . . . . . . . . . . . . . . . . . . . . . . . . . . . . . . . . . . . . . . . . . . . . . . 251
B200. . . . . . . . . . . . . . . . . . . . . . . . . . . . . . . . . . . . . . . . . . . . . . . . . . . . . . . . . . . . . . . . . 252
B201. . . . . . . . . . . . . . . . . . . . . . . . . . . . . . . . . . . . . . . . . . . . . . . . . . . . . . . . . . . . . . . . . 253
Printing. . . . . . . . . . . . . . . . . . . . . . . . . . . . . . . . . . . . . . . . . . . . . . . . . . . . . . . 254
Printing from a Computer. . . . . . . . . . . . . . . . . . . . . . . . . . . . . . . . . . . . . . . . . . . . . . . . . 255
Printing with Application Software that You are Using (Printer Driver). . . . . . . . . . . . . . . . . . . . . . . . . 256
Printing with Easy Setup. . . . . . . . . . . . . . . . . . . . . . . . . . . . . . . . . . . . . . . . . . . . . . . . . . . . . . . . 257
Setting the Media Type with the Printer Driver. . . . . . . . . . . . . . . . . . . . . . . . . . . . . . . . . . . 260
Various Printing Methods. . . . . . . . . . . . . . . . . . . . . . . . . . . . . . . . . . . . . . . . . . . . . . . . . . . . . . . . 261
Setting a Page Size and Orientation. . . . . . . . . . . . . . . . . . . . . . . . . . . . . . . . . . . . . . . . . . . 262
Setting the Number of Copies and Printing Order. . . . . . . . . . . . . . . . . . . . . . . . . . . . . . . . . 264
Setting the Stapling Margin. . . . . . . . . . . . . . . . . . . . . . . . . . . . . . . . . . . . . . . . . . . . . . . . . . 267
Fit-to-Page Printing. . . . . . . . . . . . . . . . . . . . . . . . . . . . . . . . . . . . . . . . . . . . . . . . . . . . . . . . 269
Scaled Printing. . . . . . . . . . . . . . . . . . . . . . . . . . . . . . . . . . . . . . . . . . . . . . . . . . . . . . . . . . . . 271
Page Layout Printing. . . . . . . . . . . . . . . . . . . . . . . . . . . . . . . . . . . . . . . . . . . . . . . . . . . . . . . 274
Tiling/Poster Printing. . . . . . . . . . . . . . . . . . . . . . . . . . . . . . . . . . . . . . . . . . . . . . . . . . . . . . . 276
Booklet Printing. . . . . . . . . . . . . . . . . . . . . . . . . . . . . . . . . . . . . . . . . . . . . . . . . . . . . . . . . . . 280
Duplex Printing. . . . . . . . . . . . . . . . . . . . . . . . . . . . . . . . . . . . . . . . . . . . . . . . . . . . . . . . . . . 282
Stamp/Background Printing. . . . . . . . . . . . . . . . . . . . . . . . . . . . . . . . . . . . . . . . . . . . . . . . . . 284
Registering a Stamp. . . . . . . . . . . . . . . . . . . . . . . . . . . . . . . . . . . . . . . . . . . . . . . . . . . . . . . 287
Registering Image Data to be Used as a Background. . . . . . . . . . . . . . . . . . . . . . . . . . . . . . 291
Setting Up Envelope Printing. . . . . . . . . . . . . . . . . . . . . . . . . . . . . . . . . . . . . . . . . . . . . . . . . 295
Displaying the Print Results before Printing. . . . . . . . . . . . . . . . . . . . . . . . . . . . . . . . . . . . . 297
Setting Paper Dimensions (Custom Size). . . . . . . . . . . . . . . . . . . . . . . . . . . . . . . . . . . . . . . 298
Editing the Print Document or Reprinting from the Print History. . . . . . . . . . . . . . . . . . . . . . 300
Changing the Print Quality and Correcting Image Data. . . . . . . . . . . . . . . . . . . . . . . . . . . . . . . . . 304
Setting the Print Quality Level (Custom). . . . . . . . . . . . . . . . . . . . . . . . . . . . . . . . . . . . . . . . 305
Printing a Color Document in Monochrome. . . . . . . . . . . . . . . . . . . . . . . . . . . . . . . . . . . . . . 307
Page 8

Specifying Color Correction. . . . . . . . . . . . . . . . . . . . . . . . . . . . . . . . . . . . . . . . . . . . . . . . . . 309
Optimal Photo Printing of Image Data. . . . . . . . . . . . . . . . . . . . . . . . . . . . . . . . . . . . . . . . . . 312
Adjusting Colors with the Printer Driver. . . . . . . . . . . . . . . . . . . . . . . . . . . . . . . . . . . . . . . . . 314
Printing with ICC Profiles. . . . . . . . . . . . . . . . . . . . . . . . . . . . . . . . . . . . . . . . . . . . . . . . . . . . 316
Adjusting Color Balance. . . . . . . . . . . . . . . . . . . . . . . . . . . . . . . . . . . . . . . . . . . . . . . . . . . . 320
Adjusting Color Balance Using Sample Patterns (Printer Driver). . . . . . . . . . . . . . . . . . . . . 323
Adjusting Brightness. . . . . . . . . . . . . . . . . . . . . . . . . . . . . . . . . . . . . . . . . . . . . . . . . . . . . . . 328
Adjusting Intensity. . . . . . . . . . . . . . . . . . . . . . . . . . . . . . . . . . . . . . . . . . . . . . . . . . . . . . . . . 330
Adjusting Contrast. . . . . . . . . . . . . . . . . . . . . . . . . . . . . . . . . . . . . . . . . . . . . . . . . . . . . . . . . 332
Adjusting Intensity/Contrast Using Sample Patterns (Printer Driver). . . . . . . . . . . . . . . . . . . 334
Overview of the Printer Driver. . . . . . . . . . . . . . . . . . . . . . . . . . . . . . . . . . . . . . . . . . . . . . . . . . . . 338
Canon IJ Printer Driver. . . . . . . . . . . . . . . . . . . . . . . . . . . . . . . . . . . . . . . . . . . . . . . . . . . . . 339
How to Open the Printer Driver Setup Window. . . . . . . . . . . . . . . . . . . . . . . . . . . . . . . . . . . 340
Canon IJ Status Monitor. . . . . . . . . . . . . . . . . . . . . . . . . . . . . . . . . . . . . . . . . . . . . . . . . . . . 342
Checking the Ink Status from Your Computer. . . . . . . . . . . . . . . . . . . . . . . . . . . . . . . . . . . . 344
Canon IJ Preview. . . . . . . . . . . . . . . . . . . . . . . . . . . . . . . . . . . . . . . . . . . . . . . . . . . . . . . . . . 345
Deleting the Undesired Print Job. . . . . . . . . . . . . . . . . . . . . . . . . . . . . . . . . . . . . . . . . . . . . . 346
Instructions for Use (Printer Driver). . . . . . . . . . . . . . . . . . . . . . . . . . . . . . . . . . . . . . . . . . . . 347
Printer Driver Description. . . . . . . . . . . . . . . . . . . . . . . . . . . . . . . . . . . . . . . . . . . . . . . . . . . . . . . . 349
Quick Setup tab Description. . . . . . . . . . . . . . . . . . . . . . . . . . . . . . . . . . . . . . . . . . . . . . . . . 350
Main tab Description. . . . . . . . . . . . . . . . . . . . . . . . . . . . . . . . . . . . . . . . . . . . . . . . . . . . . . . 357
Page Setup tab Description. . . . . . . . . . . . . . . . . . . . . . . . . . . . . . . . . . . . . . . . . . . . . . . . . . 365
Maintenance tab Description. . . . . . . . . . . . . . . . . . . . . . . . . . . . . . . . . . . . . . . . . . . . . . . . . 381
Canon IJ Preview Description. . . . . . . . . . . . . . . . . . . . . . . . . . . . . . . . . . . . . . . . . . . . . . . . 390
Canon IJ XPS Preview Description. . . . . . . . . . . . . . . . . . . . . . . . . . . . . . . . . . . . . . . . . . . . 394
Canon IJ Status Monitor Description. . . . . . . . . . . . . . . . . . . . . . . . . . . . . . . . . . . . . . . . . . . 405
Updating the MP Drivers. . . . . . . . . . . . . . . . . . . . . . . . . . . . . . . . . . . . . . . . . . . . . . . . . . . . . . . . 408
Obtaining the Latest MP Drivers. . . . . . . . . . . . . . . . . . . . . . . . . . . . . . . . . . . . . . . . . . . . . . 409
Deleting the Unnecessary MP Drivers. . . . . . . . . . . . . . . . . . . . . . . . . . . . . . . . . . . . . . . . . . 410
Before Installing the MP Drivers. . . . . . . . . . . . . . . . . . . . . . . . . . . . . . . . . . . . . . . . . . . . . . 412
Installing the MP Drivers. . . . . . . . . . . . . . . . . . . . . . . . . . . . . . . . . . . . . . . . . . . . . . . . . . . . 413
Sharing the Printer on a Network. . . . . . . . . . . . . . . . . . . . . . . . . . . . . . . . . . . . . . . . . . . . . . . . . . 415
Settings on Print Server. . . . . . . . . . . . . . . . . . . . . . . . . . . . . . . . . . . . . . . . . . . . . . . . . . . . . 416
Settings on Client PC. . . . . . . . . . . . . . . . . . . . . . . . . . . . . . . . . . . . . . . . . . . . . . . . . . . . . . . 418
Restrictions on Printer Sharing. . . . . . . . . . . . . . . . . . . . . . . . . . . . . . . . . . . . . . . . . . . . . . . 421
Copying. . . . . . . . . . . . . . . . . . . . . . . . . . . . . . . . . . . . . . . . . . . . . . . . . . . . . . . 423
Making Copies. . . . . . . . . . . . . . . . . . . . . . . . . . . . . . . . . . . . . . . . . . . . . . . . . . . . . . . . . 424
Page 9

Switching the Page Size between A4 and Letter. . . . . . . . . . . . . . . . . . . . . . . . . . . . . . . 426
Scanning. . . . . . . . . . . . . . . . . . . . . . . . . . . . . . . . . . . . . . . . . . . . . . . . . . . . . . 427
Scanning from a Computer. . . . . . . . . . . . . . . . . . . . . . . . . . . . . . . . . . . . . . . . . . . . . . . . 428
Scanning with IJ Scan Utility. . . . . . . . . . . . . . . . . . . . . . . . . . . . . . . . . . . . . . . . . . . . . . . . . . . . . . . . . 429
What Is IJ Scan Utility (Scanner Software)?. . . . . . . . . . . . . . . . . . . . . . . . . . . . . . . . . . . . . . . . . 430
Starting IJ Scan Utility. . . . . . . . . . . . . . . . . . . . . . . . . . . . . . . . . . . . . . . . . . . . . . . . . . . . . . . . . . 432
Easy Scanning with Auto Scan. . . . . . . . . . . . . . . . . . . . . . . . . . . . . . . . . . . . . . . . . . . . . . . . . . . 433
Scanning Photos. . . . . . . . . . . . . . . . . . . . . . . . . . . . . . . . . . . . . . . . . . . . . . . . . . . . . . . . . . . . . . 435
Scanning Documents. . . . . . . . . . . . . . . . . . . . . . . . . . . . . . . . . . . . . . . . . . . . . . . . . . . . . . . . . . . 436
Scanning with Favorite Settings. . . . . . . . . . . . . . . . . . . . . . . . . . . . . . . . . . . . . . . . . . . . . . . . . . 437
Scanning Items Larger than the Platen (Image Stitch). . . . . . . . . . . . . . . . . . . . . . . . . . . . . . . . . 438
Scanning Multiple Items at One Time. . . . . . . . . . . . . . . . . . . . . . . . . . . . . . . . . . . . . . . . . . . . . . 443
Saving after Checking Scan Results. . . . . . . . . . . . . . . . . . . . . . . . . . . . . . . . . . . . . . . . . . . . . . . 447
Sending Scanned Images via E-mail. . . . . . . . . . . . . . . . . . . . . . . . . . . . . . . . . . . . . . . . . . . . . . . 450
Extracting Text from Scanned Images (OCR). . . . . . . . . . . . . . . . . . . . . . . . . . . . . . . . . . . . . . . . 453
IJ Scan Utility Screens. . . . . . . . . . . . . . . . . . . . . . . . . . . . . . . . . . . . . . . . . . . . . . . . . . . . . . . . . . 457
IJ Scan Utility Main Screen. . . . . . . . . . . . . . . . . . . . . . . . . . . . . . . . . . . . . . . . . . . . . . . . . . 458
Settings Dialog Box. . . . . . . . . . . . . . . . . . . . . . . . . . . . . . . . . . . . . . . . . . . . . . . . . . . . . . . . 460
Data Format Settings Dialog Box. . . . . . . . . . . . . . . . . . . . . . . . . . . . . . . . . . . . . . . . . . . . . 491
Save Settings Dialog Box. . . . . . . . . . . . . . . . . . . . . . . . . . . . . . . . . . . . . . . . . . . . . . . . . . . 493
Image Stitch Window. . . . . . . . . . . . . . . . . . . . . . . . . . . . . . . . . . . . . . . . . . . . . . . . . . . . . . . 495
Scanning with Application Software that You are Using (ScanGear). . . . . . . . . . . . . . . . . . . . . . . . . . 500
What Is ScanGear (Scanner Driver)?. . . . . . . . . . . . . . . . . . . . . . . . . . . . . . . . . . . . . . . . . . . . . . 501
Scanning with Advanced Settings Using ScanGear (Scanner Driver). . . . . . . . . . . . . . . . . . . . . . 503
Starting ScanGear (Scanner Driver). . . . . . . . . . . . . . . . . . . . . . . . . . . . . . . . . . . . . . . . . . . 504
Scanning in Basic Mode. . . . . . . . . . . . . . . . . . . . . . . . . . . . . . . . . . . . . . . . . . . . . . . . . . . . 505
Scanning in Advanced Mode. . . . . . . . . . . . . . . . . . . . . . . . . . . . . . . . . . . . . . . . . . . . . . . . . 508
Scanning Multiple Documents at One Time with ScanGear (Scanner Driver). . . . . . . . . . . 510
Correcting Images and Adjusting Colors with ScanGear (Scanner Driver). . . . . . . . . . . . . . . . . . 514
Correcting Images (Unsharp Mask, Reduce Dust and Scratches, Fading Correction, etc.). 515
Adjusting Colors Using a Color Pattern. . . . . . . . . . . . . . . . . . . . . . . . . . . . . . . . . . . . . . . . . 519
Adjusting Saturation and Color Balance. . . . . . . . . . . . . . . . . . . . . . . . . . . . . . . . . . . . . . . . 521
Adjusting Brightness and Contrast. . . . . . . . . . . . . . . . . . . . . . . . . . . . . . . . . . . . . . . . . . . . 523
Adjusting Histogram. . . . . . . . . . . . . . . . . . . . . . . . . . . . . . . . . . . . . . . . . . . . . . . . . . . . . . . . 525
Adjusting Tone Curve. . . . . . . . . . . . . . . . . . . . . . . . . . . . . . . . . . . . . . . . . . . . . . . . . . . . . . 529
Setting Threshold. . . . . . . . . . . . . . . . . . . . . . . . . . . . . . . . . . . . . . . . . . . . . . . . . . . . . . . . . . 532
ScanGear (Scanner Driver) Screens. . . . . . . . . . . . . . . . . . . . . . . . . . . . . . . . . . . . . . . . . . . . . . . 533
Page 10

Basic Mode Tab. . . . . . . . . . . . . . . . . . . . . . . . . . . . . . . . . . . . . . . . . . . . . . . . . . . . . . . . . . . 534
Advanced Mode Tab. . . . . . . . . . . . . . . . . . . . . . . . . . . . . . . . . . . . . . . . . . . . . . . . . . . . . . . 541
Input Settings. . . . . . . . . . . . . . . . . . . . . . . . . . . . . . . . . . . . . . . . . . . . . . . . . . . . . . . . . . . . . 547
Output Settings. . . . . . . . . . . . . . . . . . . . . . . . . . . . . . . . . . . . . . . . . . . . . . . . . . . . . . . . . . . 550
Image Settings. . . . . . . . . . . . . . . . . . . . . . . . . . . . . . . . . . . . . . . . . . . . . . . . . . . . . . . . . . . . 553
Color Adjustment Buttons. . . . . . . . . . . . . . . . . . . . . . . . . . . . . . . . . . . . . . . . . . . . . . . . . . . 558
Preferences Dialog Box. . . . . . . . . . . . . . . . . . . . . . . . . . . . . . . . . . . . . . . . . . . . . . . . . . . . . 561
Scanner Tab. . . . . . . . . . . . . . . . . . . . . . . . . . . . . . . . . . . . . . . . . . . . . . . . . . . . . . . . . . . . . 562
Preview Tab. . . . . . . . . . . . . . . . . . . . . . . . . . . . . . . . . . . . . . . . . . . . . . . . . . . . . . . . . . . . . . 565
Scan Tab. . . . . . . . . . . . . . . . . . . . . . . . . . . . . . . . . . . . . . . . . . . . . . . . . . . . . . . . . . . . . . . . 567
Color Settings Tab. . . . . . . . . . . . . . . . . . . . . . . . . . . . . . . . . . . . . . . . . . . . . . . . . . . . . . . . . 568
Placing Items (When Scanning from a Computer). . . . . . . . . . . . . . . . . . . . . . . . . . . . . . . . . . . . 570
Adjusting Cropping Frames (ScanGear). . . . . . . . . . . . . . . . . . . . . . . . . . . . . . . . . . . . . . . . . . . . 573
General Notes (Scanner Driver). . . . . . . . . . . . . . . . . . . . . . . . . . . . . . . . . . . . . . . . . . . . . . . . . . 577
Useful Information on Scanning. . . . . . . . . . . . . . . . . . . . . . . . . . . . . . . . . . . . . . . . . . . . . . . . . . . . . . . 579
Adjusting Cropping Frames in the Image Stitch Window. . . . . . . . . . . . . . . . . . . . . . . . . . . . . . . . 580
Resolution. . . . . . . . . . . . . . . . . . . . . . . . . . . . . . . . . . . . . . . . . . . . . . . . . . . . . . . . . . . . . . . . . . . 581
Data Formats. . . . . . . . . . . . . . . . . . . . . . . . . . . . . . . . . . . . . . . . . . . . . . . . . . . . . . . . . . . . . . . . . 583
Color Matching. . . . . . . . . . . . . . . . . . . . . . . . . . . . . . . . . . . . . . . . . . . . . . . . . . . . . . . . . . . . . . . . 584
Other Scanning Methods. . . . . . . . . . . . . . . . . . . . . . . . . . . . . . . . . . . . . . . . . . . . . . . . . . . . . . . . . . . . 585
Scanning with WIA Driver. . . . . . . . . . . . . . . . . . . . . . . . . . . . . . . . . . . . . . . . . . . . . . . . . . . . . . . 586
Scanning Using the Control Panel (Windows XP Only). . . . . . . . . . . . . . . . . . . . . . . . . . . . . . . . . 589
Placing Items (When Scanning from a Computer). . . . . . . . . . . . . . . . . . . . . . . . . . . . . . . . . . . . . . . . . 591
Page 11

Read Me First
Notes on Online Manual Usage
How to Print
Notes on Online Manual Usage
• Reproduction, diversion or copying of any text, photo or image published in the Online Manual
(hereinafter referred to as "this guide"), in whole or in part, is prohibited.
• In principle, Canon shall change or delete the contents of this guide without prior notice to customers.
In addition, Canon may suspend or stop the disclosure of this guide due to unavoidable reasons.
Canon shall not be liable for any damage suffered by customers as a result of changes in or deletion
of information in this guide, or suspension/stoppage of disclosure of this guide.
• Although the contents of this guide have been prepared with utmost care, please contact the service
center if you find any incorrect or missing information.
• In principle, the descriptions in this guide are based on the product at the time of its initial sale.
• This guide does not disclose the manuals of all the products sold by Canon. See the manual supplied
with the product when using a product that is not described in this guide.
How to Print
Use the print function of your Web browser to print this guide.
To set to print background colors and images, follow the steps below.
Note
• In Windows 8, print in the desktop version.
• In Internet Explorer 9 or 10
1. Select (Tools) > Print > Page setup....
2. Select the Print Background Colors and Images checkbox.
• In Internet Explorer 8
1. Press the Alt key to display the menus.
Alternatively, from Tools, select Toolbars > Menu Bar to display the menus.
2. Select Page Setup... from the File menu.
3. Select the Print Background Colors and Images checkbox.
• In Mozilla Firefox
1. Press the Alt key to display the menus.
Alternatively, click Firefox, then select Menu Bar from the right arrow of Options to display the
menus.
2. Select Page Setup... from the File menu.
3. Select the Print Background (colors & images) checkbox in Format & Options.
11
Page 12

How to Use the Online Manual
Symbols Used in This Document
Warning
Instructions that, if ignored, could result in death or serious personal injury caused by incorrect
operation of the equipment. These must be observed for safe operation.
Caution
Instructions that, if ignored, could result in personal injury or material damage caused by incorrect
operation of the equipment. These must be observed for safe operation.
Important
Instructions including important information. To avoid damage and injury or improper use of the
product, be sure to read these indications.
Note
Instructions including notes for operation and additional explanations.
Basic
Instructions explaining basic operations of your product.
Note
• Icons may vary depending on your product.
Touch-enabled Device Users
For touch actions, you need to replace "right-click" in this document with the action set on the operating
system. For example, if the action is set to "press and hold" on your operating system, replace "right-click"
with "press and hold."
12
Page 13

Trademarks and Licenses
• Microsoft is a registered trademark of Microsoft Corporation.
• Windows is a trademark or registered trademark of Microsoft Corporation in the U.S. and/or other
countries.
• Windows Vista is a trademark or registered trademark of Microsoft Corporation in the U.S. and/or other
countries.
• Internet Explorer is a trademark or registered trademark of Microsoft Corporation in the U.S. and/or
other countries.
• Mac, Mac OS, AirPort, Safari, Bonjour, iPad, iPhone and iPod touch are trademarks of Apple Inc.,
registered in the U.S. and other countries. AirPrint and the AirPrint logo are trademarks of Apple Inc.
• IOS is a trademark or registered trademark of Cisco in the U.S. and other countries and is used under
license.
• Google Cloud Print, Google Chrome, Android and Google Play are either registered trademarks or
trademarks of Google Inc.
• Adobe, Photoshop, Photoshop Elements, Lightroom, Adobe RGB and Adobe RGB (1998) are either
registered trademarks or trademarks of Adobe Systems Incorporated in the United States and/or other
countries.
• Photo Rag is a trademark of Hahnemühle FineArt GmbH.
• Bluetooth is a trademark of Bluetooth SIG, Inc., U.S.A. and licensed to Canon Inc.
• All other company names and products mentioned herein may be trademarks or registered trademarks
of their respective companies.
Note
• The formal name of Windows Vista is Microsoft Windows Vista operating system.
13
Page 14

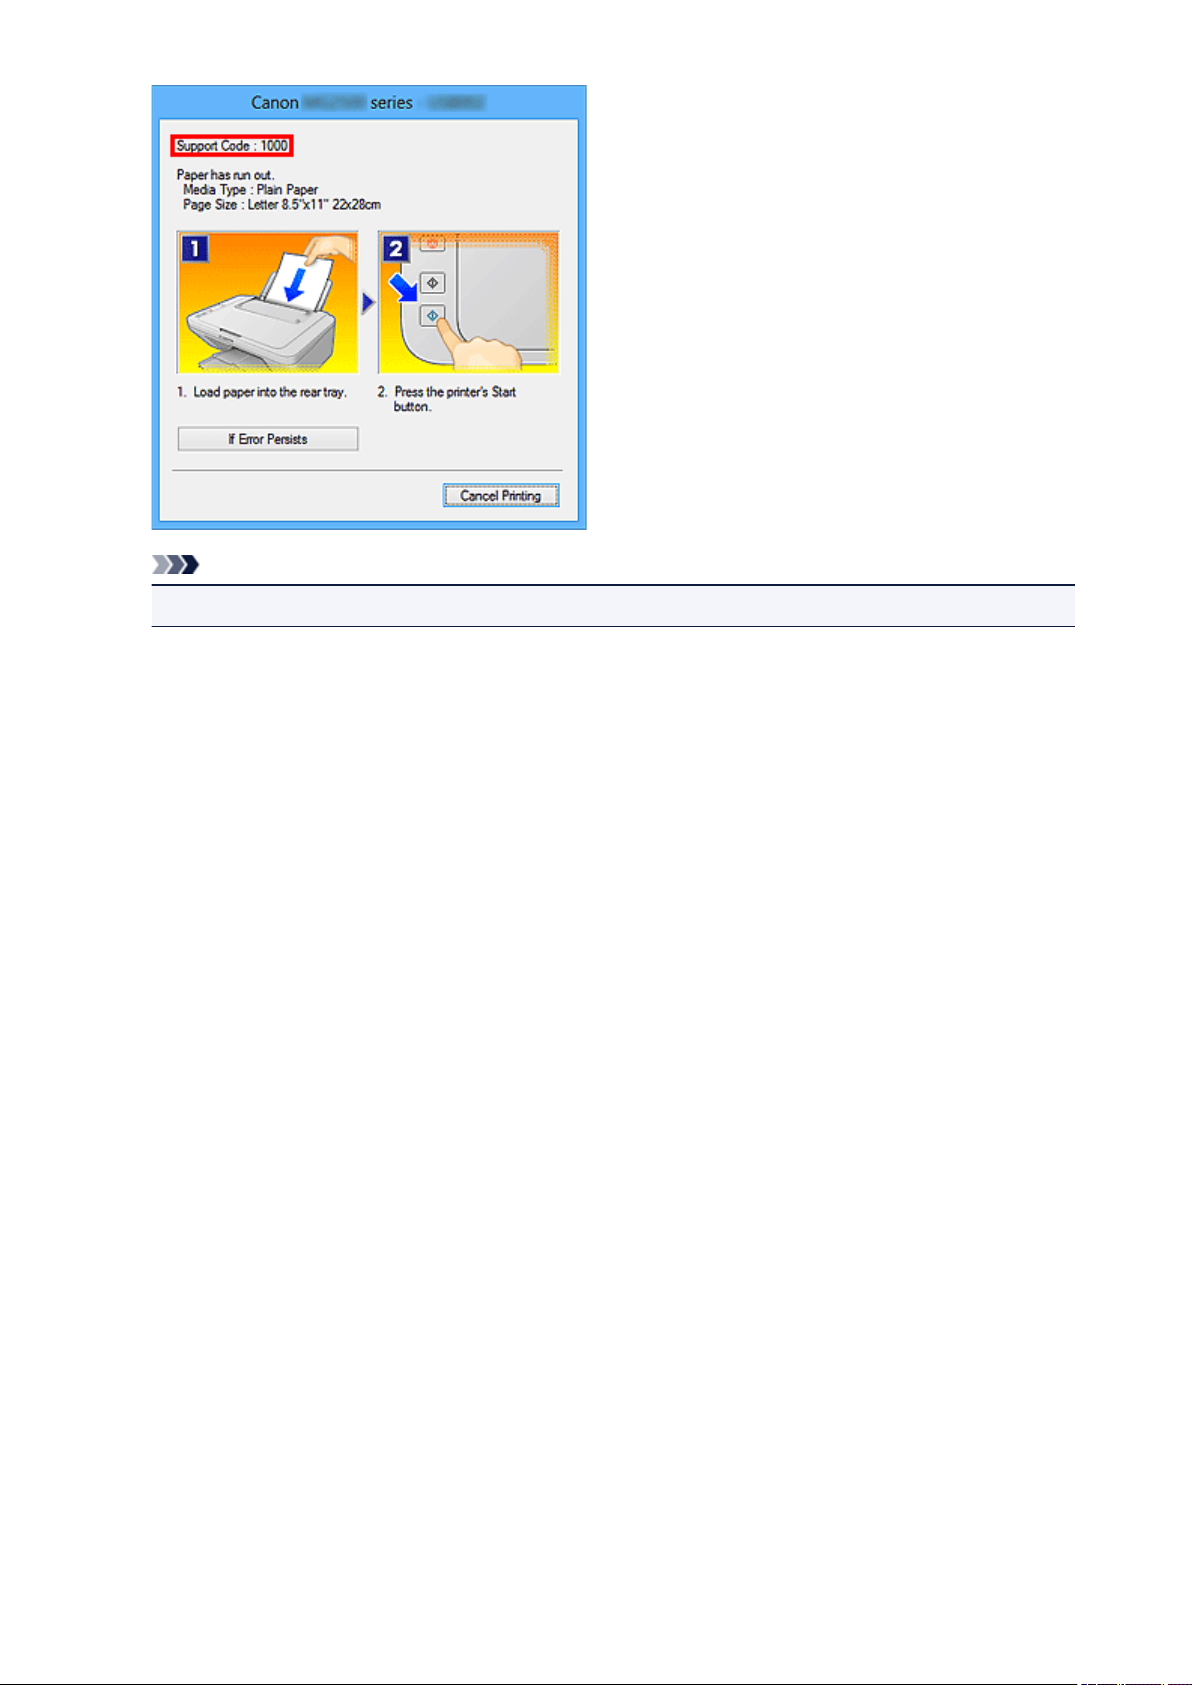
Enter keywords in the search window and click (Search).
You can search for target pages in this guide.
Entry example: "(your product's model name) load paper", "(your product's model name) 1000"
Search Tips
You can search for target pages by entering keywords in the search window.
Note
• The displayed screen may vary.
• Searching for Functions
You can find target pages easily by entering your product's model name and a keyword for the function
you want to learn about.
Example: When you want to learn how to load paper
Enter "(your product's model name) load paper" in the search window and perform a search
• Troubleshooting Errors
You can obtain more accurate search results by entering your product's model name and a support
code.
Example: When the following error screen appears
Enter "(your product's model name) 1000" in the search window and perform a search
14
Page 15
Note
• The displayed screen varies depending on your product.
• Searching for Application Functions
You can find target pages easily by entering your application's name and a keyword for the function you
want to learn about.
Example: When you want to learn how to print collages with My Image Garden
Enter "My Image Garden collage" in the search window and perform a search
• Searching for Reference Pages
You can search for reference pages described in this guide by entering your model name and a page
title.
You can find reference pages more easily by entering the function name as well.
Example: When you want to browse the page referred to by the following sentence on a scanning
procedure page
Refer to "Color Settings Tab" for your model from Home of the Online Manual for details.
Enter "(your product's model name) scan Color Settings Tab" in the search window and perform a
search
15
Page 16

Window Used in Operation Explanation
In this guide, most of the operations are described based on the windows displayed when Windows 8
operating system (called Windows 8 below) is used.
16
Page 17

Useful Functions Available on the Machine
The following useful functions are available on the machine.
Enjoy pleasant photography experience by utilizing various functions.
Useful Functions Available from Applications and the Main Unit
You can create items such as collages easily or download delightful
printing materials, and print them.
17
Page 18
Useful Functions Available from Applications and the Main Unit
On the machine, the following useful functions are available from applications and the main unit.
• Print Photos Easily
• Download Content Materials
Print Photos Easily Using an Application
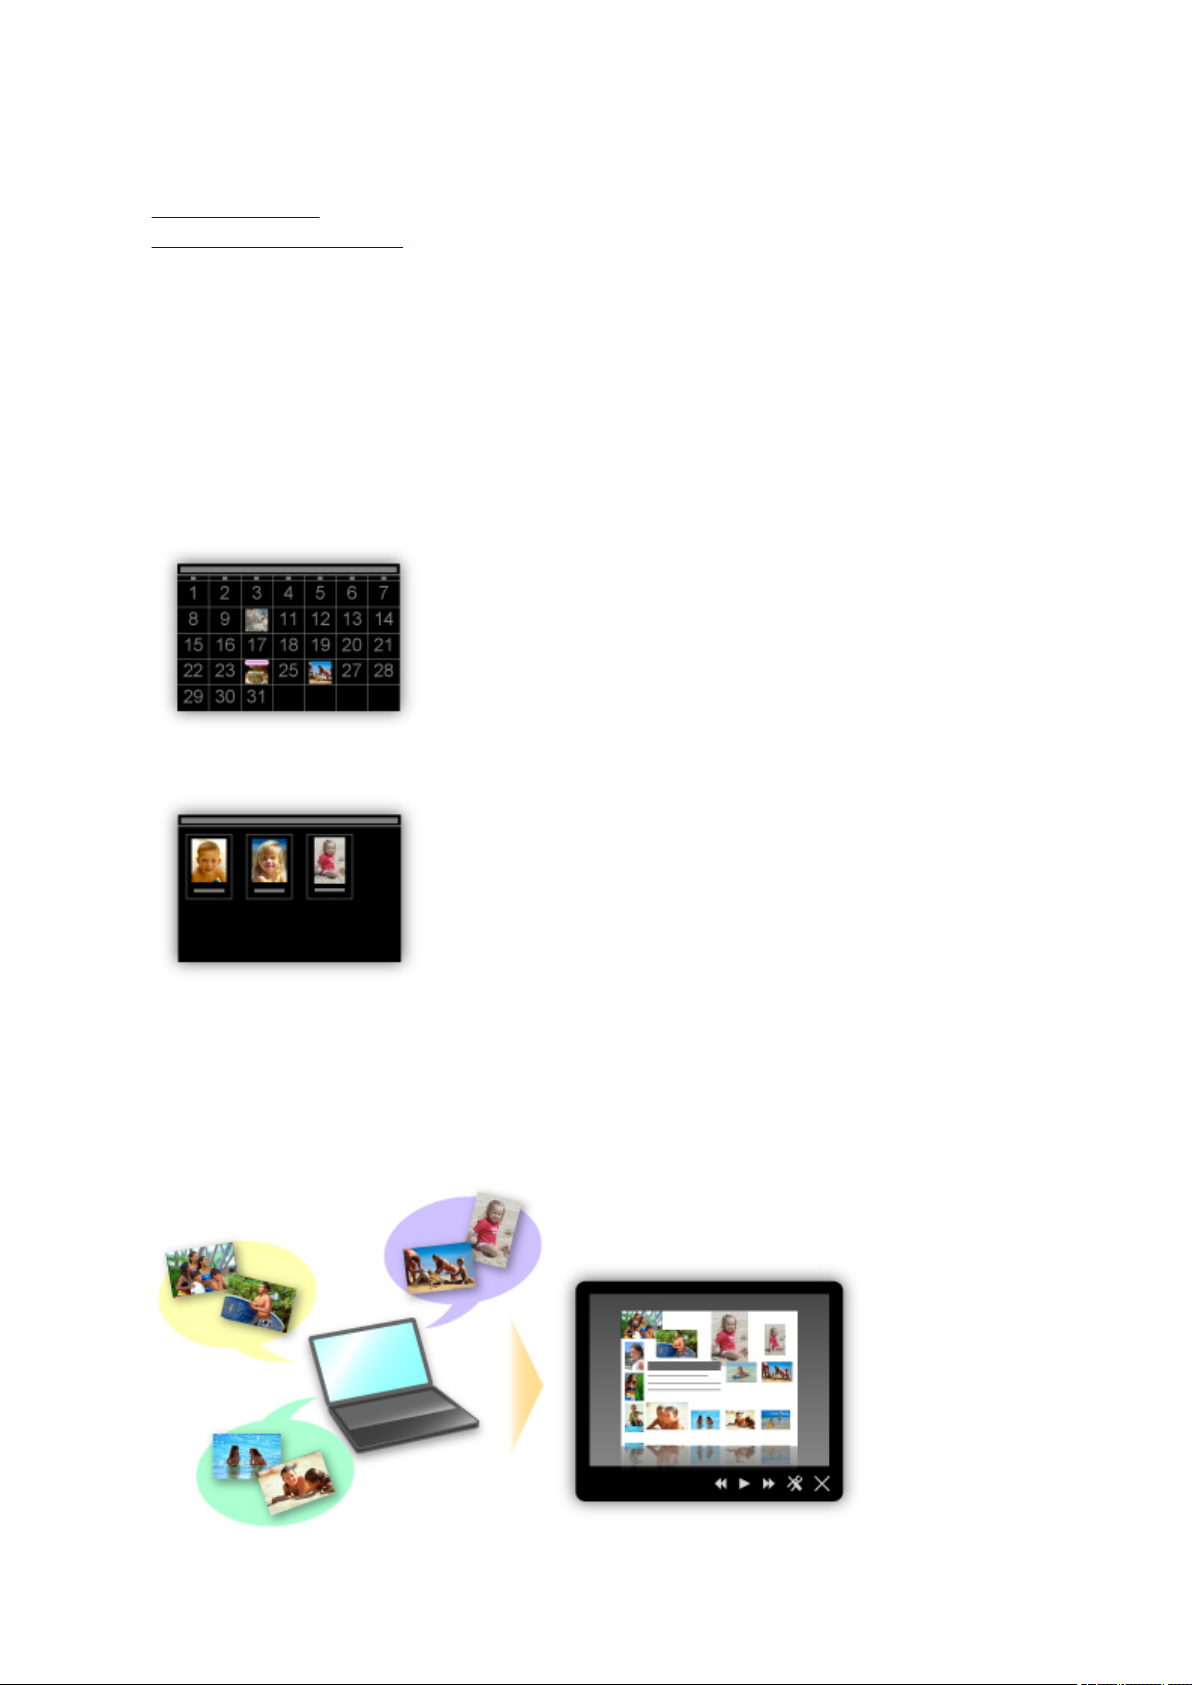
Organize Images Easily
In My Image Garden, you can register the names of people and events to photos.
You can organize photos easily as you can display them not only by folder but also by calendar, event,
and person. This also allows you to find the target photos easily when you search for them later on.
<Calendar View>
<People View>
Display Recommended Items in Slide Shows
Based on the information registered to photos, Quick Menu automatically selects the photos on your
computer and creates recommended items such as collages and cards. The created items appear in
slide shows.
18
Page 19
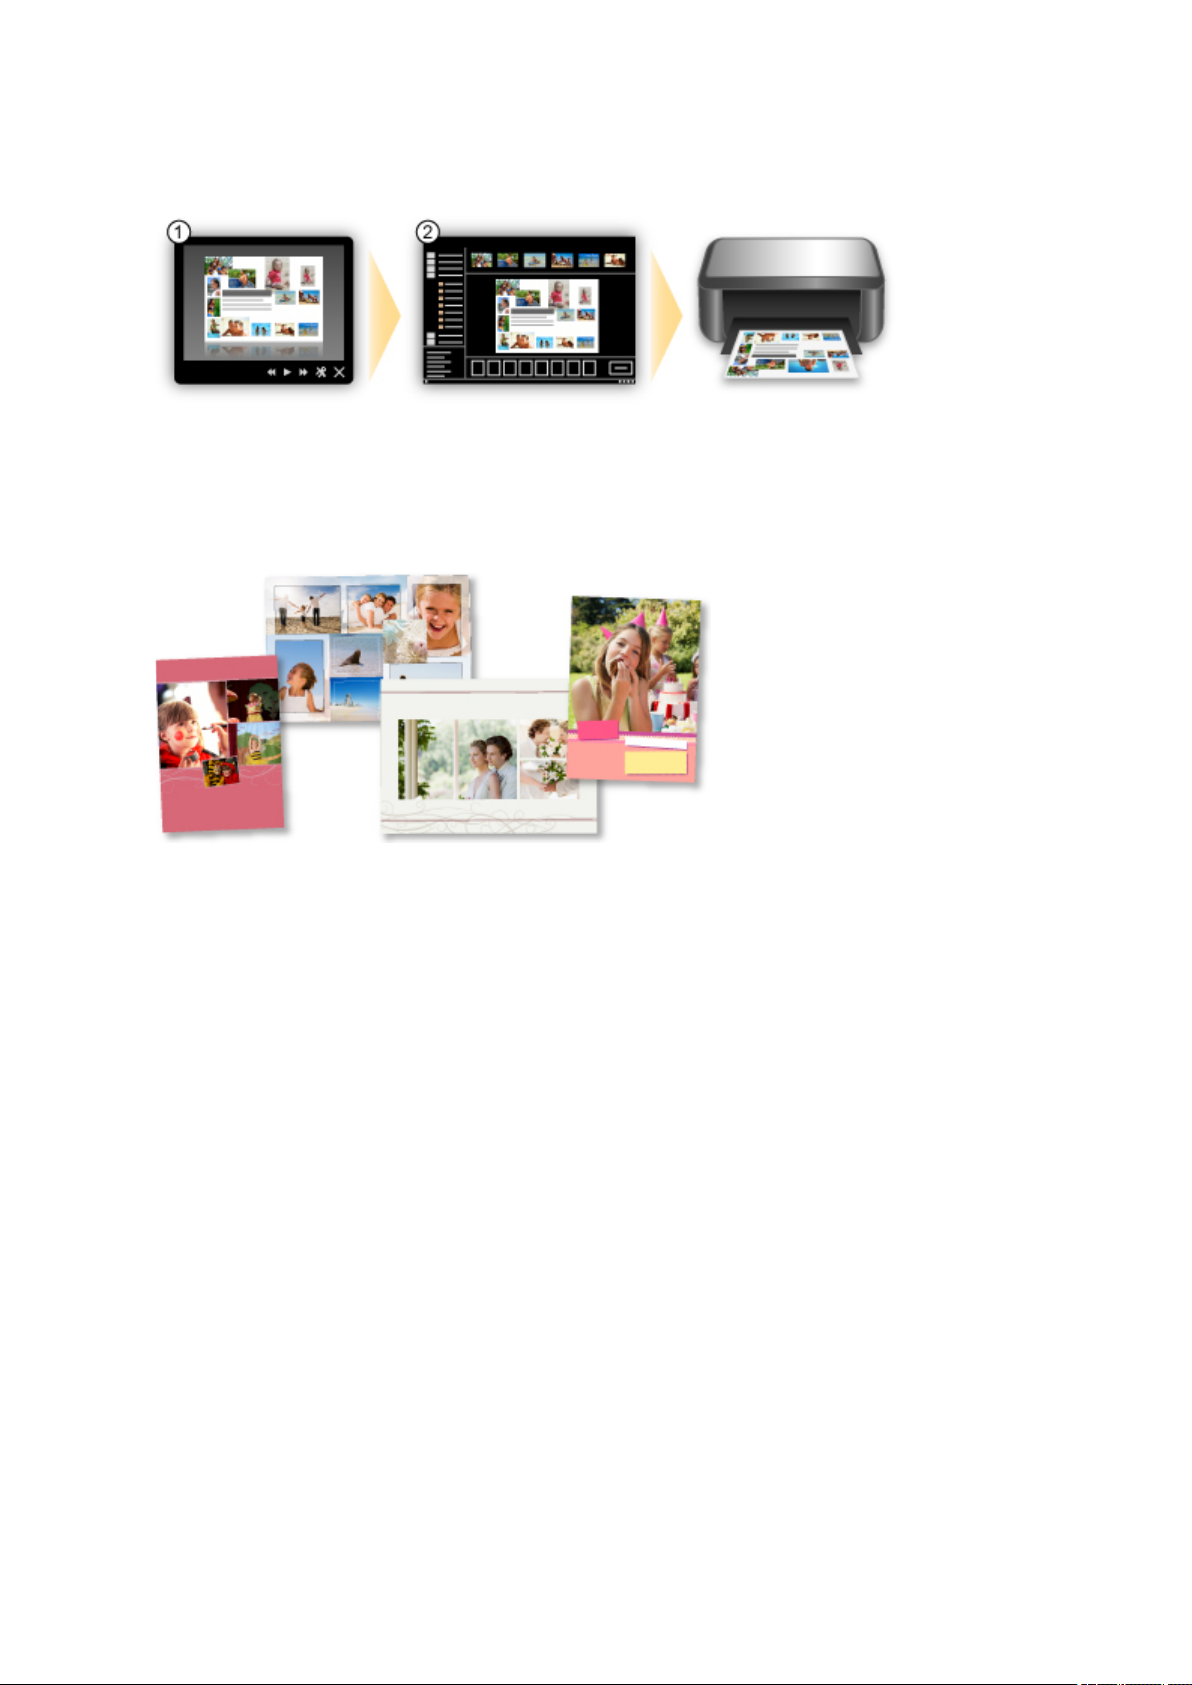
If there is an item you like, you can easily print it in just two steps.
1. In Image Display of Quick Menu, select the item you want to print.
2. Print the item with My Image Garden.
Place Photos Automatically
Delightful items are created easily as the selected photos are placed automatically according to the
theme.
Other Various Functions
My Image Garden has many other useful functions.
Refer to "What You Can Do with My Image Garden" for details.
Download a Variety of Content Materials
CREATIVE PARK
A "printing materials site" where you can download all the printing materials for free.
Various types of content such as seasonal cards and paper crafts that can be made by assembling
paper parts are provided.
It is easily accessible from Quick Menu.
CREATIVE PARK PREMIUM
A service where customers using models that support PREMIUM Contents can download exclusive
printing materials.
PREMIUM Contents can be downloaded easily via My Image Garden. Downloaded PREMIUM
Contents can be printed directly with My Image Garden.
To download PREMIUM Contents, make sure that genuine Canon ink tanks/ink cartridges are installed
for all colors on a supported printer.
19
Page 20

Note
• The designs of PREMIUM Contents provided in this page are subject to change without prior
notice.
20
Page 21

Overview of the Machine
Safety Guide
Safety Precautions
Regulatory and Safety Information
Main Components and Basic Operations
Main Components
About the Power Supply of the Machine
Loading Paper / Originals
Loading Paper
Loading Originals
Replacing a FINE Cartridge
Replacing a FINE Cartridge
Checking the Ink Status
Maintenance
When Printing Becomes Faint or Colors Are Incorrect
Performing Maintenance from a Computer
Cleaning the Machine
Changing the Machine Settings
Changing Machine Settings from Your Computer
Changing the Machine Settings Using the Operation Panel
Tips for Ensuring Optimal Printing Quality
Useful Information about Ink
Key Points to Successful Printing
Be Sure to Make Paper Settings after Loading Paper
Canceling a Print Job
Machine Handling Precautions
Key to Enjoying Consistent Printing Quality
Precautions for Safe Transport of the Machine
Legal Limitations on Use of Your Product and Use of Images
Specifications
21
Page 22

Safety Guide
• Safety Precautions
• Regulatory and Safety Information
22
Page 23

Safety Precautions
Choosing a location
• Do not install the machine in a location that is unstable or subject to excessive vibration.
• Do not install the machine in locations that are very humid or dusty, in direct sunlight, outdoors, or
close to a heating source.
To avoid the risk of fire or electric shocks, use the machine under the operating environment specified
in the Specification.
• Do not place the machine on a thick rug or carpet.
• Do not place the machine with its back attached to the wall.
Power supply
• Ensure that the area around the power outlet is kept clear at all times so you can easily unplug the
power cord if necessary.
• Never remove the plug by pulling on the cord.
Pulling the cord may damage the power cord, leading to possible fire or electrical shock.
• Do not use an extension lead/cord.
Working around the machine
• Never put your hands or fingers in the machine while it is printing.
• When moving the machine, carry the machine at both ends. In case the machine weighs more than
14 kg, it is recommended to have two people lifting the machine. Accidental dropping of the machine
causes injury. For the machine's weight, refer to the Specification.
• Do not place any object on the machine. Especially do not place metal objects (paper clips, staples,
etc.) or containers of flammable solvents (alcohol, thinners, etc.) on top of the machine.
• Do not transport or use the machine on a slant, vertically or upside-down, as the ink may leak and
damage the machine.
Working around the machine (For the multifunction printer)
• When loading a thick book on the Platen Glass, do not press hard on the Document Cover. The
Platen Glass may break and cause injury.
Print Heads/ink tanks and FINE Cartridges
• Keep ink tanks out of the reach of children. In case ink* is accidentally licked or swallowed, rinse out
mouth or give one or two glasses of water to drink. If irritation or discomfort occurs, obtain medical
advice immediately.
* Clear Ink contains nitrate salts (For models containing Clear Ink).
• In case ink gets in contact with eyes, rinse with water immediately. In case ink gets in contact with
skin, wash with soap and water immediately. If irritation to eyes or skin persists, obtain medical advice
immediately.
• Never touch the electrical contacts on a Print Head or FINE Cartridges after printing.
The metal parts may be very hot and could cause burns.
• Do not throw ink tanks and FINE Cartridges into fire.
• Do not attempt to disassemble or modify the Print Head, ink tanks, and FINE Cartridges.
23
Page 24

Regulatory and Safety Information
For models containing lithium battery
• Dispose of used batteries according to the local regulations.
• Risk of explosion if battery is replaced by an incorrect type.
Users in the U.S.A.
FCC Notice (U.S.A. Only)
For 120V, 60Hz model
Model Number: K10392
This device complies with Part 15 of the FCC Rules. Operation is subject to the following two conditions:
(1) This device may not cause harmful interference, and (2) this device must accept any interference
received, including interference that may cause undesired operation.
Note: This equipment has been tested and found to comply with the limits for a Class B digital device,
pursuant to Part 15 of the FCC Rules. These limits are designed to provide reasonable protection against
harmful interference in a residential installation. This equipment generates, uses and can radiate radio
frequency energy and, if not installed and used in accordance with the instructions, may cause harmful
interference to radio communications.
However, there is no guarantee that interference will not occur in a particular installation. If this equipment
does cause harmful interference to radio or television reception, which can be determined by turning the
equipment off and on, the user is encouraged to try to correct the interference by one or more of the
following measures:
• Reorient or relocate the receiving antenna.
• Increase the separation between the equipment and receiver.
• Connect the equipment into an outlet on a circuit different from that to which the receiver is
connected.
• Consult the dealer or an experienced radio/TV technician for help.
Use of a shielded cable is required to comply with Class B limits in Subpart B of Part 15 of the FCC Rules.
Do not make any changes or modifications to the equipment unless otherwise specified in the manual. If
such changes or modifications should be made, you could be required to stop operation of the equipment.
Canon U.S.A., Inc.
One Canon Park
Melville, New York 11747
1-800-652-2666
Only for European Union and EEA (Norway, Iceland and Liechtenstein)
This symbol indicates that this product is not to be disposed of with your household waste, according to
the WEEE Directive (2012/19/EU) and national legislation. This product should be handed over to a
designated collection point, e.g., on an authorized one-for-one basis when you buy a new similar product
or to an authorized collection site for recycling waste electrical and electronic equipment (EEE). Improper
handling of this type of waste could have a possible negative impact on the environment and human
24
Page 25

health due to potentially hazardous substances that are generally associated with EEE. At the same time,
your cooperation in the correct disposal of this product will contribute to the effective usage of natural
resources. For more information about where you can drop off your waste equipment for recycling, please
contact your local city office, waste authority, approved WEEE scheme or your household waste disposal
service. For more information regarding return and recycling of WEEE products, please visit www.canon-
europe.com/weee.
Korisnici u Srbiji
Ovaj simbol označava da ovaj proizvod ne sme da se odlaže sa ostalim kućnim otpadom, u skladu sa
WEEE Direktivom (2012/19/EU) i nacionalnim zakonima. Ovaj proizvod treba predati određenom centru
za prikupljanje, npr. na osnovi "jedan-za-jedan" kada kupujete sličan novi proizvod, ili ovlašćenom centru
za prikupljanje za reciklažu istrošene električne i elektronske opreme (EEE). Nepravilno rukovanje ovom
vrstom otpada može da ima moguće negativne posledice po životnu sredinu i ljudsko zdravlje usled
potencijalno opasnih materijala koji se uglavnom vezuju za EEE. U isto vreme, vaša saradnja na
ispravnom odlaganju ovog proizvoda će doprineti efikasnom korišćenju prirodnih resursa. Za više
informacija o tome gde možete da predate vašu staru opremu radi recikliranje, vas molimo, da
kontaktirate lokalne gradske vlasti, komunalne službe, odobreni plan reciklaže ili Gradsku čistoću. Za više
informacija o vraćanju i recikliranju WEEE proizvoda, posetite stranicu www.canon-europe.com/weee.
Environmental Information
Reducing your environmental impact while saving money
Power Consumption and Activation Time
The amount of electricity a device consumes depends on the way the device is used. This product is
designed and set in a way to allow you to reduce your electricity costs. After the last print it switches to
Ready Mode. In this mode it can print again immediately if required. If the product is not used for a time,
the device switches to its Power Save Mode. The devices consume less power (Watt) in these modes.
If you wish to set a longer Activation Time or would like to completely deactivate the Power Save Mode,
please consider that this device may then only switch to a lower energy level after a longer period of
time or not at all.
Canon does not recommend extending the Activation Times from the optimum ones set as default.
Energy Star
The Energy Star® programme is a voluntary scheme to promote the development and purchase of
energy efficient models, which help to minimise environmental impact.
Products which meet the stringent requirements of the Energy Star® programme for both environmental
benefits and the amount of energy consumption will carry the Energy Star® logo accordingly.
®
Paper types
This product can be used to print on both recycled and virgin paper (certified to an environmental
stewardship scheme), which complies with EN12281 or a similar quality standard. In addition it can
25
Page 26

support printing on media down to a weight of 64g/m2, lighter paper means less resources used and a
lower environmental footprint for your printing needs.
26
Page 27

Main Components and Basic Operations
Main Components
About the Power Supply of the Machine
27
Page 28

Main Components
Front View
Rear View
Inside View
Operation Panel
28
Page 29
Front View
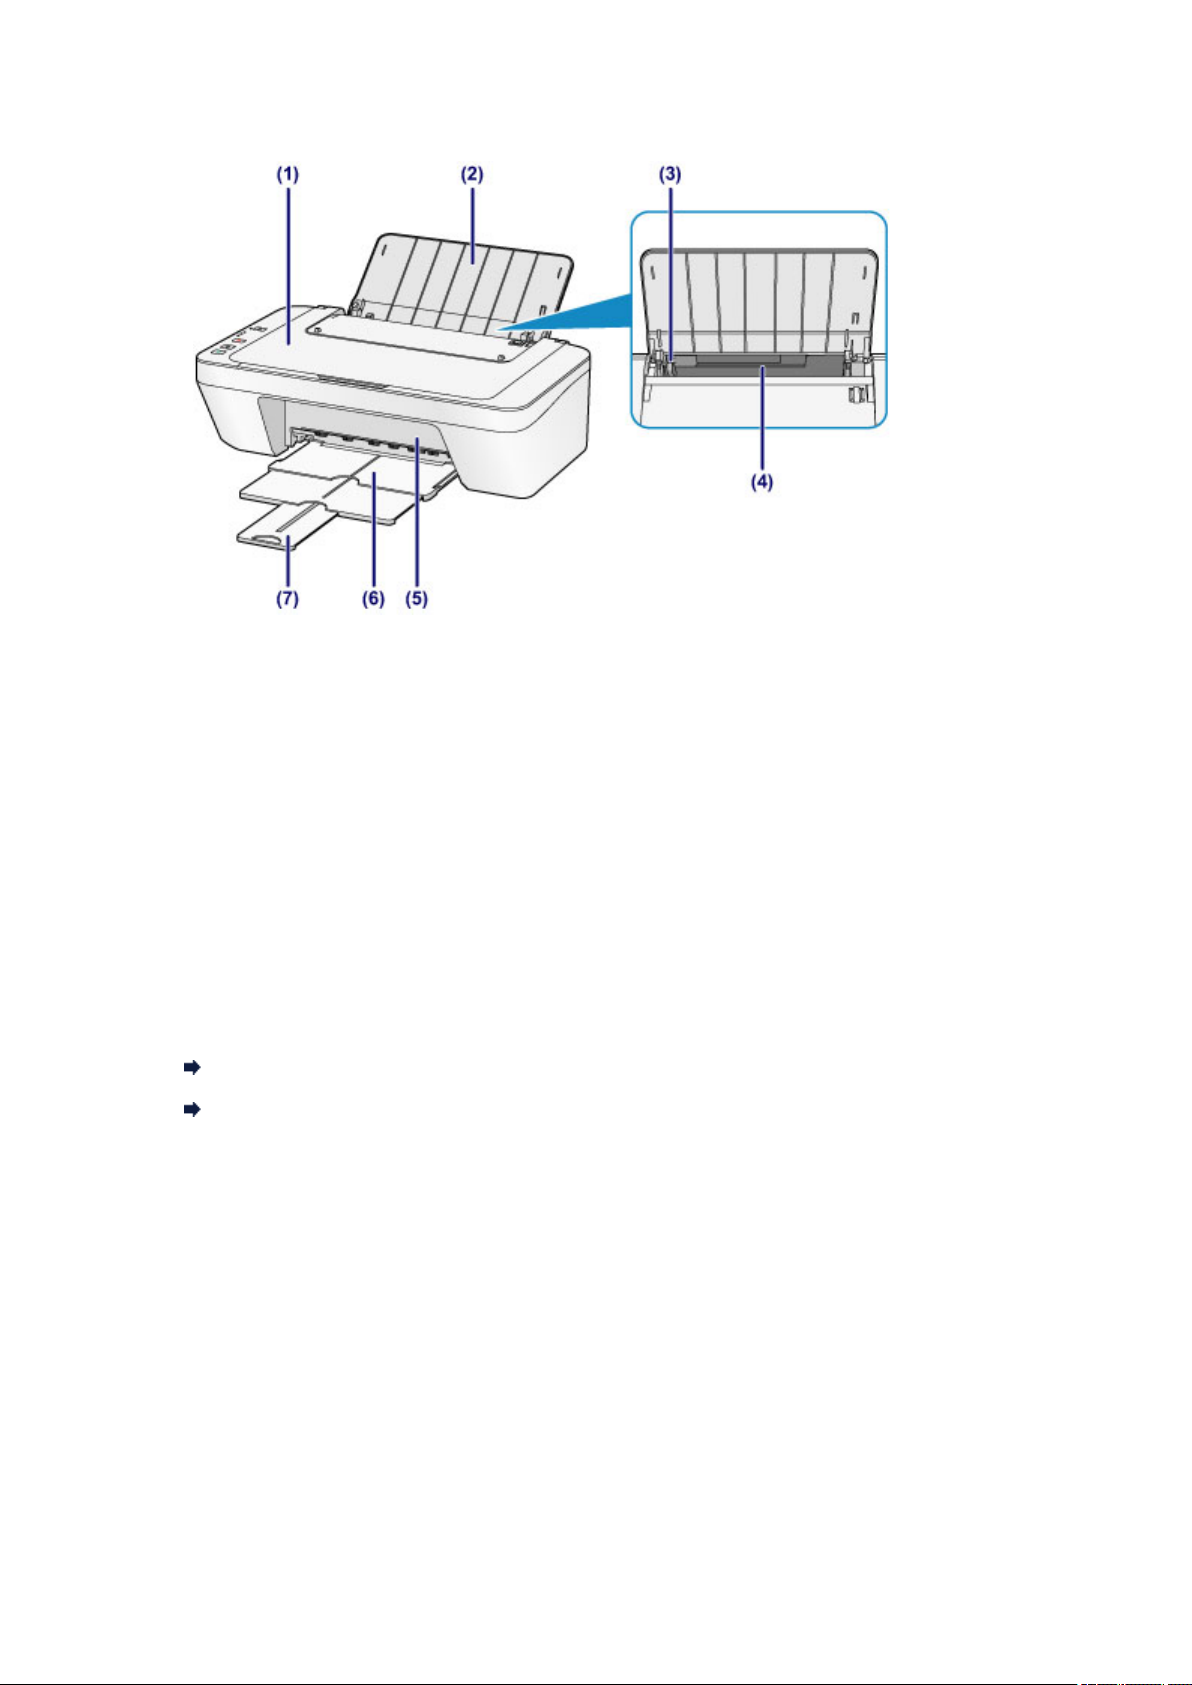
(1) document cover
Open to load an original on the platen glass.
(2) paper support
Open to load paper in the rear tray.
(3) paper guide
Slide to align with the left side of the paper stack.
(4) rear tray
Load various sizes or types of paper which you can use on the machine. Two or
more sheets of the same size and type of paper can be loaded at the same time,
and fed automatically one sheet at a time.
Loading Plain Paper / Photo Paper
Loading Envelopes
(5) cover
Open to replace the FINE cartridge or remove jammed paper inside the machine.
(6) paper output tray
Printed paper is ejected. Pull out it before printing.
(7) output tray extension
Extend to support ejected paper. Extend it when printing.
29
Page 30
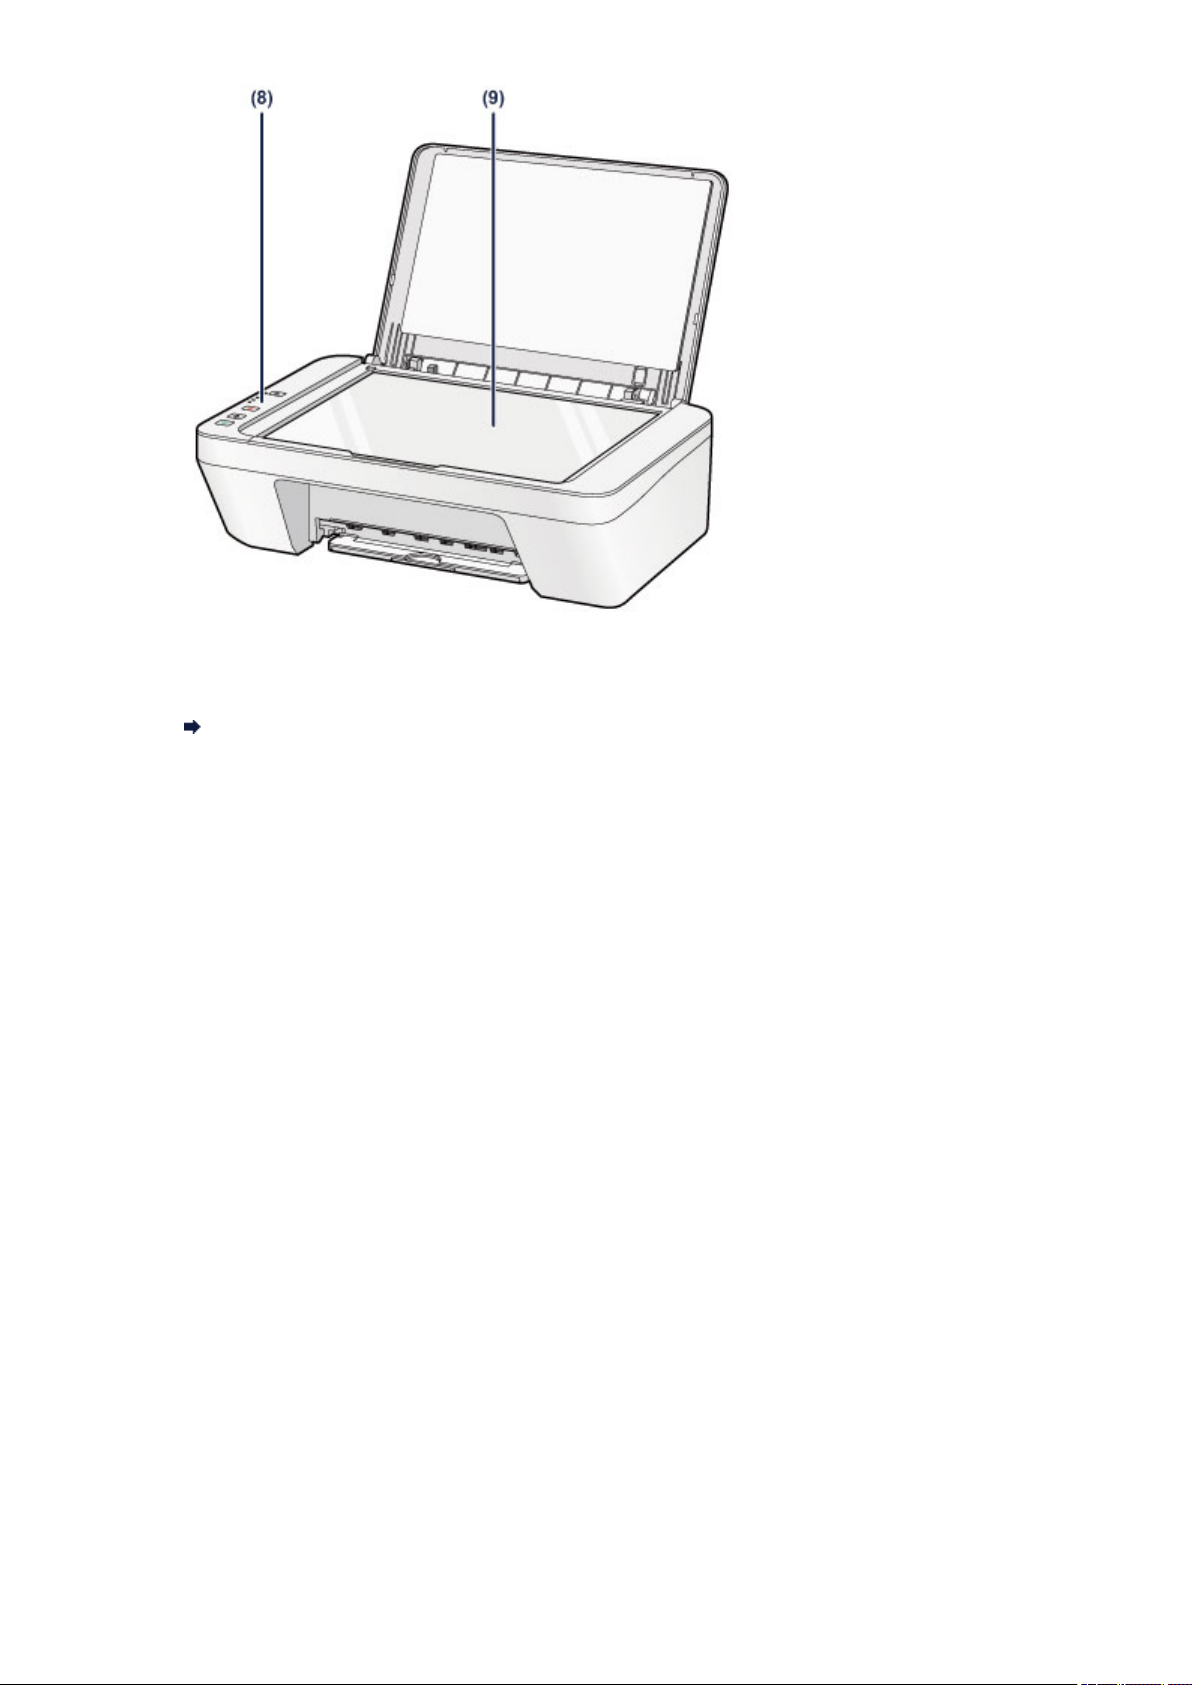
(8) operation panel
Use to change the settings of the machine or to operate it.
Operation Panel
(9) platen glass
Load an original to copy or scan.
30
Page 31

Rear View
(1) power cord connector
Plug in the supplied power cord.
(2) USB port
Plug in the USB cable to connect the machine with a computer.
Important
Do not touch the metal casing.
Do not plug in or unplug the USB cable while the machine is printing or scanning
originals with the computer.
31
Page 32

Inside View
(1) FINE cartridge (ink cartridges)
A replaceable cartridge that integrates print head and ink tank.
(2) FINE cartridge holder
Install the FINE cartridge.
The color FINE cartridge should be installed into the left slot and the black FINE
cartridge should be installed into the right slot.
Note
For details on replacing a FINE cartridge, see Replacing a FINE Cartridge.
Important
The area around the parts (A) may be splattered with ink. This does not affect the
performance of the machine.
Do not touch the parts (A). The machine may not print properly if you touch them.
32
Page 33

Operation Panel
* All lamps on the operation panel are shown lit in the illustration below for explanatory
purposes.
(1) ON button
Turns the power on or off. Before turning on the power, make sure that the
document cover is closed.
Turning the Machine On and Off
(2) ON lamp
Lights green after flashing when the power is turned on.
Note
ON and Alarm lamps
You can check the status of the machine by the ON and Alarm lamps.
– ON lamp is off: The power is off.
– ON lamp lights green: The machine is ready to print.
– ON lamp flashes green: The machine is getting ready to print, or printing is in
progress.
– Alarm lamp flashes orange: An error has occurred and the machine is not ready
to print.
"Support Code Corresponding to the Number of Flashes of the Alarm Lamp" in If
an Error Occurs
– ON lamp flashes green and Alarm lamp flashes orange alternately: An error that
requires contacting the service center may have occurred.
"Support Code Corresponding to the Number of Alternate Flashes of the ON
Lamp and the Alarm Lamp" in If an Error Occurs
(3) Alarm lamp
33
Page 34

Lights or flashes orange when an error occurs, such as paper-out or ink-out. When
performing machine maintenance or machine settings, options can be selected
according to the number of flashes.
(4) ink lamps
Light or flash orange when ink runs out, etc.
The upper lamp indicates the black FINE cartridge status, the lower lamp the color
FINE cartridge status.
(5) Stop button
Cancels operations. You can press this button to cancel a print, copy, or scan job in
progress. Holding this button down lets you select maintenance options or machine
settings.
(6) Black button*
Starts black & white copying. You can also press this button to finalize your selection
for the setting item.
(7) Color button*
Starts color copying. You can also press this button to finalize your selection for the
setting item.
* In the software applications or manuals, the Color and Black buttons are collectively
called the "Start" or "OK" button.
34
Page 35

About the Power Supply of the Machine
Confirming that the Power Is On
Turning the Machine On and Off
Notice for the Power Plug/Power Cord
Notice for Unplugging the Power Cord
35
Page 36

Confirming that the Power Is On
The ON lamp is lit green when the machine is turned on.
Note
It may take a while for the machine to start printing immediately after you turn on the
machine.
36
Page 37

Turning the Machine On and Off
Turning on the machine
1. Press the ON button to turn on the machine.
The ON lamp flashes and then remains lit green.
Confirming that the Power Is On
Note
It may take a while for the machine to start printing immediately after you turn on the
machine.
If the Alarm lamp lights up or flashes orange, see If an Error Occurs.
Auto power on feature
You can set the machine to automatically turn on when a print or scan operation is
performed from a computer. This feature is set to off by default.
For details on how to change the auto power on setting, see below.
From the machine
Turning on/off the Machine Automatically
From the computer
Managing the Machine Power
Turning off the machine
1. Press the ON button to turn off the machine.
When the ON lamp stops flashing, the machine is turned off.
37
Page 38

Important
When you unplug the power cord after turning off the machine, be sure to confirm
that the ON lamp is off.
Notice for Unplugging the Power Cord
Note
Auto power off feature
You can set the machine to automatically turn off when no operations are performed
or no print jobs are sent to the machine for a certain interval. This is the default
setting.
For details on how to change the auto power off setting, see below.
From the machine
Turning on/off the Machine Automatically
From the computer
Managing the Machine Power
38
Page 39

Notice for the Power Plug/Power Cord
Unplug the power cord once a month to confirm that the power plug/power cord does not
have anything unusual described below.
The power plug/power cord is hot.
The power plug/power cord is rusty.
The power plug/power cord is bent.
The power plug/power cord is worn.
The power plug/power cord is split.
Caution
If you find anything unusual with the power plug/power cord described above, unplug
the power cord and call for service. Using the machine with one of the unusual
conditions above may cause a fire or an electric shock.
Notice for Unplugging the Power Cord
39
Page 40

Notice for Unplugging the Power Cord
To unplug the power cord, follow the procedure below.
Important
When you unplug the power cord, press the ON button, then confirm that the ON lamp
is off. Unplugging the power cord while the ON lamp is lit or flashing may cause drying
or clogging of the print head and print quality may be reduced.
1. Press the ON button to turn the machine off.
2. Confirm that the ON lamp is off.
3.
Unplug the power cord.
The specification of the power cord differs depending on the country or region of use.
40
Page 41

Loading Paper / Originals
Loading Paper
Loading Originals
41
Page 42

Loading Paper
Loading Plain Paper / Photo Paper
Loading Envelopes
Media Types You Can Use
Media Types You Cannot Use
Printing Area
42
Page 43

Loading Plain Paper / Photo Paper
You can load plain paper or photo paper.
Important
If you cut plain paper into small size such as 4" x 6" (10 x 15 cm) or 5" x 7" (13 x 18 cm)
to perform trial print, it can cause paper jams.
Note
We recommend Canon genuine photo paper for printing photos.
For details on the Canon genuine paper, see Media Types You Can Use.
You can use general copy paper.
For the page size and paper weight you can use for this machine, see Media Types You
Can Use.
1. Prepare paper.
Align the edges of paper. If paper is curled, flatten it.
Note
Align the edges of paper neatly before loading. Loading paper without aligning the
edges may cause paper jams.
If paper is curled, hold the curled corners and gently bend them in the opposite
direction until the paper becomes completely flat.
For details on how to flatten curled paper, see "Load the paper after correcting its
curl." in Paper Is Smudged/Printed Surface Is Scratched.
2. Load paper.
(1) Open the paper support.
(2) Pull out the paper output tray and the output tray extension.
43
Page 44

(3) Slide the paper guide (A) to the left, and load the paper against the far
right of the rear tray WITH THE PRINT SIDE FACING YOU.
(4) Slide the paper guide (A) to align it with the paper stack.
Do not slide the paper guide too hard against the paper. The paper may not be fed
properly.
Important
Always load paper in the portrait orientation (B). Loading paper in the landscape
orientation (C) can cause paper jams.
44
Page 45

Note
Do not load sheets of paper higher than the load limit mark (D).
Note
The machine may make operating noise when feeding paper.
After loading paper
Select the size and type of the loaded paper on the print settings screen of the printer
driver.
45
Page 46

Loading Envelopes
You can load Envelope DL and Envelope Com 10.
The address is automatically rotated and printed according to the envelope's direction by
specifying with the printer driver properly.
Important
Printing of envelopes from the operation panel is not supported.
Do not use the following envelopes. They could jam in the machine or cause the
machine to malfunction.
- Envelopes with an embossed or treated surface
- Envelopes with a double flap
- Envelopes whose gummed flaps are already moistened and adhesive
1. Prepare envelopes.
Press down on all four corners and edges of the envelopes to flatten them.
If the envelopes are curled, hold the opposite corners and gently twist them in the
opposite direction.
If the corner of the envelope flap is folded, flatten it.
Use a pen to press the leading edge in the inserting direction flat and sharpen the
crease.
The figures above show a side view of the leading edge of the envelope.
Important
The envelopes may jam in the machine if they are not flat or the edges are not
aligned. Make sure that no curl or puff exceeds 0.1 inches (3 mm).
2. Load envelopes.
46
Page 47

(1) Open the paper support.
(2) Pull out the paper output tray and the output tray extension.
(3) Slide the paper guide (A) to the left, and load the envelopes against the
far right of the rear tray WITH THE PRINT SIDE FACING YOU.
The folded flap of the envelope will be faced up on the left side.
Up to 5 envelopes can be loaded at once.
(4) Slide the paper guide (A) to align it with the envelopes.
Do not slide the paper guide too hard against the envelopes. The envelopes may not
be fed properly.
(B) Rear side
(C) Address side
47
Page 48

Note
Do not load sheets of paper higher than the load limit mark.
Note
The machine may make operating noise when feeding paper.
After loading envelopes
Select the size and type of the loaded envelopes on the print settings screen of the
printer driver.
48
Page 49

Media Types You Can Use
Use plain paper for printing texts or photo paper for printing photos, for the best print
results. We recommend the use of Canon genuine paper for printing your important photos.
Media Types
Commercially available papers
Plain Paper (including recycled paper)
*1
Envelopes
Canon genuine papers
The Model Number of Canon genuine paper is shown in brackets. Refer to the instruction
manual supplied with the paper for detailed information on the printable side and notes on
handling paper. For information on the page sizes available for each Canon genuine paper,
access our website.
Note
You may not be able to purchase some Canon genuine papers depending on the
country or region of purchase. Paper is not sold in the US by Model Number. Purchase
paper by name.
Paper for printing photos:
Glossy Photo Paper "Everyday Use" <GP-501/GP-601>
Photo Paper Glossy <GP-601>
Photo Paper Plus Glossy II <PP-201>
*1 100% recycled paper can be used.
Paper Load Limit
Setting the Media Type with the Printer Driver
Page Sizes
You can use the following page sizes.
Standard sizes:
Letter Legal
A5 A4
B5 4" x 6" (10 x 15 cm)
5" x 7" (13 x 18 cm) Envelope DL
Envelope Com 10
49
Page 50

Non-standard sizes:
You can print on non-standard size paper within the following ranges.
Minimum size: 4.00 x 6.00 inches (101.6 x 152.4 mm)
Maximum size: 8.50 x 26.61 inches (215.9 x 676.0 mm)
Paper Weight
You can use paper in the following weight range.
17 to 28 lb (64 to 105 g /m2) (except for Canon genuine paper)
Do not use heavier or lighter paper (except for Canon genuine paper), as it could jam in the
machine.
Notes on Storing Paper
Take out only the necessary number of paper from the package, just before printing.
To avoid curling, when you do not print, put unused paper back into the package and
keep it on a level surface. And also, store it avoiding heat, humidity, and direct sunlight.
50
Page 51

Paper Load Limit
Commercially Available Papers
Media Name Rear Tray Paper Output Tray
Plain Paper (including recycled paper)
Approx. 60 sheets
Approx. 10 sheets
(10 sheets: Legal)
Envelopes 5 envelopes
*1
Canon Genuine Papers
Note
We recommend that you remove the previously printed sheet from the paper output tray
before continuously printing to avoid blurs and discoloration.
Paper for printing photos:
Media Name <Model No.> Rear Tray
Glossy Photo Paper "Everyday Use" <GP-501/
GP-601>
Photo Paper Glossy <GP-601>
Photo Paper Plus Glossy II <PP-201>
*2
*2
*2
20 sheets: 4" x 6" (10 x 15 cm)
20 sheets: 4" x 6" (10 x 15 cm)
10 sheets: 5" x 7" (13 x 18 cm)
20 sheets: 4" x 6" (10 x 15 cm)
*1 We recommend that you remove the previously printed envelope from the paper output
tray before continuously printing to avoid blurs and discoloration.
*2 When loading paper in stacks, the print side may become marked as it is fed or paper
may not feed properly. In this case, load one sheet at a time.
51
Page 52

Media Types You Cannot Use
Do not use the following types of paper. Using such paper will cause not only unsatisfactory
results, but also the machine to jam or malfunction.
Folded, curled, or wrinkled paper
Damp paper
Paper that is too thin (weighing less than 17 lb (64 g /m2))
Paper that is too thick (weighing more than 28 lb (105 g /m2), except for Canon genuine
paper)
Paper thinner than a postcard, including plain paper or notepad paper cut to a small
size (when printing on paper smaller than A5)
Picture postcards
Postcards
Envelopes with a double flap
Envelopes with an embossed or treated surface
Envelopes whose gummed flaps are already moistened and adhesive
Any type of paper with holes
Paper that is not rectangular
Paper bound with staples or glue
Paper with adhesives
Paper decorated with glitter, etc.
52
Page 53

Printing Area
Printing Area
Other Sizes than Letter, Legal, Envelopes
Letter, Legal
Envelopes
53
Page 54

Printing Area
To ensure the best print quality, the machine allows a margin along each edge of media.
The actual printable area will be the area inside these margins.
Recommended printing area : Canon recommends that you print within this area.
Printable area : The area where it is possible to print.
However, printing in this area can affect the print quality or the paper feed precision.
54
Page 55

Other Sizes than Letter, Legal, Envelopes
Size Printable Area (width x height)
A5 5.56 x 7.49 inches (141.2 x 190.3 mm)
A4 8.00 x 10.92 inches (203.2 x 277.3 mm)
B5 6.90 x 9.34 inches (175.2 x 237.3 mm)
4" x 6" (10 x 15 cm) 3.73 x 5.22 inches (94.8 x 132.7 mm)
5" x 7" (13 x 18 cm) 4.73 x 6.22 inches (120.2 x 158.1 mm)
Recommended printing area
(A) 1.24 inches (31.6 mm)
(B) 1.15 inches (29.2 mm)
Printable area
(C) 0.12 inches (3.0 mm)
(D) 0.66 inches (16.7 mm)
(E) 0.13 inches (3.4 mm)
(F) 0.13 inches (3.4 mm)
55
Page 56

Letter, Legal
Size Printable Area (width x height)
Letter 8.00 x 10.22 inches (203.2 x 259.7 mm)
Legal 8.00 x 13.22 inches (203.2 x 335.9 mm)
Recommended printing area
(A) 1.24 inches (31.6 mm)
(B) 1.15 inches (29.2 mm)
Printable area
(C) 0.12 inches (3.0 mm)
(D) 0.66 inches (16.7 mm)
(E) 0.25 inches (6.4 mm)
(F) 0.25 inches (6.3 mm)
56
Page 57

Envelopes
Size Recommended Printing Area (width x height)
Envelope DL 3.88 x 7.06 inches (98.8 x 179.5 mm)
Envelope Com 10 3.68 x 7.90 inches (93.5 x 200.8 mm)
Recommended printing area
(A) 0.31 inches (8.0 mm)
(B) 1.28 inches (32.5 mm)
(C) 0.22 inches (5.6 mm)
(D) 0.22 inches (5.6 mm)
57
Page 58

Loading Originals
Loading Originals on the Platen Glass
Originals You Can Load
58
Page 59

Loading Originals on the Platen Glass
You can load originals to copy or scan on the platen glass.
1. Load an original on the platen glass.
(1) Open the document cover.
Important
Do not place any object on the document cover. It will fall into the rear tray when
the document cover is opened and cause the machine to malfunction.
(2) Load the original WITH THE SIDE TO SCAN FACING DOWN on the
platen glass.
Originals You Can Load
Align the corner of the original with the alignment mark .
Important
Be sure to observe the following when loading the original on the platen glass.
- Do not place any objects weighing 4.4 lb (2.0 kg) or more on the platen glass.
- Do not put any pressure of 4.4 lb (2.0 kg) or more on the platen glass, such as
pressing down the original.
Failure to observe the above may cause the scanner to malfunction or the platen
glass to break.
The machine cannot scan the shaded area (A) (0.04 inches (1 mm) from the edges
of the platen glass).
59
Page 60

2. Close the document cover gently.
Important
After loading the original on the platen glass, be sure to close the document cover
before starting to copy or scan.
60
Page 61

Originals You Can Load
The originals you can load on the platen glass are as follows.
Item Details
- Text document, magazine, or newspaper
Types of originals
Size (width x height) Max. 8.5 x 11.7 inches (216 x 297 mm)
- Printed photo, postcard, business card, or disc
(BD/DVD/CD, etc.)
61
Page 62

Replacing a FINE Cartridge
Replacing a FINE Cartridge
Checking the Ink Status
62
Page 63

Replacing a FINE Cartridge
When remaining ink cautions or errors occur, the ink lamps and the Alarm lamp will flash
orange to inform you of the error. Count the number of flashes and take appropriate action.
If an Error Occurs
Replacing Procedure
When you need to replace a FINE cartridge, follow the procedure below.
Watch the movie
Important
Handling FINE cartridge
Do not touch the electrical contacts (A) or print head nozzle (B) on a FINE cartridge.
The machine may not print properly if you touch them.
If you remove a FINE cartridge, replace it immediately. Do not leave the machine with
the FINE cartridge removed.
Use a new FINE cartridge for replacement. Installing a used FINE cartridge may cause
the nozzles to clog.
Furthermore, with such a FINE cartridge, the machine will not be able to inform you
when to replace the FINE cartridge properly.
Once a FINE cartridge has been installed, do not remove it from the machine and leave
it out in the open. This will cause the FINE cartridge to dry out, and the machine may
not operate properly when it is reinstalled. To maintain optimal printing quality, use a
FINE cartridge within six months of first use.
Note
If a FINE cartridge runs out of ink, you can print with either color or black FINE
cartridge, in whichever ink remains, only for a while. However the print quality may be
reduced compared to when printing with both cartridges. We recommend to use a new
FINE cartridge in order to obtain optimum qualities.
Even when printing with one ink only, print with leaving the empty FINE cartridge
installed. If either of the color FINE cartridge or black FINE cartridge is not installed, an
error occurs and the machine cannot print.
63
Page 64

For information on how to configure this setting, see Setting the Ink Cartridge to be
Used.
Color ink may be consumed even when printing a black-and-white document or when
black-and-white printing is specified.
Both color ink and black ink are also consumed in the standard cleaning and deep
cleaning of the print head, which may be necessary to maintain the performance of the
machine. When ink runs out, replace the FINE cartridge immediately with a new one.
Useful Information about Ink
1. Make sure that the power is turned on.
2. Retract the paper output tray and the output tray extension.
3. Open the cover.
The FINE cartridge holder moves to the replacement position.
Caution
Do not hold the FINE cartridge holder to stop or move it forcibly. Do not touch the
FINE cartridge holder until it stops completely.
Important
The inside of the machine may be stained with ink. Be careful not to stain your
hands or clothing when replacing the FINE cartridge. You can easily wipe off the ink
from the inside of the machine with tissue paper or the like.
Do not touch the metallic parts or other parts inside the machine.
If the cover is left open for more than 10 minutes, the FINE cartridge holder may
move and the Alarm lamp light. In this case, close the cover, then open it again.
4. Remove the empty FINE cartridge.
(1) Push down the FINE cartridge until it clicks.
64
Page 65

(2) Remove the FINE cartridge.
Important
Handle the FINE cartridge carefully to avoid staining of clothing or the surrounding
area.
Discard the empty FINE cartridge according to the local laws and regulations
regarding disposal of consumables.
5.
Prepare a new FINE cartridge.
(1) Take a new FINE cartridge out of its package and remove the protective
tape (C) gently.
65
Page 66

Important
If you shake a FINE cartridge, ink may spill out and stain your hands and the
surrounding area. Handle a FINE cartridge carefully.
Be careful not to stain your hands and the surrounding area with ink on the removed
protective tape.
Do not reattach the protective tape once you have removed it. Discard it according
to the local laws and regulations regarding disposal of consumables.
Do not touch the electrical contacts or print head nozzle on a FINE cartridge. The
machine may not print properly if you touch them.
6. Install the FINE cartridge.
(1) Insert the new FINE cartridge at a slant into the FINE cartridge holder.
The color FINE cartridge should be installed into the left slot and the black FINE
cartridge should be installed into the right slot.
66
Page 67

Important
Insert the FINE cartridge gently so that it does not hit the electrical contacts on
the FINE cartridge holder.
(2) Push the FINE cartridge in and up firmly until it snaps into place.
67
Page 68

Important
Check if the FINE cartridge is installed correctly.
The machine cannot print unless both the color FINE cartridge and black FINE
cartridge are installed. Be sure to install both cartridges.
7. Close the cover.
Note
If the Alarm lamp lights or flashes orange after the cover is closed, take appropriate
action.
If an Error Occurs
The machine may make noise during operation.
8.
Adjust the print head position.
After replacing the FINE cartridge, perform the print head alignment.
Aligning the Print Head.
Note
When print head alignment is performed, the machine starts cleaning the print head
automatically before printing the print head alignment sheet. Do not perform any
other operations until the machine completes the cleaning of the print head.
68
Page 69

Checking the Ink Status
Checking the Ink Status with the Ink Lamps on the Operation Panel
You can also check the ink status on the computer screen.
Checking the Ink Status from Your Computer
69
Page 70

Checking the Ink Status with the Ink Lamps on the
Operation Panel
Note
The ink level detector is mounted on the machine to detect the remaining ink level. The
machine considers as ink is full when a new FINE cartridge is installed, and then starts
to detect a remaining ink level. If you install a used FINE cartridge, the indicated ink
level of it may not be correct. In such case, refer to the ink level information only as a
guide.
When remaining ink cautions or errors occur, the ink lamps and the Alarm lamp will
flash orange to inform you of the error. Count the number of flashes and take
appropriate action.
If an Error Occurs
In the copy standby mode, you can check the ink status with the Color Ink lamp and Black
Ink lamp.
* All the lamps on the operation panel are shown lit in the illustration below for explanatory
purposes.
(A) Alarm lamp
(B) Black Ink lamp
(C) Color Ink lamp
Color Ink lamp or Black Ink lamp lights
The ink is running low. Prepare a new ink cartridge.
Color Ink lamp or Black Ink lamp flashes, while Alarm lamp flashes
An error has occurred.
If an Error Occurs
* For some types of errors, the Alarm lamp may not flash.
Note
You can also check the ink status on the computer screen.
70
Page 71

Checking the Ink Status from Your Computer
71
Page 72

Maintenance
When Printing Becomes Faint or Colors Are Incorrect
Performing Maintenance from a Computer
Cleaning the Machine
72
Page 73

When Printing Becomes Faint or Colors Are Incorrect
Maintenance Procedure
Printing the Nozzle Check Pattern
Examining the Nozzle Check Pattern
Cleaning the Print Head
Cleaning the Print Head Deeply
Aligning the Print Head
73
Page 74

Maintenance Procedure
If print results are blurred or colors are not printed correctly, the print head nozzle (FINE
cartridge) is probably clogged. Follow the procedure below to print the nozzle check pattern,
check the print head nozzle condition, then clean the print head.
If printed ruled lines are misaligned or print results are otherwise unsatisfactory, aligning the
print head may improve print quality.
Important
Do not rinse or wipe the FINE cartridge. This can cause trouble with the FINE cartridge.
Note
Before performing maintenance
Check if ink remains in the FINE cartridge.
Checking the Ink Status with the Ink Lamps on the Operation Panel
Check if the FINE cartridge is installed correctly.
Replacing Procedure
Also check if the protective tape on the bottom of the FINE cartridge is removed.
If the Alarm lamp lights or flashes orange, see If an Error Occurs.
Increasing the print quality in the printer driver settings may improve the print result.
Changing the Print Quality and Correcting Image Data
74
Page 75

When the Print Results Are Blurred or Uneven:
Step 1
Print the nozzle check pattern.
From the machine
Printing the Nozzle Check Pattern
From the computer
Use Your Computer to Print a Nozzle Check
Pattern
Examine the nozzle check pattern.
Examining the Nozzle Check Pattern
If there are missing lines or horizontal white
streaks in the pattern:
Step 2
Clean the print head.
From the machine
Cleaning the Print Head
From the computer
Cleaning the Print Heads from Your
Computer
If the problem is not resolved after cleaning the
print head twice:
After cleaning the print head,
print and examine the nozzle
check pattern.
Step 3
Clean the print head deeply.
From the machine
Cleaning the Print Head Deeply
From the computer
Cleaning the Print Heads from Your
Computer
If the problem is not resolved, turn off the power
and clean the print head deeply again after 24
hours.
If the problem is still not resolved:
75
Page 76

Step 4
Replace a FINE cartridge.
Replacing a FINE Cartridge
Note
If the problem is still not resolved after replacing the FINE cartridge, contact the service
center.
When the Print Results Are Not Even such as the Ruled Lines
Are Misaligned:
Align the print head.
From the machine
Aligning the Print Head
From the computer
Aligning the Print Head Position Automatically from Your Computer
76
Page 77

Printing the Nozzle Check Pattern
Print the nozzle check pattern to determine whether the ink ejects properly from the print
head nozzle.
Watch the movie
Note
If the remaining ink level is low, the nozzle check pattern will not be printed correctly.
Replace the FINE cartridge whose ink is low.
Replacing a FINE Cartridge
You need to prepare: a sheet of A4 or Letter-sized plain paper
1. Make sure that the power is turned on.
2. Load a sheet of A4 or Letter-sized plain paper in the rear tray.
3. Pull out the paper output tray and the output tray extension.
4. Hold down the Stop button until the Alarm lamp flashes orange once,
then release it immediately.
The nozzle check pattern will be printed.
Do not perform any other operations until the machine completes the printing of the
nozzle check pattern.
5. Examine the nozzle check pattern.
Examining the Nozzle Check Pattern
77
Page 78

Examining the Nozzle Check Pattern
Examine the nozzle check pattern, and clean the print head if necessary.
1. Check if there are missing lines in the pattern (A) or horizontal white
streaks in the pattern (B).
(C) Number of sheets printed so far
If there are missing lines in the pattern (A):
Cleaning the print head is required.
Cleaning the Print Head
(D) Good
(E) Bad (lines are missing)
If there are horizontal white streaks in the pattern (B):
Cleaning the print head is required.
Cleaning the Print Head
(F) Good
(G) Bad (horizontal white streaks are present)
Note
The total number of sheets printed so far is shown in increments of 50 sheets on the
printout of the nozzle check pattern.
78
Page 79

Cleaning the Print Head
Clean the print head if lines are missing or if horizontal white streaks are present in the
printed nozzle check pattern. Cleaning unclogs the nozzles and restores the print head
condition. Cleaning the print head consumes ink, so clean the print head only when
necessary.
1. Make sure that the power is turned on.
2. Hold down the Stop button until the Alarm lamp flashes orange twice,
then release it immediately.
The machine starts cleaning the print head.
The cleaning will be complete when the ON lamp lights green after flashing.
Do not perform any other operations until the machine completes the cleaning of the
print head. This takes about 30 seconds.
3. Check the print head condition.
To check the print head condition, print the nozzle check pattern.
Printing the Nozzle Check Pattern
Note
If the problem is not resolved after cleaning the print head twice, clean the print head
deeply.
Cleaning the Print Head Deeply
79
Page 80

Cleaning the Print Head Deeply
If print quality does not improve by the standard cleaning of the print head, clean the print
head deeply. Cleaning the print head deeply consumes more ink than the standard cleaning
of the print head, so clean the print head deeply only when necessary.
1. Make sure that the power is turned on.
2. Hold down the Stop button until the Alarm lamp flashes orange three
times, then release it immediately.
The machine starts cleaning the print head deeply.
The cleaning will be complete when the ON lamp lights green after flashing.
Do not perform any other operations until the machine completes the deep cleaning of
the print head. This takes about 1 minute.
3. Check the print head condition.
To check the print head condition, print the nozzle check pattern.
Printing the Nozzle Check Pattern
If the problem is not resolved, turn off the power and clean the print head deeply again after
24 hours.
If the problem is still not resolved, replace the FINE cartridge with a new one.
Replacing a FINE Cartridge
If the problem is still not resolved after replacing the FINE cartridge, contact the service
center.
80
Page 81

Aligning the Print Head
If printed ruled lines are misaligned or print results are otherwise unsatisfactory, adjust the
print head position.
Note
If the remaining ink level is low, the print head alignment sheet will not be printed
correctly. Replace the FINE cartridge whose ink is low.
Replacing a FINE Cartridge
You need to prepare: a sheet of A4 or Letter-sized plain paper (including
recycled paper)*
* Be sure to use paper that is white and clean on both sides.
1. Make sure that the power is turned on.
2. Load a sheet of A4 or Letter-sized plain paper in the rear tray.
3. Pull out the paper output tray and the output tray extension.
4. Hold down the Stop button until the Alarm lamp flashes orange four
times, then release it immediately.
The print head alignment sheet will be printed.
81
Page 82

Important
Do not touch any printed part on the print head alignment sheet.
Be careful not to get the print head alignment sheet dirty. If the sheet is stained
or wrinkled, it may not be scanned properly.
If the print head alignment sheet was not printed correctly, press the Stop
button, then redo this procedure from the beginning.
5. Scan the print head alignment sheet to adjust the print head position.
(1) Load the print head alignment sheet on the platen glass.
Load the print head alignment sheet WITH THE PRINTED SIDE FACING DOWN
and align the mark on the bottom right corner of the sheet with the alignment
mark .
82
Page 83

(2) Close the document cover gently, then press the Color button or the
Black button.
The machine starts scanning the print head alignment sheet, and the print head
position will be adjusted automatically.
The print head position adjustment will be complete when the ON lamp lights green
after flashing.
Remove the print head alignment sheet on the platen glass.
Important
Do not open the document cover or move the print head alignment sheet on the
platen glass until adjusting the print head position is complete.
If adjusting the print head position has failed, the Alarm lamp flashes orange.
Press the Stop button to release the error, then take appropriate action.
If an Error Occurs
Note
If the print results are still not satisfactory after adjusting the print head position as
described above, adjust the print head position manually from the computer.
Aligning the Print Head Position from Your Computer
To print and check the current head position adjustment values, hold down the Stop
button until the Alarm lamp flashes orange six times, then release it immediately.
83
Page 84

Performing Maintenance from a Computer
Cleaning the Print Heads from Your Computer
Cleaning the Paper Feed Rollers from Your Computer
Aligning the Print Head
Aligning the Print Head Position Automatically from Your Computer
Aligning the Print Head Position from Your Computer
Use Your Computer to Print a Nozzle Check Pattern
Cleaning Inside the Machine
84
Page 85

Cleaning the Print Heads from Your Computer
The print head cleaning function allows you to clear up clogged print head nozzle. Perform
print head cleaning if printing is faint or a specific color fails to print, even though there is
enough ink.
The procedure for cleaning the print head is as follows:
Cleaning
1. Open the printer driver setup window
2. Click Cleaning on the Maintenance tab
When the Print Head Cleaning dialog box opens, select the ink group for which
cleaning is to be performed.
Click Initial Check Items to display the items you need to check before performing
cleaning.
3. Execute cleaning
Make sure that the machine is on and then click Execute.
Print head cleaning starts.
4. Complete cleaning
The Nozzle Check dialog box opens after the confirmation message.
5. Check the results
To check whether the print quality has improved, click Print Check Pattern. To
cancel the check process, click Cancel.
If cleaning the head once does not resolve the print head problem, clean it once
more.
Important
Cleaning consumes a small amount of ink.
Cleaning the print head frequently will rapidly deplete your printer's ink supply.
Consequently, perform cleaning only when necessary.
85
Page 86

Deep Cleaning
Deep Cleaning is more thorough than cleaning. Perform deep cleaning when two Cleaning
attempts do not resolve the print head problem.
1. Open the printer driver setup window
2. Click Deep Cleaning on the Maintenance tab
When the Deep Cleaning dialog box opens, select the ink group for which deep
cleaning is to be performed.
Click Initial Check Items to display the items you need to check before performing
deep cleaning.
3. Execute deep cleaning
Make sure that the machine is on and then click Execute.
Click OK when the confirmation message appears.
Print head deep cleaning starts.
4. Complete deep cleaning
The Nozzle Check dialog box opens after the confirmation message.
5. Check the results
To check whether the print quality has improved, click Print Check Pattern. To
cancel the check process, click Cancel.
Important
Deep Cleaning consumes a larger amount of ink than Cleaning.
Cleaning the print head frequently will rapidly deplete your printer's ink supply.
Consequently, perform cleaning only when necessary.
Note
If there is no sign of improvement after Deep Cleaning, switch off the machine, wait
24 hours, and then perform Deep Cleaning again. If there is still no sign of
improvement, see "Ink Is Not Ejected."
Related Topic
Use Your Computer to Print a Nozzle Check Pattern
86
Page 87

Cleaning the Paper Feed Rollers from Your Computer
Cleans the paper feed rollers. Perform feed roller cleaning when there are paper particles
sticking to the paper feed rollers and paper is not fed properly.
The procedure for performing the feed roller cleaning is as follows:
Roller Cleaning
1. Prepare the machine
Remove all sheets of paper from the rear tray.
2. Open the printer driver setup window
3. Click Roller Cleaning on the Maintenance tab
The confirmation message appears.
4. Execute paper feed roller cleaning
Make sure that the machine is on and then click OK.
Paper feed roller cleaning starts.
5. Complete paper feed roller cleaning
After the rollers have stopped, follow the instruction in the message, load one sheet
of plain paper into the rear tray, and click OK.
Paper will be ejected and feed roller cleaning will be completed.
87
Page 88

Aligning the Print Head
When you perform head position adjustment, errors in the print head adjustment position
are corrected and conditions such as color and line streaking are improved.
If the print results appear uneven because of line shifts or other conditions, adjust the
position of the print head.
On this machine, you can adjust the print head either automatically or manually.
88
Page 89

Aligning the Print Head Position from Your Computer
Print head alignment corrects the installation positions of the print head and improves
deviated colors and lines.
This machine supports two head alignment methods: automatic head alignment and manual
head alignment.
The procedure for performing manual print head alignment is as follows:
Print Head Alignment
1. Open the printer driver setup window
2. Click Custom Settings on the Maintenance tab
The Custom Settings dialog box opens.
3. Switch head alignment to manual
Check the Align heads manually check box.
4. Apply the settings
Click OK and when the confirmation message appears, click OK.
5. Click Print Head Alignment on the Maintenance tab
The Start Print Head Alignment dialog box opens.
6. Load paper in the machine
Load three sheets of A4 size or Letter size plain paper into the rear tray.
7. Execute head alignment
Make sure that the machine is on and click Align Print Head.
Follow the instruction in the message.
8. Check the printed pattern
Enter the numbers of the patterns with the least amount of streaks in the associated
boxes.
Even if the patterns with the least amount of streaks are clicked in the preview
window, their numbers are automatically entered in the associated boxes.
89
Page 90

When you have entered all the necessary values, click OK.
Note
If it is difficult to pick the best pattern, pick the setting that produces the least
noticeable vertical streaks.
(A) Least noticeable vertical streaks
(B) Most noticeable vertical streaks
If it is difficult to pick the best pattern, pick the setting that produces the least
noticeable horizontal streaks.
(A) Least noticeable horizontal streaks
(B) Most noticeable horizontal streaks
9. Confirm the displayed message and click OK
The second pattern is printed.
10. Check the printed pattern
Enter the numbers of the patterns with the least amount of streaks in the associated
boxes.
Even if the patterns with the least amount of streaks are clicked in the preview
window, their numbers are automatically entered in the associated boxes.
90
Page 91

When you have entered all the necessary values, click OK.
Note
If it is difficult to pick the best pattern, pick the setting that produces the least
noticeable vertical streaks.
(A) Least noticeable vertical streaks
(B) Most noticeable vertical streaks
11. Confirm the displayed message and click OK
The third pattern is printed.
12. Check the printed pattern
Enter the numbers of the patterns with the least noticeable horizontal stripes in the
associated boxes.
Even if the patterns with the least noticeable horizontal stripes are clicked in the
preview window, their numbers are automatically entered in the associated boxes.
91
Page 92

When you have entered all the necessary values, click OK.
Note
If it is difficult to pick the best pattern, pick the setting that produces the least
noticeable horizontal stripes.
(A) Least noticeable horizontal stripes
(B) Most noticeable horizontal stripes
Note
To print and check the current setting, open the Start Print Head Alignment dialog
box, and click Print Alignment Value.
92
Page 93

Aligning the Print Head Position Automatically from
Your Computer
Print head alignment corrects the installation positions of the print head and improves
deviated colors and lines.
This machine supports two head alignment methods: automatic head alignment and manual
head alignment. Normally, the machine is set for automatic head alignment. If the printing
results of automatic print head alignment are not satisfactory, perform manual head
alignment.
The procedure for performing automatic print head alignment is as follows:
Print Head Alignment
1. Open the printer driver setup window
2. Click Print Head Alignment on the Maintenance tab
The Start Print Head Alignment dialog box opens.
3. Load paper in the machine
Load one sheet of A4 size or Letter size plain paper into the rear tray.
Note
The number of sheets to be used differs when you select the manual head
alignment.
4. Print head alignment pattern printing
Make sure that the machine is on and click Align Print Head.
The adjustment pattern is printed.
Important
Do not open the cover while printing is in progress.
5. Adjustment pattern scanning
After the adjustment pattern is printed, a message is displayed.
As instructed in the message, load the adjustment pattern onto the platen, and press
the Start button on the machine.
Print head alignment starts.
93
Page 94

Note
To print and check the current setting, open the Start Print Head Alignment dialog
box, and click Print Alignment Value.
94
Page 95

Use Your Computer to Print a Nozzle Check Pattern
The nozzle check function allows you to check whether the print head is working properly
by printing a nozzle check pattern. Print the pattern if printing becomes faint, or if a specific
color fails to print.
The procedure for printing a nozzle check pattern is as follows:
Nozzle Check
1. Open the printer driver setup window
2. Click Nozzle Check on the Maintenance tab
The Nozzle Check dialog box opens.
Click Initial Check Items to display the items that you need to check before printing
the nozzle check pattern.
3. Load paper in the machine
Load one sheet of A4 size or Letter size plain paper into the rear tray.
4. Print a nozzle check pattern
Make sure that the machine is on and click Print Check Pattern.
Printing of the nozzle check pattern begins.
Click OK when the confirmation message appears.
The Pattern Check dialog box opens.
5. Check the print result
Check the print result. When the print result is normal, click Exit.
If the print result is smudged or if there are any unprinted sections, click Cleaning to
clean the print head.
Related Topic
Cleaning the Print Heads from Your Computer
95
Page 96

Cleaning Inside the Machine
Perform bottom plate cleaning before you execute duplex printing to prevent smudges on
the back side of the paper.
Also perform bottom plate cleaning if ink smudges caused by something other than print
data appear on the printed page.
The procedure for performing bottom plate cleaning is as follows:
Bottom Plate Cleaning
1. Open the printer driver setup window
2. Click Bottom Plate Cleaning on the Maintenance tab
The Bottom Plate Cleaning dialog box opens.
3. Load paper in the machine
As instructed in the dialog box, fold the A4 size or Letter size plain paper in half
horizontally, and then unfold the sheet.
Load the paper into the rear tray in the portrait orientation with the crest of the crease
facing down.
4. Perform the bottom plate cleaning
Make sure that the machine is on and then click Execute.
Bottom plate cleaning starts.
96
Page 97

Cleaning the Machine
Cleaning the Exterior of the Machine
Cleaning the Platen Glass and Document Cover
Cleaning the Paper Feed Roller
Cleaning the Inside of the Machine (Bottom Plate Cleaning)
Cleaning the Protrusions inside the Machine
97
Page 98

Cleaning the Exterior of the Machine
Be sure to use a soft and dry cloth such as eyeglasses cleaning cloth and wipe off dirt on
the surface gently. Smooth out wrinkles on the cloth if necessary before cleaning.
Important
Be sure to turn off the power and disconnect the power plug before cleaning the
machine.
Do not use tissue paper, paper towels, rough-textured cloth, or similar materials for
cleaning so as not to scratch the surface. Be sure to use a soft and dry cloth.
Never use volatile liquids such as thinners, benzene, acetone, or any other chemical
cleaner to clean the machine, as this may cause a malfunction or damage the surface
of the machine.
98
Page 99

Cleaning the Platen Glass and Document Cover
Important
Be sure to turn off the power and disconnect the power plug before cleaning the
machine.
Do not use tissue paper, paper towels, rough-textured cloth, or similar materials for
cleaning so as not to scratch the surface. Be sure to use a soft and dry cloth.
Never use volatile liquids such as thinners, benzene, acetone, or any other chemical
cleaner to clean the machine, as this may cause a malfunction or damage the surface
of the machine.
With a soft, clean, lint-free and dry cloth, wipe the platen glass (A) and the inner side of the
document cover (white sheet) (B) gently. Make sure not to leave any residue, especially on
the glass surface.
Important
The inner side of the document cover (white sheet) (B) is easily damaged, so wipe it
gently.
99
Page 100

Cleaning the Paper Feed Roller
If the paper feed rollers are dirty or paper powder is attached to it, paper may not be fed
properly.
In this case, clean the paper feed rollers. Cleaning will wear out the paper feed rollers, so
perform this only when necessary.
You need to prepare: a sheet of A4 or Letter-sized plain paper or
cleaning sheet available on the market
1. Make sure that the power is turned on and remove any paper from the
rear tray.
2. Clean the paper feed rollers without paper.
(1) Hold down the Stop button until the Alarm lamp flashes orange seven
times, then release it immediately.
The paper feed rollers will rotate as it is cleaned.
3. Clean the paper feed rollers with paper.
(1) Make sure that the paper feed rollers have stopped rotating, load a
sheet of A4 or Letter-sized plain paper or cleaning sheet available on
the market in the rear tray.
(2) Pull out the paper output tray and the output tray extension.
(3) Hold down the Stop button until the Alarm lamp flashes orange seven
times, then release it immediately.
The machine starts cleaning. The cleaning will be complete when the paper is
ejected.
If the problem is not resolved after cleaning the paper feed rollers (A) in the rear tray, turn
off the power, unplug the power cord, then wipe the paper feed rollers (the center roller and
the right roller) located inside the rear tray with a moistened cotton swab or the like while
rotating them manually. Do not touch the rollers with your fingers. Rotate the rollers two or
more times.
100
 Loading...