


Getting Started
Quick Setup
NEXT PAGE
Quick Operation
Please read "Important Safety Instructions" before operating this product. After you finish
reading this guide, store it in a safe place for future reference.
The information in this document is subject to change without notice.
https://oip.manual.canon/
P.19


Getting Started
Please read "Important Safety Instructions" before operating this product.
P.24
After you nish reading this guide, store it in a safe place for future reference.
The information in this document is subject to change without notice.
הדובעה תליחת
.הז רצומ תלעפה ינפל "תובושח תוחיטב תוארוה" תא ארק
34 דומע
.ידיתע שומישל חוטב םוקמב ותוא ןסחא ,הז ךירדמ אורקל םייסתש רחאל
.שארמ העדוה לכ אלל יונישל ןותנ הז ךמסמב עיפומש עדימה
You can access
https://oip.manual.canon/ to read the User's Guide that describes all
functions of this machine.
תבותכל סנכיהל ןתינ
לכ תא ראתמש שמתשמל ךירדמה תלבקל https://oip.manual.canon/
.הז רישכמ לש תויצקנופה
Quick Setup
3
Quick Setup
Installation of the Machine
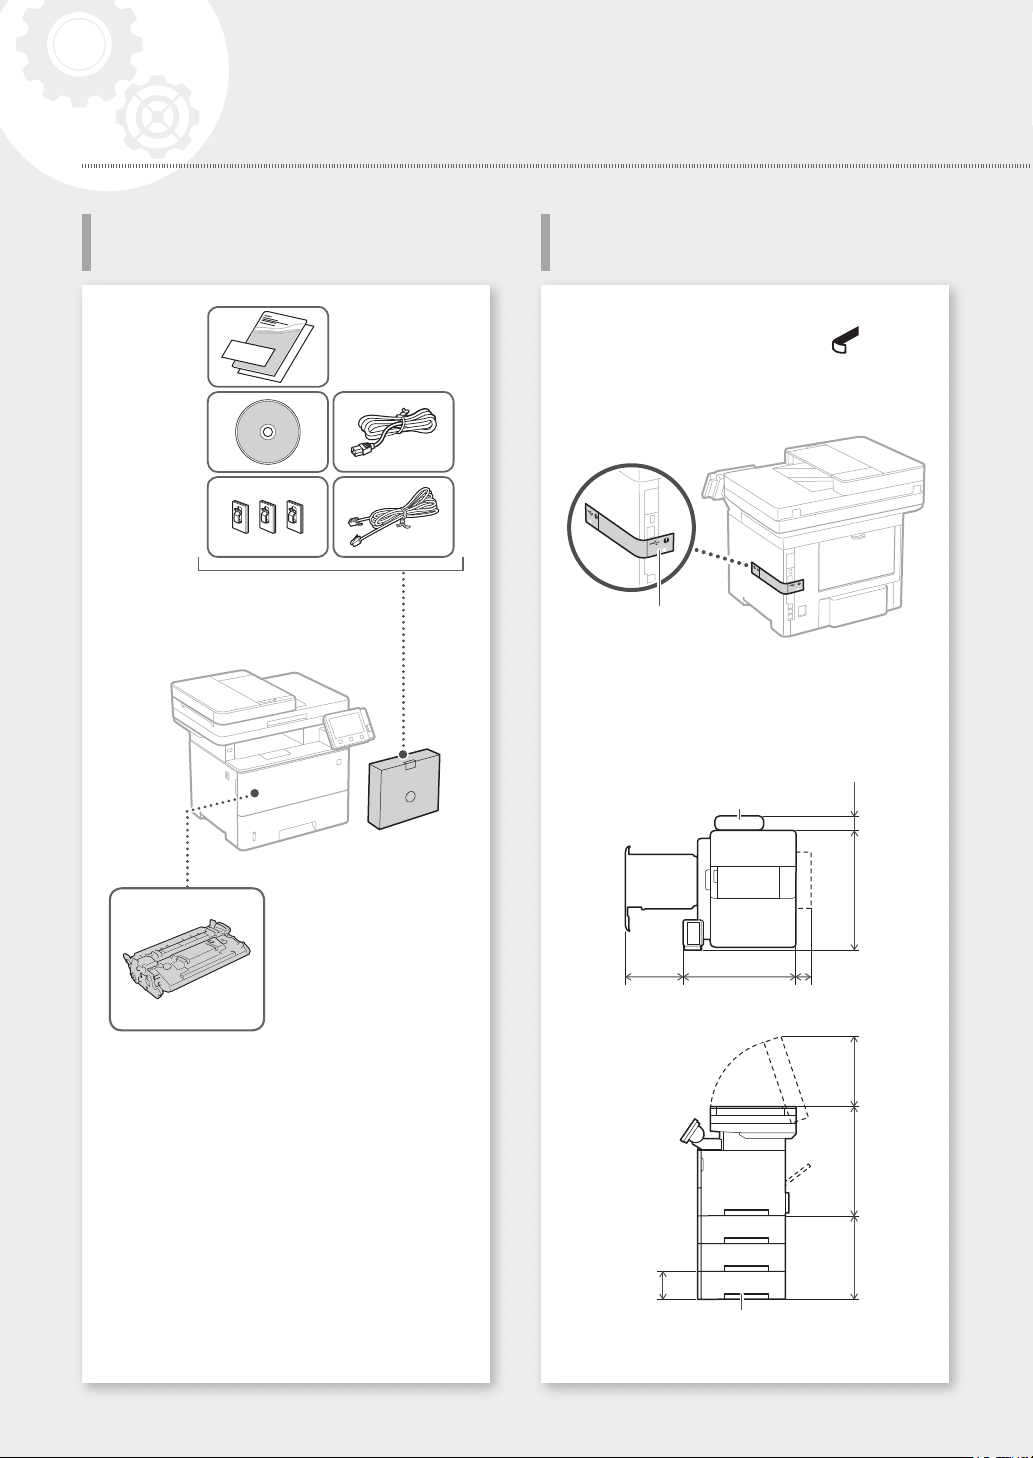
Items Included with the Machine Installing the Machine
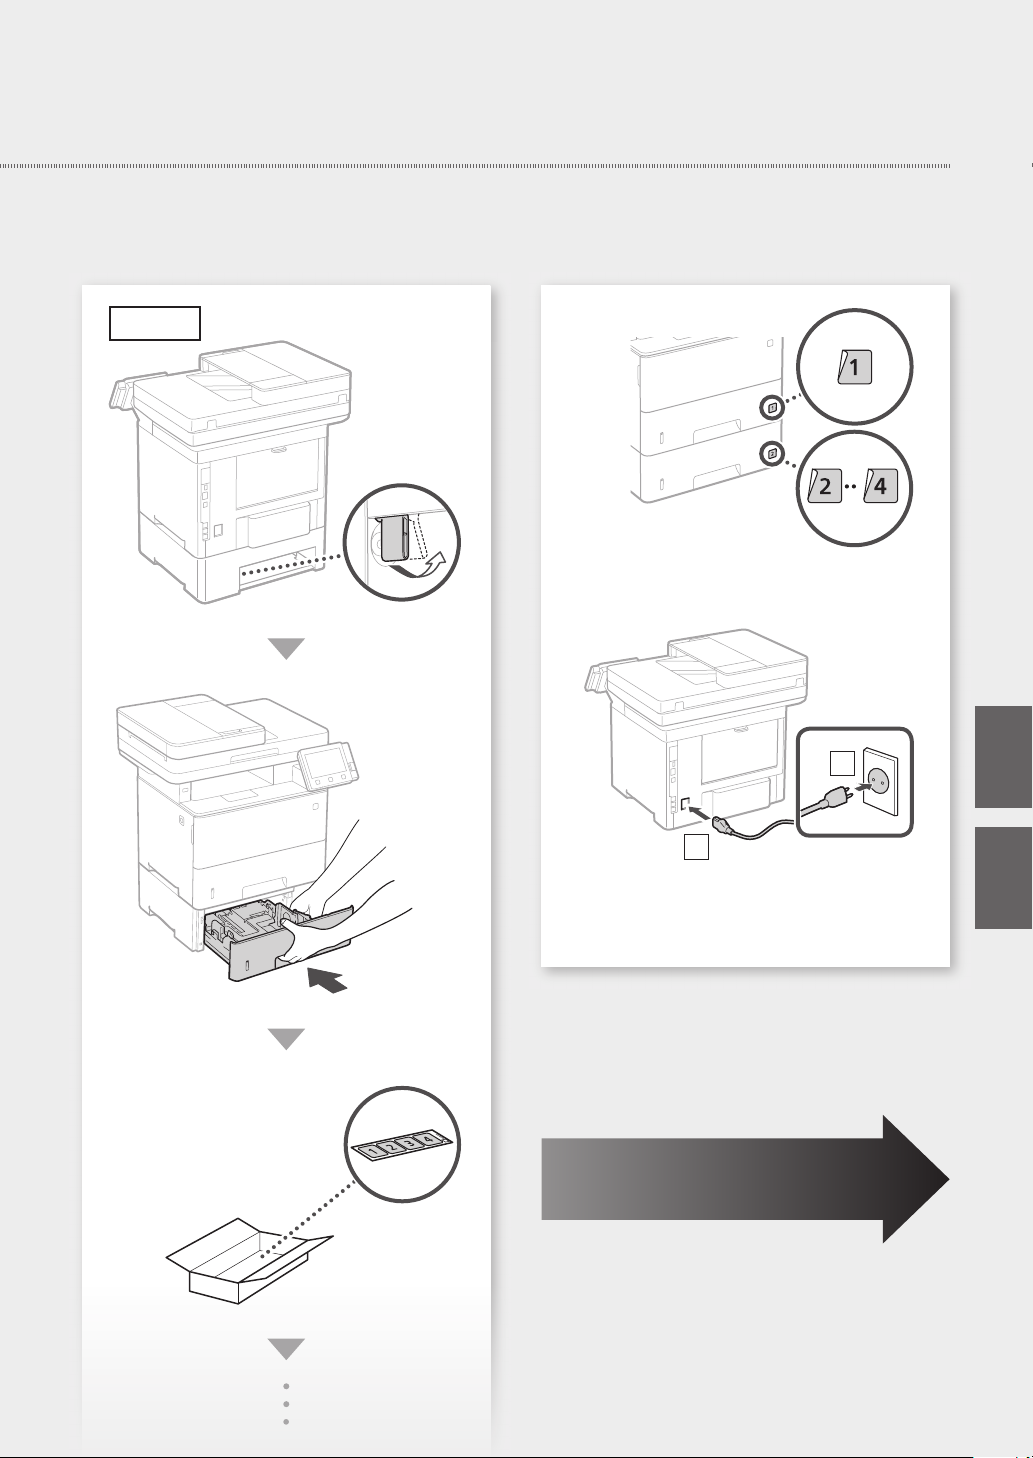
Before starting the installation
• Remove all of the tape.
• Do not remove the sticker that covers the USB
port.
*
* This item may not be
included depending on the
model of the machine.
Toner cartridge (included with the machine)
*
Sticker
Installation requirements
Provide a space of 100 mm or more around the
machine.
Handset
(optional)
494 mm 47 mm
370 mm 464 mm 71 mm
272 mm452 mm390 mm
130 mm
Paper feeder (optional)
4
Quick Setup
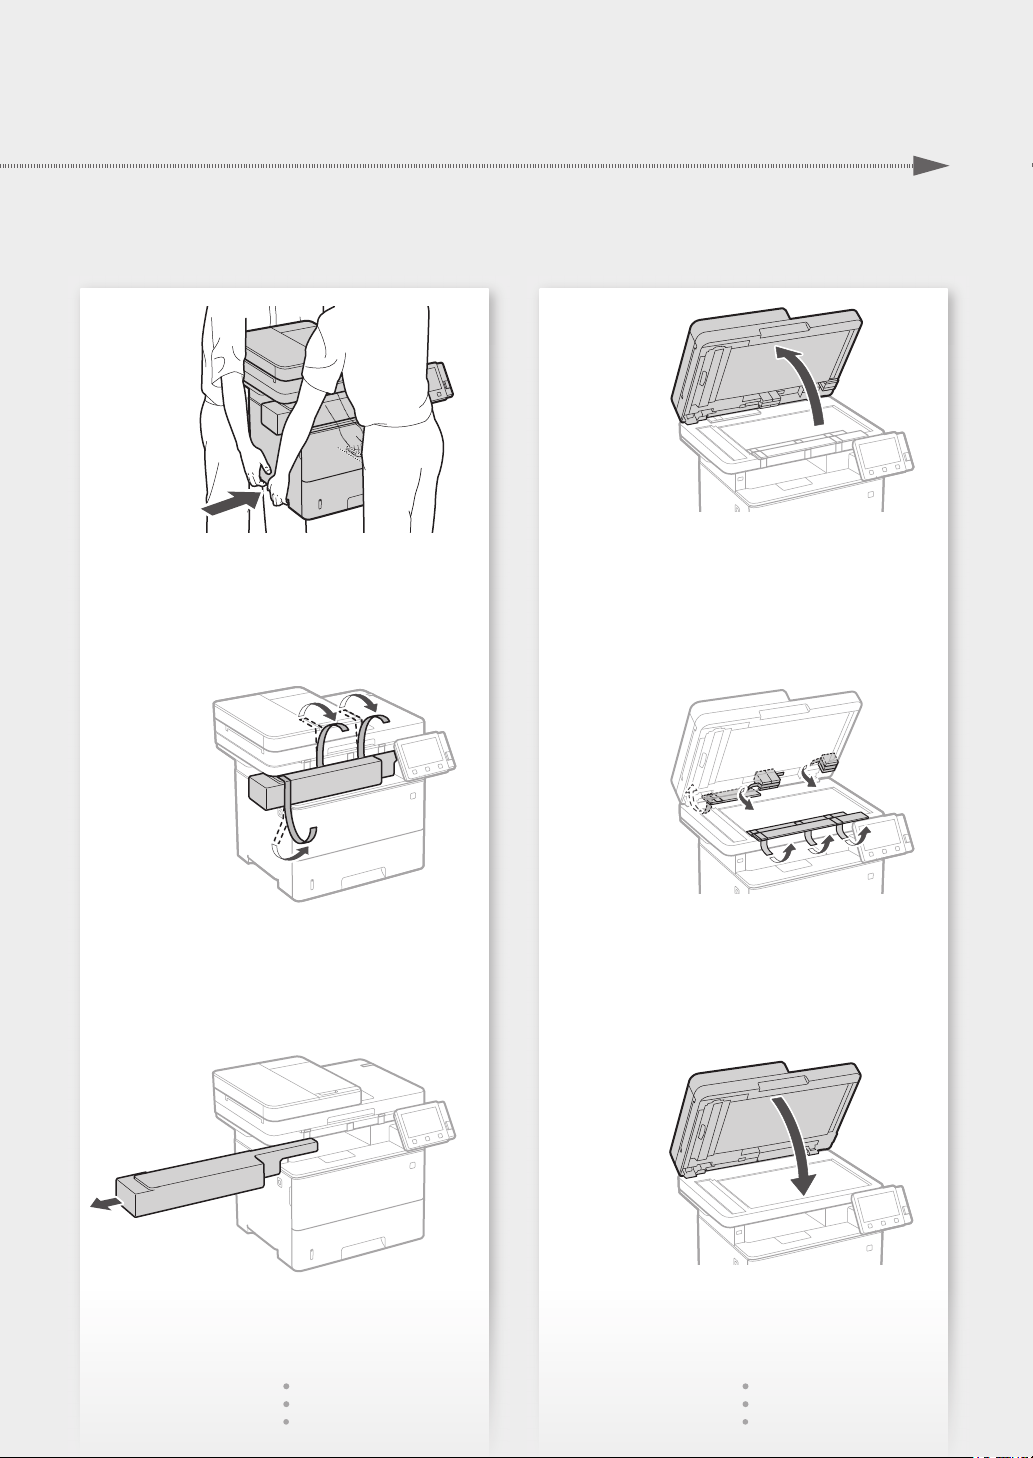
1
2
4
5
3
6
5
7
Quick Setup
Installation of the Machine
11
Up to here
8
9
12
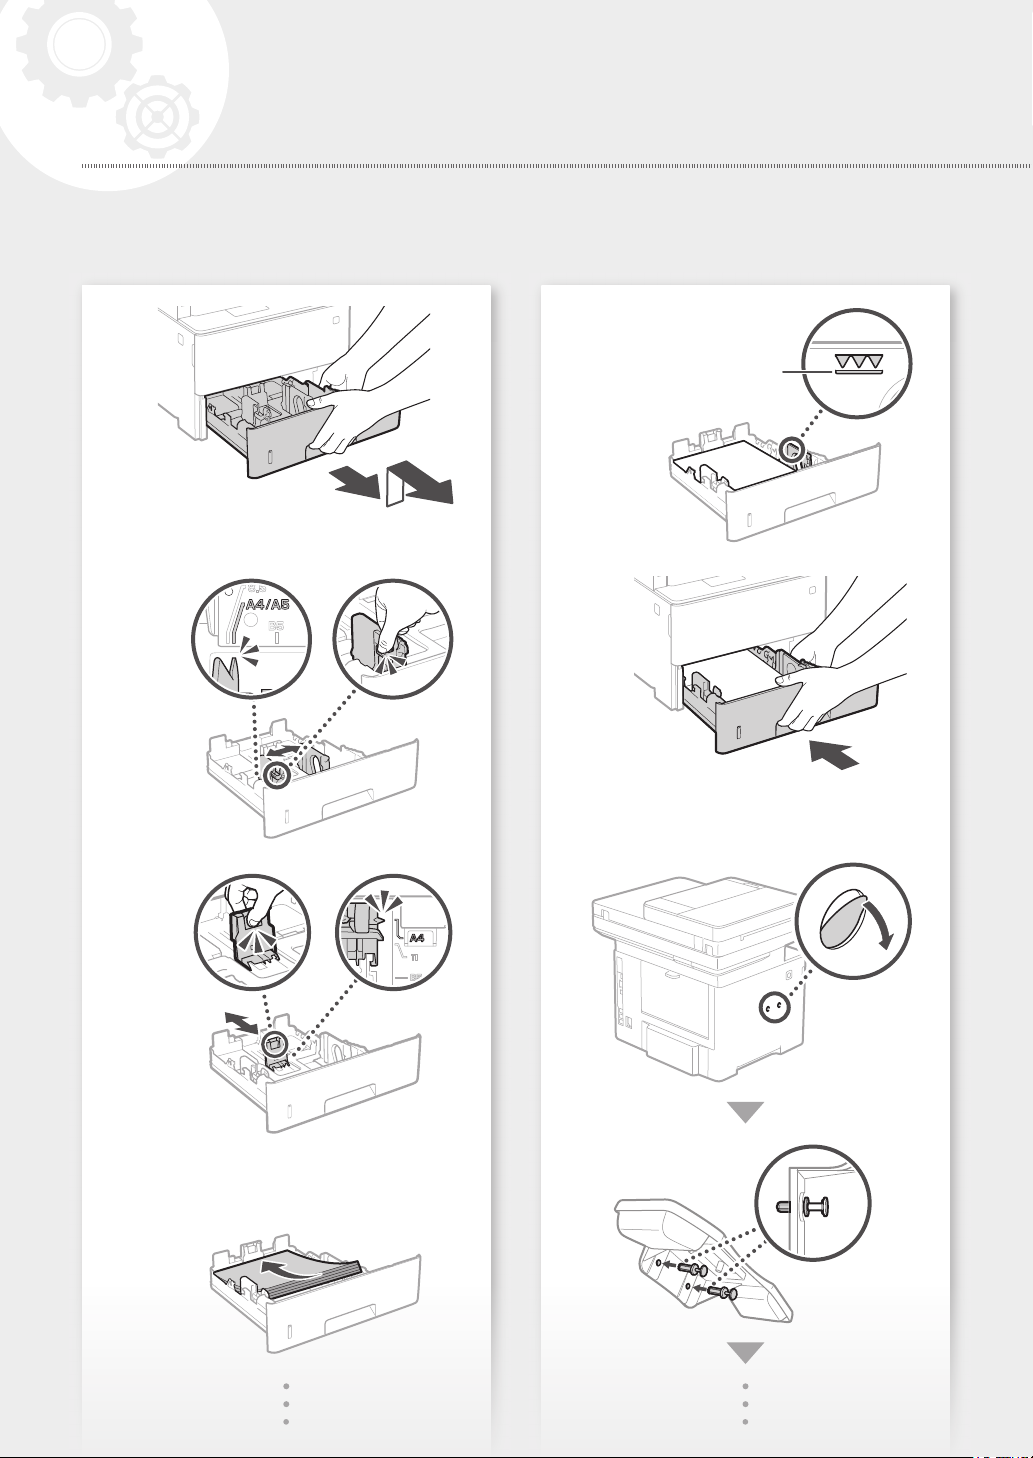
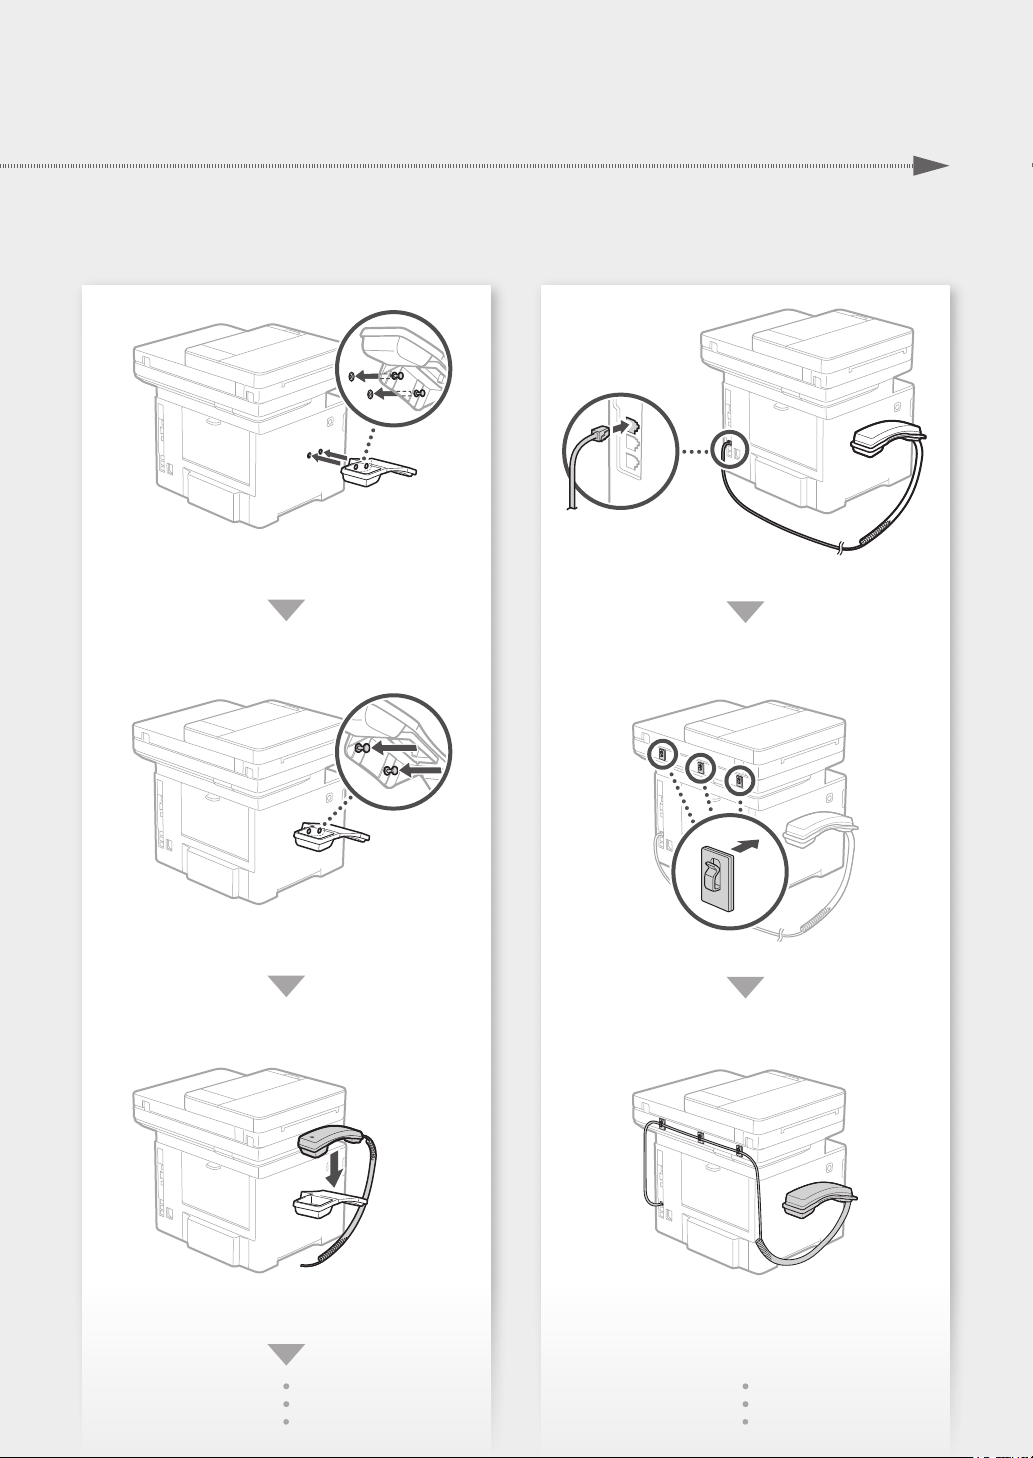
Attach the handset (optional).
13
10
6
Quick Setup
7
Quick Setup
Installation of the Machine
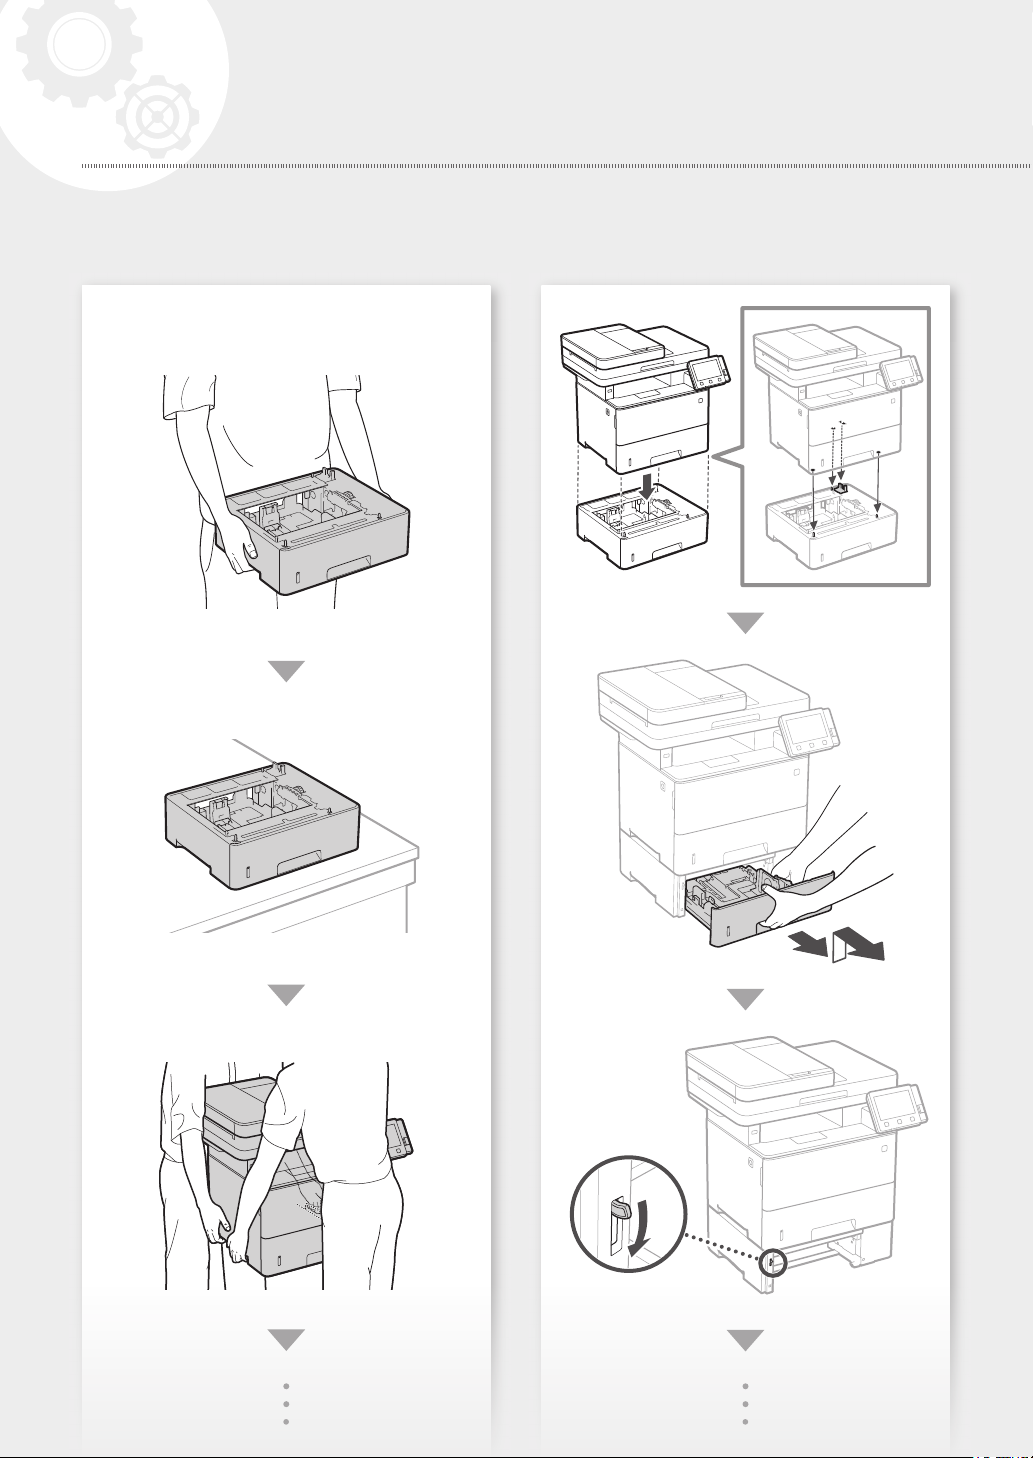
Install the paper feeder (optional).
14
8
Back side
Quick Setup
15
2
1
Next, proceed to configure the machine.
En
He
9
Quick Setup
Conguring the Machine
Conguring the Initial Settings of
the Machine
About Application Library*
Application Library is an application
that allows you to use useful functions
for routine jobs or other convenient
functions in a one-touch operation
without necessity of making functional
settings every time. You can access each
registered function by simply pressing
the appropriate button displayed in
the Home screen. For the respective
function, see the description displayed in
the Setup Guide.
* This function may not be available, depending
on the model of the machine.
1.
Configure the settings in the following order.
Conguring the Method of
Connecting to a Computer
Before starting the configuration
• The machine cannot be connected to
both wired and wireless LANs at the
same time.
• If the machine is connected to an
unsecured network, your personal
information might be leaked to a third
party. Please be aware and careful of this.
• The machine does not come with a
router. Please have one ready, if necessary.
• Even in an environment without wireless
LAN router, you can use Access Point
Mode to make a wireless connection to
the machine directly from your mobile
device (Direct Connection).
User's Guide
En
Configure the initial settings, according to the
2.
screen.
• Set the language and country/region.
• Set the time zone and current date/time.
• Configure the settings to prevent
unauthorized access.
• For the purpose of confirmation, enter the
same PIN twice.
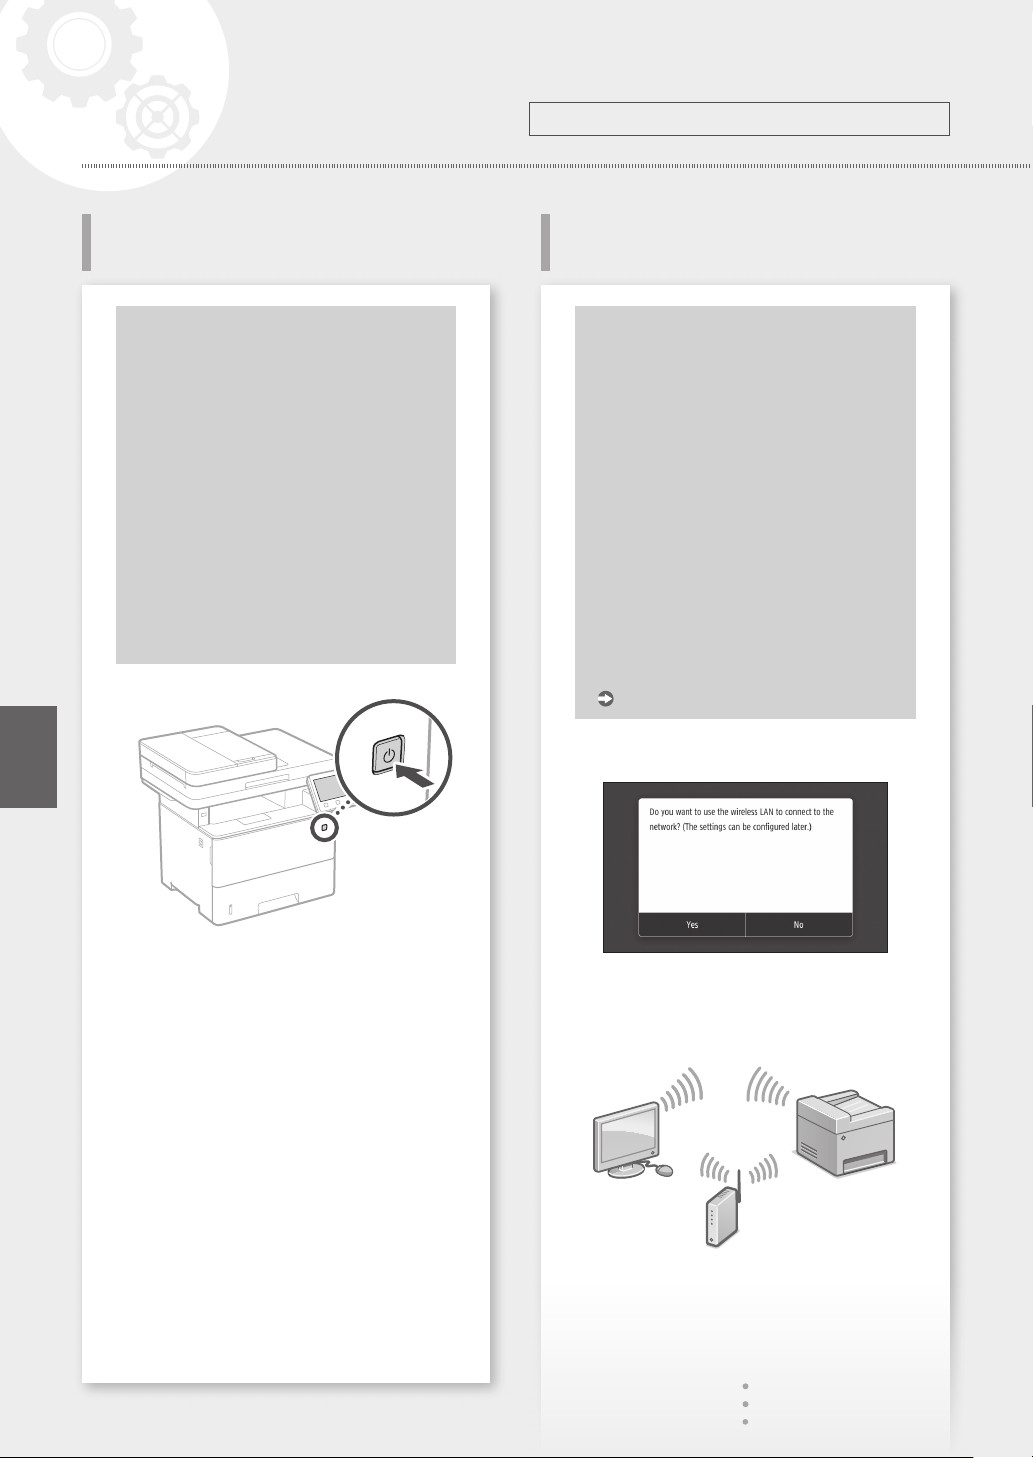
Specifying the connection method
• To connect via wireless LAN : <Yes>
• To connect via wired LAN or USB : <No>
To connect via wireless LAN
Make sure that the computer is connected to a
1.
router properly.
Check the network settings on the computer.
2.
10
For details
"Setting Up Using the Setup Guide" in the User's Guide
Quick Setup
Take note of the SSID and network key.
3.
• Check the label on the router.
• The setting operation is easier if the router is
provided with a WPS mark.
Set the access point and network key
4.
according to the screen below.
1. Select <OK>.
2. Select <SSID Settings>.
3. Select <Select Access Point>.
4. Select the access point (SSID), and select
<Next>.
5. Select <OK>.
6. Enter a network key, and select <Apply>.
7. Select <Yes>.
• Wait until message <Connected.> is
displayed.
8. Select <Close>.
• The IP address will be automatically
configured in a few minutes.
Install the driver and software.
5.
P.12 "Installing the software"
User's Guide
User's Guide
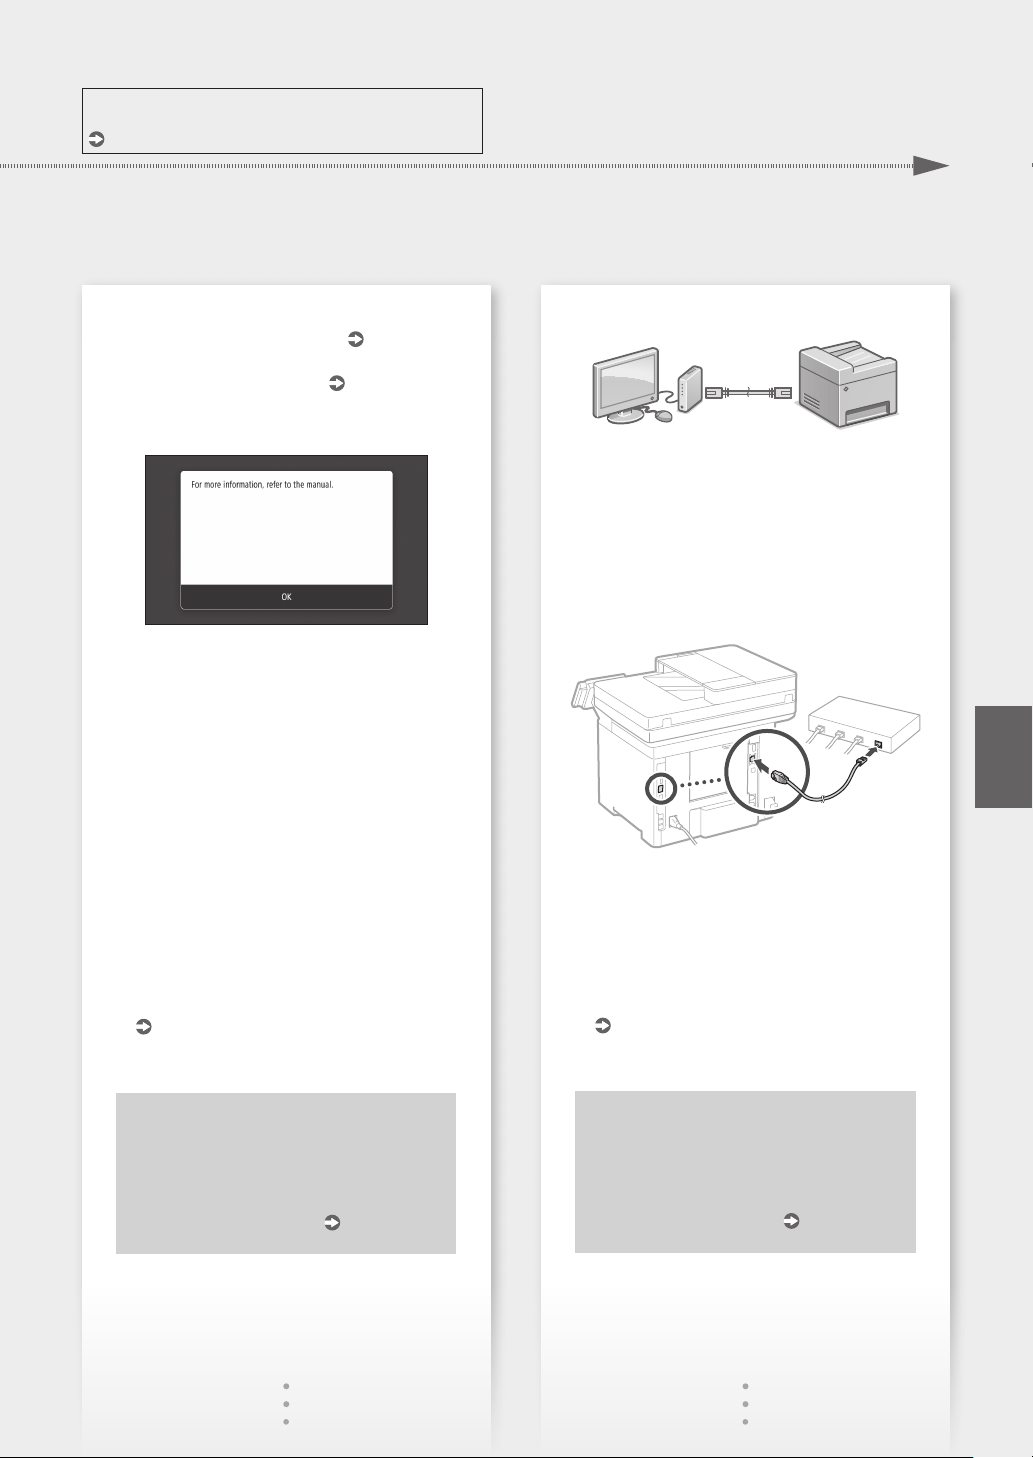
To connect via wired LAN
The machine does not come with a LAN cable.
Please have one ready, if necessary.
Make sure that the computer is connected to a
1.
router properly.
Check the network settings on the computer.
2.
Connect the LAN cable.
3.
• After connecting the cable, wait a few minutes
(until the IP address is set automatically).
• If a static IP address has been set on the
computer, set the machine's IP address
manually.
Install the driver and software.
4.
P.12 "Installing the software"
En
Now you are finished with the
configuration of the initial settings.
If your machine is provided with the fax
function, proceed to configuring
the fax settings.
P.13
Now you are finished with the
configuration of the initial settings.
If your machine is provided with the fax
function, proceed to configuring
the fax settings.
P.13
11
Quick Setup
Conguring the Machine
En
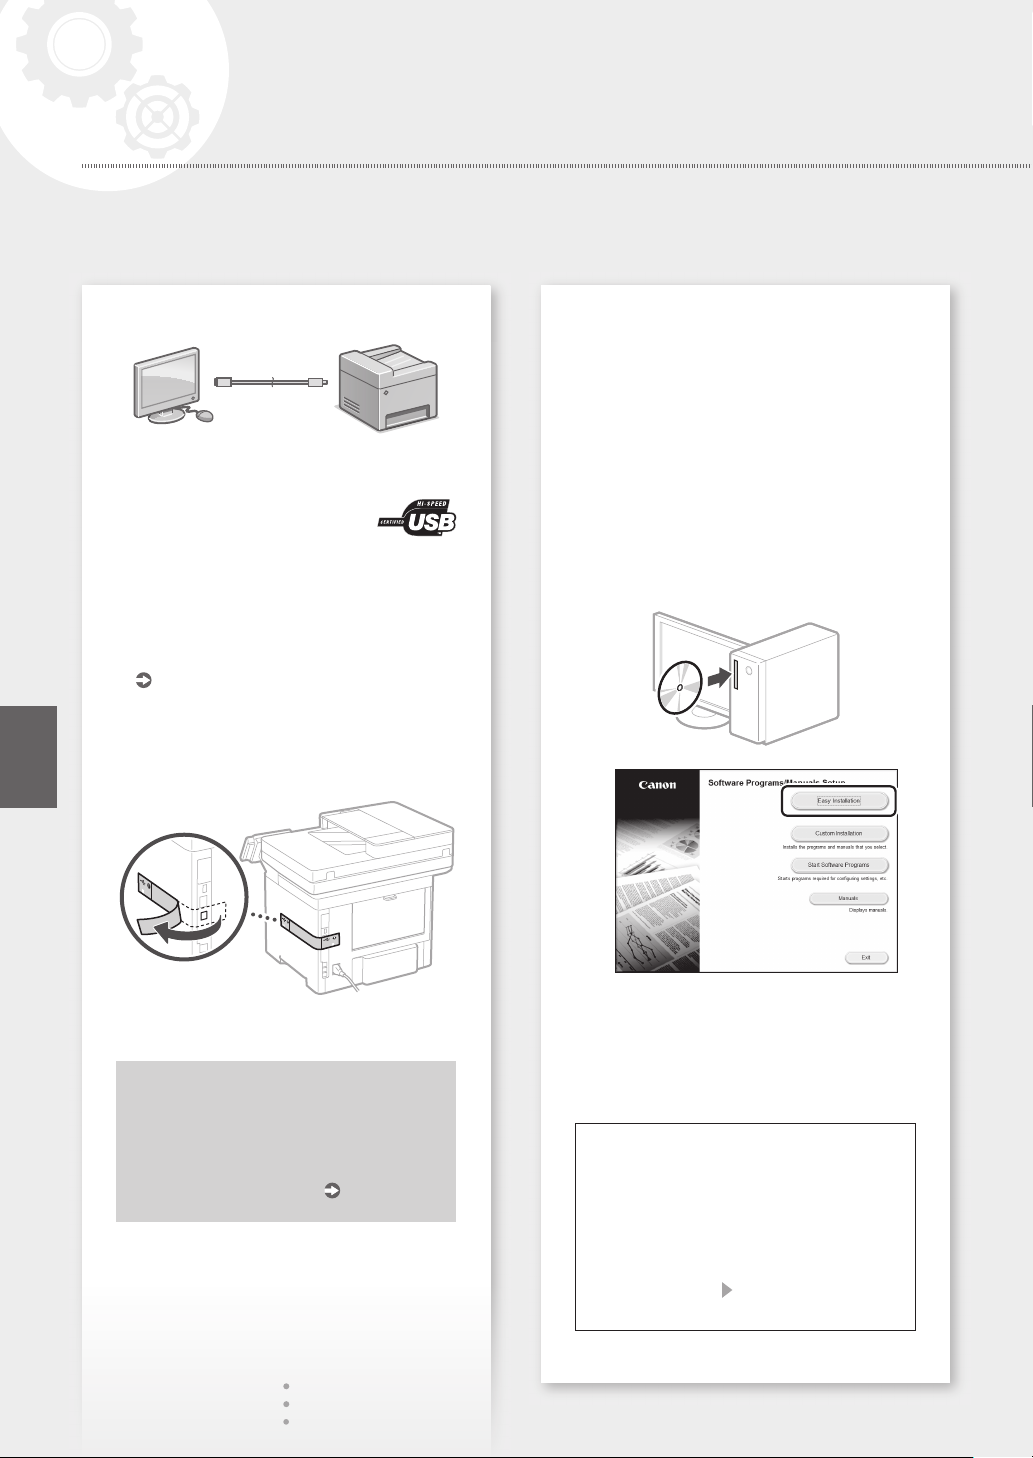
To connect via USB
• The machine does not come with a USB cable.
Please have one ready, if necessary.
• Make sure that the USB cable you
use has the following mark.
• Do not connect the USB cable before installing
the driver. If you did, disconnect the USB cable
from the computer, close the dialog box, and then
perform the following procedure from step 1.
Install the driver and software.
1.
P.12 "Installing the software"
• When a screen with instructions for
connecting the USB cable to the machine is
displayed, remove the sticker that covers the
USB port.
Installing the software
• The procedure described here is only applicable
when your computer runs on the Windows OS.
For more details on the software installation
procedure, see the driver's manual.
• For the installation when your computer runs on
the macOS, see the driver's manual.
• Your machine may not come with the driver for
the macOS, depending on the time of purchase.
New drivers are uploaded to the Canon website,
and you can download and use the latest one.
1.
2.
12
Now you are finished with the
configuration of the initial settings.
If your machine is provided with the fax
function, proceed to configuring
the fax settings.
P.13
If the screen is not displayed properly, reinsert the CD-ROM/DVD-ROM or search for
"D:\MInst.exe" on the Windows platform (This
description assumes that "D:" is the CD-ROM/
DVD-ROM drive name).
Using the scanner conveniently
Configuring the network settings with "Send
Function Setting Tool" allows you to directly
send scanned originals with e-mail or I-Fax
or store them in a shared folder or on the FTP
server.
In the screen displayed in step 2, select [Start
Software Programs] [Send Function Setting
Tool] to start the Send Function Setting Tool.

For details
"Conguring Initial Settings for Fax Functions" in the User's Guide
Conguring Fax Settings
Before starting the configuration
If your machine does not come with
a telephone cable, have one ready, as
necessary.
Congure the fax settings, according to the screen
below.
Quick Setup
Set the reception mode.
4.
• Make the setting by answering the questions
on your purposes of using the fax function.
Connect to a telephone line.
5.
Select <Fax>.
1.
Select <Set Up Now>.
2.
Register the machine's telephone number (fax
3.
number) and abbreviated user name.
• The information below will be printed at
the top part of the paper output from the
destination machine as sender information.
Fax Number
Number's Type
Sent Time Unit Name Page Number
02/02 2017 10:00AM CANON123XXXXXXXFAX 0001
Select <End>.
6.
Select <Yes>.
7.
C
B
A
En
Telephone line jack
Telephone
Handset (optional)
Now you are finished
with the configuration.
13

הריהמ הרדגה
.אבה רדסה יפל תורדגהה תרוצת תא עובקל שי
תטיש לש הרוצתה תעיבק
בשחמל תורבחתהה
הרוצתה תעיבק תא ליחתתש ינפל
LAN-ל רישכמה תא רבחל ןתינ אל •
.תינמז-וב יטוחו יטוחלא
,תחטבואמ אל תשרל רבוחמ רישכמה םא •
אנ .ישילש דצל ףולדל לולע ישיא עדימ
.תוריהז הנשמ טוקנו בל םיש
דייטצהל שי .בתנ םע עיגמ וניא רישכמה •
.ךרוצה תדימב בתנב
,יטוחלא LAN בתנ הב ןיאש הביבסב םג •
Access Point Mode-ב שמתשהל ןתינ
רוביח רוציל ידכ )השיג תדוקנ בצמ(
דיינה רישכמהמ תורישי רישכמל יטוחלא
.)רישי רוביח( ךלש
שמתשמל ךירדמ
רישכמה לש הרוצתה תעיבק
תורדגהה לש הרוצתה תעיבק
רישכמה לש תוינושארה
Application Library תודוא
* )םימושייה תיירפס(
)םימושייה תיירפס( Application Library'
שמתשהל ךל רשפאמש םושיי אוה
וא תויתרגש תומישמל תוישומיש תויצקנופב
תחא עגמ תלועפב תורחא תוחונ תויצקנופב
תוילנויצקנופ תורדגה תעיבקב ךרוצ אלל
היצקנופ לכל תשגל ןתינ .שדחמ םעפ לכב
ןצחלה לע הציחל ידי-לע טושפ המושר
יבגל עדימל .תיבה ךסמב עיפומש םאותה
העיפומש רואיתב ןייע ,תיטנוולרה היצקנופה
.הרדגהה ךירדמב
םגדל םאתהב הנימז היהת אל וז היצקנופש ןכתיי *
.רישכמה לש
He
תורבחתהה תטיש ןויצ
)ןכ( >Yes< :יטוחלא LAN תועצמאב רבחתהל ידכ •
: USB וא יווק LAN תועצמאב רבחתהל ידכ •
)אל( >No <
יטוחלא LAN תועצמאב רבחתהל ידכ
.הכלהכ בתנל רבוחמ בשחמה יכ אדו .1
.בשחמב תשרה תורדגה תא קודב .2
.1
םאתהב ,תוינושארה תורדגהה תרוצת תא עבק .2
.ךסמה תוארוהל
.רוזאה/ץראה תאו הפשה תא רדגה •
העש/ךיראתה תאו ןמזה רוזא תא רדגה •
.םייחכונה
יתלב השיג עונמל ידכ תורדגהה תרוצת תא עבק •
.תישרומ
.םיימעפ PIN דוק ותוא תא ןזה ,רושיא ךרוצל •
14

הריהמ הרדגה
האר םיטרפל
הז שמתשמל ךירדמבש "הרדגהה ךירדמ תועצמאב הרדגה"
יטוח LAN תועצמאב רבחתהל ידכ
לבכב דייטצהל שי .LAN לבכ םע עיגמ וניא רישכמה
.ךרוצה תדימב הז
.הכלהכ בתנל רבוחמ בשחמה יכ אדו
.בשחמב תשרה תורדגה תא קודב .2
.LAN-ה לבכ תא רבח .3
דע( תוקד המכ ןתמה ,לבכה רוביח רחאל •
.)תיטמוטוא רדגות IP-ה תבותכש
רדגה ,תיטטס IP תבותכ בשחמב הרדגוה םא •
.תינדי רישכמה לש IP-ה תבותכ תא
.הנכותה תאו ןקתהה להנמ תא ןקתה
"הנכותה תנקתה" 16 דומע
דגהה לש הרוצתה תעיבק תא תמייס תעכ־
.תוינושארה תור
,סקפ תייצקנופ םע עיגמ ךלש רישכמה םא
.סקפה תורדגה תרוצת תא עבקו ךשמה
17 דומע
.1
.4
.תשרה חתפמ תאו SSID-ה חתפמ תא םושר .3
.בתנה לע העיפומש תיוותה תא קודב •
שמתשמל ךירדמ
םע עיגמ בתנה םא רתוי הלק הרדגהה תלועפ •
שמתשמל ךירדמ
תשרה חתפמ תאו השיגה תדוקנ תא רדגה
.הטמלש ךסמל םאתהב
.)רושיא( >OK< רחב .1
.)SSID תורדגה( >SSID Settings< רחב .2
>Select Access Point< רחב .3
רחבו )SSID( השיגה תדוקנב רחב .4
.)רושיא( >OK< רחב .5
.)לחה( >Apply< רחבו תשר חתפמ ןזה .6
>.Connected< העדוההש דע ןתמה •
.)רוגס( >Close< רחב .8
המכ דועב תיטמוטוא רדגות IP-ה תבותכ •
.הנכותה תאו ןקתהה להנמ תא ןקתה
"הנכותה תנקתה" 16 דומע
.WPS ןמיס
.)השיג תדוקנ רחב(
.)אבה( >Next<
.)ןכ( >Yes< רחב .7
.גצות )רבוחמ(
.תוקד
דגהה לש הרוצתה תעיבק תא תמייס תעכ־
.תוינושארה תור
,סקפ תייצקנופ םע עיגמ ךלש רישכמה םא
.סקפה תורדגה תרוצת תא עבקו ךשמה
17 דומע
.4
He
.5
15

הריהמ הרדגה
רישכמה לש הרוצתה תעיבק
He
הנכותה תנקתה
םבש םיבשחמב קר יטנוולר ןלהל ראותמש ךילהה •
םיטרפל .Windows הלעפהה תכרעמ תלעופ
ךירדמב ןייע ,הנכותה תנקתה ךילה יבגל םיפסונ
.ןקתהה להנמ
להנמ ךירדמב ןייע ,macOS יבשחמב הנקתהל •
.ןקתהה
ןקתה להנמ םע עיגמ וניא ךלש רישכמהש ןכתיי •
.macOS יבשחמ לש הלעפהה תכרעמל םאותה
םישדח ןקתה ילהנמ .השיכרה דעומב יולת רבדה
דירוהל ןתינו ,Canon לש טנרטניאה רתאל םילעומ
.םשמ רתויב ינכדעה ןקתהה להנמ תא
.1
.2
USB תועצמאב רבחתהל ידכ
דייטצהל שי .USB לבכ םע עיגמ וניא רישכמה •
.ךרוצה תדימב הז לבכב
ךתנווכב ובש USB-ה לבכ יכ אדו •
.אבה ןומיסה תא אשונ שמתשהל
ינפל USB-ה לבכ תא רבחת לא •
,לבכה תא תרביח רבכ םא .ןקתהה להנמ תנקתה
עצבו חיש-ודה תבית תא רוגס ,בשחמהמ ותוא קתנ
.1 בלשמ לחה אבה ךילהה תא
.הנכותה תאו ןקתהה להנמ תא ןקתה
"הנכותה תנקתה" 16 דומע
לבכ רוביחל תוארוה םע ךסמ עיפוי רשאכ •
תא הסכמה קקפה תא רסה ,רישכמל USB-ה
.USB-ה תאיצי
.1
16
תא שדחמ סנכה ,הנוכנ הרוצב גצומ וניא ךסמה םא
תא שפח וא CD-ROM/DVD-ROM-ה
יכ חינמ הז רואית( Windows-ב "D:\MInst.exe"
CD-ROM/DVD-ROM-ה לש ןנוכה םש אוה "D: "
.)ךלש בשחמב
קרוסב חונ שומיש
ילכ תועצמאב תשרה תורדגה לש הרוצתה תעיבק
חולשל ךל תרשפאמ "החילשה תייצקנופ תרדגה
וא ,I-Fax וא ל"אוד ךרד תורישי םיירוקמ םיכמסמ
.FTP תרשב וא תפתושמ היקיתב םיכמסמה תא ןסחאל
Start Software
Send Function[ )הנכות תוינכות לעפה( ]Programs
ידכ )החילשה תייצקנופ תרדגה ילכ( ]Setting Tool
[ רחב ,2 בלשב עיפומש ךסמב
.החילשה תייצקנופ תרדגה ילכ תא ליעפהל
לש הרוצתה תעיבק תא תמייס תעכ
.תוינושארה תורדגהה
,סקפ תייצקנופ םע עיגמ ךלש רישכמה םא
.סקפה תורדגה תרוצת תא עבקו ךשמה
17 דומע

הריהמ הרדגה
האר םיטרפל
שמתשמל ךירדמב "סקפ תויצקנופל תוינושאר תורדגה תרוצת תעיבק"
סקפה תורדגה לש הרוצתה תעיבק
.הלבקה בצמ תא רדגה .4
יבגל תולאשה לע הנעמ ידי-לע הרדגהה תא עבק •
.סקפה תייצקנופב שומישה תרטמ
.ןופלט וקל רבחתה
ןופלט וק עקש
ןופלט
)ילנויצפוא( תוינזא
הרוצתה תעיבק תא ליחתתש ינפל
שי ,ןופלט לבכ םע עיגמ וניא רישכמה םא
.5
תוארוהל םאתהב ,סקפה תורדגה תרוצת תא עבק
C
B
A
.ךרוצה תדימב הזכ דחאב דייטצהל
.ןלהלש ךסמה
.)סקפ( >Fax< רחב .1
.)וישכע רדגה( >Set Up Now< לע ץחל .2
רפסמ( רישכמה לש ןופלטה רפסמ תא םושר .3
.רצוקמה שמתשמה םש תאו )סקפ
He
.)םויס( >End< רחב .6
.)ןכ( >Yes< רחב .7
.הרוצתה תעיבק תא תמייס תעכ
טלפ לש ןוילעה וקלחב ספדוי ןלהלש עדימה •
.חלושה יטרפ רותב דעיה רישכממ ריינה
סקפ רפסמ
רפסמ גוס
החילש תעש הדיחי םש דומע רפסמ
02/02 2017 10:00AM CANON123XXXXXXXFAX 0001
17

18

Quick
Operation
Quick Operation
הריהמ הלעפה
En
He
19

Quick Operation
En
Place the Original Properly
Place your original on the platen glass
Place to t
inside the
corner.
Suitable for scanning book
pages, magazine pages and
newspaper clips.
Place the original
with the scan side
face down.
Place your originals into the feeder
Adjust
the slide
guides.
Start the Operation from the Operation Panel
Machine
Operation Panel
Remember before
You Start Operation
Place the originals
with the scan side
face up.
Suitable for continuously
scanning many pages of
literature, quotation, etc.
([Energy Saver] key)
Scanning
1. Place the original.
2. Press
3. Select the type of scan, and enter the necessary information.
4. Select <Start>, <B&W Start> or <Color Start>.
Types of scan
■
■
■
■
, and select <Scan>.
Store in computer
Store in USB memory device
Send e-mail/I-Fax
Send to file server
To scan from a computer
■
MF Scan Utility
([Home] key)
Display (screen)
NFC (Near Field
Communication) mark*
* NFC may not be available, depending
on the model of the machine.
For details
"Scanning" in the User's Guide
20

Copying
1. Place the original.
2. Press
3. Specify the copy settings, as necessary.
4. Enter the desired number of copies.
5. Select <Start>.
, and then select <Copy>.
Quick Operation
Useful copy functions
■
N on 1
■
2-Sided or 1-Sided
■
Enlarging or reducing
■
Copying ID cards
■
Passport Copy
Faxing*
1. Place the original.
2. Press
3. Enter the destination information.
4. Specify the fax settings, as necessary.
5. Select <Start>.
Useful fax functions
■
■
■
, and select <Fax>.
Sequential Broadcast
Memory Reception
PC Fax
For details
"Copying" in the User's Guide
* This function may not be available, depending on the model of the machine.
En
For details
"Faxing" in the User's Guide
Printing
1. Open the document to print, and select the print function of the
application.
2. Select the printer driver for the machine, and select [Preferences] or
[Properties].
3. Specify the paper size.
4. Specify the paper source and paper type.
5. Specify the print settings, as necessary.
6. Select [OK].
7. Select [Print] or [OK].
Useful print settings
■
2-sided
■
N on 1
■
Booklet Printing
For details
"Help" on the printer driver
21

Quick Operation
Loading Paper
For details
"Loading Paper" in the User's Guide
En
Loading in the Paper Drawer
Pull out the paper drawer.
1
2
Loading in the Multi-Purpose
Tray
1
2
22
3
Up to here
Insert the paper drawer into the machine.
4
If you load a different size or type of paper from
the one before, make sure to change the settings.
Press , and select <Paper Settings>.
5
Specify the size and type of paper, according
to the screen.
6
3
Up to here
4
Specify the size and type of paper, according
to the screen.
5

If a Problem Has Occurred
Quick Operation
The Machine Does Not Seem to
Work
Check the following.
• Is the power turned ON?
• Is the machine out of sleep mode?
If both the display and
power switch.
• Is the power cord connected correctly ?
are not lit, press the
Paper Jams Have Occurred
Clear the paper jams, according to the on-screen
instructions.
Replacing the Toner Cartridge
En
Replace the toner cartridge, according to the onscreen instructions.
If the problem persists, see the User's Guide.
Model number of replacement toner
cartridge
• Canon Cartridge 056 L
• Canon Cartridge 056
• Canon Cartridge 056 H
23

Appendix
En
Important Safety
Instructions
This chapter describes important safety
instructions for the prevention of injury to users
of this machine and others, and damage to
property. Read this chapter before using the
machine, and follow the instructions to use the
machine properly. Do not perform any
operations not described in this manual. Canon
will not be responsible for any damages resulting
from operations not described in this manual,
improper use, or repair or changes not
performed by Canon or a third party authorized
by Canon. Improper operation or use of this
machine could result in personal injury and/or
damage requiring extensive repair that may not
be covered under your Limited Warranty.
WARNING
Indicates a warning concerning operations
that may lead to death or injury to persons if
not performed correctly. To use the machine
safely, always pay attention to these warnings.
CAUTION
Indicates a caution concerning operations
that may lead to injury to persons if not
performed correctly. To use the machine
safely, always pay attention to these cautions.
IMPORTANT
Indicates operational requirements and
restrictions. Be sure to read these items
carefully to operate the machine correctly and
avoid damage to the machine or property.
Installation
To use this machine safely and comfortably,
carefully read the following precautions and
install the machine in an appropriate location.
WARNING
Do not install in a location that may result in a
re or electrical shock
•
A location where the ventilation slots are
blocked (too close to walls, beds, sofas, rugs, or
similar objects)
•
A damp or dusty location
•
A location exposed to direct sunlight or
outdoors
•
A location subject to high temperatures
•
A location exposed to open ames
•
Near alcohol, paint thinners or other
ammable substances
Other warnings
•
Do not connect unapproved cables to this
machine. Doing so may result in a re or
electrical shock.
•
Do not place necklaces and other metal
objects or containers lled with liquid on the
machine. If foreign substances come in
contact with electrical parts inside the
machine, it may result in a re or electrical
shock.
•
When installing and removing the optional
accessories, be sure to turn OFF the power,
unplug the power plug, and then disconnect
all the interface cables and power cord from
the machine. Otherwise, the power cord or
interface cables may be damaged, resulting in
a re or electrical shock.
•
If any foreign substance falls into this machine,
unplug the power plug from the AC power
outlet and contact your local authorized
Canon dealer.
CAUTION
Do not install in the following locations
The machine may drop or fall, resulting in injury.
•
An unstable location
•
A location exposed to vibrations
Other cautions
•
When carrying this machine, follow the
instructions in this manual. If carried
improperly, it may fall, resulting in injury.
•
When installing this machine, be careful not to
get your hands caught between the machine
and the oor or walls. Doing so may result in
injury.
IMPORTANT
Do not install in the following locations
Doing so may result in damage to the machine.
•
A location subject to temperature and
humidity extremes, whether low or high
•
A location subject to dramatic changes in
temperature or humidity
•
A location near equipment that generates
magnetic or electromagnetic waves
•
A laboratory or location where chemical
reactions occur
•
A location exposed to corrosive or toxic gases
•
A location that may warp from the weight of
the machine or where the machine is liable to
sink (a carpet, etc.)
Avoid poorly ventilated locations
This machine generates a slight amount of ozone
and other emissions during normal use. These
emissions are not harmful to health. However,
they may be noticeable during extended use or
long produc tion runs in poorly ventilated rooms.
To maintain a comfortable working environment,
it is recommended that the room where the
machine operates be appropriately ventilated.
Also avoid locations where people would be
exposed to emissions from the machine.
Do not install in a location where
condensation occurs
Water droplets (condensation) may form inside
the machine when the room where the machine
is installed is heated rapidly, and when the
machine is moved from a cool or dr y location to
a hot or humid location. Using the machine
under these conditions may result in paper jams,
poor print quality, or damage to the machine.
Let the machine adjust to the ambient
temperature and humidity for at least 2 hours
before use.
In altitudes of above sea level 3,000 m or
higher
Machines with a hard disk may not operate
properly when used at high altitudes of about
3,000 meters above sea level, or higher.
Connecting the Telephone Line
This machine conforms to a analog telephone
line standard. The machine can be connec ted to
the public switched telephone network (PSTN)
only. If you connect the machine to a digital
telephone line or a dedicated telephone line, it
might impede proper operation of the machine
and could be the cause of damage. Make sure to
conrm a type of telephone line before
connecting the machine. Contact your optical
ber line or IP telephone line service providers if
you want to connect the machine to those
telephone lines.
When using wireless LAN
•
Install the machine at a distance of 50 meters
or less from the wireless LAN router.
•
As far as possible, install in a location where
communication is not blocked by intervening
objects. The signal may be degraded when
passing through walls or oors.
•
Keep the machine as far as possible from
digital cordless phones, microwave ovens, or
other equipment that emits radio waves.
•
Do not use near medical equipment. Radio
waves emitted from this machine may
interfere with medical equipment, which may
result in malfunctions and accidents.
If the operating noise concerns you
Depending on the use environment and
operating mode, if the operating noise is of
concern, it is recommended that the machine be
installed in a place other than the oce.
Power Supply
WARNING
•
Use only a power supply that meets the
specied voltage requirements. Failure to do
so may result in a re or electrical shock.
•
The machine must be connected to a
socket-outlet with grounding connection by
the provided power cord.
•
Do not use power cords other than the one
provided, as this may result in a re or electrical
shock.
•
The provided power cord is intended for use
with this machine. Do not connect the power
cord to other devices.
•
Do not modify, pull, forcibly bend, or perform
any other act that may damage the power
cord. Do not place heavy objects on the power
cord. Damaging the power cord may result in
a re or electrical shock.
•
Do not plug in or unplug the power plug with
wet hands, as this may result in an electrical
shock.
•
Do not use extension cords or multi-plug
power strips with the machine. Doing so may
result in a re or electrical shock.
•
Do not wrap the power cord or tie it in a knot,
as this may result in a re or electrical shock.
•
Insert the power plug completely into the AC
power outlet. Failure to do so may result in a
re or electrical shock.
•
Remove the power plug completely from the
AC power outlet during a thunder storm.
Failure to do so may result in a re, electrical
shock, or damage to the machine.
•
Make sure that the power supply for the
machine is safe, and has a steady voltage.
•
Keep the power cord away from a heat source;
failure to do this may cause the power cord
coating to melt, resulting in a re or electrical
shock.
Avoid the following situations:
If excessive stress is applied to the connection
part of the power cord, it may damage the
power cord or the wires inside the machine may
disconnect. This could result in a re.
– Connecting and disconnecting the power cord
frequently.
– Tripping over the power cord.
– The power cord is bent near the connection
part, and continuous stress is being applied to
the power outlet or the connection part.
– Applying excessive force on the power plug.
CAUTION
•
Install this machine near the power outlet and
leave sucient space around the power plug
so that it can be unplugged easily in an
emergency.
24

IMPORTANT
When connecting power
•
Do not connect the power cord to an
uninterruptible power source. Doing so may
result in malfunction of or damage to the
machine at power failure.
•
If you plug this machine into an AC power
outlet with multiple sockets, do not use the
remaining sockets to connect other devices.
•
Do not connect the power cord to the auxiliary
AC power outlet on a computer.
Other precautions
Electrical noise may cause this machine to
malfunction or lose data.
Handling
WARNING
•
Immediately unplug the power plug from the
AC power outlet and contact an authorized
Canon dealer if the machine makes an unusual
noise, emits an unusual smell, or emits smoke
or excessive heat. Continued use may result in
a re or electrical shock.
•
Do not disassemble or modify this machine.
There are high-voltage and high-temperature
components inside the machine. Disassembly
or modication may result in a re or electrical
shock.
•
Place the machine where children will not
come in contact with the power cord and
other cables or gears and electrical parts inside
the machine. Failure to do so may result in
unexpected accidents.
•
Do not use ammable sprays near this
machine. If ammable substances come into
contact with electrical parts inside this
machine, it may result in a re or electrical
shock.
•
When moving this machine, be sure to turn
OFF the power of this machine, and then
unplug the power plug and interface cables.
Failure to do so may damage the power cord
or interface cables, resulting in a re or
electrical shock.
•
When plugging or unplugging a USB cable
when the power plug is plugged into an AC
power outlet, do not touch the metal part of
the connector, as this may result in an electrical
shock.
If you are using a cardiac pacemaker
This machine generates a low level magnetic ux
and ultrasonic waves. If you use a cardiac
pacemaker and feel abnormalities, please move
away from this machine and consult your
physician immediately.
CAUTION
•
Do not place heavy objects on this machine as
they may fall, resulting in injury.
•
For your safety, please unplug the power cord
if the machine will not be used for a long
period of time.
•
Use caution when opening and closing covers
to avoid injury to your hands.
•
Keep hands and clothing away from the rollers
in the output area. If the rollers catch your
hands or clothing, this may result in personal
injury.
•
The inside of the machine and the output slot
are very hot during and immediately after use.
Avoid contact with these areas to prevent
burns. Also, printed paper may be hot
immediately after being output, so use caution
when handling it. Failure to do so may result in
burns.
•
Be careful not to drop a heavy object, such as
a dictionary, on the platen glass. Doing so may
damage the platen glass and result in injury.
•
Do not carry the machine with any of the
paper drawer or optional paper feeder installed.
Otherwise, they may fall, resulting in injury.
Feeder
•
Do not press down hard on the feeder when
using the platen glass to make copies of thick
books. Doing so may damage the platen glass
and result in personal injury.
•
Close the feeder gently to avoid catching your
hands, as this may result in personal injury.
•
Be careful not to put your hands or ngers into
the feeder. Otherwise, you may be injured.
Paper drawer
•
Do not insert your hand into the machine
while the paper drawer is removed, as this may
result in personal injury.
Energy Saver key
•
Press (Energy Saver) for safety when the
machine will not be used for a long period of
time, such as overnight. Also, turn OFF the
main power switch, and disconnect the power
cord for safety when the machine will not be
used for an extended period of time, such as
during consecutive holidays.
Laser Safety
This product is conrmed as a Class 1 laser
product in IEC60825-1:2014 and EN60825-1:2014.
CLASS 1 LASER PRODUCT
LASER KLASSE 1
APPAREIL À LASER DE CLASSE 1
APPARECCHIO LASER DI CLASSE 1
PRODUCTO LÁSER DE CLASE 1
APARELHO A LASER DE CLASSE 1
LUOKAN 1 L ASER-TUOTE
LASERPRODUKT KLASS 1
The laser beam can be harmful to human bodies.
Since radiation emitted inside the product is
completely conned within protective housings
and external covers, the laser beam cannot
escape from the machine during any phase of
user operation. Read the following remarks and
instructions for safety.
•
Never open covers other than those instructed
in the manuals for this machine.
•
If the laser beam should escape and enter your
eyes, exposure may cause damage to your
eyes.
•
Use of controls, adjustments, or performance
of procedures other than those specied in
this manual may result in hazardous radiation
exposure.
Laser Safety Caution
IMPORTANT
•
Follow the caution instructions on labels and
the like found on this machine.
•
Do not subject the machine to strong shocks
or vibration.
•
Do not forcibly open and close doors, covers,
and other parts. Doing so may result in
damage to the machine.
•
Do not turn the main power switch OFF or
open the covers while the machine is in
operation. This may result in paper jams.
•
Use a modular cable that is shorter than 3
meters.
•
Use a USB cable that is shorter than 3 meters.
En
25

Appendix
En
26
•
Do not touch the contacts (
machine. Doing so may result in damage to
the machine.
) inside the
a
When transporting the machine
To prevent damage to the machine during
transport, perform the following.
•
Remove the toner cartridge.
•
Securely pack the machine in the original box
with packing materials.
Safety-Related Symbols
Power switch: “ON” position
Power switch: “OFF” position
Power switch: “STAND-BY” position
Push-push switch “ON” “OFF”
Protective ear thing terminal
Dangerous voltage inside. Do not open
covers other than instructed.
CAUTION: Hot surface. Do not touch.
Class II equipment
Moving parts: Keep body parts away from
moving parts
CAUTION: An electrical shock may occur.
Remove all the power plugs from the power
outlet.
There are sharp edges. Keep body parts
away from sharp edges.
[NOTE]
Some of symbols shown above may not be
affixed depending on the product.
Maintenance and Inspections
Clean this machine periodically. If dust
accumulates, the machine may not operate
properly. When cleaning, be sure to observe the
following. If a problem occurs during operation,
see the User's Guide. If the problem cannot be
resolved or you feel the machine requires an
inspection, see "When a Problem Cannot Be
Solved" in the User's Guide.
WARNING
•
Before cleaning, turn OFF the power and
unplug the power plug from the AC power
outlet. Failure to do so may result in a re or
electrical shock.
•
Unplug the power plug periodically and clean
with a dry cloth to remove dust and grime.
Accumulated dust may absorb humidity in the
air and may result in a re if it comes into
contact with electricity.
•
Use a damp, well wrung-out cloth to clean the
machine. Dampen cleaning cloths with water
only. Do not use alcohol, benzine, paint
thinner, or other ammable substances. Do
not use tissue paper or paper towels. If these
substances come into contact with electrical
parts inside the machine, they may generate
static electricity or result in a re or electrical
shock.
•
Check the power cord and plug periodically
for damage. Check the machine for rust, dents,
scratches, cracks, or excessive heat generation.
Use of poorly-maintained equipment may
result in a re or electrical shock.
CAUTION
•
The inside of the machine has hightemperature and high-voltage components.
Touching these components may result in
burns. Do not touch any part of the machine
that is not indicated in the manual.
•
When loading paper or removing jammed
paper, be careful not to cut your hands with
the edges of the paper.
Consumables
WARNING
•
Do not dispose of used toner cartridges or the
like in open ames. Also, do not store toner
cartridges or paper in a location exposed to
open ames. This may cause the toner to
ignite, and result in burns or re.
•
If you accidentally spill or scatter toner,
carefully gather the toner particles together or
wipe them up with a soft, damp cloth in a way
that prevents inhalation. Never use a vacuum
cleaner that does not have safeguards against
dust explosions to clean up spilled toner.
Doing so may cause a malfunction in the
vacuum cleaner, or result in a dust explosion
due to static discharge.
If you are using a cardiac pacemaker
•
The toner cartridge generates a low level
magnetic ux. If you are using a cardiac
pacemaker and feel abnormalities, please
move away from the toner cartridge and
consult your physician immediately.
CAUTION
•
Use caution not to inhale any toner. If you
should inhale toner, consult a physician
immediately.
•
Use caution so that toner does not get into
your eyes or mouth. If toner should get into
your eyes or mouth, immediately wash with
cold water and consult a physician.
•
Use caution so that toner does not come into
contact with your skin. If it should, wash with
soap and cold water. If there is any irritation on
your skin, consult a physician immediately.
•
Keep the toner cartridges and other
consumables out of the reach of small
children. If toner is ingested, consult a
physician or poison control center
immediately.
•
Do not disassemble or modify the toner
cartridge or the like. Doing so may cause the
toner to scatter.
•
When removing the sealing tape from the
toner cartridge, pull it out completely but
without using excessive force. Doing otherwise
may cause the toner to scatter.
IMPORTANT
Handling the toner cartridge
•
Be sure to hold the toner cartridge using the
handle.
•
Do not touch the toner cartridge memory
) or the electrical contacts (). To avoid
(
scratching the surface of the drum inside the
machine or exposing it to light, do not open
the drum protective shutter (
a
).
c
Bottom View
b
•
Except when necessary, do not take out the
toner cartridge from the packing material or
from this machine.
•
The toner cartridge is a magnetic product. Do
not move it close to products susceptible to
magnetism including oppy disks and disk
drives. Doing so may result in data corruption.
Storing the toner cartridge
•
Store in the following environment to ensure
safe and satisfactory use.
Storage temperature range: 0 to 35°C
Storage humidity range: 35 to 85% RH (relative
humidity/no condensation)*
•
Store without opening until the toner
cartridge is to be used.
•
When removing the toner cartridge from this
machine for storage, place the removed toner
cartridge in the original packing material.
•
When storing the toner cartridge, do not store
it upright or upside down. The toner will
solidify and may not return to its original
condition even if it is shaken.
* Even within the storable humidity range,
water droplets (condensation) may develop
inside the toner cartridge if there is a
dierence of temperature inside and outside
the toner cartridge. Condensation will
adversely aect the print quality of toner
cartridges.
Do not store the toner car tridge in the
following locations
•
Locations exposed to open ames
•
Locations exposed to direct sunlight or bright
light for ve minutes or more
•
Locations exposed to excessive salty air
•
Locations where there are corrosive gases (i.e.
aerosol sprays and ammonia)
•
Locations subject to high temperature and
high humidity
•
Locations subject to dramatic changes in
temperature and humidity where
condensation may easily occur
•
Locations with a large amount of dust
•
Locations within the reach of children

Be careful of counterfeit toner cartridges
•
Please be aware that there are counterfeit
Canon toner cartridges in the marketplace.
Use of counterfeit toner cartridge may result in
poor print quality or machine performance.
Canon is not responsible for any malfunction,
accident or damage caused by the use of
counterfeit toner cartridge.
For more information, see global.canon/ctc.
Availability period of repairing parts and toner
cartridges and the like
•
The repairing parts and toner cartridges and
the like for the machine will be available for at
least seven (7) years after production of this
machine model has been discontinued.
Toner cartridge packing materials
•
Save the packing materials for the toner
cartridge. They are required when transporting
this machine.
•
The packing materials may be changed in
form or placement, or may be added or
removed without notice.
•
After you pull out the sealing tape from the
toner cartridge, dispose of it in accordance
with the applicable local regulations.
When disposing of a used toner cartridge or
the like
•
When discarding a toner cartridge or the like,
place it in the original packing material to
prevent toner from scattering from inside, and
dispose of it in accordance with the applicable
local regulations.
Notice
Product Name
Safety regulations require the product's name to
be registered.
In some regions where this product is sold, the
following name(s) in parentheses ( ) may be
registered instead.
MF 543x ( F1764 02)
MF 542 x (F176400)
EMC requirements of EC Directive
This equipment conforms with the essential EMC
requirements of EC Directive. We declare that
this product conforms with the EMC
requirements of EC Directive at nominal mains
input 230 V, 50 Hz although the rated input of
the product is 220 to 240 V, 50/60 Hz. Use of
shielded cable is necessary to comply with the
technical EMC requirements of EC Directive.
EU WEEE and Battery Directives
You can see the WEEE and Battery Directives
information in the latest User's Guide (HTML
manual) from the Canon website
(https://oip.manual.canon).
Wireless LAN Regulatory Information
Regulatory information for users in Jordan
MF543x / MF542x includes approved Wireless
LAN Module (Model name: AW-NM333).
Contains Wireless LAN Module approved by TRC/
SS/ 2018/181
Regulatory information for users in Russia
Подтверждение соответствия Минкомсвязи
России: Декларация соответствия №
Д-МДРД-5398 от 28.05.2018 года, действительна
до 28.05.2024 года, зарегистрирована в
Федеральном агентстве связи 07.06.2018
Regulatory information for users in UAE
MF543x / MF542x includes approved Wireless
LAN Module (Model name: AW-NM333).
TRA
REGISTERED No: ER63428/18
DEALER No: DA0060877/11
RE Directive
(Only for European radio equipment)
RE Declaration of Conformity
English (EN) Hereby, Canon Inc. declares that
this equipment is in compliance with Directive
2014 /53/EU.
The full text of the EU declaration of conformity
is available at the following internet address:
http://www.canon-europe.com/ce-documentation
Wireless LAN Specications
Frequency band(s):2412-2472MHz
Maximum radio-frequency power: 16.51 dBm
Czech (CS) Tímto společnost Canon Inc.
prohlašuje, že toto zařízení je v souladu se
směrnicí 2014/53/EU.
Úplné znění EU prohlášení o shodě je k dispozici
na této internetové adrese:
http://www.canon-europe.com/ce-documentation
Technické údaje bezdrátové LAN
Pásmo(a) frekvence: 2412-2472 MHz
Maximální výkon rádiové frekvence: 16.51 dBm
Danish (DA) Hermed erklærer Canon Inc., at
dette udstyr er i overensstemmelse med direktiv
2014 /53/EU.
EU-overensstemmelseserklæringens fulde tekst
kan ndes på følgende internetadresse:
http://www.canon-europe.com/ce-documentation
Trådløs LAN specokationer
Frekvensbånd: 2412-2472 MHz
Maks. radio-frekvenseekt: 16.51 dBm
German (DE) Hiermit erklärt Canon Inc,
dass diese Anlage der Richtlinie 2014/53/EU
entspricht.
Der vollständige Text der EUKonformitätserklärung ist unter der folgenden
Internetadresse verfügbar:
http://www.canon-europe.com/ce-documentation
WLAN-Spezikationen
Frequenzbereich(e): 2412-2472 MHz
Maximale Funkfrequenzleistung: 16.51 dBm
Estonian (ET) Käesolevaga deklareerib Canon
Inc., et käesolev seade vastab direktiivi 2014/53/
EL nõuetele.
ELi vastavusdeklaratsiooni täielik tekst on
kättesaadav järgmisel internetiaadressil:
http://www.canon-europe.com/ce-documentation
Juhtmevaba LAN-i spetsikatsioonid
Sagedusriba(d): 2412-2472 MHz
Maksimaalne raadiosageduslik võimsus: 16.51
dBm
Spanish (ES) Por la presente, Canon Inc. declara
que este equipo es conforme con la Directiva
2014/53/UE.
El texto completo de la declaración UE de
conformidad está disponible en la dirección de
Internet siguiente:
http://www.canon-europe.com/ce-documentation
Especicaciones LAN inalámbrica
Banda(s) de frecuencia: 2412-2472 MHz
Potencia máxima de radiofrecuencia: 16.51 dBm
Greek (EL) Με την παρούσα, η Canon
Inc. δηλώνει ότι ο παρών εξοπλισμός
συμμορφώνεται με την Οδηγία 2014/53/ΕΕ.
Το πλήρες κείμενο της δήλωσης συμμόρφωσης
της ΕΕ διατίθεται στην ακόλουθη διεύθυνση στο
διαδίκτυο:
http://www.canon-europe.com/ce-documentation
Προδιαγραφές ασύρματου LAN (WLAN)
Ζώνες συχνότητας: 2412-2472 MHz
Μέγιστη ισχύς ραδιοσυχνότητας: 16.51 dBm
French (FR) Le soussigné, Canon Inc., déclare
que le présent équipement est conforme à la
Directive 2014/53/UE.
Le texte complet de la déclaration UE de
conformité est disponible à l'adresse internet
suivante :
http://www.canon-europe.com/ce-documentation
Spécications LAN sans l
Bande(s) de fréquence: 2412-2472 MHz
Puissance maximale de radiofréquence: 16.51
dBm
Italian (IT ) Con la presente, Canon Inc. dichiara
che questa apparecchiatura è conforme alla
direttiva 2014/53/UE.
Il testo completo della dichiarazione di
conformità UE è disponibile al seguente indirizzo
Internet:
http://www.canon-europe.com/ce-documentation
Caratteristiche LAN wireless
Banda/e di frequenza: 2412-2472 MHz
Potenza massima a radiofrequenza: 16.51 dBm
Latvian (LV) Canon Inc. ar šo deklarē, ka šī
iekārta atbilst Direktīvai 2014/53/ES.
Pilns ES atbilstības deklarācijas teksts ir pieejams
šādā interneta vietnē:
http://www.canon-europe.com/ce-documentation
Bezvadu LAN specikācijas
Frekvences josla(s): 2412-2472 MHz
Maksimālā radiofrek vences jauda: 16.51 dBm
Lithuanian (LT) Šiuo dokumentu „Canon
Inc.“ patvirtina, kad ši įranga atitinka direktyvą
2014/53/ES.
Visas ES atitikties deklaracijos tekstas prieinamas
šiuo interneto adresu:
http://www.canon-europe.com/ce-documentation
Belaidžio LAN specikacijos
Dažnio diapazonas(-ai): 2412-2472 MHz
Maksimali radijo ryšio dažnio galia: 16.51 dBm
Dutch (NL) Hierbij verklaar ik, Canon Inc.,
dat deze apparatuur conform is met Richtlijn
2014 /53/EU.
De volledige tekst van de EUconformiteitsverklaring kan worden
geraadpleegd op het volgende internetadres:
http://www.canon-europe.com/ce-documentation
Draadloos LAN specicaties
Frequentieband(en): 2412-2472 MHz
Maximaal radiofrequentievermogen: 16.51 dBm
Maltese (MT) B'dan, Canon, qed tiddikjara li dan
it-tip ta' tagħmir huwa konformi mad-Direttiva
2014/53/UE.
It-test kollu tad-dikjarazzjoni ta' konformità talUE huwa disponibbli f 'dan is-sit fuq l-internet:
http://www.canon-europe.com/ce-documentation
Speċikazzjonijiet tal-Wireless LAN
Band(i) tal-Frekwenza: 2412-2472 MHz
Qawwa ta' frekwenza tar-radju massima: 16.51 dBm
Hungarian (HU) A Canon Inc. igazolja, hogy
ez a berendezés megfelel a 2014/53/EU
irányelvnek.
Az EU-megfelelőségi nyilatkozat teljes szövege
elérhető a következő internetes címen:
http://www.canon-europe.com/ce-documentation
Vezeték nélküli LAN műszaki adatai
Frekvenciasáv(ok): 2412-2472 MHz
Maximális rádiofrek venciás teljesítmény: 16.51
dBm
Polish (PL) Canon Inc. niniejszym oświadcza,
że niniejsze urządzenie jest zgodne z dyrektywą
2014/53/UE.
Pełny tekst deklaracji zgodności UE jest dostępny
pod następującym adresem internetowym:
http://www.canon-europe.com/ce-documentation
Specykacja bezprzewodowej sieci LAN
Pasmo(-a) częstotliwości: 2412-2472MHz
Maksymalna moc na częstotliwościach
radiowych: 16.51 dBm
En
27

Appendix
En
Portuguese (PT) Por este meio, a Canon Inc.
declara que o presente equipamento está em
conformidade com a Diretiva 2014/53/UE.
O texto integral da declaração de conformidade
da UE está disponível no seguinte endereço de
Internet:
http://www.canon-europe.com/ce-documentation
Especicações de LAN Sem Fios
Banda(s) de frequências: 2412-2472 MHz
Potência máxima de radiofrequência: 16.51 dBm
Slovene (SL) Canon Inc. potr juje, da je ta
oprema v skladu z Direktivo 2014/53/EU.
Celotno besedilo izjave EU o skladnosti je na
voljo na naslednjem spletnem naslovu:
http://www.canon-europe.com/ce-documentation
Specikacije za brezžični LAN
Frekvenčna območja: 2412-2472 MHz
Največja radiofrekvenčna moč: 16.51 dBm
Slovak (SK) Spoločnosť Canon Inc. týmto
vyhlasuje, že toto zariadenie je v súlade so
smernicou 2014/53/EÚ.
Úplné znenie EÚ vyhlásenia o zhode je k
dispozícii na tejto internetovej adrese:
http://www.canon-europe.com/ce-documentation
Technické údaje bezdrôtovej LAN
Pásmo (a) frekvencia: 2412-2472 MHz
Maximálny výkon rádiovej frekvencie: 16.51 dBm
Finnish (FI) Canon Inc. vakuuttaatäten, että
tämä laite on direktiivin 2014/53/EU mukainen.
EU-vaatimustenmukaisuusvakuutuksen
täysimittainen teksti on saatavilla seuraavassa
internetosoitteessa:
http://www.canon-europe.com/ce-documentation
Langattoman LAN:in tekniset ominaisuudet
Taajuuskaista(t): 2412-2472 MHz
Suurin radiotaajuusteho: 16.51 dBm
Swedish (SV) Härmed försäkrar Canon Inc. att
denna utrustning överensstämmer med direktiv
2014 /53/EU.
Den fullständiga texten till EU-försäkran om
överensstämmelse nns tillgänglig på följande
webbadress:
http://www.canon-europe.com/ce-documentation
Specikationer för trådlöst LAN
Frekvensband: 2412-2472 MHz
Maximal radiofrek venseekt: 16.51 dBm
Romanian (RO) Prin prezenta, Canon
Inc. declară că acest echipament este în
conformitate cu Directiva 2014/53/UE.
Textul integral al declarației UE de conformitate
este disponibil la următoarea adresă internet:
http://www.canon-europe.com/ce-documentation
Specicații wireless LAN
Benzi de frecvență: 2412-2472 MHz
Putere maximă a frecvenței radio: 16.51 dBm
Bulgarian (BG) С настоящото Canon
Inc. декларира, че това съоръжение е в
съответствие с Директива 2014/53/ЕС.
Цялостният текст на ЕС декларацията за
съответствие може да се намери на следния
интернет адрес:
http://www.canon-europe.com/ce-documentation
Спецификация на безжичната LAN
Честотна лента(и): 2412-2472 MHz
Максимална радиочестотна мощност: 16.51
dBm
Croatian (HR) Canon Inc. ovime izjavljuje da je
oprema u skladu s Direktivom 2014/53/EU.
Cjeloviti tekst EU izjave o sukladnosti dostupan
je na sljedećoj internetskoj adresi:
http://www.canon-europe.com/ce-documentation
Specikacije bežičnog LAN-a
Frekvencijski pojas(evi): 2412-2472 MHz
Maksimalna snaga radijske frekvencije: 16.51
dBm
Irish (GA) Dearbhaíonn Canon Inc., leis seo, go
bhfuil an trealamh seo i gcomhlíonadh leis an
Treoir 2014/53/AE.
Tá an téacs iomlán de Dhearbhú Comhréireachta
AE ar fáil ag seoladh an láithreáin ghréasáin mar
seo a leanas:
http://www.canon-europe.com/ce-documentation
Sonraíochtaí LAN Gan Sreang
Banda(í) minicíochta: 2412-2472 MHz
Uaschumhacht radaimhinicíochta: 16.51 dBm
Norwegian (NO) Her ved erklærer Canon Inc.
at dette utstyret er i overensstemmelse med
direktiv 2014/53/EU.
Den fulle teksten til EUs samsvarserklæring er
tilgjengelig på følgende Internett-adresse:
http://www.canon-europe.com/ce-documentation
Trådløs LAN-spesikasjoner
Bølgelengde: 2412-2472 MHz
Maks radiofrekvensstyrke: 16.51 dBm
Icelandic (IS) Hér með lýsir Canon Inc því yr
að þessi búnaður er í samræmi við tilskipun
2014/53/ESB.
Allur texti ESB-samræmisyrlýsingar er í boði á
eftir farandi veangi:
http://www.canon-europe.com/ce-documentation
Tæknilýsingar fyrir þráðlausa nettengingu
Tíðnisvið: 2412-2472 MHz
Hámarksst yrkur útvarpstíðnibylgja: 16.51 dBm
Legal Limitations on the Usage of Your Product
and the Use of Images
Using your produc t to scan, print or otherwise
reproduce certain documents, and the use of
such images as scanned, printed or otherwise
reproduced by your product, may be prohibited
by law and may result in criminal and/or civil
liability. A non-exhaustive list of these
documents is set forth below. This list is intended
to be a guide only. If you are uncertain about the
legality of using your product to scan, print or
otherwise reproduce any par ticular document,
and/or of the use of the images scanned, printed
or otherwise reproduced, you should consult in
advance with your legal advisor for guidance.
•
Paper Money
•
Travelers Checks
•
Money Orders
•
Food Stamps
•
Certicates of Deposit
•
Passports
•
Postage Stamps (canceled or uncanceled)
•
Immigration Papers
•
Identifying Badges or Insignias
•
Internal Revenue Stamps (canceled or
uncanceled)
•
Selective Service or Draft Papers
•
Bonds or Other Certicates of Indebtedness
•
Checks or Drafts Issued by Governmental
Agencies
•
Stock Certicates
•
Motor Vehicle Licenses and Certicates of Title
•
Copyrighted Works/Works of Art without
Permission of Copyright Owner
Disclaimers
•
The information in this document is subject
to change without notice.
•
CANON INC. MAKES NO WARRANTY OF ANY
KIND WITH REGARD TO THIS MATERIAL,
EITHER EXPRESS OR IMPLIED, EXCEPT AS
PROVIDED HEREIN, INCLUDING WITHOUT
LIMITATION, THEREOF, WARRANTIES AS TO
MARKETABILITY, MERCHANTABILITY, FITNESS
FOR A PARTICULAR PURPOSE OF USE, OR
NON-INFRINGEMENT. CANON INC. SHALL NOT
BE LIABLE FOR ANY DIRECT, INCIDENTAL, OR
CONSEQUENTIAL DAMAGES OF ANY NATURE,
OR LOSSES OR EXPENSES RESULTING FROM
THE USE OF THIS MATERIAL.
About This Manual
Keys and Buttons Used in This Manual
The following symbols and key names are a few
examples of how keys to be pressed are
expressed in this manual.
•
Operation panel keys: [Key icon]
Example:
•
Display: <Specify destination.>
•
Buttons and items on the computer display:
[Preferences]
Illustrations and Displays Used in This Manual
Illustrations and displays used in this manual are
which of MF543x unless specied.
Trademarks
Mac is a trademark of Apple Inc.
Microsoft, Windows, Windows Vista, Windows
Server, Internet Explorer, Excel, and PowerPoint
are either registered trademarks or trademarks of
Microsoft Corporation in the United States and/
or other countries.
Other product and company names herein may
be the trademarks of their respective owners.
Third Party Software
This Canon product (the “PRODUCT”) includes
third-par ty software modules. Use and
distribution of these software modules,
including any updates of such software modules
(collectively, the “SOFT WARE”) are subject to
license conditions (1) through (9) below.
(1) You agree that you will comply with any
applicable export control laws, restrictions or
regulations of the countries involved in the
event that this PRODUCT including the
SOFTWARE is shipped, transferred or
exported into any country.
(2) Rights holders of the SOFT WARE retain in all
respects the title, ownership and intellectual
property rights in and to the SOFT WARE.
Except as expressly provided herein, no
license or right, expressed or implied, is
hereby conveyed or granted by rights holders
of the SOFTWARE to you for any intellectual
property of rights holders of the SOFT WARE.
(3) You may use the SOFTWARE solely for use
with the PRODUCT.
(4) You may not assign, sublicense, market,
distribute, or transfer the SOFTWARE to any
third part y without prior written consent of
rights holders of the SOF TWARE.
(5) Notwithstanding the foregoing, you may
transfer the SOFTWARE only when (a) you
assign all of your rights to the PRODUC T and
all rights and obligations under the license
conditions to transferee and (b) such
transferee agrees to be bound by all these
conditions.
(6) You may not decompile, reverse engineer,
disassemble or otherwise reduce the code of
the SOFT WARE to human readable form.
(7) You may not modify, adapt, translate, rent,
lease or loan the SOFTWARE or create
derivative works based on the SOFTWARE.
(8) You are not entitled to remove or make
separate copies of the SOFTWARE from the
PRODUCT.
(9) The human-readable portion (the source
code) of the SOFTWARE is not licensed to
you.
28

Notwithstanding (1) through (9) above, the
PRODUCT includes third-party software modules
accompanying the other license conditions, and
these sof tware modules are subjec t to the other
license conditions.
Please refer to the other license conditions of
third-par ty software modules described in
Appendix of Manual for the corresponding the
PRODUCT. This Manual is available at
https://oip.manual.canon/.
By using the PRODUCT, you shall be deemed to
have agreed to all applicable license conditions.
If you do not agree to these license conditions,
please contact your service representative.
V_181009
En
29

הריהמ הלעפה
הלעפה ליחתתש ינפל רוכז
םיכמסמה ןיזמ ךותב םיירוקמה םיכמסמה תא םקמ
תא םאתה
ינווחמ
.קילחמה
םיכמסמה תא םקמ
דצשכ םיירוקמה
יפלכ הקירסה
.הלעמ
לש הפיצר הקירסל םיאתמ
,תורפס לש םיבר םיפד
.האלה ןכו םיטוטיצ
רישכמ
ירוקמה ךמסמה תא הכלהכ םקמ
לילגה תיכוכז לע ירוקמה ךמסמה תא םקמ
ידכ םקמ
םיאתהל
ךותב
.הניפה
יפד ,רפס ידומע תקירסל םיאתמ
ךמסמה תא םקמ
דצשכ ירוקמה
יפלכ הקירסה
.הטמ
.םינותיע יריזגו ןיזגמ
הלעפהה חולמ הלעפהה תא לחתה
הלעפה חול
He
האר םיטרפל
שמתשמל ךירדמב "הקירס"
)ךסמ( גצ
NFC ןומיס
*)ספא חווט תרושקת(
)]היגרנאב ךסוח[ שקמ(
)שקמ ]תיבה ףד[(
םאתהב הנימז היהת אל NFC-ש ןכתיי *
.רישכמה לש םגדל
הקירס
.ירוקמה ךמסמה תא םקמ .1
.)קורס( >Scan< רחבו ,
.ץוחנה עדימה תא ןזהו הקירסה גוס תא רחב .3
וא )ןבל רוחשב לחתה( >B&W Start< ,)לחתה( >Start< רחב .4
.)ינועבצב לחתה( >Color Start<
בשחממ קורסל ידכ
MF Scan Utility
■
USB ןורכיז רישכמב ןסחא
I-Fax/ל"אוד חלש
םיצבק תרשל חלש
לע ץחל .2
הקירס יגוס
בשחמב ןסחא
■
■
■
■
30

הריהמ הלעפה
.ירוקמה ךמסמה תא םקמ .1
.)קתעה( >Copy< רחב ןכמ רחאלו ,
.שרדנכ קתועה תורדגה תא ןייצ .3
.שורדה םיקתועה רפסמ תא ןזה .4
.)לחתה( >Start< רחב .5
הקתעה
לע ץחל .2
האר םיטרפל
שמתשמל ךירדמב "םוליצ"
.רישכמה לש םגדל םאתהב הנימז היהת אל וז היצקנופש ןכתיי *
האר םיטרפל
"םיסקפ לש הלבקו החילש"
שמתשמל ךירדמב
םיכמסמ םוליצ לש תוישומיש תויצקנופ
1-ב N
ידדצ-דח וא ידדצ-וד
הנטקה וא הלדגה
תוהז יסיטרכ תקתעה
ןוכרד קתעה
*סקפ תחילש
.ירוקמה ךמסמה תא םקמ .1
.)סקפ( >Fax< רחבו ,
.דעיה יטרפ תא ןזה .3
.שרדנכ סקפה תורדגה תא ןייצ .4
.)לחתה( >Start< רחב .5
תוישומיש סקפ תויצקנופ
לע ץחל .2
ףיצר רודיש
ןורכיז תלוביק
בשחמב סקפ
■
■
■
■
■
■
■
■
He
האר םיטרפל
להנמב )הרזע( "Help"
תספדמה לש ןקתהה
הספדה
.םושייה לש הספדהה תייצקנופ תא רחבו הספדהל ךמסמה תא חתפ .1
.]םינייפאמ[ וא ]תופדעה[ רחבו רישכמה רובע תספדמה ןקתה להנמ תא רחב .2
.ריינה לדוג תא ןייצ .3
.רינה גוס תאו ריינה רוקמ תא ןייצ .4
.שרדנכ הספדהה תורדגה תא ןייצ .5
.]רושיא[ רחב .6
.]רושיא[ וא ]ספדה[ רחב .7
תוישומיש הספדה תורדגה
■
ידדצ-וד
■
1-ב N
תרבוח תספדה
■
31

האר םיטרפל
שמתשמל ךירדמב "ריינ תניעט"
יתילכת-ברה שגמב הניעט ריינה תריגמב הניעט
הריהמ הלעפה
1
ריינ תניעט
.ריינה תריגמ תא אצוה
1
2
2
He
32
ןאכ דע
.ךסמל םאתהב ריינה גוסו לדוג תא ןייצ
3
4
5
3
ןאכ דע
.רישכמה ךותל ריינה תריגמ תא סנכה
4
ריינהמ ריינ לש הנוש גוס וא הנוש לדוג ןיעטת םא
.תורדגהה תא הנשמ התאש אדו ,ןכל םדוק היהש
>Paper Settings< רחבו , לע ץחל
.)ריינ תורדגה(
.ךסמל םאתהב ריינה גוסו לדוג תא ןייצ
5
6

הריהמ הלעפה
היעבב תלקתנ םא
דבוע וניא רישכמהש הארנריינ תועיקת ועריא
יבג-לעש תוארוהל םאתהב עקתנש ריינה תא הקנ
.ךסמה
רנוטה תינסחמ תפלחה
יבג-לעש תוארוהל םאתהב רנוטה תינסחמ תא ףלחה
.ךסמה
.םיאבה םירבדה תא קודב
?לעופ רישכמה םאה •
?הניש בצממ אצי רישכמה םאה •
גתמ לע ץחל םיראומ םניא
?הכלהכ רבוחמ למשחה לבכ םאה •
םגו גצה םג םא
.למשחה
He
רנוטה תינסחמ תפלחהל םגדה רפסמ
Canon Cartridge 056 L •
Canon Cartridge 056 •
Canon Cartridge 056 H •
.שמתשמל ךירדמב ןייע ,תכשמנ היעבה םא
33

תיטוחלא LAN תשרב שומיש תעב
.תיטוחלאה LAN תשר בתנמ
ןכתיי .םיעירפמ םיצפח ידי לע המוסח הניא
.תופצר וא תוריק ךרד רבעמ תעב דרי תואהש
רחא דויצמ וא םילגורקיממ ,םיילטיגיד םייטוחלא
דויצל עירפהל םילולע הז רישכממ םיטלפנה
.תונואתו תולקתל םורגל לולעש רבד ,יאופר
שומישה תביבסל םאתהב ,עירפמ הלעפהה שער םא
רדחל ץוחמ ןקתוי רישכמהש ץלמומ ,הלעפהה בצמו
םורגל לולע רחא חוכ קפסב שומיש .וניוצש
.קפוסמה למשחה לבכ תועצמאב הקראה רוביח
םורגל לולע רבדהש רחאמ ,קפוסש למשחה
.םירחא םירישכמל למשחה לבכ תא רבחת לא
םקמת לא .למשחה לבכב םוגפל הלולעש תרחא
לבכב העיגפ .למשחה לבכ לע םידבכ םיצפח
.תולמשחתהל וא הפירשל םורגל הלולע למשחה
םורגל לולע רבדהש רחאמ ,תובוטר םיידי םע
םורגל לולע הז רבד .רישכמה םע למשח יטוח
וא הפירשל םורגל לולע רבדהש רחאמ ,רשקב
םורגל לולע רבדה ,ןכ השעת אל םא .למשחה
He
רבדה ,ןכ השעת אל םא .םימער תפוס ךלהמב
עוגפל וא תולמשחתהל וא הפירשל םורגל לולע
לבכ יופיצ תא סימהל לולע רבדה ןכ השעת
.תולמשחתהל וא הפירשל םורגלו למשחה
,למשחה לבכ לש רוביחה קלח לע בר ץחל לעפומ םא
רישכמה ךותבש םיטוחה וא למשחה לבכש ןכתיי
קלח לע וא למשחה עקש לע לחומ ךשמתמ
היהי ןתינש ךכ למשחה עקתל ביבסמ קיפסמ
ךל עירפמ הלעפהה שער םא
.תולמשחתהל וא הפירשל
.תולמשחתהל וא הפירשל
.תולמשחתהל וא הפירשל
.תולמשחתהל וא הפירשל
:םיאבה םיבצמהמ ענמיה
.הפירשל םורגל לולע רבדה .וקתנתי
.םוריח הרקמב תולקב וקתנל
.וידר ילג טלופש
.אצמנ התא ובש
חוכה קפס
הרהזא
.תולמשחתהל
.תולמשחתהל
.רישכמב
.ביצי קפסה
.רוביחה
תוריהז יעצמא
• תוחפ וא רטמ 50 לש קחרמב רישכמה תא ןקתה
• תרושקתה ובש םוקימב ןקתה ,רשפאה לככ קוחר
• םינופלטמ רישכמה תא רשפאה תדימב קחרה
הרוצב רישכמה תא םיאשונ םא .הז ךירדמבש
• וידר ילג .יאופר דויצ תברקב שמתשת לא
• קפסהה תושירדב דמועש חוכ קפסב קר שמתשה
• םע למשח עקשל רבוחמ תויהל בייח רישכמה
• לבכ טעמל םירחא למשח ילבכב שמתשת לא
• .הז רישכמ םע שומישל דעונ קפוסש למשחה לבכ
• הלועפ עצבת וא חוכב קיבדת ,ךושמת ,הנשת לא
םירדחב תוכורא רוציי תוצרה וא בחרנ שומיש ךלהמב
• ותוא קתנת וא למשחה לבכ תא רבחת לא
• לש םילצפמב וא םיכיראמ םילבכב שמתשת לא
• ותוא רושקת וא למשחה לבכ תא ףוטעת לא
• עקש ךותל ופוס דע למשחה לבכ תא סנכה
• למשחה עקשמ ירמגל למשחה לבכ תא רסה
• ול שיו חוטב אוה הז רישכמל חוכה קפסש אדו
• אל םא ;םוח רוקממ למשחה לבכ תא קחרה
– .תופוכת םיתעל וקותינו למשחה לבכ רוביח
– .למשחה לבכ לעמ הדיעמ
– ץחלו רוביחה קלח דיל ףפוכמ למשחה לבכ
– .למשחה לבכ לע ךשוממ ץחל
• בחרמ ראשהו למשח עקש דיל רישכמה תא ןקתה
.העיצפל םורגלו לופיל לולע אוה ,היוגש
התא תרחא .תוריקל וא הפצרל הנוכמה ןיב ךידי
)המודכו חיטש( וב עובטל לולע רישכמהש
תוטילפו ןוזוא לש תמיוסמ תומכ קיפמ הז רישכמ
תועגופ ןניא ולא תוטילפ .ליגר שומיש ךלהמב תורחא
ןהב ןיחבהל היהי ןתינש ןכתיי ,תאז םע .תואירבב
,החונ הדובע תביבס לע רומשל ידכ .עורג רורווא םע
ררוואמ היהי לעופ רישכמה ובש רדחהש ץלמומ
םישנא םהבש םימוקיממ ענמיהל שי ,ףסונב .הכלהכ
ךותב רצוויהל תולולע )תובעתה( םימ תופיט
םמחתמ ןקתומ רישכמה ובש רדחהש תעב רישכמה
וא רק םוקיממ רבעומ רישכמה רשאכו תוריהמב
םיאנתב רישכמב שומיש .חל וא םח םוקימל שבי
הספדה תוכיאל ,עקתיהל ריינל םורגל לולע הלא
לגרתהל רישכמל רשפא .רישכמל קזנל וא העורג
תוחפל םייתעש ךשמל תוחללו הביבסה תרוטרפמטל
רתוי הובג וא רטמ 3000 לש םיה ינפ לעמ םיהבגב
הכלהכ ולעפי אל חישק קסיד םע םירישכמש ןכתיי
םירטמ 3000 לש םיהבגב םהב םישמתשמשכ
ןתינ .יגולנא ןופלט וק טרדנטסל תייצמ הז רישכמ
תגתוממ תירוביצ ןופלט תשרל רישכמה תא רבחל
ןופלט וקל רישכמה תא רבחת םא .דבלב )PSTN(
הלועפ בכעל לולע אוה תרושקת לבכל וא ילטיגיד
התאש אדו .קזנל םורגל לולעו רישכמה לש הנוכנ
רוצ .רישכמה רוביח ינפל ןופלטה וק גוס תא רשאמ
וק וא יטפואה ביסה וק לש תורישה יקפס םע רשק
יווקל רישכמה תא רבחל ךנוצרב םא ךלש IP ןופלטה
םיאבה םימוקימב ןיקתת לא
.העיצפל םורגלו לופיל לולע רישכמה
םיפסונ תוריהז יעצמא
.העיגפב ןכתסמ
םיאבה םימוקימב ןיקתת לא
.רישכמל קזנל םורגל הלולע וז הנקתה
תוהובג וא תוכומנ
םייטנגמורטקלא
עורג רורווא םע םימוקיממ ענמיה
.רישכמהמ תוטילפל םיפושח ויהי
תובעתה וב שיש םוקימב ןיקתת לא
.רתוי וא םיה ינפ הבוג לעמ תוחפל
תוריהז יעצמא
•ביצי אל םוקימ
•טטרל ףושח םוקימ
• תוארוהה תא עצב ,רישכמה תאישנ תעב
• תא סינכהל אלש דפקה ,הז רישכמ תנקתה תעב
בושח
• םא ןיב ,תוינוציק וב תוחלהו הרוטרפמטהש םוקימ
• וא הרוטרפמטב םייטמרד םייוניש וב שיש םוקימ
תוחלב
• וא םייטנגמ םילג קיפמש דויצ דיל םוקימ
•תוימיכ תויצקאר םהב שיש םוקימ וא הדבעמ
•םיליער םיזגל וא הדולחל ףושח םוקימ
• וא רישכמה לקשמ לשב םקעתהל לולעש םוקימ
.שומישה ינפל
ןופלטה וק רוביח
.ולא ןופלט
נספח
תובושח תוחיטב תוארוה
תעינמל תובושח תוחיטב תוארוה ראתמ הז קרפ
םירחא םירישכמבו הז רישכמב םישמתשמל תועיגפ
שומישה ינפל הז קרפ ארק .שוכרל קזנ עונמל ןכו
.רישכמב יואר שומישל תוארוהה תא עצבו רישכמב
תוראותמ ןניאש הקוזחת תולועפ םוש עצבת לא
קזנ ףאל תיארחא היהת אל Canon .הז ךירדמב
שומישמ ,הז ךירדמב הראות אלש הלעפהמ םרגנש
ידי לע ועצוב אלש םייוניש וא ןוקיתמ וא םלוה אל
הלעפה .Canon לש השרומ ישילש דצ וא Canon
םורגל הלוכי הז רישכמב םימלוה אל שומיש וא
בחרנ ןוקית שורדיש קזנ םורגל וא/ו תינפוג העיגפל
.תלבגומה תוירחאב הסוכמ היהי אלש ןכתייו
הרהזא
תולולעש תולועפל תעגונש הרהזא תנייצמ
ועצובי אל םא םישנאב העיגפל וא תוומל ליבוהל
םיש ,תוחיטבב רישכמב שמתשהל ידכ .הכלהכ
.ולא תורהזאל דימת בל
תוריהז יעצמא
תולולעש תולועפל עגונש תוריהז יעצמא תנייצמ
.הכלהכ ועצובי אל םא םישנאב העיגפל ליבוהל
בל םיש ,תוחיטבב רישכמב שמתשהל ידכ
.ולא תוריהז יעצמאל דימת
בושח
אדו .תוילועפת תולבגהו תושירד תנייצמ
תא ליעפהל ידכ הדיפקב םיטירפה תא תארקש
רישכמל קזנמ ענמיהלו הנוכנ הרוצב רישכמה
.שוכרל וא
הנקתה
ארק ,תוחונבו תוחיטבב הז רישכמב שמתשהל ידכ
רישכמה תא ןקתהו תואבה תורהזאה תא הדיפקב
.םיאתמ םוקימב
הרהזא
וא הפירש רוציל לולעש םוקימב ןיקתת לא
תולמשחתה
• ידמ בורק( םימוסח רורוואה יצירח ובש םוקימ
םיצפחל וא םיחיטשל ,תופסל ,תוטימל ,תוריקל
)םימוד
•קבואמ וא חל םוקימ
•תיבל ץוחמ וא הרישי שמשל ףושחש םוקימ
•תוהובג תורוטרפמטל ףושחש םוקימ
•תוחותפ תובהלל ףושחש םוקימ
• םיקילד םירמוח וא עבצ יללדמ ,לוהוכלא תברקב
םירחא
תופסונ תורהזא
• רוביח .הז רישכמל םירשואמ אל םילבכ רבחת לא
.תולמשחתהל וא הפירשל םורגל לולע הזכ
• םירחא םייתכתמ םיצפחו תוזורחמ םישת לא
םא .רישכמה לע םילזונב םיאלמ םילכמ וא
םיילמשח םיקלח םע עגמב םיאב םירז םיצפח
וא הפירשל םורגל לולע רבדה ,רישכמה ךותב
.תולמשחתהל
• שי ,םיילנויצפוא םירזיבא לש הרסהו הנקתה תעב
עקשמ עקתה תאצוה ,הנוכמה יוביכ לע דיפקהל
לבכו םיקשממה ילבכ לכ לש קותינו למשחה
לבכל קזנ םרגיהל לולע תרחא .הנוכמהמ למשחה
וא הפרשל ומרגיש םיקשממה ילבכל וא למשחה
.תולמשחתהל
• תא קתנ ,רישכמה ךותל לפונ והשלכ רז ץפח םא
גיצנ לא הנפו AC למשחה עקשמ למשחה לבכ
.ימוקמה השרומה Canon
34

היגרנאב ךסוח שקמ
• אל רשאכ תוחיטבל )היגרנאב ןוכסיח( שקה
ומכ ,ךשוממ ןמז קרפל רישכמב שומיש השענ
גתמ תא הבכ ,ףסונב .הלילה ךשמב לשמל
תוחיטבל למשחה לבכ תא קתנו ישארה למשחה
ומכ ,ךשוממ ןמז קרפל רישכמב שומיש ןיא רשאכ
.םיגחב לשמל
רזייל תוחיטב
Class 1 רזייל רצומכ רשואמ הז רצומ
.EN60825-1:2014-בו IEC60825-1:2014-ב
CLASS 1 LASER PRODUCT
LASER KLASSE 1
APPAREIL À LASER DE CLASSE 1
APPARECCHIO LASER DI CLASSE 1
PRODUCTO LÁSER DE CLASE 1
APARELHO A LASER DE CLASSE 1
LUOKAN 1 LASER-TUOTE
LASERPRODUKT KLASS 1
רחאמ .םדאה ףוגל קזנ םורגל הלולע רזיילה ןרק
ןיטולחל המוטא רישכמה ךותב תטלפנש הנירקהש
הניא רזיילה ןרק ,םיינוציח םייוסיכו ןגמ ןוסחא ךותב
לש הלעפהה בלש ךלהמב רישכמהמ חורבל הלוכי
ןעמל תואבה תוארוההו תורעהה תא ארק .שמתשמה
.ךתוחיטב
• ולא טעמל םייוסיכה תא חתפת לא םלועל
.רישכמה לש הלעפהה יכירדמב םימושרש
• היושע הפישחה ,ךייניעב עגפת רזיילה ןרק םא
.םייניעב העיגפל םורגל
• לש עוציבב וא תומאתהב ,םידקפב שומיש
םורגל םילולע הז ךירדמב םיניוצמ םניאש םיכילה
.תנכוסמ הנירקל הפישחל
רזייל תוחיטבל תוריהז יעצמא
בושח
• תויוות לע תוספדומה תוחיטבה תויחנה תא עצב
.רישכמה לע תורחא תוקבדמו
•.םיקזח טטר וא םלהל רישכמה תא ףושחת לא
• םיקלח וא םייוסיכ ,תותלד רוגסתו חתפת לא
.רישכמל קזנ םרגיהל לולע תרחא .חוכב םירחא
• חתפת וא ישארה למשחה גתמ תא הבכת לא
לולע רבדה .תלעופ הנוכמהש ןמזב םייוסיכה תא
.עקתיהל ריינל םורגל
•.םירטמ 3-מ רתוי רצק ירלודומ לבכב שמתשה
•.םירטמ 3-מ רתוי רצק USB לבכב שמתשה
ענמיה .וירחאל דימו שומישה ךלהמב דואמ םימח
ריינ ,ףסונב .תויווכ עונמל ידכ הלא םירוזאב עגממ
רחאל דימ וב םיעגונ םא םח תויהל יושע ספדומ
תעב תוריהז טוקנל שי ןכל ,רישכמהמ טלפנש
.תויווכ תויהל תולולע תרחא .וב לופיטה
קזנ םורגל הלולע וז הלועפ .תיכוכזה חטשמ לע
.העיצפל ליבוהלו תיכוכזה חטשמל
,תרחא .םינקתומה ילנויצפואה םיכמסמה ןיזמ םע
.העיצפל םורגלו לופיל םייושע םה
םיכמסמה ןיזמ
םירפס לש םיקתוע ןיכהל ידכ לילגה תיכוכזב
תיכוכזל קזנל םורגל לולע רבדה תרחא .םיבע
.תינפוג הלבחלו לילגה
םורגל לולע הזש רחאמ ,וב ספתיהל ךידימ
.תינפוג הלבחל
.עצפיהל יושע התא ,תרחא .םיכמסמה ןיזמל
• טלפה ץירחו רישכמה לש םיימינפה םיקלחה
למשחה רוביח תעב
וא דוקפת יאל םורגל לולע הז רבד .וקתנל ירשפא
.למשח תקספה תעב רישכמה לש קזנל
םיעקשב שמתשת לא ,םיבורמ םיעקש תועצמאב
.םירחא םירישכמ רבחל ידכ םירתונה
םיפסונ תוריהז יעצמא
וא דוקפת יאל רישכמל םורגל לולע ילמשח שער
םא Canon לש השרומ קוושמ םע רשק רוצו
ליגר אל חיר טלופ ,ליגר אל שער עימשמ רישכמה
ךשמתמ שומיש .שרפומ םוח וא ןשע טלופ וא
.תולמשחתהל וא הפירשל םורגל לולע
קוריפ .ההובג הרוטרפמטו הובג חתמ לש םיביכר
• ,ןולימ ןוגכ ,םידבכ םימצע ליפהל אלש רהזיהל שי
.תולמשחתהל וא הפירשל םורגל לולע יוניש וא
םילבכה ראשו למשחה לבכ תא םג םהמ קחרהו
• וא ריינה תריגמ םע דחי רישכמה תא אשית לא
.רישכמה ךותבש םיילמשחה םיקלחהו דויצה וא
תונואת תורקל תולולע םשוית אל וז הלועפ םא
םיקלח םע עגמב ואובי םיקילד םירמוח םא .הז
םורגל לולע רבדה ,הז רישכמ ךותבש םיילמשח
.תולמשחתהל וא הפירשל
.קשממה ילבכ תאו למשחה לבכ תא קתנ ןכמ
לבכל קזנל םורגל לולע רבדה תאז השעת אל םא
וא הפירשל םורגל ןכו קשממה ילבכלו למשחה
.תולמשחתהל
עגית לא ,AC-ה חתמ עקשל רבוחמ למשחה
העיגנש רחאמ ,רבחמה לש יתכתמה קלחב
.תולמשחתהל םורגל הלולע
בל בצוקב שמתשמ התא םא
םילגו הכומנ המרב יטנגמ םרז קיפמ הז רישכמ
שיגרמו בל בצוקב שמתשמ התא םא .םיינוסארטלוא
• שומיש תעב םיכמסמה ןיזמ לע קזח ץחלת לא
ךלש אפורה םע ץעייתהו רישכמהמ קחרתה ,תוגירח
• ענמיהל ידכ תונידעב םיכמסמה ןיזמ תא רוגס
תוריהז יעצמא
.העיצפל םורגלו לופיל םילולע
• ךיתועבצא תא וא ךידי תא סינכהל אלש רהזיה
.ךורא ןמז קרפל רישכמב שומיש השעיי
.ךידיב העיצפמ ענמיהל
,ךידגב וא ךידי תא וספתי םישבכמה םא .טלפה
.תינפוג הלבחל םורגל לולע רבדה
בושח
• יתלבש חתמ רוקמל למשחה לבכ תא רבחת לא
• AC למשח עקשל רישכמה תא רבחת םא
• למשחה רזע עקשל למשחה לבכ תא רבחת לא
.בשחמב
.םינותנ ןדבואל
לופיט
הרהזא
• AC-ה חתמ עקשמ למשחה לבכ תא דימ קתנ
• שי רישכמה ךותב .הז רישכמ הנשת וא קרפת לא
• םידלי לש םדי גשיהמ קחרה רישכמה תא םקמ
.תויופצ אל
• רישכמ תברקב םיקילד םיזתמב שמתשת לא
• רחאלו ותוא תיביכש אדו ,רישכמה תזזה ינפל
• לבכ רשאכ USB לבכ קותינ וא רוביח תעב
He
.םדקהב
• םהש רחאמ רישכמה לע םידבכ םיצפח םקמת לא
• אל םא למשחה לבכ תא קתנ ,ךתוחיטב ןעמל
• ידכ םיסכמ לש הריגסו החיתפ תעב תוריהז טוקנ
• רוזאבש םישבכמהמ םידגבה תאו ךידי תא קחרה
ריינה תריגמ
.תינפוג הלבחל םורגל לולע הזש רחאמ ,ריינה
• תריגמ תרסה תעב רישכמל ךידי תא סינכת לא
35

b
( רנוטה תינסחמ ןורכיזב תעגל ןיא
לש הטירש עונמל ידכ .)
לא ,רואל ותפישח וא רישכמה ךותב ףותה חטשמ
( ףותה ןגמ סירת תא חתפת
.)
a
.ךכב ךרוצ שי םא אלא ,רישכמהמ
ללוכ תויטנגמל םישיגרה םירצומל תוכימסמב
הלולע וז הלועפ .םיקסיד יננוכו םישימג םיקסיד
.ליעומו חוטב שומיש חיטבהל
35°C דע 0 :ןוסחא תרוטרפמט חווט
/תיסחי תוחל( 85% דע 35 :ןוסחא תוחל חווט
He
ךותב תאצוהש רנוטה תינסחמ תא חנה ,ןוסחא
אלו שבגתהל לולע רנוטה .ךופה וא הדימע בצמב
תופיט חתפתהל תולולע ןוסחאל תוחלה חווטב םג *
רנוטה תינסחמ לש ינוציחה קלחה ןיב תורוטרפמט
תוכיא לע הערל עיפשי יוביע .הלש ימינפה קלחל
.רועינ רחאל םג ירוקמה ובצמל רוזחל
ילדבה שי םא רנוטה תינסחמ ךותב )יוביע( םימ
.רנוטה תוינסחמ לש הספדהה
םיאבה םימוקימב רנוטה תינסחמ תא ןסחאל ןיא
רתוי וא תוקד שמח ךשמל
יוביע םהב רצוויהל לולעש תוחלבו
בושח
רנוטה תוינסחמב לופיט
.תידיה תועצמאב
( םיילמשחה םיעגמב
הטמלמ הגוצת
c
.םינותנ סרהל םורגל
רנוטה תוינסחמ ןוסחא
*)יוביע אלל
.רנוטה תינסחמב
.ירוקמה הזיראה רמוח
)הינומאו
ההובג
.ךולכלו קבא ריסהל ידכ השבי תילטמ תועצמאב
םורגלו ריוואב תוחל גופסל לולע רבצנש קבא
• רנוטה תינסחמ לש הזיחא לע דיפקהל שי
• וא )
.למשח םע עגמב אב אוה םא הפירשל
םימ םע תוחל יוקינ תוילטמ .רישכמה תא תוקנל
עבצ ללדמ ,ןיזנב ,לוהוכלאב שמתשת לא .דבלב
ריינב שמתשת לא .םירחא םיקילד םירמוח וא
םיאב הלא םירמוח םא .ריינ תובגמב וא ושיט
םה רישכמה ךותב םיילמשח םיקלח םע עגמב
וא הפירשל םורגל וא יטטס למשח קיפהל םילולע
,םיעקש ,הדולח רחא רישכמה תא קודב .קזנ
שומיש .זרפומ םוח תקפה וא םיקדס ,תוטירש
וא הפירשל םורגל הלולע בטיה רמשנ אלש דויצב
תוריהז יעצמא
העיגנ .הובג קפסהבו ההובג הרוטרפמטב
ףאב עגית לא .תויווכל םורגל הלולע ולא םיביכרב
.ךירדמב ןיוצמ וניאש רישכמב קלח
.ריינה תוצקב ךידיב ךתחיהל
םילכתמ םיקלח
ריינ וא רנוט תוינסחמ ןסחאת לא ,ףסונב .שאל
לולע רבדה .תוחותפ תובהלל ףושחש םוקימב
.הפירשל וא תויווכל ליבוהלו רנוטה תתצהל םורגל
תילטמ תועצמאב םתוא בגנ וא רנוטה יקיקלח תא
• וא הזיראה רמוחמ רנוטה תינסחמ תא איצות לא
• התוא חינהל ןיא .יטנגמ רצומ איה רנוטה תינסחמ
• תנמ-לע ןהל תטרופמה הביבסב ןסחאל שי
• שומישה דעומל דע חותפל ילבמ ןסחאל שי
• ךרוצל הז רישכממ רנוטה תינסחמ תרסה תעב
• התוא ןסחאל ןיא רנוטה תינסחמ ןוסחא תעב
•תוחותפ תובהלל םיפושחה םימוקימ
• ריהב רוא וא רישי שמש רואל םיפושחה םימוקימ
•דחוימב חולמ ריוואל םיפושחה םימוקימ
• םיסיסרת לשמל( םילכאמ םיזג שי םהבש םימוקימ
• תוחלו תוהובג תורוטרפמט םהב שיש םימוקימ
• הרוטרפמטב םיינוציק םייונישל םינותנה םימוקימ
•קבא לש הלודג תומכ ילעב םימוקימ
•םידלי לש םדי גשיהב םימוקימ
ןיא םלועל .הפיאש ענמיש ןפואב ,החלו הכר
הנגה יעצמא ללוכ וניאש ,קבא באושב שמתשהל
לולע רבדה .ךפשנש רנוט יוקינל ,קבא יצוציפ דגנ
קבא תוצצופתהל וא קבאה באושב הלקתל ליבוהל
.יטטס ןעטמ תוקרפתה בקע
בל בצוקב שמתשמ התא םא
,תוגירח שיגרמו בל בצוקב שמתשמ התא םא
אפורה םע ץעייתהו רנוטה תינסחממ קחרתה
תוריהז יעצמא
.םדקהב אפור םע ץעייתה ,רנוט ףאשתו הדימב
,ךיניעל וא ךיפל סנכנ רנוטהו הדימב .ךלש הפל וא
.אפור םע ץעייתהו םירק םימב דימ ףוטש
.ןובסבו םירק םימב ףוטש ,הרוק הזו הדימב
דימ ץעייתה ,ךלש רועב והשלכ יוריג שיו הדימב
.םינטק םידלי לש םדי גשיהמ קחרה םירחא
וא אפורל דימ תונפל שי ,רנוט תעילב לש הרקמב
.רזפתהל רנוטל םורגל היושע וזכ הלועפ
חוכ ליעפהל ילבמ ךא אלמ ןפואב הצוחה ותוא
רנוטל םורגל היושע רחא ןפואב הלועפ .זרפומ
.תולמשחתהל
.תולמשחתהל
הרהזא
.םדקהב ךלש
.אפור םע
.םילער זכרמל
.רזפתהל
נספח
• הקנו םעפל םעפמ למשחה לבכ תא קתנ
• ידכ בטיה הטוחס ,החל תילטמב שמתשה
• רחא םעפל םעפמ למשחה עקתו לבכ תא קודב
• םיביכר שי רישכמה לש ימינפה קלחב
• אלש רהזיה ,עוקת ריינ תרסה וא ריינ תניעט תעב
עצבל שי ,התלבוה ךלהמב הנוכמל קזנ עונמל ידכ
• ןהימוד וא תושמושמ רנוט תוינסחמ ךילשת לא
• תוריהזב ףוסא ,רנוט תרזיפ וא תכפש הרקמב םא
• .הכומנ המרב יטנגמ םרז הקיפמ רנוטה תינסחמ
• .רנוטהמ ףואשל אלש ידכ תוריהז יעצמא טוקנ
• םייניעל סנכיי אל רנוטהש ידכ תוריהז יעצמא טוקנ
• .ךרועב עגי אל רנוטהש ידכ תוריהז יעצמא טוקנ
• םילכתמ םיקלחו רנוטה תוינסחמ תא ןסחאל שי
• .הימוד וא רנוטה תינסחמ תא תונשל וא קרפל ןיא
• ךושמ ,רנוטה תינסחממ םוטיאה קבד תרסה תעב
"יובכ" "לעופ" הפיחד-הפיחד גתמ
םייוסיכה תא חתפת לא .םינפב ןכוסמ חתמ
םיענ םיקלחמ ףוג יקלח קחרה :םיענ םיקלח
אצוה .תורקל לולע ילמשח רצק :תוריהז יעצמא
תווצקמ ףוגה יקלח תא קחרה .םידח תווצק ש
םיפרוצמ ויהי אל ליעל םיגצומש םילמסהמ קלש ןכתיי
ןכתיי ,קבא רבטצמ םא .תעל תעמ רישכמה תא הקנ
יפל לעפ ,יוקינה תעב .הכלהכ לעפי אל רישכמהש
,הלעפהה ךלהמב היעב הנשי םא .תואבה תויחנהה
תא רותפל ןתינ אל םא .שמתשמל ךירדמב ןייע
האר ,רישכמה לש הקידבב ךרוצ שיש וא היעבה
.שמתשמל ךירדמב 'היעב רותפל ןתינ אלשכ'
רבדה ,ןכ השעת אל םא .למשחה עקשמ למשחה
.תולמשחתהל וא הפירשל םורגל לולע
( םיעגמב תעגל ןיא
.רישכמל קזנל םורגל הלולע
a
הנוכמה תלבוה תעב
תואבה תולועפה תא
תוחיטבל םירושקה םילמס
"לעופ" בצמ :למשח גתמ
"יובכ" בצמ :למשח גתמ
"הנתמהב" בצמ :למשח גתמ
ןגמ הקראה ףוסמ
.ןכ תושעל הארוה שי ןכ םא אלא
.תעגל ןיא .םח חטשמ :תוריהז
Class II דויצ
.םיעקשהמ למשחה יעקת לכ תא
.רצומל םאתהב -
תרוקיבו הקוזחת
• וז הלועפ .רישכמה ךותב )
•.רנוטה תינסחמ תרסה
• ירמוח םע תירוקמה הספוקב הנוכמה תזירא
.הזיראה
.םידח
]הרעה[
הרהזא
• לבכ תא קתנו למשחה תא הבכ ,יוקינה ינפל
36

French )FR( Le soussigné, Canon Inc., déclare
que le présent équipement e conforme à la
Directive 2014/53/UE.
Le texte complet de la déclaration UE de
conformité e disponible à l'adresse internet
suivante :
http://www.canon-europe.com/ce-documentation
Spécications LAN sans l
Bande)s( de fréquence: 2412-2472 MHz
Puissance maximale de radiofréquence: 15.9 dBm
Italian )IT( Con la presente, Canon Inc.
dichiara che quea apparecchiatura è
conforme alla direttiva 2014/53/UE.
Il teo completo della dichiarazione di
conformità UE è disponibile al seguente
indirizzo Internet:
http://www.canon-europe.com/ce-documentation
Caratteriiche LAN wireless
Banda/e di frequenza: 2412-2472 MHz
Potenza massima a radiofrequenza: 15.9 dBm
Latvian )LV( Canon Inc. ar šo deklarē, ka šī
iekārta atbil Direktīvai 2014/53/ES.
Pilns ES atbilības deklarācijas teks ir
pieejams šādā interneta vietnē:
http://www.canon-europe.com/ce-documentation
Bezvadu LAN specikācijas
Frekvences josla)s(: 2412-2472 MHz
Maksimālā radiofrekvences jauda: 15.9 dBm
Lithuanian )LT( Šiuo dokumentu „Canon
Inc.“ patvirtina, kad ši įranga atitinka direktyvą
2014/53/ES.
Visas ES atitikties deklaracijos tekas
prieinamas šiuo interneto adresu:
http://www.canon-europe.com/ce-documentation
Belaidžio LAN specikacijos
Dažnio diapazonas )-ai(: 2412-2472 MHz
Maksimali radijo ryšio dažnio galia: 15.9 dBm
Dutch )NL( Hierbij verklaar ik, Canon Inc.,
dat deze apparatuur conform is met Richtlijn
2014/53/EU.
De volledige tek van de EUconformiteitsverklaring kan worden
geraadpleegd op het volgende internetadres:
http://www.canon-europe.com/ce-documentation
Draadloos LAN specicaties
Frequentieband)en(: 2412-2472 MHz
Maximaal radiofrequentievermogen: 15.9 dBm
Maltese )MT( B'dan, Canon, qed tiddikjara
li dan it-tip ta' tagħmir huwa konformi madDirettiva 2014/53/UE.
It-te kollu tad-dikjarazzjoni ta' konformità talUE huwa disponibbli f'dan is-sit fuq l-internet:
http://www.canon-europe.com/ce-documentation
Speċikazzjonijiet tal-Wireless LAN
Band)i( tal-Frekwenza: 2412-2472 MHz
Qawwa ta' frekwenza tar-radju massima: 15.9 dBm
Hungarian )HU( A Canon Inc. igazolja, hogy
ez a berendezés megfelel a 2014/53/EU
irányelvnek.
Az EU-megfelelőségi nyilatkozat teljes szövege
elérhető a következő internetes címen:
http://www.canon-europe.com/ce-documentation
Vezeték nélküli LAN műszaki adatai
Frekvenciasáv)ok(: 2412-2472 MHz
Maximális rádiofrekvenciás teljesítmény: 15.9 dBm
Polish )PL( Canon Inc. niniejszym oświadcza,
że niniejsze urządzenie je zgodne z
dyrektywą 2014/53/UE.
Pełny tek deklaracji zgodności UE je
doępny pod naępującym adresem
internetowym:
http://www.canon-europe.com/ce-documentation
RE Directive
)Only for European radio equipment(
RE Declaration of Conformity
English )EN( Hereby, Canon Inc. declares that
this equipment is in compliance with Directive
2014/53/EU.
The full text of the EU declaration of conformity
is available at the following internet address:
http://www.canon-europe.com/ce-documentation
Wireless LAN Specications
Frequency band)s(:2412-2472MHz
Maximum radio-frequency power: 15.9 dBm
Czech )CS( Tímto společno Canon Inc.
prohlašuje, že toto zařízení je v souladu se
směrnicí 2014/53/EU.
Úplné znění EU prohlášení o shodě je k
dispozici na této internetové adrese:
http://www.canon-europe.com/ce-documentation
Technické údaje bezdrátové LAN
Pásmo)a( frekvence: 2412-2472 MHz
Maximální výkon rádiové frekvence: 15.9 dBm
Danish )DA( Hermed erklærer Canon Inc.,
at dette udyr er i overensemmelse med
direktiv 2014/53/EU.
EU-overensemmelseserklæringens fulde
tek kan ndes på følgende internetadresse:
http://www.canon-europe.com/ce-documentation
Trådløs LAN specokationer
Frekvensbånd: 2412-2472 MHz
Maks. radio-frekvenseekt: 15.9 dBm
German )DE( Hiermit erklärt Canon Inc,
dass diese Anlage der Richtlinie 2014/53/EU
entspricht.
Der volländige Text der EUKonformitätserklärung i unter der folgenden
Internetadresse verfügbar:
http://www.canon-europe.com/ce-documentation
WLAN-Spezikationen
Frequenzbereich)e(: 2412-2472 MHz
Maximale Funkfrequenzleiung: 15.9 dBm
Eonian )ET( Käesolevaga deklareerib
Canon Inc., et käesolev seade vaab direktiivi
2014/53/EL nõuetele.
ELi vaavusdeklaratsiooni täielik tek on
kättesaadav järgmisel internetiaadressil:
http://www.canon-europe.com/ce-documentation
Juhtmevaba LAN-i spetsikatsioonid
Sagedusriba)d(: 2412-2472 MHz
Maksimaalne raadiosageduslik võimsus: 15.9 dBm
Spanish )ES( Por la presente, Canon Inc.
declara que ee equipo es conforme con la
Directiva 2014/53/UE.
El texto completo de la declaración UE de
conformidad eá disponible en la dirección de
Internet siguiente:
http://www.canon-europe.com/ce-documentation
Especicaciones LAN inalámbrica
Banda)s( de frecuencia: 2412-2472 MHz
Potencia máxima de radiofrecuencia: 15.9 dBm
Greek )EL( Με την παρούσα, η Canon
Inc. δηλώνει ότι ο παρών εξοπλισμός
συμμορφώνεται με την Οδηγία 2014/53/ΕΕ.
Το πλήρες κείμενο της δήλωσης συμμόρφωσης
της ΕΕ διατίθεται στην ακόλουθη διεύθυνση
στο διαδίκτυο:
http://www.canon-europe.com/ce-documentation
Προδιαγραφές ασύρματου LAN )WLAN(
Ζώνες συχνότητας: 2412-2472 MHz
Μέγιστη ισχύς ραδιοσυχνότητας: 15.9 dBm
Specykacja bezprzewodowej sieci LAN
Pasmo)-a( częotliwości: 2412-2472 MHz
Maksymalna moc na częotliwościach
radiowych: 15.9 dBm
תופיוזמ רנוט תוינסחממ רהזיהל שי
• תופיוזמ רנוט תוינסחמ קושב שיש תעדל יאדכ
תפיוזמ רנוט תינסחמב שומישה .Canon לש
םוגפלו הדורי הספדה תוכיאל םורגל הלולע
תוירחא לכב אשית אל Canon .הנוכמה יעוציבב
שומישמ האצותכ ומרגייש קזנ וא הנואת ,הלקתל
.תפיוזמ רנוט תינסחמב
global.canon/ תבותכב ןייעל ןתינ ףסונ עדימל
.ctc
רנוט תוינסחמו ףוליח יקלח לש תונימזה תפוקת
םהימודו
• רובע םהימודו רנוטה תוינסחמו ףוליחה יקלח
תוחפל םינש )7( עבש ךשמל םינימז ויהי רישכמה
.הז הנוכמ םגד לש רוצייה תקספה רחאל
רנוט תינסחמ לש הזיראה ירמוח
• םה .רנוטה תינסחמ לש הזיראה ירמוח תא רומש
.רישכמה עוניש תעב םישרדנ
• וא הרוצב תונתשהל םייושע הזיראה ירמוח
םהמ ריסחהל וא םהל ףיסוהל היהי ןתינו ,םוקימב
.תמדקומ הארתה אלל
• ,רנוטה תינסחממ םוטיאה קבד תרסה רחאל
תוימוקמה תונקתל םאתהב ותוא ךילשהל שי
.תומיאתמה
הל המודה וא תשמושמ רנוט תינסחמ תכלשה תעב
• המודה וא תשמושמ רנוט תינסחמ תכלשה תעב
עונמל ידכ ירוקמה הזיראה רמוחב התוא חנה ,הל
םאתהב התוא ךלשהו ,םינפבמ רנוט לש הכיפש
.תומיאתמה תוימוקמה תונקתל
העדוה
רצומה םש
.רצומה םש לש םושיר תושרוד תוחיטבה תונקת
ןכתיי ,רכמנ הז רצומ םהבש םימיוסמ םירוזאב
.םיירגוסב םיעיפומש םיאבה תומשה ומשרייש
MF543x )F176402(
MF542x )F176400(
EC תונקת תרגסמב EMC-ה תושירד
EMC-ה לש תוינויחה תושירדל םאות הז דויצ
הז רצומ יכ םיריהצמ ונא .EC תונקת תרגסמב
טלקב EC תונקת תרגסמב EMC-ה תושירדל םאות
טלקש תורמל ,ץרה 50 ,טלוו 230 לש ילנימונ למשח
,טלוו 240 דע 220 איה רצומה לש תימשרה למשחה
תומיאתל תינויח ךכוסמ לבכב שומישה .ץרה 50/60
.EC תונקת תרגסמב EMC-ה לש תוינכטה תושירדל
He
Wireless LAN לע ירוטלוגר עדימ
Regulatory information for users in
Jordan
MF543x / MF542x includes approved
Wireless LAN Module )Model name:
AW-NM333(.
Contains Wireless LAN Module approved by
TRC/SS/2018/181
Regulatory information for users in
Russia
Подтверждение соответствия
Минкомсвязи России: Декларация
соответствия № Д-МДРД-5398 от
28.05.2018 года, действительна до
28.05.2024 года, зарегистрирована в
Федеральном агентстве связи 07.06.2018
Regulatory information for users in UAE
MF543x / MF542x includes approved
Wireless LAN Module )Model name:
AW-NM333(.
TRA
REGISTERED No: ER63428/18
DEALER No: DA0060877/11
37

נספח
הז ךירדמב םישמשמה םינצחלו םישקמ
המגוד םיווהמ םיאבה םישקמהו םילמסה תומש
ץוחלל שיש םישקמ םיראותמ ובש ןפואל תיקלח
םגדל םיכייש הז ךירדמב םישמשמה תוגוצתו םירויא
דחי( הלא הנכות ילודומל ןוכדע לכ ללוכ ,הלא הנכות
,עמתשמ וא שרופמ ןפואב םא ןיב ,תוכז וא ןוישר
,קוושל ,הנשמ ןוישר קינעהל ,תוצקהל יאשר ךניא )4(
He
ךלש תובוחהו תויוכזה לכ תאו רצומה לע ךיתויוכז
םרוג ותוא )ב(ו רחא םרוגל ןוישרה יאנת תרגסמב
וא קרפל ,רוחאל הסדנה עצבל ,רדהל יאשר ךניא )6(
רוציל וא רצומהמ הנכותה תא ריסהל יאשר ךניא )8(
הז ךירדמב םישמשמה תוגוצתו םירויא
.תרחא ןיוצ םא אלא MF543x
.מ"עב Apple לש ירחסמ ןמיס אוה Mac
,Windows Vista , Windows , Microsoft
Excel , Internet Explorer , Windows Server
םינמיס וא םיירחסמ םינמיס םה PowerPoint-ו
Microsoft Corporation לש םימושר םיירחסמ
.תורחא תונידמב וא/ו ב"הראב
ךירדמב םיעיפומש םירחא תורבח תומשו םירצומ
,םהילעב לש םיירחסמ םינמיס תויהל םייושע הז
לש םילודומ ללוכ )"רצומה"( Canon לש הז רצומ
ילודומ לש הצפההו שומישה .ישילש דצ לש הנכות
דע )1( ןוישרה יאנתל םיפופכ ,)"הנכותה" םיארקנ
אוציי תרקב קוח לכל ףופכ תויהל םיכסמ התא )1(
תונידמה לש הנקת לכלו הלבגמ לכל ,יטנוולר
הנכותה ללוכ הז רצומ ובש הרקמב תוברועמה
.איהש הנידמ לכל אצויי וא רבעוי ,חלשיי ולש
לע ןבומ לכב םירמוש הנכותב תויוכזה ילעב )2(
רשקהב ינחורה ןיינקה תויוכזו תולעבה ,ןיינקה
,שרופמ ןפואב ןאכ ןיוצמה ןפואל דבלמ .הנכותל
לכ הנכותה ילעב ידי-לע ךל ןתניי וא רבעוי אל
.הנכותה לע ינחור ןיינק תוכז לכל
תרטמל קרו ךא הנכותב שמתשהל יאשר התא )3(
ישילש דצ לכל הנכותה תא ריבעהל וא ץיפהל
.הנכותה ילעבמ בתכב םכסה ילבמ
תא ריבעהל יאשר ךניה ,ליעל רומאה ףא לע )5(
לכ תא ריבעמ התא )א( :ש הדימב קר הנכותה
.וללה םיאנתה לכל ףופכב לועפל םיכסמ
ןפואב וז הנכות לש דוקה תא הרוצ לכב תונשל
.םדא ידי-לע האירקל ןתינש
,ריכשהל ,םגרתל ,םיאתהל ,תונשל יאשר ךניא )7(
תודובע רוציל וא הנכותה תא ליאשהל וא רוכחל
.הנכותה לע ססבתהב תורזגנ
.רצומהמ הנכותה לש םידרפנ םיקתוע
הנכותה לש םדא ידי-לע האירקל ןתינה קלחה )9(
.ןוישרב ךל ןתינ וניא )רוקמה דוק(
הז ךירדמ תודוא
.הז ךירדמב םהילע
•]שקמ למס[ :הלעפהה חול ישקמ
:המגוד
•>.דעי ןויצ< :גצ
• :בשחמה גצב םיעיפומש םיטירפו םינצחל
]תופדעה[
םיירחסמ םינמיס
.המאתהב
ישילש דצ תנכות
.ןלהל םיעיפומש )9(
.רצומב שומיש
Irish )GA( Dearbhaíonn Canon Inc., leis seo,
go bhfuil an trealamh seo i gcomhlíonadh leis
an Treoir 2014/53/AE.
Tá an téacs iomlán de Dhearbhú
Comhréireachta AE ar fáil ag seoladh an
láithreáin ghréasáin mar seo a leanas:
http://www.canon-europe.com/ce-documentation
Sonraíochtaí LAN Gan Sreang
Banda)í( minicíochta: 2412-2472 MHz
Uaschumhacht radaimhinicíochta: 15.9 dBm
Norwegian )NO( Herved erklærer Canon Inc.
at dette utyret er i overensemmelse med
direktiv 2014/53/EU.
Den fulle teken til EUs samsvarserklæring er
tilgjengelig på følgende Internett-adresse:
http://www.canon-europe.com/ce-documentation
Trådløs LAN-spesikasjoner
Bølgelengde: 2412-2472 MHz
Maks radiofrekvensyrke: 15.9 dBm
Icelandic )IS( Hér með lýsir Canon Inc því yr
að þessi búnaður er í samræmi við tilskipun
2014/53/ESB.
Allur texti ESB-samræmisyrlýsingar er í boði á
eftirfarandi veangi:
http://www.canon-europe.com/ce-documentation
Tæknilýsingar fyrir þráðlausa nettengingu
Tíðnisvið: 2412-2472 MHz
Hámarksyrkur útvarpíðnibylgja: 15.9 dBm
שומישה לעו רצומב שומיש לע תויטפשמ תולבגמ
םיכמסמ תקפהלו הספדהל ,הקירסל רצומב שומיש
תונומתכ הלאכש תונומתב שומישהו תומיוסמ
,ךלש רצומה ידי לע וקפוה וא/ו וספדוה ,וקרסנש
םהילע ולוחיש ןכתייו קוח יפל םירוסא תויהל םייושע
לש התצומ אלש המישר .תילילפ וא תיחרזא תובח
הדעונ וז המישר .ןלהל ךכיפל העבקנ ולא םיכמסמ
ףקותה יבגל חודב ךניא םא .דבלב היחנהכ שמשל
וא הספדה ,הקירסל רצומב שומיש לש יטפשמה
תונומתב שומישה יבגל וא/ו והשלכ ךמסמ לש הקפה
ךילע ,תרחא ךרד לכב וקפוה וא וספדוה ,וקרסנש
.היחנה תלבקל יטפשמ ץעוי םע שארמ ץעייתהל
םירצויה תויוכז ילעבמ
תוירחא לע רותיו בתכ
,עמתשמ וא שרופמ ןפואב םא ןיב ,ולא םירמוחל
יבגל תוירחאל לבגומ אלו ללוכ ,ןאכ ןיוצמכ דבלמ
,םימיוסמ שומיש וא הרטמל רשוכ ,קוויש ,תוריחס
היהת אל מ"עב Canon תרבח .הרפה-יא וא
וא ןדבוא לכל וא ,גוס לכמ קזנ לכל תיארחא
ןפואב םא ןיב ,הז רצומב שומישמ עבונה דספה
.יתביסנ וא ירקמ ,רישי
תונומתב
•תורטש
•םיעסונ תואחמה
•ףסכ תואחמה
•ןוזמ ישולת
•ןודקיפ תודועת
•םינוכרד
•)םילטובמ אל וא םילטובמ( ראוד ילוב
•הריגה יכמסמ
•הגרד ינמיס וא םיגת יוהיז
•)םילטובמ אל וא םילטובמ( םילוב סמ
•סויג וא הבוח תוריש יכמסמ
•םירחא בוח יכמסמ וא בוח תורגא
• תויונכוס ידי לע וקפנוהש תוטויט וא םיקיש
תויתלשממ
•תוינמ יכמסמ
•ראות יכמסמו בכרל תונוישיר
• תושר אלל ,םירצוי תויוכזב תונגומ תונמוא/תודובע
• לכ אלל יונישל ןותנ הז ךמסמב עיפומש עדימה
.שארמ העדוה
• הרוצ םושב תיארחא הניא מ"עב Canon תרבח
Portuguese )PT( Por ee meio, a Canon Inc.
declara que o presente equipamento eá em
conformidade com a Diretiva 2014/53/UE.
O texto integral da declaração de conformidade
da UE eá disponível no seguinte endereço
de Internet:
http://www.canon-europe.com/ce-documentation
Especicações de LAN Sem Fios
Banda)s( de frequências: 2412-2472 MHz
Potência máxima de radiofrequência: 15.9 dBm
Slovene )SL( Canon Inc. potrjuje, da je ta
oprema v skladu z Direktivo 2014/53/EU.
Celotno besedilo izjave EU o skladnoi je na
voljo na naslednjem spletnem naslovu:
http://www.canon-europe.com/ce-documentation
Specikacije za brezžični LAN
Frekvenčna območja: 2412-2472 MHz
Največja radiofrekvenčna moč: 15.9 dBm
Slovak )SK( Spoločnosť Canon Inc. týmto
vyhlasuje, že toto zariadenie je v súlade so
smernicou 2014/53/EÚ.
Úplné znenie EÚ vyhlásenia o zhode je k
dispozícii na tejto internetovej adrese:
http://www.canon-europe.com/ce-documentation
Technické údaje bezdrôtovej LAN
Pásmo )a( frekvencia: 2412-2472 MHz
Maximálny výkon rádiovej frekvencie: 15.9
dBm
Finnish )FI( Canon Inc. vakuuttaatäten, että
tämä laite on direktiivin 2014/53/EU mukainen.
EU-vaatimuenmukaisuusvakuutuksen
täysimittainen teki on saatavilla seuraavassa
internetosoitteessa:
http://www.canon-europe.com/ce-documentation
Langattoman LAN:in tekniset ominaisuudet
Taajuuskaia)t(: 2412-2472 MHz
Suurin radiotaajuueho: 15.9 dBm
Swedish )SV( Härmed försäkrar Canon Inc. att
denna utruning överensämmer med direktiv
2014/53/EU.
Den fulländiga texten till EU-försäkran om
överensämmelse nns tillgänglig på följande
webbadress:
http://www.canon-europe.com/ce-documentation
Specikationer för trådlö LAN
Frekvensband: 2412-2472 MHz
Maximal radiofrekvenseekt: 15.9 dBm
Romanian )RO( Prin prezenta, Canon
Inc. declară că ace echipament ee în
conformitate cu Directiva 2014/53/UE.
Textul integral al declarației UE de conformitate
ee disponibil la următoarea adresă internet:
http://www.canon-europe.com/ce-documentation
Specicații wireless LAN
Benzi de frecvență: 2412-2472 MHz
Putere maximă a frecvenței radio: 15.9 dBm
Bulgarian )BG( С настоящото Canon
Inc. декларира, че това съоръжение е в
съответствие с Директива 2014/53/ЕС.
Цялостният текст на ЕС декларацията за
съответствие може да се намери на следния
интернет адрес:
http://www.canon-europe.com/ce-documentation
Спецификация на безжичната LAN
Честотна лента)и(: 2412-2472 MHz
Максимална радиочестотна мощност: 15.9 dBm
Croatian )HR( Canon Inc. ovime izjavljuje da je
oprema u skladu s Direktivom 2014/53/EU.
Cjeloviti tek EU izjave o sukladnoi doupan
je na sljedećoj internetskoj adresi:
http://www.canon-europe.com/ce-documentation
Specikacije bežičnog LAN-a
Frekvencijski pojas)evi(: 2412-2472 MHz
Maksimalna snaga radijske frekvencije: 15.9 dBm
38

רצומה ,ליעל )9( דע )1( םיפיעסב רומאה ףא לע
יאנת תא םיוולמה ישילש דצ תנכות לש םילודומ ללוכ
יאנתל םיפופכ הלא הנכות ילודומו ,םיפסונה ןוישרה
תנכות ילודומ לש םיפסונה ןוישרה יאנתב ןייעל שי
ךירדמ לש חפסנב םיראותמה ישילשה דצה
ןימז הז ךירדמ .יטנוולרה רצומה לש שמתשמה
.https://oip.manual.canon/
יאנת לכל םיכסמ ךניה ,הז רצומב שומיש ידי-לע
ןוישר יאנתל םיכסמ ךניא םא .םייטנוולרה ןוישרה
.ךלש תורישה גיצנ לא הנפ ,ולא
V_181009
.םיפסונה ןוישרה
תבותכב
He
39

CANON INC.
30-2, Shimomaruko 3-chome, Ohta-ku, Tokyo 1468501, Japan
CANON CHINA CO. LTD.
2F Jinbao Building No.89, Jinbao Street,
Dongcheng District, Beijing 100005, PRC
CANON MARKETING JAPAN INC.
16-6, Konan 2-chome, Minato-ku, Tokyo 108-8011,
Japan
CANON U.S.A., INC.
One Canon Park, Melville, NY 11747, U.S.A.
CANON EUROPA N.V.
Bovenkerkerweg 59, 1185 XB Amstelveen, The
Netherlands
USRM2-9908-00 XXXXXXXXXX Copyright CANON INC. 2019 PRINTED IN XXXXX
CANON SINGAPORE PTE LTD
1 Fusionopolis Place, #15-10, Galaxis, Singapore
138522
CANON AUSTRALIA PTY LTD
Building A, The Park Estate, 5 Talavera Road,
Macquarie Park, NSW 2113, Australia
CANON GLOBAL WORLDWIDE SITES
https://global.canon/
 Loading...