

Canon LBP-1760, LBP 1760 - B/W Laser Printer, LBP-1760e User Manual

LBP-1760e
Laser Beam Printer
USER’S GUIDE
Canon Inc.
3-30-2 Shimomaruko
Ohta-ku, Tokyo 146-8501, Japan

Copyright
Copyright © 1999 Canon Inc. . This document contains proprietary information which is protected by copyright. All
rights are reserved. No part of this document may be photocopied, reproduced, or translated into another language
without prior written consent of Canon Inc. The information in this document is subject to change without notice.
Notice
Canon Inc. makes no warranty of any kind with regard to this material, either express or implied, except as provided
herein, including without limitation thereof, warranties as to marketability, merchantability, for a particular purpose
of use, or against infringement of any patent. Canon Inc. shall not be liable for any direct, incidental, or
consequential damages of any nature, or losses or expenses resulting from the use of this material.
License Notice
Copyright 1992-1999 Peerless Systems Corp.
Universal Font Scaling Technology, UFST, is licensed from Agfa-Gevaert Japan, Ltd.
Trademark Credits
Adobe, the Adobe logo, PostScript, PostScript 3, Carta, Tekton and the PostScript logo are trademarks of Adobe
Systems Incorporated.
Agfa is a trademark of Agfa-Gevaert AG and may be registered in some jurisdictions.
Albertus, Arial, Book Antiqua, Bookman Oldstyle, Century Gothic, GillSans, Joanna and Times New Roman are
trademarks of The Monotype Corporation Plc., and may be registered in some jurisdictions.
Apple, Apple Chancery, Chicago, Geneva, Hoefler Text, Macintosh, Monaco, New York and TrueType are
trademarks of Apple Computer, Inc. Macintosh computer is a product of Apple Computer, Inc.
Coronet is a registered trademark of Ludlow Type Foundry.
CG, Intellifont and UFST are trademarks of Bayer Corporation or its affiliated companies and may be registered in
some jurisdictions.
CG Omega is a product of Bayer Corporation and CG Times, based on Times New Roman under license from the
Monotype Corporation plc, is a product of Bayer Corporation.
Clarendon, Helvetica, New Century Schoolbook, Optima, Palatino, Stempel Garamond and Times are trademarks
of Linotype-Hell AG and/or its subsidiaries. Univers is a trademark of Linotype-Hell AG and/or its subsidiaries and
may be registered in some jurisdictions.
Eurostile is a trademark of Nebiolo.
ITC AvantGarde Gothic, ITC Bookman, ITC Lubalin Graph, ITC Mona Lisa, ITC Symbol, ITC Zapf Chancery and
ITC Zapf Dingbats are registered trademarks of International Typeface Corporation.
LaserJet 4, 5, 5si Printers are a products of Hewlett-Packard Company.
LBP, Canon and the Canon logo are trademarks of Canon Inc.
Marigold and Oxford are trademarks of AlphaOmega Typography, Plc.
Memory Reduction Technology is a trademark of Peerless Systems Corporation that may be registered in some
countries.
Microsoft, Windows and Windows NT are either registered trademarks or trademarks of Microsoft Corporation in
the United States and/or in other countries. Wingdings is a trademark of Microsoft Corporation.
PCL and HP-GL/2 are trademarks of Hewlett-Packard Company.
UNIX is a registered trademark exclusively licensed from X/Open Company,Ltd. in the United States and other
countries.
As concerns typeface credit, the actual names on a FONT LIST for this printer may differ from those listed above.
Other company or product names used in this manual and not included in the list above are trademarks of those
companies and may be registered in certain jurisdictions.

Welcome!
Your printer is the latest in a long series of Canon printers and incorporates the best
features of our leading edge technology. This USER’S GUIDE contains all the
information you need for everyday operation and reference.
What This Manual Contains
■
Chapter 1: Getting to Know Your Printer
A brief introduction to the printer and its parts, including a list of key features and
improvements over earlier models.
■
Chapter 2: Using the Printer
All the information you need for everyday operation, such as loading the cassette and
the Multi-Purpose tray with different sizes and types of media.
■
Chapter 3: The Printing Environment
Detailed explanations of all the menu messages and how to change the settings. A
quick hands-on introduction guides you through menus and shows you how to use the
printer control panel.
■
Chapter 4: Optimizing Your Printing Environment
This explains many of the printer’s advanced features such as context saving,
personality switching and how to optimize the use of memory. Procedures about how
to print the test page and font list are also covered.
■
Chapter 5: PostScript Printing
Shows you how to test your PostScript module installation and print with PostScript.
■
Chapter 6: Maintenance
Routine maintenance procedures for handling and storing toner cartridges, replacing
a toner cartridge and cleaning the printer.
■
Chapter 7: Troubleshooting
Shows how to solve problems. Read this chapter when you have trouble with poor
printouts, paper jams and messages you don’t understand.
■
Reference: Appendices
Information tables about resident fonts, symbol sets and specifications are provided
at the end of this manual. Detailed information about selecting, handling and storing
paper and other media for the printer is also provided.
■
Glossary
If you find a term you don’t understand, look it up in the glossary of printer terms at
the end of the guide.

Conventions
The following conventions are used in this guide.
■
Indicators
References to indicators on the printer control panel appear by name in bold text just
as they appear on the panel. For example:
While the printer is processing a job, the On Line indicator starts blinking. When the
printer is on-line, the On Line indicator is on.
■
Go
Key names appear in bold text. For example:
Press Go to take the printer off-line.
■
Printer message displays are enclosed in a box:
The printer uses an easy-to-read, 2 line × 16 character LCD panel for messages.
Unless messages continue onto two lines, this manual will only show a single line
display.
CAUTION
This symbol indicates specific procedures that must be followed to
prevent possible personal injury or damage to furnishings.
This symbol indicates important instructions about procedures to help you
prevent possible damage to the printer software or hardware; or how to avoid
unnecessary difficulties.
This symbol indicates notes and memos containing useful tips or more
detailed information.

Table of Contents
Chapter 1 Getting to Know Your Printer...................................... 1
Introduction ................................................................................1
Optional equipment ............................................................... 4
Parts of the Printer ................................................................ 6
Printer control panel ............................................................ 11
Serial number...................................................................... 15
Chapter 2 Using the Printer........................................................17
Paper Path and Printing Process.............................................17
Paper path........................................................................... 18
Paper orientation................................................................. 19
Paper requirements............................................................. 20
Setting Up the Printer Driver....................................................22
Printing from the Standard Paper Cassette.............................26
Removing the paper cassette ............................................. 26
Changing the paper size for the paper cassette ................. 26
Loading paper in the paper cassette................................... 27
Cancelling a print job...........................................................30
Selecting paper delivery...................................................... 31
Printing from the Multi-Purpose Tray....................................... 33
Guidelines for using the Multi-Purpose tray ........................33
Loading the Multi-Purpose tray ........................................... 35
Printing the first sheet on letterhead ................................... 37
Using the Multi-Purpose tray as a manual feed station....... 39
Printing Envelopes with the Multi-Purpose Tray......................42
Before loading envelopes.................................................... 42
Loading envelopes .............................................................. 44
Using the control panel to print envelopes .......................... 46
Printing transparencies ....................................................... 47
Manual duplex printing ........................................................ 48
Duplex Printing.........................................................................50
Selecting a binding method................................................. 51
Setting duplex printing from the printer control panel.......... 52
Loading letterhead paper for duplex printing....................... 53
1
2
3
4
5
6
7
Chapter 3 The Printing Environment ......................................... 55
What is the Printing Environment? ..........................................55
A Quick Tour of the Printing Environment ............................... 56
How the menus are organized ............................................ 56
Going off-line for menu display and item selection..............57
Making a selection from a menu ......................................... 57
v

Resetting the Default Values ................................................... 59
Resetting the printer or menus............................................ 59
Performing a cold reset ....................................................... 60
The Standard Printing Environment Settings .......................... 61
PCL MENU.......................................................................... 62
FEEDER MENU .................................................................. 68
CONFIG MENU................................................................... 72
MEMCONFIG MENU .......................................................... 75
PARALLEL MENU............................................................... 77
ETHERNET MENU ............................................................. 79
TOKEN RING MENU .......................................................... 81
TEST MENU ....................................................................... 83
Displaying the Page Count.................................................. 84
LANGUAGE MENU............................................................. 85
RESET MENU..................................................................... 86
Chapter 4 Optimizing Your Printing Environment ....................87
Economizing on Use of Toner ................................................. 87
Adjusting the Print Density.......................................................88
Printer Personality Switching ................................................... 89
Dedicating the printer to one personality.............................90
Saving Downloaded Resources With Context Saving............. 91
How much memory is enough?........................................... 92
Turning context saving on and of f........................................ 93
Printing a Test Print ................................................................. 94
Test print sample ................................................................. 95
Printing the test print continuously ...................................... 97
Printing the Font Lists .............................................................. 98
PCL font list sample ............................................................ 99
PCL demonstration page ..................................................101
Chapter 5 PostScript Printing .................................................. 103
Testing the PostScript Installation .........................................104
Checking the menus.......................................................... 104
Setting PostScript Printing Options ....................................... 105
Automatic personality switching ........................................ 105
Dedicating the printer to the PostScript language............. 105
Setting up the PostScript printing environment ................. 106
PS MENU.......................................................................... 107
Printing the demo page and font list.................................. 109
Notes on the PostScript Personality ...................................... 113
Chapter 6 Maintenance............................................................. 115
Storing and Handling Toner Cartridges ................................. 116
Storing toner cartridges ..................................................... 116
Handling toner cartridges.................................................. 117
vi

Replacing a Toner Cartridge.................................................. 118
When to replace a toner cartridge..................................... 118
Replacing a toner cartridge............................................... 119
Cleaning the Printer ............................................................... 124
Daily care ..........................................................................124
Cleaning the transfer guide area....................................... 125
1
2
Chapter 7 Troubleshooting....................................................... 127
When You Have Trouble Printing .......................................... 127
Problems and Solutions Without Messages.......................... 128
Responding to Error Messages ............................................. 132
Call-for-service messages................................................. 132
Messages T able ................................................................ 134
Skipping error messages temporarily................................ 140
Setting the printer to skip errors automatically .................. 140
Clearing Paper Jams .............................................................141
Restarting a print after clearing a paper jam..................... 143
z Face-up tray area.......................................................... 143
x Face-down tray area..................................................... 144
c Imaging area................................................................. 145
v Optional envelope feeder area ..................................... 147
b Multi-Purpose tray area ................................................ 149
n Paper cassette area...................................................... 150
m Optional 500-sheet paper feed unit area ...................... 152
, Optional duplex unit area.............................................. 153
Correcting Poor Print Quality .................................................158
When text is too light or dark ............................................ 158
When you see vertical stripes or fading ... ........................ 159
When you see black spots or white specks ...................... 161
Calling for service.............................................................. 162
Reference Appendix 1: Typeface Samples .............................. 163
Resident scalable font samples......................................... 163
Resident bitmap font samples........................................... 164
Resident scalable barcode font samples .......................... 164
PostScript (option) font samples ....................................... 165
3
4
5
6
7
Appendix 2: Symbol Sets Supported ....................168
ISO substitution table ........................................................ 188
Appendix 3: Print Media Specifications ................ 189
General specifications....................................................... 189
Plain white paper............................................................... 190
Colored paper ................................................................... 191
Heavy (thick) paper ........................................................... 191
Paper you can’t use! ......................................................... 192
vii

Transparency film.............................................................. 193
Adhesive labels................................................................. 193
Envelopes .........................................................................194
Storing paper..................................................................... 196
Handling paper.................................................................. 197
Appendix 4: Printer Specifications ........................ 198
Operating specifications.................................................... 198
Interface specifications...................................................... 202
Glossary ...................................................................204
Index .........................................................................218
Menu Operation Flow .............................................. 224
viii

Chapter 1
Getting to Know Your Printer
Introduction
Your printer offers fast printing speed, superior print quality, sophisticated paper
handling, and ecology- and energy-sensitive features. The printer also accommodates
hardware options to meet your networking requirements.
This chapter introduces the features of the printer, the names of the printer parts and
the functions of the printer control panel buttons and indicators.
■
High speed printing
The Intel 960HD-50 processor enables a print speed of up to 16 pages per minute
(ppm) for A4 size paper and 17 ppm for letter size paper.
1
■
Superior print quality
High resolution printing at 1200 × 1200 or 600 × 600 dpi (dots per inch) is further
enhanced by Automatic Image Refinement to smooth jagged edges along with the use
of super fine toner. Combined, these will ensure superior reproduction quality of text
and graphics.
■
Software compatibility and language switching
The printer supports Hewlett-Packard’s PCL6 printer language, which enables the
printer to work with a wide variety of software applications supporting PCL. The
printer can also support Adobe® PostScript® 3™, which allows you to print PostScript
data files at 1200 or 600 dpi. With the optional Canon Adobe® PostScript® 3™ Module
A5 (an add-in ROM for Adobe PostScript 3) installed, the printer can sample the print
data as it is received and then automatically switch between the PCL and PostScript
personalities.
Introduction
1

■
Memory saving technology
Memory Reduction Technology accomplishes 1200 × 1200 dpi printing with only 4
MB of memory for A4 or Letter simplex printing. Complex page data is compressed
to optimize available resources.
■
Paper handling
The standard paper cassette holds 500 sheets of paper while the Multi-Purpose tray
holds about 100 sheets of standard paper. The tray can hold a variety of media for
automatic feeding and operate as a manual feed station.
In addition, there are several optional features to greatly increase your printing
capacity: a 500-sheet paper feed unit, a duplex unit, and an envelope feeder.
■
Energy saving
The on-demand fusing technology of the printer provides improved energy efficiency.
Because of this power saving feature, the printer meets the guidelines for the
International ENERGY STAR Program.
■
Reducing toner consumption
To save toner, you can also select the economy mode to print rough drafts with less
toner. The printed page is much lighter, similar to the draft mode found on many dot
matrix printers.
2 Introduction
■
Interface features
The printer supports automatic interface switching between all active ports. The
printer comes with the IEEE 1284 compliant parallel interface. The IEEE 1284
compliant parallel interface supports bi-directional communications between the
printer and the computer. The printer also comes with I/O slots designed to support
the optional network modules to connect the printer to Ethernet or Token Ring
network environments. This allows you to connect multiple computers to the printer
simultaneously.

■
Typefaces
The printer comes with 45 scalable typefaces in 14 typeface families (Agfa 45
MicroType fonts) and 27 additional TrueType fonts, all compatible with application
software supporting Microsoft Windows. In addition, 9 bitmapped typefaces of the
Line Printer family are also included. The printer uses the Universal Font Scaling
Technology (UFST) for outline fonts, provided under license from Agfa-Gevaert
Japan, Ltd. Also supplied with the printer are the TrueType screen fonts for 110 font
solution and Canon Font Manager for easy management of installed fonts in Microsoft
Windows® 98/95 and Windows NT version 4.0. A list of typeface samples is provided in
Appendix 1.
■
Printer drivers and utilities
The printer comes with printer drivers for Microsoft Windows 98/95, and Windows
NT 4.0. This allows you to control most printer settings from the Windows driver
screens.
You may need to install additional memory for duplex printing or for
printing large, complex files. See page 50.
1
®
Introduction
3

Optional equipment
Below is a list of the options available for installation with this printer. For more
details, contact your local supplier.
■
Adobe PostScript 3
The software that enables your printer to perform Adobe PostScript 3 printing is
supplied in the Canon Adobe® PostScript® 3™ Module A5 (hereafter referred to as the
A5 module) as an optional ROM. This software includes a total of 136 fonts.
(Typeface samples are shown in Appendix 1.) The module comes with Adobe
PostScript 3 printer drivers for Macintosh OS computers, Microsoft Windows 98/95,
and Windows NT version 4.0.
■
Network Cards
Easily installed in the printer, the network cards connect the printer to an Ethernet or
Token Ring network environment including Canon Ethernet Board EB-52.
For details on the network cards supported by the printer, contact your local
supplier.
■
500 Sheet Paper Feed Unit PF-52
The Canon 500 Sheet Paper Feed Unit is designed for high volume printing and sits
underneath the standard paper cassette. The feeder holds 500 sheets (80 g/m2 or 21 lbs.
paper) and can be adjusted to accept different sizes of paper, up to Legal-size.
4 Introduction
■
Envelope Feeder EF-52
The Canon Envelope Feeder is available where there is a heavy requirement for
printing envelopes. The envelope feeder can hold up to 75 envelopes or a stack up to
2 1/8 inches (55mm).
■
Duplex Unit DU-52
The Canon Duplex Unit allows you to print on both sides of a page and produce
documents ready for professional binding. The duplex unit fits snugly in the rear of
the printer. Once installed, you can switch easily between duplex (two-sided) printing
and simplex (single-sided) printing.

■
Flash ROM Module FR5
Easily installed in the printer, this increases the amount of memory available for the
storage of fonts and macros in the printer.
■
RAM DIMM Modules
Easily installed in the printer, these increase the amount of memory available to the
printer.
1
Introduction
5
Parts of the Printer
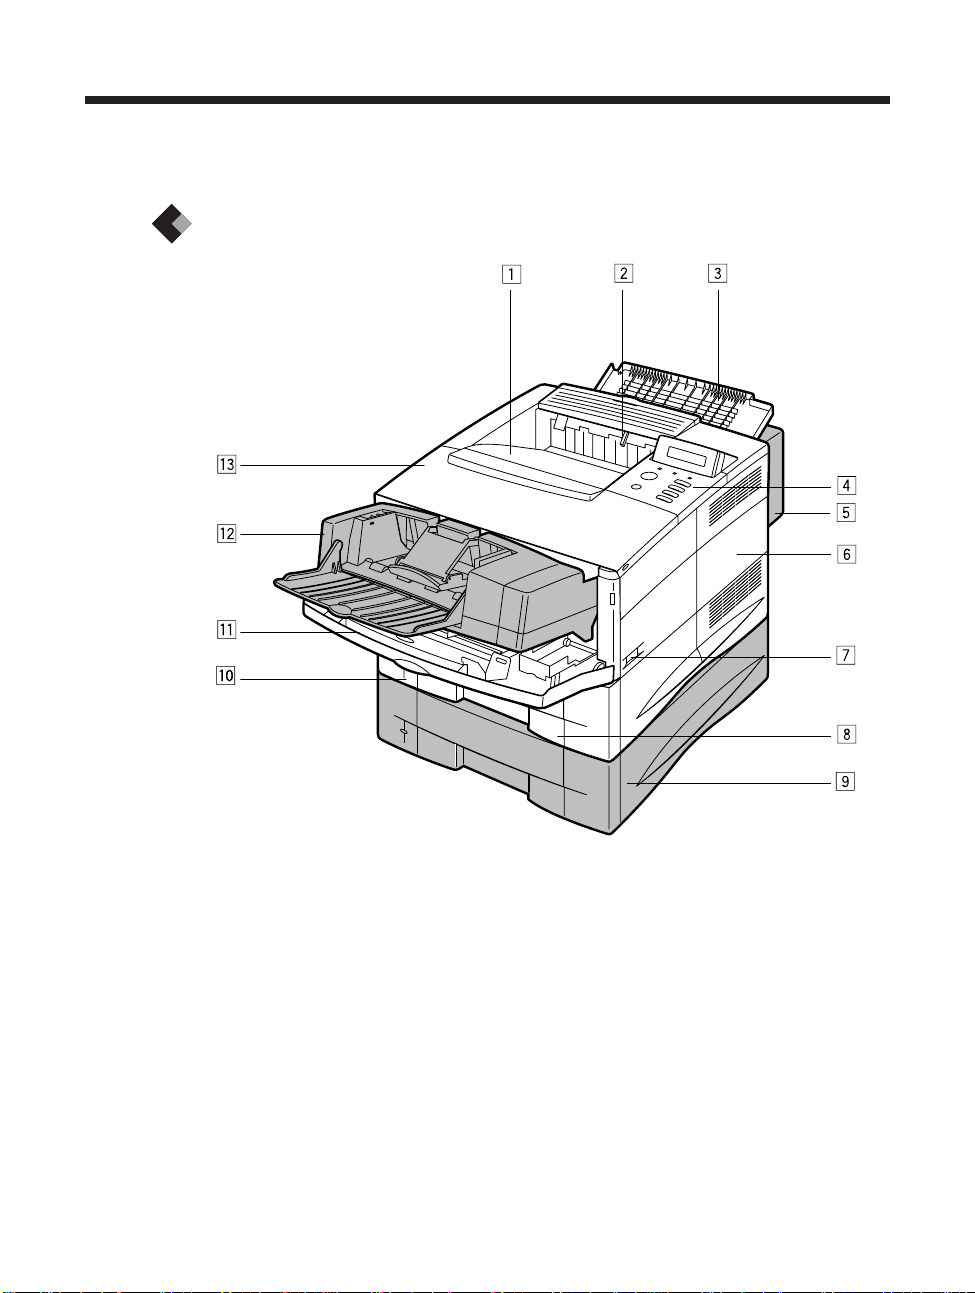
Front right view
6 Introduction
z Face-down tray (top tray) Holds approximately 250 printed sheets
(80 g/m2 or 21 lbs.) delivered face down and collated.
x Full paper sensor Indicates when the face-down tray is full.
c Face-up tray (opened) Holds approximately 50 printed sheets (80 g/m2 or
21 lbs.) delivered face up.
v Control panel For printer operation and status display.
b Duplex unit The optional Canon Duplex Unit DU-52 allows the printer to
automatically print on both sides of the paper.

n Side cover Open to install the optional Canon Adobe® PostScript® 3™ Module
A5 or additional RAM DIMMs.
m Power switch Press to turn the printer on or off.
, Standard paper cassette The Canon 500 Sheet Universal Cassette UC-52,
which is also available as an option, holds approximately 500 sheets of A4-,
Letter- or Legal-size paper (80 g/m2 or 21 lbs.).
. Paper feeder The optional Canon 500 Sheet Paper Feed unit PF-52 holds an
additional approximately 500 sheets of paper up to Legal in size (80 g/m2 or 21
lbs.).
⁄0 Paper volume status bar Indicates how much paper remains in the paper
cassette.
⁄1 Multi-Purpose tray Holds a variety of print media such as plain paper,
envelopes, labels, transparencies and non-standard size paper. The capacity is
approximately 100 sheets of plain paper (80 g/m2 or 21 lbs.) (see page 33).
⁄2 Envelope feeder The optional Canon Envelope Feeder EF-52 holds up to 75
envelopes or a stack up to 2 1/8 inches (55 mm) deep.
⁄3 Top cover Open to install the toner cartridge, clear paper jams, and for printer
maintenance.
1
Introduction
7

Inside top cover
z Toner cartridge compartment Holds the Canon EP-52 Toner Cartridge.
x Transfer guide area (black metal strip) Located inside the printer, the
transfer guide area and registration roller area should be cleaned periodically
with a damp cloth to remove any paper dust collected on the plate or transparent
sheet.
8 Introduction
c Transfer charging roller This delicate roller should be kept free of fingerprints
and oil to prevent print quality deterioration.
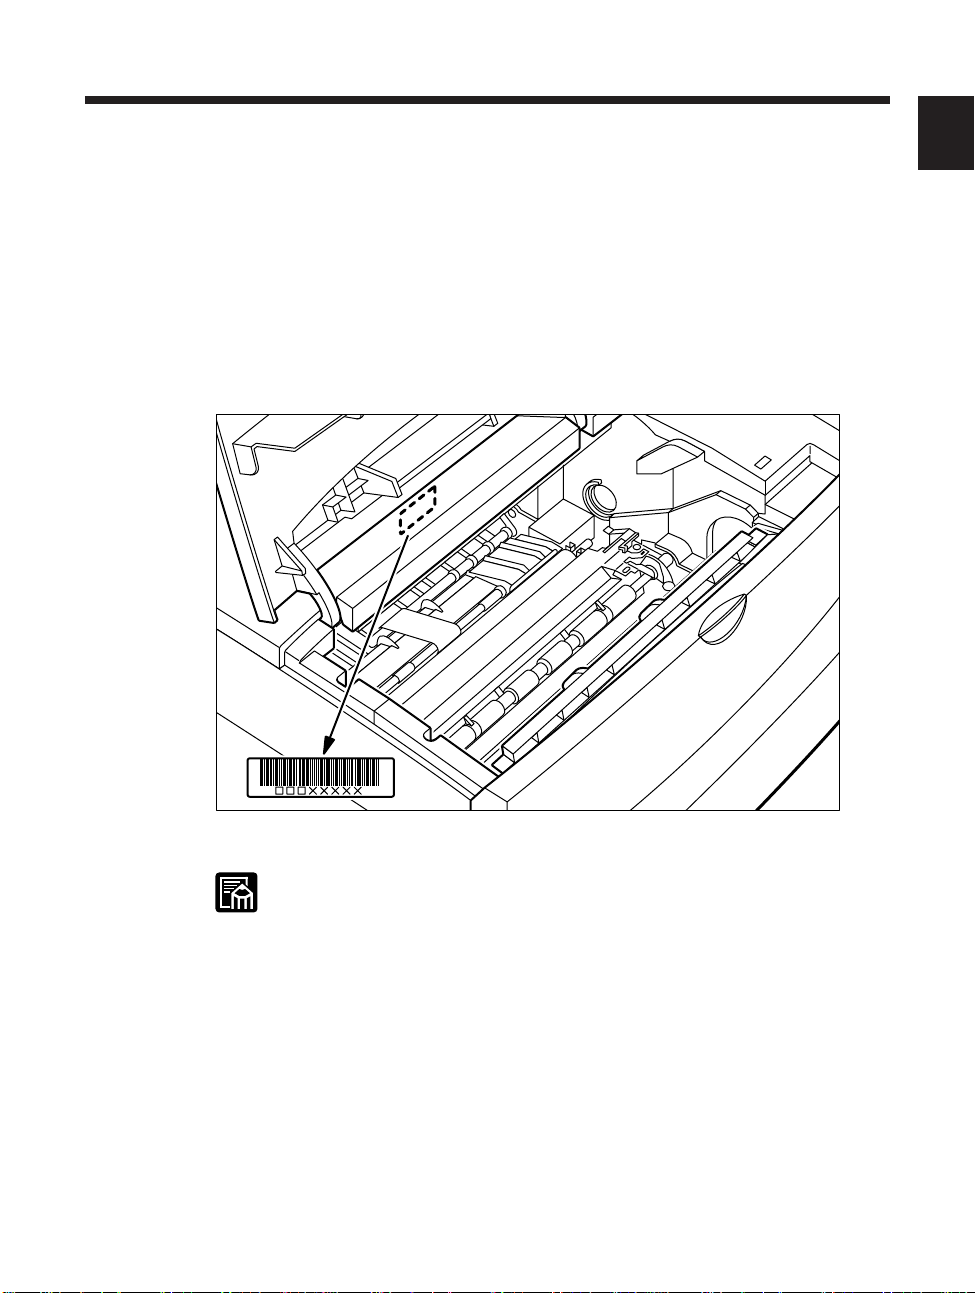
v Serial number This is located inside the printer. Refer to this number when
calling a service technician.
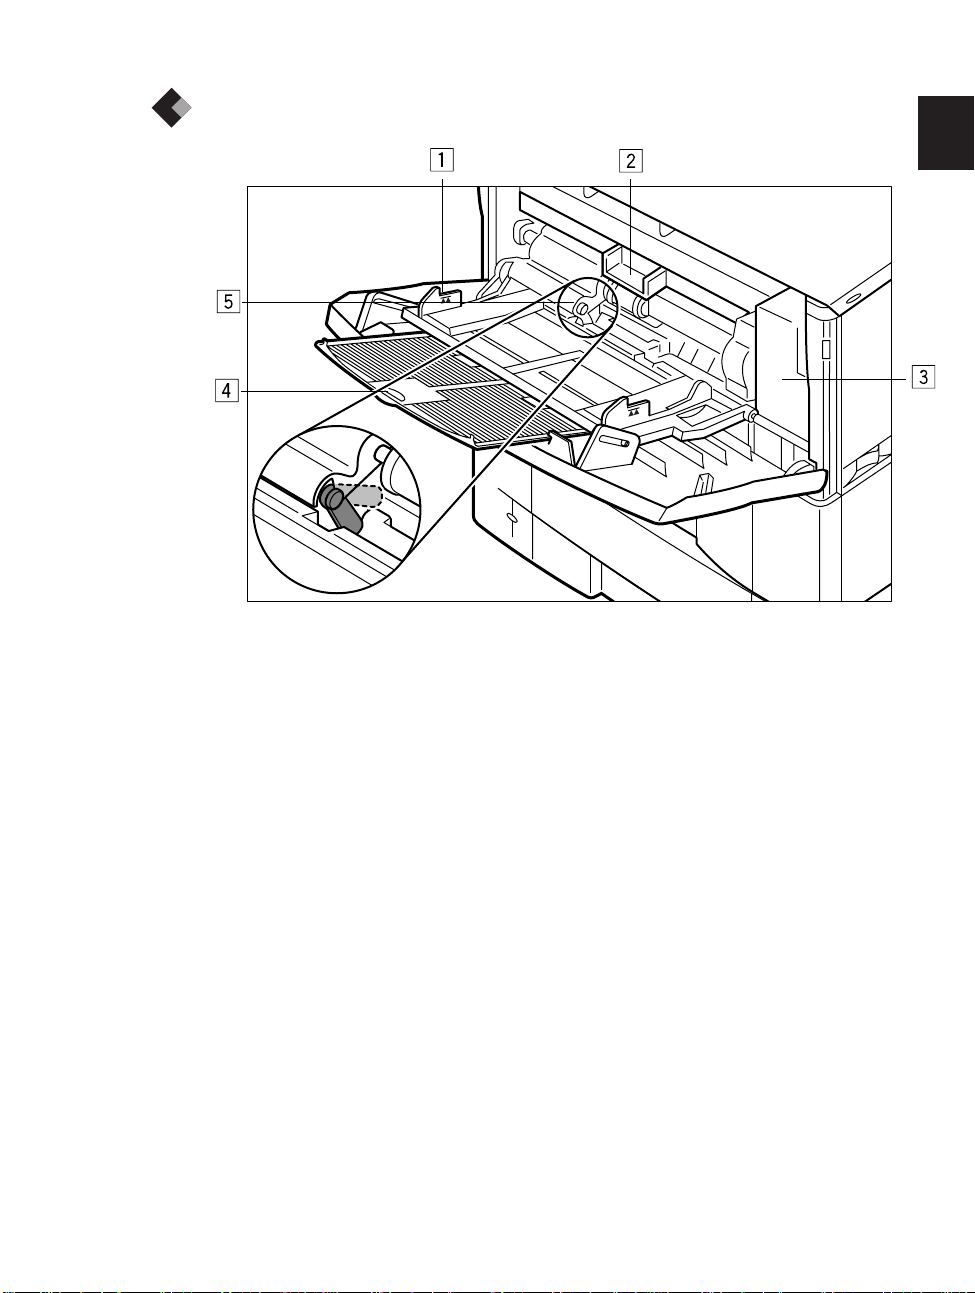
Multi-Purpose tray
z Paper guides Set to the size of the print media.
x Envelope feeder slot (covered) For installing the optional Canon Envelope
Feeder EF-52.
1
c Envelope feeder gear and connector (covered) For installing the optional
envelope feeder.
v Extension tray (pulled out) Supports loading of a variety of print media and
sizes.
b Paper sensor Detects if paper is loaded in the Multi-Purpose tray.
Introduction
9
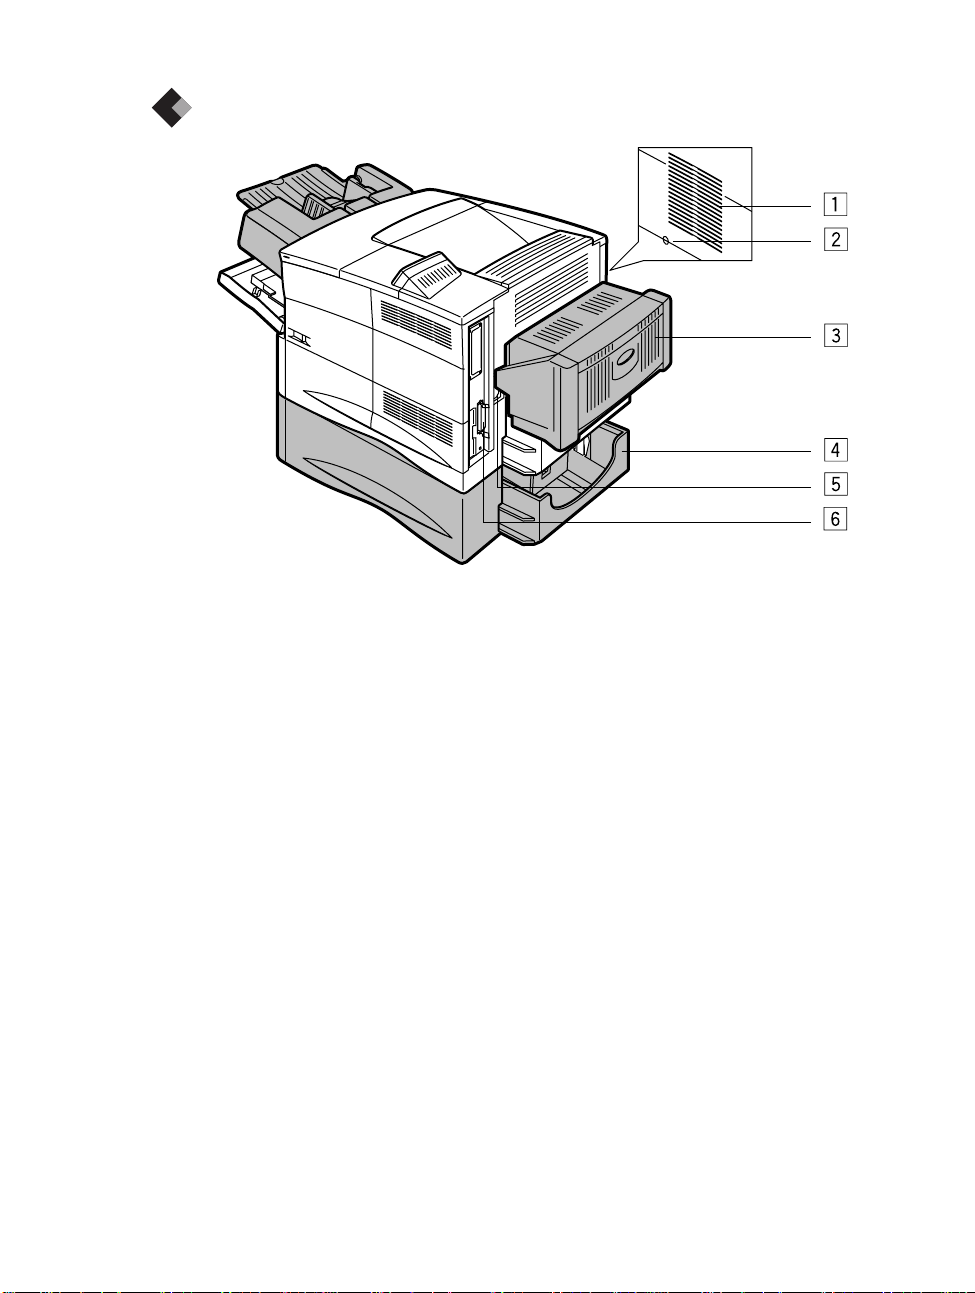
Rear right view
z Ventilation slot
x Test print button This is for use by authorized service personnel only. Use the
printer control panel buttons to perform test prints (see page 83).
10 Introduction
c Duplex Unit DU-52 (optional) This allows the printer to print on both sides
of a sheet of paper.
v 500 Sheet Paper Feed Unit PF-52 (optional) This increases the paper
capacity of the printer by 500 sheets of paper. It uses the Canon 500 Sheet
Universal Cassette UC-52K which is also available as an option.
b Power socket Connects to a power source.
n Parallel interface port

Printer control panel
1
On Line Job Alarm
Go Menu
Item
Shift
Value
Enter/Cancel
The message display
The two-line, 16-digit display tells you what is happening inside the printer and shows
you the menus and settings which can be changed. The display keeps you informed
about the printer’s operational status, lets you make menu selections, warns you about
problems and identifies errors.
Printer control panel buttons
The table on page 13 is a short summary of what the buttons on the printer control panel
do. The first time you read through the table you may want to actually press the buttons
on the printer control panel to see how they operate.
Your software application program should send all the commands required to print
your documents.
Remember that the software application commands that determine page
size, font selection, page layout, page orientation, etc., override most of the
printer settings.
Introduction
11

Use the printer control panel buttons when you need to:
■
Take the printer off-line and put it back on-line.
■
Set up the printing environment so the computer can communicate with the host
computer or solve a problem causing a printer error.
■
Select test prints so you can visually check the operation of the printer and print a
list of the configuration settings.
■
Reset the printer to the factory defaults.
■
Print a list of printer resident fonts or permanently downloaded soft fonts.
■
Make other print selection your software application does not allow.
The printer must be off-line before you can use buttons other than Go on
the printer control panel. If an invalid key is pressed, the control panel will
display the message KEY NOT VALID as a warning.
12 Introduction

Printer control panel button summary
Buttons Function
q Go Takes the printer off-line and back on-line. When the On Line
indicator is on, the printer is ready to receive data and print. When
the On Line indicator is off, the printer is off-line and you can use
the other buttons on the printer control panel to view and change
settings.
Resumes printing after the printer stopped printing and displayed a
message. For most situations, after you press Go the message
clears and printing resumes (see page 134). When the MultiPurpose tray is being used as a manual feed station (MANUAL=ON
in the FEEDER MENU), you have to press Go every time you feed
a single sheet of paper.
To perform a form feed and print any data remaining in the printer,
press Go twice in succession.
To reset the printer settings to their default values, press and hold
this button while turning on the printer. This resets all settings
except the PAGE COUNT field on the TEST PRINT page.
w Menu When the printer is off-line, press Menu to cycle through the menu
names and return to the first menu name. To step back through
menu names in the opposite direction, press Shift and Menu.
Depending on what options you have installed, some menu names
may not appear. (See the Menu Operation Flow table at the end of
this guide.)
e Item With a menu name displayed, press Item to cycle through all the
items on a menu and return to the first item. To step back through
the items in the opposite direction, press Shift and Item.
Depending on what options you have installed, some items may not
appear. (See the Menu Operation Flow table at the end of this
guide.)
1
r Value With an item name displayed, press Value to step through the
item's values. Press Shift and Value to step through the values in
reverse order. Some items have a large range of numbers from
which to choose a value. For example, for COPIES you can set a
value from 1 to 999. In this case, to quickly scroll through the
values, press and hold down Value.
t Enter Saves a value you selected for an item in the menu. An asterisk (*)
marks the current default setting.
y Cancel Press Shift and Enter/Cancel to cancel the current operation.
•If a cancel operation is performed while the printer is receiving
data, this will cause the input data to be flushed from the printer's
memory. In this case, READY/FLUSHING will appear on the
display while the data is being flushed. READY appears after the
data has been flushed from memory.
•To cancel a job while the printer is off-line and PAUSED message
is displayed, press Enter while holding down Shift.
If you do not take care to stop the flow of data from the host
computer, the printer will continue to print out any data it receives
after READY has appeared.
Introduction
13
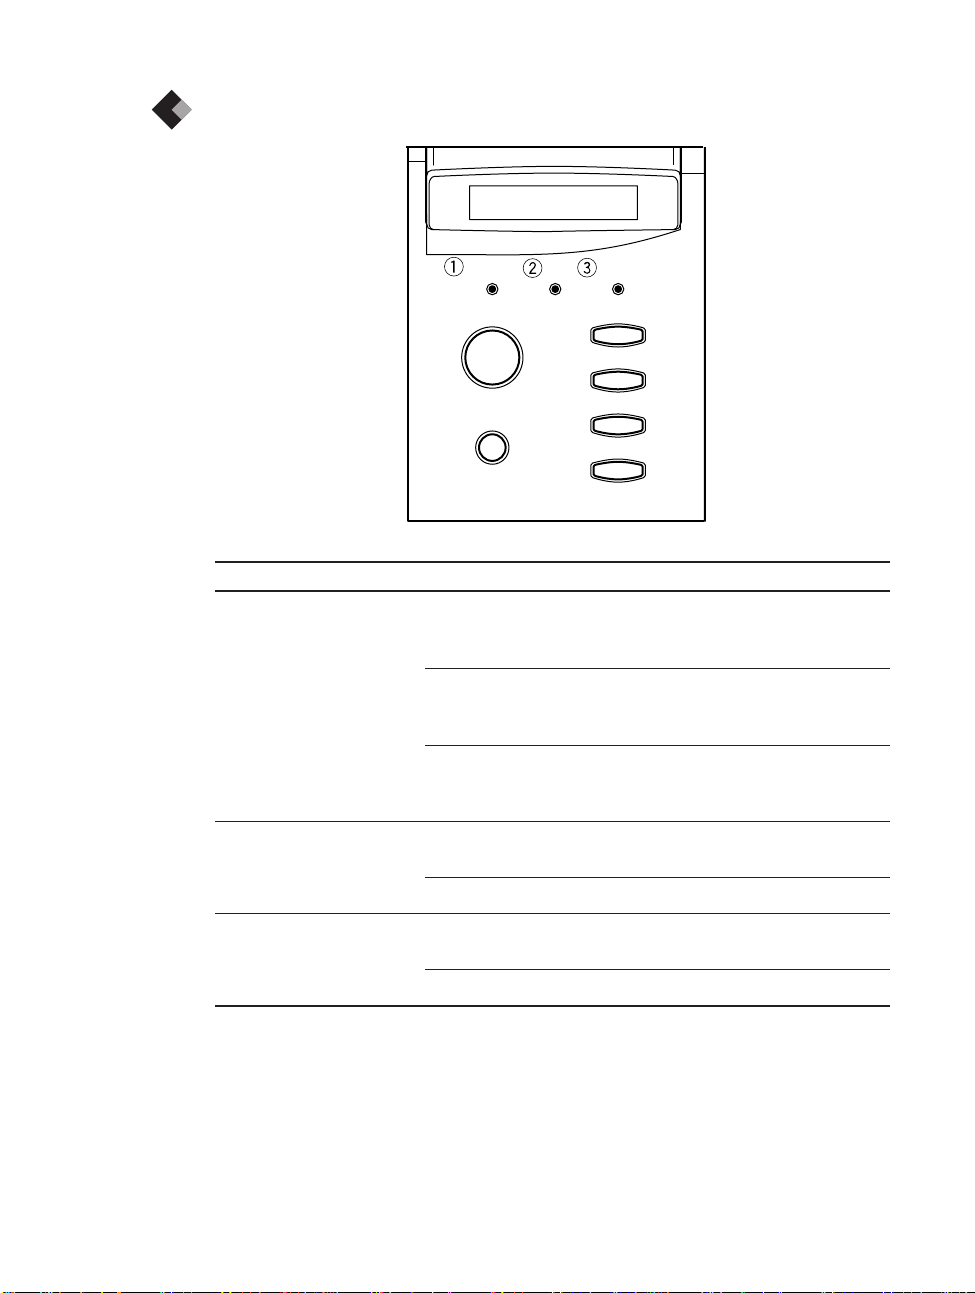
Indicators
On Line Job Alarm
Go Menu
Item
Shift
INDICATOR NAME
On Line On The printer is on-line (power on, warmed up and ready to
q
w Job On Part of a page has been processed and stored in the printer's
e Alarm On An error has occurred and printing has stopped. Check the
STATE WHAT IT MEANS
receive data for printing). Before you send a print job, this
indicator must be on.
Blinking The printer is processing a print job. Do not turn the power off,
otherwise you may lose print data. The page is printed when all
of the data has been processed.
Off The printer is off-line. You can now use the printer control panel
buttons to view and change settings. When off-line, the printer
cannot accept data for printing.
memory.
Off There is no data stored in the printer's memory.
display for a message describing the problem.
Value
Enter/Cancel
14 Introduction
Off Operation is normal and there is no error.
Serial number
The serial number is an identification number used for effective printer service and
maintenance. You will need the serial number to complete your warranty registration
card or you may be asked for the serial number when you call for service or
maintenance.
To find the serial number, open the top cover. The serial number label (consisting of
3 letters followed by 5 numbers) is located inside the printer.
1
Do not remove the serial number label—your service representative will
need to examine it before servicing your printer.
Introduction
15

MEMO
16

Chapter 2
Using the Printer
This chapter shows you how to start using the printer. We’ll show you how to select
the correct paper, load it in the printer, select the source of paper feed and how to
handle simple errors.
For more details about paper specifications, storing and handling paper, see Appendix
3. It is important to read this information before you order large quantities of paper
for your printer.
Paper Path and Printing Pr ocess
Understanding how paper moves inside the printer will help you to handle paper jams
and load paper.
2
After a sheet of paper is fed manually or from a cassette, it travels to the EP cartridge.
Toner is attracted onto the paper by means of the laser beam and the paper then moves
to the fixing assembly, where the toner is fused to the paper. Finally, the paper is
delivered to either the face-down or face-up tray depending on which is selected.
When the face-up tray is open, the printer will automatically select face-up
delivery. Face-up delivery cannot be selected by sending a command from
your computer.
17
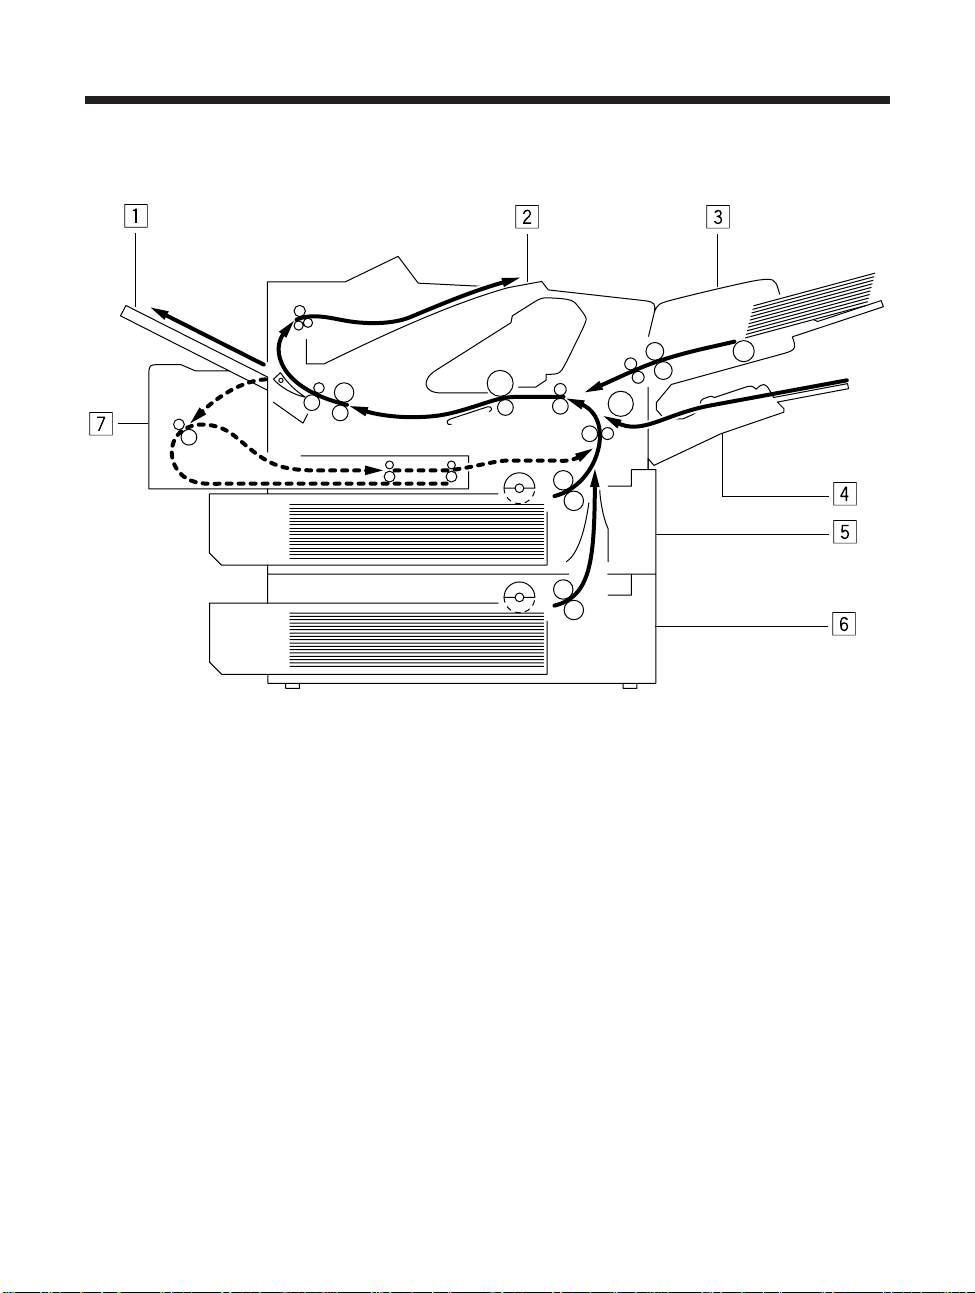
Paper path
z Face-up tray
x Face-down tray
c Envelope feeder (option)
v Multi-Purpose tray
b Universal paper cassette
n 500 sheet paper feed unit (option)
m Duplex unit (option)
18 Paper Path and Printing Process

Paper orientation
When using pre-printed paper (letterhead etc.), be sure to load the paper in the correct
way as explained below:
Paper cassette
The printed side should be face down with the top of the paper at the front.
2
Multi-Purpose tray
The printed side should be face up and placed as shown below.
For details on paper feeding, see “Loading paper in the paper cassette” page 28 or
“Loading the Multi-Purpose tray” page 35.
Paper Path and Printing Process
19

Paper requirements
You can load the internal 500-sheet universal paper cassettes or the Multi-Purpose tray
when the printer is switched off or on. For optimum performance, only use paper that
falls within the specifications listed in the table below.
Source Media Size Weight Capacity Delivery
500- Plain paper Letter (81/2" × 11") 60–105 Max. height: 56 mm. Face-up/
sheet Legal (81/2" × 14") (16–28) (83/16") Face-down
paper A4 (210 × 297 mm) (approx. 500 sheets
cassette of 80 g/m2 or 21 lbs.)
Multi-Purpose Tray Any size: from 60–128 Max height: 10 mm Face-up/
Plain paper 98.4 × 190 mm to (16–34) (3/8") Face-down
Table 2-1 Paper Specifications
g/m2 (lbs.)
215.9 × 355.6 mm (approx.100 sheets
(37/8" × 71/2". to of 80 g/m2 or 21 lbs.)
81/2" × 14"),
including:
Letter (81/2" × 11")
Legal (81/2" × 14")
A4 (210 × 297 mm)
B5-JIS (182 × 257 mm)
Executive (7 1/4" × 10 1/2")
B5-ISO (176 × 250 mm)
A5 (148 × 210 mm)
Multi-Purpose Tray Letter, A4 — Approx. 50 sheets Face-up/
Transparencies Face-down
Multi-Purpose Tray Letter, A4 — Approx. 40 sheets Face-up/
Labels Face-down
Multi-Purpose Tray Any size: from — Approx. 10 Face-up/
Envelopes 98.4 × 190 mm to envelopes Face-down
For more details about print media for the tray and for general information about paper
specifications, storing paper and handling paper, please refer to Appendix 3 (see page
189).
20 Paper Path and Printing Process
215.9 × 355.6 mm
(37/8" × 71/2". to
81/2" × 14")
including:
COM 10 (41/8" × 91/2")
Monarch (37/8" × 71/2")
DL size (110 × 220 mm)
C5 size (162 × 229 mm)
B5 size (176 × 250 mm)
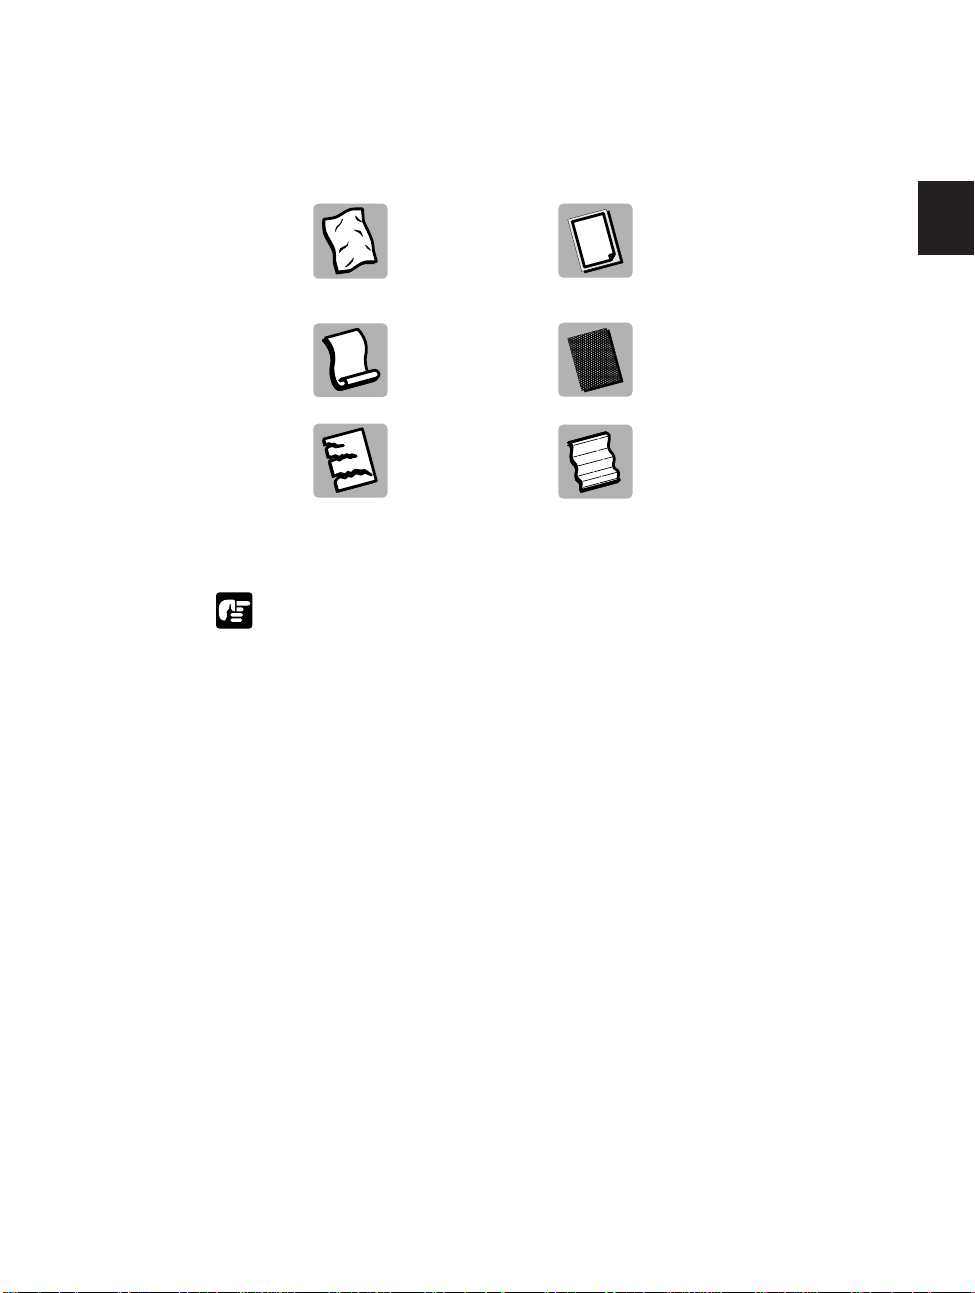
Precautions about paper
The following paper should not be loaded in the paper cassette.
Wrinkled or Carbon paper
creased paper
Curled paper Coated paper
Torn paper Onion skin or other
thin paper
Here are some simple rules to follow when you handle and load paper in the
cassette:
■
Never use moist paper or paper that has been folded, clipped or stapled. We do not
recommend using paper that is perforated.
■
Leave unused paper in its wrapper.
■
Never mix different types of paper when you load the cassette or Multi-Purpose tray.
■
Before you load fresh paper, always wait until the cassette or tray is empty. To avoid
paper jams, do not add fresh paper to paper already in the cassette or tray.
2
For more details about print media for the Multi-Purpose tray and for general
information about paper specifications, storing paper and handling paper, please refer
to Appendix 3 (see page 189).
Paper Path and Printing Process
21
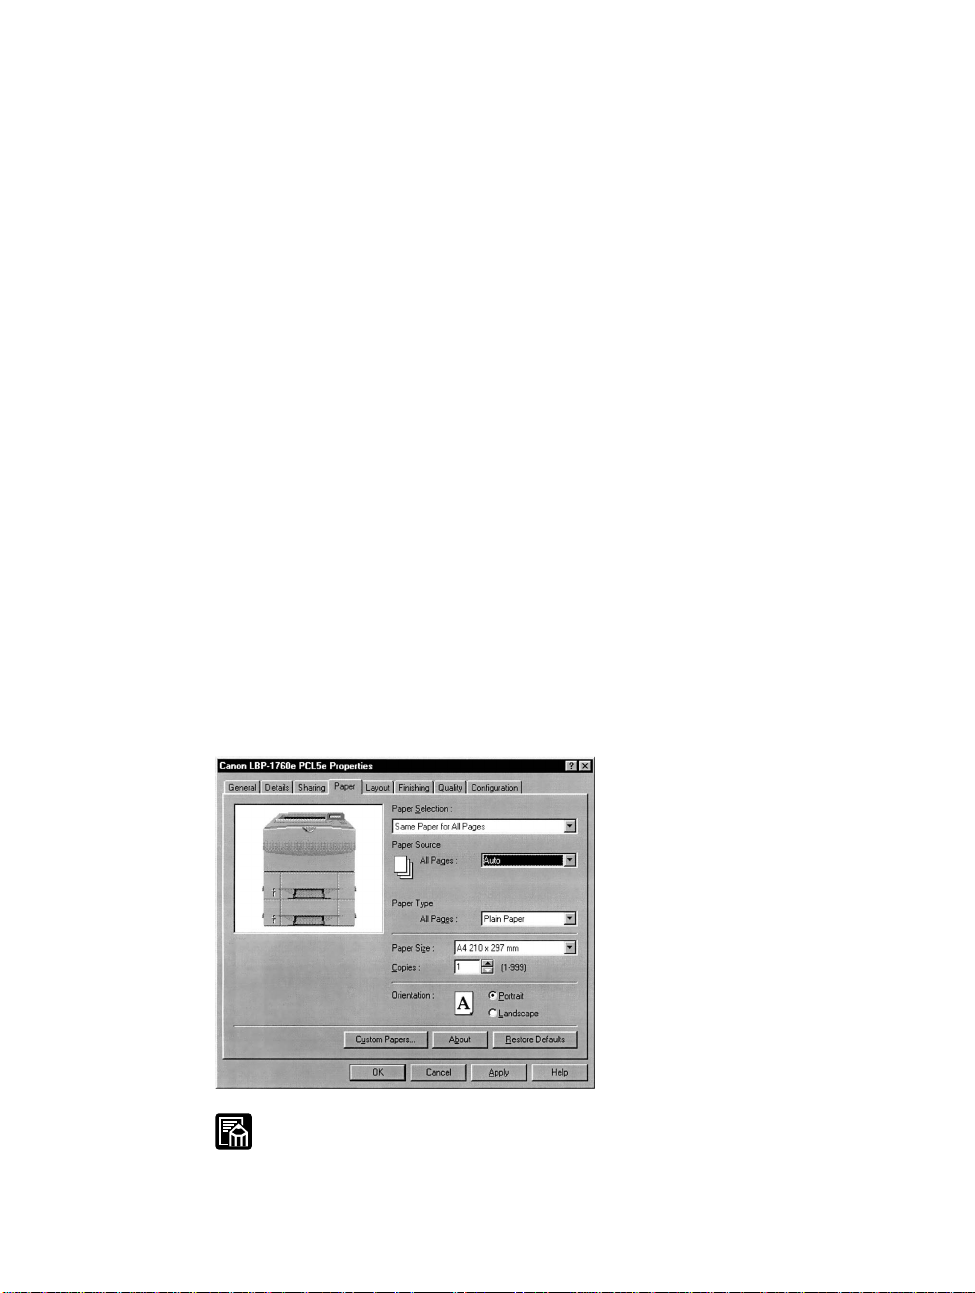
Setting Up the Printer Driver
For Windows 98 and 95 Users
After you install the printer driver for the printer, you can change the printer Setup
from Microsoft Windows.
The instructions for using the printer driver are included on the CD-ROM. Follow the
procedure below to install the driver.
Insert the CD-ROM into the CD-ROM drive of your computer.
1
Choose the My Computer icon on the Desktop.
2
In the My Computer folder, choose the CD-ROM drive icon and then the driver folder
3
you require. For Windows 98 and 95 users this is "\DRIVERS\WIN9X\PCL5E".
The CD-ROM contains the following driver folders:
Windows 98 and 95 PCL 5e printer driver \DRIVERS\WIN9X\PCL5E
Windows NT 4.0 PCL 5e printer driver \DRIVERS\WINNT40\PCL5E
Windows 98 and 95 PCL 6 printer driver \DRIVERS\WIN9X\PCL6
Windows NT 4.0 PCL 6 printer driver \DRIVERS\WINNT40\PCL6
Choose the Setup icon.
4
The Printer Installation dialog box appears. Follow the instructions on the screen to
5
finish the installation.
When the message Installation Successful is displayed, choose the Printer Setup button.
6
The procedure for setting up the printer driver in Windows NT 4.0 is the same
as for Windows 98 and 95. If you are setting up the printer driver on Windows
NT 4.0, remember to login as a member of the Printer Administrators group.
22 Setting Up the Printer Driver
 Loading...