

Page 1
Laser Beam Printer
User's Guide
User's Guide
Page 2

1
Table of Contents
Ta ble of Contents . . . . . . . . . . . . . . . . . . . . . . . . . . . . . . . . . . . . . . . . . . .1
Tu r ning the Printer On/Off . . . . . . . . . . . . . . . . . . . . . . . . . . . . . . . . . . . .2
Turning On the Printer. . . . . . . . . . . . . . . . . . . . . . . . . . . . . . . . . . . . . . . . . . . .2
Turning Off the Printer. . . . . . . . . . . . . . . . . . . . . . . . . . . . . . . . . . . . . . . . . . . .3
About Online and Offline . . . . . . . . . . . . . . . . . . . . . . . . . . . . . . . . . . . . .5
Online . . . . . . . . . . . . . . . . . . . . . . . . . . . . . . . . . . . . . . . . . . . . . . . . . . . . . . . .5
Offline . . . . . . . . . . . . . . . . . . . . . . . . . . . . . . . . . . . . . . . . . . . . . . . . . . . . . . . .6
Paper Requirements . . . . . . . . . . . . . . . . . . . . . . . . . . . . . . . . . . . . . . . . .7
Printable Paper . . . . . . . . . . . . . . . . . . . . . . . . . . . . . . . . . . . . . . . . . . . . . . . . .7
Printable Areas . . . . . . . . . . . . . . . . . . . . . . . . . . . . . . . . . . . . . . . . . . . . . . . .11
Paper You Cannot Use . . . . . . . . . . . . . . . . . . . . . . . . . . . . . . . . . . . . . . . . . .12
Printing from the Paper Cassette . . . . . . . . . . . . . . . . . . . . . . . . . . . . . .14
Cautions When Loading Paper . . . . . . . . . . . . . . . . . . . . . . . . . . . . . . . . . . . .15
Loading Paper in the Paper Cassette . . . . . . . . . . . . . . . . . . . . . . . . . . . . . . .16
Printing from the Multi-Purpose Tray . . . . . . . . . . . . . . . . . . . . . . . . . . .21
Loading Paper in the Multi-Purpose Tray . . . . . . . . . . . . . . . . . . . . . . . . . . . .22
Selecting Paper Delivery. . . . . . . . . . . . . . . . . . . . . . . . . . . . . . . . . . . . . . . . .32
Clearing Paper Jams . . . . . . . . . . . . . . . . . . . . . . . . . . . . . . . . . . . . . . . 35
Procedure for Clearing Paper Jams . . . . . . . . . . . . . . . . . . . . . . . . . . . . . . . .35
Replacing the Toner Cartridge . . . . . . . . . . . . . . . . . . . . . . . . . . . . . . . .52
Canceling Printing . . . . . . . . . . . . . . . . . . . . . . . . . . . . . . . . . . . . . . . . .58
Checking Operations . . . . . . . . . . . . . . . . . . . . . . . . . . . . . . . . . . . . . . . 60
Status Print . . . . . . . . . . . . . . . . . . . . . . . . . . . . . . . . . . . . . . . . . . . . . . . . . . .60
When a Message Is Displayed . . . . . . . . . . . . . . . . . . . . . . . . . . . . . . . . 62
When <nn-nn
サービス コール
> or <F9-nn
チェック プリンタ
>
Is Displayed . . . . . . . . . . . . . . . . . . . . . . . . . . . . . . . . . . . . . . . . . . . . . . . . . .62
Error Messages. . . . . . . . . . . . . . . . . . . . . . . . . . . . . . . . . . . . . . . . . . . . . . . .64
Page 3
2
Turning the Printer On/Off
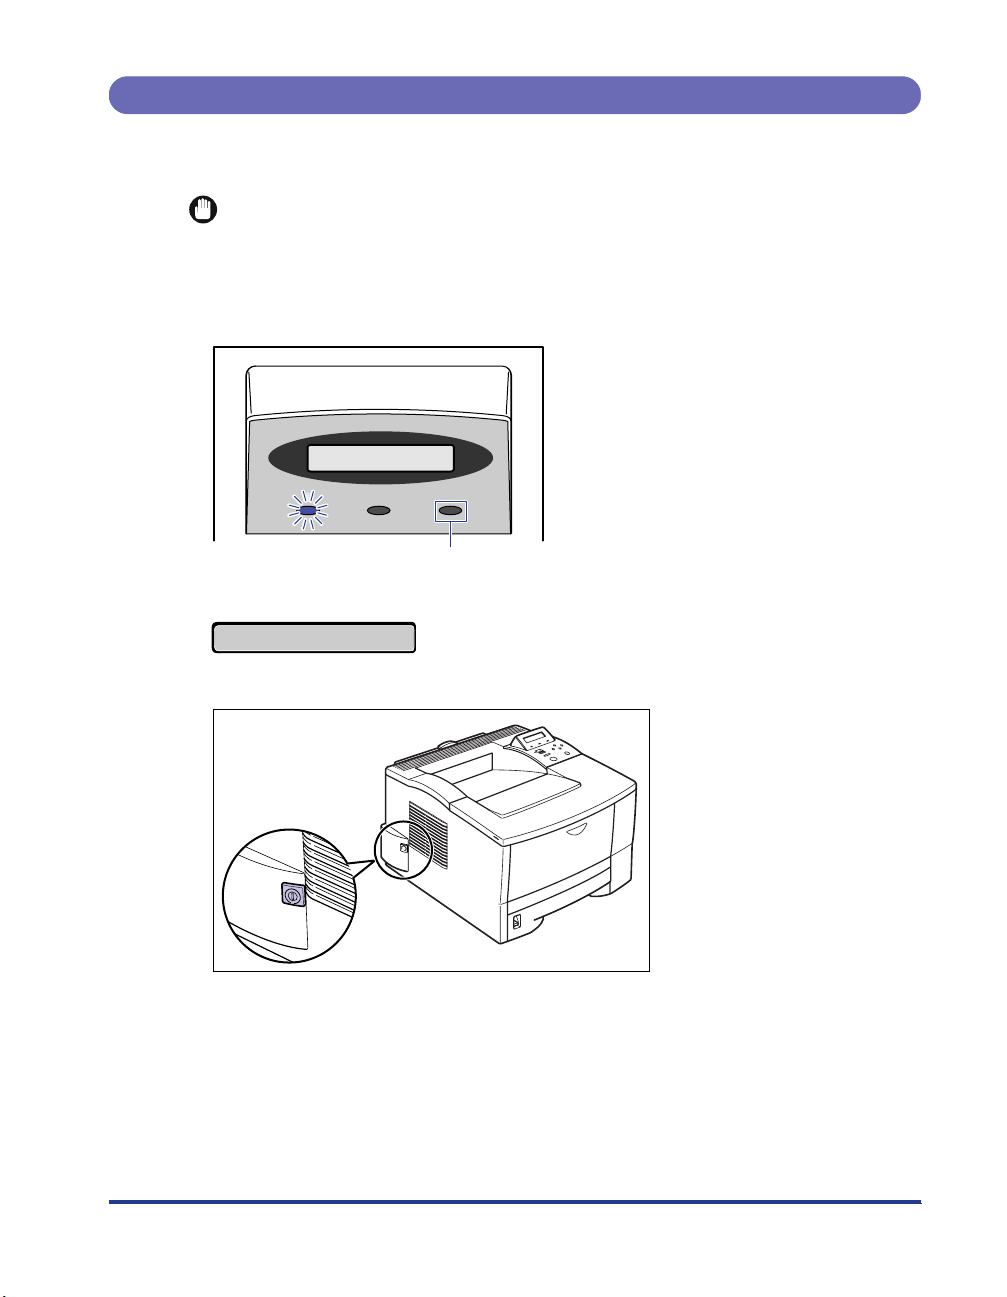
Tu r ning the printer’s power on and off is performed with the power switch on the left
side of the printer. Please learn the correct procedures to avoid any unexpected
trouble.
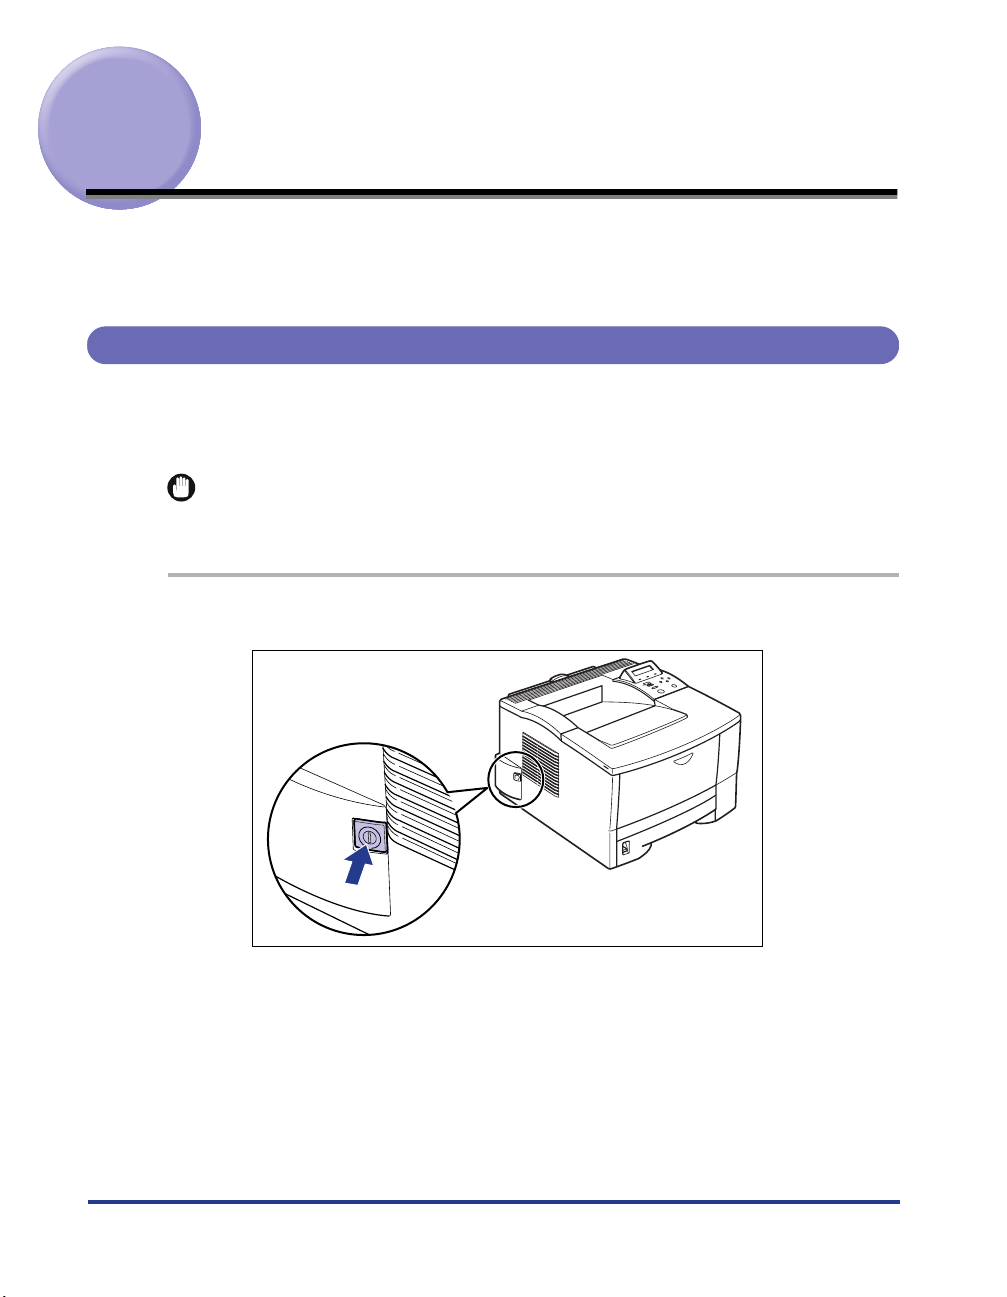
Turning On the Printer
To use the printer, turn it on by pressing down the power switch. Printing is enabled
after the printer performs a self-diagnostic test to check the status of the printer and
any options installed.
•
Do not turn on the printer again immediately after turning off the power. Turn on the
printer after at least 3 seconds have passed since turning off the power.
1
Press down the power switch on the printer.
The power switch will be in a pressed-down state.
The indicators and the display on the control panel are turned on. Then, the
printer performs a self-diagnostic test to check the status of the printer and any
options installed.
IMPORTANT
Page 4
3
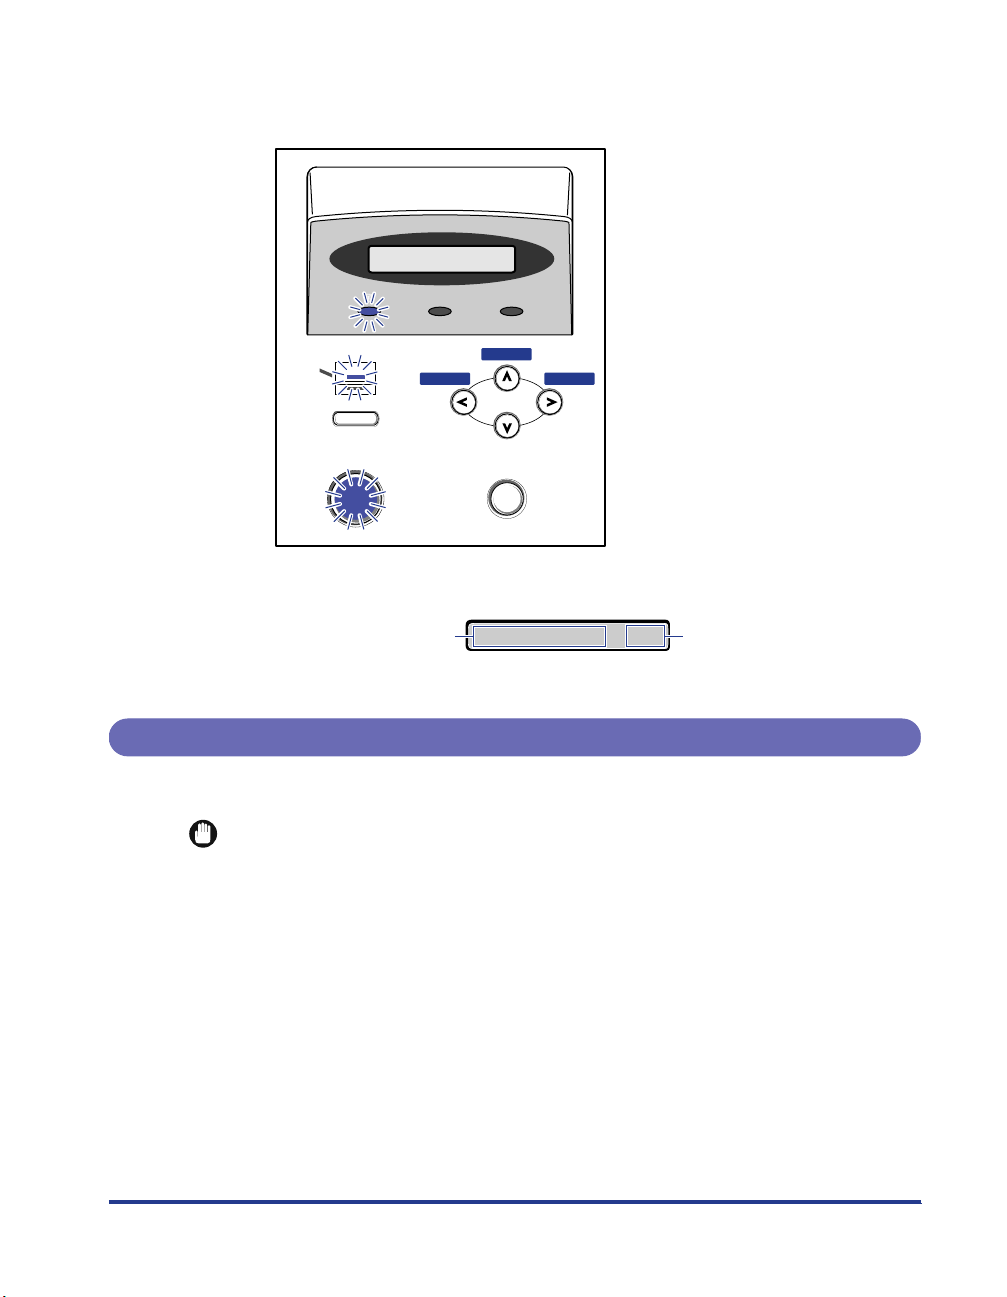
If no errors are found, the
オンライン
indicator, the
印刷可
indicator and the
selected paper feed indicator light up, and the message
<00 インサツ カノウ >
appears on the display when the printer is ready to print.
The information shown on the display is as follows:
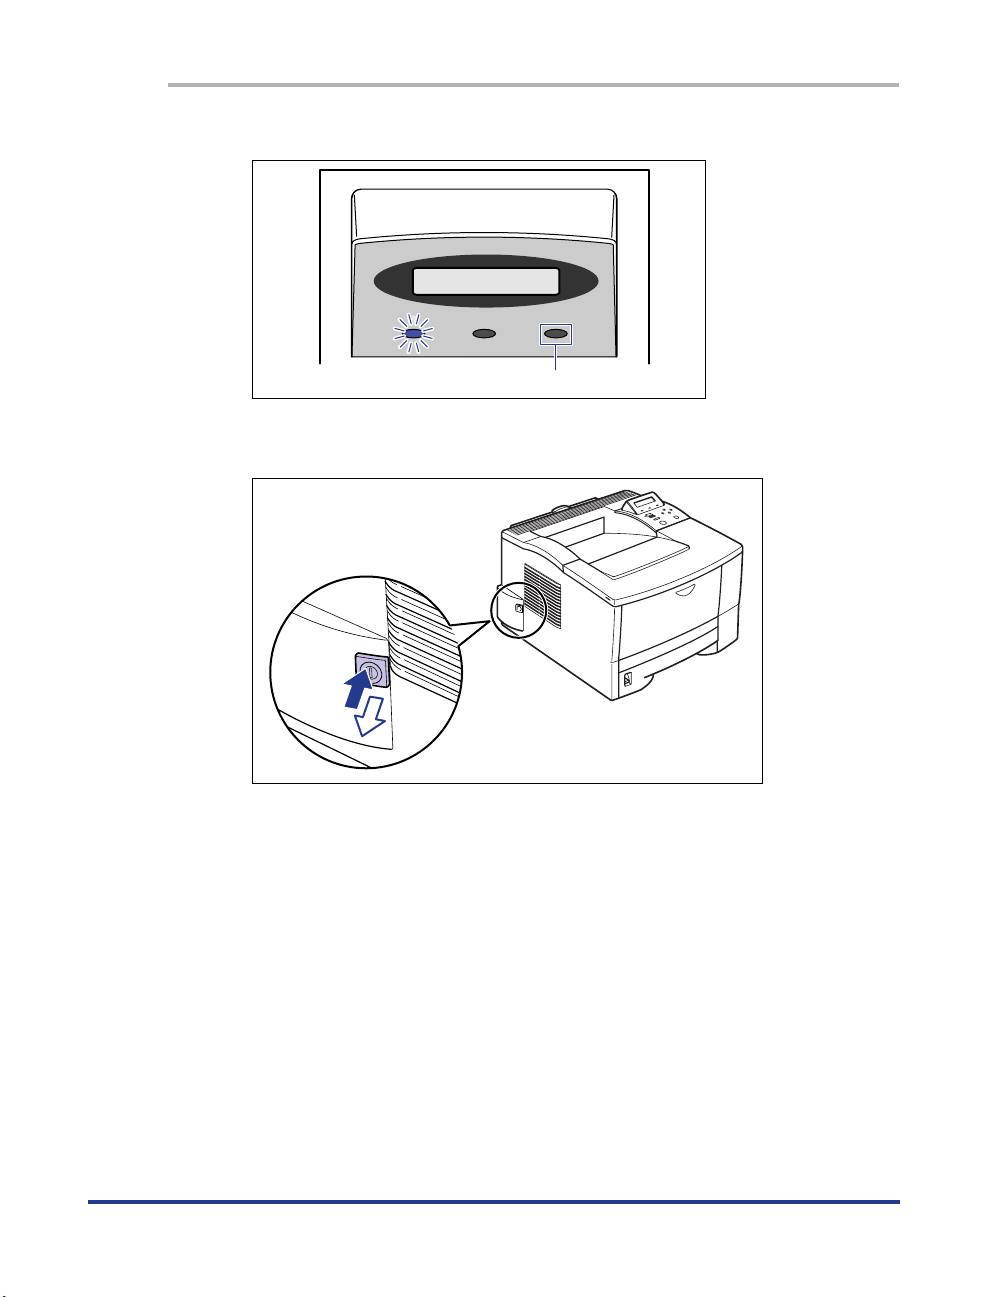
Turning Off the Printer
The printer should be turned off as described in the following procedure.
•
If the printer is connected to a network, make sure that the printer is not printing data
from another personal computer before turning off the power.
•
If the power is turned off while the
ジョブ
indicator is on, any print data remaining in the
memory of the printer is erased. Press
[排出]
while offline to output any important print
data, or wait until printing is complete, before turning off the power. (See “Canceling
Printing,” on P. 58)
•
Do not turn off the power to the printer while it is printing.
•
Do not turn off the power to the printer during the self-diagnostic test performed
immediately after the power has been turned on.
•
If the message that the NVRAM is initializing or writing data is displayed, make sure that
the message has been canceled before turning off the power.
•
If the message that the Flash Memory is initializing or deleting data is displayed, make
sure that the message has been canceled before turning off the power.
00インサツカノウ
給紙選択
オンライン
メッセ ー ジ ジョブ 印刷可
ジョブキ ャン セ ル
ユーティリティ
A4
動作モード
リセット/実行
セットアップ
排出
Ready to print and no
data is being
00インサツカノウ
Currently selected
A4
paper feed size.
processed for printing.
IMPORTANT
Page 5
4
1
Make sure that the
ジジジジョョョョブブ
ブブ
indicator is off.
2
Press down the power switch.
The power switch will pop up.
00インサツカノウ
A4
メッセ ー ジ ジョブ 印刷可
off
Page 6
5
About Online and Offline
When the printer can receive data from a personal computer and is able to print the
data, this is called “online”, and when the printer cannot receive data, this is called
“offline.” The printer should be offline when you perform operations from the menu
on the control panel.
Online
The printer must be online in order to print data received from a personal computer.
Make sure that the printer is online before you send a job to the printer. If the printer
is not online, bring the printer online as described in the following procedure. The
printer automatically comes online when it is turned on.
1
Press [
オオオオンンンンラララライイイインン
ンン
].
The
オンライン
indicator is turned on and the printer is ready for printing.
•
If there is an error in the printer (when the
メッセージ
indicator is on or the digit part
of the message is flashing), the printer will not come online. Eliminate the cause of
the error before bringing the printer online.
•
Do not open the cover of the printer or remove the paper cassette while printing. If
the cover is opened or the paper cassette is removed, the printer will stop printing
and may not be able to resume printing again.
•
If the printer is in panel off mode, the
オンライン
indicator goes out and only the
印刷
可
indicator remains lit.
オンライン
IMPORTANT
NOTE
Page 7
6
Offline
The printer must be offline when you use the menu on the control panel of the
printer, to select the paper feeding method, or set the paper size. Check that the
printer is offline before you press any keys on the control panel. If the printer is not
offline, take it offline as described in the following procedure.
1
Press [
オオオオンンンンラララライイイインン
ンン
].
The
オンライン
indicator is turned off and the printer gets ready for operation using
the control panel.
•
If you try to print data from a personal computer while the printer is offline, a
message, such as
<プリンタの準備ができていません>
or
<プリンタが接続されていませ
ん>
is shown and the printer is not available for printing.
•
The printer automatically comes online after being left offline for more than five
minutes. However, the printer does not come online when an error occurs (when
the
メッセージ
indicator is on or the digit part of the message is flashing) or during
operations such as selecting a menu function or paper feed method, or setting the
paper size.
オンライン
IMPORTANT
Page 8

7
Paper Requirements
Use paper that is compatible with your printer in order to get the best performance
from your printer. Using incompatible paper can lead to reduced printing quality and
paper jams.
Printable Paper
You can use the following types of paper with this printer.
◎
in the table means
single side printing and duplex printing is possible, and
○
means only single side
printing is possible,
×
means impossible.
•
All types of paper must be loaded in the portrait orientation.
•
In the following cases, the safety function is activated to prevent the malfunctions caused
by heat, etc., and then the print speed may be gradually decreased.
•
If paper smaller than Executive-size (267 mm) is continuously printed, the print speed
may decrease to 4 ppm.
•
If paper that is 270 mm or longer is continuously printed, the print speed may decrease to
2 ppm. (Print speed will return to normal when the temperature inside the printer drops
below a certain temperature.)
IMPORTANT
Page 9
8
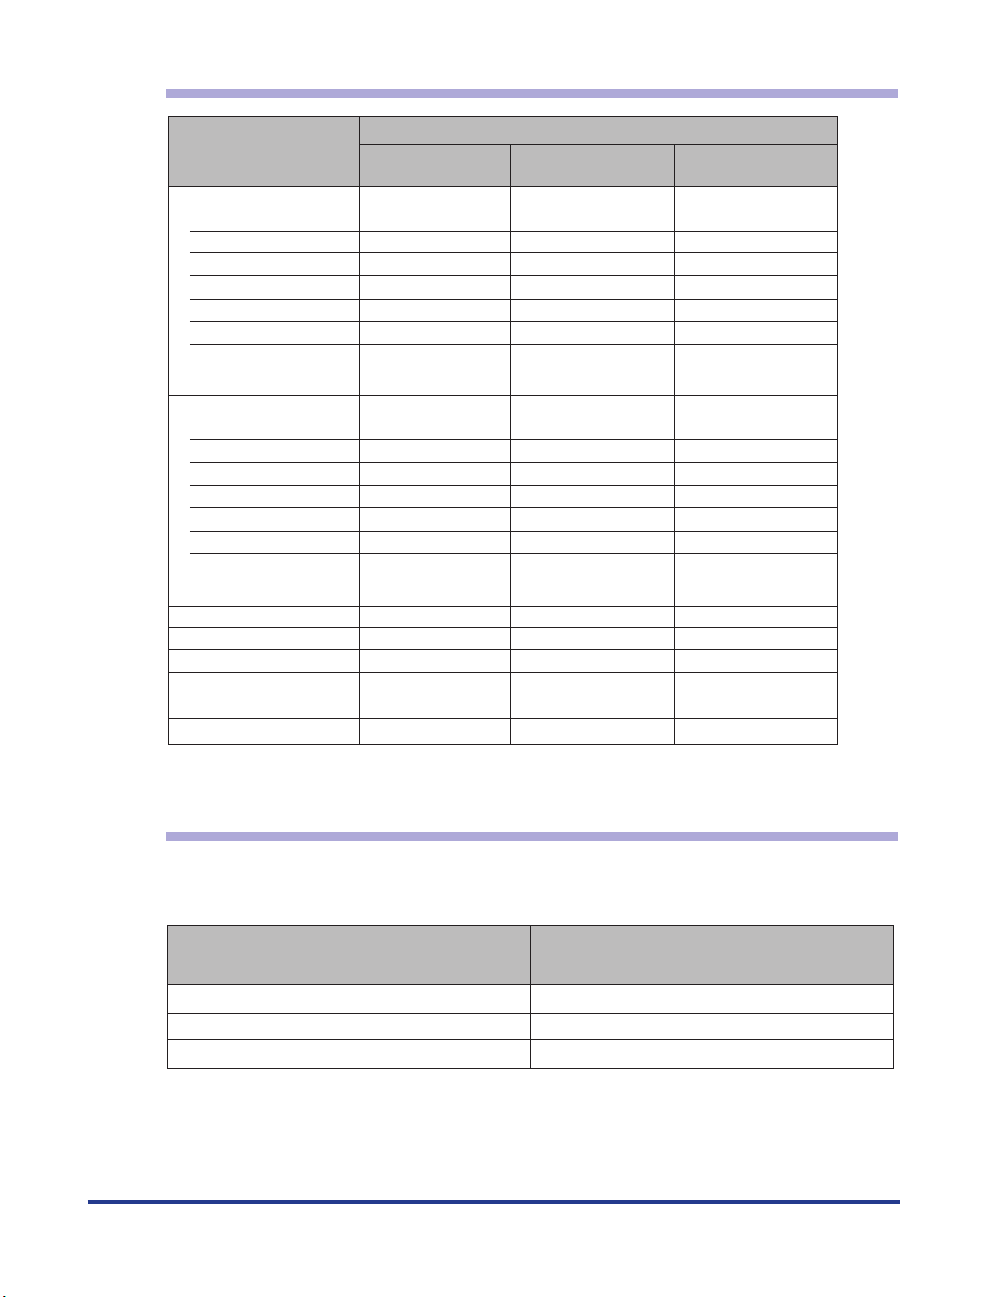
Paper Size
Abbreviations of Paper Sizes
The following abbreviations are used on the paper size selector for the paper
cassette.
Paper Source
Type of Paper
Plain Paper (64-105 g/m2)
A5
B5
A4
Letter
Executive
Legal
Custom Paper
Width : 76.2-215.9 mm
Length : 127-355.6 mm
Thick Paper (106-163 g/m2)
A5
B5
A4
Letter
Executive
Legal
Custom Paper
Width : 76.2-215.9 mm
Length : 127-355.6 mm
Tr ansparencies A4
Label sheets A4
Postcards 100 × 148 mm
Stamped, self-addressed
postcards148 × 200 mm
Envelopes Youkei No.4
1
*
*1 If you are using plain paper that is less than 100 g/m2, printing can be performed
using paper larger than A5-size only.
Multi-Purpose
Tray
○
○
◎
◎
○
◎
○
○
○
○
○
○
○
○
○
○
○
○
○
Cassette 1
○
○
◎
◎
○
◎
×
×
×
×
×
×
×
×
×
×
×
×
×
Cassette 2 (Option)
○
○
◎
◎
○
◎
×
×
×
×
×
×
×
×
×
×
×
×
×
Paper Size
Legal
Letter
Executive
Paper size selector for
the paper cassette
LGL
LT R
EXEC
Page 10
9
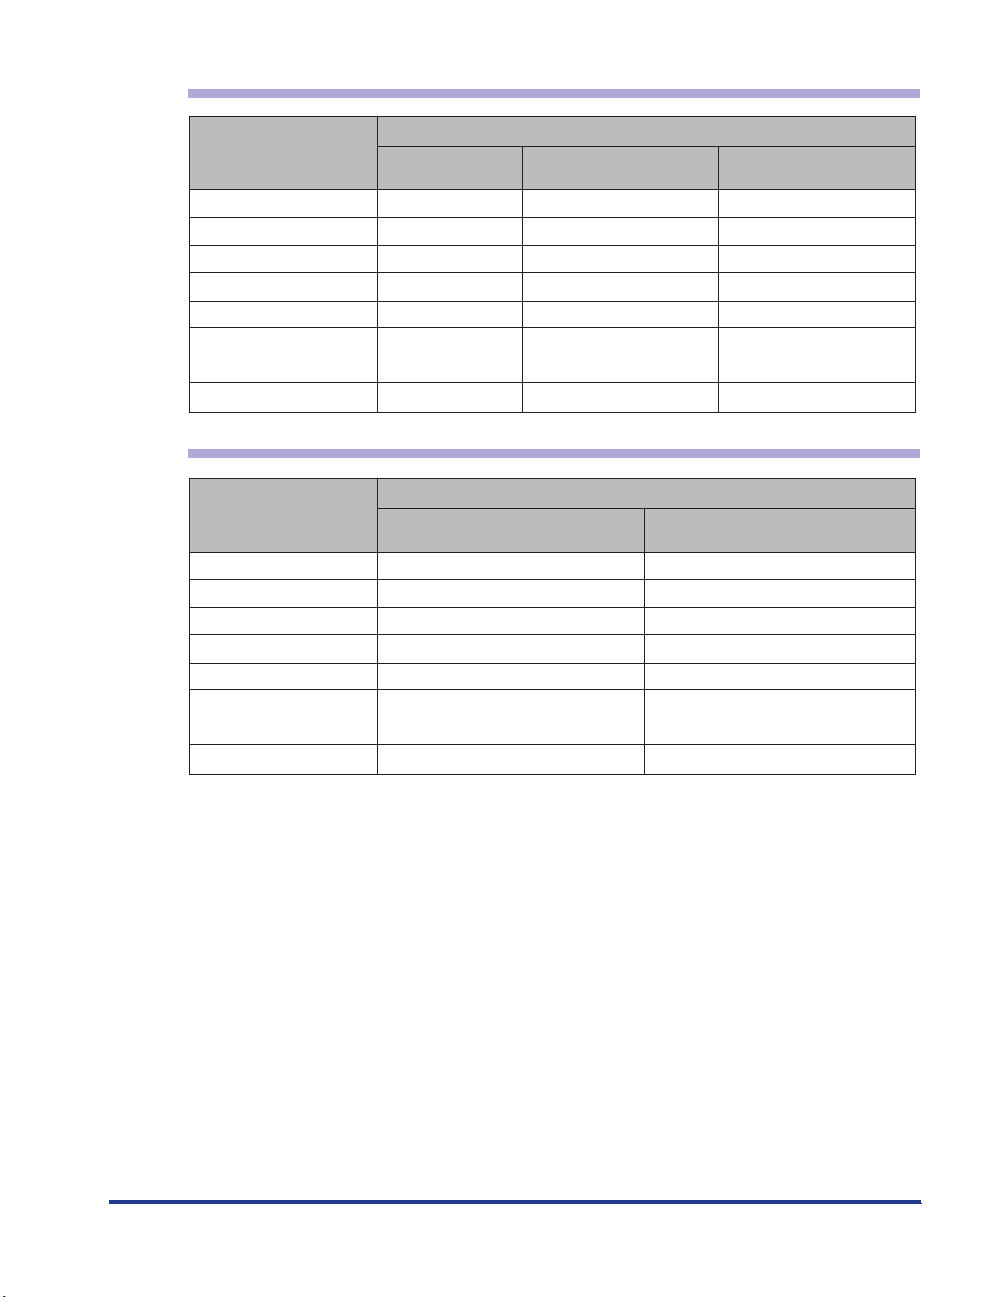
Paper Capacity of Paper Sources
Paper Capacity of Paper Delivery Tray
■
Plain Paper
You can use plain paper of 76.2-215.9 mm width, 127-355.6 mm length and 64-105 g/m
2
weight with this printer. This includes A4-, B5-, A5-, Legal-, Letter- and Executive-size
paper. These standard sizes of paper can be fed from the paper cassette or paper tray.
Duplex printing is possible for A4-, Letter- and Legal-size paper. Non-standard-size paper
can be fed only from the paper tray and single-side printing is possible.
■
Thick Paper
You can use thick paper of 76.2-215.9 mm width, 127-355.6 mm length and 106-163 g/m
2
weight with this printer. This includes A4-, B5-, A5-, Legal-, Letter- and Executive-size
paper. Thick paper can be fed from the paper tray and only single-side printing is possible.
Type of Paper
Plain Paper (64 g/m2)
Thick Paper (128 g/m
Tr ansparencies
Label sheets
Postcards
Stamped,
self-addressed postcards
Envelopes
Type of Paper
Plain Paper (64 g/m2)
Thick Paper (128 g/m
Tr ansparencies
Label sheets
Postcards
Stamped,
self-addressed postcards
Envelopes
Multi-Purpose
Tray
About 100 sheets
2
About 50 sheets
)
About 50 sheets
About 40 sheets
About 40 sheets
About 40 sheets
About 10 sheets
2
)
Cassette 1
About 250 sheets
×
×
×
×
×
×
Paper Delivery*
Output Tray Sub-output Tray
About 150 sheets
About 40 sheets *
About 10 sheets *
About 60 sheets *
×
×
×
2
2
2
Cassette 2 (Option)
About 250 sheets
1
About 50 sheets
About 30 sheets
1 sheet
About 40 sheets
About 40 sheets
About 40 sheets
About 10 sheets
×
×
×
×
×
×
*1 The maximum number of sheets of paper that can be stacked on the tray may differ depending on
the environment in which the printer is located.
Paper Source
2
*
For thick paper, transparencies and label sheets, you can use the output tray, however they may
become curled or wrinkled. It is recommended that you use the sub-output tray for these types of
paper.
Page 11
10
■
Transparency Film
A4-size transparency film can be used with this printer. Transparency film should be
loaded into the paper tray.
•
Be sure to load the stack of transparencies after thoroughly fanning them. If they are not
fanned, they may overlap when fed and this may cause paper jams.
•
When transparencies are output with the printed side face up, remove the transparencies
from the tray one at a time as they come out. If you leave them on the tray, they may be
wrinkled, or paper jams may occur.
■
Label sheets
A4-size label sheets can be used with this printer. Check which side of the label sheets is
the face-up side before you load them into the paper tray.
•
Do not use the following types of label sheets. If a sheet type that does not conform to
specifications is used, this may cause hard to clear paper jams or a printer malfunction.
- Sheets with labels that are likely to peel off, or sheets on which some of the labels have
been used.
- Coated sheets that can easily peel off from the backing sheet.
- Label sheets with some adhesive surfaces exposed.
■
Postcards/Stamped, self-addressed postcards
Postcards should be loaded into the paper tray with the print side face down.
•
Do not use postcards other than official postcards. If other types of postcards are used,
this may cause a deterioration in the print quality as well as paper jams.
•
You can use only stamped, self-addressed postcards without creases.
•
When the edges of postcards are curled, bend them back in the opposite direction to
straighten them before loading them into the paper tray.
•
Do not use postcards designed for ink jet printers.
■
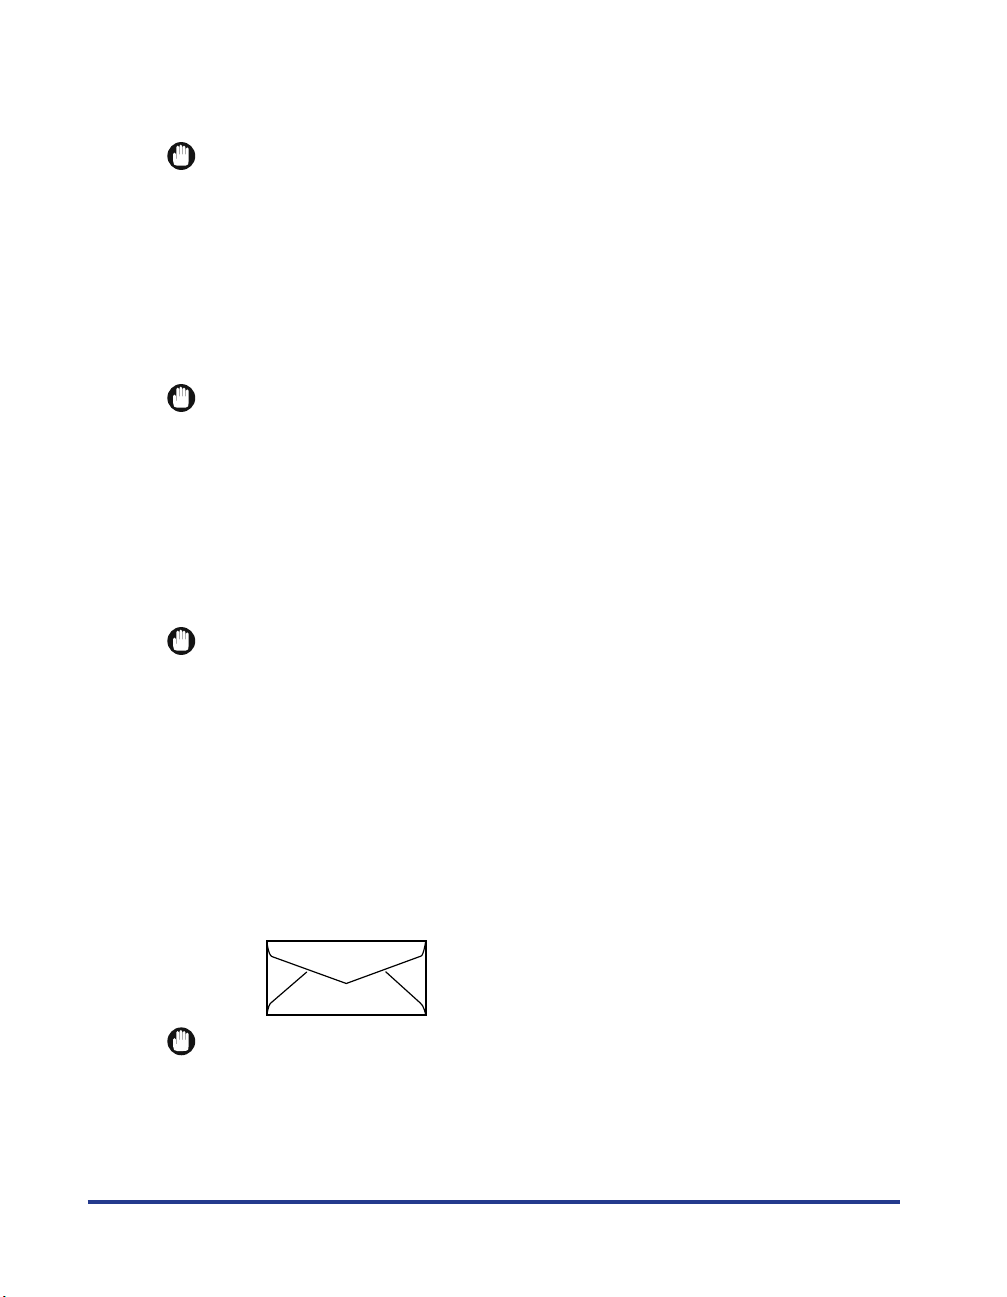
Envelopes
Only Youkei No.4 envelopes of the type shown below can be used with this printer. (You
cannot use envelopes with a flap along the short edge.)
•
Never use the following types of envelope. If envelopes that do not conform to
specifications are used, this may cause hard to clear paper jams or a printer malfunction.
-Envelopes with fasteners or snaps.
-Envelopes with windows.
- Self-adhesive envelopes.
IMPORTANT
IMPORTANT
IMPORTANT
Youkei No.4
(Envelope Y401 for Canon LBP / recommended)
IMPORTANT
Page 12
11
-Envelopes with wrinkles or creases.
-Envelopes with very irregular thickness at the folds or overlaps.
-Envelopes with irregular shapes (not rectangle).
- Press the envelopes with your hands to expel any air pockets and press down on the
edges before loading them into the paper tray.
- Do not print on the back (adhesive surface) of the envelopes.
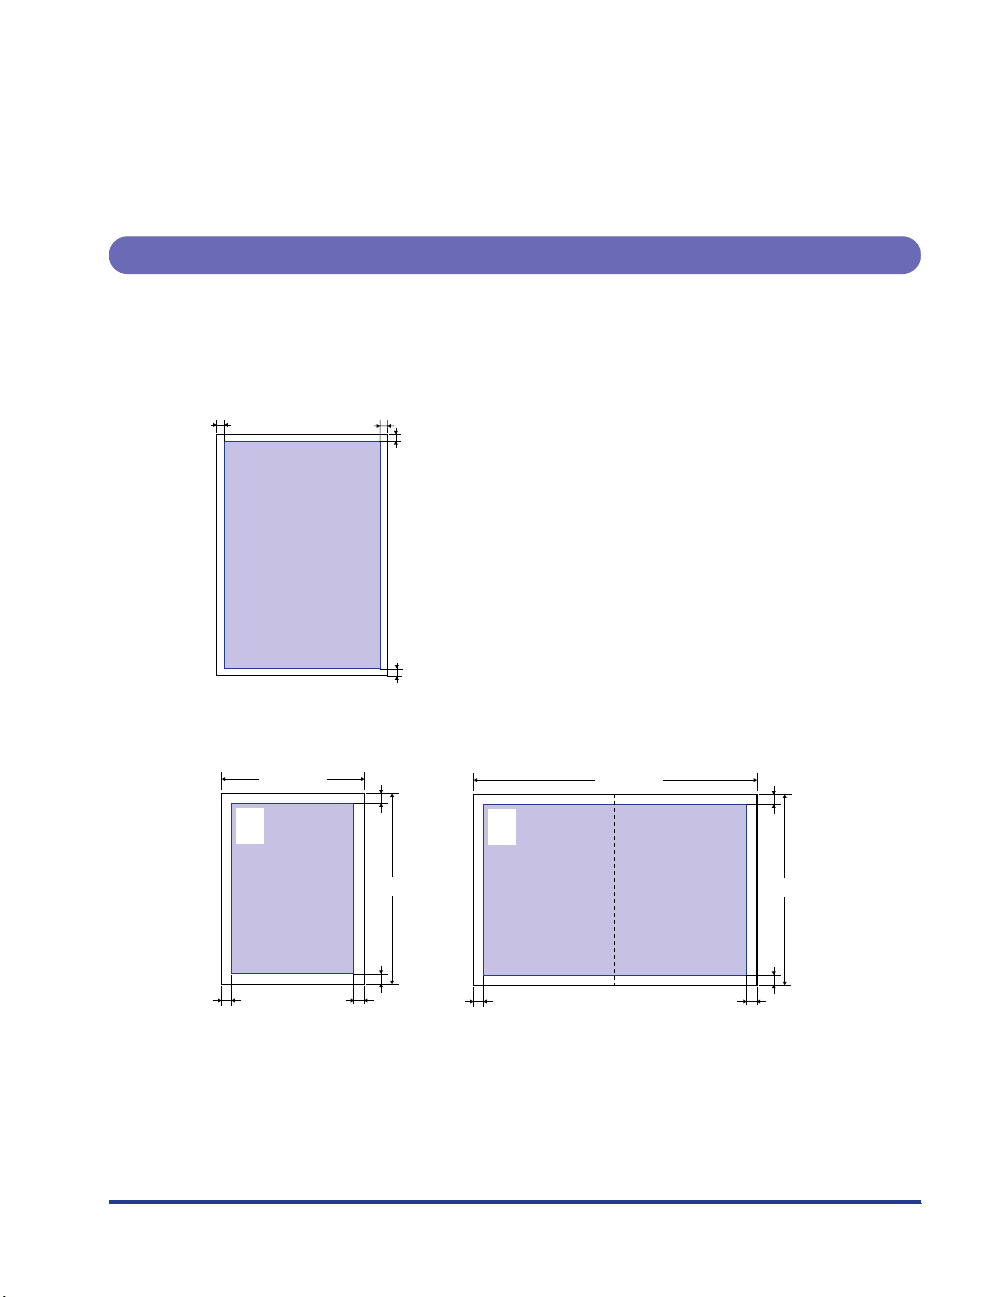
Printable Areas
The areas that can be printed on the paper are shown below.
■
Plain paper/thick paper/transparencies/label sheets
Data cannot be printed inside a 5 mm wide border around the paper.
■
Postcards/Stamped, self-addressed postcards
Data cannot be printed inside a 5 mm wide border around the postcard.
5 mm5 mm
5 mm
5 mm
100 mm
123-4567
東京都千代田区
○○○
148 mm
5 mm5 mm
5 mm
123-4567
東京都千代田区
○○○
5 mm
200 mm
5 mm
148 mm
5 mm
5 mm5 mm
Page 13
12
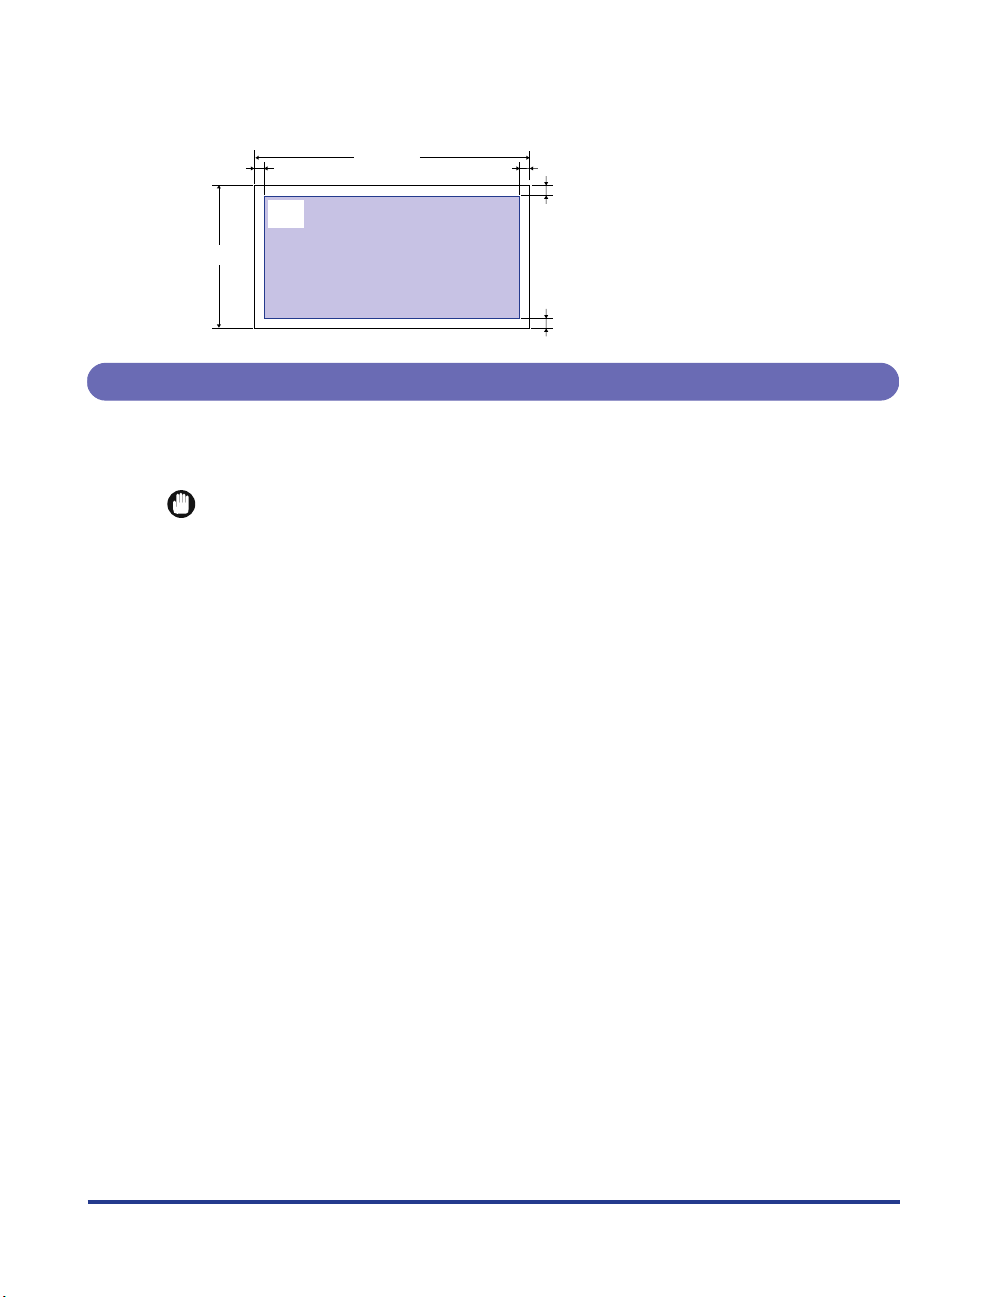
■
Envelopes
Data cannot be printed inside a 10 mm wide border around the envelope.
Adjust the print location depending on the application being used.
Paper You Cannot Use
To avoid problems such as paper jams and printer malfunctions, the following types
of paper should never be used.
•
Paper that tends to cause paper jams.
-Paper that is too thick or too thin.
-Paper that is irregular shaped.
-Paper that is wet or holding moisture.
-Paper that is torn or damaged.
-Paper that is rough or extremely smooth.
-Paper that has holes for binding or perforations.
- Curled paper or paper with creases.
-Paper with a special coating on its surface (Coated paper for ink jet printers, etc.).
- Label sheets with the base easily peeled.
-Paper that has been used once by the copy machine or other laser printers. (The back
of that paper is also improper. However, note that you can use the paper delivery tray to
perform manual duplex printing on the reverse side of a sheet of paper that has already
been printed on using this printer. You cannot print on the same side of a sheet of paper
that has already been printed on.)
-Paper that has fins.
-Paper that is wrinkled.
-Paper that is folded at corners.
•
Paper that changes its quality at high temperature.
-Paper that uses ink that melts, burns, evaporates or emits dangerous fumes at
temperatures of 150 °C or higher.
- Heat-sensitive paper.
-Paper used for color printing with a processed surface.
-Paper with a special coating on its surface. (Coated paper for ink jet printers, etc.)
-Paper with adhesive on its surface.
•
Paper that causes failure or damage to the printer
- Carbon paper.
10 mm
235 mm
10 mm
10 mm
10 mm
105 mm
123-4567
東京都千代田区
○○○
IMPORTANT
Page 14

13
-Paper with staples, clips, ribbons or tapes.
-Paper that has been used once by the copy machine or other laser printers. (The back
of that paper is also improper. However, note that you can use the paper delivery tray to
perform manual duplex printing on the reverse side of a sheet of paper that has already
been printed on using this printer. You cannot print on the same side of a sheet of paper
that has already been printed on.)
•
Paper that is difficult for the toner to adhere to.
-Paper with rough surfaces such as rough paper and Japanese paper.
-Paper with special coating on its surface. (Coated paper for ink jet printers, etc.)
-Paper containing thick fibers.
Page 15

14
Printing from the Paper Cassette
The paper cassette can hold up to 250 sheets of standard-size plain paper
(64 g/m
2
). When the paper is used up, the message
<11 ヨウシガ アリマセン >
, or
<17 カセット 1 ヨウシ ナシ >
is displayed, indicating that there is no paper left in the
paper cassette. When this message is displayed, load paper into the paper
cassette. A paper cassette (Cassette 1) is originally supplied with this printer as
standard equipment. Also you can attach an optional paper feed unit to the printer
as Cassette 2.
When printing from the paper cassette, you need to set up the following items;
•
Always set the
[キュウシカセット1 サイズ ]
and
[キュウシカセット 2 サイズ ]
in the set-up
menu to the size of the paper loaded in Cassette 1 and Cassette 2. Otherwise the
message
<41 プリント チェック >
appears on the display and data cannot be printed
correctly.
•
Always make sure that the paper size settings in the printer set-up menu match the
settings in the printer driver before you print. If the settings do not match, the message
[PC XXX ヨウシ ニ コウカン ]
appears on the display. In this case, press
[オンライン ]
to change the
[キュウシカセット1 サ イズ ]
or
[キュウシカセット 2 サイズ ]
settings to match
those of the printer driver. After this, you can continue printing.
■
Load paper into the paper cassettes.
(
→→
→→
P
..
..
16)
■
Set the size of paper.
If you have changed the paper size of the paper cassette, set up the following items on the
control panel. If not, you do not need to set up those items.
[キュウシ]
group in the set-up menu
•
「キュウシカセット 1 サイズ」=
the paper size to be loaded in Cassette 1
•
「キュウシカセット2 サイズ」
=
the paper size to be loaded in the optional paper feeder unit
■
Set the printer driver.
When printing from the printer driver, you need to set up the following items;
The setup items may vary depending on the OS. Following are the items for a Windows
printer driver.
[ページ設定]
sheet
[出力用紙サイズ]=
the paper size to be loaded
[給紙]
sheet
[給紙部]=[自動],[カセット 1]
, or
[カセット 2]
IMPORTANT
Page 16
15
Cautions When Loading Paper
Load paper in the following circumstances only. Do not pull out the paper cassette
when the
ジョブ
indicator is flashing, because printing is in progress.
•
Do not open the cover of the printer or remove the paper cassette while printing. If the
cover is opened or the paper cassette is removed, the printer will stop printing and may
not be able to resume printing again.
■
When the
ジジジジョョョョブブ
ブブ
indicator is off.
■
When the message
<<<<ヨヨヨヨウウウウシシシシカカカカ゛゛゛゛アアアアリリリリママママセセセセンンンン>>
>>
appears on the display.
■
When the printer is off.
IMPORTANT
11A4
ヨウシガアリマセン
00インサツカノウ
メッセ ー ジ ジョブ 印刷可
A4
off
Page 17
16
Loading Paper in the Paper Cassette
Follow the same procedure to load paper into paper cassette 1, which is supplied
with the printer, and paper cassette 2 in the optional paper feeder. You can load
different sizes of paper into cassettes 1 and 2, and you can also switch between
paper cassettes automatically.
Follow the procedure below to load paper into the paper cassettes properly.
•
To avoid paper jams, note the following precautions.
•
Do not use non-standard-size paper, such as transparencies, label sheets or envelopes.
For more details, see “Paper Requirements,” on P. 7.
•
Never use paper that has fins, or paper that is wrinkled or extremely curled, as this may
cause paper jams or a printer malfunction.
•
Never stack paper higher than the limit mark in the paper cassette. This may cause paper
jams or a printer malfunction.
•
Refill the paper cassette with paper after the loaded paper has run out. Refilling the
paper cassette with paper before paper has run out may lead to problems when feeding
paper into the printer.
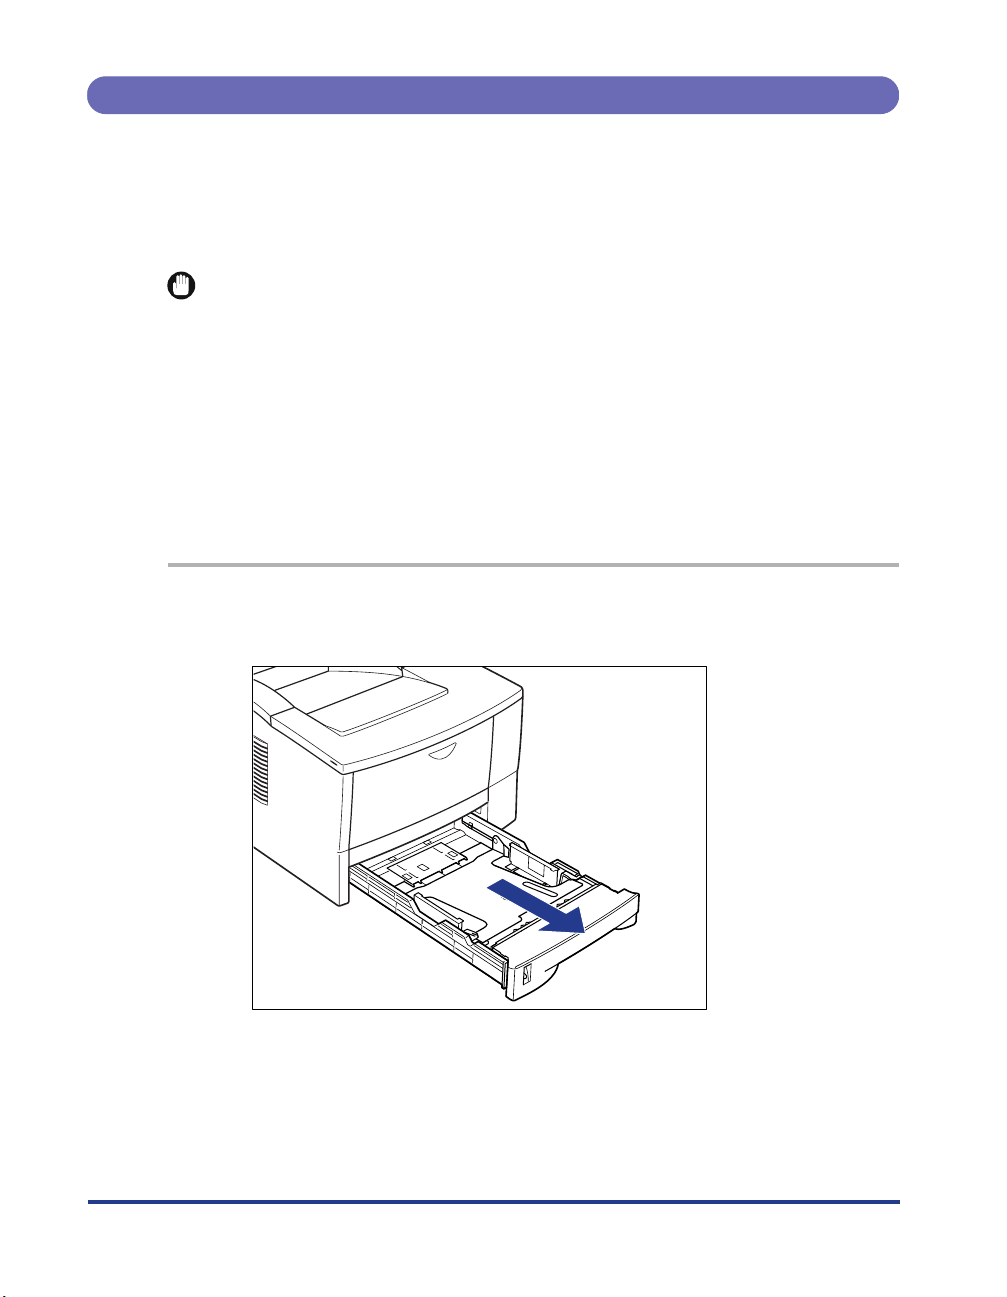
1
Check that the
ジジジジョョョョブブ
ブブ
indicator is not flashing, then pull out the
paper cassette into which you want to load paper.
IMPORTANT
Page 18
17
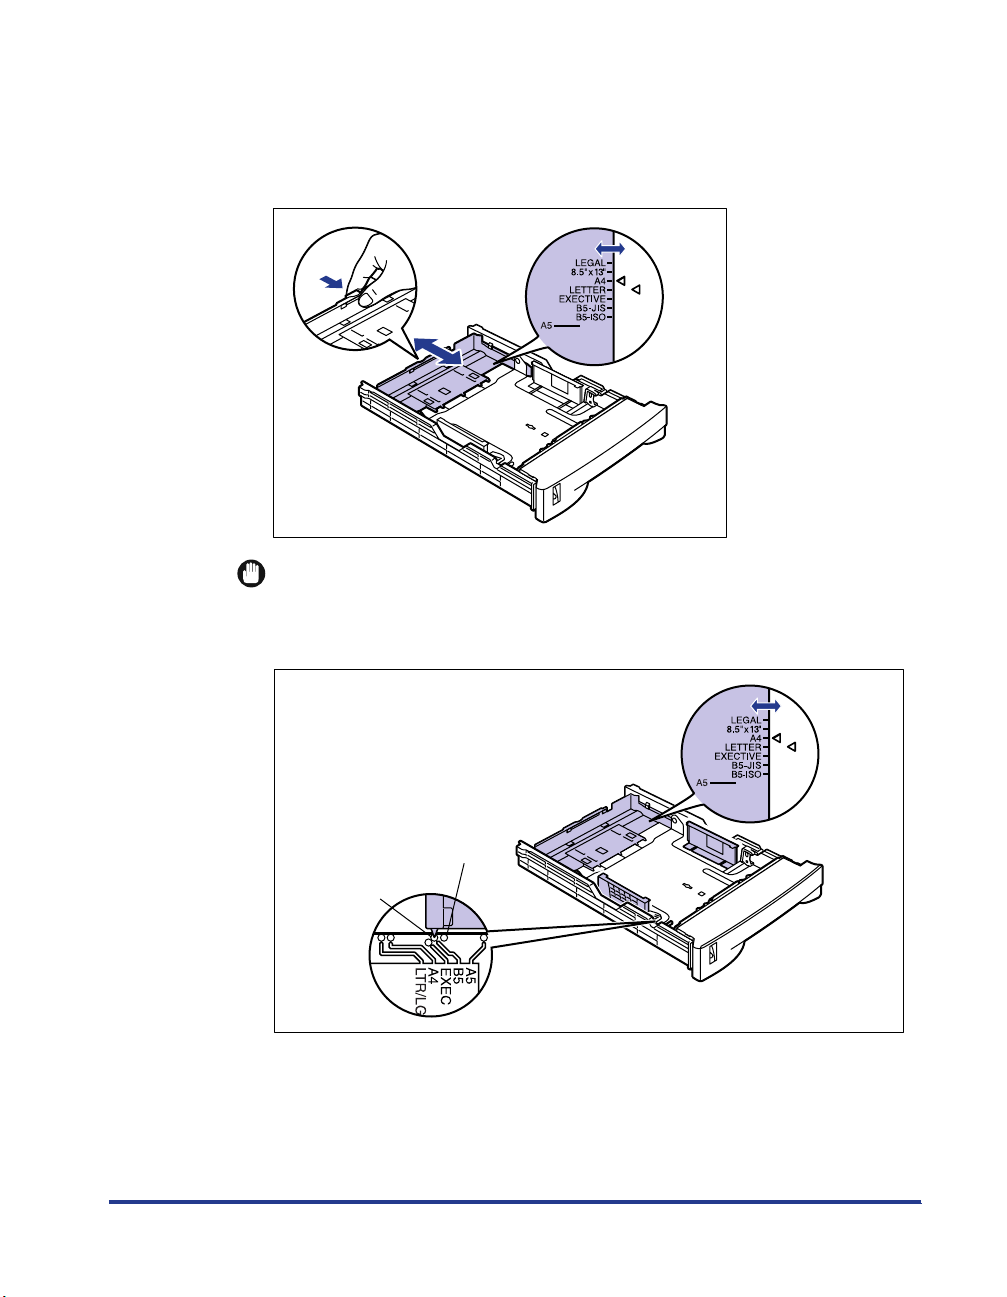
2
Hold the lock release lever of the rear paper size guide
11
11
and
line it up with the size of the paper you want to load
22
22
.
Move the rear paper size guide so that the triangular mark on the guide points to
the size of paper you want to load into the paper cassette.
•
When you are using B5-size (182 mm
×
257 mm) paper, line the rear paper size
guide up with the position (B5-JIS) shown in the illustration below. Do not move the
guide to the B5-ISO position.
1
2
IMPORTANT
B5-ISO Position
B5-JIS Position
Page 19
18
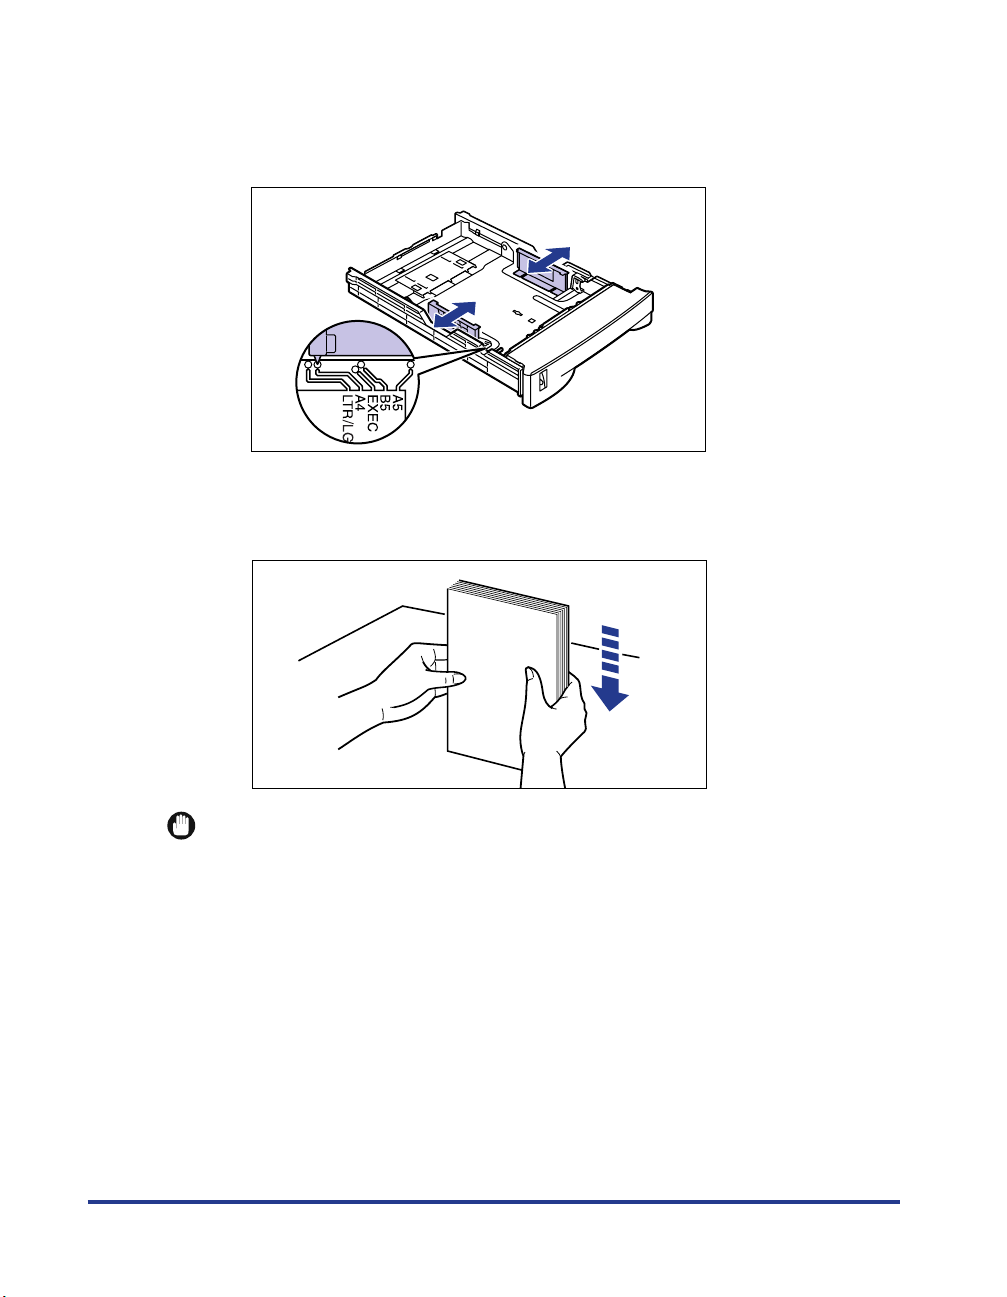
3
Slide the paper guides to align them with the selected paper
size.
The paper guides on both sides move together.
4
Tap the stack of paper on a flat surface to properly align the
edges.
•
If you are using paper that has been cut badly, sheets may overlap when delivered. If you
are using such paper, fan the stack of paper well, and then load it into the cassette.
IMPORTANT
Page 20
19
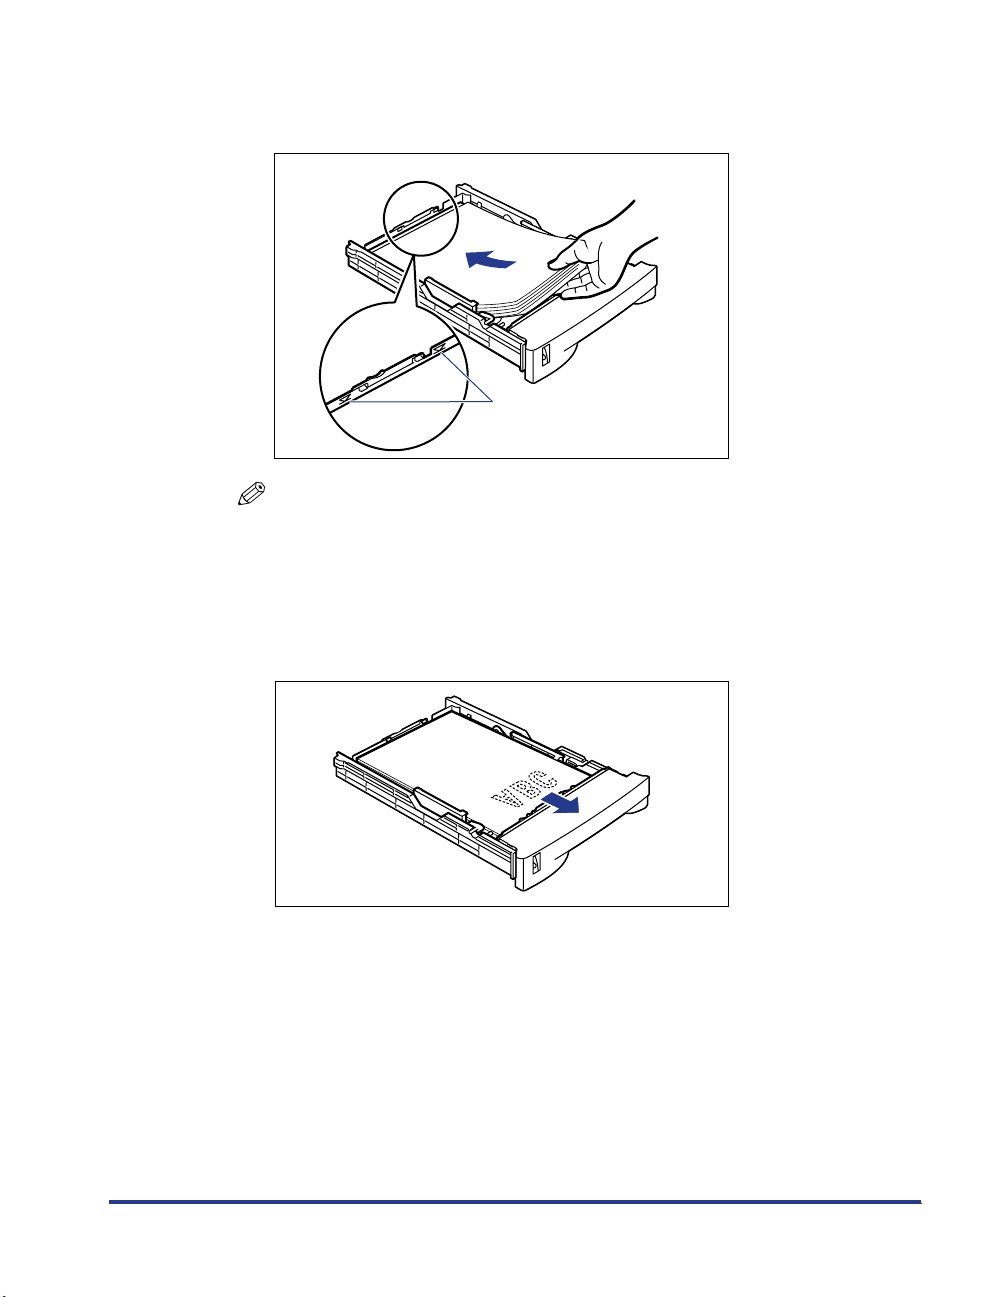
5
Set the paper flush against the rear paper size guide and load
it into the cassette.
•
You can load up to 250 sheets of plain paper (64 g/m
2
) into the cassette. Make sure
that the height of the paper stack does not exceed the limit mark. If the stack is
higher than the limit mark, this may cause a paper feed failure.
•
To print on letterhead paper or paper with a logo on it, follow the instructions below
to load the paper in the proper direction.
- Load the paper so that the print side is facing down and the top edge of the paper
is facing the front of the cassette.
Limit Mark
NOTE
Paper Feed Direction
Page 21
20
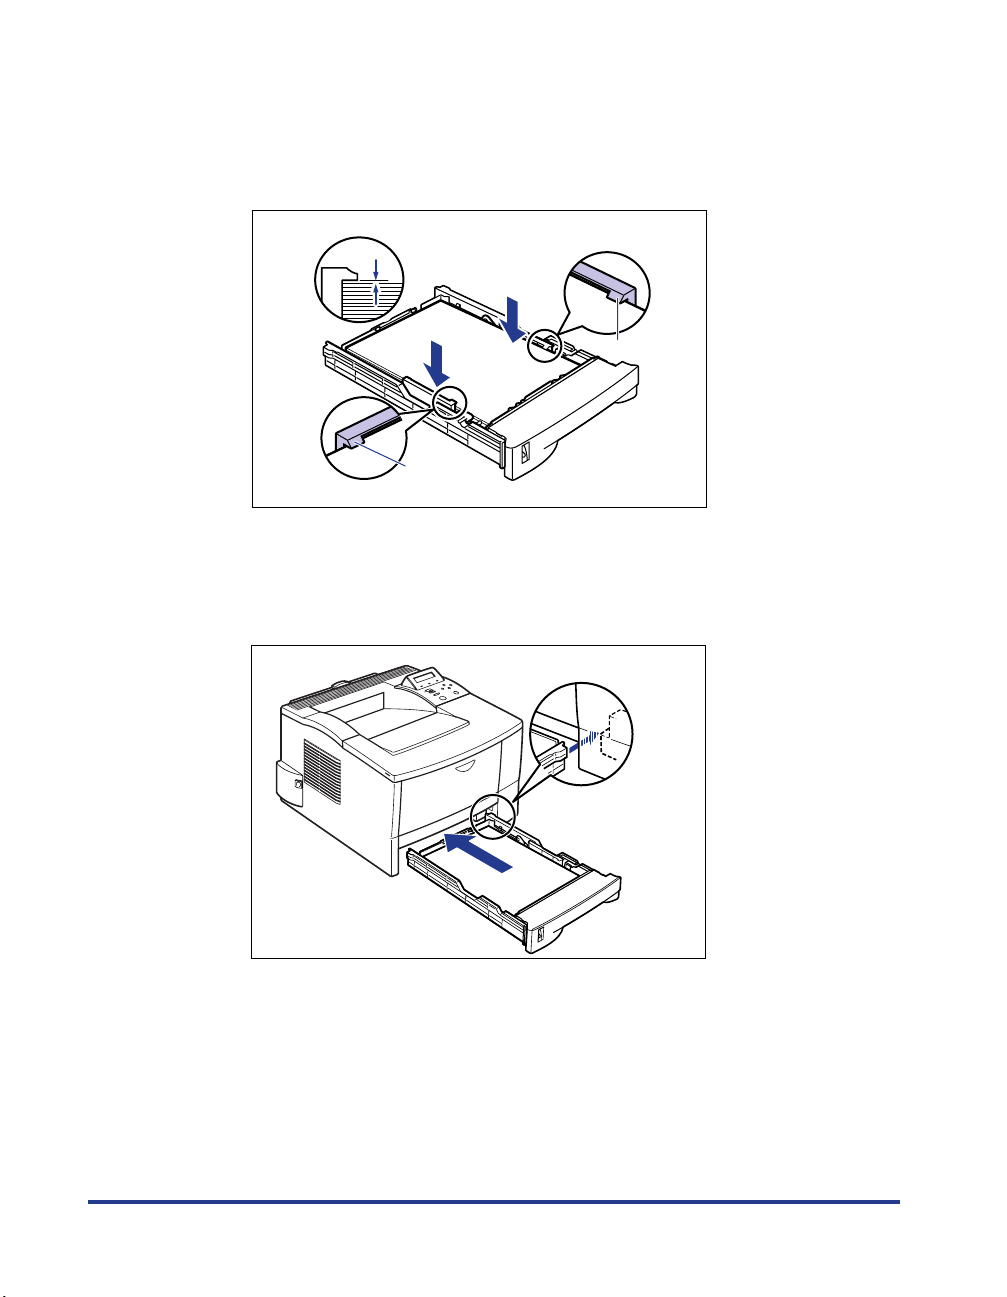
6
Push down the right and left side of the paper stack so that
both sides are under the hooks of the paper guides.
Make sure that there is some space left between the stack and the hooks.
Otherwise, remove some paper from the stack.
7
Insert the paper cassette into the printer.
Push the cassette into the printer securely until its front surface is flush with the
front surface of the printer.
Hook
Hook
Page 22

21
Printing from the Multi-Purpose Tray
You can load up to 100 sheets of paper (64 g/m
2
) of 76.2-215.9 mm width and 127-
355.6 mm length into the multi-purpose tray. Transparencies, label sheets, postcards,
stamped, self-addressed postcards and non-standard-size paper can be loaded into
the multi-purpose tray, which is useful when you want to use paper that cannot be
loaded into the paper cassette. When printing from the multi-purpose tray, you need to
set up the following items.
•
Always set the
[ トレイ ヨウシ サイズ ]
in the set-up menu to the size of the paper loaded in
the paper tray. Otherwise the message
<41 プリント チェック >
appears on the display
and data cannot be printed correctly.
•
Always make sure that the paper size settings in the printer set-up menu match the
settings in the printer driver before you print. If the settings do not match, the message
[PC XXX ヨウシ ニ コウカン ]
appears on the display. In this case, press
[オンライン ]
to change the
[トレイ ヨウシ サイズ ]
settings to match those of the printer driver. After
this, you can continue printing.
•
If you are using an OS which cannot run the printer driver, always set the paper source to
[トレイ ]
.
■
Load paper into the multi-purpose tray. ( → P. 22)
■
Select the paper delivery. ( → P. 32)
■
Set the paper size and type.
「キュウシ」
group in the set-up menu
•
「トレイ ヨウシ サイズ」=
the paper size you have set
If you are using an OS which cannot run a printer driver, such as DOS or UNIX, set up the
following items.
「キュウシ」
group in the set-up menu
•
「デフォルト ヨウシ タイプ」=
the paper type you have set
■
Set the printer driver.
When printing from the printer driver, set the following items. The items to be set may vary
depending on the OS. The following are items to be set for a Windows printer driver.
[ページ設定]
sheet
[出力用紙サイズ]=
the paper size you have set
[給紙]
sheet
[給紙部]=[手差し(トレイ)]
[用紙タイプ]=[普通紙]:
plain paper, label sheet, envelope, postcard,
stamped, self-addressed postcard
[厚紙]:
thick paper
[OHP フィルム]:
transparencies
IMPORTANT
NOTE
Page 23

22
Loading Paper in the Multi-Purpose Tray
Loading Paper (other than envelopes and postcards)
To load plain paper, thick paper or label sheets in the multi-purpose tray, follow the
procedure described below.
•
Data cannot be printed in a 5 mm wide border around the paper.
1
Open the multi-purpose tray on the front of the printer.
When loading long size paper, such as A4, open the extension tray.
•
To avoid damaging the multi-purpose tray and extension tray, do not place anything other
than paper in them. In addition, avoid pressing or applying excessive force to the tray as
this may damage it.
■
Closing the multi-purpose tray
▼
To close the multi-purpose tray, reverse the procedure for opening the tray.
IMPORTANT
1
IMPORTANT
2
Page 24

23
When you are not using the multi-purpose tray, keep it closed.
Be sure to return the extension tray to its original position. To avoid damaging the
multi-purpose tray, do not close the multi-purpose tray with the extension tray left
open.
2
Tap the stack of paper on a flat surface to properly align the
edges.
•
Be sure to load a stack of transparencies or labels after thoroughly fanning them.
Otherwise, they may overlap when they are fed into the printer, causing paper
jams.
•
When fanning or aligning transparencies, always hold the edges, where possible,
to avoid touching the print side.
•
Ta ke care not to mark/stain the print side of transparencies with fingerprints, dust
or oil. This may cause poor printing.
•
If the leading edge of the paper is bent or curled, straighten out the paper before
loading it into the tray.
•
If you are using paper that has been cut badly, sheets may overlap when delivered.
If you are using such paper, fan the stack of paper well, and then load it into the
tray.
1
2
IMPORTANT
Page 25

24
3
Insert the paper stack gently as far as it will go into the printer,
with the print side facing up.
•
You can load up to 100 sheets of plain paper (64 g/m
2
). Make sure that the height
of the paper stack does not exceed the limit guide.
•
Do not place the paper into the tray at an angle.
•
If the rear edge of the paper stack is not properly aligned, this may cause a paper
feed failure and paper jams.
•
To print on letterhead paper or paper with a logo on it, follow the instructions below
to load the paper in the proper direction.
- Load the stack of paper so that the print side faces up and the top edge of the
paper is inserted first.
Limit Guide
IMPORTANT
NOTE
Page 26

25
4
Slide the paper guides so that they closely fit the right and left
edges of the stack of paper.
•
Be sure to set the paper guide to the paper width. Misfeeds or paper jams may
occur if the paper guides are too loose or too tight.
•
Do not touch or remove the paper from the paper tray during printing. This may
cause a printer malfunction.
Proceed to “Selecting Paper Delivery,” on P. 32.
IMPORTANT
Page 27

26
Loading Postcards
You can load postcards into the multi-purpose tray. To load postcards into the multipurpose tray, follow the procedure described below.
•
Data cannot be printed in a 5 mm wide border around the postcard.
1
Open the multi-purpose tray on the front of the printer.
•
Do not place anything other than paper on the multi-purpose tray and extension
tray. In addition, avoid pressing or applying excessive force to the tray as this is may
damage it.
2
Tap the stack of postcards on a flat surface to properly align
the edges.
IMPORTANT
IMPORTANT
Page 28

27
IMPORTANT
•
If the postcards are warped, correct the warp so that it does not exceed 2 mm in an
upward direction before loading the stack into the multi-purpose tray.
•
If you are using postcards that have been cut badly they may overlap when
delivered. If you are using such postcards, fan the stack of postcards well, and then
load them in the paper tray.
3
Load the postcard stack in the multi-purpose tray.
If you want to print on the side that the address will be written, load postcards
with the print side of the postcards facing up and the top edge of the postcards
going into the printer first.
•
You can load up to 40 postcards. Make sure that the height of the stack does not
exceed the limit guide.
No more than 2 mm
Limit Guide
IMPORTANT
Page 29

28
•
When printing on stamped, self-addressed postcards, make sure that the
application page setup and orientation settings match the way the postcards are
loaded in the multi-purpose tray. (Example: For Windows NT 4.0/Windows 2000,
select
[往復はがき横 ]
.)
4
Slide the paper guides so that they closely fit the right and left
edges of the stack of postcards.
•
Be sure to set the paper guides to postcard width. Misfeeds or paper jams may
occur if the paper guides are too loose or too tight.
•
Do not touch or remove the postcards from the paper tray during printing. This may
cause a printer malfunction.
•
Never use stamped, self-addressed postcards with creases.
Proceed to “Selecting Paper Delivery,” on P. 32.
IMPORTANT
Page 30

29
Loading envelopes
The multi-purpose tray can hold Youkei No.4 envelopes. To load envelopes in the multipurpose tray, follow the procedure described below.
•
You can load only envelopes of the size shown below. (You cannot use envelopes with a
flap along the short edge.)
•
Do not use self-adhesive envelopes. This may cause a deterioration in the print quality or
printer malfunction.
•
Data cannot be printed in a 10 mm wide border around the envelopes.
1
Open the multi-purpose tray on the front of the printer.
•
To avoid damaging the multi-purpose tray and extension tray, do not place anything
other than paper on them. In addition, avoid pressing or applying excessive force to
the tray as this may damage it.
IMPORTANT
Yo u k ei No.4
(Envelope Y401 for Canon LBP / recommended)
IMPORTANT
Page 31

30
2
Place the stack of envelopes on a flat surface and press down
the corners to crease and flatten the envelopes.
3
Flex the stack on all four sides to remove any stiffness as
illustrated below. If the corners are curled, straighten them.
4
Tap the stack of envelopes on a flat surface to properly align
the edges.
Page 32

31
5
Insert the envelope stack into the printer as far as it will go, so
that the print side faces up with the flap on the left.
•
The multi-purpose tray can hold about ten envelopes. Make sure that the height of
the stack of envelopes does not exceed the limit guide.
•
You cannot print on the back (adhesive surface) of the envelope.
•
Load the envelope with the flap on the left.
Limit Guide
積載制限ガイド
IMPORTANT
Page 33

32
6
Slide the paper guides so that they closely fit the right and left
edges of the stack of envelopes.
•
Make sure that the paper guides are set to the size of the envelopes. A paper feed
failure or paper jams may occur if they are too loose or too tight.
•
Do not touch or remove the envelopes from the paper tray during printing. This may
cause a printer malfunction.
Proceed to “Selecting Paper Delivery,”. ( → See below.)
Selecting Paper Delivery
For thick paper, transparencies, label sheets, postcards, stamped, self-addressed
postcards and envelopes, you must switch the paper delivery to the sub-output tray.
For plain paper, you can select the type of paper delivery that suits your purpose.
IMPORTANT
Page 34

33
Selecting the Sub-output tray
To switch the paper delivery to the sub-output tray, follow the procedure described
below.
1
Hold the handle of the sub-output tray and pull it open.
2
Pull out the extension tray.
•
Be sure to pull out the extension tray when using the sub-output tray. Otherwise,
paper jams may occur.
IMPORTANT
Page 35

34
Selecting the Output Tray
To switch the paper delivery to the output tray, follow the procedure described
below.
1
Return the extension tray to its original position, then close
the sub-output tray.
Page 36

35
Clearing Paper Jams
When a paper jam occurs during printing, a warning beep will sound and the error
message
<13 ヨウシガ ツマリマシタ>
will appear on the display. When a paper jam
occurs, follow the procedure below to remove the jammed paper from the printer
and then resume printing. If the message remains after removing the jammed
paper according to the prescribed procedure, torn pieces of the jammed paper may
still remain in the printer. In this case, re-check various sections of the printer and
remove all pieces of the jammed paper from inside the printer.
Procedure for Clearing Paper Jams
If a paper jam occurs, check the message on the display first, and then follow the
procedure below to remove jammed paper.
•
Some devices inside the printer may be high-pressured. When accessing the
inside of the printer, always remove any necklaces, bracelets, or other metal
items from your body before you start. Otherwise, this may result in burns and/
or electrical shock.
•
The fixing unit may be hot during operation. Do not touch the fixing unit or its
peripherals as this may cause personal injury, or burns.
•
If you get loose toner powder on your hands or clothing, wash it off with cold
water immediately. Using warm water may fix the toner to your hands or
clothing, making it difficult to remove.
WAR NING
CAUTION
Page 37

36
IMPORTANT
•
Never touch the high-voltage contact points inside the top cover. This could damage the printer.
•
Always remove the toner cartridge before you try to remove any jammed paper, this
makes it easier to remove the jammed paper.
•
Remove the jammed paper while the power to the printer still on. If you turn the power off,
the print data will be erased.
•
If you attempt to remove the jammed paper forcibly, the paper may be torn or parts inside
the printer may be damaged. Pull out the jammed paper in the correct direction according
to the location at which the paper is jammed.
•
If the jammed paper has torn, find any scraps pieces of paper remaining inside the
printer and remove them.
•
If you remove the jammed paper without opening the top cover, the error message may
not disappear. In this case, open and close the top cover again.
1
Check all the messages appearing on the display.
The error messages and the locations are shown one by one on the display.
Check all of them. The messages will disappear when you open the cover. It is
recommended that you note down the messages.
The message indicates the location of the paper jam. The following types of
messages are shown on the display. When two or more messages appear on the
display, note down all of them and check them one by one, in sequence.
High-voltage
Terminals
13ヨウシガツマリマシタ
ウエカバーエリア
Display message
<キュウシ エリア>
<ウエカバー エリア>
<ハイシ エリア>
<リョウメン エリア>
Location of a paper jam
Multi-purpose tray, Paper cassette
Inside the top cover
Output tray, Sub-output tray
Inside the duplex unit
Page 38

37
2
Open the top cover.
3
Remove the toner cartridge.
Page 39

38
4
Put the toner cartridge in the original protective bag.
5
If you can see the jammed paper inside the top cover, remove
the paper from the printer by pulling it straight out.
Pull out the jammed paper slowly so as not to scatter any loose toner.
•
If you remove the jammed paper by pulling it up and out of the printer at an angle,
this may cause any toner that is not fixed to the paper to scatter. To remove the
paper from the printer, pull it straight out of the printer. If the inside of the printer
becomes soiled, this may result in a deterioration of the print quality.
IMPORTANT
Page 40

39
6
If you can see the leading edge of the paper under the transfer
guide, lift the transfer guide
11
11
, and then pull out the edge of
the jammed paper and remove the paper
22
22
.
Lift the transfer guide by holding the part indicated by the green mark.
7
If you cannot see the paper, lift the transfer guide
11
11
and
remove the paper
22
22
.
Lift the transfer guide by holding the part indicated by the green mark, then pull
the paper up slowly with both hands.
•
If the leading edge of the jammed paper has been fed as far as the output area,
remove the paper from the sub-output tray. If you remove it from the top cover area,
this will soil the inside of the printer and lead to a deterioration in the print quality.
1
2
Transfer Guide
Green Mark
2
Transfer Guide
IMPORTANT
1
Green Mark
Page 41

40
8
Return the transfer guide to its original position.
•
Make sure that the transfer guide is returned to its original position. Replacing the
toner cartridge without returning the transfer guide to its original position could
damage the toner cartridge.
9
Close the top cover.
Transfer Guide
IMPORTANT
Page 42

41
10
Open the sub-output tray.
11
Remove the jammed paper from the output tray.
•
If you cannot remove the jammed paper easily, do not try to pull it out forcibly. Go to
the next step.
IMPORTANT
Page 43

42
12
Pull out the top edge of the jammed paper from the suboutput tray
11
11
, then remove the paper from the printer
22
22
.
1
2
● If you are performing duplex printing:
Page 44

43
When you are having trouble removing the jammed paper from the printer,
slightly tilt the sub-output tray 1 as shown in the illustration below, and remove
the pins from the hooks on right and left sides of the tray 2.
•
To lower the sub-output tray after you have removed the pins from the hooks,
always hold the tray and lower it slowly.
1
2
Pin
IMPORTANT
Page 45

44
NOTE
•
To return the sub-output tray to its original position, raise the sub-output tray up to
the position shown in the illustration below
1
. The pins will be re-positioned
automatically on the hooks
2
.
13
Close the sub-output tray.
2
1
Page 46

45
14
When using the multi-purpose tray, remove the jammed paper
from the multi-purpose tray.
15
Close the multi-purpose tray.
Page 47

46
16
Pull out the paper cassette.
When an optional paper feeder unit is attached to your printer, pull out all the
paper cassettes.
Page 48

47
17
Remove the jammed paper.
When the optional paper feeder unit is attached, you can remove the jammed
paper in the same way.
If you are not duplex printing, go to step 22.
Page 49

48
18
Open the duplexing transfer cover.
Pull the green lock release lever toward you.
The duplexing transfer cover will open.
•
Never touch the transfer roller, as this may result in a paper feed failure.
19
Remove the jammed paper.
IMPORTANT
Page 50

49
20
Close the duplexing transfer cover.
21
Re-install the paper cassette in the printer.
Insert the cassette securely until its front surface is flush with the front surface of
the printer.
Page 51

50
22
Open the top cover.
23
Re-install the toner cartridge in the printer.
Page 52

51
24
Close the top cover.
Page 53

52
Replacing the Toner Cartridge
To replace a toner cartridge, follow the procedure described below.
• To avoid a fire and personal injury, never attempt to incinerate a used toner
cartridge. Toner residue inside the cartridge is flammable and if it is scattered
near an open flame, this may result in a fire or personal injury.
• If you get loose toner powder on your hands or clothing, wash it off with cold
water immediately. Using warm water may fix the toner to your hands or
clothing, making it difficult to remove.
•
Be sure to use only toner cartridges designed for this printer.
1
Open the top cover.
WAR NING
CAUTION
IMPORTANT
Page 54

53
2
Remove the toner cartridge from the printer.
3
Remove the new toner cartridge from its protective bag.
Open the protective bag by cutting it with scissors etc., so as not to damage the
cartridge.
•
Save the protective bag. You may need it later when removing the toner cartridge
for maintenance of the printer.
IMPORTANT
Page 55

54
4
Hold the toner cartridge as illustrated below and gently rock it
5 or 6 times to evenly distribute the toner.
• If the toner is not evenly distributed inside the cartridge, this may reduce print quality.
5
Place the toner cartridge on a sturdy surface, then pull out the
sealing tape (about 50 cm long) while holding the cartridge.
Fold the tab back and forth, then pull the sealing tape straight out of the
cartridge, as illustrated below.
IMPORTANT
Page 56

55
IMPORTANT
•
Do not pull the tape diagonally upwards or downwards. It may snap off and you will
not be able to remove it completely.
•
Remove the sealing tape completely from the cartridge. Otherwise, this may cause
a deterioration in the print quality.
•
Ta ke care not to touch the drum protective shutter when you remove the sealing
tape from the cartridge.
•
Dispose of the sealing tape properly.
Drum Protective Shutter
Page 57

56
6
Hold the toner cartridge as illustrated below, then install it
into the printer.
Slide the toner cartridge into the printer as far as it will go with the projections at
both sides aligned with the toner cartridge guide located inside the printer.
•
When inserting the toner cartridge, make sure that the top cover is fully open.
Otherwise, you will not be able to insert the cartridge into the printer.
IMPORTANT
Page 58

57
7
Close the top cover.
Close the top cover with both hands until it clicks.
•
When you cannot close the top cover completely, check the installation of the toner
cartridge. Do not try to close the top cover forcibly, as this may damage it.
•
Do not leave the top cover open for a long time after installing a toner cartridge.
IMPORTANT
Page 59

58
Canceling Printing
To cancel printing currently being processed, follow the procedure described below
to perform job cancel. Job cancel lets you cancel a job while data is being received
or processed. It does not affect the print data for the next job or any other interface
jobs for which data processing has not begun.
•
Perform job cancel offline when data is being processed (when the
ジョブ
indicator
is on or flashing). If you press [
ジョブキャンセル
] when the
ジョブ
indicator is off, this
activates the [
ユーティリティ
] function.
•
Data that has already been processed and is currently being printed (when paper
feeding has begun) cannot be canceled. In this case, be careful because
performing job cancel may cancel the print data for the next job.
•
If print data sent from a printer driver not compatible with this printer is mixed with
other data, multiple print jobs may be canceled.
•
When job cancel is performed, the message
<03 ジョブ キャンセル >
is displayed.
However the print job may not be canceled.
Follow the procedure described below to perform job cancel. Only perform job
cancel when the
ジョブ
indicator is on or flashing (when the print data for the job
you want to cancel is being received or processed).
1
Press [
オオオオンンンンラララライイイインン
ンン
].
The
オンライン
indicator is turned off and the printer gets ready for operation
using the control panel.
•
The display changes depending on the printer status. During job processing, the
operation mode, a user name or printer status is shown alternately.
IMPORTANT
NOTE
オンライン
NOTE
Page 60

59
2
Press [
ジジジジョョョョブブブブキキキキャャャャンンンンセセセセルル
ルル
].
The message
<03 ジョブ キャンセル>
appears on the display and the print
data being processed is canceled. When processing takes time, such as when
receiving data, the message on the display changes to
<00 ジョブ スキップ>
.
When the message
<00 インサツ カノウ>
appears on the display, job cancel is
complete.
•
When the message
<00 ジョブ スキップ>
appears on the display, you can press
[
リセット
] to perform a soft reset or hard reset. If you perform a reset, any print data
being received or any other interface print data will be lost. In this case, perform
printing again.
•
When the message
<03 ジョブ キャンセル>
appears on the display, you cannot
perform a soft reset or hard reset. Wait until job cancel is complete or the message
<00 ジョブ スキップ>
appears on the display.
ジョブキ ャン セル
ユーティリティ
03ジョブキャンセル
03ジョブスキップ
00インサツカノウ
NOTE
A4
Page 61

60
Checking Operations
You can use the status print to check the configuration of the printer. Use this
function whenever necessary such as after preparing and connecting the printer or
whenever you want to check its operating status.
Status Print
Currently available printer functions and a list of setting values are printed in a status
print. To perform a status print, follow the procedure described below.
•
Status print is set to print on A4-size. You can print on other paper sizes, however the
status print data may be enlarged or reduced, and as a result a part of the status print
may be cut off or inclined.
•
The values that are programmed in menus from the printer’s control panel are reflected in
the status print. For example, if duplex printing is programmed, the status print will also
be printed on both sides of the paper. However, the number of copies is ignored and one
sheet is printed at all times.
1
Press [
オオオオンンンンラララライイイインン
ンン
].
The
オンライン
indicator is turned off and the printer gets ready for operation
using the control panel.
2
Press [
ユユユユーーーーテテテティィィィリリリリテテテティィ
ィィ
].
The message
<ステータス プリント>
appears on the display.
3
Press [
∨∨
∨∨
].
The message
<01 ステータス プリント>
appears on the display and the status
print begins.
NOTE
ジョブキ ャン セル
オンライン
ユーティリティ
リセット/実行
ユーティリティ
ステータスプリント
ステータスプリント
01
ステータスプリント
→
→
Page 62

61
4
Check the contents of the status print.
A status print is printed as shown below. It allows you to check functions that can
be currently used, provides a list of setting values in the printer function menu
and versions of software and hardware installed in the printer, as well as the page
count.
Page 63

62
When a Message Is Displayed
When <nn-nn
ササササーーーービビビビススススココココーーーールル
ルル
> or <F9-nn
チチチチェェェェッッッックク
クク
ププププリリリリンンンンタタ
タタ
> Is Displayed
If a problem has occurred internally in the printer, or if a problem has occurred while
print data was being processed, an error message (error code and message) is
displayed. An error code is a four-digit number as shown in the illustration below.
1
Turn the printer’s power to off, wait for a while, and then turn
the power back to on.
If the message is not displayed again, you can use the printer as it is.
Error code Message
Error code Message
5F-50 サービスコール
F9-nn チェックプリンタ
When these types of messages are
displayed, make a note of the four-digit
number on the display, and then take the
following actions.
Page 64

63
2
If the message is displayed again, turn the printer’s power to
off. Disconnect the power plug and remove the earth cable
from the earth terminal. Then contact the place where you
purchased the printer.
When you contact the place of purchase, describe the problem and quote the
four-digit number.
•
When the message <5F-nn
サービスコール
> is displayed, condensation may have
formed inside the printer. Let the printer stand for two hours or more so that it
adjusts to the surrounding temperature and humidity. If you print while there is
condensation inside the printer, the paper may not feed properly causing paper
jams, and the print quality may also be poor.
NOTE
Page 65

64
Error Messages
If the printer is unable to print for some reason, an alarm sounds, the error indicator
lights up and an error message appears on the display. Furthermore, a warning
message is displayed when you are required to take some sort of action, even
though there is no problem with the print job. When these types of messages are
displayed, take the following actions in response.
•
When multiple warning messages occur at the same time, the messages are displayed
alternately.
•
When an error message occurs at the same time as a warning message, the warning
message is not displayed.
•
When [
警告表示
] in the set-up menu is set to [
シナイ
], a message with the < Warning
message > symbol is not displayed.
•
When a message with the < Error skip > symbol is displayed, press [
オンライン
] to bypass
the error and continue printing. However if you do this, print data may be lost or the data
may not be printed correctly. If you want to cancel the procedure, perform a soft reset to
remove the cause of the problem and then press [
オンライン
] to print the data again.
Furthermore, messages with this symbol can be automatically skipped by setting
[
自動エラースキップ
] in the set-up menu to [
ツカウ
].
Message
Cause and Remedy
11 XXX ヨウシガアリマセン
(where XXX is the paper size
abbreviation)
Cause: The paper size specified in an
application software has not been
loaded in the paper cassette or
paper tray. (When the paper feed
mode is set to [
自動
], this applies to
all paper cassettes and the paper
tray. When the paper mode is fixed,
this applies to a paper cassette or
the paper tray.)
Remedy: Add paper to the paper source or, if
there is no paper in the paper
source, load paper into it.
12 カバーガ アイテイマス
Cause: The top cover is open.
Remedy: Close the top cover firmly.
13 ヨウシガ ツマリマシタ
Cause: Paper has jammed inside the printer.
Remedy: Clear the paper jam.
14 EP カートリッジ ナシ
Cause: The toner cartridge has not been
installed or it has not been installed
correctly.
Remedy: Install the toner cartridge or re-install
the toner cartridge correctly.
IMPORTANT
Page 66

65
17 カセット n ヨウシ ナシ
(n is the cassette number.)
<Warning message>
Cause: Paper in the cassette of the number
indicated on the display has run out.
Remedy: Load paper into the cassette of the
number indicated on the display.
32 リョウメン フカノウ
<Error skip>
Cause: The paper specified cannot be
duplex printed.
Remedy: Select the paper source on the
printer with standard-size paper
loaded, and set the paper size
setting on the PC to standard-size.
Then start printing again.
37 ヨウシタイプ フカノウ
Cause: The paper type specified cannot be
printed.
Remedy: Press [
オンライン
] and the paper will
be printed as plain paper. If the
paper is not plain paper, the data
may not be printed properly.
40 ツウシン エラー
<Error skip>
Cause: An error occurred when data was
being transferred between a PC and
the printer.
Remedy: Check the interface cable connection
and print the data again.
41 プリント チェック
<Error skip>
Cause: The sizes of the paper loaded in the
paper cassette and paper tray are
different to the paper size settings
specified on the PC or the control
panel.
Remedy: When paper is being fed from the
paper cassette, make sure that the
size of the paper loaded in the paper
cassette is the same as the paper
size settings for the paper cassette.
Also, when paper is being fed from
the paper tray, make sure that the
size of the paper loaded in the paper
tray is the same as the paper size
settings for the paper tray before you
press [
オンライン
].
Message
Cause and Remedy
Page 67

66
PC XXX ヨウシ ニ コウカン
(where XXX is the paper size
abbreviation)
<Error skip>
Cause: Either the size of the paper loaded in
the paper source is different to the
paper size setting in the application
software, or a paper source in which
a different size of paper is loaded
has been selected.
Remedy: Replace the paper in the selected
paper source with paper of the size
specified by the application software
(or scaling setting).
Message
Cause and Remedy
 Loading...