

Page 1

LBP112
User's Guide
USRMA-2506-00 2018-08 en Copyright CANON INC. 2018
Page 2

Contents
Important Safety Instructions ...........................................................................................................
Installation ............................................................................................................................................................... 3
Power Supply ............................................................................................................................................................ 5
Handling ................................................................................................................................................................... 6
Maintenance and Inspections .................................................................................................................................... 8
Consumables ............................................................................................................................................................ 9
Setting Up .......................................................................................................................................................... 13
Preparations Required Before Use ........................................................................................................................... 14
Installing Drivers .................................................................................................................................................... 15
Setting Up Print Server ............................................................................................................................................ 16
Basic Operations .......................................................................................................................................... 20
Parts and Their Functions ........................................................................................................................................ 22
Front Side .......................................................................................................................................................... 23
Back Side ........................................................................................................................................................... 25
Drawer .............................................................................................................................................................. 26
2
Printer Status Window ............................................................................................................................................ 27
Turning ON the Machine ......................................................................................................................................... 30
Turning OFF the Machine ..................................................................................................................................... 31
Loading Paper ......................................................................................................................................................... 32
Loading Paper in the Drawer ................................................................................................................................ 34
Loading Envelopes .............................................................................................................................................. 37
Loading Preprinted Paper .................................................................................................................................... 39
Entering Sleep Mode ............................................................................................................................................... 40
Setting Auto Shutdown ........................................................................................................................................... 41
Printing ................................................................................................................................................................ 43
Printing from a Computer ....................................................................................................................................... 44
Canceling Prints ................................................................................................................................................. 46
Checking the Printing Status ................................................................................................................................ 49
Managing the Machine ........................................................................................................................... 51
Updating the Firmware ........................................................................................................................................... 52
Maintenance ................................................................................................................................................... 54
Regular Cleaning ..................................................................................................................................................... 56
Cleaning the Exterior ........................................................................................................................................... 57
Cleaning the Fixing Assembly ............................................................................................................................... 58
Replacing the Toner Cartridge ................................................................................................................................. 59
I
Page 3

Replacing the Drum Cartridge ................................................................................................................................. 64
Checking the Remaining Amount of Consumables .................................................................................................... 69
Relocating the Machine ........................................................................................................................................... 71
Vie
wing the Counter Value ...................................................................................................................................... 73
Printing Lists of Settings ......................................................................................................................................... 74
Consumables .......................................................................................................................................................... 75
Troubleshooting ........................................................................................................................................... 79
Common Problems .................................................................................................................................................. 81
Installation/Settings Problems .............................................................................................................................. 82
Printing Problems ............................................................................................................................................... 83
When You Cannot Print Properly .............................................................................................................................. 85
Printing Results Are Not Satisfactory ..................................................................................................................... 87
Paper Creases or Curls ........................................................................................................................................ 96
Paper Is Fed Incorrectly ....................................................................................................................................... 98
Countermeasures for Each Message ......................................................................................................................... 99
Clearing Paper Jams .............................................................................................................................................. 105
Paper Jams inside the Machine ........................................................................................................................... 107
When a Problem Cannot Be Solved ......................................................................................................................... 112
Appendix ........................................................................................................................................................... 114
Third Party Software ............................................................................................................................................. 115
Feature Highlights ................................................................................................................................................ 116
Going Green and Saving Money ......................................................................................................................... 117
Improving Eciency ......................................................................................................................................... 118
Specications ....................................................................................................................................................... 119
Main Unit ........................................................................................................................................................ 120
Available Paper ................................................................................................................................................ 122
Printer Functions .............................................................................................................................................. 124
System Environment ......................................................................................................................................... 125
Manuals and Their Contents .................................................................................................................................. 126
Using User's Guide ................................................................................................................................................ 127
Screen Layout of User's Guide ............................................................................................................................ 128
Viewing User's Guide ........................................................................................................................................ 131
Basic Windows Operations .................................................................................................................................... 132
Notice .................................................................................................................................................................. 140
II
Page 4

Important Safety Instructions
Important Safety Instructions
Important Safety Instructions ................................................................................................................... 2
Installation ............................................................................................................................................................
Power Supply ......................................................................................................................................................... 5
Handling ................................................................................................................................................................. 6
Maintenance and Inspections .............................................................................................................................. 8
Consumables .......................................................................................................................................................... 9
3
1
Page 5

Important Safety Instructions
Important Safety Instructions
2754-000
The content described in this chapter is for the pre
and others. Before using this machine, read this chapter and follow the instructions to properly use this machine. Do
not perform any operations not described in this manual. Canon will not be responsible for any damages resulting
from use not described in this manual, improper use, or repair/changes not performed by Canon or a third party
authorized by Canon.
Installation(P. 3)
Power Supply(P. 5)
Handling(P. 6)
Maintenance and Inspections(P. 8)
Consumables(P. 9)
vention of damage to property and injury to users of the machine
2
Page 6
Installation
Important Safety Instructions
2754-001
To use this machine safely and comfortably
appropriate location.
Do not install in a location that may result in a r
● A location wher
(too close to walls, beds, sofas, rugs, or similar objects)
● A damp or dusty location
● A location exposed to direct sunlight or outdoors
● A location subject to high temperatures
● A location exposed to open ames
● Near alcohol, paint thinners or other ammable substances
e the ventilation slots are blocked
, carefully read the following precautions and install the machine in an
e or electrical shock
Other warnings
● Do not connect unapproved cables to this machine. Doing so may result in a re or electrical shock.
● Do not place necklaces and other metal objects or containers lled with liquid on the machine. If foreign
substances come in contact with electrical parts inside the machine, it may result in a re or electrical shock.
● If any foreign substance falls into this machine, unplug the power plug from the AC power outlet and
contact your local authorized Canon dealer.
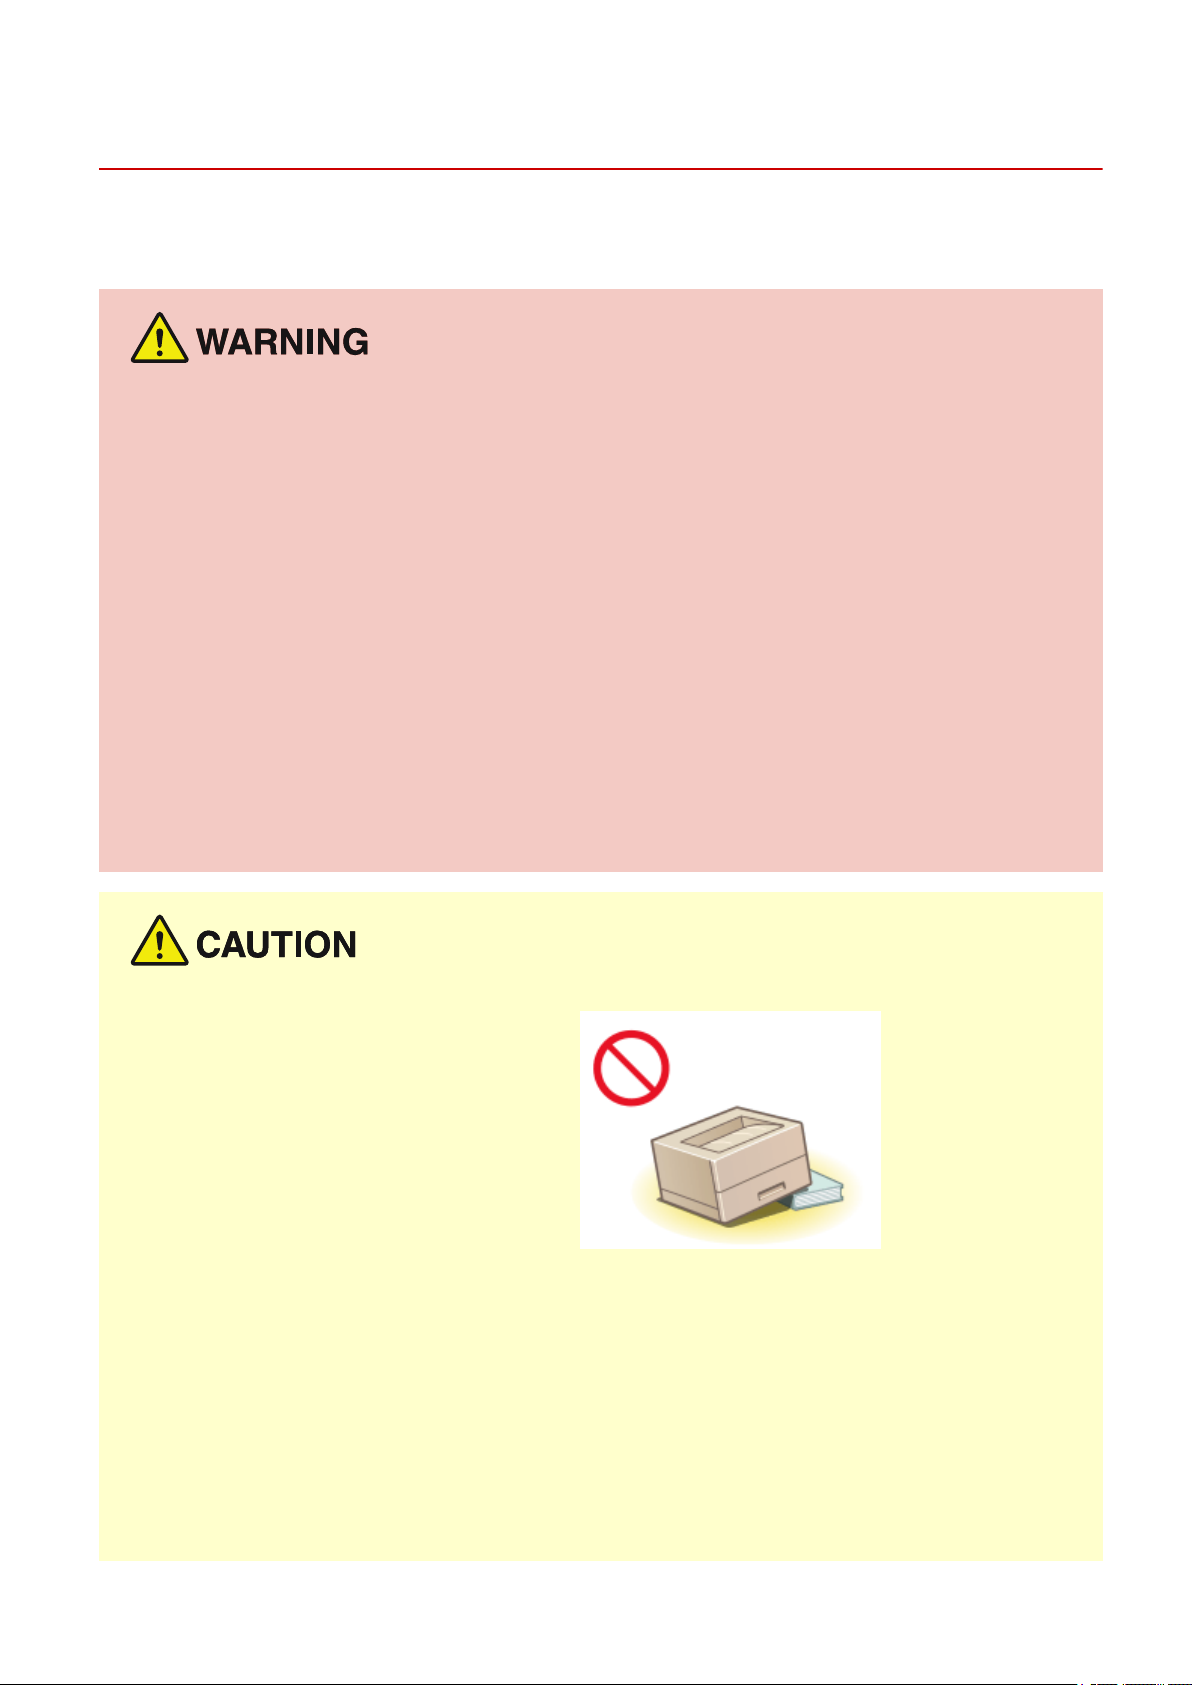
Do not install in the following locations
● The machine may drop or fall, r
- An unstable location
- A location exposed to vibrations
esulting in injury.
Other cautions
● When carrying this machine, follow the instructions in this manual. If carried impr
in injury.
● When installing this machine, be careful not to get your hands caught between the machine and the oor or
walls. Doing so may result in injury.
operly, it may fall, resulting
Avoid poorly ventilated locations
● This machine generates a slight amount of ozone and other emissions during normal use. These emissions
are not harmful to health. However, they may be noticeable during extended use or long production runs in
poorly ventilated rooms. To maintain a comfortable working environment, it is recommended that the room
3
Page 7
Important Safety Instructions
where the machine operates be appropriately ventilated. Also avoid locations where people would be
exposed to emissions fr
om the machine.
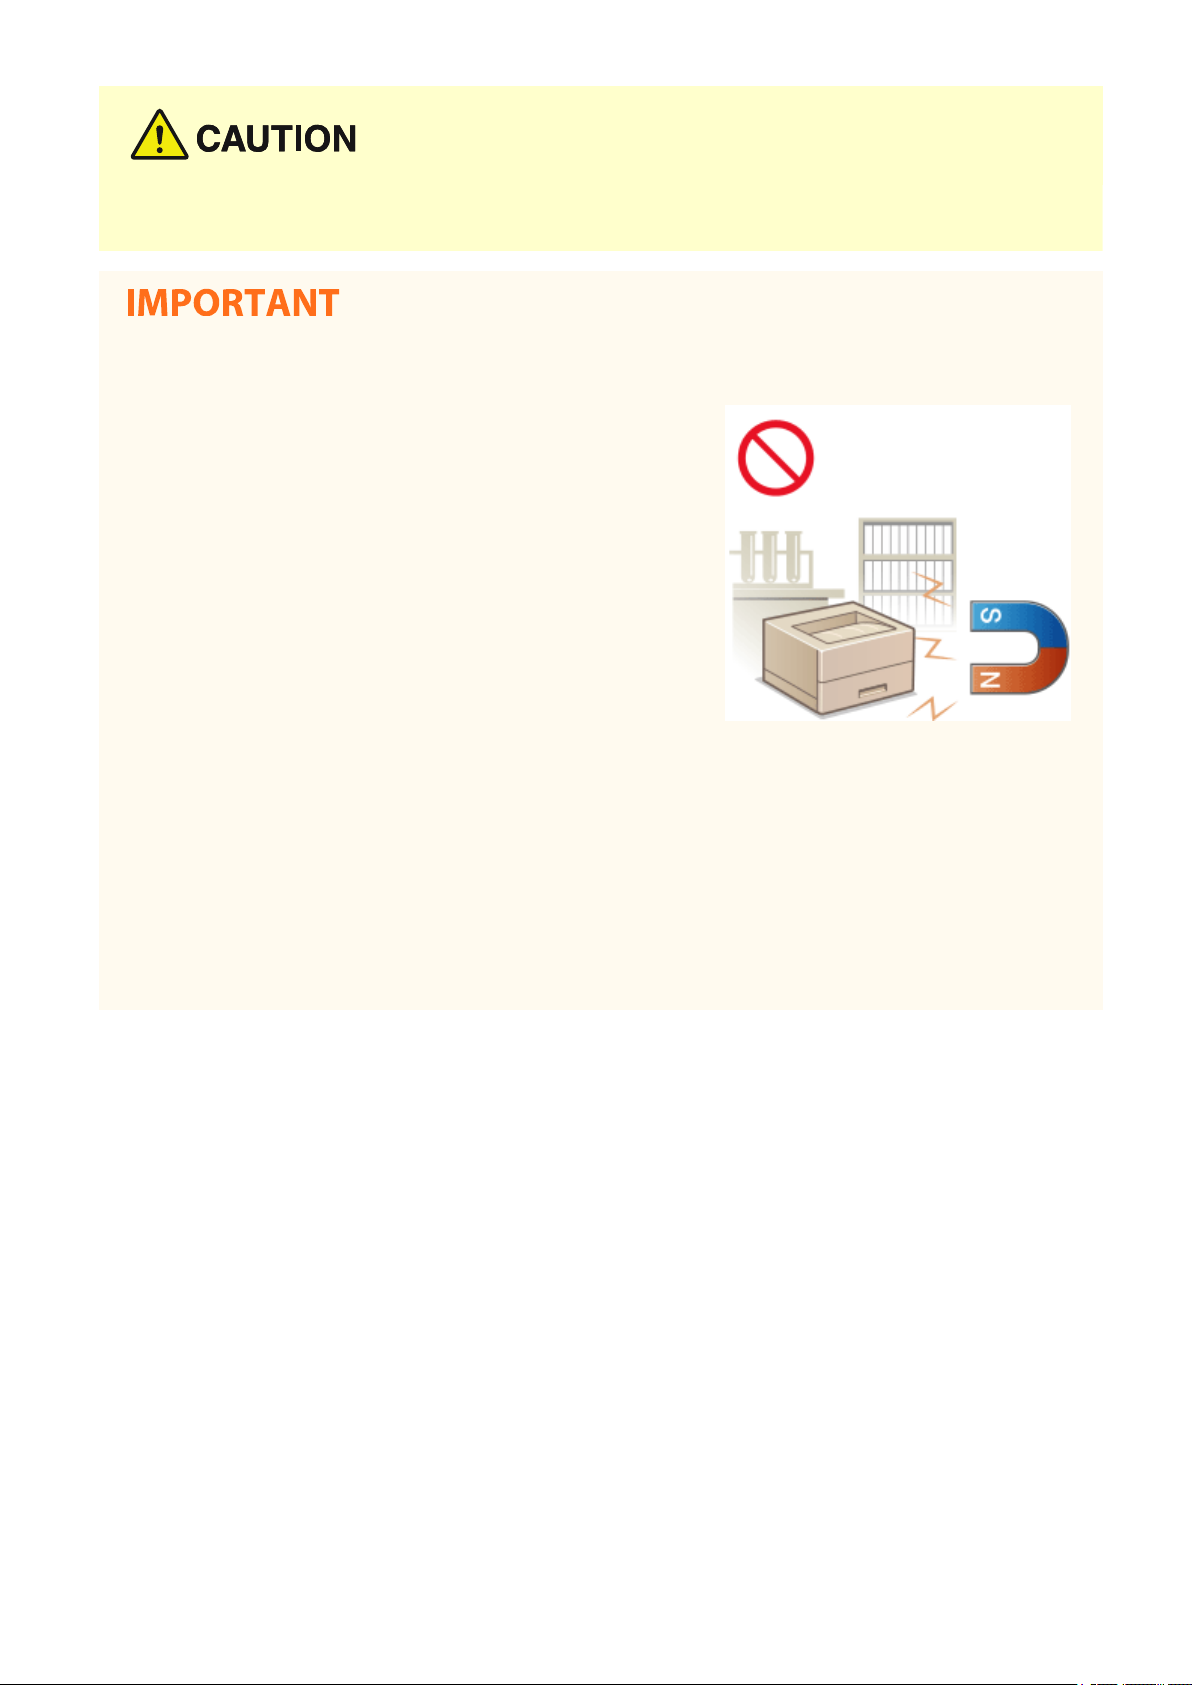
Do not install in the following locations that may result in damage
● A location subject to dr
humidity
● A location near equipment that generates magnetic or
electromagnetic waves
● A laboratory or location where chemical reactions occur
● A location exposed to corrosive or toxic gases
● A location that may warp from the weight of the machine or
where the machine is liable to sink (a carpet, etc.)
amatic changes in temper
ature or
Do not install in a location where condensation occurs
● Water dr
is heated rapidly, and when the machine is moved from a cool or dry location to a hot or humid location.
Using the machine under these conditions may result in paper jams, poor print quality, or damage to the
machine. Let the machine adjust to the ambient temperature and humidity for at least 2 hours before use.
oplets (condensation) may form inside the machine when the room where the machine is installed
In altitudes of above sea level 3,000 m or higher
● Machines with a hard disk may not operate properly when used at high altitudes of about 3,000 meters
above sea level, or higher.
4
Page 8
Power Supply
Important Safety Instructions
2754-002
● Use only a power supply that meets the specied voltage r
or electrical shock.
● The machine must be connected to a socket-outlet with grounding connection by the provided power cord.
● Do not use power cords other than the one provided, as this may result in a re or electrical shock.
● The provided power cord is intended for use with this machine. Do not connect the power cord to other
devices.
● Do not modify, pull, forcibly bend, or perform any other act that may damage the power cord. Do not place
heavy objects on the power cord. Damaging the power cord may result in a re or electrical shock.
● Do not plug in or unplug the power plug with wet hands, as this may result in an electrical shock.
● Do not use extension cords or multi-plug power strips with the machine. Doing so may result in a re or
electrical shock.
● Do not wrap the power cord or tie it in a knot, as this may result in a re or electrical shock.
● Insert the power plug completely into the AC power outlet. Failure to do so may result in a re or electrical
shock.
● Remove the power plug completely from the AC power outlet during a thunder storm. Failure to do so may
result in a re, electrical shock, or damage to the machine.
equirements. Failure to do so may result in a re
● Install this machine near the power outlet and leave sucient space ar
unplugged easily in an emergency.
ound the power plug so that it can be
When connecting power
● Do not connect the power cor
damage to the machine at power failure.
● If you plug this machine into an AC power outlet with multiple sockets, do not use the remaining sockets to
connect other devices.
● Do not connect the power cord to the auxiliary AC power outlet on a computer.
d to an uninterruptible power source. Doing so may result in malfunction of or
Other precautions
● Electrical noise may cause this machine to malfunction or lose data.
5
Page 9
Handling
Important Safety Instructions
2754-003
● Immediately unplug the power plug fr
and contact an authorized Canon dealer if the machine makes
an unusual noise, emits an unusual smell, or emits smoke or
excessive heat. Continued use may result in a re or electrical
shock.
● Do not disassemble or modify this machine. There are high-
voltage and high-temperature components inside the machine
which may result in a re or electrical shock.
● Place the machine where childr
and electrical parts. Failure to do so may result in unexpected accidents.
● Do not use ammable sprays near this machine. If ammable substances come into contact with electrical
parts inside this machine, it may result in a re or electrical shock.
● When moving this machine, be sure to turn OFF the power of this machine and your computer, and then
unplug the power plug and interface cables. Failure to do so may damage the power cord or interface
cables, resulting in a re or electrical shock.
● When plugging or unplugging a USB cable when the power plug is plugged into an AC power outlet, do not
touch the metal part of the connector, as this may result in an electrical shock.
om the AC power outlet
en will not come in contact with the power cord and other cables or internal
If you are using a cardiac pacemaker
● This machine generates a lo
feel abnormalities, please move away from this machine and consult your physician immediately.
● Do not place heavy objects on this machine as they may fall, r
● For your safety, please unplug the power cord if the machine will not be used for a long period of time.
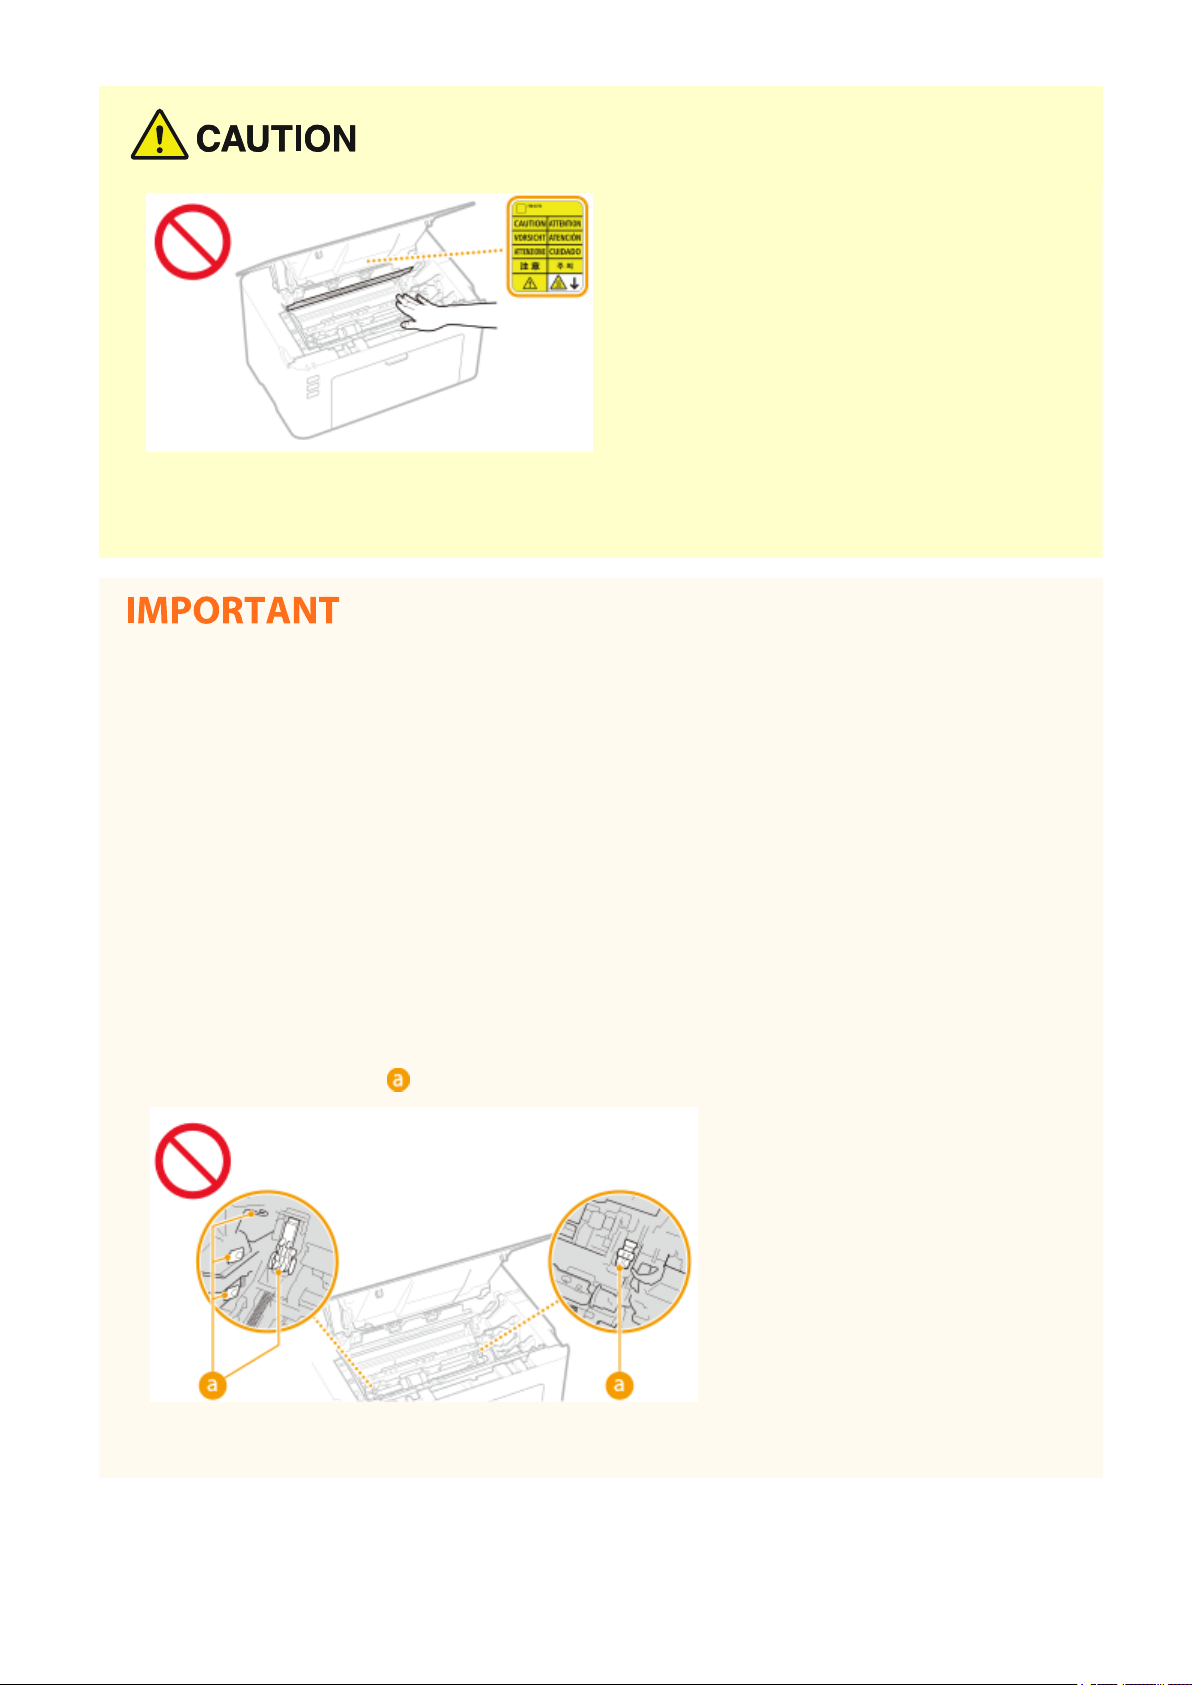
● Use caution when opening and closing covers to avoid injury to your hands.
● Keep hands and clothing away from the rollers in the output area. If the rollers catch your hands or clothing,
this may result in personal injury.
● The inside of the machine and the output slot are very hot during and immediately after use. Avoid contact
with these areas to prevent burns. Also, printed paper may be hot immediately after being output, so use
caution when handling it. Failure to do so may result in burns.
w level magnetic ux and ultrasonic waves. If you use a cardiac pacemaker and
esulting in injury.
6
Page 10
Important Safety Instructions
Laser beam
● If the laser beam should escape and enter your eyes, e
xposure may cause damage to your eyes.
When transporting the machine
● To pr
event damage to the machine during transport, perform the following.
- Remove the toner cartridges and the drum cartridges.
- Securely pack the machine in the original box with packing materials.
If the operating noise concerns you
● Depending on the use environment and operating mode, if the operating noise is of concern, it is
recommended that the machine be installed in a place other than the oce.
Other precautions
● Follow the caution instructions on labels and the like found on this machine.
● Avoid shaking or applying shock to this machine.
● Do not forcibly open and close doors, covers, and other parts. Doing so may result in damage to the
machine.
● Do not touch the contacts (
) inside the machine. Doing so may result in damage to the machine.
● T
o prevent a paper jam, do not turn OFF the power, open/close the covers, and load/unload the paper when
printing.
7
Page 11
Important Safety Instructions
Maintenance and Inspections
2754-004
Clean this machine periodically. If dust accumulates, the machine may not oper
observe the following. If a problem occurs during operation, see
be r
esolved or you feel the machine requires an inspection, see
● Before cleaning, turn OFF the power and unplug the power plug from the AC power outlet. Failure to do so
may r
esult in a re or electrical shock.
● Unplug the power plug periodically and clean with a dry cloth to remove dust and grime. Accumulated dust
may absorb humidity in the air and may result in a re if it comes into contact with electricity.
● Use a damp, well wrung-out cloth to clean the machine. Dampen cleaning cloths with water only. Do not use
alcohol, benzine, paint thinner, or other ammable substances. Do not use tissue paper or paper towels. If
these substances come into contact with electrical parts inside the machine, they may generate static
electricity or result in a re or electrical shock.
● Check the power cord and plug periodically for damage. Check the machine for rust, dents, scratches,
cracks, or excessive heat generation. Use of poorly-maintained equipment may result in a re or electrical
shock.
Troubleshooting(P. 79) . If the problem cannot
When a Problem Cannot Be Solved(P. 112) .
ate properly. When cleaning, be sure to
● The inside of the machine has high-temperatur
may result in burns. Do not touch any part of the machine that is not indicated in the manual.
● When loading paper or removing jammed paper, be careful not to cut your hands with the edges of the
paper.
● When removing jammed paper or replacing toner cartridges or the like, be careful not to get any toner on
your hands or clothing. If toner gets on your hands or clothing, wash them immediately with cold water.
e and high-voltage components. Touching these components
8
Page 12
Consumables
Important Safety Instructions
2754-005
● Do not dispose of used toner cartridges or the like in open ames. Also, do not stor
cartridges, or paper in a location exposed to open ames. This may cause the toner to ignite, and result in
burns or re.
● If you accidentally spill or scatter toner, carefully gather the toner particles together or wipe them up with a
soft, damp cloth in a way that prevents inhalation. Never use a vacuum cleaner that does not have
safeguards against dust explosions to clean up spilled toner. Doing so may cause a malfunction in the
vacuum cleaner, or result in a dust explosion due to static discharge.
e toner cartridges, drum
If you are using a cardiac pacemaker
● The toner cartridge generates a low level magnetic ux. If you are using a cardiac pacemaker and feel
abnormalities, please move away from the toner cartridge and consult your physician immediately.
● Use caution not to inhale any toner. If you should inhale toner, consult a physician immediately.
● Use caution so that toner does not get into your e
immediately wash with cold water and consult a physician.
● Use caution so that toner does not come into contact with your skin. If it should, wash with soap and cold
water. If there is any irritation on your skin, consult a physician immediately.
yes or mouth. If toner should get into your eyes or mouth,
● Keep the toner cartridges and other consumables out of the reach of small children. If toner is ingested,
consult a physician or poison control center immediately.
● Do not disassemble or modify the toner cartridge or the like. Doing so may cause the toner to scatter.
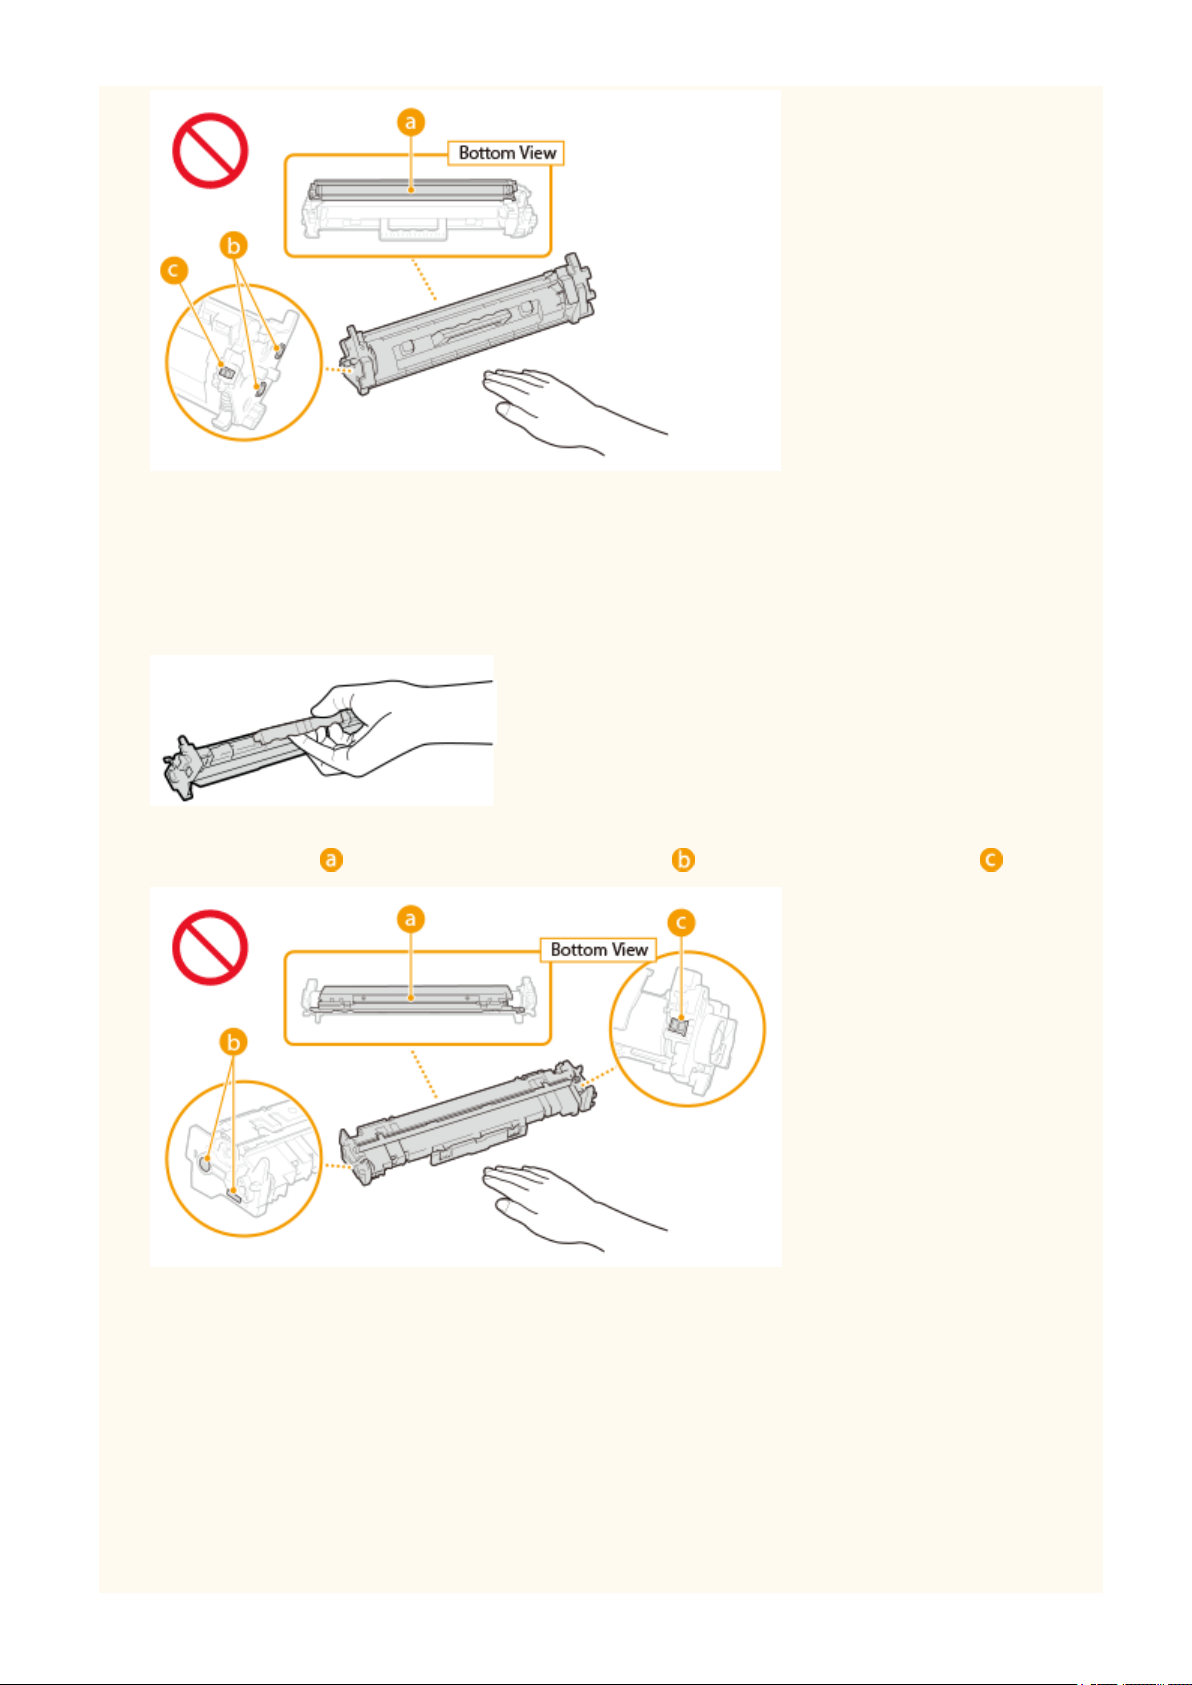
Handling the toner cartridge
● Be sure to hold the toner cartridge using the handle.
● Do not touch the toner feed section ( ), the electrical contacts ( ) or the toner cartridge memory ( ).
9
Page 13
Important Safety Instructions
● Except when necessary, do not take out the toner cartridge from the packing material or from this machine.
● The toner cartridge is a magnetic pr
including oppy disks and disk drives. Doing so may result in data corruption.
oduct. Do not move it close to products susceptible to magnetism
Handling the drum cartridge
● Be sure to hold the drum cartridge using the handle.
● To avoid scratching the surface of the drum inside the machine or exposing it to light, do not open the drum
pr
otective shutter (
). Do not touch the electrical contacts ( ) or the drum cartridge memory ( ).
● Except when necessary, do not take out the drum cartridge from the packing material or from this machine.
Storing the toner cartridge or the drum cartridge
● Stor
e in the following environment to ensure safe and satisfactory use.
Storage temperature range: 0 to 35°C
Storage humidity range: 35 to 85% RH (relative humidity/no condensation)
● Store without opening until the toner cartridge or the drum cartridge is to be used.
● When removing the toner cartridge or the drum cartridge from this machine for storage, place the removed
toner cartridge or drum cartridge in the original packing material.
● When storing the toner cartridge, do not store it upright or upside down. The toner will solidify and may not
return to its original condition even if it is shaken.
10
*
Page 14

Important Safety Instructions
*
Even within the storable humidity r
cartridge if there is a difference of temperature inside and outside the toner cartridge or the drum cartridge. Condensation
will adversely affect the print quality of toner cartridges or drum cartridges.
ange, water droplets (condensation) may develop inside the toner cartridge or the drum
Do not store the toner cartridge or the drum cartridge in the following locations
● Locations exposed to open ames
● Locations exposed to direct sunlight or bright light for ve minutes or more
● Locations exposed to excessive salty air
● Locations where there are corrosive gases (i.e. aerosol sprays and ammonia)
● Locations subject to high temperature and high humidity
● Locations subject to dramatic changes in temperature and humidity where condensation may easily occur
● Locations with a large amount of dust
● Locations within the reach of children
Be careful of counterfeit toner cartridges or drum cartridges
● Please be aware that there are counterfeit Canon toner cartridges or Canon drum cartridges in the
marketplace. Use of counterfeit toner cartridge or drum cartridge may result in poor print quality or
machine performance. Canon is not responsible for any malfunction, accident or damage caused by the use
of counterfeit toner cartridge or drum cartridge.
For more information, see canon.com/counterfeit.
Availability period of repairing parts, toner cartridges, drum cartridges and the like
● The repairing parts, toner cartridges, drum cartridges and the like for the machine will be available for at
least seven (7) years after production of this machine model has been discontinued.
Packing materials for the toner cartridge and the drum cartridge
● Save the packing materials for the toner cartridge and the drum cartridge. They are required when
transporting this machine.
● The packing materials may be changed in form or placement, or may be added or removed without notice.
When disposing of a used toner cartridge, drum cartridge or the like
● When discarding a toner cartridge, drum cartridge or the like, place it in the original packing material to
prevent toner from scattering from inside, and dispose of it in accordance with the applicable local
regulations.
11
Page 15

Setting Up
Setting Up
Setting Up ............................................................................................................................................................. 13
Pr
eparations Required Before Use ..................................................................................................................... 14
Installing Drivers ................................................................................................................................................. 15
Setting Up Print Server ....................................................................................................................................... 16
12
Page 16

Setting Up
Setting Up
2754-006
Before using the functions of the machine, the envir
the sequences of ow required to complete the setup, and then perform the actual settings.
Before Use(P
. 14)
onmental conditions must be set in advance. To begin with, check
Preparations Required
13
Page 17

Setting Up
Preparations Required Before Use
2754-007
Set up the machine using the following step. For mor
corresponding section.
Step 1 Installing Drivers(P. 15)
e information about this step, click on the link to go to the
14
Page 18

Setting Up
Installing Drivers
Install the various drivers and associated software on your computer.
Mak
1
e the necessary preparation before proceeding with the installation.
2754-00A
● If the machine is supplied with a CD-ROM/DVD-ROM, insert the CD-ROM/D
computer.
● You can download drivers and software you are going to use from the Canon website (http://
www.canon.com/).
● When new versions of drivers and software become available, they will be uploaded to the Canon website.
ou can download them as necessary after checking their system requirements.
Y
● Depending on your machine or environmental conditions, some functions may not be available.
● Some of the drivers are not supported depending on the OS. For more information about the supported
status of the latest OS, see the Canon website.
Proceed with the installation.
2
● For more information about the installation procedure, see the manuals for the drivers and software you are
going to use.
VD-ROM into the drive on the
15
Page 19
Setting Up Print Server
Setting Up
2754-009
With a print server, you can reduce the load on the computer that you print fr
possible to install the drivers on each computer over the network, which saves you the trouble of installing the drivers
on each computer by using the provided CD-ROM/DVD-ROM. To set up a computer on the network as a print server,
congure the settings for sharing the printer.
● To perform the following procedure, log in to your computer with an administrator account.
ou may be unable to install drivers over the network depending on the operating system and the bit
● Y
architecture (32-bit or 64-bit) of the print server and client computers.
● When implementing a print server in a domain environment, consult your Network Administrator.
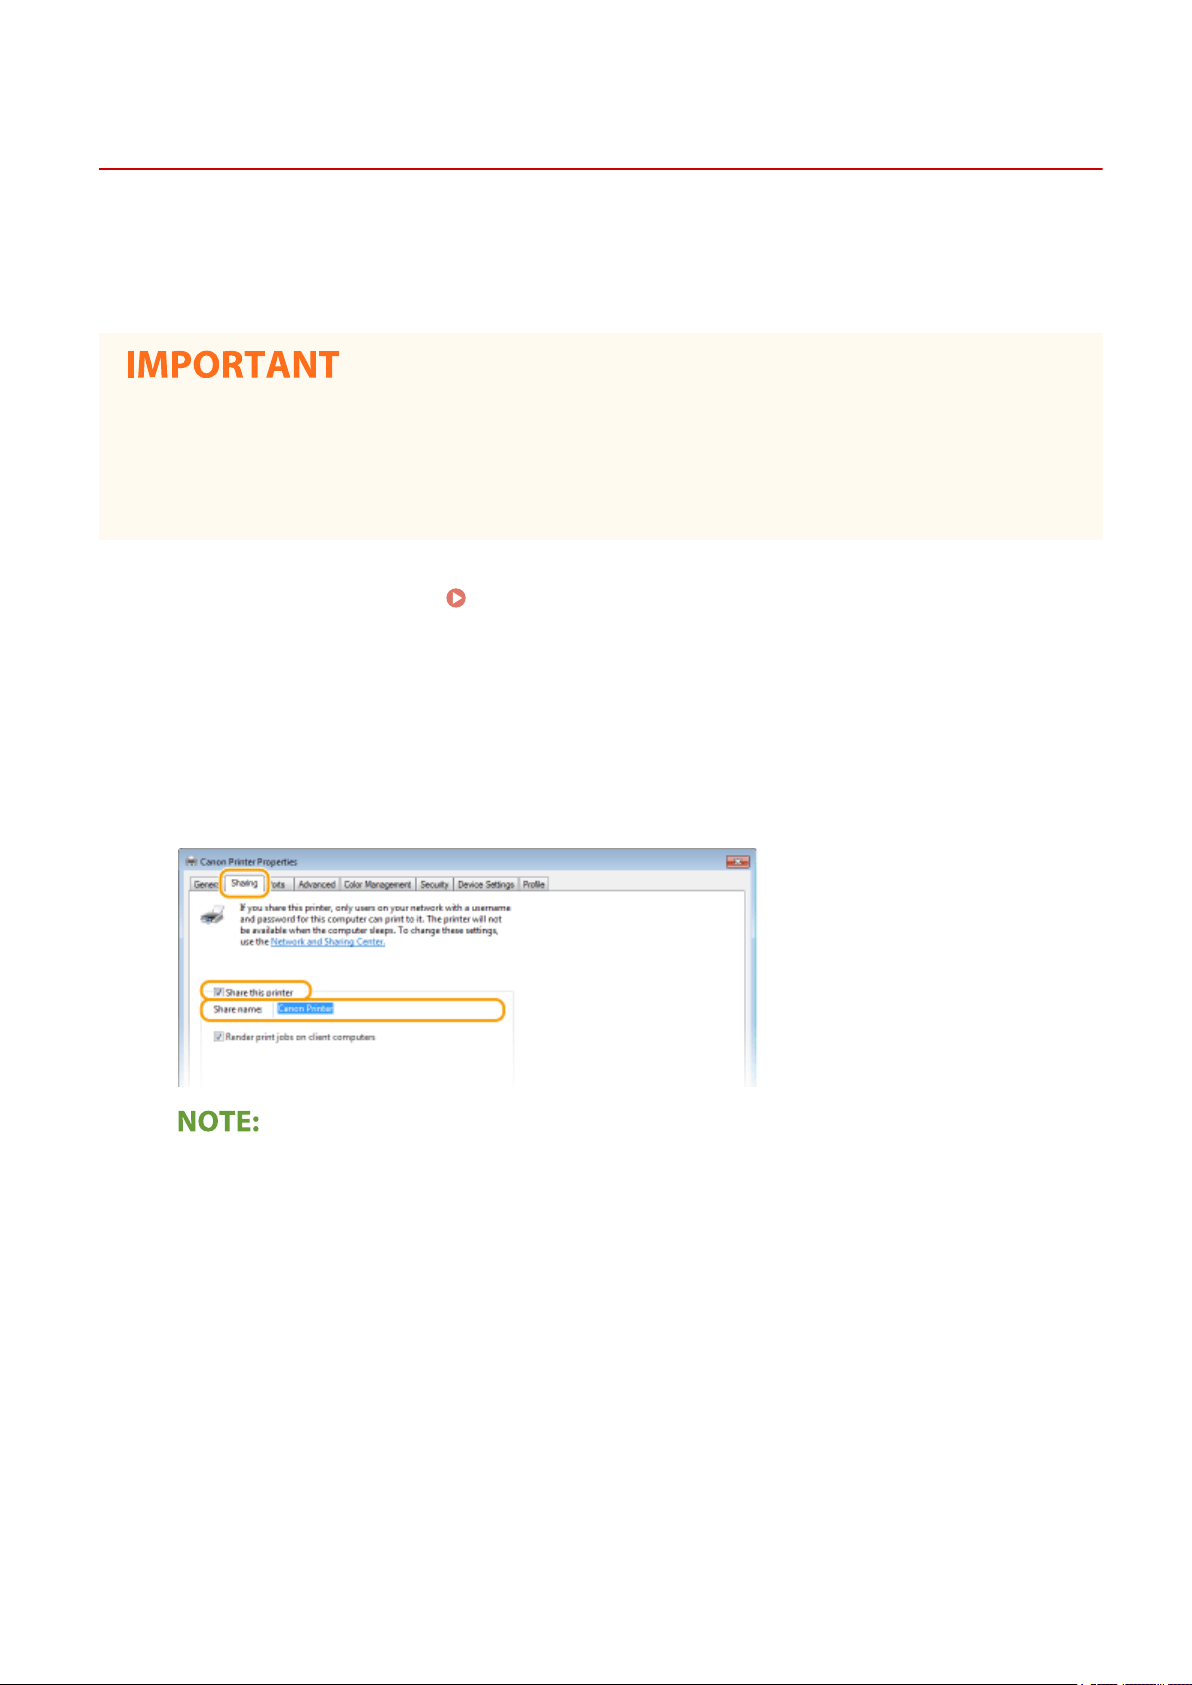
Open the printer folder.
1
Right-click the printer driver icon for this machine and click [Printer properties] or
2
[Pr
operties].
Click the [Sharing] tab, select [Shar
3
machine.
Displaying the Printer Folder(P. 132)
e this printer], and enter the share name of the
om. The print server also makes it
● Click the [Change Sharing Options] button if displayed.
Install additional drivers as necessary.
4
● This operation is r
architecture via the print server.
Click [Additional Drivers].
1
Select the check box for the bit architecture that other computers are running, and click [OK].
2
equired if you want to install the drivers in other computers running a different bit
16
Page 20
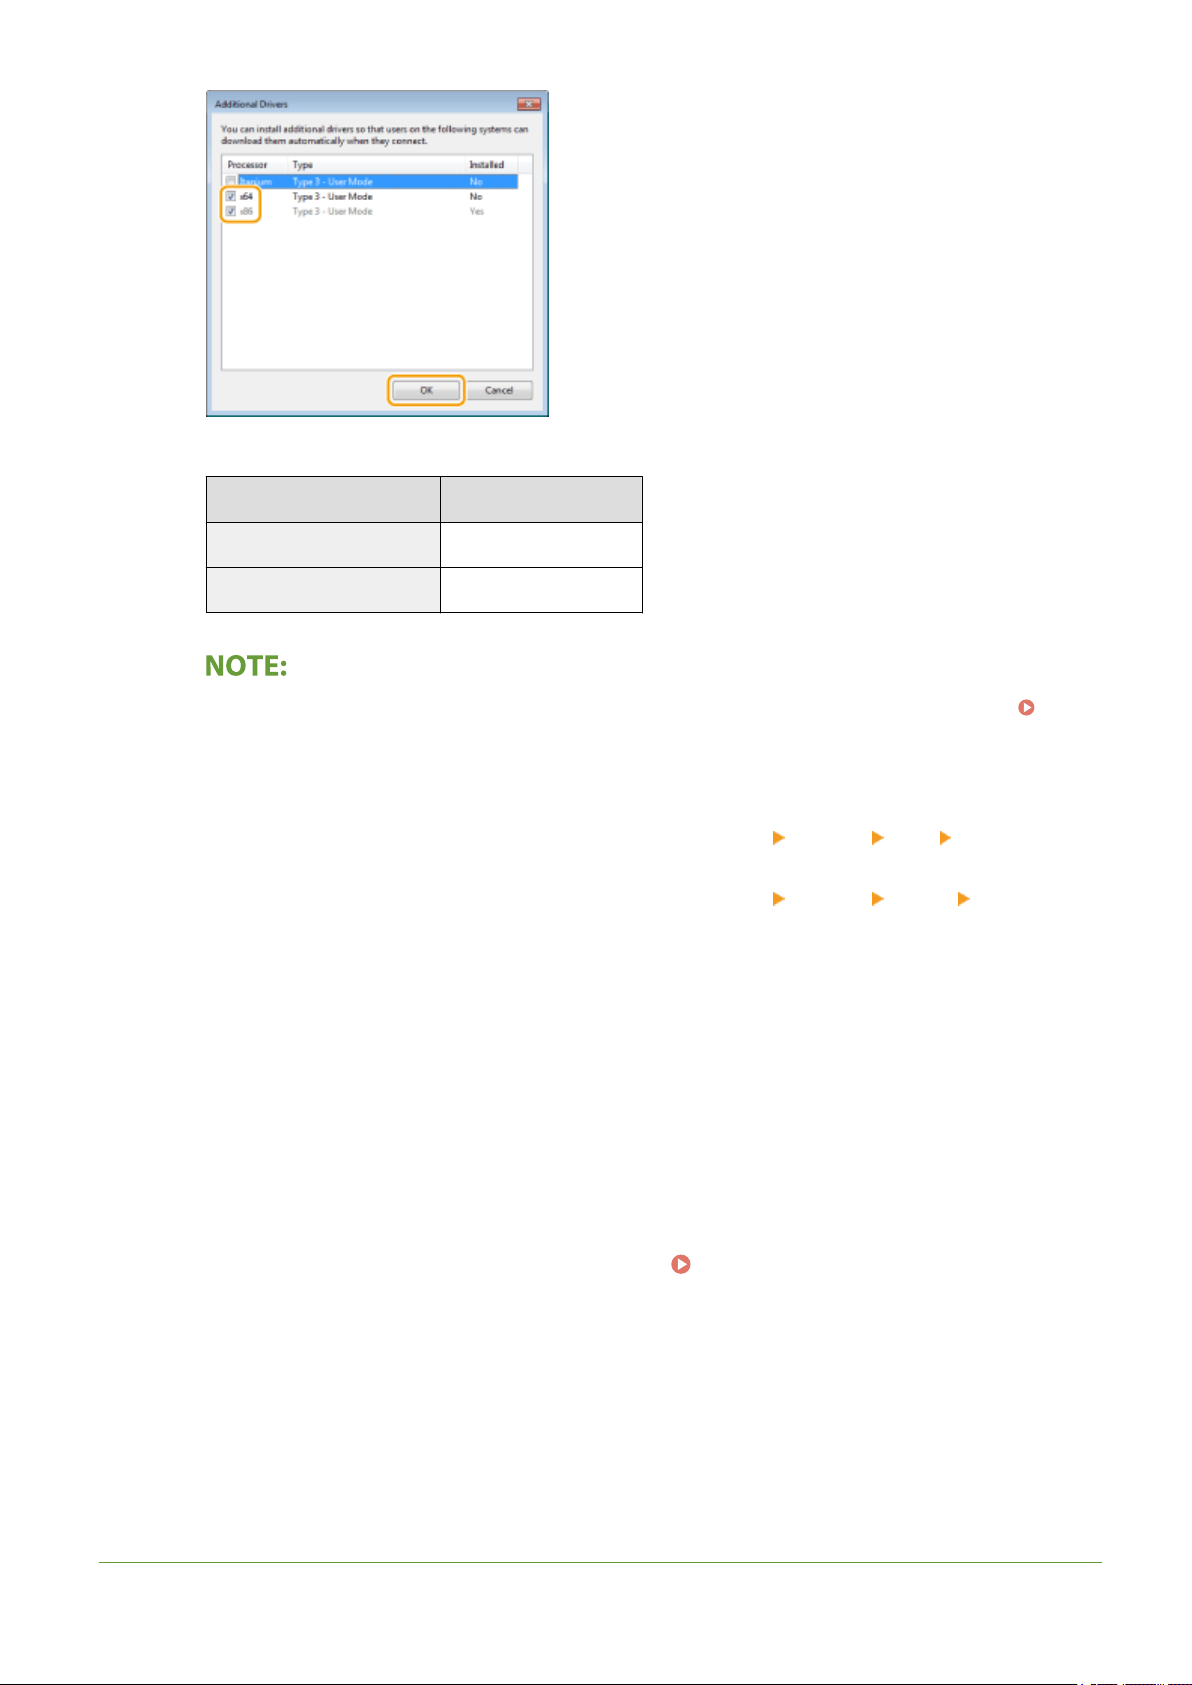
Setting Up
● Select additional drivers from the follo
Print server Select the check box for
32-bit operating systems [x64]
64-bit operating systems [x86] under [Processor]
● If you do not know whether your Windo
Checking the Bit Architecture(P. 135) .
Insert the provided CD-ROM/DVD-ROM into the drive on the computer, click [Browse] to specify the folder
3
that contains the drivers, and then click [OK].
● If the print server runs a 32-bit operating system, select [UFRII] [uk_eng] [x64] [Driver] folders
on the pro
● If the print server runs a 64-bit operating system, select [UFRII]
folders on the pro
Follow the on-screen instructions to install additional drivers.
4
vided CD-ROM/DVD-ROM.
vided CD-ROM/DVD-ROM.
wing, according to the operating system of the print server.
ws operating system is a 32-bit or 64-bit version, see
[uk_eng] [32BIT] [Driver]
Click [OK].
5
◼ Installing the Drivers on a Computer via the Print Server
1
2
3
LINKS
Locate the shared printer in the print server.
Print Server(P. 133
Double-click the shared printer.
Follow the on-screen instructions to install the drivers.
)
17
Displaying Shared Printers in the
Page 21

Printing from a Computer(P. 44)
Setting Up
18
Page 22

Basic Operations
Basic Operations
Basic Operations ...............................................................................................................................................
Parts and Their Functions ................................................................................................................................... 22
Front Side ....................................................................................................................................................... 23
Back Side ........................................................................................................................................................ 25
Drawer ............................................................................................................................................................ 26
Printer Status Window ........................................................................................................................................ 27
Turning ON the Machine ..................................................................................................................................... 30
Turning OFF the Machine ............................................................................................................................... 31
Loading Paper ...................................................................................................................................................... 32
Loading Paper in the Drawer .......................................................................................................................... 34
Loading Envelopes .......................................................................................................................................... 37
Loading Preprinted Paper ............................................................................................................................... 39
Entering Sleep Mode ........................................................................................................................................... 40
Setting Auto Shutdown ....................................................................................................................................... 41
20
19
Page 23
Basic Operations
Basic Operations
2754-00C
This chapter describes the parts of the machine and basic operations, such as ho
w to load paper.
◼ Parts and Their Functions
This section describes the names and functions of the exterior and interior parts of the machine.
Functions(P
. 22)
◼ Printer Status Window
This section e
settings.
xplains how to use the "Printer Status Window" utility to check the machine's status and make machine
Printer Status Window(P. 27)
Parts and Their
◼ Turning ON the Machine
This section describes ho
w to turn the machine ON and OFF.
◼ Loading Paper
This section describes how to load the paper into the dr
awer.
Turning ON the Machine(P. 30)
Loading Paper(P. 32)
Entering Sleep Mode
20
Page 24

Basic Operations
◼ Entering Sleep Mode
This section describes how to set the sleep mode. Entering Sleep Mode(P. 40)
◼ Setting Auto Shutdown Time
This section describes ho
w to enable the auto shutdown function.
Setting Auto Shutdown(P. 41)
21
Page 25

Basic Operations
Parts and Their Functions
2754-00E
This section describes the parts of the machine (exterior, fr
to describing the parts of the machine used for such basic operations as loading paper and replacing the toner
cartridges, etc., this section also describes the functions of the keys and meaning of indications by indicators of the
machine. Read this section for tips on how to use the machine properly.
Front Side(P. 23)
Back Side(P. 25)
Drawer(P. 26)
ont side and back side) and how they function. In addition
22
Page 26
Front Side
Output cover
Basic Operations
2754-00F
● Place the output cover whene
● Do not place or drop heavy objects on the output cover.
ver you use the machine.
Output tray
Printed paper is output to the output tray.
Alarm indicator
Lights up or ashes when a paper jam or other error occurs. Solve the pr
displayed in the Printer Status Window.
Countermeasures for Each Message(P. 99)
oblem following the message
Job indicator
Lights up when there is print data that is being printed or waiting to be printed. Flashes when a print job is
canceled.
Cancel Job key
Cancels a print job that is currently printing. Canceling Prints(P. 46)
Paper indicator/key
Flashes when the machine is out of paper, when the paper is the wrong size, and after other err
paper needs to be checked. Reset the paper and press the key to restart printing.
You can also use the Paper key to print a list of the machine's settings (with the machine ready to print, press
the k
y and hold it down for 3 seconds).
e
Printing Lists of Settings(P. 74)
ors when the
Power indicator/switch
Press the power switch to turn the power ON or OFF. Indicator lights up when the power is turned ON.
23
Page 27

Basic Operations
Lift handles
Hold the lift handles when carrying the machine. Relocating the Machine(P. 71)
Ventilation slots
Air from inside the machine is vented out to cool do
on the ventilation slots prevents ventilation.
wn the inside of the machine. Note that placing objects
Toner cover
Open the toner co
Procedure for Replacing the Toner Cartridge(P. 61)
Procedure for Replacing the Drum Cartridge(P. 66)
ver when r
eplacing toner cartridges or drum cartridges.
Paper stopper
Open the paper stopper when you want to pre
vent paper from falling out of the output tray.
Drawer
Load the paper to print in this tray. Loading Paper in the Drawer(P. 34)
24
Page 28
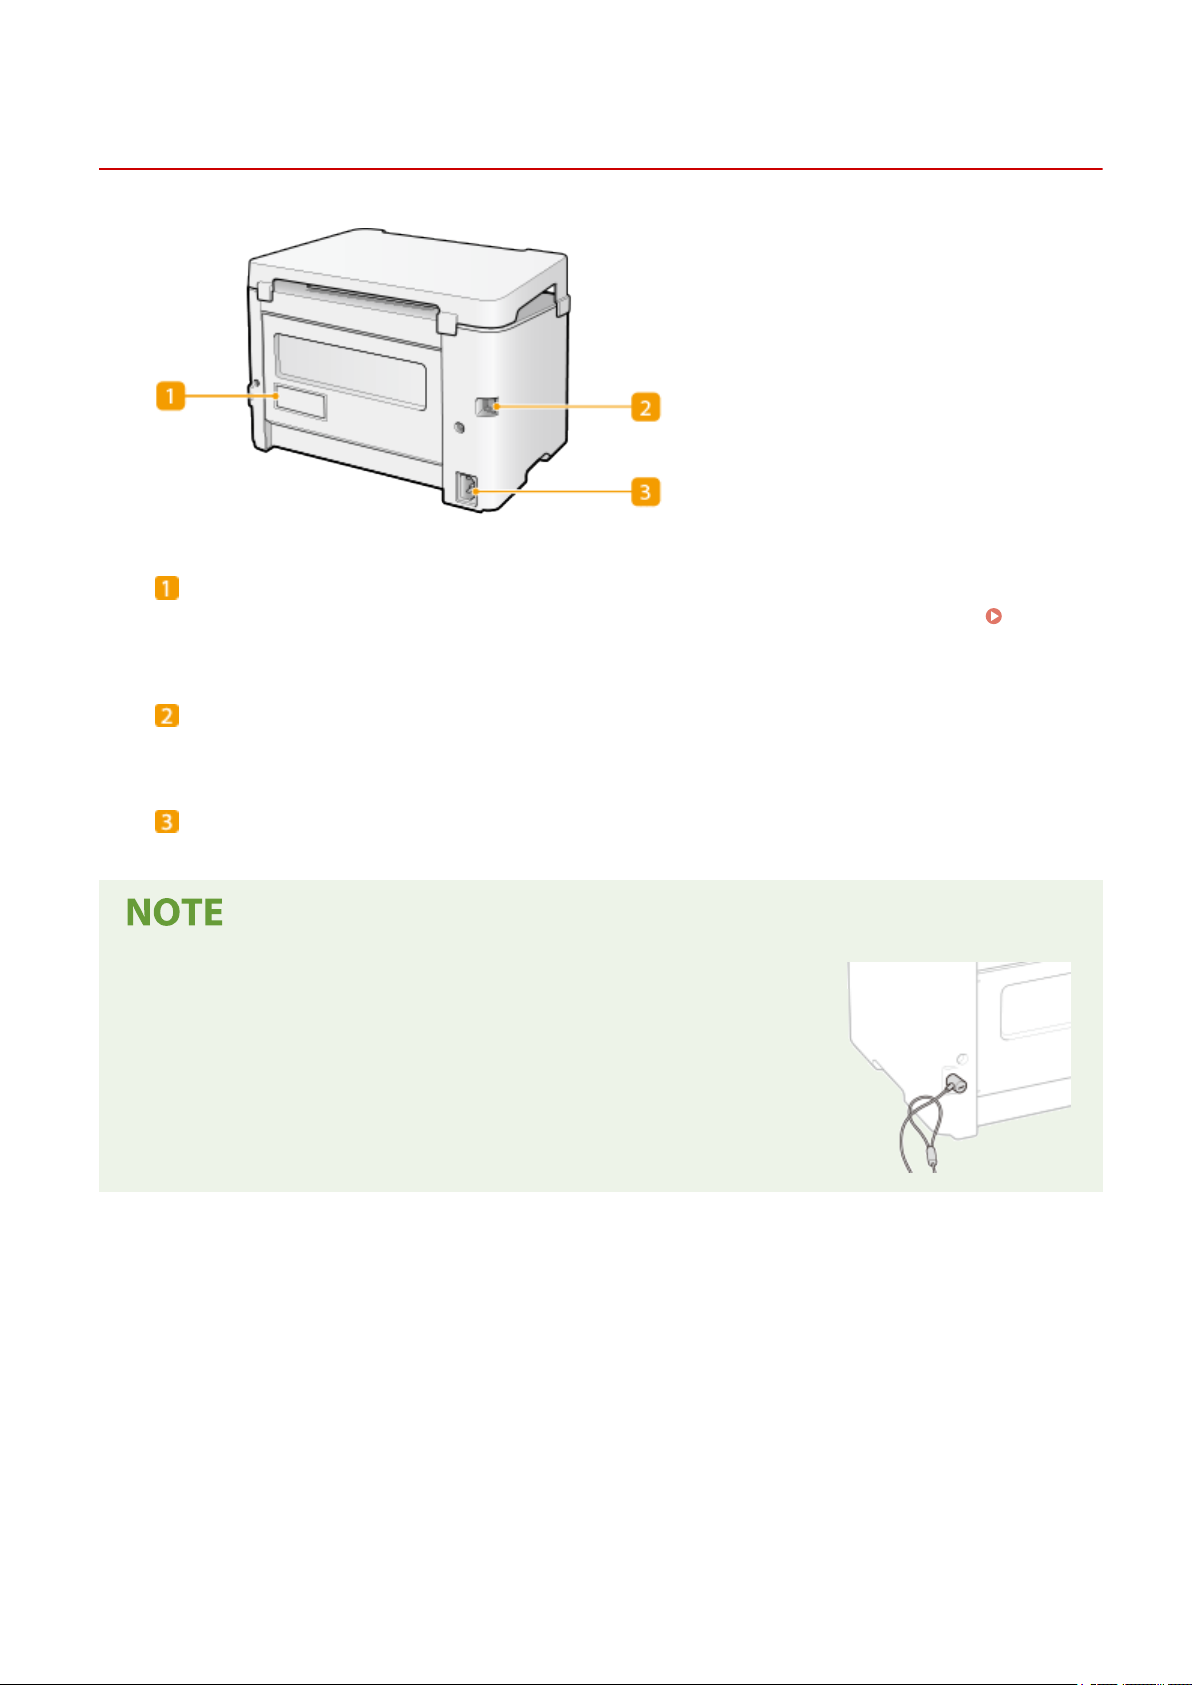
Back Side
Rating label
The label shows the serial number, which is needed when making inquiries about the machine. When a
Problem Cannot Be Solved
Basic Operations
2754-00H
(P. 112)
USB port
Connect a USB cable when connecting the machine and a computer.
Power socket
Connect the power cor
Anti-theft Security Slot
● This machine is pro
security wire or equivalent.
● The hole of the security slot is 4.4 mm wide and 8.3 mm high.
● For inquiries about the security slot, contact your local authorized Canon
dealer.
d.
vided with a security slot, to which you can attach
25
Page 29

Drawer
Paper cover
Remove this co
Basic Operations
2754-00J
ver to load paper in the drawer.
Paper guides
Adjust the paper guides to exactly the size of the loaded paper to ensur
machine.
LINKS
Loading Paper in the Drawer(P. 34)
e that paper is fed straight into the
26
Page 30
Printer Status Window
Basic Operations
2754-00K
The Printer Status Window is a utility that allo
settings related to the machine, such as power saving settings. You can also use it for operations such as cancelling a
print job or printing a list of the machine's settings. The Printer Status Window utility is installed on your computer
when you install the printer driver.
Displaying the Printer Status Window(P. 27)
Parts of the Screen and Their Functions(P. 27)
ws you to check the machine's status, view error information, and make
Displaying the Printer Status Window
Select the machine by clicking in the system tray.
Automatic Display of the Printer Status Window
The Printer Status Window is displayed automatically when an err
*
You can change the setting that determines when the Printer Status Window is displayed automatically. Change it with the
[Options] menu
details, see the Help. [Help] menu(P. 28)
If you are using Windo
Display the Printer Status Window after moving to the desktop.
[Preferences (Users)] or [Preferences (Administrators)] dialog box of the Printer Status Window. For
ws 8/Server 2012
or occurs during printing.
Parts of the Screen and Their Functions
This section pro
with the controls and menus in this screen, see the Help.
vides an outline of the main screen. For detailed descriptions of the dialog boxes that can be displayed
[Help] menu(P. 28)
27
Page 31

Basic Operations
[Job] menu
Allows you to check documents that ar
printing.
e printing or waiting. You can also select documents and cancel
[Options] menu
Allows you to e
make machine settings, such as power saving settings. You can also check information such as the total
number of pages printed.
xecute maintenance functions, such as printing setting lists or cleaning the xing unit, and to
[Help] menu
Displays Help about the Printer Status Window and version information.
You can also display the Printer Status Window Help by clicking the [Help] button in the various dialog boxes.
ver, some dialog boxes do not have a [Help] button.
Howe
Toolbar
(Print Queue)
Displays the print queue, a Windows function. See the Windo
queue.
ws Help for more information about the print
(Refresh)
Refreshes the Printer Status Windo
(Consumables Information)
You can check the amount r
w with the latest information.
emaining in the toner cartridge and the drum cartridge.
Animation area
Displays animations and illustrations about the machine
display a simple explanation of how to deal with the error.
28
's status. After an error occurs, this area may also
Page 32

Icon
Basic Operations
Displays an icon that indicates the machine'
display changes to one of / / , depending on the message.
s status. The normal status is
but when an error occurs, the
Message area
Displays messages about the machine'
explanation beneath the error message or warning, together with information about how to deal with the
problem.
Countermeasures for Each Message(P. 99)
s status. If an error or warning occurs, this area displays an
[Troubleshooting Details]
Displays tr
oubleshooting information for pr
oblems described by messages.
[Print Job Information]
Displays information about the document that is currently being printed.
(Cancel Job)
Cancels the printing of the document currently being printed.
(Continue/Retry)
When an error has occurr
resume printing. However, if you use the Continue/Retry function to resume printing, partially printed pages
or other improper printing may occur.
ed, but printing can be continued, this button allows you to clear the error and
[Access Purchasing Site]
If you click [Access Purchasing Site] select your country or region click [OK], a Canon Web site page is
displayed where you can nd information about pur
chasing consumables.
Status bar
Displays the connection destination (port name) of the Printer Status Window
.
29
Page 33

Basic Operations
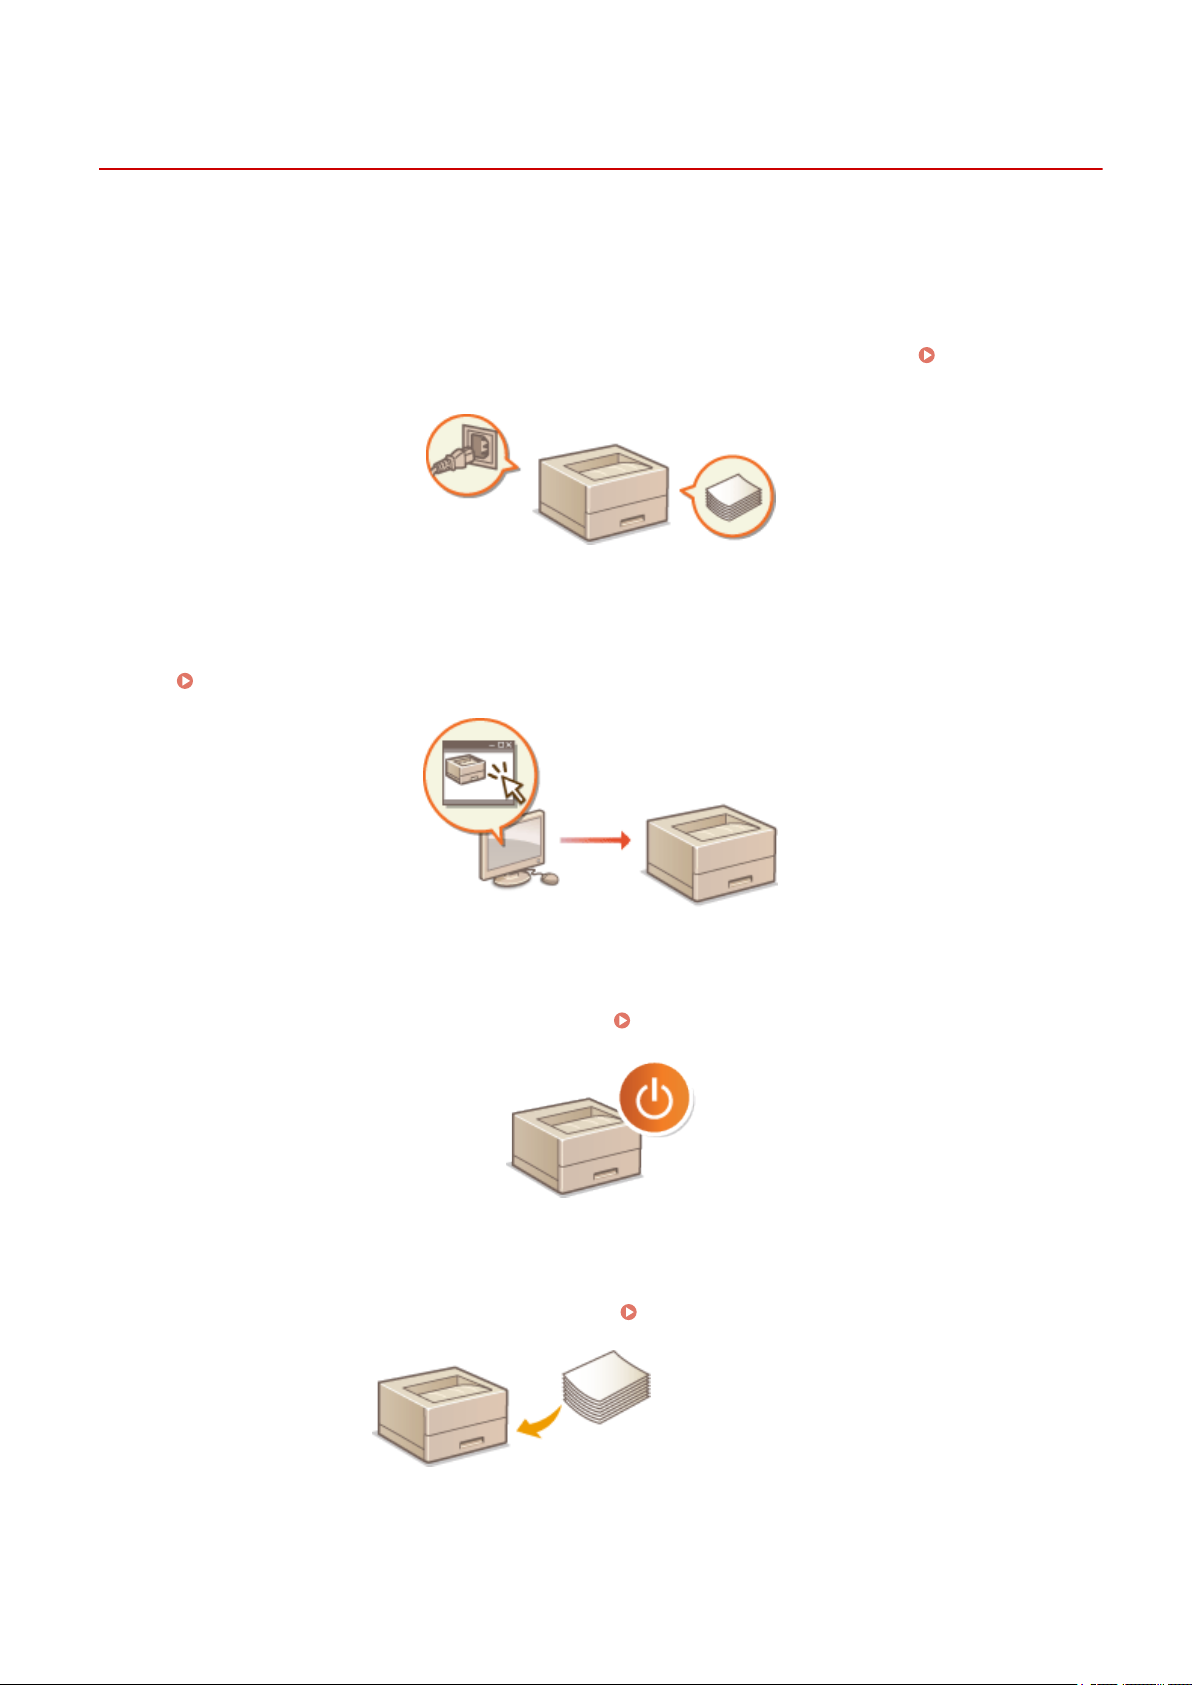
Turning ON the Machine
This section describes how to turn ON the machine.
Mak
1
2
e sure that the power plug is rmly inserted into a po
ess the power switch.
Pr
2754-00L
wer outlet.
➠ The power indicator lights and the machine is ready for printing.
● A blank sheet of paper may be output when you turn ON the power for the rst time after pur
machine. This is not a malfunction.
LINKS
Turning OFF the Machine(P. 31)
chasing the
30
Page 34

Basic Operations
Turning OFF the Machine
This section describes how to turn OFF the machine.
Pr
1
ess the power switch.
● Make sure that the power indicator has gone out.
2754-00R
● It may take some time for the machine to completely shut do
power indicator goes out.
● To restart the machine, wait for at least 10 seconds after the machine is turned OFF.
● Even when the power is turned OFF, the machine continues to consume a small amount of power. To reduce
power consumption to zero, unplug the power plug from the AC power outlet.
wn. Do not unplug the power cord until the
31
Page 35

Loading Paper
Basic Operations
2754-00S
You can load the paper into the dr
About Paper
Precautions for Paper(P. 32)
Storing the Paper Printed with the Machine(P. 33)
How to Load Paper
Loading Paper in the Drawer(P. 34)
Loading Envelopes(P. 37)
Loading Preprinted Paper(P. 39)
awer. See
Precautions for Paper
Available Paper(P. 122) for available paper sizes and types.
Do not use the following types of paper:
● A paper jam or printing error may occur.
Wrinkled or creased paper
-
- Curled or rolled paper
- Torn paper
- Damp paper
- Very thin paper
- Thin coarse paper
- Paper printed by a thermal transfer printer
- Back side of paper printed by a thermal transfer printer
- Highly textured paper
- Glossy paper
Notes on use of paper
● Only use paper that has fully acclimatized to the environment in which the machine is installed. Using paper
that has been stored under different temperature or humidity conditions may cause paper jams or result in
poor print quality.
Paper handling and storage
● It is recommended that you use paper as soon as possible after unwrapping. Paper remaining unused
should be covered with the original wrapping paper and stored on a at surface.
● Keep the paper wrapped in its original package to protect the paper from moisture or dryness.
● Do not store the paper in such a way that may cause it to curl or fold.
32
Page 36

Basic Operations
● Do not store the paper vertically or do not stack too much paper.
● Do not stor
in temperature or humidity.
e the paper in direct sunlight, or in a place subject to high humidity, dryness, or drastic changes
When printing on paper that has absorbed moisture
● Steam may emit from the paper output ar
There is nothing unusual about any of these occurrences, which occur when the heat generated from xing
toner on the paper causes moisture in the paper to evaporate (most likely to occur at low room
temperatures).
ea, or water droplets may form around the paper output area.
Storing the Paper Printed with the Machine
When handling/storing the paper printed with the machine, take the follo
◼ How to Store the Printed Paper
● Store on a at surface.
wing precautions.
● Do not store together with articles made of PVC (polyvinyl chloride) such as clear folders. Toner may melt, resulting
in the paper's sticking to PVC articles.
● Take care that the paper does not get folded or creased. Toner may peel off.
● To store over a long period of time (two years or longer), store in binders or equivalent.
● When the paper is stored over a long period of time, it may become discolored and thus the print may seem to have
undergone a change of color.
● Do not store in a place where the temperature is high.
◼ Precautions When Applying Adhesive
● Always use insoluble adhesive.
● Before applying adhesive, perform a test using a printout no longer required.
● When putting adhesive-applied paper sheets one over another, make sure that the adhesive is completely dried out.
33
Page 37

Basic Oper
Loading Paper in the Drawer
Load the paper into the drawer.
Always load paper in portrait orientation
ations
2754-00U
● Paper cannot be loaded in landscape orientation. Be sure to load paper in portr
the illustration below.
Open the drawer.
1
ait orientation, as shown in
When replenishing paper
When the drawer is alr
Spread the paper guides apart.
2
● Slide the paper guides outward.
eady opened and the paper cover is covered, remove the paper cover.
34
Page 38

Basic Operations
Load the paper and slide it all the way in, until it touches the back side.
3
● Load the paper in portr
Paper cannot be loaded in landscape orientation.
● Before loading it, fan the paper stack well, and tap it on a at surface to align the edges.
Keep the paper stack within the load limit guides
Make sure that the paper stack does not exceed the load limit guides ( ). Loading too much paper may
cause paper jams.
ait orientation (with the short edge to
ward the machine) and the print side face up.
When loading envelopes or preprinted paper, see Loading Envelopes(P. 37) or Loading Preprinted
Paper(P.
Align the paper guides against the edges of the paper.
4
● Align the paper guides securely against the edges of the paper.
39) .
35
Page 39

Basic Operations
Align the paper guides securely against the paper
Paper guides that are too loose or too tight may cause misfeeds or paper jams.
Replace the paper co
5
● When performing printing, open the paper stopper in advance so that the output paper does not fall out of
the output tray
.
ver.
● After reloading paper that has run out during printing, or resetting the paper after a paper error
notication, pr
ess the Paper key to restart printing.
Printing on the Back Side of Printed Paper (Manual 2-Sided Printing)
● You can print on the back side of printed paper. Flatten any curls on the printed paper and insert it into the
dr
awer, with the side to print face up (previously printed side face down).
- Load only one sheet of paper each time you print.
- You can use only the paper printed with this machine.
- You cannot print on the side that has previously been printed on.
- If you are using A5 size paper, the reverse side may not be printed correctly.
LINKS
Available Paper(P. 122)
36
Page 40

Loading Envelopes
Basic Operations
2754-00W
Make sur
and which side is face up.
e to atten any curls on envelopes before loading them. Also pay attention to the orientation of envelopes
Before Loading Envelopes(P. 37)
Loading Envelopes in the Drawer(P. 38)
● This section describes how to load envelopes in the orientation you want, as well as pr
need to complete before loading envelopes. For a description of the general procedure for loading
envelopes in the drawer, see
Loading Paper in the Drawer(P. 34) .
Before Loading Envelopes
Follow the pr
1
ocedure below to prepare the envelopes before loading.
Close the ap of each envelope.
ocedures that you
Flatten them to release any remaining air, and make sure that the edges are pressed
2
tightly
Loosen any stiff corners of the envelopes and atten any curls.
3
.
Align the edges of the envelopes on a at surface.
4
37
Page 41

Basic Operations
Loading Envelopes in the Drawer
Load the envelopes Monarch, No. 10 (COM10), DL, or C5 in portrait orientation (with the short edge toward the
machine), with the non-glued side (front side) face up. You cannot print on the reverse side of envelopes.
war
● Load the envelopes so that the edge with the ap is to
d the left side as shown in the illustration.
38
Page 42

Basic Operations
Loading Preprinted Paper
2754-00X
When you use paper that has been preprinted with a logo, pay attention to the orientation of the paper when loading.
Load the paper pr
Making Printouts on Paper with Logos(P. 39)
operly so that printing is performed on the correct side of the paper with a logo.
● This section mainly describes how to load pr
description of the general procedure for loading paper in the drawer, see
Drawer(P
. 34) .
eprinted paper with the proper facing and orientation. For a
Making Printouts on Paper with Logos
Load the paper with the logo side (the side to print the document) face up.
Printing on Paper with Logos in Portr
Printing on Paper with Logos in Landscape Orientation
ait Orientation
Loading Paper in the
39
Page 43

Entering Sleep Mode
Basic Operations
2754-00Y
The sleep mode function reduces the amount of po
internal operations. You can set up the machine to enter sleep mode automatically when it remains idle for a certain
length of time. The factory default setting for the amount of time that elapses before the machine enters sleep mode
is 1 minute. We recommend using the factory default setting to save the most power. If you want to change the
amount of time that elapses before the machine enters sleep mode, follow the procedure below in the Printer Status
Window.
Situations in which the machine does not enter sleep mode
● When the machine is in operation
● When the Job indicator is lit up or blinking
● When the machine is performing an oper
● When a paper jam occurs
Changing the Auto Sleep Time Value
Select the machine by clicking in the system tray.
1
wer consumed by the machine by temporarily stopping some
ation such as adjustment or cleaning
Select [Options]
2
Make sleep mode settings, and click [OK].
3
[Device Settings] [Sleep Settings].
[ Auto Sleep After]
Specify the length of time after which the machine enters sleep mode. Y
40
ou can select fr
om 1 to 30 minutes.
Page 44

Basic Operations
Setting Auto Shutdown
Set a timer to automatically shut down the machine after the specied period of idle time has elapsed since the
machine enter
ed the sleep mode.
2754-010
Select the machine by
1
Select [Options] [Device Settings] [Auto Shutdown Settings].
2
in the system tray.
Make auto shutdown settings, and click [OK].
3
[Auto Shutdown after Fixed Period]
Select the check box to enable auto shutdown after the time specied with [Auto Shutdown After].
[Auto Shutdown After]
Specify the length of time until the machine executes auto shutdown, starting from the time when the
machine enters sleep mode. You can select from 1 hour to 8 hours, in units of 1 hour.
41
Page 45

Printing
Printing
Printing .................................................................................................................................................................. 43
Printing fr
om a Computer ................................................................................................................................... 44
Canceling Prints .............................................................................................................................................. 46
Checking the Printing Status .......................................................................................................................... 49
42
Page 46

Printing
Printing
2754-011
You can print documents on your computer b
y using the printer driver.
◼ Printing from a Computer
You can print a document made on your computer by using the printer driver.
Printing from a Computer(P. 44)
43
Page 47

Printing from a Computer
Printing
2754-012
You can print a document made with an application on your computer by using the printer driver. Ther
settings on the printer driver, such as enlarging/reducing, that enable you to print your documents in various ways.
Before you can use this function, you need to complete some procedures, such as installing the printer driver on your
computer. For more information, see the manuals for the relevant drivers on the online manual website.
About the Printer Driver Help(P. 44)
Basic Printing Operations(P. 44)
e are useful
About the Printer Driver Help
Clicking [Help] on the printer driver screen displays the Help scr
descriptions that are not in the User's Guide.
een. On this screen, you can see the detailed
Basic Printing Operations
This section describes how to print a document on your computer by using the printer driver.
Paper settings on the machine
● Normally
proceeding to printing.
1
2
3
● Switch the tab accor
, it is necessary to specify the paper size and type for the paper loaded in the drawer befor
Open a document in an application and display the print dialog box.
Select the printer driver for this machine, and click [Preferences] or [Properties].
Specify the print settings as necessary, and click [OK].
ding to the settings.
e
44
Page 48

Click [Print] or [OK].
4
Printing
➠ Printing starts.
● If you want to cancel printing, see
LINKS
Checking the Printing Status(P. 49)
Canceling Prints(P. 46) .
45
Page 49

Canceling Prints
Printing
2754-013
You can cancel printing fr
From a Computer(P. 46)
From the Cancel Job key(P. 47)
om your computer or the Cancel Job key of the machine.
From a Computer
You can cancel printing from the Printer Status Window.
Select the machine by clicking
1
➠ The Printer Status Window is displayed.
Cancel the print job.
2
in the system tray.
To cancel a print job that is currently printing
1
Click
➠ Printing of the current document is canceled.
To cancel a print job that is waiting
Select [Job] [Job Status].
1
.
46
Page 50

Printing
Select the document that you want to cancel, and click [Delete].
2
Click [OK].
3
➠ Printing of the selected document is canceled.
● Several pages may be output after you cancel printing.
Canceling from an application
● On some applications, a screen lik
e shown below appears. You can cancel printing by clicking [Cancel].
From the Cancel Job key
e
Cancel printing using the Cancel Job k
y.
● Several pages may be output after you cancel printing.
47
Page 51

LINKS
Basic Printing Operations(P. 44)
Checking the Printing Status(P. 49)
Printing
48
Page 52

Printing
Checking the Printing Status
2754-014
You can check the curr
Useful in the Following Cases
● When your documents ar
documents waiting to be printed.
Select the machine by clicking in the system tray.
1
Select [Job] [Job Status].
2
ent print statuses.
e not printed for a long time, you may want to see the waiting list of the
➠ A list of documents appears, showing documents that ar
LINKS
Basic Printing Operations(P. 44)
Canceling Prints(P. 46)
e being printed or waiting to be printed.
49
Page 53

Managing the Machine
Managing the Machine
Managing the Machine ................................................................................................................................. 51
Updating the Firmwar
e ....................................................................................................................................... 52
50
Page 54

Managing the Machine
Managing the Machine
2754-02X
This chapter describes how to update the machine
's rmware.
◼ Managing the System Conguration and Settings
Updating the Firmware(P. 52)
51
Page 55

Managing the Machine
Updating the Firmware
2754-015
You can access the latest rmwar
computer if the version currently installed in the machine is not the latest.
When you have downloaded the latest rmware version from the Canon website, use "User Support Tool" utility
software to update the rmware from a computer. For how to perform rmware update from a computer, see the
"User Support Tool Operation Guide" included with the rmware.
Checking the rmware
● You can check the rmware version on the User Data List. After completion of the rmwar
operation, make sure that the update was performed correctly.
e version on the Internet from a computer and perform the update from the
version
e update
Printing Lists of Settings(P. 74)
To Put the Machine into a Firmware Update Waiting State
Display the Printer Status Window ( Displaying the Printer Status Window(P. 27) )
[Options] [Utility] [Enter/Cancel Firmware Update Mode] [OK]
52
Page 56

Maintenance
Maintenance
Maintenance .......................................................................................................................................................
Regular Cleaning ................................................................................................................................................. 56
Cleaning the Exterior ...................................................................................................................................... 57
Cleaning the Fixing Assembly ......................................................................................................................... 58
Replacing the Toner Cartridge ............................................................................................................................ 59
Replacing the Drum Cartridge ............................................................................................................................ 64
Checking the Remaining Amount of Consumables ........................................................................................... 69
Relocating the Machine ...................................................................................................................................... 71
Viewing the Counter Value ................................................................................................................................. 73
Printing Lists of Settings ..................................................................................................................................... 74
Consumables ....................................................................................................................................................... 75
54
53
Page 57

Maintenance
Maintenance
2754-016
This chapter describes upkeep of the machine, including ho
◼ Basic Cleaning
Regular Cleaning(P. 56)
◼ Replacing Consumables
w to clean the machine and adjustment of print quality.
Replacing the Toner Cartridge(P. 59)
Replacing the Drum Cartridge(P. 64)
Checking the Remaining Amount of Consumables(P. 69)
Consumables(P. 75)
54
Page 58

◼ Adjusting and Managing the Machine
Relocating the Machine(P. 71) Viewing the Counter Value(P. 73)
Maintenance
Printing Lists of Settings(P. 74)
55
Page 59

Regular Cleaning
Maintenance
2754-017
Regularly clean the machine to pre
Where to Clean
vent deterioration in printing quality and to ensure that you use it safely and easily.
Exterior of the machine and ventilation slots
Cleaning the Exterior(P. 57)
Internal xing assembly
Cleaning the Fixing Assembly(P. 58)
56
Page 60

Cleaning the Exterior
Maintenance
2754-018
Regularly wipe the exterior of the machine, especially ar
condition.
Turn OFF the machine, and unplug the power cord from the AC power outlet.
1
● When you turn OFF the machine, data that is waiting to be printed is deleted.
Clean the exterior of the machine and the ventilation slots.
2
● Use a soft, well-wrung-out cloth dampened with water or a mild deter
o locate the ventilation slots, see
● T
Wait for the exterior of machine to dry completely.
3
Front Side(P. 23) .
ound the ventilation slots, to keep the machine in good
gent diluted with water.
Reconnect the power cord and turn ON the machine.
4
57
Page 61

Maintenance
Cleaning the Fixing Assembly
2754-019
Dirt may adhere to the xing assembly inside the machine and cause black str
the xing assembly, perform the following procedure. Note that you cannot clean the xing assembly when the
machine has documents waiting to be printed. To clean the xing assembly, you need plain A4 size paper. Set the
paper in the drawer before performing the following procedure.
● Cleaning consumes the toner cartridge and the drum cartridge. Make sur
remaining in the toner cartridge and the drum cartridge beforehand.
of Consumables(P
Select the machine by clicking
1
Window(P
Select [Options]
2
. 69)
in the system tray. Displaying the Printer Status
. 27)
[Utility] [Cleaning].
Loading Paper(P. 32)
eaks to appear on printouts. To clean
e that there is sucient amount
Checking the Remaining Amount
Click [OK].
3
➠ Cleaning starts.
58
Page 62

Maintenance
Replacing the Toner Cartridge
2754-01A
The machine displays a message in the Printer Status Window when the amount r
low. Note that the print quality may suffer if you continue printing without resolving this issue. You can check the
amount remaining in the toner cartridges in the Printer Status Window (
Consumables(P
When a Message Appear(P. 59)
Procedure for Replacing the Toner Cartridge(P. 61)
. 69) ).
emaining in the toner cartridge is
Checking the Remaining Amount of
When a Message Appear
The message that is displayed depends on the amount remaining in the toner cartridges. Depending on which
message is displayed, prepare a new toner cartridge ( Consumables(P. 75) ) or replace the curr
with a new one (
Procedure for Replacing the Toner Cartridge(P. 61) ).
[The toner cartridge needs to be replaced soon.]
This message noties you that the toner cartridge needs to be replaced soon. Mak
replacement toner cartridge ready. Replace the toner cartridge if you see this message before you start to print
a large job.
e sure that you have a
ent toner cartridge
When this message is displayed
● When printing, you can continue printing the original.
Specifying When This Message Is Displayed
You can set any value as the percentage of the amount remaining in the toner cartridge that triggers this
message.
Select the machine by clicking
1
Select [Options]
2
[Device Settings] [Warning Display Details].
in the system tray.
59
Page 63

Maintenance
In [Toner] under [Amount Remaining in the Cartridge to Display Warning], specify the amount
3
remaining in the toner cartridge to display the message, then click [OK].
If you are using a toner cartridge that is not a Canon product or the amount remaining in the toner
cartridge cannot be detected correctly
, it is possible that no message will be displayed.
Disabling Message Display
You can disable display of the message [The toner cartridge needs to be replaced soon.] b
as follows: Select Printer Status Window's [Options] menu
Cartridge Replacement Notice] check box in the [W
arning Display Settings] dialog box.
[Device Settings] Clear the [Display
y doing
[The toner cartridge has reached the end of its lifetime.]
This message noties you that the toner cartridge has reached the end of its lifetime. It is r
you replace the toner cartridge with a new one. You can continue printing, but the print quality cannot be
guaranteed.
ecommended that
60
Page 64

Maintenance
Procedure for Replacing the Toner Cartridge
Remove the output cover.
1
Close the paper stopper, and then open the toner cover.
2
Remove the toner cartridge.
3
Do not shake or tilt the toner cartridge. Also, make sure to avoid applying shocks to the toner cartridge, such
as b
y hitting it against something. Doing so may cause the toner left in the toner cartridge to leak. Remove
the toner cartridge gently at the same angle as the slot.
61
Page 65

Maintenance
Remove the new toner cartridge from the protective package.
4
Pull the tab of the protective package on a at place.
1
Pull out the toner cartridge.
2
Shake the toner cartridge 5 or 6 times as shown below to evenly distribute the toner
5
inside the cartridge, and then place it on a at surface.
Replace the toner cartridge.
6
Close the toner cover.
7
62
Page 66

Replace the output cover.
8
LINKS
Consumables(P. 75)
Maintenance
63
Page 67

Maintenance
Replacing the Drum Cartridge
2754-01C
The machine displays a message in the Printer Status Window when the amount r
low. Note that the print quality may suffer if you continue printing without resolving this issue. You can check the
amount remaining in the drum cartridges in the Printer Status Window (
Consumables(P
When a Message Appear(P. 64)
Procedure for Replacing the Drum Cartridge(P. 66)
. 69) ).
emaining in the drum cartridge is
Checking the Remaining Amount of
When a Message Appear
The message that is displayed depends on the amount remaining in the drum cartridges. Depending on which
message is displayed, prepare a new drum cartridge ( Consumables(P. 75) ) or replace the curr
with a new one (
Procedure for Replacing the Drum Cartridge(P. 66) ).
[The drum cartridge needs to be replaced soon.]
This message noties you that the drum cartridge needs to be replaced soon. Mak
replacement drum cartridge ready. Replace the drum cartridge if you see this message before you start to print
a large job.
e sure that you have a
ent drum cartridge
When this message is displayed
● When printing, you can continue printing the original.
Specifying When This Message Is Displayed
You can set any value as the percentage of the amount remaining in the drum cartridge that triggers this
message.
Select the machine by clicking
1
Select [Options]
2
[Device Settings] [Warning Display Details].
in the system tray.
64
Page 68

Maintenance
In [Drum] under [Amount Remaining in the Cartridge to Display Warning], specify the amount
3
remaining in the drum cartridge to display the message, then click [OK].
If you are using a drum cartridge that is not a Canon product or the amount remaining in the drum
cartridge cannot be detected correctly
, it is possible that no message will be displayed.
Disabling Message Display
You can disable display of the message [The drum cartridge needs to be replaced soon.] b
as follows: Select Printer Status Window's [Options] menu
Cartridge Replacement Notice] check box in the [W
arning Display Settings] dialog box.
[Device Settings] Clear the [Display
y doing
[The drum cartridge has reached the end of its lifetime.]
This message noties you that the drum cartridge has reached the end of its lifetime. It is r
you replace the drum cartridge with a new one. You can continue printing, but the print quality cannot be
guaranteed.
ecommended that
65
Page 69

Maintenance
Procedure for Replacing the Drum Cartridge
Remove the output cover.
1
Close the paper stopper, and then open the toner cover.
2
Remove the toner cartridge.
3
Do not shake or tilt the toner cartridge. Also, make sure to avoid applying shocks to the toner cartridge, such
y hitting it against something. Doing so may cause the toner left in the toner cartridge to leak. Remove
as b
the toner cartridge gently at the same angle as the slot.
66
Page 70

Maintenance
Remove the drum cartridge.
4
Do not shake or tilt the drum cartridge. Also, make sure to avoid applying shocks to the drum cartridge, such
as by hitting it against something. Doing so may cause the toner left in the drum cartridge to leak. Remove
the drum cartridge gently at the same angle as the slot.
Remove the new drum cartridge from the protective bag.
5
Replace the drum cartridge.
6
Insert the toner cartridge.
7
67
Page 71

Close the toner cover.
8
Replace the output cover.
9
Maintenance
LINKS
Consumables(P. 75)
68
Page 72

Maintenance
Checking the Remaining Amount of Consumables
2754-01E
Use the procedur
check whether you need to have a new toner cartridge or a new drum cartridge ready before starting a large print job.
e below to check the amount remaining in the toner cartridges, etc. It is particularly important to
Display the Printer Status Window ( Displaying the Printer Status Window(P. 27) ) [Options]
[Consumables Information]
Amount Remaining in Toner Cartridge
Displays the amount remaining in the toner cartridges.
Amount Remaining in Drum Cartridge
Displays the amount r
emaining in the drum cartridges.
Information about Genuine Products
Displays the model numbers of the toner cartridge and the drum cartridge for the machine.
● The displayed amount remaining in the toner cartridge or the drum cartridge can be used only as a guide
and may differ fr
● Other internal parts may reach the end of their lifetime before the amount remaining in the toner cartridge
or the drum cartridge reaches its lifetime.
LINKS
Replacing the Toner Cartridge(P. 59)
Replacing the Drum Cartridge(P. 64)
om the actual amount.
69
Page 73

Consumables(P. 75)
Maintenance
70
Page 74

Relocating the Machine
Maintenance
2754-01F
The machine is heavy. Mak
make sure to read the safety precautions before you begin.
Turn OFF the machine and computer.
1
● When you turn OFF the machine, data that is waiting to be printed is deleted.
Disconnect the cables and cord from the machine in numerical order as in the
2
illustr
ation belo
Power plug
Power cord
USB cable
e sure to follow the procedure below when moving the machine to avoid injury, and also
Important Safety Instructions(P. 2)
w.
When transporting the machine across a long distance, remove the toner cartridge
3
and the drum cartridge.
Procedure for Replacing the Toner Cartridge(P. 61)
Procedure for Replacing the Drum Cartridge(P. 66)
Remove the paper cover, output cover and any paper.
4
● If the paper guides are e
xtended, return them so that they t in the drawer.
71
Page 75

Maintenance
Close the drawer, paper stopper, and all similar parts, and then move the machine to
5
a ne
w location.
● Check how heavy the machine is and carry it without str
Hold the lift handles, and lift up the machine.
Carefully place the machine at the new installation site.
6
● For information about how to install the machine after r
Their Contents(P
. 126)
aining.
elocating it, see "Getting Started."
Main Unit(P. 120)
Manuals and
72
Page 76

Maintenance
Viewing the Counter Value
2754-01H
You can check total for the number of pages used for printouts. The number of printouts includes printouts of the list
as well as printouts of data fr
Display the Printer Status Window ( Displaying the Printer Status Window(P. 27) ) [Options]
[Counter Information] Check the number of pages printed
om computers.
73
Page 77

Printing Lists of Settings
Maintenance
2754-01J
You can print information and settings r
egistered in the machine as a list.
User Data List
You can check the list of the settings as well as the content that has been registered in the machine by printing a User
Data List. Before starting, load A4 size paper in the drawer. Loading Paper in the Drawer(P. 34)
Display the Printer Status Window ( Displaying the Printer Status Window(P. 27) ) [Options]
[Utility] [User Data List] [OK]
● You can also use the Paper key to print a User Data List (with the machine ready to print, press the key and
hold it do
Setting the language to print in
● In the Printer Status Window's [Options] menu
dialog bo
wn for 3 seconds).
[Device Settings] [Select Language for User Data List]
x, you can specify the language for printing a User Data List in.
74
Page 78

Maintenance
Consumables
The following is a guide to the estimated replacement time for the consumables used in
this machine. Purchase consumables at your local authorized Canon dealer. Observe
safety and health pr
print quality, using Canon genuine Toner, Cartridge and Parts is recommended.
● To handle and store consumables, observe precautions in "Getting Started" provided for this product.
ecautions when storing and handling consumables. For optimum
2754-01K
● Depending on the installation envir
onment, printing paper size, or original type, you may need to replace
consumables before the end of the estimated lifetime.
◼ Toner Cartridges
Supplied Toner Cartridge
The aver
● Average yield
● Weight
Replacement Toner Cartridges
For optimum print quality
age yield and the weight of the toner cartridge that comes with the machine are shown below.
*
700 sheets
Approx. 0.3 kg
, using Canon genuine toner cartridges is recommended.
Canon Genuine Toner Cartridge Average yield and weight of toner cartridge
age yield
● Aver
Canon Toner Cartridge 047
*
The average yield is based on "ISO/IEC 19752" (the global standard related to "Method for the determination of toner
cartridge yield for monochromatic electrophotographic printers and multi-function devices that contain printer
components" issued by ISO [International Organization for Standardization]) when printing A4 size paper with the default
print density setting.
1,600 sheets
● W
eight
Approx. 0.3 kg
*
75
Page 79

Maintenance
Be careful of counterfeit toner cartridges
● Please be aware that ther
counterfeit toner cartridge may result in poor print quality or machine performance. Canon is not
responsible for any malfunction, accident or damage caused by the use of counterfeit toner cartridge.
For more information, see canon.com/counterfeit.
● When replacing toner cartridges, see Replacing the Toner Cartridge(P. 59) .
◼ Drum Cartridges
Supplied Drum Cartridge
The average yield and the weight of the drum cartridge that comes with the machine are sho
● Average yield
12,000 sheets
e are counterfeit Canon toner cartridges in the marketplace. Use of
wn below.
*
● Weight
Approx. 0.2 kg
Replacement Drum Cartridges
For optimum print quality, using Canon genuine drum cartridges is r
Canon Genuine Drum Cartridge Average yield and weight of drum cartridge
● Average yield
Canon Drum Cartridge 049
*
The average yield is on the basis of our e
A4 size paper.
12,000 sheets
● W
Approx. 0.2 kg
eight
valuation criteria when printing at 2-sheet intervals (2-sheet intermittent) of plain
*
ecommended.
Be careful of counterfeit drum cartridges
● Please be aware that ther
counterfeit drum cartridge may result in poor print quality or machine performance. Canon is not
responsible for any malfunction, accident or damage caused by the use of counterfeit drum cartridge.
For more information, see canon.com/counterfeit.
e are counterfeit Canon drum cartridges in the marketplace. Use of
76
Page 80

Maintenance
● When replacing drum cartridges, see Replacing the Drum Cartridge(P. 64) .
77
Page 81

Troubleshooting
Troubleshooting
Troubleshooting ............................................................................................................................................... 79
Common Pr
Installation/Settings Problems ........................................................................................................................ 82
Printing Problems ........................................................................................................................................... 83
When You Cannot Print Properly ........................................................................................................................ 85
Printing Results Are Not Satisfactory .............................................................................................................. 87
Paper Creases or Curls ................................................................................................................................... 96
Paper Is Fed Incorrectly .................................................................................................................................. 98
Countermeasures for Each Message .................................................................................................................. 99
Clearing Paper Jams .......................................................................................................................................... 105
Paper Jams inside the Machine ..................................................................................................................... 107
When a Problem Cannot Be Solved .................................................................................................................. 112
oblems .............................................................................................................................................. 81
78
Page 82

Troubleshooting
T
roubleshooting
2754-01L
When a problem occurs, check this chapter to
nd out solutions before contacting Canon.
◼ Common Problems
This section describes how to take action when you suspect that the machine is malfunctioning.
Problems(P
. 81)
◼ When You Cannot Print Properly
This section describes ho
When You Cannot Print Properly(P. 85)
w to take action when printing results are not satisfactory or the paper creases or curls.
Common
◼ Countermeasures for Each Message
This section describes ho
for Each Message(P. 99)
w to take action when a message appears in the Printer Status Window.
◼ Clearing Paper Jams
This section describes how to tak
e action when a paper is jammed.
◼ When a Problem Cannot Be Solved
Countermeasures
Clearing Paper Jams(P. 105)
If a problem persists, see When a Problem Cannot Be Solved(P. 112) to nd out where to contact.
79
Page 83

Troubleshooting
80
Page 84

Troubleshooting
Common Problems
If you encounter problems when using the machine, check the items in this section before contacting us. If the
pr
oblems persist, contact your local authorized Canon dealer or the Canon help line.
Check the Following
Is the machine turned ON? Is the power cord connected?
2754-01R
● If the machine is turned ON but does not respond, turn it OFF
correctly, and turn it back ON. For information on connecting the power cord, see Getting Started.
Manuals and Their Contents(P. 126)
, check whether the power cord is connected
Is the machine connected via a USB cable?
● Check whether the machine is connected correctly. Problem with the USB Connection(P. 82)
Is sleep mode activated?
● If you leave the machine unattended for a specic period of time, it enters sleep mode for power
conservation, not allo
To cancel sleep mode, press any key other than the power switch.
wing you to operate it.
Is any message displayed in the Printer Status Window?
● If a problem occurs, a message is displayed. Countermeasures for Each Message(P. 99)
If a problem persists e
Click the link that corresponds to the problem.
ven after checking
Installation/Settings Problems(P. 82)
Printing Problems(P. 83)
81
Page 85

Troubleshooting
Installation/Settings Problems
See Common Problems(P. 81) also.
Problem with the USB Connection(P. 82)
Problem with the Print Server(P. 82)
Problem with the USB Connection
Cannot communicate.
2754-01S
● Change the USB cable. If you are using a long USB cable, r
● If you are using a USB hub, connect the machine directly to your computer using a USB cable.
eplace it with a short one.
Problem with the Print Server
You cannot nd the print server to connect to.
● Ar
e the print server and computer connected correctly?
● Is the print server running?
● Do you have user rights to connect to the print server? If you are not sure, contact the server administrator.
● Is [Network discovery] enabled?
Enabling [Network discovery](P. 132)
You cannot connect to a shared printer.
● On the network, does the machine appear among the printers of the print server? If it is not displayed,
contact the network or server administr
Displaying Shared Printers in the Print Server(P. 133)
ator.
82
Page 86

Printing Problems
See Common Problems(P. 81) also.
Printing results are not satisfactory. Paper creases or curls. When You
Troubleshooting
2754-01U
Cannot Print Properly
(P. 85)
You cannot print.
● Can you print a Windows test page? If you can print a Windo
machine or the printer driver. Check the print settings of your application.
Printing a Test Page in Windows(P. 134)
If you cannot print a test page, check the following accor
USB connection
● Have you selected the correct port? If there is no port to use or you are not sure, reinstall the printer
driver. When you reinstall the printer driver, the correct port is created automatically.
Checking the Printer Port(P. 136)
Installing Drivers(P. 15)
● Is bidirectional communication enabled? Enable bidirectional communication, and restart the computer.
Checking Bidirectional Communication(P. 137)
● Disable security software and other resident software.
● Connect to another USB port on the computer.
● Can you print from a USB connection to another computer? If you also cannot print from other computers,
contact your local authorized Canon dealer or the Canon help line.
ws test page, there is no problem with the
ding to your environment.
Via print server
● Can you print from the print server? If you can print from the print server, check the connection between
the print server and your computer.
Problem with the Print Server(P. 82)
● Disable security software and other r
● Reinstall the printer driver.
Installing Drivers(P. 15)
● Can you
contact your local authorized Canon dealer or the Canon help line.
● Has an error occurred? Check the job status.
Checking the Printing Status(P. 49)
print from other computers via the print server? If you also cannot print from other computers,
Printing seems to be slow.
● Print or delete data in memory.
*
When the free space in memory is running lo
does. There is nothing abnormal.
esident software.
*
w, the processing speed of the machine becomes slow, just as a computer
83
Page 87

Troubleshooting
It takes a long time before printing starts.
● Did you print to narro
maintain the print quality. As a result, it may take some time before the next job is printed. Wait until the
machine is ready to print. Printing will resume when the temperature inside the machine has fallen.
w width paper? After you print to narrow width paper, the machine may cool itself to
84
Page 88

Troubleshooting
When You Cannot Print Properly
2754-01W
If printing results ar
contact your local authorized Canon dealer or the Canon help line.
◼ Problems with Image Quality
Smudge Marks Appear on the
Edge of Printouts(P
e not satisfactory, or paper creases or curls, try the following solutions. If the problems persist,
Printing Results Are Not Satisfactory(P. 87)
Smudges Appear on
. 87
)
Printouts
(P
. 87)
Afterimages Appear in Blank
eas(P
Ar
. 88)
Toner Smudges and Splatters
Appear(P
Streaks Appear/Printing is
Uneven(P
. 88)
. 91)
Printouts Are Faded(P. 89) A Portion of the Page Is Not
91)
Printouts Are Entirely or
Partially Grayish
(P. 92)
Printed(P.
White Spots Appear(P. 93)
85
Page 89

Troubleshooting
Spots Appear(P. 94) Reverse Side of Paper is
(P
Smudged
. 94)
Read(P
◼ Problems with Printout Paper Paper Creases or Curls(P. 96)
Paper Creases(P. 96) Paper Curls(P. 96)
◼ Problems with Paper Feed Paper Is Fed Incorrectly(P. 98)
Printed Barcode Cannot Be
. 95)
Printouts Are Skewed(P. 98) Paper Is Not Fed/Two or More Sheets Are Fed Together(P. 98)
86
Page 90

Troubleshooting
Printing Results Are Not Satisfactory
2754-01X
Dirt inside the machine may affect printing results. Perform car
Cleaning(P
. 56)
e and cleaning to the machine rst.
Smudge Marks Appear on the Edge of Printouts
Are you using appropriate paper?
● Check the
correctly.
Available Paper(P. 122)
Loading Paper(P. 32)
supported paper types and replace with an appropriate type. Also, set the paper size and type
Regular
Do you print data without margins?
● This
[Finishing] tab
symptom
edge of paper or 10 mm or less around the edge of envelopes is not printable with the machine. Make
sure to have margins around the document to print.
occurs if a margin is set to none in the printer driver. A margin of 5 mm or less around the
[Advanced Settings] [Expand Print Region and Print] [Off]
Smudges Appear on Printouts
Are you using appropriate paper?
● Check usable paper, and replace with appr
Available Paper(P. 122)
Loading Paper(P. 32)
opriate paper.
● If using
setting in the Printer Status Window may solve the problem. [Mode 2] can improve the quality more
signicantly than [Mode 1].
the appropriate paper still does not solve the problem, changing the [Special Print Adjustment A]
Displaying the Printer Status Window(P. 27)
87
Page 91

Troubleshooting
[Options] [Device Settings] [Assisting Print Settings] [Special Print Adjustment A] Select mode
Afterimages Appear in Blank Areas
Are you using appropriate paper?
● Check usable paper, and replace with appr
Available Paper(P. 122)
Loading Paper(P. 32)
opriate paper.
Is the amount remaining in the toner cartridge running low?
● Check ho
necessary.
● Regardless of the amount remaining in the toner cartridge, the toner cartridge may reach the end of its
lifetime depending on the use environment or the deterioration of materials inside the toner cartridge.
w much the amount remaining in the toner cartridge is left, and replace the toner cartridge as
Replacing the Toner Cartridge(P. 59)
Is the amount remaining in the drum cartridge running low?
● Check ho
necessary.
● Regardless of the amount remaining in the drum cartridge, the drum cartridge may reach the end of its
lifetime depending on the use environment or the deterioration of materials inside the drum cartridge.
w much the amount remaining in the drum cartridge is left, and replace the drum cartridge as
Replacing the Drum Cartridge(P. 64)
Toner Smudges and Splatters Appear
Are you using appropriate paper?
● Check usable paper, and replace with appropriate paper.
Available Paper(P. 122)
Loading Paper(P. 32)
88
Page 92

Troubleshooting
● Setting [Use Special Print Adjustment U] to on in the Printer Status Window may solve the pr
Displaying the Printer Status Window(P. 27)
[Options] [Device Settings] [Assisting Print Settings] Select the [Use Special Print Adjustment U] check
box
oblem.
Are you using paper containing much paper dust or other dust particles?
● Smudges may
[Use Special Print Adjustment L] to on in the Printer Status Window may solve the problem.
Displaying the Printer Status Window(P. 27)
[Options] [Device Settings] [Assisting Print Settings] Select the [Use Special Print Adjustment L] check
box
appear in a printout when the paper has a lot of paper dust or other dust particles. Setting
Is the amount remaining in the toner cartridge running low?
● Check ho
necessary.
● Regardless of the amount remaining in the toner cartridge, the toner cartridge may reach the end of its
lifetime depending on the use environment or the deterioration of materials inside the toner cartridge.
w much the amount remaining in the toner cartridge is left, and replace the toner cartridge as
Replacing the Toner Cartridge(P. 59)
Is the amount remaining in the drum cartridge running low?
● Check ho
necessary.
● Regardless of the amount remaining in the drum cartridge, the drum cartridge may reach the end of its
lifetime depending on the use environment or the deterioration of materials inside the drum cartridge.
w much the amount remaining in the drum cartridge is left, and replace the drum cartridge as
Replacing the Drum Cartridge(P. 64)
Printouts Are Faded
Are you using appropriate paper?
● Check usable
properly.
Available Paper(P. 122)
Loading Paper(P. 32)
paper, and replace with appropriate paper. Also, specify the paper size and type settings
Are you using paper containing much paper dust?
● Using
paper containing much paper dust may result in a faded or streaky printout. Setting [Use Special
Print Adjustment G] to on in the Printer Status Window may solve the problem.
Displaying the Printer Status Window(P. 27)
89
Page 93

Troubleshooting
[Options] [Device Settings] [Assisting Print Settings] Select the [Use Special Print Adjustment G] check
box
Are you using rough-surface paper?
● Printed
Adjustment Q] to on in the Printer Status Window may solve the problem.
[Options] [Device Settings] [Assisting Print Settings] Select the [Use Special Print Adjustment Q] check
box
● Setting this to on may affect the image quality.
images may be faint when they are printed on rough-surface paper. Setting [Use Special Print
Displaying the Printer Status Window(P. 27)
Are you using the machine in an environment with high humidity?
● Setting [Use Special Print Adjustment T] to on in the Printer Status Window may solve the pr
Displaying the Printer Status Window(P. 27)
[Options] [Device Settings] [Assisting Print Settings] Select the [Use Special Print Adjustment T] check
box
● Printed images or text may be blurr
Is the machine installed in the appropriate envir
ed when you set this to on and print in a low-humidity environment.
onment?
oblem.
● Install the printer in an appropriate location.
● The print quality may be faint, light or faded depending on the installation environment. Avoid placing the
machine in a location exposed to wind.
Installation(P. 3)
Relocating the Machine(P. 71)
Is the amount remaining in the toner cartridge running low?
● Check ho
necessary.
● Regardless of the amount remaining in the toner cartridge, the toner cartridge may reach the end of its
lifetime depending on the use environment or the deterioration of materials inside the toner cartridge.
w much the amount remaining in the toner cartridge is left, and replace the toner cartridge as
Replacing the Toner Cartridge(P. 59)
Is the amount remaining in the drum cartridge running low?
● Check ho
necessary.
● Regardless of the amount remaining in the drum cartridge, the drum cartridge may reach the end of its
lifetime depending on the use environment or the deterioration of materials inside the drum cartridge.
w much the amount remaining in the drum cartridge is left, and replace the drum cartridge as
Replacing the Drum Cartridge(P. 64)
90
Page 94

Troubleshooting
A Portion of the Page Is Not Printed
Do you print data without margins?
● This
[Finishing] tab
symptom
edge of paper or 10 mm or less around the edge of envelopes is not printable with the machine. Make
sure to have margins around the document to print.
occurs if a margin is set to none in the printer driver. A margin of 5 mm or less around the
[Advanced Settings] [Expand Print Region and Print] [Off]
Do the paper guides align with the edges of the paper?
● If the paper guides ar
Loading Paper(P. 32)
e too loose or too tight, part of a document may not be printed.
Streaks Appear/Printing is Uneven
Are you using appropriate paper?
● Check usable paper, and replace with appr
Available Paper(P. 122)
Loading Paper(P. 32)
opriate paper.
Have you cleaned the xing unit?
● Clean the xing unit.
Cleaning the Fixing Assembly(P. 58)
Are you using rough-surface paper?
● Printed
Adjustment Q] to on in the Printer Status Window may solve the problem.
images may be faint when they are printed on rough-surface paper. Setting [Use Special Print
Displaying the Printer Status Window(P. 27)
91
Page 95

Troubleshooting
[Options] [Device Settings] [Assisting Print Settings] Select the [Use Special Print Adjustment Q] check
box
● Setting this to on may affect the image quality.
Are you using the machine in an environment with high humidity?
● Change the
on may solve the problem.
Displaying the Printer Status Window(P. 27)
[Options] [Device Settings] [Assisting Print Settings] Select the [Use Special Print Adjustment T] check
box
● Printed images or text may be blurr
setting for [Use Special Print Adjustment T] in the Printer Status Window. Setting this item to
ed when you set this to on and print in a low-humidity environment.
Are you using paper containing much paper dust?
● Using
[Options] [Device Settings] [Assisting Print Settings] Select the [Use Special Print Adjustment G] check
box
paper containing much paper dust may result in a faded or streaky printout. Setting [Use Special
Print Adjustment G] to on in the Printer Status Window may solve the problem.
Displaying the Printer Status Window(P. 27)
Is the amount remaining in the toner cartridge running low?
● Check ho
necessary.
w much the amount remaining in the toner cartridge is left, and replace the toner cartridge as
● Regardless of the amount remaining in the toner cartridge, the toner cartridge may reach the end of its
lifetime depending on the use environment or the deterioration of materials inside the toner cartridge.
Replacing the Toner Cartridge(P. 59)
Is the amount remaining in the drum cartridge running low?
● Check ho
necessary.
● Regardless of the amount remaining in the drum cartridge, the drum cartridge may reach the end of its
lifetime depending on the use environment or the deterioration of materials inside the drum cartridge.
w much the amount remaining in the drum cartridge is left, and replace the drum cartridge as
Replacing the Drum Cartridge(P. 64)
Printouts Are Entirely or Partially Grayish
92
Page 96

Troubleshooting
Are you using a specic type of paper?
● The printed
using and try a different type.
Available Paper(P. 122)
● Setting [Use
Window may solve the problem.
Displaying the Printer Status Window(P. 27)
[Options] [Device Settings] [Assisting Print Settings] Select the [Use Special Print Adjustment U] or
[Use Special Print Adjustment G] check box
● A desirable effect may not be attained even with these settings applied.
side may come out in grayish color for certain type of paper. Check the type of paper you are
Special Print Adjustment U] or [Use Special Print Adjustment G] to on in the Printer Status
Is the machine installed in the appropriate environment?
● Install the printer in an appropriate location.
● The
● Store
printed side may come out in grayish color depending on the installation environment. Avoid placing
the machine in a location exposed to wind.
Installation(P. 3)
Relocating the Machine(P. 71)
the toner cartridge in an appropriate location for two to three hours, then try printing again. This
may solve the problem. If the problem persists, replace the toner cartridge.
Replacing the Toner Cartridge(P. 59)
Has the drum cartridge been left in direct sunlight for a long period of time?
● Store
the drum cartridge in an appropriate location for two to three hours, then try printing again. This
may solve the problem. If the problem persists, replace the drum cartridge.
Replacing the Drum Cartridge(P. 64)
White Spots Appear
Are you using paper that has absorbed moisture?
● Replace with appr
Loading Paper(P. 32)
opriate paper.
Are you using appropriate paper?
● Check usable paper, and r
eplace with appropriate paper.
93
Page 97

Troubleshooting
Available Paper(P. 122)
Loading Paper(P. 32)
Is the amount remaining in the toner cartridge running low?
● Check ho
necessary.
● Regardless of the amount remaining in the toner cartridge, the toner cartridge may reach the end of its
lifetime depending on the use environment or the deterioration of materials inside the toner cartridge.
Replacing the Toner Cartridge(P. 59)
Is the amount remaining in the drum cartridge running lo
● Check how much the amount remaining in the drum cartridge is left, and replace the drum cartridge as
necessary.
● Regardless of the amount remaining in the drum cartridge, the drum cartridge may reach the end of its
lifetime depending on the use environment or the deterioration of materials inside the drum cartridge.
Replacing the Drum Cartridge(P. 64)
Spots Appear
w much the amount remaining in the toner cartridge is left, and replace the toner cartridge as
w?
Have you cleaned the xing unit?
● Clean the xing unit.
Cleaning the Fixing Assembly(P. 58)
Reverse Side of Paper is Smudged
Have you loaded paper that is smaller than the size of the print data?
● Check to make sur
e that the paper size matches the size of the print data.
94
Page 98

Have you cleaned the xing unit?
● Clean the xing unit.
Cleaning the Fixing Assembly(P. 58)
Printed Barcode Cannot Be Read
Are you trying to read a small barcode or one with thick lines?
Troubleshooting
● Enlarge the bar
● Changing the [Select Line Width] setting may solve the problem.
Displaying the Printer Status Window(P. 27)
[Options] [Device Settings] [Assisting Print Settings] [Select Line Width] Select the line width
code.
95
Page 99

Paper Creases or Curls
Paper Creases
Is paper loaded correctly?
Troubleshooting
2754-01Y
● If paper is not loaded below the load limit line or is loaded obliquely
Loading Paper(P. 32)
Are you using paper that has absorbed moisture?
● Replace with appropriate paper.
Loading Paper(P. 32)
Are you using appropriate paper?
● Check usable paper, and r
Available Paper(P. 122)
Loading Paper(P. 32)
Paper Curls
eplace with appr
, it may crease.
opriate paper.
Are you using appropriate paper?
● Check usable
properly.
Available Paper(P. 122)
Loading Paper(P. 32)
● Change the
[Plain [71-89 g/m2]], change it to [Plain L [61-70 g/m2]] or [Plain L2 [60 g/m2]].
Available Paper(P. 122)
paper, and replace with appropriate paper. Also, specify the paper size and type settings
setting of [Paper Type] to a setting for thinner paper. For example, if the current setting is
96
Page 100

Troubleshooting
● Reload the paper by changing the side to print on (fr
● In rare cases the symptom may become worse depending on the paper. If this occurs, change the side to
print on back to the pr
evious side.
ont side/back side).
Are you using paper that has absorbed moisture?
● Replace with appr
Loading Paper(P. 32)
opriate paper.
97
 Loading...