

Page 1
Laser Beam Printer
User's Guide
User's Guide
Page 2

Contents
Turning the Printer ON/OFF . . . . . . . . . . . . . . . . . . . . . . . . . . . . . . . . . . . . . . . 2
Tu r ning the Printer ON . . . . . . . . . . . . . . . . . . . . . . . . . . . . . . . . . . . . . . . . . . 2
Tu r ning the Printer OFF. . . . . . . . . . . . . . . . . . . . . . . . . . . . . . . . . . . . . . . . . . 3
When Not Using a Hard Disk . . . . . . . . . . . . . . . . . . . . . . . . . . . . . . . . . . 4
When Using a Hard Disk (Only When a Hard Disk Is Installed) . . . . . . . . 4
Online and Offline . . . . . . . . . . . . . . . . . . . . . . . . . . . . . . . . . . . . . . . . . . . . . . . 7
Placing the Printer Online . . . . . . . . . . . . . . . . . . . . . . . . . . . . . . . . . . . . . . . . 7
Placing the Printer Offline . . . . . . . . . . . . . . . . . . . . . . . . . . . . . . . . . . . . . . . . 8
Paper Requirements . . . . . . . . . . . . . . . . . . . . . . . . . . . . . . . . . . . . . . . . . . . . . 9
Usable Paper. . . . . . . . . . . . . . . . . . . . . . . . . . . . . . . . . . . . . . . . . . . . . . . . . . 9
Paper Size . . . . . . . . . . . . . . . . . . . . . . . . . . . . . . . . . . . . . . . . . . . . . . . . 9
Paper Type . . . . . . . . . . . . . . . . . . . . . . . . . . . . . . . . . . . . . . . . . . . . . . . 10
Abbreviations of Paper Sizes . . . . . . . . . . . . . . . . . . . . . . . . . . . . . . . . . 15
Printable Area . . . . . . . . . . . . . . . . . . . . . . . . . . . . . . . . . . . . . . . . . . . . . . . . 15
Unusable Paper. . . . . . . . . . . . . . . . . . . . . . . . . . . . . . . . . . . . . . . . . . . . . . . 17
Paper Capacity of Paper Source . . . . . . . . . . . . . . . . . . . . . . . . . . . . . . . . . . 18
Paper Capacity of the Output Tray. . . . . . . . . . . . . . . . . . . . . . . . . . . . . . . . . 19
Loading Paper in the Paper Cassette . . . . . . . . . . . . . . . . . . . . . . . . . . . . . . . 20
When Loading Standard Size Paper. . . . . . . . . . . . . . . . . . . . . . . . . . . . . . . 20
When Loading Custom Size Paper (Non-Standard Size Paper) . . . . . . . . . . 25
Loading Paper in the Multi-purpose Tray . . . . . . . . . . . . . . . . . . . . . . . . . . . . 31
When Loading Paper (Other than Postcards and Envelopes). . . . . . . . . . . . 31
When Loading Postcards or Envelopes . . . . . . . . . . . . . . . . . . . . . . . . . . . . 37
Paper Jams . . . . . . . . . . . . . . . . . . . . . . . . . . . . . . . . . . . . . . . . . . . . . . . . . . . . 43
Paper Jam Area. . . . . . . . . . . . . . . . . . . . . . . . . . . . . . . . . . . . . . . . . . . . . . . 46
Procedure for Clearing Paper Jams . . . . . . . . . . . . . . . . . . . . . . . . . . . . . . . 47
When the Message That Indicates a Paper Jam Does Not Disappear . . . . . 61
Replacing the Toner Cartridges . . . . . . . . . . . . . . . . . . . . . . . . . . . . . . . . . . . 66
When a Message Appears . . . . . . . . . . . . . . . . . . . . . . . . . . . . . . . . . . . . . . 66
Replacing the Toner Cartridges . . . . . . . . . . . . . . . . . . . . . . . . . . . . . . . . . . . 67
Canceling a Job . . . . . . . . . . . . . . . . . . . . . . . . . . . . . . . . . . . . . . . . . . . . . . . . 80
Confirming the Printer Features . . . . . . . . . . . . . . . . . . . . . . . . . . . . . . . . . . . 81
Service Call Display . . . . . . . . . . . . . . . . . . . . . . . . . . . . . . . . . . . . . . . . . . . . . 83
Message List . . . . . . . . . . . . . . . . . . . . . . . . . . . . . . . . . . . . . . . . . . . . . . . . . . 85
1
Page 3
Turning the Printer ON/OFF
The power switch to turn the printer ON or OFF is located on the right side of the
printer. Be sure to observe the following instructions in order to prevent unexpected
problems.
Turning the Printer ON
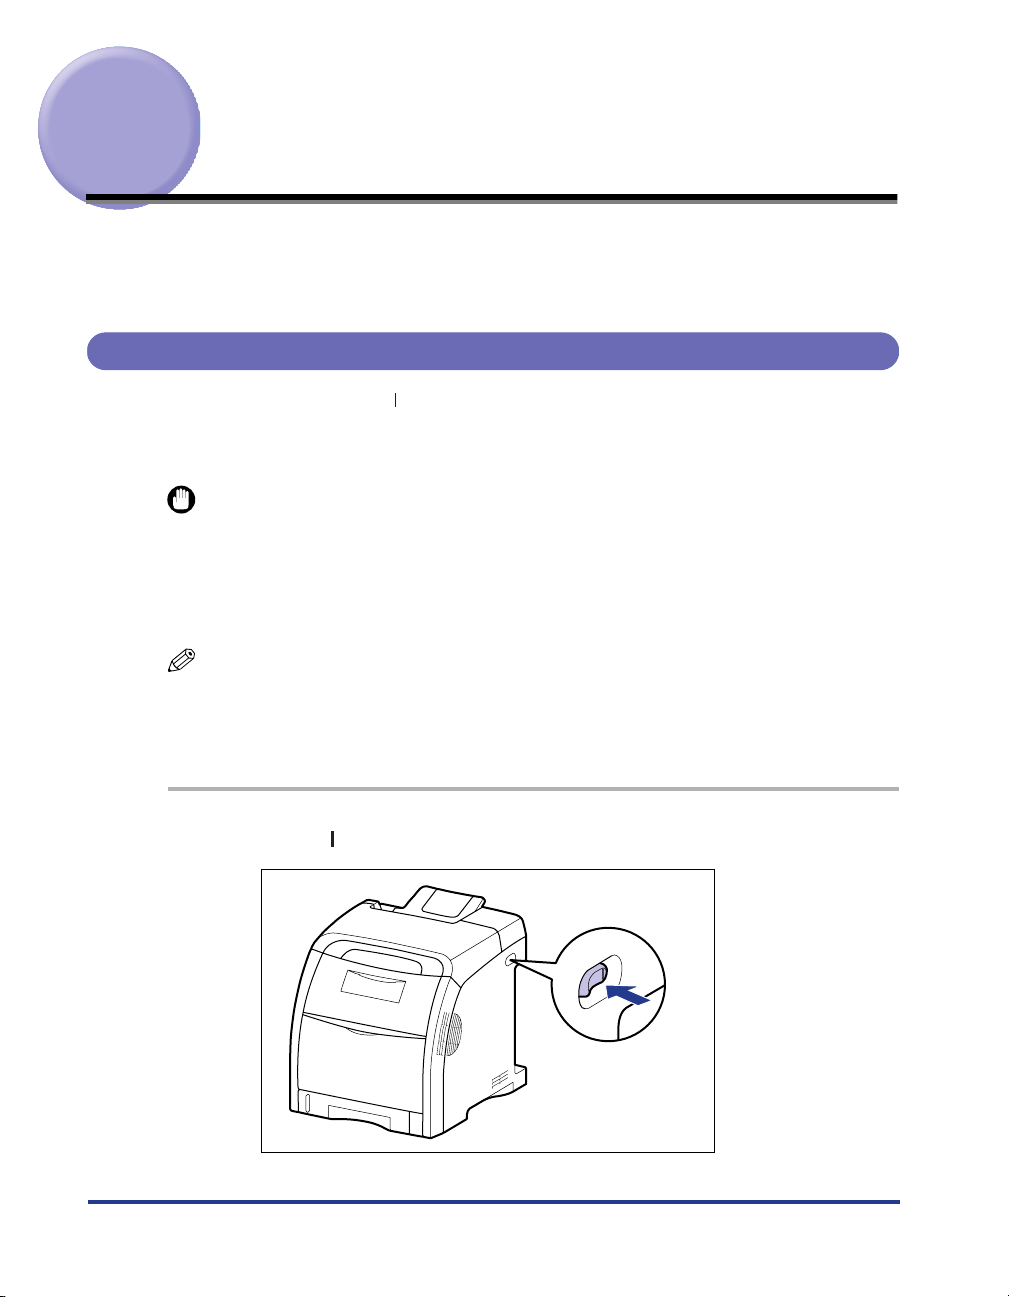
To use this printer, press " " of the power switch to turn the printer ON. After running
a self-diagnostic test on the printer unit and optional accessories, the printer will be
ready to print.
IMPORTANT
•
Do not turn the power ON immediately after turning it OFF. If you want to turn the printer
ON again after turning it OFF, wait at least 10 seconds after turning the printer OFF
before turning it ON again.
•
Be sure to set the paper cassette in the printer before you turn the power ON for the first
time after you install the printer.
NOTE
When you turn the power ON for the first time after you install a hard disk or when a
problem has occurred to the hard disk, the printer is ready to print after approximately 60
seconds after it is turned ON because the hard disk is formatted after the printer is turned
ON.
Press " " of the power switch on the printer.
1
2
Page 4
3
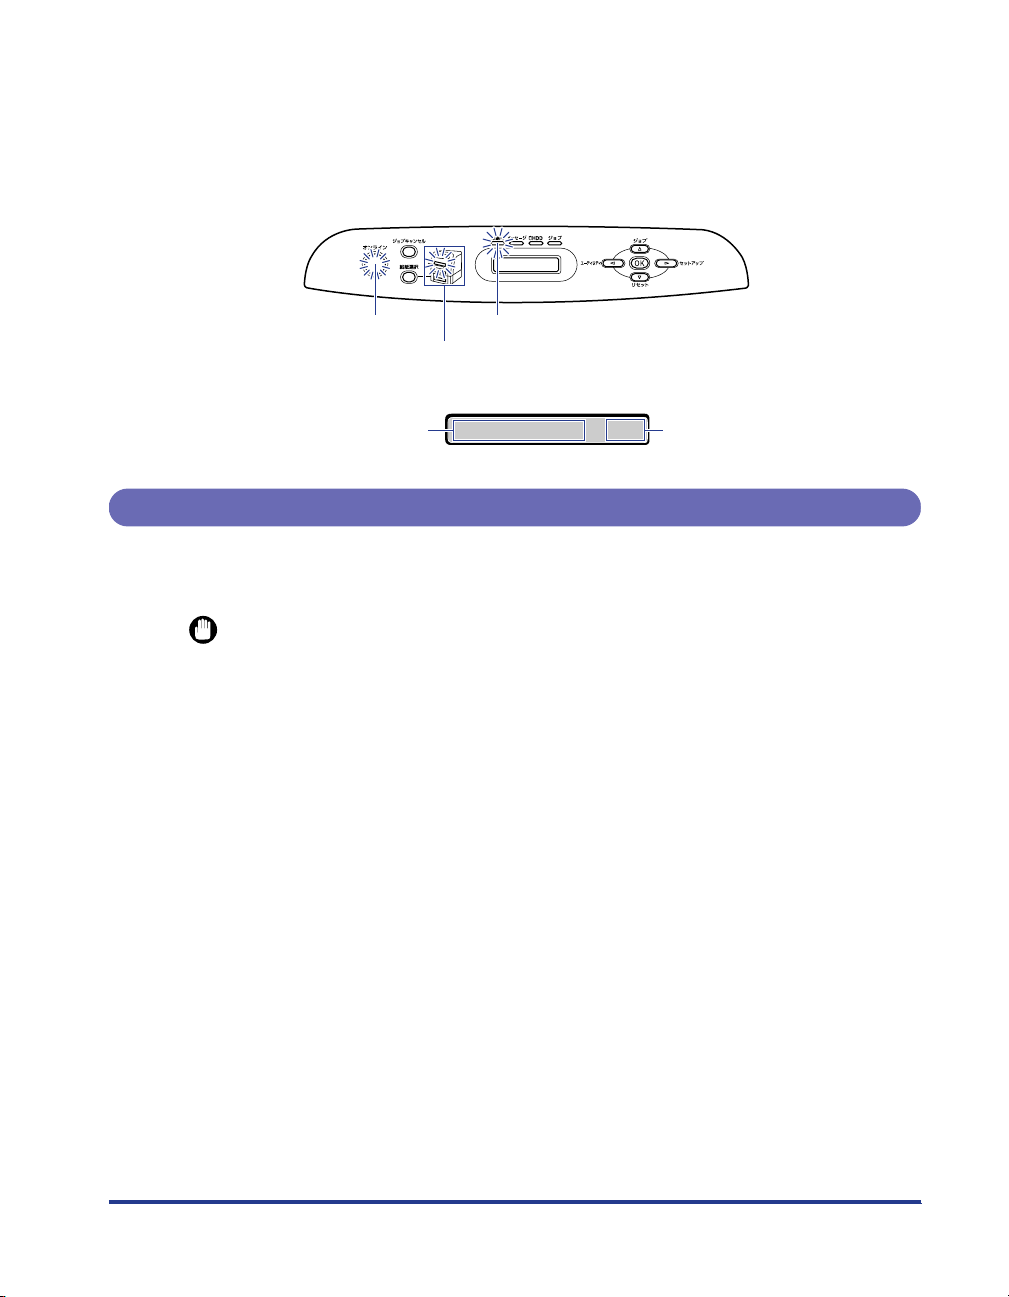
The indicators and display on the control panel come on, and the printer initiates a
self-diagnostic test on the printer unit and optional accessories.
If no abnormality is found during the self-diagnostic test, the
indicator and Paper Source indicator for the currently selected paper source
刷可
come on, <
00 インサツ カノウ
>, <00 LIPS>, or <00 ESC/P> appears in the
オンライン
indicator,
印
display, and the printer is ready to print.
オンライン Indicator
Paper Source Indicators
印刷可 Indicator
The following information is displayed in the display.
Printable and not
processing print data
00インサツカノウ
Size of paper in the currently
A4
selected paper source
Turning the Printer OFF
Tu rn the printer OFF using the following procedure. The procedure for turning the
printer OFF is different between when a hard disk is used and when it is not used.
IMPORTANT
When using the hard disk, be sure to turn the printer OFF as the procedure for the
•
protection of the hard disk. (See p. 4)
If the printer is used on a network, make sure that it is not printing data from another
•
computer before turning the power OFF.
If you turn the printer OFF when the
•
the printer memory will be erased. If there is any necessary print data remaining in the
printer, wait until it is output, or press [
シュツ
> to output the data before turning the printer OFF.
Do not turn the power OFF when the printer is in any of the following status:
•
- While the printer is in the middle of printing
- While the printer is running a self-diagnostic test immediately after turning the power
ON
- While a message informing you that the NVRAM is being initialized or being written is
displayed
- While <
When you are using a hard disk, make sure that the HDD indicator is not on. If you turn
•
02 キドウチュウ
> or <
the printer OFF while the HDD indicator is on (while data is being read from the hard disk
or being written to the hard disk), the hard disk may be damaged and disabled.
ジョブ
indicator is on, all the print data remaining in
リセット
02 キャリブレーションチュウ
] in the offline state and then select <
> is displayed
ハイ
Page 5
When Not Using a Hard Disk
When you are not using a hard disk, turn the printer OFF using the following
procedure.
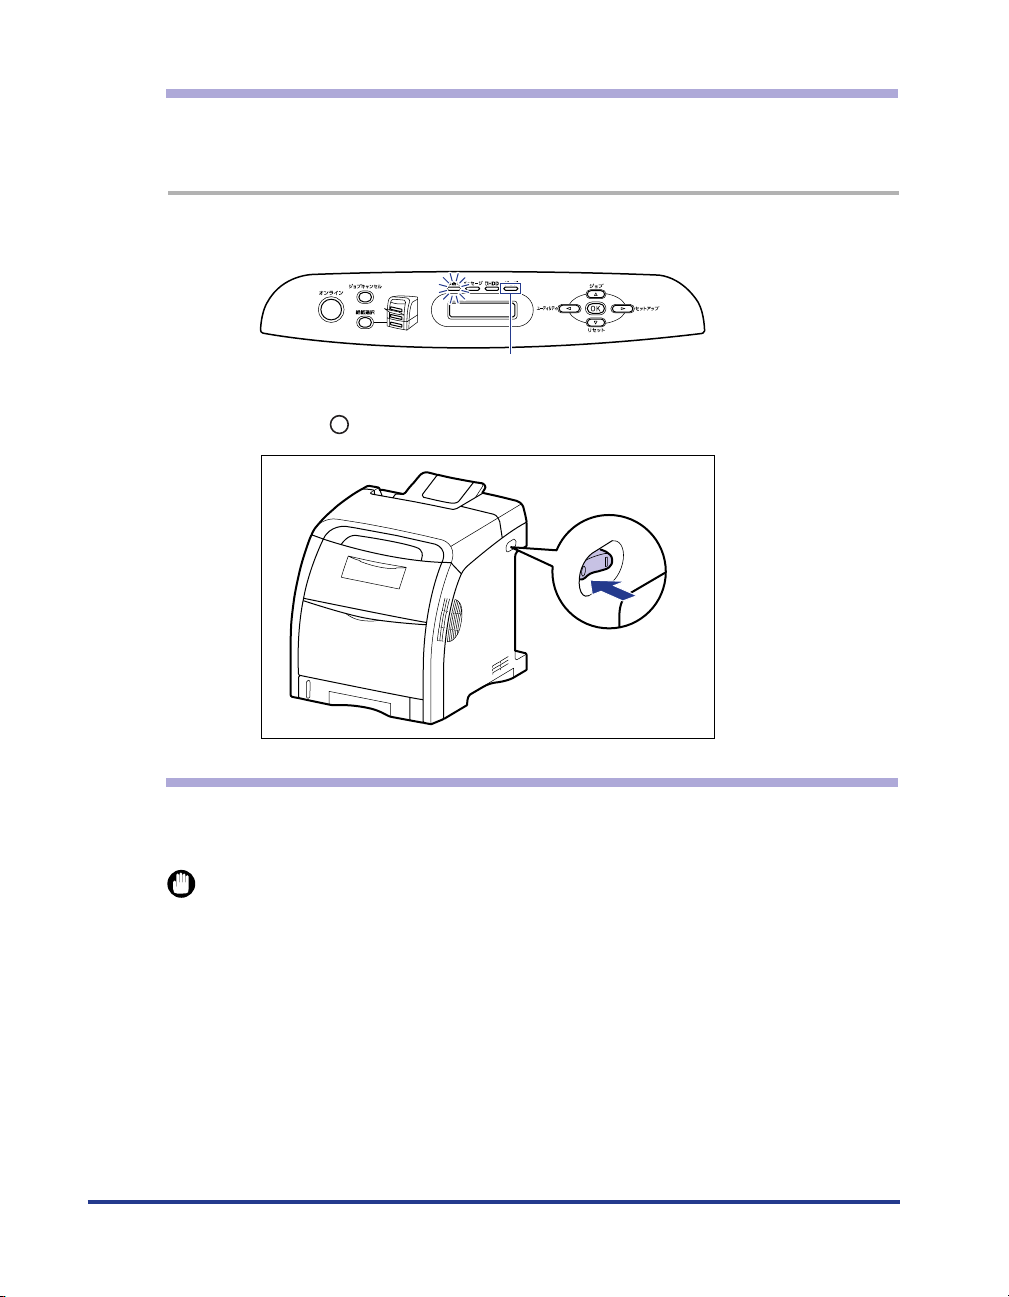
Make sure that the
1
2
Press " " of the power switch on the printer.
ジョブ
indicator is off.
Off
When Using a Hard Disk (Only When a Hard Disk Is Installed)
When using the optional hard disk, turn the printer OFF using the following
procedure.
IMPORTANT
•
If you perform a shutdown when any job of which you stopped the operation or of
secured print is in the hard disk, the message <
you perform a shutdown, all the jobs are deleted. However, the jobs stored in the boxes
are saved on the hard disk as it is. When you want to continue to print, press [
to place the printer online.
•
Once you perform a shutdown, you cannot cancel the operation in midstream. When you
want to turn the printer ON again, turn the printer OFF once following the instruction of
the message, and then turn the printer ON.
4
ジョブガ ノコッテイマス
> is displayed. If
オンライン
]
Page 6
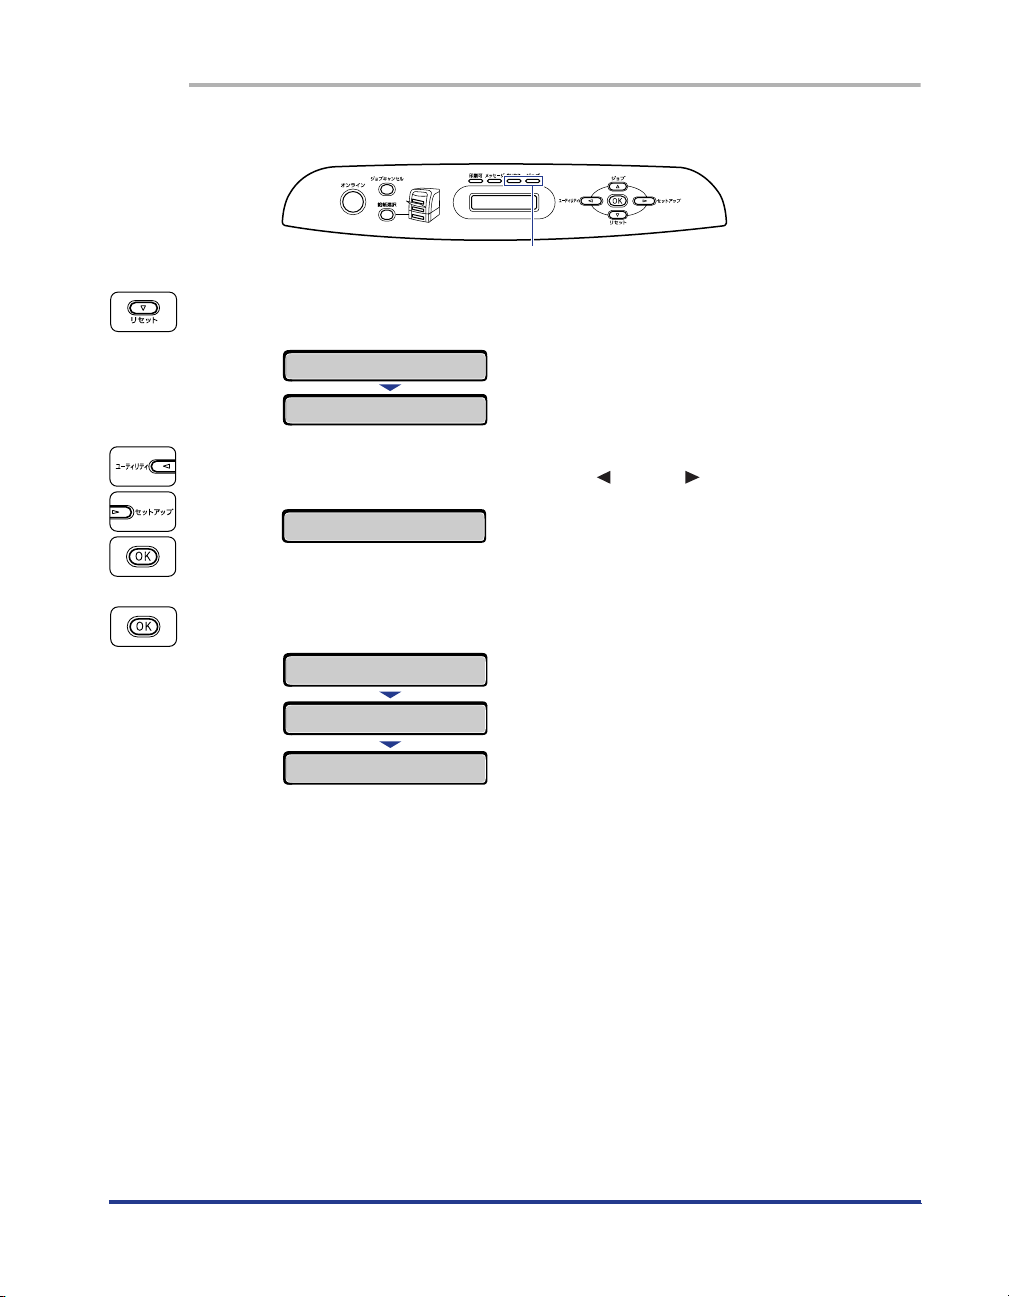
Make sure that the
1
Press [
2
3
Select <
リセット
リセット
ソフトリセット
シャットダウン
].
ジョブ
indicator and HDD indicator are off.
Off
→
> using [ ] and [ ], then press [OK].
シャットダウン
Confirm the message, then press [OK].
4
ジッコウシマスカ
ジッコウチュウ
デンゲンヲオキリクダサイ
When the printer is ready to be turned OFF after the process for it is performed,
the message <
→
?
デンゲンヲオキリクダサイ
> appears.
5
Page 7
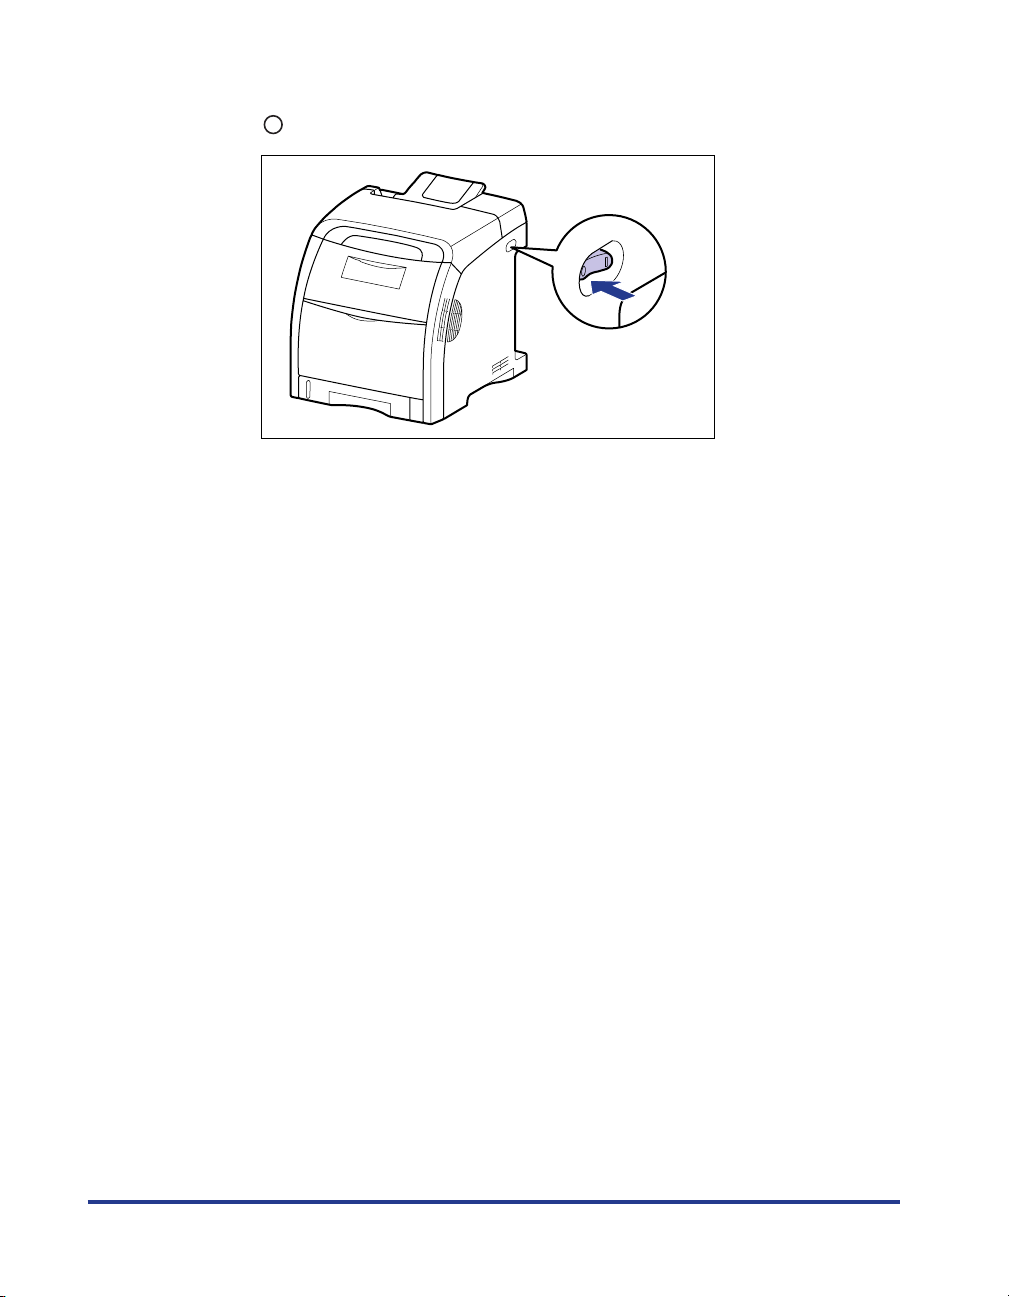
When the message <
5
"" of the power switch on the printer.
デンゲンヲオキリクダサイ
> appears, press
6
Page 8
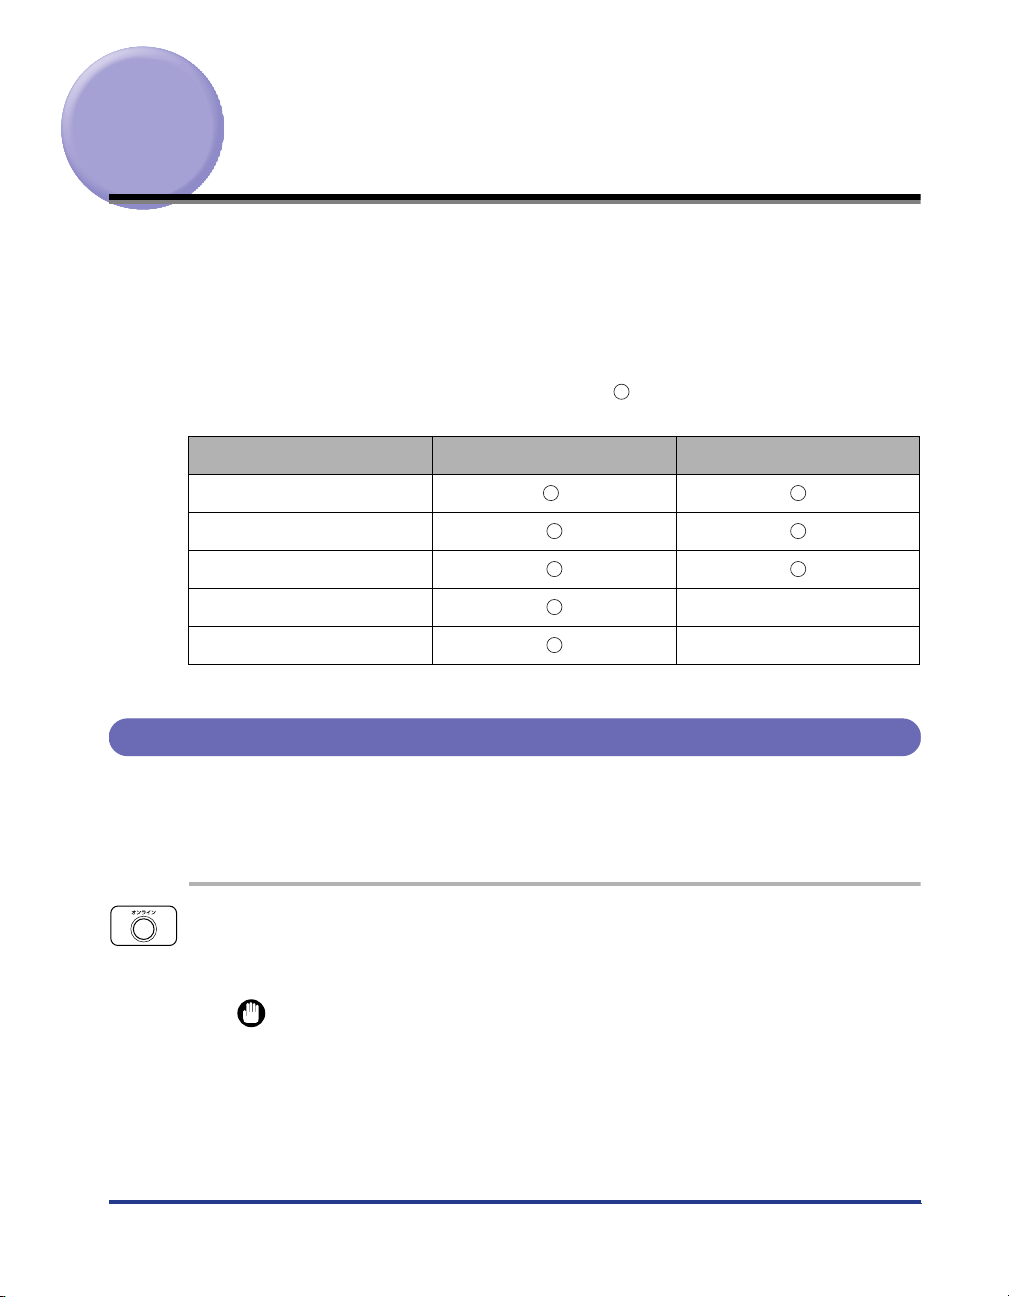
Online and Offline
When the printer can receive data from the computer and print the data, the printer
is in the state of "Online", and when the printer is disconnected with the computer
and cannot receive data, the printer is in the state of "Offline".
To perform the settings for each menu using the control panel, switch the printer
status as follows:
: The status that you can enter the menu
- : The status that you cannot enter the menu
When the printer is online
セットアップ
キュウシ センタク
リセット
ジョブ
ユーティリティ
*You cannot specify the settings in the
Menu *
Menu
Menu
Menu -
Menu -
options when the printer is in the online status.
ユーザメンテナンス
When the printer is offline
Placing the Printer Online
When printing from the computer, the printer has to be online. Before printing, make
sure that the printer is online. If not, place the printer online using the following
procedure. The printer comes online automatically after you turn it ON.
Press [
1
The
IMPORTANT
When an error is occurring in the printer (when the
number in the message blinks), the printer does not come online. Eliminate the
cause of the error before you place the printer online.
オンライン
オンライン
indicator comes on, and the printer is ready to print.
].
メッセージ
indicator is on, or the
7
Page 9
NOTE
If the printer has entered Power Save Mode, the
when the printer is online, and only the
data while it is in the sleep mode, the mode is released, the
comes on, and the printer is ready to print.
印刷可
オンライン
indicator is on. If the printer receives
indicator is off even
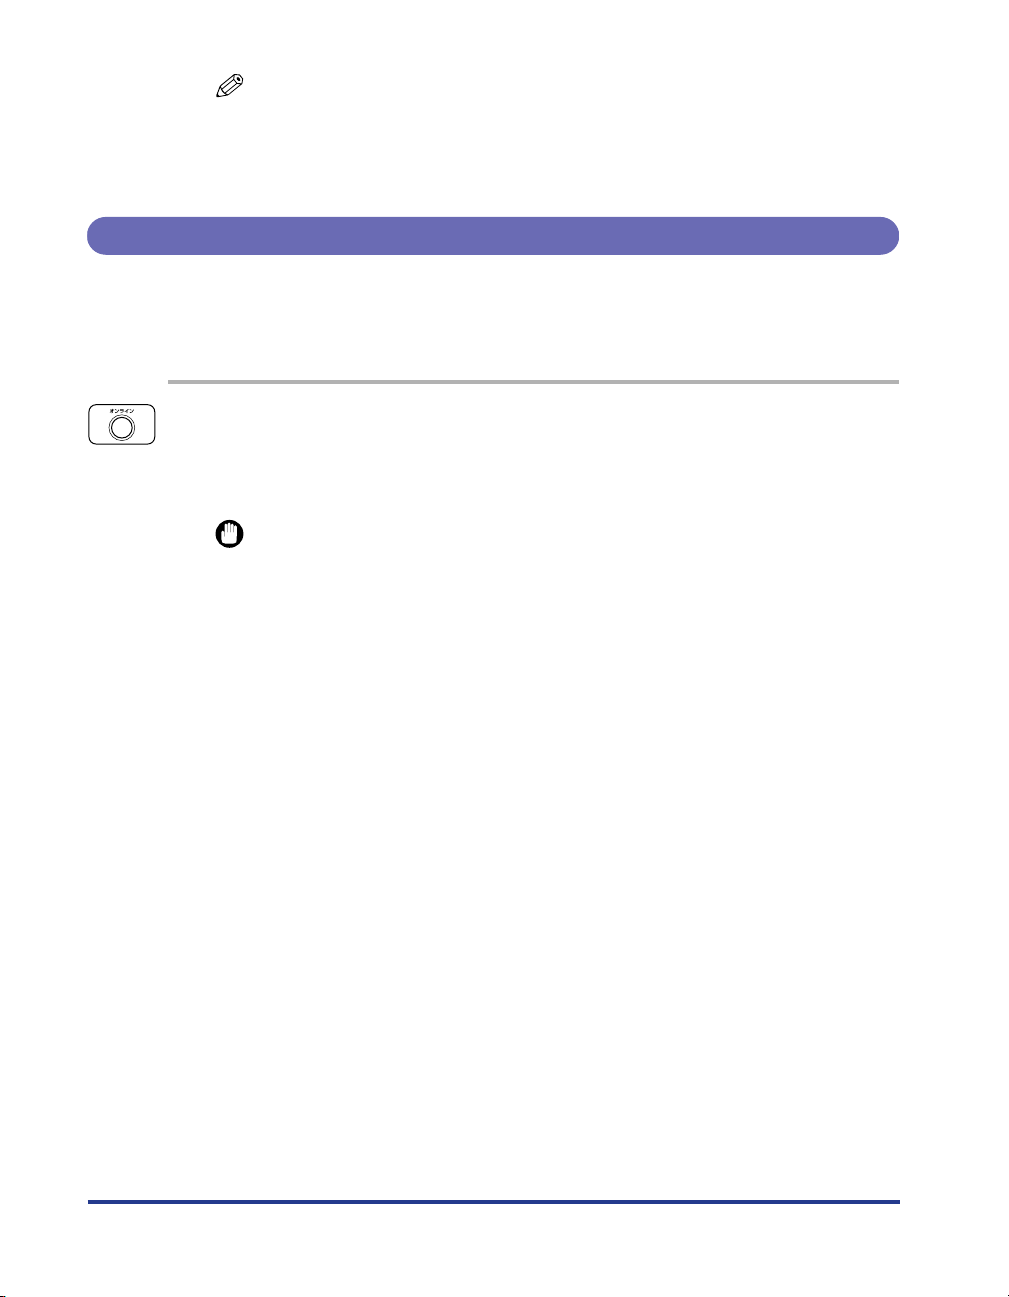
Placing the Printer Offline
To configure the printer so that it does not receive data from the computer or
specify the settings for all the options in the
offline using the following procedure.
Press [
1
The
panel.
IMPORTANT
This printer comes online automatically if left in the offline state for five minutes or
longer. However, when an error is occurring in the printer (when the
indicator is on, or the number in the message blinks), or while you are performing
any setting, such as selecting the menu functions or a paper source, or when
specifying the paper size, the printer does not come online.
オンライン
オンライン
indicator goes off, allowing you to specify the settings on the control
].
セットアップ
menu, place the printer
オンライン
indicator
メッセージ
8
Page 10
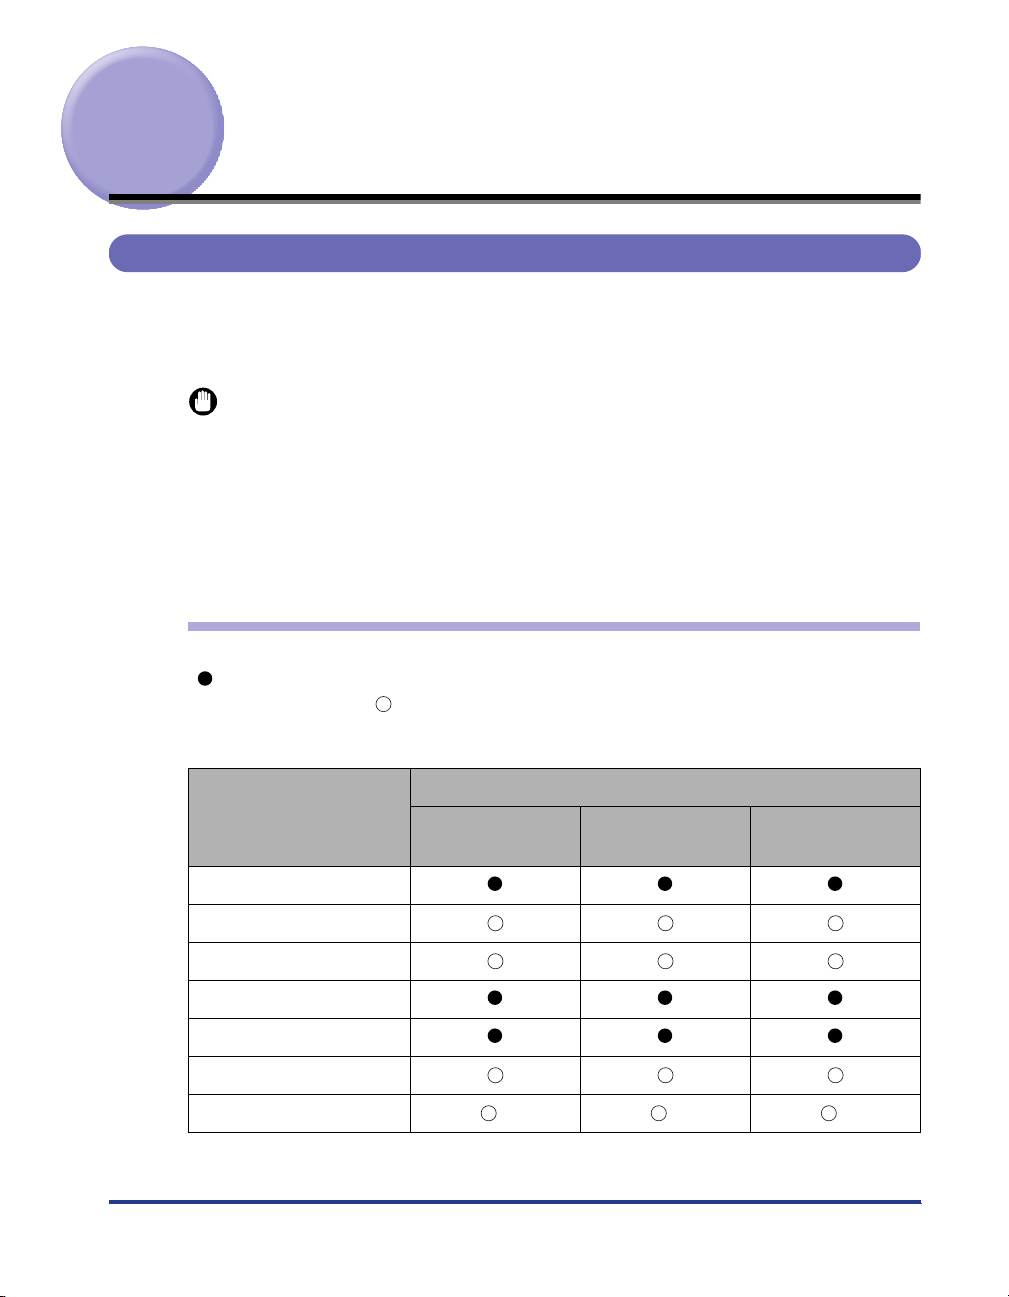
Paper Requirements
Usable Paper
To ensure optimum performance, use only paper that falls within the specifications
in the following lists. Using inappropriate paper may result in deterioration in print
quality or paper jams.
IMPORTANT
•
Print speed may drop depending on the settings for the paper size, paper type, and print
copies.
-Postcard/Reply postcard/4 on 1 postcard: Approx. 5.8 pages/min.
-Envelope: Approx. 3.2 pages/min.
•
When continuously printing the paper that is less than 210.0 mm wide, the safety function
that prevents damages caused by heat may slow the print speed down in stages. (The
print speed may be as slow as approximately 1.6 pages/min.)
Paper Size
The following shows the paper sizes that can be used with this printer. The symbol
"" indicates the paper that can be used for 1-sided printing and automatic 2-sided
printing, the symbol " " indicates the paper that can be used for only 1-sided
printing, and the symbol "-" indicates the paper that cannot be used.
Paper Size
Multi-purpose Tray Cassette 1
A4
B5
A5
Legal
Letter
Executive
Custom paper size *
Paper Source
Cassette 2
(Optional)
1
2
*
2
*
9
Page 11
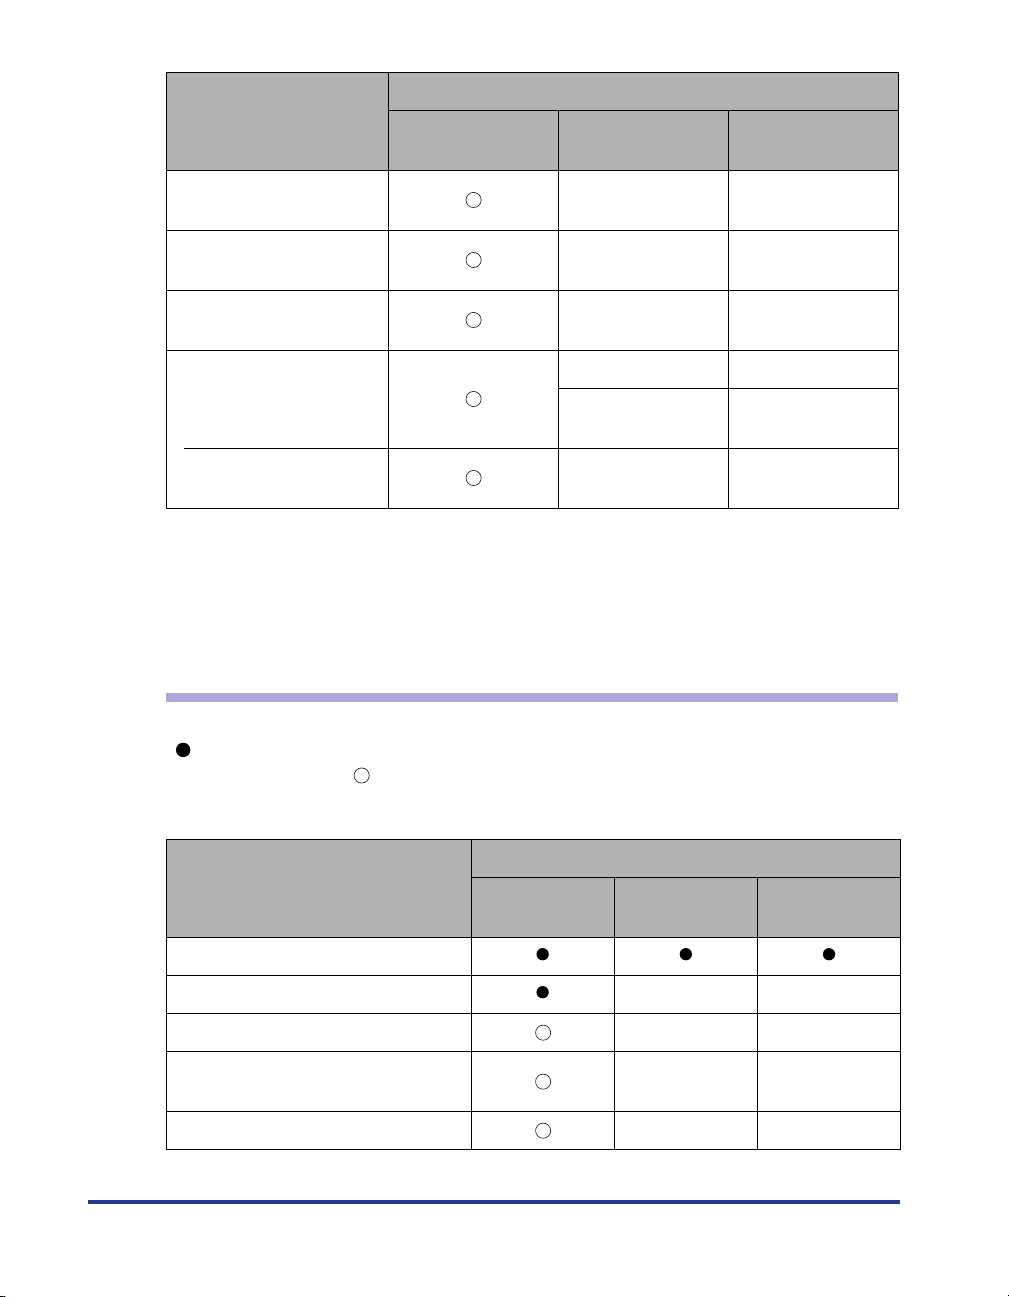
Paper Size
Paper Source
Multi-purpose Tray Cassette 1
Cassette 2
(Optional)
Postcard
100.0 mm x 148.0 mm
Reply postcard
148.0 mm x 200.0 mm
4 on 1 postcard
200.0 mm x 296.0 mm
--
--
--
Envelope - -
YOUGATA No. 4
105.0 mm x 235.0 mm
YOUGATA No. 2
114.0 mm x 162.0 mm
*1 You can load paper of the following custom paper sizes.
- When loading paper in portrait orientation: Width 76.2 to 215.9 mm; Length 127.0 to 355.6 mm
- When loading paper in landscape orientation (only when LIPS LX Printer Driver is used):
Width 127.0 to 215.9 mm; Length 127.0 to 215.9 mm
*2 You can load paper of the following custom paper sizes.
- When loading paper in portrait orientation: Width 148.0 to 215.9 mm; Length 210.0 to 355.6 mm
- When loading paper in landscape orientation (only when LIPS LX Printer Driver is used):
Width 210.0 to 215.9 mm; Length 210.0 to 215.9 mm
--
--
Paper Type
The following shows the paper types that can be used with this printer. The symbol
"" indicates the paper that can be used for 1-sided printing and automatic 2-sided
printing, the symbol " " indicates the paper that can be used for only 1-sided
printing, and the symbol "-" indicates the paper that cannot be used.
10
Paper Source
Paper Type
Plain paper (60 - 105 g/m
Heavy paper (106 - 120 g/m
Heavy paper (121 - 220 g/m
2
)
2
)--
2
)--
Tr ansparency (Black and white
printing only)
Multi-purpose
Tray
Cassette 1
Cassette 2
(Optional)
--
Label - -
Page 12
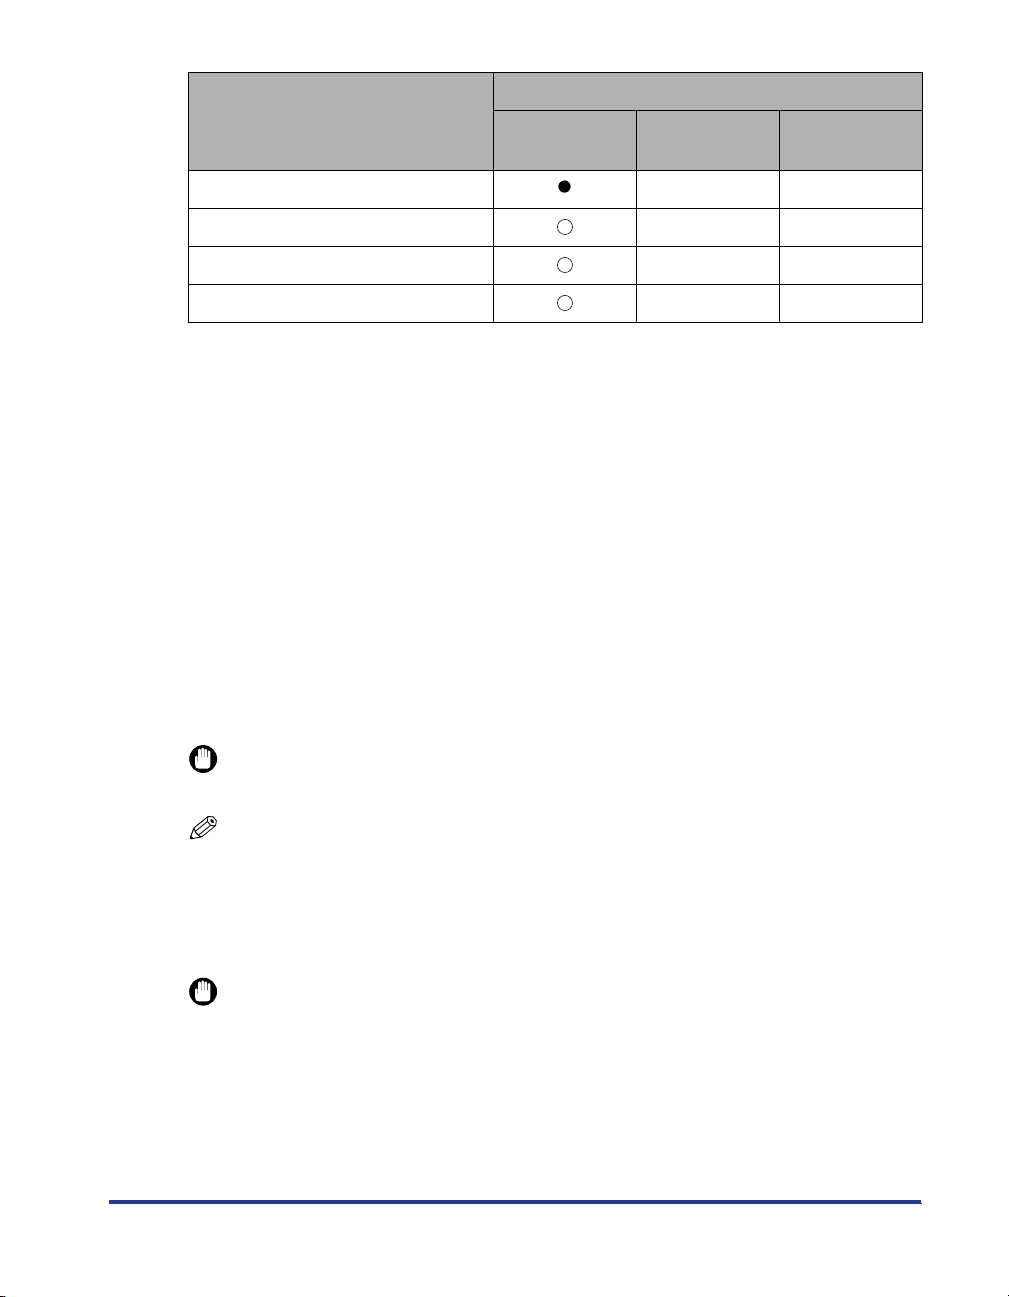
Paper Source
Paper Type
Multi-purpose
Tray
Cassette 1
Cassette 2
(Optional)
Coated paper (105 - 120 g/m2)--
Coated paper (121 - 160 g/m
2
)--
Postcard - -
Envelope - -
■ Plain Paper
This printer can print plain paper that is 76.2 to 215.9 mm wide, 127.0 to 355.6 mm long,
and that weighs between 60 and 105 g/m
A5, Legal, Letter, Executive, Postcard, Reply postcard, and 4 on 1 postcard.
Plain paper can be loaded in the paper cassettes and multi-purpose tray. Also, paper at a
size of A4, Legal, or Letter is available for automatic 2-sided printing.
2
, including the standard paper sizes: A4, B5,
■ Heavy Paper
This printer can print heavy paper that is 76.2 to 215.9 mm wide, 127.0 to 355.6 mm long,
and that weighs between 106 and 220 g/m
A5, Legal, Letter, Executive, Postcard, Reply postcard, and 4 on 1 postcard (However, it is
not recommended to print on heavy paper that weighs between 177 and 220 g/m
than Postcard, Reply postcard, and 4 on 1 postcard). Set the paper type to "Heavy Paper
3" if you have to perform the printing.).
Heavy paper can be loaded in the multi-purpose tray. Also, heavy paper at a size of A4,
Legal, or Letter that weighs between 106 and 120 g/m
printing.
2
, including the standard paper sizes: A4, B5,
2
(other
2
is available for automatic 2-sided
IMPORTANT
Printing speed drops when printing heavy paper.
NOTE
Paper at a size of Postcard, Reply postcard, or 4 on 1 postcard can be used as heavy
paper that weighs between 106 and 176 g/m
2
.
■ Transparency
This printer can print A4 and Letter size transparencies.
IMPORTANT
•
Tr ansparencies can only be printed in black and white.
•
Use "A4 size transparencies for LBP recommended by Canon". "A4 size transparencies
for LBP recommended by Canon" weighs 8.7 g per sheet.
•
Thoroughly fan the transparencies before loading them as they may stick to each other.
•
Printing speed drops when printing transparencies.
11
Page 13

■ Label
This printer can print labels.
IMPORTANT
•
Use "A4 size labels recommended by Canon". "A4 size labels recommended by Canon"
weighs 7.8 g per sheet.
•
Do not use the labels in the following conditions. Using inappropriate labels may result in
paper jams that are difficult to clear or may result in damage to the printer.
-Peeled labels or partly used labels
- Coated labels that are easily peeled off from the backing sheet
- Labels with uneven adhesive
•
Printing speed drops when printing labels.
■ Coated Paper
This printer can print coated paper. Coated paper is to be loaded in the multi-purpose tray.
Also, coated paper at a size of A4, Legal, or Letter that weighs between 105 and 120 g/m
is available for automatic 2-sided printing.
IMPORTANT
Use "A4 size coated paper recommended by Canon".
■ Postcard/Reply Postcard/4 on 1 Postcard
This printer can print postcards, reply postcards, 4 on 1 postcards, and 4 on 1 postcards
recommended by Canon. Load postcards, reply postcards, and 4 on 1 postcards in the
multi-purpose tray with the printing side facing down.
2
12
IMPORTANT
•
Printing inappropriate size postcards (other than Postcard, Reply postcard, 4 on 1
postcard, and 4 on 1 postcard recommended by Canon) may result in deterioration in
print quality or paper jams.
•
You cannot print reply postcards with folds.
•
If the postcards are curled, flatten the curls by warping them in the opposite direction
before loading them.
•
Postcards and reply postcards for ink jet printers cannot be printed.
•
Postcards cannot be loaded in landscape orientation. Be sure to load them in portrait
orientation with the printing side facing down.
Page 14
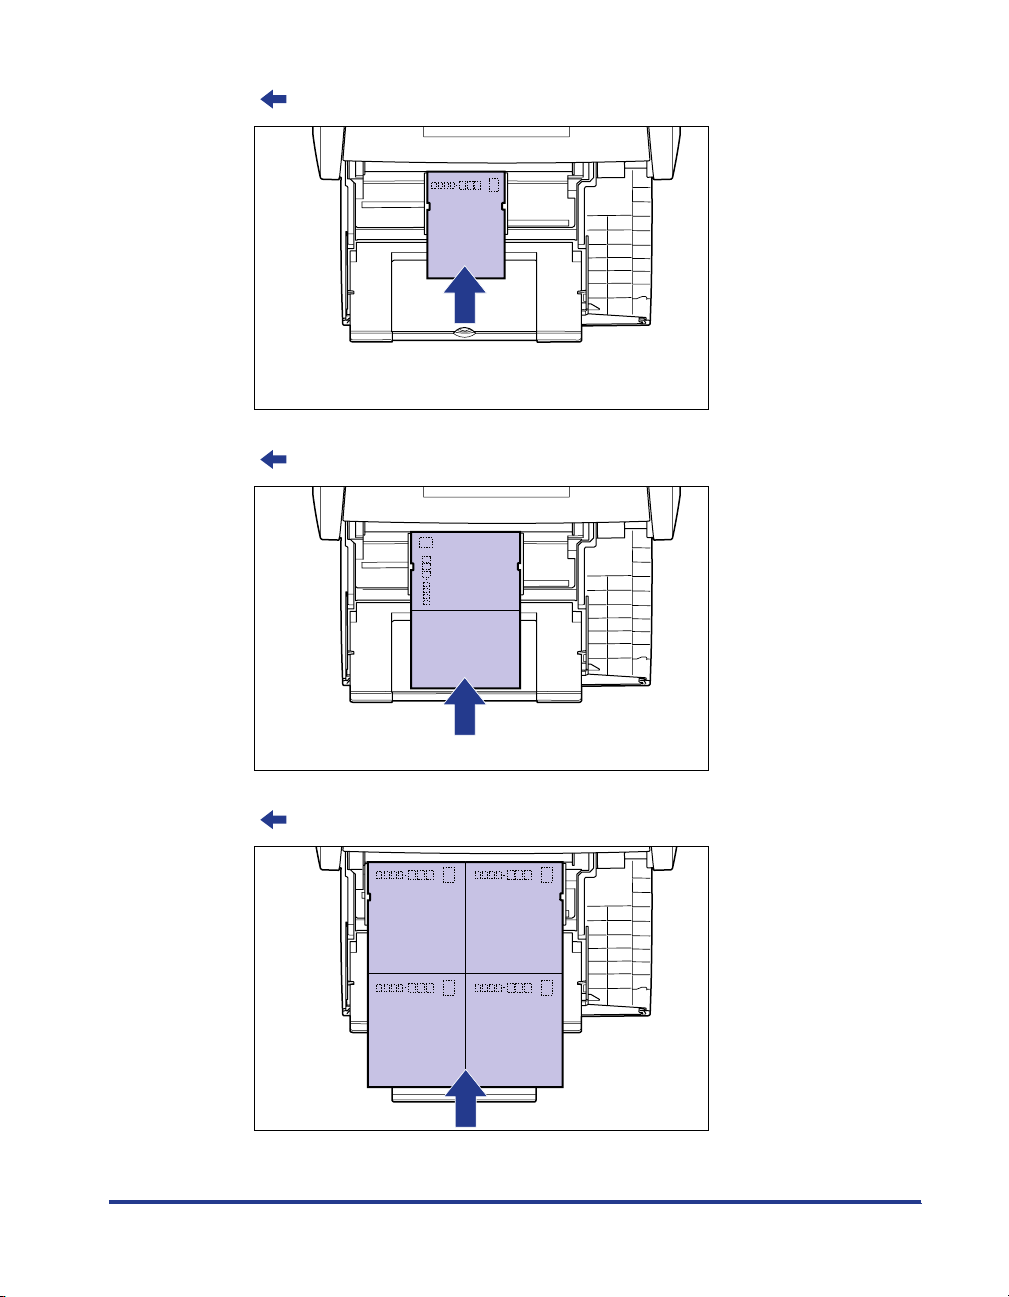
-Postcard
(: Feeding direction)
- Reply postcard
(: Feeding direction)
-4 on 1 postcard
(: Feeding direction)
•
Printing speed drops when printing postcards, replay postcards, or 4 on 1 postcards.
13
Page 15
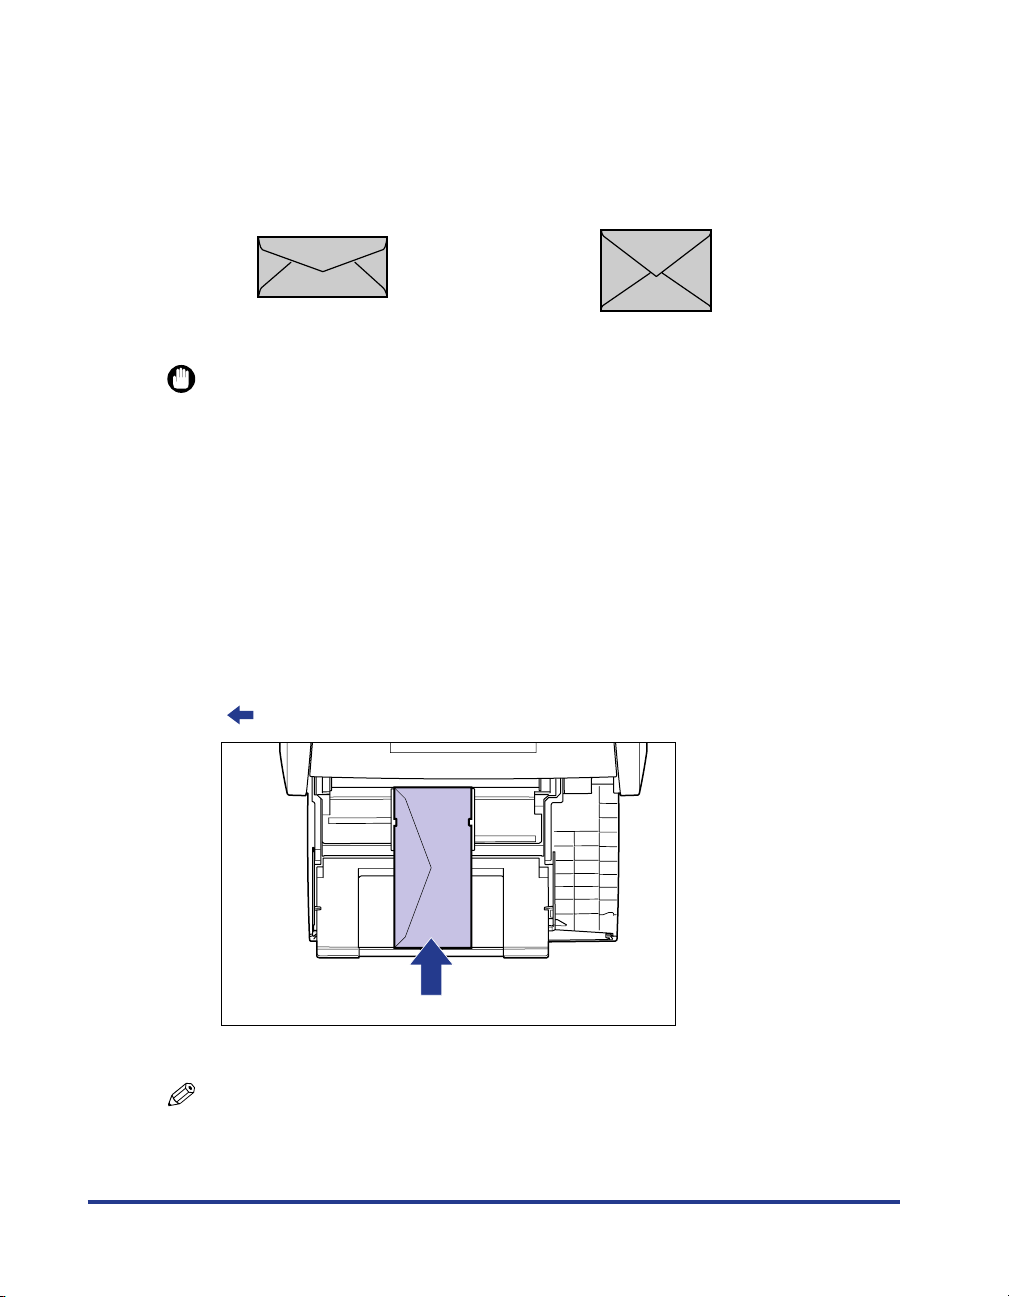
■ Envelope
The envelopes that can be used with this printer are YOUGATA No. 4 and YOUGATA No. 2
with the following structures only.
Load the envelopes with the address side (non-glued side) facing down in the
multi-purpose tray.
YOUGATA No. 4 (105 mm x 235 mm)
* You cannot use envelopes that have a flap on the short edge.
YOUGATA No. 2 (114 mm x 162 mm)
IMPORTANT
•
Do not use the following types of envelopes. Using inappropriate envelopes may result in
paper jams that are difficult to clear or may result in damage to the printer.
-Envelopes with fasteners or snaps
-Envelopes with address windows
-Envelopes with adhesive on the surface
-Wrinkled or creased envelopes
-Poorly manufactured envelopes in which the glued parts are uneven
- Irregularly-shaped envelopes
•
Before loading the envelopes, flatten the stack of envelopes to release any remaining air,
and press the fold lines along the edges tight.
•
Do not print on the reverse side (glued side) of envelopes.
•
When loading the envelopes, load them so that the flap is toward the left of the printer
when viewed from the front.
(: Feeding direction)
14
•
Printing speed drops when printing envelops.
NOTE
When printing envelopes, they may be creased.
Page 16
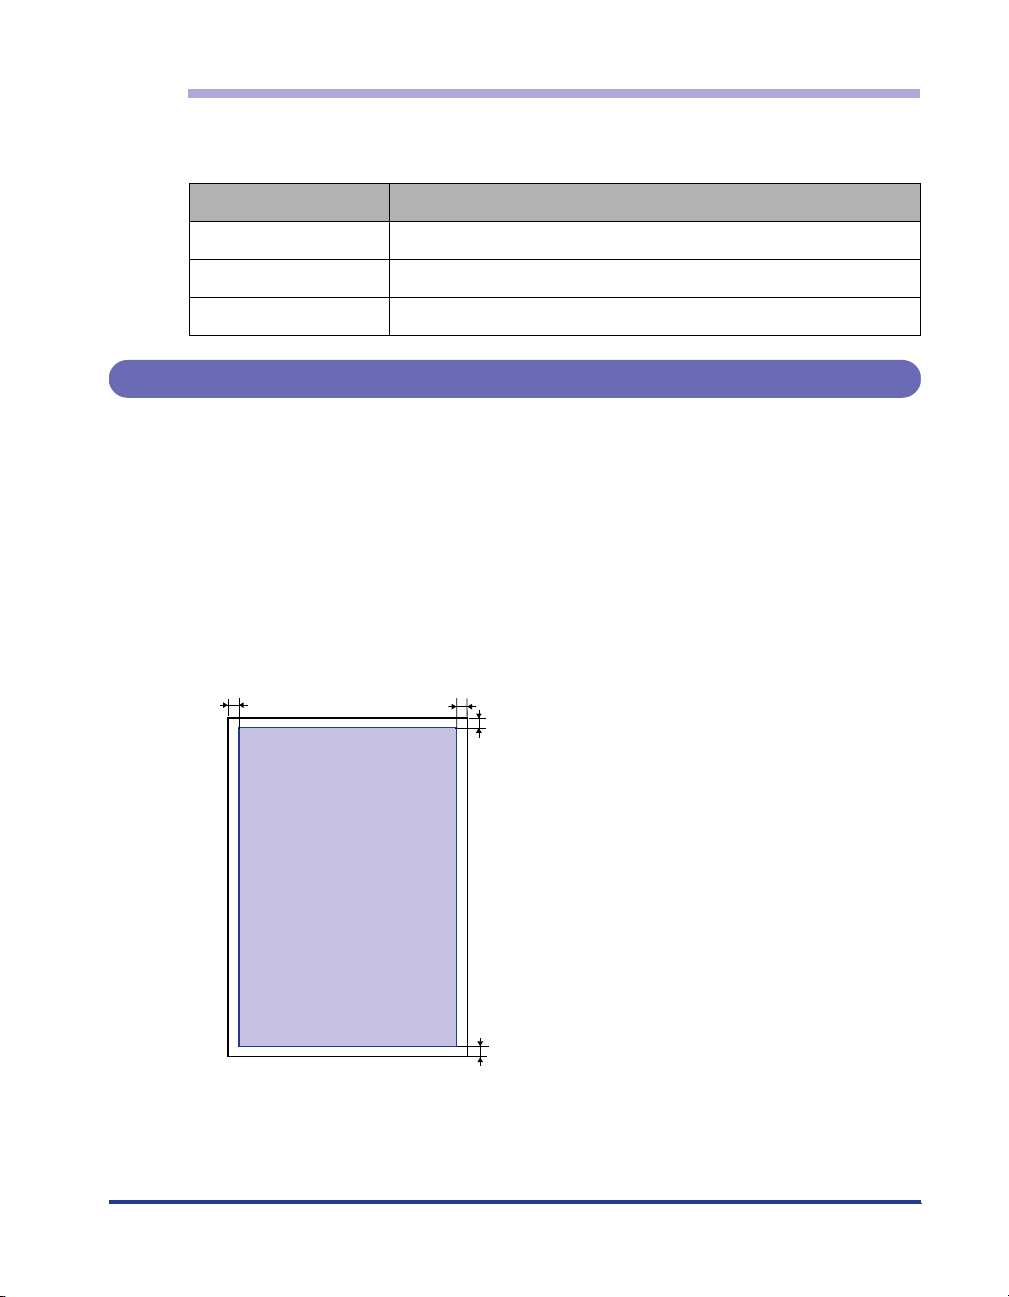
Abbreviations of Paper Sizes
The following shows the abbreviations of paper sizes that are marked on the paper
cassette.
Paper Size Paper Guides
Legal LGL
Letter LTR
Executive EXEC
Printable Area
The following shows the printable area of this printer. However, if you have selected
the [Print with Upper Left of Sheet as Starting Point] check box or [Expand Print
Region and Print] check box in the [Finishing Details] dialog box in the LIPS printer
driver, you can extend the printable area to near the edges of the paper. Depending
on the print data to be printed, however, the edge of paper may be missing partly
during printing or may blot during color printing. For more details, see Help of the
printer driver.
■ Plain Paper/Heavy Paper/Transparency/Label/Coated Paper
You cannot print on any area within 5 mm of the edges of paper.
5 mm5 mm
5 mm
5 mm
15
Page 17
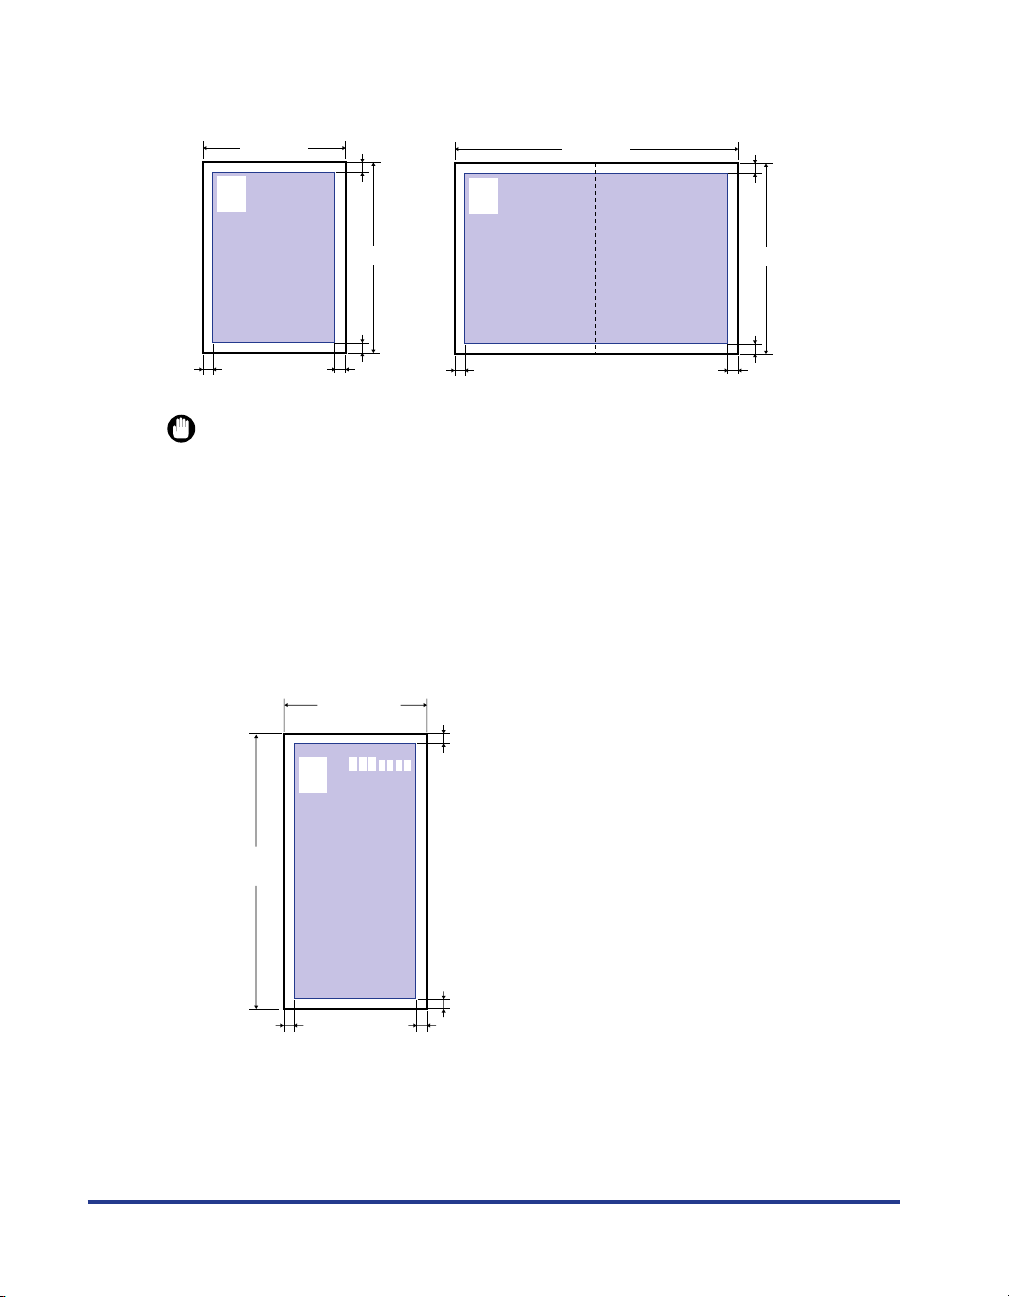
■ Postcard/Reply Postcard/4 on 1 Postcard
You cannot print on any area within 5 mm of the edges of a postcard.
100 mm
123-4567
東京都千代田区
○○○
5 mm5 mm
5 mm
148 mm
5 mm
東京都千代田区
○○○
123-4567
200 mm
5 mm
148 mm
5 mm
5 mm5 mm
IMPORTANT
You may not obtain the optimum print quality when printing postcard data with no margin.
It is recommended that you specify the size of the data a little smaller than the printable
area for the postcard size.
■ Envelope
You cannot print on any area within 10 mm of the edges of an envelope.
You may have to change the printable area before printing, depending on the application
you use.
(Sample: Envelope YOUGATA No. 4)
105 mm
16
10 mm
235 mm
10 mm
10 mm10 mm
Page 18

IMPORTANT
When you print envelopes, a part of the printed zip code may be missing. In this case,
you can print the envelopes without any part of the zip code missing by selecting the
[Print with Upper Left of Sheet as Starting Point] check box or [Expand Print Region and
Print] check box. Depending on the print data to be printed, however, the edge of paper
may blot during color printing.
Unusable Paper
To avoid problems such as paper jams and other malfunctions, the following types
of paper should never be used:
IMPORTANT
•
Paper that jams easily
-Paper that is too thick or too thin
- Irregularly-shaped paper
-Wet or moist paper
-Torn or damaged paper
- Rough, extremely smooth, or glossy paper
-Paper with binding holes or perforations
- Curled or creased paper
- Specially coated paper (coated paper for ink jet printers, etc.)
- Labels with backing sheet that is easily peeled off
-Paper that has already been printed by a copy machine or another laser printer (The
reverse side of the paper is also unusable. Using the multi-purpose tray, however, you
can perform 2-sided printing manually on the other side of previously printed paper. You
cannot print on the printed side again.)
-Paper with jagged edges
-Wrinkled paper
-Paper with the corners folded
•
Paper that changes its quality at a high temperature
-Paper that contains ink that melts, burns, evaporates or emits harmful gases at a
temperature lower than the heating temperature (approx. 275 °C) of the fixing unit
- Heat-sensitive paper
-Treated color paper
- Specially coated paper (coated paper for ink jet printers, etc.)
-Paper with adhesive on the surface
•
Paper that causes printer malfunctions or damages the printer
- Carbon paper
-Paper with staples, clips, ribbons or tapes
-Paper that has already been printed by a copy machine or another laser printer (The
reverse side of the paper is also unusable. Using the multi-purpose tray, however, you
can perform 2-sided printing manually on the other side of previously printed paper. You
cannot print on the printed side again.)
•
Paper that is difficult for the toner to fix onto
17
Page 19
-Paper with rough surfaces
- Specially coated paper (coated paper for ink jet printers, etc.)
-Paper containing thick fibers
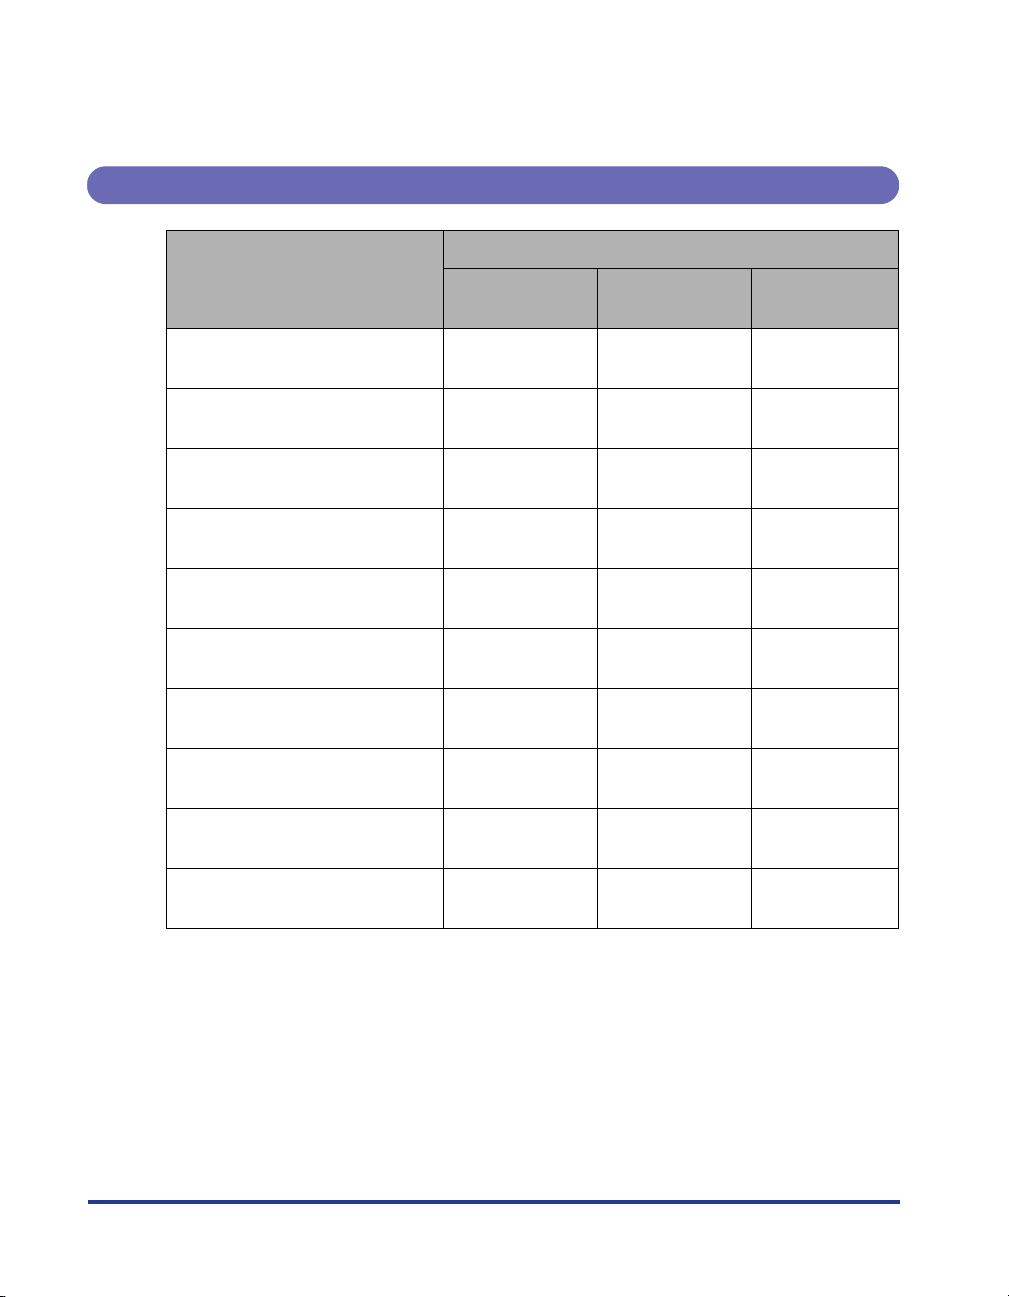
Paper Capacity of Paper Source
Paper Type
Multi-purpose
Tray
Paper Source
Cassette 1
Cassette 2
(Optional)
Plain paper (Ex. 64 g/m
Heavy paper (Ex. 128 g/m
2
)
2
)
Tr ansparency (Black and white
printing only)
Label
Coated paper
Postcard
Reply postcard
4 on 1 postcard
4 on 1 postcard recommended
by Canon
Envelope
Approx. 100
sheets
Approx. 50
sheets
Approx. 50
sheets
Approx. 40
sheets
Approx. 50
sheets
Approx. 50
sheets
Approx. 50
sheets
Approx. 50
sheets
Approx. 50
sheets
Approx. 10
sheets
Approx. 250
sheets
Approx. 500
sheets
--
--
--
--
--
--
--
--
--
18
Page 20
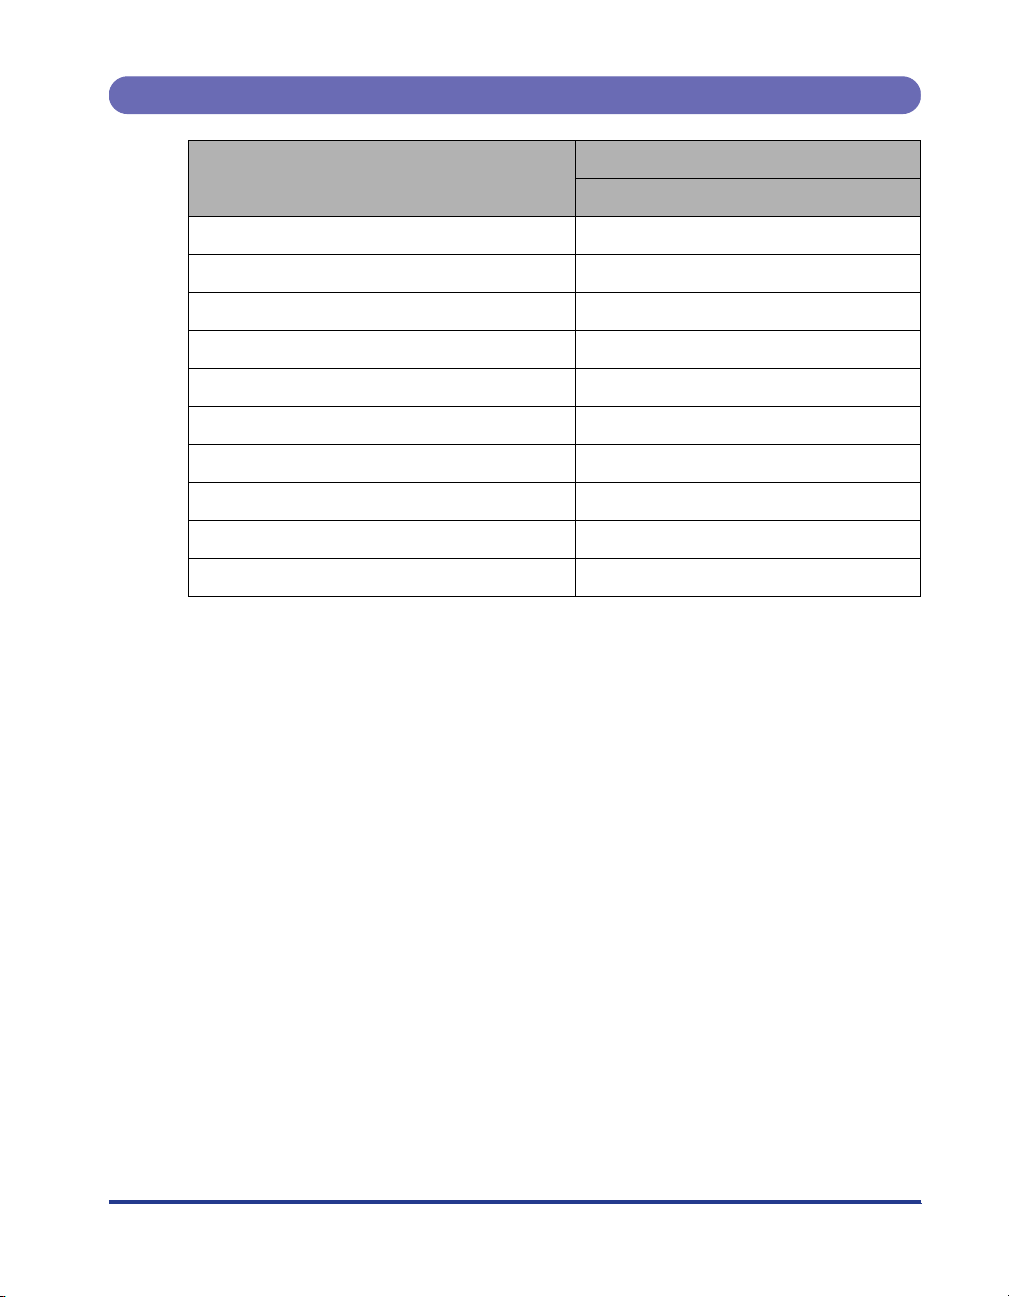
Paper Capacity of the Output Tray
Paper Type
Output Tray*
Output Tray (Face-down)
Plain paper (Ex. 64 g/m
Heavy paper (Ex. 128 g/m
2
) Approx. 200 sheets
2
) Approx. 40 sheets
Tr ansparency (Black and white printing only) Approx. 50 sheets
Label Approx. 40 sheets
Coated paper Approx. 50 sheets
Postcard Approx. 40 sheets
Reply postcard Approx. 40 sheets
4 on 1 postcard Approx. 40 sheets
4 on 1 postcard recommended by Canon Approx. 40 sheets
Envelope Approx. 10 sheets
* Actual paper capacity varies depending on the installation environment or paper type.
19
Page 21
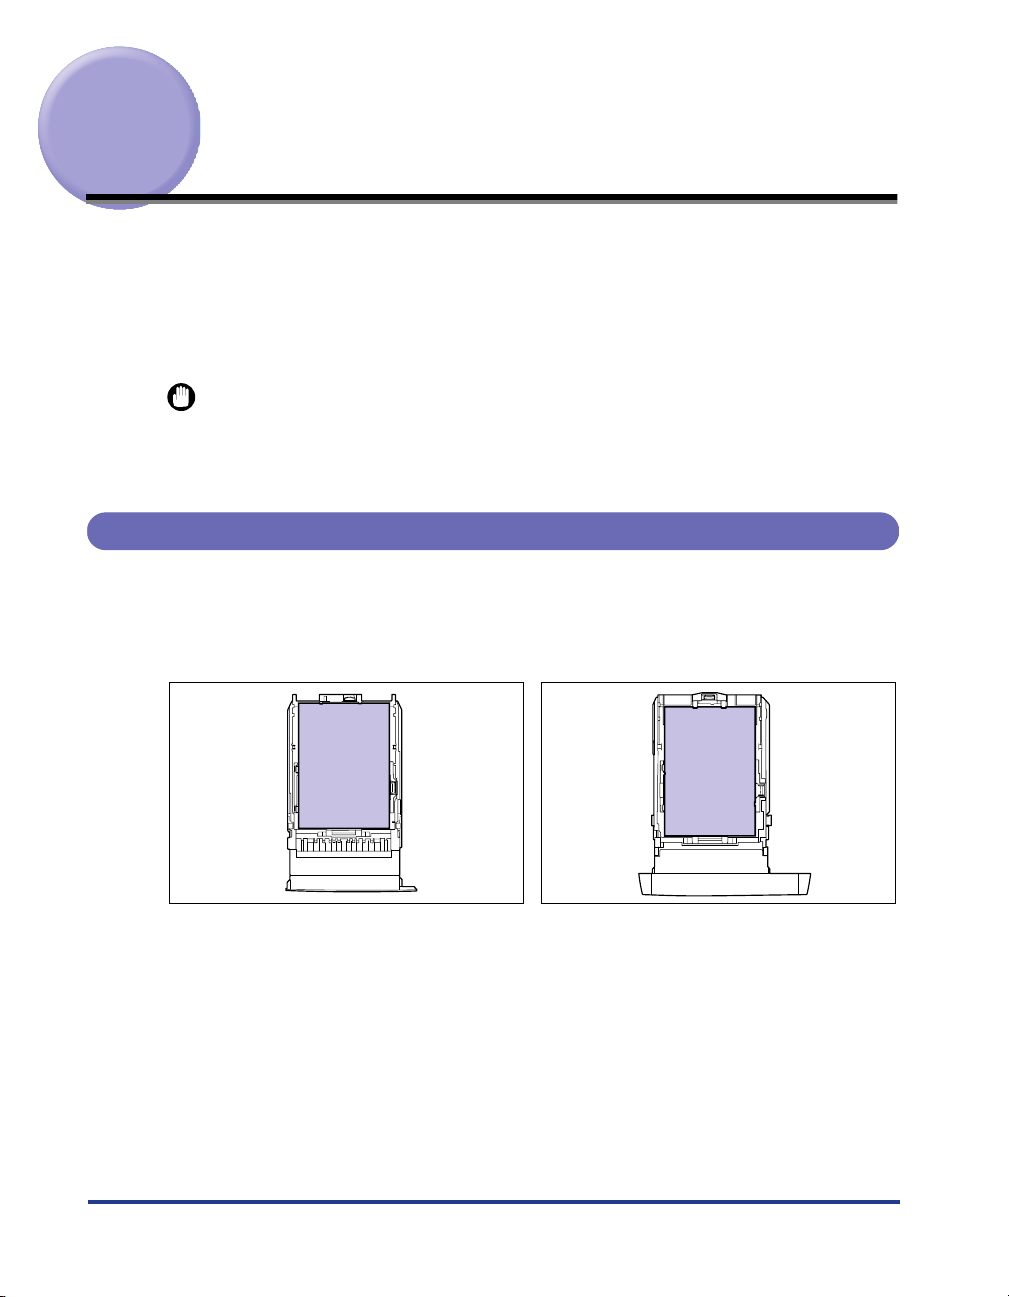
Loading Paper in the Paper Cassette
Load paper in the paper cassette. The paper loading methods are different between
standard size paper and custom size paper. Therefore, load paper properly using
the following procedures.
• When Loading Standard Size Paper (See p. 20)
• When Loading Custom Size Paper (Non-Standard Size Paper) (See p. 25)
IMPORTANT
•
For more details on the usable paper, see "Usable Paper," on p. 9.
•
Do not load any media other than plain paper (60 - 105 g/m2) in the paper cassette. This
may result in paper jams or damage to the printer.
When Loading Standard Size Paper
Perform the following procedure to load standard size paper.
Be sure to load paper in portrait orientation when loading it in the paper cassette.
Cassette 1 Cassette 2
20
Page 22
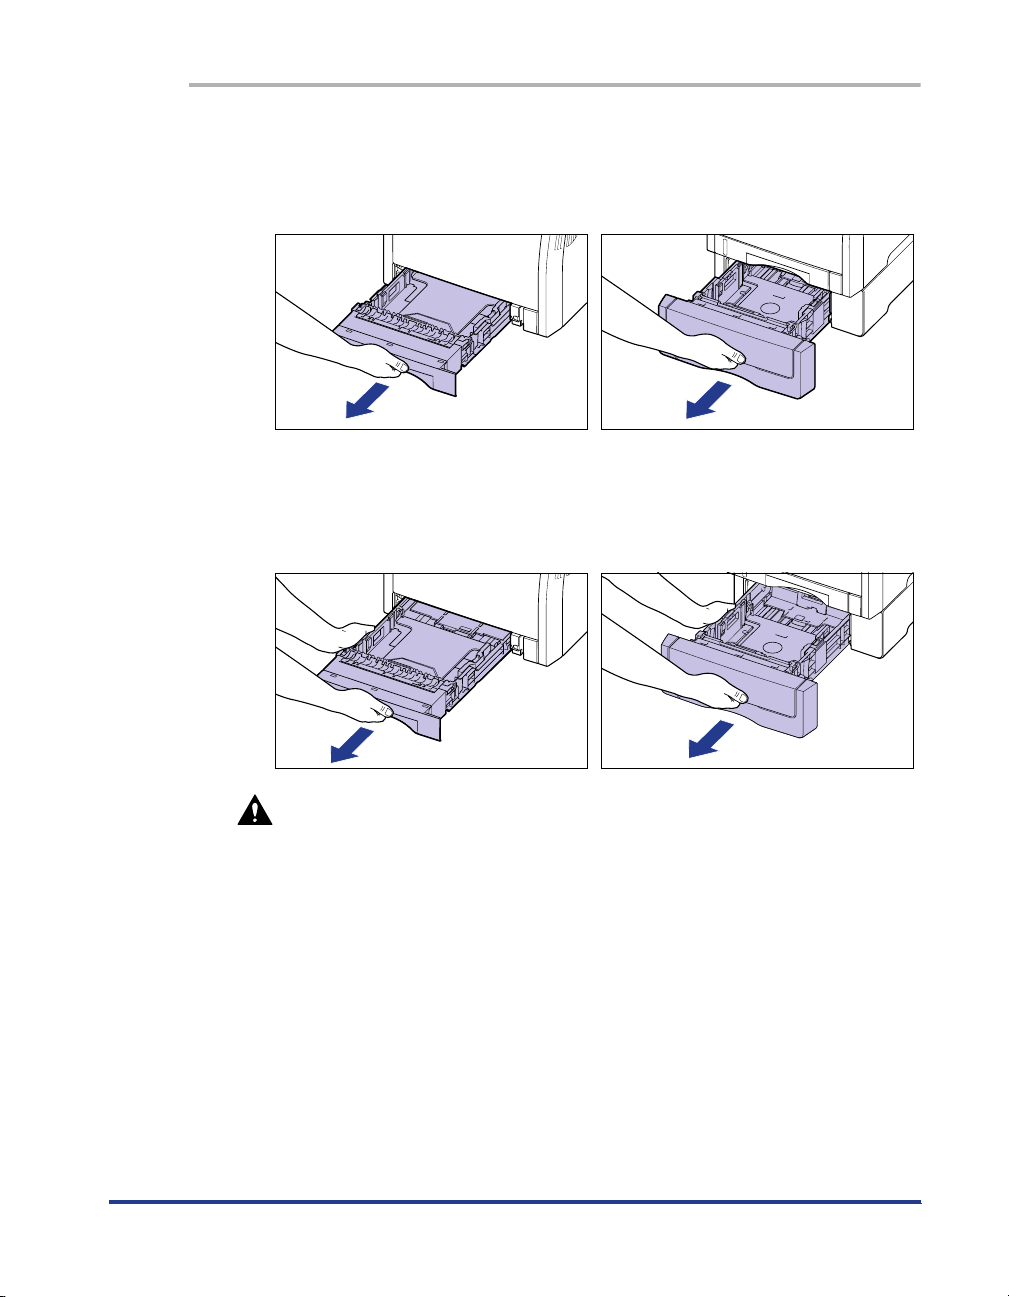
1
Pull out the paper cassette.
Cassette 1
Pull out the paper cassette gently a.
a
While holding the paper cassette with
both hands, remove it from the printer
unit as shown in the figure b.
b
Cassette 2
Pull out the paper cassette gently a.
a
While holding the paper cassette with
both hands, remove it from the paper
feeder as shown in the figure b.
b
CAUTION
Be sure to take the paper cassette out of the printer before loading paper.
If paper is loaded while the paper cassette is partially pulled out, the paper
cassette may drop or the printer may become damaged resulting in
personal injury.
2
When changing the size of the paper to be loaded, adjust the
length of the paper cassette and change the positions of the
paper guides.
● While holding the lock release lever of the side paper guides, slide
the guides to the size mark for the paper to be loaded.
The side paper guides move together. Align the position of (A) with the size mark
for the paper to be loaded.
21
Page 23
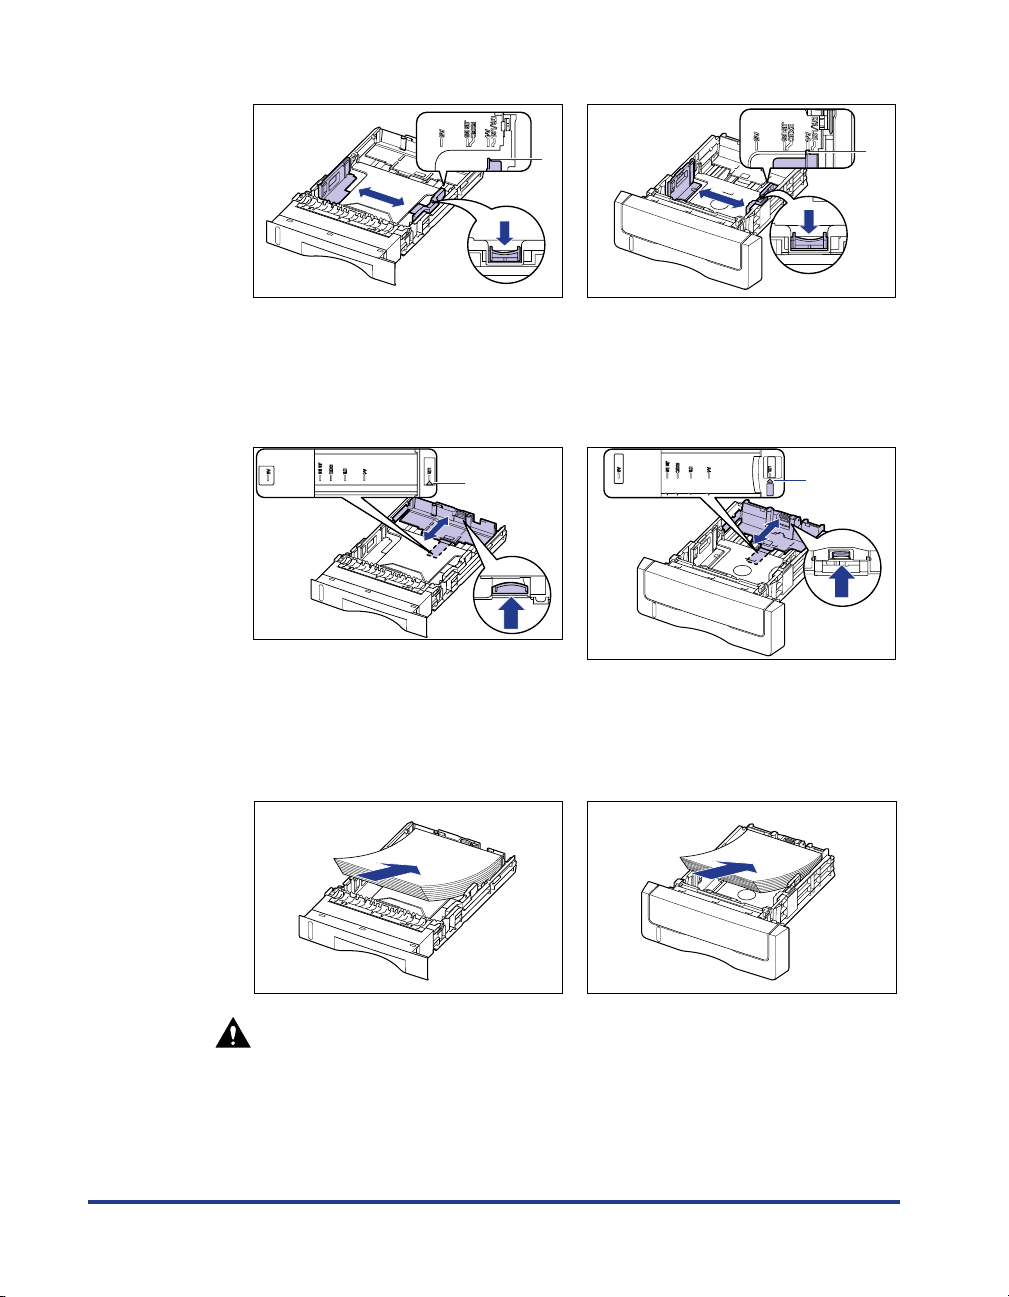
Cassette 1 Cassette 2
(A)
● While holding the lock release lever of the rear paper guide, slide the
guide to the size mark for the paper to be loaded.
Align the position of (A) with the size mark for the paper to be loaded.
Cassette 1 Cassette 2
(A)
3
Load the paper stack so that the rear edge is aligned with the
(A)
paper guide.
(A)
22
Cassette 1 Cassette 2
CAUTION
When loading paper, take care not to cut your hands with the edges of the
paper.
Page 24
IMPORTANT
•
Be sure to check if the paper guide is at the position of the size of the loaded paper.
If the paper guide is set at a wrong position, this may result in misfeeds.
•
If you use paper that has been poorly cut, multiple sheets of paper may be fed at
once. In this case, fan the paper thoroughly, and then align the edges of the stack
on a hard, flat surface.
NOTE
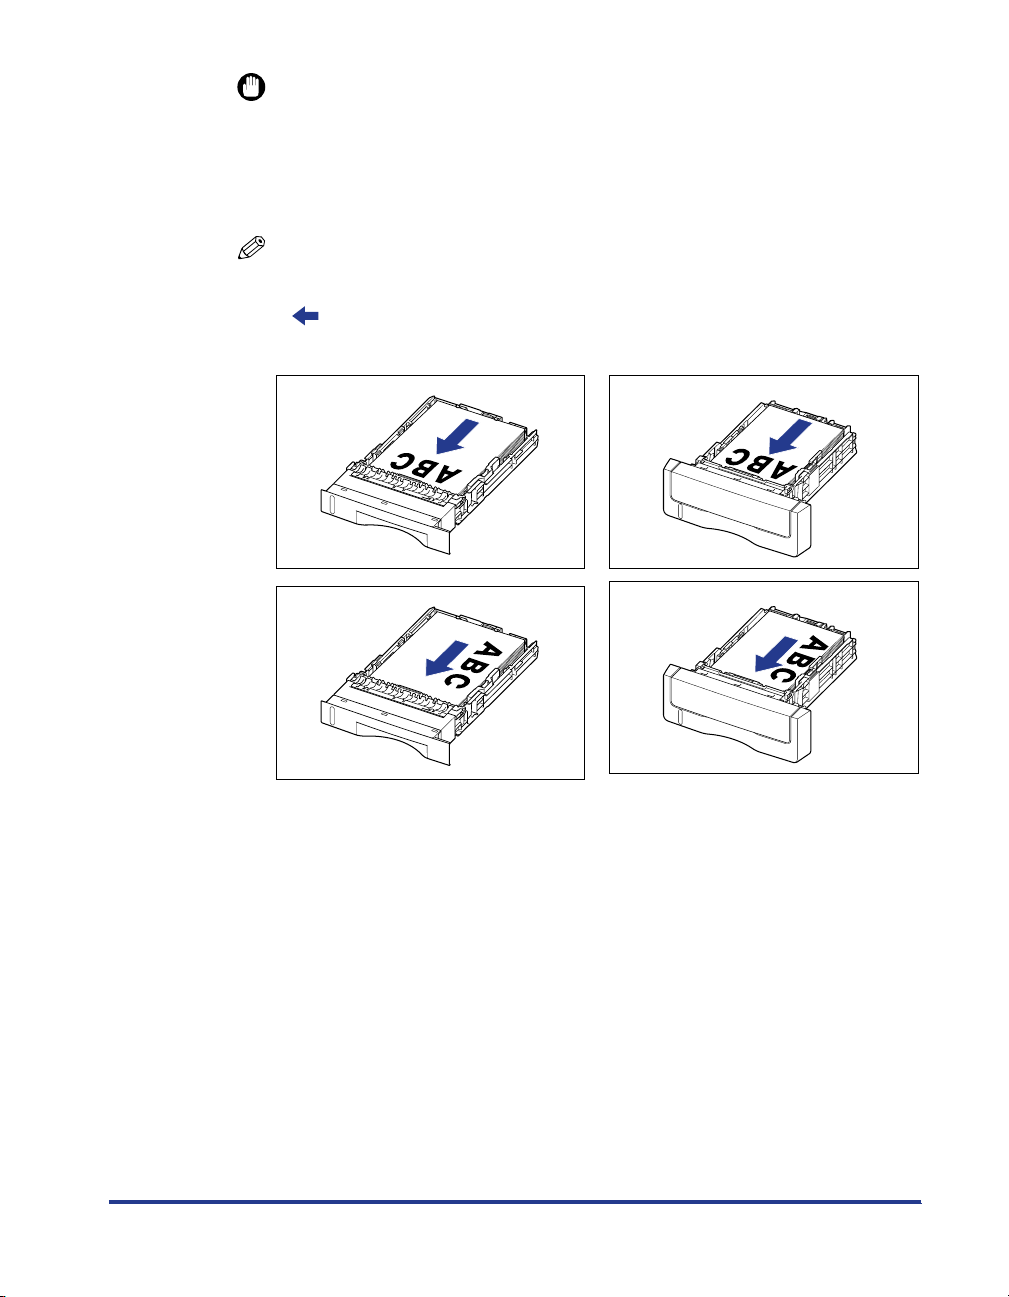
To print letterhead paper or paper printed with a logo, load the paper so that the
printing side is facing up, as shown in the following figure.
(: Feeding direction)
Cassette 1 Cassette 2
4
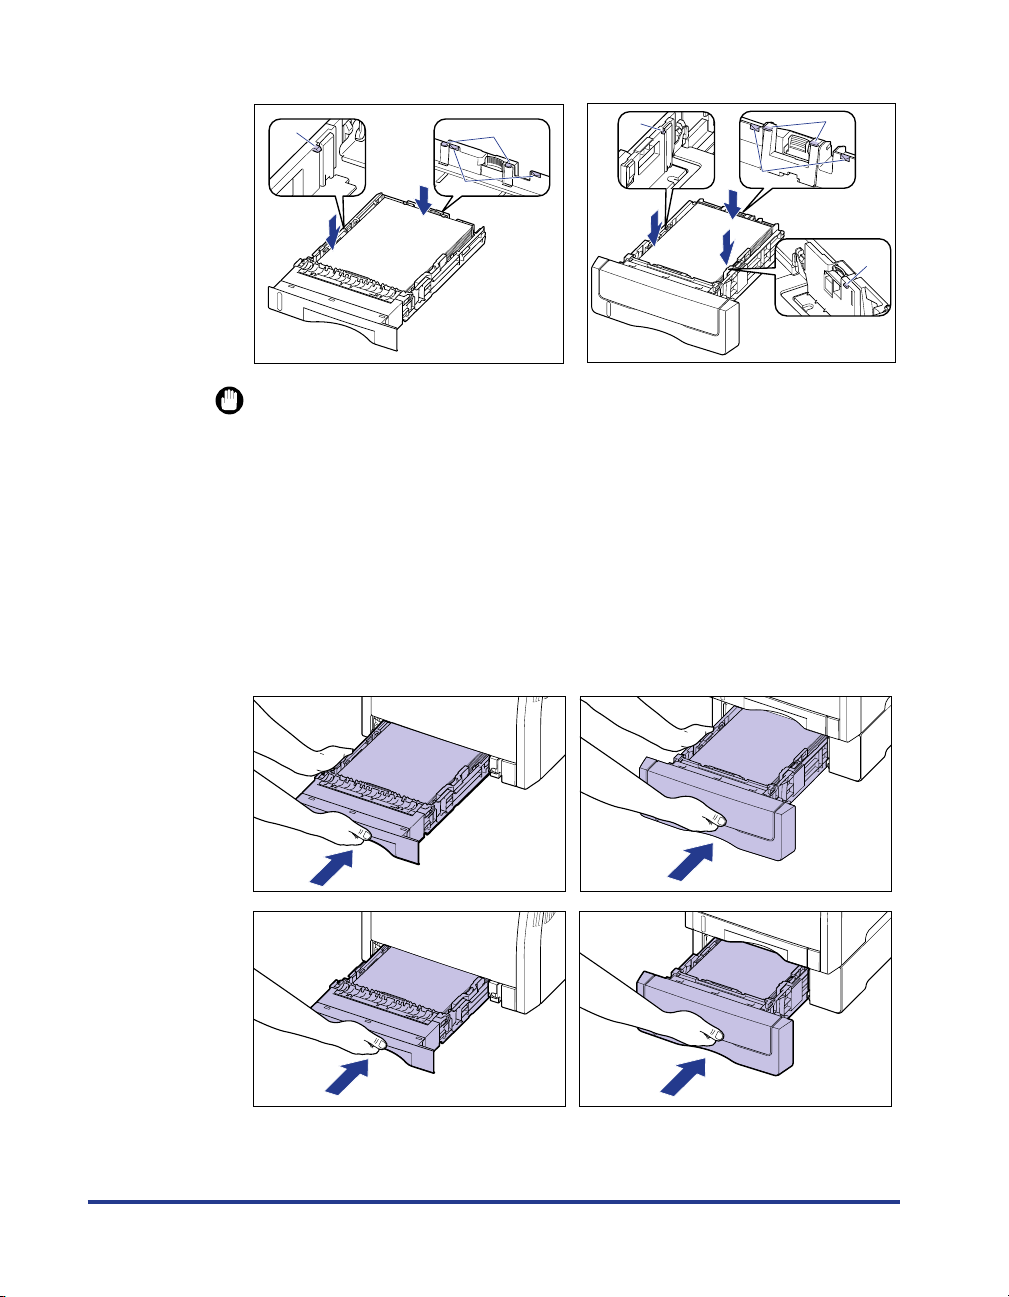
Hold down the paper as shown in the figure, make sure that
the paper stack does not exceed the load limit marks (A), and
then set it under the hooks (B) on the paper guides.
Make sure that there is sufficient space between the hooks of the paper guides
and the paper stack. If there is no sufficient space, slightly reduce the amount of
paper.
23
Page 25
Cassette 1 Cassette 2
(B)
(A)
(B)
(B)
(A)
(B)
(B)
IMPORTANT
The paper capacity of Cassette 1 is approximately 250 sheets of plain paper (64 g/
2
m
), and that of Cassette 2 is approximately 500 sheets of plain paper (64 g/m2).
Be sure that the paper stack does not exceed the load limit marks on the paper
guides. If the paper stack exceeds the load limit marks, this may result in misfeeds.
5
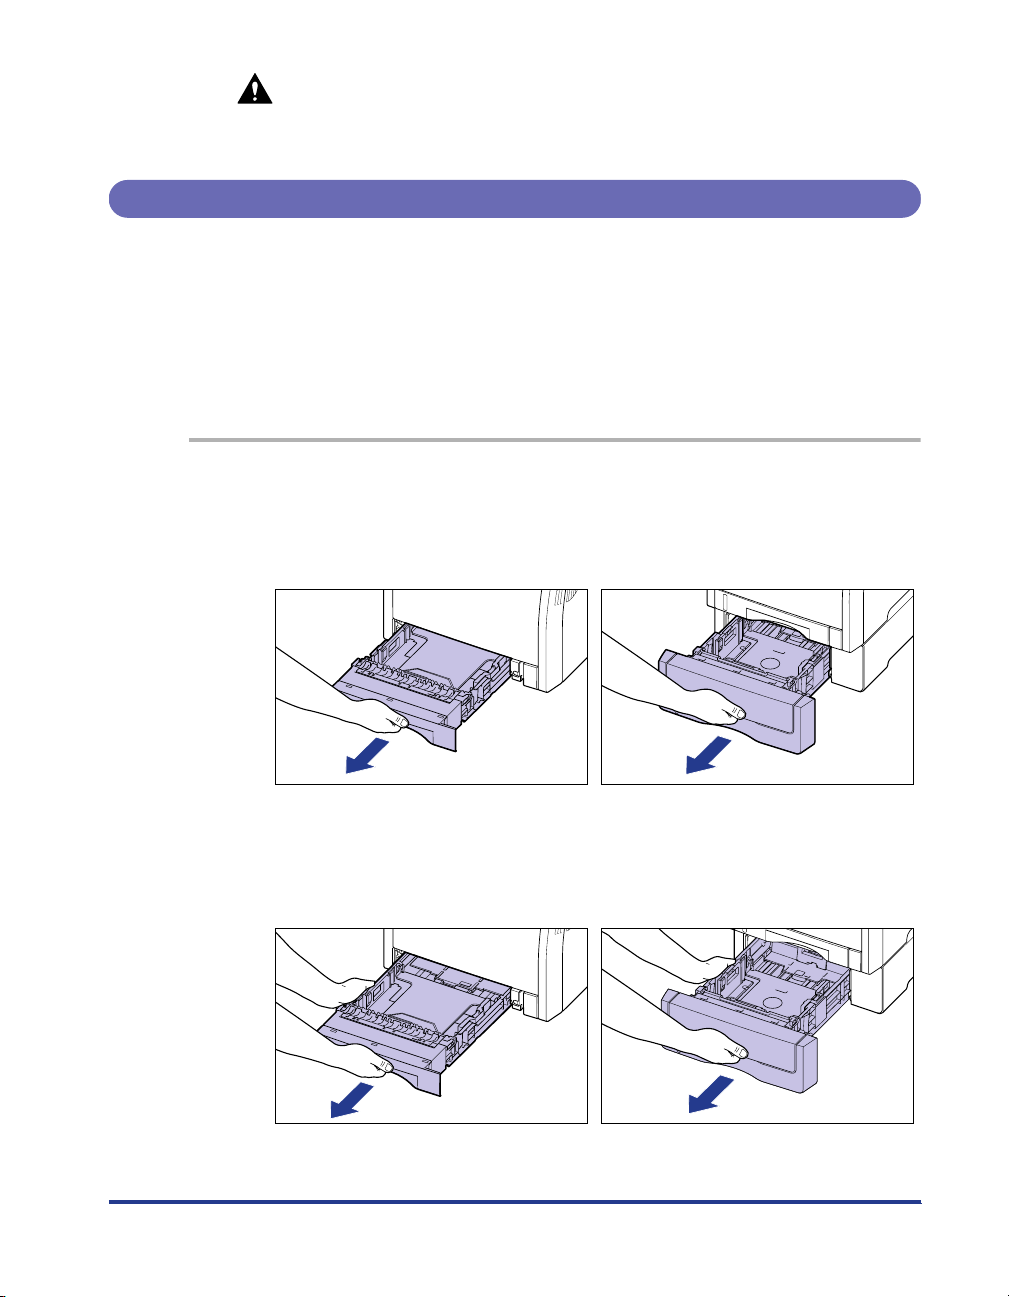
Set the paper cassette in the printer.
Push the paper cassette into the printer firmly until the front side of the paper
cassette is flush with the front surface of the printer.
Cassette 1 Cassette 2
24
Page 26
CAUTION
When setting the paper cassette in the printer, be careful not to catch your
fingers.
When Loading Custom Size Paper (Non-Standard Size Paper)
Perform the following procedure to load custom size paper.
You can load paper of the following custom sizes.
• When loading paper in portrait orientation:
Width 148.0 to 215.9 mm; Length 210.0 to 355.6 mm
•
When loading paper in landscape orientation (only when LIPS LX Printer Driver is used):
Width 210.0 to 215.9 mm; Length 210.0 to 215.9 mm
1
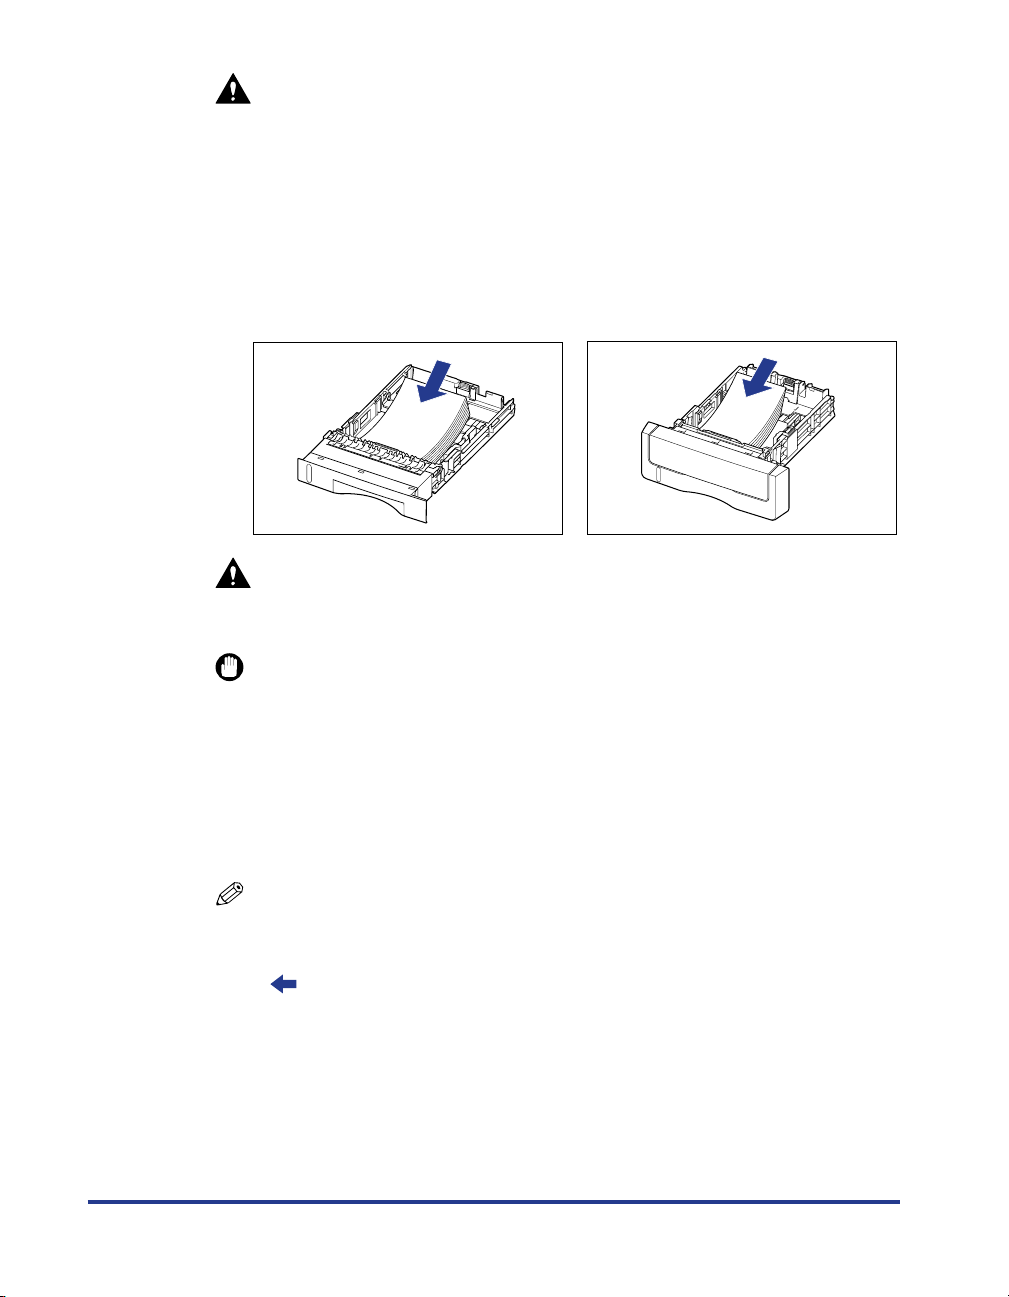
Pull out the paper cassette.
Cassette 1
Pull out the paper cassette gently a.
a
While holding the paper cassette with
both hands, remove it from the printer
unit as shown in the figure b.
b
Cassette 2
Pull out the paper cassette gently a.
a
While holding the paper cassette with
both hands, remove it from the paper
feeder as shown in the figure b.
b
25
Page 27
CAUTION
Be sure to take the paper cassette out of the printer before loading paper.
If paper is loaded while the paper cassette is partially pulled out, the paper
cassette may drop or the printer may become damaged resulting in
personal injury.
2
Load the paper so that the edge of the paper is aligned with
the front side of the paper cassette.
Cassette 1 Cassette 2
CAUTION
When loading paper, take care not to cut your hands with the edges of the
paper.
IMPORTANT
•
If you use paper that has been poorly cut, multiple sheets of paper may be fed at
once. In this case, fan the paper thoroughly, and then align the edges of the stack
on a hard, flat surface.
•
When custom size paper is printed from LIPS LX Printer Driver, you can load the
paper either in portrait or landscape orientation. However, when you are printing
custom size paper of its long edges 215.9 mm or less with <
ヨウシサイズ
are not printing from LIPS LX Printer Driver, load the paper in portrait orientation.
> set to <
>, load the paper in landscape orientation. When you
フリー
カセット N(N=1、2)
26
NOTE
•
When loading letterhead paper or paper printed with a logo in portrait orientation
for printing, load the paper so that the printing side is facing up, as shown in the
following figure.
(: Feeding direction)
Page 28
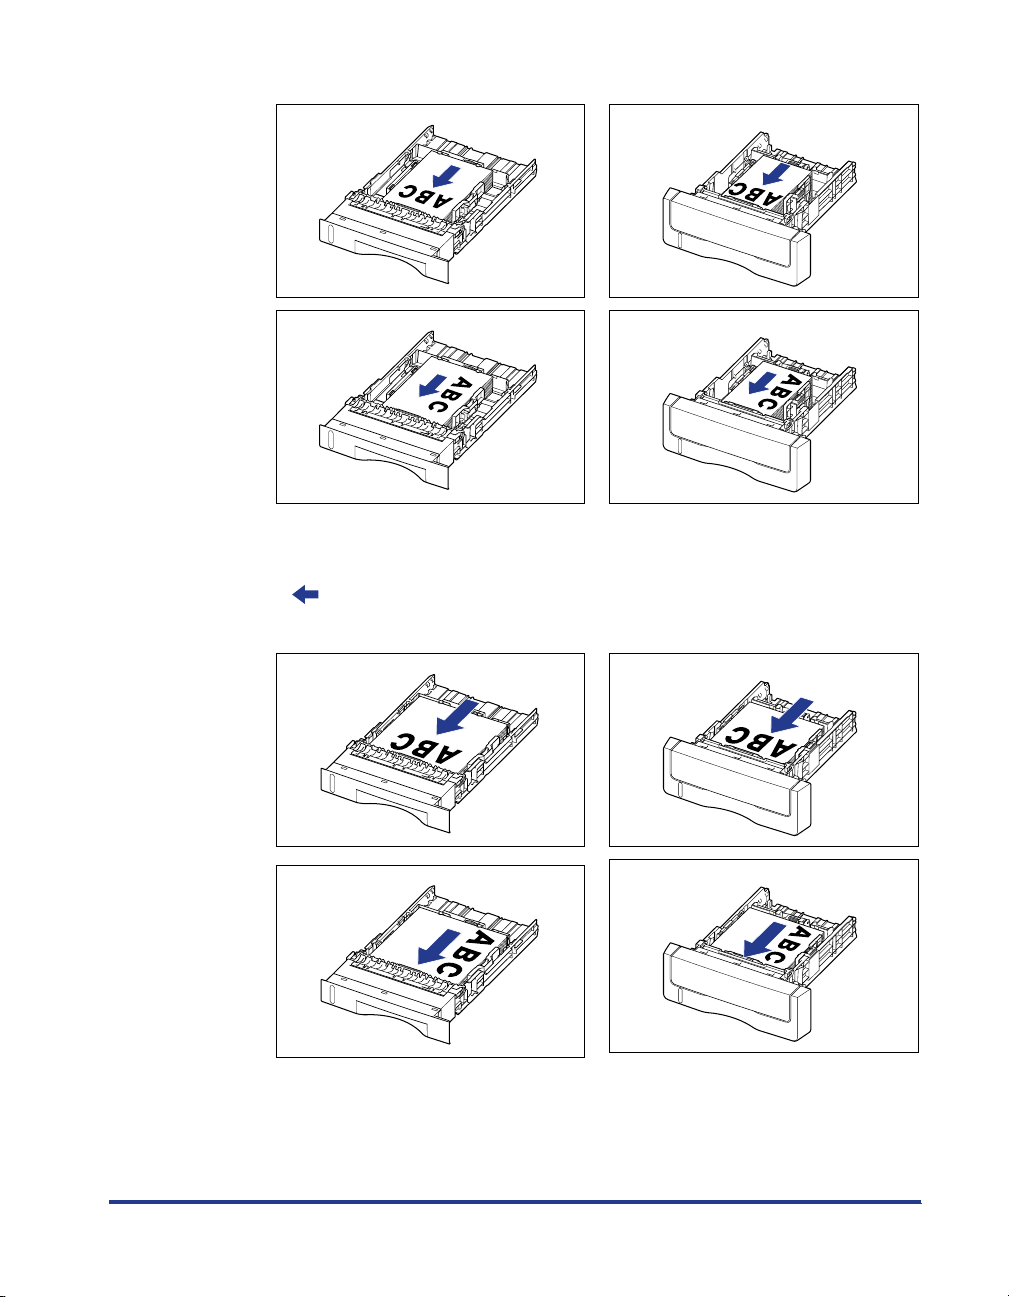
Cassette 1 Cassette 2
•
When loading letterhead paper or paper printed with a logo in landscape
orientation for printing, load the paper so that the printing side is facing up, as
shown in the following figure.
(: Feeding direction)
Cassette 1 Cassette 2
27
Page 29
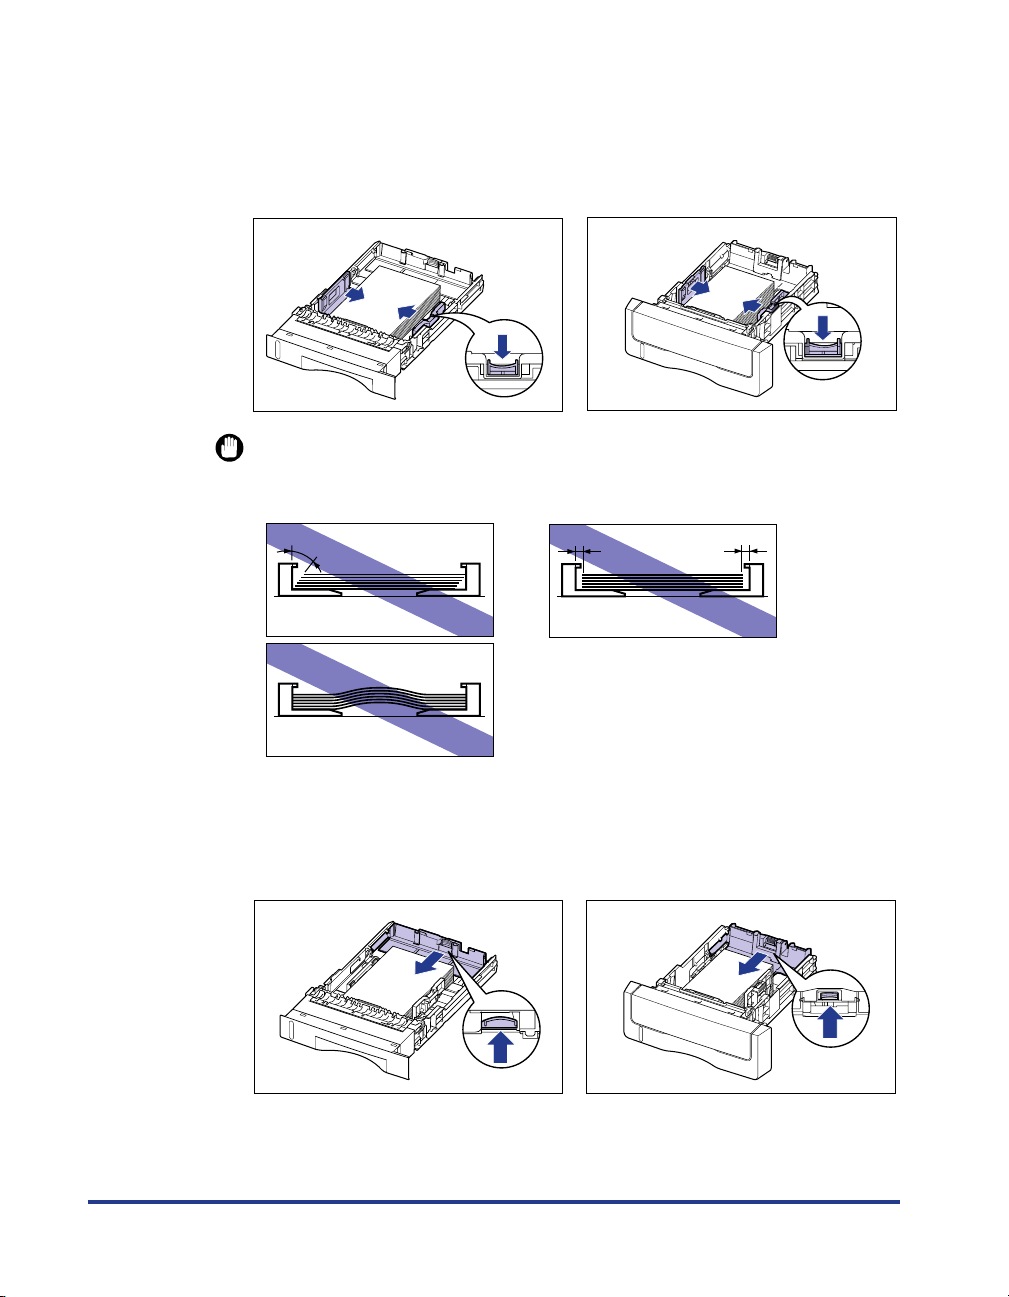
While holding the lock release lever of the side paper guides,
3
slide the guides to the size mark for the paper to be loaded.
The side paper guides move together.
Cassette 1 Cassette 2
IMPORTANT
Be sure to align the paper guides with the width of the paper. If the paper guides
are too loose or too tight, this may result in misfeeds or paper jams.
28
4
While holding the lock release lever of the rear paper guide,
slide the guide to the size mark for the loaded paper.
Cassette 1 Cassette 2
Page 30
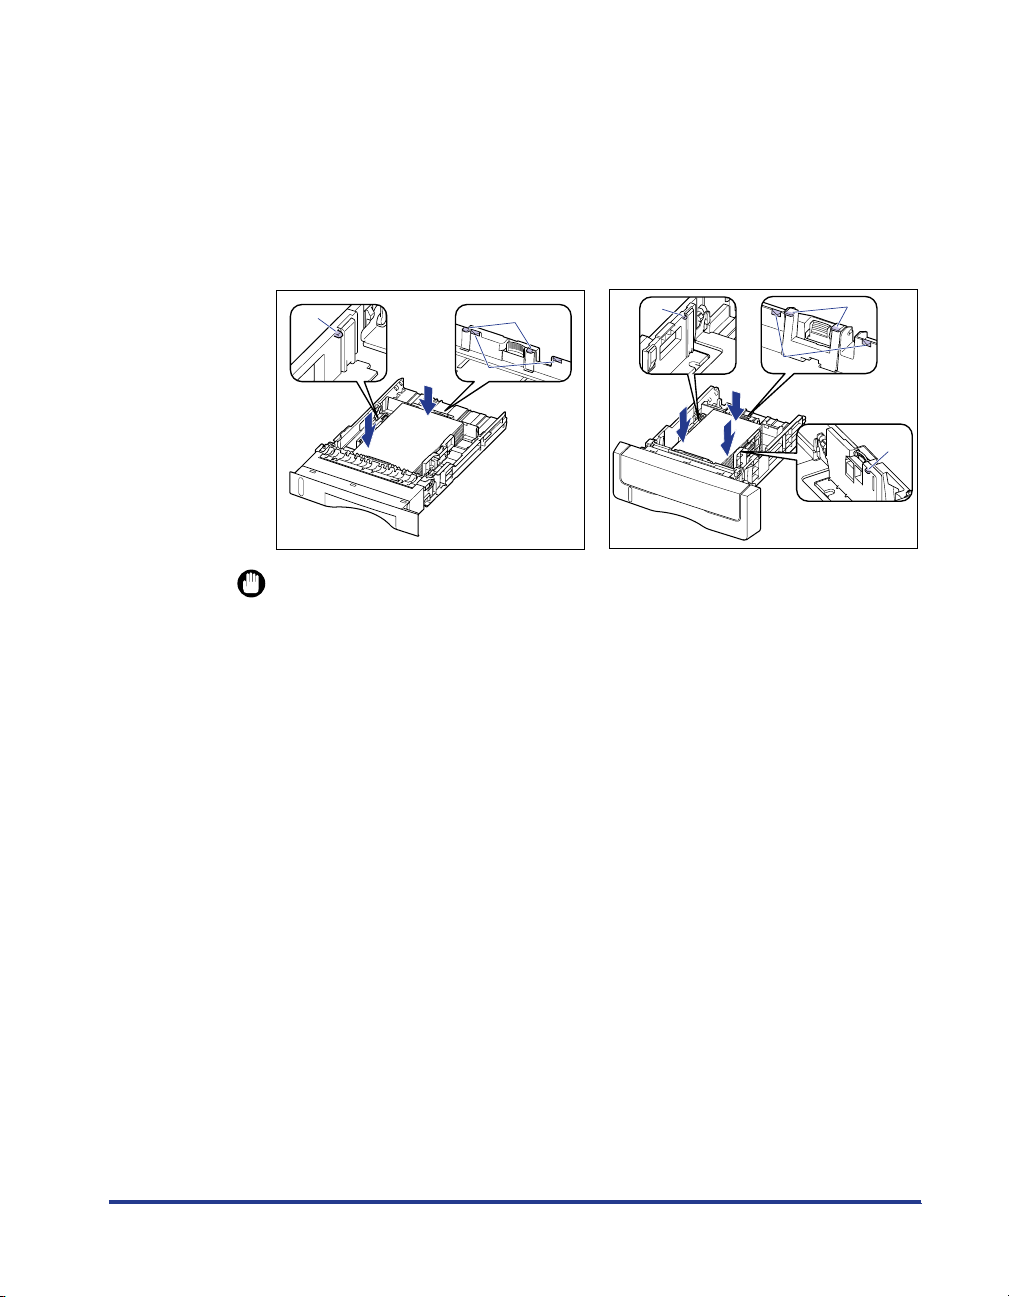
Hold down the paper as shown in the figure, make sure that
(B)
(A)
(B)
(B)
(A)
(B)
5
the paper stack does not exceed the load limit marks (A), and
then set it under the hooks (B) on the paper guides.
Make sure that there is sufficient space between the hooks of the paper guides
and the paper stack. If there is no sufficient space, slightly reduce the amount of
paper.
Cassette 1 Cassette 2
(B)
IMPORTANT
The paper capacity of Cassette 1 is approximately 250 sheets of plain paper (64 g/
2
m
), and that of Cassette 2 is approximately 500 sheets of plain paper (64 g/m
Be sure that the paper stack does not exceed the load limit marks on the paper
guides. If the paper stack exceeds the load limit marks, this may result in misfeeds.
2
).
29
Page 31
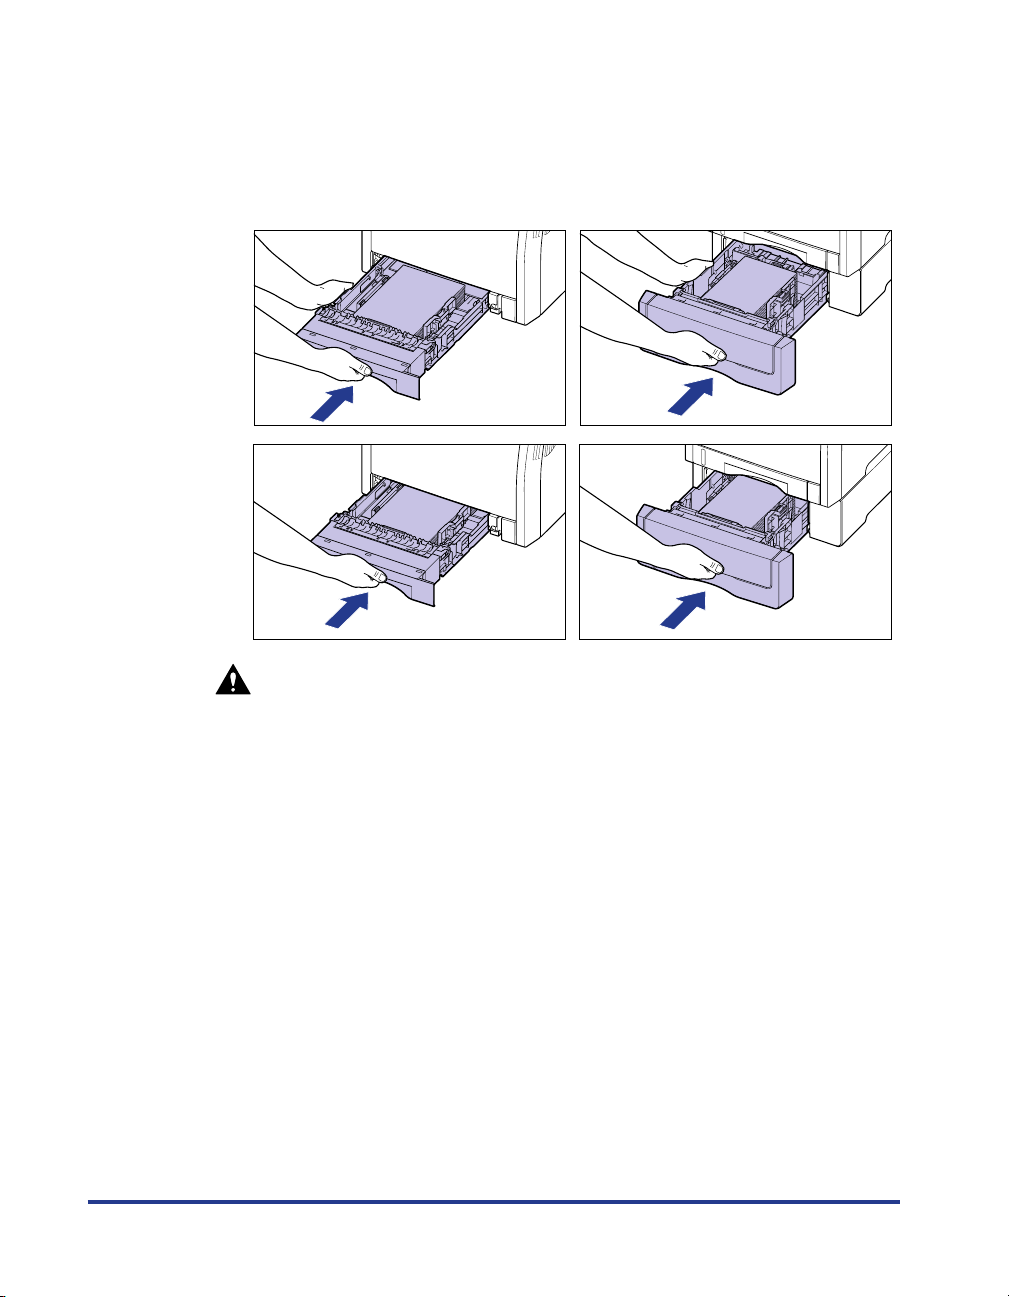
Set the paper cassette in the printer.
6
Push the paper cassette into the printer firmly until the front side of the paper
cassette is flush with the front surface of the printer.
Cassette 1 Cassette 2
30
CAUTION
When setting the paper cassette in the printer, be careful not to catch your
fingers.
Page 32
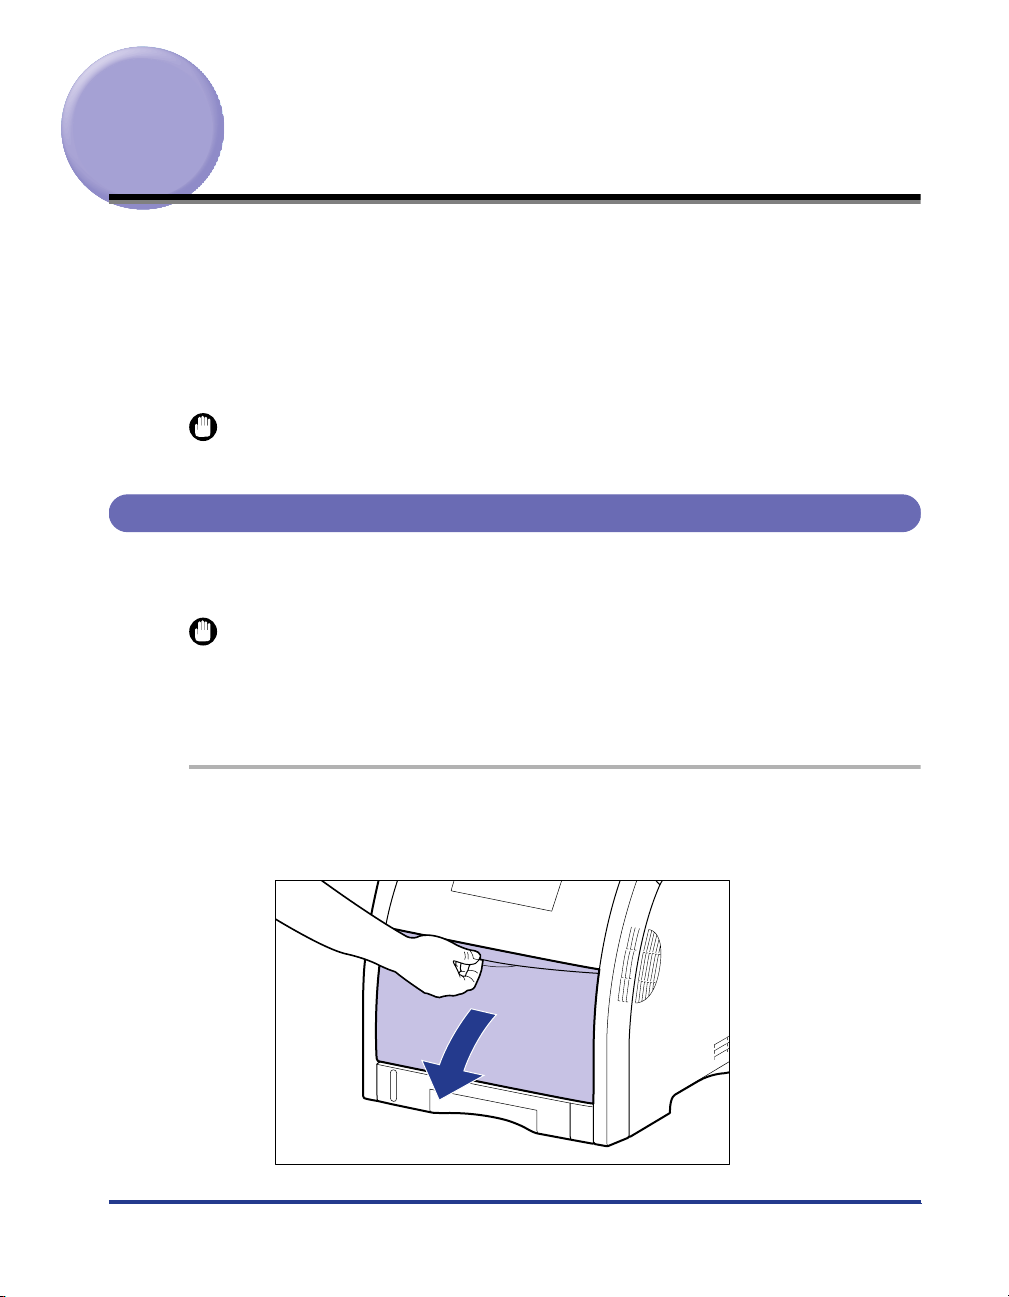
Loading Paper in the Multi-purpose Tray
Load paper in the multi-purpose tray. The paper loading procedure varies
depending on the paper type. Refer to the respective procedures for each paper
type.
•
Plain Paper, Heavy Paper, Transparency, Coated Paper, Label (See "When
Loading Paper (Other than Postcards and Envelopes)," on p. 31)
•
Postcard, Envelope (See "When Loading Postcards or Envelopes," on p. 37)
IMPORTANT
For more details on the usable paper, see "Usable Paper," on p. 9.
When Loading Paper (Other than Postcards and Envelopes)
Perform the following procedure to load plain paper, heavy paper, transparencies,
labels, or coated paper in the multi-purpose tray.
IMPORTANT
•
Tr ansparencies can only be printed in black and white.
•
It is not recommended to print on heavy paper that weighs between 177 and 220 g/m
(other than Postcard, Reply postcard, and 4 on 1 postcard). However, set the paper type
to "Heavy Paper 3" if you have to perform the printing.
2
1
Open the multi-purpose tray.
Holding the opening at the center of the printer, open the multi-purpose tray.
31
Page 33
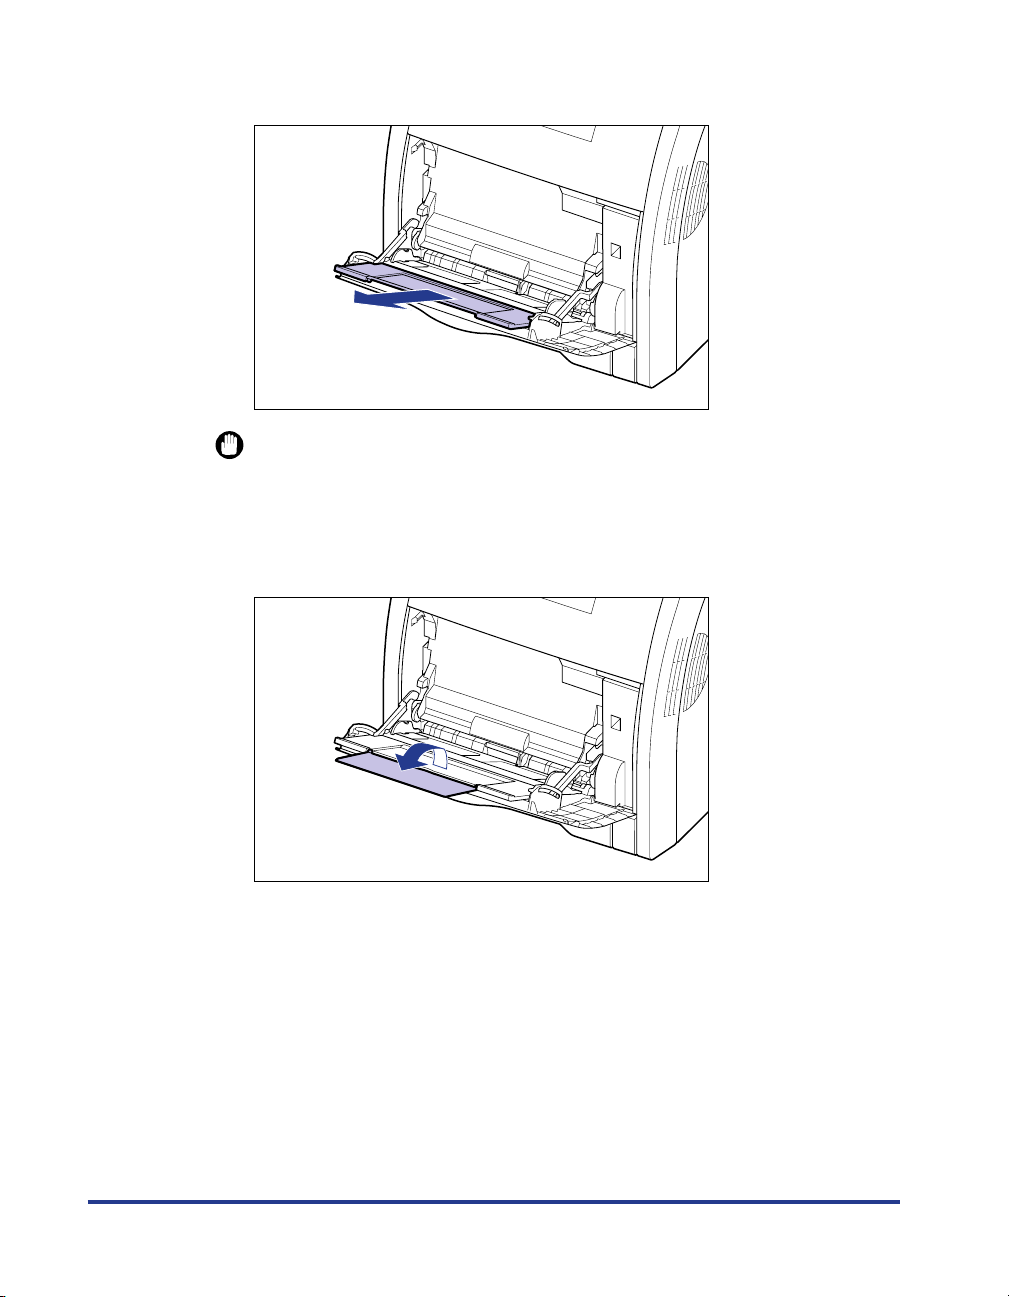
Pull out the auxiliary tray.
2
IMPORTANT
Be sure to pull out the auxiliary tray when loading paper in the multi-purpose tray.
When loading long-size paper such as A4 etc, open the tray
3
extension.
32
Page 34
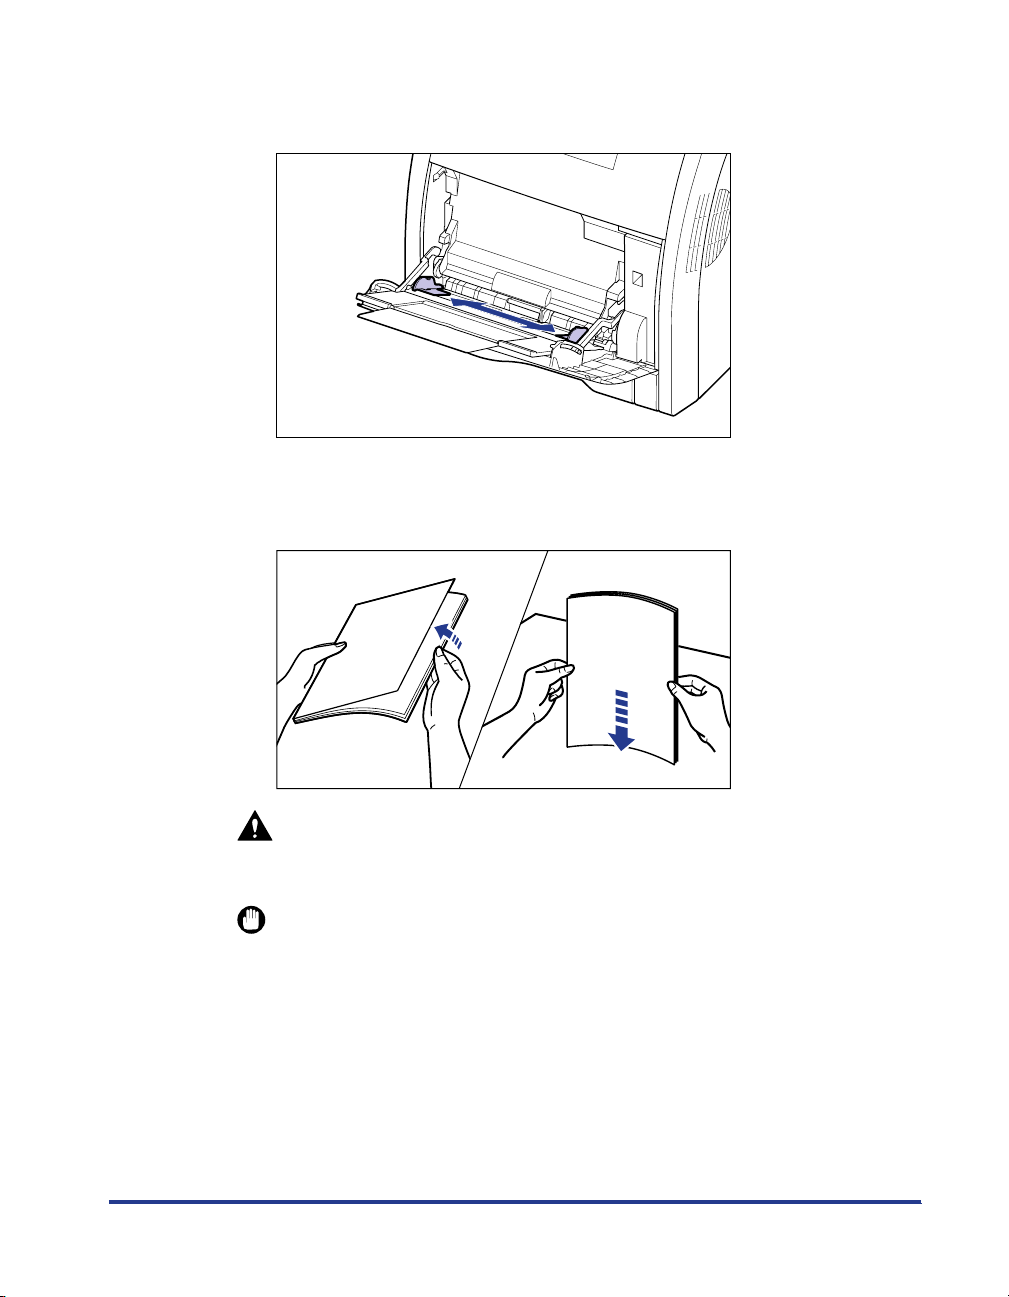
Spread the paper guides a little wider than the actual paper
4
width.
Before loading transparencies, labels, or coated paper, fan
5
them in small batches and align the edges.
Thoroughly fan in small batches Tap the edges on a flat
CAUTION
When loading paper, take care not to cut your hands with the edges of the
paper.
IMPORTANT
•
Be sure to fan the transparencies, labels, or coated paper thoroughly before
loading them. If they are not fanned enough, multiple sheets of paper may be fed at
once, causing paper jams.
•
When fanning or aligning the transparencies or coated paper, try to hold the edges
to avoid touching the printing surface.
•
Ta ke care not to mark or stain the printing surface of the transparencies or coated
paper with fingerprints, dust, or oil. This may result in poor print quality.
surface a few times
33
Page 35
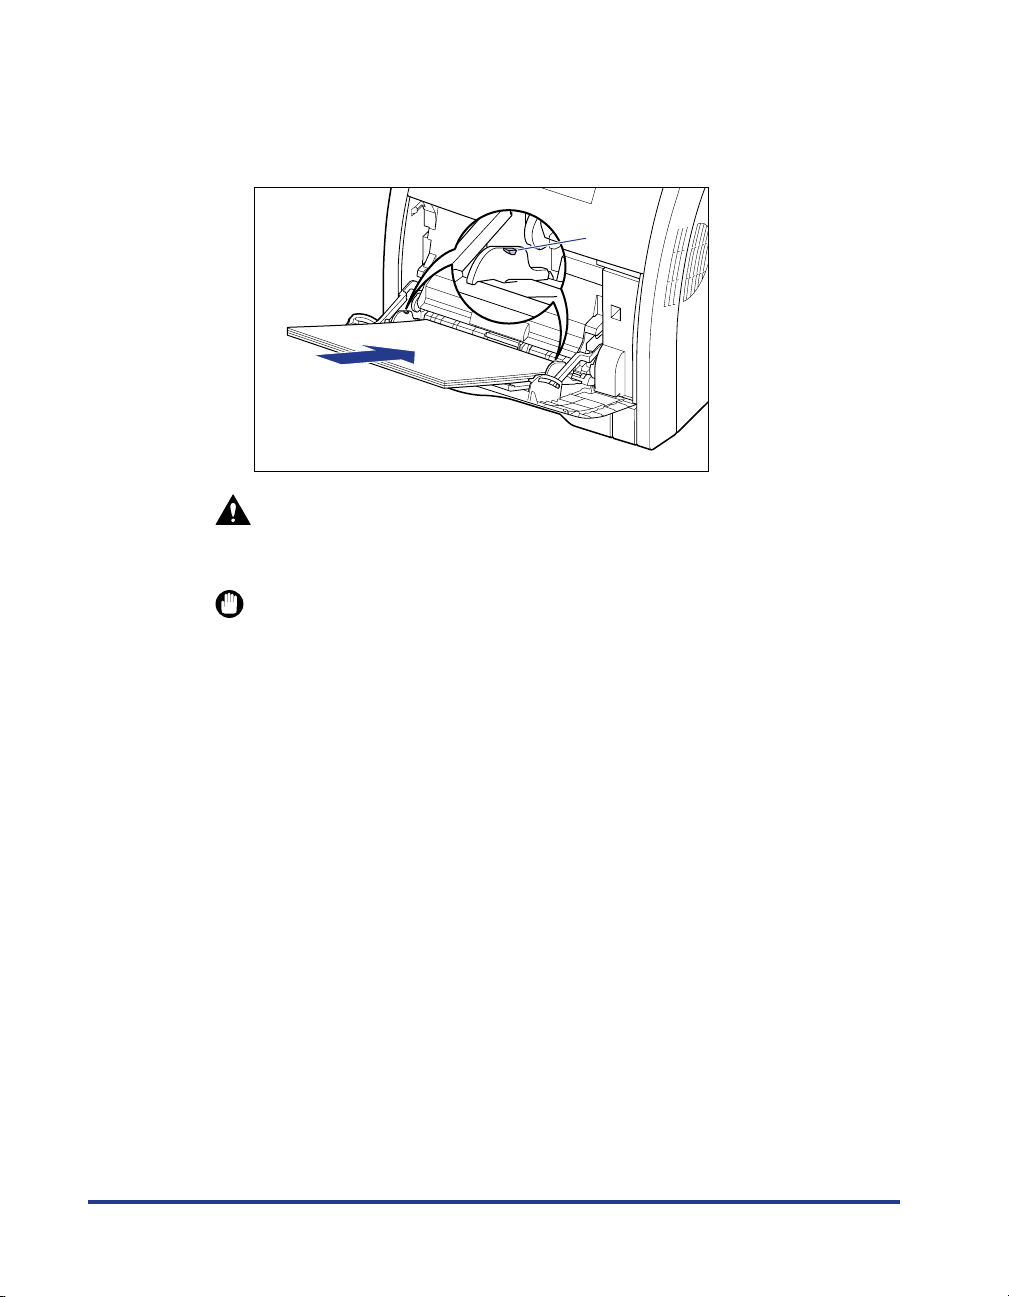
Gently load the stack of paper with the printing side facing
6
down until it touches the back of the tray.
Be sure that the paper stack is loaded under the load limit guides (A).
(A)
CAUTION
When loading paper, take care not to cut your hands with the edges of the
paper.
IMPORTANT
•
The multi-purpose tray can be loaded with up to the number of sheets listed below.
Make sure that the paper stack does not exceed the load limit guides.
- Plain paper : Approx. 100 sheets (When plain paper that weighs 64 g/m
used)
- Heavy paper : Approx. 50 sheets (When heavy paper that weighs 128 g/m
used)
-Transparency : Approx. 50 sheets
- Label : Approx. 40 sheets
- Coated paper : Approx. 50 sheets
•
Load the paper so that it is straight.
•
If the rear edge of the paper stack is not properly aligned, this may result in
misfeeds or paper jams.
•
If the paper is curled or folded at corners, flatten it before loading it in the printer.
•
If you use paper that has been poorly cut, multiple sheets of paper may be fed at
once. In this case, fan the paper thoroughly, and then align the edges of the stack
on a hard, flat surface.
•
When custom size paper is printed from LIPS LX Printer Driver, you can load the
paper either in portrait or landscape orientation. However, when you are printing
custom size paper of its long edges 215.9 mm or less with <
イズ
> set to <
printing from LIPS LX Printer Driver, load the paper in portrait orientation.
フリー
>, load the paper in landscape orientation. When you are not
テザシトレイ ヨウシサ
2
is
2
is
34
Page 36
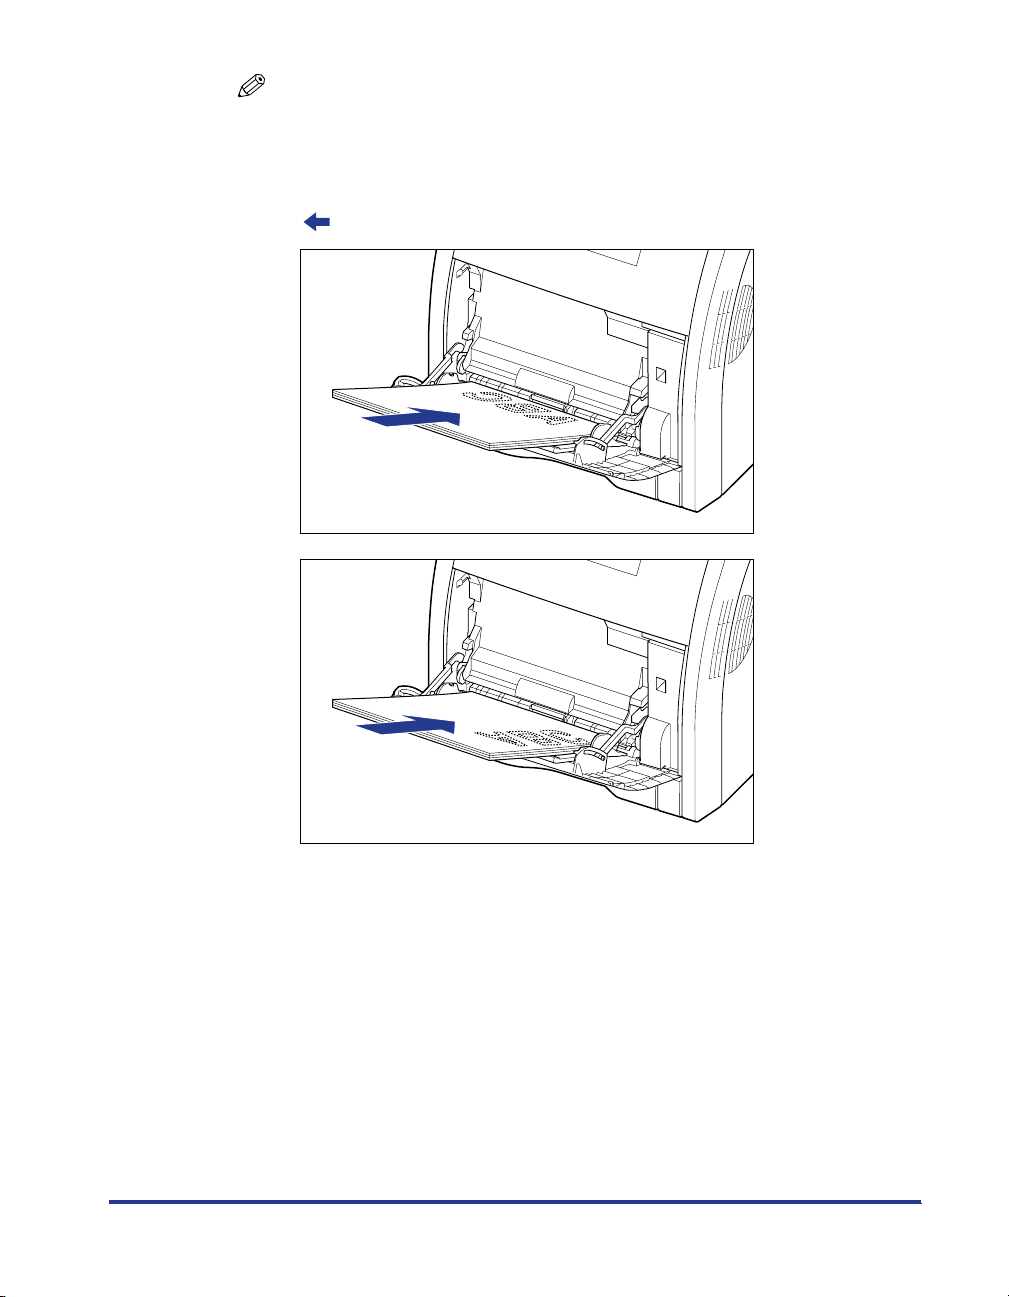
NOTE
To print letterhead paper or paper printed with a logo, load the paper in the proper
orientation according to the following instructions:
- When loading paper at a size of A4, B5, A5, Legal, Letter, or Executive or loading
custom size paper in portrait orientation, load the paper so that the printing side is
facing down as shown in the following figures.
(: Feeding direction)
35
Page 37
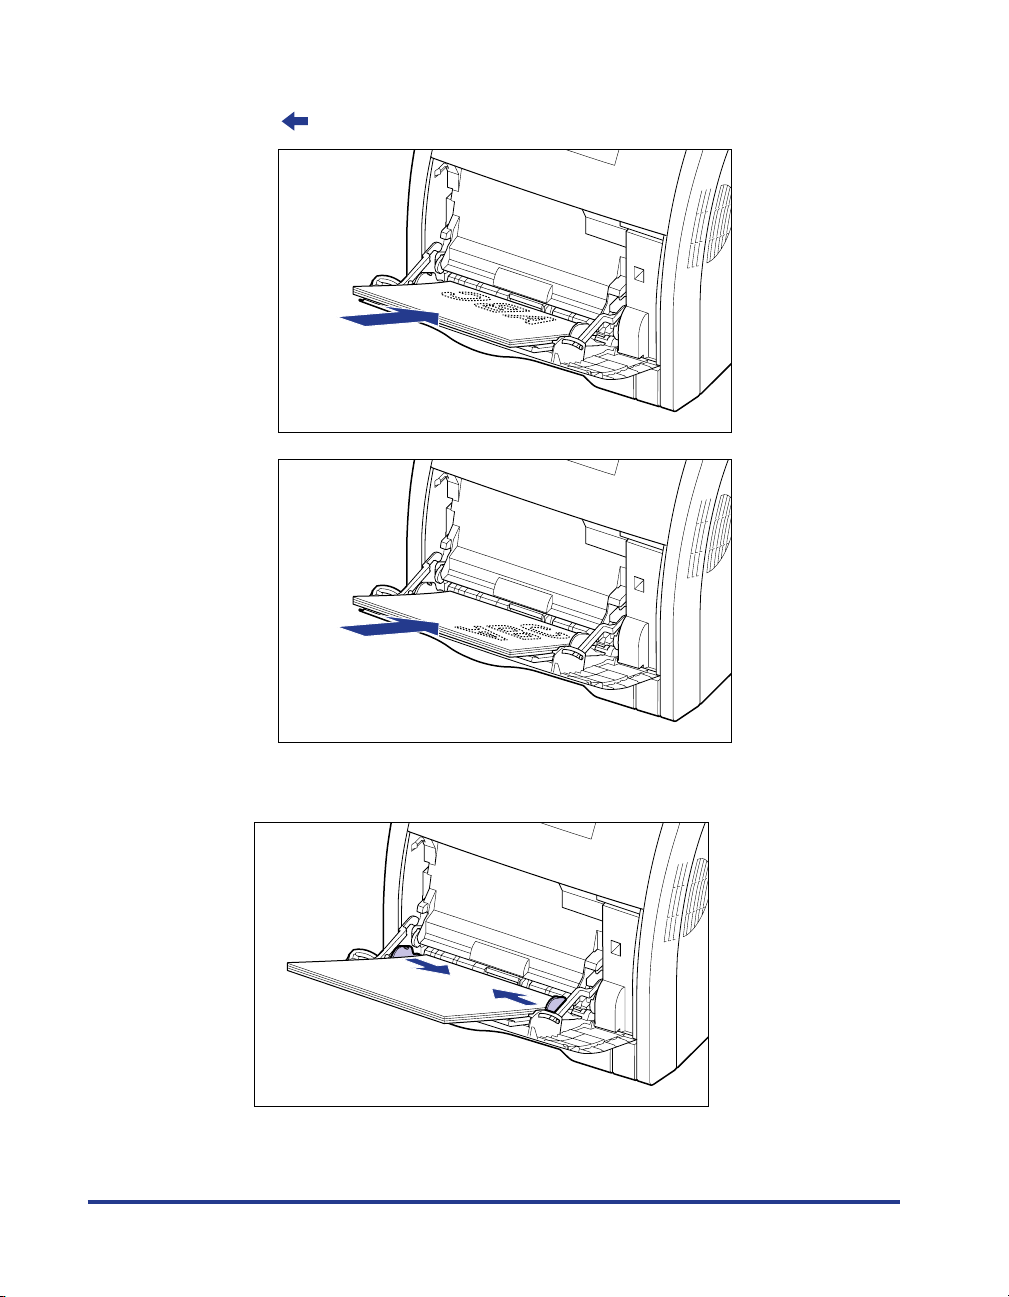
- When loading custom size paper in landscape orientation, load the paper so that
the printing side is facing down as shown in the following figure.
(: Feeding direction)
Align the paper guides with both sides of the stack.
7
36
Page 38
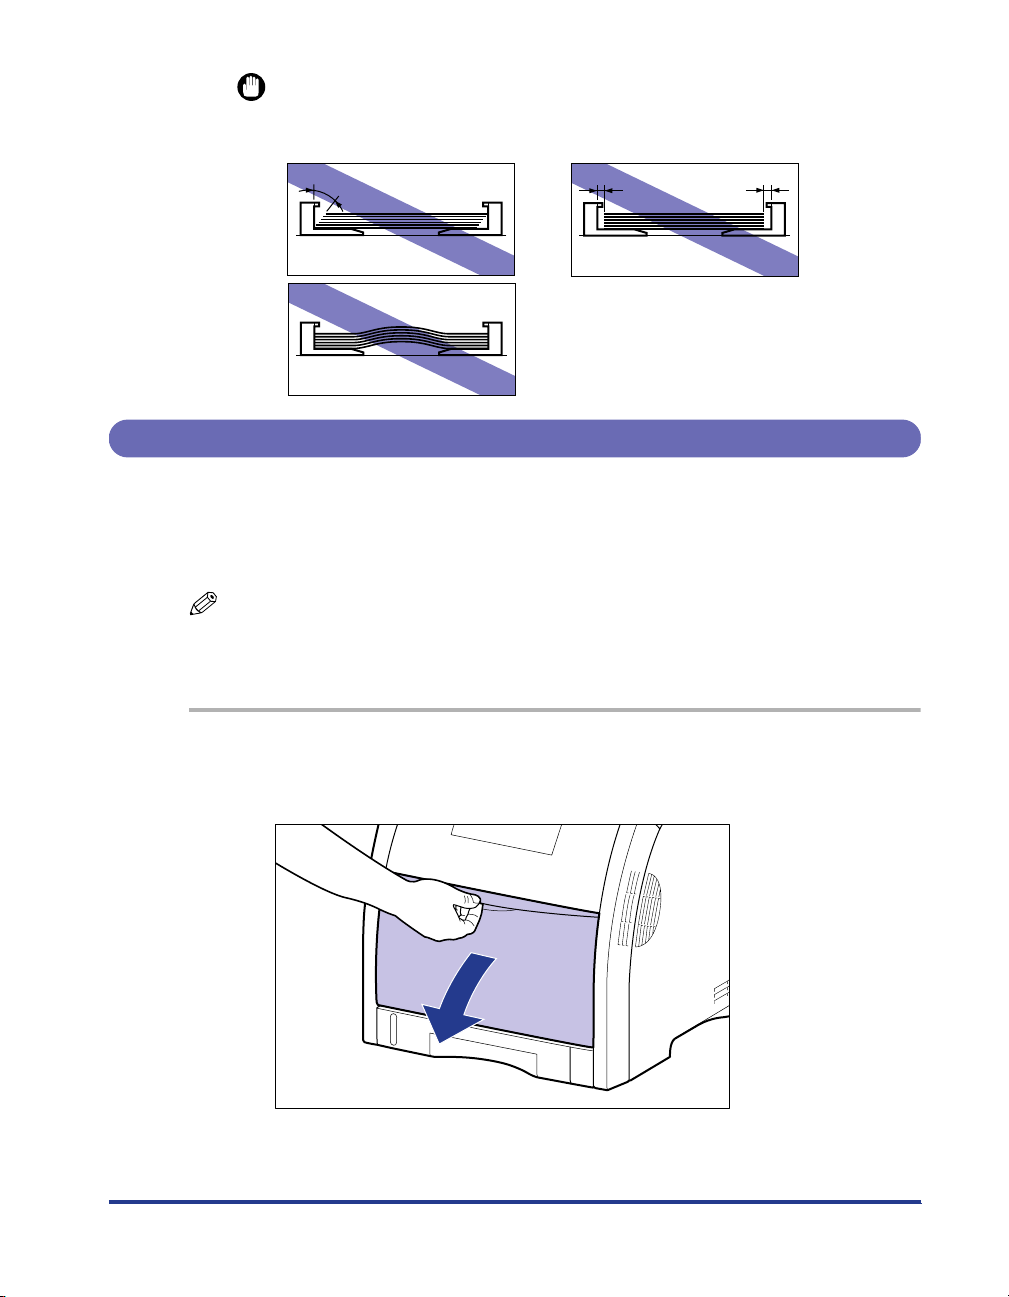
IMPORTANT
Be sure to align the paper guides with the width of the paper. If the paper guides
are too loose or too tight, this may result in misfeeds or paper jams.
When Loading Postcards or Envelopes
You can load postcards at sizes of Postcard, Reply postcard, 4 on 1 postcard, and 4
on 1 postcard recommended by Canon, and envelopes at sizes of YOUGATA No. 4
and YOUGATA No. 2 in the multi-purpose tray. Use the following procedure when
loading postcards or envelopes in the multi-purpose tray.
NOTE
When printing plain paper (60 - 105 g/m
Postcard, Reply postcard, or 4 on 1 postcard, see "When Loading Paper (Other than
Postcards and Envelopes)," on p. 31.
Open the multi-purpose tray.
1
Holding the opening at the center of the printer, open the multi-purpose tray.
2
) or heavy paper (106 - 176 g/m
2
) at a size of
37
Page 39
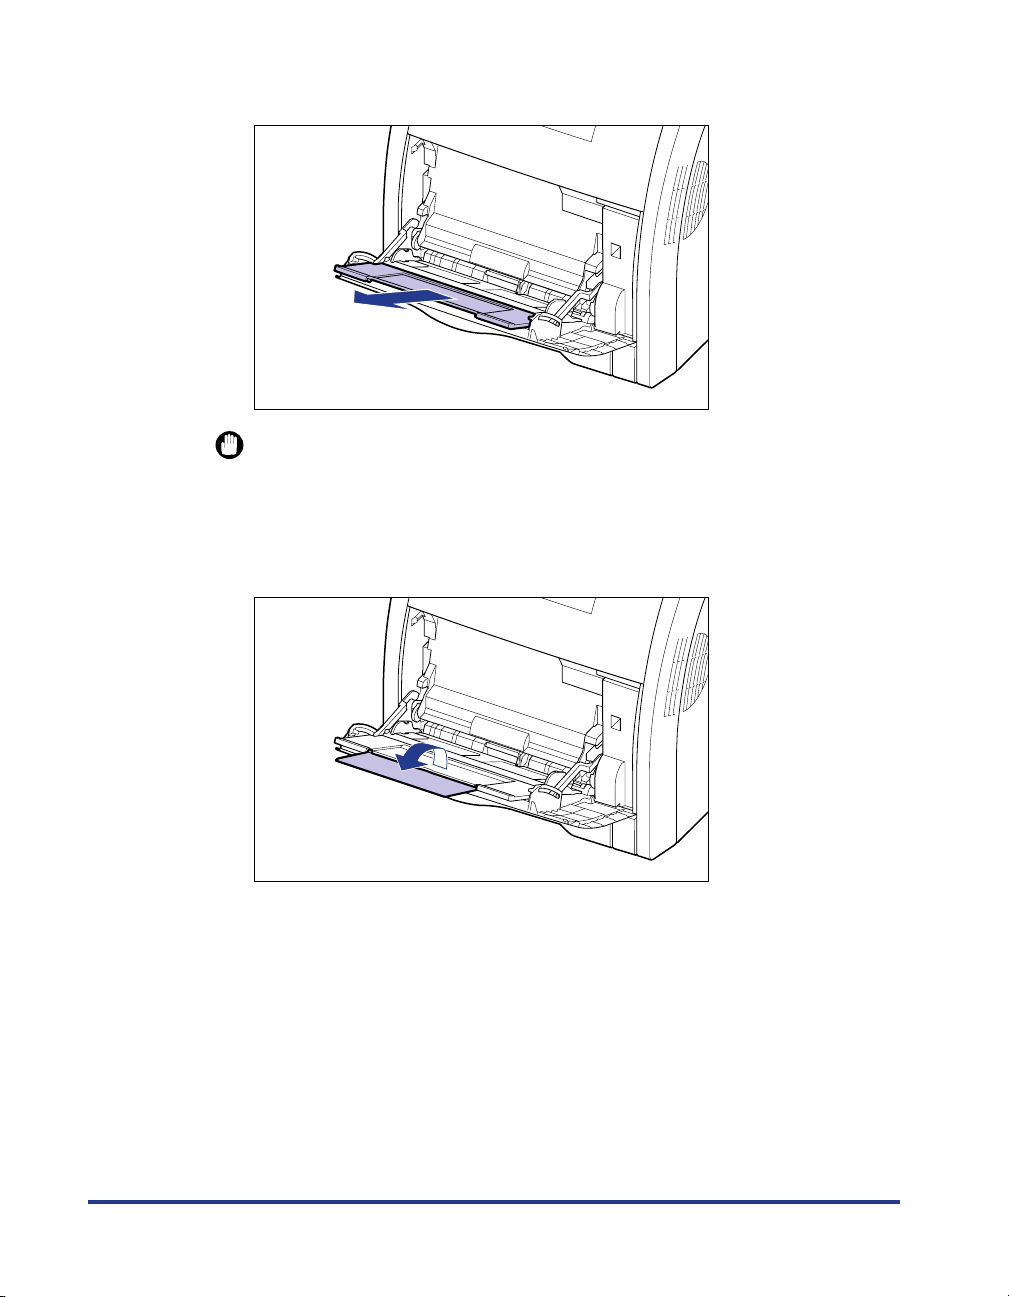
Pull out the auxiliary tray.
2
IMPORTANT
Be sure to pull out the auxiliary tray when loading paper in the multi-purpose tray.
3
When loading long-size paper such as 4 on 1 postcard etc,
open the tray extension.
38
Page 40
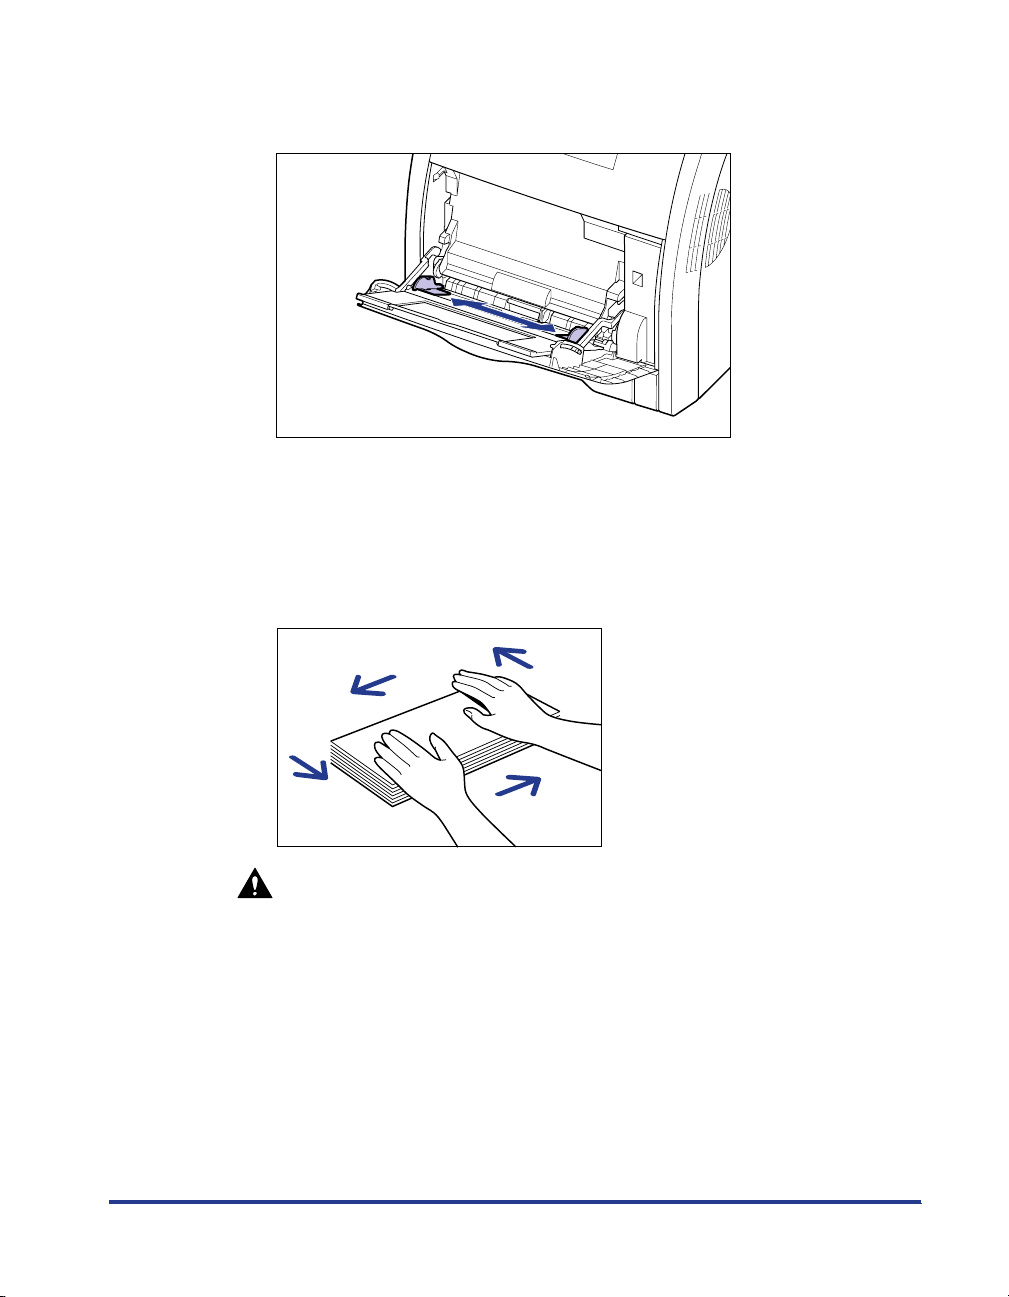
Spread the paper guides a little wider than the actual paper
4
width.
5
Before loading envelopes, align them as shown in the
following figures.
Place the stack of envelopes on a flat surface, flatten them to release
any remaining air, and be sure that the edges are pressed tightly.
CAUTION
When loading paper, take care not to cut your hands with the edges of the
paper.
●
39
Page 41
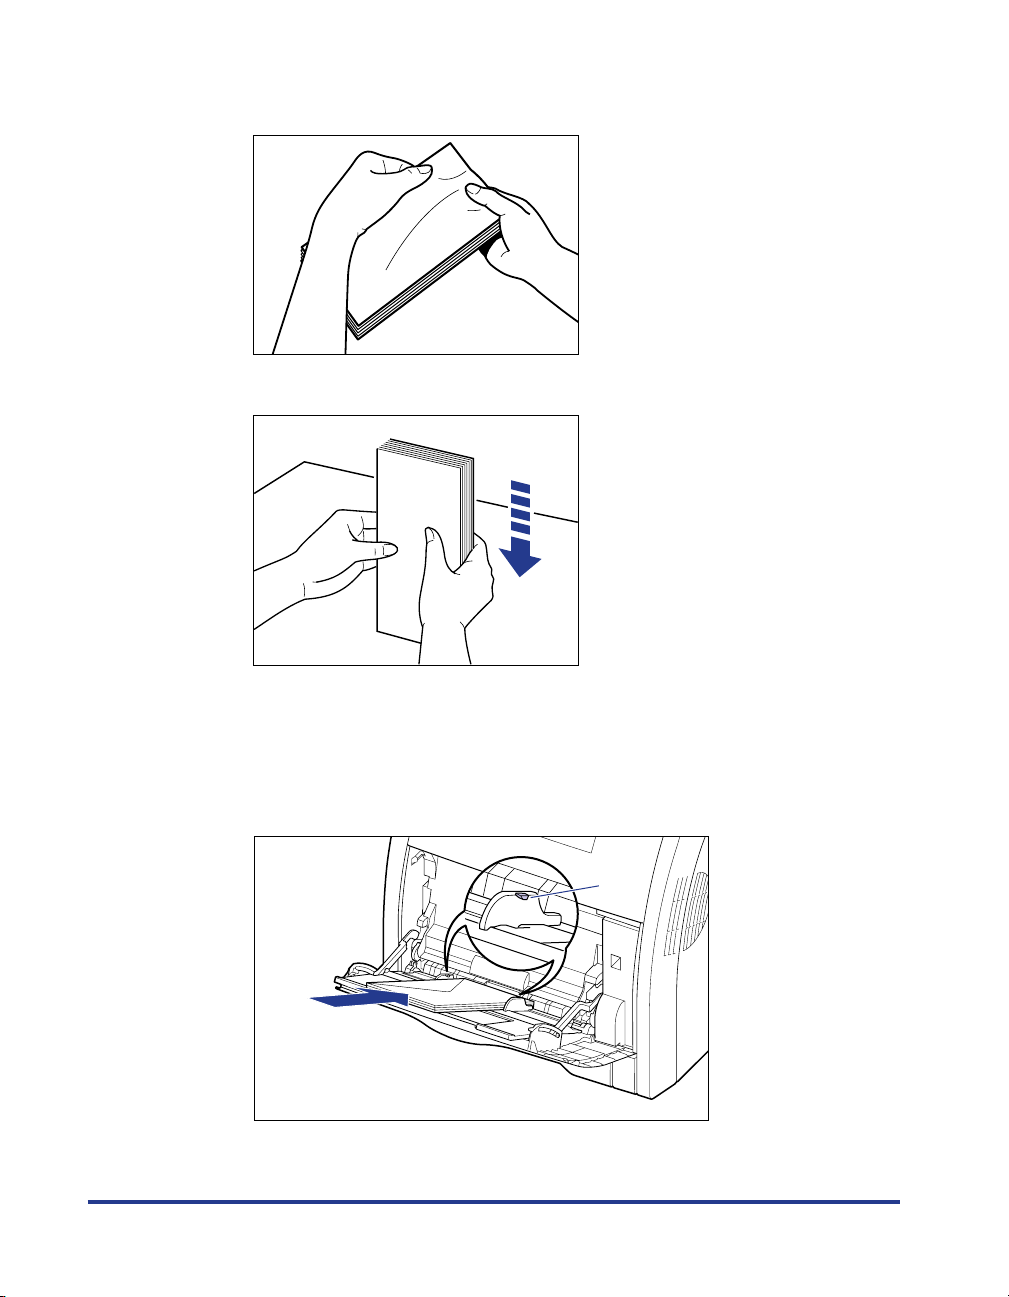
Loosen any stiff corners of the envelopes and flatten curls as shown
in the figure.
Align the edges of the envelopes on a flat surface.
40
6
Gently load the stack of envelopes with the printing side
facing down until it touches the back of the multi-purpose tray
as shown in the figure.
Be sure that the paper stack is loaded under the load limit guides (A).
(A)
●
●
Page 42
CAUTION
When loading paper, take care not to cut your hands with the edges of the
paper.
IMPORTANT
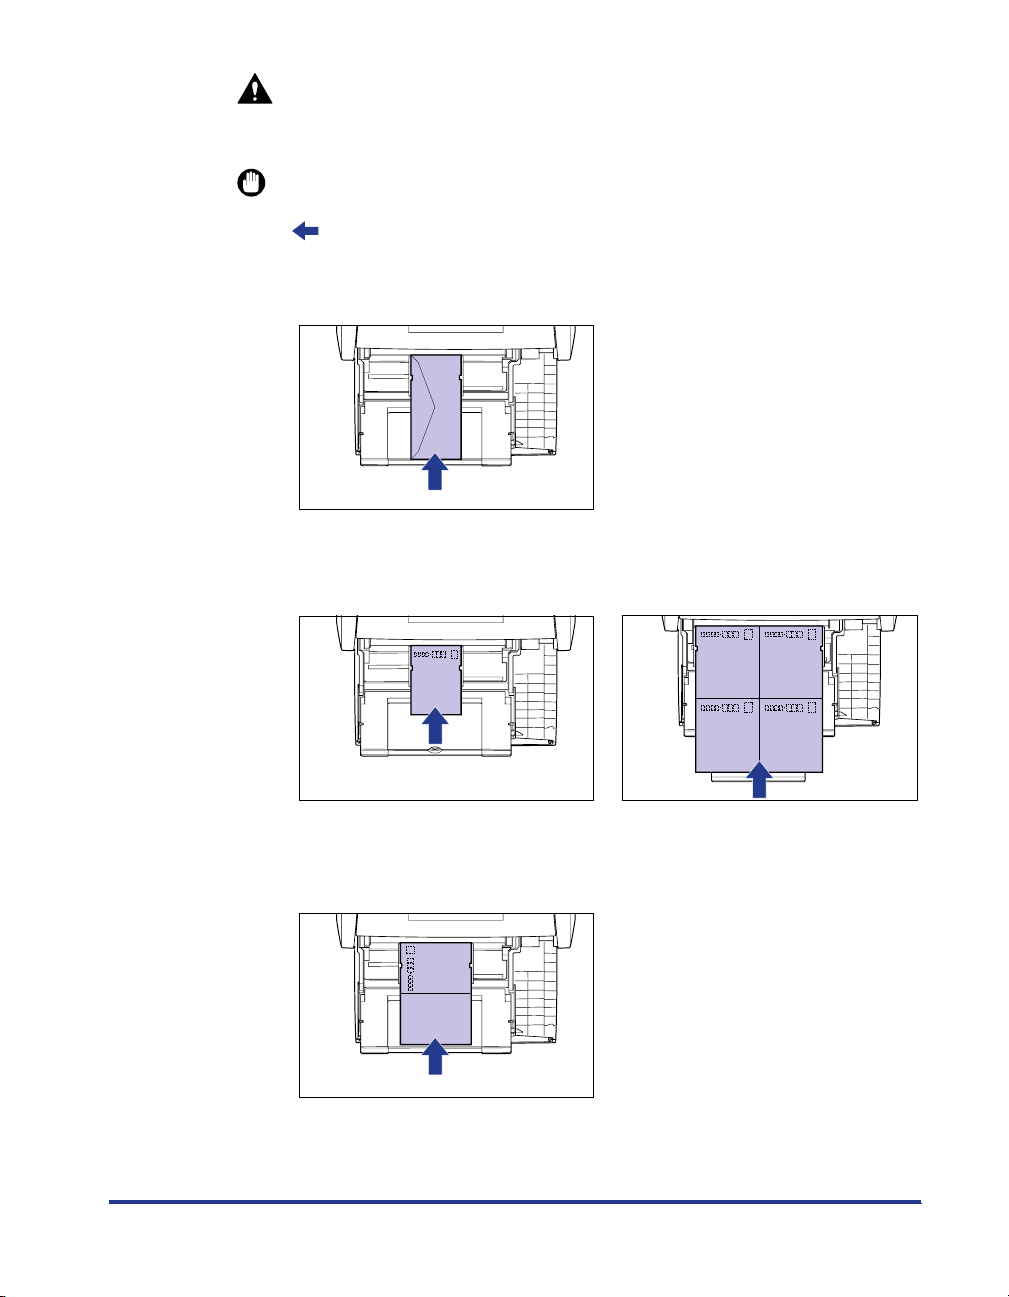
Load postcards or envelopes as shown in the following figures.
•
(: Feeding direction)
-YOUGATA No. 4/YOUGATA No. 2
Load the envelopes so that the flap is toward the left of the printer when viewed
from the front.
-Postcard/4 on 1 Postcard
Load the postcards so that the top of the postcards is toward the back of the
printer when viewed from the front.
- Reply Postcard
Load the postcards so that the top of the postcards is toward the left of the
printer when viewed from the front.
41
Page 43
•
You can load up to approximately 50 sheets of postcards at sizes of Postcard,
Reply postcard, 4 on 1 postcard, and 4 on 1 postcard recommended by Canon,
and up to approximately 10 sheets of envelopes in the multi-purpose tray. Make
sure that the paper stack does not exceed the load limit guides.
•
You cannot print on the reverse side (glued side) of envelopes.
•
When printing reply postcards, match the paper settings and printing orientation
specified in the application with the actual printing orientation. (Example: For
Windows 2000/XP/Server 2003, select "Double Japan Postcard Rotated".)
•
If the postcards are curled, flatten the curls by warping them in the opposite
direction before loading them.
•
If you use postcards that have been poorly cut, multiple sheets of postcards may
be fed at once. In this case, align the edges of the stack on a hard, flat surface.
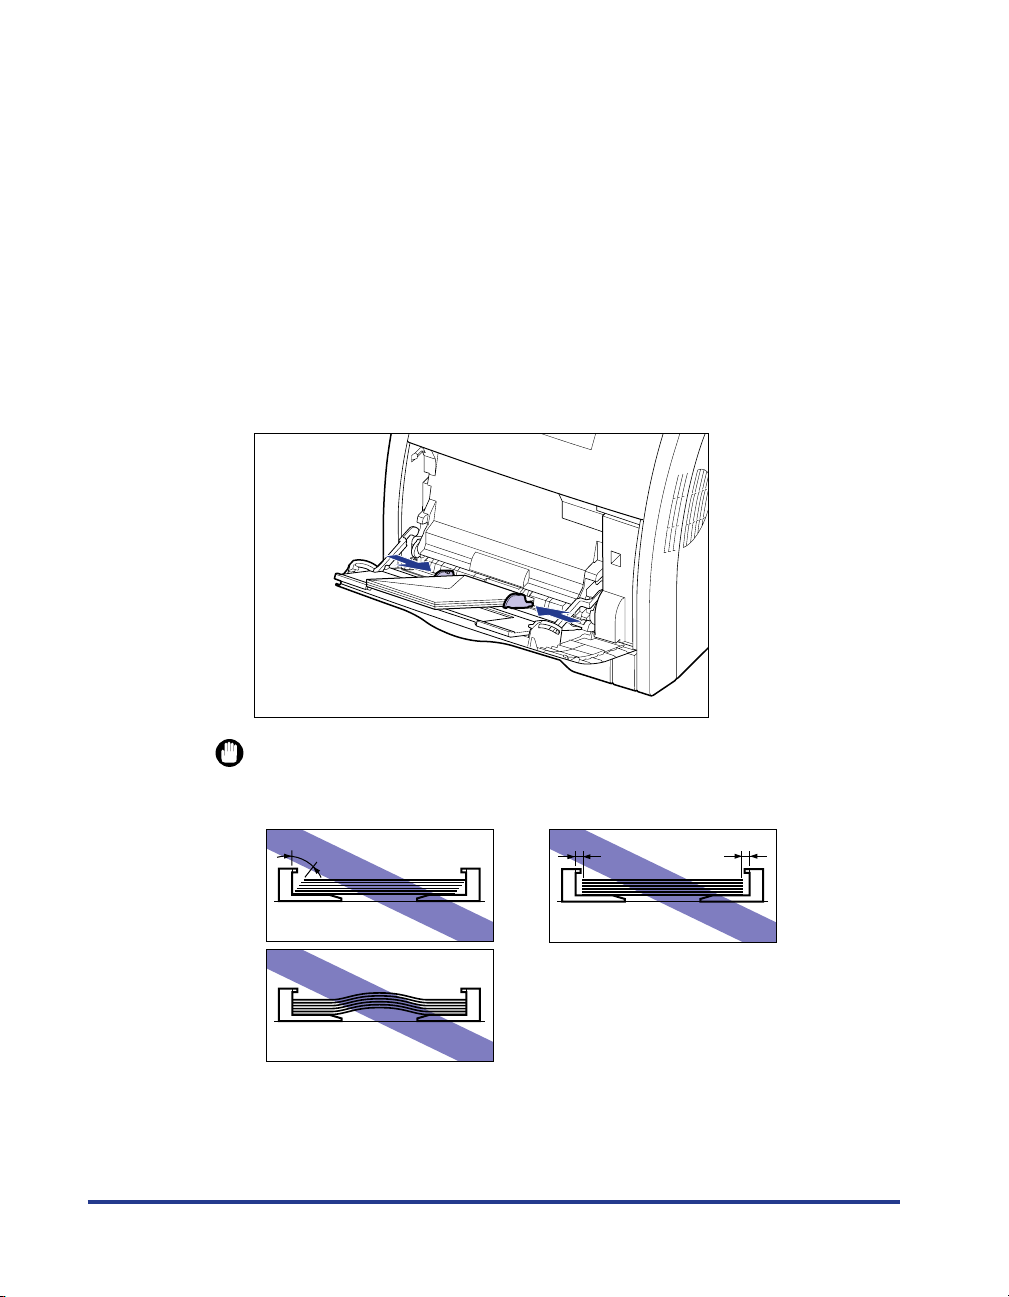
Align the paper guides with both sides of the stack.
7
42
IMPORTANT
Be sure to align the paper guides with the width of the paper. If the paper guides
are too loose or too tight, this may result in misfeeds or paper jams.
Page 44

Paper Jams
When a paper jam occurs during printing for some reason, the printer beeps,
displaying the message <
occurs, remove the jammed paper using the following procedure, and then resume
the job. If the message that indicates the paper jam does not disappear even after
removing the jammed paper following the procedure, there is a possibility that torn
pieces of paper are still left inside the printer. Inspect each part of the printer again,
and completely remove all pieces of jammed paper.
WARNING
There are some areas inside the printer which are subject to high-voltages.
When removing jammed paper or when inspecting the inside of the printer, do
not allow necklaces, bracelets, or other metal objects to touch the inside of the
printer, as this may result in burns or electrical shock.
13 ヨウシガ ツマリマシタ
> in the display. When a paper jam
43
Page 45
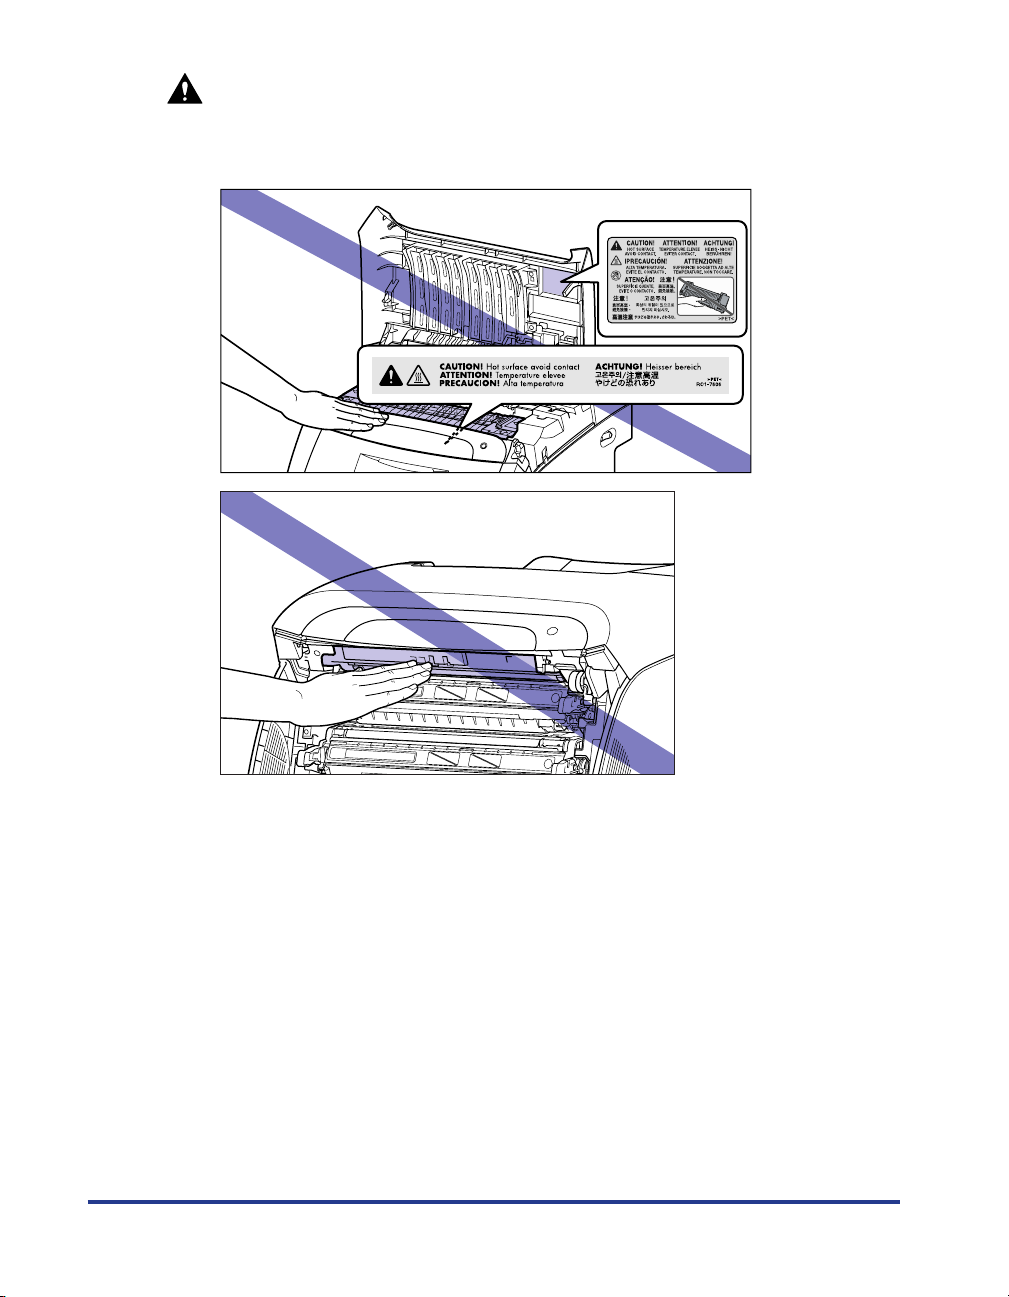
CAUTION
The fixing unit and its surroundings inside the printer are hot during use. Make
•
sure the fixing unit is completely cool before removing the jammed paper.
Touching the fixing unit when it is still hot may result in burns.
44
•
When removing jammed paper, take care not to allow the toner to come into
contact with your hands or clothing, as this will dirty your hands or clothing. If
they become dirty, wash them immediately with cold water. Washing with warm
water will set the toner and make it impossible to remove the toner stains.
•
When removing paper jammed inside the printer, remove the jammed paper
gently to prevent the toner on the paper from scattering and getting into your
eyes or mouth. If the toner gets into your eyes or mouth, wash them
immediately with cold water and immediately consult a physician.
•
When removing jammed paper, take care not to cut your hands with the edges
of the paper.
Keep your hands or clothing away from the roller in the output area after
•
removing jammed paper completely. Even if the printer is not printing, sudden
rotation of the roller may catch your hands or clothing, resulting in personal
injury.
Page 46
IMPORTANT
•
Remove jammed paper while the power of the printer is ON. If the power is turned OFF,
the data being printed will be deleted. When you remove the fixing unit to remove
jammed paper, however, the data being printed will be deleted because you have to turn
the printer OFF.
•
Applying excess force may result in tearing paper or damaging the parts in the printer.
When removing jammed paper, pull out the paper in the most appropriate direction,
judging from the position of the paper.
•
If paper is torn, be sure to find and remove any remaining pieces of paper.
•
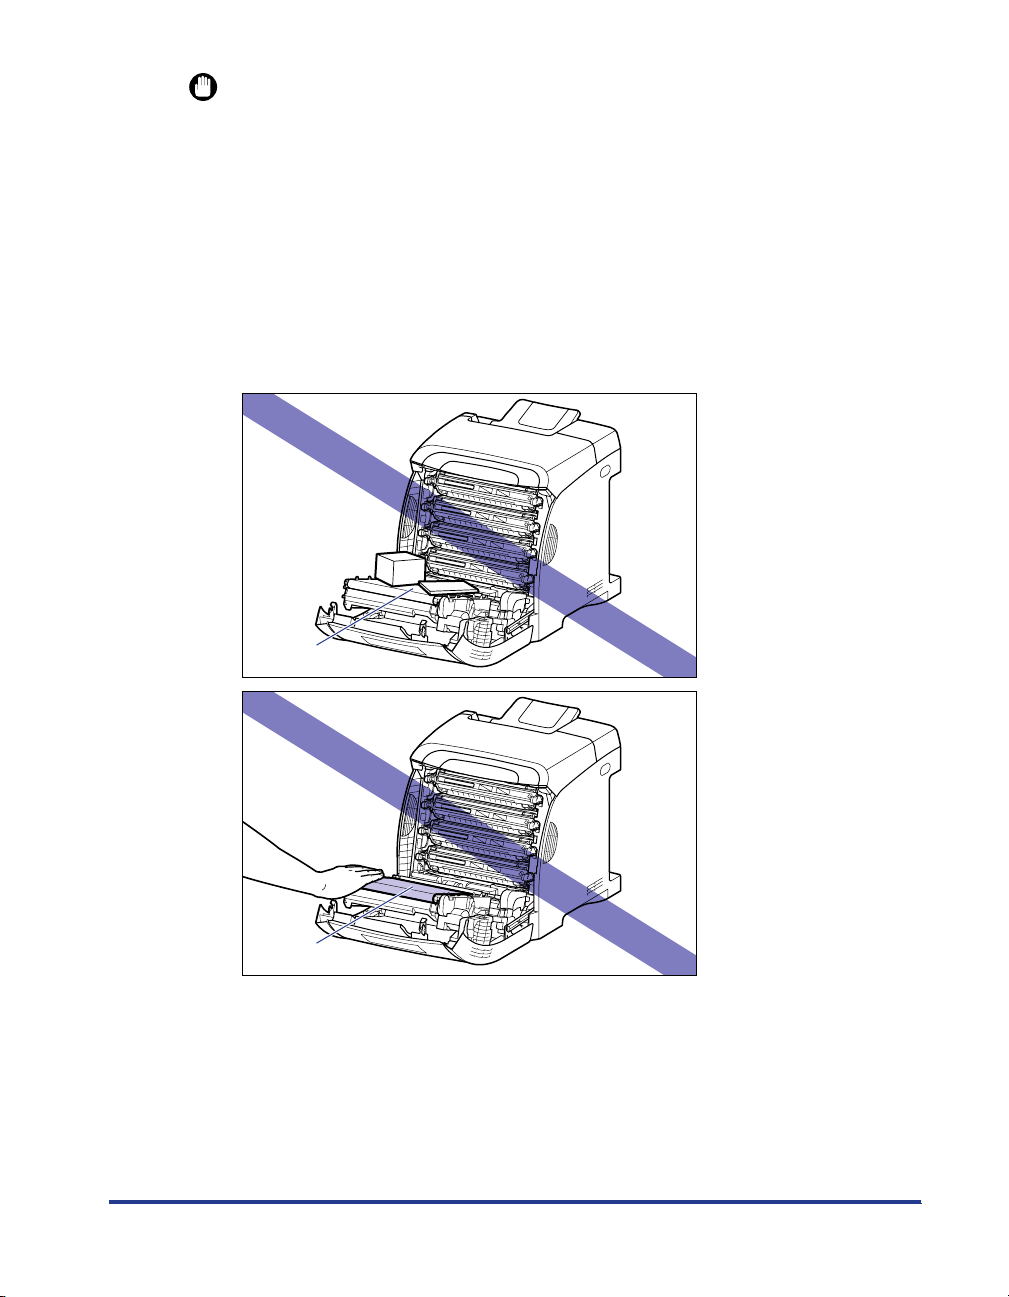
Do not place any object on or touch the transfer belt (A) of the ETB unit. The transfer belt
of the ETB unit is supplied with a function that cleans itself, therefore, do not clean the
belt even when the toner is on it. If the ETB unit is broken or transfer belt is damaged, this
may result in misfeeds or deterioration in print quality.
(A)
(A)
45
Page 47
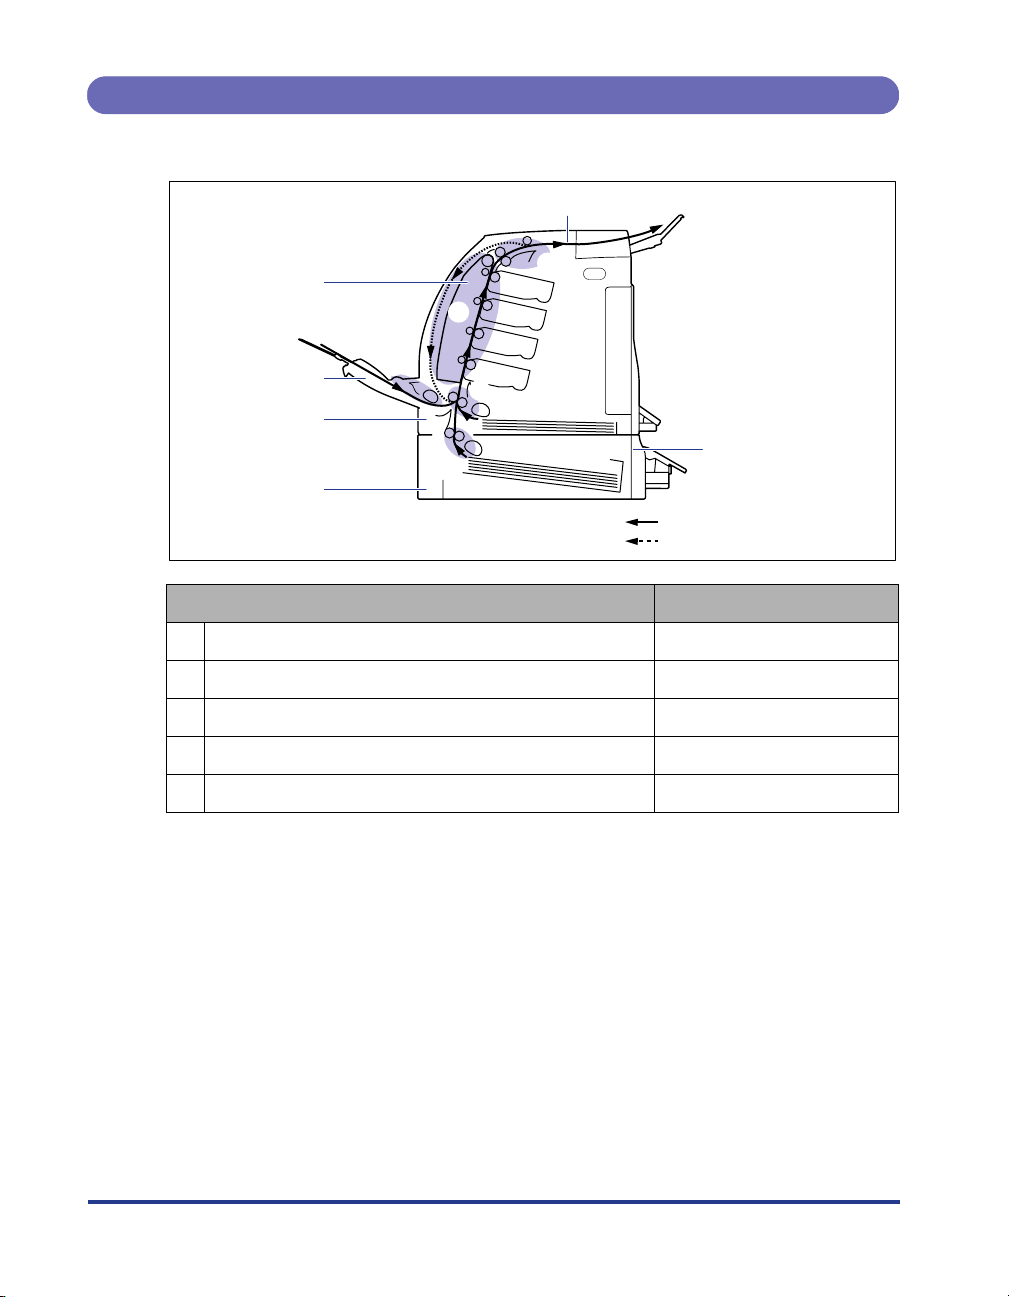
Paper Jam Area
The messages displayed in the display indicate where the paper is jammed.
Output Tray
Duplex Print
Tr ansport Area
a
b
Multi-purpose Tray
Cassette 1
c
d
e
Cassette 2
Paper Jam Area
Inside the top cover, Output tray
Inside the front cover, Duplex print transport area
Multi-purpose tray
Cassette 1
Cassette 2 (only when the paper feeder is installed)
a
Paper Feeder Unit
(Optional)
Paper flow for 1-sided printing
Paper flow for 2-sided printing
Display Message
ウエカバー エリア
マエカバー エリア
テザシトレイ エリア
カセット 1 エリア
カセット 2 エリア
b
c
d
e
46
Page 48
Procedure for Clearing Paper Jams
Remove any jammed paper using the following procedures.
IMPORTANT
The error message may remain if jammed paper is removed without opening the front
cover or top cover. In this case, open and close the front cover or top cover once.
1
Confirm all the messages that appear in the display.
Messages appear one at a time. Confirm all of them.
As the messages disappear when the cover is open, take a note of them if
required.
13ヨウシガツマリマシタ
マエカバーエリア
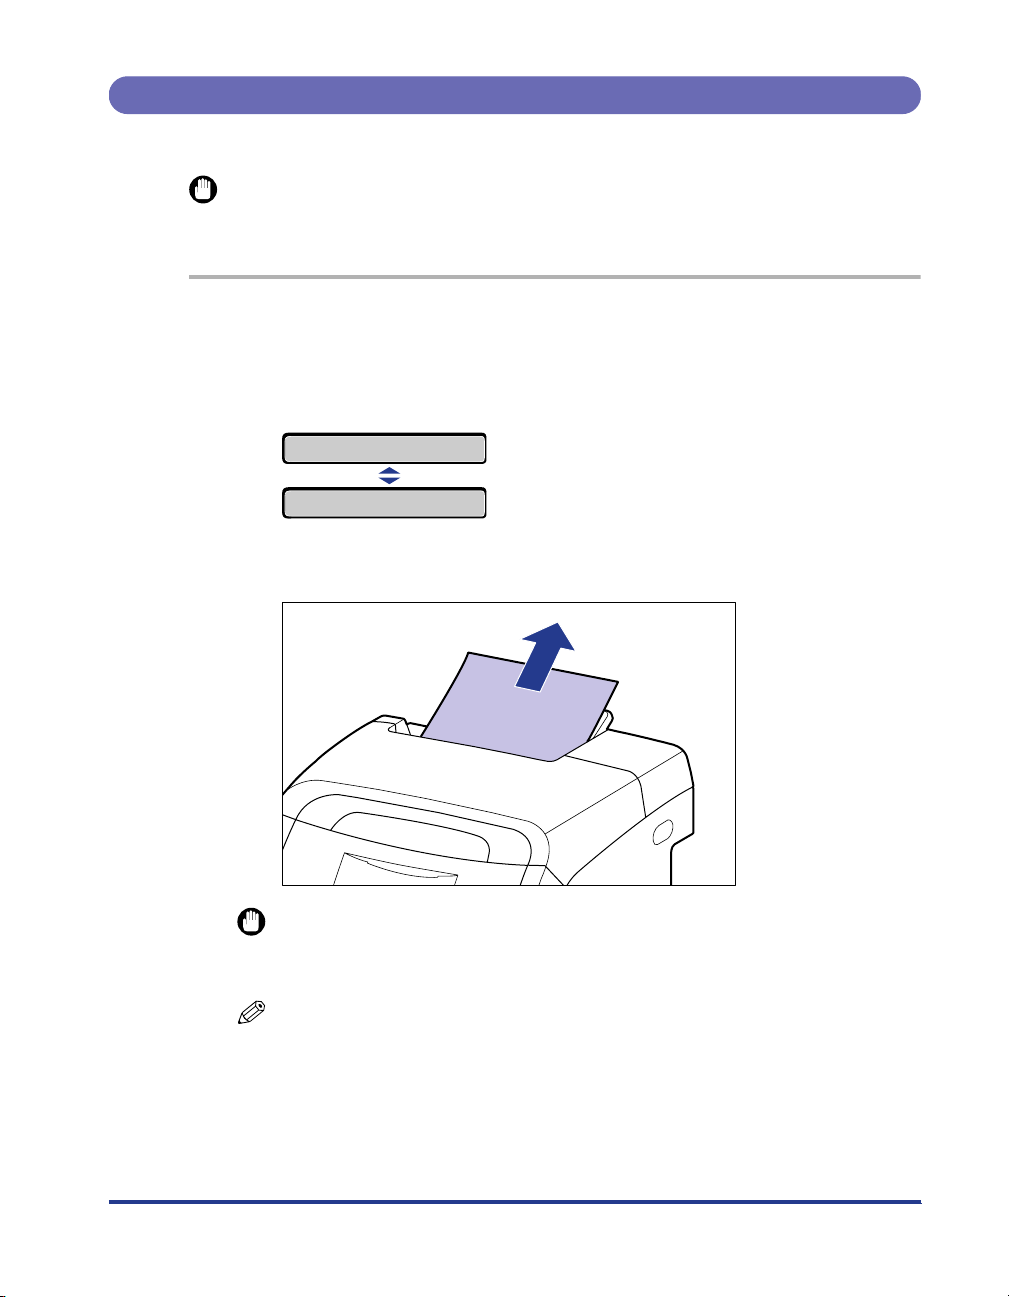
2
Check the output tray and remove any jammed paper.
IMPORTANT
If the jammed paper cannot be removed easily, do not try to remove it forcefully but
proceed to the next step.
NOTE
If unfixed toner is on the removed paper, it may adhere to the paper to be printed
next.
47
Page 49
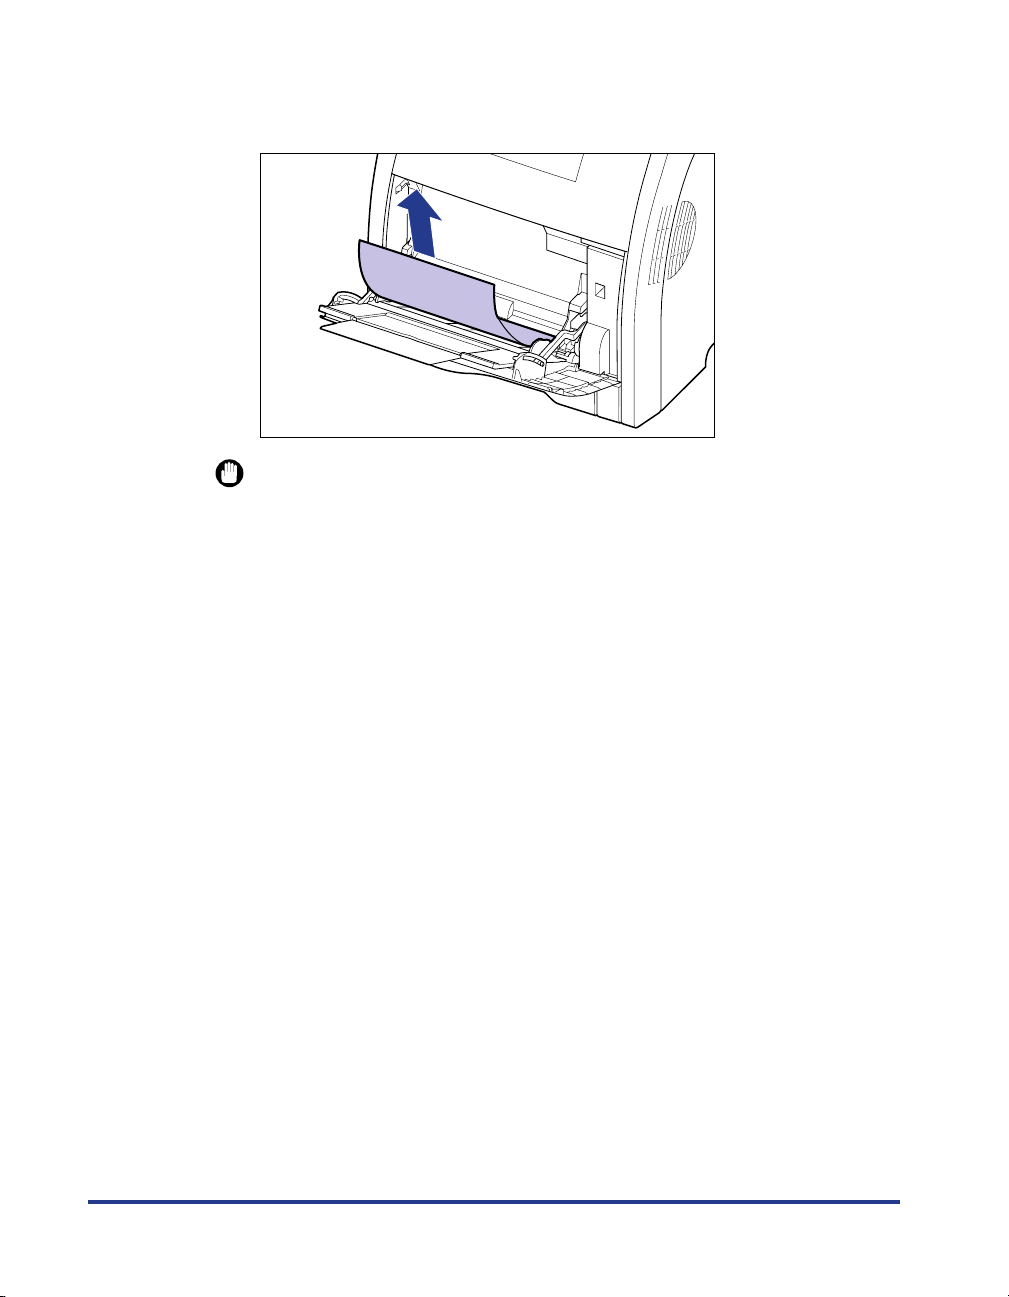
If you are using the multi-purpose tray, remove any paper
3
jammed in the multi-purpose tray.
IMPORTANT
If the jammed paper cannot be removed easily, do not try to remove it forcefully but
proceed to the next step.
48
Page 50
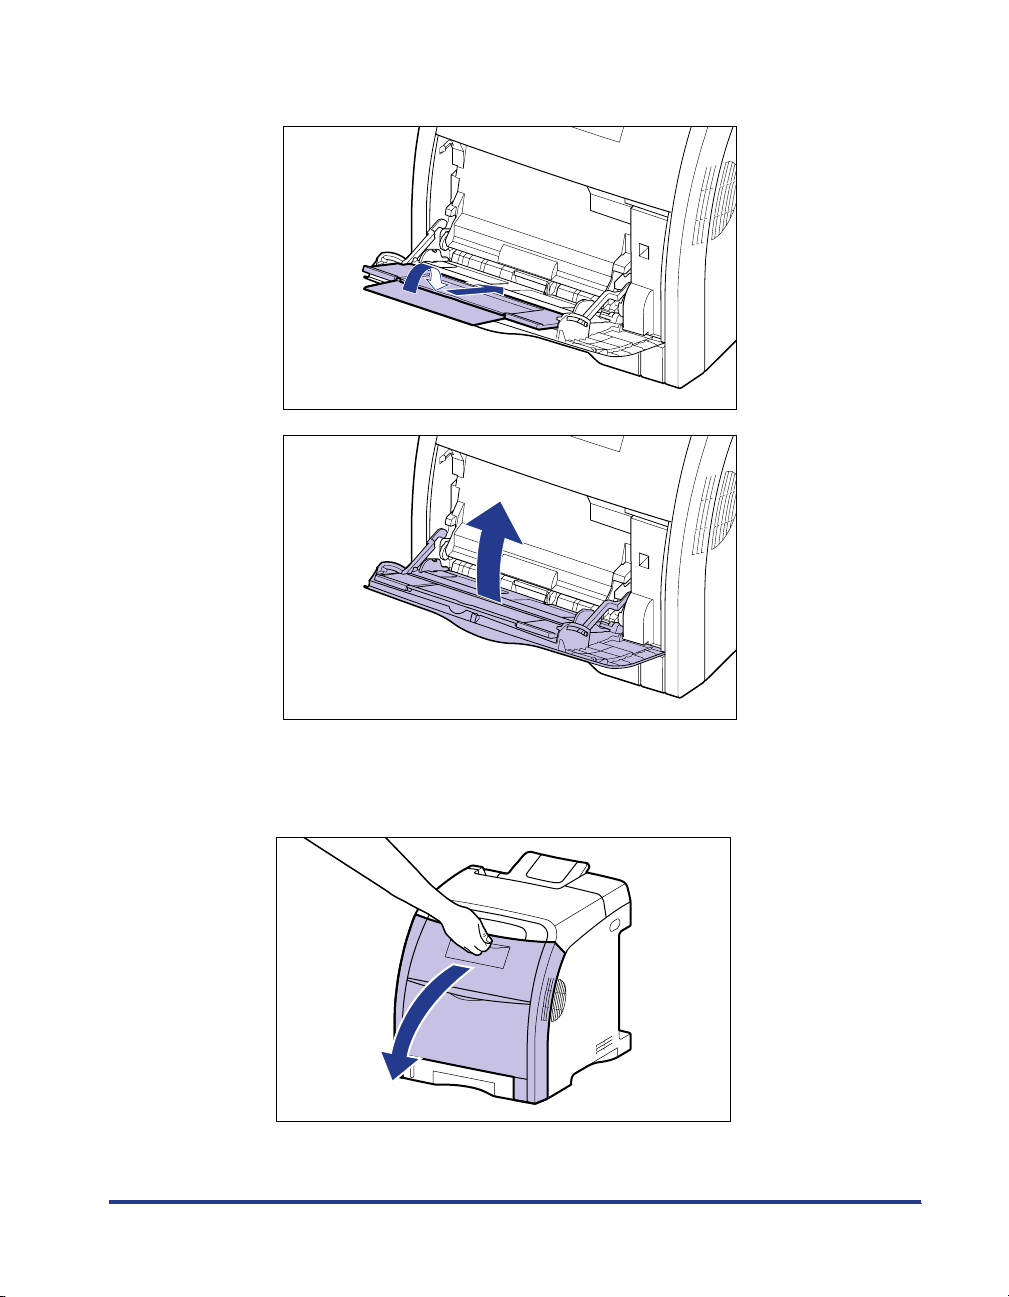
If you are using the multi-purpose tray, close it.
4
5
Open the front cover.
Holding the opening of the front cover, open it gently.
49
Page 51
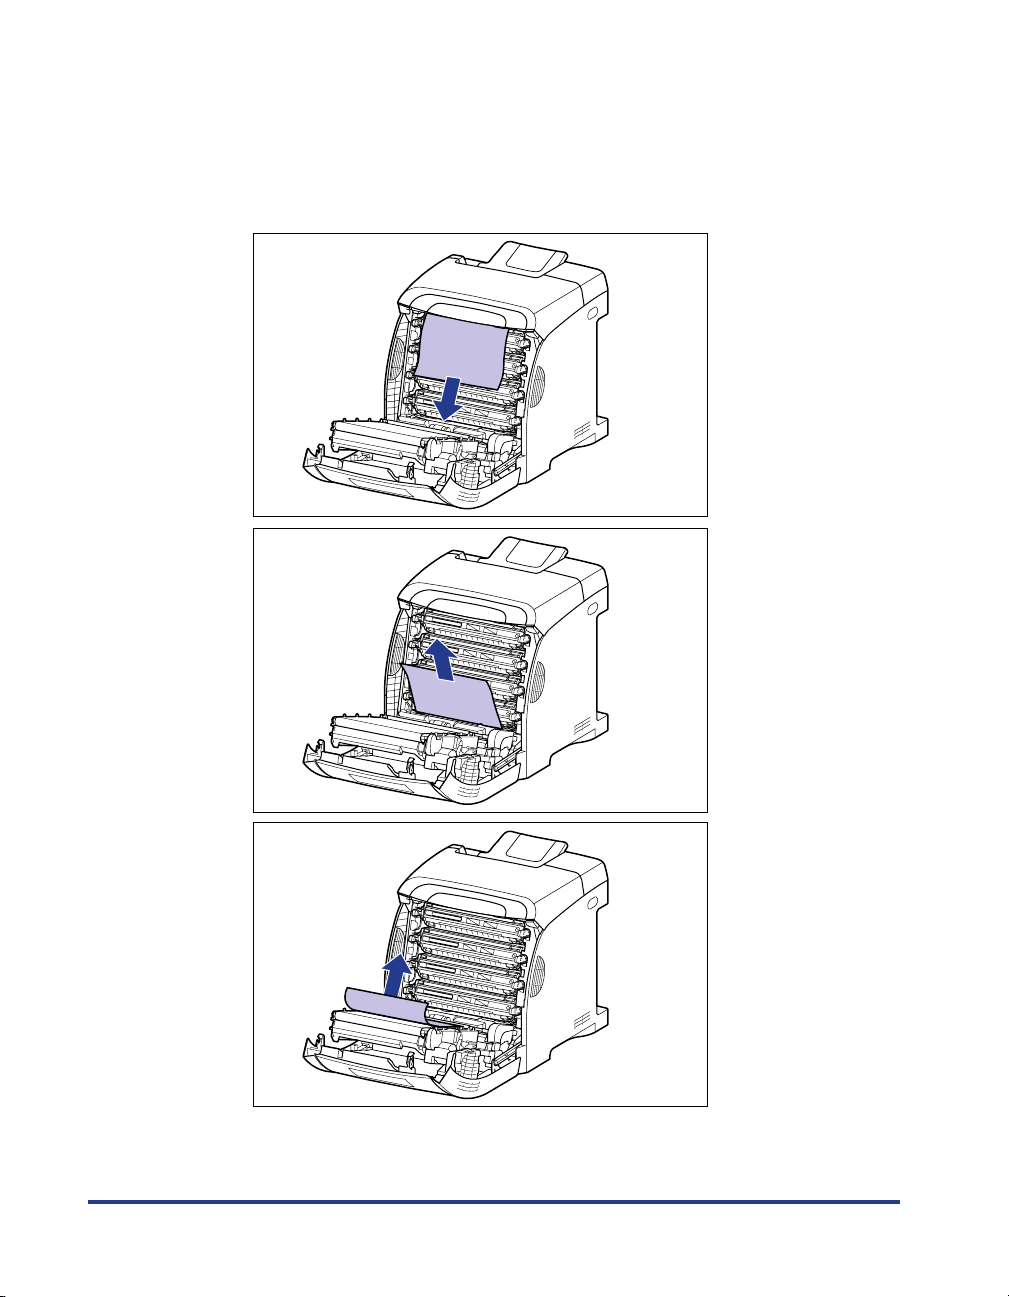
Remove any jammed paper by pulling it in the direction of the
6
arrow.
Remove the jammed paper in the direction of the arrow gently to prevent unfixed
toner from spilling. Remove the paper, being careful not to touch the transfer belt
of the ETB unit or toner cartridge.
50
Page 52
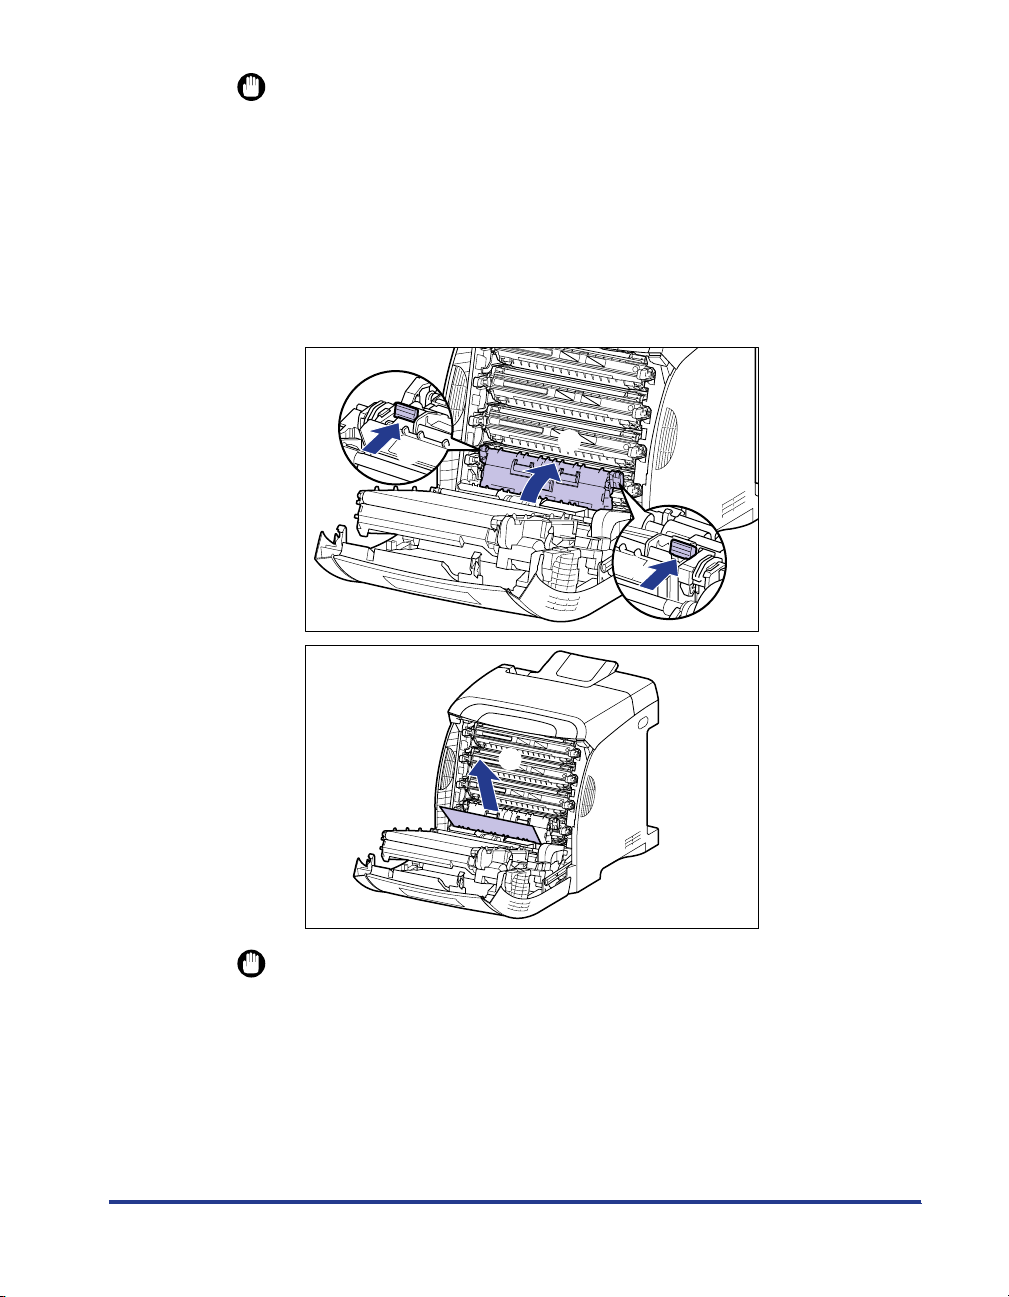
IMPORTANT
If the jammed paper cannot be removed easily, do not try to remove it forcefully but
proceed to the next step.
7
If a paper jam occurs when performing 2-sided printing,
perform the following procedure.
If you are not performing 2-sided printing, proceed to the next step.
❑ Press the lock release buttons on the duplex print transport guide a, raise it
b, and remove the jammed paper c.
a
c
IMPORTANT
If the jammed paper cannot be removed easily, do not try to remove it forcefully but
proceed to the next step.
b
a
51
Page 53
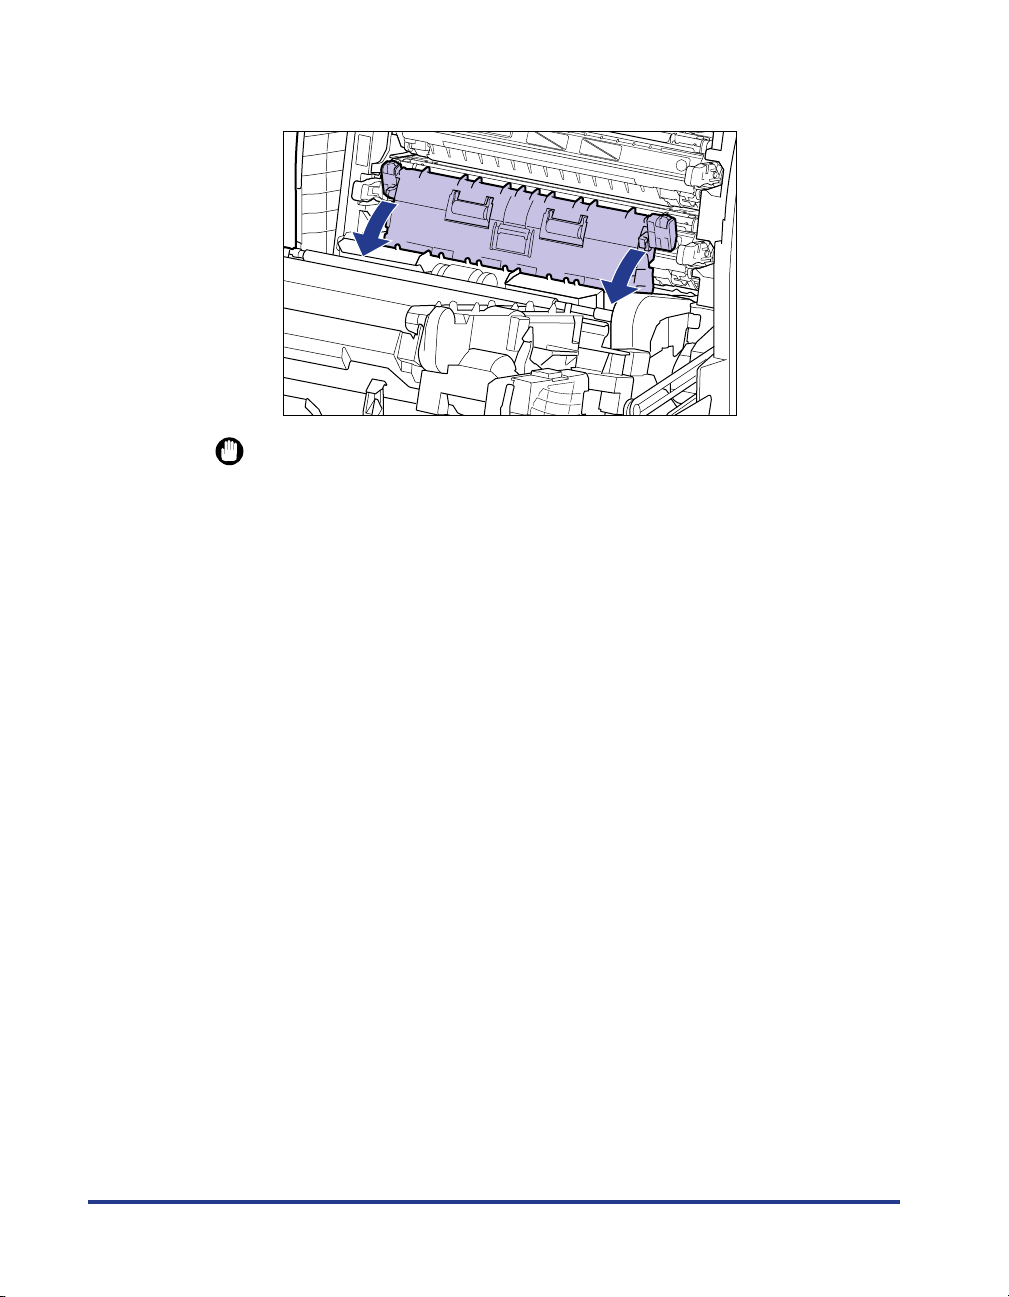
❑ Close the duplex print transport guide.
Close both sides of the duplex print transport guide firmly.
IMPORTANT
Make sure that the duplex print transport guide is closed completely. If the duplex
print transport guide is not closed completely, this may result in misfeeds or paper
jams.
52
Page 54
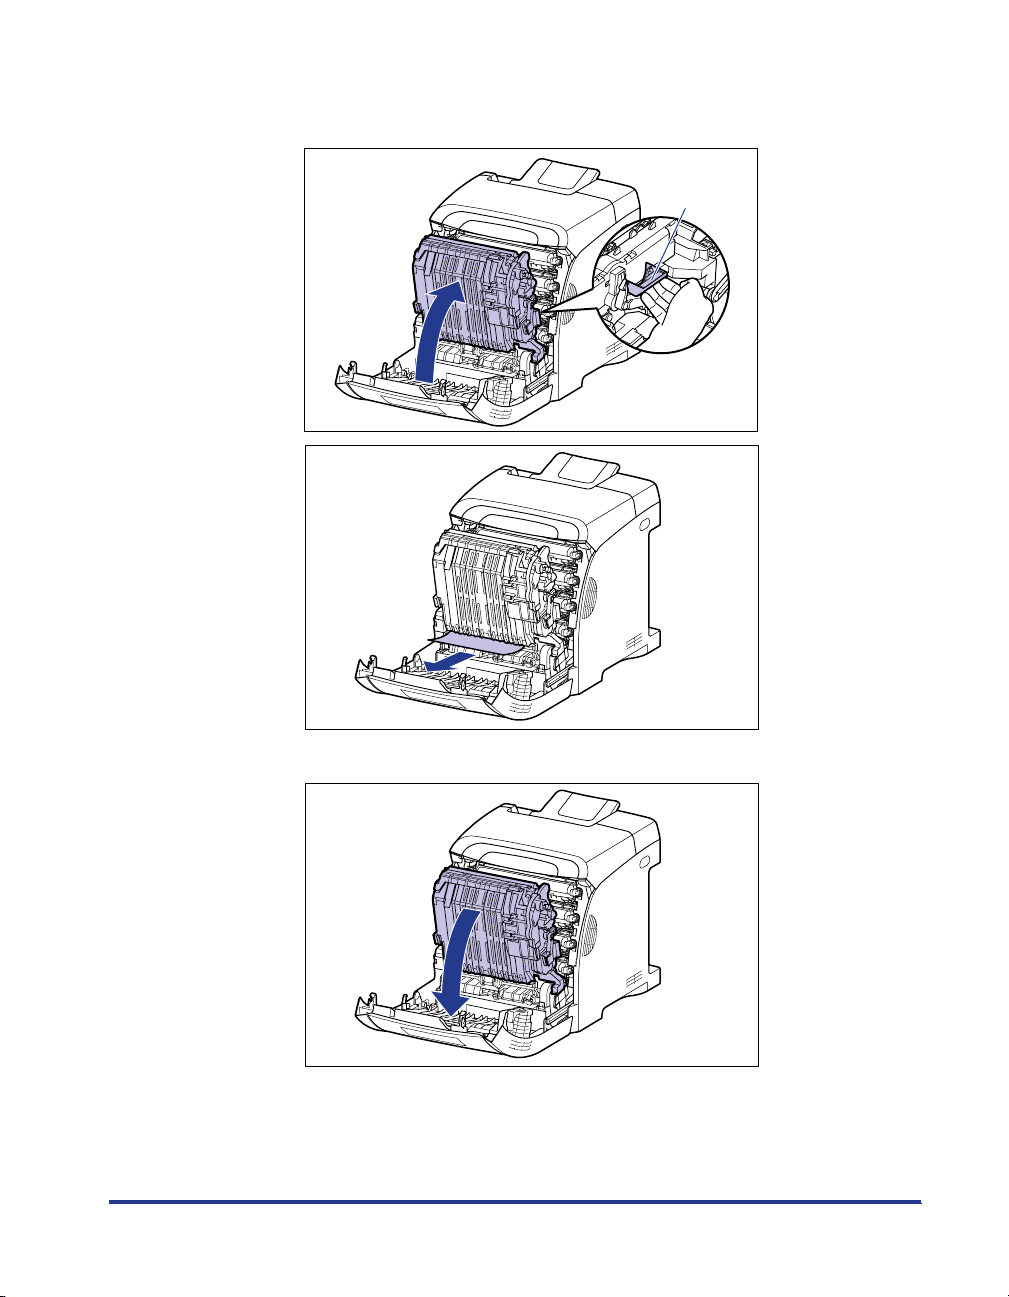
❑ While raising the tab (A) of the duplex unit with your right hand a, pull out the
jammed paper in the direction of the arrow to remove the paper b as shown in
the figure.
(A)
a
b
❑ Move the duplex unit back to its original position.
53
Page 55
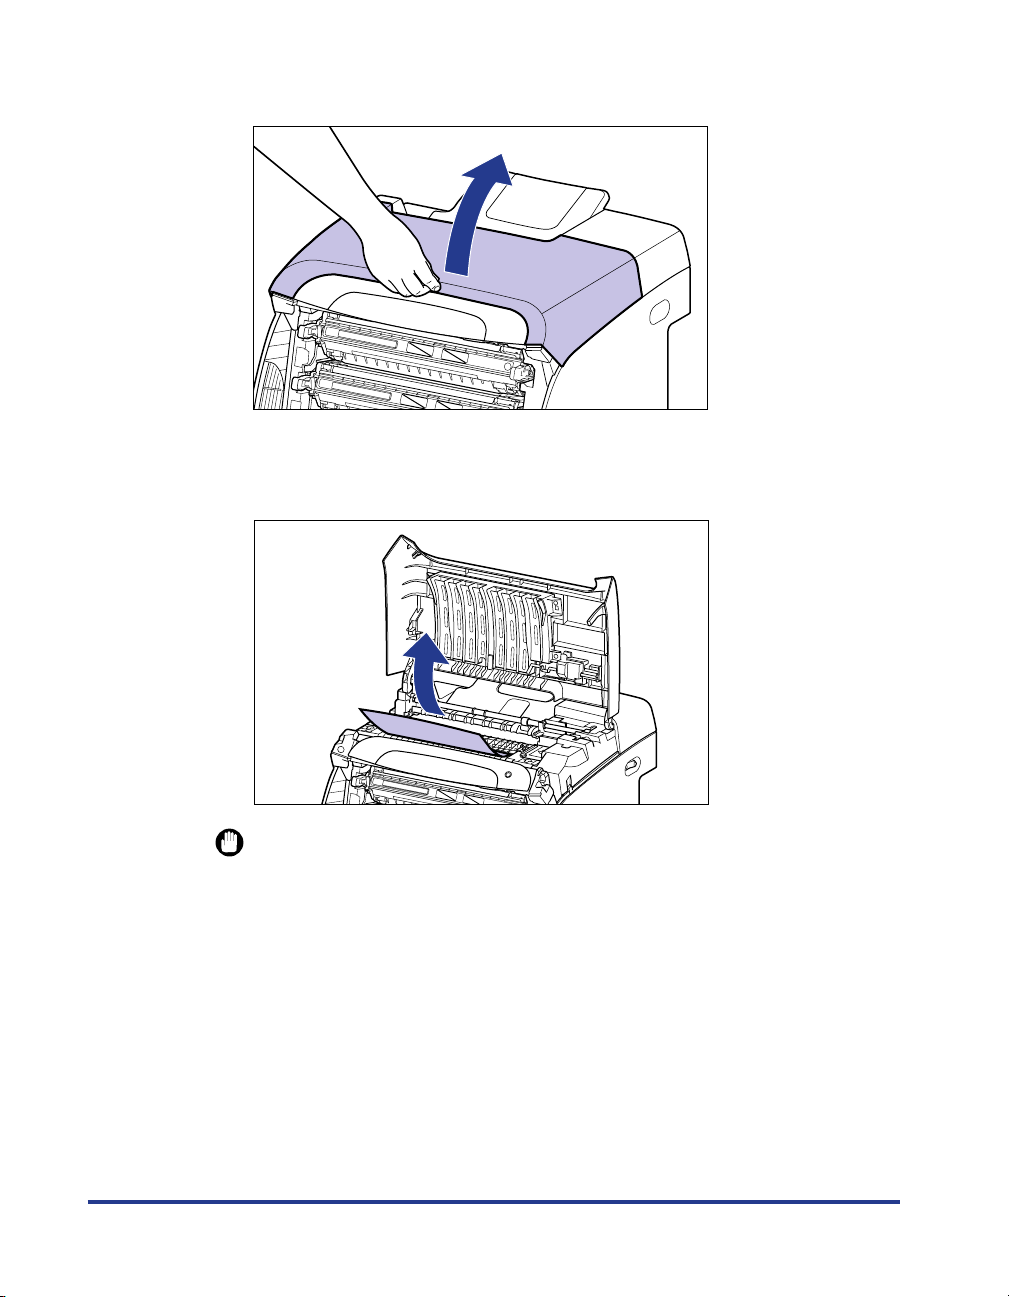
8
Open the top cover.
9
Remove any jammed paper by pulling it in the direction of the
arrow.
54
IMPORTANT
If the jammed paper cannot be removed easily, do not try to remove it forcefully but
proceed to the next step.
Page 56
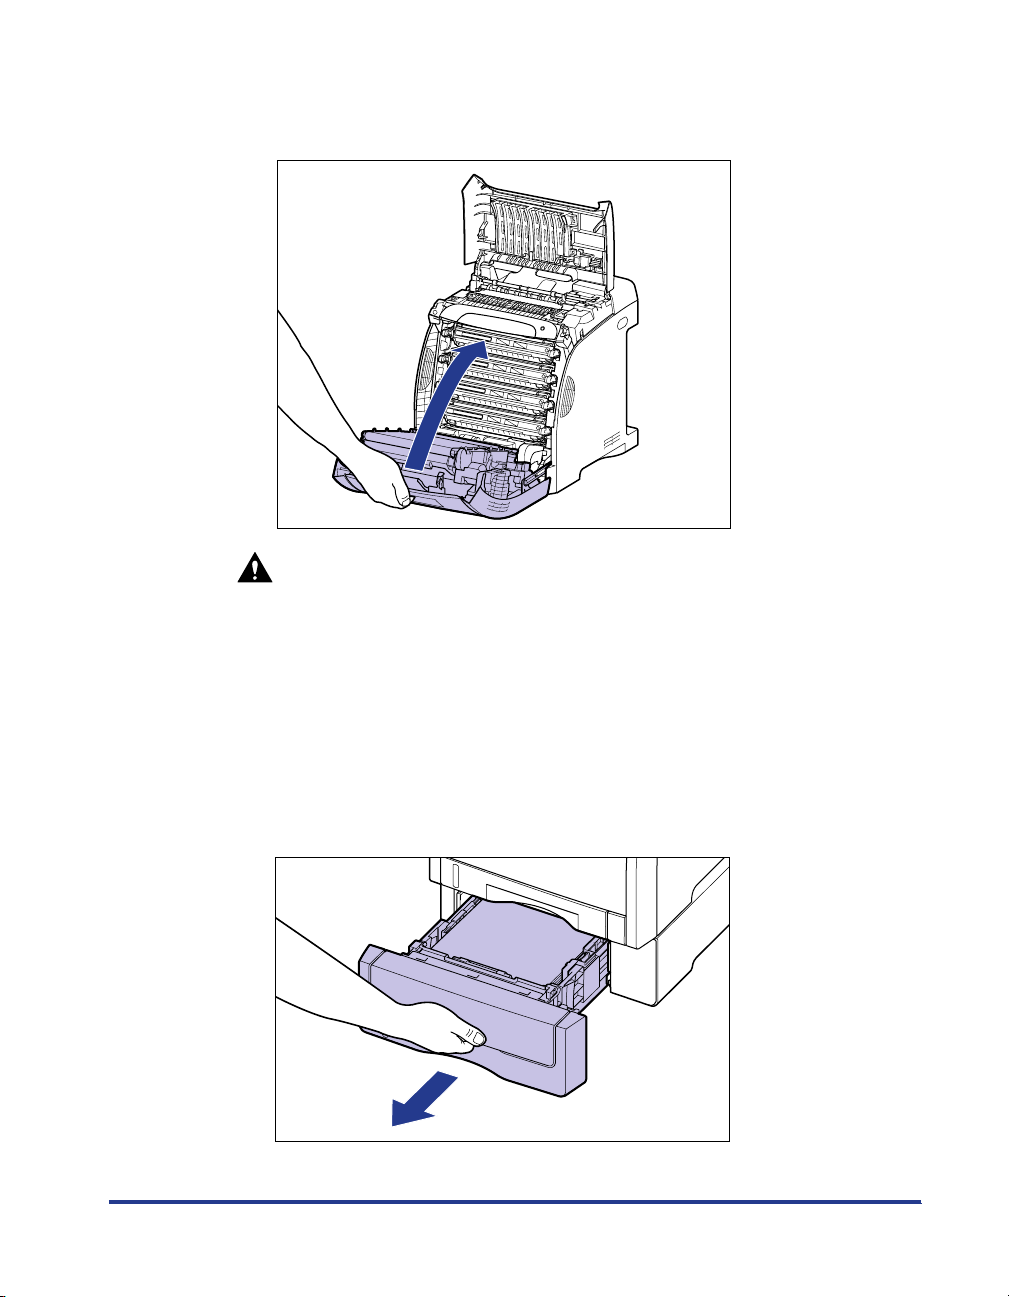
10
Close the front cover.
Holding the opening of the front cover, close it gently.
CAUTION
When closing the front cover, be careful not to catch your fingers.
11
Perform the following procedure with the top cover open. Be
careful so that the top cover does not close.
12
If the optional paper feeder is installed, pull out the paper
cassette of the paper feeder.
Pull out the paper cassette gently a.
a
55
Page 57
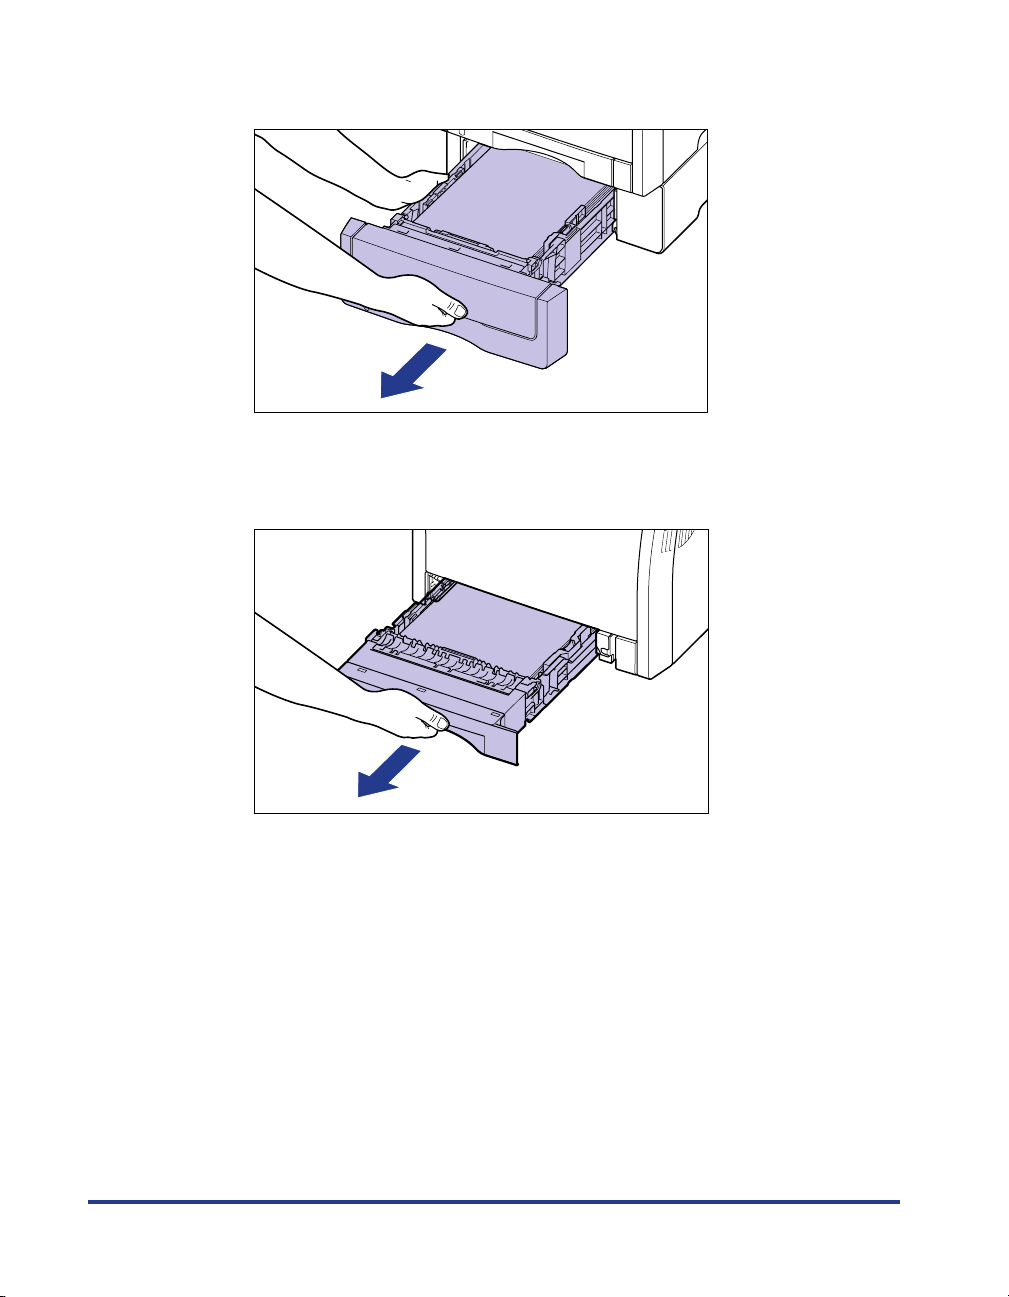
While holding the paper cassette with both hands, remove it from the paper
feeder as shown in the figure b.
b
13
Pull out the paper cassette of the printer.
Pull out the paper cassette gently a.
56
a
Page 58
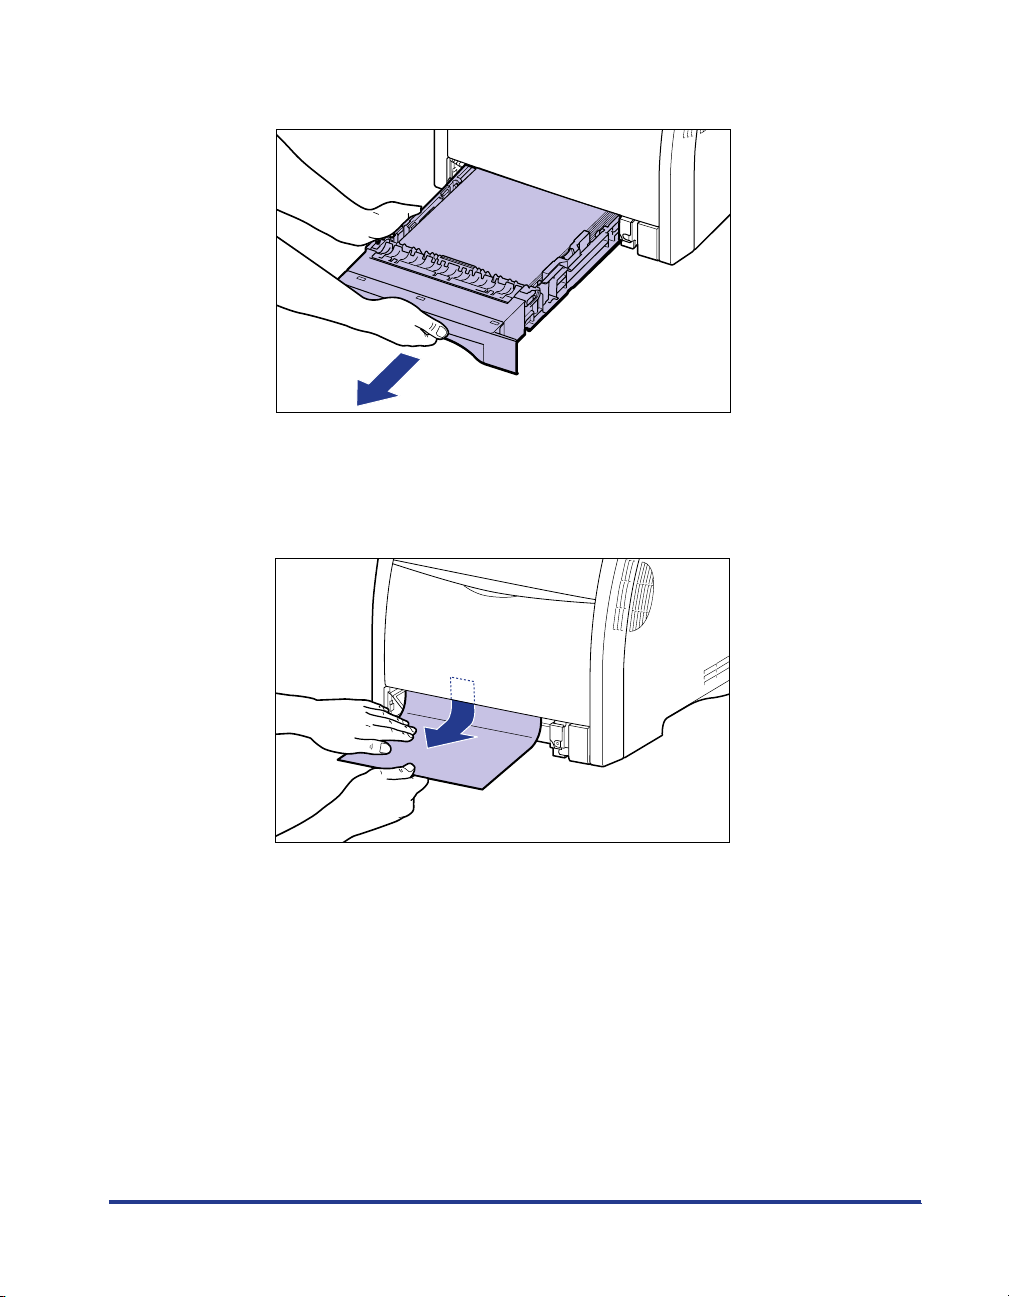
While holding the paper cassette with both hands, remove it from the printer unit
as shown in the figure b.
b
14
Remove any jammed paper while pushing it downward to
some extent.
In case of the printer unit
57
Page 59
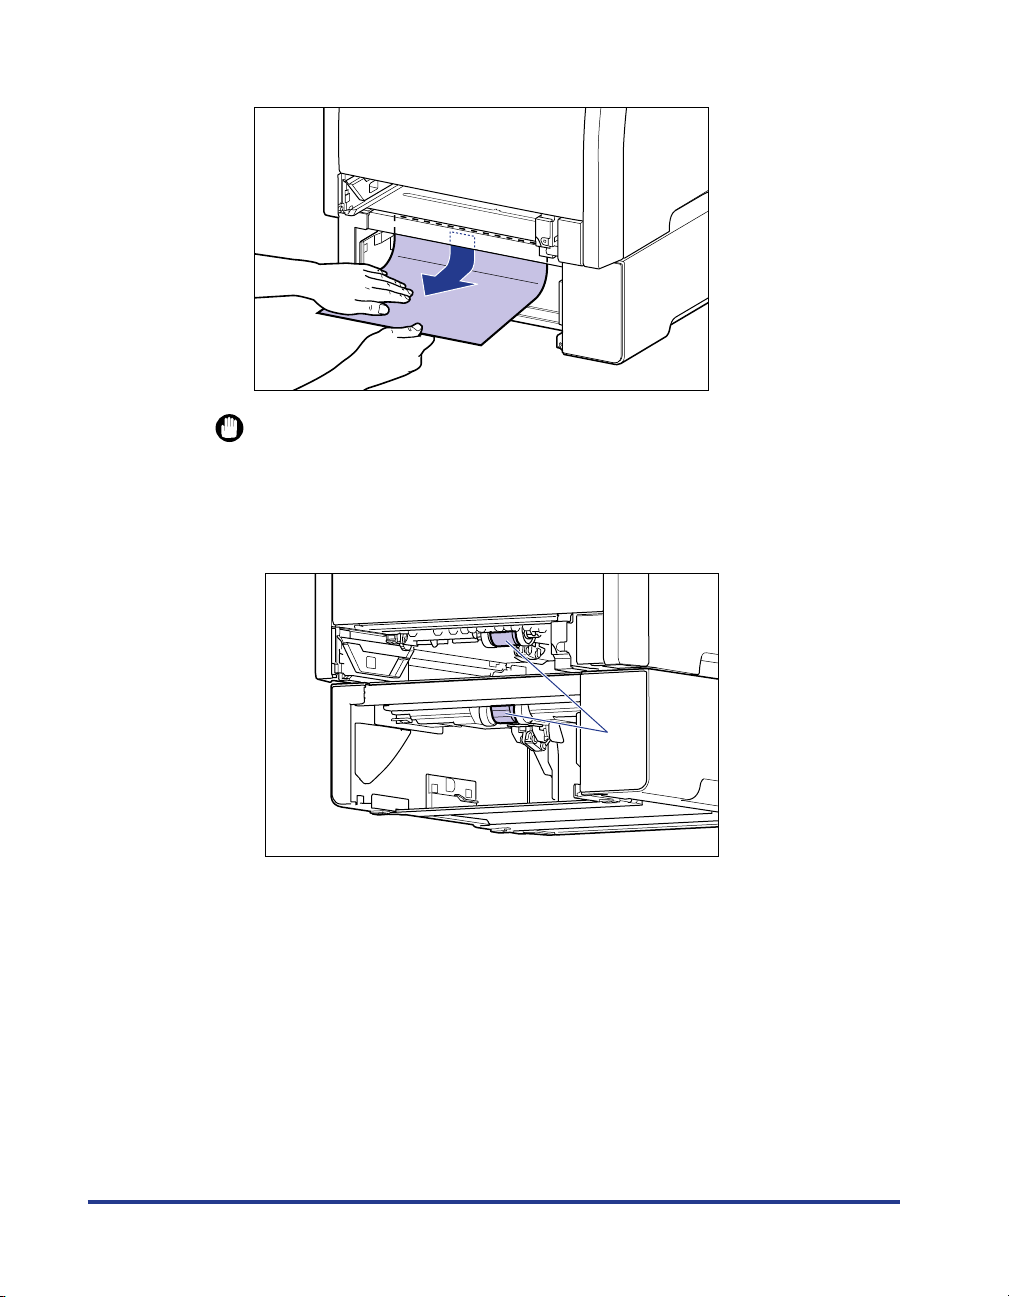
In case of the paper feeder
IMPORTANT
•
If the jammed paper cannot be removed easily, do not try to remove it forcefully but
open the front cover, and then see Step 6 and remove the jammed paper. If you try
to remove the jammed paper forcefully, the feed roller may come off.
•
Do not touch the feed rollers (A) in the printer unit and paper feeder. This may
result in damage to the printer or printer error.
58
(A)
Page 60
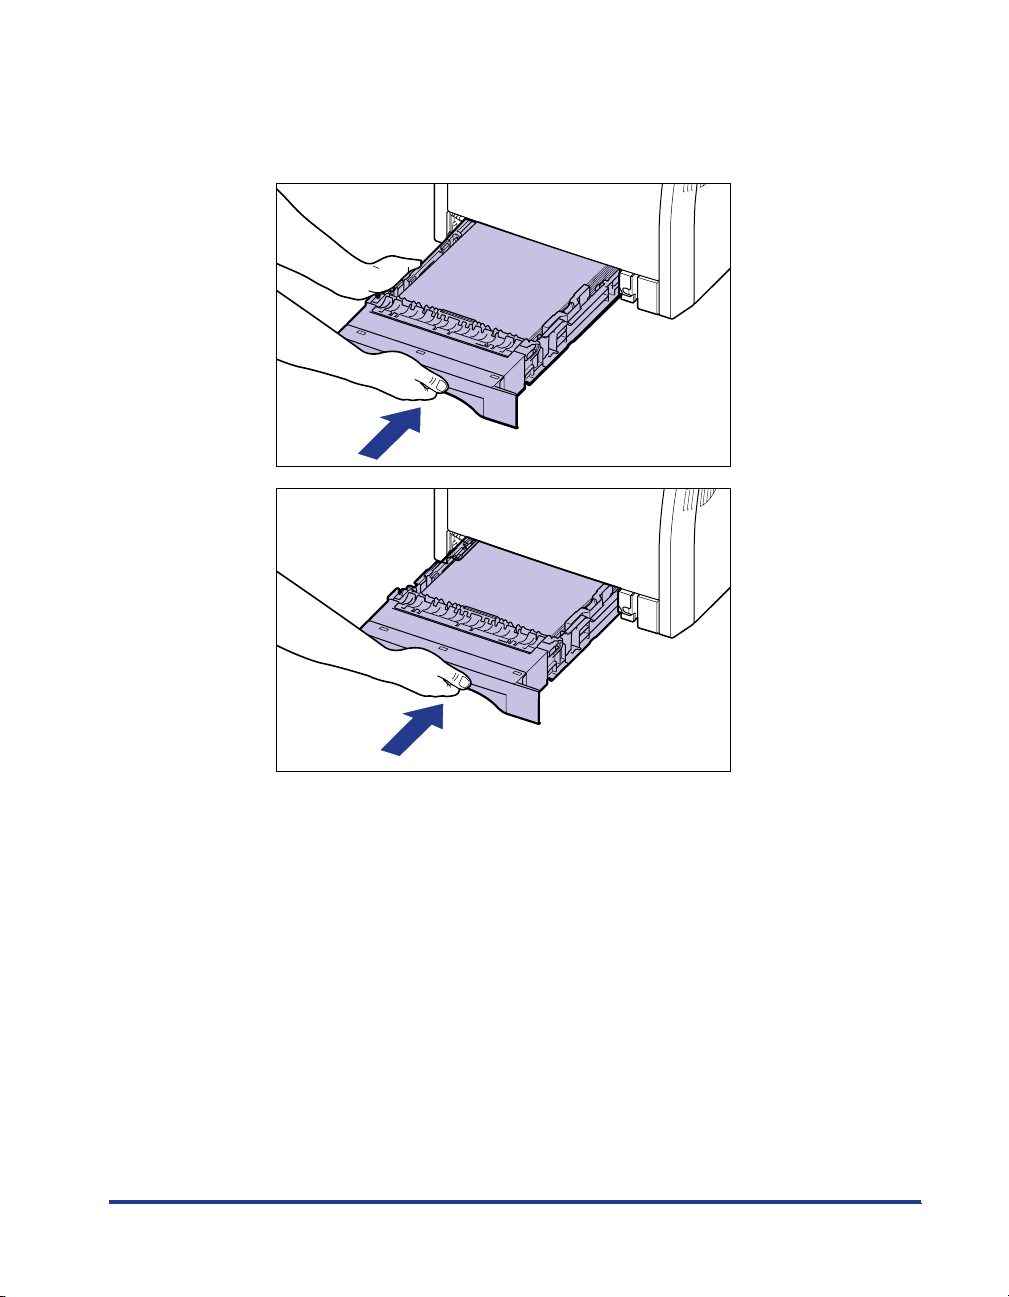
15
Set the paper cassette in the printer.
Push the paper cassette into the printer firmly until the front side of the paper
cassette is flush with the front surface of the printer.
59
Page 61
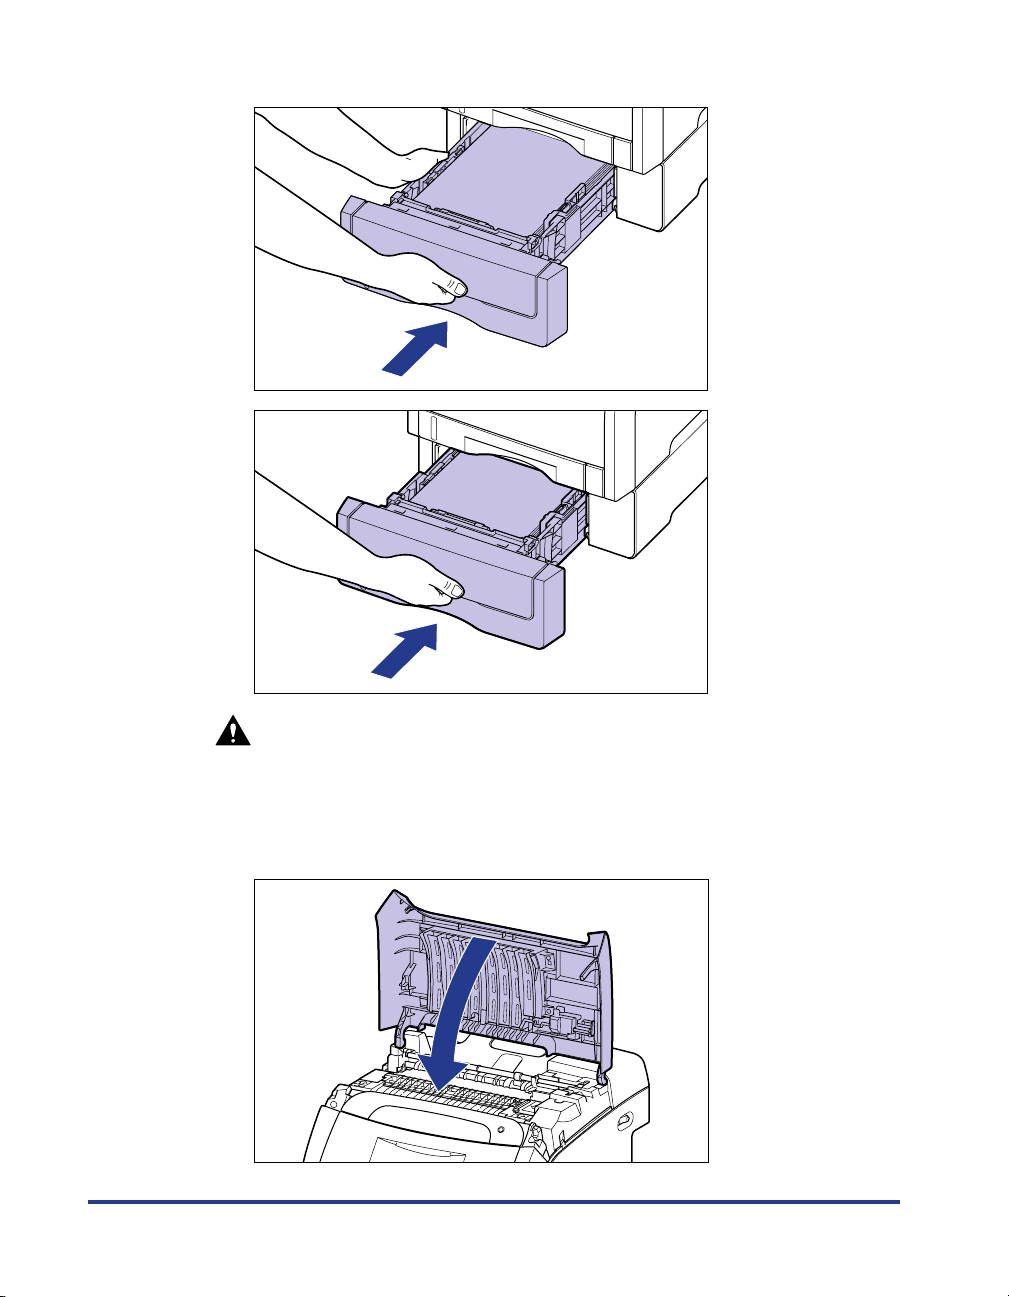
If the paper feeder is installed, set the paper cassette of the paper feeder also.
60
CAUTION
When setting the paper cassette in the printer, be careful not to catch your
fingers.
16
Close the top cover.
Page 62
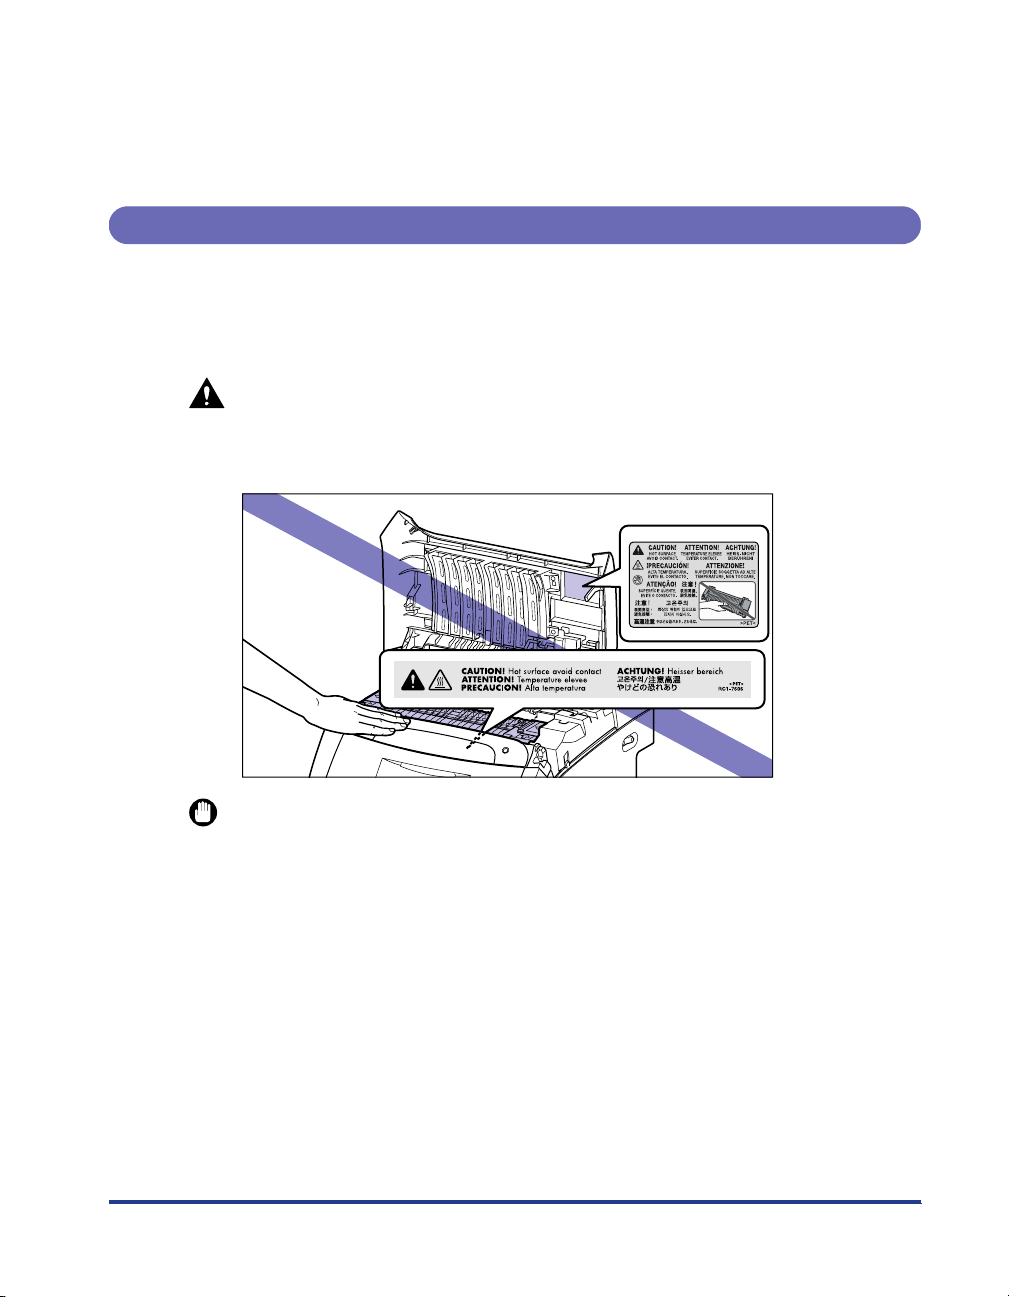
When the message that indicates a paper jam occurring inside the top cover
remains in the display even after the top cover is closed, the jammed paper may
still remain in the fixing unit. Remove the jammed paper following the procedure in
"When the Message That Indicates a Paper Jam Does Not Disappear" (See p.
61).
When the Message That Indicates a Paper Jam Does Not Disappear
When the message that indicates a paper jam occurring inside the top cover is
displayed in the display even after the jammed paper is removed, this indicates that
the jammed paper still remains in the fixing unit. Remove the fixing unit using the
following procedure to remove the jammed paper.
CAUTION
The fixing unit and its surroundings inside the printer are hot during use. Make
sure the fixing unit is completely cool before removing the jammed paper.
Touching the fixing unit when it is still hot may result in burns.
IMPORTANT
When you remove the fixing unit, the data being printed will be deleted because you have
to turn the power of the printer OFF. Print the data again after removing the jammed
paper.
61
Page 63
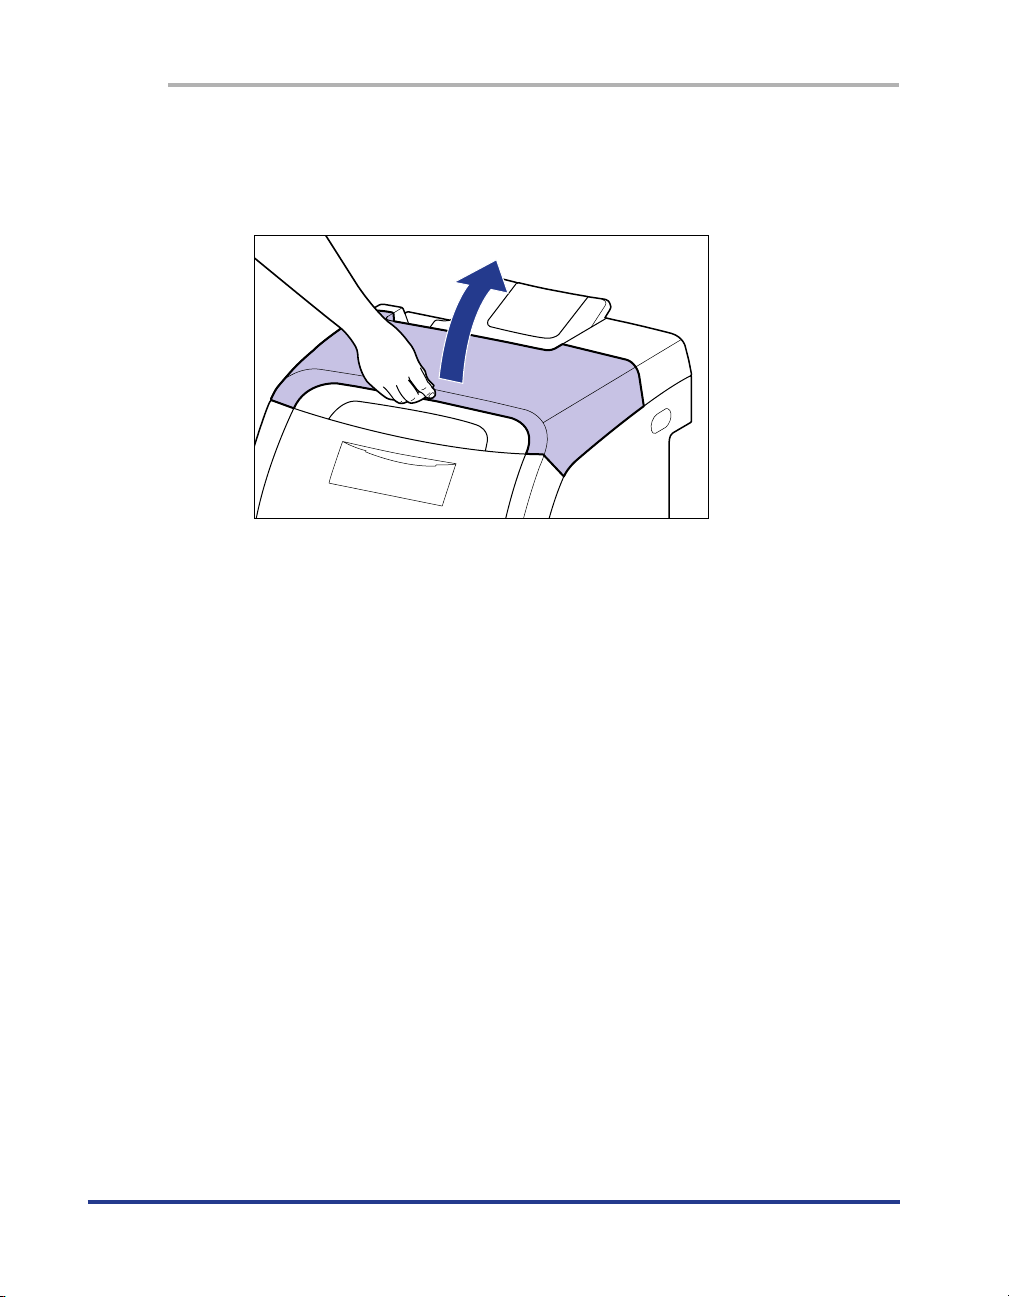
1
Turn the printer OFF.
2
Open the top cover.
62
Page 64
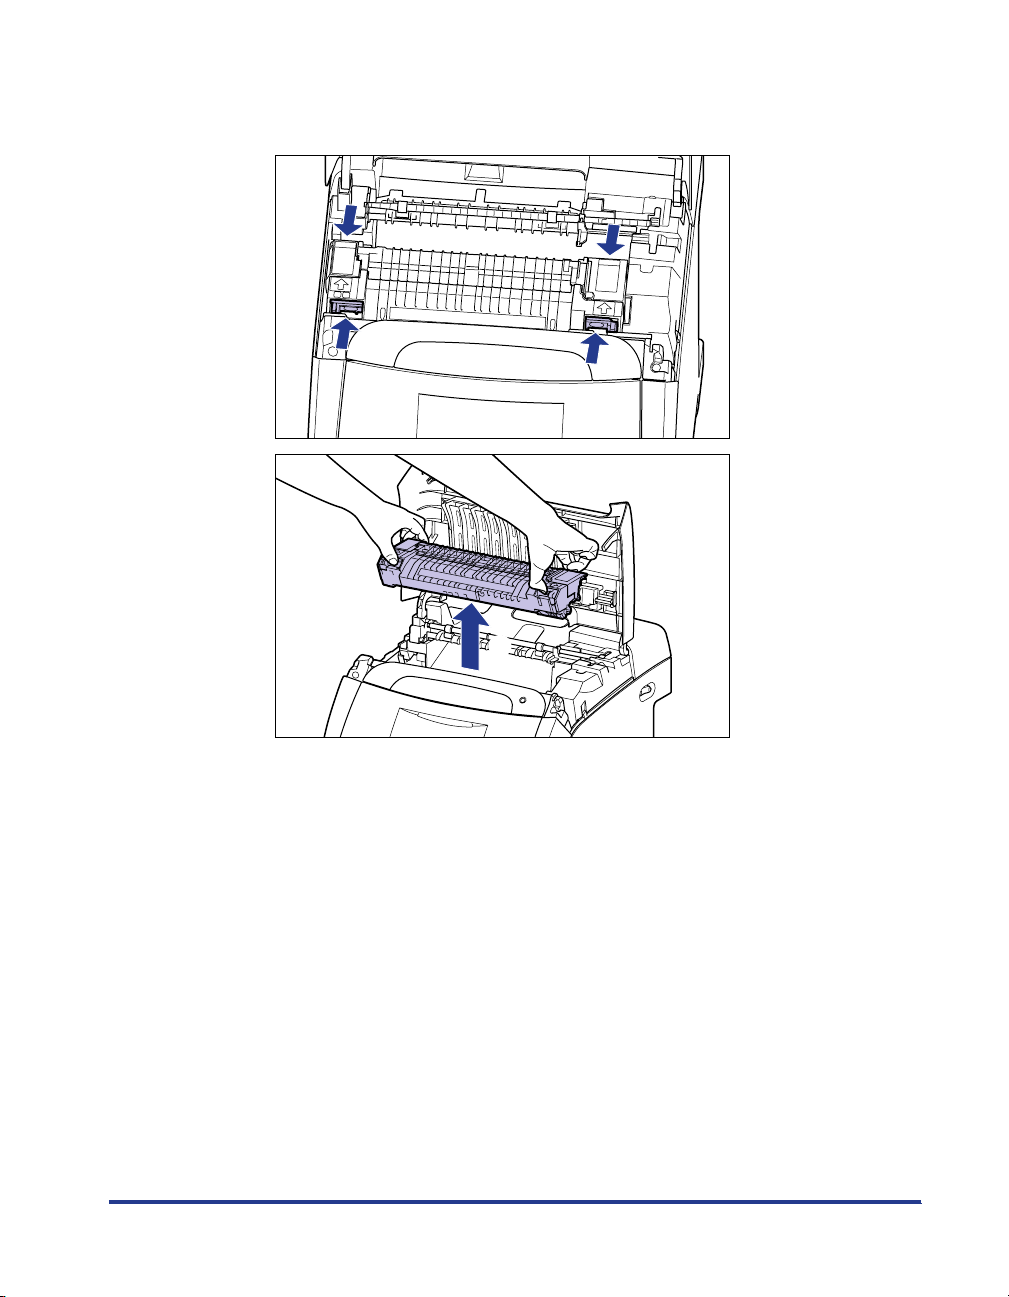
3
While holding the fixing unit by the arrowed portions a,
remove it gently as shown in the figure
b.
a
a
b
63
Page 65
4
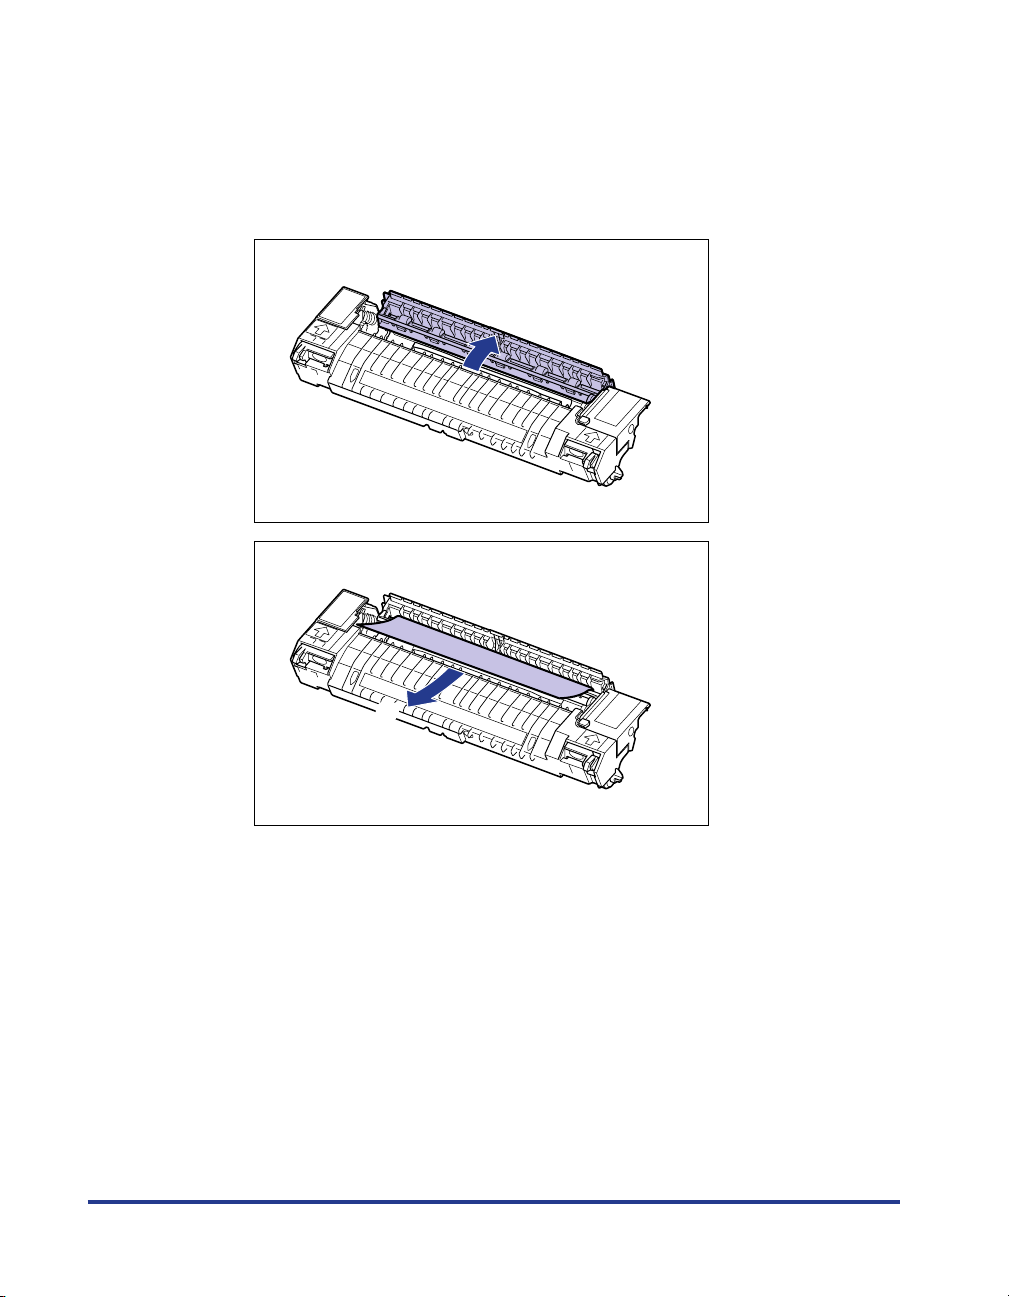
Open the cover of the fixing unit a, pull out the jammed paper
in the direction of the arrow to remove the paper
b as shown
in the figure.
Remove the jammed paper in the direction of the arrow gently to prevent unfixed
toner from spilling.
a
64
b
Page 66
5
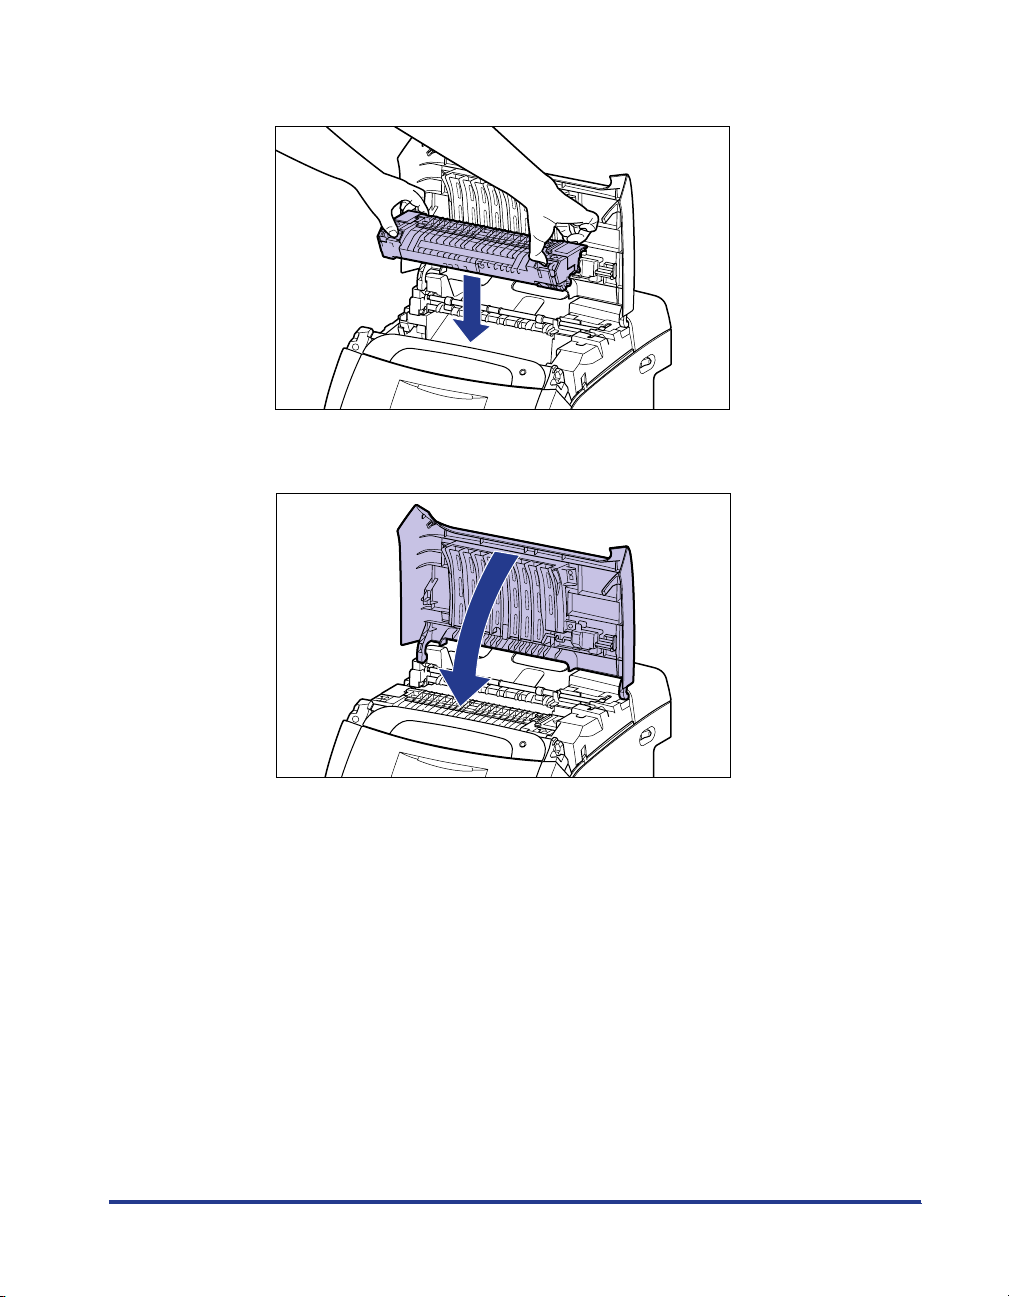
Install the fixing unit.
6
Close the top cover.
7
Turn the printer ON.
65
Page 67
Replacing the Toner Cartridges
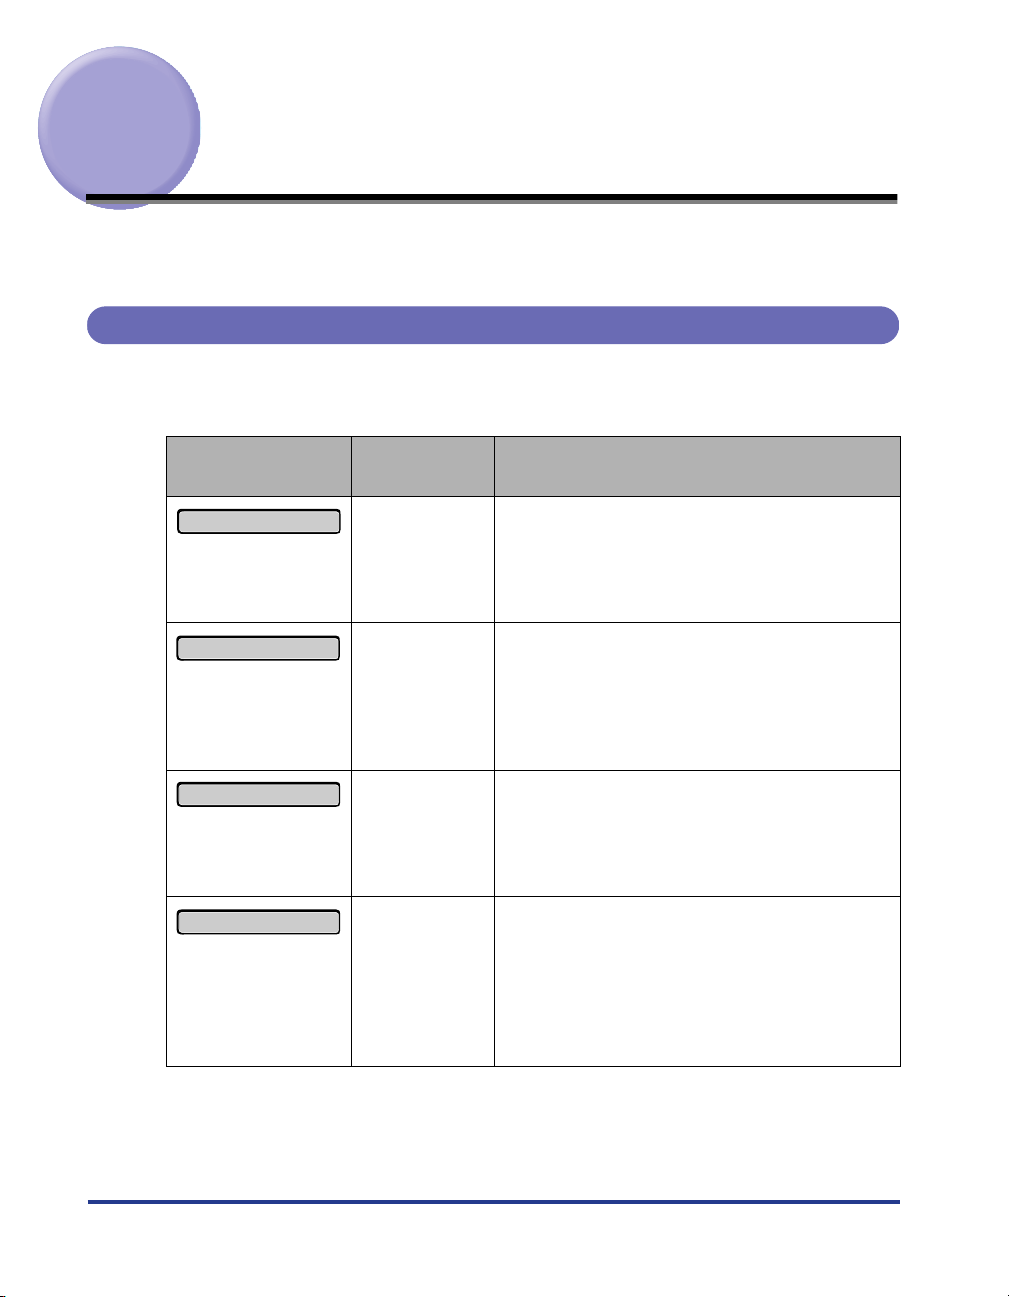
This section describes how to replace or handle the toner cartridges and
precautions on storing them.
When a Message Appears
Toner cartridges are consumable products. If the toner is running out during
printing, a message appears in the display.
Message
16
X
トナーヨウイ
(X indicates K, Y, M,
or C)
16
X
トナー
コウカン
(X indicates K, Y, M,
or C)
9GXトナーカクニン
(X indicates K, Y, M,
or C)
1GXトナーコウカン
(X indicates K, Y, M,
or C)
When it is
Displayed
When a toner
cartridge needs
to be replaced
soon
When a toner
cartridge needs
to be replaced
soon
When there is a
possibility that a
toner cartridge
has reached the
end of its life
When a toner
cartridge has
reached the end
of its life
Contents and Remedies
- You can continue to print.
- Have ready a new toner cartridge of the
indicated color.
- It is recommended that you replace the toner
cartridge before printing a large amount of data.
- The printer stops printing.
- You can continue to print by pressing [
オンライン
- Have ready a new toner cartridge of the
indicated color.
- It is recommended that you replace the toner
cartridge before printing a large amount of data.
- You can continue to print.
- You can continue printing for a while, however,
as this may result in damage to the printer, it is
recommended to replace the toner cartridge
with a new one.
- When <
1G K トナー コウカン
> appears, the
printer stops printing, and you cannot continue
the job.
- When <
1G X トナー コウカン
> (X = Y, M, C)
appears, you can print only in black and white.
- Replace the toner cartridge of the indicated
color with a new one.
].
66
* Whether <
cartridge has reached depends on the setting for <
set to display <
* "K", "Y", "C", and "M" in a message indicate black, yellow, cyan, and magenta respectively.
16 X トナー ヨウイ
16 X トナー ヨウイ
> or <
16 X トナー コウカン
ケイコク ショリ
> in the default settings.
> appears when lifetime of the toner
> in the
セットアップ
menu. The printer is
Page 68
IMPORTANT
If the printing appears faint or inconsistent even when a message does not appear, this
may be due to any toner cartridge reaching the end of its life. Do not continue to use the
toner cartridge, and replace it with a new one when there is deterioration in print quality.
When you are replacing a toner cartridge, be sure to use a toner cartridge designed for
this printer.
Model Name Supported Canon Genuine Toner Cartridge
Cartridge 311 Black
LBP5400
NOTE
•
The lifetime of the toner cartridges (Canon Genuine Cartridges) designed for this printer
is as follows. The numbers of the pages are estimated when printing in the following
conditions.
Printing ratio: 5 %; Print density: the default; Paper size: A4 or Letter; Paper type: plain
paper
- Cartridge 311 Black: approx. 6,000 pages
- Cartridge 311 Yellow: approx. 6,000 pages
- Cartridge 311 Magenta: approx. 6,000 pages
- Cartridge 311 Cyan: approx. 6,000 pages
•
Depending on the printing preferences or printing environment such as the intermittency
of printing, paper types and paper sizes, the number of pages you can print may be half
this number.
•
When the toner consumption is low due to low printing ratio, printing of the expected
number of print pages may not be able to be achieved. Also, if you print in color, more
than one cartridges may reach the end of their life at the same time.
•
Even if you print in black and white, this may affect the life of the cartridges of magenta,
yellow, and cyan due to the printer structure.
Cartridge 311 Yellow
Cartridge 311 Magenta
Cartridge 311 Cyan
Replacing the Toner Cartridges
If any of the following messages appears, replace the toner cartridge of the
indicated color with a new one.
<
•
1G K トナー コウカン
<
•
1G Y トナー コウカン
<
•
1G M トナー コウカン
<
•
1G C トナー コウカン
WARNING
Do not throw a used toner cartridge into open flames, as this may cause the
toner remaining inside the cartridge to ignite, resulting in burns or a fire.
>...Replace the black toner cartridge.
>...Replace the yellow toner cartridge.
>...Replace the magenta toner cartridge.
>...Replace the cyan toner cartridge.
67
Page 69
CAUTION
Take care not to allow the toner to come into contact with your hands or
clothing, as this will dirty your hands or clothing. If they become dirty, wash
them immediately with cold water. Washing with warm water will set the toner
and make it impossible to remove the toner stains.
IMPORTANT
Dispose of the packing materials according to local regulations.
•
Be sure to use only the toner cartridges designed for this printer.
•
NOTE
The packing materials may be changed in form or position to be placed, or may be added
or removed without notice.
1
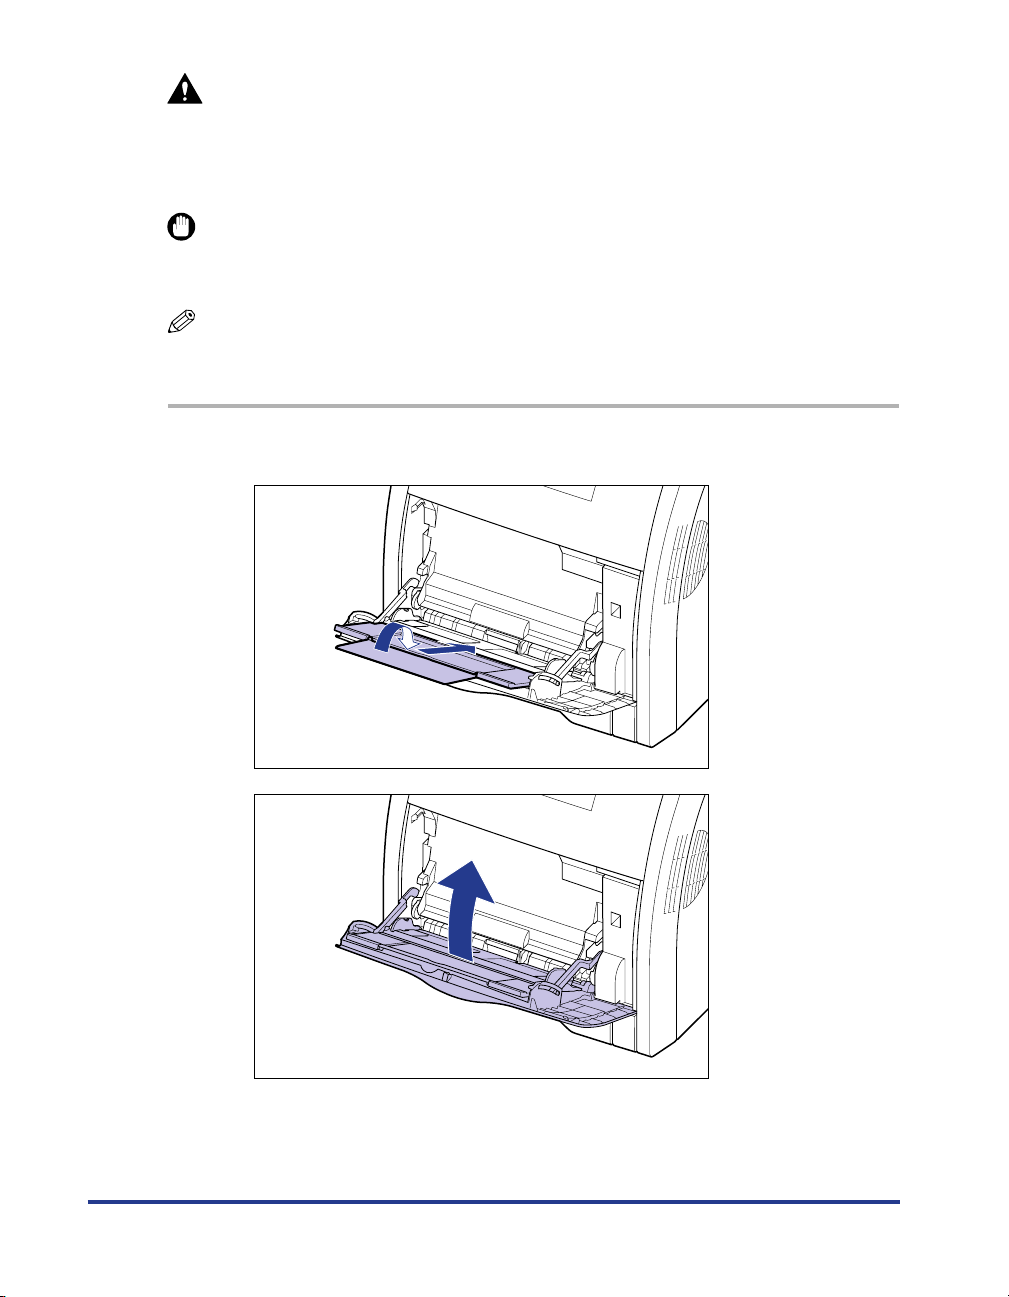
If you are using the multi-purpose tray, close it.
68
Page 70
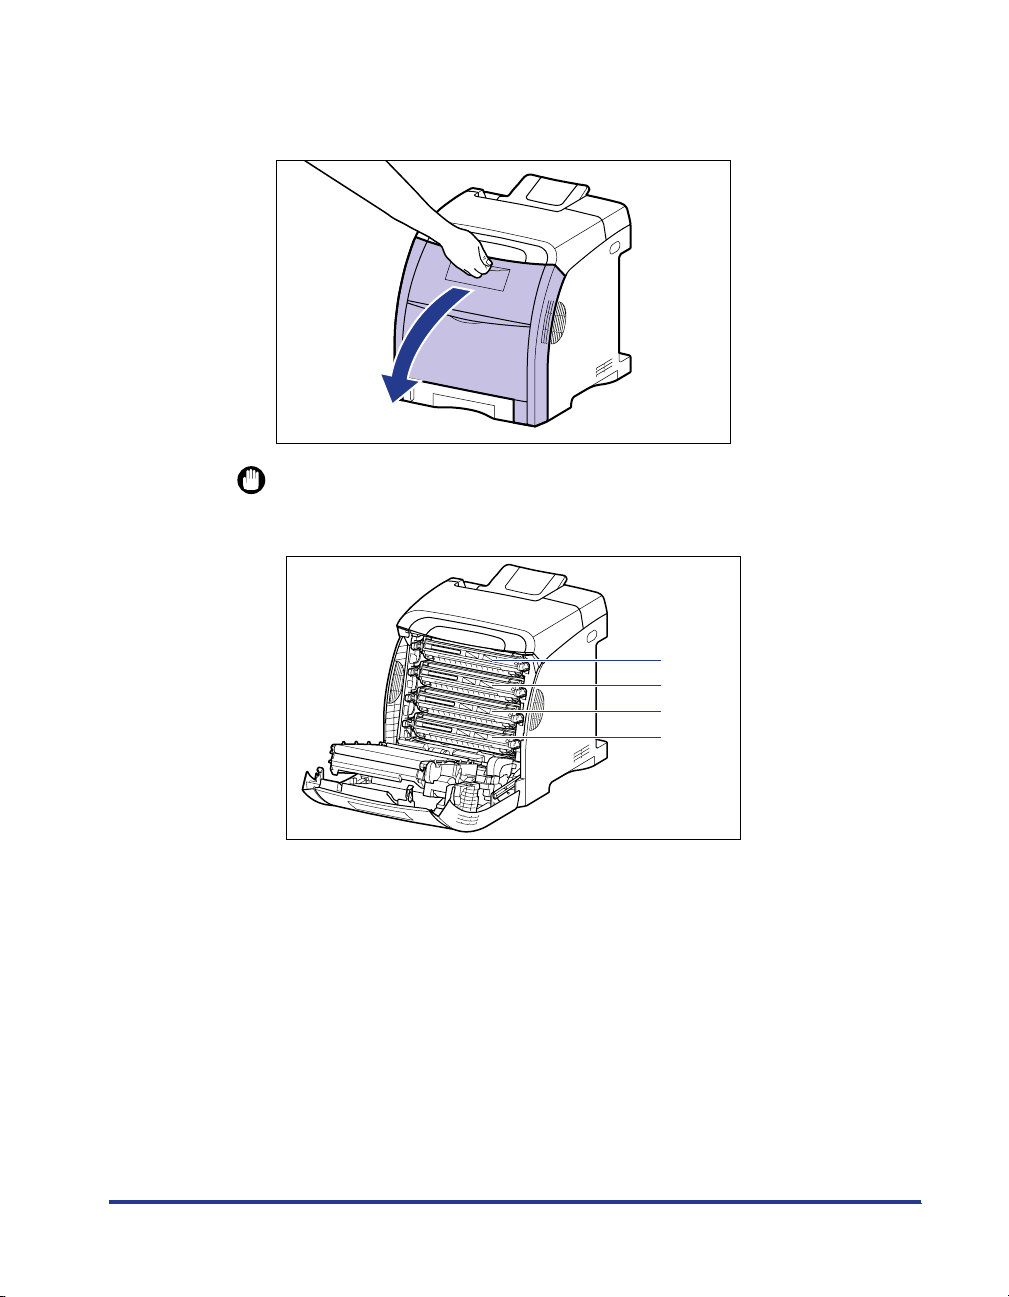
Open the front cover.
2
Holding the opening of the front cover, open it gently.
IMPORTANT
The toner cartridges are installed in order of black, yellow, cyan, and magenta from
the top as shown in the figure.
Black
Yellow
Cyan
Magenta
69
Page 71
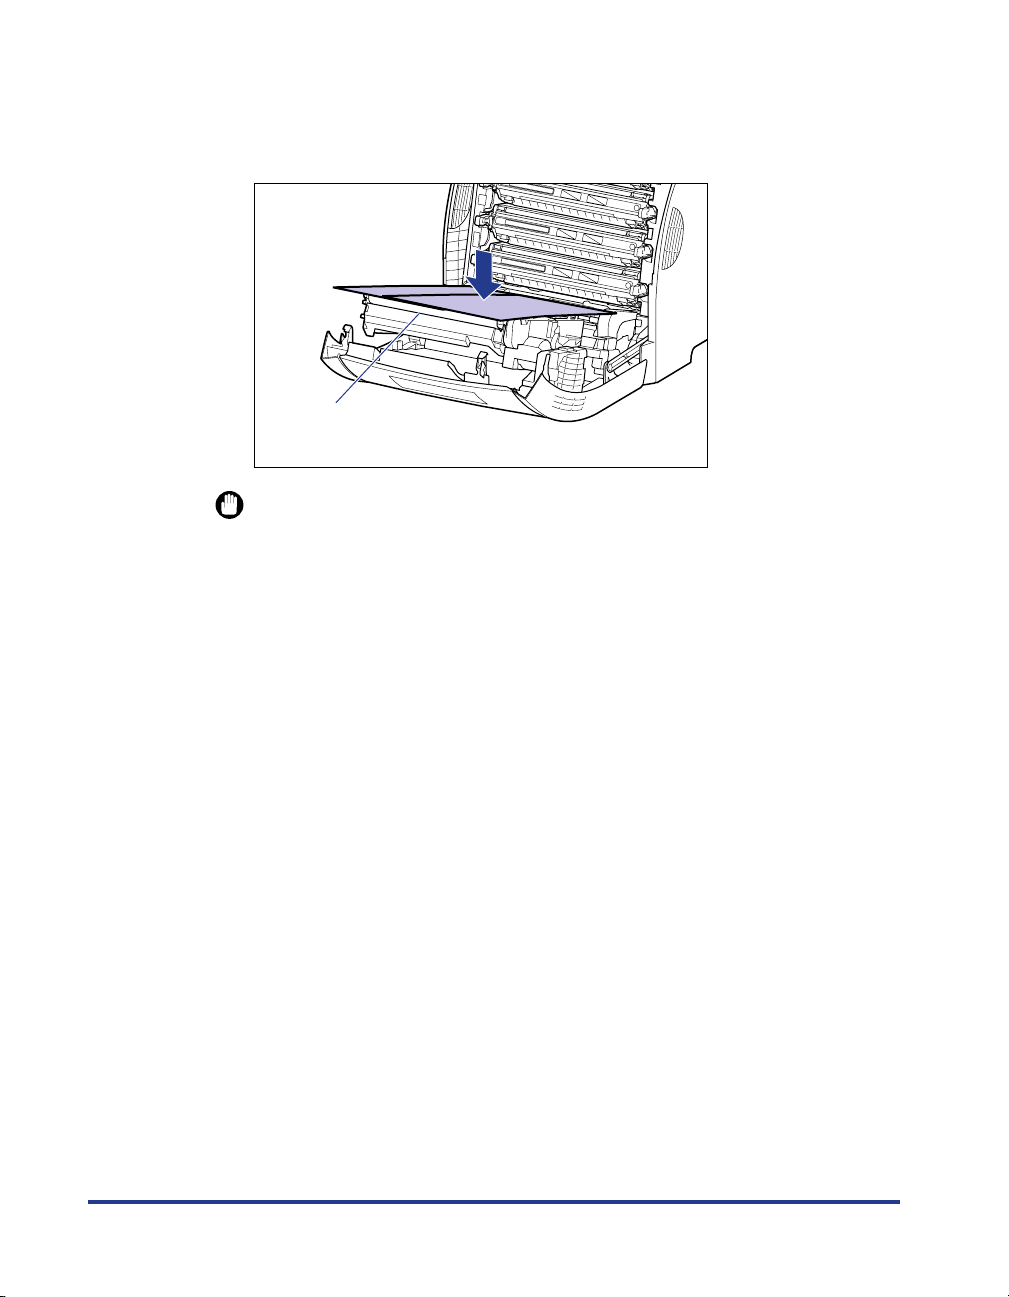
Place paper (A4 size paper is recommended) on the transfer
3
belt of the ETB unit (A) as shown in the figure so that the
paper is not shifted.
(A)
IMPORTANT
•
When installing or removing the toner cartridges, be sure to place paper on the
transfer belt of the ETB unit to protect the belt.
70
Page 72
•
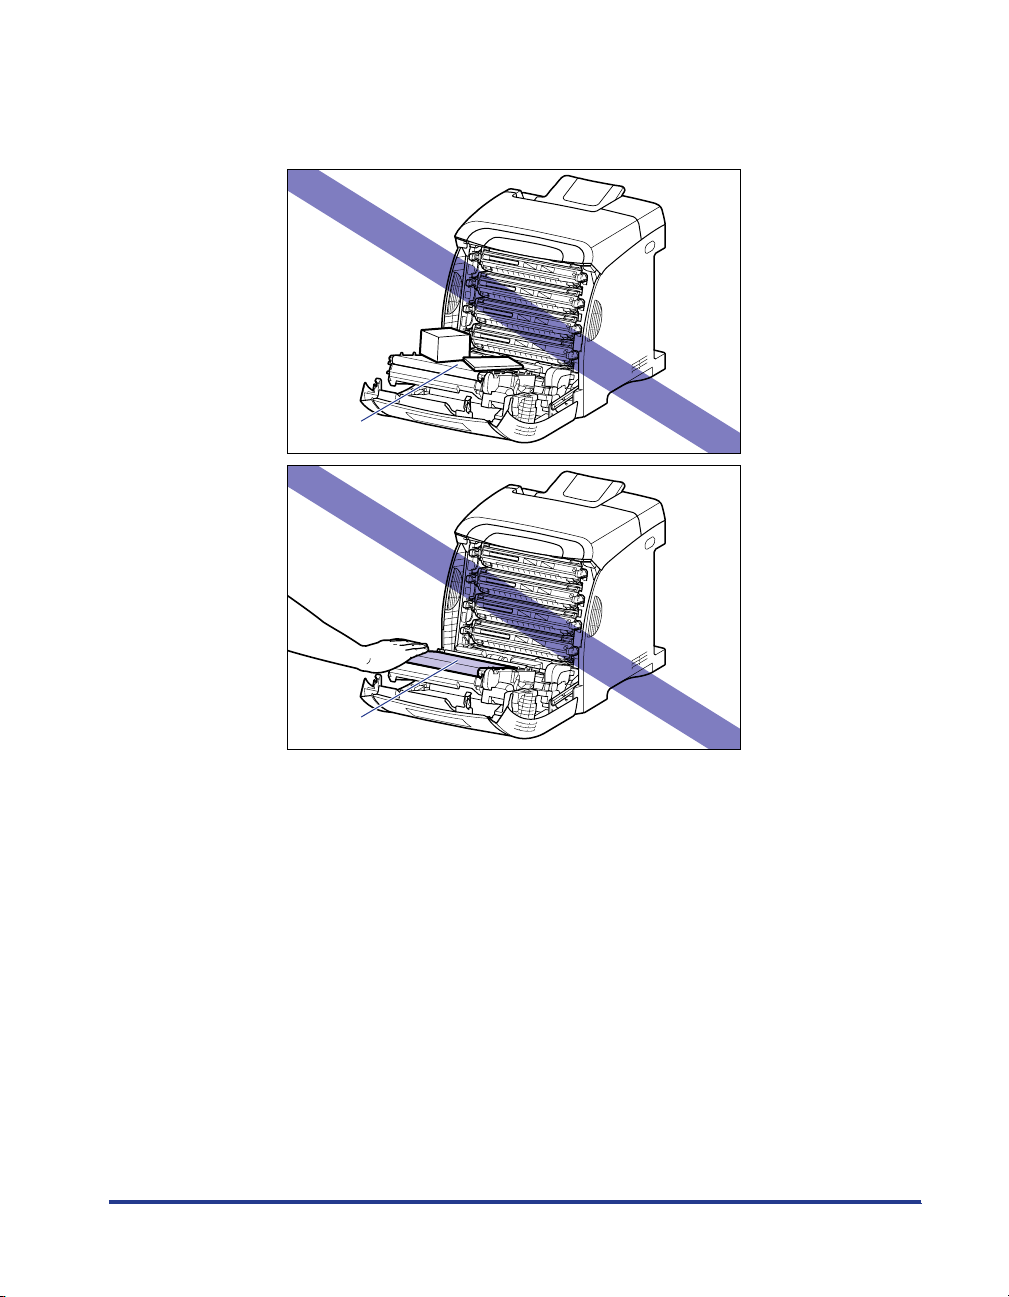
Do not place any object on or touch the transfer belt (A) of the ETB unit. The
transfer belt of the ETB unit is supplied with a function that cleans itself, therefore,
do not clean the belt even when the toner is on it. If the ETB unit is broken or
transfer belt is damaged, this may result in misfeeds or deterioration in print quality.
(A)
(A)
71
Page 73
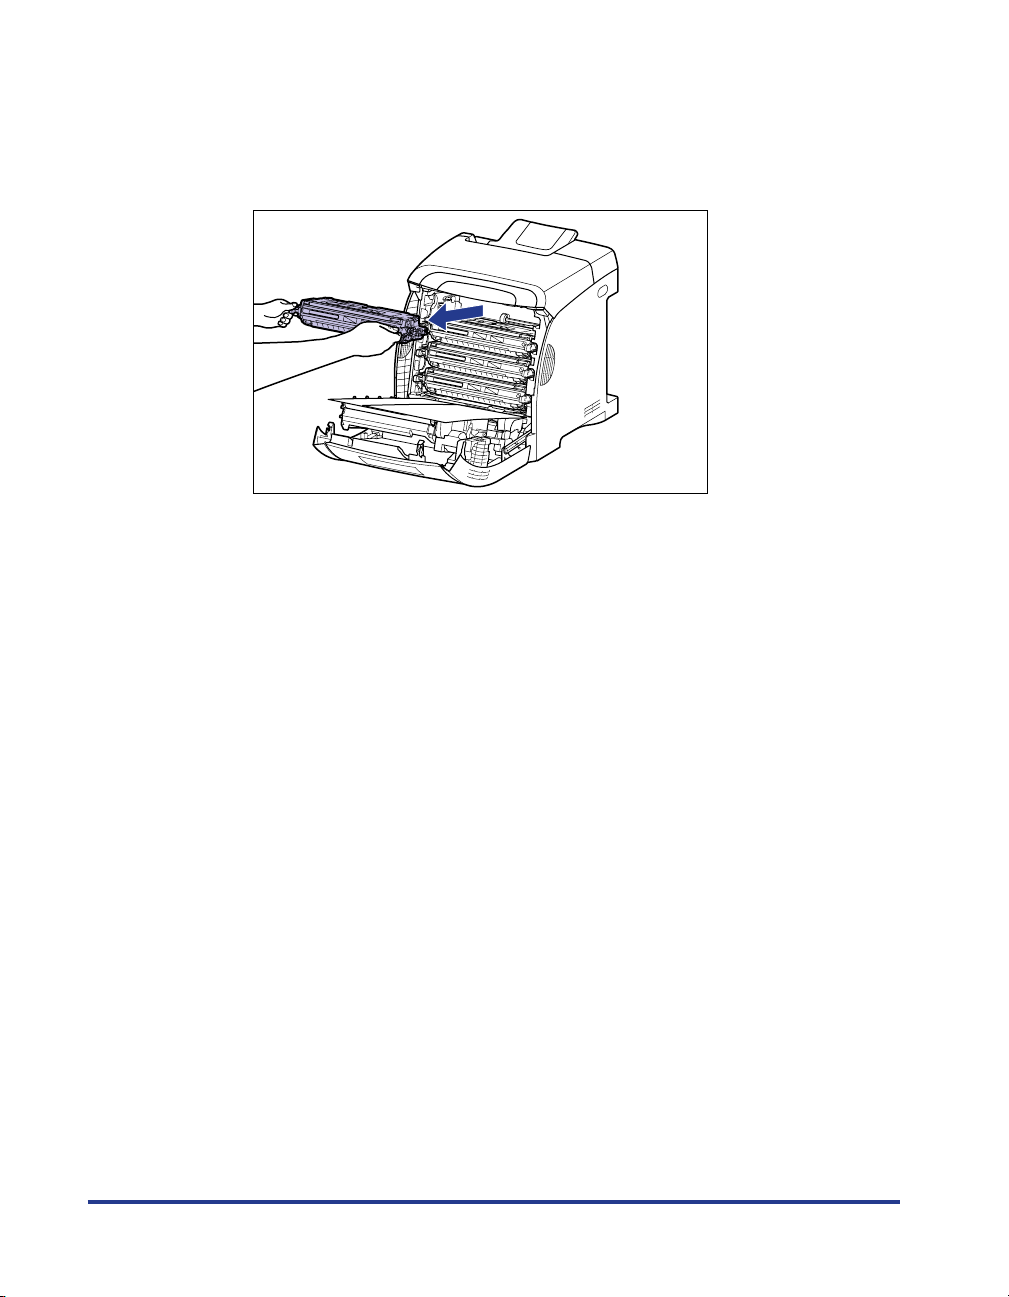
Holding the toner cartridge to be replaced by the blue tabs on
4
the both sides, pull it horizontally.
Holding the toner cartridge with your both hands firmly, pull it out so that you do
not touch the transfer belt of the ETB unit.
72
Page 74
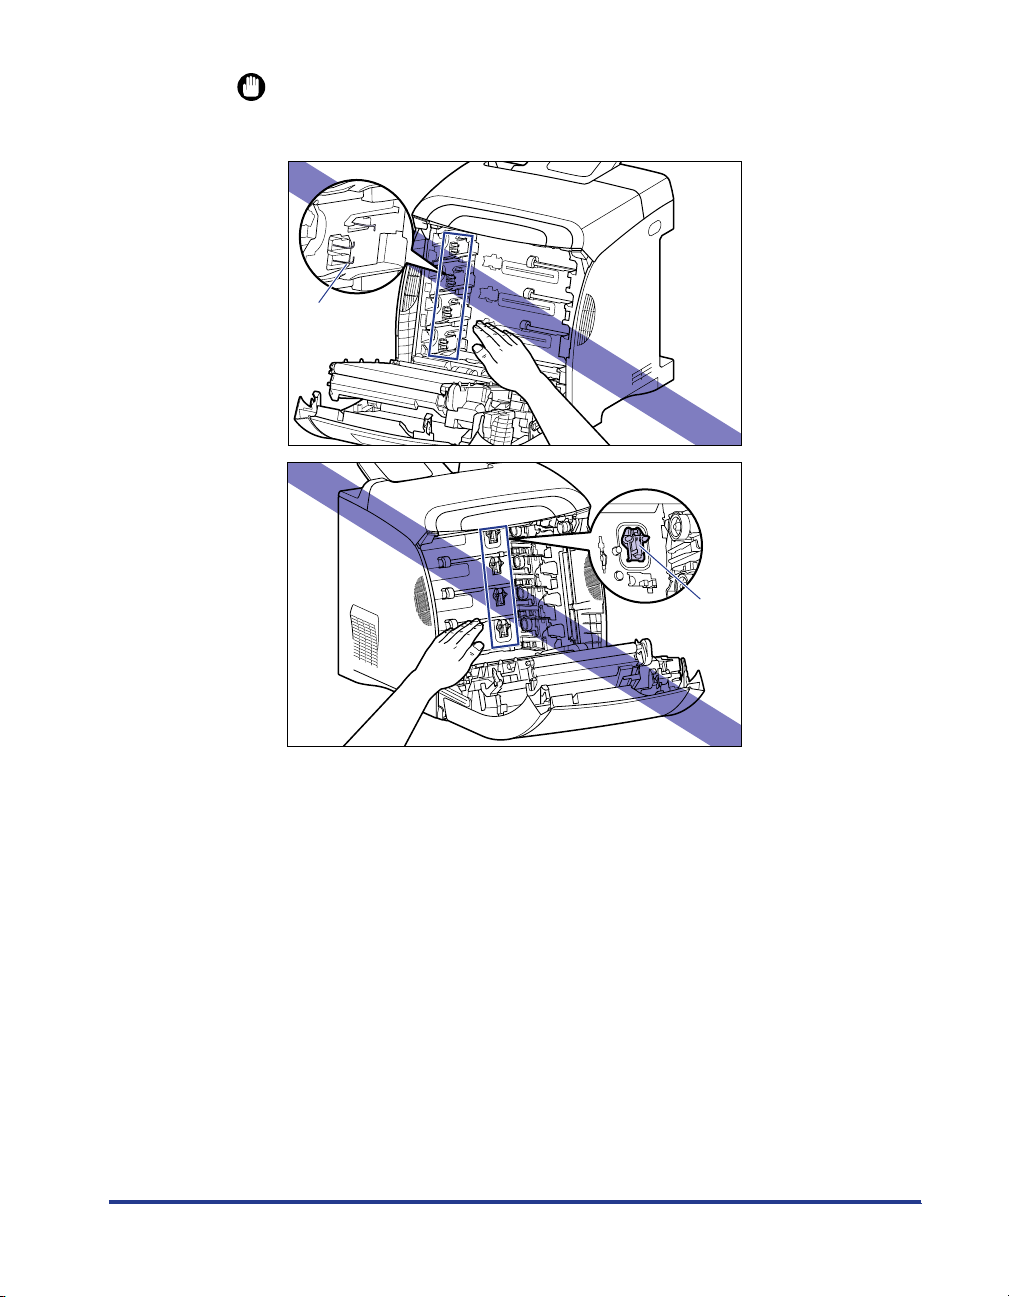
IMPORTANT
Do not touch the high-voltage contact (A) or the electrical contacts (B) shown in the
figure, as this may result in damage to the printer.
(A)
(B)
73
Page 75
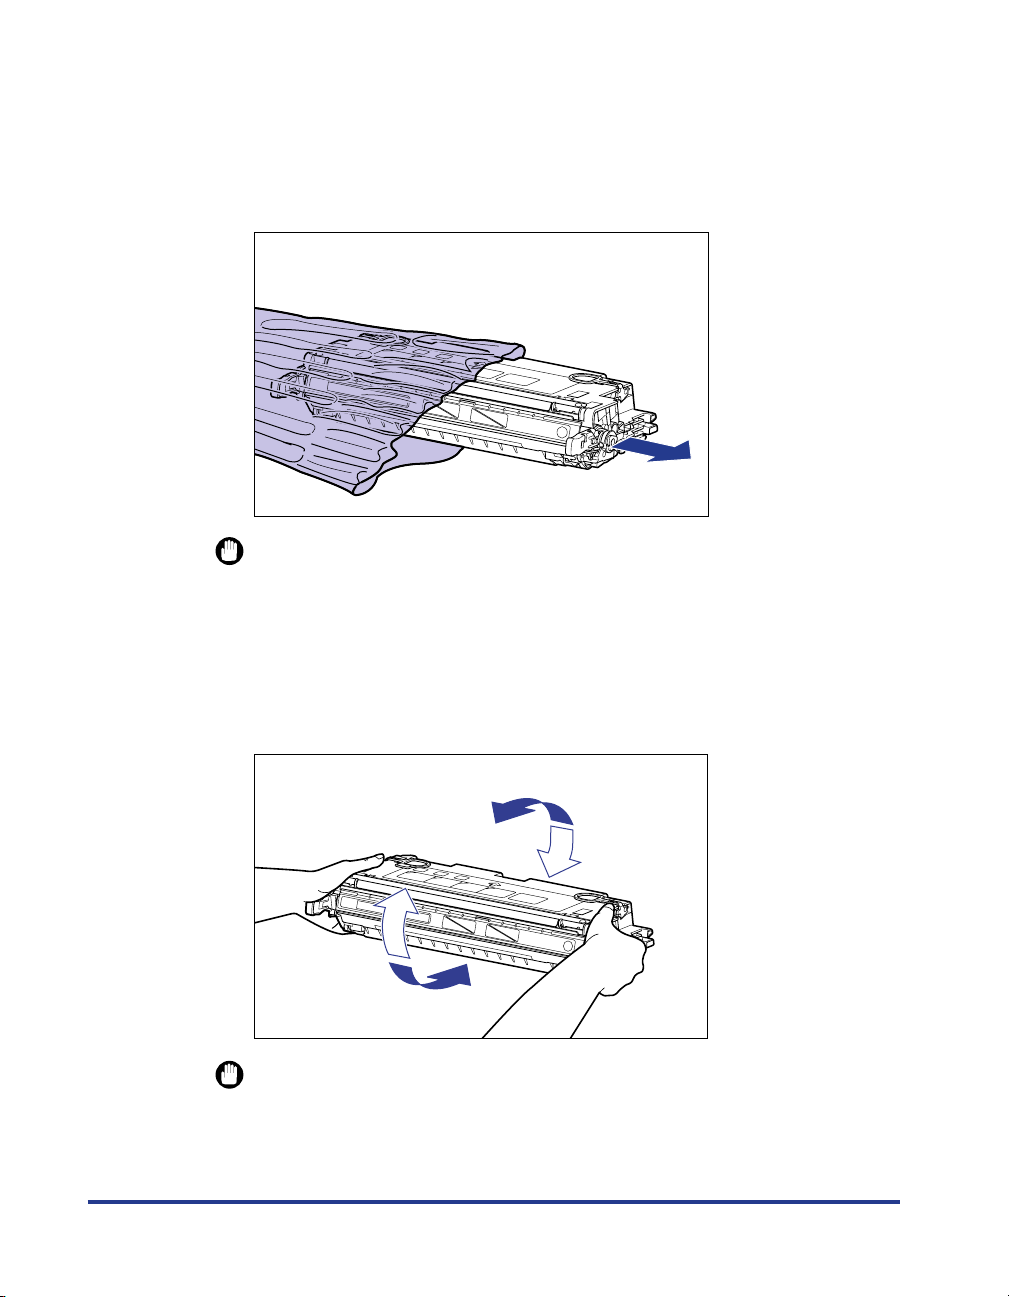
Take the new toner cartridge out of the protective bag after
5
taking it out of the package.
There is a cut near the arrow on the protective bag, so you can open it by hand.
However, if you cannot open it by hand, use scissors to open the protective bag
so as not to damage the toner cartridge.
IMPORTANT
Keep the protective bag for the toner cartridge. It may be required after taking out
the toner cartridge for printer maintenance.
Hold the toner cartridge as shown in the figure, and shake it
6
gently 5 or 6 times to evenly distribute the toner inside the
cartridge.
74
IMPORTANT
If toner is not distributed evenly, this may result in deterioration in print quality. Be
•
sure to carry out this procedure properly.
Page 76
•
Be sure to shake the toner cartridge gently. If you do not shake the cartridge gently,
toner may spill out.
7
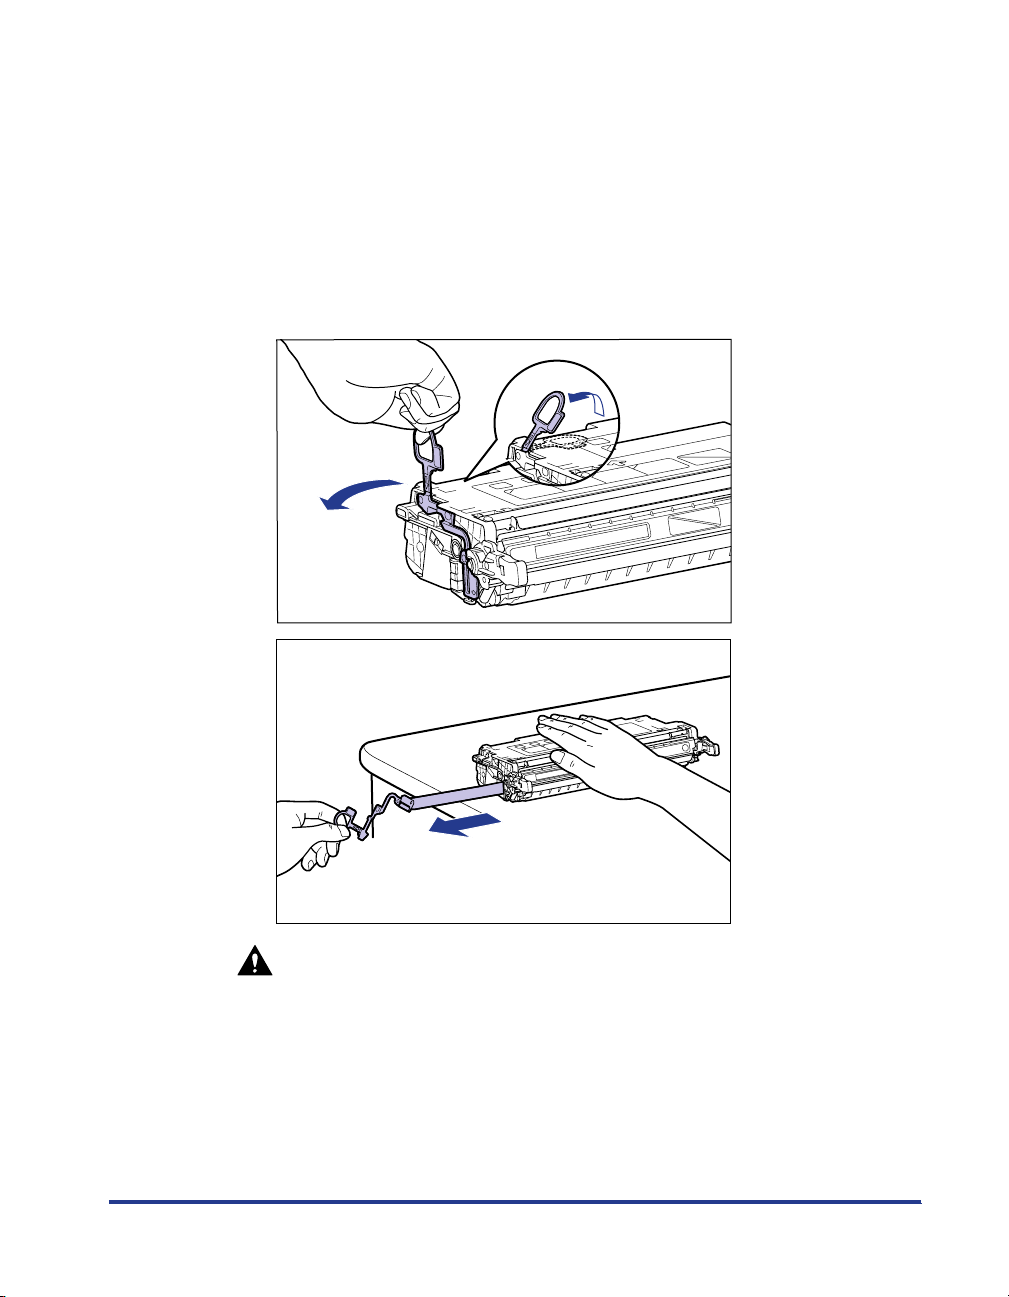
Place the toner cartridge on a flat surface, fold back the tab of
the sealing tape
(approx. 48 cm long) gently
ab
, and then pull out the sealing tape
while supporting the toner
c
cartridge.
Remove the sealing tape by hooking your fingers into the tab and pulling it out
straight in the direction of the arrow.
a
b
c
CAUTION
If the sealing tape is pulled out forcefully or stopped at midpoint, toner
may spill out. If the toner gets into your eyes or mouth, wash them
immediately with cold water and immediately consult a physician.
75
Page 77
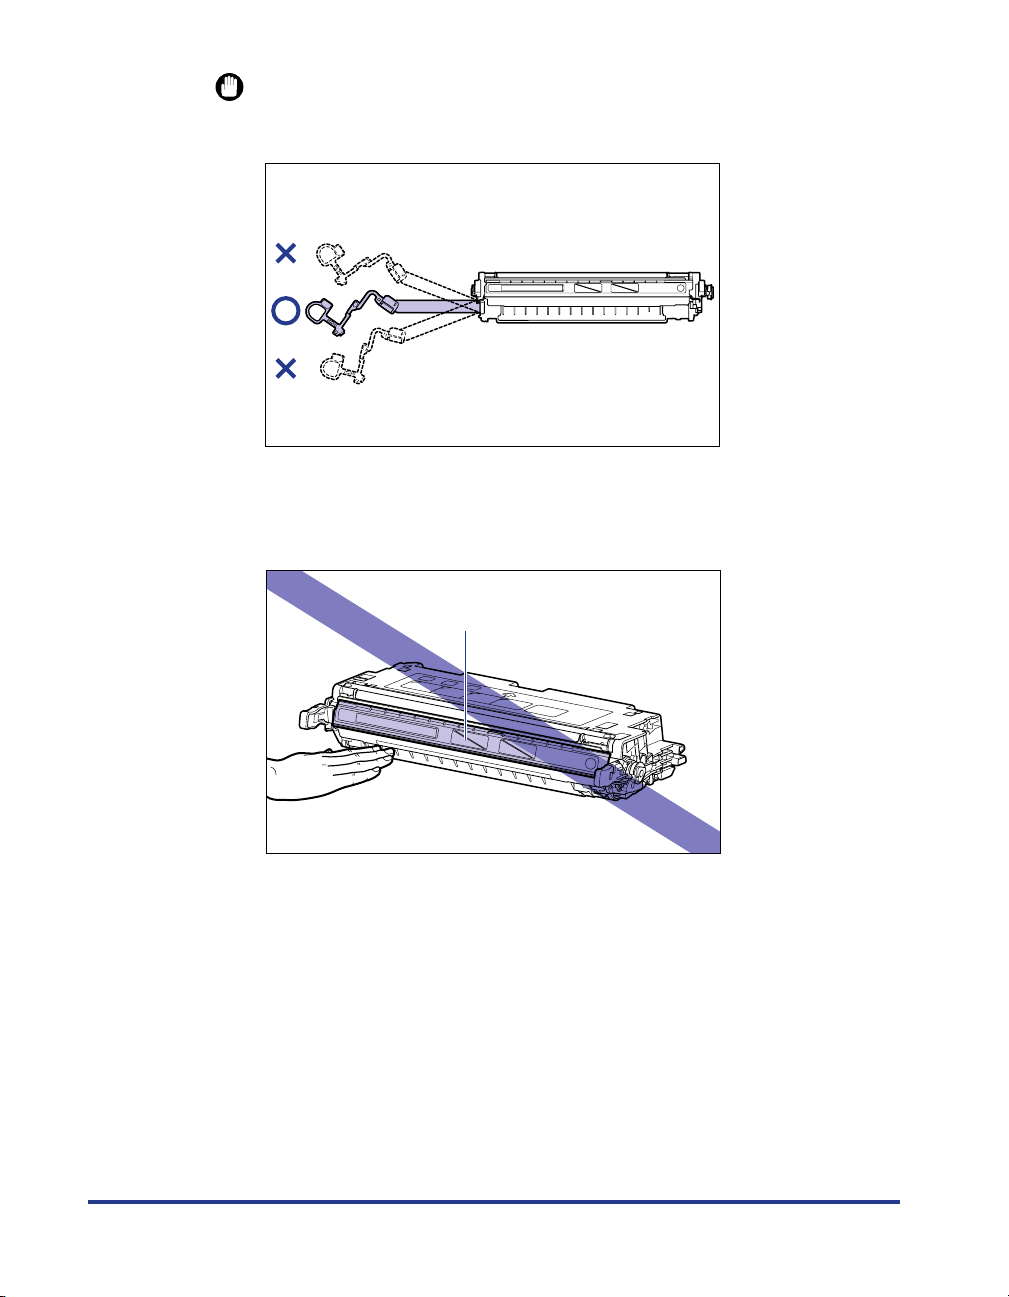
IMPORTANT
•
Do not pull the sealing tape diagonally, upwards, or downwards. If the tape is
severed, it may become difficult to pull out completely.
•
Pull out the sealing tape completely from the toner cartridge. If any tape remains in
the toner cartridge, this may result in poor print quality.
•
When pulling out the sealing tape, be careful not to hold the drum protective shutter
(A) with your hands.
(A)
76
Page 78
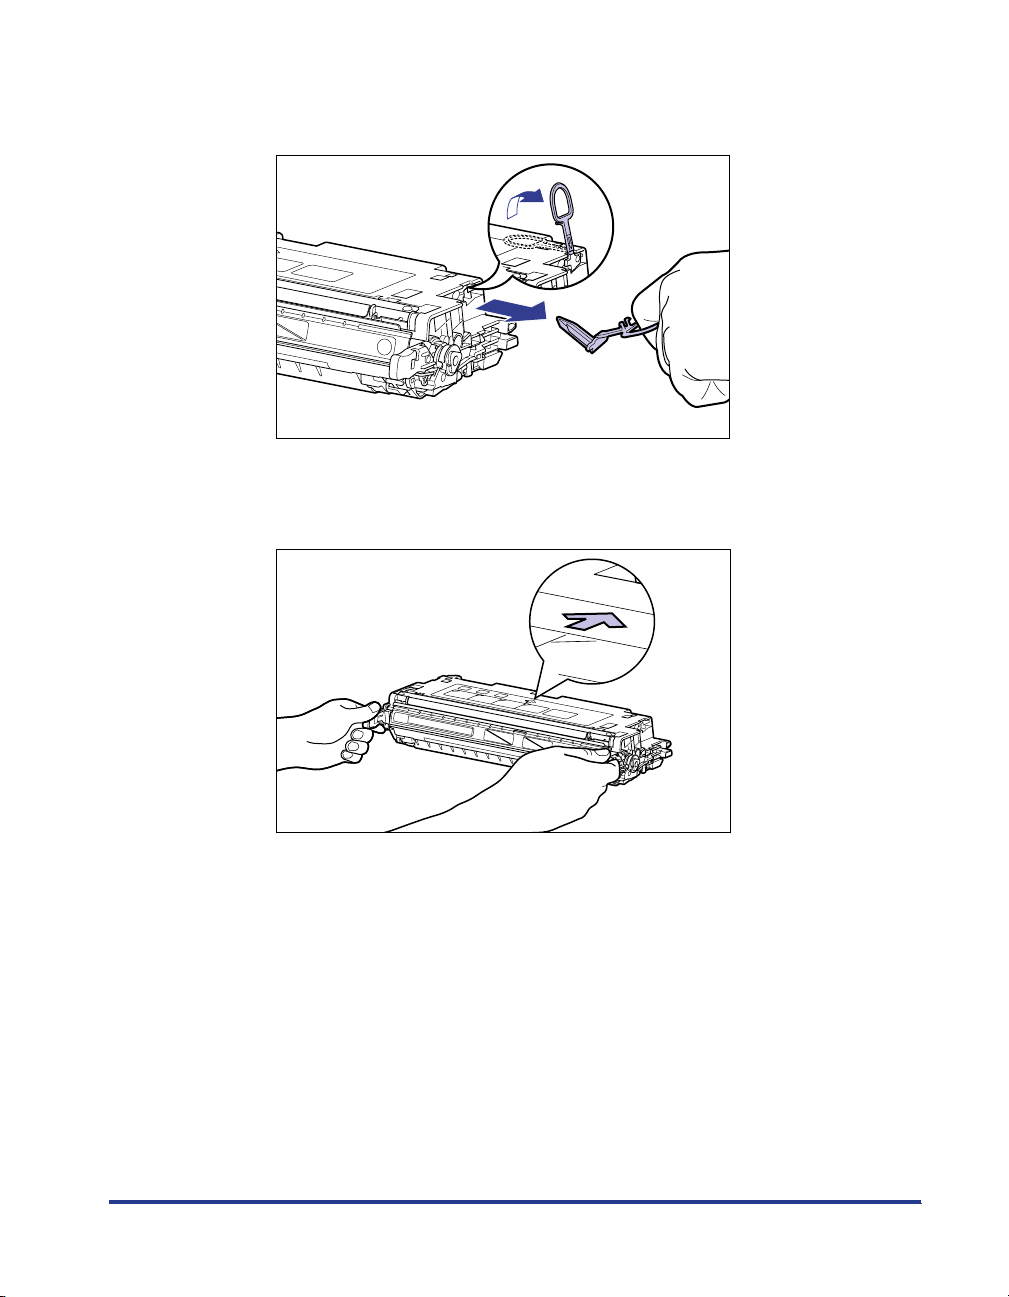
Hook your finger into the tab and remove the packing
8
materials as shown in the figure.
a
b
Hold the toner cartridge properly with the arrowed side facing
9
up as shown in the figure.
77
Page 79
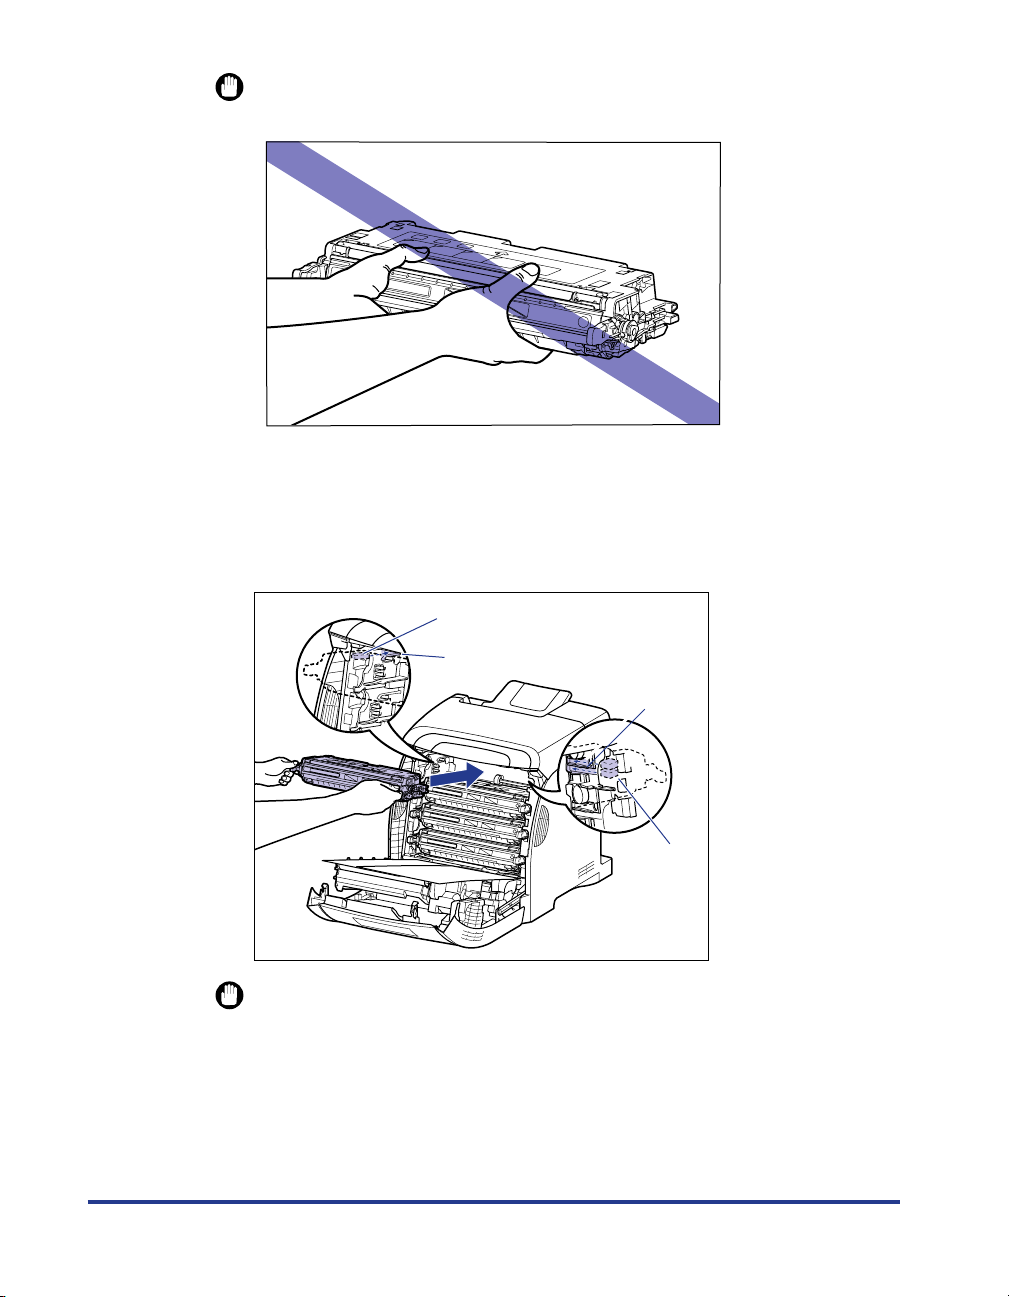
IMPORTANT
Do not hold the toner cartridge in a manner that is not directed in this procedure.
10
Hold the toner cartridge with both hands and install it into the
printer.
Align (A) of the toner cartridge that you want to replace with the slots (B) to which
the label of the same color is attached, then insert the cartridge until it stops.
(A)
(B)
78
(B)
(A)
IMPORTANT
Be sure to install the toner cartridge by pushing it firmly. If the toner cartridges are
not installed firmly, this may result in deterioration in print quality.
Page 80
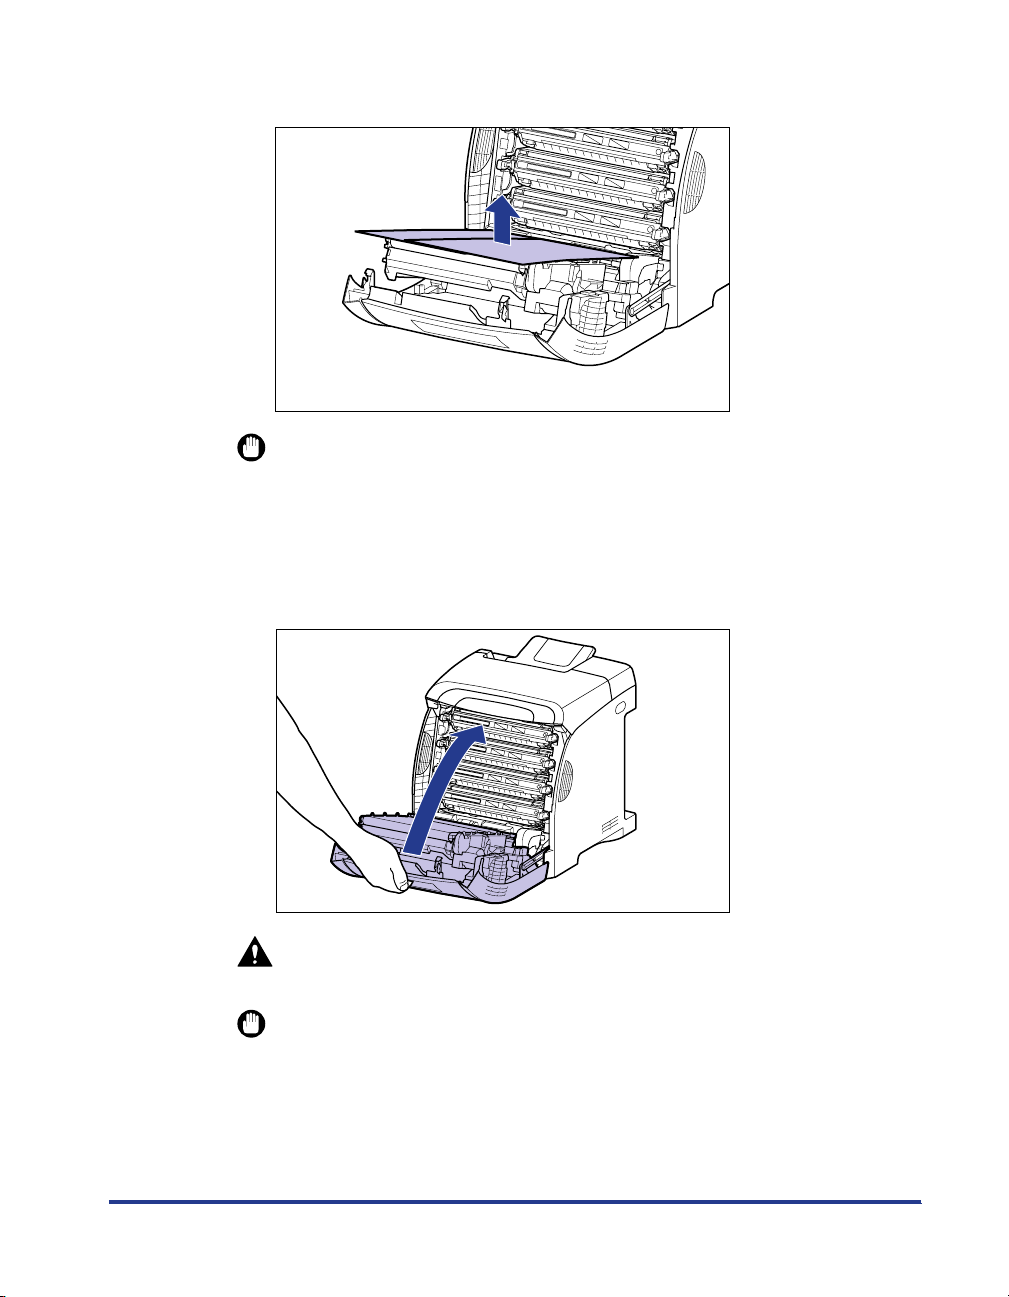
Remove the paper.
11
IMPORTANT
When removing the paper, be careful not to touch or damage the transfer belt of
the ETB unit.
12
Close the front cover.
Holding the opening of the front cover, close it gently.
CAUTION
When closing the front cover, be careful not to catch your fingers.
IMPORTANT
•
If you cannot close the front cover, check if the toner cartridge is installed properly.
If you try to close the front cover forcefully, this may result in damage to the printer.
•
Do not leave the front cover open for a long time after installing the toner cartridge.
79
Page 81
Canceling a Job
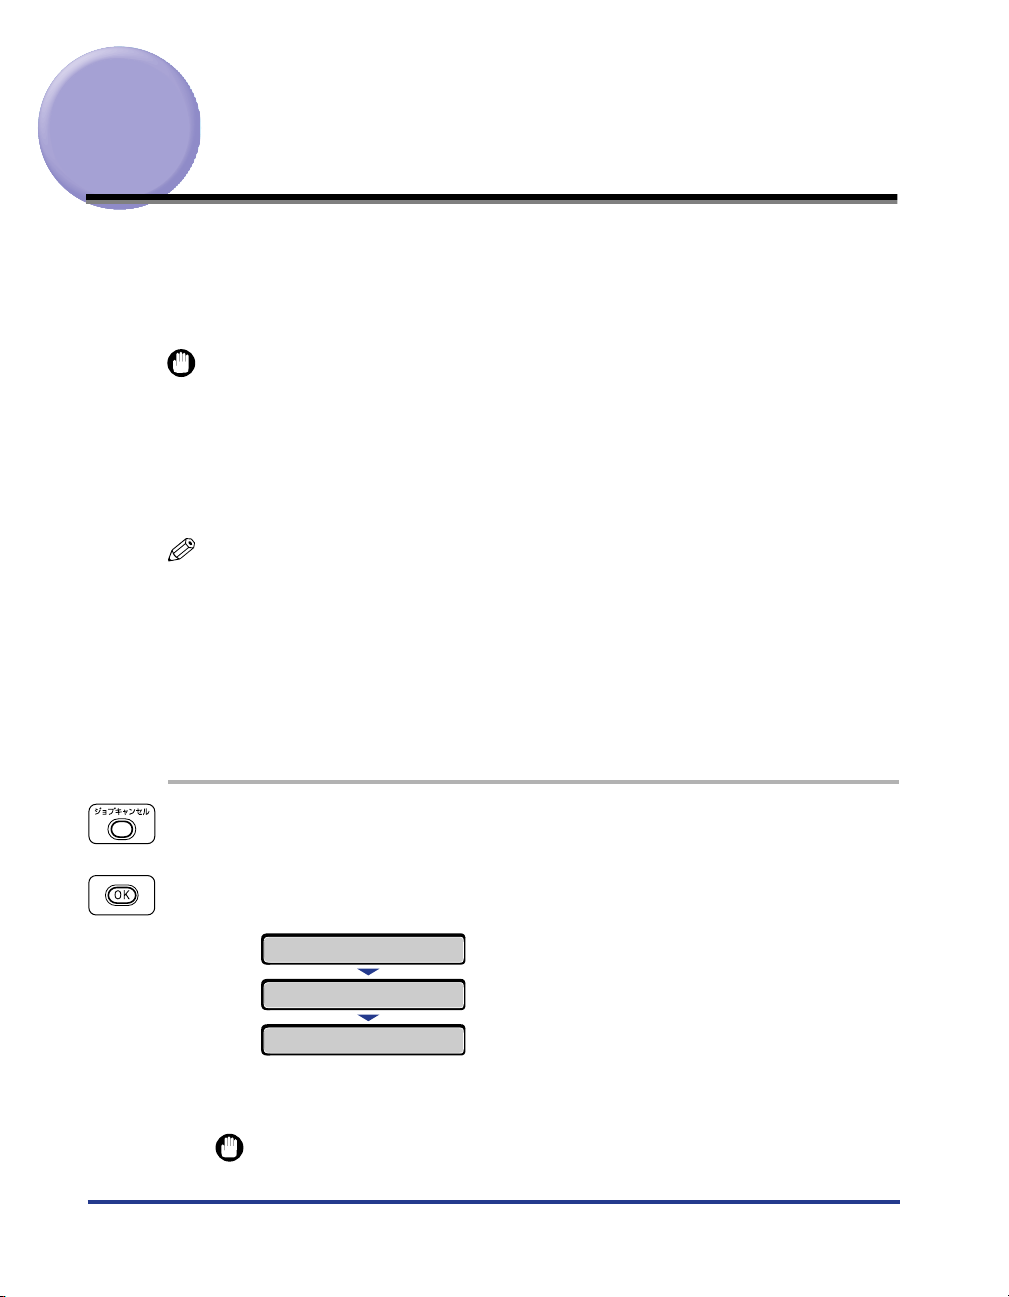
If you want to cancel the job currently being printed, perform "Cancel Job" using the
following procedure. A job cancel allows you to cancel the job currently being
received or processed. This option does not affect the next print data or the jobs
that have not been processed yet.
IMPORTANT
•
Cancel the job while the printer is processing the data (While the
blinking). No job is canceled by pressing [
The data that has already been processed and is being printed (started to be fed) cannot
•
be canceled. In this case, the next print data may be canceled.
When there is any print data sent from a printer driver other than that for this printer,
•
multiple data may be canceled.
NOTE
When canceling a job, you may not be able to cancel the job even if <
セル
> is displayed. The secure print job before entering the password and the job to be
stored in the box cannot be canceled. Delete the secure print job before entering the
password and the job to be stored in the box with the Remote UI.
Cancel a job using the following procedure. When canceling a job, be sure that the
indicator is on or blinking (when the job that you want to cancel is being
ジョブ
received or being processed).
ジョブキャンセル
ジョブ
] when the
indicator is on or
indicator is off.
ジョブ
03 ジョブ キャン
80
Press [
1
2
When canceling the job, press [OK].
03 ジョブ キャンセル
<
The job is canceled when <
IMPORTANT
You cannot operate the printer while <
ジョブキャンセル
キャンセルジッコウ
03ジョブキャンセル
00インサツカノウ
?
].
A4
> appears, and the print data being processed is canceled.
00 インサツ カノウ
> appears.
03 ジョブ キャンセル
> is displayed.
Page 82
Confirming the Printer Features
This printer is provided with a function of Status Print that allows you to check the
menu settings, etc. Use these functions when required after installing and
connecting the printer, for example when you want to check the operation.
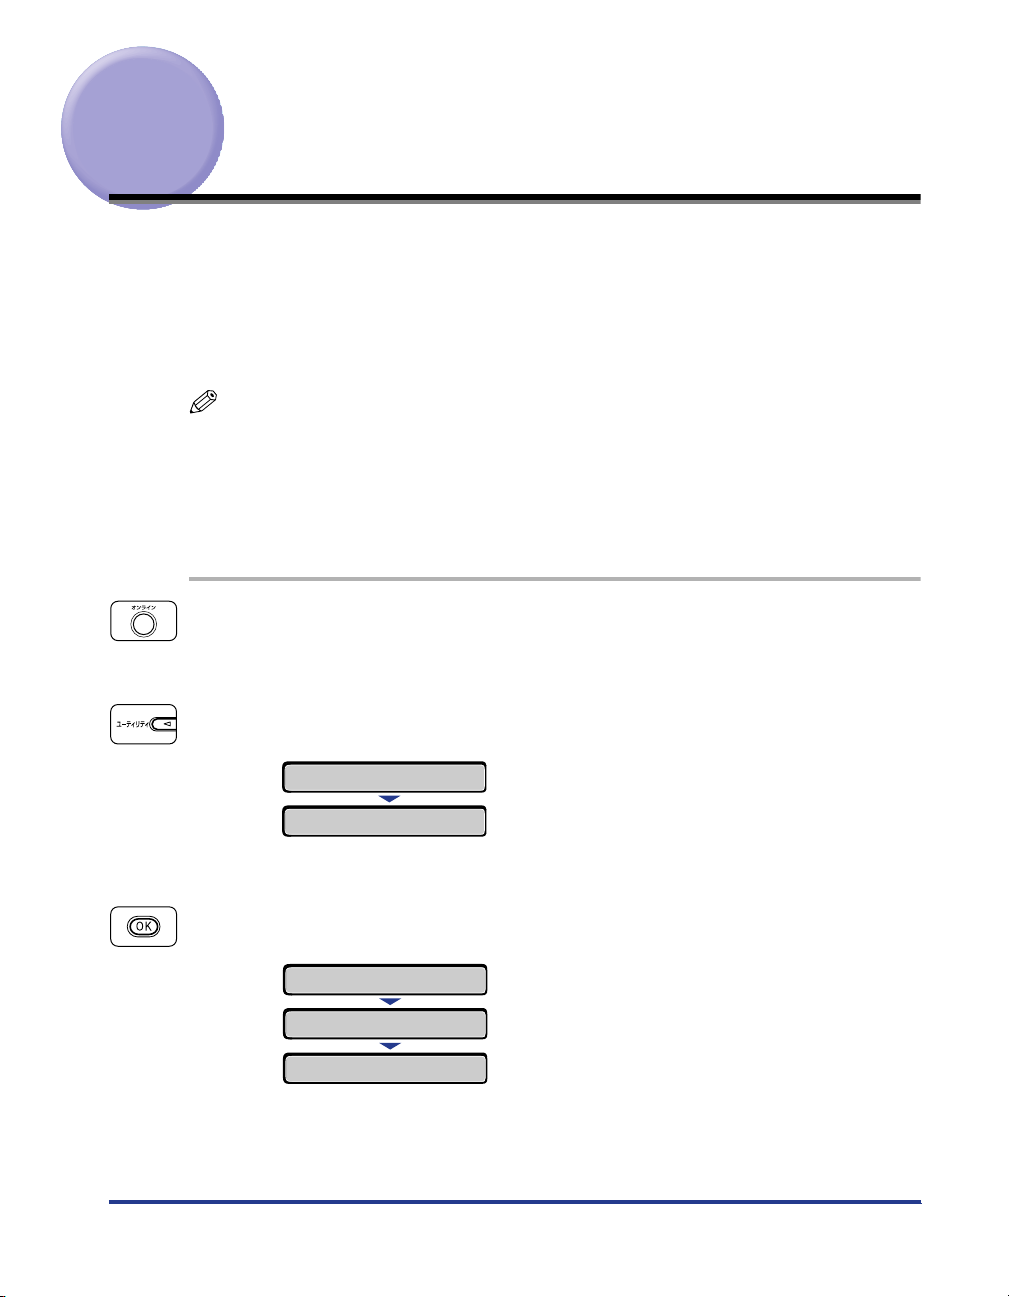
Status Print prints information about the currently available functions, a list of the
menu settings, and others. Perform Status Print using the following procedure.
NOTE
•
Status Print is to be printed on A4 size paper. Load A4 size paper in the paper cassette
or multi-purpose tray.
•
The settings specified using the menu of the printer's control panel are reflected to Status
Print. For example, when the automatic 2-sided printing function is specified, Status Print
will be printed with two pages on both sides of paper. However, always a sheet of paper
is printed regardless of the number of copies.
Make sure that the printer is online.
1
If the printer is not online, press [
Press [
2
<
ステータスプリント
3
Press [OK].
Status Print is printed.
ユーティリティ
ユーティリティ
ステータスプリント
> is displayed in the display.
ステータスプリント
ジッコウチュウ
ステータスプリント
→
→
→
オンライン
].
(Approx. 1 sec.)
].
81
Page 83
4
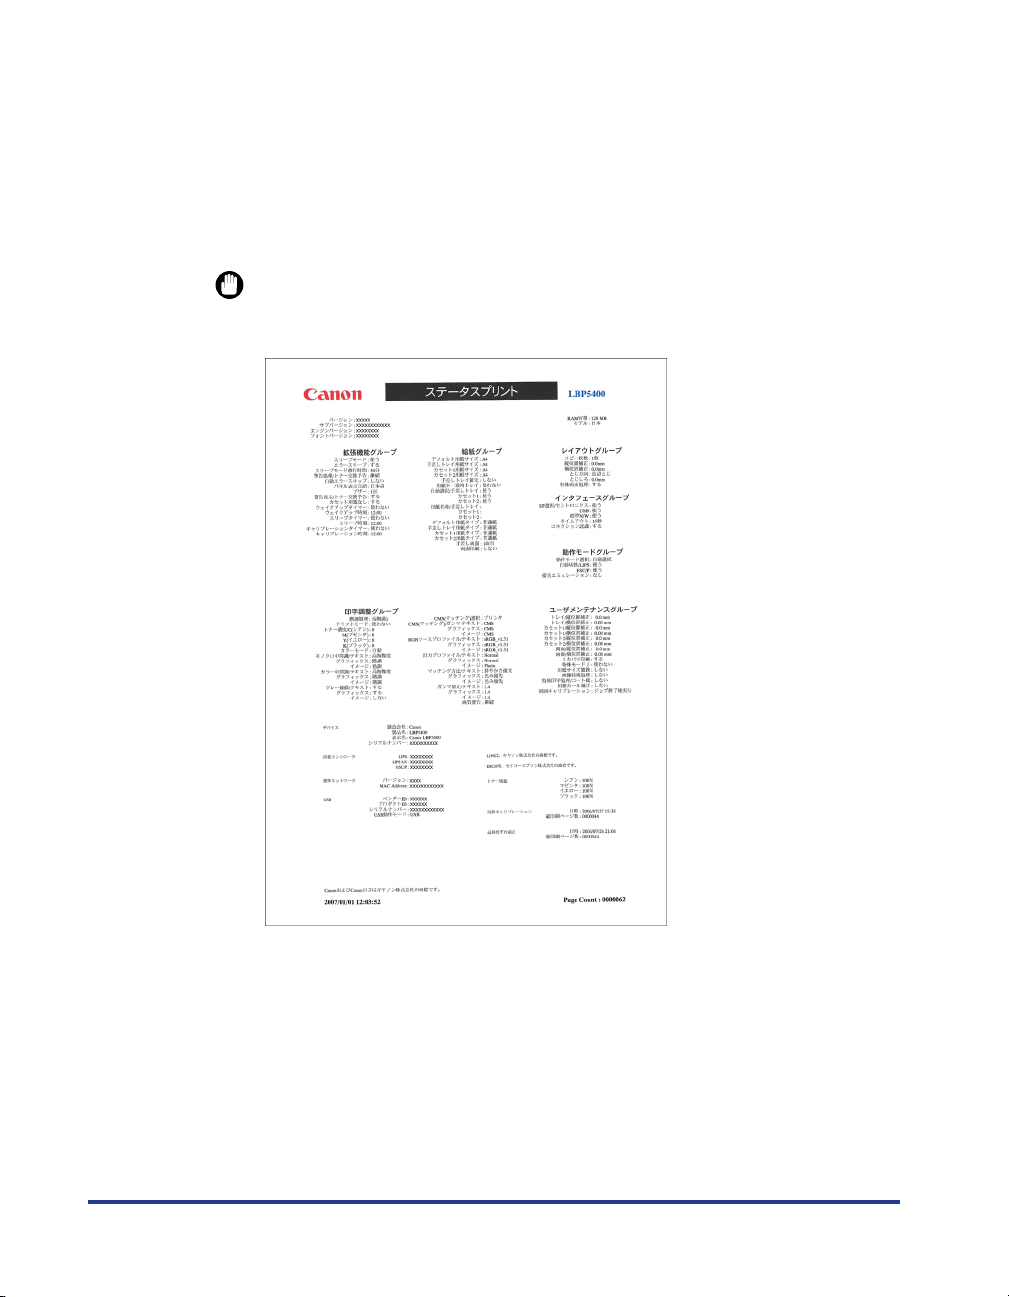
Confirm the contents of the Status Print.
Status Print prints information as shown in the following figure. Status Print allows
you to confirm information about the currently available functions, a list of the
setting values specified in the printer function menu, the versions of the software
and hardware equipped with the printer, and number of the total print pages. You
can check the number of total print pages using "Page Count" on the lower right
of Status Print.
IMPORTANT
This is a sample of Status Print. The contents may differ from the Status Print
printed by your printer.
82
Page 84
Service Call Display
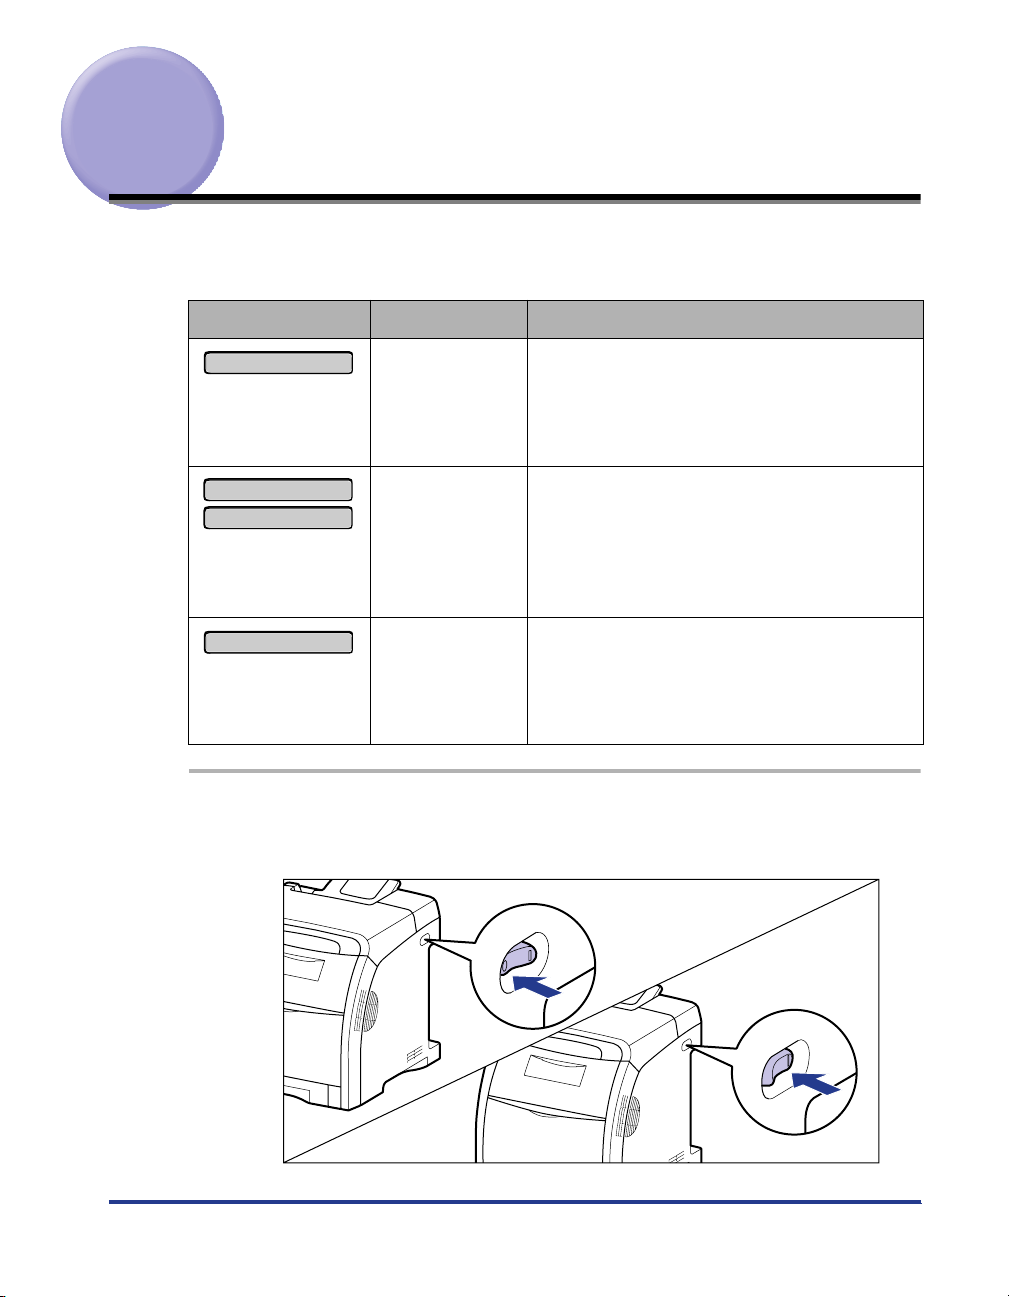
ON
OFF
When a problem has occurred and the printer does not work properly, the service
call shown in the figure appears:
Message
Ennn-nnnn
("n" represents an
alphanumeric
character)
E001-nnnn
E003-nnnn
("n" represents an
alphanumeric
character)
F9-nnチェックプリンタ
("n" represents an
alphanumeric
character)
Turn the power OFF, wait for 10 seconds or longer, and then
1
turn it ON again.
Cause Remedy
Cycle the power of the printer using the following
A problem has
occurred inside
the printer.
A problem has
occurred with the
fixing unit of the
printer.
A problem has
occurred while the
printer is
processing print
data.
procedure. If the message does not disappear
after cycling the power of the printer several
times, contact your local authorized Canon
dealer.
Perform the following procedures from the Step
2 to contact your local authorized Canon dealer.
Cycle the power of the printer using the following
procedure.
83
Page 85
If the message does not reappear, the printer can be used as normal. If the error
message still appears, proceed to the next step.
2
Note down the alphanumeric characters and message in the
display.
3
Perform the following procedure.
Turn the printer OFF a .
If a USB cable is connected, turn the computer off b , and then disconnect the
USB cable c .
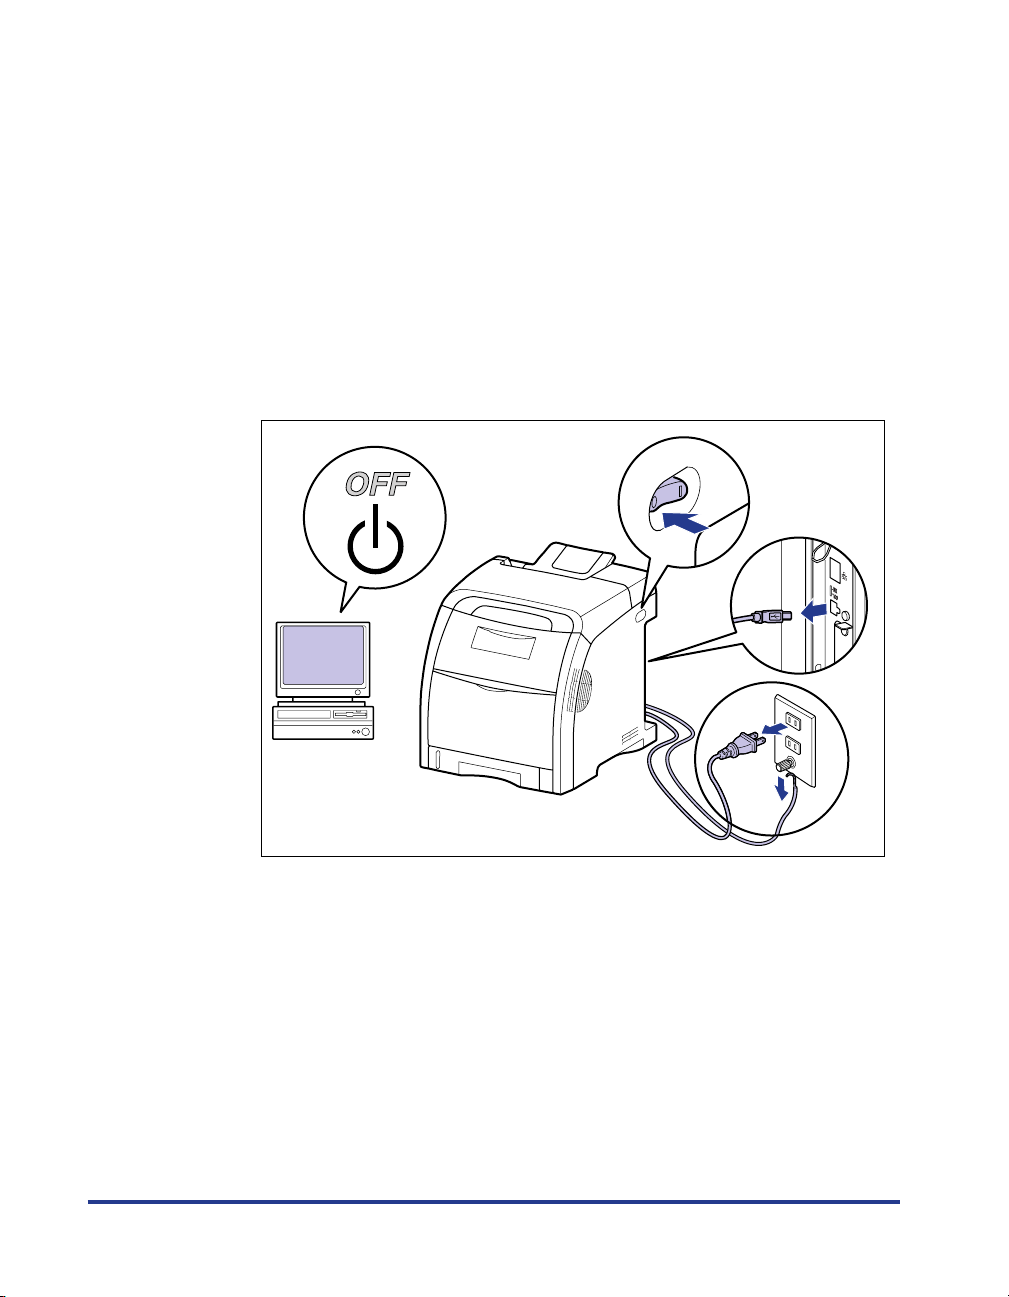
Disconnect the power plug from the AC power outlet d .
Remove the ground wire from the ground terminal e .
b
a
c
d
e
84
4
Contact your local authorized Canon dealer.
When contacting your Canon dealer, please report the problems and the code
number that you have noted.
Page 86
Message List
When the printer cannot continue printing for some reason (an error status), the
printer beeps, the
indicates the description of the error appears in the display. A Warning message
appears in the display when the printer requires some remedy (a warning status)
although the job is not affected.
If either of these messages appears, perform the following procedures according to
the message.
NOTE
When multiple warnings are occurring at the same time, the Warning messages appear
•
by rotation.
When the printer is in error status and warning status at the same time, the Warning
•
message does not appear.
For a message with the <Warning Message> mark, the printer does not stop the
•
operation even when the message is being displayed (when the printer is in a warning
status).
For a message with the <Auto Error Skip> mark, you can skip the error by pressing [
•
ライン
not be printed properly. When you want to stop the process, perform a soft reset to
eliminate the cause of the error, press [
automatically skip the errors to which this mark is attached by setting <
キップ
indicator comes on, and an error message that
メッセージ
] and continue printing. However, part of the print data may be missing or it may
], and then print again. Also, you can
ジドウ エラース
> in the
セットアップ
menu to <
オンライン
>.
スル
オン
Message
02 レイキャクチュウ
11 XXX ヨウシガアリマセン
(xxx indicates abbreviations
of paper sizes)
Cause and Remedy
Cause The temperature of the fixing unit exceeded a
fixed value after printing (especially paper with a
narrower width) continuously.
Remedy Please wait a moment. The printer cools down
the fixing unit automatically. It resumes the job
after finishing the cool down process.
Cause Paper of the size specified in the application is
not loaded in the paper source (in all the paper
sources when <
キュウシモード
> is set to <
ジドウ
in the specified paper source when the setting is
fixed).
Remedy Refill or load paper.
>;
85
Page 87
Message
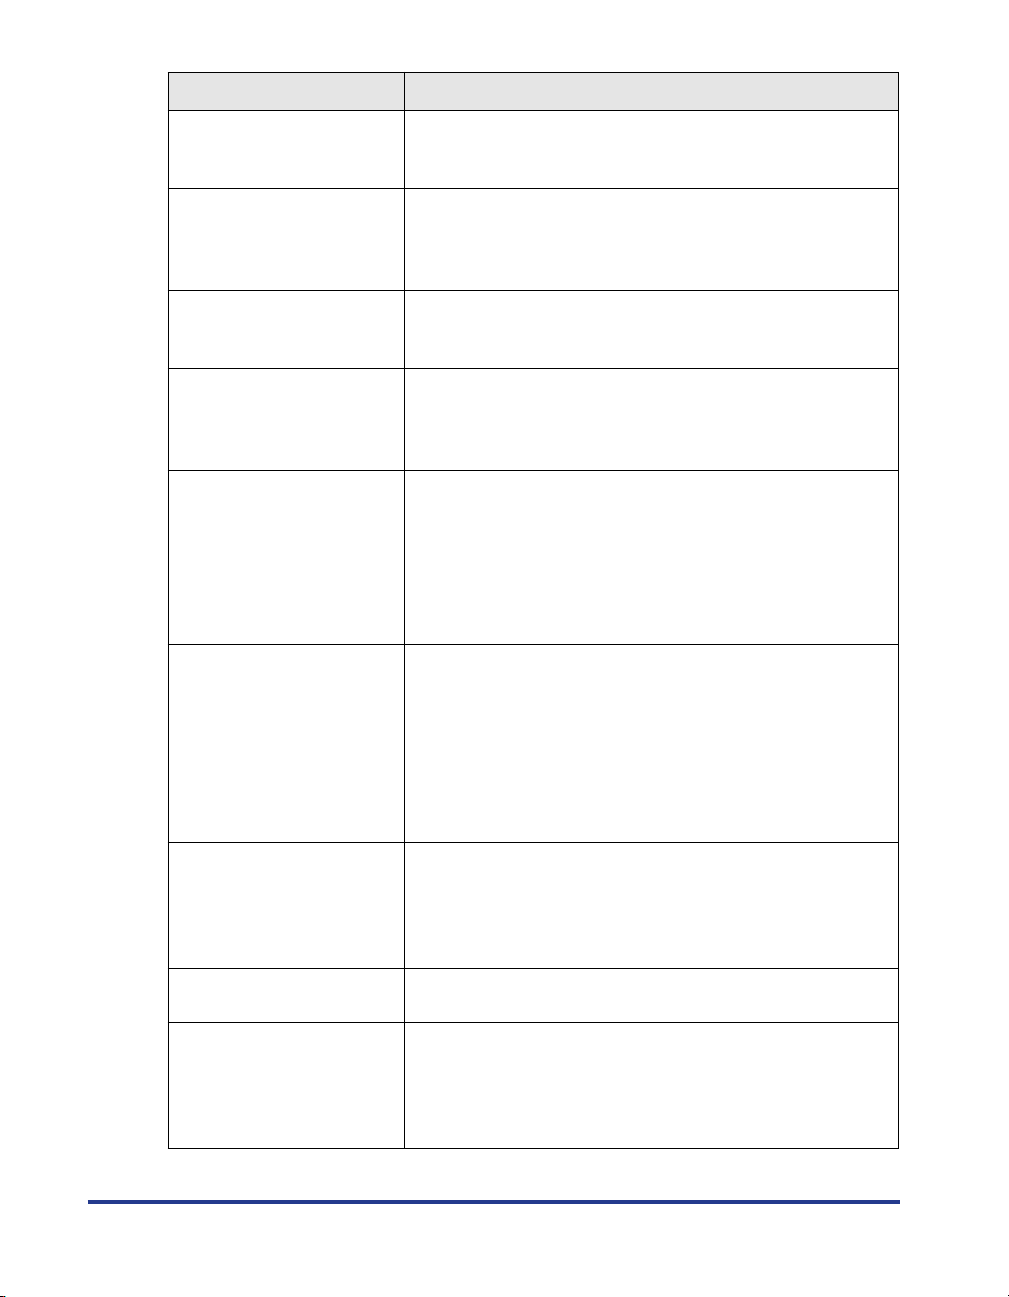
12 カバーガ アイテイマス
13 ヨウシガ ツマリマシタ
14 X トナーミソウチャク
(X indicates K, Y, M, or C)
16 X セット カクニン
(X indicates K, Y, M, or C)
16 X トナー ヨウイ
(X indicates K, Y, M, or C)
<Warning Message>
16 X トナー コウカン
(X indicates K, Y, M, or C)
18 キュウシ エラー
1F ハイシトレイ フル
1G X トナー コウカン
(X indicates K, Y, M, or C)
Cause and Remedy
Cause The front cover or top cover is open.
Remedy Close the front cover or top cover firmly. If the
printer is not online, press [
オンライン
].
Cause Paper is jammed inside the printer.
Remedy Remove the jammed paper and set the paper
cassette and covers to the original position. If the
printer is not online, press [
オンライン
].
Cause The toner cartridge of Y (Yellow), M (Magenta), C
Remedy Install the toner cartridge of the indicated color.
(Cyan), or K (Black) is not installed.
Cause The toner cartridge of Y (Yellow), M (Magenta), C
(Cyan), or K (Black) is not installed properly.
Remedy Install the toner cartridge of the indicated color
properly.
Cause The toner cartridge of K (Black), Y (Yellow), M
(Magenta), or C (Cyan) is nearing the end of its
life.
Remedy Although you can continue to print for a while,
have ready a new toner cartridge. Replace the
toner cartridge of the indicated color with a new
one before printing a large amount of data.
Cause The toner cartridge of K (Black), Y (Yellow), M
(Magenta), or C (Cyan) has reached the end of its
life.
Remedy Press [
オンライン
print for a while, have ready a new toner
]. Although you can continue to
cartridge. Replace the toner cartridge of the
indicated color with a new one before printing a
large amount of data.
Cause Paper of the size or type that cannot be fed from
the multi-purpose tray or paper cassettes is
specified.
Remedy If a paper source is specified, press [
then set <
キュウシモード
> to <
ジドウ
給紙選択
>.
Cause The output tray is filled to the limit.
Remedy Remove the paper in the output tray.
Cause The toner cartridge of K (Black), Y (Yellow), M
(Magenta), or C (Cyan) has reached the end of its
Remedy Replace the toner cartridge of the indicated color
life.
with a new one.
],
86
Page 88

Message
1H X セツゾクカクニン
(X indicates K, Y, M, or C)
32 リョウメンインサツ エ
ラー
<Auto Error Skip>
37 ヨウシタイプ カクニン
<Auto Error Skip>
41 ヨウシサイズ カクニン
9E X トナー イチカクニン
(X indicates K, Y, M, or C)
Cause and Remedy
Cause There is a possibility that the toner cartridge of Y
(Yellow), M (Magenta), C (Cyan), or K (Black) is
Remedy Remove the toner cartridge of the indicated color,
not installed properly.
then install it properly.
Cause The printer received data for 2-sided printing of a
paper size (including the paper orientation) or
paper type on which the printer cannot perform
automatic 2-sided printing.
Remedy Press [
オンライン
] to continue printing. However,
the data on each side is printed on two pages.
Cause An unavailable paper type is selected.
Remedy Press [
オンライン
] to continue printing. Printing is
continued with the paper type assumed to be
plain paper. If the paper type is not plain paper,
you cannot obtain appropriate printout results.
Cause The size of the paper loaded in the multi-purpose
tray or paper cassette is different from the setting
for <
テザシトレイ ヨウシサイズ
(N=1、2) ヨウシサイズ
> or <
カセット N
> specified from the
computer or control panel.
Remedy Match the size specified in <
> or <
イズ
and the size of the loaded paper, and then press [
オンライン
カセット N(N=1、2) ヨウシサイズ
].
テザシトレイ ヨウシサ
Cause You are using LIPS LX Printer Driver, and you
loaded custom size paper of its long edges 215.9
mm or less in portrait orientation, and printed
when <
(N=1、2) ヨウシサイズ
テザシトレイ ヨウシサイズ
> is set to <
> or <
フリー
Remedy Load the paper in landscape orientation, then
print again.
Cause The toner cartridge of Y (Yellow), M (Magenta), C
(Cyan), or K (Black) is not installed in the
appropriate position.
Remedy The toner cartridges of each color are installed in
order of black, yellow, cyan, and magenta from
the top. Reinstall the toner cartridge of the
indicated color in the appropriate position.
>
カセット N
>.
87
Page 89
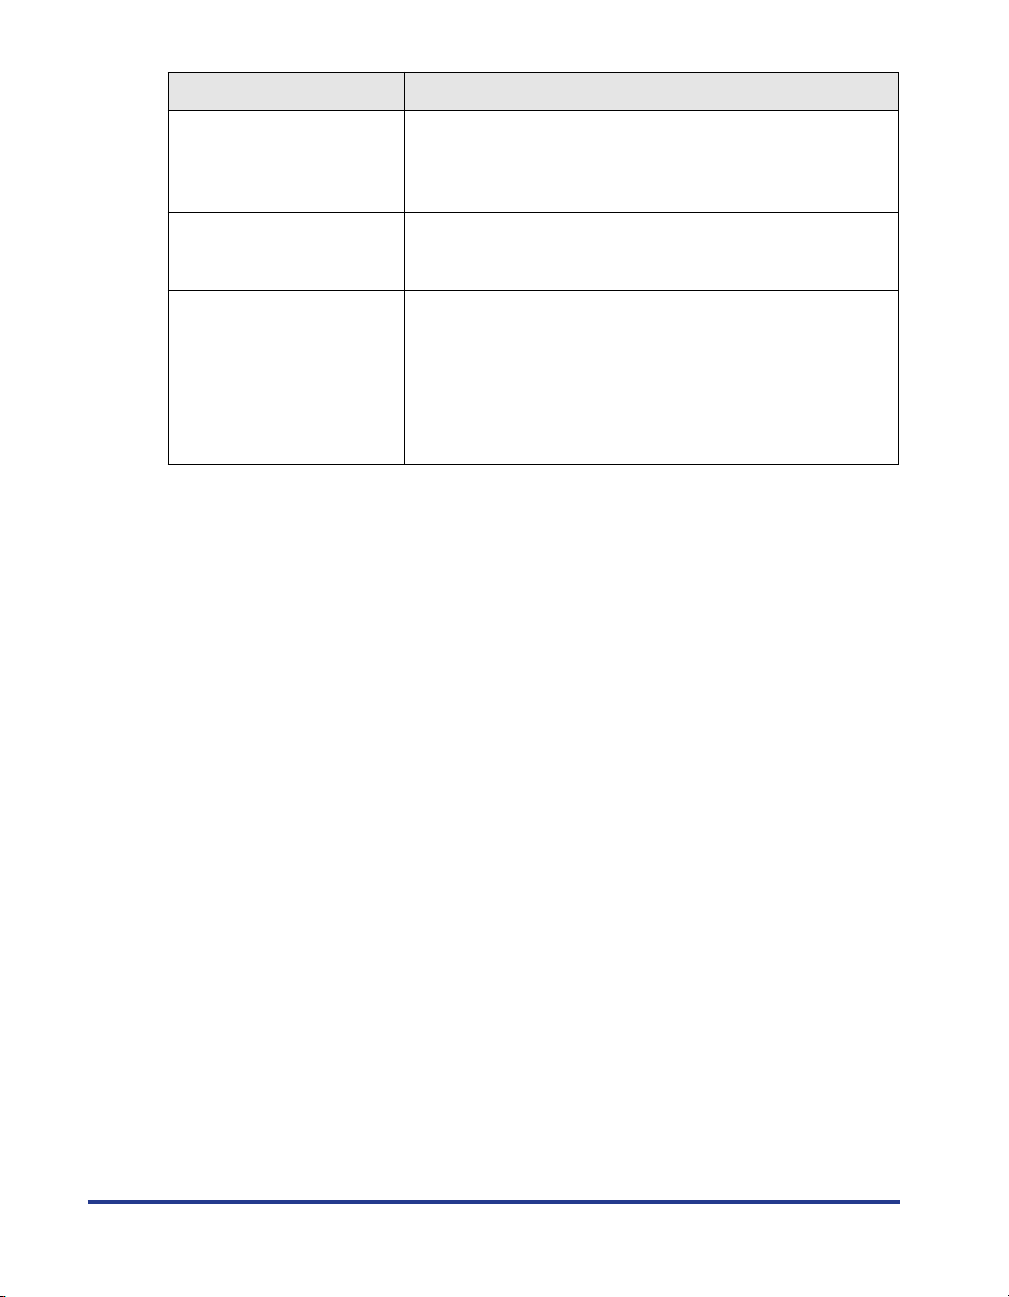
Message
Cause and Remedy
9G X トナー カクニン
(X indicates K, Y, M, or C)
<Warning Message>
E7 テイチャクキ カクニン
PC XXX ヨウシニ コウカン
(xxx indicates abbreviations
of paper sizes)
Cause There is a possibility that a used toner cartridge
that has reached its lifetime is installed.
Remedy Check if there is any problem with the toner
cartridge of the indicated color.
Cause The fixing unit is not installed or installed
improperly.
Remedy Install the fixing unit properly.
Cause The paper of the size specified in the application
is not loaded in the paper cassette or
multi-purpose tray, or the paper source for the
different paper size is selected.
Remedy Load the paper of the size selected in the
application (or the size specified by scaling
factors) in the selected paper cassette.
88
 Loading...