


EF500mm f/4L IS II
 USM
USM
EF600mm f/4L IS II
 USM
USM
COPY
ENG
Instructions
Thank you for purchasing a Canon product.
Canon’s EF500mm f/4L IS II USM and EF600mm |
8. A power focus mode enables smooth focus |
|||
f/4L IS II USM are high-performance super- |
change. |
|||
telephoto lenses, for use with EOS cameras. |
9. A focus preset function for advance storage |
|||
OO“IS” stands for Image Stabilizer. |
of focusing positions in memory to allow |
|||
OO“USM” stands for Ultrasonic Motor. |
instantaneous focusing. |
|||
|
|
|
10. Circular aperture for producing beautiful |
|
Features |
|
softfocus images. |
||
|
|
|
11. Can be used with EF1.4× III/EF2× III extenders. |
|
1. |
The Image Stabilizer gives the equivalent effect |
|||
12. Attachment slot provided for wire-type security |
||||
|
of a shutter speed four stops* faster. |
|||
|
lock, located under the cover for the orientation |
|||
|
Also, a third Image Stabilizer mode effective for |
|||
|
locking knob. |
|||
|
shooting irregularly moving subjects. |
|||
|
13. Tight seal structure ensures excellent dustproof |
|||
2. |
Use of fluorite lens elements giving superior |
|||
and drip-proof performance. |
||||
|
definition. |
|
||
|
|
14. Designed for lighter weight with parts made of |
||
3. |
SWC (Subwavelength Structure oating) |
|||
magnesium alloy. |
||||
|
reduces flare and ghosting. |
|||
|
|
|||
4. |
Using a fluorine coating on the foremost and |
* Based on [1/focal length] second. |
||
|
rearmost lens surfaces allows adhered dirt to be |
Generally, it requires a shutter speed [1/focal length] |
||
|
removed more easily than before. |
second or faster to prevent camera shake. |
||
5. |
Ultrasonic motor (USM) for fast, quiet autofocus. |
|
||
6. |
|
COPY |
||
Manual focusing is available after the subject |
|
|||
|
comes into focus in autofocus mode (ONE |
|
||
|
SHOT AF). |
|
|
|
7. |
An AF stop button to pause autofocus whenever |
|
||
|
desired. |
|
|
|
ENG-1
 Safety Precautions
Handling Cautions |
|
|
Safety Precautions |
||||
OO If the lens is taken from a cold environment into a |
|
OO Do not look at the sun or a bright light source |
|||||
|
|
warm one, condensation may develop on the lens |
|
through the lens or camera. Doing so could result in |
|||
|
|
surface and internal parts. To prevent condensation |
|
loss of vision. Looking at the sun directly through the |
|||
|
|
in this case, first put the lens into an airtight plastic bag |
|
lens is especially hazardous. |
|||
|
|
before taking it from a cold to warm environment. Then |
|
OO Do not point the lens or camera at the sun or |
|||
|
|
take out the lens after it has warmed gradually. Do the |
|
photograph it. This is because the lens concentrates |
|||
|
|
same when taking the lens from a warm environment |
|
the sun’s rays even when the sun is outside the image |
|||
|
|
into a cold one. |
COPY |
||||
|
|
|
|
area or when shooting with backlight, which could cause |
|||
OO Do not leave the lens in excessive heat such as in a car |
malfunction or fire. |
||||||
|
|
in direct sunlight. High temperatures can cause the |
OO Whether it is attached to the camera or not, do not |
||||
|
|
lens to malfunction. |
|
|
leave the lens under the sun without the lens cap |
||
|
|
|
|
|
|
|
attached. This is to prevent the lens from concentrating |
|
|
|
|
|
|
|
the sun’s rays, which could cause a fire. |
Conventions used in this instruction |
|
When the lens is mounted on a camera, be sure to also |
|||||
|
|
|
|
Warning to prevent lens or camera malfunction |
|
hold the camera by the lens, including when mounting |
|
|
|
|
|
|
on a tripod. Only holding by the camera could result in |
||
|
|
|
|
or damage. |
|
|
scratches on the camera body or the lens itself. The lens |
|
|
|
|
|
|
|
may also detach from its mount and fall, causing injury. |
|
|
|
|
Supplementary notes on using the lens and |
|
OO Do not use a strap attached to the camera. The mount |
|
|
|
|
|
|
|||
|
|
|
|
taking pictures. |
|
|
may break, resulting in the lens falling off and causing |
|
|
|
|
|
|
||
|
|
|
|
|
|
|
injury or in scratches on the camera. Be sure to use the |
|
|
|
|
|
|
|
camera with a dedicated strap attached correctly to the |
|
|
|
|
|
|
|
strap mount on the lens. |
|
|
|
|
|
|
|
OO Do not stand on top of the lens case. You may fall and |
|
|
|
|
|
|
|
injure yourself. |
|
|
|
|
|
|
|
OO Do not pile lens cases on top of one another as they |
|
|
|
|
|
|
|
may fall and cause injury. |
|
|
|
|
|
|
|
|
ENG-2
 Safety Precautions
This device complies with Part 15 of the FCC Rules. Operation is subject to the following two conditions: (1) This device may not cause harmful interference, and (2) this device must accept any interference received, including interference that may cause undesired operation.
Do not make any changes or modifications to the equipment unless otherwise specified in the instructions. If such changes or modifications should be made, you could be required to stop operation of the equipment.
This equipment has been testedCOPYand found to comply with the limits for a class B digital device, pursuant to part 15 of the FCC Rules. These limits are designed to provide reasonable protection against harmful interference in a residential installation. This equipment generates, uses and can radiate radio frequency energy and, if not installed and
used in accordance with the instructions, may cause harmful interference to radio communications.
However, there is no guarantee that interference will not occur in a particular installation. If this equipment does cause harmful interference to radio or television reception, which can be determined by turning the equipment off and on, the user is encouraged to try to correct the interference by one or more of the following measures:
• Reorient or relocate the receiving antenna.
• Increase the separation between the equipment and receiver.
• Consult the dealer or an experienced radio/TV technician for help.
ENG-3
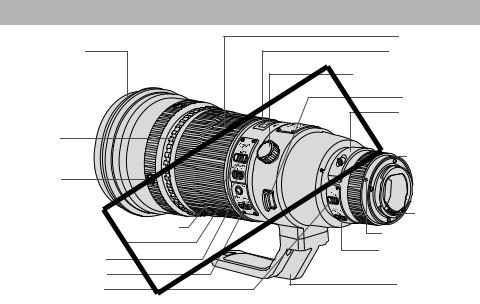
Nomenclature
|
|
|
Focusing ring (→ 6) |
Hood mount (→ 14) |
|
|
Distance scale (→ 14) |
|
|
Orientation locking knob (→ 17) |
|
|
|
|
Security slot (covered) (→ 17) |
|
|
|
Strap mount (→ 5) |
|
COPY |
Drop-in filter (→ 18) |
|
Playback ring |
|
||
(→ 9) |
|
|
Rubber ring (→ 5) |
|
|
|
|
AF stop button |
|
|
|
(→ 7) |
|
|
|
|
|
|
Contacts (→ 5) |
Image stabilizer mode selector switch (→ 11) |
|
Lens mount index (→ 5) |
|
Image stabilizer switch (→ 11) |
|
|
|
|
|
Focusing distance range |
|
Focus preset button (→ 8) |
|
|
|
|
|
selector switch (→ 6) |
|
Focus preset switch (→ 8) |
|
|
Tripod mount (→ 17) |
Focus mode switch (→ 6) |
|
|
|
|
|
|
|
OOThe illustrations used in the explanations in this manual show the EF500mm f/4L IS II USM, but the EF600mm f/4L IS II USM is used in the same way.
OOFor detailed information, reference page numbers are provided in parentheses (→ **).
ENG-4
1. Mounting and Detaching the Lens
See your camera’s instructions for details on mounting and detaching the lens.
 The lens mount has a rubber ring for enhanced dustand water-resistance. The rubber ring may cause slight abrasions around the camera’s lens mount, but this will not cause any problems. If the rubber ring becomes worn, it is replaceable by a Canon Service Center at cost.
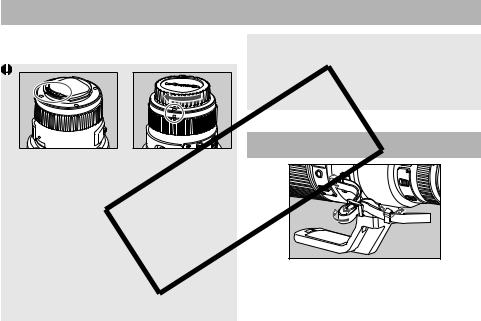
OOAfter detaching the lens, place the lens with |
Attaching the strap |
|
|
the rear end up to prevent the lens surface and |
|
contacts from getting scratched. |
|
OOIf the contacts get soiled, scratched, or have |
|
fingerprints on them, corrosion or faulty |
|
connections can result. The camera and lens |
|
may not operate properly. |
|
OOIf the contacts get soiled or have fingerprints on |
|
them, clean them with a soft cloth. |
|
OOIf you remove the lens, cover it with the dust cap. |
Thread the end of the strap through the strap |
To attach it properly, align the lens mount index |
|
and the index of the dust cap as shown in |
mount on the lens and then back through the |
COPclaspYon the strap. Pull the strap tight and check |
|
the diagram, and turn clockwise. To remove it, |
|
reverse the order. |
that there is no slack in the clasp. |
ENG-5

2. Setting the Focus Mode 3. Switching the Focusing Distance Range
To shoot in autofocus (AF) mode, set the focus |
|
|
||
mode switch to AF. |
|
You can set the focusing distance range with a |
||
To shoot in manual focus (MF) mode, set the |
||||
switch. By setting a suitable focusing distance |
||||
focus mode switch to MF, and focus by turning |
||||
range, the actual autofocusing time will be |
||||
the focusing ring. The focusing ring always |
||||
shorter. |
|
|||
works, regardless of the focus mode. |
|
|||
|
|
|||
To shoot in power focus (PF) mode, set the |
Lens |
Ranges |
||
focus mode switch to PF when the focus preset |
|
FULL |
||
switch (p. 8) is at OFF. |
|
EF500mm f/4L IS II USM |
3.7 m/12.14 ft. – 10 m/32.81 ft. |
|
Operating the playback ring enables focus |
||||
|
10 m/32.81 ft. – ∞ |
|||
change at a set speed. This is a useful feature |
|
FULL |
||
for changing focus when shooting movies. |
EF600mm f/4L IS II USM |
4.5 m/14.76 ft. – 16 m/52.49 ft. |
||
|
COPY |
16 m/52.49 ft. – ∞ |
||
|
|
|||
After autofocusing in ONE SHOT AF mode, focus |
|
|
||
manually by pressing the shutter button halfway |
|
|
||
and turning the focusing ring. (Full-time manual |
|
|
||
focus) |
|
|
|
|
 Loading...