

Page 1
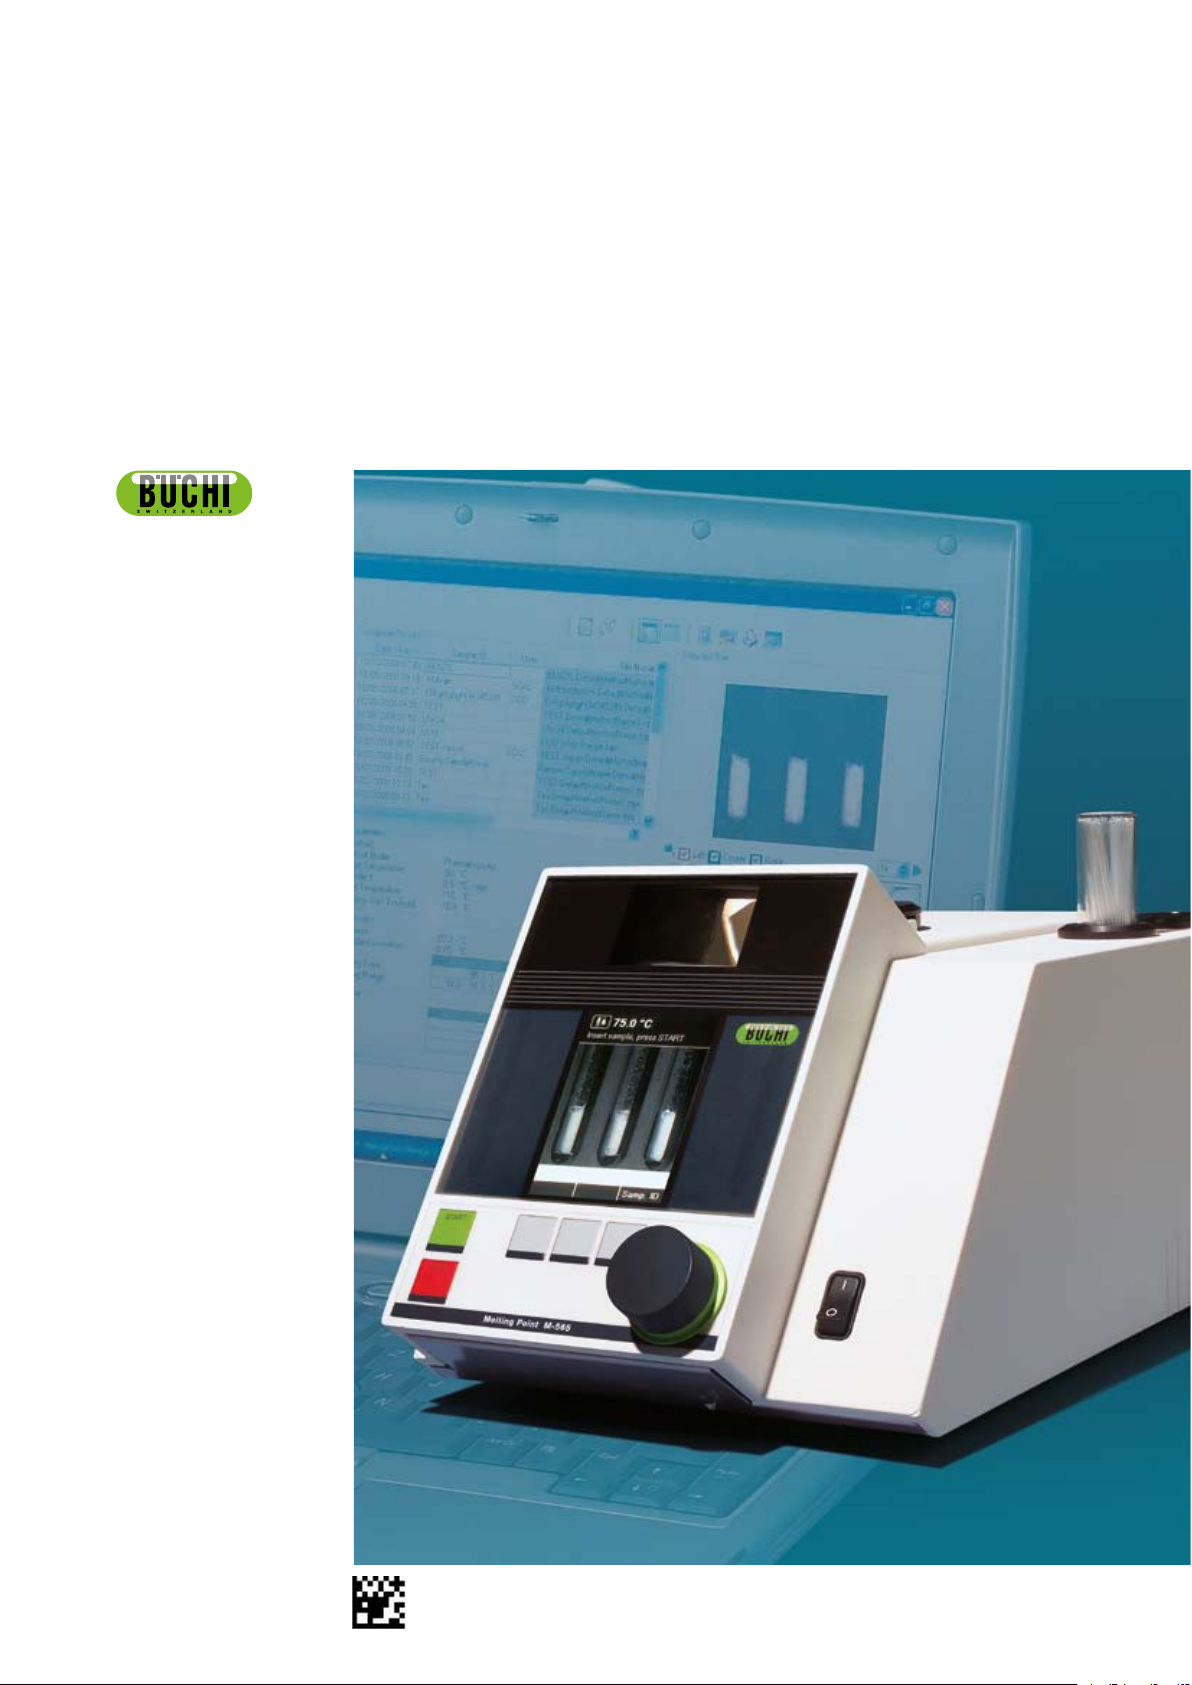
Operation Manual
MeltingPoint
Monitor 1.1
093299
en
Page 2

Page 3

Table of contents
Table of contents
1 About this manual and general information . . . . . . . . . . . . . . . . . . . . . . . . . 5
1.1 About this manual . . . . . . . . . . . . . . . . . . . . . . . . . . . . . . . . . . . . 5
1.2 Reference documents. . . . . . . . . . . . . . . . . . . . . . . . . . . . . . . . . . 5
1.3 Trademarks . . . . . . . . . . . . . . . . . . . . . . . . . . . . . . . . . . . . . . . 5
1.4 Abbreviations . . . . . . . . . . . . . . . . . . . . . . . . . . . . . . . . . . . . . . 5
2 Safety. . . . . . . . . . . . . . . . . . . . . . . . . . . . . . . . . . . . . . . . . . . . . . 6
2.1 Warning notices and messages used in this manual. . . . . . . . . . . . . . . . . . . 6
2.2 Software-related hazards . . . . . . . . . . . . . . . . . . . . . . . . . . . . . . . . 6
3 Technical data . . . . . . . . . . . . . . . . . . . . . . . . . . . . . . . . . . . . . . . . . 7
3.1 Minimum system requirements . . . . . . . . . . . . . . . . . . . . . . . . . . . . . 7
4. Description of function . . . . . . . . . . . . . . . . . . . . . . . . . . . . . . . . . . . . 8
4.1 Product functions . . . . . . . . . . . . . . . . . . . . . . . . . . . . . . . . . . . . 8
5 Putting into operation . . . . . . . . . . . . . . . . . . . . . . . . . . . . . . . . . . . . . 9
5.1 Step 1: Installing the program . . . . . . . . . . . . . . . . . . . . . . . . . . . . . . 9
5.2 Step 2: Starting the program . . . . . . . . . . . . . . . . . . . . . . . . . . . . . . 9
5.3 Step 3: Connecting a Melting Point M-565 . . . . . . . . . . . . . . . . . . . . . . . 9
5.4 Software installation guide. . . . . . . . . . . . . . . . . . . . . . . . . . . . . . . 10
5.5 Registration . . . . . . . . . . . . . . . . . . . . . . . . . . . . . . . . . . . . . . 11
5.6 Licensing . . . . . . . . . . . . . . . . . . . . . . . . . . . . . . . . . . . . . . . 12
6 Operation . . . . . . . . . . . . . . . . . . . . . . . . . . . . . . . . . . . . . . . . . . 13
6.1 Program window layout . . . . . . . . . . . . . . . . . . . . . . . . . . . . . . . . 13
6.2 Operation — Melting point determinations. . . . . . . . . . . . . . . . . . . . . . . 14
6.2.1 Program overview . . . . . . . . . . . . . . . . . . . . . . . . . . . . . . . . . . . 14
6.2.2 Recording a new melting point determination . . . . . . . . . . . . . . . . . . . . . 15
6.2.3 Handling recorded melting point results . . . . . . . . . . . . . . . . . . . . . . . . 16
6.2.4 Handling of melting point methods . . . . . . . . . . . . . . . . . . . . . . . . . . 18
6.3 Operation — Boiling point determinations . . . . . . . . . . . . . . . . . . . . . . . 19
6.3.1 Program overview . . . . . . . . . . . . . . . . . . . . . . . . . . . . . . . . . . 19
6.3.2 Recording a new boiling point determination . . . . . . . . . . . . . . . . . . . . . 20
6.3.3 Handling recorded boiling point results . . . . . . . . . . . . . . . . . . . . . . . . 21
6.3.4 Handling of boiling point methods . . . . . . . . . . . . . . . . . . . . . . . . . . . 23
6.4 Settings menu. . . . . . . . . . . . . . . . . . . . . . . . . . . . . . . . . . . . . 24
6.5 Other Program functions . . . . . . . . . . . . . . . . . . . . . . . . . . . . . . . 25
7 LIMS integration . . . . . . . . . . . . . . . . . . . . . . . . . . . . . . . . . . . . . . . 29
8 FAQ and troubleshooting . . . . . . . . . . . . . . . . . . . . . . . . . . . . . . . . . . 30
3 MeltingPoint Monitor 1.1 Operation Manual, Version B
Page 4

Table of contents
No technical modifications may be made to the software without the prior written agreement of Buchi.
Unauthorized modifications may affect the system safety or result in accidents.
This manual is protected by copyright. Information from it may not be reproduced, distributed, or used
for competitive purposes, nor made available to third parties. The manufacture of any component with
the aid of this manual without prior written agreement is also prohibited.
If you need another language version of this manual, you can download available versions at
www.buchi.com.
4
MeltingPoint Monitor 1.1 Operation Manual, Version B
Page 5

1 About this manual and general information
1.1 About this manual
This manual is part of the product. It describes the MeltingPoint Monitor 1.1 software and provides all
information required for its use.
It is addressed to laboratory personnel and operators in particular.
Read this operation manual before use.•
Observe all safety instructions.•
Keep the operation manual during the product lifetime.•
Pass the operation manual to every subsequent owner or user of the product.•
1 About this manual
1.2 Reference documents
For information about the Melting Point M-565, please refer to the corresponding manual.
Table of available language versions with their respective ordering numbers:
Language Ordering number
English 93256
German 93257
French 93258
Italian 93259
Spanish 93260
1.3 Trademarks
The following product names and any registered and unregistered trademarks mentioned in this
manual are used for identification purposes only and remain the exclusive property of their respective
owners:
Windows®•
1.4 Abbreviations
PC: Personal Computer
CD: Compact Disk
XML: Extensible Markup Language
FAQ: Frequently Asked Questions
USB: Universal Serial Bus
5 MeltingPoint Monitor 1.1 Operation Manual, Version B
Page 6

2 Safety
This section highlights the safety concept of the MeltingPoint Monitor software and contains general
rules of behavior and warnings from hazards concerning the use of the product.
The safety of users and personnel can only be ensured if these safety instructions and the safety
related warnings in the individual sections are strictly observed and followed. Therefore, the manual
must always be available to all persons performing the tasks described herein.
For further safety information and instruction about the Melting Point M-565, see section 1.2, Reference documents for related documentation.
2.1 Warning notices and messages used in this manual
NOTE
Tips for optimal use of the soft– and hardware.
2 Safety
2.2 Software-related hazards
There are no known software–related hazards.
6 MeltingPoint Monitor 1.1 Operation Manual, Version B
Page 7

3 Technical data
3.1 Minimum system requirements
Operating System Requirements
Windows XP Professional (32-bit only), SP3
3 Technical data
1GHz CPU or faster
>15 GB of free harddisk space; 512 MB RAM
CD– ROM drive
USB 1.1 or higher
Display resolution: 1024 x 768
Windows 7 Professional / Ultimate / Enterprise
(32-bit only)
1 GHz CPU or faster
>15 GB of free harddisk space; 1 GB RAM
CD– ROM drive
USB 1.1 or higher
x
Display resolution: 1024
768
7 MeltingPoint Monitor 1.1 Operation Manual, Version B
Page 8

4. Description of function
This section will introduce all basic functions provided by the software and its structure.
4.1 Product functions
The MeltingPoint Monitor software is a monitoring, method handling and report generating program
only. Thus, performing remote actions at the Melting Point M-565 itself is not possible.
It provides the following features for melting and boiling point determination:
Management of methods
Also the Melting Point M-565 provides an easy-to-handle user interface, to manage a lot of methods
is even more comfortable via a PC and this software.
Handling and storage of determination results
Determination results can be converted into reports•
Video sequences, which have been recorded are stored for reviews •
Reports can be generated, printed and exported •
Video–replay options (e.g. playback speed) are available•
4 Description of function
8 MeltingPoint Monitor 1.1 Operation Manual, Version B
Page 9
5 Putting into operation
RS232
PS/2
USB
USB
This section contains three steps to a working setup in chronologic order. If any error occurs, please
check every step carefully again from the beginning.
5.1 Step 1: Installing the program
The following prerequisites must be fulfilled:
• The Melting Point M-565 must be disconnected from the computer at the time of
installation
For installation, the user must hold administrative rights on the computer•
The PC must match the minimum system requirements for this software, see section 3.1•
Installation of the software:
Put the CD into the optical drive of the PC and follow the installation dialog of the autostart–CD. For
detailed information about the installation process and the test period of the software, see sections
5.4 and following.
5 Putting into operation
5.2 Step 2: Starting the program
Go to: Start > Programs > Buchi > MeltingPoint Monitor1.1 > MeltingPoint Monitor 1.1•
Or double-click the program shortcut icon, that can be found on the desktop•
5.3 Step 3: Connecting a Melting Point M-565
Perform the following steps:
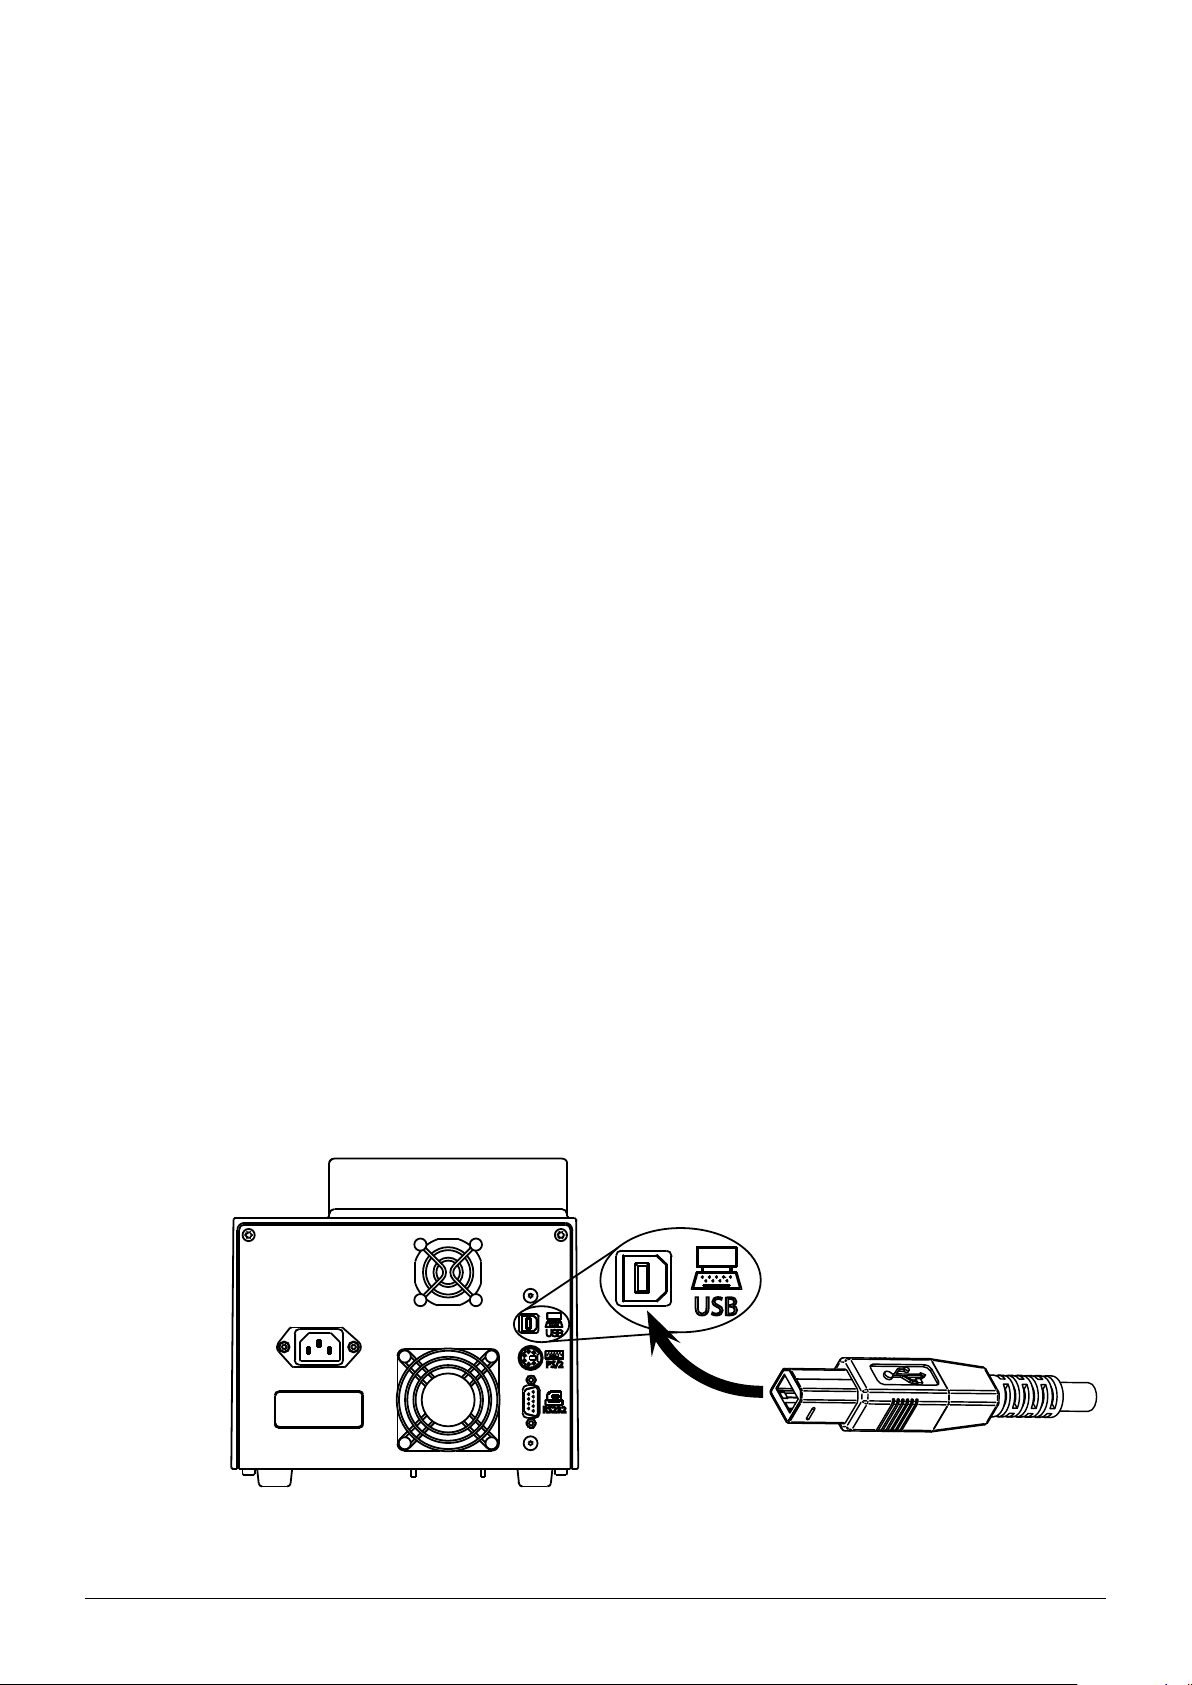
Use the delivered USB cable to connect the Melting Point M-565 to the PC (see below drawing)1.
Switch on the Melting Point M-5652.
Wait for the software to establish the communication link (check ‘Connection status’ field, see 3.
section 6.1)
The software is now ready to receive data.
NOTE
The maximum cable length for USB cables must not exceed 5m!
9 MeltingPoint Monitor 1.1 Operation Manual, Version B
Page 10
5.4 Software installation guide
�
Installation procedure
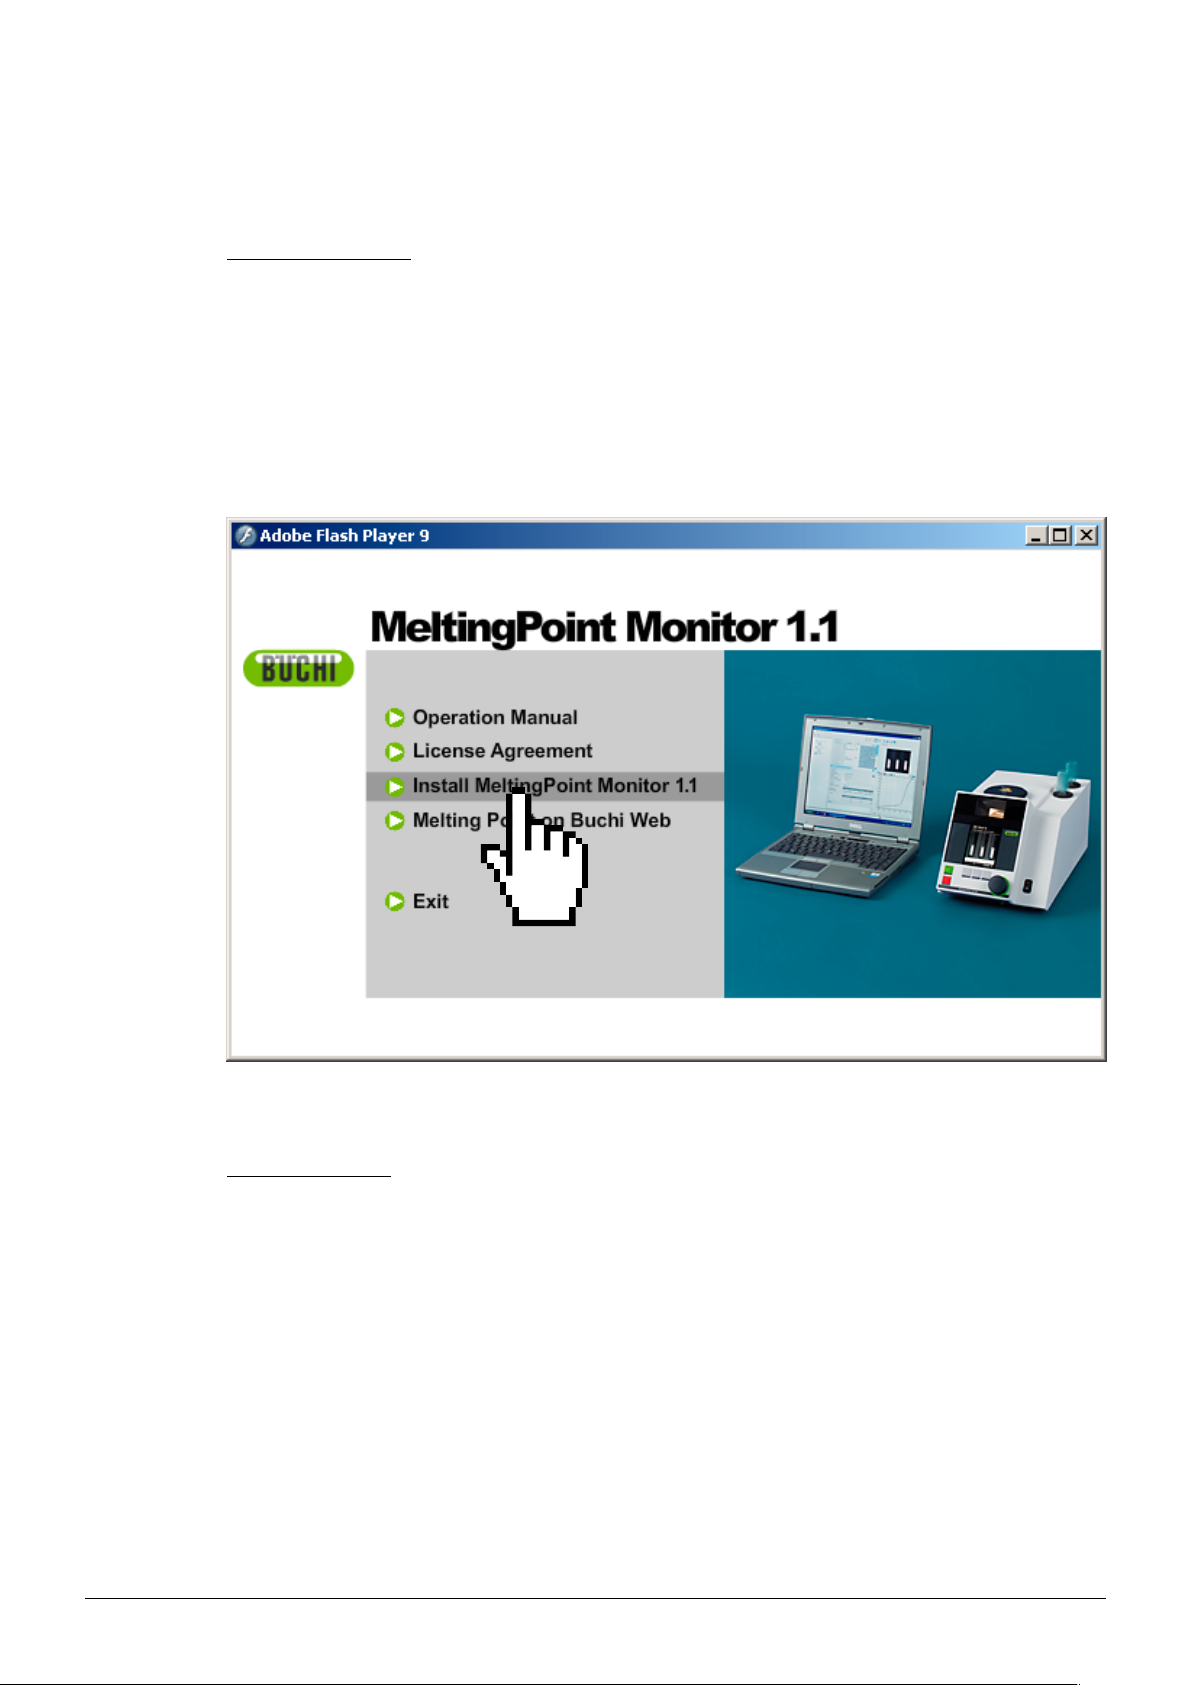
Start the PC and log–in as a user with administrator rights. Put the MeltingPoint Monitor CD into the
optical drive—the installation dialog window should start automatically (this may take some seconds).
If the window does not pop–up, go to ‘My Computer’. Click on the optical drive to start the CD manually.
NOTE
Do not connect the Melting Point M-565 to the PC at the time of software installation!
5 Putting into operation
Installation dialog window
Installation process
Click ‘Install MeltingPoint Monitor’ (a) and follow the instructions on the screen.
Click ‘Next’ to continue with the subsequent pop–up.•
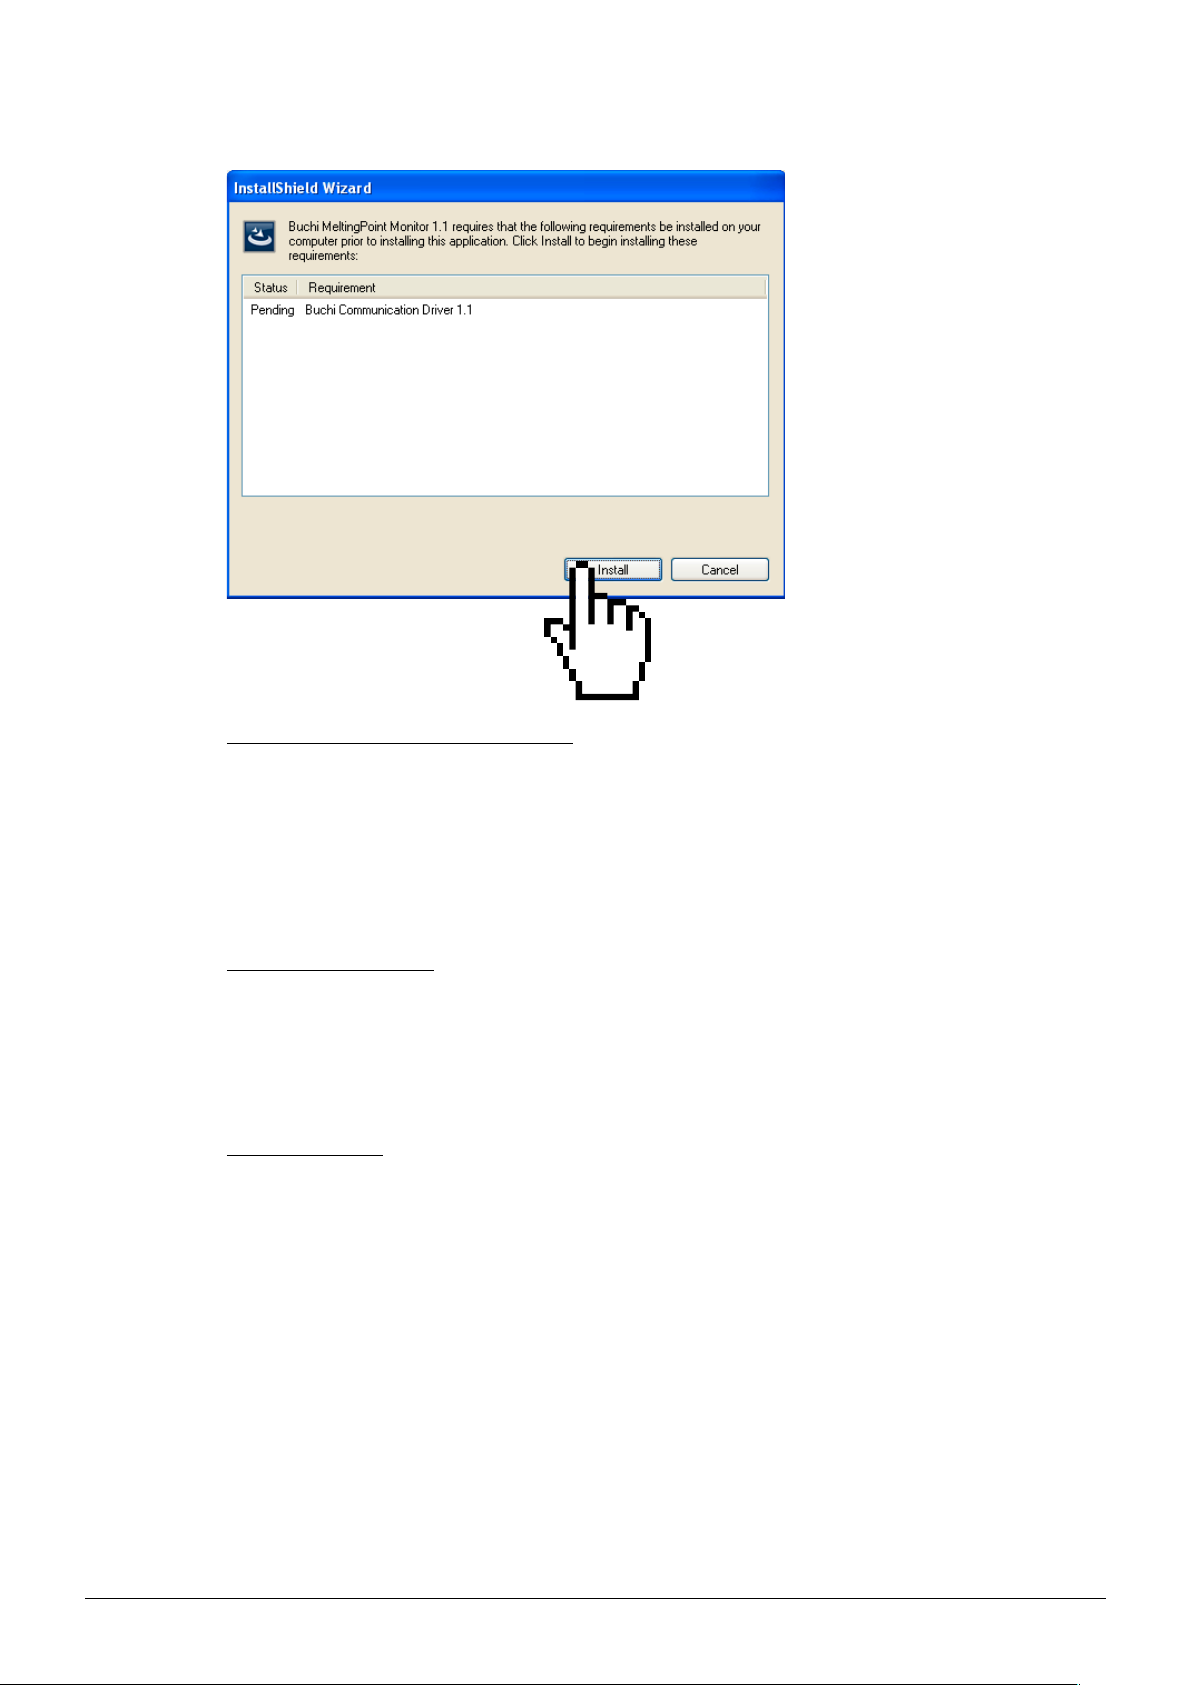
The ‘InstallShield Wizard’ will start. The listed software components are ready to be installed (see •
next figure).
Click ‘Install’ (• b) to proceed and follow the instructions on the screen.
10 MeltingPoint Monitor 1.1 Operation Manual, Version B
Page 11
Windows InstallShield Wizard
�
5 Putting into operation
Special information for Windows 7 users
If the ‘User Account Control’ is activated, the message “Do you want to allow the following program to
make changes to this comupter” appears at the beginning of the installation procedure. Click ‘Yes’ to
acknowledge.
5.5 Registration
Software in demo mode
When you start the software for the first time, the ‘Buchi Software Evaluation Information’ window will
start. Click ‘OK’ to start the MeltingPoint Monitor software in demo–mode. This mode is limited to 60
days only! After the trial period has expired, the MeltingPoint Monitor software can not be started. In
this case, you will have to order a licensed version of the program.
Licensed software
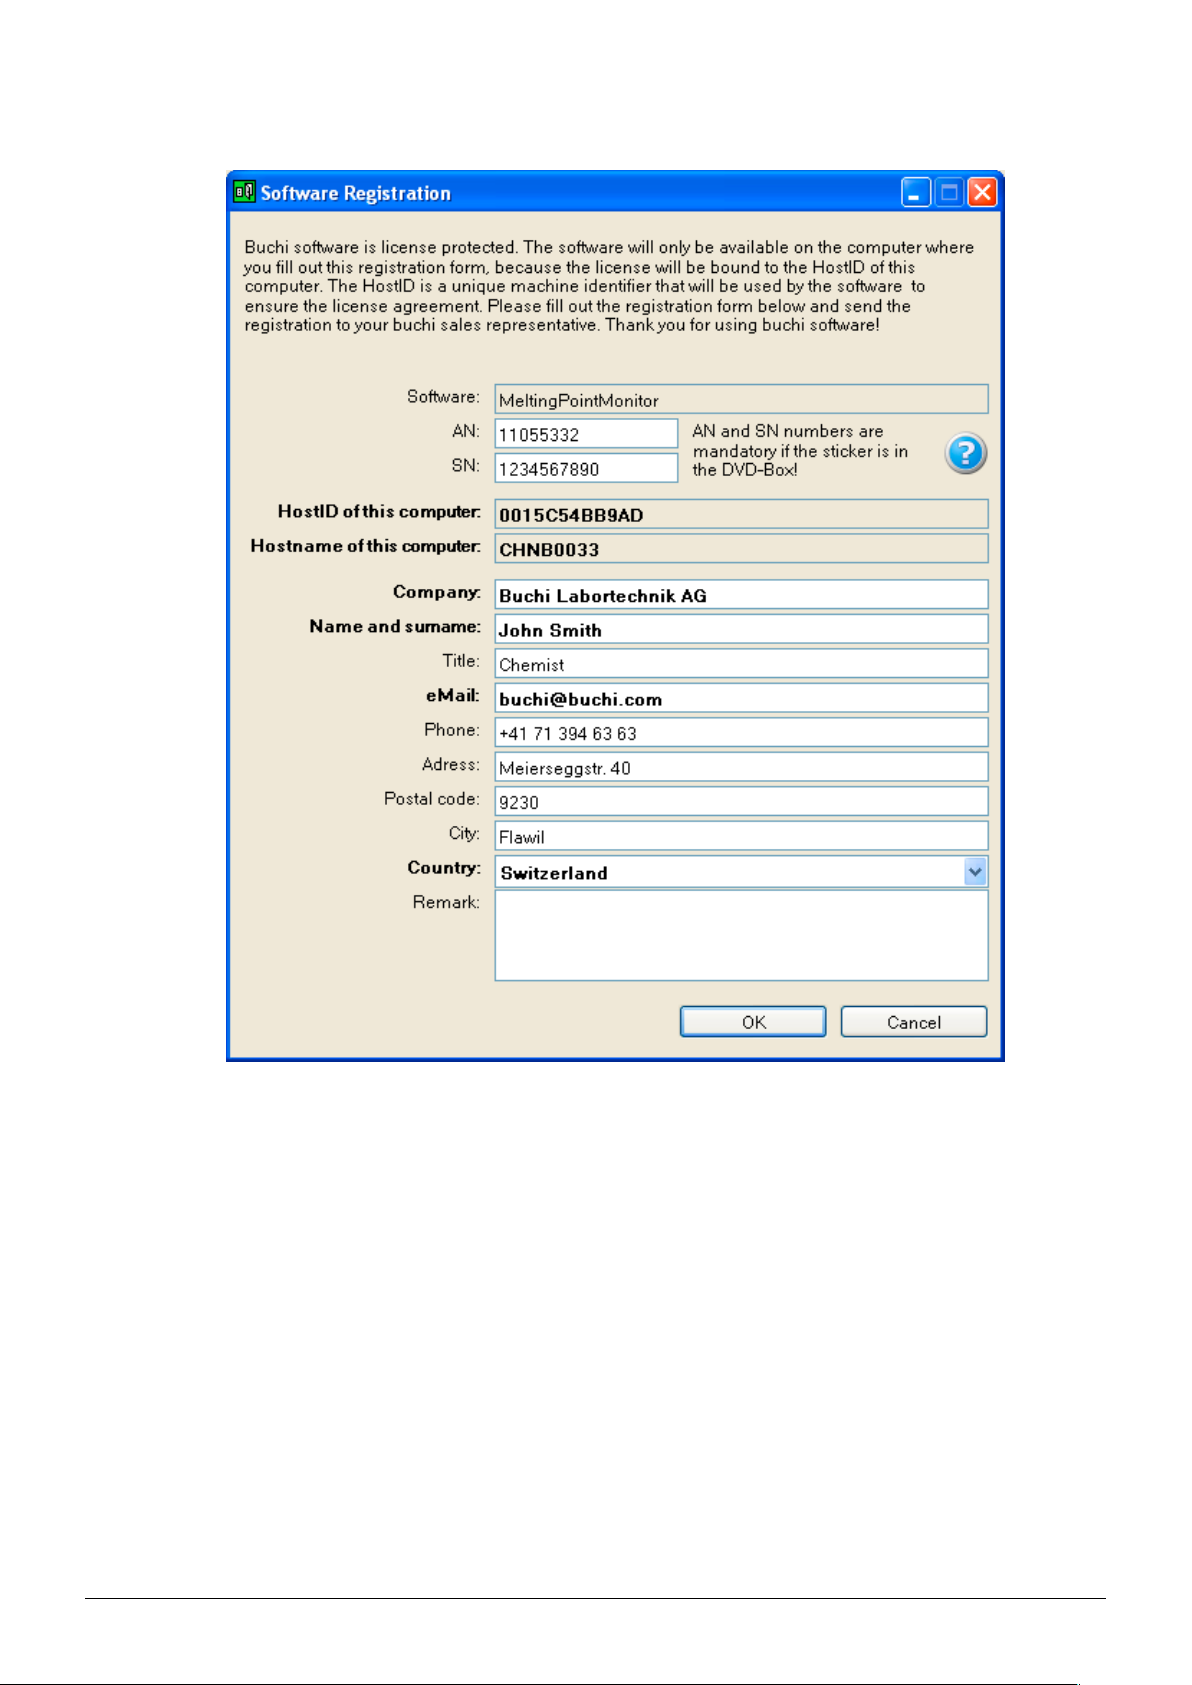
For activation, it is necessary to register the software. To do so, select Help > Software Registration
in the MeltingPoint Monitor program. This will bring up the registration form. Follow the instructions,
displayed in the form (see next figure).
11 MeltingPoint Monitor 1.1 Operation Manual, Version B
Page 12
5 Putting into operation
Example form
The AN and SN numbers are mandatory. Click ‘OK’ to save the information in a registration file.
Send this file to your local Buchi distributor. A license key will be send by Buchi in return.
NOTE
Only licensed software packages are labeled with these numbers. They can be found at the inside of
the disk box.
5.6 Licensing
To finish the licensing process import the license key, you received by your Buchi partner.
Start the software and go to Help > Import License, select the key file and click ‘OK’.
The software is now activated.
12 MeltingPoint Monitor 1.1 Operation Manual, Version B
Page 13
6 Operation
MeltingPoint Monitor 1.1
This section explains the different program views and handling steps. It is divided into two independent major topics melting point (section 6.2) and boiling point (section 6.3).
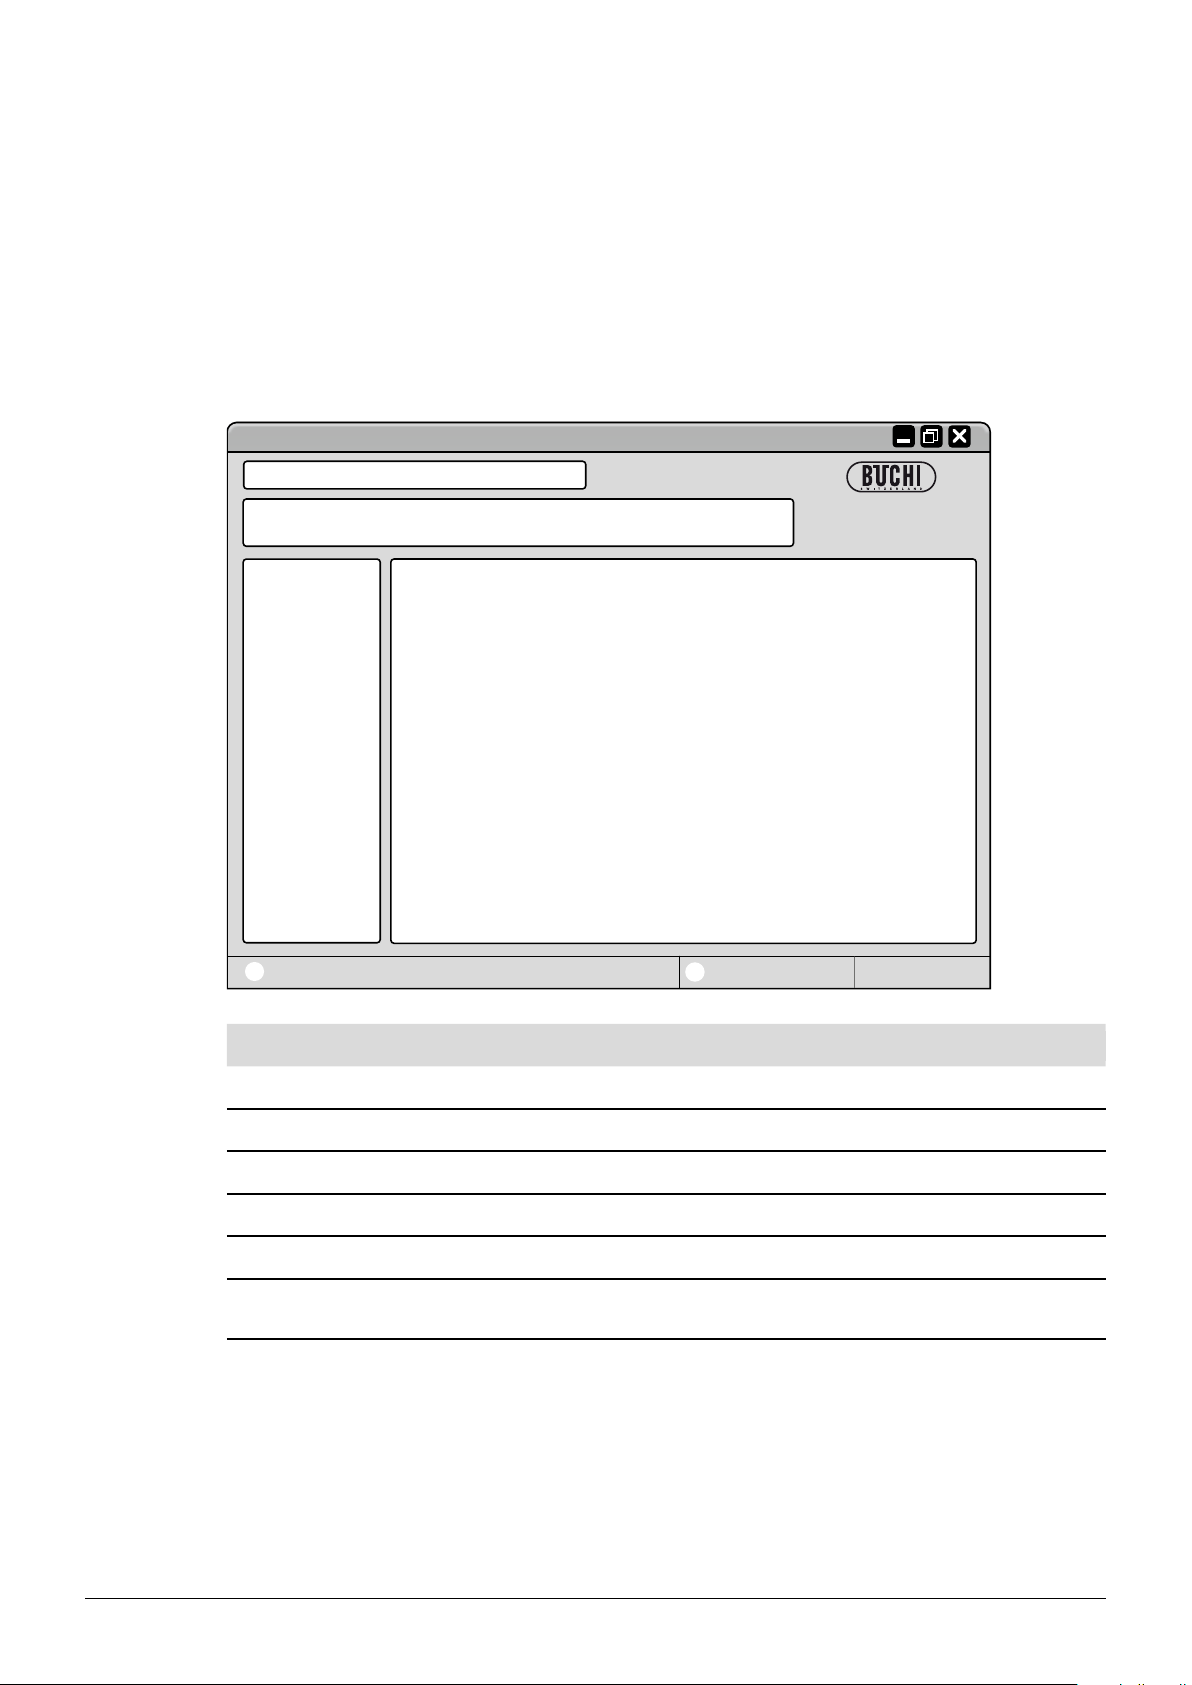
6.1 Program window layout
a
b
6 Operation
System status
Position Description
a Menu bar
b Toolbar
Click on text, to roll-out drop down menus
Program functions are available via buttons
Connection status
Serial number
Program function window
Main view
System status
Connection status
13 MeltingPoint Monitor 1.1 Operation Manual, Version B
Access to program categories (will change the ‘Main view’ accordingly)
Displays main program information such as recording and configuration screens
Informs the user about the Melting Point M-565 status
Displays connection status of the program and the serial number of the Melting
Point M-565
Page 14
6.2 Operation — Melting point determinations
6.2.1 Program overview
Follow the description in section 5 to start the software and establish a link to the Melting Point
M-565.
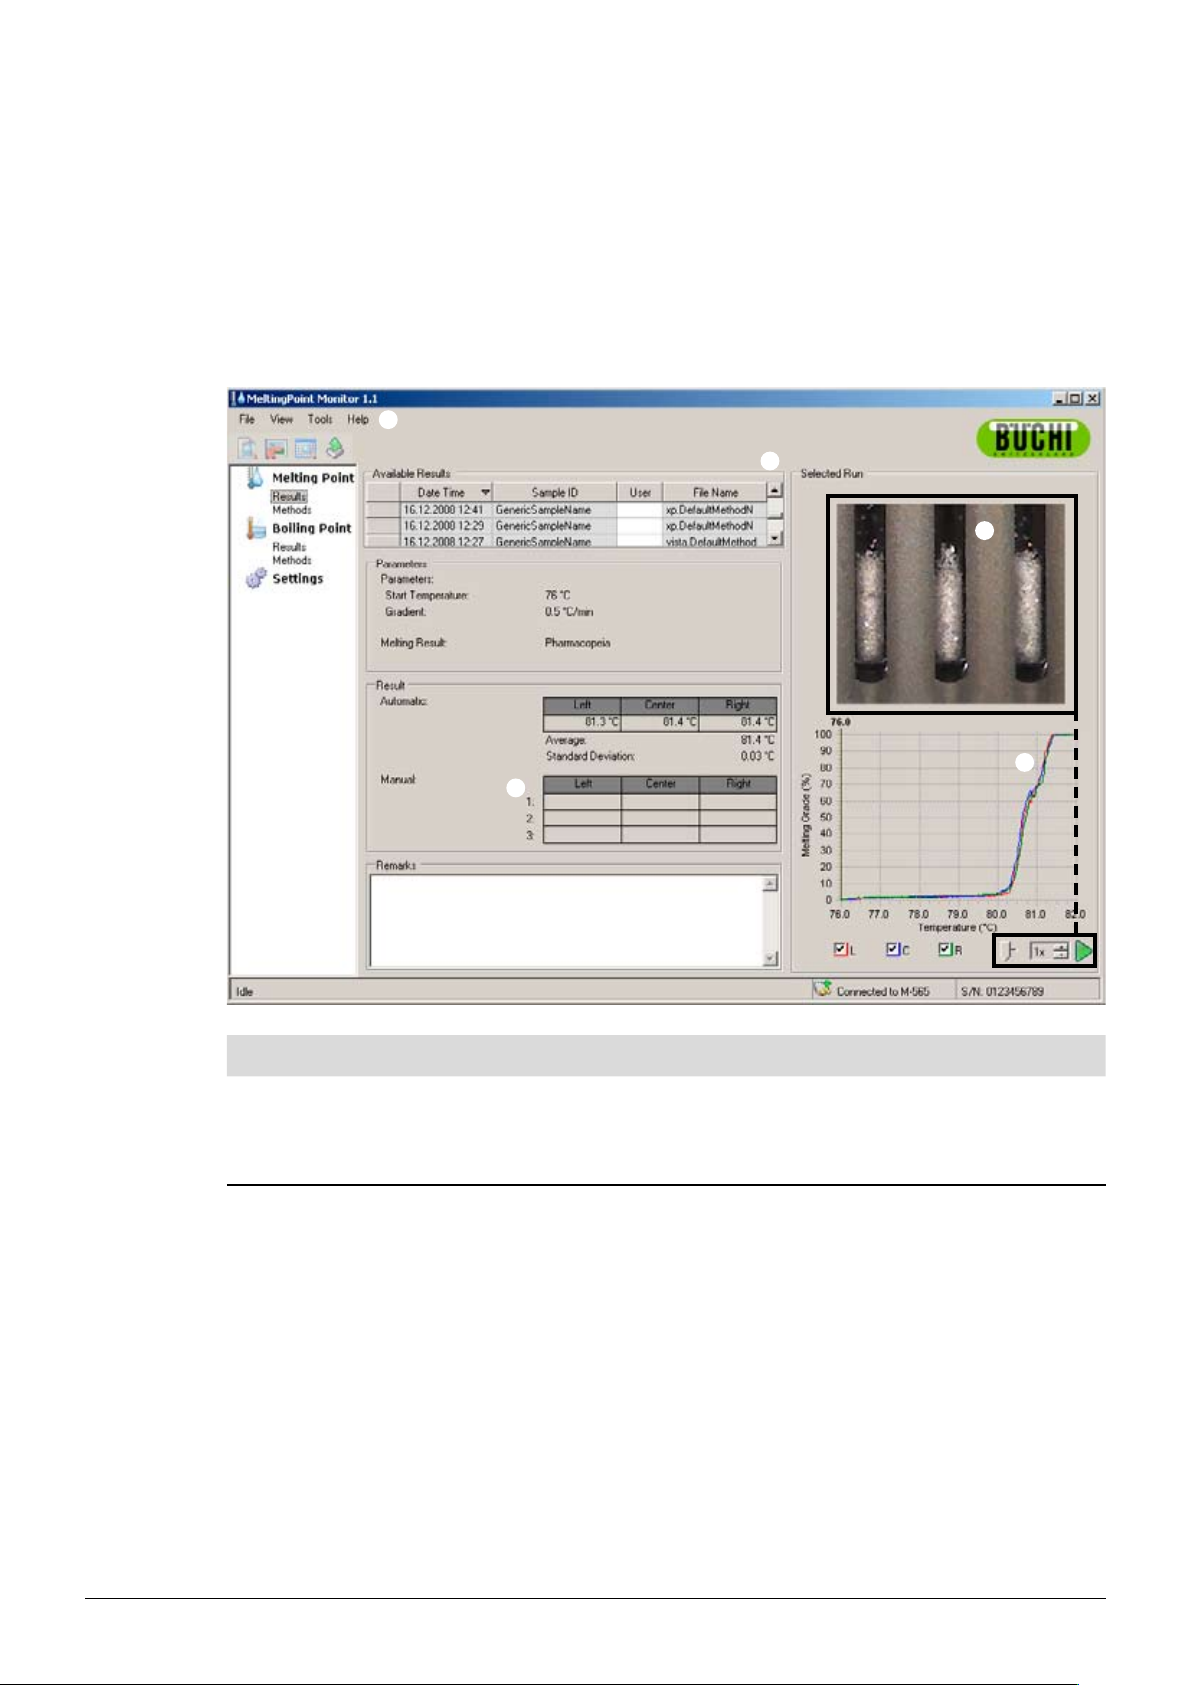
The following figure shows the start–up view:
a
g
6 Operation
b
Position Description
Extended program functions can be accessed in the drop–down menus of the menu bar by a click.
a
b
The buttons below allow fast access to frequently used standard functions. For tooltips, keep the mouse
pointer over a button for a moment.
The table lists all available determination recordings. The black triangle in the left column marks the
currently chosen record.
To select a recording, click into a row.•
Mark one or more rows to select multiple recordings (selected items are highlighted in blue)•
To delete recordings, select one or more and press the ‘Delete’ button on the keyboard•
To sort the table, click on the column headers.•
To change the user–name click into the white field and enter the new name. •
14 MeltingPoint Monitor 1.1 Operation Manual, Version B
Page 15

Position Description
This area shows the first scene of the chosen determination movie.
6 Operation
Click onto a curve below to choose a point of interest at the temperature diagram. The displayed •
image will change simultaneously to the matching timestamp of recording.
For constant playback with adjustable speed, use the playback controls in the lower right corner •
This diagram shows the detected determination curves in different colors.
To show or hide curves, use the corresponding colored checkboxes. •
g
6.2.2 Recording a new melting point determination
To record a new melting point determination, the Melting Point M-565 should be linked to the •
PC first. In case the Melting Point M-565 and the PC have been linked before the determination
run starts, the recording data are automatically transferred to the computer. At this time, viewing
existing results or changing stored methods on the PC is still possible.
Use the ‘Remarks’ text box to enter comments for a determination record at any time.
This area shows two different tables.
The first table lists the automatically detected melting point temperature of all three samples •
including their statistic values.
The second table can hold up to three values per sample set. Here, the user can manually add •
marks while a determination is in process.
The program function window allows to change between the main views ‘Results’ and ‘Methods’ for
melting point determination. Additionally, some program settings can be changed under ‘Settings’.
The recording takes place at the Melting Point M-565 which always keeps the last determination •
results in its internal storage. In case a determination run has already been finished, without the
Melting Point M-565 linked to the PC, it is possible to import the last set of results to the PC using
the import button (see section 6.2.3).
Information about the system status during determination are displayed in the ‘System status’ area.
Status in ‘System status’
area
Idle System is ready for a determination run..
Approaching System approaches the start temperature of the chosen method/settings.
Ready System has reached the programmed start temperature. Insert samples now.
Measuring .. Determination is beeing processed.
Completing Measurement Some internal tasks are about to be finished. System is cooling down to
Realtime view during an ongoing recording
The software displays all necessary determination values in realtime, so the user can easily supervise
the automated process.
The temperature history is visualized by curves and the actual–temperature of the heating–block is •
continuously displayed. The scale of the grid is adapted to the determination curves accordingly.
During the recording, the live image changes continuously as the Melting Point M-565 is recording •
a determination movie.
Description
environmental temperature in the meantime.
15 MeltingPoint Monitor 1.1 Operation Manual, Version B
Page 16
NOTE
Restarting the Melting Point M-565 or starting a new determination will erase the last recording!•
Sample IDs can only be changed during the measurement! •
During the recording, no other data exchange between the Melting Point M-565 and the software •
is possible.
On the computer the number of storable results is limited by the available disk space only.•
6.2.3 Handling recorded melting point results
The software offers comprehensive options to handle recordings on the PC. The following list gives an
overview about possible actions:
Sort and view recorded results in the table of ‘Available results’ (click on the column–headers)•
Replay a determination•
Change comments in the ‘Remarks’ field •
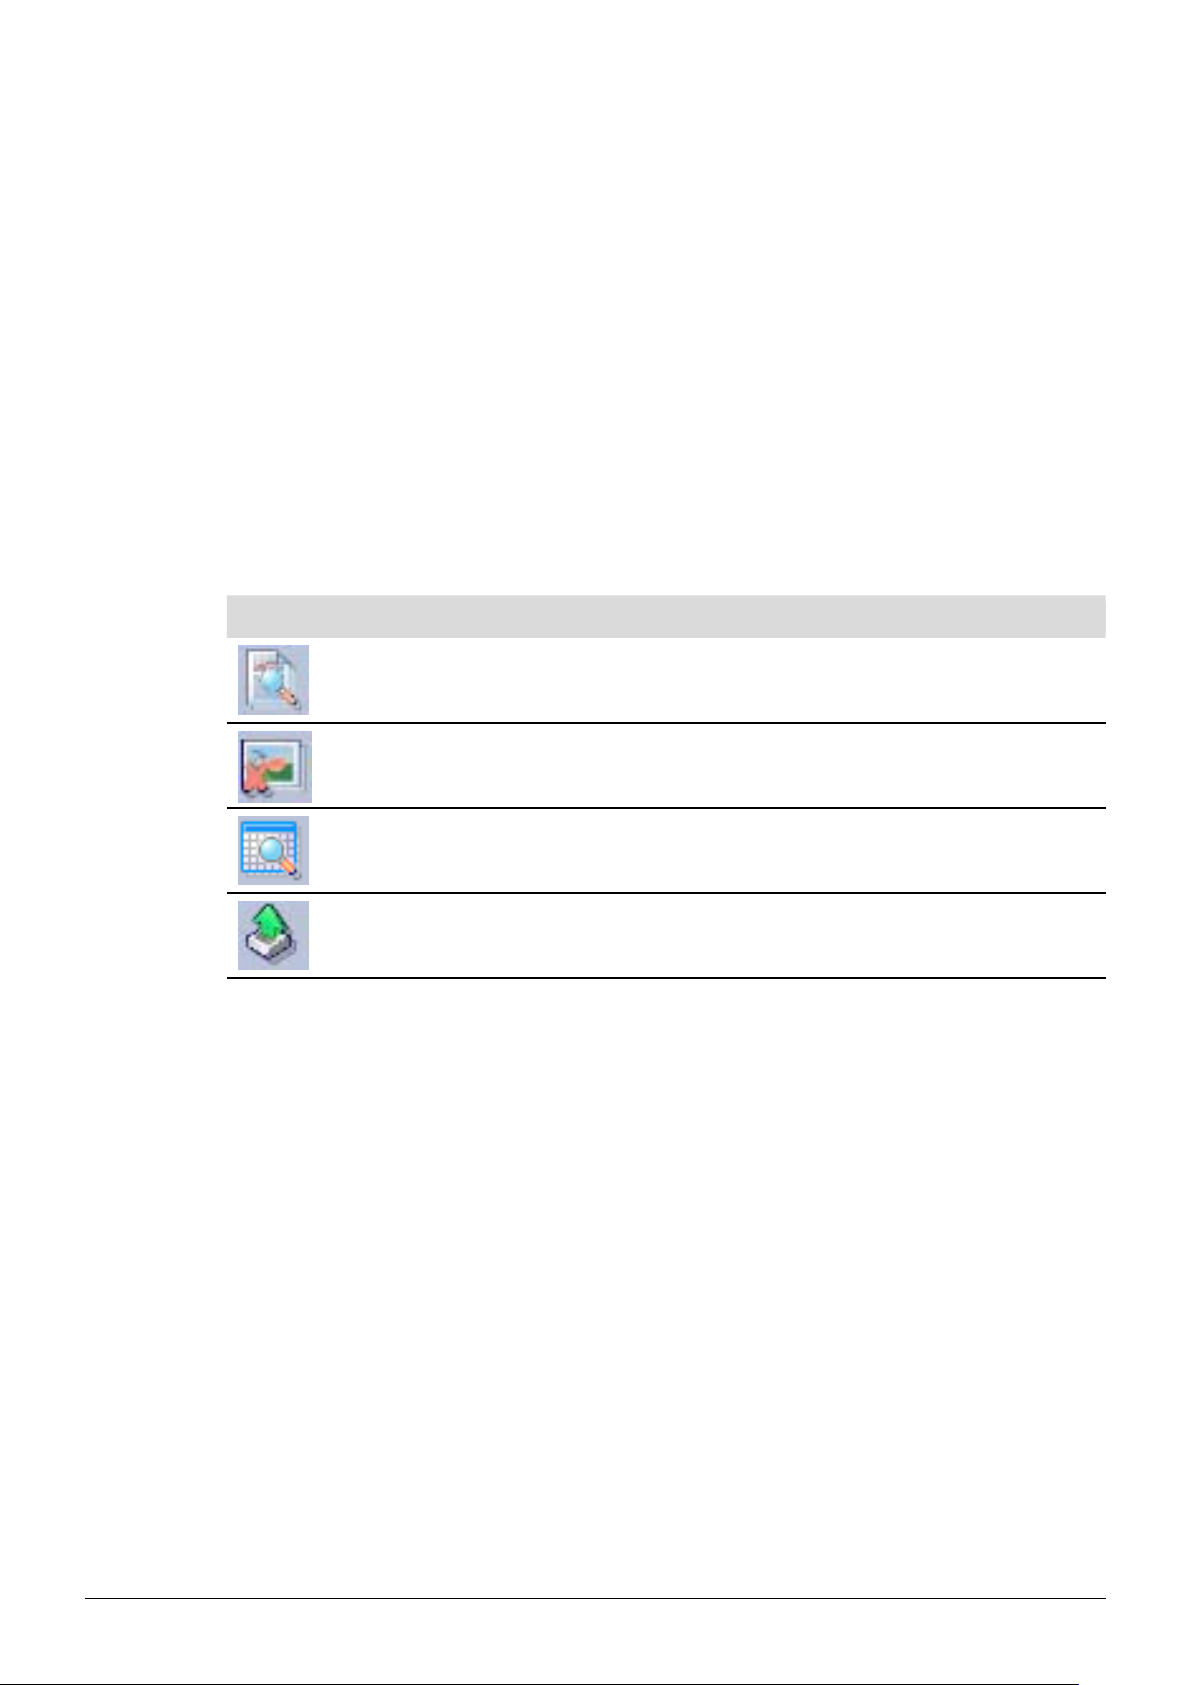
Buttons Description
6 Operation
Click on this button to let the system generate a PDF–report of the selected
result for easy printing and storage (see section 6.6.5 for an example report)
Click on this button to delete video data which are no longer required to have
more recording–space available
Click on this button to change between graph and table view (see also workflow
description for spreadsheet export)
Click on this button to receive the latest set of results (only necessary, if the
Melting Point M-565 finished a recording without beeing linked to a PC)
NOTE
Deleted video data are lost and can not be recovered!•
Each result is stored in a single file. The directory path of these files is defined under ‚Settings’. •
Files stored in other directories than the defined one are not displayed in the table of ‚Available
Results‘.
16 MeltingPoint Monitor 1.1 Operation Manual, Version B
Page 17
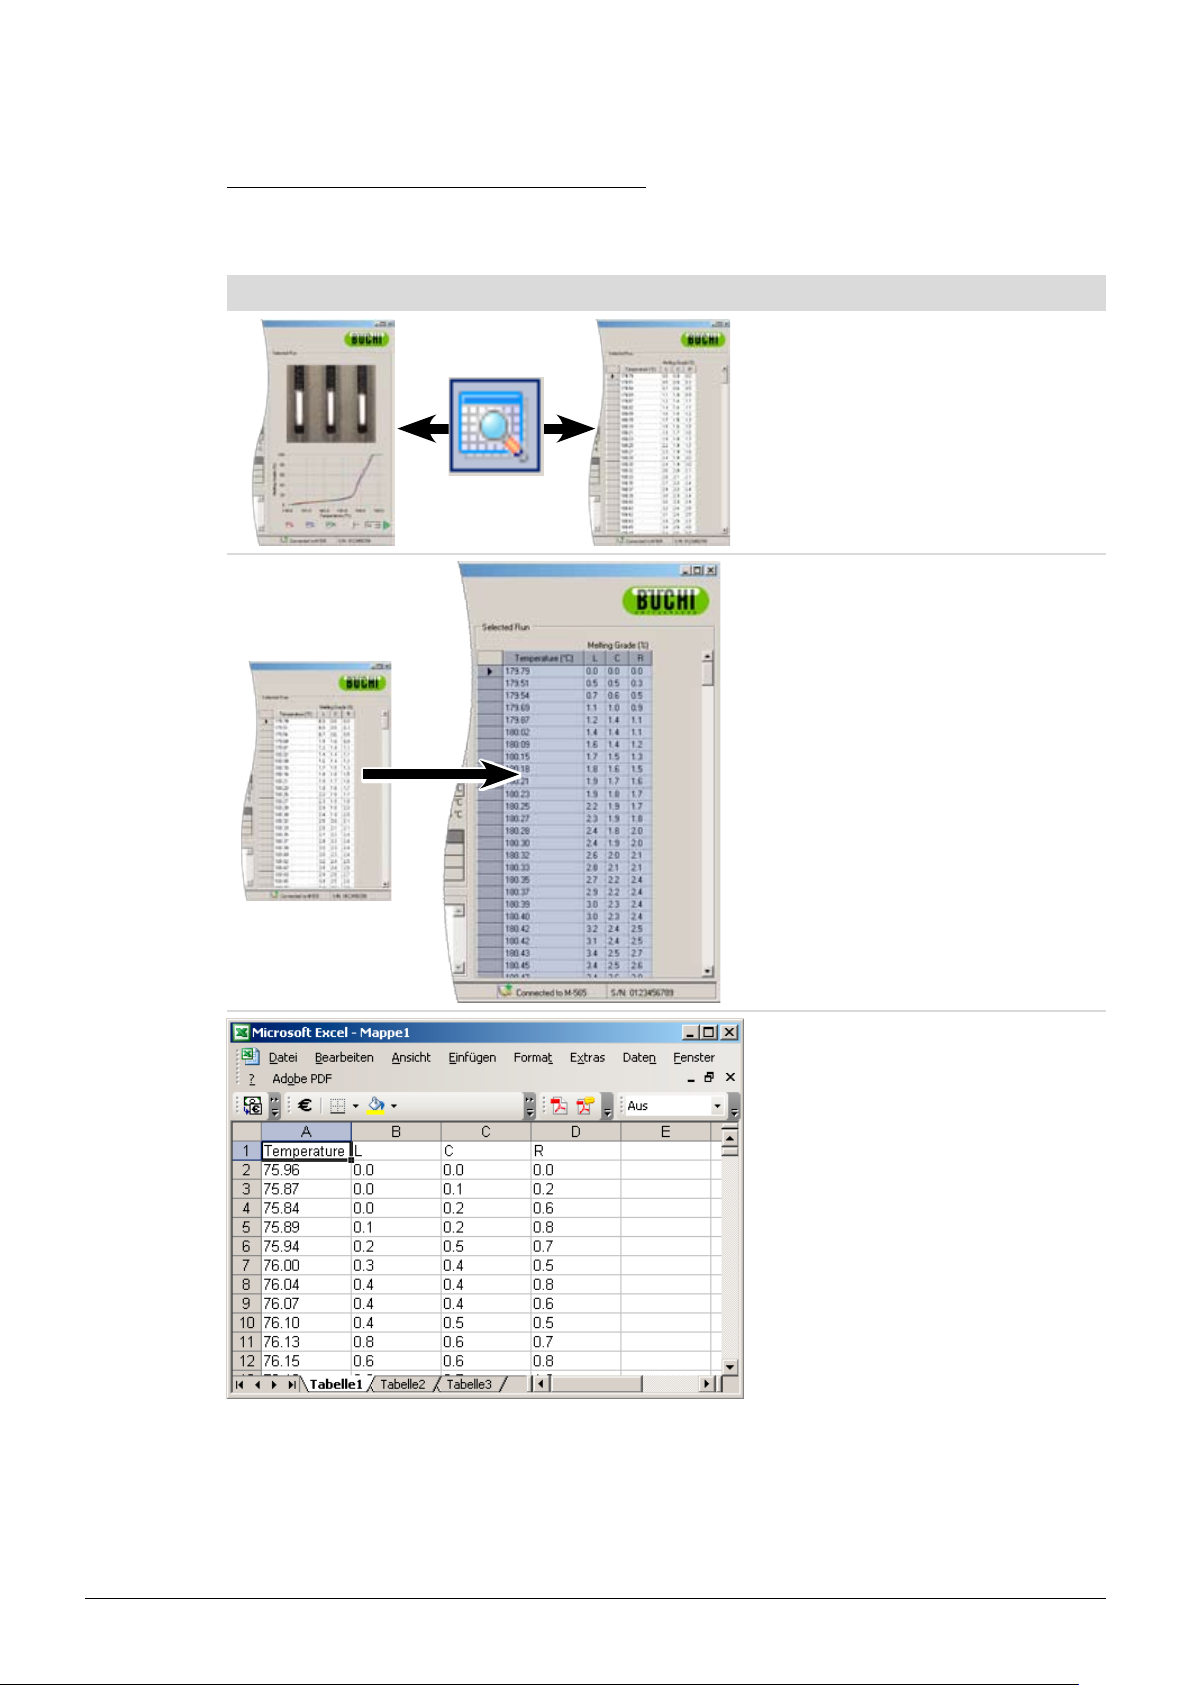
Optional data export into a spreadsheet program
Recorded determination data can be exported into any spreadsheet program.
The necessary workflow is as follows:
Exporting data from the MeltingPoint Monitor program to a spreadsheet program
Step 1:
Click on the button to change between
video/curve and table mode
Step 2:
Mark the complete table and copy it to
the clipboard
6 Operation
Step 3:
Insert the data from the clipboard into a
spreadsheet program
17 MeltingPoint Monitor 1.1 Operation Manual, Version B
Page 18
6.2.4 Handling of melting point methods
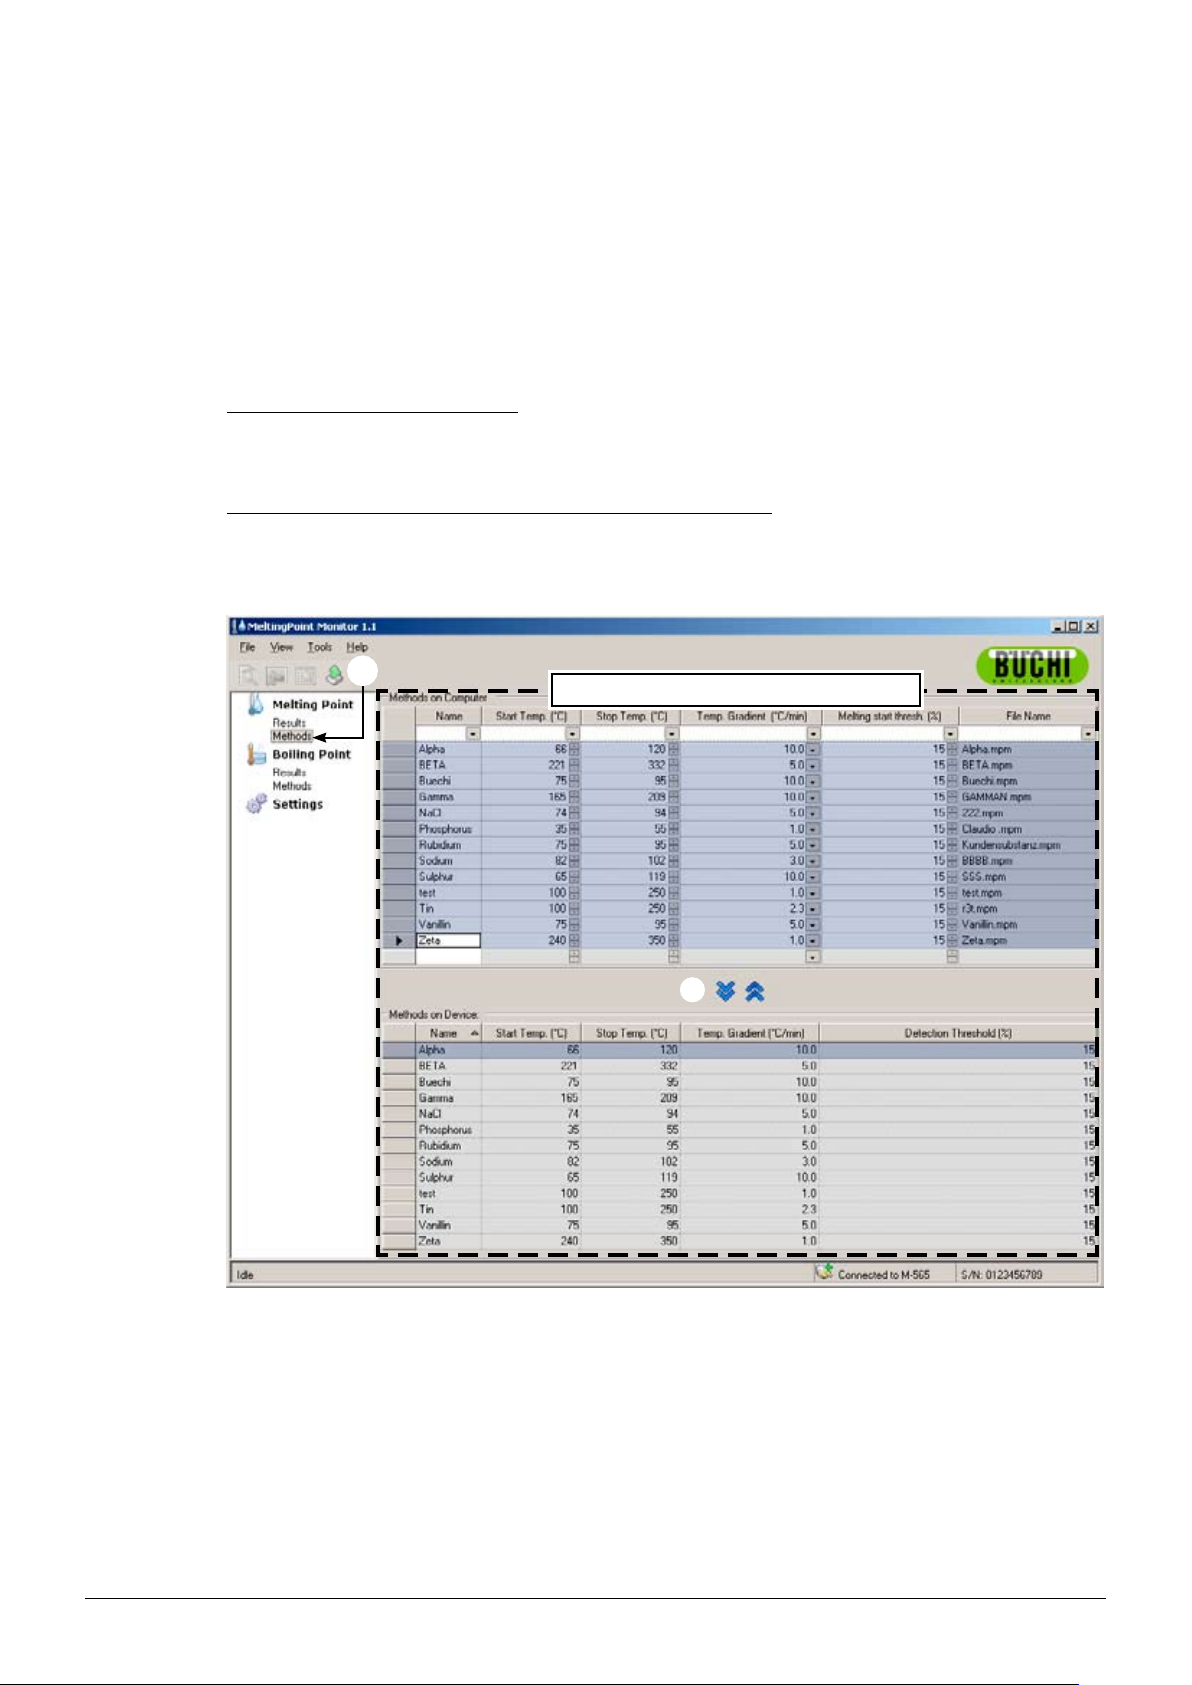
The software offers comprehensive options to handle large amounts of methods on the PC, while the
Melting Point M-565 storage is limited to 50 melting point methods. The following list gives an overview about possible actions:
Create or edit methods at the PC•
Exchange methods between PC and the Melting Point M-565•
Delete methods (select methods in the list and press the ‘Delete’ button on the keyboard)•
How to change to ‘Methods’ view
Activate ‘Methods’ in the program’s window by a mouse–click (
able methods instantly.
How to transfer methods between Melting Point M-565 and PC
To transfer methods, select one or more methods. Selected methods are highlighted in blue. Use the
blue double–arrow buttons (b) to transfer them between the upper table (PC) and the lower table
(Melting Point M-565).
6 Operation
a). The ‘Main view’ will show all avail-
a
The tables in the box list all available methods
b
NOTE
Methods stored on the Melting Point M-565 must be copied to the computer for editing first.•
‘Melting start thresh. (%)’ value must be defined for all methods. The default value is 15 %. The •
value is used for a melting range determination only. For detailed information, check also the
operation manual of the Melting Point M-565.
Maximum 50 methods can be stored on the Melting Point M-565. On the computer the number •
of storable methods is limited by the available disk space only.
Each method is stored as a single file. The files are stored in the directory defined in the settings. •
Files stored in another directory are not displayed.
18 MeltingPoint Monitor 1.1 Operation Manual, Version B
Page 19
6.3 Operation — Boiling point determinations
6.3.1 Program overview
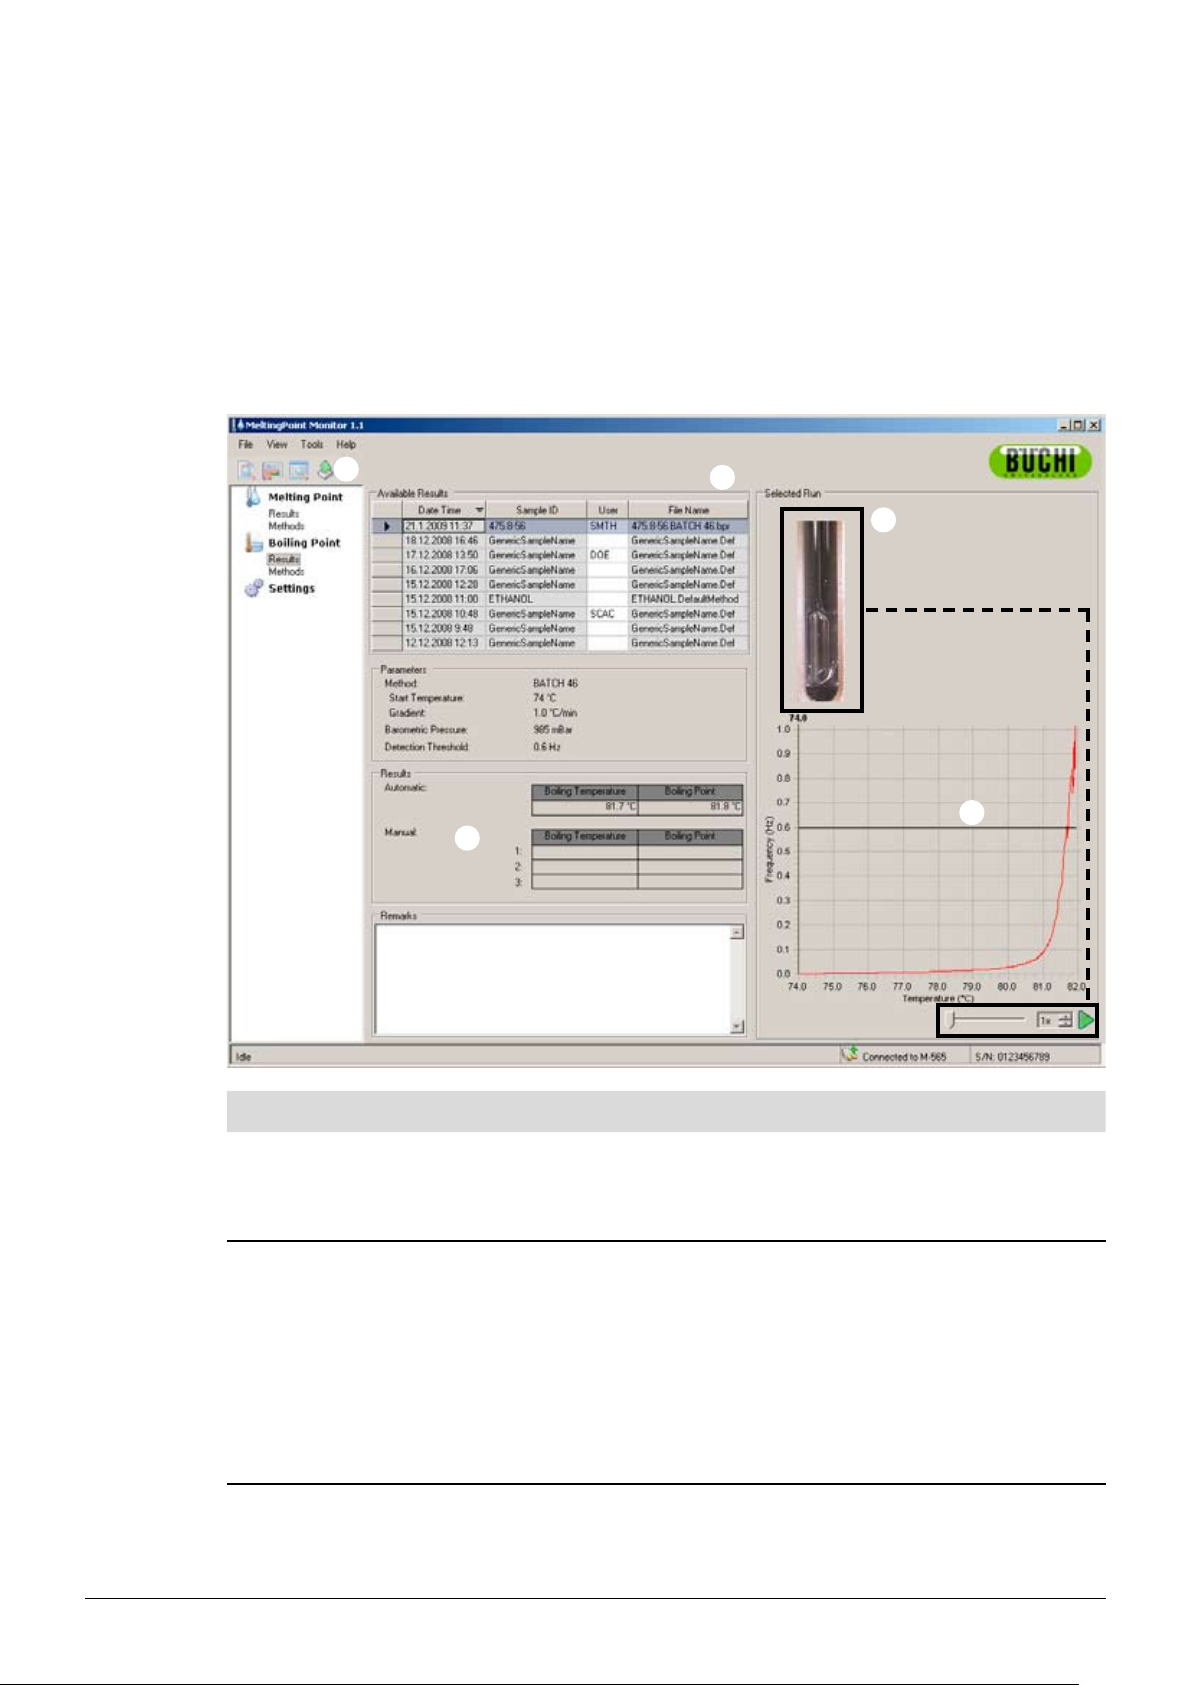
Follow the description in section 5 to start the software and establish a link to the Melting Point
M-565. Select ‘Results’ below ‘Boiling Point’ in the program function window to switch to boiling point
determination mode.
The following figure already contains some determination recordings:
6 Operation
g
a
b
Position Description
Extended program functions can be accessed in the drop–down menus of the menu bar by a click.
a
b
19 MeltingPoint Monitor 1.1 Operation Manual, Version B
The buttons below allow fast access to frequently used standard functions. For tooltips, keep the mouse
pointer over a button for a moment.
The table lists all available determination recordings. The black triangle in the left column marks the
currently chosen record.
To select a recording, click into a row.•
Mark one or more rows to select multiple recordings (selected items are highlighted in blue)•
To delete recordings, select one or more and press the ‘Delete’ button on the keyboard•
To sort the table, click on the column headers.•
To change the user–name click into the white field and enter the new name. •
Page 20

Position Description
This area shows the first scene of the chosen determination movie.
6 Operation
g
6.3.2 Recording a new boiling point determination
To record a new boiling point determination, the Melting Point M-565 should be linked to the •
PC first. In case the Melting Point M-565 and the PC have been linked before the determination
run starts, the recording data are automatically transferred to the computer. At this time, viewing
existing results or changing stored methods on the PC is still possible.
Click onto a curve below to choose a point of interest at the temperature diagram. The displayed •
image will change simultaneously to the matching timestamp of recording.
For constant playback with adjustable speed, use the playback controls in the lower right corner•
This diagram shows the detected determination curve.
Use the ‘Remarks’ text box to enter comments for a determination record at any time.
This area shows two different tables.
The first table lists the automatically detected boiling point temperature of the sample including •
statistic values.
The second table can hold up to three values per sample set. Here, the user can manually add •
marks for the time of boiling point during an ongoing determination process.
The program function window allows to change between the main views ‘Results’ and ‘Methods’ for
boiling point determination. Additionally, some program settings can be changed under ‘Settings’.
The recording takes place at the Melting Point M-565 which always keeps the last determination •
results in its internal storage. In case a determination run has already been finished without the
Melting Point M-565 linked to the PC, it is possible to import the last set of results to the PC using
the import button (see section 6.2.3).
Information about the system status during determination are displayed in the ‘System status’ area.
Status in ‘System status’
area
Idle System is ready for a determination run..
Approaching System approaches the start temperature of the chosen method/settings.
Ready System has reached the programmed start temperature. Insert samples now.
Measuring .. Determination is beeing processed.
Completing Measurement System is cooling down to environmental temperature.
Realtime view during an ongoing recording
The software displays all necessary determination values in realtime, so the user can easily supervise
the automated process.
The temperature history is visualized by a curve and the actual–temperature of the heating–block is •
continuously displayed. The scale of the grid is adapted to the determination curves accordingly.
During the recording, the live image changes continuously as the Melting Point M-565 is recording •
a determination movie.
Description
20 MeltingPoint Monitor 1.1 Operation Manual, Version B
Page 21
NOTE
Restarting the Melting Point M-565 or starting a new determination will erase the last recording!•
Sample IDs can only be changed during the measurement! •
During the recording, no other data exchange between the Melting Point M-565 and the software •
is possible.
On the computer the number of storable results is limited by the available disk space only.•
6.3.3 Handling recorded boiling point results
The software offers comprehensive options to handle recordings on the PC. The following list gives an
overview about possible actions:
Sort and view recorded results in the table of ‘Available results’ (click on the column–headers)•
Replay a determination (if a video is available)•
Change comments in the ‘Remarks’ field •
6 Operation
Buttons in order of ap-
pearance
NOTE
Deleted video data are lost and can not be recovered!•
Each result is stored in a single file. The directory path of these files is defined under ‚Settings’. •
Files stored in other directories than the defined one are not displayed in the table of ‚Available
Results‘.
Action behind buttons
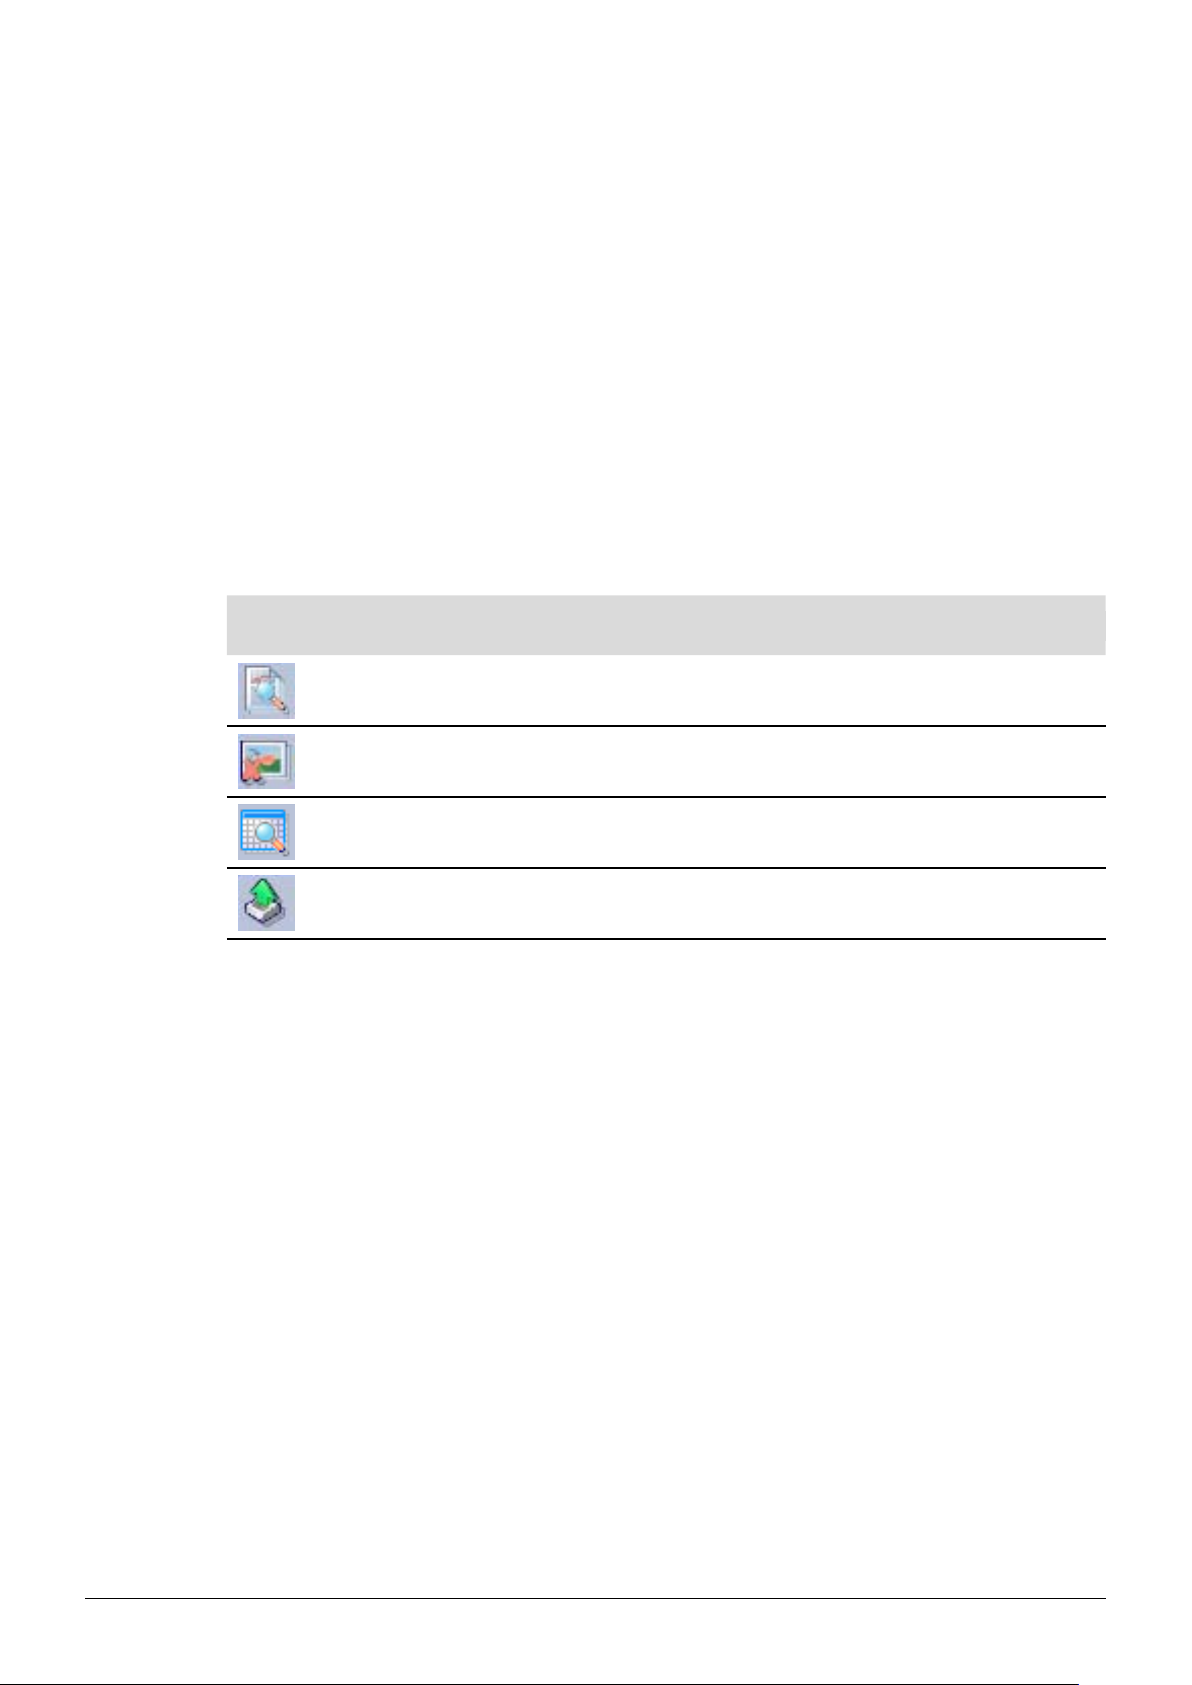
Click on this button to let the system generate a PDF–report of the selected result
for easy printing and storage (see section 6.6.5 for an example report)
Click on this button to delete video data which are no longer required to have more
recording–space available
Click on this button to change between graph and table view (see also workflow
description for spreadsheet export)
Click on this button to get the latest recording from device (only necessary, if the
Melting Point M-565 finished a recording without beeing linked to a PC)
21 MeltingPoint Monitor 1.1 Operation Manual, Version B
Page 22
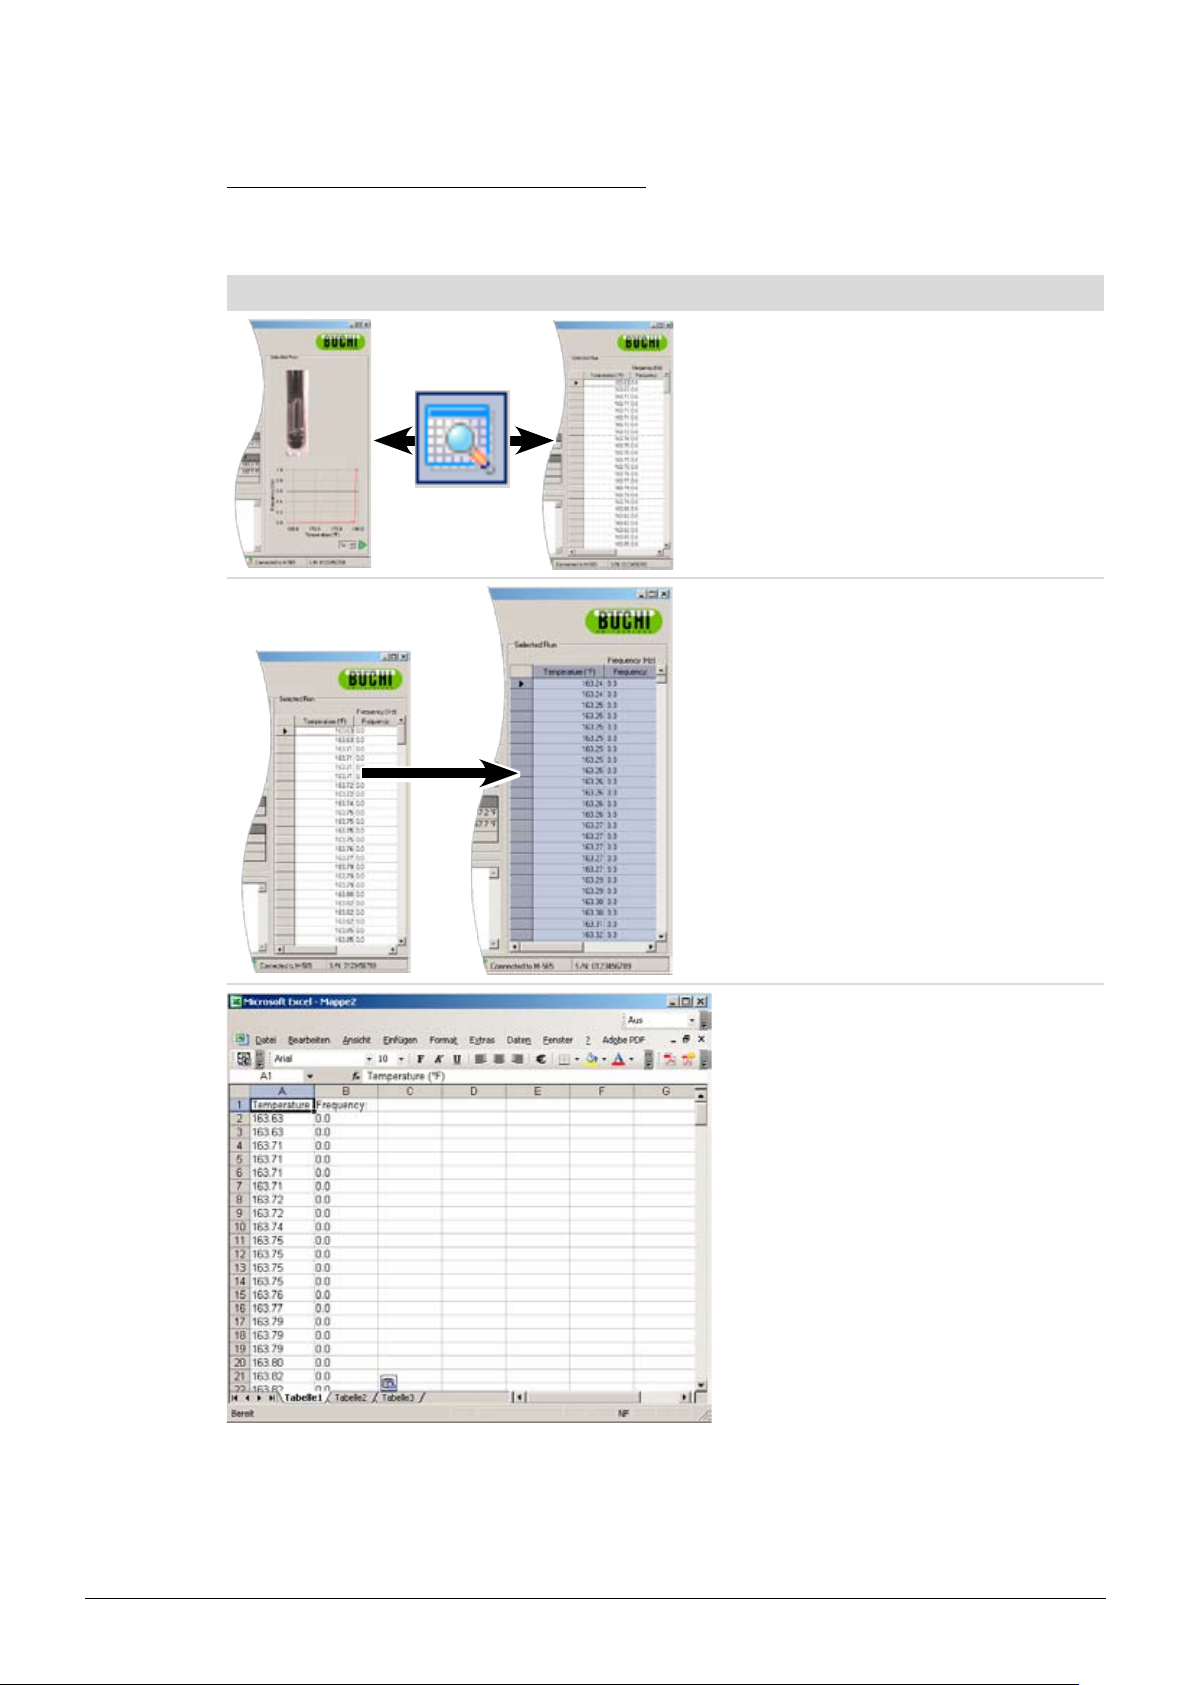
Optional data export into a spreadsheet program
Recorded determination data can be exported into any spreadsheet program.
The necessary workflow is as follows:
Exporting data from the MeltingPoint Monitor program to a spreadsheet program
Step 1:
Click on the button to change between
video/curve and table mode
Step 2:
Mark the complete table and copy it to
the clipboard
6 Operation
Step 3:
Insert the data from the clipboard into a
spreadsheet program
22 MeltingPoint Monitor 1.1 Operation Manual, Version B
Page 23
6.3.4 Handling of boiling point methods
The software offers comprehensive options to handle large amounts of methods on the PC, while the
Melting Point M-565 storage is limited to 50 boiling point methods. The following list gives an overview
about possible actions:
Create or edit methods at the PC on the fly•
Exchange methods between PC and Melting Point M-565•
Delete methods (select methods in the list and press the ‘Delete’ button on the keyboard)•
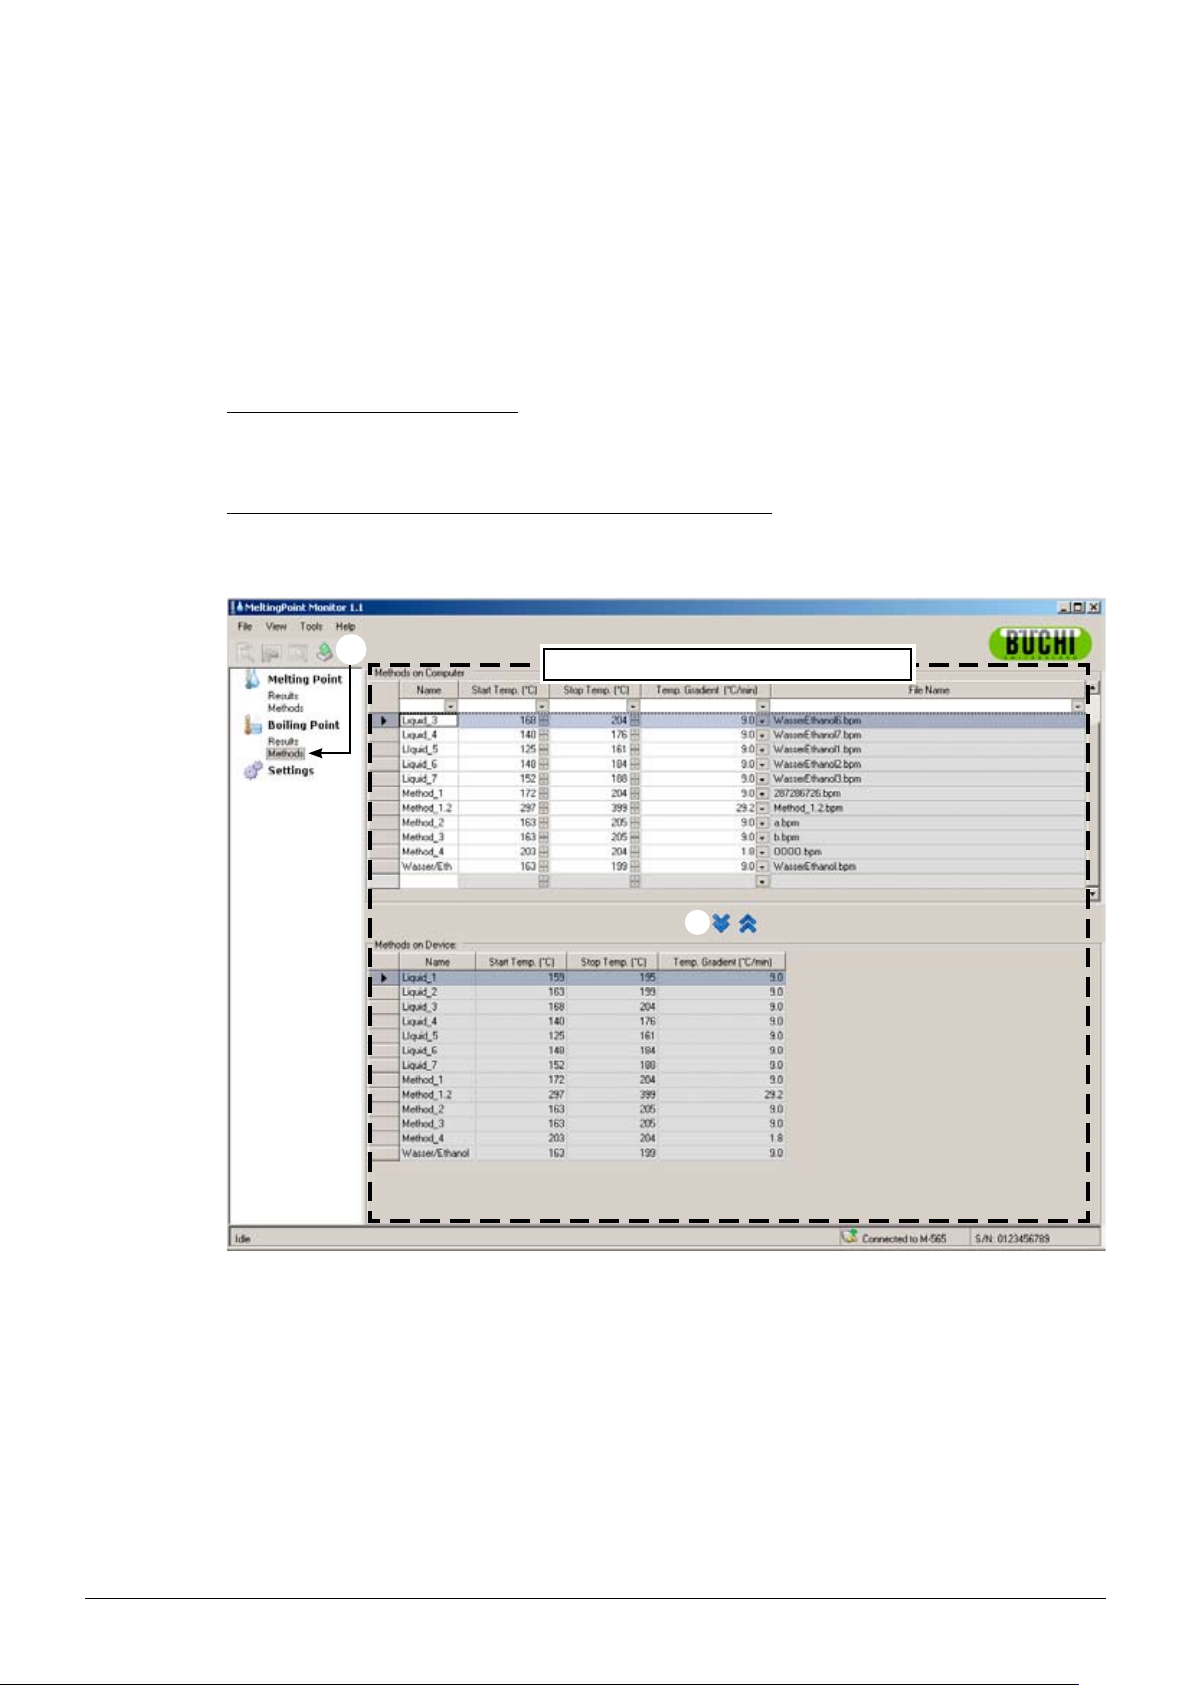
How to change to ‘Methods’ view
Activate ‘Methods’ in the program’s window by a mouse–click (
able methods instantly.
How to transfer methods between Melting Point M-565 and PC
To transfer methods, select one or more methods. Selected methods are highlighted in blue. Use the
blue double–arrow buttons (b) to transfer them between the PC and the Melting Point M-565.
6 Operation
a). The ‘Main view’ will show all avail-
a
The tables in the box list all available methods
b
NOTE
Methods stored on the Melting Point M-565 must be copied to the computer for editing first.•
Maximum 50 methods can be stored on the Melting Point M-565. On the computer the number •
of storable methods is limited by the available disk space only.
Each method is stored as a single file. The files are stored in the directory defined in the settings. •
Files stored in another directory are not displayed.
23
MeltingPoint Monitor 1.1 Operation Manual, Version B
Page 24
6.4 Settings menu
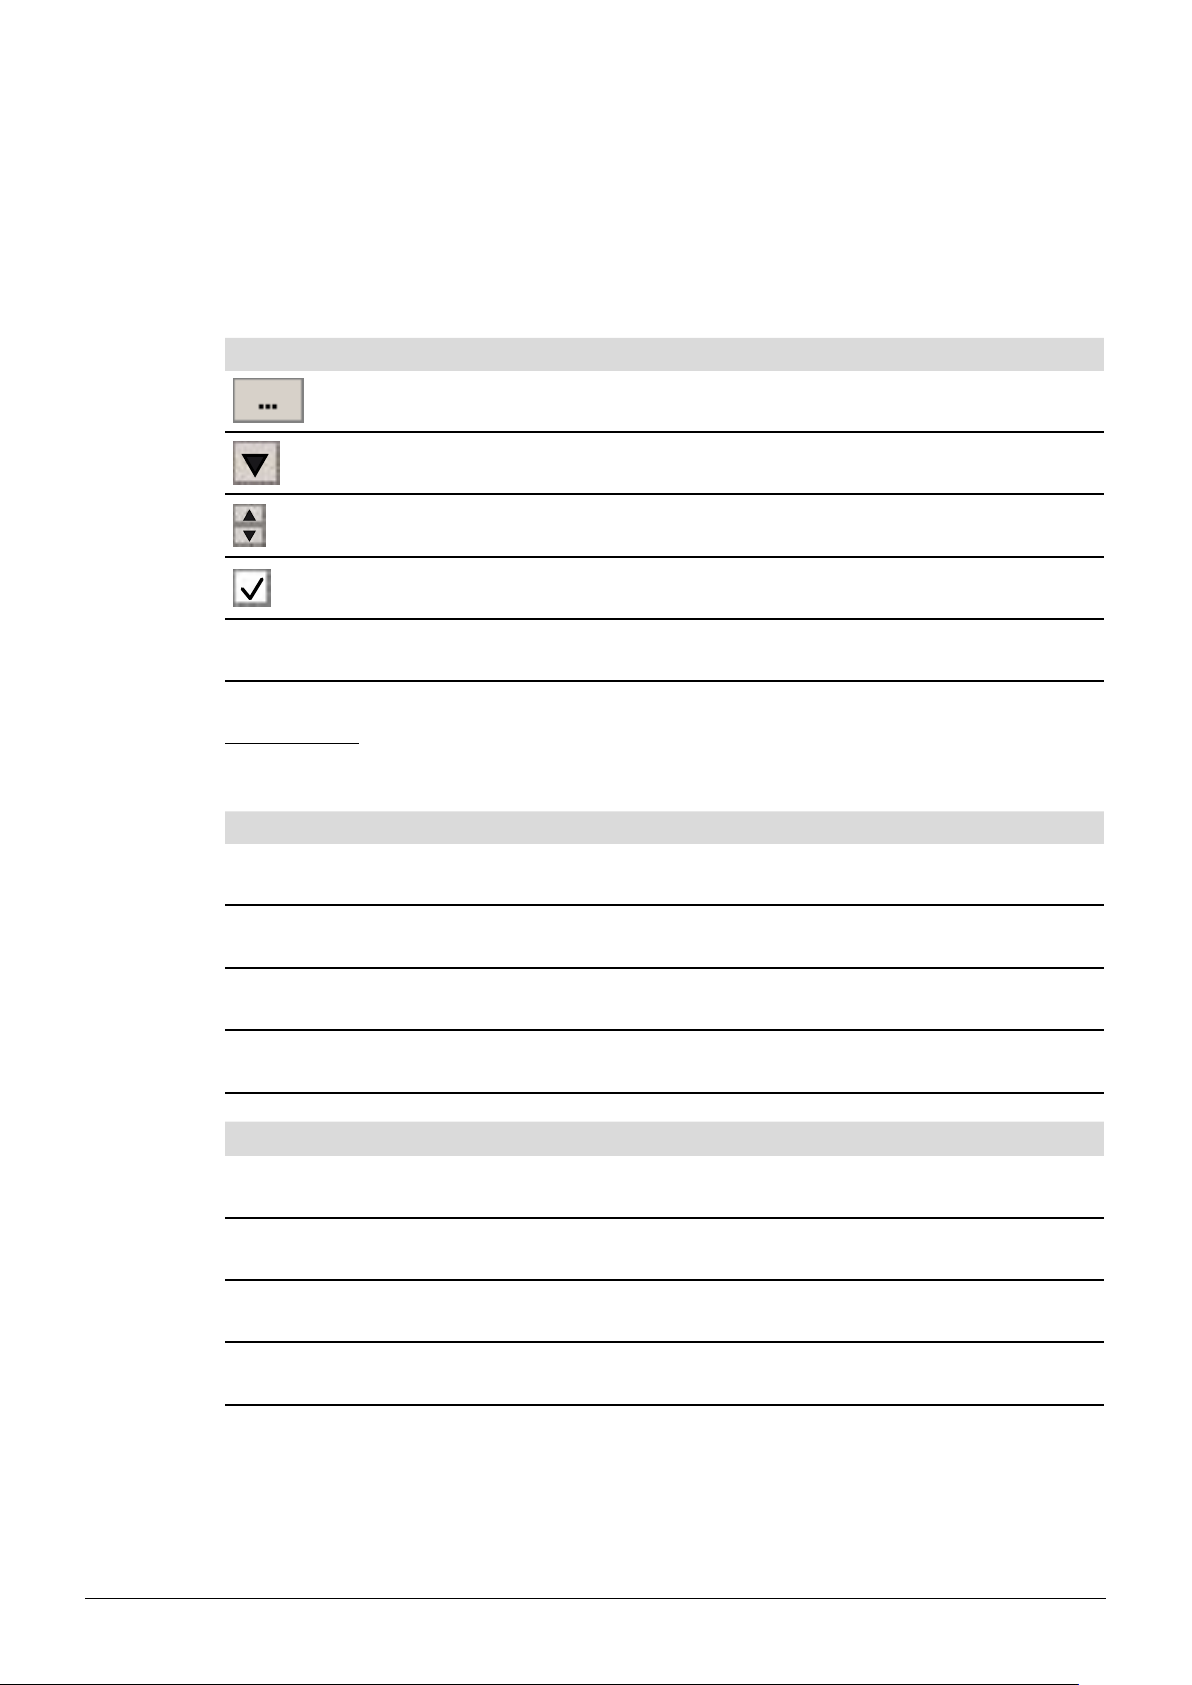
Selecting ‘Settings’ in the ‘program function’ window brings up a table in the ‘main view’, where
various program values can be set. To change values make use of the different access tools,
described as follows:
Tool Explanation
(Text–box) Only available for ‘Company Name’. Click into the text–box and start typing the new name.
6 Operation
Click on this button to open a file explorer window. This tool is used to set a storage path for files.
Click on this button for a drop-down menu. Select the desired value out of a predefined list.
Use the small up/down buttons to change a value.
Use the check to enable or disable a ‘Setting’ item
‘Settings’ table:
The table below gives a short explanation for every item of the ‘Setting’ row.
Melting Point Explanation
Path to Method Files Storage path of melting point method files
Path to Result Files Storage path of melting point result files
Save Image
Path to Meltingpoint Reports Storage path of melting point report files
Boiling Point Explanation
Path to Method Files Storage path of boiling point method files
Path to Result Files Storage path of boiling point result files
Save Image
Uncheck, to reduce the amount of needed harddisk space dramatically
NOTE: Video function will not be available in this case!
Uncheck, to reduce the amount of needed harddisk space dramatically
NOTE: Video function will not be available in this case!
Path to Boilingpoint Reports Storage path of boiling point report files
24 MeltingPoint Monitor 1.1 Operation Manual, Version B
Page 25

General Explanation
Company name Enter the company name that is inserted on all reports
Company logo Select a new logo to customize the report
6 Operation
Regional settings
Temperature unit Use the drop–down menu to choose the preferred physical unit
Pressure unit Use the drop–down menu to choose the preferred physical unit
Image quality
path to calibration eports Storage path of ‘calibration’ report files
path to sysInfo reports Storage path of ‘sysInfo’ report files
path to test result reports Storage path of ‘test result’ report files
NOTE
It is recommended to select backuped directories.•
Most changes are taken over after leaving the view. For ‘Regional settings’, restart the program to •
activate the changes.
Company name, Language, Temperature unit and Pressure unit can be defined independently of •
Melting Point M-565 and software.
Select an entry to set date, time format and interface language.
NOTE: The interface changes back to English for currently unsupported
Higher values will increase the image quality as well as the needed file size
Lower values will decrease the image quality as well as the needed file size
6.5 Other Program functions
In the ‘Menu bar’ the software offers special functions which are not accessible via the ‘Toolbar’. See
the following table for more information:
Access to function Description
‘Tools’ > ‘Get last calibration’ Transfers the latest calibration report to the computer (if available)
‘Tools’ > ‘Get SysInfo’ Transfers the system information report to the computer
‘Tools’ > ‘Get last test’ Transfers the system test report to the computer (if available)
‘Help’ > ‘Help’ Opens this manual
‘Help’ > ‘Software Registration ..’ Opens the registration form.
‘Help’ > ‘Import License’ Imports a license file to activate program
‘Help’ > ‘Transfer Demo to Device’ Transfers Demo file to Melting Point M-565
‘Help’ > ‘About’ Displays software information
25
Follow the instructions, to register your software.
MeltingPoint Monitor 1.1 Operation Manual, Version B
Page 26
6.6 System generated reports
Temp. gradient
0.5 °C/min
Standard deviation limit
0.2 °C
No. of required samples
6
4-Nitrotoluene
Lot: 1234567890
Automatic:
Left
Center
Right
1:
50.1 °C 52.5 °C 52.3 °C
2:
54.9 °C 52.5 °C
3:
52.6 °C 53.7 °C
4:
52.8 °C 52.4 °C 56.0 °C
Average
52.5 °C
Standard deviation
0.17 °C
Reference temperature
52.0 °C
Diphenylacetic Acid
Lot: Subst. 2
Automatic:
Left
Center
Right
1:
148.1 °C 148.2 °C 148.3 °C
2:
148.9 °C 148.5 °C
3:
148.6 °C 148.7 °C
4:
148.8 °C 148.4 °C 148.0 °C
Average
148.3 °C
Standard deviation
0.19 °C
Reference temperature
148.0 °C
Caffeine
Lot: Coffein
Automatic:
Left
Center
Right
1:
237.1 °C 237.2 °C 237.3 °C
237.9 °C 237.5 °C
3:
237.6 °C 237.7 °C
4:
237.8 °C 237.4 °C 237.0 °C
237.3 °C
Standard deviation
0.19 °C
Reference temperature
237.0 °C
Potassium Nitrate
Lot: Kalibriersubstanz 4
M-565
CompanyName
Calibration
6.6.1 Calibration report
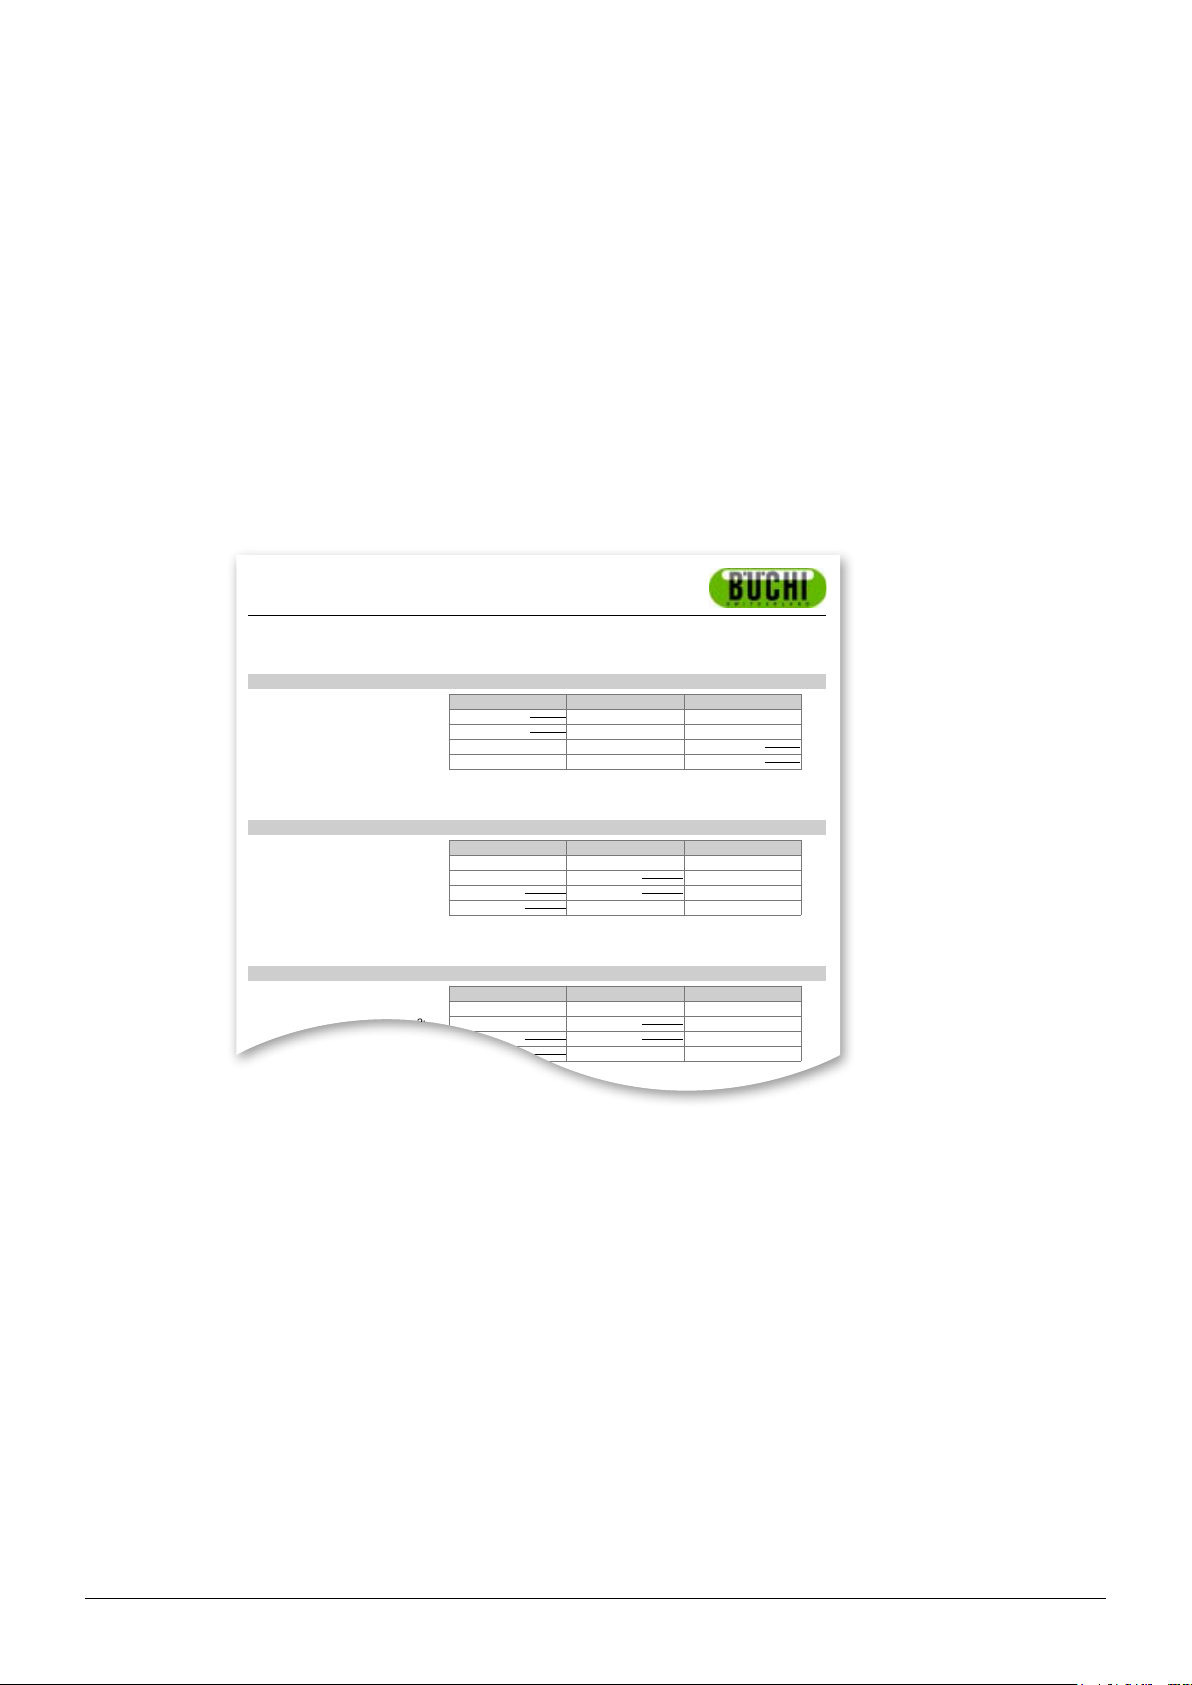
After a successful system calibration, the software will automatically generate a report in PDF format
if the PC is linked. In case the link has not been established, the report is stored in the temporary
memory and can be received via Tools > Get Latest Calibration.
NOTE
During calibration, viewing existing results or changing methods stored on the computer is •
possible.
The calibration result stays available on the Melting Point M-565 until it is switched-off or a new •
determination is started!
6 Operation
26 MeltingPoint Monitor 1.1 Operation Manual, Version B
Page 27

6.6.2 System Information report
Settings
Service
Language
english
Serial number
12.12.12.1
Stop after detection
enabled
Firmware version
1.0.0
Param adjust. during Measurement
disabled
CPLD version
0.0
Result printout automaically
disabled
Operating hours
320
Result graph indication
enabled
No. of melting point measurements
55
Calibration interval
12 Months
No. of boiling point measurements
15
Sample ID Request
enabled
No. of calibrations
0
Barometric pressure request
never
Last calibration
1/28/2009
Boiling sample conditioning
30 s
Last verification
10/30/2008
Melting result
thermodynamic
Factory adjustment at 20°C
0.00 °C
Thermodynamic factor
1.5
Calibration value at 52 °C
0.00 °C
Company name
MARCEL
Calibration value at 148 °C
0.00 °C
Date (DD.MM.YYYY)
2/2/2009
Calibration value at 237 °C
0.00 °C
Time (24h)
12:06 PM
Calibration value at 335 °C
0.00 °C
Date format
DD MM YYYY
Factory adjustment at 400 °C
0.00 °C
Time format
european (24h)
Sample illumination brightness
50 %
Temperature unit
°C
Camera position horizontally
20
Pressure unit
mmHg
Camera position vertically
20
Buzzer volume
0
Color gain red for melting point
87
External keyboard
EN_US
Color gain green for melting point
52
Display brightness
100 %
Color gain blue for melting point
38
Color gain red for boiling point
20
Color gain green for boiling point
18
Color gain blue for boiling point
77
Date of board test
1/1/0001
Date of end test
1/1/0001
26.0 °C
OK
Cooling fan present
OK
Housing fan present
OK
M-565
CompanyName
SysInfo
Test Result
KeypadOKCamera value without sample L
13
Rotary knob
OK
Camera value without sample C
11
24 V input present
OK
Camera value without sample R
11
24 V after fuse present
OK
Camera value with sample L
49
5 V present
OK
Camera value with sample C
57
Heating present
OK
Camera value with sample R
80
Cooling fan present
OK
Housing fan present
OK
Temperature sensor present
OK
Temperature sensor function
OK
External keyboard
Not tested
Board temp. sensor
OK
Heating function
OK
Cooling fan
OK
Housing fan
OK
Sample illumination
OK
Camera position
OK
Camera brightness
Not OK
OK
Display
Not OK
M-565
CompanyName
Test
A system information report contains all settings and service information of a Melting Point M-565. If
requested, use this report to provide detailed information to the customer service.
Link the Melting Point M-565 to the computer and select Tools > Get SysInfo, to generate a PDF.
6 Operation
6.6.3 Test Result report
A ‘Test Result’ report can be generated after performing a hardware test at the Melting Point M-565.
It contains information about the hardware functionality only. If requested, use this report to provide
detailed information to the customer service.
Link the Melting Point M-565 to the computer and select Tools > Get Test Report, to generate a PDF.
27 MeltingPoint Monitor 1.1 Operation Manual, Version B
Page 28
6.6.5 Determination reports
Parameter:
Start Temperature:
118 °C
Temperature Gradient:
0.5 °C/min
Melting Result:
Pharmacopeia
Sample ID:
GenericSampleName
Automatic:
Left
Center
Right
123.2 °C 123.3 °C 123.3 °C
Average:
123.3 °C
Standard deviation:
0.03 °C
Manual:
Center
Right1:2:
3:
Remarks:
M-565
CompanyName
Melting Point
Method
BATCH 46
Start Temperature:
74 °C
Temperature Gradient:
1.0 °C/min
Barometric Pressure
985 mBar
Detection Threshold:
0.6 Hz
Sample ID:
475.8-56
Automatic:
Boiling Temperature
Boiling Point
81.7 °C 81.8 °C
Manual:
Boiling Temperature
1:
2:
M-565
CompanyName
Boiling Point
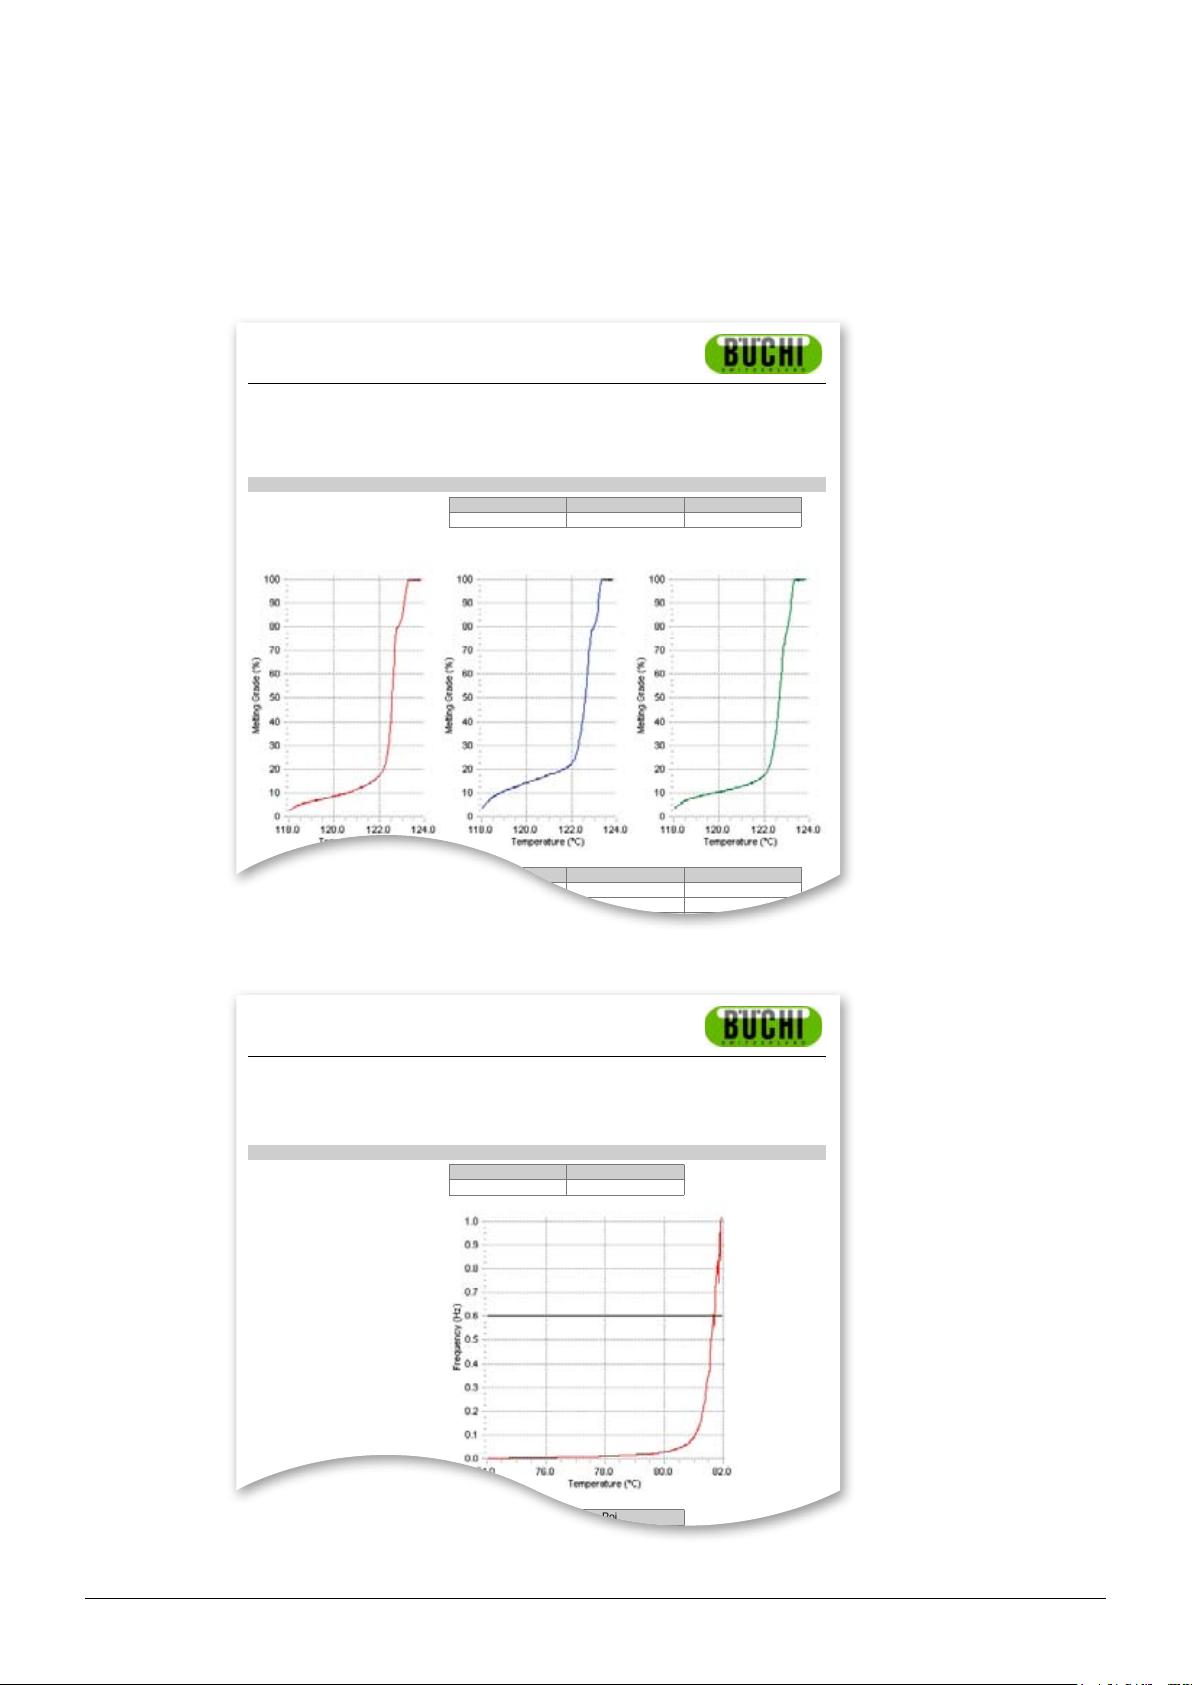
A determination report for melting point or boiling point can be generated by selecting a result and
clicking the ‘show report’ button. Alternatively, go to File > Show Report. It contains information about
the determination result and can be used for documentation.
6 Operation
Melting point report in PDF format
Boiling point report in PDF format
28 MeltingPoint Monitor 1.1 Operation Manual, Version B
Page 29

7 LIMS integration
Results and methods are stored in XML-format. All data can be transferred to your LIMS system.
Contact your administrator of the LIMS system to provide the necessary program.
The XML scheme of the result files can be found in the installation folder of the MeltingPoint Monitor
software.
7 LIMS
29 MeltingPoint Monitor 1.1 Operation Manual, Version B
Page 30

8 FAQ and troubleshooting
The software does not record the current measurement.1.
Make sure that the connection status shows the Melting Point M-565.
What happens when the MeltingPoint Monitor software was not started before determination?2.
During a running determination the software will receive the determination data as soon as it is
connected to the Melting Point M-565. In case the determination is completed, use the button “get
latest result from device”.
When a determination is started always a sample ID pops up. Where can I change this behaviour?3.
If the software is used the sample ID can be entered directly into the software. It is advised to disable
the setting “sample ID request” on the Melting Point M-565.
Why does the software not list all results or methods in the respective tables?4.
Check for the correct storage paths in the settings view. They must point to the folder, where the
corresponding data are stored in. If they are not set correctly, the program can not find the desired
data.
8 Troubleshooting
5. My system reacts very slow after starting up the MeltingPoint Monitor software. How can I increase
the performance again?
Huge numbers of stored recordings may slow down the internal database. Make a backup of your
recordings first! Now you can safely delete entrys.
30 MeltingPoint Monitor 1.1 Operation Manual, Version B
Page 31

Page 32

BÜCHI Labortechnik AG
CH-9230
T +41 71 394 63 63
F +41 71 394 65 65
Flawil 1 / Switzerland
www.buchi.com Quality in your hands
 Loading...