

Page 1

ELECTRONIC LABELING SYSTEM
English
User’s Guide
E110
Page 2
ELECTRONIC LABELING SYSTEM
GETTING STARTED
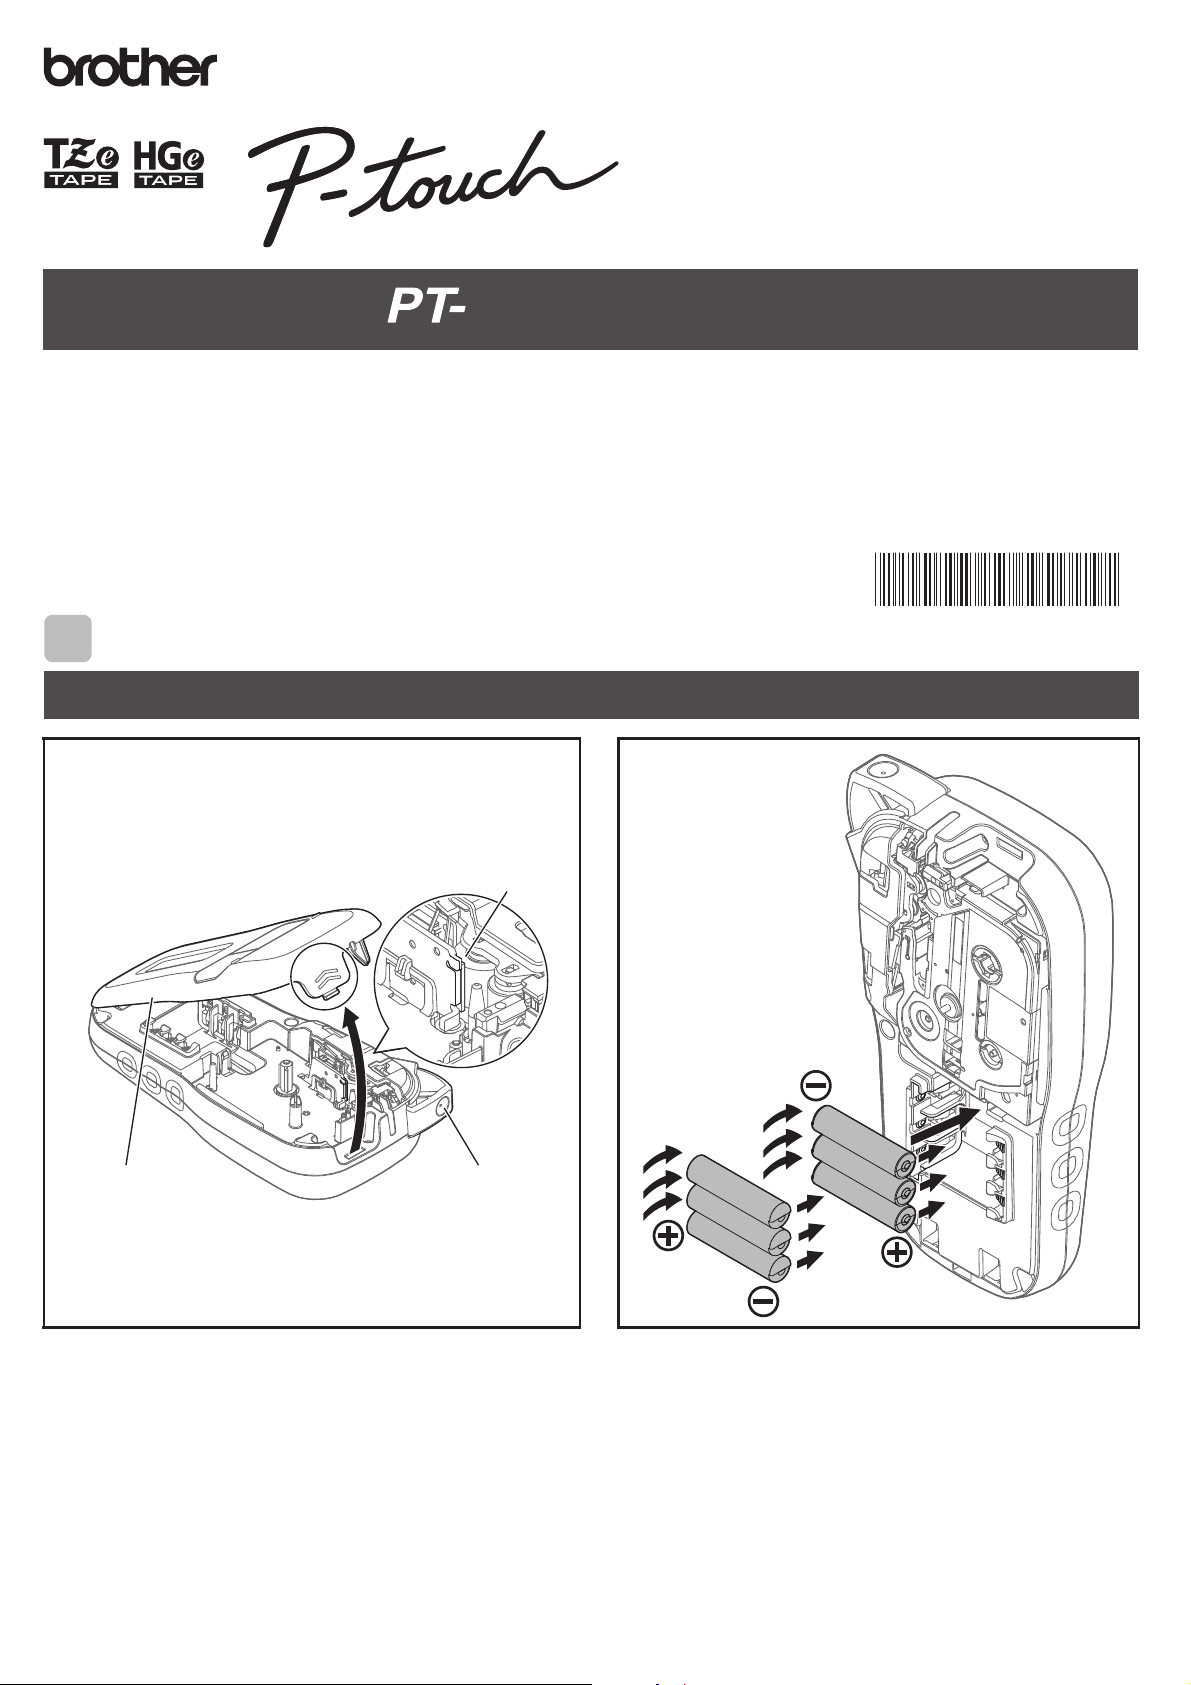
Installing Power Supply and Tape Cassette
With the LCD facing down, open the Cassette
Cover by pressing the grooved tab and
pushing in the direction of the arrow, as
illustrated.
When replacing batteries or tape cassettes,
make sure the power is turned off.
This P-touch labeling system requires six (6)
AAA alkaline batteries or six (6) fully-charged
Ni-MH batteries, not included.
1
1
2
Thank you for purchasing a Brother P-touch labeling system!
Use your new Brother P-touch labeling system to create a wide variety of custom, self-adhesive labels.
This P-touch labeling system uses Brother TZe or HGe tapes. TZe and HGe tape cassettes are available in many color and sizes. For
a complete list of tapes compatible with your P-touch labeling system, visit us at: www.brother.com.
Please read this guide, and the included Product Safety Guide, before using this P-touch labeling system. After reading this guide, keep
it in a safe place.
Printed in China
D00PN3001
English
User’s Guide
E110
Tape Cutter LeverCassette Cover
Print Head
Page 3

Insert the Tape Cassette following the
drawing marked inside the case. Gently
press the Cassette into the P-touch labeling
system until it clicks into place.
• Make sure your Tape Cassette is marked or .
• Use only Brother TZe or HGe tapes with this
machine.
Close the Cassette Cover and gently press
until it clicks into place.
NOTE
If you prefer to use the optional AC Adapter
(AD24) instead of using batteries:
1. Insert the Power Adapter cord into the AC
Adapter Jack on the side of the P-touch
labeling system.
2. Insert the Power Adapter into a grounded
AC electrical outlet.
Tape Exit Slot
Toothed Wheel
Cutter Edge
End of Tape
Tape Guides
3
AC Adapter Jack
4
Page 4
NOTE
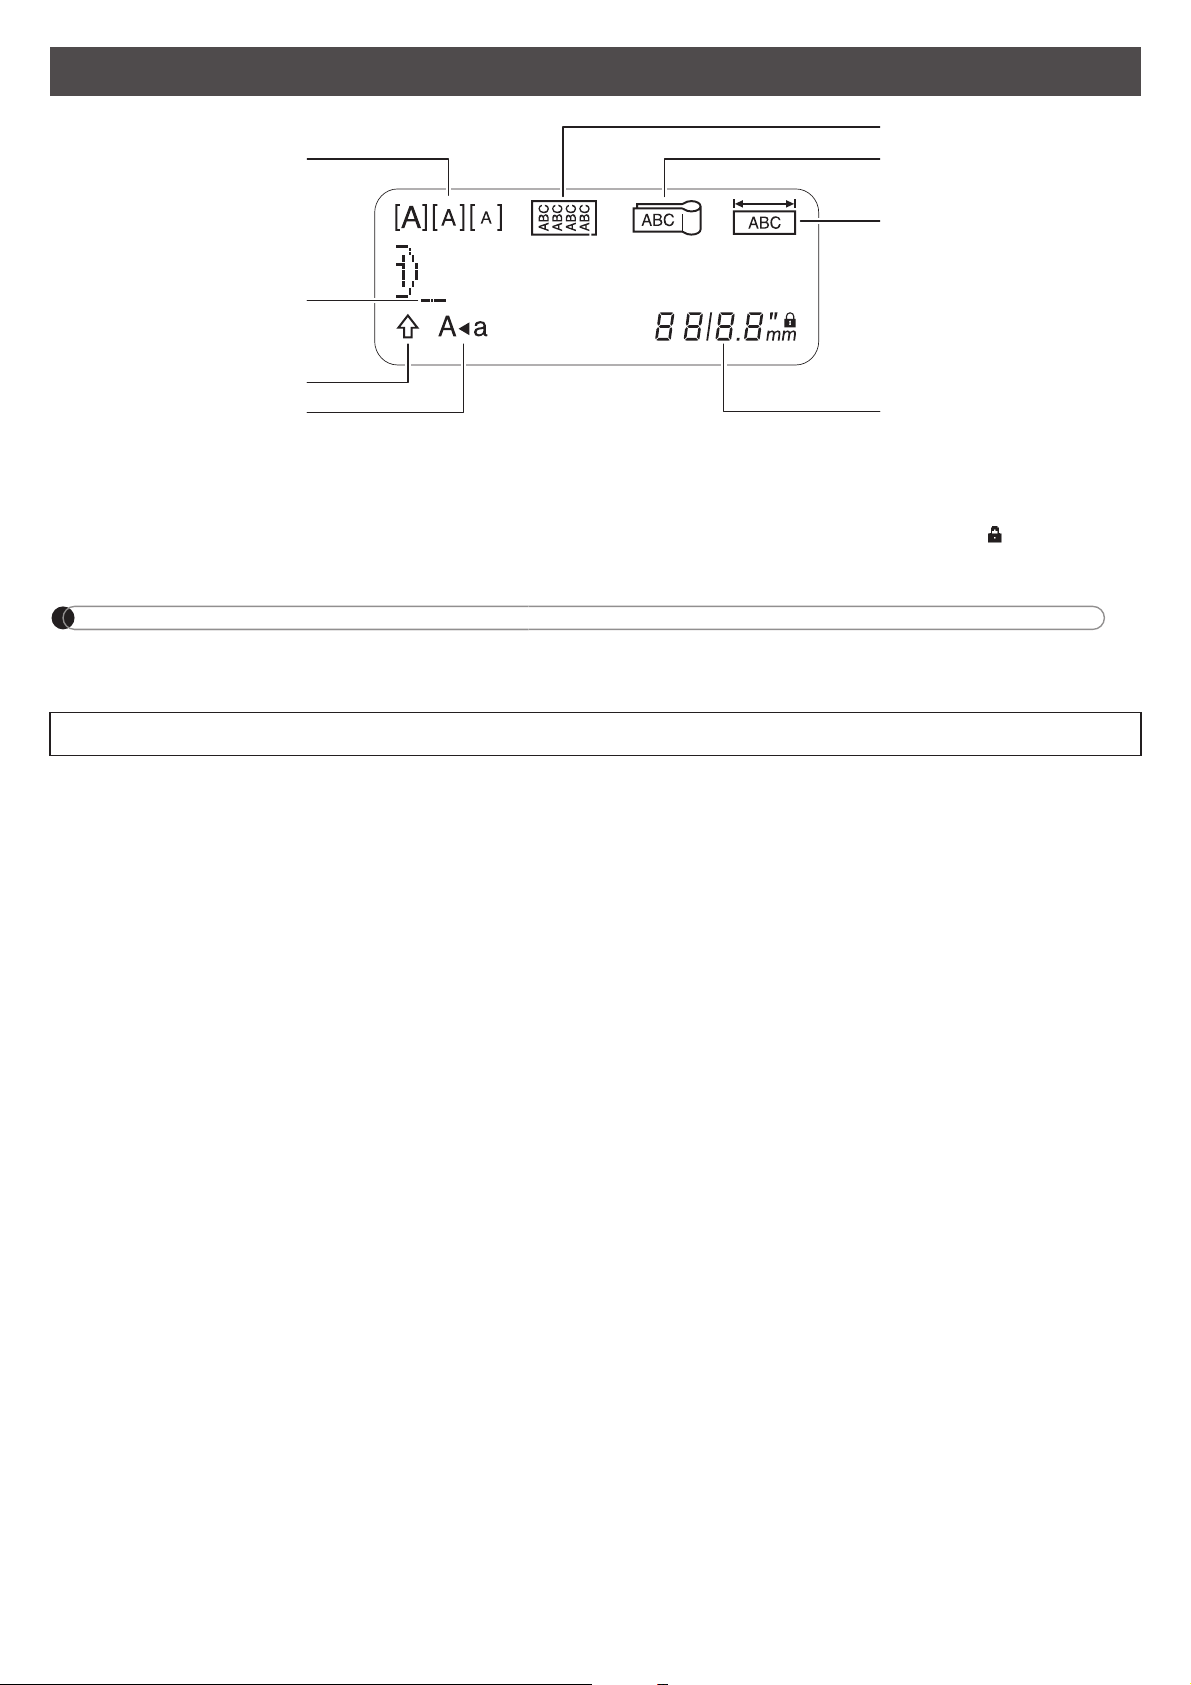
• The LCD displays one row of 15 characters; however, the text you enter can be up to 80 characters in
length.
LCD
1. Size
2. Cursor
3. Shift
4. Caps
5. Cable Wrap
6. Cable Flag
7. Faceplate
8. Label Length
If a specific label length has
been selected, also appears.
• Label length displayed on LCD may differ slightly from the actual label length when printed.
1
2
7
6
4
3
8
5
Page 5
NOTE
• When selecting settings or lengths, press the Space key to return to the default value.
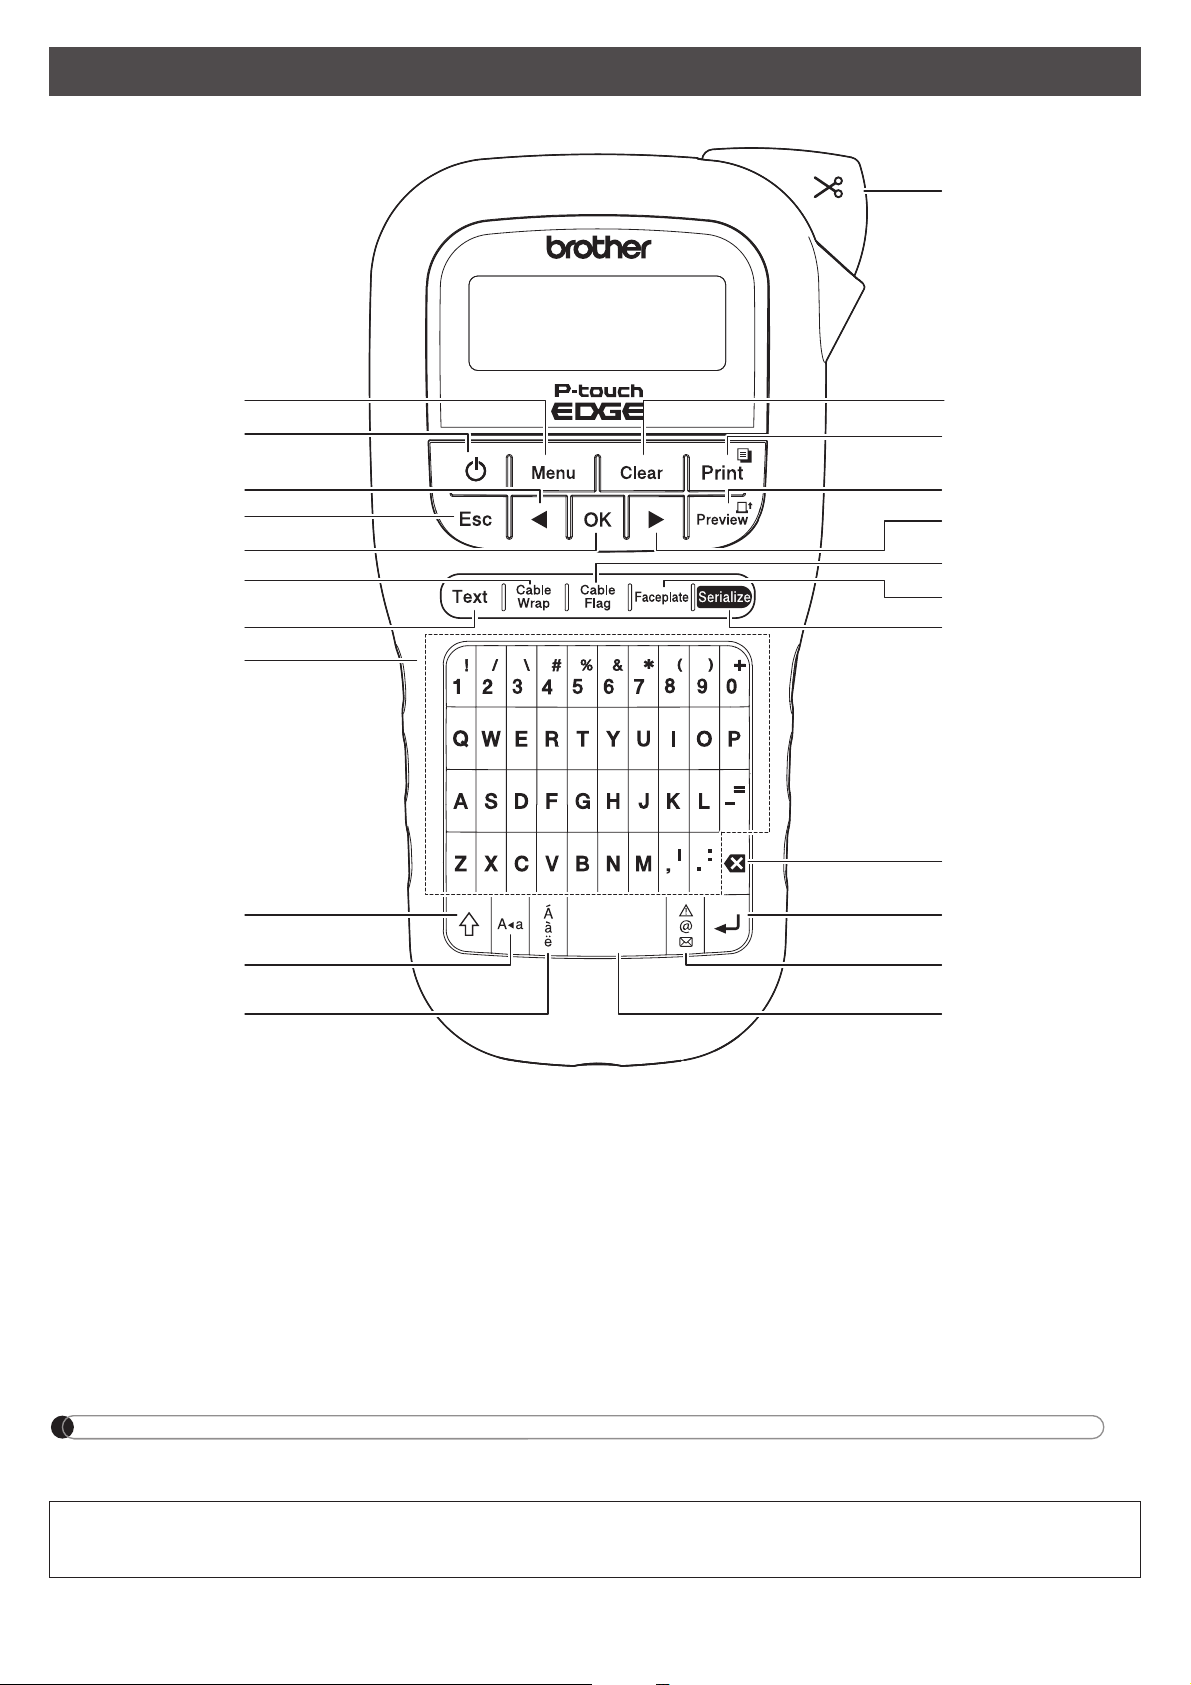
Keyboard
1. Menu key
2. Power key
3.
Cursor key : Left (Use with Shift
key to go to top of the text.)
4. Escape key
5. OK key
6. Cable Wrap key
7. Text key
8. Character keys
9. Shift key
10. Caps key
11. Accent key
12. Tape Cutter lever
13. Clear key
14. Print key
15. Preview key
16.
Cursor key : Right (Use with
Shift key to go to end of the text.)
17. Cable Flag key
18. Faceplate key
19. Serialize key
20. Backspace key
21. Enter key
22. Symbols key
23. Space key
• Pressing the Preview key displays a generated image of the label, and may differ from the actual label
when printed.
1
2
3
4
7
5
6
9
8
10
11
21
13
12
14
16
17
18
19
22
23
15
20
Page 6

1 Turn on your P-touch labeling system.
Supply power using six AAA batteries or the optional AC Adapter (AD24), and then press to turn
on the power.
2 Set the language.
The default setting is [English].
3 Set the unit of measurement.
The default setting is [inch].
NOTE
• The P-touch labeling system automatically turns off if it is inactive for five minutes.
• To cancel any operation, press .
• To return to the default setting, press the Space key.
Use this function to set LCD brightness. There are five levels from [-2] (darkest) to [+2] (brightest). The
default setting is [0].
NOTE
• To return to the default setting, press the Space key.
Initial Settings
/ [Language] / [English/Español/Français/Hrvatski/
Italiano/Magyar/Melayu/Nederlands/Norsk/Polski/Português/Portug. (BR)/Românã/
Slovenski/Slovenský/Suomi/Svenska/Türkçe/ýeština/Dansk/Deutsch] .
/ [Unit] / [inch/mm] .
Contrast
/ [LCD contrast] / [-2 / -1 / 0 / +1 / +2]
Page 7

If the cutter blade becomes blunt after repetitive use
and the tape cannot be cut cleanly, turn the cutter
board as shown in the illustration
1
.
If you still have difficulties, replace with new cutter
unit (stock no. TC-4) from an authorized Brother
reseller.
X Replacing the Cutter Unit
1. Remove the two sections of the Cutter Unit
(green) in the direction of the arrows as
illustrated below
2
.
2. Install a new Cutter Unit. Push it in gently until
it snaps into place.
*1 Visit support.brother.com for the latest
information about the recommended batteries.
Supplies and Accessories
Cassettes: See the included Supplies and
Accessories Guide.
AC Adapter: AD24
Cutter Unit: TC-4 (replacement)
WARNING
Do not touch the cutter blade directly with your
fingers.
Specifications
Dimensions:
(W x D x H)
4.3" X 8.0" X 2.2"
(Approx. 109(W) X 202(D) X 55(H)mm)
Weight: Approx. 0.9 lb. (Approx. 400 g)
(without batteries and tape cassette)
Power supply: Six AAA alkaline batteries (LR03)
Six AAA Ni-MH batteries (HR03)*
1
Optional AC Adapter (AD24)
Tape cassette: Brother P-touch TZe tape widths:
0.13" (3.5mm), 0.23" (6mm),
0.35" (9mm), 0.47" (12mm)
Brother HGe tape widths:
0.23" (6mm), 0.35" (9mm),
0.47" (12mm)
Cutter Board
Page 8
BASIC USAGE
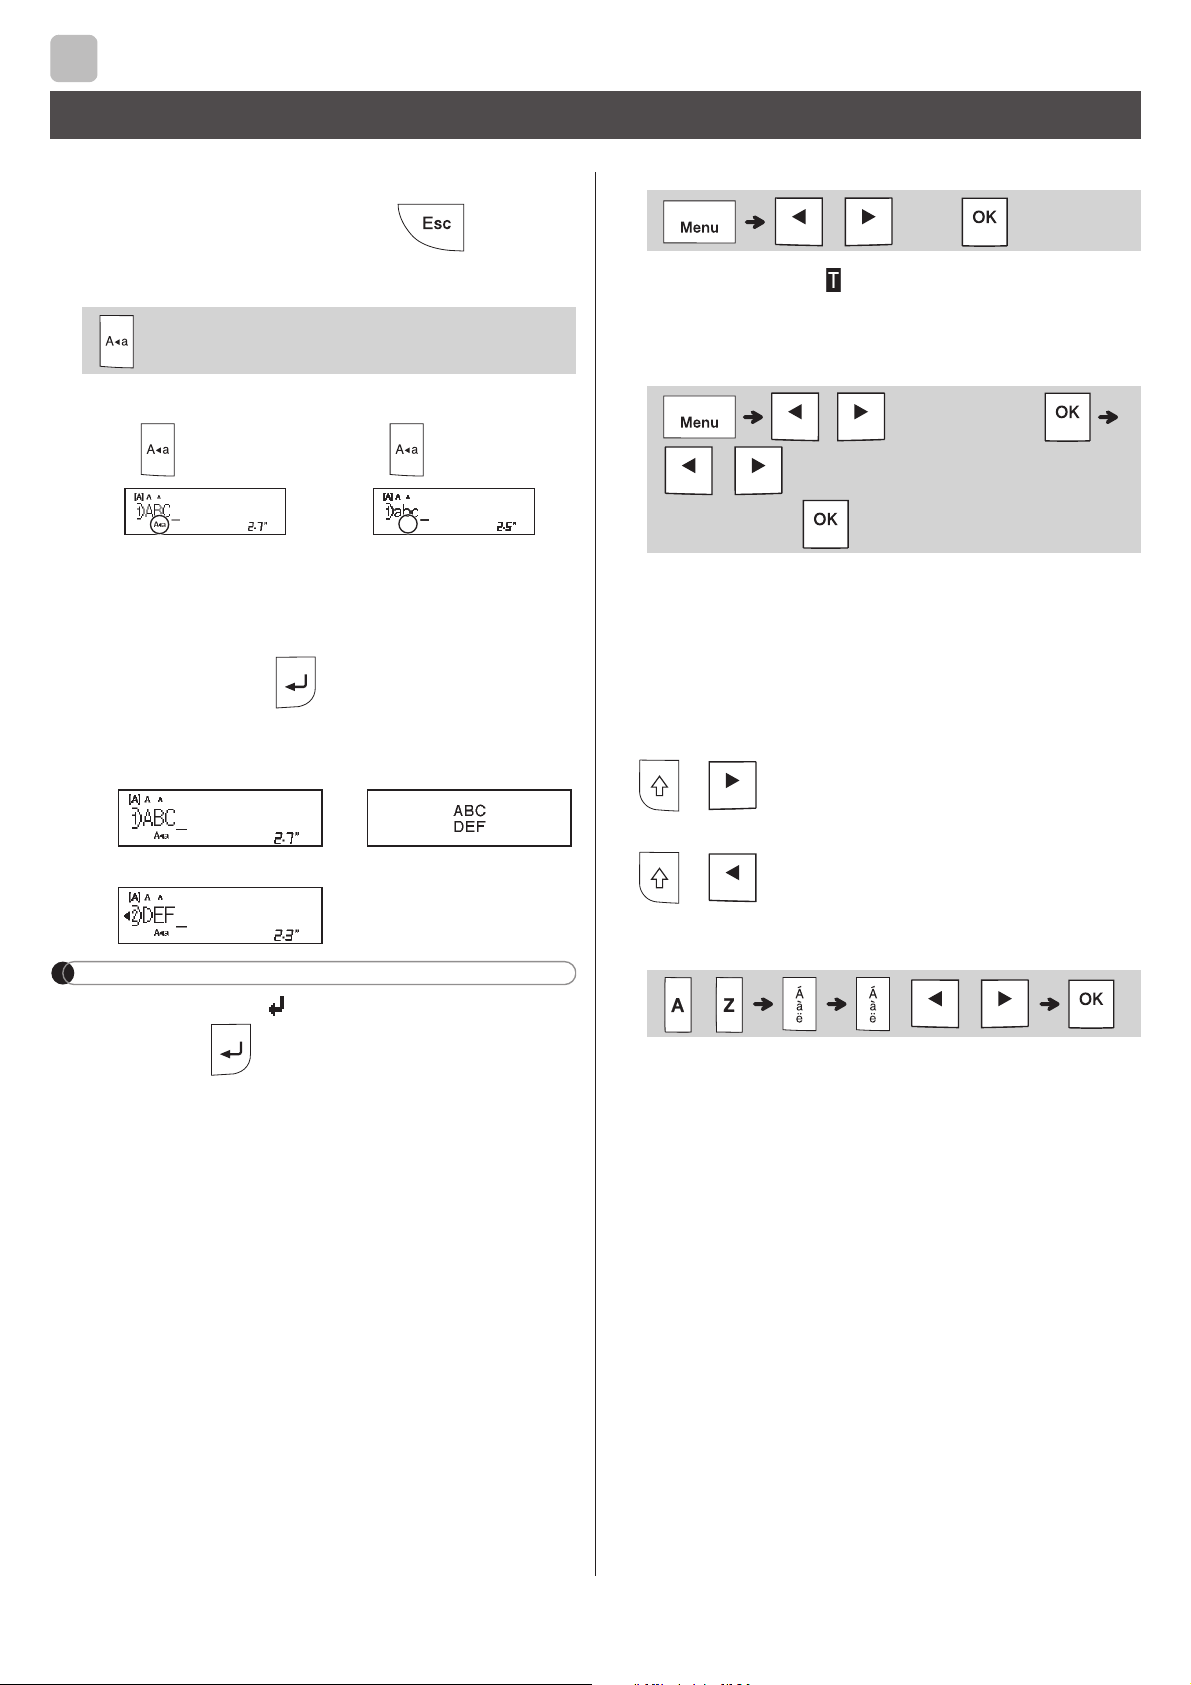
You can enter a maximum of 80 characters and
spaces for a text label.
To cancel any operation, press .
X Switching Upper Case / Lower Case
X Creating Two-Line Tapes
Move the cursor to where you want to start the
next line and press . Use either 0.35" (9mm)
or 0.47" (12mm) tape for two-line printing.
NOTE
• The return symbol ( ) appears when you press
the Enter key .
X Entering Tabs
• The tab symbol appears when you insert a
tab in the text.
X Changing Tab Length
• To return to the default tab length, press the Space
key.
• Please note: the default length varies based on
your tape size.
X Cursor Keys
To move to the end of your text:
+
To move to the beginning of your text:
+
X Entering Accented Characters
• Refer to the Accented Characters table in this
guide.
• The order of accented characters varies based
on the language you selected.
Entering Text
2
Upper case
( ON)
Lower case
( OFF)
Line 1 The image
Line 2
Caps
Caps
/ [Tab]
/ [Tab Length]
/ [Auto / 0.0"-4.0"
(0-100mm)]
- / /
Page 9

X Changing Label Length
NOTE
• The lock symbol appears when you set a
specific tape length.
• To return to the default length (Automatic,
based on text length), press the Space key.
X Clearing Text and Settings
To delete individual letters and spaces, press .
To delete all text :
To delete all text and settings:
You can save and reuse the text and settings for
up to nine different labels. Each tape holds up to
80 characters (including spaces). Assign a
number (1-9) to each saved file so you can reuse
it, and edit or overwrite stored files as needed.
X Saving a new file
NOTE
• When saving a file, if you reuse a number that is
already assigned to another file, [Overwrite
OK?] appears on the LCD. To overwrite the
previously-saved file, press . To cancel
without saving, press .
X Printing a saved file
X Opening a saved file
/ [Label Length]
/ [Auto / 1.2"-12.0"
(30-300mm)]
/ [Text Only]
/ [Text&Format]
Saving Tapes Files
(Enter text) / [File]
/ [Save] /
/ [File]
/ [Print] /
/ [File]
/ [Open] /
Page 10

1 Press to select the settings to enter
the text.
2 Press / to select the settings.
Emphasize text using underlines or a frame.
X Entering Symbols
• Refer to the Symbols table in this guide.
• To cancel operation, press .
• Select History to view up to seven recently-used
symbols.
• You can also insert Symbols by pressing the
shortcut keys, as shown below.
Text Key
/
(Select an item)
Size
Large
Medium
Small
Style
Normal
Bold
Outline
Shadow
Italic
I+Bold
I+Outline
I+Shadow
Vertical
V+Bold
Width
Normal
× 2
× 1/2
Underline and Frame
/ [Undl/Frame]
/ (Select a frame type)
2
3
Symbols Key
(Select category)
/
(Select a symbol)
Punctuation
Space
key
Currency
History Greek
Brackets Electrical
Bullets Datacom
Super/
Subscript
AV/Security
Mathematics Safety
Arrows
Page 11

X Preview
• Pressing the Preview key displays a preview of
the label, and may differ from the actual one
when printed.
• If the LCD cannot display all the text at once,
press / to display the hidden text.
• Press / / to exit Preview
mode.
X Feeding (Tape Feed)
• This function feeds approximately 1" (25mm) of
blank tape.
• Do not pull uncut tape from the Tape Cassette
as this may damage the Tape Cassette.
X Printing
Press the Print key to print the text displayed on
the LCD.
X Printing Multiple Copies
• You can print up to nine copies of each label.
• DO NOT touch the Tape Cutter Lever while the
message [Please Wait] appears on the LCD.
• To cut tape: When printing ends, push the
Tape Cutter Lever after the message [Please
Cut] appears.
• To remove tape backing, fold the tape
lengthwise (with the text facing inward), to
expose the inside edges that run down the
center of the tape backing. Peel and apply.
X Setting Margins
[Full] / [Half] / [Narrow]
Use one of these options to customize margin
length before and after your text.
The printed dots (:) indicate the end of the label.
Cut along the printed dots (:) with scissors.
[Chain Print] (tape-saving option)
Use this option to print multiple different labels
with narrow margins. This option saves tape.
1. Enter your text.
2.
Press .
3. When [Feed OK?] appears on the LCD, press
to change the text.
4. Clear the text, enter the text you want on the
next label, and then press .
5. After your last label prints, when [Feed OK?]
appears on the LCD, press .
NOTE
• When you use [
Chain Print
], feed the tape
before using the cutter ( + ), otherwise
part of the text may be cut off.
• Do not pull the tape, as this may damage the Tape
Cassette.
• The printed dots (:) indicate the end of the label. Cut
along the printed dots (:) with scissors.
Printing Labels
+
+ [Copies:] / /
-
/
[Margin]
/
[Full / Half / Narrow / Chain
Print]
LCD Printout
Full
Half
Narrow
1.0"
ABC
0.16"0.16"
1" 1"
ABC
2.7"
ABC
1.6"
0.47" 0.47"
Page 12

LABEL APPLICATION KEYS
Use this function to create a label
that can be wrapped around a
cable or wire.
Turn on the Cable Rotate/Repeat function to print
text repeatedly along the length of the label so
that it can easily be read from any angle.
• To activate the Text Repeat function, press
and then select [CableRot/Rpt].
• Cable diameter: 0.2" to 3.6" (3mm to 90mm)
available
Default: 0.3" (6mm)
Use this function to create a
label that can be wrapped
around a cable or wire with its
ends applied together to form a
flag.
You can select the desired flag length. When you
select [Auto], the flag length is automatically
adjusted according to the text length.
• Flag length: 0.4" to 8.0" (10mm to 200mm), Auto
Default: Auto
• Use the Cable Flag function when the diameter
of the object is more than 0.2" (3mm).
• Text cannot be rotated when using the Cable
Flag function.
NOTE
• We recommend using Flexible ID Tape for labels attached to cables and wires.
• To cancel the Cable Wrap/Cable Flag/Faceplate functions during operation, press / or
accordingly.
• Depending on the format you select, the entire contents of your text may not be printed. For example, if the
text is too long to fit into the format, the [Text Limit!] error message will appear.
3
Cable Wrap
[Txt Rpt: Off][Txt Rpt: On]
/ (Select a cable diameter)
(Input text)
Cable Flag
/ (Select a flag length)
(Input text)
Page 13

Use this function to create a label that can be
used to identify various components, or panels.
Using the Faceplate function ensures that each
block of text is evenly spaced on a single label.
• Faceplate length: 1.2" to 12.0" (30mm to 300mm)
Default: 2.0" (50mm)
Use this function to create multiple labels with a
number or letter automatically incremented on
each label.
This serializing function can also be used with the
Cable Wrap, Cable Flag, or Faceplate templates
to save time entering and printing a series of
labels.
• You can Serialize numbers from 01 - 50.
Faceplate
/ (Select a faceplate length)
(Input text)
Serialize
Input text / (Select a character to be
incremented) [Serialize:] /
/ -
Page 14

HELPFUL HINTS
Reset your P-touch labeling system when you want to
initialize the settings, or in the event it is not working
properly. Resetting clears all the text, settings, and
stored files.
1 Turn off the P-touch labeling system, hold
down and , and then press to
turn the P-touch labeling system back on.
2 First release the power button, and then
release and .
The P-touch labeling system turns on with the
internal memory reset.
NOTE
4
Shortcuts
Language
Space key
Undl/Frame
Label Length
Margin
CableRot/Rpt
File
Tab
Tab Length
Unit
LCD contrast
Resetting the P-touch Labeling System
If you have questions or need information
about your Brother product, please visit us
online or call.
For FAQs, Troubleshooting, and Manuals,
visit support.brother.com.
To order supplies and accessories, visit
www.brothermall.com
or call
1-877-552-6255.
For USA Customer Service, call
1-877-BROTHER (1-877-276-8437)
Fax: 1-901-379-1210
CAUTION
USING A COMBINATION OF DIFFERENT
BATTERIES (SUCH AS ALKALINE WITH
Ni-MH) , MAY RESULT IN AN EXPLOSION.
DISPOSE OF USED BATTERIES
ACCORDING TO THE INSTRUCTIONS.
• Remove the batteries if you do not intend to
use the P-touch labeling system for an
extended period of time.
• Dispose of batteries at an appropriate
collection point, not in the general waste
stream. Be sure to observe all applicable
federal, state, and local regulations.
• When storing or discarding a battery, wrap
it with cellophane tape to prevent it from
short-circuiting. (see illustration)
1. Cellophane tape
2. Alkaline or Ni-MH
battery
Do not mix old and new batteries. Replace all
six batteries at the same time.
2
1
Page 15

Symbols
Symbols
Category Symbols
Accented Characters
Punctuation
Brackets
Bullets
Super/
Subscript
Mathematics
Arrows
Currency
Greek
Electrical
Datacom
AV/Security
Safety
Page 16

X Error messages
Troubleshooting
Message Cause / Remedy
Battery
Low!
The batteries are weak.
If using AAA alkaline batteries,
replace them with new ones (do not
use a combination of old and new
batteries).
If using Ni-MH batteries, charge
them fully.
Battery
Empty!
The installed batteries are
exhausted and need to be replaced
for continued operation.
Invalid! • An invalid number was entered as
the label length, tab length, cable
diameter, flag length or faceplate
length.
• An invalid letter or number to be
incremented was selected in the
Serialize function.
No Text! • You tried to print a text file when
there is no data stored in the
memory.
• is pressed when no text is
entered.
• + is pressed when no
text is entered.
•
is pressed when no text is
entered.
• or was pressed when no
text was entered while using
templates.
2 Line
Limit!
/
1 Line
Limit!
• You tried to enter a 3rd line by
pressing .
• You tried to print or preview two
lines of text while 0.13" (3.5mm) or
0.23" (6mm) tape is installed. Install
a larger tape size.
No
Cassette!
There is no cassette installed.
Install a cassette with the mark
or mark.
Message Cause / Remedy
Cutter
Pressed
The Tape Cutter Lever was pressed
in the middle of the printing process.
Text
Full!
The maximum number of characters
(80 characters for text) have already
been entered.
Text
Limit!
Change
Length
You may have exceeded the set
tape length. Reduce the text or
select [Auto] as the tape length.
Feed OK? • Feeding tape after printing when
[Chain Print] is selected. Refer
to the Setting Margins section in
this guide.
Wrong
Tape!
Use TZe
tape
• Use a cassette with the mark or
mark.
Page 17

X What to do when
Problem Solution
The display
remains
blank after
you have
turned on
the P-touch
labeling
system.
• Check that the batteries are
correctly installed. Refer to the
Installing Power Supply and
Tape Cassette section.
• The batteries may be weak.
Replace them.
• Check that the AD24 Adapter is
correctly connected.
When the
label is
printed,
there is too
much
margin
(space) on
both sides
of the text.
• Refer to the Setting Margins
section in this guide and select
[Half] , [Narrow] or [Chain
Print] to have smaller margins for
your tape.
The P-touch
labeling
system
does not
print, or the
printed
characters
are not
formed
properly.
• Check that the cassette is inserted
correctly.
• If the cassette is empty, replace it.
• Check that the Tape Cassette
Cover is closed correctly.
The setting
has cleared
on its own.
• The batteries may be weak.
Replace them.
• When power is disconnected for
more than three minutes, all text
and formats in the display settings
are cleared.
A blank
horizontal
line appears
through the
printed
tape.
• There may be some dust on the
Print Head. Remove the cassette
and use a dry cotton swab to gently
wipe the Print Head with an up-anddown motion. Refer to the
Installing Power Supply and
Tape Cassette section in this guide
for the Print Head location.
Problem Solution
The P-touch
labeling
system has
“locked up”
(i.e., nothing
happens
when a key
is pressed,
even though
the P-touch
labeling
system is
on.)
• Refer to the Resetting the P-touch
Labeling System section in this
guide.
The power
turns off
when you
try to print.
• The batteries may be weak.
Replace them.
• Check that the batteries are
correctly inserted.
• The wrong AC Adapter is used. We
recommend using the AD24
Adapter.
The tape
does not
feed
properly or
the tape
gets stuck
inside the
P-touch
labeling
system.
• Check that the end of the tape
feeds under the tape guides. Refer
to the Installing Power Supply
and Tape Cassette section in this
guide for an example.
• The Cutter Lever is pressed while
printing. Do not touch the Cutter
Lever during printing.
To change
language
setting.
• Refer to the Initial Settings section
in this guide.
 Loading...