

Page 1
SSL Guide
(Secure Socket Layer)
To find basic information about network and advanced network
features of your Brother machine: uu Network User's Guide.
To download the latest manual, please visit the Brother Solutions
Center at (http://solutions.brother.com/)
latest drivers and utilities for your machine, read FAQs and
troubleshooting tips or learn about special printing solutions from the
Brother Solutions Center.
Not all models are available in all countries.
. You can also download the
Version A
ENG
Page 2

Applicable models
Note
This User’s Guide applies to the following models.
HL-5450DN(T)/5470DW(T)/6180DW(T)
DCP-8110DN/8150DN/8155DN/8250DN/MFC-8510DN/8710DW/8810DW/8910DW/8950DW(T)
Definitions of notes
We use the following icon throughout this User’s Guide:
Notes tell you how you should respond to a situation that may arise or give tips
about how the operation works with other features.
Trademarks
The Brother logo is a registered trademark of Brother Industries, Ltd.
Microsoft, Windows, Windows Server and Internet Explorer are either registered trademarks or trademarks
of Microsoft Corporation in the United States and/or other countries.
Windows Vista is either a registered trademark or trademark of Microsoft Corporation in the United States
and/or other countries.
Each company whose software title is mentioned in this manual has a Software License Agreement specific
to its proprietary programs.
Any trade names and product names of companies appearing on Brother products, related
documents and any other materials are all trademarks or registered trademarks of those respective
companies.
i
Page 3

IMPORTANT NOTE
This product is approved for use in the country of purchase only. Do not use this product outside the
country of purchase as it may violate the wireless telecommunication and power regulations of that
country.
In this manual, the screens of the MFC-8950DW(T) are used unless specified.
Windows® XP in this document represents Windows® XP Professional, Windows® XP Professional x64
®
Edition and Windows
Windows Server
x64 Edition.
Windows Server
R2.
Windows Vista
Windows
®
®
7 in this document represents all editions of Windows® 7.
in this document represents all editions of Windows Vista®.
XP Home Edition.
®
2003 in this document represents Windows Server® 2003 and Windows Server® 2003
®
2008 in this document represents Windows Server® 2008 and Windows Server® 2008
Please go to the Brother Solutions Center at http://solutions.brother.com/
page to download the other manuals.
and click Manuals on your model
ii
Page 4

Table of Contents
1 Introduction 1
Overview....................................................................................................................................................1
Brief History of SSL ...................................................................................................................................1
Benefits of using SSL ................................................................................................................................1
Using Certificates for device security.........................................................................................................2
2 Digital Certificate for SSL communication 4
Digital Certificate Installation .....................................................................................................................4
Creating a self-signed certificate .........................................................................................................6
Creating a Certificate Signing Request (CSR) ....................................................................................7
How to install the certificate to your machine ......................................................................................9
Choosing the certificate.....................................................................................................................10
Installing the self-signed certificate or pre-installed certificate
onto Windows Vista
with administrator rights.................................................................................................................12
Installing the self-signed certificate or pre-installed certificate
for Windows
Import and export the certificate and private key.....................................................................................17
How to import the self-signed certificate, the certificate issued by a CA, and the private key...........17
How to export the self-signed certificate, the certificate issued by a CA, and the private key...........17
Import and export a CA certificate .....................................................................................................18
Managing multiple certificates .................................................................................................................19
®
®
, Windows® 7 and Windows Server® 2008 for users
XP and Windows Server® 2003 users....................................................................14
3 Managing your network machine securely using SSL/TLS 20
Secure Management using Web Based Management (web browser) ....................................................20
4 Printing documents securely using SSL 21
Printing documents securely using IPPS for Windows®..........................................................................21
Windows
Windows Vista
®
XP and Windows Server® 2003.......................................................................................21
®
, Windows® 7 and Windows Server® 2008..............................................................23
5 Sending or Receiving (for DCP and MFC models) an E-mail securely 25
Configuration using Web Based Management (web browser) ................................................................25
Sending or Receiving (for DCP and MFC models) an E-mail securely using SSL/TLS ....................26
6 Troubleshooting 27
Overview..................................................................................................................................................27
Identifying your problem ....................................................................................................................27
Printing the Printer Settings Page (For HL-5450DN(T)) ..........................................................................29
Printing the Network Configuration Report (For other models)................................................................29
Network terms and concepts ...................................................................................................................31
SSL technical overview .....................................................................................................................31
Network terms ...................................................................................................................................32
iii
Page 5

1
1
Introduction 1
Overview 1
Secure Socket Layer (SSL) is an effective method of protecting data which is sent over a local or wide area
network. It works by encrypting data sent over a network, i.e. a print job, so anyone trying to capture it will not
be able to read it as all the data will be encrypted.
It can be configured on both wired and wireless networks and will work with other forms of security such as
WPA keys and firewalls.
Brief History of SSL 1
SSL was originally created to secure web traffic information, in particular data sent between web browsers
®
and servers. For example, when you use Internet Explorer
little padlock in the web browser, you are using SSL. It then grew to work with other applications such as
Telnet, printers and FTP software in order to become a universal solution for online security. Its original
design intentions are still being used today by many online retailers and banks to secure sensitive data, such
as credit card numbers, customer records etc.
for Internet Banking and you see https:// and the
SSL uses extremely high levels of encryption and is trusted by banks all over the world since it is unlikely that
it will be broken.
Benefits of using SSL 1
The sole benefit to using SSL on Brother machines is to provide secure printing over an IP network by
restricting unauthorized users from being able to read data sent to the machine. Its key selling point is that it
can be used to print confidential data securely. For example, a HR department for a large company may be
printing wage slips on a regular basis. Without encryption, the data contained on these wage slips can be
read by other network users. However, with SSL, anyone trying to capture the data will only see a confusing
page of code and not the actual wage slip.
1
Page 6
Introduction
1
Note
Using Certificates for device security 1
Your Brother machine supports the use of multiple security certificates allowing secure management,
authentication and communication with the machine. The following security certificate features can be used
with the machine. When you print a document or use Web Based Management (web browser) securely using
SSL, you must install the certificate onto your computer. See Digital Certificate Installation uu page 4.
SSL/TLS communication
SSL communication for SMTP/POP3
The Brother machine supports the following certificates.
Pre-installed certificate
Your machine has a pre-installed self-signed certificate.
Using this certificate, you can easily use the SSL/TLS communication without creating or installing a
certificate. If you want to use your machine's Google Cloud Print feature, you can use this pre-installed
certificate to configure the Google Cloud Print settings securely. For more information on Google Cloud
Print, go to the Brother Solutions Center at http://solutions.brother.com/
page to download the Google Cloud Print Guide.
and click Manuals on your model
The pre-installed self-signed certificate cannot protect your communication from spoofing. We recommend
using a certificate that is issued by a trusted organization for better security.
Self-signed certificate
This print server issues its own certificate. Using this certificate, you can easily use the SSL/TLS
communication without having a certificate from a CA. (See Creating a self-signed certificate uu page 6.)
Certificate from a CA
There are two methods for installing a certificate from a CA. If you already have a certificate from a CA or
if you want to use a certificate from an external trusted CA:
• When using a CSR (Certificate Signing Request) from this print server. (See Creating a Certificate
Signing Request (CSR) uu page 7.)
• When importing a certificate and a private key. (See Import and export the certificate and private key
uu page 17.)
2
Page 7

Introduction
1
Note
CA certificate
If you use a CA certificate that identifies the CA (Certificate Authority) itself, you must import a CA
certificate from the CA, prior to the configuration. (See Import and export a CA certificate uu page 18.)
• If you are going to use SSL/TLS communication, we recommend that you contact your system
administrator first.
• When you reset the print server back to its default factory settings, the certificate and the private key that
are installed will be deleted. If you want to keep the same certificate and the private key after resetting the
print server, export them before resetting and re-install them. (See How to import the self-signed
certificate, the certificate issued by a CA, and the private key uu page 17.)
3
Page 8
2
2
Note
Digital Certificate for SSL communication2
Digital Certificate Installation 2
Printing over a secured network or secure management using Web Based Management (web browser)
requires a digital certificate to be installed on both the machine and device which is sending data to the
machine, e.g. a computer. Your machine has a pre-installed certificate. In order to configure the certificate,
the user needs to log onto the machine remotely through a web browser using its IP address.
We recommend Windows® Internet Explorer® 7.0/8.0 or Firefox® 3.6 for Windows® and Safari 4.0/5.0 for
Macintosh. Please also make sure that JavaScript and Cookies are always enabled in whichever browser
you use. If a different web browser is used, make sure it is compatible with HTTP 1.0 and HTTP 1.1.
a Start your web browser.
b Type “http://machine’s IP address/” into your browser's address bar (where “machine’s IP address” is the
IP address of the machine or the print server name).
For example: http://192.168.1.2/
c No password is required by default. If you have previously set a password, enter it and press .
d Click Network.
e Click Security.
f Click Certificate.
4
Page 9
Digital Certificate for SSL communication
2
Note
g You can configure the certificate settings.
To create a self-signed certificate using Web Based Management, go to Creating a self-signed certificate
uu page 6.
To create a Certificate Signing Request (CSR), go to Creating a Certificate Signing Request (CSR)
uu page 7.
1
2
1 To create and install a self-signed certificate
2 To use a certificate from a Certificate Authority (CA)
• The functions that are grayed and unlinked indicate they are not available.
• For more information on configuration, see the Help text in the Web Based Management.
5
Page 10
Digital Certificate for SSL communication
2
Note
Creating a self-signed certificate 2
a Click Create Self-Signed Certificate.
b Enter a Common Name and a Valid Date.
• The length of the Common Name must be less than 64 characters. Enter an identifier such as an IP
address, node name or domain name to use when accessing this machine through SSL/TLS
communication. The node name is displayed by default.
• A warning will pop-up if you use the IPPS or HTTPS protocol and enter a different name in the URL than
the Common Name that was used for the self-signed certificate.
c You can choose the Public Key Algorithm and Digest Algorithm settings from the pull-down list. The
default settings are RSA(2048bit) for Public Key Algorithm and SHA256 for Digest Algorithm.
d Click Submit.
e The self-signed certificate is created and saved in your machine's memory successfully.
6
Page 11
Digital Certificate for SSL communication
2
Note
Note
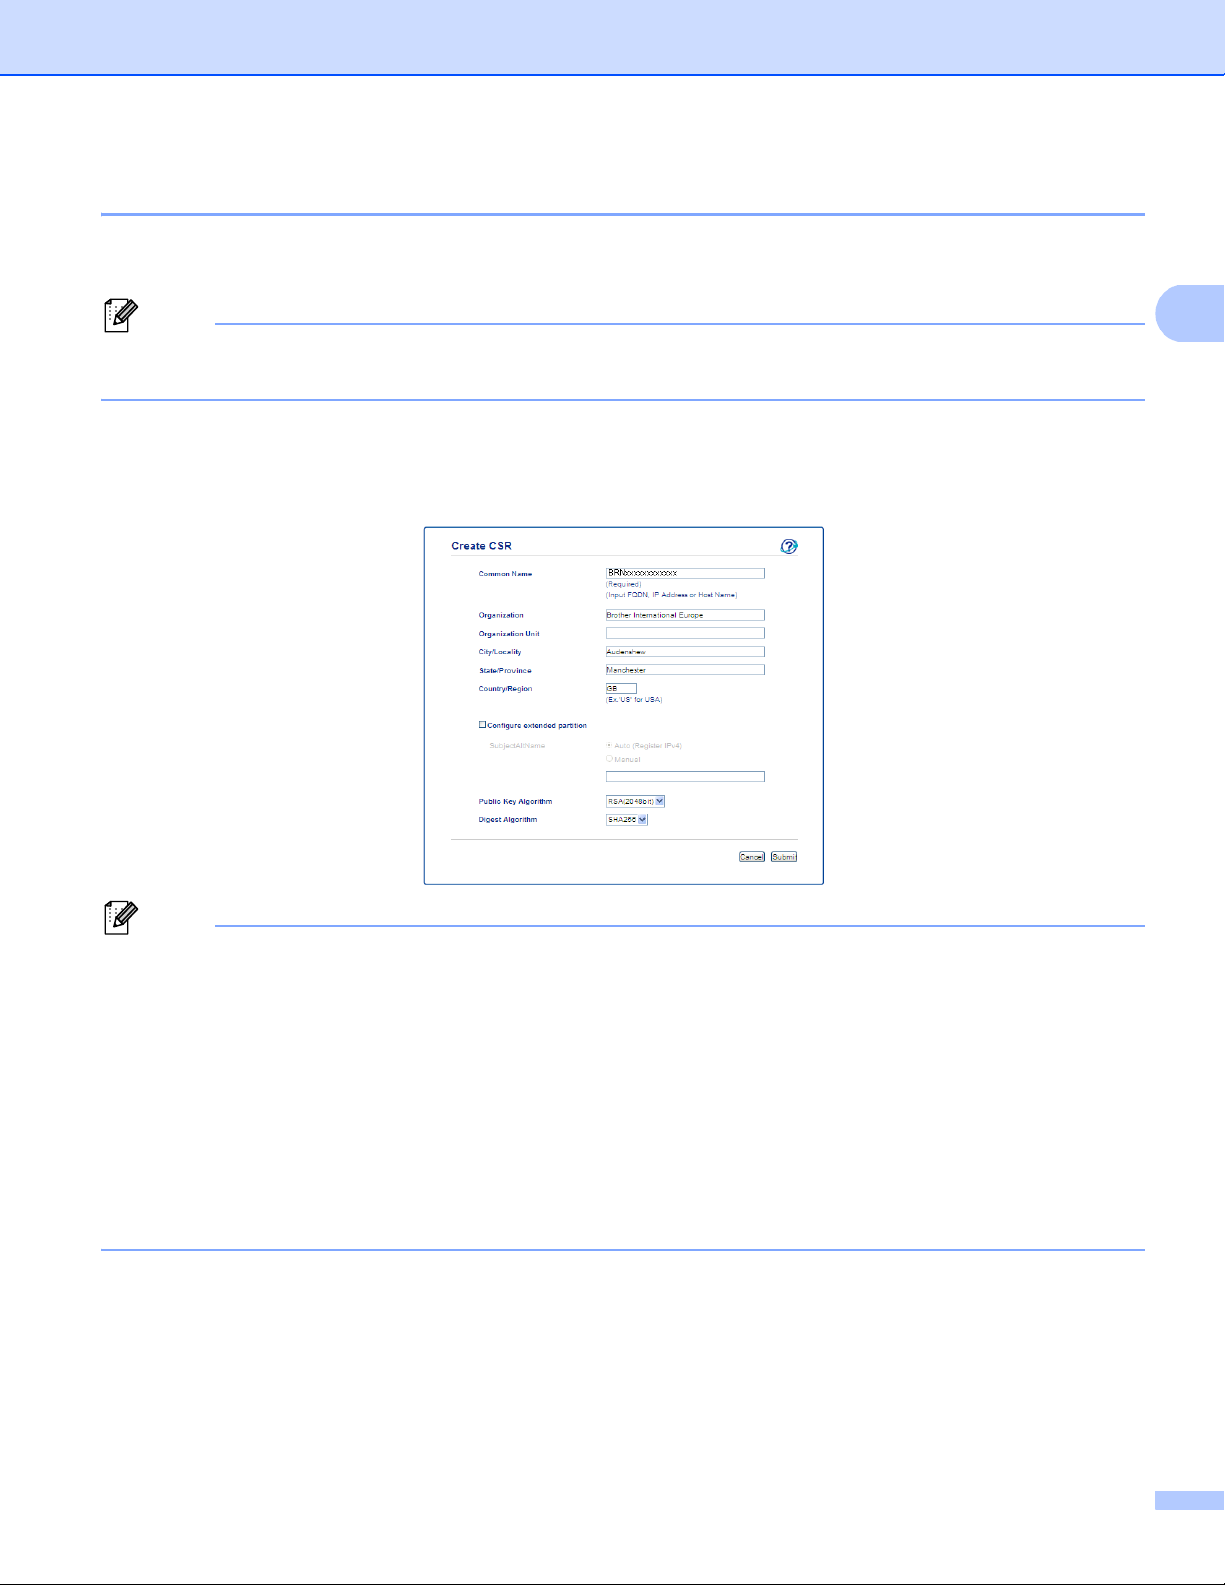
Creating a Certificate Signing Request (CSR) 2
A Certificate Signing Request (CSR) is a request sent to a CA in order to authenticate the credentials
contained within the certificate.
We recommend that the Root Certificate from the CA be installed on your computer before creating the
CSR.
a Click Create CSR.
b Enter a Common Name and your information, such as Organization.
Your company details are required so that a CA can confirm your identity and attest to the outside world.
• The length of the Common Name must be less than 64 characters. Enter an identifier such as an IP
address, node name or domain name to use when accessing this machine through SSL/TLS
communication. The node name is displayed by default. The Common Name is required.
• A warning will pop-up if you enter a different name in the URL than the Common Name that was used for
the certificate.
• The length of the Organization, the Organization Unit, the City/Locality and the State/Province must
be less than 64 characters.
•The Country/Region should be an ISO 3166 country code composed of two characters.
• If you are configuring the X.509v3 certificate extension, choose the Configure extended partition check
box and then choose Auto (Register IPv4) or Manual.
c You can choose the Public Key Algorithm and Digest Algorithm settings from the pull-down list. The
default settings are RSA(2048bit) for Public Key Algorithm and SHA256 for Digest Algorithm.
7
Page 12

Digital Certificate for SSL communication
2
Note
d Click Submit. The following screen will appear.
e After a few moments, you will be presented with the certificate, which can be saved into a small file or
copied and pasted directly into an online CSR form offered by a Certificate Authority. Click Save to save
the CSR file to your computer.
Follow your CA policy regarding the method to send a CSR to your CA.
f The CSR is created. For instructions on how to install the certificate to your machine, go to How to install
the certificate to your machine uu page 9.
8
Page 13

Digital Certificate for SSL communication
2
Note
How to install the certificate to your machine 2
When you receive the certificate from a CA, follow the steps below to install it into the print server.
Only a certificate issued with this machine’s CSR can be installed. When you want to create another CSR,
make sure that the certificate is installed before creating another CSR. Create another CSR after installing
the certificate to the machine. Otherwise the CSR you made before installing will be invalid.
a Click Install Certificate on the Certificate page.
b Specify the file of the certificate that has been issued by a CA, and then click Submit.
c Now the certificate has been created successfully and saved in your machine memory successfully.
To use SSL/TLS communication, the Root Certificate from the CA needs to be installed on your
computer. Contact your network administrator about installation.
You have completed the digital certificate configuration. If you want to send or receive an E-mail using
SSL, see Sending or Receiving (for DCP and MFC models) an E-mail securely uu page 25 for the
necessary configuration steps.
9
Page 14

Digital Certificate for SSL communication
2
Choosing the certificate 2
After you install the certificate, follow the steps below to choose the certificate you want to use.
a Click Network.
b Click Protocol.
c Click HTTP Server Settings and then choose the certificate from the Select the Certificate pull-down
list.
10
Page 15

Digital Certificate for SSL communication
2
Note
• If the following dialog box appears, Brother recommends disabling the Telnet, FTP, TFTP protocols and
the network management with older versions of BRAdmin Professional (2.8 or less) for secure
communication. If you enable them, user authentication is not secure.
• For DCP and MFC models:
If you disable FTP, the Scan to FTP function will be disabled.
d Click Submit.
11
Page 16

Digital Certificate for SSL communication
2
Note
Note
Installing the self-signed certificate or pre-installed certificate
®
onto Windows Vista
, Windows® 7 and Windows Server® 2008 for users
with administrator rights 2
• The following steps are for Windows® Internet Explorer®. If you use another web browser, follow the help
text of the web browser itself.
• You must have administrator rights to install the self-signed certificate or pre-installed certificate.
a Click the button and All Programs.
b Right-click Internet Explorer, and then click Run as administrator.
If the User Account Control screen appears,
(Windows Vista
(Windows
®
) Click Continue (Allow).
®
7) Click Yes.
12
Page 17

Digital Certificate for SSL communication
2
c Type “https://machine’s IP address/” into your browser to access your machine (where “machine’s IP
address” is the machine’s IP address or the node name that you assigned for the certificate).
Then, click Continue to this website (not recommended)..
d Click Certificate Error, and then click View certificates. For the rest of the instructions, follow the steps
from step d in Installing the self-signed certificate or pre-installed certificate for Windows® XP and
Windows Server® 2003 users uu page 14.
13
Page 18

Digital Certificate for SSL communication
2
Installing the self-signed certificate or pre-installed certificate for Windows® XP and Windows Server® 2003 users 2
a Start your web browser.
b Type “https://machine’s IP address/” into your browser to access your machine (where “machine’s IP
address” is the IP address or the node name that you assigned for the certificate).
c When the security alert dialog box appears, do one of the following:
Click Continue to this website (not recommended).. Click Certificate Error, and then click
View certificates.
If the following dialog box appears, click View Certificate.
d Click Install Certificate... from the General tab.
14
Page 19

Digital Certificate for SSL communication
2
e When the Certificate Import Wizard appears, click Next.
f You need to specify a location to install the certificate. We recommend you choose
Place all certificates in the following store and then, click Browse....
g Choose Trusted Root Certification Authorities and then click OK.
15
Page 20

Digital Certificate for SSL communication
2
Note
h Click Next.
i On the next screen, click Finish.
j You will then be asked to install the certificate.
Do one of the following:
If you are installing the self-signed certificate, confirm the fingerprint (thumbprint) and then click Yes.
If you are installing the pre-installed certificate, click Yes.
• For the self-signed certificate, the fingerprint (thumbprint) is printed on the Network Configuration Report.
To learn how to print the Network Configuration, see Printing the Printer Settings Page (For
HL-5450DN(T)) uu page 29 or Printing the Network Configuration Report (For other models) uu page 29.
• For the pre-installed certificate, the fingerprint is not printed on the Network Configuration Report.
k Click OK.
l The self-signed certificate or pre-installed certificate is now installed on your computer, and SSL/TLS
communication is available.
Each computer wanting to print securely must do the same. However, once it has been installed, these steps
will not need to be repeated unless the certificate changes.
16
Page 21

Digital Certificate for SSL communication
2
Note
Import and export the certificate and private key 2
You can store the certificate and private key on the machine and manage them by importing and exporting.
How to import the self-signed certificate, the certificate issued by a CA, and the private key 2
a Click Import Certificate and Private Key on the Certificate page.
b Specify the file that you want to import.
c Enter the password if the file is encrypted, and then click Submit.
d Now the certificate and private key are imported to your machine successfully.
How to export the self-signed certificate, the certificate issued by a CA, and the private key 2
a Click Export shown with Certificate List on the Certificate page.
b Enter a password if you want to encrypt the file.
If a blank password is used, the output is not encrypted.
c Enter the password again for confirmation, and then click Submit.
d Specify the location where you want to save the file.
e Now the certificate and private key are exported to your computer.
17
Page 22

Digital Certificate for SSL communication
2
Import and export a CA certificate 2
You can store a CA certificate on the machine by importing and exporting.
How to import a CA certificate 2
a Click CA Certificate on the Security page.
b Click Import CA Certificate and choose the certificate. Click Submit.
How to export a CA certificate 2
a Click CA Certificate on the Security page.
b Choose the certificate you want to export and click Export. Click Submit.
c Click Save to choose the destination folder.
d Choose the destination you want to save the exported certificate and then save the certificate.
18
Page 23

Digital Certificate for SSL communication
2
Note
Managing multiple certificates 2
The multiple certificate feature allows you to manage each certificate that you have installed using Web
Based Management. After installing certificates, you can view what certificates are installed from the
Certificate page and then view each certificate's content, delete or export the certificate. For information on
how to access the Certificate page, see Digital Certificate Installation uu page 4.
For Printer models
The Brother machine allows you to store up to three self-signed certificates or up to three certificates
issued by a CA. You can use the stored certificates for using the HTTPS/IPPS protocol or IEEE 802.1x
authentication.
For DCP and MFC models
The Brother machine allows you to store up to four self-signed certificates or up to four certificates issued
by a CA. You can use the stored certificates for using the HTTPS/IPPS protocol, IEEE 802.1x
authentication or a Signed PDF.
You can also store up to four CA certificates for using IEEE 802.1x authentication and SSL for SMTP/POP3.
We recommend you store one certificate less and keep the last free to deal with certificate expiration. For
example, if you want to store a CA certificate, store three certificates and leave one storage as a backup. In
the case of re-issuing the certificate, such as when the certificate is expired, you can import a new certificate
to the backup and then you can delete the expired certificate, to avoid configuration failure.
• When you use HTTPS/IPPS, IEEE 802.1x or Signed PDF (for DCP and MFC models), you must choose
which certificate you are using.
• When you use SSL for SMTP/POP3 communications (for DCP and MFC models), you do not have to
choose the certificate. The necessary certificate will be chosen automatically.
19
Page 24

3
Note
Managing your network machine securely
3
To manage your network machine securely, you need to use the management utilities with security protocols.
using SSL/TLS
Secure Management using Web Based Management (web browser) 3
We recommend to use HTTPS protocol for secure management. To use these protocols, the following
machine settings are required.
• The HTTPS protocol is enabled by default.
You can change the HTTPS protocol settings and the certificate to use on the Web Based Management
screen, by clicking Network, Protocol and then HTTP Server Settings.
• You must also install the certificate you have installed to the machine onto your computer. See Installing
®
the self-signed certificate or pre-installed certificate onto Windows Vista
®
Server
pre-installed certificate for Windows
2008 for users with administrator rights uu page 12 or Installing the self-signed certificate or
®
XP and Windows Server® 2003 users uu page 14.
a Start your web browser.
, Windows® 7 and Windows
3
b Type “https://machine’s IP address/” into your browser. (If you use the created certificate, type
“https://Common Name/” into your browser. Where “Common Name” is the Common Name that you
assigned for the certificate, such as an IP address, node name or domain name. For how to assign a
Common Name for the certificate, see Using Certificates for device security uu page 2.)
For example:
https://192.168.1.2/ (if the Common Name is the machine’s IP address)
c No password is required by default. Enter a password if you have set one and press .
20
Page 25

4
4
Note
Note
Printing documents securely using SSL 4
Printing documents securely using IPPS for Windows
We recommend to use IPPS protocol for secure management. To use the IPPS protocol, the following
machine settings are required.
• Communication using IPPS cannot prevent unauthorized access to the print server.
• You must also install the certificate you have installed to the machine onto your computer. See Installing
®
the self-signed certificate or pre-installed certificate onto Windows Vista
®
Server
pre-installed certificate for Windows
• The IPPS protocol must be enabled. The default setting is enabled. You can change the IPPS protocol
settings and the certificate to use on the Web Based Management screen, by clicking Network, Protocol
and then HTTP Server Settings.
2008 for users with administrator rights uu page 12 or Installing the self-signed certificate or
®
XP and Windows Server® 2003 users uu page 14.
, Windows® 7 and Windows
®
Windows® XP and Windows Server® 2003 4
a Click Start and choose Printers and Faxes.
b Click Add a printer to start Add Printer Wizard.
4
c Click Next when you see the Welcome to the Add Printer Wizard screen.
d Choose A network printer, or a printer attached to another computer.
e Click Next.
f Choose Connect to a printer on the Internet or on a home or office network and then enter the
following in the URL field:
“https://machine’s IP address/ipp” (where “machine’s IP address” is the machine’s IP address or the
node name.)
• It is important that you use “https://” and not “http://” otherwise printing over IPP will not be secure.
• If you have edited the hosts file on your computer or are using a Domain Name System (DNS), you can
also enter the DNS name of the print server. As the print server supports TCP/IP and NetBIOS names,
you can also enter the NetBIOS name of the print server. The NetBIOS name can be seen in the Network
Configuration Report. (To learn how to print the Network Configuration Report, see Printing the Printer
Settings Page (For HL-5450DN(T)) uu page 29 or Printing the Network Configuration Report (For other
models) uu page 29.) The NetBIOS name assigned is the first 15 characters of the node name, and by
default it will appear as “BRNxxxxxxxxxxxx” for a wired network or “BRWxxxxxxxxxxxx” for a wireless
network. (“xxxxxxxxxxxx” is your machine’s MAC Address / Ethernet Address.)
21
Page 26

Printing documents securely using SSL
4
Note
g When you click Next, Windows
that you specified.
If the printer driver has already been installed:
You will see the printer selection screen in the Add Printer Wizard.
Go to step k.
If the printer driver has NOT been installed:
One of the benefits of the IPP printing protocol is that it establishes the model name of the printer
when you communicate with it. After successful communication you will see the model name of the
printer automatically. This means that you do not need to inform Windows
2003 about the type of printer driver to be used.
Go to step h.
If the printer driver that you are installing does not have a Digital Certificate you will see a warning
message. Click Continue Anyway to continue with the installation.
®
XP and Windows Server® 2003 will make a connection with the URL
®
XP and Windows Server®
h Click Have Disk. You will then be asked to insert the driver disk.
i Click Browse and choose the appropriate Brother printer driver that is contained on the CD-ROM or in
the network share.
Click OK.
j Click OK.
k Choose your machine and click OK.
l Check Yes if you want to use this machine as the default printer. Click Next.
m Click Finish and the machine is now configured and ready to print. To test the printer connection, print
a test page.
22
Page 27

Printing documents securely using SSL
4
Note
Windows Vista®, Windows® 7 and Windows Server® 2008 4
a (Windows Vista
Click the button, Control Panel, Hardware and Sound, and then Printers.
(Windows
Click the button, and then click Devices and Printers.
(Windows Server
Click Start, Control Panel, Hardware and Sound, and then Printers.
®
)
®
7)
®
2008)
b Click Add a printer.
c Choose Add a network, wireless or Bluetooth printer.
d Click The printer that I want isn’t listed.
e Choose Select a shared printer by name and then enter the following in the URL field:
“https://machine’s IP address/ipp” (where “machine’s IP address” is the machine’s IP address or the
node name.)
• It is important that you use “https://” and not “http://” otherwise printing over IPP will not be secure.
• If you have edited the hosts file on your computer or are using a Domain Name System (DNS), you can
also enter the DNS name of the print server. As the print server supports TCP/IP and NetBIOS names,
you can also enter the NetBIOS name of the print server. The NetBIOS name can be seen in the Network
Configuration Report. (To learn how to print the Network Configuration Report, see Printing the Printer
Settings Page (For HL-5450DN(T)) uu page 29 or Printing the Network Configuration Report (For other
models) uu page 29.) The NetBIOS name assigned is the first 15 characters of the node name, and by
default it will appear as “BRNxxxxxxxxxxxx” for a wired network or “BRWxxxxxxxxxxxx” for a wireless
network. (“xxxxxxxxxxxx” is your machine’s MAC Address / Ethernet Address.)
f When you click Next, Windows
with the URL that you specified.
®
7, Windows Vista® and Windows Server® 2008 will make a connection
If the printer driver has already been installed:
You will see the printer selection screen in the Add Printer Wizard. Click OK.
®
If the appropriate printer driver is already installed on your computer, Windows
®
and Windows Server
you wish to make the driver the default printer, after which the Driver installation wizard will complete.
You are now ready to print.
Go to step k.
2008 will automatically use that driver. In this case, you will simply be asked if
7, Windows Vista®
23
Page 28

Printing documents securely using SSL
4
Note
If the printer driver has NOT been installed:
One of the benefits of the IPP printing protocol is that it establishes the model name of the printer
when you communicate with it. After successful communication you will see the model name of the
®
printer automatically. This means that you do not need to inform Windows
®
Windows Server
Go to step g.
2008 about the type of printer driver to be used.
7, Windows Vista® and
g If your machine is not in the list of supported printers, click Have Disk. You will then be asked to insert
the driver disk.
h Click Browse and choose the appropriate Brother printer driver that is contained on the CD-ROM or in
the network share. Click Open.
i Click OK.
j Specify the model name of the machine. Click OK.
• When the User Account Control screen appears, click Continue.
• If the printer driver that you are installing does not have a Digital Certificate you will see a warning
message. Click Install this driver software anyway to continue with the installation. The
Add Printer Wizard will then complete.
k You will see the Type a printer name screen in the Add Printer Wizard. Check the
Set as the default printer check box if you want to use this machine as the default printer, and then click
Next.
l To test the printer connection, click Print a test page, and then click Finish. The machine is now
configured and ready to print.
24
Page 29

5
Note
Sending or Receiving (for DCP and MFC
5
models) an E-mail securely
Configuration using Web Based Management (web browser) 5
You can configure secured E-mail sending with user authentication or E-mail sending and receiving (for DCP
and MFC models) using SSL/TLS on the Web Based Management screen.
a Start your web browser.
b Type “http://machine’s IP address/” into your browser (where “machine’s IP address” is the machine’s IP
address).
For example:
http://192.168.1.2/
c No password is required by default. Enter a password if you have set one and press .
d Click Network.
e Click Protocol.
f Click Advanced Setting of POP3/SMTP and make sure that the status of POP3/SMTP is Enabled.
5
g You can configure the POP3/SMTP settings on this page.
• For more information, see the Help text in Web Based Management.
• You can also confirm whether the E-mail settings are correct after configuration by sending a test E-mail.
• If you do not know the POP3/SMTP server settings, please contact your system administrator or ISP
(Internet Service Provider) for details.
h After configuring, click Submit. The Test E-mail Send Configuration or
Test E-mail Send/Receive Configuration screen appears.
i Follow the instructions on-screen if you want to test with the current settings.
25
Page 30

Sending or Receiving (for DCP and MFC models) an E-mail securely
5
Sending or Receiving (for DCP and MFC models) an E-mail securely using SSL/TLS 5
This machine supports SSL/TLS methods to send or receive (for DCP and MFC models) an E-mail via an
E-mail server that requires secure SSL/TLS communication. To send or receive E-mail via an E-mail server
that is using SSL/TLS communication, you must configure SMTP over SSL/TLS or POP3 over SSL/TLS
correctly.
Verifying Server Certificate
If you choose SSL or TLS for SMTP over SSL/TLS or POP3 over SSL/TLS, the
Verify Server Certificate check box will be automatically checked to verify the Server Certificate.
• Before you verify the Server Certificate, you must import the CA certificate that has been issued by the
CA that signed the Server Certificate. Contact your network administrator or your ISP (Internet Service
Provider) whether a CA certificate import is necessary. For importing the certificate, see Import and
export a CA certificate uu page 18.
• If you do not need to verify the Server Certificate, uncheck Verify Server Certificate.
Port Number
If you choose SSL or TLS, the SMTP Port or POP3 Port value will be changed to match the protocol. If
you want to change the port number manually, enter the port number after you choose
SMTP over SSL/TLS or POP3 over SSL/TLS.
You must configure the POP3/SMTP communication method to match the E-mail server. For details of the
E-mail server settings, contact your network administrator or ISP (Internet Service Provider). In most
cases, the secured webmail services require the following settings:
• SMTP
• SMTP Port: 587
• SMTP Server Authentication Method: SMTP-AUTH
• SMTP over SSL/TLS: TLS
• POP3
• POP3 Port: 995
• POP3 over SSL/TLS: SSL
26
Page 31

6
6
Troubleshooting 6
Overview 6
This chapter explains how to resolve typical network problems you may encounter when using the Brother
machine. If, after reading this chapter, you are unable to resolve your problem, please visit the Brother
Solutions Center at: (http://solutions.brother.com/)
.
Please go to the Brother Solutions Center at (http://solutions.brother.com/)
page to download the other manuals.
and click Manuals on your model
Identifying your problem 6
Make sure that the following items are configured before reading this chapter.
First check the following:
The power cord is connected properly and the Brother machine is turned on.
All protective packaging has been removed from the machine.
The toner cartridges and drum unit are installed properly.
The front and back covers are fully closed.
Paper is inserted properly in the paper tray.
The machine is connected to the network properly.
Go to the page for your solution from the lists below 6
I cannot print the document over the internet using IPPS.
See I cannot print the document over the internet using IPPS. uu page 28.
I want to check my network devices are working properly.
See I want to check my network devices are working properly. uu page 28.
27
Page 32

Troubleshooting
6
I cannot print the document over the internet using IPPS.
Question Solution
I cannot communicate with my
Brother machine using SSL.
Obtain valid certificate and install on both your machine and computer again.
Make sure the port setting of your machine is correct. You can confirm your
machine’s port setting on the Web Based Management screen, by clicking
Network, Protocol and then HTTP Server Settings.
I want to check my network devices are working properly.
Question Solution
Is your Brother machine
turned on?
Where can I find my Brother
machine's network settings,
such as IP address?
Make sure you have confirmed all instructions in First check the following:
uu page 27.
Print the Network Configuration Report. See Printing the Printer Settings Page (For
HL-5450DN(T)) uu page 29 or Printing the Network Configuration Report (For
other models) uu page 29.
28
Page 33

Troubleshooting
6
Note
Note
Printing the Printer Settings Page (For HL-5450DN(T)) 6
Node name: The Node name appears on the Network Configuration Report. The default node name is
“BRNxxxxxxxxxxxx”. (“xxxxxxxxxxxx” is your machine’s MAC Address / Ethernet Address.)
The Printer Settings Page prints a report listing all the current printer settings including the network print
server settings.
You can print the Printer Settings Page using the Go button on the machine.
a Make sure that the front cover is closed and the power cord is plugged in.
b Turn on the machine and wait until the machine is in the Ready state.
c Press Go three times within 2 seconds. The machine will print the current Printer Settings Page.
Printing the Network Configuration Report (For other models)6
Node name: The Node name appears on the Network Configuration Report. The default node name is
“BRNxxxxxxxxxxxx” for a wired network or “BRWxxxxxxxxxxxx” for a wireless network. (“xxxxxxxxxxxx” is
your machine’s MAC Address / Ethernet Address.)
The Network Configuration Report prints a report listing all the current network configuration including the
network print server settings.
For HL-5470DW(T) and HL-6180DW(T)
a Press a or b to choose Machine Info..
Press OK.
b Press a or b to choose Print NetSetting.
Press OK.
6
29
Page 34

Troubleshooting
6
Note
For DCP-8110DN, DCP-8150DN, DCP-8155DN, MFC-8510DN, MFC-8710DW, MFC-8810DW and
MFC-8910DW 6
a Press Menu.
b (For MFC models) Press a or b to choose Print Reports.
(For DCP models) Press a or b to choose Machine Info..
Press OK.
c Press a or b to choose Network Config.
Press OK.
d Press Start.
For DCP-8250DN and MFC-8950DW(T) 6
a Press Menu.
b Press a or b to display Print Reports and then press Print Reports.
c Press Network Config.
d Press Start.
If the IP Address on the Network Configuration Report shows 0.0.0.0, wait for one minute and try again.
30
Page 35

Troubleshooting
6
Network terms and concepts 6
SSL technical overview 6
Secure Socket Layer (SSL) is a method for protecting transport layer data sent over a local or wide area
network by using the Internet Printing Protocol (IPP), to prevent unauthorised users being able to read them.
It achieves this by using authentication protocols in the form of digital keys, of which there are 2:
A public key – known by everyone who is printing.
A private key – known only by the machine used to decrypt packets and make them readable again by the
machine.
The public key uses either 1024bit or 2048bit encryption and is contained inside a digital certificate. These
certificates can either be self signed or approved by a Certificate Authority (CA).
First, there are three different keys, Private, Public and Shared.
The Private key, known only to the machine, is associated with the Public key but not contained within the
client's (sender's) digital certificate. When the user first establishes the connection, the machine will send the
Public key with the certificate. The client PC trusts that the Public key is from the machine with the certificate.
The client generates the Shared key, and encodes it with the Public key, then sends to the machine. The
machine encodes the Shared key with the Private key. Now the machine and client share the Shared key
safely, and establish the safe connection for print data transfers.
The print data is encoded and decoded with the Shared key.
SSL will not stop unauthorised users from accessing packets, however, it will make them unreadable without
the private key, which is not disclosed to anyone apart from the machine.
It can be configured on both wired and wireless networks and will work with other forms of security such as
WPA keys and firewalls, given the appropriate configuration.
31
Page 36

Troubleshooting
6
Network terms 6
Secure Socket Layer (SSL)
The security communication protocol encrypts data to prevent security threats.
Internet Printing Protocol (IPP)
IPP is a standard printing protocol used for managing and administering print jobs. It can be used both
locally and globally so anyone in the world can print to the same machine.
IPPS
The version of the printing protocol Internet Printing Protocol (IPP Version 1.0) that uses SSL.
HTTPS
The version of the internet protocol Hyper text Transfer Protocol (HTTP) that uses SSL.
CA (Certificate Authority)
A CA is an entity that issues digital certificates (especially X.509 certificates) and vouches for the binding
between the data items in a certificate.
CSR (Certificate Signing Request)
A CSR is a message sent from an applicant to a CA in order to apply for issue of a certificate. The CSR
contains information identifying the applicant, the public key generated by the applicant and the digital
signature of the applicant.
Certificate
A Certificate is the information that binds together a public key with an identity. The certificate can be used
to verify that a public key belongs to an individual. The format is defined by the x.509 standard.
Public key cryptosystem
A Public key cryptosystem is a modern branch of cryptography in which the algorithms employ a pair of
keys (a public key and a private key) and use a different component of the pair for different steps of the
algorithm.
Shared key cryptosystem
A Shared key cryptosystem is a branch of cryptography involving algorithms that use the same key for two
different steps of the algorithm (such as encryption and decryption).
32
 Loading...