

Page 1

53-1000610-01
Publication Date: 10/10/07
Fabric Manager
Administrator’s Guide
Supporting Fabric Manager 5.4.0
Supporting Fabric OS 6.0.0
Page 2

Copyright © 2006-2007 Brocade Communications Systems, Inc. All Rights Reserved.
Brocade, the Brocade B-weave logo, Fabric OS, File Lifecycle Manager, MyView, SilkWorm, and StorageX are registered
trademarks and the Brocade B-wing symbol, SAN Health, and Tapestry are trademarks of Brocade Communications Systems,
Inc., in the United States and/or in other countries. FICON is a registered trademark of IBM Corporation in the U.S. and other
countries. All other brands, products, or service names are or may be trademarks or service marks of, and are used to identify,
products or services of their respective owners.
Notice: This document is for informational purposes only and does not set forth any warranty, expressed or implied, concerning
any equipment, equipment feature, or service offered or to be offered by Brocade. Brocade reserves the right to make changes to
this document at any time, without notice, and assumes no responsibility for its use. This informational document describes
features that may not be currently available. Contact a Brocade sales office for information on feature and product availability.
Export of technical data contained in this document may require an export license from the United States government.
The authors and Brocade Communications Systems, Inc. shall have no liability or responsibility to any person or entity with
respect to any loss, cost, liability, or damages arising from the information contained in this book or the computer programs that
accompany it.
The product described by this document may contain “open source” software covered by the GNU General Public License or other
open source license agreements. To find-out which open source software is included in Brocade products, view the licensing
terms applicable to the open source software, and obtain a copy of the programming source code, please visit
http://www.brocade.com/support/oscd.
Brocade Communications Systems, Incorporated
Corporate Headquarters
Brocade Communications Systems, Inc.
1745 Technology Drive
San Jose, CA 95110
Tel: 1-408-333-8000
Fax: 1-408-333-8101
Email: info@brocade.com
European and Latin American Headquarters
Brocade Communications Switzerland Sàrl
Centre Swissair
Tour A - 2ème étage
29, Route de l'Aéroport
Case Postale 105
CH-1215 Genève 15
Switzerland
Tel: +41 22 799 56 40
Fax: +41 22 799 56 41
Email: emea-info@brocade.com
Asia-Pacific Headquarters
Brocade Communications Singapore Pte. Ltd.
9 Raffles Place
#59-02 Republic Plaza 1
Singapore 048619
Tel: +65-6538-4700
Fax: +65-6538-0302
Email: apac-info@brocade.com
Document History
\
Title Publication number Summary of changes Date
Brocade Fabric Manager User’s
Guide, v3.0
Brocade Fabric Manager User’s
Guide, v4.0
Brocade Fabric Manager User’s
Guide, v4.1.0
Brocade Fabric Manager User’s
Guide, v4.1.1
Fabric Manager User’s Guide 53-0000823-06 Updated to include switch specific information. March 2004
53-0000204-01 N/A October 2001
53-0000823-02 N/A April 2003
53-0000823-04 N/A September
2003
53-0000823-05 Editorial & structural changes, aligned
information with online help information,
December
2003
updated Call Home feature information,
updated link icons, additional troubleshooting
information.
Page 3

Title Publication number Summary of changes Date
Fabric Manager User’s Guide 53-0000823-07 Editorial & structural changes, included new
feature support since Fabric Manager 4.1.1,
updated graphics, updated troubleshooting
information.
Fabric Manager User’s Guide 53-0000823-08 Editorial & structural changes, device node
and device port name support, and minor
adjustment for database change.
Fabric Manager User’s Guide 53-0000823-09 Editorial & structural changes, added support
for SilkWorm 4100, 4 Gbit/sec support, and
end-to-end performance monitoring; also
revised installation, firmware download, fabric
merge, admin password on multiple switches,
and enable security sections.
Fabric Manager Administrator’s
Guide
53-0000823-10 Editorial & structural changes, including new
feature support; also revised installation and
overview sections and book title.
Fabric Manager Administrator’s
Guide
53-1000042-01 Added support for SilkWorm 4900, 7500, and
FR4-18i port blade; added support for Fabric
OS v5.1.0 features, such as FCIP Tunneling
and FC-FC Routing Service.
Fabric Manager Administrator’s
Guide
53-1000196-01 Added support for FR4-16IP port blade; added
support for Fabric OS v5.2.0 features, such as
Admin Domains and iSCSI; added offline
zoning. Revised Fabric Manager client
information throughout.
Fabric Manager Administrator’s
Guide
53-1000443-01 Rebranded; added new features for 5.3.0
release such as Access Gateway visibility,
MetaSAN View, FCIP tunneling; improved
scalability, updated screens.
Fabric Manager Administrator’s
Guide
53-1000610-01, Added information for newly supported
feautres in v5.4 features such as ICL support,
IPv6 support, VLAN Tag support, FICON
Emulation parameters support, and updated
screens.
May 2004
July 2004
October 2004
April 2005
February 2006
October 2006
March 2007
October 2007
Fabric Manager Administrator’s Guide iii
53-1000610-01
Page 4

iv Fabric Manager Administrator’s Guide
53-1000610-01
Page 5

Contents
About This Document
In this chapter . . . . . . . . . . . . . . . . . . . . . . . . . . . . . . . . . . . . . . . . . . . xix
How this document is organized . . . . . . . . . . . . . . . . . . . . . . . . . . . . xix
Supported hardware and software . . . . . . . . . . . . . . . . . . . . . . . . . . xxi
What’s new in this document. . . . . . . . . . . . . . . . . . . . . . . . . . . . . . .xxii
Document conventions. . . . . . . . . . . . . . . . . . . . . . . . . . . . . . . . . . . .xxii
Additional information. . . . . . . . . . . . . . . . . . . . . . . . . . . . . . . . . . . . xxiii
Getting technical help. . . . . . . . . . . . . . . . . . . . . . . . . . . . . . . . . . . . xxiv
Document feedback . . . . . . . . . . . . . . . . . . . . . . . . . . . . . . . . . . . . . .xxv
Chapter 1 Introducing Fabric Manager
In this chapter . . . . . . . . . . . . . . . . . . . . . . . . . . . . . . . . . . . . . . . . . . . . 1
Overview of Fabric Manager. . . . . . . . . . . . . . . . . . . . . . . . . . . . . . . . . 1
Browser and platform requirements . . . . . . . . . . . . . . . . . . . . . . . . . . 2
System requirements . . . . . . . . . . . . . . . . . . . . . . . . . . . . . . . . . . . . . . 4
Fabric and switch access . . . . . . . . . . . . . . . . . . . . . . . . . . . . . . . . . . . 5
Administrative Domains . . . . . . . . . . . . . . . . . . . . . . . . . . . . . . . . 6
Role-Based Access Control . . . . . . . . . . . . . . . . . . . . . . . . . . . . . . 7
Chapter 2 Installation
In this chapter . . . . . . . . . . . . . . . . . . . . . . . . . . . . . . . . . . . . . . . . . . . . 9
Planning for the installation . . . . . . . . . . . . . . . . . . . . . . . . . . . . . . . . . 9
Installation and troubleshooting information. . . . . . . . . . . . . . . 10
Upgrading Fabric Manager . . . . . . . . . . . . . . . . . . . . . . . . . . . . . . . . .15
License keys. . . . . . . . . . . . . . . . . . . . . . . . . . . . . . . . . . . . . . . . .15
Upgrading from the evaluation version . . . . . . . . . . . . . . . . . . .15
Installing the Fabric Manager server . . . . . . . . . . . . . . . . . . . . . . . . .16
Installing Fabric Manager server on Windows. . . . . . . . . . . . . . 16
Installing Fabric Manager server on Solaris. . . . . . . . . . . . . . . . 23
Installing Fabric Manager server on Linux . . . . . . . . . . . . . . . . . 26
Copying an installation from server to server . . . . . . . . . . . . . . . . . .29
Uninstalling the Fabric Manager server. . . . . . . . . . . . . . . . . . . . . . . 31
Fabric Manager Administrator’s Guide v
53-1000610-01
Page 6

Chapter 3 Fabric Manager Client
In this chapter . . . . . . . . . . . . . . . . . . . . . . . . . . . . . . . . . . . . . . . . . . .35
Launching Fabric Manager. . . . . . . . . . . . . . . . . . . . . . . . . . . . . . . . . 35
Notes on logging in to a switch . . . . . . . . . . . . . . . . . . . . . . . . . .38
Uninstalling the Fabric Manager client . . . . . . . . . . . . . . . . . . . . . . .39
Understanding the Fabric Manager layout . . . . . . . . . . . . . . . . . . . . 40
Scope panel . . . . . . . . . . . . . . . . . . . . . . . . . . . . . . . . . . . . . . . . . 41
View panel . . . . . . . . . . . . . . . . . . . . . . . . . . . . . . . . . . . . . . . . . . 42
Task panel . . . . . . . . . . . . . . . . . . . . . . . . . . . . . . . . . . . . . . . . . .45
Information panel. . . . . . . . . . . . . . . . . . . . . . . . . . . . . . . . . . . . . 46
Menu bar . . . . . . . . . . . . . . . . . . . . . . . . . . . . . . . . . . . . . . . . . . . 48
Status indicators . . . . . . . . . . . . . . . . . . . . . . . . . . . . . . . . . . . . .49
Refreshing the window . . . . . . . . . . . . . . . . . . . . . . . . . . . . . . . .50
Selecting elements and accessing modules . . . . . . . . . . . . . . . 51
Customizing Fabric Manager . . . . . . . . . . . . . . . . . . . . . . . . . . . . . . .52
Displaying fabrics by IP address, domain ID, WWN, and name 52
Customizing tables. . . . . . . . . . . . . . . . . . . . . . . . . . . . . . . . . . . .52
Filtering elements in a table . . . . . . . . . . . . . . . . . . . . . . . . . . . .55
Customizing tool tips . . . . . . . . . . . . . . . . . . . . . . . . . . . . . . . . . . 56
Resizing panels . . . . . . . . . . . . . . . . . . . . . . . . . . . . . . . . . . . . . . 56
Resetting to Default Values. . . . . . . . . . . . . . . . . . . . . . . . . . . . . 57
Configuring SSH . . . . . . . . . . . . . . . . . . . . . . . . . . . . . . . . . . . . . . 57
Configuring Event Options . . . . . . . . . . . . . . . . . . . . . . . . . . . . . . . . . 58
Chapter 4 Discovering and Customizing Fabrics
In this chapter . . . . . . . . . . . . . . . . . . . . . . . . . . . . . . . . . . . . . . . . . . .61
Discovering a fabric. . . . . . . . . . . . . . . . . . . . . . . . . . . . . . . . . . . . . . . 61
About FCS Policy and seed switches . . . . . . . . . . . . . . . . . . . . .62
Discovering a single fabric . . . . . . . . . . . . . . . . . . . . . . . . . . . . .62
Discovering multiple fabrics (subnet scan) . . . . . . . . . . . . . . . .63
Logging in to multiple switches simultaneously . . . . . . . . . . . . . . . .65
Monitoring fabrics . . . . . . . . . . . . . . . . . . . . . . . . . . . . . . . . . . . . . . . .67
Changing the seed switch. . . . . . . . . . . . . . . . . . . . . . . . . . . . . . . . . .68
Deleting a fabric from Fabric Manager . . . . . . . . . . . . . . . . . . . . . . .70
vi Fabric Manager Administrator’s Guide
53-1000610-01
Page 7

Renaming fabric components . . . . . . . . . . . . . . . . . . . . . . . . . . . . . . 71
Renaming a fabric . . . . . . . . . . . . . . . . . . . . . . . . . . . . . . . . . . . . 71
Renaming a switch. . . . . . . . . . . . . . . . . . . . . . . . . . . . . . . . . . . . 71
Renaming a port . . . . . . . . . . . . . . . . . . . . . . . . . . . . . . . . . . . . . 72
Renaming a device . . . . . . . . . . . . . . . . . . . . . . . . . . . . . . . . . . .72
Importing device names . . . . . . . . . . . . . . . . . . . . . . . . . . . . . . . 73
Working with switch and port groups. . . . . . . . . . . . . . . . . . . . . . . . .75
Understanding the groups view . . . . . . . . . . . . . . . . . . . . . . . . . 76
Creating and populating switch groups . . . . . . . . . . . . . . . . . . . 77
Editing a switch group . . . . . . . . . . . . . . . . . . . . . . . . . . . . . . . . . 79
Creating port groups . . . . . . . . . . . . . . . . . . . . . . . . . . . . . . . . . .80
Editing a port group . . . . . . . . . . . . . . . . . . . . . . . . . . . . . . . . . . . 81
Deleting a switch or port group. . . . . . . . . . . . . . . . . . . . . . . . . .81
Chapter 5 Viewing Fabric Topologies
In this chapter . . . . . . . . . . . . . . . . . . . . . . . . . . . . . . . . . . . . . . . . . . .83
Understanding the View panel . . . . . . . . . . . . . . . . . . . . . . . . . . . . . .83
View panel toolbar items . . . . . . . . . . . . . . . . . . . . . . . . . . . . . . .84
Viewing tool tips . . . . . . . . . . . . . . . . . . . . . . . . . . . . . . . . . . . . . . 85
Selecting items in the topology. . . . . . . . . . . . . . . . . . . . . . . . . .85
Changing the layout. . . . . . . . . . . . . . . . . . . . . . . . . . . . . . . . . . .86
Saving view preferences . . . . . . . . . . . . . . . . . . . . . . . . . . . . . . .86
Topology views. . . . . . . . . . . . . . . . . . . . . . . . . . . . . . . . . . . . . . . . . . .86
Displaying monitored fabrics. . . . . . . . . . . . . . . . . . . . . . . . . . . . 87
Displaying backbone and edge fabrics. . . . . . . . . . . . . . . . . . . . 87
Displaying switch interconnectivity. . . . . . . . . . . . . . . . . . . . . . . 88
Displaying attached devices . . . . . . . . . . . . . . . . . . . . . . . . . . . .88
Displaying zone configurations . . . . . . . . . . . . . . . . . . . . . . . . . .89
Viewing link information . . . . . . . . . . . . . . . . . . . . . . . . . . . . . . . . . . .90
Chapter 6 Displaying Name Server Information
Chapter 7 Monitoring Alerts and Events
In this chapter . . . . . . . . . . . . . . . . . . . . . . . . . . . . . . . . . . . . . . . . . . .95
Fabric Manager Administrator’s Guide vii
53-1000610-01
Page 8

Monitoring Alerts. . . . . . . . . . . . . . . . . . . . . . . . . . . . . . . . . . . . . . . . .95
Viewing alerts . . . . . . . . . . . . . . . . . . . . . . . . . . . . . . . . . . . . . . . .95
Identifying alerts . . . . . . . . . . . . . . . . . . . . . . . . . . . . . . . . . . . . .96
Filtering alerts . . . . . . . . . . . . . . . . . . . . . . . . . . . . . . . . . . . . . .100
Acknowledging alerts. . . . . . . . . . . . . . . . . . . . . . . . . . . . . . . . .101
Resolving alerts . . . . . . . . . . . . . . . . . . . . . . . . . . . . . . . . . . . . .102
Deleting alerts . . . . . . . . . . . . . . . . . . . . . . . . . . . . . . . . . . . . . .102
Configuring alert display options . . . . . . . . . . . . . . . . . . . . . . .103
Monitoring fabric events . . . . . . . . . . . . . . . . . . . . . . . . . . . . . . . . . .104
Viewing fabric events . . . . . . . . . . . . . . . . . . . . . . . . . . . . . . . . .104
Viewing all events. . . . . . . . . . . . . . . . . . . . . . . . . . . . . . . . . . . .106
Filtering fabric events . . . . . . . . . . . . . . . . . . . . . . . . . . . . . . . .107
Configuring notification parameters . . . . . . . . . . . . . . . . . . . . . . . .108
Chapter 8 Using Performance Monitoring
In this chapter . . . . . . . . . . . . . . . . . . . . . . . . . . . . . . . . . . . . . . . . . .111
Overview of performance monitoring in Fabric Manager . . . . . . . .111
Performance monitoring components. . . . . . . . . . . . . . . . . . . . . . .112
Configuring port data collection and alerts. . . . . . . . . . . . . . . . . . .116
Enabling end-to-end monitoring. . . . . . . . . . . . . . . . . . . . . . . . . . . .118
Disabling performance monitoring . . . . . . . . . . . . . . . . . . . . . . . . .119
Generating custom reports and graphs . . . . . . . . . . . . . . . . . . . . .121
Creating custom reports . . . . . . . . . . . . . . . . . . . . . . . . . . . . . .121
Creating real time graphs . . . . . . . . . . . . . . . . . . . . . . . . . . . . .124
Creating and using report templates. . . . . . . . . . . . . . . . . . . . . . . .125
Creating templates for reports and graphs . . . . . . . . . . . . . . .126
Generating reports and graphs from templates . . . . . . . . . . .129
Saving Performance Monitor reports. . . . . . . . . . . . . . . . . . . . . . . .130
Printing Performance Monitor reports. . . . . . . . . . . . . . . . . . . . . . .130
Exporting reports. . . . . . . . . . . . . . . . . . . . . . . . . . . . . . . . . . . . . . . .130
Displaying saved reports and graphs . . . . . . . . . . . . . . . . . . . . . . .131
Deleting reports and graphs. . . . . . . . . . . . . . . . . . . . . . . . . . . . . . .132
Editing End-to-End Monitoring graphs . . . . . . . . . . . . . . . . . . . . . . .132
Displaying End-to-End Monitor reports in external applications . .133
Chapter 9 Change Management
In this chapter . . . . . . . . . . . . . . . . . . . . . . . . . . . . . . . . . . . . . . . . . .135
viii Fabric Manager Administrator’s Guide
53-1000610-01
Page 9

Overview of change management . . . . . . . . . . . . . . . . . . . . . . . . . .135
Using change management profiles . . . . . . . . . . . . . . . . . . . . . . . .136
Creating a profile . . . . . . . . . . . . . . . . . . . . . . . . . . . . . . . . . . . .138
Cloning a profile . . . . . . . . . . . . . . . . . . . . . . . . . . . . . . . . . . . . .139
Editing a profile . . . . . . . . . . . . . . . . . . . . . . . . . . . . . . . . . . . . .139
Deleting a profile . . . . . . . . . . . . . . . . . . . . . . . . . . . . . . . . . . . .140
Using snapshots and change reports . . . . . . . . . . . . . . . . . . . . . . .140
Displaying a change report . . . . . . . . . . . . . . . . . . . . . . . . . . . . 141
Creating snapshots on demand . . . . . . . . . . . . . . . . . . . . . . . .142
Comparing snapshots . . . . . . . . . . . . . . . . . . . . . . . . . . . . . . . .143
Exporting snapshot and change reports . . . . . . . . . . . . . . . . .143
Exporting switch configuration information . . . . . . . . . . . . . . .143
Displaying change reports in external applications. . . . . . . . .144
Printing snapshot and change reports . . . . . . . . . . . . . . . . . . .145
Changing baseline snapshot. . . . . . . . . . . . . . . . . . . . . . . . . . .145
Chapter 10 Call Home Support
In this chapter . . . . . . . . . . . . . . . . . . . . . . . . . . . . . . . . . . . . . . . . . .147
About call home. . . . . . . . . . . . . . . . . . . . . . . . . . . . . . . . . . . . . . . . .147
Call home e-mail messages . . . . . . . . . . . . . . . . . . . . . . . . . . .148
Call home external executable . . . . . . . . . . . . . . . . . . . . . . . . .148
Call home modem support . . . . . . . . . . . . . . . . . . . . . . . . . . . .149
Configuring call home . . . . . . . . . . . . . . . . . . . . . . . . . . . . . . . . . . . .149
Editing configurations . . . . . . . . . . . . . . . . . . . . . . . . . . . . . . . . . . . .153
Enabling or disabling call home globally . . . . . . . . . . . . . . . . . . . . .154
Monitoring call home . . . . . . . . . . . . . . . . . . . . . . . . . . . . . . . . . . . .154
Chapter 11 Switch Configuration and Management
In this chapter . . . . . . . . . . . . . . . . . . . . . . . . . . . . . . . . . . . . . . . . . .157
Viewing switch information. . . . . . . . . . . . . . . . . . . . . . . . . . . . . . . .157
Viewing port information. . . . . . . . . . . . . . . . . . . . . . . . . . . . . . . . . .159
Synchronizing date and time across a fabric . . . . . . . . . . . . . . . . .161
Opening a Telnet session for a nonsecure switch. . . . . . . . . . . . . .162
Enabling and disabling switches and ports. . . . . . . . . . . . . . . . . . .162
Configuring SNMP . . . . . . . . . . . . . . . . . . . . . . . . . . . . . . . . . . . . . . .162
Configuring ports. . . . . . . . . . . . . . . . . . . . . . . . . . . . . . . . . . . . . . . .164
Swapping ports . . . . . . . . . . . . . . . . . . . . . . . . . . . . . . . . . . . . .165
Fabric Manager Administrator’s Guide ix
53-1000610-01
Page 10

Administering ISL trunking . . . . . . . . . . . . . . . . . . . . . . . . . . . . . . . .166
Administering license keys . . . . . . . . . . . . . . . . . . . . . . . . . . . . . . . .166
Exporting license keys . . . . . . . . . . . . . . . . . . . . . . . . . . . . . . . .167
Importing and restoring license keys . . . . . . . . . . . . . . . . . . . .168
Removing license keys. . . . . . . . . . . . . . . . . . . . . . . . . . . . . . . .169
Using configuration management . . . . . . . . . . . . . . . . . . . . . . . . . .170
Switch configuration backup and restore . . . . . . . . . . . . . . . . . . . .170
Viewing the configuration repository . . . . . . . . . . . . . . . . . . . . . . . . 171
Replicating configurations . . . . . . . . . . . . . . . . . . . . . . . . . . . . . . . .173
Replicating a switch SNMP configuration . . . . . . . . . . . . . . . .173
Replicating a switch Fabric Watch configuration. . . . . . . . . . . 174
Replicating an entire switch configuration. . . . . . . . . . . . . . . .175
Saving switch configuration files . . . . . . . . . . . . . . . . . . . . . . . . . . . 176
Checking the physical health of a switch . . . . . . . . . . . . . . . . . . . .177
Replacing a switch in the fabric . . . . . . . . . . . . . . . . . . . . . . . . . . . .178
Configuring Asset Polling . . . . . . . . . . . . . . . . . . . . . . . . . . . . . . . . .179
Configuring a Domain ID on a phantom switch . . . . . . . . . . . . . . .180
Chapter 12 Managing Access Gateway-moded Switches
In this chapter . . . . . . . . . . . . . . . . . . . . . . . . . . . . . . . . . . . . . . . . . .183
Introduction to Access Gateway Management . . . . . . . . . . . . . . . .183
Supported Features . . . . . . . . . . . . . . . . . . . . . . . . . . . . . . . . . . . . .183
Showing Access Gateway-moded switches . . . . . . . . . . . . . . . . . . .184
Discovering an Access Gateway switch . . . . . . . . . . . . . . . . . .184
Viewing Access Gateway moded switches . . . . . . . . . . . . . . . .184
Backing up Access Gateway-moded switches. . . . . . . . . . . . . . . . .185
Configuring an access gateway . . . . . . . . . . . . . . . . . . . . . . . . . . . .185
Performing a Firmware Download . . . . . . . . . . . . . . . . . . . . . . . . . .185
Chapter 13 Configuring Standard Security Features
In this chapter . . . . . . . . . . . . . . . . . . . . . . . . . . . . . . . . . . . . . . . . . .187
A note about security . . . . . . . . . . . . . . . . . . . . . . . . . . . . . . . . . . . .187
Managing passwords . . . . . . . . . . . . . . . . . . . . . . . . . . . . . . . . . . . .187
Enabling and disabling switch passwords . . . . . . . . . . . . . . . .187
Changing admin password on multiple switches . . . . . . . . . .188
Enabling secure communication over HTTPS . . . . . . . . . . . . . . . . .189
Managing the truststore . . . . . . . . . . . . . . . . . . . . . . . . . . . . . . . . . .190
x Fabric Manager Administrator’s Guide
53-1000610-01
Page 11

Managing Administrative Domains . . . . . . . . . . . . . . . . . . . . . . . . .190
Requirements for Admin Domains . . . . . . . . . . . . . . . . . . . . . .191
Launching the Admin Domain module . . . . . . . . . . . . . . . . . . .191
Managing Access Control Lists . . . . . . . . . . . . . . . . . . . . . . . . . . . .192
Propagating RADIUS configuration across switches. . . . . . . . . . . .193
Chapter 14 Managing the iSCSI Target Gateway
In this chapter . . . . . . . . . . . . . . . . . . . . . . . . . . . . . . . . . . . . . . . . . .197
About the iSCSI Target Gateway . . . . . . . . . . . . . . . . . . . . . . . . . . . .197
Viewing iSCSI information. . . . . . . . . . . . . . . . . . . . . . . . . . . . . . . . .198
iSCSI summary . . . . . . . . . . . . . . . . . . . . . . . . . . . . . . . . . . . . . .199
iSCSI ports . . . . . . . . . . . . . . . . . . . . . . . . . . . . . . . . . . . . . . . . .199
iSCSI initiators . . . . . . . . . . . . . . . . . . . . . . . . . . . . . . . . . . . . . .200
iSCSI targets. . . . . . . . . . . . . . . . . . . . . . . . . . . . . . . . . . . . . . . .201
Virtual initiators . . . . . . . . . . . . . . . . . . . . . . . . . . . . . . . . . . . . .201
iSCSI FC targets . . . . . . . . . . . . . . . . . . . . . . . . . . . . . . . . . . . . .202
iSCSI sessions . . . . . . . . . . . . . . . . . . . . . . . . . . . . . . . . . . . . . .203
Setting up iSCSI Target Gateway services . . . . . . . . . . . . . . . . . . . .203
Chapter 15 Firmware Management
In this chapter . . . . . . . . . . . . . . . . . . . . . . . . . . . . . . . . . . . . . . . . . .205
Determining availability of firmware-specific features . . . . . . . . . .205
Using built-in FTP server and firmware repository . . . . . . . . . . . . .207
Viewing the firmware repository . . . . . . . . . . . . . . . . . . . . . . . .207
Importing and removing firmware. . . . . . . . . . . . . . . . . . . . . . .208
Defining a fabric profile . . . . . . . . . . . . . . . . . . . . . . . . . . . . . . .209
Viewing SAN firmware versions. . . . . . . . . . . . . . . . . . . . . . . . .212
Configuring file transfer options. . . . . . . . . . . . . . . . . . . . . . . . . . . .212
Downloading firmware to multiple switches . . . . . . . . . . . . . . . . . .214
Downloading firmware with firmware repository support . . . .215
Downloading firmware using an external FTP server . . . . . . .216
Controlling firmware download reboots. . . . . . . . . . . . . . . . . . . . . .218
Downloading firmware to HBAs . . . . . . . . . . . . . . . . . . . . . . . . . . . .218
Downloading firmware to XPath OS switches . . . . . . . . . . . . . . . . .221
Accessing firmware when changing the FTP server . . . . . . . . . . . .221
Collecting FDMI device information. . . . . . . . . . . . . . . . . . . . . . . . .222
Fabric Manager Administrator’s Guide xi
53-1000610-01
Page 12

Rebooting switches. . . . . . . . . . . . . . . . . . . . . . . . . . . . . . . . . . . . . .222
Creating a reboot group with multiple switches . . . . . . . . . . .222
Creating single-switch reboot groups . . . . . . . . . . . . . . . . . . . .224
Assigning switches to a reboot group. . . . . . . . . . . . . . . . . . . .225
Performing a sequenced reboot . . . . . . . . . . . . . . . . . . . . . . . .226
Chapter 16 Managing Zones
In this chapter . . . . . . . . . . . . . . . . . . . . . . . . . . . . . . . . . . . . . . . . . .227
Introduction to zoning. . . . . . . . . . . . . . . . . . . . . . . . . . . . . . . . . . . .227
Managing zoning offline . . . . . . . . . . . . . . . . . . . . . . . . . . . . . . . . . .228
Use cases for offline zoning . . . . . . . . . . . . . . . . . . . . . . . . . . .229
Requirements for offline zoning . . . . . . . . . . . . . . . . . . . . . . . .229
Offline zone editing . . . . . . . . . . . . . . . . . . . . . . . . . . . . . . . . . .230
Managing zoning with Web Tools . . . . . . . . . . . . . . . . . . . . . . . . . . .243
Chapter 17 Fabric Watch
In this chapter . . . . . . . . . . . . . . . . . . . . . . . . . . . . . . . . . . . . . . . . . .245
Introduction to Fabric Watch . . . . . . . . . . . . . . . . . . . . . . . . . . . . . .245
Launching Fabric Watch . . . . . . . . . . . . . . . . . . . . . . . . . . . . . . . . . .245
Using Fabric Watch with Web Tools . . . . . . . . . . . . . . . . . . . . . . . . .246
Chapter 18 Managing Secure Fabrics
In this chapter . . . . . . . . . . . . . . . . . . . . . . . . . . . . . . . . . . . . . . . . . .249
Enabling secure mode . . . . . . . . . . . . . . . . . . . . . . . . . . . . . . . . . . .249
Using the Policy Editor . . . . . . . . . . . . . . . . . . . . . . . . . . . . . . . . . . .251
Configuring FCS policy options . . . . . . . . . . . . . . . . . . . . . . . . .252
Configuring SCC policy options . . . . . . . . . . . . . . . . . . . . . . . . .254
Configuring Telnet, RSNMP, WSNMP, HTTP, and API policy options
255
Configuring DCC policy options. . . . . . . . . . . . . . . . . . . . . . . . .257
Configuring SES and MS policy options . . . . . . . . . . . . . . . . . .259
Configuring Serial and Front Panel policy options. . . . . . . . . .261
Changing the admin security password . . . . . . . . . . . . . . . . . .263
Configuring No-Node WWN Zoning . . . . . . . . . . . . . . . . . . . . . .265
Adding a switch to a secure fabric. . . . . . . . . . . . . . . . . . . . . . . . . .265
Merging secure fabrics . . . . . . . . . . . . . . . . . . . . . . . . . . . . . . . . . . .266
Using Telnet on a secure fabric . . . . . . . . . . . . . . . . . . . . . . . . . . . .267
xii Fabric Manager Administrator’s Guide
53-1000610-01
Page 13

Chapter 19 FICON and CUP
In this chapter . . . . . . . . . . . . . . . . . . . . . . . . . . . . . . . . . . . . . . . . . .269
Introducing FICON and CUP . . . . . . . . . . . . . . . . . . . . . . . . . . . . . . .269
Identifying switches with FMS mode enabled. . . . . . . . . . . . . . . . .270
Editing the current port connectivity configuration . . . . . . . . . . . .270
Editing a stored port connectivity configuration . . . . . . . . . . . . . . .273
Identifying port zone conflicts . . . . . . . . . . . . . . . . . . . . . . . . . . . . . 274
Configuring Insistent Domain ID mode . . . . . . . . . . . . . . . . . . . . . . 274
Identifying ports that completed the RNID exchange . . . . . . . . . . . 276
Monitoring link incidents . . . . . . . . . . . . . . . . . . . . . . . . . . . . . . . . .277
Cascaded FICON setup. . . . . . . . . . . . . . . . . . . . . . . . . . . . . . . . . . .277
Configure a fabric for cascaded FICON . . . . . . . . . . . . . . . . . .277
Merge two fabrics for cascaded FICON . . . . . . . . . . . . . . . . . .279
Chapter 20 Managing the FC-FC Routing Service
In this chapter . . . . . . . . . . . . . . . . . . . . . . . . . . . . . . . . . . . . . . . . . .281
Requirements for Fibre Channel routing . . . . . . . . . . . . . . . . . . . . .281
About Fibre Channel routing. . . . . . . . . . . . . . . . . . . . . . . . . . . . . . .281
Setting Up FC-FC routing. . . . . . . . . . . . . . . . . . . . . . . . . . . . . . . . . .283
Connecting edge fabrics. . . . . . . . . . . . . . . . . . . . . . . . . . . . . . . . . .284
Diagnosing fabric device sharing. . . . . . . . . . . . . . . . . . . . . . . . . . .285
Sharing devices between fabrics . . . . . . . . . . . . . . . . . . . . . . . . . . .286
Displaying logical SANs and imported/exported devices. . . . . . . .288
Displaying virtual devices . . . . . . . . . . . . . . . . . . . . . . . . . . . . .289
Displaying FC Router information. . . . . . . . . . . . . . . . . . . . . . . . . . .290
Translate domains and virtual device status . . . . . . . . . . . . . . . . .291
FC-FC routing and secure fabrics. . . . . . . . . . . . . . . . . . . . . . . . . . .292
FC-FC routing and AD-enabled fabrics. . . . . . . . . . . . . . . . . . . . . . .292
Chapter 21 Using the FCIP Tunneling Service
In this chapter . . . . . . . . . . . . . . . . . . . . . . . . . . . . . . . . . . . . . . . . . .293
About FCIP Tunneling . . . . . . . . . . . . . . . . . . . . . . . . . . . . . . . . . . . .293
Viewing FCIP information . . . . . . . . . . . . . . . . . . . . . . . . . . . . . . . . .296
Configuring an FCIP tunnel. . . . . . . . . . . . . . . . . . . . . . . . . . . . . . . .298
Fabric Manager Administrator’s Guide xiii
53-1000610-01
Page 14

Managing FCIP tunnels. . . . . . . . . . . . . . . . . . . . . . . . . . . . . . . . . . .305
Viewing FCIP tunnel Information . . . . . . . . . . . . . . . . . . . . . . . .305
Modifying FCIP tunnels . . . . . . . . . . . . . . . . . . . . . . . . . . . . . . .305
Disabling and re-enabling FCIP tunnels . . . . . . . . . . . . . . . . . .306
Deleting FCIP tunnels . . . . . . . . . . . . . . . . . . . . . . . . . . . . . . . .307
Chapter 22 Configuring SYSLOG Fault Management
In this chapter . . . . . . . . . . . . . . . . . . . . . . . . . . . . . . . . . . . . . . . . . .309
About Fault Management. . . . . . . . . . . . . . . . . . . . . . . . . . . . . . . . .309
Configuring the SYSLOG destination registration . . . . . . . . . . . . . .309
Configuring the Registration Policy . . . . . . . . . . . . . . . . . . . . . . . . .310
Viewing SYSLOG status . . . . . . . . . . . . . . . . . . . . . . . . . . . . . . . . . . .311
Chapter 23 Third-Party and Foreign Device Management
In this chapter . . . . . . . . . . . . . . . . . . . . . . . . . . . . . . . . . . . . . . . . . .313
Accessing third-party management applications . . . . . . . . . . . . . . 313
Adding third-party management applications . . . . . . . . . . . . .313
Editing third-party management applications . . . . . . . . . . . . .315
Running third-party management applications . . . . . . . . . . . .316
Examples of launching applications . . . . . . . . . . . . . . . . . . . . .316
Importing device WWNs . . . . . . . . . . . . . . . . . . . . . . . . . . . . . . . . . .319
Chapter 24 Creating Reports
In this chapter . . . . . . . . . . . . . . . . . . . . . . . . . . . . . . . . . . . . . . . . . .323
Generating the SAN health report . . . . . . . . . . . . . . . . . . . . . . . . . .323
Displaying the switch health report . . . . . . . . . . . . . . . . . . . . . . . . .325
Generating the fabric summary report . . . . . . . . . . . . . . . . . . . . . .326
Generating the physical inventory report . . . . . . . . . . . . . . . . . . . .328
Chapter 25 Storing Data and Performing Backups
In this chapter . . . . . . . . . . . . . . . . . . . . . . . . . . . . . . . . . . . . . . . . . .329
Data persistence . . . . . . . . . . . . . . . . . . . . . . . . . . . . . . . . . . . . . . . .329
Performing backups . . . . . . . . . . . . . . . . . . . . . . . . . . . . . . . . . . . . .329
Full backup . . . . . . . . . . . . . . . . . . . . . . . . . . . . . . . . . . . . . . . . .329
Incremental backup. . . . . . . . . . . . . . . . . . . . . . . . . . . . . . . . . .330
Chapter 26 Server Management Console
In this chapter . . . . . . . . . . . . . . . . . . . . . . . . . . . . . . . . . . . . . . . . . .333
xiv Fabric Manager Administrator’s Guide
53-1000610-01
Page 15

Introduction to Server Management Console . . . . . . . . . . . . . . . . .333
Launching the Server Management Console . . . . . . . . . . . . . . . . .334
Managing Fabric Manager services. . . . . . . . . . . . . . . . . . . . . . . . .334
Changing authentication information . . . . . . . . . . . . . . . . . . . . . . .335
Backing up and restoring the database . . . . . . . . . . . . . . . . . . . . .337
Capturing technical support information. . . . . . . . . . . . . . . . . . . . .338
Creating a login banner . . . . . . . . . . . . . . . . . . . . . . . . . . . . . . . . . .339
Changing secure communication settings (HTTP or HTTPS) . . . . .340
Changing the Web Server port numbers . . . . . . . . . . . . . . . . . . . . .342
Changing the SYSLOG listening port . . . . . . . . . . . . . . . . . . . . . . . .343
Chapter 27 Fabric Troubleshooting Tools
In this chapter . . . . . . . . . . . . . . . . . . . . . . . . . . . . . . . . . . . . . . . . . .345
General device diagnostics . . . . . . . . . . . . . . . . . . . . . . . . . . . . . . .345
Fabric merge check. . . . . . . . . . . . . . . . . . . . . . . . . . . . . . . . . . . . . .346
Merge Resolve Failures . . . . . . . . . . . . . . . . . . . . . . . . . . . . . . . . . .350
Between non-secure fabrics . . . . . . . . . . . . . . . . . . . . . . . . . . .350
Between secure and nonsecure fabrics. . . . . . . . . . . . . . . . . .351
Event message severity level . . . . . . . . . . . . . . . . . . . . . . . . . . . . . .352
Trace route. . . . . . . . . . . . . . . . . . . . . . . . . . . . . . . . . . . . . . . . . . . . .352
Appendix A Troubleshooting
In this chapter . . . . . . . . . . . . . . . . . . . . . . . . . . . . . . . . . . . . . . . . . .357
Capturing Fabric Manager support information . . . . . . . . . . . . . . .357
Checking the client side . . . . . . . . . . . . . . . . . . . . . . . . . . . . . . . . . .359
Authentication issues (unable to log in). . . . . . . . . . . . . . . . . .359
Client access to switches . . . . . . . . . . . . . . . . . . . . . . . . . . . . .361
Client-side CPU usage . . . . . . . . . . . . . . . . . . . . . . . . . . . . . . . .361
Capturing/reporting client-side issues . . . . . . . . . . . . . . . . . . .361
Client log overwritten. . . . . . . . . . . . . . . . . . . . . . . . . . . . . . . . .361
Checking client/server interaction. . . . . . . . . . . . . . . . . . . . . . . . . .361
No client/server interaction . . . . . . . . . . . . . . . . . . . . . . . . . . .361
Client/server version mismatch . . . . . . . . . . . . . . . . . . . . . . . .362
Determine whether client or server problem. . . . . . . . . . . . . .362
Switch connection failure when firmware download is performed with
SSL enabled in Fabric Manager . . . . . . . . . . . . . . . . . . . . . . . .362
Fabric Manager Administrator’s Guide xv
53-1000610-01
Page 16

Checking the server side . . . . . . . . . . . . . . . . . . . . . . . . . . . . . . . . .362
Server cannot access switches. . . . . . . . . . . . . . . . . . . . . . . . .363
Server-side CPU usage . . . . . . . . . . . . . . . . . . . . . . . . . . . . . . .363
Statistics not collected . . . . . . . . . . . . . . . . . . . . . . . . . . . . . . .363
Capturing/reporting server-side issues . . . . . . . . . . . . . . . . . .363
Server IP interface configuration in a multihome server environment
363
Checking fabric discovery problems . . . . . . . . . . . . . . . . . . . . . . . .364
Capturing supportShow and supportSave output . . . . . . . . . . . . .365
Topology. . . . . . . . . . . . . . . . . . . . . . . . . . . . . . . . . . . . . . . . . . . . . . .366
Nodes swapped with another switch node . . . . . . . . . . . . . . .367
Lettering in legend unreadable when printed . . . . . . . . . . . . .367
Links do not reconfigure after disruptive failover . . . . . . . . . .367
Nodes Overlap . . . . . . . . . . . . . . . . . . . . . . . . . . . . . . . . . . . . . .367
Pinpointing additional problem areas . . . . . . . . . . . . . . . . . . . . . . .367
Locating Fabric Manager license key and serial number . . . .368
Switches and hosts do not recognize HBA after firmware download to
HBA . . . . . . . . . . . . . . . . . . . . . . . . . . . . . . . . . . . . . . . . . . . . . . .368
503 Service Unavailable/Overloaded error . . . . . . . . . . . . . . .368
Installation wizard . . . . . . . . . . . . . . . . . . . . . . . . . . . . . . . . . . .368
Services not starting after upgrade . . . . . . . . . . . . . . . . . . . . .368
Uninstallation of an upgraded Fabric Manager installation hangs369
Fabric Manager client does not start . . . . . . . . . . . . . . . . . . . .369
Web Tools pages do not launch . . . . . . . . . . . . . . . . . . . . . . . .370
Wizard hangs . . . . . . . . . . . . . . . . . . . . . . . . . . . . . . . . . . . . . . .370
Performance monitoring . . . . . . . . . . . . . . . . . . . . . . . . . . . . . .370
Fabric Manager database file is too large . . . . . . . . . . . . . . . . 371
Sequenced reboot does not show correct status . . . . . . . . . .371
Stopping Fabric Manager server on Solaris and Linux . . . . . . 371
Changing printers in Fabric Manager . . . . . . . . . . . . . . . . . . . . 371
Changing the time in Fabric Manager . . . . . . . . . . . . . . . . . . . 371
ODBC driver installer error . . . . . . . . . . . . . . . . . . . . . . . . . . . .372
fmsupportshow output file is empty. . . . . . . . . . . . . . . . . . . . .372
Failed to connect to database error . . . . . . . . . . . . . . . . . . . . .372
Fabric Manager server restarts when IP interface is changed372
Appendix B CIM Representations of Fabric Elements
In this appendix. . . . . . . . . . . . . . . . . . . . . . . . . . . . . . . . . . . . . . . . .373
xvi Fabric Manager Administrator’s Guide
53-1000610-01
Page 17

About CIM and the CIM tables . . . . . . . . . . . . . . . . . . . . . . . . . . . . .373
SAN. . . . . . . . . . . . . . . . . . . . . . . . . . . . . . . . . . . . . . . . . . . . . . . . . . . 374
Fabric . . . . . . . . . . . . . . . . . . . . . . . . . . . . . . . . . . . . . . . . . . . . . . . . . 374
Switch. . . . . . . . . . . . . . . . . . . . . . . . . . . . . . . . . . . . . . . . . . . . . . . . . 374
Device . . . . . . . . . . . . . . . . . . . . . . . . . . . . . . . . . . . . . . . . . . . . . . . .375
Switch port. . . . . . . . . . . . . . . . . . . . . . . . . . . . . . . . . . . . . . . . . . . . .376
Device port . . . . . . . . . . . . . . . . . . . . . . . . . . . . . . . . . . . . . . . . . . . .378
Zone_config . . . . . . . . . . . . . . . . . . . . . . . . . . . . . . . . . . . . . . . . . . . .378
Zone . . . . . . . . . . . . . . . . . . . . . . . . . . . . . . . . . . . . . . . . . . . . . . . . . .378
Zone membership. . . . . . . . . . . . . . . . . . . . . . . . . . . . . . . . . . . . . . .379
Zone alias . . . . . . . . . . . . . . . . . . . . . . . . . . . . . . . . . . . . . . . . . . . . .379
Appendix C Licenses for Third-Party Products
In this appendix. . . . . . . . . . . . . . . . . . . . . . . . . . . . . . . . . . . . . . . . .381
Third-party products included in Fabric Manager. . . . . . . . . . . . . .381
ABA License . . . . . . . . . . . . . . . . . . . . . . . . . . . . . . . . . . . . . . . . . . . .382
Index
Apache License . . . . . . . . . . . . . . . . . . . . . . . . . . . . . . . . . . . . . . . . .384
AXL License . . . . . . . . . . . . . . . . . . . . . . . . . . . . . . . . . . . . . . . . . . . .386
Jason Hunter & Brett McLaughlin License . . . . . . . . . . . . . . . . . . .387
LGPL License 2.0 . . . . . . . . . . . . . . . . . . . . . . . . . . . . . . . . . . . . . . .388
LGPL License 2.1. . . . . . . . . . . . . . . . . . . . . . . . . . . . . . . . . . . . . . . .393
MIT License . . . . . . . . . . . . . . . . . . . . . . . . . . . . . . . . . . . . . . . . . . . .401
ONC RPC License . . . . . . . . . . . . . . . . . . . . . . . . . . . . . . . . . . . . . . .401
Open SSL License . . . . . . . . . . . . . . . . . . . . . . . . . . . . . . . . . . . . . . .402
Open Symphony License. . . . . . . . . . . . . . . . . . . . . . . . . . . . . . . . . .405
Public Domain . . . . . . . . . . . . . . . . . . . . . . . . . . . . . . . . . . . . . . . . . .406
RXTX License . . . . . . . . . . . . . . . . . . . . . . . . . . . . . . . . . . . . . . . . . . .406
Reusable Objects/NetComponents License . . . . . . . . . . . . . . . . . .407
Sun Java License. . . . . . . . . . . . . . . . . . . . . . . . . . . . . . . . . . . . . . . .408
Sun Binary Code License . . . . . . . . . . . . . . . . . . . . . . . . . . . . . . . . .411
Wolf Paulus License . . . . . . . . . . . . . . . . . . . . . . . . . . . . . . . . . . . . . 414
Fabric Manager Administrator’s Guide xvii
53-1000610-01
Page 18

xviii Fabric Manager Administrator’s Guide
53-1000610-01
Page 19

About This Document
In this chapter
•How this document is organized . . . . . . . . . . . . . . . . . . . . . . . . . . . . . . . . . . xix
•Supported hardware and software. . . . . . . . . . . . . . . . . . . . . . . . . . . . . . . . . xxi
•What’s new in this document . . . . . . . . . . . . . . . . . . . . . . . . . . . . . . . . . . . . xxii
•Document conventions . . . . . . . . . . . . . . . . . . . . . . . . . . . . . . . . . . . . . . . . . xxii
•Additional information. . . . . . . . . . . . . . . . . . . . . . . . . . . . . . . . . . . . . . . . . . xxiii
•Getting technical help . . . . . . . . . . . . . . . . . . . . . . . . . . . . . . . . . . . . . . . . . . xxiv
•Document feedback . . . . . . . . . . . . . . . . . . . . . . . . . . . . . . . . . . . . . . . . . . . xxv
How this document is organized
The Fabric Manager Administrator’s Guide is written to help you, the storage area network (SAN)
administrator, to monitor, configure, and manage your SAN. This document is specific to Fabric
Manager version 5.4.0 and all switches running Brocade Fabric OS version 6.0.0. For a detailed list
of the firmware and hardware versions that are supported with specific versions of Fabric Manager,
refer to the Fabric Manager release notes.
In those instances in which procedures or parts of procedures documented here apply to some
switches but not to others, this guide identifies exactly which switches are supported and which are
not.
The document contains the following components:
• Chapter 1, “Introducing Fabric Manager” provides an overview of Fabric Manager and lists the
supported operating systems.
• Chapter 2, “Installation” provides information and instructions on installing the Fabric Manager
server on supported operating systems.
• Chapter 3, “Fabric Manager Client” introduces you to the graphical user interface.
• Chapter 4, “Discovering and Customizing Fabrics” includes common tasks that fabric
administrators perform.
• Chapter 5, “Viewing Fabric Topologies” describes Fabric Manager’s Topology View.
• Chapter 6, “Displaying Name Server Information” includes information in the Name Server
table.
• Chapter 7, “Monitoring Alerts and Events” provides information about different types of Fabric
Manager alerts and switch events, and how to manage and monitor them using Fabric
Manager.
• Chapter 8, “Using Performance Monitoring” provides information about the Performance
Monitoring feature of Fabric Manager.
Fabric Manager Administrator’s Guide xix
53-1000610-01
Page 20

• Chapter 9, “Change Management” describes how the Change Management feature works and
can be set up to create reports and alerts based on defined changes.
• Chapter 10, “Call Home Support” provides information on how to enable, configure, and
disable the Fabric Manager Call Home feature.
• Chapter 11, “Switch Configuration and Management” provides information saving baselines
and comparing switches against them. It also includes information on creating custom
templates.
• Chapter 12, “Managing Access Gateway-moded Switches” provides information specific to
Access Gateway mode switches and how to use Fabric Manager to view them.
• Chapter 13, “Configuring Standard Security Features” provides information about standard
security features, such as enabling secure communication, managing Admin Domains, and
managing ACLS.
• Chapter 14, “Managing the iSCSI Target Gateway” provides information about iSCSI
management in Fabric Manager.
• Chapter 15, “Firmware Management” provides information on downloading firmware to single
and multiple switches simultaneously. It also provides information about performing an
FDMI-capable HBA firmware download.
• Chapter 16, “Managing Zones” provides information on how to create and manage zones,
aliases, and configurations in Fabric Manager.
• Chapter 17, “Fabric Watch” provides information on how Fabric Watch works and how to
configure alarms and thresholds.
• Chapter 18, “Managing Secure Fabrics” provides information on using the Security feature on
switches and fabrics, including configuring policies, managing secure fabrics, and changing
secure passwords.
• Chapter 19, “FICON and CUP” provides information on how to manage FICON and FICON CUP
using Fabric Manager.
• Chapter 20, “Managing the FC-FC Routing Service” provides information on how to use Fabric
Manager to work with Fibre Channel routers.
• Chapter 21, “Using the FCIP Tunneling Service” provides information on how to configure an
FCIP tunnel.
• Chapter 22, “Configuring SYSLOG Fault Management” describes how to configure fault
management.
• Chapter 23, “Third-Party and Foreign Device Management” provides information on launching
third-party applications and importing foreign devices.
• Chapter 24, “Creating Reports” provides information on creating Excel reports.
• Chapter 25, “Storing Data and Performing Backups” provides information on storing user
settings and performing backups.
• Chapter 26, “Server Management Console” provides information on using the Server
Management Console to stop and start Fabric Manager services, backup the Fabric Manager
database, and capture technical support information.
• Chapter 27, “Fabric Troubleshooting Tools” provides information on the Device Diagnostics
wizard.
• Appendix A, “Troubleshooting” provides information on troubleshooting client and server
issues.
• Appendix B, “CIM Representations of Fabric Elements” provides information on the database
views of elements within Fabric Manager so that they can be accessed by a CIM model.
xx Fabric Manager Administrator’s Guide
53-1000610-01
Page 21

• Appendix C, “Licenses for Third-Party Products” lists the licenses for the third-party products
that are included as part of Fabric Manager.
Supported hardware and software
Although many different software and hardware configurations are tested and supported by
Brocade Communications Systems, Inc. for the Brocade Fabric Manager 5.4.0 release,
documenting all possible configurations and scenarios is beyond the scope of this document;
however, this document does specify when procedures or steps of procedures apply only to specific
switches.
Some Fabric Manager tasks launch Brocade Web Tools. This document provides procedures based
on Web Tools v6.0.0 for procedures during which Fabric Manager launches Web Tools. If your
switch is running a firmware version other than v6.0.0, refer to the version of Web Tools
documentation for that firmware version.
This document does not support all Fabric Manager versions. This document is specific to Fabric
Manager 5.4.0 and Brocade Fabric OS v6.0.0. To obtain information about an OS version other
than v6.0.0, refer to the documentation specific to your OS version.
• Brocade 200E switch
• Brocade 3014 switch
• Brocade 3016 switch
• Brocade 3250 switch
• Brocade 3850 switch
• Brocade 3900 switch
• Brocade 4012 switch
• Brocade 4020 switch
• Brocade 4100 switch
• Brocade 4900 switch
• Brocade 5000 switch
• Brocade 7500 switch
• Brocade 7600 switch
• Brocade 24000 director
• Brocade 48000 director
• Brocade DCX director
Fabric Manager Administrator’s Guide xxi
53-1000610-01
Page 22

What’s new in this document
NOTE
The following information was added since this document was last released:
• Support for IPv6 for FCIP
• FCIP Configuration: Support for VLAN Tag and FICON Emulation Parameters
• ICL support
• Troubleshooting information
For further information about new features and documentation updates for this release, refer to
the release notes.
Document conventions
This section describes text formatting conventions and important notice formats used in this
document.
Text formatting
The narrative-text formatting conventions that are used are as follows:
bold text Identifies command names
Identifies the names of user-manipulated GUI elements
Identifies keywords and operands
Identifies text to enter at the GUI or CLI
italic text Provides emphasis
Identifies variables
Identifies paths and Internet addresses
Identifies document titles
code text Identifies CLI output
Identifies command syntax examples
For readability, command names in the narrative portions of this guide are presented in mixed
lettercase: for example, switchShow. In actual examples, command lettercase is often all
lowercase. Otherwise, this manual specifically notes those cases in which a command is case
sensitive.
Notes, cautions, and warnings
The following notices and statements are used in this manual. They are listed below in order of
increasing severity of potential hazards.
A note provides a tip, guidance or advice, emphasizes important information, or provides a reference
to related information.
xxii Fabric Manager Administrator’s Guide
53-1000610-01
Page 23
ATTENTION
An Attention statement indicates potential damage to hardware or data.
CAUTION
DANGER
A Caution statement alerts you to situations that can be potentially hazardous to you.
A Danger statement indicates conditions or situations that can be potentially lethal or extremely
hazardous to you. Safety labels are also attached directly to products to warn of these conditions
or situations.
Key terms
For definitions specific to Brocade and Fibre Channel, see the Brocade Glossary.
For definitions of SAN-specific terms, visit the Storage Networking Industry Association online
dictionary at:
http://www.snia.org/education/dictionary
Additional information
This section lists additional Brocade and industry-specific documentation that you might find
helpful.
Brocade resources
To get up-to-the-minute information, join Brocade Connect. It’s free! Go to http://www.brocade.com
and click Brocade Connect to register at no cost for a user ID and password.
For practical discussions about SAN design, implementation, and maintenance, you can obtain
Building SANs with Brocade Fabric Switches through:
http://www.amazon.com
For additional Brocade documentation, visit the Brocade SAN Info Center and click the Resource
Library location:
http://www.brocade.com
Release notes are available on the Brocade Connect Web site and are also bundled with the Fabric
OS firmware.
Fabric Manager Administrator’s Guide xxiii
53-1000610-01
Page 24

Other industry resources
• White papers, online demos, and data sheets are available through the Brocade Web site at
http://www.brocade.com/products/software.jhtml.
• Best practice guides, white papers, data sheets, and other documentation is available through
the Brocade Partner Web site.
For additional resource information, visit the Technical Committee T11 Web site. This Web site
provides interface standards for high-performance and mass storage applications for Fibre
Channel, storage management, and other applications:
http://www.t11.org
For information about the Fibre Channel industry, visit the Fibre Channel Industry Association Web
site:
http://www.fibrechannel.org
Getting technical help
Contact your switch support supplier for hardware, firmware, and software support, including
product repairs and part ordering. To expedite your call, have the following information available:
1. General Information
• Switch model
• Switch operating system version
• Error numbers and messages received
• supportSave command output
• Detailed description of the problem, including the switch or fabric behavior immediately
following the problem, and specific questions
• Description of any troubleshooting steps already performed and the results
• Serial console and Telnet session logs
• syslog message logs
2. Switch Serial Number
The switch serial number and corresponding bar code are provided on the serial number label,
as illustrated below.:
*FT00X0054E9*
FT00X0054E9
The serial number label is located as follows:
• Brocade 3014—On the top of the chassis, under the insertion arm
• Brocade 3016 and 4012—On the bottom of the switch module
• Brocade 200E, 3200, 3250 and 3850—On the nonport side of the chassis
- Brocade 3800 and 3900— Nonport side of the chassis
xxiv Fabric Manager Administrator’s Guide
53-1000610-01
Page 25

• Brocade 4100, 4900, and 7500—On the switch ID pull-out tab located inside the chassis
on the port side on the left
• Brocade 5000—On the switch ID pull-out tab located on the bottom of the port side of the
switch
• Brocade 7600—On the bottom of the chassis
• Brocade 12000, Brocade 24000, and 48000—Inside the chassis next to the power supply
bays
• Brocade DCX—On the bottom right on the port side of the chassis
3. World Wide Name (WWN)
Use the wwn command to display the switch WWN.
If you cannot use the wwn command because the switch is inoperable, you can get the WWN
from the same place as the serial number, except for the Brocade DCX. For the Brocade DCX,
access the numbers on the WWN cards by removing the Brocade logo plate at the top of the
nonport side of the chassis.
Document feedback
Quality is our first concern at Brocade and we have made every effort to ensure the accuracy and
completeness of this document. However, if you find an error or an omission, or you think that a
topic needs further development, we want to hear from you. Forward your feedback to:
documentation@brocade.com
Provide the title and version number of the document and as much detail as possible about your
comment, including the topic heading and page number and your suggestions for improvement.
Fabric Manager Administrator’s Guide xxv
53-1000610-01
Page 26

xxvi Fabric Manager Administrator’s Guide
53-1000610-01
Page 27

Chapter
Introducing Fabric Manager
In this chapter
This chapter describes the system requirements and supported operating systems, and includes
the following sections:
• Overview of Fabric Manager . . . . . . . . . . . . . . . . . . . . 1
• Browser and platform requirements . . . . . . . . . . . . . . 2
• System requirements . . . . . . . . . . . . . . . . . . . . . . . . . . 4
• Fabric and switch access . . . . . . . . . . . . . . . . . . . . . . . 5
Overview of Fabric Manager
Fabric Manager is a fabric monitor and management application that provides a central point of
control for multiple switches and fabrics. You can use Fabric Manager to configure multiple
switches simultaneously from one location, view the status of multiple devices in one window, and
perform SAN-level maintenance without having to access each switch in your fabric or SAN.
1
Fabric Manager is tightly integrated with additional SAN management products (including Web
Tools and Fabric Watch) and can be used in conjunction with other SAN and storage resource
management applications as the tool to drill down into single or multiple Brocade fabrics.
Fabric Manager:
• Enables global integration and execution of processes across multiple switches and fabrics
• Assists SAN administrators by centralizing the configuration, monitoring, and management
tasks of SANs
• Reduces the overall cost of SAN management by simplifying management tasks
• Provides access to critical SAN information across Brocade SANs
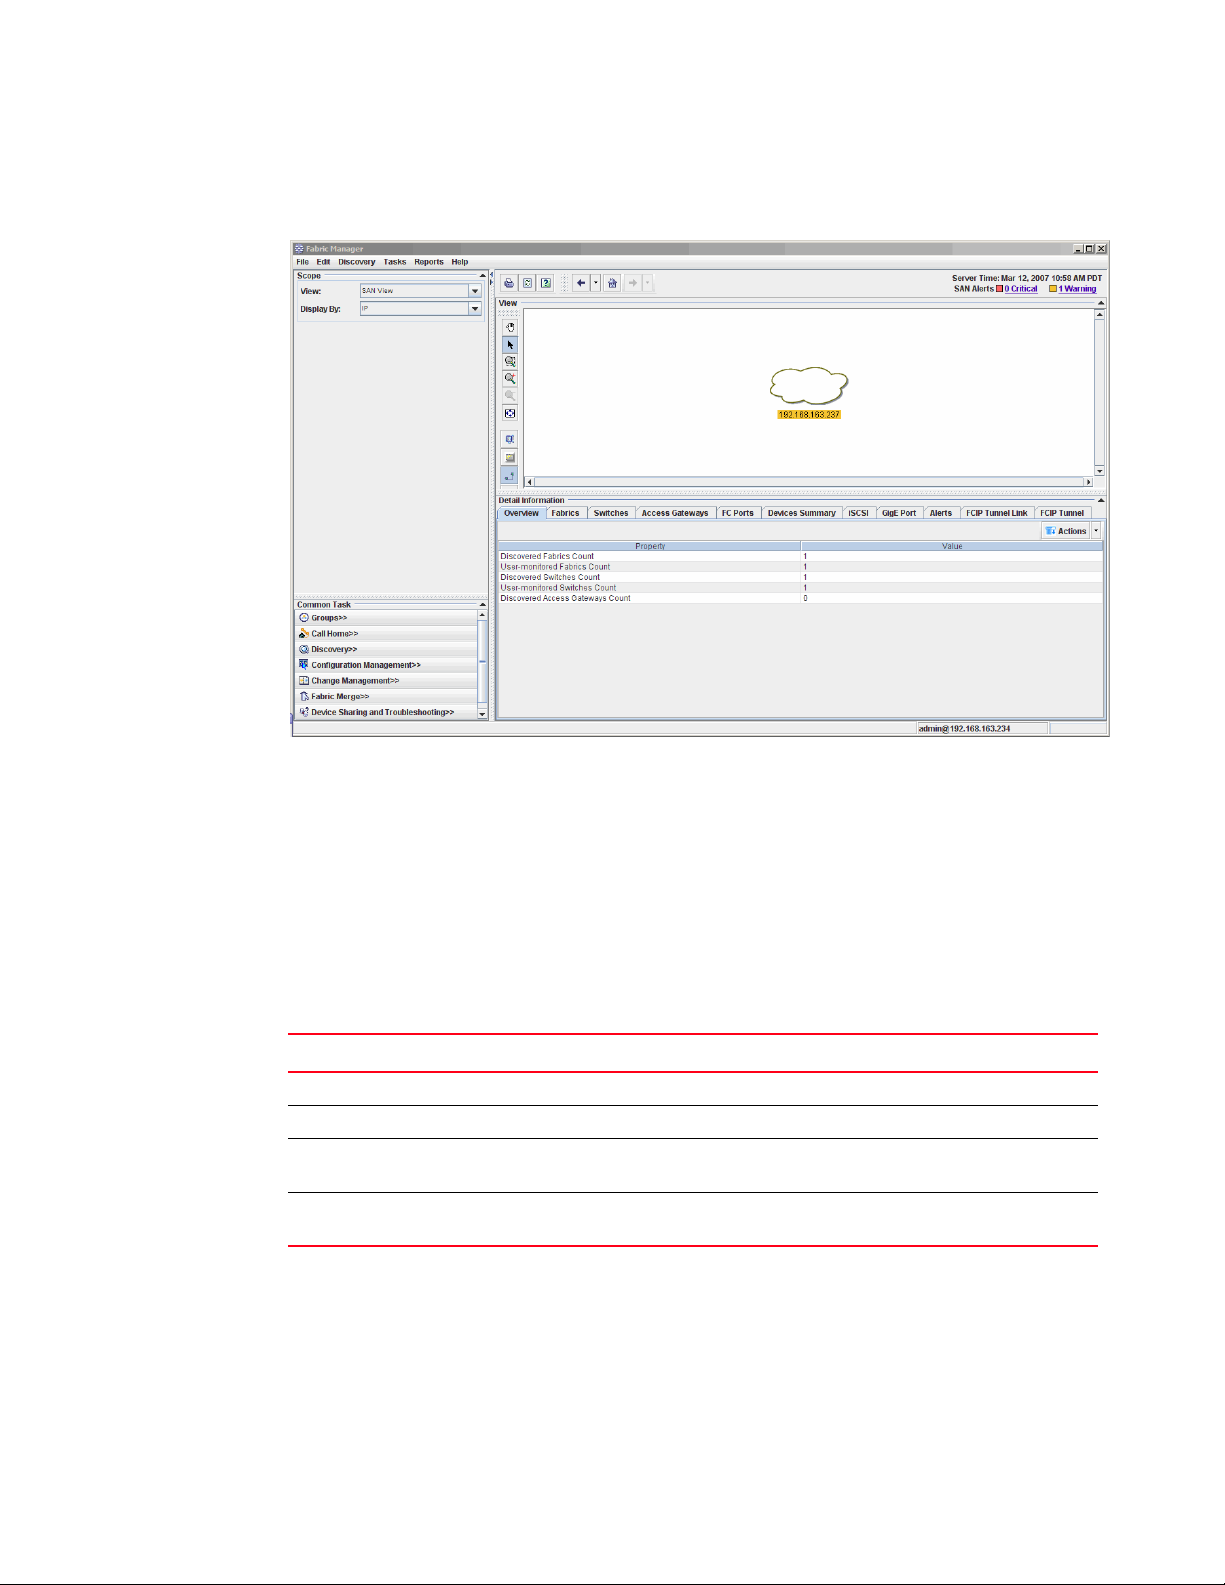
Figure 1 on page 2 shows an example Fabric Manager display.
The remainder of this chapter lists the requirements and supported browsers and operating
systems for Fabric Manager.
Chapter 2, “Installation” describes how to install Fabric Manager.
Chapter 3, “Fabric Manager Client” describes the components of Fabric Manager, including how
you can customize the layout.
Fabric Manager Administrator’s Guide 1
53-1000610-01
Page 28
Browser and platform requirements
1
The remaining chapters describe how to use Fabric Manager to perform various management
tasks.
FIGURE 1 Fabric Manager client
Browser and platform requirements
Fabric Manager requires any browser that conforms to HTML version 4.0, JavaScript version 1.0,
and Java Plug-in 1.6.0 or higher.
Brocade has certified and tested Fabric Manager on the platforms shown in Table 1.
TABLE 1 Certified and tested platforms
Operating system Browser Java plug-in (minimum)
Solaris 10 (Sparc only) Firefox 2.0. 1.6.0
Linux Red Hat AS 4.0 Firefox 2.0 1.6.0
Windows 2003 Server SP1 Internet Explorer 6.0+
Firefox 1.7.8 and 2.0
Windows XP SP2 Internet Explorer 6.0+
Firefox 1.7.8 and 2.0
1. For switches with IPv6 addressing schemes, Internet Explorer 7.0 or higher is required.
2. For switches with IPv6 addressing schemes, Internet Explorer 7.0 or higher is required.
The following platforms are supported, but have not been fully tested:
1
and 7.0
2
and 7.0
1.6.0
1.6.0
• Solaris 8 (Sparc only)
• Solaris 9 (Sparc only)
2 Fabric Manager Administrator’s Guide
53-1000610-01
Page 29
NOTE
NOTE
Browser and platform requirements
1
• Linux Red Hat AS 3.0
• Windows 2000 Server SP4
Operating systems that are running on top of any virtualization software (such as VMWare or
Microsoft Virtual Server) are not supported.
Fabric Manager is tested and supported on English, Japanese, and German operating systems. Text
entered into the application should be done using the English keyboard layout. Most of the displayed
text is in English, although message strings and dates may display in the local language. Other
languages may work, but are not tested or supported at this time.
Some browsers must be configured to work with Fabric Manager. For information about how to do
this, see “Configuring Internet Explorer”.
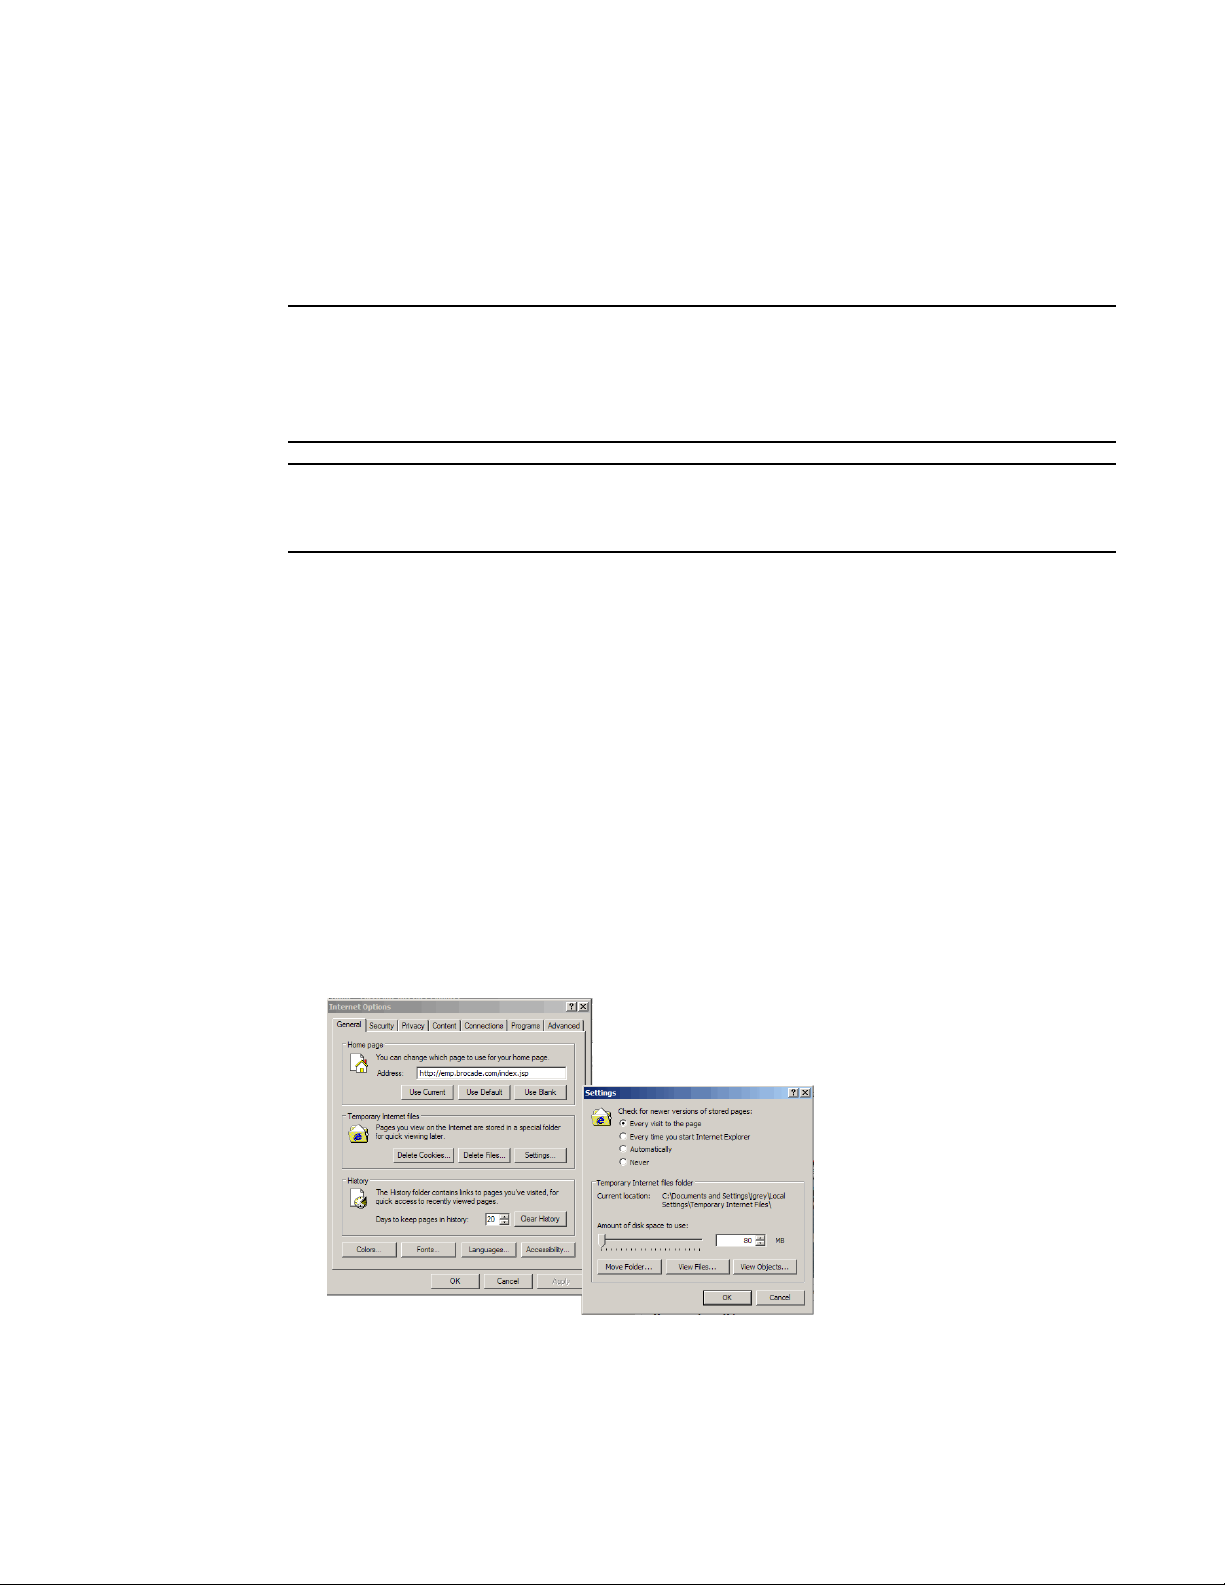
Configuring Internet Explorer
Correct operation of Fabric Manager with Internet Explorer requires specifying the appropriate
settings for browser refresh frequency and process model. Browser pages should be refreshed
frequently to ensure the correct operation of Fabric Manager.
See the Web Tools Administrator’s Guide for additional information on installing Java on your
workstation.
To set the refresh frequency
1. Launch Internet Explorer.
1. Click Tools > Internet Options.
2. Click the General tab and click Settings under Temporary Internet Files.
3. Click Every visit to the page under “Check for newer versions of stored pages,” as shown in
Figure 2.
.
FIGURE 2 Configuring Internet Explorer
Fabric Manager Administrator’s Guide 3
53-1000610-01
Page 30

System requirements
NOTE
NOTE
1
System requirements
The system requirements for the Fabric Manager client and server software depend on the size of
the fabric and whether you are using one or more machines for the client and server software.
Best practices recommend that you have a dedicated system for the Fabric Manager server.
For a large SAN with 1281 to 2560 ports or 51 to 80 switches, you should run the Fabric Manager
client and server software on separate machines. Adhere to the system requirements for each, as
listed in Table 2 on page 4.
When monitoring multiple SANs, the total number of ports should be taken into consideration to
meet the requirements of Table 2.
Each Fabric Manager server can support up to five Fabric Manager clients (not running on the
same machine).
The Fabric Manager client accesses any managed switches through an Ethernet connection.
If your client and server are on different systems, you must ensure that both have access to the
switches, good network connection, and good bandwidth. A firewall between the client, server, and
SAN is not recommended.
TABLE 2 System requirements for client and server machines
Operating
system
Windows
and Linux
Installation
type
Client 800 MHz CPU
Server 1.8 GHz P4 CPU
Combined
Small SAN
1-512 ports
(1-20 switches)
256 MB RAM
512 MB virtual memory
1 GB RAM
512 MB virtual memory
1
2 GHz P4 CPU
1.5 GB RAM
1 GB virtual memory
Requirements
Medium SAN
513-1280 ports
(21-50 switches)
1.5 GHz CPU
512 MB RAM
512 MB virtual memory
2.0 GHz P4 CPU
1.5 GB RAM
512 MB virtual memory
2 x 3 GHz P4 CPU
2 GB RAM
1 GB virtual memory
Large SAN
1281-2560 ports
(51-80 switches)
1.5 GHz CPU
512 MB RAM
512 MB virtual memory
2 x 3 GHz P4 CPU
2.5 GB RAM
1 GB Virtual Memory
Not supported
4 Fabric Manager Administrator’s Guide
53-1000610-01
Page 31

Fabric and switch access
TABLE 2 System requirements for client and server machines (Continued)
Operating
system
Solaris Client Sun Ultra 25 or equivalent
Installation
type
Server Sun Ultra 25 or equivalent
Combined
Small SAN
1-512 ports
(1-20 switches)
UltraSPARC CPU 1 @ 750
MHz
512 MB RAM
1 GB of virtual memory
UltraSPARC CPU 1 @ 750
MHz
1 GB RAM
1 GB of virtual memory
1
Sun Ultra 25 or equivalent
UltraSPARC CPU 1 @ 750
MHz
2 GB RAM
2 GB of virtual memory
Requirements
Medium SAN
513-1280 ports
(21-50 switches)
Sun Ultra 25 or equivalent
UltraSPARC CPU 1 @ 750
MHz
1 GB RAM
1 GB of virtual memory
Sun Ultra 45 or equivalent
UltraSPARC CPU 2 @ 1
GHz
2 GB RAM
2 GB of virtual memory
Sun Ultra 45 or equivalent
UltraSPARC CPU 2 @ 1
GHz
4 GB RAM
2 GB of virtual memory
Large SAN
1281-2560 ports
(51-80 switches)
Sun Ultra 45 or equivalent
UltraSPARC CPU 1 @ 1 GHz
2 GB RAM
2 GB of virtual memory
Sun Ultra 45 or equivalent
UltraSPARC CPU 2 @ 1 GHz
4 GB RAM
2 GB of virtual memory
Not supported
1
1. Requirements for a combined installation assume one client and server. Separate machines are suggested for
running additional clients.
Minimum hard disk space required for installation is 400 MB (Windows) and 500 MB (Solaris and
Linux). After installation, the recommended minimum free disk space is 2 GB for small and
medium SAN sizes and 10 GB for large SAN sizes. The selected SAN size setting can affect Fabric
Manager performance.
To allow for a large amount of history data, the recommended amount of free disk space is 5 GB for
small and medium SAN sizes, and 40 GB for large SAN size.
Fabric and switch access
Fabric Manager behavior is dependent on your Administrative Domain access privileges and your
user account role. The Administrative Domain defines what switches, ports, and devices you can
monitor. The account role determines the actions you can perform on those switches, ports, and
devices.
The following sections briefly describe how Administrative Domains and account roles affect Fabric
Manager users:
• “Administrative Domains” on page 6
• “Role-Based Access Control” on page 7
See the Fabric OS Administrator’s Guide and the Web Tools Administrator’s Guide for detailed
information about these topics.
Fabric Manager Administrator’s Guide 5
53-1000610-01
Page 32

Fabric and switch access
NOTE
1
ADMINISTRATIVE DOMAINS
An Administrative Domain (Admin Domain) is a logical grouping of fabric elements that defines
what switches, ports, and devices you can view and modify. An Admin Domain is a filtered
administrative view of the fabric. The logical view presented within an Admin Domain does not hide
fabrics, chassis, switches, and slots; however, the attributes of switch ports and end devices are
filtered based on Admin Domain membership.
Do not confuse an Admin Domain with the domain ID of a switch. They are two different identifiers.
Admin Domains are numbered from 0 through 255. This document refers to specific Admin
Domains using the format “ADn” where n is a number between 0 and 255.
This document uses the following Admin Domain concepts:
AD0 A special Admin Domain that contains all switches, ports,
and devices that have not been put into other Admin
Domains.
AD255 A special Admin Domain that is an unfiltered view of the
entire physical fabric. AD255 is also referred to as the
physical fabric.
Admin Domain-capable fabric A fabric that runs Fabric OS v5.2.0 or higher and has a valid
Advanced Zoning license, but has no Admin Domains other
than AD0 and AD255 (physical fabric).
Admin Domain-unaware fabric A fabric that:
• runs Fabric OS v5.1.x or lower.
• runs Fabric OS v5.2.0 or higher but does not have an
Advanced Zoning license.
Admin Domain-aware fabric A fabric with at least one user-defined Admin Domain
activated. User-defined Admin Domains include AD0, if you
have explicitly added members to it.
Physical fabric administrator A user with the Admin role and access to all Admin Domains
(AD0 through AD255).
All Fabric Manager users must have access to AD0 and the physical fabric to monitor Admin
Domain-aware fabrics. If you do not have access to these Admin Domains, then you cannot log in to
the switch using Fabric Manager. If, after you log in, you lose access to the physical fabric, you can
no longer access the port configuration, Admin Domain administration, and Fabric Watch
functionality.
Fabric Manager displays each Admin Domain as a virtual fabric (see “Topology views” on page 86
for more information about how Admin Domains are displayed). Fabric Manager shows only Admin
Domain members that have been discovered. For example, if the Admin Domain membership list
has a device WWN that is not yet connected to the fabric (and so was never discovered by Fabric
Manager), this device is not displayed in the user interface.
The Admin Domain information is gathered initially during discovery. After the initial discovery, the
Admin Domain data is gathered in the following instances:
• When you run Discovery > Refresh, the Admin Domain data is gathered from the Fabric.
6 Fabric Manager Administrator’s Guide
53-1000610-01
Page 33

NOTE
Fabric and switch access
1
• For fabrics with Small and Medium polling definitions, the Admin Domain data is gathered by
default every 30 minutes.
• For fabrics with a Large polling definition, the Admin Domain data is gathered every 60
minutes.
All switches in the fabric are expected to have the same Admin Domain membership configuration,
although Fabric Manager does not validate this.
Fabric Manager displays an unfiltered view in the Fabric Manager client window. All legacy
(pre-5.2.0) views, dialogs, and functionality continue to work in Admin Domain-unaware mode and
display an unfiltered view at the physical fabric level.
ROLE-BASED ACCESS CONTROL
Role-Based Access Control (RBAC) defines the capabilities that a user account has based on the
role the account has been assigned. For each role, there is a set of pre-defined permissions on the
jobs and tasks that can be performed on a fabric and its associated fabric elements.
When you log in to a switch, your user account is associated with a predefined role. The role that
your account is associated with determines the level of access you have on that switch and in the
fabric. Following is a description of each of the roles:
Admin Administrative use.
FabricAdmin Administrative use excluding user management and Admin Domain
management.
SwitchAdmin Administrative use excluding security, user management, and zoning.
ZoneAdmin Zone management only.
BasicSwichAdmin Administrative use with a subset of Admin level access.
Operator A subset of administrative tasks performed off-hours.
User Nonadministrative use, such as monitoring system activity.
SecurityAdmin Secure fabrics only, administrative use.
NonFCSAdmin Secure fabrics only, a subset of administrator.
For information about changing user account roles, see the Web Tools Administrator’s Guide.
You can log in to (authenticate to a fabric in) Fabric Manager with any role, as long as you have the
correct credentials and access to AD0 and the physical fabric.
Due to FAL API limitations, Fabric Manager does not support Security Operations for the user role
SecurityAdmin.
All Fabric Manager users have full access (create, edit, delete) to all Fabric Manager resources,
such as:
• Firmware repository
• Call home configurations
• Preferences
• Change Management profiles and reports
• Third-party application launch configurations
Fabric Manager Administrator’s Guide 7
53-1000610-01
Page 34

Fabric and switch access
1
When you log in to a switch, the role of the user account with which you log in to the switch
determines your permissions on that switch. If you try to perform an operation for which your role
does not give permission, Fabric Manager displays an informative message.
All fabric-level actions are limited to actions allowed by the user role that you provide for the seed
switch.
8 Fabric Manager Administrator’s Guide
53-1000610-01
Page 35

NOTE
Chapter
Installation
In this chapter
This chapter describes how to install, upgrade, or uninstall the Fabric Manager server software. You
do not need to explicitly install the Fabric Manager client at this time; the Fabric Manager client
automatically installs the first time you launch it.
You cannot downgrade to an earlier version of Fabric Manager if your fabric contains switches using
the IPv6 addressing scheme.
2
•Planning for the installation . . . . . . . . . . . . . . . . . . . . . . . . . . . . . . . . . . . . . . . 9
•Upgrading Fabric Manager . . . . . . . . . . . . . . . . . . . . . . . . . . . . . . . . . . . . . . . 15
•Installing the Fabric Manager server . . . . . . . . . . . . . . . . . . . . . . . . . . . . . . . 16
•Copying an installation from server to server . . . . . . . . . . . . . . . . . . . . . . . . 29
•Uninstalling the Fabric Manager server . . . . . . . . . . . . . . . . . . . . . . . . . . . . . 31
Performing a configuration download from a switch running Fabric OS v5.3 or higher to switches
running Fabric OS version v5.2 or lower will fail if the source configuration contains the following IPv6
parameters:
snmp.accessList.*.address_v6
snmp.agtParty.*.address_v6
snmp.snmpv3TrapTarget.*.trapTargetAddr_v6
To avoid this problem, remove these parameters manually from source configuration before
attempting to download it to a destination switch with lower Fabric OS versions.
Planning for the installation
You should have the following information available prior to starting the installation:
• Fabric Manager serial number and license key (if you are installing the full version).
• Details about whether to use the built-in FTP server or an external FTP server for operations
such as firmware or configuration download.
• SAN size; you must select the SAN size during the Fabric Manager installation.
• A dedicated machine that is not running any other server applications, such as another
database server.
• Type of authentication to use:
- Windows authentication: You need to know the Windows Domain or Workgroup name.
Fabric Manager Administrator’s Guide 9
53-1000610-01
Page 36

Planning for the installation
2
- RADIUS server authentication: For each RADIUS server, you need to know the IP or DNS
name, authentication port and type (PAP or CHAP), and shared secret.
- Switch-based authentication: You need to know the switch IP addresses.
- Solaris and Linux only: NIS authentication. You need to know the host name or IP address
of your NIS server and NIS domain name.
INSTALLATION AND TROUBLESHOOTING INFORMATION
Before installing Fabric Manager, refer to the following sections for installation notes and
troubleshooting information (including information specific to the Windows, Solaris, and Linux
environments).
Uninstalling or upgrading Fabric Manager
Fabric Manager stores user-specific information— such as username and server port number—for
each user in a FabricManager.Properties file.
When you uninstall Fabric Manager, this properties file is not deleted automatically. To remove the
file, locate it in your home directory on the file system and delete it manually.
The properties file is commonly located at:
C:\Documents and Settings\userA\Fabric
Manager\<Server_IP>\client\FabricManager.Properties
When you uninstall an upgraded version of Fabric Manager, some files from the client, jre and bin
directories are not removed. You can safely delete these files manually.
Single server monitoring a fabric
You should have only one Fabric Manager server configured to monitor a fabric. If multiple Fabric
Manager servers monitor the same fabric, switches in that fabric are subject to duplicate requests,
which could result in performance degradation.
Java Runtime Environment (JRE)
The JRE used by Fabric Manager is embedded in the Fabric Manager install image; a separate Java
installation is not required. During the Fabric Manager installation, the JRE included in the Fabric
Manager install image is installed in the directory where Fabric Manager is installed. This JRE is
available only for Fabric Manager.
The Fabric Manager JRE installation does not modify any Java-related environment variables. This
JRE does not replace or conflict with any other JRE installed on the system (for example, this JRE is
not used by Web Tools). You can install or run any other application (such as Web Tools) using a
different JRE and the two JREs will not conflict with each other. See the Fabric Manager release
notes to determine the JRE version included in Fabric Manager.
Video drivers
Ensure that your system has the latest video drivers installed prior to installing Fabric Manager. As
an added precaution, also upgrade to the latest Microsoft DirectX drivers. This should fix any
interaction problems among the JRE, the DirectX drivers, and the video drivers.
10 Fabric Manager Administrator’s Guide
53-1000610-01
Page 37

Planning for the installation
2
Install wizard
If the install wizard does not appear during the installation, run the DOS command dxdiag and
ensure that the graphics tests run without error. If any Microsoft DirectX files are missing or any
diagnostics fail, go to the Microsoft Web site and upgrade to the latest version of DirectX.
Web Tools Java plug-in and Web browser
Fabric Manager launches Web Tools to process some requests. Web Tools requires a Java Plug-in
and a compatible Web browser. See the Web Tools Administrator’s Guide to determine the Java
Plug-in and Web browser requirements.
Fabric Manager server
If you try to install the Fabric Manager server immediately after closing a Fabric Manager client, the
install wizard indicates that the port is currently in use. You need to wait approximately five minutes
after closing all clients before you can install the Fabric Manager server. This allows the Fabric
Manager server enough time to free the connection port.
IP connection to switches
The Fabric Manager client and server software poll different fabric information directly,
necessitating access to each switch through an IP connection. Ensure that the network
environment does not have a proxy server or firewall between the switches and the server and
clients. If a proxy server or firewall exists, ensure that proper rules are set up to allow access.
Blocked port numbers
Tab le 3 lists the TCP/UDP port numbers must not be blocked by a proxy server or network firewall
for some Fabric Manager functions to function correctly.
TABLE 3 Ports required to be opened for proper communication when using a firewall
Port Number TCP, UDP or
Both
If a firewall exists beterrn the FM server and client:
• PORT0 (24600) FM Naming Service Listening Port
TCP This is the default setting but can be
• PORT1 (24601) FM RMI Naming Service
• PORT2 (24602) FM RMI/JRMP Invoker
• PORT3 (24603) FM Server Pooled Invoker
• PORT4 (24604) FM Messaging Service
• PORT5 (24605) FM Web Service
• PORT9 (24608) Authentication
• PORT10 (24609) JBoss EJB3 Connector Bind
Address
• 20
TCP Passive FTP data transfer. This range
• 21
• 22
TCP Telnet/sectelnet
• 23
• 111 TCP RPC Mapping (FAL-API)
Description
changed during installation. If a
non-default port range is used than we
need to specify that range instead. Would
be the 1st, 2nd, 3rd, 4th, 5th, 6th, 9th, &
10th port in the consecutive range.
needs to be defined by the user in the
ftpd.conf file.
Fabric Manager Administrator’s Guide 11
53-1000610-01
Page 38

Planning for the installation
2
TABLE 3 Ports required to be opened for proper communication when using a firewall (Continued)
Port Number TCP, UDP or
Both
Description
HTTP and HTTPS port numbers (by default, these
•
are ports 80 and 443, respectively)
TCP This is the default setting but can be
changed either during installation or after
via SMC. If a non-default port is used than
open that port instead.
• PORT 2002 TCP Required for proper communication with
Built-In FTP Server
If a firewall exists beterrn the FM server and SAN:
• 20
• 21
• HTTP and HTTPS port numbers (by default, these
are ports 80 and 443, respectively)
TCP Passive FTP data transfer. This range
needs to be defined by the user in the
ftpd.conf file
TCP This is the default setting but can be
changed either during installation or after
via SMC. If a non-default port is used than
open that port instead.
1
• 111 TCP RPC Mapping (FAL-API)
• 514 UDP Syslog: This is the default setting but can
be changed either during installation or
after via SMC. If a non-default port is used
than open that port instead.
• 161 UDP SNMP
• 111 TCP RPC (FAL-API)
• 897
• 898
TCP FAL-API (For switches running FOS v3.1 &
v4.1 and higher)
• 600 through 1023 TCP FAL-API (For switches running FOS lower
than v3.1 or v4.1)
• PORT 2002 TCP Required for proper communication with
Built-In FTP Server
• 24610
• 24611
• 25612
If a firewall exists beterrn the FM client and SAN:
These are only required for certain operations such as launching of Telnet/SecTelnet/SSH or Webtools, Manageing SFOS
Policies, Enabling/Disabling SFOS.
TCP FAL-API - To have the API behave properly
from the FM Server (only when a firewall is
between server and SAN) this needs to be
uncommented in the connservice.conf file.
These numbers are default numbers. After
uncommenting the port numbers and
changing them to non-default ports, than
those ports would have to be opened
instead
• 22 TCP SSH
• 23 TCP Telnet/SecTelnet
• HTTP and HTTPS port numbers (by default, these
are ports 80 and 443, respectively)
12 Fabric Manager Administrator’s Guide
TCP This is the default setting but can be
changed either during installation or after
via SMC. If a non-default port is used than
open that port instead.
53-1000610-01
Page 39

Planning for the installation
2
TABLE 3 Ports required to be opened for proper communication when using a firewall (Continued)
Port Number TCP, UDP or
Both
Description
• 111 TCP RPC (FAL-API)
If a firewall exists beterrn the FM server and Authentication Server:
The only ports needed are for the type of authentication server setup during Installation of FM Server or changed through SMC.
• HTTP and HTTPS port numbers (by default, these
are ports 80 and 443, respectively)
If a firewall exists beterrn the FM server and other external servers
Should only be required if this feature is being used.
TCP This is the default setting but can be
changed either during installation or after
via SMC. If a non-default port is used than
open that port instead.
• 514 UDP External Syslog server that is retrieving
messages from switch and forwarding
them to the FMServer syslog. This is the
default setting but can be changed either
during installation or after via SMC. If a
non-default port is used than open that
port instead.
1. The file is in the following location: <Fabric Manager Install folder>\fmftp\apps\ftp\conf.
Uncomment the following lines in connservice.conf file under
<FabricManager Install folder>\server\conf
and provide port numbers to be used by SAN management connector to connect to switch. Lines to
uncomment include:
#wrapper.java.additional.12=-Dfa.rpc.client.port.range=24610-24610
#wrapper.java.additional.13=-Dfa.event.server.port.range=24611-24611
#wrapper.java.additional.14=-Dfa.arp.server.port.range=24612-24612
These ports should be unblocked by the firewall.
The FTP client in Fabric Manager connects to the FTP server in passive mode, and the FTP server
uses different ports to transfer data from the client to server during operations such as firmware
import. This can cause a problem if there is a firewall between the client and the server because
the ports to be unblocked would change every time.
The FTP server configuration file FabricManager Install folder\fmftp\apps\ftp\conf\ftpd.conf will
have an entry to specify the range of ports. You can allocate up to 20 ports in this entry:
FtpServer.server.config.data.port.pool=0
To run the application in a firewall environment, update this entry to specify the ports to be used by
the FTP server to allow passive connection, then restart the services from SMC.
An example entry would look like the following:
FtpServer.server.config.data.port.pool=10002,10003,10004
Fabric Manager Administrator’s Guide 13
53-1000610-01
Page 40

Planning for the installation
NOTE
NOTE
2
HTTP
HTTP must be enabled on each switch in the SAN that you want to discover, monitor, and configure
with Fabric Manager. Each supported switch has HTTP enabled automatically. See the Fabric OS
Command Reference for information about enabling HTTP with the command line interface (CLI), if
necessary, or see Chapter 18, “Managing Secure Fabrics” for information about secure Fabric OS
policies for HTTP.
Solaris installation considerations
When you install Fabric Manager over an existing version on a UNIX system, the install wizard
prompts you to select the location where the existing version of Fabric Manager is installed. The
install wizard then finds the existing serial number and license key and attempts to validate them.
If the serial number and license key are valid, the install wizard skips the Specify Serial Number
and License Key window and goes directly to the Backup Previous Config window. The serial
number and license key are saved. If the serial number and license key are not valid, you must
re-enter the serial number and license key to install the Full version of Fabric Manager.
Ensure that the recommended J2SE patches for Solaris Java applications are installed. Use the
appropriate patch for your version of Solaris. These patches can be found at:
http://sunsolve.sun.com/pub-cgi/show.pl?target=patches/patch-access
You might encounter issues when using XWindows emulators from Windows to access the SUN host.
Windows installation considerations
When you install Fabric Manager over an existing version, the install wizard automatically finds the
existing serial number and license key and attempts to validate them. If the serial number and
license key are valid, the install wizard does not prompt you to re-enter them. The serial number
and license key are saved. If the serial number and license key are not valid, you must re-enter the
serial number and license key to install the full version of Fabric Manager.
If you launch the Fabric Manager install wizard on a Windows XP or 2003 machine and an After
Installation window appears, click Cancel to exit. The After Installation window provides access to a
Windows program that exists only on a few Windows XP or 2003 machines (depending on your
Windows image). If you do not cancel this program, your Fabric Manager shortcut is moved to the
All Users folder after the installation is complete. Also, if you subsequently uninstall Fabric
Manager, the uninstall wizard is unable to remove the Fabric Manager menu item from the Start >
Programs menu.
To find the name of the Windows authentication domain that must be specified during installation,
open a DOS window and type set. The alias USERDOMAIN indicates the active domain. If the client
and server reside on different Microsoft domains, both domains must have trusts established
between them or Fabric Manager will not be able to authenticate the client.
The domain name required is not the internet domain (such as corp.mycompany.com); it is the
Domain name Microsoft uses for authentication.
If you are installing Fabric Manager server on a Windows host that has anti-virus software, you
must disable the anti-virus software during the installation.
14 Fabric Manager Administrator’s Guide
53-1000610-01
Page 41

NOTE
NOTE
Upgrading Fabric Manager
You can upgrade to Fabric Manager 5.4.0 from versions 5.2.x or 5.3.x. If you have earlier versions
of Fabric Manager, you must first upgrade them to at least 5.2.x and then upgrade to 5.4.0.
The first time you launch Fabric Manager after upgrading it, the Switch Groups and Port Groups do
not appear. In subsequent launches, Switch Groups and Port Groups display correctly.
Note that the Web server port is not updated when performing an upgrade.
The following information cannot be migrated to Fabric Manager 5.4.0:
• Topology settings
• View customization
• At-a-Glance window customization
After you upgrade to Fabric Manager 5.4.0, you cannot discover a fabric with a seed switch running
Fabric OS v2.x or lower. If, prior to the upgrade, you had discovered a fabric with the seed switch
running Fabric OS v2.x, this fabric is available for monitoring after the Fabric Manager upgrade.
Upgrading Fabric Manager
2
LICENSE KEYS
If you are upgrading to Fabric Manager 5.4.0 from a version earlier than 5.0.0, you need a new
license key. License keys for versions prior to 5.0.0 can no longer be used. Upgrading from Fabric
Manager 5.0.0 or 5.1.0 does not require a new Fabric Manager license.
Fabric Manager has the following license types:
• 4 Domain Limit
• 10 Domain Limit
• Unlimited Upgrade (4 domain to unlimited)
• Unlimited Upgrade (10 domain to unlimited)
• Unlimited Upgrade (Fabric Manager 4.x unlimited to Fabric Manager 5.x unlimited)
• 10 Domain Limit Upgrade Version (4 to 10 domain)
• 4 Domain Limit Upgrade (Fabric Manager 4.x with 4 domains to Fabric Manager 5.x with 4
domains)
• 10 Domain Limit Upgrade (Fabric Manager 4.x with 10 domains to Fabric Manager 5.x with 10
domains)
Licensing for Fabric Manager is per-server, not one copy per site.
UPGRADING FROM THE EVALUATION VERSION
During installation, you can choose to install either the full version of Fabric Manager or an
evaluation version. The evaluation version can be used for up to 60 days. You do not need to
provide a serial number or license key to use the evaluation version; however, you must accept the
license agreement displayed during the installation.
Fabric Manager Administrator’s Guide 15
53-1000610-01
Page 42

Installing the Fabric Manager server
2
Each time you launch the evaluation version of Fabric Manager, a warning message notifies you
when the evaluation version will expire and gives you the option to register Fabric Manager or to
continue with the evaluation version. To register Fabric Manager, click Enter Now in the warning
message and enter a valid serial number and license key.
No data is lost while upgrading from evaluation version to full license version.
You can also register Fabric Manager at any time from within Fabric Manager.
To register Fabric Manager
1. Select Help > Register.
2. Type a valid serial number and license key in the Fabric Manager Registration window.
3. Click Enter.
Installing the Fabric Manager server
This section describes how to install the Fabric Manager server using the installation wizard.
• “Installing Fabric Manager server on Windows” on page 16
• “Installing Fabric Manager server on Solaris” on page 23
• “Installing Fabric Manager server on Linux” on page 26
INSTALLING FABRIC MANAGER SERVER ON WINDOWS
Use the following procedure to install the Fabric Manager server on a Windows platform.
To install the Fabric Manager server on Windows
1. Double-click the Windows folder from the Fabric Manager Installation for Windows CD-ROM
(disk 1).
2. Double-click the Install icon.
The Fabric Manager installation wizard launches and asks whether you want to install the full
version or the evaluation version of Fabric manager.
16 Fabric Manager Administrator’s Guide
53-1000610-01
Page 43

Installing the Fabric Manager server
A valid serial number and license key are required to install the full version of Fabric Manager.
2
FIGURE 3 Fabric Manager installation wizard
3. Select the version you want to install (Full or Evaluation); then click Next.
4. Enter a serial number and license key, or accept the license agreement, depending on whether
the full or evaluation version is selected.
- Full version only: Type a valid serial number and license key.
The serial number and license key are verified at this time. If the serial number or license
key is invalid, an error message displays and you must re-enter them. You cannot continue
installing the full version without a valid serial number and license key.
- Evaluation version only: Accept the license agreement.
5. Click Next.
If you already have Fabric Manager 4.2 or later installed, the install wizard provides you the
choice of migrating your existing database automatically, or removing it:
a. Click Yes if you want to update to the new database and automatically save your
existing data, or click No to remove your current data and create the new database.
b. Click Next.
The Introduction window appears.
6. Read the introduction; then click Next.
Fabric Manager Administrator’s Guide 17
53-1000610-01
Page 44

Installing the Fabric Manager server
NOTE
2
The Select Destination Folder window displays.
FIGURE 4 Select destination folder
7. Use the default location (C:\FabricManager), or click Choose to select a new folder.
You can also type a new destination folder. The path must not contain spaces. Alphanumeric
characters, the dash, and the underscore are the only characters allowed.
This document uses <installdir> to indicate the folder into which Fabric Manager is installed.
8. Click Next.
The Select FTP Server window displays.
FIGURE 5 Select FTP server
9. Select whether to use the built-in FTP server or your own external FTP server.
18 Fabric Manager Administrator’s Guide
53-1000610-01
Page 45

NOTE
NOTE
Installing the Fabric Manager server
The FTP server is used primarily for firmware download. To use the Fabric Manager firmware
repository, you must either select the built-in FTP server or, if you select the external FTP
server, ensure that your FTP server resides on the same system as the Fabric Manager server.
The built-in FTP server is always installed, regardless of which option you select. If you select
the external FTP server, the built-in FTP server is disabled.
After installation, you can change which FTP server to use at any time, as described in
“Configuring file transfer options” on page 212.
Specific port numbers cannot be blocked if you are using an FTP server. See “Blocked port
numbers” on page 11 for more information on the ports that cannot be blocked.
10. Click Install.
Fabric Manager is installed on your machine.
The Specify Port Number window displays.
2
FIGURE 6 Specify port number
11. Enter the Web server port number. The default is 80.
If you type a new Web server port number, make note of it; you must use the same port
number when you launch the Fabric Manager client. Do not use port 2638; it is used internally
by the Fabric Manager server.
12. Enter the starting port number. The default is 24600.
If the default starting port number is not a free port number, the server cannot start up
correctly. If you enter a new port number, you must ensure that it and the next ten port
numbers represent free ports.
If you are upgrading or migrating from a previous version of Fabric Manager, you might receive
a message indicating that the ports are unavailable. This can occur when the ports have yet to
be released by the previous uninstall. You should wait a few minutes and try again.
Fabric Manager Administrator’s Guide 19
53-1000610-01
Page 46

Installing the Fabric Manager server
2
13. Enter the syslog listening port number. The default is 514.
This is the port number on which Fabric Manager will listen for syslog messages.
14. Click Next.
The Select Authentication Method window displays.
FIGURE 7 Select authentication method
15. Select your authentication method and click Next.
This is the method that will be used to authenticate users when users try to log in to the Fabric
Manager server.
16. Provide additional information depending on the type of authentication method selected.
FIGURE 8 Windows domain or workgroup authentication
For Windows domain or work group authentication:
Type the Windows Domain or Workgroup name.
20 Fabric Manager Administrator’s Guide
53-1000610-01
Page 47

NOTE
Installing the Fabric Manager server
If your machine is running Windows XP and it belongs to a local workgroup, but you want to
authenticate the users locally (instead of using a Windows domain controller), you must
perform the following Windows XP registry configuration:
1. Set HKEY_LOCAL_MACHINE\SYSTEM\CurrentControlSet\Control\Lsa\ForceGuest to 0.
2. Disable the guest account.
3. Create a local user and use it to log in within Fabric Manager.
For RADIUS authentication:
You should configure at least two RADIUS servers so that if one fails, the other assumes
service. You can configure up to three RADIUS servers.
a. Enter values for the following:
- RADIUS server IP address or DNS name.
- RADIUS authentication port number.
- Authentication type. The authentication type should match the setting on your
RADIUS server.
- Shared secret and confirm shared secret. The shared secret is a password for the
RADIUS client and server. It is used in an encryption process to obscure details in
RADIUS messages like user passwords.
2
It is recommended that the shared secret be at least 22 characters containing
mixed-case letters with numeric and symbol or punctuation characters.
- Timeout. The number of seconds the client waits for the RADIUS server to reply.
- Retry. The number of attempts to connect to the RADIUS server before giving up.
b. Click Add.
c. Optional: You can add multiple RADIUS servers by entering their configuration
information and clicking Add. To edit information you have already entered, select a
server from the table at the bottom of the window, make your changes, and click
Update.
FIGURE 9 Switch-based authentication
Fabric Manager Administrator’s Guide 21
53-1000610-01
Page 48

Installing the Fabric Manager server
2
For switch-based authentication:
17. Click Next.
The SAN size selection window displays. The selected SAN size setting can affect Fabric
Manager performance.
Enter the IP addresses of the switches, separating each IP address with a semicolon.
When using switch-based authentication, you should enter multiple switch IP addresses. If
you enter only a single switch IP address, you cannot access Fabric Manager if that switch
is down.
FIGURE 10 Select SAN sizes
18. Select the size of the SAN that Fabric Manager will be managing (Table 4 lists the polling rates
for each SAN size).
TABLE 4 Polling rates per SAN size
Total ports managed Polling rates
Performance
Monitoring
Small SAN (up to 512 ports, 1-20 domains) 5 minutes 1 minute
Medium SAN (513-1280 ports, 21-50 domains) 5 minutes 5 minutes
Large SAN (1281-2560 ports, 51-80 domains) 5 minutes 30 minutes
1. Medium SANs can take between 5 and 10 minutes to update for some actions. Large SANs can take
between 30 to 60 minutes to update for some actions. You should issue a refresh manually for immediate
updates. Using Refresh Status Information to refresh a switch typically provides quicker updates than refreshing
an entire fabric.
Fabric Manager updates
1
1
19. Click Next.
The Important Information window displays.
20. Ensure that the Services window is closed (as described in the Information window); then click
Next.
22 Fabric Manager Administrator’s Guide
53-1000610-01
Page 49

NOTE
Installing the Fabric Manager server
When the Fabric Manager installation finishes, the Install Complete window displays.
FIGURE 11 Installation complete
2
21. Optional: Click the View ReadMe checkbox to open the ReadMe file after exiting the installation
wizard.
22. Click Done to exit the installation wizard.
The Fabric Manager server starts. If you selected to use the built-in FTP server, and if no other
FTP server is installed on the Fabric Manager server, then the built-in FTP server starts.
INSTALLING FABRIC MANAGER SERVER ON SOLARIS
This section describes how to install the Fabric Manager server on a Solaris platform.
You must have root access to install the Fabric Manager server on a Solaris system. You do not
need root access to install and run the Fabric Manager client.
Before installing, ensure that all NFS mount points are up. Fabric Manager uses the df -k command
to check disk space. If the NFS mount points are down, the df command can take a long time to
respond and the Fabric Manager installation might stop responding.
To install Fabric Manager server on Solaris
1. Click install.bin from the File Manager window that displays when you insert the Fabric
Manager Installation for Solaris CD-ROM (disk 3).
2. Double-click the Install icon.
The Get User Input window displays.
3. Click Yes if you have a previous version of Fabric Manager installed; otherwise, click No and
then click Next.
Fabric Manager Administrator’s Guide 23
53-1000610-01
Page 50

Installing the Fabric Manager server
NOTE
2
If you selected Yes:
a. Select whether you have client, server, or both installed and click Next.
b. Identify the location where the previous Fabric Manager client is installed and click Next.
c. Identify the location where the previous Fabric Manager server is installed and click Next.
d. Click Yes if you want to update to the new database and automatically save your existing
e. Click Next.
4. Select the version you want to install (Full or Evaluation); then click Next.
5. Enter a serial number and license key, or accept the license agreement, depending on whether
the full or evaluation version is selected.
- Full version only: Type a valid serial number and license key.
The install wizard provides you the choice of migrating your existing database
automatically, or removing it.
data, or click No to remove your current data and create the new database.
The serial number and license key are verified at this time. If the serial number or license
key is invalid, an error message displays and you must re-enter them. You cannot continue
installing the full version without a valid serial number and license key.
- Evaluation version only: Accept the license agreement.
6. Click Next.
The Introduction window displays.
7. Read the introduction; then click Next.
The Select Destination Folder window appears.
8. Use the default location, or click Choose to select a new folder.
You can also type a new destination folder. The path must not contain spaces. Alphanumeric
characters, the dash, and the underscore are the only characters allowed.
This document uses <installdir> to indicate the folder where Fabric Manager is installed.
9. Click Next.
The Select FTP Server window appears.
10. Select whether to use the built-in FTP server or your own external FTP server.
The FTP server is used primarily for firmware download. To use the Fabric Manager firmware
repository, you must either select the built-in FTP server or, if you select the external FTP
server, ensure that your FTP server resides on the same system as the Fabric Manager server.
The built-in FTP server is always installed, regardless of which option you select. If you select
the external FTP server, the built-in FTP server is disabled.
After installation, you can change which FTP server to use at any time, as described in
“Configuring file transfer options” on page 212.
11. Click Install.
Fabric Manager is installed on your machine.
24 Fabric Manager Administrator’s Guide
53-1000610-01
Page 51

NOTE
Installing the Fabric Manager server
The Specify Port Number window appears.
12. Enter the Web server port number. The default is 80.
If you type a new Web server port number, make note of it; you must use the same port
number when you launch the Fabric Manager client. Do not use port 2638; it is used internally
by the Fabric Manager server.
13. Enter the starting port number. The default is 24600.
If the default starting port number is not a free port number, the server cannot start up
correctly. If you enter a new port number, you must ensure that it and the next eight port
numbers represent free ports.
If you are upgrading or migrating from a previous version of Fabric Manager, you might receive
a message indicating that the ports are unavailable. This can occur when the ports have yet to
be released by the previous uninstall. You should wait a few minutes and try again.
14. Click Next.
The Select Authentication Method window appears.
15. Select your authentication method and click Next.
2
This is the method that is used to authenticate users when users try to log in to the Fabric
Manager server.
16. Provide additional information depending on the type of authentication method selected.
For NIS authentication:
Enter your NIS host name or IP address and NIS domain name. You can omit the NIS host
name to force the Fabric Manager server to use broadcast to locate a valid NIS server or
NIS slave.
For switch-based authentication:
Enter the IP addresses of the switches, separating each IP address with a semicolon.
When using switch-based authentication, you should enter multiple switch IP addresses. If
you enter only a single switch IP address, you cannot access Fabric Manager if that switch
is down.
For RADIUS server authentication:
You should configure at least two RADIUS servers so that if one fails, the other assumes
service. You can configure up to three RADIUS servers.
a. Enter values for the following:
- RADIUS server IP address or DNS name.
- RADIUS authentication port number.
- Authentication type. The authentication type should match the setting on your
RADIUS server.
- Shared secret and confirm shared secret. The shared secret is a password for the
RADIUS client and server. It is used in an encryption process to obscure details in
RADIUS messages like user passwords.
Fabric Manager Administrator’s Guide 25
53-1000610-01
Page 52

Installing the Fabric Manager server
NOTE
2
For password file authentication:
17. Click Next.
The SAN size selection window appears.
18. Select the size of the SAN that Fabric Manager will be managing (Table 4 lists the polling rates
for each SAN size).
It is recommended that the shared secret should be at least 22 characters
containing mixed case letters with numeric and symbol or punctuation characters.
- Timeout. The number of seconds the client waits for the RADIUS server to reply.
- Retry. The number of attempts to connect to the RADIUS server before giving up.
b. Click Add.
c. Optional: You can add multiple RADIUS servers by entering their configuration
information and clicking Add. To edit the information you have already entered, select
it from the list, make your changes, and then click Update.
No additional information is required.
19. Click Next.
When the Fabric Manager installation finishes, the Install Complete window appears.
20. Click Done to exit the install wizard.
INSTALLING FABRIC MANAGER SERVER ON LINUX
This section describes how to install the Fabric Manager server on a Linux platform.
You must have root access to install Fabric Manager server on a Linux system. You do not need root
access to install and run the Fabric Manager client.
Before installing, ensure that all NFS mount points are up. Fabric Manager uses the df -k command
to check disk space. If the NFS mount points are down, the df command can take a long time to
respond and the Fabric Manager installation might stop responding.
To install Fabric Manager server on Linux
1. Click install.bin from the File Manager window that displays when you insert the Fabric
Manager Installation for Linux CD-ROM (disk 2).
2. Double-click the Install icon.
The Get User Input window displays.
3. Click Yes if you have a previous version of Fabric Manager installed; otherwise, click No and
then click Next.
If you selected Yes:
a. Select whether you have client, server, or both installed and click Next.
b. Identify the location where the previous Fabric Manager client is installed and click Next.
c. Identify the location where the previous Fabric Manager server is installed and click Next.
26 Fabric Manager Administrator’s Guide
53-1000610-01
Page 53

NOTE
Installing the Fabric Manager server
The install wizard provides you the choice of migrating your existing database
automatically, or removing it.
d. Click Yes if you want to update to the new database and automatically save your existing
data, or click No to remove your current data and create the new database.
e. Click Next.
4. Select the version you want to install (Full or Evaluation); then click Next.
5. Enter a serial number and license key, or accept the license agreement, depending on whether
the full or evaluation version is selected.
2
- Full version only: Type a valid serial number and license key.
The serial number and license key are verified at this time. If the serial number or license
key is invalid, an error message displays and you must re-enter them. You cannot continue
installing the full version without a valid serial number and license key.
- Evaluation version only: Accept the license agreement.
6. Click Next.
The Introduction window appears.
7. Read the introduction; then click Next.
The Select Destination Folder window appears.
8. Use the default location, or click Choose to select a new folder.
You can also type a new destination folder. The path must not contain spaces.
This document uses <installdir> to indicate the folder where Fabric Manager is installed.
9. Click Next.
The Select FTP Server window appears.
10. Select whether to use the built-in FTP server or your own external FTP server.
The FTP server is used primarily for firmware download. To use the Fabric Manager firmware
repository, you must either select the built-in FTP server or, if you select the external FTP
server, ensure that your FTP server resides on the same system as the Fabric Manager server.
The built-in FTP server is always installed, regardless of which option you select. If you select
the external FTP server, the built-in FTP server is disabled.
After installation, you can change which FTP server to use at any time, as described in
“Configuring file transfer options” on page 212.
11. Click Install.
Fabric Manager is installed on your machine.
The Specify Port Number window appears.
12. Enter the Web server port number. The default is 80.
If you type a new Web server port number, make note of it; you must use the same port
number when you launch the Fabric Manager client. Do not use port 2638; it is used internally
by the Fabric Manager server.
Fabric Manager Administrator’s Guide 27
53-1000610-01
Page 54

Installing the Fabric Manager server
NOTE
2
13. Enter the starting port number. The default is 24600.
If the default starting port number is not a free port number, the server cannot start up
correctly. If you enter a new port number, you must ensure that it and the next eight port
numbers represent free ports.
If you are upgrading or migrating from a previous version of Fabric Manager, you might receive
a message indicating that the ports are unavailable. This can occur when the ports have yet to
be released by the previous uninstall. You should wait a few minutes and try again.
14. Click Next.
The Select Authentication Method window appears.
15. Select your authentication method and click Next.
This is the method that is used to authenticate users when users try to log in to the Fabric
Manager server.
16. Provide additional information depending on the type of authentication method selected.
For NIS authentication:
Enter your NIS host name or IP address and NIS domain name. You can omit the NIS host
name to force the Fabric Manager server to use broadcast to locate a valid NIS server or
NIS slave.
For switch-based authentication:
Enter the IP addresses of the switches, separating each IP address with a semicolon.
When using switch-based authentication, you should enter multiple switch IP addresses. If
you enter only a single switch IP address, you cannot access Fabric Manager if that switch
is down.
For RADIUS server authentication:
You should configure at least two RADIUS servers so that if one fails, the other assumes
service. You can configure up to three RADIUS servers.
a. Enter values for the following:
- RADIUS server IP address or DNS name.
- RADIUS authentication port number.
- Authentication type. The authentication type should match the setting on your
RADIUS server.
- Shared secret and confirm shared secret. The shared secret is a password for the
RADIUS client and server. It is used in an encryption process to obscure details in
RADIUS messages like user passwords.
It is recommended that the shared secret should be at least 22 characters
containing mixed case letters with numeric and symbol or punctuation
characters.
- Timeout. The number of seconds the client waits for the RADIUS server to reply.
- Retry. The number of attempts to connect to the RADIUS server before giving up.
28 Fabric Manager Administrator’s Guide
53-1000610-01
Page 55

Copying an installation from server to server
b. Click Add.
c. Optional: You can add multiple RADIUS servers by entering their configuration
information and clicking Add. To edit the information you have already entered, select
it from the list, make your changes, and then click Update.
For password file authentication:
No additional information is required.
17. Click Next.
The SAN size selection window appears.
18. Select the size of the SAN that Fabric Manager will be managing (Table 4 lists the polling rates
for each SAN size).
19. Click Next.
When the Fabric Manager installation finishes, the Install Complete window appears.
20. Click Done to exit the install wizard.
Copying an installation from server to server
2
This section provides information on how to copy a Fabric Manager server installation from one
server to another (keeping the same version).
If you are using an external FTP server (located on the Fabric Manager server), you must copy the
firmware files. For more information, see “Accessing firmware when changing the FTP server” on
page 221.
Before you start the copy, ensure that the following conditions exist:
• Host1 and Host2 are running the same type of operating system.
• Host2 will be running the same version of Fabric Manager that was running on Host1.
• Host2 will have the same Fabric Manager license as on Host1.
Fabric Manager installation on Host2 will be in the same drive and directory as Host1 (for example,
C:\FabricManager).
If an external executable is used in a call home configuration on Host1, then it will be located on
the same drive and directory on Host2.
Fabric Manager server will use the same ports on Host2 that are used on Host1.
If the Web server port number on Host1 is already in use on Host2, use the Server Management
Console on Host2 to change the Web Server port number after installation, as described in
“Changing the Web Server port numbers” on page 342.
The user will enter the Host2 name/IP address when connecting from the Fabric Manager client.
Fabric Manager Administrator’s Guide 29
53-1000610-01
Page 56

NOTE
Copying an installation from server to server
2
To copy a Fabric Manager server installation
1. Perform a fresh install of Fabric Manager server on Host2 in the same drive and directory as
on Host1 and with the same license level. See “Installing the Fabric Manager server” on
page 16 for installation information.
You can specify XX for the authentication method, switch/domain name, Web server port
number, and starting port number, because these are all overwritten by the remainder of this
procedure.
2. Stop the Fabric Manager client on Host1.
3. Stop the Fabric Manager services on Host1.
You can stop the services using the Server Management Console, as described in “Managing
Fabric Manager services” on page 334.
4. Stop the Fabric Manager services on Host2.
You can stop the services using the Server Management Console, as described in “Managing
Fabric Manager services” on page 334.
5. Delete the fmserver folder on Host2.
The default from the Fabric Manager server installation on Host2 is:
<installdir>\server\server\fmserver
6. Delete the databases folder on Host2.
The default from the Fabric Manager server installation on Host2 is:
<installdir>\server\db\SYBSsa9\databases
7. C op y t he fmserver folder from the Fabric Manager server installation on Host1 to the same
location on Host2.
The default location is <installdir>\server\server\fmserver.
8. Copy the databases folder from the Fabric Manager server installation on Host1 to the same
location on Host2
The default location is <installdir>\server\db\SYBSsa9\databases.
9. Delete all files displayed under the log folder within the fmserver folder.
The default location is <installdir>\server\server\fmserver\log\*
10. Optional (only if you still want to access the old Fabric Manager server): Start the Fabric
Manager services on Host1 using the Server Management Console.
11. Start the Fabric Manager services on Host2 using the Server Management Console.
After copying the Fabric Manager server installation from Host1 to Host2 and confirming that it
is working as expected on Host2, you might want to uninstall the Fabric Manager server
installation from Host1 so that your switches are polled by only one Fabric Manager server.
30 Fabric Manager Administrator’s Guide
53-1000610-01
Page 57

NOTE
CAUTION
To upgrade the Fabric Manager server installation on Host2
1. Follow the steps in “To copy a Fabric Manager server installation” on page 30 to keep the same
version of Fabric Manager server on Host2.
2. Upgrade the Fabric Manager server version on Host2 as directed in “Installing the Fabric
Manager server” on page 16.
Do not install a newer version of Fabric Manager on Host2 and then overwrite those files by
copying old files from Host1.
Uninstalling the Fabric Manager server
This section describes how to uninstall Fabric Manager from either a Windows, Solaris, or Linux
platform.
When you uninstall the Fabric Manager server, the FTP service is uninstalled, and the FTP root
directory is deleted. Save any firmware files stored in the FTP root directory to another location
before uninstalling the server.
Uninstalling the Fabric Manager server
2
You must stop the Fabric Manager server, if it is running, before you uninstall it. Chapter 26,
“Server Management Console” describes how to stop the Fabric Manager server using the Server
Management Console.
You must restart your system after you uninstall Fabric Manager.
To uninstall the Fabric Manager server from Windows
1. Stop the Fabric Manager server, if it is running. See “Managing Fabric Manager services” on
page 334 for instructions.
2. From the Start menu, click Programs > Fabric Manager > Uninstall Fabric Manager to launch
the uninstall wizard.
Fabric Manager Administrator’s Guide 31
53-1000610-01
Page 58

Uninstalling the Fabric Manager server
2
The Uninstall Fabric Manager wizard appears, as shown in Figure 12.
FIGURE 12 Fabric Manager uninstall wizard
3. Click Next.
You must restart your system when uninstallation is complete. You are prompted whether you
want the wizard to restart your system immediately, or whether you want to restart your system
yourself.
4. Select Yes to automatically restart your system immediately, or No to restart your system
yourself.
If you select No, be sure to restart your system before performing any other operations.
5. Click Done.
User-specific information, such as login name and server port number, is stored in a separate file
and is not removed when you uninstall Fabric Manager. You must manually delete this file. For
more information, see “Uninstalling or upgrading Fabric Manager” on page 10.
To uninstall the Fabric Manager server from Solaris
1. Stop the Fabric Manager server, if it is running. See “Managing Fabric Manager services” on
page 334 for instructions.
2. Navigate to the location where you installed Fabric Manager.
3. From the Fabric Manager/ UninstallerData directory, run Uninstall_FabricManager.
4. Click Next.
You must restart your system when uninstallation is complete. You are prompted whether you
want the wizard to restart your system immediately, or whether you want to restart your system
yourself.
5. Select Yes to automatically restart your system immediately, or No to restart your system
yourself.
32 Fabric Manager Administrator’s Guide
53-1000610-01
Page 59

Uninstalling the Fabric Manager server
If you select No, be sure to restart your system before performing any other operations.
6. Click Done.
To uninstall the Fabric Manager server from Linux
1. Stop the Fabric Manager server, if it is running. See “Managing Fabric Manager services” on
page 334 for instructions.
2. Navigate to the location where you installed Fabric Manager.
3. From the Fabric Manager/ UninstallerData directory, run Uninstall_FabricManager.
4. Click Next.
You must restart your system when uninstallation is complete. You are prompted whether you
want the wizard to restart your system immediately, or whether you want to restart your system
yourself.
5. Select Yes to automatically restart your system immediately, or No to restart your system
yourself.
If you select No, be sure to restart your system before performing any other operations.
6. Click Done.
2
Fabric Manager Administrator’s Guide 33
53-1000610-01
Page 60

Uninstalling the Fabric Manager server
2
34 Fabric Manager Administrator’s Guide
53-1000610-01
Page 61

Chapter
Fabric Manager Client
In this chapter
•Launching Fabric Manager . . . . . . . . . . . . . . . . . . . . . . . . . . . . . . . . . . . . . . . 35
•Uninstalling the Fabric Manager client . . . . . . . . . . . . . . . . . . . . . . . . . . . . . 39
•Understanding the Fabric Manager layout . . . . . . . . . . . . . . . . . . . . . . . . . . 40
•Customizing Fabric Manager . . . . . . . . . . . . . . . . . . . . . . . . . . . . . . . . . . . . . 52
Launching Fabric Manager
This section describes how to launch the Fabric Manager client. Before launching the client, you
must have already installed the Fabric Manager server, as described in Chapter 2, “Installation”.
The Fabric Manager client is automatically installed the first time you launch it. Note that the Fabric
Manager client is not a web-based client—but it supports a web-based client installation.
On Windows platforms, during client installation you can optionally choose to create desktop and
Start menu shortcut items for the Fabric Manager client. The Start Menu shortcut is:
3
Start > Programs > FabricManager serverIP
The user name and password that you use to start Fabric Manager are not used for authenticating
with the switch and these are typically not the same accounts.
Whenever the Fabric Manager server version is upgraded or downgraded, the version change is
auto-detected before the client is launched and the new version of the client is automatically
downloaded and installed.
If you launch the Fabric Manager client for multiple servers running the same or different versions,
then multiple copies of the Fabric Manager client are installed on the client machine. For Windows
and Linux users, one desktop icon is optionally created for all the Fabric Manager servers to which
you connect.
To launch Fabric Manager
1. Open a browser window and type the Fabric Manager server hostname or IP address in the
Address field; for example:
http://FMserverhost1.companyname.com/
http://192.168.10.11
http://[FEBC:A574:382B:23C1:AA49:4592:4EFE:9982]
If, when the Fabric Manager server was installed, a Fabric Manager web server port number
was specified (instead of the default 80), you must specify the port number after the hostname
or IP address. In the following examples, 8080 is the web server port number:
http://FMserverhost1.companyname.com:8080/
http://192.168.10.11:8080/
Fabric Manager Administrator’s Guide 35
53-1000610-01
Page 62

Launching Fabric Manager
3
The Fabric Manager introduction window displays, as shown in Figure 13 on page 36.
FIGURE 13 Fabric Manager introductory window
2. Click the Launch Fabric Manager link.
If the browser is not configured with the correct JRE version (JRE version 1.6), then Fabric
Manager redirects you to a window from which you can download the correct version.
If this is the first time that the Fabric Manager client is launched from the server, then the
client is automatically installed on the client machine, in the Java Control Panel user cache.
A security warning displays, asking whether you want to trust the digitally signed Fabric
Manager client application.
3. Click Yes to trust the application.
Windows and Linux only: If this is the first time that the Fabric Manager client is launched from
the server, a create shortcut dialog displays, asking whether you want to create shortcuts for
the Fabric Manager client.
- Click Yes to create the desktop and Start menu shortcuts.
- Click No to continue without creating the shortcuts.
36 Fabric Manager Administrator’s Guide
53-1000610-01
Page 63

NOTE
Launching Fabric Manager
- Click Configure to customize shortcut creation using the Java Control Panel, shown in
Figure 14. Then click OK to close the Java Control Panel.
3
FIGURE 14 Customizing shortcut creation
4. Type your user name and password in the login dialog, shown in Figure 15. This is the user
name and password that you use to log in to the server, and not the ones used to log in to the
switches.
FIGURE 15 Fabric Manager login
Fabric Manager stores your user name and populates the User name field automatically
whenever you subsequently launch the software.
The login banner displays, if one is configured. See “Creating a login banner” on page 339 for
information on configuring a login banner.
5. Click Agree in the login banner.
The Fabric Manager client launches.
Fabric Manager Administrator’s Guide 37
53-1000610-01
Page 64

Launching Fabric Manager
NOTE
3
Figure 16 shows the Fabric Manager window the first time you launch it. Note that it does not show
any fabrics. You must discover fabrics before you can manage them with Fabric Manager. See
“Discovering a fabric” on page 61 for information about adding devices from a SAN for Fabric
Manager to begin monitoring.
The screenshots in the remainder of this chapter show Fabric Manager windows in which fabrics are
already discovered.
FIGURE 16 Fabric Manager initial launch default window
If this is not the first time the Fabric Manager client is launched from the server, Fabric Manager
determines whether any fabrics were previously discovered and whether your user credentials are
valid. All of the fabrics that have valid user credentials are loaded in the client. If any fabrics were
discovered by the Fabric manager server but do not have your valid user credentials, then you
receive a message dialog that one or more fabrics are available for monitoring. If you receive this
message, you can click Close to ignore it, or click Monitor Fabrics to begin monitoring these fabrics.
See “Monitoring fabrics” on page 67 for instructions.
NOTES ON LOGGING IN TO A SWITCH
When you log into a switch, if the details about that switch do not appear in the details table, you
may need to re-log in and ensure that the overwrite check discovery credentials feature is enabled.
If you do not enable this feature in the switch login dialog, the credentials for the switch are not
saved in the switches table.
This can occur if you are prompted to provide non-seed switch credentials (that are different from
the seed switch), but you cancel the login. On the next login, if you provide credentials but do not
enable this feature, the switches table does not update the information and no data about the
switch appears in the Fabric Manager window.
38 Fabric Manager Administrator’s Guide
53-1000610-01
Page 65

Any subsequent operation that requires switch authentication will fail until you re-log in and enable
the feature. For example, the following operations would not succeed:
• Fabric asset collection, such as GigE port info
• Physical Inventory collection
• FDMI collection
• Switch password changes
Uninstalling the Fabric Manager client
To remove the installed Fabric Manager client, you must clear the Java Control Panel cache, as
described in the following procedure.
To uninstall the Fabric Manager client
1. Launch the Java Control Panel.
Windows: From the Start menu, click Settings > Control Panel > Java.
Solaris and Linux: Launch the Control Panel executable file. In the Java 2 SDK, this file is in the
following location:
Uninstalling the Fabric Manager client
3
<SDK installation directory>/jre/bin/ControlPanel
In a Java 2 Runtime Environment installation, this file is in the following location:
<JRE installation directory>/bin/ControlPanel
FIGURE 17 Java Control Panel
2. Click the General tab.
3. Click View in the Temporary Internet Files section.
Fabric Manager Administrator’s Guide 39
53-1000610-01
Page 66

Understanding the Fabric Manager layout
3
4. Select Applications from the selection menu.
FIGURE 18 Java application cache viewer
5. Select Fabric Manager and click Remove Selected Application.
6. Click OK to close the Java windows.
Understanding the Fabric Manager layout
The Fabric Manager client consists of four basic panels, illustrated in Figure 19 on page 41 and
described in the following sections:
• “Scope panel” on page 41
• “View panel” on page 42
• “Task panel” on page 45
• “Information panel” on page 46
The remainder of this section describes the general layout of the Fabric Manager client. In addition
to the panel descriptions, this section contains the following information:
• “Menu bar” on page 48
• “Status indicators” on page 49
• “Refreshing the window” on page 50
40 Fabric Manager Administrator’s Guide
53-1000610-01
Page 67

Menu bar
Information
Panel
Scope Panel
Ta sk
Panel
View
Panel
Understanding the Fabric Manager layout
Additional details are described in Chapter 5, “Viewing Fabric Topologies”.
3
FIGURE 19 Fabric Manager client window
SCOPE PANEL
The Scope panel is where you select the information to be displayed in the other panels of the
Fabric Manager client. The selections you make in the Scope panel affect what is displayed in the
other panels.
From the View drop-down menu, you can select one of the following views to be displayed in the
View panel:
• SAN View
If you select SAN View, the View panel displays all of the monitored fabrics in the database. The
SAN View is the default view when you launch the Fabric Manager client.
• Fabric View
If you select Fabric View, the View panel displays the switches and their interconnectivity for a
single fabric. Note that Access gateway-mode switches are only visible in the topology from the
Fabric view.
• Host-Storage View
If you select Host-Storage View, the View panel displays the end-to-end connectivity of all of the
monitored fabrics.
Fabric Manager Administrator’s Guide 41
53-1000610-01
Page 68

Understanding the Fabric Manager layout
The view that is selected in the Scope panel determines
the topology that is displayed in the View panel.
3
• MetaSAN View
If you select MetaSAN View, backbone fabrics, edge fabrics, and FCR switches are displayed.
When you select a backbone fabric, the LSANs for the fabric are displayed. When you select an
LSAN, the associated devices are shown.
In Figure 21, the Fabric View is selected in the Scope panel, and the View panel displays the
switches that are in the selected fabric.
FIGURE 20 View panel, Fabric selection
The Display By drop-down menu provides four different identifiers you can use to view SAN
elements (name, IP address, domain ID, or WWN). Select the identifier that you want Fabric
Manager to use as it displays each element.
The contents of the Scope panel changes depending on what view is selected (see the different
Scope panels in Figure 19 and Figure 21). The View and Display By options are always available.
When Fabric View or Host-Storage View is selected, the Scope panel displays additional options,
which are described in detail in “Viewing Fabric Topologies” on page 83.
Also available from the Scope panel are the scoping tabs. Depending on which tab is selected, a list
of selectable items appears. Use the drop-down menus to make a selection, and the selected item
becomes highlighted and selected in the View panel.
VIEW PANEL
The View panel displays the topology of the selection in the Scope panel.
42 Fabric Manager Administrator’s Guide
53-1000610-01
Page 69

The View panel displays the topology for the view that is selected
in the Scope panel, in this case, the Host-Storage View.
Understanding the Fabric Manager layout
In Figure 21, the Host-Storage View is selected in the Scope panel, and the View panel displays the
monitored fabrics and attached devices. See Figure 19 and Figure 20 for examples of the View
panel when the SAN View and the Fabric View are selected.
3
FIGURE 21 View panel, Host-Storage selection
You can right-click an element in the View panel to display a context menu of tasks for that
element. Different SAN elements provide different menu options. Figure 22 shows the context
menu that appears when you right-click a fabric element.
The Topology background menu options are included in the right-click menu. For example, if you
are in the Fabric View and right-click on the background (without selecting a fabric), the Hide and
Show menus and submenus are presented.
Fabric Manager Administrator’s Guide 43
53-1000610-01
Page 70

Understanding the Fabric Manager layout
3
If you are in the Fabric view and have selected an object right-clicking displays menu options for
that object. Appended to this submenu is the background right-click menu, with a separator to
distinguish contexts.
FIGURE 22 Context menu for the fabric element
The section directly above the View Panel has the following additional components, as shown in
Figure 20:
• Server date and time
The date and time (including the time zone) of the Fabric Manager server.
• Alert count
Summary of unacknowledged and unresolved alerts. Each alert type is a clickable link; if you
click a link, the View panel displays the SAN view and the Information panel displays the Alerts
tab for the SAN.
• Application toolbar
Buttons that allow you to move backward and forward in your session history, refresh your data
and print the view. Table 5 provides a description of these buttons. You can also hover the
mouse over any of the buttons to get a short description.
44 Fabric Manager Administrator’s Guide
53-1000610-01
Page 71

View toolbar
Server date and time
Application
toolbar
Alert count
Understanding the Fabric Manager layout
• View toolbar
Buttons that allow you to perform operations on the topology displayed in the View panel.
These buttons are described in detail in Chapter 5, “Viewing Fabric Topologies”. You can also
hover the mouse over any of the buttons to get a short description.
3
FIGURE 23 View panel components
TABLE 5 Application toolbar buttons
Icon Name Description
Help Opens the online help.
Print View Prints the contents of the View panel.
Refresh View Refreshes the displayed information.
Go Back Navigation icon: Returns to the previous view in the navigation history (if applicable). If
you click the small downward arrow next to the Back button, a menu showing the
previous 10 views displays.
Go Home Navigation icon: Returns to the view that appeared when you opened Fabric Manager.
Go Forward Navigation icon: Moves forward to the next view in the navigation history (if applicable). If
you click the small downward arrow next to the Forward button, a menu showing the next
10 views displays.
TASK PANEL
The Task panel provides quick access to commonly performed tasks for the selected SAN element
in the View panel. This is not a comprehensive list of tasks, but just the tasks that are used most
often on the type of selected element.
Fabric Manager Administrator’s Guide 45
53-1000610-01
Page 72

Understanding the Fabric Manager layout
Number of items in the table,
and number of items selected
Filter options
3
The task list changes depending on the type of element that is selected. For example, Figure 19
shows the Task panel when the entire SAN is selected (by clicking on the background of the View
panel). The list of tasks is different than the list for a single fabric is selected, or when a device is
selected (as shown in Figure 20 and Figure 21, respectively).
To select a task from the Task panel, click on one of the task groups, and then select the task you
want from the pop-up menu that displays, as shown in Figure 24.
FIGURE 24 Selecting a task from the Task panel
INFORMATION PANEL
The Information panel displays detailed information about the elements in the View panel. The
Information panel consists of a series of tabs, each containing a table of information (as shown in
Figure 25).
FIGURE 25 Information panel
Some of the tabs have a filter that allows you to selectively display information for that tab. All tabs,
other than the Overview tab, display the total number of items in the table, and the number of
items you have selected.
The Information panel has Export, Copy, and Search options within the Actions menu, at the top of
the tables. These options are not available if the table does not have any content.
46 Fabric Manager Administrator’s Guide
53-1000610-01
Page 73

Understanding the Fabric Manager layout
If a table has a great deal of content, use the pagination option to move to the next page in the list,
or type the page number directly into the field. The pagination option is present only on the ports
table and the devices table. It is not available for all tables.
To set the page size, select Set Page Size from the Actions menu (shown in Figure 26) and choose
the page size that suits you best.
FIGURE 26 Set the page size
3
• Click Export to save the contents of the table to a tab-delimited file. The entire table contents
will be exported to the file.
• Click Copy to copy the contents of the table in tab-delimited text format to a file. Only the tables
current contents (rows in the current view) will be copied to the file.
• Click Search to search for a specific text string in the table.
Type your text string in the box that displays on the table, as shown in Figure 27, and press
Enter. The first row that contains the text string is highlighted. If the text is not found in the
table, the text turns red.
FIGURE 27 Searching for text string in a table
• Click Customize to define the columns that are visible on the client window.
Fabric Manager Administrator’s Guide 47
53-1000610-01
Page 74

Understanding the Fabric Manager layout
3
To restore the selection to those set at the factory, click Restore Defaults.
FIGURE 28 Customize the information visible
• Click Refresh to refresh the current view.
The contents in the Information panel changes depending on the element that is selected in the
View panel. For example, the Information panel shown in Figure 19 (SAN View) shows a different
set of tabs than the Information panel shown in Figure 20 (Fabric View).
For some of the tables in the Information panel, you can right-click an element in the table to
display a context menu of tasks for that element. Different elements provide different menu
options. Figure 22 shows the context menu that appears when you right-click a port element.
FIGURE 29 Context menu for the port element
MENU BAR
The menu bar contains drop-down menus with commands for executing specific Fabric Manager
tasks. Commands are dependent upon the element selected within the View panel. Not all
commands apply to all elements. Unavailable commands appear grayed out in the menu bar.
48 Fabric Manager Administrator’s Guide
53-1000610-01
Page 75

Understanding the Fabric Manager layout
3
STATUS INDICATORS
The colors that appear as background headers provide a quick, visual status. These colors
correspond to the Status Legend available from the Help menu (Help > Status Legend).
FIGURE 30 Status legend
For example, Figure 31 shows the status of various switches, indicated by colored backgrounds in
the View panel, the Scope panel, and the Information panel. In the Information panel, the Status
column also indicates the status.
FIGURE 31 Background colors indicating status
Fabric Manager Administrator’s Guide 49
53-1000610-01
Page 76

Understanding the Fabric Manager layout
NOTE
3
By default, persistently disabled ports are no color (transparent). For switches running Fabric OS
v5.0.x or later, you can change this color using the following procedure.
Segmented switches appear with a red - (minus sign) overlaid over the topology node in the view
panel.
A red - (minus sign) is overlaid on the segmented switch both in the scoping and view panel of
fabric view.
When a new switch joins the fabric, an amber + (plus sign) is overlaid on the new switch both in the
scoping and view panel of fabric view.
To change the default color of persistently disabled ports
1. Click Edit > Preferences in the Menu bar.
The Preferences dialog box displays.
2. Expand User Specific and select General (see Figure 36 on page 54).
3. Select the color you want to indicate persistently disabled ports.
REFRESHING THE WINDOW
Fabric Manager views are updated periodically, depending on your SAN size, as shown in Table 6.
TABLE 6 Polling rates per SAN size
Total Ports Managed Polling Rates
PM and APM Fabric Manager Updates
Small SAN (up to 512 ports, 1-20 domains) 5 minutes 1 minute
Medium SAN (513-1280 ports, 21-50 domains) 5 minutes 5 minutes
Large SAN (1281-2560 ports, 51-80 domains) 5 minutes 30 minutes
1. Medium SANs can take between 5 and 10 minutes to update for some actions. Large SANs can take between
30 to 60 minutes to update for some actions. You should issue a refresh manually for immediate updates.
The Fabric Manager window is automatically updated whenever you switch views, such as
switching from the SAN View to the Fabric View. The tables in the Information Panel are
automatically updated whenever you click a different tab.
You can manually refresh the status at any time using one of the following methods:
• Right-click a switch or fabric element and select Refresh Status Information from the context
menu. Using Refresh Status Information to refresh a switch typically provides quicker updates
than refreshing an entire fabric.
1
1
Fabric Manager updates the Admin Domain information every 30 minutes. Using the Refresh
Fabric Data option from the right-click menu does not refresh this information.
• Click the Refresh button in the View panel to refresh the view.
• Click the Refresh link in the Information panel. This method refreshes only the information in
the visible table. The header of the Information panel indicates the last time the panel was
refreshed.
• Select Discovery > Refresh from the Menu bar.
50 Fabric Manager Administrator’s Guide
53-1000610-01
Page 77

Select Refresh from the Discovery menu
Click Refresh button in the View panel
Click Refresh in the Information panel to
refresh the visible table.
Right-click a fabric or switch and select
Refresh Status Information from the
context menu.
The header in the Information panel
displays the time of the last refresh.
Understanding the Fabric Manager layout
Figure 32 illustrates the various ways you can manually refresh the Fabric Manager views.
3
FIGURE 32 Manually refreshing the Fabric Manager window
If you encounter problems refreshing the Fabric Manager client information, refer to “Checking
fabric discovery problems” on page 364 for troubleshooting tips.
SELECTING ELEMENTS AND ACCESSING MODULES
Some of the procedures in this document require you to select SAN elements, such as fabrics,
devices, or switches. When you select SAN elements, you can select them from different places in
the Fabric Manager client:
• View panel
• Information panel table
• Scope panel
Fabric Manager Administrator’s Guide 51
53-1000610-01
Page 78

Customizing Fabric Manager
3
This document does not list all of the ways you can select an element. When procedures in this
document indicate you must select a SAN element, note that there are several ways you can select
it.
Fabric Manager provides several methods for you to access modules and execute tasks:
• From the Menu bar
• From the Task panel
• From the right-click context menu
When describing how you can access a module or task, this document describes one way you can
do it; however, note that there might be other ways to access the same module or task.
Customizing Fabric Manager
This section describes several ways to change the look and feel of Fabric Manager.
• “Displaying fabrics by IP address, domain ID, WWN, and name,” next
• “Customizing tables” on page 52
• “Filtering elements in a table” on page 55
• “Customizing tool tips” on page 56
• “Resizing panels” on page 56
DISPLAYING FABRICS BY IP ADDRESS, DOMAIN ID, WWN, AND NAME
You can display the SAN elements by the identifier that you find most useful.
To select the identifier, click (Name, WWN, IP, or Domain ID) from the Display By drop-down menu in
the Scope panel, as shown in Figure 33.
FIGURE 33 Selecting how to identify SAN elements
CUSTOMIZING TABLES
You can customize the tables in the Information panel to display only the information you want to
see, in the order you want to see it. You can also sort the order of the columns and the order of the
information displayed in the columns.
To customize the contents displayed in a table
1. In the Information panel, click Actions and select Customize.
A pop-up menu displays the available columns for the table, as shown in Figure 34. A check
next to a column name indicates that the column is displayed in the table.
52 Fabric Manager Administrator’s Guide
53-1000610-01
Page 79

Customizing Fabric Manager
2. Check or uncheck a column name in the dialog to display or hide it in the table.
3
FIGURE 34 Hiding/showing table columns
3. Click OK to complete the change.
To set the number of lines on a page
1. In the Information panel, click the arrow to drop down the Actions menu.
2. Select Set Page Size.
3. Select the desired number of lines per page and click Close.
To reorder the columns in a table
1. Click and hold on the header of the table column you want to move.
2. Drag the column to the left or right until you get it in the position you want; then release the
mouse button.
To sort the information displayed within a column (ascending or descending)
1. Click the header of the column you want to reorder. Each time you click the column heading,
the order toggles between ascending and descending.
An up or down arrow to the right of the column name indicates the column that is sorted and
whether it is in ascending (up arrow) or descending (down arrow) order.
Fabric Manager Administrator’s Guide 53
53-1000610-01
Page 80

Customizing Fabric Manager
3
To sort the information displayed within multiple columns from different table views
simultaneously (ascending or descending)
1. Click the header of the first column to be sorted.
2. Ctrl-click each additional column that you want to be sorted. To sort a column in descending
order, ctrl-click twice on the column header.
An up or down arrow to the right of the column name indicates the column that is sorted and
whether it is in ascending (up arrow) or descending (down arrow) order. Numbers next to the
arrows indicate the sort order.
In Figure 35, the table is sorted first by status (in descending order), and then by switch name
(in ascending order). The numbers next to the arrows in the column headers indicate the sort
order.
FIGURE 35 Editing the sort order for multiple columns
To customize the table font setting
1. Click Edit > Preferences in the Menu bar.
The Preferences dialog displays.
2. Expand User Specific and click General (see Figure 36).
FIGURE 36 General preferences
54 Fabric Manager Administrator’s Guide
53-1000610-01
Page 81

NOTE
Customizing Fabric Manager
3. Select the table font from the Font Name drop-down menu. The default font is “Courier New.”
4. Select the font size from the Font Size drop-down menu. The default size is 11.
5. Click OK.
The table font changes accordingly. This setting is persisted in the Fabric Manager database.
3
FILTERING ELEMENTS IN A TABLE
When a table can potentially display a large amount of data rows, a set of filters is provided at the
top of the table so you can narrow the display to the data in which you are most interested.
The filters can consist text fields and drop-down menus. In Figure 37, the Name is a text field, and
the Type, State, and Status are drop-down menus.
FIGURE 37 Filtering elements in a table
For example, if you name all of the switches for your Accounting team “acctx”, where x is a number,
you can view only the accounting switches by typing acct in the Name text field, and clicking Filter.
Only the switches that have acct in their name are then displayed in the table.
To filter elements in a table
1. In the filter text fields, type text (letters, numbers, or symbols such as a period) that are
included in the elements that you want to view.
If you are filtering using numeric values, you must use the asterisk character (*) to prodcuce
complete results.
For example, to view all the elements that include “switch” in their name, type switch in the text
field of the Name filter.
2. From the filter drop-down menus, select a value that you want included in the elements that
you want to view.
3. Click the Filter tab.
Each element that matches all of the criteria you specified in the filters is displayed in the
table.
Fabric Manager Administrator’s Guide 55
53-1000610-01
Page 82

Customizing Fabric Manager
3
CUSTOMIZING TOOL TIPS
Fabric Manager tables with multiple columns of information can be difficult to view due to narrow
columns or having to use the side-to-side scroll bars. Information within an individual cell of a
column or information within an entire row in a table can be viewed much easier using tool tips. You
can customize whether the tool tips display the entire text of a cell or all of the information for a
single row when you mouse over the cell. The default is to display the entire row.
To customize table tool tips
1. Click Edit > Preferences in the Menu bar.
2. Expand User Specific and select General (see Figure 36 on page 54).
3. Check the Show all column values for the current row checkbox to display tool tips for the
4. Click OK.
The Preferences dialog box displays.
entire row in a table. Uncheck this box to display tool tips for only a single cell in the table.
RESIZING PANELS
You can adjust the size of the Fabric Manager panels (Scope panel, View panel, Tasks panel, and
Information panel) by dragging the borders between the panels.
56 Fabric Manager Administrator’s Guide
53-1000610-01
Page 83

Click the arrows in the panel headers
to hide or show the panel.
Customizing Fabric Manager
You can hide or show panels by clicking the arrow in the panel header. For example, if you want to
make the Information panel as large as possible so you can view more of the table, you can click
the arrow in the View panel header to hide that panel, as shown in Figure 38. To display the View
panel again, click the arrow in the View panel header.
3
FIGURE 38 Hiding the View panel
RESETTING TO DEFAULT VALUES
Many options, such as Alerts history and Log parameters, can be reset to the default value by
clicking Restore Defaults.
CONFIGURING SSH
For added security, you can use an SSH client instead of the system’s Telnet or secTelnet client. To
use SSH, you must install the SSH client on the Fabric manager client host.
If no SSH client is configured, Fabric Manager will use Telnet or SecureTelnet.
To configure SSH
1. Select Edit > Preferences.
2. Expand User specific and select Configure SSH, as shown in Figure 39.
Fabric Manager Administrator’s Guide 57
53-1000610-01
Page 84

Configuring Event Options
3
FIGURE 39 Configuring an SSH client
3. Type the full path to the SSH client. This is the client that is installed on the Fabric Manager
client host.
4. Enter any parameters required for logging in to the SSH client.
5. Click OK.
Configuring Event Options
Configure the number of events saved in the Fabric Manager database. If you prefer, you can also
choose to delete events based on their age. When the two choices conflict, the events are saved
based on the number of events defined, rather than the date.
To configure event options
1. Select Edit > Preferences.
2. Expand Server specific and select Event option.
The Event Option windows displays, as shown in Figure 40.
FIGURE 40 Configuring event options
58 Fabric Manager Administrator’s Guide
53-1000610-01
Page 85

Configuring Event Options
3. Type the number of events that you want to keep in the history log into the Maximum historical
events field.
4. Select the number of days events should be kept. Choose from 1 to 30 days.
5. Click OK to save your configuration.
3
Fabric Manager Administrator’s Guide 59
53-1000610-01
Page 86

Configuring Event Options
3
60 Fabric Manager Administrator’s Guide
53-1000610-01
Page 87

Chapter
Discovering and Customizing Fabrics
In this chapter
•Discovering a fabric. . . . . . . . . . . . . . . . . . . . . . . . . . . . . . . . . . . . . . . . . . . . . 61
•Logging in to multiple switches simultaneously . . . . . . . . . . . . . . . . . . . . . . 65
•Monitoring fabrics . . . . . . . . . . . . . . . . . . . . . . . . . . . . . . . . . . . . . . . . . . . . . . 67
•Deleting a fabric from Fabric Manager . . . . . . . . . . . . . . . . . . . . . . . . . . . . . 70
•Renaming fabric components. . . . . . . . . . . . . . . . . . . . . . . . . . . . . . . . . . . . . 71
•Working with switch and port groups . . . . . . . . . . . . . . . . . . . . . . . . . . . . . . . 75
Discovering a fabric
You must discover a fabric before you can administer it with Fabric Manager. You can discover a
fabric in two ways:
4
Discover fabric Use this option if you want to discover a single fabric and you know the IP
address or DNS name of the seed switch.
Subnet Scan Use this option if you want to discover multiple fabrics in the same subnet, or if
you do not know the exact IP address of the seed switch.
When you discover a fabric, Fabric Manager checks to confirm that the seed switch is running the
latest Fabric OS version in the fabric, and if it is not, Fabric Manager prompts you to select a new
seed switch.
The primary FCS must be a seed switch. If you use a non-primary FCS to discover the fabric, Fabric
Manager displays an error and will not allow the discovery to proceed. If Fabric Manager has
already discovered the fabric, but afterward you create the FCS policy and the seed switch is not a
primary FCS, an alert is generated during the next poll.
Fabric Manager cannot discover a fabric that is in the process of actively configuring to form a
fabric. Wait until the fabric is formed and stable, then re-attempt the fabric discovery.
After fabric discovery successfully completes, the Fabric Manager client that initiated the discovery
is updated to display the newly discovered fabric. Other Fabric Manager clients receive a message
dialog that one or more fabrics are available for monitoring. If you receive this message, you can
ignore it, or choose to begin monitoring the newly discovered fabrics. See “Monitoring fabrics” on
page 67 for instructions.
During fabric discovery, if you have defined IPv6 IP addresses for the switch, Fabric Manager
remembers the IP address only. If the switch has a DNS name that you have defined, Fabric
Manager can remember the DNS name and use that.
Fabric Manager Administrator’s Guide 61
53-1000610-01
Page 88

Discovering a fabric
NOTE
4
On an Admin Domain-aware fabric, you must be a physical fabric administrator to discover the fabric.
ABOUT FCS POLICY AND SEED SWITCHES
Fabric Manager requires that the seed switch is the primary FCS switch at the time of discovery.
Setting time on the fabric will set the time on the primary FCS switch, which will then distribute the
changes to other switches.
When FCS Policy is defined, ConfigDownload is allowed only from the primary FCS switch, but
Fabric Manager does not check at the time of download that the switch is the primary FCS Switch.
See “Configuring FCS policy options” on page 252 for details about configuring the FCS policy.
Access gateway-moded switches cannot be used as the primary FCS switch.
DISCOVERING A SINGLE FABRIC
Use the following procedure to discover a single fabric. You need to provide the IP address of the
seed switch for the fabric. If you do not know the exact IP address, see “Discovering multiple fabrics
(subnet scan)” on page 63.
To discover a fabric
1. Select Discovery > Discover Fabric.
The Fabric Discovery Login dialog box appears, as shown in Figure 41.
FIGURE 41 Fabric discovery login
2. Type the IP address or the DNS name of the seed switch in the fabric that you want to discover.
To discover a fabric using a DNS name, you must have an entry in the hosts.txt file in
C:\WINDOWS\system2\driver\etc or in /etc on Unix-based machines. The entry should be on a
new line with the format switchIP switchName. For example 10.144.8.42 mySwitch. The switch
is discovered in Fabric Manager using the DNS name switchName as specified in the hosts.txt
file (mySwitch in the above example).
You do not need to include http:// before the IP address to discover a fabric. If you do not know
the exact address of a switch, you can run a subnet scan to discover fabrics. See “Discovering
multiple fabrics (subnet scan),” next, for additional information.
62 Fabric Manager Administrator’s Guide
53-1000610-01
Page 89

NOTE
NOTE
Discovering a fabric
3. Type the user name and password used to log in to the switch.
4. Click OK.
The fabric is discovered only if the authentication succeeds. Otherwise, you are prompted
again for a user name and password. Authentication fails if the user name or password is
invalid for the switch, if the password has expired, or if the account is locked out after too many
invalid login attempts. If the password has expired, you are prompted to either change the
password or provide different login credentials.
After the fabric is discovered, all the switches in the fabric are tested against the user name
and password. If any of the switches fails to authenticate, you are prompted to log in to the
switches that failed. If you choose not to log in, the Fabric Device Management Interface
(FDMI) and some data for the Fabric Inventory reports might not be available.
If you choose to not log in to the switches that failed, you can log in later by choosing Discovery
> Switch Login. If the seed switch is not running the latest Fabric OS version in the fabric, you
are prompted to change the seed switch.
4
DISCOVERING MULTIPLE FABRICS (SUBNET SCAN)
You c an use Fab ric Manager to scan a subnet and discover fabrics. A subnet scan eliminates the
need to know the exact address of a switch to discover a fabric. Fabric Manager lists the switches
and fabrics that it finds during the subnet scan. You can then select which fabrics to discover.
Switches might appear in your subnet scan even after you unplug the Ethernet cables of those
switches.
To run a subnet scan
1. Select Discovery > Subnet scan.
The Subnet scan dialog displays (see Figure 42).
Subnet scan is only available for IPv4-formatted addresses: IPv6-formatted addresses are not
supported for this feature.
Fabric Manager Administrator’s Guide 63
53-1000610-01
Page 90

Discovering a fabric
NOTE
4
FIGURE 42 Subnet scan (above) subnet scan results (below)
2. Type the first three sets of digits of an IP address in the first three sections of the IP Address
Range field.
3. Type a wildcard in the last section of the IP Address Range field to represent the range of the
scan. For example:
- 192.168.168.*
Discovers any fabric in the address range of 192.168.168.0 through 192.168.168.255.
- 192.168.168.1**
Discovers any fabric in the address range of 192.168.168.100 through 192.168.168.199.
- 192.168.168.11*
Discovers any fabric in the address range of 192.168.168.110 through 192.168.168.119.
- 192.168.168.25*
Discovers any fabric in the address range of 192.168.168.250 through 192.168.168.255.
The number before the “*” can be any number as long as the resulting range is greater than 0
and less than 255. You cannot enter 192.168.168.3** or 192.168.168.26*, for example.
4. Click Scan.
The result of the scan is a list of available fabrics that match the IP address range. The IP
addresses are of seed switches that are running the latest firmware in the fabrics and are
HTTP-reachable from Fabric Manager. If multiple switches in the fabric are running the latest
firmware version, then the seed switch is randomly chosen from those switches.
5. Click the checkboxes next to the fabrics you want to discover. Click Select All to select all of the
fabrics in the list.
6. Click Discover Selected Fabrics.
64 Fabric Manager Administrator’s Guide
53-1000610-01
Page 91

NOTE
Logging in to multiple switches simultaneously
You are prompted to log in to the seed switch of each fabric you discover.
7. C l i c k Close to close the Subnet scan dialog.
Logging in to multiple switches simultaneously
You can use Fabric Manager to log in to multiple switches at the same time. With multiple logins,
you do not need to log in to each switch individually to administer your fabric. After you log in to a
switch, Fabric Manager stores your login information and automatically logs you in to the switches.
By default, Fabric Manager stores switch passwords on the server. You can disable switch
passwords from being saved on the server. See “Enabling and disabling switch passwords” on
page 187 for additional information.
You must log in to a switch to perform most of the Fabric Manager administrative tasks.
For switches running Fabric OS v5.2.0 or higher in admin domain-unaware mode, you can provide
credentials for any role on the switch. For Admin Domain-aware switches, you must have access to
at least AD0 and the physical fabric.
For switches running firmware versions earlier than Fabric OS v5.2.0, you must provide admin-level
credentials.
4
If the Persist switch passwords option is set (from the Edit > Preferences menu), then all
credentials are persisted immediately, after successful authentication.
You cannot log in to Fabric OS v4.0 through v4.2 switches with the factory user account in Fabric
Manager (although you can from the CLI or Web Tools). You must use an account with administrative
privileges (such as admin) to gain access.
To log in to multiple switches
1. Select Discovery > Switch Login.
The Switch Login window displays (see Figure 43).
Fabric Manager Administrator’s Guide 65
53-1000610-01
Page 92

Logging in to multiple switches simultaneously
4
FIGURE 43 Switch login
2. Select the switches or fabrics you want from the SAN Elements tab and click the right arrow to
move them to the Selected Switches panel.
You can also drag fabric or switch names from the SAN Elements tab directly into the Selected
Switches panel.
3. Type your user name in the User ID field.
4. Type your password in the Password field.
5. Optional: Click the Overwrite discovery credentials checkbox if you want only admin-level (for
Fabric OS versions earlier than 5.2.x) or physical fabric admin-level (for Fabric OS versions
5.2.x or higher) credentials to be authenticated. Any other user-level credentials will fail with
the message “Invalid Role.”
6. Click Apply.
The success or failure of the login displays in the Status column of the Selected Switches table.
The Messages column provides additional information if the login fails.
The background of the status field changes colors to display its status:
- Green indicates a successful login.
The user ID and password are saved for performing administrative operations until the
session is terminated. When the session is terminated, this user ID and corresponding
password are persisted to the database. The saved information is used for successive
Fabric Manager sessions when administrative operations are initiated from Fabric
Manager.
- Red indicates that the login failed.
- Yellow indicates one of the following conditions:
• The switch login is being applied; the Status column text changes to Testing.
66 Fabric Manager Administrator’s Guide
53-1000610-01
Page 93

NOTE
If you did not log in to all of the switches successfully, remove the successful switches from the
Selected Switches panel and retry with a new user ID and password.
A key icon displays next to each switch and fabric that completes a successful login. The key
icon is displayed next to the fabric only if authentication is successful for all the switches in the
fabric.
Monitoring fabrics
In the SAN View, the Overview tab of the Information panel displays the number of discovered
fabrics and the number of fabrics you are monitoring, as shown in Figure 44. The number of
discovered fabrics might be higher than the number of fabrics you are monitoring if other Fabric
Manager clients have discovered fabrics.
Monitoring fabrics
4
• The switch is unreachable in Fabric Manager. When you add this unreachable switch
to the Selected Switches list, the “Status” column text changes to “Unreachable”.
FIGURE 44 Information panel showing discovered and monitored fabrics
You can monitor these fabrics using the following procedure.
To monitor already discovered fabrics
1. Select Discovery > Monitor Fabrics.
The Monitor Fabrics dialog appears, as shown in Figure 45.
Fabric Manager Administrator’s Guide 67
53-1000610-01
Page 94

Changing the seed switch
4
FIGURE 45 Monitor fabrics dialog
2. Select the fabrics you want to monitor from the left of the window and click the right arrow to
move them to the right.
3. Click Start Monitoring.
For each selected fabric, you are prompted to provide the user name and password for logging
in to the seed switch (see Figure 41).
4. Type the user name and password used to log in to the switch.
5. Click OK.
Changing the seed switch
The seed switch must be running the latest Fabric OS version of all the switches in the fabric.
Sometimes, the seed switch is auto-selected, such as when a fabric segments or when two fabrics
merge. Other times, you are prompted to change the seed switch, such as in the following cases:
• If, during fabric discovery, Fabric Manager detects that the seed switch is not running the latest
Fabric OS version, you are prompted to change the seed switch.
• When one or more switches join the fabric or if the switch firmware is changed on any of the
switches in the fabric, Fabric Manager checks to make sure that the seed switch is still running
the latest Fabric OS version. If it is not, then you are prompted to either upgrade the firmware
on the seed switch or to change the seed switch to a switch running the latest firmware.
68 Fabric Manager Administrator’s Guide
53-1000610-01
Page 95

CAUTION
CAUTION
Changing the seed switch
If a fabric of switches running only Fabric OS v2.x or older is created due to segmentation, Fabric
Manager continues to monitor that fabric, but if any switch with a higher Fabric OS version joins the
fabric, you do not receive any prompts to change the seed switch.
If a seed switch is segmented or merged, historical data such as offline zone DB, Change
Management profile and reports, and Firmware Download Profile can be lost. Segmentation of a
seed switch does not result in formation of a new fabric. If a merge occurs, the historical data is lost
only from the second fabric.
You can change the seed switch as long as the following conditions are met:
4
• The new seed switch is HTTP-reachable from Fabric Manager.
• The new seed switch is a primary FCS.
• The new seed switch is running the latest Fabric OS version in the fabric.
• You have physical fabric administrator level access to the new seed switch for Admin
Domain-aware fabrics.
This operation preserves historical and configuration data, such as performance monitoring,
change management, and user-customized data for the selected fabric.
If the seed switch firmware is downgraded from Fabric OS v5.2.x to a lower version, then all
RBAC-related data is discarded from Fabric Manager.
If, during the seed switch change, the fabric is deleted, but the rediscovery operation fails (for
example, if the new seed switch becomes unreachable using HTTP), then you must rediscover the
fabric again. If you rediscover the fabric using a switch that was present in the fabric before the
change seed switch operation was performed, then all of the historical and configuration data is
restored to the rediscovered fabric. If you rediscover the fabric using a switch that was added to the
fabric after the fabric was deleted, then the historical and configuration data is lost.
If multiple users try to change the seed switch of the same fabric simultaneously, only the first
change seed switch request is executed; subsequent requests that are initiated before the first
request completes will fail.
If another user changes the seed switch of a fabric you are monitoring, and if you have provided
login credentials for only that seed switch in the fabric, then you lose connection to the seed
switch.
To change the seed switch
1. Select the fabric for which you want to change the seed switch and select Tasks > Fabric
Management > Change Seed Switch.
Alternatively, you can right-click the fabric in the View panel or Information panel and select
Change Seed Switch from the context menu.
If the fabric contains other switches that are running the latest Fabric OS version and are also
HTTP-reachable from Fabric Manager, the Change Seed Switch dialog appears, as shown in
Figure 46. Otherwise, a message displays that you cannot change the seed switch.
Fabric Manager Administrator’s Guide 69
53-1000610-01
Page 96

Deleting a fabric from Fabric Manager
4
FIGURE 46 Change Seed Switch dialog
2. Select a switch to be the new seed switch from the Change Seed Switch dialog.
You can select only one switch. Only switches that are running the latest Fabric OS version in
the fabric are displayed. The current seed switch is not displayed in this list.
3. Click Ok.
If you are not already logged in to the seed switch, the Fabric Login Dialog displays (as shown
in Figure 41).
If you are successfully authenticated, the fabric is deleted from Fabric Manager without
purging historical data, and the same fabric is rediscovered with the new seed switch.
Deleting a fabric from Fabric Manager
If you decide you no longer want Fabric Manager to monitor a specific fabric, you can delete it.
Deleting a fabric also deletes any Change Management profiles and snapshots; removes
Performance Monitoring data (including historical statistics for its switches and any reports or
graphs that have been generated and saved in the database); and, any switches and ports from the
fabric are removed from their switch or port groups.
To delete a fabric from Fabric Manager
• Right-click the fabric from View panel or Information panel that you want to remove and select
Delete from the context menu.
Fabric Manager prompts you to ensure that you want to delete the fabric.
70 Fabric Manager Administrator’s Guide
53-1000610-01
Page 97

NOTE
NOTE
Renaming fabric components
You can rename the following SAN elements in Fabric Manager:
• Fabric
• Switch
• Port
• Switch Group
• Port Group
• Device
In most cases, you can right-click on the element and select Rename from the pop-up menu to
rename it.
RENAMING A FABRIC
When you discover a fabric, Fabric Manager assigns a name to that fabric that matches the name
of the switch that you used to discover the fabric. For example, to monitor a fabric that includes
Switch_01, enter the IP address of Switch_01 in the Fabric Discovery Login dialog box to discover
the fabric. Fabric Manager then names that fabric Switch_01.
Renaming fabric components
4
Fabric names and device names are concepts used only by Fabric Manager. Removing or renaming
fabric names and device names apply only to the Fabric Manager server.
After you discover the fabric, you can assign a more meaningful name (for example, mktng_SAN or
HQ).
Fabric information is global and any changes you make to the fabric, including renaming the fabric,
are displayed to all users connected to the Fabric Manager server. No information is copied or
changed on any switches.
To rename a fabric
1. Right-click the fabric that you want to rename and select Rename from the context menu.
2. Type a new name for the fabric and click OK.
RENAMING A SWITCH
Switch information is global and any changes you make to the switch, including renaming the
switch, are displayed to all users connected to the server.
Renaming a switch changes the switch configuration and affects all Fabric Manager servers
accessing the switch.
Switches can be identified by IP address, domain ID, WWN, or customized switch names that are
unique and meaningful.
Switch names can be a maximum of 15 characters long. They must begin with an alpha character,
but otherwise can consist of any combination of alphanumeric and underscore characters.
Fabric Manager Administrator’s Guide 71
53-1000610-01
Page 98

Renaming fabric components
NOTE
4
To rename a switch
1. Right-click the switch you want to rename and select Rename from the context menu.
2. Type a new name for the switch and press Enter.
RENAMING A PORT
If you rename a port on a switch that runs Fabric OS versions 3.1.0 (and higher) or 4.1.0 (and
higher), Fabric Manager propagates that name to the port and changes the port name on the
switch, provided the fabric login information has been set up successfully.
If you want to rename a port on a switch that runs firmware versions prior to 3.1.0 or 4.1.0, the por t
name is local to the Fabric Manager server.
Port information is global and any changes you make to the port, including renaming the port, are
displayed to all users accessing the server. Neither Fabric Manager nor the Fabric OS enforce
names to be unique. You should use port names that are easy to distinguish.
You must be logged in to the switch to rename it. If you are not logged in to the switch, Fabric
Manager prompts you to log in before proceeding.
To rename a port
1. In the Information panel, right-click the port you want to rename and select Rename from the
context menu.
2. Type a new name for the port and press Enter.
RENAMING A DEVICE
Devices are identified using WWN and SCSI inquiry or custom names that are unique and
meaningful. Use the following procedure to rename a single device name.
You can also rename devices by importing the names from import device names using the Device
Name Import Wizard and rename several devices at once.
To rename a device
1. Select a fabric from the View panel.
2. Click the FC Devices tab in the Information panel to display the list of devices for that fabric.
3. Right-click the device you want to rename and select Rename from the context menu (see
Figure 47).
72 Fabric Manager Administrator’s Guide
53-1000610-01
Page 99

Renaming fabric components
FIGURE 47 Renaming a device port
IMPORTING DEVICE NAMES
The Device Name Import wizard allows you to easily change device names by importing them.
You can rename devices by:
4
• Using zone aliases
• Importing names from a .csv file
• Importing FDMI host names
To import device names
1. Select Tasks > Device Management and Troubleshooting > Import Device Node/Port Names
from the Menu bar, or right-click the device in the detailed information panel.
The Device Name Import wizard displays (see Figure 48 on page 74).
2. Follow the wizard instructions to complete the import process.
Fabric Manager Administrator’s Guide 73
53-1000610-01
Page 100

Renaming fabric components
4
FIGURE 48 Device Name Import wizard
Using zone aliases
You can name devices using zone aliases by placing a WWN in a zone alias and then defining the
name as you want. Subsequently, the device is identified using the name of the alias in which it
was placed, using the zone alias as the name of the device.
Before you rename a device using a zone alias, note the following:
• If an alias contains more than one member and one or more of those members is not a WWN,
then the alias is ignored.
• If an alias contains more than one member and all members are WWNs, an “_x” string is
appended to the alias where x is an incrementing number.
• If a WWN is contained in multiple aliases, one of the aliases is selected at random.
• An import operation overrides current names for devices.
• The names are global to the Fabric Manager server and they apply to the devices for all fabrics
on that Fabric Manager server.
• The Name value is stored in a different table from the device information. This allows the
device to exit the fabric and return without losing the user configured name.
• The name defaults to www-symbolicName-role or www-SCSIInquiryName-role where the role is
initiator, target, both, or unknown.
Importing names from a .
When importing from a comma-separated value (.csv) file, Fabric Manager first parses the file for
errors. If any invalid data is found, an alert box asks you whether to skip the invalid lines and
continue the import process.
74 Fabric Manager Administrator’s Guide
csv
file
53-1000610-01
 Loading...