


Copyright - - - - - - - - - - - - - - - - - - - - - - - - - - - - - - - - - - - - - - - - - - - - - - - - - - - i-iii Disclaimer- - - - - - - - - - - - - - - - - - - - - - - - - - - - - - - - - - - - - - - - - - - - - - - - - - - i-iii
End User License Agreement for Microsoft Windows CE„ - - - - - - - - - - - - - - - - - - i-iv
Brady Warranty - - - - - - - - - - - - - - - - - - - - - - - - - - - - - - - - - - - - - - - - - - - - - - - i-v FCC Notice-US Only - - - - - - - - - - - - - - - - - - - - - - - - - - - - - - - - - - - - - - - - - - - i-vi
Canada - - - - - - - - - - - - - - - - - - - - - - - - - - - - - - - - - - - - - - - - - - - - - - - - - - - - - - - i-vi Europe - - - - - - - - - - - - - - - - - - - - - - - - - - - - - - - - - - - - - - - - - - - - - - - - - - - - - - - - i-vi
Specifications - - - - - - - - - - - - - - - - - - - - - - - - - - - - - - - - - - - - - - - - - - - - - - - - i-vii
Physical characteristics - - - - - - - - - - - - - - - - - - - - - - - - - - - - - - - - - - - - - - - - - - - - i-vii Environmental characteristics - - - - - - - - - - - - - - - - - - - - - - - - - - - - - - - - - - - - - - - - i-vii Electrical characteristics - - - - - - - - - - - - - - - - - - - - - - - - - - - - - - - - - - - - - - - - - - - i-vii
International Power Cords - - - - - - - - - - - - - - - - - - - - - - - - - - - - - - - - - - - - - - - - i-viii
CHAPTER 1 Welcome
About This Book - - - - - - - - - - - - - - - - - - - - - - - - - - - - - - - - - - - - - - - - - - - - - - 1-2
Features and Functions - - - - - - - - - - - - - - - - - - - - - - - - - - - - - - - - - - - - - - - - - - 1-2
The three printer systems- - - - - - - - - - - - - - - - - - - - - - - - - - - - - - - - - - - - - - - - - - - - 1-3
Specialty applications- - - - - - - - - - - - - - - - - - - - - - - - - - - - - - - - - - - - - - - - - - - - - - 1-4
Contacting Technical Support- - - - - - - - - - - - - - - - - - - - - - - - - - - - - - - - - - - - - - 1-5
Americas - - - - - - - - - - - - - - - - - - - - - - - - - - - - - - - - - - - - - - - - - - - - - - - - - - - - - - 1-5
Europe - - - - - - - - - - - - - - - - - - - - - - - - - - - - - - - - - - - - - - - - - - - - - - - - - - - - - - - - 1-5
Pacific - - - - - - - - - - - - - - - - - - - - - - - - - - - - - - - - - - - - - - - - - - - - - - - - - - - - - - - - 1-6
CHAPTER 2 Setting Up
Connecting Peripherals - - - - - - - - - - - - - - - - - - - - - - - - - - - - - - - - - - - - - - - - - - 2-2 Installing supplies- - - - - - - - - - - - - - - - - - - - - - - - - - - - - - - - - - - - - - - - - - - - - - 2-3
Opening the printer - - - - - - - - - - - - - - - - - - - - - - - - - - - - - - - - - - - - - - - - - - - - - - - 2-4 Installing a ribbon cartridge - - - - - - - - - - - - - - - - - - - - - - - - - - - - - - - - - - - - - - - - - 2-5 Adjusting the ribbon cartridge - - - - - - - - - - - - - - - - - - - - - - - - - - - - - - - - - - - - - - - - 2-6 Installing a tape cartridge - - - - - - - - - - - - - - - - - - - - - - - - - - - - - - - - - - - - - - - - - - - 2-7 Closing the printer cover- - - - - - - - - - - - - - - - - - - - - - - - - - - - - - - - - - - - - - - - - - - - 2-11
Installing a compact flash memory card - - - - - - - - - - - - - - - - - - - - - - - - - - - - - - - 2-13 Cleaning your system - - - - - - - - - - - - - - - - - - - - - - - - - - - - - - - - - - - - - - - - - - - 2-14
CHAPTER 3 Starting Up
Launching Your System - - - - - - - - - - - - - - - - - - - - - - - - - - - - - - - - - - - - - - - - - 3-2
The Main Menu - - - - - - - - - - - - - - - - - - - - - - - - - - - - - - - - - - - - - - - - - - - - - - - - - - 3-2
Keyboard Basics - - - - - - - - - - - - - - - - - - - - - - - - - - - - - - - - - - - - - - - - - - - - - - 3-4
1
The standard keyboard - - - - - - - - - - - - - - - - - - - - - - - - - - - - - - - - - - - - - - - - - - - - - - 3-5 System function keys - - - - - - - - - - - - - - - - - - - - - - - - - - - - - - - - - - - - - - - - - - - - - - - 3-5 Alphabetic and command keys- - - - - - - - - - - - - - - - - - - - - - - - - - - - - - - - - - - - - - - - - 3-9 Arrow and navigation keypads- - - - - - - - - - - - - - - - - - - - - - - - - - - - - - - - - - - - - - - - - 3-11 Numeric keypad - - - - - - - - - - - - - - - - - - - - - - - - - - - - - - - - - - - - - - - - - - - - - - - - - - 3-14 Shortcut keys - - - - - - - - - - - - - - - - - - - - - - - - - - - - - - - - - - - - - - - - - - - - - - - - - - - - 3-16
Mouse Basics - - - - - - - - - - - - - - - - - - - - - - - - - - - - - - - - - - - - - - - - - - - - - - - - -3-16
Using a mouse on labels - - - - - - - - - - - - - - - - - - - - - - - - - - - - - - - - - - - - - - - - - - - - - 3-17
Checking System Status - - - - - - - - - - - - - - - - - - - - - - - - - - - - - - - - - - - - - - - - - -3-17 Accessing Online Help- - - - - - - - - - - - - - - - - - - - - - - - - - - - - - - - - - - - - - - - - - -3-18
CHAPTER 4 Basic Procedures
Working in the Editor window- - - - - - - - - - - - - - - - - - - - - - - - - - - - - - - - - - - - - -4-2
Inside the Editor window - - - - - - - - - - - - - - - - - - - - - - - - - - - - - - - - - - - - - - - - - - - - 4-3 Editing procedures- - - - - - - - - - - - - - - - - - - - - - - - - - - - - - - - - - - - - - - - - - - - - - - - - 4-7
Working in Entry Screens - - - - - - - - - - - - - - - - - - - - - - - - - - - - - - - - - - - - - - - - -4-9
Navigating in entry screens - - - - - - - - - - - - - - - - - - - - - - - - - - - - - - - - - - - - - - - - - - - 4-9 Entering information in entry screens - - - - - - - - - - - - - - - - - - - - - - - - - - - - - - - - - - - - 4-11 Choosing options- - - - - - - - - - - - - - - - - - - - - - - - - - - - - - - - - - - - - - - - - - - - - - - - - - 4-12 Exiting entry screens - - - - - - - - - - - - - - - - - - - - - - - - - - - - - - - - - - - - - - - - - - - - - - - 4-15
CHAPTER 5 Setting Preferences
Accessing System Setup - - - - - - - - - - - - - - - - - - - - - - - - - - - - - - - - - - - - - - - - - -5-2
Setting Printing Tab Options - - - - - - - - - - - - - - - - - - - - - - - - - - - - - - - - - - - - - - -5-4
Setting Localization Tab Options - - - - - - - - - - - - - - - - - - - - - - - - - - - - - - - - - - - -5-6
Setting Hardware Tab Options- - - - - - - - - - - - - - - - - - - - - - - - - - - - - - - - - - - - - -5-8
Naming supply colors- - - - - - - - - - - - - - - - - - - - - - - - - - - - - - - - - - - - - - - - - - - - - - - 5-9
Setting Other Tab Options- - - - - - - - - - - - - - - - - - - - - - - - - - - - - - - - - - - - - - - - -5-10
Displaying the screen grid - - - - - - - - - - - - - - - - - - - - - - - - - - - - - - - - - - - - - - - - - - - 5-11
Setting Text Tab Options - - - - - - - - - - - - - - - - - - - - - - - - - - - - - - - - - - - - - - - - -5-12
Setting On Line Tab Options - - - - - - - - - - - - - - - - - - - - - - - - - - - - - - - - - - - - - - -5-15
CHAPTER 6 Working with Labels
Creating Custom Labels - - - - - - - - - - - - - - - - - - - - - - - - - - - - - - - - - - - - - - - - - -6-2 Creating QuickText Labels - - - - - - - - - - - - - - - - - - - - - - - - - - - - - - - - - - - - - - - -6-5
QuickText toolbar functions - - - - - - - - - - - - - - - - - - - - - - - - - - - - - - - - - - - - - - - - - - 6-7 QuickText key functions - - - - - - - - - - - - - - - - - - - - - - - - - - - - - - - - - - - - - - - - - - - - - 6-9
Creating Template Labels - - - - - - - - - - - - - - - - - - - - - - - - - - - - - - - - - - - - - - - - -6-10
2
Pipe Marker and Right-to-Know exceptions - - - - - - - - - - - - - - - - - - - - - - - - - - - - - - - 6-11
Choosing a label application - - - - - - - - - - - - - - - - - - - - - - - - - - - - - - - - - - - - - - - - - 6-11 Choosing a category- - - - - - - - - - - - - - - - - - - - - - - - - - - - - - - - - - - - - - - - - - - - - - - 6-12 Selecting a template - - - - - - - - - - - - - - - - - - - - - - - - - - - - - - - - - - - - - - - - - - - - - - - 6-13 Following prompt sequences - - - - - - - - - - - - - - - - - - - - - - - - - - - - - - - - - - - - - - - - - 6-16
Creating Sets of Labels - - - - - - - - - - - - - - - - - - - - - - - - - - - - - - - - - - - - - - - - - - 6-21
Adding labels to a label set - - - - - - - - - - - - - - - - - - - - - - - - - - - - - - - - - - - - - - - - - - 6-22 Moving between labels in a label set - - - - - - - - - - - - - - - - - - - - - - - - - - - - - - - - - - - - 6-23 Editing labels in a label set - - - - - - - - - - - - - - - - - - - - - - - - - - - - - - - - - - - - - - - - - - 6-23 Clearing labels in a label set - - - - - - - - - - - - - - - - - - - - - - - - - - - - - - - - - - - - - - - - - 6-23 Saving label sets - - - - - - - - - - - - - - - - - - - - - - - - - - - - - - - - - - - - - - - - - - - - - - - - - 6-24
Changing Labels - - - - - - - - - - - - - - - - - - - - - - - - - - - - - - - - - - - - - - - - - - - - - - 6-24
Changing the size of template labels - - - - - - - - - - - - - - - - - - - - - - - - - - - - - - - - - - - - 6-25 Editing template labels - - - - - - - - - - - - - - - - - - - - - - - - - - - - - - - - - - - - - - - - - - - - - 6-26 Changing Label Properties - - - - - - - - - - - - - - - - - - - - - - - - - - - - - - - - - - - - - - - - - - 6-27
Setting Application Preferences - - - - - - - - - - - - - - - - - - - - - - - - - - - - - - - - - - - - 6-33
CHAPTER 7 Working with Objects
About Objects - - - - - - - - - - - - - - - - - - - - - - - - - - - - - - - - - - - - - - - - - - - - - - - - 7-2 Adding Objects - - - - - - - - - - - - - - - - - - - - - - - - - - - - - - - - - - - - - - - - - - - - - - - 7-3
Adding and formatting text objects - - - - - - - - - - - - - - - - - - - - - - - - - - - - - - - - - - - - - 7-4 Adding variable text objects- - - - - - - - - - - - - - - - - - - - - - - - - - - - - - - - - - - - - - - - - - 7-10 Adding vertical xtteobjects - - - - - - - - - - - - - - - - - - - - - - - - - - - - - - - - - - - - - - - - - - 7-16 Adding bar code objects - - - - - - - - - - - - - - - - - - - - - - - - - - - - - - - - - - - - - - - - - - - - 7-17 Adding graphics objects - - - - - - - - - - - - - - - - - - - - - - - - - - - - - - - - - - - - - - - - - - - - 7-22 Adding HotShapes - - - - - - - - - - - - - - - - - - - - - - - - - - - - - - - - - - - - - - - - - - - - - - - - 7-24
Selecting Objects - - - - - - - - - - - - - - - - - - - - - - - - - - - - - - - - - - - - - - - - - - - - - - 7-25
Selecting a layered object - - - - - - - - - - - - - - - - - - - - - - - - - - - - - - - - - - - - - - - - - - - |
7-26 |
Moving Objects - - - - - - - - - - - - - - - - - - - - - - - - - - - - - - - - - - - - - - - - - - - - - - - 7-26 Sizing Objects - - - - - - - - - - - - - - - - - - - - - - - - - - - - - - - - - - - - - - - - - - - - - - - - 7-27
Using Increase Size and Decrease Size - - - - - - - - - - - - - - - - - - - - - - - - - - - - - - - - - - 7-28 Using the Scale function - - - - - - - - - - - - - - - - - - - - - - - - - - - - - - - - - - - - - - - - - - - - 7-28
Copying and Pasting Objects - - - - - - - - - - - - - - - - - - - - - - - - - - - - - - - - - - - - - - 7-30 Changing Objects - - - - - - - - - - - - - - - - - - - - - - - - - - - - - - - - - - - - - - - - - - - - - - 7-31
Opening and editing an object - - - - - - - - - - - - - - - - - - - - - - - - - - - - - - - - - - - - - - - - 7-31 Changing object properties - - - - - - - - - - - - - - - - - - - - - - - - - - - - - - - - - - - - - - - - - - 7-32
CHAPTER 8 Applying Color
About Color - - - - - - - - - - - - - - - - - - - - - - - - - - - - - - - - - - - - - - - - - - - - - - - - - 8-2
3
Ribbon color- - - - - - - - - - - - - - - - - - - - - - - - - - - - - - - - - - - - - - - - - - - - - - - - - - - - - 8-2 Tape color - - - - - - - - - - - - - - - - - - - - - - - - - - - - - - - - - - - - - - - - - - - - - - - - - - - - - - 8-4
Applying Color to Objects - - - - - - - - - - - - - - - - - - - - - - - - - - - - - - - - - - - - - - - -8-5
About the Object Color screen- - - - - - - - - - - - - - - - - - - - - - - - - - - - - - - - - - - - - - - - - 8-5 Choosing color on the Monocolor system - - - - - - - - - - - - - - - - - - - - - - - - - - - - - - - - - 8-6
Choosing color on the Multicolor and Color & Cut systems - - - - - - - - - - - - - - - - - - - - - 8-7
Printing Color - - - - - - - - - - - - - - - - - - - - - - - - - - - - - - - - - - - - - - - - - - - - - - - - -8-9
CHAPTER 9 Working with Files
About Files and File Groups - - - - - - - - - - - - - - - - - - - - - - - - - - - - - - - - - - - - - - -9-2 Saving Labels as Files - - - - - - - - - - - - - - - - - - - - - - - - - - - - - - - - - - - - - - - - - - -9-3 Managing Files - - - - - - - - - - - - - - - - - - - - - - - - - - - - - - - - - - - - - - - - - - - - - - - -9-7
Opening saved label files - - - - - - - - - - - - - - - - - - - - - - - - - - - - - - - - - - - - - - - - - - - - 9-7 Editing files - - - - - - - - - - - - - - - - - - - - - - - - - - - - - - - - - - - - - - - - - - - - - - - - - - - - - 9-10 Deleting files - - - - - - - - - - - - - - - - - - - - - - - - - - - - - - - - - - - - - - - - - - - - - - - - - - - - 9-11
Printing Files - - - - - - - - - - - - - - - - - - - - - - - - - - - - - - - - - - - - - - - - - - - - - - - - -9-12 Transferring Files - - - - - - - - - - - - - - - - - - - - - - - - - - - - - - - - - - - - - - - - - - - - - -9-12 Using My Templates - - - - - - - - - - - - - - - - - - - - - - - - - - - - - - - - - - - - - - - - - - - -9-12
Accessing template files - - - - - - - - - - - - - - - - - - - - - - - - - - - - - - - - - - - - - - - - - - - - - 9-13 Changing My Template label size- - - - - - - - - - - - - - - - - - - - - - - - - - - - - - - - - - - - - - - 9-14
CHAPTER 10 Working with Cut-outs
About Cutting - - - - - - - - - - - - - - - - - - - - - - - - - - - - - - - - - - - - - - - - - - - - - - - - -10-2 Creating Cut Out Objects - - - - - - - - - - - - - - - - - - - - - - - - - - - - - - - - - - - - - - - - -10-3
Adding cut out objects - - - - - - - - - - - - - - - - - - - - - - - - - - - - - - - - - - - - - - - - - - - - - - 10-4
Cutting Around Objects - - - - - - - - - - - - - - - - - - - - - - - - - - - - - - - - - - - - - - - - - -10-8
Minimum cut size - - - - - - - - - - - - - - - - - - - - - - - - - - - - - - - - - - - - - - - - - - - - - - - - - 10-9
Cutting Around Label Frames - - - - - - - - - - - - - - - - - - - - - - - - - - - - - - - - - - - - - -10-10 Calibrating the Cutter- - - - - - - - - - - - - - - - - - - - - - - - - - - - - - - - - - - - - - - - - - - -10-11
Setting cutter calibration values- - - - - - - - - - - - - - - - - - - - - - - - - - - - - - - - - - - - - - - - 10-11
Restoring default cutter calibration settings- - - - - - - - - - - - - - - - - - - - - - - - - - - - - - - - 10-14
CHAPTER 11 Printing
Printing Labels - - - - - - - - - - - - - - - - - - - - - - - - - - - - - - - - - - - - - - - - - - - - - - - -11-2
About pages - - - - - - - - - - - - - - - - - - - - - - - - - - - - - - - - - - - - - - - - - - - - - - - - - - - - - 11-2 Printing a single label - - - - - - - - - - - - - - - - - - - - - - - - - - - - - - - - - - - - - - - - - - - - - - 11-4 Printing multiple copi es of a singlelabel- - - - - - - - - - - - - - - - - - - - - - - - - - - - - - - - - - 11-5 Printing labels in a label set - - - - - - - - - - - - - - - - - - - - - - - - - - - - - - - - - - - - - - - - - - 11-6
4
Printing labels in a file group- - - - - - - - - - - - - - - - - - - - - - - - - - - - - - - - - - - - - - - - - 11-7
Checking Supplies - - - - - - - - - - - - - - - - - - - - - - - - - - - - - - - - - - - - - - - - - - - - - 11-10 Checking Size - - - - - - - - - - - - - - - - - - - - - - - - - - - - - - - - - - - - - - - - - - - - - - - - 11-11 Checking Length - - - - - - - - - - - - - - - - - - - - - - - - - - - - - - - - - - - - - - - - - - - - - - 11-12
Minimum length- - - - - - - - - - - - - - - - - - - - - - - - - - - - - - - - - - - - - - - - - - - - - - - - - - 11-12 Maximum length - - - - - - - - - - - - - - - - - - - - - - - - - - - - - - - - - - - - - - - - - - - - - - - - - 11-12 Cut out label length - - - - - - - - - - - - - - - - - - - - - - - - - - - - - - - - - - - - - - - - - - - - - - - 11-15
Checking Color - - - - - - - - - - - - - - - - - - - - - - - - - - - - - - - - - - - - - - - - - - - - - - - 11-15
Ribbon and color choices - - - - - - - - - - - - - - - - - - - - - - - - - - - - - - - - - - - - - - - - - - - 11-15 Ribbon color needed- - - - - - - - - - - - - - - - - - - - - - - - - - - - - - - - - - - - - - - - - - - - - - - 11-17 Tape color needed - - - - - - - - - - - - - - - - - - - - - - - - - - - - - - - - - - - - - - - - - - - - - - - - 11-18 Checking for cut out labels - - - - - - - - - - - - - - - - - - - - - - - - - - - - - - - - - - - - - - - - - - 11-19
Printing Tab Options- - - - - - - - - - - - - - - - - - - - - - - - - - - - - - - - - - - - - - - - - - - - 11-19
Accessing the Printing tab options - - - - - - - - - - - - - - - - - - - - - - - - - - - - - - - - - - - - - 11-20 Supply saver option - - - - - - - - - - - - - - - - - - - - - - - - - - - - - - - - - - - - - - - - - - - - - - - 11-21 Overprint option - - - - - - - - - - - - - - - - - - - - - - - - - - - - - - - - - - - - - - - - - - - - - - - - - 11-23
Canceling a Print Job - - - - - - - - - - - - - - - - - - - - - - - - - - - - - - - - - - - - - - - - - - - 11-24
CHAPTER 12 Connecting to a PC
Working with a PC - - - - - - - - - - - - - - - - - - - - - - - - - - - - - - - - - - - - - - - - - - - - - 12-2
Setting Up Your System as a Hardware Device - - - - - - - - - - - - - - - - - - - - - - - - - - 12-3
Placing Your System Online- - - - - - - - - - - - - - - - - - - - - - - - - - - - - - - - - - - - - - - 12-4
Setting Online Options - - - - - - - - - - - - - - - - - - - - - - - - - - - - - - - - - - - - - - - - - - - - - 12-4 Connecting your system and a PC - - - - - - - - - - - - - - - - - - - - - - - - - - - - - - - - - - - - - 12-5
Printing from a PC - - - - - - - - - - - - - - - - - - - - - - - - - - - - - - - - - - - - - - - - - - - - - 12-7
Working with the File Management Utility - - - - - - - - - - - - - - - - - - - - - - - - - - - - - 12-8
Storage locations for exported files - - - - - - - - - - - - - - - - - - - - - - - - - - - - - - - - - - - - - 12-8 Installing the File Management Utility - - - - - - - - - - - - - - - - - - - - - - - - - - - - - - - - - - 12-10 Launching the File Management Utility- - - - - - - - - - - - - - - - - - - - - - - - - - - - - - - - - - 12-11 Communication Status - - - - - - - - - - - - - - - - - - - - - - - - - - - - - - - - - - - - - - - - - - - - - 12-11 File Management Utility Main Menu- - - - - - - - - - - - - - - - - - - - - - - - - - - - - - - - - - - - 12-12
Upgrading the Operating System - - - - - - - - - - - - - - - - - - - - - - - - - - - - - - - - - - - 12-15
Appendix A Special Characters
Appendix B Cutter Maintenance
About the Cutting Mechanism - - - - - - - - - - - - - - - - - - - - - - - - - - - - - - - - - - - - - B-2
Removing the Stylus Holder- - - - - - - - - - - - - - - - - - - - - - - - - - - - - - - - - - - - - - - B-3
5
Adjusting the Cut Depth - - - - - - - - - - - - - - - - - - - - - - - - - - - - - - - - - - - - - - - - - -B-4
Replacing the Stylus Blade - - - - - - - - - - - - - - - - - - - - - - - - - - - - - - - - - - - - - - - -B-7
Cleaning the Stylus - - - - - - - - - - - - - - - - - - - - - - - - - - - - - - - - - - - - - - - - - - - - -B-8
Appendix C Error Messages
Error Messages - - - - - - - - - - - - - - - - - - - - - - - - - - - - - - - - - - - - - - - - - - - - - - - -C-2
6

Copyright
This manual is copyrighted with all rights reserved. No portion of this manual may be copied or reproduced by any means without the prior consent of Brady Worldwide, Inc.
While every precaution has been taken in preparation of this document, Brady assumes no liability to any party for any loss or damage caused by errors or omissions or by statements resulting from negligence, accident, or any other cause. Brady further assumes no liability arising out of the application or use of any product or system described, herein; nor any liability for incidental or consequential damages arising from the use of this document. Brady disclaims all warranties of merchantability or fitness for a particular purpose.
Brady reserves the right to make changes without further notice to any product or system herein to improve reliability, function, or design.
Reproduction of this material, in part or whole, is strictly prohibited without the written permission of Brady Worldwide, Inc. For more information, contact: Brady Worldwide, Inc. Signmark® Division, 2221 W. Camden Road, Milwaukee, WI 53209.
Disclaimer
Every effort has been made to make this guide as accurate and complete as possible. Brady Worldwide, Inc. is not responsible for labeling inaccuracies and omissions occurring during the use of this guide.
This manual is proprietary to Brady Worldwide, Inc. and may be revised from time to time without notice. Brady Worldwide, Inc. disclaims any understanding to provide you with revisions, if any.
Windows CE is a trademark of the Microsoft Corporation. Adobe Illustrator is a trademark of the Adobe Corporation.
All brand or product names referenced in this manual are trademarks or registered trademarks of their respective companies or organizations.
MarkWare and GalaRio are registered trademarks of Brady Worldwide, Inc.
© 2006 Brady Worldwide, Inc. All rights reserved. www.bradycorp.com
iii

End User License Agreement for
Microsoft Windows CE©
You have acquired a device that includes software licensed by Brady Worldwide, Inc. from Microsoft Licensing or
its affiliates (“MS”). Those installed so |
ftware products of Microsoftasorigin,well as associated media, printed |
|
materials, and “online” or electronic documentation (“SO |
FTWARE”) are protected by international intellectual |
|
property laws and treaties. The SOFTWARE is licensed, not sold. All rights reserved.
IF YOU DO NOT AGREE TO THIS END USER LICENSE AGREEMENT, DO NOT USE THE DEVICE OR COPY THE SOFTWARE. INSTEAD, PROMPTLY CONTACT BRADY WORLDWIDE, INC. FOR INSTRUCTIONS ON RETURN OF THE UNUSED DEVICE FOR A REFUND. ANY USE OF THE
SOFTWARE, INCLUDING BUT NOT LIMITED TO USE ON THE DEVICE, WILL CONSTITUTE YOUR AGREEMENT TO THIS END USER LICENSE AGREEMENT (OR RATIFICATION OF ANY PREVIOUS CONSENT).
GRANT OF SOFTWARE LICENSE: This End User License Agreement grants you the following license: You may use the SOFTWARE only on the DEVICE.
NOT FAULT TOLERANT. THE SOFTWARE IS NOT FAULT TOLERANT. BRADY WORLDWIDE, INC. HAS INDEPENDENTLY DETERMINED HOW TO USE THE SOFTWARE IN THE DEVICE, AND MS HAS RELIED UPON BRADY WORLDWIDE, INC. TO CONDUCT SUFFICIENT TESTING TO DETERMINE THAT THE SOFTWARE IS SUITABLE FOR SUCH USE.
NO WARRANTIES FOR THE SOFTWARE. The SOFTWARE is provided “as is” and with all faults. THE
ENTIRE RISH AS TO SATISFACTORY QUALITY, PERFORMANCE, ACCURACY, AND EFFORT (INCLUDING LACK OF NEGLIGENCE) IS WITH YOU. ALSO, THERE IS NO WARRANTY AGAINST INTERFERENCE WITH YOUR ENJOYMENT OF THE SOFTWARE OR AGAINST INFRINGEMENT.
IF YOU HAVE RECEIVED ANY WARRANTIES REGARDING THE DEVICE OR THE SOFTWARE, THOSE WARRANTIES DO NOT ORIGINATE FROM, AND ARE NOT BINDING ON, MS.
Note on Java support. The SOFTWARE may contain support for programs written in Java. Java technology is not
fault tolerant and is not designed, manufactured, or inte |
nded for use or resale as online control equipment in |
||
hazardous environments |
requiring fail-safe performances, such as in the operatio |
n of nuclear facilities, aircraft |
|
navigation or communication systems, air traffic control, direct life support machines, or weapons systems, in which the failure of Java technology could lead directly to death, personal injury, or severe physical or environmental damage. Sun Microsystems, Inc. has contractually obligated MS to make this disclaimer.
No Liability for Certain Damages. EXCEPT AS PROHIBITED BY LAW, MS SHALL HAVE NO
LIAGNILITY FOR ANY INDIRECT, SPECIAL, CONSEQUENTIAL OR INCIDENTAL DAMAGES ARISING FROM OR IN CONNECTION WITH THE USE OR PERFORMANCE OF THE SOFTWARE. THIS LIMITATION SHALL APPLY EVEN IF ANY REMEDY FAILS OF ITS ESSENTIAL PURPOSE. IN NO EVENT SHALL MS BE LIABLE FOR ANY AMOUNT IN EXCESS OF U.S. TWO HUNDRED FIFTY DOLLARS (U.S.$250.00).
Limitations on Reverse Engineering, Decompilation, and Disassembly. You may not reverse engineer, decompile, or disassemble the SOFTWARE, except and only to the extent that such activity is expressly permitted by applicable law not withstanding this limitation.
SOFTWARE TRANSFER ALLOWED BUT WITH RESTRICTIONS. You may permanently transfer rights under this End User License Agreement only as part of a permanent sale or transfer of the Device, and only if the recipient agrees to this End User License Agreement. If the SOFTWARE is an upgrade, any transfer must also include all prior versions of the SOFTWARE.
iv

EXPORT RESTRICTIONS. You acknowledge that SOFTWARE is of US-origin. You agree to comply with all applicable international and national laws that apply to the SOFTWARE, including the U.S. Export Administration Regulations, as well as end-user, end-use, and country destination restrictions issued by U.S. and other
governments. For additional information on exporting the SOFTWARE, see http://www.microsoft.com/exporting/.
Brady Warranty
Our products are sold with the understanding that the buyer will test them in actual use and determine for him or herself their adaptability to his/her intended uses. Brady warrants to the buyer that its products are free from defects in material and workmanship, but limits its obligation under this warranty to replacement of the product shown to Brady’s satisfaction to have been defective at the time Brady sold it. This warranty does not extend to any persons obtaining the product from the buyer.
THIS WARRANTY IS IN LIEU OF ANY OTHER WARRANTY, EXPRESS OR IMPLIED, INCLUDING, BUT NOT LIMITED TO, ANY IMPLIED WARRANTY OF MERCHANTABILITY OR FITNESS FOR A PARTICULAR PURPOSE, AND OF ANY OTHER OBLIGATIONS OR LIABILITY ON BRADY’S PART. UNDER NO CIRCUMSTANCES WILL BRADY BE LIABLE FOR ANY LOSS, DAMAGE, EXPENSE OR CONSEQUENTIAL DAMAGES OF ANY KIND ARISING IN CONNECTION WITH THE USE, OR INABILITY TO USE, BRADY’S PRODUCTS.
v
FCC Notice-US Only
Warning: This equipment generates, uses and can radiate radio frequency energy. If not installed and used in accordance with the manufacturer’s instructions, it may cause interference to radio communications. It has been tested and found to comply with the limits for a Class A computing device pursuant to Subpart B of Part 15 of the FCC rules, which are designed to provide reasonable protection against interference when operating in a commercial environment. Operation of this equipment in a residential area is likely to cause interference, in which case required corrective measures will be at the owner’s expense.The user is cautioned that any changes or modifications not expressly approved by Brady Worldwide, Inc. could void the user’s authority to use the equipment.
Canada
This Class A digital apparatus meets all requirements of the Canadian InterferenceCausing Equipment Regulations.
Cet appareil numerique de la classe A respecte toutes les exigences du Reglement sur le material broilleur du Canada.
Europe
This is a Class A product. In a domestic environment this product may cause radio interference, in which case the user may be required to take adequate measures.
vi

Specifications
Physical characteristics
Size: Height 10” Width 16” Depth 11”
Weight: approximately 30 pounds
Environmental characteristics
Operational requirements
Ambient operating temperature: 50° F to 105 F° (10° C to 41° C)
Relative humidity: 20% to 80% (non-condensing)
Storage requirements
Ambient storage temperature: 0° F to 140° F (-18° C to 60° C)
Relative humidity: 10 to 95% (non-condensing)
Electrical characteristics
Input current: 2.0 Amps
Input voltages: 100-240 VAC
Input frequency: 50 to 60 Hz
vii

International Power Cords
Users in countries outside of North America may be required to supply their own power cord for connecting the system to an AC electrical outlet. Choose an AC power cord and plug that is suitable for the country in which the equipment is to be installed. The AC power cord and plug must meet all national regulations and requirements for that intended country.
The table below shows the specifications for the power cord to be used in various countries:
In this country: |
Use this power cord: |
|
|
Sweden, Norway, Finland, Austria, Germany, |
Specifications |
Belgium, France, Spain, Portugal, |
plug: CEE-7/7 |
Netherlands |
connector: IEC 320 60320 C13 |
|
|
|
conductor size: 3 x 1.00 mm2 |
|
description: H05VVF3G1.0 |
|
typ. stranding: 32/0.2 mm |
|
current rating: 10A |
|
voltage rating: 250 VAC |
|
maximum length |
|
|
United Kingdom, Ireland |
Specifications |
|
plug: BS 1363A |
|
connector: IEC 60320 C13 |
|
conductor size: 3 x 1.00 mm2 |
|
description: H05VVF3G1.0 |
|
typ. stranding: 32/0.2 mm |
|
current rating: 10A |
|
voltage rating: 250 VAC |
|
maximum length: less than 3 meters |
|
|
viii
In this country: |
Use this power cord: |
|
|
Australia, New Zealand |
Specifications |
|
plug: AS 3112-1981 |
|
connector: IEC 320 60320 C13 |
|
conductor size: 3 x 1.00 mm2 |
|
description: AS 3191H05WF3G1.0 |
|
typ. stranding: 32/0.2 mm |
|
current rating: 10A |
|
voltage rating: 250 VAC |
|
maximum length: less than 3 meters |
|
|
Italy |
Specifications |
|
plug: CEI 23-16/VII |
|
connector: IEC 60 320 C13 |
|
conductor size: 3x 1.0 mm2 |
|
description: H05VVF3G1.0 |
|
typ. stranding: 32/0.2 mm |
|
current rating: 10A |
|
voltage rating: 250 VAC |
|
maximum length: less than 3 meters |
|
|
Denmark |
Specifications |
|
plug: Afsnit 107-2-D1 |
|
connector: IEC 60 320 C13 |
|
conductor size: 3x 1.0 mm2 |
|
description: H05VVF3G1.0 |
|
typ. stranding: 32/0.2 mm |
|
current rating: 10A |
|
voltage rating: 250 VAC |
|
maximum length: less than 3 meters |
|
|
Switzerland |
Specifications |
|
plug: SEV 1011 |
|
connector: IEC 60 320 C13 |
|
conductor size: 3x 1.0 mm2 |
|
description: H05VVF3G1.0 |
|
typ. stranding: 32/0.2 mm |
|
current rating: 10A |
|
voltage rating: 250 VAC |
|
maximum length: less than 3 meters |
|
|
|
ix |
x

CHAPTER 1 |
Welcome |
Thank you for purchasing our label maker, which you use to create and print professional-looking labels and signs for use just about anywhere. All you have to do is:
zDrop in a ribbon cartridge, choosing from a wide range of single-color ribbons, paneled ribbons, and CYMK ribbons for blended colors.
zDrop in a tape cartridge, choosing tape in widths that range from 1/2 inch to 4 inches, and come in many colors, in many different styles, and in a wide range of materials.
zType your text and plug in objects or symbols of your choice, or choose a preformatted layout design to use.
This chapter introduces you to your printing system. Topics include:
About This Book
Features and Functions
Contacting Technical Support
1-1

About This Book
This manual documents the basic Monocolor printing system, all of whose features are common to all three systems (described in The three printer systems on
page 1-3).
You’ll also find complete information about the Multicolor system and the Color & Cut system features and special applications in specially-designated sections and chapters. This book also provides an appendix listing all special characters you can use on your labels, and instructions for those of you with the Color & Cut system about how to maintain your system’s cutter mechanisms.
Features and Functions
Listed below are just some of the features that make this system so easy to use and ready to meet your label-making requirements:
z z
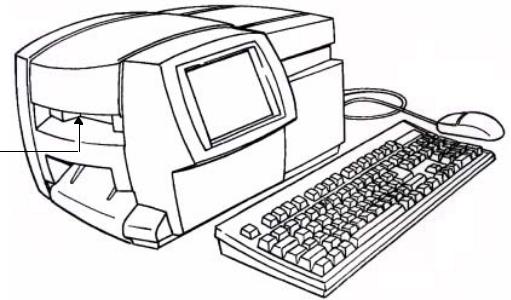
Small, lightweight (approximately 30 pounds), ready for your desktop. Touch screen LCD display, plus keyboard input for ease of use, with optional mouse capabilities provided.
z z z z
Pre-designed layouts for many standard-use labels included. Hundreds of graphics provided for inclusion on your labels. QuickText special application for speedy print of text-only labels.
HotShapes feature for printing non-standard labels of various shapes. Cut-out capability comes with Color & Cut system.
zSingle color job printing at 300 DPI up to 100 mm wide, up to 100 inches (2540 mm).
z z
Color job printing at 300 DPI, 2 inches (51 mm) to 38 inches (965 mm). Tape supplies from .5 (13mm) to 4 (102) inches, in vinyl, polyester, phosphorescent, reflective, polypropylene, tamper evident, tag stock, brushed metallic polyester tapes, custom-color vinyl offered.
zWide variety of monochrome ribbons, panel ribbons in panel lengths of 6 to 16 inches (152 to 406 mm), and CYMK ribbons that blend to make many colors.
zFile or graphic transfer from PC available.
1-2 |
About This Book |

The three printer systems
All three label-printing systems use Microsoft Windows CE© as the basis for the operating system and application. As the user, most of the Windows CE operating system will be invisible to you. You don’t need to use your computer skills to operate this printing system.
Hint! You do have the option to connect to a desktop computer to use the system as a peripheral printer or to manage and store files. See CHAPTER 12: Connecting to a PC, beginning on page 12-1, for information.
The three systems are:
Monocolor system
The base system, which produces monochrome labels only.
Hint! The definition of monochrome in this context is not necessarily black, white, and shades of gray as you may see on a black-and-white television screen. In this system, monochrome means a single color, plus shades of that color, plus white. In the Monocolor system, the single color is determined by the color of the ribbon you have installed.
The Monocolor system automatically shears labels to the correct length after printing, but does not have the ability to produce cut-outs and cut-arounds.
The system is designed to run as a standalone system without support from a PC, but you can attach a PC to access special file management features. The Monocolor system LCD screen displays in grayscale only, like a black and white television.
Multicolor system
The base system, plus color printing capability. The Multicolor system is provided with a color LCD display, and can take full advantage of spot and process color printing supplies available. See CHAPTER 8: Applying Color, beginning on page 8-1, for information about using color.
Color & Cut system
The base system, plus color printing capability and a color LCD display, plus cut-out capability, which means the system can not only print your labels, but can cut labels into shapes. See CHAPTER 10: Working with Cut-outs, beginning on page 10-1, for information about using the cutter.
Welcome 1-3

Specialty applications
Your system provides these specialty label applications:
zCustom, for creating labels you design yourself.
zQuickText, for creating text-only labels quickly and easily
zPipe Marker, with pre-designed layouts for creating standard, roll-form, or symbol and arrow labels for marking pipes.
zTags, with pre-designed layouts for creating hazard prevention, maintenance, production, and quality labels you can print on tag label stock.
zRight to Know, with pre-designed layouts for creating U.S. Occupational Safety and Health OSHA-compliant chemical warning labels, including the entire OSHA database of chemical names and hazard information, with all relevant safety data.
zSafety, with pre-designed layouts for creating Caution, Notice, Danger, and other warning labels.
zEquipment, with pre-designed layouts for creating equipment placards, panel and switch labels, bin and shelf labels, and property or asset identification labels.
zWarehouse , with pre-designed layouts for creating warehouse facility labels such as shelf, rack, and bin labels, or production quality control labels.
zWHMIS, with pre-designed layouts for creating Workplace Hazardous Materials Information System-compliant chemical warning labels, which communicate safe-handling procedures for hazardous products in the workplace.
Note: WHMIS is available only in North American markets.
1-4 |
Features and Functions |

Contacting Technical Support
Please contact Brady Worldwide, Inc., with your questions or concerns. The contact support numbers for each region are listed below.
Americas
www.bradycorp.com
United States |
800-643-8766 |
technical_support @bradycorp.com |
|
|
|
Canada |
888-262-7576 |
techsuppcanada@bradycorp.com |
|
|
|
Mexico |
0 1-800-112-7239 |
bradymexico@bradycorp.com |
|
|
|
Brazil |
55 11 3604-7700 |
brady_service_brazil@bradycorp.com |
|
|
|
Other (Americas) |
414-438-6868 |
bradyintl@bradycorp.com |
|
|
|
Europe
www.bradyeurope.com
Austria |
+49 |
6032 8091 800 |
tsbelgium@bradyeurope.com |
|
|
|
|
|
|
|
|
|
|
Benelux and other |
+32 |
52 457 |
+32 52 457 |
tsbelgium@bradyeurope.com |
|
|
European countries |
397 |
|
393 (French) |
|
|
|
|
(Dutch) |
|
|
|
|
|
|
|
|
|
|
|
|
|
+32 |
52 457 |
+32 52 457 |
|
|
|
|
394 (English) |
390 (German) |
|
|
|
|
|
|
|
|
|
|
|
France - Signmark |
+33 |
4 72 66 26 80 |
tsfrance@bradyeurope.com |
|
|
|
|
|
|
|
|
|
|
Germany - Signmark |
+49 |
6032 8091 800 |
tsgermany@bradyeurope.com |
|
|
|
|
|
|
|
|
|
|
Italy |
+39 |
02 96 28 60 14 |
tsitaly@bradyeurope.com |
|
|
|
|
|
|
|
|
|
|
Spain |
+33 |
437 245 234 |
tsspain@bradyeurope.com |
|
|
|
|
|
|
|
|
|
|
Switzerland |
+49 |
6032 8091 800 |
tsbelgium@bradyeurope.com |
|
|
|
|
|
|
|
|
|
|
|
|
|
|
Welcome |
1-5 |
|
United Kingdom |
+44 1295 228205 |
tsuk@bradyeurope.com |
|
|
|
Nordic Region |
+46 85 90 057 33 |
tssweden@bradyeurope.com |
|
|
|
Eastern Europe |
+ 36 23 42 85 26 |
ts_ece@bradyeurope.com |
|
|
|
Pacific
www.bradyaust.com.au
New Zealand |
0800 446 269 |
brady_aust@bradycorp.com |
|
|
|
Australia |
1800 644 834 |
brady_aust@bradycorp.com |
|
|
|
1-6 |
Contacting Technical Support |

CHAPTER 2 Setting Up
This chapter tells you how to set up and maintain your label printing system. Topics are:
Connecting Peripherals
Installing supplies
Installing a compact flash memory card
Cleaning your system
If you plan to connect your printer to a desktop computer, be sure to see
Connecting to a PC on page 11-1.
2-1
Connecting Peripherals
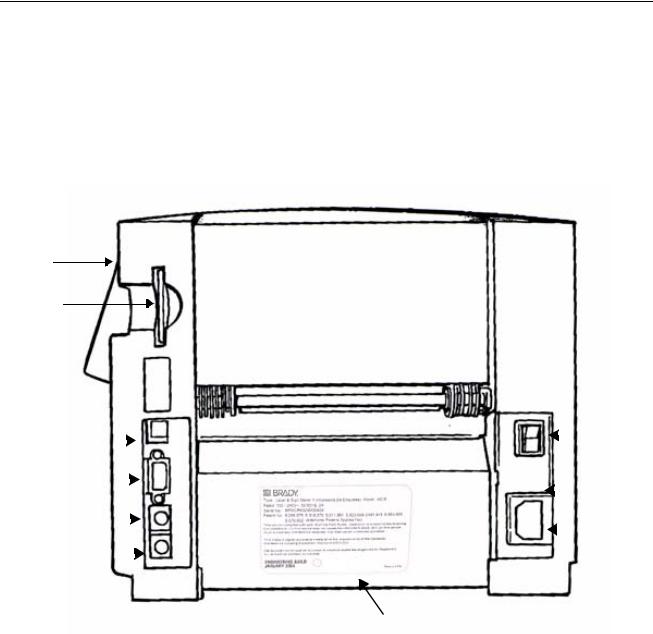
This section describes how to get your system connected and powered up. You should have already unpacked your printer, using the instruction sheet included in the shipping box.
You connect your keyboard and your mouse, if you have one, and then the power cord, to begin setting up your system. (The USB connection is discussed in Placing Your System Online on page 11-4.)
Display screen
Compact memory flashcard port
USB port |
|
|
|
|
|
|
|
|
|
|
|
|
|
|
|
|
ON/OFF |
|
|
|
|
|
|
|
|
|
|
|
|
|
|
|
|
switch |
|
|
|
|
|
|
|||||||||||||
Serial port |
|
|
|
|
|
|
|
|
|
|
|
|
|
|
Fuse |
||
Mouse connector |
|
|
|
|
|
|
|
|
|
|
|
|
|
Power |
|||
|
|
|
|
|
|
|
|
|
|
|
|
|
|
|
|
|
cord |
|
|
|
|
|
|
|
|
|
|
|
|
|
|
|
|
|
|
Keyboard |
|
|
|
|
|
|
|
|
|
|
|
|
connector |
||||
|
|
|
|
|
|
|
|
|
|
|
|
||||||
connector |
|
|
|
|
Serial number |
||||||||||||
|
|
|
|
|
|
|
|
|
|
||||||||
Figure 2-1. The label printer, side view.
Step 1: Plug the keyboard cable into the keyboard connector, shown in Figure 2-2.
Step 2: If you have a mouse, plug the mouse cable into the mouse connector, as shown in Figure 2-1
2-2 |
Connecting Peripherals |

Step 3: Plug the power cord into the printer as shown in Figure 2-1. Plug the other end of the cord into an AC power outlet.
Important! Be sure the AC power outlet is located near the printer and is easily accessible.
Installing supplies
The next step in setting up your printer is installing a ribbon cartridge and a tape cartridge. Your system reads information stored in the memory cell located on each ribbon and tape cartridge, and uses that information when you compose a label and when you print a label.
Hint! Before composing a label, install the supplies you want to use for printing the label. You may change supplies during the label composition process, but you then may have to make length or color adjustments to your label before you can print it.
The system reads the memory cells on the cartridges every time you open and close the printer, whether you install new supplies or not, and when you print a label.
Setting Up |
2-3 |
Opening the printer
Step 1: To open the printer, squeeze the release bar.
Step 2: Raise the printer cover up and away to the right.
Cover release bar
Figure 2-2. Opening the printer.
Make sure all internal packing materials have been removed before you proceed.
2-4 |
Installing supplies |

Installing a ribbon cartridge
Figure 2-3. Installing a ribbon cartridge.
Step 1: Hold the ribbon cartridge with the open part of the tab on top and facing you.
Step 2: Place the lower cylinder of the cartridge (with the unused ribbon), in the lower slot in the cover, as shown.
Step 3: Position the upper cylinder of the cartridge in the upper slot and push gently until the tab clicks in place.
Your ribbon is now installed.
Setting Up |
2-5 |
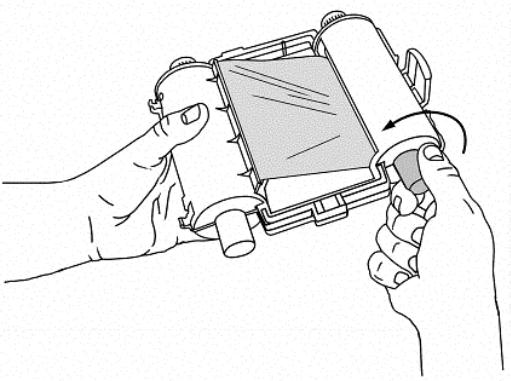
Adjusting the ribbon cartridge
If a ribbon cartridge has been stored outside the printer, the ribbon between the take-up spool and the wiper may have been exposed to dust. The dust on the ribbon may transfer to the print head causing streaks or scratches on your labels.
When a ribbon cartridge has been stored outside the printer, before installing it, you should first advance the ribbon approximately 2 inches (or 250 millimeters) counterclockwise, as shown in Figure 2-4.
Figure 2-4. Adjusting the ribbon cartridge.
This will prevent any dust that may have accumulated on the ribbon from transferring to the print head and affecting how your labels print.
2-6 |
Installing supplies |

Installing a tape cartridge
There are three simple steps to installing a tape cartridge: (1) adjusting the tape cartridge receptacle to accommodate the width of the tape, (2) dropping in the cartridge, and (3) feeding the tape through the advance rollers.
Adjusting the tape receptacle
Since the printer accepts tape widths from .5 inches (25 mm) to 4 inches (102 mm), you must use the tape guides to adjust the tape receptacle inside the printer to accommodate the size of the cartridge you are installing.
Figure 2-5. Tape guide, print tape receptacle and color-coded measuring guide.
Setting Up |
2-7 |
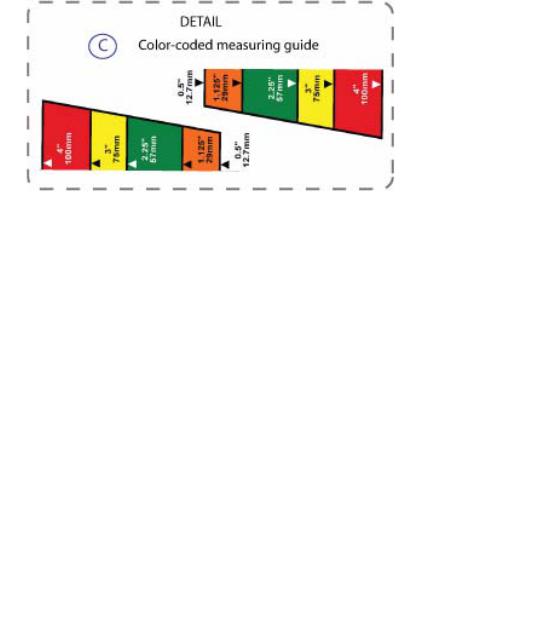
Figure 2-6. Color-coded measuring guide detail.
Step 1: |
Verify your tape’s size by noting the colored label in the center of the tape |
||
|
cartridge’s handle. For example, if your tape is 4”, you will see a red label in the |
||
|
center of the tape handle. That red label corresponds to the red bar on the color- |
||
|
coded measuring guide (Figure 2-6). |
||
Step 2: |
Grasp both tape guides. |
Note: Each tape guide is made up of two parts: a movable |
|
|
lever (1) and sliding tape guide (2) (Figure 2-5). Squeeze the movable lever and |
||
|
sliding tape guide together to position them. |
||
Step 3: |
Align the tape guides to the corresponding color on the measuring guide. Be certain |
||
|
to also match the arrows on the tape guides with the arrows on the measuring guide |
||
|
to ensure the guides are aligned properly. The tape guides will lock in place. (For |
||
|
example , if your supply is 4”, align both tape guides with the arrows on the red |
||
|
bars on each side of the measuring guide.) |
||
|
|
|
|
|
Important! |
Be certain to center justify the guides and make sure that each |
|
|
|
guide is equidistant from the edges of the inside of the printer. |
|
This will ensure that the tape is perfectly centered when it’s installed. If the guides aren’t centered when you install the tape, you will get an error message saying that the tape was not properly installed.
2-8 |
Installing supplies |

Inserting the tape cartridge.
Figure 2-7. Installing a tape cartridge.
Step 4: Hold the tape cartridge by the handle with the feet pointed downward and parallel with the surface the printer is sitting on, as shown in Figure 2-7. Make sure the tape extends through the slot in the cartridge.
Step 5: Slowly lower the tape cartridge until the tape roller cylinder ends nest in the circular slots of the tape receptacle.
Setting Up |
2-9 |
 Loading...