

Page 1
Register your new Bosch now:
www.bosch-home.com/welcome
Moodpic 1
63,2 x 50,25mm
CMYK & GREY
Moodpic 2
98,6 x 46,7mm
CMYK & GREY
TES 515..
en Instruction manual
fr Mode d’emploi
pl Instrukcjaobsługi
nl Gebruiksaanwijzing
cs Návodkpoužití
ru Инструкцияпоэксплуатации
Page 2
A
5
4
6
9
1 2 3
7
10
11
12
13
14
15
16
17
18
8
E-Nr. ……… FD… …
d e f
a
b
c
en English 2
fr Français 21
pl Polski 41
nl Nederlands 61
cs Čeština 81
ru Pycckий 100
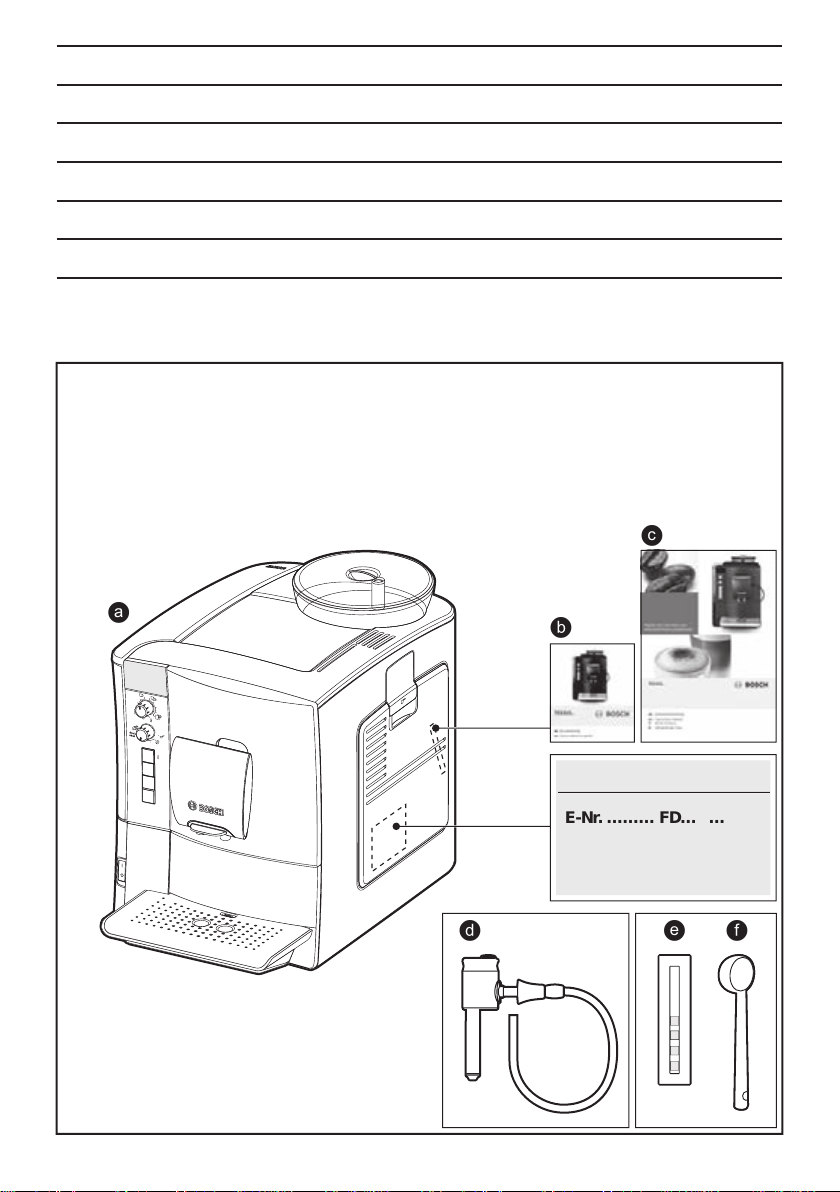
Included in delivery (see page 2)
Contenu de l’emballage (voir page 21)
Zakres dostawy (patrz strona 41)
Leveringsomvang (zie pagina 61)
Součást dodávky (viz strana 81)
Объем поставки (см. стр. 100)
Page 3
A
5
4
6
9
1 2 3
7
10
11
12
13
14
15
16
17
18
8
Page 4
B
C D
19
8d
8c
8b
2021
8e
8a
6f
6a
6d
6b
6c
6e
6g
Page 5
1.
2.
2.
1.
E
5b
5f
5a
5c
5d
5e
Page 6

en Contents
Contents
Included in delivery .....................................2
Intended use ...............................................3
Important safety information ....................... 3
Overview.....................................................5
Controls ......................................................5
Display messages ......................................6
aromaDouble Shot......................................6
Before using for the rst time......................7
Water lter ..................................................8
Menu settings .............................................9
Adjusting the grinding unit ..........................9
Preparation using coffee beans ................10
Preparation using ground coffee .............10
Dispensing hot water ................................ 11
Preparing milk froth ..................................11
Maintenance and daily cleaning ...............12
Tips on energy saving ..............................14
Service Programmes ................................ 14
Frost protection.........................................17
Accessories ..............................................17
Disposal ....................................................18
Guarantee.................................................18
Technical data...........................................18
Simple troubleshooting ............................. 19
Dear Coffee Connoisseur,
congratulations on purchasing this fully
automatic espresso machine from Bosch.
These instructions describe various models
with different features.
Please also note the enclosed quick
reference guide. It can be kept in the
special storage compartment (5c) until it is
needed.
Included in delivery
(see overview image at the start of the
instructions)
a Fully automatic espresso machine
b Quick reference guide
c Instruction manual
d Milk frother
e Water hardness testing strip
f Measuring spoon
2
Page 7

Intended use
en
Intended use
Intended use
This appliance is designed for
processing normal household
quantities in the home or similar
quantities in non-industrial
applications.
Only use the appliance indoors
at room temperature and up to
2000 m above sea level.
Important safety information
Important safety information
Please read and follow the
operating instructions carefully
and keep them for later reference! Enclose these instructions
when you give this appliance to
someone else.
This appliance can be used
by children aged from 8 years
and above and by persons with
reduced physical, sensory or
mental capabilities or lack of
experience and knowledge if
they have been given supervision or instruction concerning
use of the appliance in a safe
way and if they understand the
hazards involved. Keep children
under 8 years of age away from
the appliance and connecting
cable and do not allow them
to use the appliance. Children
shall not play with the appliance.
Cleaning and user maintenance
shall not be made by children
unless they are older than
8 years and supervised.
3
Page 8

en Intended use
W Warning
Risk of electric shock!
■ The appliance may only be
connected to a power supply
with alternating current via
a correctly installed socket
with earthing. Ensure that the
protective conductor system
of the domestic supply has
been correctly installed.
■ Connect and operate the
appliance only in accordance
with the speci cations on the
rating plate.
■ Do not use the appliance if
the power cord and/or appli-
ance are damaged.
■ Only our customer service
may repair the appliance,
e.g. by replacing a damaged
power cord, in order to avoid
hazards.
■ Never immerse the appliance
or mains cord in water.
■ If there is a fault, pull out the
mains plug immediately or
switch off the power supply.
W Warning
Hazard due to magnetism!
The appliance contains permanent magnets which can affect
electronic implants such as
pacemakers or insulin pumps.
Persons wearing electronic
implants must maintain a
minimum distance of 10 cm
from the appliance and from the
following parts upon removal:
milk container, water tank and
brewing unit.
W Warning
Risk of suffocation!
Do not allow children to play
with packaging material. Store
small parts safely as they can be
easily swallowed.
W Warning
Risk of injury!
■ Do not reach into the grinding
unit!
■ Improper use of this appliance
may result in injury.
W Warning
Risk of burns!
The milk frother gets very hot.
After use, always let it cool down
before you touch it.
W Warning
Risk of scalding!
Only use the appliance when the
milk frother is completely assem-
bled and tted.
4
Page 9

Overview
en
Overview
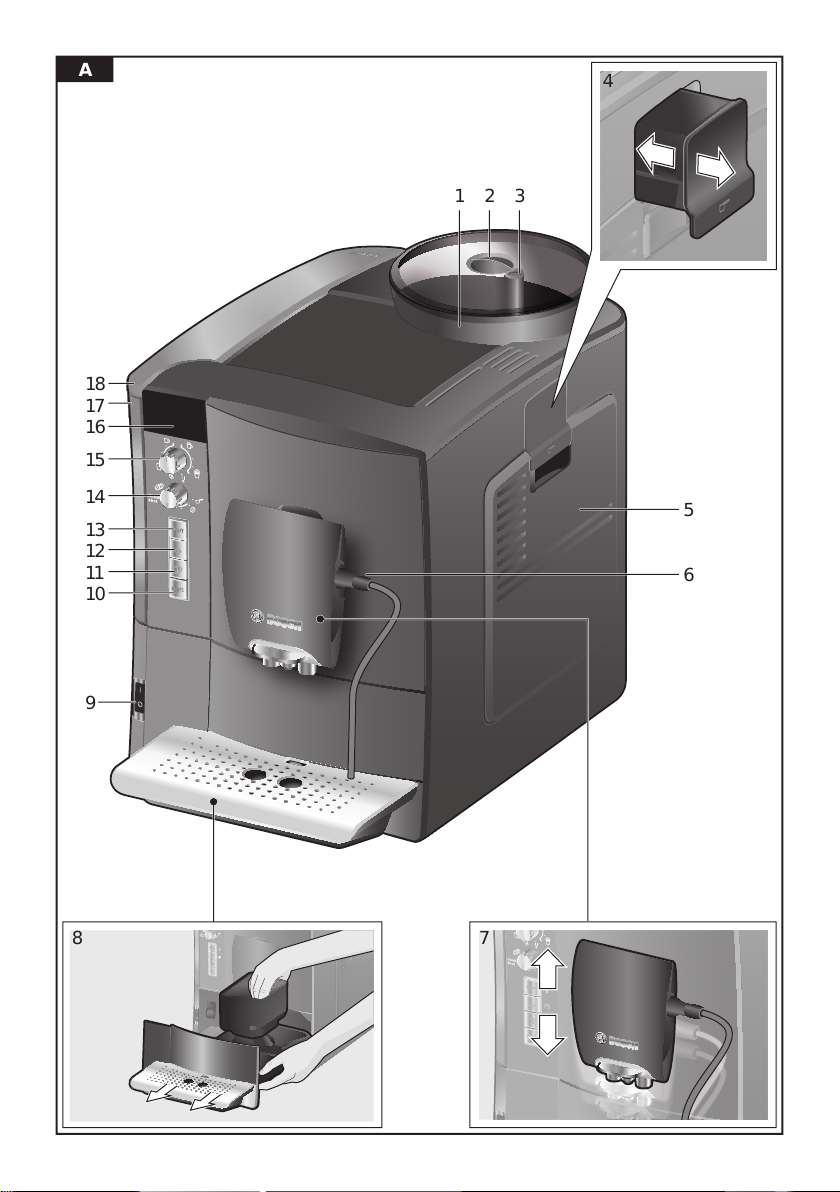
(see overview images A, B, C, D and E at
the beginning of this instruction manual)
1 Bean container
2 Aroma cover
3 Selector for grind setting
4 Drawer (ground coffee/cleaning tablet)
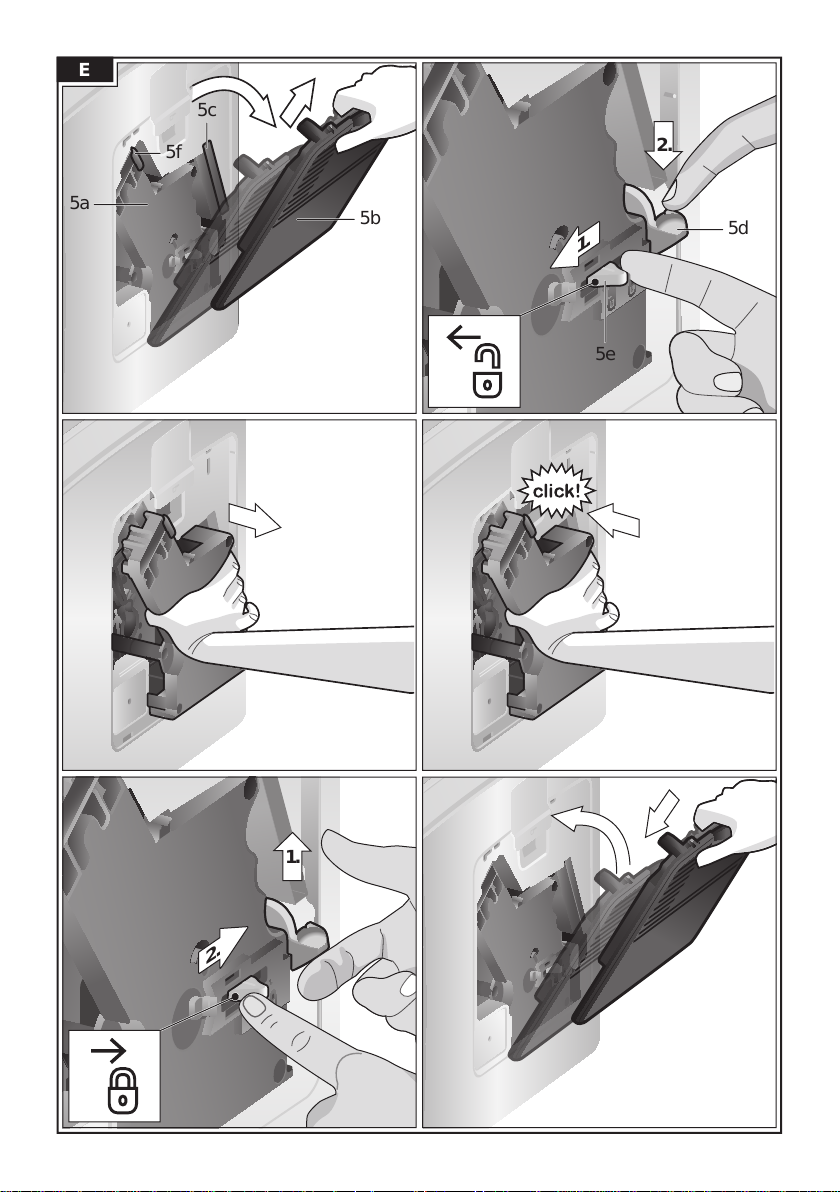
5 Brewing unit (Fig. E)
a Brewing unit
b Door
c Storage compartment for
quick reference guide
d Eject lever for brewing unit
e Lock
f Cover
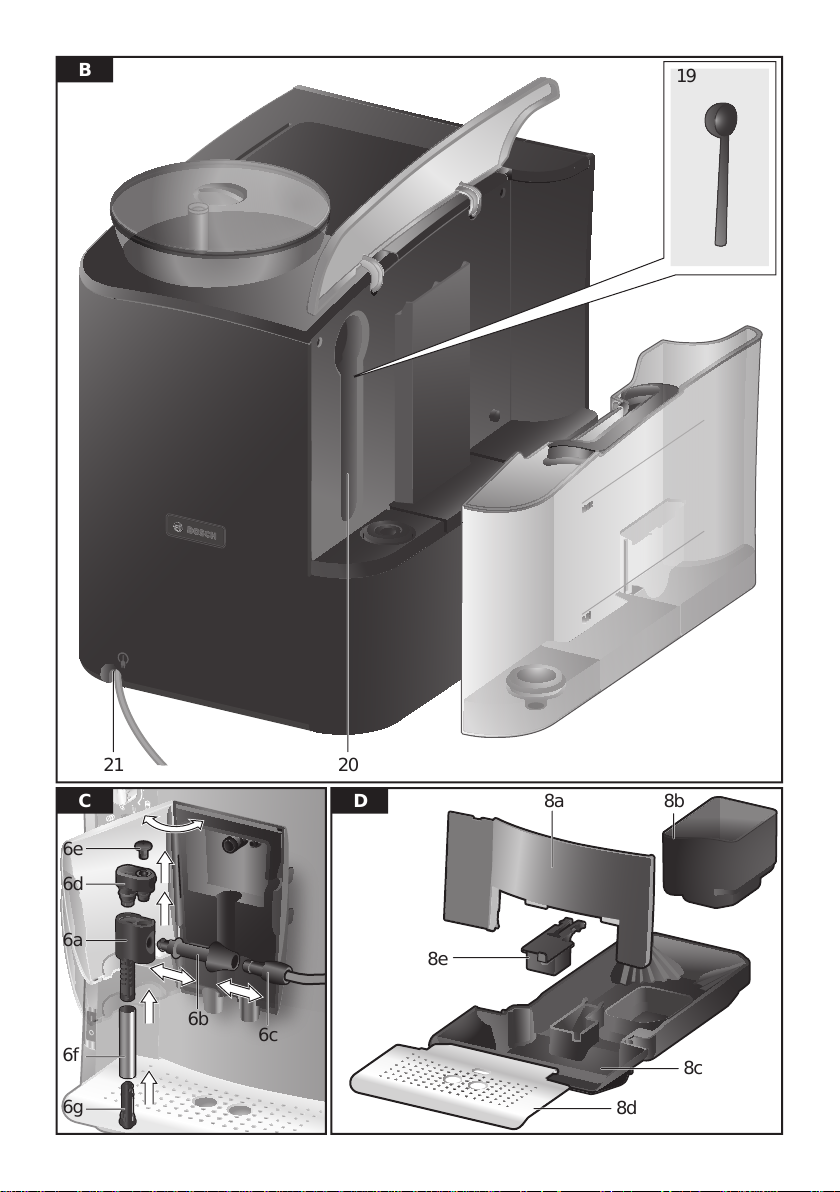
6 Milk frother (Fig. C) removable
a Outlet
b Connection (milk tube)
c Milk tube with adapter
d Upper part
e Air nozzle
f Sleeve
g Nozzle tip
7 Coffee outlet, height-adjustable
8 Drip tray (Fig. D)
a Drip tray panel
b Coffee grounds container
c Drip tray for coffee outlet
d Grate for coffee outlet
e Float
9 Power on/off switch O / I
10 start button
button
11 a
12 l / m button
13 k off / i button
14 “Coffee strength” rotary knob
15 “Drink selection” rotary knob
16 Display
17 Removable water tank
18 Lid for water tank
19 Measuring spoon
(insertion aid for water lter)
20 Storage compartment for
measuring spoon
21 Power cable with storage compartment
Controls
Power on/off switch O / I
The power switch O / I (9) is used to switch
the appliance on or to switch it off fully
(power supply off).
Important: Before switching off, run the
cleaning programme or use the k off / i
button (13) to switch off.
a button
Press the a button (11) to prepare
two cups of the selected drink at the
same time. The button can be activated
for drinks without milk and without the
aromaDouble Shot function.
k off / i button
When the k off / i button (13) is pressed
briey, the appliance rinses and switches
off. Pressing and holding down the k off / i
button (13) displays the user settings or
starts the descaling and cleaning function.
l / m button
Press the button l / m (12) to generate
steam for preparing milk froth.This button is
also used to dispense hot water.
start button
Press the start button (10) to begin drink
preparation or to start a service programme.
Press the start button (10) again during
drink preparation to cut the dispensing
process short.
5
Page 10
en Display messages
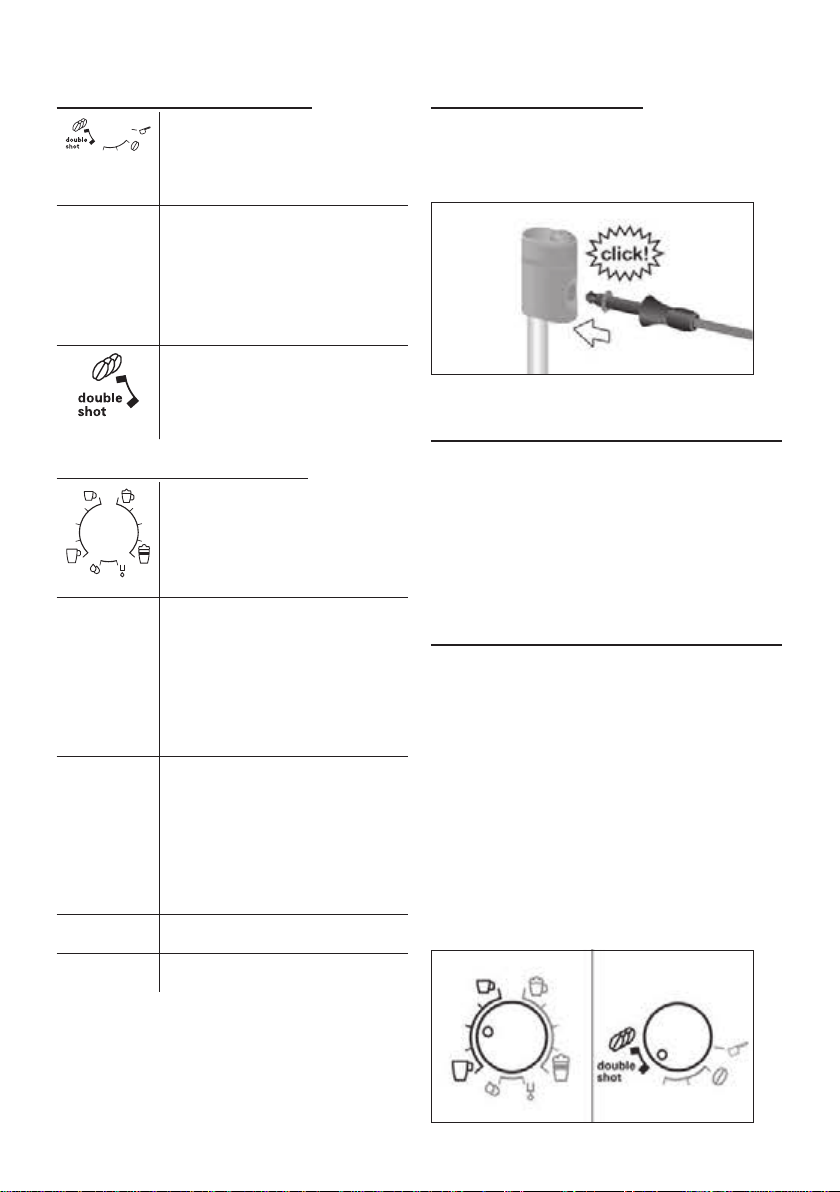
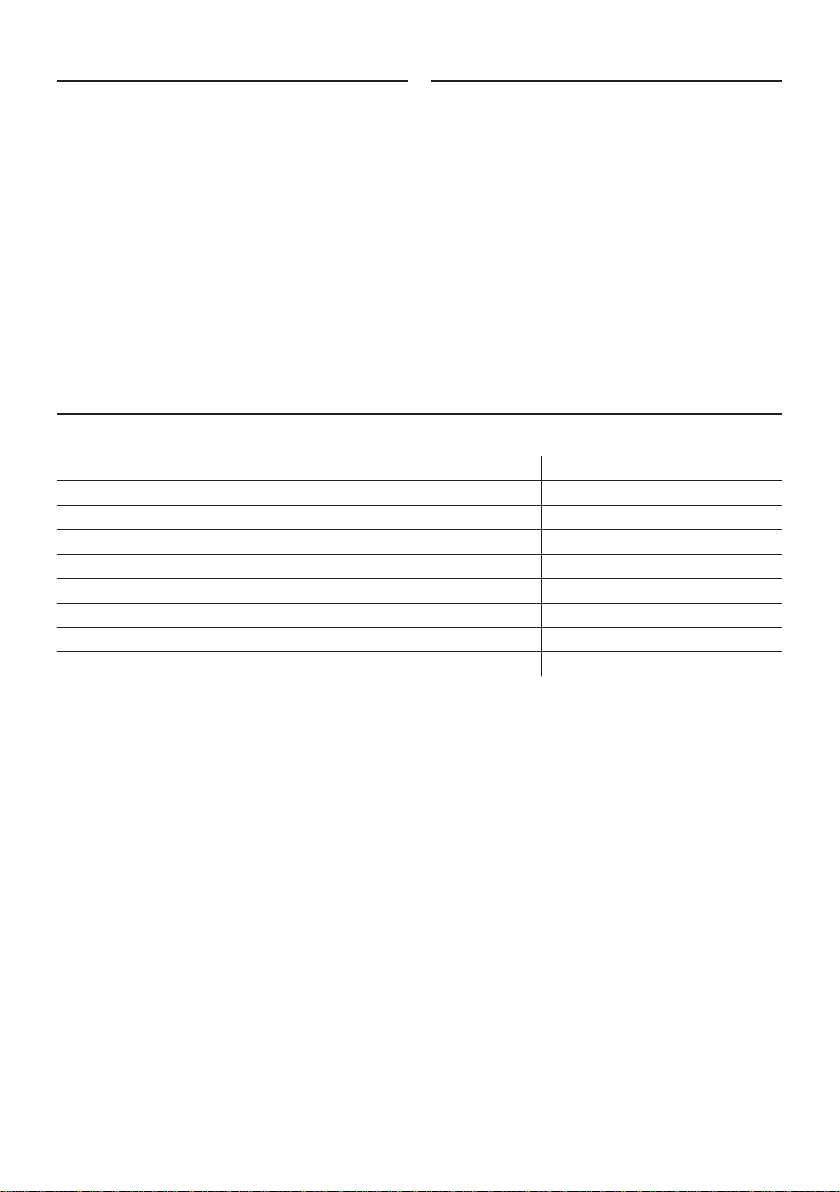
“Coffee strength” rotary knob
This rotary knob (14) is for
adjusting the coffee strength
or when using pre-ground
coffee.
b
c
to
d
“Drink selection” rotary knob
e
to
f
g
to
h
k
Ground coffee
Mild
Regul ar
Strong
DoubleShotstrong +
DoubleShotstrong ++
With these coffee strengths
the coffee is brewed in
2 stages.
See “aromaDouble Shot”.
This rotary knob (15) is used
to select the required drink
and the per-cup quantity. It
is also used to change user
settings.
Coffee-based drinks without
milk:
Small Espresso
Espresso
Small Café Crème
Café Crème
Large Café Crème
Coffee-based drinks with
milk:
Small Cappuccino
Large Cappuccino
Small Macchiato
Macchiato
Large Macchiato
Rinse machine
Connection for milk tube
To produce milk froth – for example for latte
macchiato or cappucino – the connection
and the milk tube must be properly secured
to the milk frother.
Important: This is also necessary when
dispensing hot water.
Display messages
The display (16) shows not only the current
operating status, but also various messages that give you status information or
let you know when you need to take action.
As soon as you have taken the necessary
action, the message disappears and the
menu for drink selection is displayed again.
aromaDouble Shot
The longer the coffee is brewed, the more
bitter substances and undesired aromas
are released. This has a negative effect on
the taste and makes the coffee less easily
digestible. So for extra strong coffee the
TES51... has a special aromaDouble Shot
function. When half the quantity has been
prepared, coffee is ground and brewed
again so that only the pleasant, aromatic
scents are released.
The aromaDouble Shot function is activated
with the following settings:
j
N.B.: If a drink is selected that cannot be
prepared, Invalid combination appears in
the display. Change the coffee strength or
the selected drink.
6
Rinse milk system
Page 11
Before using for the rst time
en
Before using for
the rst time
General
Fill the appropriate container using only
pure, cold, uncarbonated water and solely
roasted beans. Do not use coffee beans
that have been glazed, caramelised or
treated with other additives containing
sugar, since they will block the brewing unit.
The water hardness setting can be adjusted
on this appliance. The factory default setting
for the water hardness is 4. Check the
water hardness with the enclosed test strip.
If the check reveals a value other than 4,
change the setting on the appliance accordingly after switching on (see “Menu settings”
Water hardness).
Switching on the appliance
■ Remove the protective lm.
■ Place the fully automatic espresso
machine on a at, water-resistant surface
that can take its weight. Make sure that
the machine’s ventilation slots remain
unobstructured.
Important: Only use the appliance in
frost-free rooms. If the appliance has been
transported or stored at temperatures below
0 °C, wait at least 3 hours before operation.
■ Install the milk frother. Operate the
machine only after the milk frother (6) has
been fully assembled and installed.
■ Lift the lid of the water tank (18).
■ Remove and rinse the water tank (17)
and ll it with fresh cold water.
Do not ll above the max mark.
■ Replace the water tank (17) and push it
rmly downward into place.
■ Close the lid of the water tank (18) again.
■ Fill the bean container (1) with coffee
beans (for preparation using ground
coffee, see “Preparation using
ground coffee”).
■ Press the power switch O / I (9). The
display (16) shows the menu for setting
the display language.
■ Select the required display language with
the upper rotary knob (15).
■ Place a receptacle under outlet (6a).
■ Press the start button (10).
The language you selected is saved.
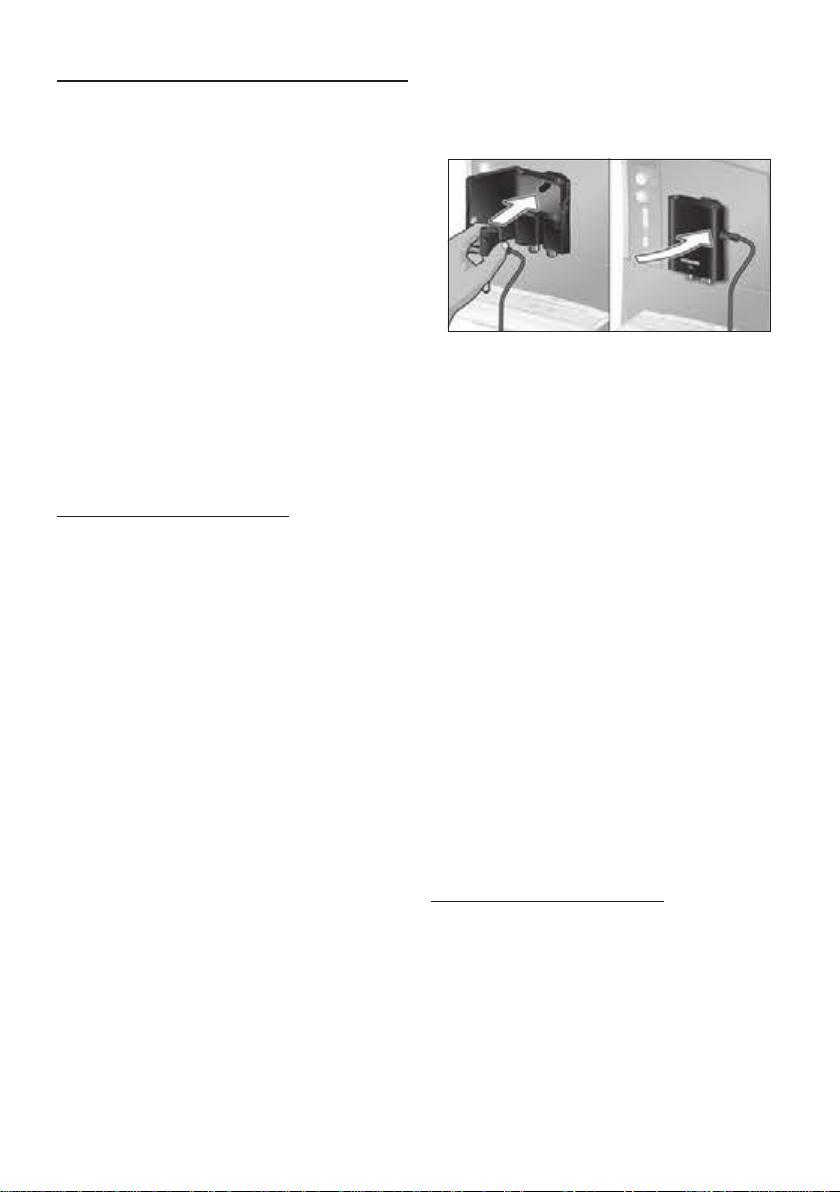
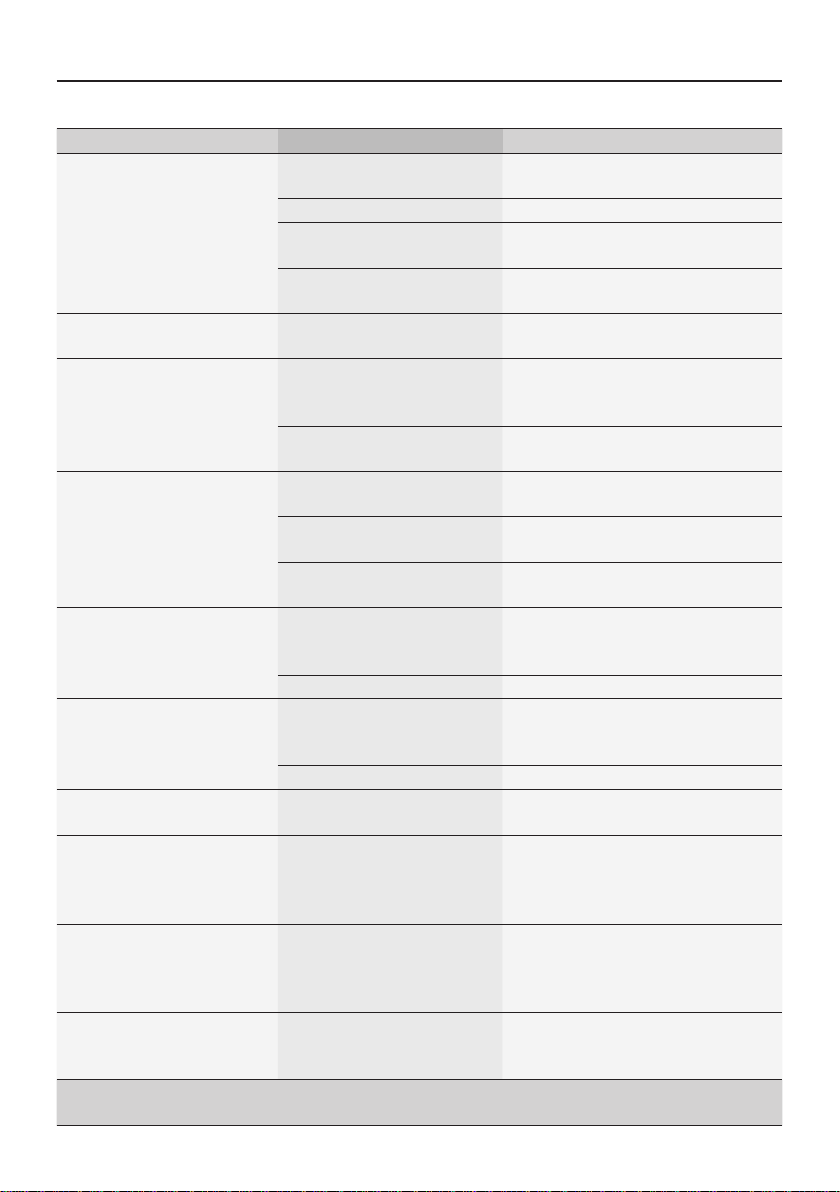
■ Pull the power cord out of the storage com-
partment (21) and plug in. Adjust the length
of the cable by pushing it back in or pulling
it out. The easiest way to do this is to place
the appliance so that its back is ush with
the edge of the counter and either pull the
cable downward or push it upward.
7
The appliance heats up and rinses. Some
water will run out of the coffee outlet.
When the drink selection menu is shown in
the display, the appliance is ready for use.
Switching off the appliance
The factory settings of the fully automatic
espresso machine are programmed for
optimal performance. The appliance
switches off automatically after a specic
time (time span can be programmed, see
“Menu settings” Shut off).
Exception: The appliance switches off
without rinsing if only hot water or steam
were dispensed.
Page 12
en Water lter
To switch the appliance off manually before
this, press the k off / i button (13).
The appliance rinses and switches off.
N.B.: If the appliance is being used for the
rst time, a service program has been run,
or the appliance has not been operated
for a long period, the rst beverage will
not have the full aroma and should not be
consumed.
When using the espresso machine for the
rst time, you will achieve a suitably thick
and stable “crema” only after the rst few
cups have been dispensed.
After extended use, water droplets may
form on the ventilation slots. This is normal.
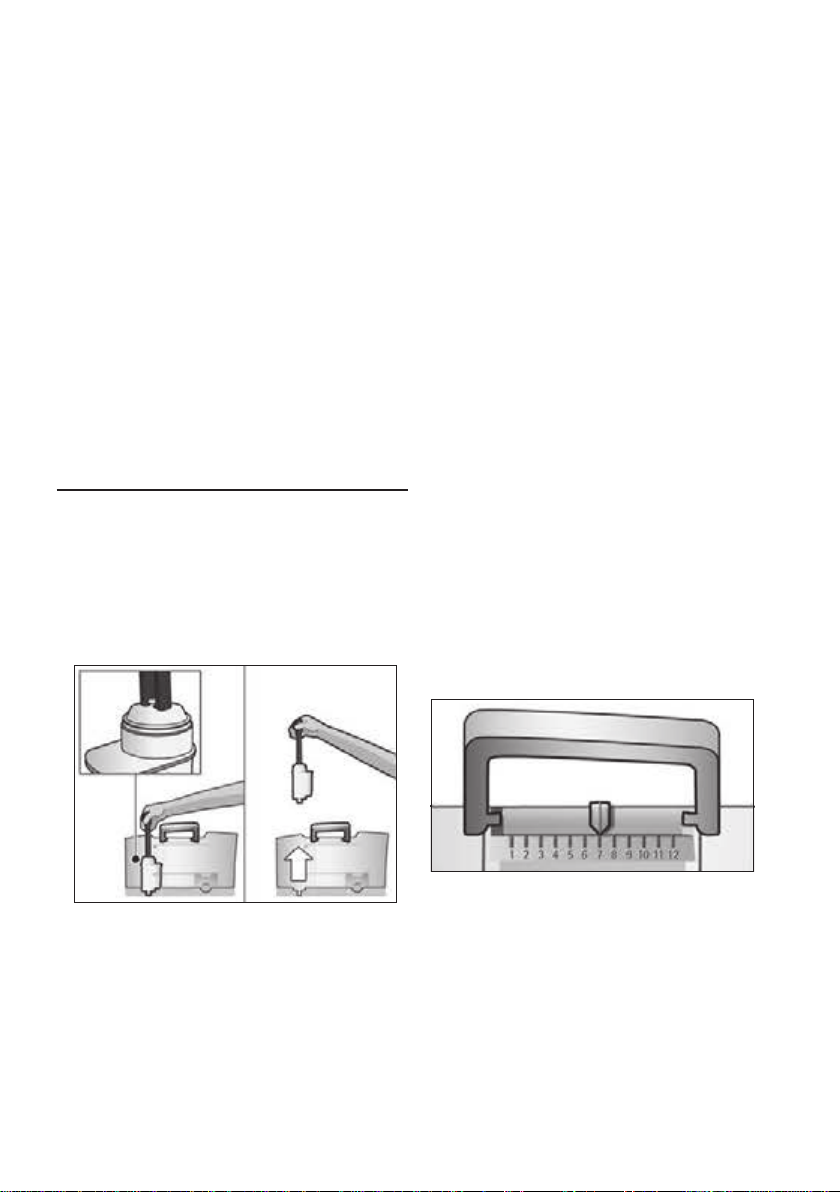
Water lter
A water lter can prevent scale buildup.
Before a new water lter is used, it must be
rinsed. To do this, proceed as follows:
■ Press the water lter rmly into the
water tank with the aid of the measuring
spoon (19).
■ Place a receptacle with a capacity of
0.5 litres under the outlet (6a).
■ Press the start button (10).
■ Water will now ow through the lter to
rinse it.
■ Empty the container.
The appliance is ready to use once more.
Note: Rinsing the lter simultaneously
activates the setting for the Change filter!
display.
The lter is no longer effective when the
Change filter! display appears, or at
the latest after 2 months. It needs to be
replaced for reasons of hygiene and so
that there is no build-up of limescale (this
could damage the appliance). Replacement
lters can be obtained from retailers or from
customer service (see “Accessories”). If
no new lter is used, turn the filter setting
to No / Old.
Note: You can use the lter indicator to
mark the month in which you inserted the
lter. You can also mark the month in which
you will need to replace the lter next (at
the latest after two months).
■ Fill the water tank (17) with water up to
the max mark.
■ Press and hold the k off / i button (13)
for at least three seconds. The menu
opens.
■ Press the k off / i button (13) repeatedly
until the display shows No/Oldfilter.
■ Select Activate filter with the upper
rotary knob (15).
■ Press the start button (10).
8
Note: If the appliance has not been used
for a prolonged period (e.g. vacation) the
lter should be rinsed before the appliance
is used again. To do so, dispense a cup of
hot water and pour it away.
Page 13
Menu settings
a b
en
Menu settings
You can adapt the appliance to your
individual needs in the menu settings.
■ Hold the k off / i button (13) down for at
least 3 seconds.
■ Press the k off / i button (13) repeatedly
until the required menu item appears in
the display.
■ Select the required setting with the upper
rotary knob (15).
■ Conrm by pressing the start button (10).
To leave the menu without making any
changes, turn the rotary selector to Exit and
press the start button (10).
You can set the following:
Shut off: Here you can set the time
span after which the appliance automatically switches off following the last drink
preparation. A time between 15 minutes and
4 hours can be set. The default time can be
shortened to save energy.
To save power you can specify a shorter
period.
Filter: Here you can set whether a water
lter is being used. If a water lter is not
being used, turn the setting to No / Old. If a
water lter is being used, turn the setting to
Activate filter. New water lters have to be
rinsed before use (see “Water lter”).
Start Calc‘n‘Clean: The service programmes (Calc‘n‘Clean / descaling /
cleaning) can be selected manually
here. Press the start button (10) and run
the selected programme (see “Service
Programmes”).
Water hardness: The water hardness
setting can be adjusted on this appliance.
It is important to set the water hardness
correctly, so that the appliance indicates
accurately when the descaling programme
should be run. The factory setting for the
water hardness is 4.
You can check the water hardness using
the enclosed test strip or by asking your
local water supplier. If a water softening
system is installed in the house, please
select the Softening system.
Dip the test strip briey in water, gently
shake off any drips, and check the result
after one minute.
Level Water hardness
German (°dH) French (°fH)
1
2
3
4
Drink counter: This displays how many
drinks have been dispensed since the
appliance was rst put into operation.
1-7
8-14
15-21
22-30
1-13
14-25
26-38
39-54
Adjusting the grinding unit
The rotary selector (3) adjusts the grind
settings from coarse to ne.
W Warning!
Adjust the grinding unit only while it is
running! Otherwise the appliance may
be damaged. Do not reach into the
grinding unit.
■ While the grinding unit is running, adjust
the rotary selector (3) from ne (a: Turn
anticlockwise) to coarse (b: Turn
clockwise) as required.
Temp.: The brewing temperature (high /
middle / low) can be set here.
Language: The display language can be set
here.
9
Page 14

en Preparation using coffee beans
Note: The new setting will not become
apparent until after the second cup of coffee.
Note: If the message Adjust coarseness!
appears in the display, the grind setting
for the coffee beans is too ne. Adjust the
grinding unit to a coarser setting.
Tip: For dark roast coffee beans, choose a
ner grind, for lighter beans a coarser grind.
Preparation using
coffee beans
This fully automatic espresso machine
grinds beans freshly for each brew.
The appliance must be ready for use. To
make coffee drinks with milk, rst insert
the milk tube in a milk container and secure
to the milk frother with the connection.
Important: Dried milk residue is difcult
to remove, so the milk frother (6) must be
cleaned with lukewarm water immediately
after use and rinse using the Clean milk
system programme.
Tip: For optimum quality, store the beans in
a cool place in sealed containers.
■ Select the required coffee strength by
turning the lower rotary knob (14). The
selected coffee strength is shown in the
display. To prepare two cups at the same
time, press the a button (11) (only for
drinks without milk and without the aro-
maDouble Shot function).
■ Press the start button (10).
Coffee is brewed and then poured into the
cup(s).
N.B.: With some settings the coffee is
prepared in two stages (see “aromaDouble
Shot”). Wait until the procedure is fully
completed.
Press the start button (10) again to cut the
brewing process short.
Preparation using
ground coffee
This fully automatic espresso machine can
also be operated with ground coffee (not
instant coffee powder).
The appliance must be ready for use. To
make coffee drinks with milk, rst insert the
milk tube in a milk container and secure to
the milk frother with the connection.
Important: Fill the water tank with fresh,
uncarbonated, cold water every day. The
tank (17) should always contain sufcient
water for operating the appliance.
Preparation
■ Place the pre-warmed cup(s) under the
coffee outlet (7).
Tip: For a small espresso, always
preheat the cup, e.g. using hot water.
■ Select the required coffee and the
required per-cup quantity by turning the
upper rotary knob (15). The selected
coffee and the per-cup quantity are
shown in the display.
10
N.B.: The aromaDouble Shot function
cannot be used when coffee is prepared
using ground coffee.
Important: Dried milk residue is difcult
to remove, so the milk frother (6) must be
cleaned with lukewarm water immediately
after use and rinse using the Clean milk
system programme.
Important: Fill the water tank with fresh,
uncarbonated, cold water every day. The
tank (17) should always contain sufcient
water for operating the appliance.
Page 15

Dispensing hot water
en
Preparation
■ Open the drawer (4).
■ Pour in no more than 2 level measuring
spoons of ground coffee.
Warning: Do not use whole beans or
instant coffee.
■ Close the drawer (4).
■ Select the required drink by turning the
upper rotary knob (15) (only one cup
possible).
■ Set the lower rotary knob to
b Groundcoffee.
■ Press the start button (10).
Coffee is brewed and then poured into
the cup.
N.B.: Repeat the procedure for another
cup of coffee.
Dispensing hot water
W Risk of burns!
The milk frother (6) gets very hot. After use,
always let it cool down before you touch it.
Before dispensing hot water the milk frother
must be cleaned and the milk tube secured
with the connection.
The appliance must be ready for use.
■ Place the pre-warmed cup or glass under
the outlet of the milk frother (6).
■ Press and hold the l / m button (12) for
approx. 3 seconds. The appliance heats
up. Hot water runs out of the milk frother
outlet (6) for about 40 seconds.
■ Press the l / m button (12) again to cut
the process short.
Preparing milk froth
W Risk of burns!
The milk frother (6) gets very hot. After use,
always let it cool down before you touch it.
Tip: You can foam the milk rst and then
dispense coffee, or foam the milk separately
and pour it onto the coffee.
The appliance must be ready for use.
■ Place a pre-warmed cup under
outlet (6a).
■ Insert the milk tube (6c) into a milk
container.
■ Press the l / m button (12).
The l / m button (12) ashes and
the appliance now heats up for approx.
20 seconds.
W Risk of burns!
Milk froth comes out of the milk frother
(6) at high pressure. Splashes of milk can
scald. Do not touch the outlet (6a) or aim it
at anyone.
■ End the process by pressing the
l / m button (12).
Important: Dried milk residue is difcult
to remove, so the milk frother (6) must be
cleaned with lukewarm water immediately
after use and rinse using the Clean milk
system programme.
11
Page 16
en Maintenance and daily cleaning
Maintenance and
daily cleaning
W Risk of electric shock!
Unplug the appliance before cleaning it.
Never immerse the appliance in water.
Do not use a steam cleaner.
■ Wipe the outside of the appliance with a
soft, damp cloth.
■ Do not use abrasive cloths or cleaning
agents.
■ Always remove any limescale, residues
of coffee or milk, cleaning or descaling
solution immediately. Such residue can
cause corrosion.
■ New sponge cloths may contain salts.
Salts can cause rust lm on stainless
steel and must therefore be washed out
thoroughly before use.
■ Pull the drip tray (8c) with the coffee
grounds container (8b) forward and
out. Remove the panel (8a) and the
grate (8d). Empty and clean the drip tray
and coffee grounds container.
■ Remove the oat (8e) and clean with a
damp cloth.
■ Wipe out the inside of the appliance
(holder, trays) and the drawer for ground
coffee (this cannot be removed).
Do not put the following items in
the dishwasher: drip tray panel (8a),
L
brewing unit (5a).
The following items are dishwashersafe: drip tray for coffee outlet (8c),
M
coffee grounds container (8b), grate
for coffee outlet (8d), aroma cover
(2), all parts of the milk frother (6) and
powder spoon (19).
■ Wipe out the inside of the appliance (tray
holders and drawer).
Important: The drip tray and coffee
grounds container should be emptied and
cleaned every day in order to prevent
deposits.
N.B.: If the appliance is cold when switched
on with the power switch O / I (9) or if it
switches off automatically after coffee has
been dispensed, it rinses automatically. In
other words the system cleans itself.
Important: If the appliance has not been
used for a prolonged period of time (e.g.
after a vacation), clean the entire appliance
thoroughly, including the milk system and
brewing unit.
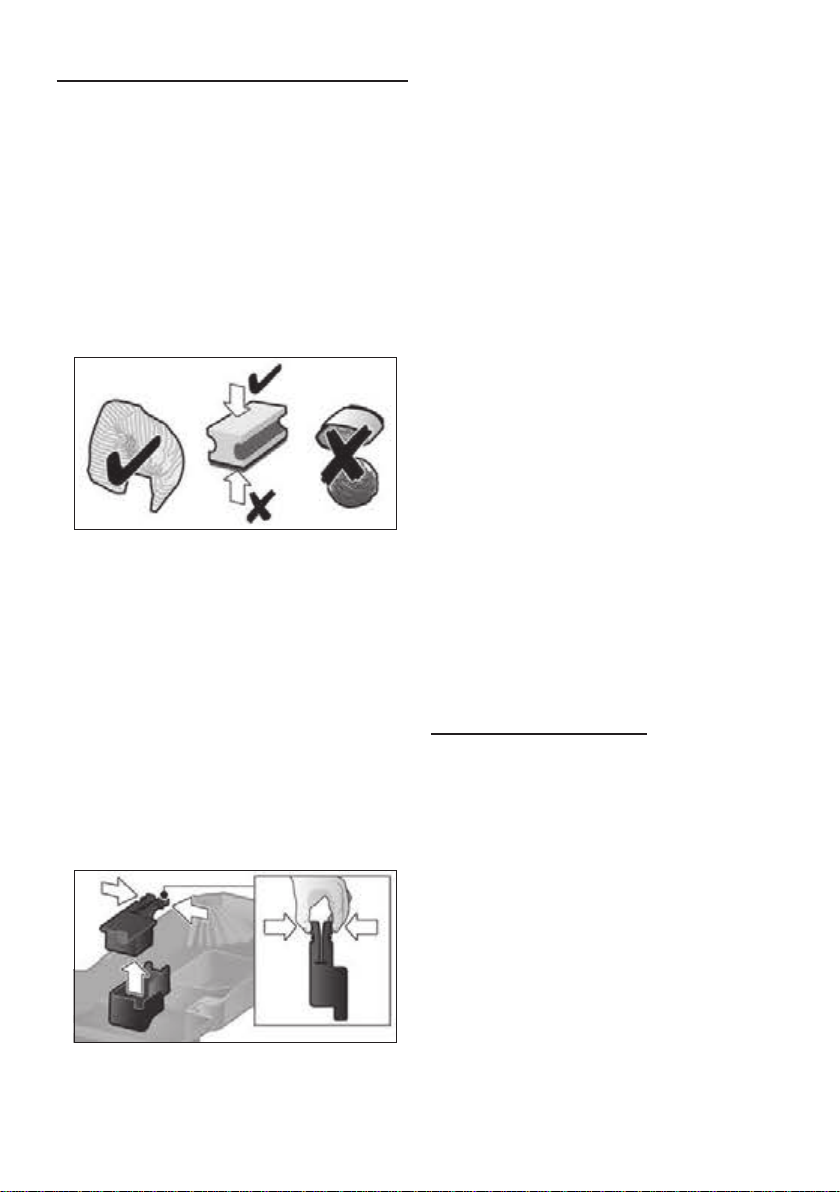
Cleaning the milk system
If the milk system was not cleaned after
milk has been dispensed, after a certain
amount of time the message Clean milk
system! will appear on the display.
Clean the milk system immediately after use!
To pre-clean the milk system automatically:
■ Select j by turning the rotary knob (15).
■ Place a tall, empty container under the
outlet (6a).
■ Push the outlet as close as possible to
the container.
■ Place the end of the milk tube (6c) into
the container.
■ Press the start button (10).
The machine automatically releases water
into the container and vacuums it up again
via the milk tube to rinse the milk system.
12
Page 17
Maintenance and daily cleaning
en
The rinse procedure stops automatically
after about 1 minute.
■ Empty the container and clean the milk
tube (6c).
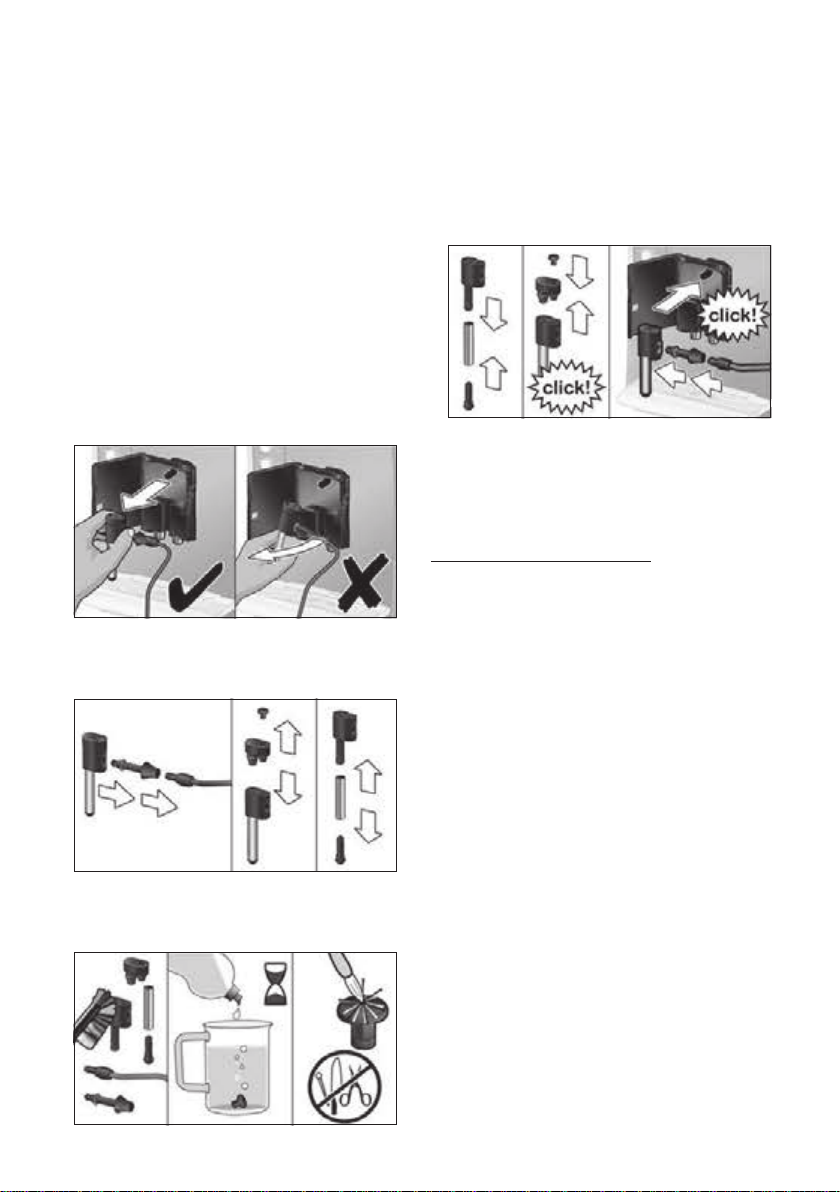
In addition to this, clean the milk system
thoroughly at regular intervals (by hand or
in the dishwasher).
W Risk of burns!
The milk frother (6) gets very hot. After use,
always let it cool down before you touch it.
Dismantling the milk system for cleaning:
■ Pull the milk frother (6) forward out of the
appliance.
■ Dismantle the milk frother into its
individual parts (6a to 6d) (see gure C
at the start of the operating instructions).
■ Rinse all parts with clear water and dry
them.
N.B.: All the parts of the milk frother and the
milk tube can also be put in the dishwasher.
■ Reassemble all the parts and replace fully
in the appliance.
W Risk of scalding!
Use this appliance only after the milk frother
(6) has been fully assembled and installed.
Cleaning the brewing unit
Clean the brewing unit regularly!
To pre-clean the brewing unit automatically:
■ Select k by turning the rotary knob (15).
■ Place an empty glass under outlet (6a).
■ Press the start button (10).
The appliance rinses.
In addition to the automatic cleaning
programme, the brewing unit (5a) should
be removed regularly for cleaning. (See
gure E at the start of the operating
instructions.)
■ Switch the appliance off at the power on/
off switch O / I (9). No buttons are lit.
■ Clean the individual parts with a detergent
solution and a soft brush. If necessary,
soak in a warm detergent solution.
13
■ Open the door (5b) to the brewing unit.
■ Slide the red lock (5e) on the brewing unit
(5a) completely to the left.
■ Press the eject lever (5d) down fully. The
brewing unit is released.
■ Grasp the brewing unit (5a) by the
recessed grips and remove carefully.
Page 18
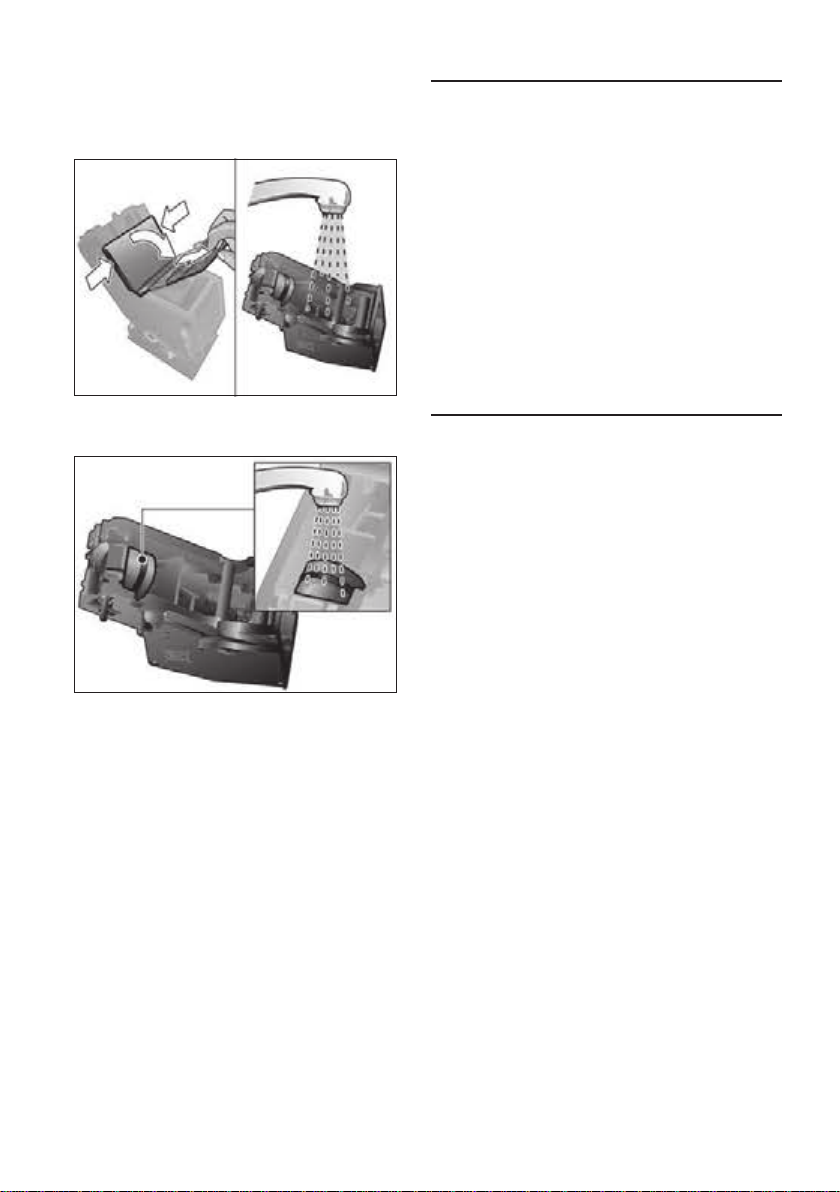
en Tips on energy saving
■ Remove the cover (5f) of the brewing unit
and rinse the brewing unit (5a) thoroughly
under running water.
■ Thoroughly clean the brewing unit sieve
under the running water.
Important: Do not clean with detergent or
other cleaning agents and do not put it in
the dishwasher.
■ Wipe out the inside of the appliance
thoroughly with a damp cloth and remove
any coffee residues.
■ Allow the brewing unit (5a) and the inside
of the appliance to dry.
■ Replace the cover (5f) on the brewing unit
and reinsert the brewing unit (5a) fully
into the appliance.
■ Press the eject lever (5d) up fully.
■ Slide the red lock (5e) fully to the right
and close the door (5b).
Tips on energy saving
■ Switch off the fully automatic espresso
machine when not in use. To do this,
press the k off / i button (13). The
appliance rinses and switches off.
■ If possible, do not interrupt coffee or
milk froth dispensing. Cutting the coffee
or milk froth dispensing process short
results in higher energy consumption and
in more residual water collecting in the
drip tray.
■ Descale the appliance regularly to avoid
a build-up of limescale. Limescale residue
results in higher energy consumption.
Service Programmes
Tip: Refer also to the quick reference guide
in the storage compartment (5c).
Depending on usage, the following
messages will appear on the display at
certain intervals:
Descale required!
or
Clean required!
or
Calc‘n‘Clean required!
The appliance should be cleaned or
descaled immediately using the corre-
sponding programme. You also have the
option of combining both processes with the
Calc‘n‘Clean function (see “Calc‘n‘Clean”).
If the service programme is not run as
instructed, the appliance may be damaged.
W Warning!
Each time you run the service programme,
you should follow the instructions for using
the descaling and cleaning agents. Please
observe the safety instructions on the
packaging of the cleaning agent.
Never interrupt the service programme!
Do not drink the liquids!
Never use vinegar, vinegar-based products,
citric acid or citric acid-based products!
14
Page 19

Service Programmes
en
Never put descaling tablets or other
descaling agents in the ground coffee
drawer or the drawer for cleaning tablets (4)!
Before starting the service programme
(Descale, Clean or Calc’nClean), remove
the brewing unit, clean as instructed and
re-insert.
Specially developed descaling and
cleaning tablets are available from
retailers or customer service (see
“Accessories”).
Descaling
Duration: approx. 25 minutes.
Important: If there is a lter in the water
tank (17), it needs to be removed before the
descaling programme is run.
If the message Descale required! appears
on the display, press the k off / i button
(13) for 3 seconds and then press the start
button (10). The descaling programme
will start. To descale the appliance before
being prompted, press the k off / i button
(13) for at least 3 seconds. Then press the
k off / i button (13) briey twice. Turn the
upper rotary knob (15) until Start descaling
appears in the display. To start the descaling procedure, press the start button (10).
The display will guide you through the
programme.
Empty drip tray
Insert drip tray
■ Empty drip tray (8) and replace them.
N.B.: If the water lter is activated, the
display will prompt you to remove the lter
and then press the start button (10) again.
Remove the lter now if you have not
already done so. Press the start button (10).
Fill descaler
Press start
■ Pour lukewarm water into the empty
water tank (17) up to the 0.5 l mark and
then dissolve 1 Bosch descaling tablet
TCZ8002 in it.
■ Press the start button (10).
Place container
Press start
■ Place a receptacle with a capacity of at
least 0.5 litres under the outlet (6a).
■ Press the start button (10).
Descale in progress
The descaling pro gramme will now run for
about 20 minutes.
Clean / Fill water tank
Press start
■ Rinse the water tank (17) and rell it with
fresh water up to the max mark.
■ Press the start button (10).
Descale in progress
The descaling pro gramme now runs for
about 3 minutes and rinses the appliance.
Empty drip tray
Insert drip tray
■ Empty drip tray (8) and replace them.
Replace the lter if one is being used. The
appliance has completed descaling and is
ready for use again.
Important: Wipe down the appliance using
a soft, damp cloth to immediately remove
any descaler residue. Such residue can
cause corrosion. New sponge cloths may
contain salts. Salts can cause rust lm
on stainless steel and must therefore be
washed out thoroughly before use.
15
Page 20

en Service Programmes
Cleaning
Duration: approx. 10 minutes.
If the message Clean required! appears
on the display, press the k off / i button
(13) for 3 seconds and then press the start
button (10).
The cleaning programme will start.
To clean the appliance before being
prompted, press the k off / i button (13)
for at least 3 seconds. Then press the
k off / i button (13) briey twice. Turn the
upper rotary knob (15) until Start cleaning
appears in the display. To start the
cleaning procedure, press the start button
(10). The display will guide you through the
programme.
Empty drip tray
Insert drip tray
■ Empty drip tray (8) and replace them.
Open drawer
■ Open the drawer (4).
Fill cleaner
Press start
■ Drop a Bosch cleaning tablet in the
drawer (4) and close.
■ Press the start button (10).
Cleaning in progress
The cleaning pro gramme will now run for
about 8 minutes.
Calc‘n‘Clean
Duration: approx. 35 minutes.
Calc‘n‘Clean combines the separate func-
tions of descaling and cleaning. If both
programmes are due to be run soon, the
espresso machine automatically suggests
this service programme.
Important: If there is a lter in the water
tank (17), it needs to be removed before the
service programme is run.
If the message Calc‘n‘Clean required!
appears on the display, press the k off / i
button (13) for 3 seconds and then press
the start button (10). The service pro-
gramme will start.
To run Calc‘n‘Clean before being prompted,
press the k off / i button (13) for at least
3 seconds. Then press the k off / i button
(13) briey twice. Turn the upper rotary
knob (15) until Start Calc‘n‘Clean appears
in the display. To start Calc‘n‘Clean, press
the start button (10).
The display will guide you through the
programme.
Empty drip tray
Insert drip tray
■ Empty drip tray (8) and replace them.
Open drawer
■ Open the drawer (4).
Empty drip tray
Insert drip tray
■ Empty drip tray (8) and replace them.
The appliance has nished cleaning is
ready for use again.
16
Fill cleaner
Press start
■ Drop a Bosch cleaning tablet in the
drawer (4) and close.
■ Press the start button (10).
N.B.: If the water lter is activated, the display
will prompt you to remove the lter and then
press the start button (10) again. Remove the
lter now if you have not already done so.
Press the start button (10).
Page 21

Frost protection
en
Fill descaler
Press start
■ Pour lukewarm water into the empty
water tank (17) up to the 0.5 l mark and
then dissolve 1 Bosch descaling tablet
TCZ8002 in it.
■ Press the start button (10).
Place container
Press start
■ Place a receptacle with a capacity of at
least 1 litre under the outlet (6a).
■ Press the start button (10).
Calc‘n‘Clean in progress
The descaling pro gramme will now run for
about 22 minutes.
Clean / Fill water tank
Press start
■ Rinse the water tank (17) and rell it with
fresh water up to the max mark.
■ Press the start button (10).
Calc‘n‘Clean in progress
The descaling pro gramme now runs for
about 10 minutes and rinses the appliance.
Empty drip tray
Insert drip tray
■ Empty drip tray (8) and replace them.
Replace the lter if one is being used. The
appliance has nished cleaning is ready for
use again.
Frost protection
W To avoid damage from low
temperatures during transport and
storage, the appliance must be
completely emptied rst.
Note: The appliance must be ready for use
and the water tank (17) lled.
■ Place a large receptacle under outlet (6a).
■ Press the l / m button (12) and
allow the appliance to steam for about
15 seconds.
■ Switch the appliance off at the power on/
off switch O / I (9).
■ Empty the water tank (17) and the
drip tray (8).
Accessories
The following accessories can be obtained
from retailers and customer service.
Accessories Ordering number
Retail /
Customer service
Cleaning tablets TCZ8001 / 00311808
Descaling tablets TCZ8002 / 00576694
Water lter TCZ7003 / 00575491
Care set TCZ8004 / 00576331
Milk container with
“Fresh Lock” lid
TCZ8009N / 00576165
Important: Wipe down the appliance using
a soft, damp cloth to immediately remove
any descaler residue. Such residue can
cause corrosion. New sponge cloths may
contain salts. Salts can cause rust lm
on stainless steel and must therefore be
washed out thoroughly before use.
17
Page 22
en Disposal
J
Dispose of packaging in an environ-
electronic appliances (waste electrical
The guarantee conditions for this appliance
are as de ned by our representative in the
country in which it is sold. Details regarding
these conditions can be obtained from
the dealer from whom the appliance was
purchased. The bill of sale or receipt must
be produced when making any claim under
the terms of this guarantee.
Changes reserved.
Disposal
mentally-friendly manner. This
appliance is labelled in accordance
with European Directive 2012/19/EU
concerning used electrical and
and electronic equipment – WEEE).
The guideline determines the framework for the return and recycling
of used appliances as applicable
throughout the EU. Please ask your
specialist retailer about current
disposal facilities.
Guarantee
Technical data
Power connection (voltage – frequency) 220-240 V~ 50/60 Hz
Heater wattage 1600 W
Maximum static pump pressure 15 bar
Maximum water tank capacity (without lter) 1.7 liters
Maximum capacity of the coffee bean container 300 grams
Length of power cable 100 cm
Dimensions (H x W x D) 385 x 280 x 479 mm
Weight, empty 9.3 kg
Type of grinding unit Ceramic
18
Page 23
Simple troubleshooting
en
Simple troubleshooting
Problem Cause Solution
Too little or no milk froth or
the milk frother (6) does
not draw the milk in.
No hot water dispensed. The milk frother (6) is
Coffee dispensing slows
to a trickle or stops
completely.
Coffee has no “crema”. Unsuitable type of coffee. Use a type of coffee with a higher
Coffee is too “acidic”. The grinding setting is too
Coffee is too “bitter”. The grinding setting is
Coffee or milk froth quality
varies considerably.
The coffee grounds are not
compact and are too wet.
Water dripped onto the
inner oor of the appliance
when the drip tray (8) was
removed.
The water lter does not
stay in position in the
water tank (17).
If you are unable to solve the problem, always call the hotline!
You will nd the telephone numbers at the back of these instructions.
The milk frother (6) is
soiled.
Milk unsuitable for frothing. Use low-fat milk (1.5 % fat).
The milk frother (6) is not
correctly assembled.
Build-up of limescale in the
appliance.
soiled.
Coffee is ground too nely.
Pre-ground coffee is too
ne.
Build-up of limescale in the
appliance.
The beans are no longer
fresh.
The grinding setting is not
suitable for the beans.
coarse or the pre-ground
coffee is too coarse.
Unsuitable type of coffee. Use a darker roast.
too ne or the pre-ground
coffee is too ne.
Unsuitable type of coffee. Change type of coffee used.
Build-up of limescale in the
appliance.
The grinding setting is too
ne or too coarse, or not
enough ground coffee has
been used.
Drip tray (8) removed too
early.
The water lter is not
mounted correctly.
Clean the milk frother (6), see
“Maintenance and daily cleaning”.
Wet the milk frother parts and
press together rmly.
Descale the appliance as
described in the instructions.
Clean the milk frother (6), see
“Maintenance and daily cleaning”.
Adjust the grinding unit to a
coarser setting. Use coarser
pre-ground coffee.
Descale the appliance as
described in the instructions.
proportion of robusta beans.
Use fresh beans.
Adjust grinding setting to ne.
Adjust the grinding unit to a ner
setting or use ner pre-ground
coffee.
Adjust the grinding unit to a
coarser setting or use coarser
pre-ground coffee.
Descale the appliance as
described in the instructions.
Adjust the grinding unit to a
coarser or ner setting, or use
2 level measuring spoons of
ground coffee.
Wait a few seconds after the
last drink was dispensed before
removing the drip tray (8).
Firmly press the water lter
straight down into the tank
connection.
19
Page 24

en Simple troubleshooting
Problem Cause Solution
Restore the unit to its
original factory settings
(“Reset”).
Display shows
Refill beans! although the
bean container (1) is full,
or the grinding unit does
not grind the beans.
Display shows
Insert brewing unit
Display shows
Clean brewing unit
Display shows
Check water tank
Display shows
Restart required
Display shows
Error
Call hotline
If you are unable to solve the problem, always call the hotline!
You will nd the telephone numbers at the back of these instructions.
You changed some
settings and want to
discard them.
Beans are not falling into
the grinding unit
(beans too oily).
Brewing unit (5) is missing
or was not recognised.
Brewing unit (5) is soiled. Clean brewing unit (5).
Too much pre-ground
coffee in the brewing
unit (5).
The brewing unit’s
mechanism is stiff.
Water tank wrongly
inserted.
Carbonated water i n th e
water tank.
Float is stuck in the water
tank.
New water lter did not
rinse according to the
instructions.
Air in the water lter. Dip the water lter into water
Water lter is old. Insert a new water lter.
Appliance is too warm. Leave the appliance to cool down.
Brewing unit is soiled. Clean the brewing unit.
The appliance has a fault. Please call the hotline.
Turn off the unit with the power
on/off switch O / I (9). Press and
hold the k off / i (13) and the l
(12) button and turn the appliance
on with the power on/off switch
O / I (9). Conrm by pressing the
start button start (10). The factory
settings are now activated.
Gently tap the bean container (1).
Change the type of coffee if
necessary.
When the bean container (1) is
empty, wipe it with a dry cloth.
Switch off the appliance with the
brewing unit (5) in place, wait
three seconds and switch on the
appliance.
Clean brewing unit (5).
Pour in no more than 2 level
measuring spoons of ground
coffee.
Remove and clean the brewing
unit, see “Maintenance and daily
cleaning”.
Insert water tank correctly.
Fill the water tank wit h f re sh tap
water.
Remove the tank and clean
thoroughly.
Rinse the water lter according to
instructions and then switch on.
until no more air bubbles escape,
replace the lter.
20
Page 25

Sommaire
fr
Sommaire
Contenu de l’emballage ............................21
Conformité dʼutilisation .............................22
Consignes de sécurité importantes ..........22
Présentation .............................................24
Eléments de commande ...........................24
Messages à l’écran...................................25
aromaDouble Shot....................................25
Avant la première utilisation .....................26
Filtre eau...................................................27
Réglages menu ........................................28
Régler la nesse de la mouture ................29
Préparation avec du café en grains ..........29
Préparation à partir de café moulu ..........30
Préparer de l’eau chaude .........................30
Préparation de mousse de lait ..................30
Entretien et nettoyage quotidien ...............31
Conseils pour économiser l’énergie .........34
Programmes de maintenance ..................34
Protection contre le gel .............................37
Accessoires ..............................................37
Mise au rebut ............................................37
Garantie ....................................................37
Caractéristiques techniques .....................37
Eliminer soi-même les
problèmes simples ...................................38
Chère amatrice de café,
cher amateur de café.
Félicitation pour avoir choisi la cafetière
Bosch.
Ce mode d’emploi décrit différents modèles
qui se différencient par leur niveau
d’équipe ment.
Veuillez également tenir compte du
Mémento fourni. Un logement (5c) a été
prévu pour le conserver à portée de main
dans la machine.
Contenu de l’emballage
(voir l’illustration gurant au début du
présent Mode d’emploi)
a Machine à café
b Mémento
c Mode d’emploi
d Mousseur lait
e Bandelette pour déterminer
la dureté de l’eau
f Cuillère-dose
21
Page 26

fr Conformité dʼutilisation
Conformité dʼutilisation Consignes de sécurité
Conformité dʼutilisation
Cet appareil est destiné à la
préparation de quantités habituellement nécessaires dans un
foyer, ou dans des applications
non professionnelles similaires à
celles dʼun foyer.
Nʼutiliser lʼappareil quʼà lʼintérieur
de pièces, à température
ambiante, et jusquʼà 2 000 m
au-dessus du niveau de la mer.
Consignes de sécurité
importantes
importantes
Veuillez lire la notice dʼutilisa-
tion attentivement, respecter
les instructions et la conserver
soigneusement ! Si lʼappa-
reil change de propriétaire,
remettez-lui cette notice.
Les enfants de 8 ans et plus,
les personnes souffrant dʼun
handicap physique, sensoriel
ou mental ou ne détenant pas
lʼexpérience et/ou les connais-
sances nécessaires pourront
utiliser cet appareil à condition
de le faire sous surveillance,
ou que son utilisation sûre leur
ait été enseignée et quʼils aient
compris les dangers qui en
émanent. Maintenir les enfants
de moins de 8 ans à lʼécart de
lʼappareil et du cordon dʼalimen-
tation secteur et ne pas leur
permettre dʼutiliser lʼappareil.
Ne pas laisser les enfants jouer
avec lʼappareil. Le nettoyage et
lʼentretien incombant à lʼutilisa-
teur ne doivent pas être effec-
tués par des enfants sauf sʼils
sont âgés de 8 ans et plus et
sʼils agissent sous surveillance.
22
Page 27

Conformité dʼutilisation
fr
W Avertissement
Risque dʼélectrocution !
■ Lʼappareil doit être branché
uniquement sur un réseau à
courant alternatif par lʼintermédiaire dʼune prise secteur
installée de manière conforme
et disposant dʼune connexion
à la terre. Assurez-vous que
le système à conducteur de
protection de lʼinstallation
électrique de votre maison est
conforme.
■ Branchez et utilisez lʼappareil
uniquement en conformité
avec les indications gurant
sur la plaque signalétique.
■ Nʼutilisez lʼappareil que si
son cordon dʼalimentation
et lʼappareil lui-même ne
présentent aucun dommage.
■ A n dʼécarter tout danger,
seul notre service aprèsvente est habilité à réparer
lʼappareil, comme par
exemple procéder au
remplacement dʼun cordon
dʼalimentation endommagé.
■ Ne plongez jamais lʼappareil
ou le cordon dʼalimentation
dans lʼeau.
■ En cas de défaut, débran-
chez immédiatement la che
secteur ou coupez la tension
du réseau.
W Avertissement
Danger par magnétisme !
Lʼappareil renferme des aimants
permanents susceptibles dʼagir
sur des implants électroniques,
par exemple des stimulateurs
cardiaques ou des pompes à
insuline. Les personnes portant
des implants électroniques sont
priées de rester à au moins
10 cm de lʼappareil et des pièces
suivantes, lors de leur retrait :
réservoir à lait, réservoir dʼeau et
unité de percolation.
W Avertissement
Risque dʼasphyxie !
Ne laissez jamais les enfants
jouer avec les emballages.
Rangez les petites pièces de
manière sûre, elles pourraient
être avalées.
W Avertissement
Risque de blessures !
■ Nʼintroduisez jamais les doigts
dans le moulin.
■ Lʼutilisation inappropriée de
lʼappareil peut entraîner des
blessures.
W Avertissement
Risque de brûlure !
Le mousseur de lait est très
chaud. Après utilisation, lais-
sez-le refroidir avant de le
toucher.
W Avertissement
Risque de brûlures !
N’utiliser l’appareil que lorsque
le mousseur de lait est complè-
tement assemblé et monté.
23
Page 28

fr Présentation
Présentation
(voir les illustrations de vue d’ensemble
A, B, C, D et E au début de la notice)
1 Bac à café
2 Couvercle préservateur d’arôme
3 Sélecteur de réglage de nesse de
mouture
4 Tiroir à café
(café en poudre/pastille de nettoyage)
5 Unité de percolation (gure E)
a Unité de percolation
b Volet
c Logement du Mémento
d Levier d’éjection pour
l’unité de percolation
e Verrouillage
f Couvercle de protection
6 Mousseur de lait amovible (gure C)
a Embout
b Raccordement (exible de lait)
c Flexible de lait avec adaptateur
d Partie supérieure
e Buse à air
f Douille
g Pointe de la buse
7 Bec verseur du café,
réglable en hauteur
8 Bac collecteur (gure D)
a Support des bacs collecteurs
b Récipient pour marc de café
c Bac collecteur du bec verseur du café
d Grille bec verseur du café
e Flotteur
9 Interrupteur électrique O / I
10 Touche start
11 Touche a
12 Touche l / m
13 Touche k off / i
14 Sélecteur rotatif « Arôme du café »
15 Sélecteur rotatif
« Sélection de la boisson »
16 Ecran
17 Réservoir d’eau amovible
18 Couvercle du réservoir d’eau
19 Cuillère-dose (sert de poignée pour
placer le ltre d’eau)
20 Logement de la cuillère-dose
21 Cordon électrique et logement
Eléments de commande
Interrupteur électrique O / I
L’interrupteur réseau O / I (9) permet de
mettre en marche et d’arrêter entièrement la
machine (alimentation électrique coupée).
Important : Avant d’arrêter la machine,
lancer un programme de rinçage ou bien
utiliser la touche k off / i (13).
Touche a
Appuyer sur la touche a (11) pour
préparer simultanément deux tasses de
la boisson sélectionnée. La touche est
utilisable pour les boissons sans lait et sans
fonction aromaDouble Shot.
Touche k off / i
Appuyer brièvement sur la touche
k off / i (13) pour effectuer un rinçage et
arrêter la machine. Appuyer de manière
prolongée sur la touche k off / i (13)
pour afcher les réglages utilisateur ou
pour lancer un cycle de détartrage et de
nettoyage.
Touche l / m
Appuyer sur la touche l / m (12) pour
créer de la vapeur qui sert à préparer la
mousse de lait. Cette touche permet également de prélever de l’eau chaude.
Touche start
Appuyer sur la touche start (10) pour
lancer la préparation d’une boisson ou pour
effectuer un programme de Service.
Pour réduire la quantité de boisson appuyer
de nouveau sur la touche start (10) en
cours de préparation.
24
Page 29

Messages à l’écran
fr
Sélecteur rotatif « Arôme du café »
Ce bouton rotatif (14) permet
de régler l’intensité du
café ou l’utilisation de café
en poudre.
b
c
à
d
Sélecteur rotatif
« Sélection de la boisson »
e
à
f
g
à
h
k
j
Remarque : Lorsqu’il est sélectionné une
boisson impossible à préparer, l’écran
afche Combinaison non valide. Modier
l’arôme du café ou la sélection de la
boisson.
Comp. poudre
Doux
Normal
Fort
DoubleShot fort +
DoubleShot fort ++
Avec ces réglages de
l’arôme, le café est préparé
en 2 étapes. Voir point
« aromaDouble Shot ».
Le sélecteur (15) permet de
sélectionner la boisson et
la quantité. Il permet aussi
de modier les réglages de
l’utilisateur.
Boisson café sans lait :
Petit espresso
Espresso
Petit café crème
Café crème
Grand café crème
Boisson café avec lait :
Petit cappuccino
Grand cappuccino
Petit macchiato
Macchiato
Grand macchiato
Rinçage machine
Rincer syst.de lait
Raccordement pour le exible de lait
Pour lancer la préparation de mousse de
lait, par exemple pour un latte macchiato ou
un cappucino, le raccordement et le exible
de lait doivent être xés correctement sur le
mousseur de lait.
Important : ceci est également nécessaire
pour la préparation d’eau chaude.
Messages à l’écran
En plus de l’état de fonctionnement actuel,
l’écran (16) afche également différents
messages qui correspondent à des informations d’état ou qui vous demandent
d’intervenir. Dès que vous avez effectué
l’opération nécessaire, le message dispa-
raît et le menu de sélection des boissons
s’afche de nouveau.
aromaDouble Shot
Plus la percolation du café dure longtemps,
plus les substances amères et les arômes
indésirables sont prononcés. Cela a un effet
négatif sur le goût et rend le café moins
digeste. La TES51... dispose donc d’une
fonction spéciale, aromaDouble Shot pour
préparer un café très fort. Une fois que
la moitié de la quantité a été préparée,
la machine moud de nouveau du café et
effectue une percolation. Cela permet de
ne développer que les arômes parfumés et
très digestes du café.
25
Page 30
fr Avant la première utilisation
Pour activer la fonction aromaDouble Shot,
procéder comme indiqué ci-après :
Avant la première utilisation
Généralités
Ne verser, dans les conteneurs correspondants, que de l’eau pure, froide, sans
gaz carbonique et uniquement du café en
grains torréé. Ne pas employer des grains
de café avec glaçage, des grains caramélisés ou enrobés d’une substance sucrée
quelconque ; ils encrassent et obturent l’unité
de percolation. Sur cette machine, il existe
un réglage de la dureté de l’eau. En usine,
la machine est réglée sur la dureté 4. Se
servir de la bandelette fournie pour détermi-
ner la dureté de l’eau.
Si le contrôle donne une valeur différente
de 4, il faut programmer la machine en
conséquence après la mise en service (voir
Eau Dureté point « Réglages menu »).
Mise en service de la machine
■ Retirer le lm de protection existant.
■ Placer la machine à café sur un plan
horizontal, sufsamment solide pour
supporter son poids et résistant à l’eau.
Assurez-vous que la fente de ventilation
de la machine n’est pas obstruée.
Important : Utiliser l’appareil uniquement
dans des locaux hors gel. Dans le cas où
l’appareil a été transporté ou entreposé
à des températures en dessous de 0 °C,
attendre au moins 3 heures avant la mise
en service de l’appareil.
■ Extraire du logement (21) la longueur de
cordon électrique nécessaire et brancher
dans une prise. Pour ajuster la longueur
du cordon, il suft de le tirer ou de le
repousser à l’intérieur. Pour cela, placer
la machine sur un bord de table, par ex.,
et tirer le câble vers le bas ou le pousser
vers le haut.
■ Installez le mousseur de lait. N’utilisez la
machine que lorsque le mousseur de lait
(6) est entièrement monté et installé.
■ Rabattre vers le haut le couvercle du
réservoir d’eau (18).
■ Retirer le réservoir d’eau (17), le rincer et
le remplir d’eau froide. Ne pas dépasser
le repère max.
■ Placer le réservoir d’eau (17) bien vertical
et appuyer pour le faire descendre.
■ Refermer le couvercle du réservoir
d’eau (18).
■ Remplir de café en grains le bac à
café (1) (pour la préparation à partir de
café moulu, voir point « Préparation à
partir de café moulu »).
■ Appuyer sur l’interrupteur électrique
O / I (9). L’écran (16) afche le menu de
réglage de la langue d’afchage.
■ A l’aide du sélecteur (15), choisir la
langue d’afchage souhaitée. Placer un
récipient sous l’embout (6a).
■ Appuyer sur la touche start (10). La
langue sélectionnée est enregistrée.
La machine chauffe et effectue un rinçage.
Un peu d’eau s’écoule à partir du bec
verseur du café. Lorsque la sélection de
boisson apparaît à l’écran, la machine est
prête à fonctionner.
26
Page 31

Filtre eau
fr
Arrêter la machine
La machine à expresso automatique est
programmée en usine de façon à fonc-
tionner de manière optimale. La machine
s’arrête automatiquement après une durée
dénie (durée réglable, voir Arrêt point
« Réglages menu »).
Exception : Lorsque vous avez prélevé de
l’eau chaude ou de la vapeur, la machine
s’arrête sans effectuer de nettoyage.
Pour arrêter la machine manuellement,
appuyer sur la touche k off / i (13). La
machine effectue un rinçage et s’arrête.
Remarque : Lors de la première utilisation
de la machine ou après un programme de
service ou encore après une longue période
d’inutilisation, la première tasse préparée
n’a pas encore son plein arôme. Il ne faut
donc pas la boire.
Une fois effectuée la mise en service de la
machine, la présence d’une mousse dense
et ne sur le café n’est obtenue qu’après
avoir préparé plusieurs tasses.
Après une utilisation extensive, il peut se
former des gouttelettes d’eau sur les fentes
de ventilation. C’est un phénomène normal.
Filtre eau
L’utilisation d’un ltre à eau peut diminuer la
formation de dépôts calcaires.
Avant d’utiliser un nouveau ltre à eau il
faut tout d’abord effectuer un rinçage. Pour
cela, procéder comme indiqué ci-après.
■ En s’aidant de la cuillère dose (19), bien
insérer le ltre à eau dans le réservoir
d’eau.
■ Remplir d’eau le réservoir (17) jusqu’au
repère max.
■ Maintenez appuyé le bouton k off / i
(13) durant au moins trois secondes. Le
menu s’ouvre.
■ Appuyez plusieurs fois sur le bouton
k off / i (13) jusqu’à ce que l’écran
afche Sans/ancien filtre.
■ A l’aide du sélecteur du haut (15), choisir
Activer filtre.
■ Appuyer sur la touche start (10).
■ Placer un récipient d’une contenance de
0,5 litre sous l’embout (6a).
■ Appuyer sur la touche start (10).
■ L’eau traverse le ltre pour le rincer.
■ Ensuite, vider le récipient.
La machine est de nouveau prête à
fonctionner.
Info : Le rinçage du ltre a activé le réglage
pour l’afchage du changement de ltre.
Au moment où s’afche Remplacer filtre!
ou bien au bout de 2 mois, au plus tard, le
ltre n’est plus efcace.
Pour des raisons d’hygiène et pour éviter
l’entartrage de la machine (ce qui provoque
des dommages), il faut remplacer le ltre.
27
Page 32

fr Réglages menu
Les ltres de rechange sont disponibles
dans le commerce ou peuvent être commandés auprès du Service Clientèle (voir
point « Accessoires »). Si l’on n’utilise pas
un nouveau ltre, il faut régler filtre sur
Sans/ancien.
Info : L’indicateur de ltre vous permet
d’indiquer le mois où vous avez placé le
ltre. Vous pouvez aussi préciser le mois où
vous devrez le remplacer (au plus tard au
bout de deux mois).
Info : Si la machine n’est pas utilisée durant
une période prolongée (par ex. congés), il
faut que le ltre utilisé soit rincé avant utilisation. Pour cela, prélever une tasse d’eau
chaude et en jeter le contenu.
Réglages menu
Vous pouvez adapter votre machine de
manière individuelle à l’aide des réglages
menu.
■ Maintenir appuyée la touche k off / i
(13) au moins 3 secondes.
■ Appuyer plusieurs fois sur la touche
k off / i (13) jusqu’à ce que l’option de
menu souhaitée s’afche à l’écran.
■ A l’aide du sélecteur du haut (15), choisir
le réglage souhaité.
■ Conrmer avec la touche start (10).
Pour quitter le menu sans enregistrer
les modications, placer le sélecteur sur
Quitter et appuyer sur la touche start (10).
Arrêt : Vous pouvez régler ici l’intervalle de
temps à l’issue duquel la machine s’arrête
automatiquement après la préparation de
la dernière boisson. La plage de réglage
est de 15 minutes à 4 heures. La durée
programmée peut être raccourcie pour
économiser l‘énergie.
Filtre : Vous pouvez indiquer ici si vous uti-
lisez ou non un ltre à eau avec la machine.
Si vous n’utilisez pas de ltre, sélectionnez
le réglage Sans/ancien. Si vous utilisez un
ltre, sélectionnez le réglage Activer filtre.
Avant de placer un nouveau ltre à eau,
rincez celui-ci (voir point « Filtre eau »).
Démarrer Calc‘n‘Clean : Vous pouvez ici
sélectionner manuellement les programmes
de service (Calc‘n‘Clean / détartrage /
nettoyage). Appuyer sur la touche start (10)
et effectuer le programme sélectionné (voir
point « Programmes de maintenance »).
Temp. : Vous pouvez régler ici la température
de percolation (élevée / moyenne / basse).
Langue : Vous pouvez régler ici la langue
d’afchage.
Eau Dureté : Il est possible, sur cette
machine, de régler la dureté de l’eau.
Le réglage correct de la dureté de l’eau
est important car il permet à la machine
d’indiquer le moment où un détartrage est
nécessaire. En usine, la dureté de l’eau est
réglée sur 4. La dureté de l’eau peut être
déterminée à l’aide de la bandelette fournie
ou être demandée au Service des Eaux
local. Dans le cas où un adoucisseur d’eau
est installé dans la maison, veuillez choisir
le réglage Adoucisseur.
Vous pouvez effectuer les réglages
suivants :
28
Page 33

Régler la nesse de la mouture
fr
Plonger brièvement la bandelette dans
l’eau, la secouer légèrement et attendre
une minute pour lire le résultat.
Niveau Dureté de l’eau
Allemagne (°dH) France (°fH)
1
2
3
4
Compteur de boissons : Il est possible d’af-
cher ici le nombre des boissons préparées
depuis la mise en service de la machine.
1-7
8-14
15-21
22-30
1-13
14-25
26-38
39-54
Régler la nesse
Conseil pratique : Régler une mouture
plus ne pour les grains torréés foncés et
une mouture plus grossière pour les grains
torréés clairs.
Préparation avec du
café en grains
Cette machine Espresso tout automatique
moud du café frais lors de chaque préparation.
La machine doit être prête à fonctionner.
Pour préparer une boisson à base de lait,
introduire tout d’abord le exible de lait
dans un réservoir à lait et le xer sur le
mousseur de lait avec le raccordement.
de la mouture
Le sélecteur (3) de réglage de la mouture
du café permet de régler la nesse de
mouture souhaitée du café.
W Attention !
Modier le réglage de la mouture uniquement lorsque le broyeur fonctionne. Sinon
la machine peut être endommagée. Ne pas
glisser les doigts à l’intérieur du moulin.
■ Lorsque le broyeur fonctionne, régler le
sélecteur (3) entre une mouture ne
(a : tourner dans le sens opposé aux
aiguilles d’une montre) et une mouture
plus grossière (b : tourner dans le sens
des aiguilles d’une montre).
Info : Le nouveau réglage n’est perceptible
qu’à la seconde ou la troisième tasse.
Remarque : Si le message Moudre moins
fin ! apparait à l’écran, les grains de café
sont moulus trop nement. Régler une
mouture moins ne.
29
Important : Les restes de lait séchés sont
difciles à retirer. Après chaque utilisation
du mousseur lait (6), il est impératif d’effectuer un nettoyage à l’eau tiède à l’aide
du programme Nettoyer syst. lait.
Conseil pratique : Pour assurer aux grains
une qualité optimale, les conserver au frais
dans un récipient fermé.
Important : Remplir chaque jour le réservoir
d’eau avec de l’eau fraîche, froide et sans
gaz carbonique. Celui-ci doit toujours
contenir sufsamment d’eau pour assurer le
fonctionnement de la machine.
Préparation
■ Placer la(les) tasse(s) sous le bec
verseur du café (7).
Conseil pratique : Pour préparer un
espresso, toujours préchauffer la tasse,
par ex. à l’eau bouillante.
■ Sélectionner le café et la quantité à l’aide
du sélecteur rotatif (15). Le café et la
quantité sélectionnés s’afchent à l’écran.
■ Sélectionner l’arôme du café en tournant
le sélecteur inférieur (14). L’arôme sélectionné est afché à l’écran. Pour préparer
simultanément deux tasses de la même
boisson, appuyer sur la touche a (11)
(uniquement pour les boissons sans lait
et sans fonction aromaDouble Shot).
■ Appuyer sur la touche start (10).
Page 34

fr Préparation à partir de café moulu
Le café se fait et s’écoule ensuite dans la/
les tasse(s).
Remarque : Avec certains réglages, le café
est préparé en deux étapes (voir point
« aromaDouble Shot »). Attendre que l’opération soit entièrement terminée.
Appuyer de nouveau sur la touche
start (10) pour interrompre avant terme
la percolation.
Préparation à partir de café
moulu
La machine peut aussi préparer un café à
partir de café moulu (pas du café soluble).
La machine doit être prête à fonctionner.
Pour préparer une boisson à base de lait,
introduire tout d’abord le exible de lait
dans un réservoir à lait et le xer sur le
mousseur de lait avec le raccordement.
Remarque : Lorsque l’on utilise du café
moulu pour la préparation du café, la
fonction aromaDouble Shot n’est pas
disponible.
Important : Les restes de lait séchés sont
difciles à retirer. Après chaque utilisation
du mousseur lait (6), il est impératif d’effectuer un nettoyage à l’eau tiède à l’aide
du programme Nettoyer syst. lait.
Important : Remplir chaque jour le réservoir
d’eau avec de l’eau fraîche, froide et sans
gaz carbonique. Celui-ci doit toujours
contenir sufsamment d’eau pour assurer le
fonctionnement de la machine.
Préparation
■ Ouvrir le tiroir à café (4).
■ Verser au maximum 2 cuillères-dose
rases de café moulu.
Attention : Ne pas verser de café en
grains ou de café soluble.
■ Fermer le tiroir à café (4).
■ Sélectionner la boisson souhaitée à l’aide
du sélecteur du haut (15) (une seule
tasse possible).
■ Placer le bouton rotatif inférieur sur
b Comp. poudre.
■ Appuyer sur la touche start (10).
Le café se fait et s’écoule ensuite dans la
tasse.
Remarque : Pour préparer une autre tasse
de café moulu, répéter l’opération.
Préparer de l’eau chaude
W Risque de brûlure !
Le mousseur de lait (6) devient brûlant. Après
utilisation, laisser refroidir avant de le toucher.
Avant de préparer de l’eau chaude, le mous-
seur de lait doit être nettoyé et le exible de
lait doit être xé sur le raccordement.
La machine doit être prête à fonctionner.
■ Placer la tasse préchauffée ou le verre
sous le bec du mousseur de lait (6).
■ Maintenir appuyée la touche l / m (12)
env. 3 secondes. La machine chauffe.
De l’eau chaude s’écoule durant env.
40 secondes du mousseur lait (6).
■ Pour arrêter l’opération avant
terme, appu yer de nouveau sur la
touche l / m (12).
Préparation de
mousse de lait
W Risque de brûlure !
Le mousseur de lait (6) devient brûlant. Après
utilisation, laisser refroidir avant de le toucher.
Conseil pratique : Faire mousser tout
d’abord le lait puis préparer le café ; ou bien
faire mousser séparément le lait et verser la
mousse sur le café.
La machine doit être prête à fonctionner.
■ Placer une tasse préchauffée sous
l’embout (6a).
■ Placer le exible Lait (6c) dans un
récipient de lait.
30
Page 35

Entretien et nettoyage quotidien
fr
■ Appuyer sur la touche l / m (12).
La touche l / m (12) clignote, la
machine chauffe durant 20 s environ.
W Risque de brûlure !
La mousse de lait sort avec grande
pression du mousseur de lait (6). Les éclaboussures de lait peuvent provoquer des
brûlures. Ne pas toucher l’embout (6a) et
ne pas le diriger vers une personne.
■ Arrêter l’opération en appuyant sur la
touche l / m (12).
Important : Les restes de lait séchés sont
difciles à retirer. Après chaque utilisation
du mousseur lait (6), il est impératif d’effectuer un nettoyage à l’eau tiède à l’aide
du programme Nettoyer syst. lait.
Entretien et
nettoyage quotidien
W Risque de choc électrique !
Avant tout nettoyage, débrancher le cordon
électrique. Ne jamais plonger la machine
dans l’eau. Ne pas utiliser de nettoyeur à
vapeur.
■ Nettoyer le boîtier de la machine à l’aide
d’un chiffon doux humide.
■ Ne pas utiliser de tissus ou de produits
nettoyants abrasifs.
■ Les chiffons éponges neufs peuvent
contenir des sels. Les sels peuvent être
responsables de rouille supercielle sur
l’acier spécial ; un rinçage soigneux est par
conséquent indispensable avant l’emploi.
■ Extraire le bac collecteur (8c) et le
récipient pour marc de café (8b). Retirer
le support (8a) et la grille (8d). Vider et
nettoyer le bac collecteur et le récipient
pour marc de café.
■ Démonter le otteur (8e) et le nettoyer
avec un chiffon humide.
■ Essuyer l’intérieur de la machine (loge-
ment des bacs collecteurs) et le tiroir à
café (non amovible).
Ne pas passer en lave-vaisselle les
éléments suivants : panneau des
L
bacs collecteurs (8a), unité de perco-
lation (5a).
Les éléments suivants peuvent passer
en lave-vaisselle : bac collecteur du
M
bec verseur du café (8c), récipient
pour marc de café (8b), grille bec
verseur du café (8d), couvercle
préservateur d’arôme (2), toutes les
pièces du mousseur de lait (6) et la
cuillère doseuse (19).
Important : Vider et nettoyer tous les jours
le bac collecteur et le bac à marc de café
afin d’éviter la formation de dépôts.
■ Toujours nettoyer immédiatement les
résidus de tartre, de café, de lait, de
produit nettoyant ou de solution détar-
trante. En effet, de la corrosion peut se
former sous ces résidus.
31
Remarque : Lorsque la machine est mise
en marche à froid à l’aide de l’interrupteur
O / I (9) ou lorsqu’elle s’arrête automatiquement après la préparation d’un café, elle
effectue automatiquement un rinçage. Elle
se nettoie donc de manière autonome.
Page 36

fr Entretien et nettoyage quotidien
Important : Si la machine est restée inutilisée durant une période prolongée (congés,
p. ex.), nettoyer soigneusement l’ensemble
de la machine, y compris le mousseur lait et
l’unité de percolation.
Nettoyage du mousseur de lait
Si après avoir prélevé du lait vous ne
nettoyez pas le système de lait, le message
Nettoyer syst. lait ! s’afche à l’écran au
bout d’un certain temps.
Nettoyer le mousseur de lait après chaque
utilisation.
Pour effectuer un nettoyage prélable automatique du système lait :
■ A l’aide du sélecteur (15), choisir j.
■ Placez un récipient haut et vide sous
l’embout (6a).
■ Poussez l’embout pour le rapprocher
autant que possible du récipient.
■ Placez l’extrémité du exible Lait (6c) à
l’intérieur du récipient.
■ Appuyer sur la touche start (10).
La machine verse automatiquement de
l’eau dans le récipient et l’aspire à l’aide
du exible (6c) pour effectuer le rinçage.
Au bout de 1 min environ, l’opération de
nettoyage s’arrête automatiquement.
■ Videz le récipient et nettoyez le
exible (6c).
Démonter le mousseur lait pour le nettoyer :
■ Tirer le mousseur lait (6) droit vers l’avant
hors de la machine.
■ Démonter les différents éléments du
mousseur lait (6a) à (6d) (voir gure C au
début du mode d’emploi).
■ Nettoyer les différentes pièces avec
une solution de produit détergent et une
bros se douce. Si nécessaire, laisser trem
per dans une solution détergente chaude.
De plus, nettoyer régulièrement et très
soigneusement le mousseur de lait (en
lave-vaisselle ou à la main).
W Risque de brûlure !
Le mousseur de lait (6) devient brûlant.
Après utilisation, laisser refroidir avant de le
toucher.
32
■ Bien rincer tous les éléments à l’eau
courante et les sécher.
Remarque : Toutes les pièces du mousseur
de lait ainsi que le exible de lait peuvent
également être mis au lave-vaisselle.
Page 37

Entretien et nettoyage quotidien
fr
■ Remonter tous les éléments et les remplacer jusqu’en butée.
W Risque de brûlure !
N’utilisez la machine que lorsque le mousseur de lait (6) est entièrement monté et
installé.
Nettoyer l’unité de percolation
Nettoyer régulièrement l’unité de
percolation !
Pour effectuer un nettoyage prélable automatique de l’unité de percolation :
■ A l’aide du sélecteur (15), choisir k.
■ Disposer un verre vide sous
l’embout (6a).
■ Appuyer sur la touche start (10).
La machine effectue un rinçage.
■ Retirer le couvercle de protection (5f) de
l’unité de percolation et nettoyer soigneusement l’unité de percolation (5a) sous
l’eau courante.
■ Nettoyer soigneusement le tamis de
l’unité de percolation sous le jet d’eau.
En plus du programme de nettoyage
automatique, il convient de retirer réguliè-
rement l’unité de percolation (5a) an de la
nettoyer (voir la gure E au début du mode
d’emploi).
■ Arrêter la machine à l’aide de l’interrup-
teur électrique O / I (9). Aucune touche
n’est allumée.
■ Ouvrir le volet (5b) de l’unité de
percolation.
■ Faire glisser le verrouillage rouge (5e) de
l’unité de percolation (5a) vers la gauche.
■ Pousser le levier d’éjection (5d) totale-
ment vers le bas. L’unité de percolation
se débloque.
■ Saisir l’unité de percolation (5a) par les
évidements et la retirer avec précaution.
33
Important : Effectuer le nettoyage sans
produit vaisselle ou autre produit nettoyant
et ne pas placer en lave-vaisselle.
■ Essuyer l’intérieur de la machine avec un
chiffon humide et retirer tous les résidus
de café.
■ Laisser sécher l’unité de percolation (5a)
et l’intérieur de la machine.
■ Remettre le couvercle de protection (5f)
de nouveau en place sur l’unité de percolation (5a) et la pousser jusqu’en butée
dans l’appareil.
■ Pousser le levier d’éjection (5d) totale-
ment vers le haut.
■ Faire glisser vers la droite le verrouillage
rouge (5e) et fermer le volet (5b).
Page 38

fr Conseils pour économiser l’énergie
Conseils pour
économiser l’énergie
■ Lorsque vous n’utilisez pas la machine
à café, vous devez l’arrêter. Pour cela,
appuyer sur la touche k off / i (13). La
machine effectue un rinçage et s’arrête.
■ Autant que possible ne jamais inter-
rompre la production de café ou de
mousse de lait. Une interruption provoque
en effet une consommation d’énergie
supérieure ainsi que le remplissage plus
rapide des bacs collecteurs.
■ Détartrer régulièrement la machine an
d’éviter les dépôts de calcaire. Les dépôts
de calcaire provoquent en effet une
consommation électrique plus élevée.
Programmes de
maintenance
Conseil : Voir aussi le Mémento placé dans
son logement (5c).
En fonction de l’utilisation, les messages
suivant apparaissent à l’écran à certains
intervalles.
Détartrage nécessaire !
ou
Nettoyage nécessaire !
ou
Calc‘n‘Clean nécessaire !
La machine doit alors être nettoyée ou
détartrée sans délai avec le programme
correspondant. Il est également possible
d’effectuer les deux opérations simultanément avec la fonction Calc‘n‘Clean (voir
point « Calc‘n‘Clean »). Si le programme de
maintenance n’est pas réalisé conformément aux indications, cela peut détériorer la
machine.
W Attention !
Lors de chaque programme de maintenance,
utiliser le produit détartrant et le produit
nettoyant conformément aux indications.
Respecter les consignes de sécurité gurant
sur l’emballage du produit nettoyant.
Ne jamais interrompre le programme de
maintenance ! Ne jamais boire les liquides !
Ne jamais utiliser de vinaigre, de produits
à base de vinaigre, d’acide citrique ou de
produits à base d’acide citrique !
Ne jamais déposer de pastilles de détartrage ou autres produits de détartrage dans
le tiroir du café moulu (4) !
Avant de démarrer le programme de
maintenance correspondant (Détartrage,
Nettoyage ou Calc‘nClean), retirer l‘unité de
percolation, la nettoyer en suivant la notice
et la remettre en place.
Des pastilles de détartrage et de nettoyage spécialement développées
sont disponibles dans le commerce et
auprès du Service Clientèle (voir point
« Accessoires »).
Détartrage
Durée : env. 25 minutes.
Important : Lorsqu’un ltre à eau est
présent dans le réservoir d’eau (17), le
retirer impérativement avant de lancer un
détartrage.
Lorsque le message Détartrage
nécessaire! apparaît à l’écran, appuyer sur
la touche k off / i (13) durant 3 secondes
et appuyer ensuite sur la touche start (10).
Le détartrage commence.
Pour détartrer entre-temps la machine,
appuyer sur la touche k off / i (13) durant
au moins 3 secondes. Appuyer brièvement
à deux reprises sur la touche k off / i (13).
Tourner le sélecteur du haut (15) jusqu’à
ce que Démarrer détartrage s’afche à
l’écran. Pour lancer le détartrage, appuyer
sur la touche start (10).
Le programme déle à l’écran.
34
Page 39

Programmes de maintenance
fr
Vider bac
Placer bac
■ Vider le bac collecteur (8) et le replacer.
Remarque : Si le ltre à eau est activé, le
message correspondant s’afche, demandant de retirer le ltre et d’appuyer de
nouveau sur la touche start (10). Si cela n’a
pas déjà été fait, retirer le ltre maintenant.
Appuyer sur la touche start (10).
Remplir détartrant
Appuyer sur start
■ Verser de l’eau tiède dans le réservoir
d’eau (17) jusqu’au repère « 0,5 l » et y
dissoudre 1 pastille de détartrage Bosch
TCZ8002.
■ Appuyer sur la touche start (10).
Placer réservoir
Appuyer sur start
■ Placer un récipient d’une contenance
d’au moins 0,5 litre sous l’embout (6a).
■ Appuyer sur la touche start (10).
Détartrage en cours
Le programme de détartrage se déroule
maintenant durant 20 minutes environ.
Nett./Remp. réserv. eau
Appuyer sur start
■ Rincer le réservoir d’eau (17) et le remplir
d’eau fraîche jusqu’au repère max.
■ Appuyer sur la touche start (10).
Important : Essuyer l’appareil avec un
torchon doux et humide pour éliminer immé-
diatement les résidus du détartrant. En
effet, de la corrosion peut se former sous
ces résidus. Les chiffons éponges neufs
peuvent contenir des sels. Les sels peuvent
être responsables de rouille supercielle sur
l’acier spécial ; un lavage soigneux est par
conséquent indispensable avant l’emploi.
Nettoyage
Durée : env. 10 minutes.
Lorsque le message Nettoyage nécessaire!
apparaît à l’écran, appuyer sur la touche
k off / i (13) durant 3 secondes et appuyer
ensuite sur la touche start (10).
Le nettoyage commence.
Pour nettoyer entre-temps la machine,
appuyer sur la touche k off / i (13) durant
au moins 3 secondes. Appuyer brièvement
à deux reprises sur la touche k off / i (13).
Tourner le sélecteur du haut (15) jusqu’à ce
que Démarrer nettoyage s’afche à l’écran.
Pour lancer le nettoyage, appuyer sur la
touche start (10).
Le programme déle à l’écran.
Vider bac
Placer bac
■ Vider le bac collecteur (8) et le replacer.
Ouvrir tiroir
■ Ouvrir le tiroir à café (4).
Détartrage en cours
Le programme de détartrage se déroule
durant env. 3 minutes et effectue un rinçage
de la machine.
Vider bac
Placer bac
■ Vider le bac collecteur (8) et le replacer.
Si un ltre est utilisé, le replacer maintenant. La machine est maintenant détartrée
et de nouveau prête à fonctionner.
35
Remplir nettoyant
Appuyer sur start
Placer une pastille de nettoyage Bosch
dans le tiroir (4) et refermer.
■ Appuyer sur la touche start (10).
Nettoyage en cours
Le nettoyage est activé pour une durée de
8 minutes env.
Vider bac
Placer bac
■ Vider le bac collecteur (8) et le replacer.
La machine est maintenant nettoyée et de
nouveau prête à fonctionner.
Page 40

fr Programmes de maintenance
Calc‘n‘Clean
Durée : env. 35 minutes.
Calc‘n‘Clean combine les fonctions Détar-
trage et Nettoyage. Si le moment de réaliser
chacun des deux programmes est proche,
la machine propose automatiquement ce
programme.
Important : Si un ltre d’eau est placé dans
le réservoir d’eau (17) le retirer impérativement avant de lancer le programme de
maintenance.
Lorsque le message Calc‘n‘Clean
nécessaire! apparaît à l’écran, appuyer sur
la touche k off / i (13) durant 3 secondes
et appuyer ensuite sur la touche start (10).
Le programme de service démarre.
Pour effectuer entre-temps l’opération
Calc‘n‘Clean, appuyer sur la touche
k off / i (13) durant au moins 3 secondes.
Appuyer brièvement à deux reprises sur la
touche k off / i (13). Tourner le sélecteur
du haut (15) jusqu’à ce que Démarrer
Calc‘n‘Clean s’afche à l’écran. Pour
lancer Calc‘n‘Clean, appuyer sur la touche
start (10).
Le programme déle à l’écran.
Vider bac
Placer bac
■ Vider le bac collecteur (8) et le replacer.
Ouvrir tiroir
■ Ouvrir le tiroir à café (4).
Remplir nettoyant
Appuyer sur start
■ Placer une pastille de nettoyage Bosch
dans le tiroir (4) et refermer.
■ Appuyer sur la touche start (10).
Remarque : Si le ltre à eau est activé, le
message correspondant s’afche, demandant de retirer le ltre et d’appuyer de
nouveau sur la touche start (10). Si cela n’a
pas déjà été fait, retirer le ltre maintenant.
Appuyer sur la touche start (10).
Remplir détartrant
Appuyer sur start
■ Verser de l’eau tiède dans le réservoir
d’eau (17) jusqu’au repère « 0,5 l » et y
dissoudre 1 pastille de détartrage Bosch
TCZ8002.
■ Appuyer sur la touche start (10).
Placer réservoir
Appuyer sur start
■ Placer un récipient d’une contenance
d’au moins 1 litre sous l’embout (6a).
■ Appuyer sur la touche start (10).
Calc‘n‘Clean en cours
Le programme de détartrage se déroule
maintenant durant 22 minutes environ.
Nett./Remp. réserv. eau
Appuyer sur start
■ Rincer le réservoir d’eau (17) et le remplir
d’eau fraîche jusqu’au repère max.
■ Appuyer sur la touche start (10).
Calc‘n‘Clean en cours
Le programme de détartrage se déroule
durant env. 10 minutes et effectue un
rinçage de la machine.
Vider bac
Placer bac
■ Vider le bac collecteur (8) et le replacer.
Si un ltre est utilisé, le replacer maintenant. La machine est maintenant nettoyée
et de nouveau prête à fonctionner.
Important : Essuyer l’appareil avec un
torchon doux et humide pour éliminer immé-
diatement les résidus du détartrant. En
effet, de la corrosion peut se former sous
ces résidus. Les chiffons éponges neufs
peuvent contenir des sels. Les sels peuvent
être responsables de rouille supercielle sur
l’acier spécial ; un lavage soigneux est par
conséquent indispensable avant l’emploi.
36
Page 41

Protection contre le gel
J
Eliminez l’emballage en respectant
marqué selon la directive eu ropéenn e
S’informer auprès du revendeur sur la
Les conditions de garantie applicables
sont celles publiées par notre distributeur
dans le pays où a été effectué l’achat. Le
revendeur chez qui vous vous êtes procuré
l’appareil fournira les modalités de garantie
sur simple demande de votre part. En cas
de recours en garantie, veuillez toujours
vous munir de la preuve d’achat.
Sous réserve de modi cations.
fr
Protection contre le gel
W An d’éviter les dommages
provoqués par le gel lors du transport et
du stockage, il faut préalablement vider
entièrement la machine.
Info : La machine doit être prête à fonction-
ner et le réservoir d’eau (17) doit être rempli.
■ Placer un grand récipient sous
l’embout (6a).
■ Appuyer sur la touche l / m (12) et
laisser s’échapper la vapeur durant 15 s
environ.
■ Arrêter la machine à l’aide de l’interrup-
teur électrique O / I (9).
■ Vider le réservoir d’eau (17) et le bac
collecteur (8).
Accessoires
Les accessoires suivants sont disponibles
dans le commerce ou auprès du service
Clientèle.
Accessoires N° commande
Commerce /
Service Clientèle
Pastilles de
nettoyage
Pastilles de
détartrage
Filtre eau TCZ7003 / 00575491
Kit d’entretien TCZ8004 / 00576331
Réservoir de lait
avec couvercle
« Fresh Lock »
TCZ8001 / 00311808
TCZ8002 / 00576694
TCZ8009N / 00576165
Mise au rebut
l’environnement. Cet appareil est
2012/19/UE relative aux appareils
électriques et électroniques usagés
(waste electrical and electronic equ ip-
ment – WEEE). La directive définit
le cadre pour une reprise et une
récupération des appareils usagés
applicables dans les pays de la CE.
procédure actuelle de recyclage.
Garantie
Caractéristiques techniques
Raccordement électrique (tension – fréquence) 220-240 V~ 50/60 Hz
Puissance de chauffage 1600 W
Pression statique maximale de la pompe 15 bars
Contenance maximale du réservoir d’eau (sans ltre) 1,7 l
Contenance du bac à café 300 g
Longueur du cordon d’alimentation 100 cm
Dimensions (Ht x Lg x Prof) 385 x 280 x 479 mm
Poids, à vide 9,3 kg
Type de meule céramique
37
Page 42

fr Eliminer soi-même les problèmes simples
Eliminer soi-même les problèmes simples
Problème Cause Remède
Trop peu de mousse ou pas
de mousse ou le mousseur
de lait (6) n’aspire pas le lait.
Impossible de produire de
l’eau chaude.
Le café s’écoule goutte à
goutte ou ne s’écoule plus.
Le café ne présente pas de
« crème ».
Le café est trop « acide ». La mouture n’est pas assez
Le café est trop « amer ». La mouture est trop ne ou le
Qualité de la mousse de café
ou de lait variable.
Appeler impérativement la hotline si les problèmes ne peuvent pas être résolus !
Les numéros de téléphone se trouvent aux dernières pages de la notice.
Le mousseur lait (6) est
obturé.
Lait non adapté. Utiliser du lait à une teneur
Le mousseur de lait (6) n’est
pas correctement monté.
La machine est entartrée. Détartrer la machine suivant
Le mousseur lait (6) est
obturé.
Mouture trop ne,
café moulu trop n.
La machine est fortement
entartrée.
Qualité du café ne convient
pas.
Les grains ne sont pas
fraîchement torréés.
La mouture n’est pas
adaptée aux grains de café.
ne ou bien le café moulu
n’est pas assez n.
Qualité de café non adaptée. Utiliser un café torréé plus
café moulu est trop n.
Qualité du café ne convient
pas.
La machine est entartrée. Détartrer la machine suivant
Nettoyer le mousseur lait (6),
voir chapitre « Entretien et
nettoyage quotidien ».
de 1,5 % de matières
grasses.
Humidier les éléments
du mousseur lait et serrer
vigoureusement.
la notice.
Nettoyer le mousseur lait (6),
voir chapitre « Entretien et
nettoyage quotidien ».
Régler une mouture moins
ne. Utiliser du café moulu
moins n.
Détartrer la machine suivant
la notice.
Utiliser un café avec une
proportion plus importante de
Robusta.
Utiliser des grains fraîche-
ment torréés.
Optimiser la nesse de la
mouture.
Régler une mouture plus ne
ou acheter du café moulu
plus n.
foncé.
Régler une mouture moins
ne ou acheter du café
moulu moins n.
Changer de qualité de café.
la notice.
38
Page 43

Eliminer soi-même les problèmes simples
fr
Problème Cause Remède
Le marc de café n’est pas
compact et il est trop humide.
Présence d’eau sur le fond
interne de la machine une
fois que l’on a retiré le bac
collecteur (8).
Le ltre à eau ne tient pas
dans le réservoir d’eau (17).
Les réglages usine ont été
modiés et doivent être rétablis (« Reset »).
Afchage à l’écran
Remplir gr ains !
bien que le bac à café (1)
soit rempli, ou bien le moulin
ne parvient pas à moudre.
Afchage à l’écran
Placer unité perco.
Afchage à l’écran
Nettoyer unité perc.
Appeler impérativement la hotline si les problèmes ne peuvent pas être résolus !
Les numéros de téléphone se trouvent aux dernières pages de la notice.
La mouture est trop ne
ou trop grossière ou bien
la quantité de café moulu
utilisée est trop faible.
Bac collecteur (8) retiré
trop tôt.
Le ltre d’eau n’est pas correctement xé.
Des réglages individuels ont
été antérieurement dénis ;
ils ne sont plus souhaités.
Les grains ne tombent pas
dans le broyeur (grains trop
gras).
Unité de percolation (5) non
placée ou non reconnue.
Unité de percolation (5)
encrassée.
Trop de café moulu dans
l’unité de percolation (5).
Le mécanisme de l’unité de
percolation ne fonctionne
pas aisément.
Régler la mouture plus gros-
sière ou plus ne ou bien
utiliser 2 cuillères-doses de
café moulu bien rases.
Retirer le bac collecteur
(8) en attendant quelques
secondes après la dernière
boisson préparée.
Placer le ltre d’eau bien
droit et appuyer fortement
pour l’enfoncer dans le
réservoir.
Arrêter la machine à l’aide
de l’interrupteur électrique
O / I (9). Maintenir appuyées
les touches k off / i (13)
et l (12) et remettre en
marche la machine à l’aide
de l’interrupteur électrique
O / I (9). Ensuite, conrmer
avec la touche start (10). Les
réglages usine sont rétablis.
Frapper légèrement le bac à
café (1). Changer éventuellement de café. Une fois que
le bac à café (1) est vide,
l’essuyer avec un chiffon sec.
Une fois l’unité de percolation (5) placée, arrêter
la machine, attendre trois
secondes, puis la remettre
en marche.
Nettoyer l’unité de percolation (5).
Nettoyer l’unité de percolation (5) (remplir au maximum
2 cuillères-doses de café
moulu bien rases).
Retirer et nettoyer l’unité de
percolation (voir chapitre
« Entretien et nettoyage
quotidien »).
39
Page 44

fr Eliminer soi-même les problèmes simples
Problème Cause Remède
Afchage à l’écran
Contrôler réserv. eau
Afchage à l’écran
Redémarrer
Afchage à l’écran
Défaillance
Hotline.
Appeler impérativement la hotline si les problèmes ne peuvent pas être résolus !
Les numéros de téléphone se trouvent aux dernières pages de la notice.
Le réservoir d’eau est mal
inséré.
Le réser voir d ’eau contie nt
de l’eau gazeuse.
Le otteur qui se trouve dans
le réservoir d’eau est grippé.
Le ltre d’eau neuf n’a pas
été rincé conformément aux
instructions.
De l’air se trouve dans le
ltre d’eau.
Le ltre à eau est trop vieux. Mettre en place un nouveau
Appareil trop chaud. Laisser l'appareil refroidir.
L'unité de percolation est
encrassée.
Une défaillance s’est produite
dans la machine.
Mettre le réservoir d’eau
correctement en place.
Remplir le réservoir d’eau
avec de l’eau fraîche du
robinet.
Retirer le réservoir et le net-
toyer minutieusement.
Rincer le ltre à eau confor-
mément aux instructions et le
remettre en service.
Plonger le ltre à eau dans
l’eau jusqu’à ce que plus
aucune bulle ne survienne et
remettre le ltre en place.
ltre à eau.
Nettoyer l'unité de
percolation.
Appeler le Service Clientèle.
40
Page 45

Spis treści
pl
Spis treści
Zakres dostawy ........................................41
Użytkowanie zgodne z przeznaczeniem .. 42
Ważne wskazówki dotyczące
bezpieczeństwa ........................................42
W skrócie ..................................................44
Elementy obsługi ......................................44
Komunikaty na wyświetlaczu ....................45
aromaDouble Shot....................................45
Przed pierwszym użyciem ........................ 46
Filtr wody ..................................................47
Ustawienia menu ...................................... 48
Wybór stopnia zmielenia ..........................49
Parzenie z kawy ziarnistej ........................49
Parzenie z kawy mielonej ......................... 50
Pobieranie gorącej wody ..........................50
Spienianie mleka ......................................50
Konserwacja i codzienne czyszczenie .....51
Porady dotyczące oszczędzania energii .. 53
Programy serwisowe ................................54
Ochrona przed zamarzaniem ...................57
Akcesoria ..................................................57
Gwarancja ................................................57
Ekologiczna utylizacja ..............................57
Samodzielne usuwanie
drobnych usterek ......................................58
Dane techniczne .......................................60
Szanowny Kliencie,
serdecznie gratulujemy zakupu automatycz-
nego ekspresu do kawy rmy Bosch.
W instrukcji obsługi opisane są różne
modele różniące się wyposażeniem.
Patrz też załączona skrócona instrukcja
obsługi.
Można ją umieścić w specjalnym schowku
(5c) aż do następnego użycia.
Zakres dostawy
(patrz przegląd graczny na początku
instrukcji)
a Automatyczny ekspres do kawy
b Skrócona instrukcja obsługi
c Instrukcja obsługi
d Spieniacz mleka
e Pasek do mierzenia poziomu
twardości wody
f Miarka do kawy
41
Page 46

pl Użytkowanie zgodne z przeznaczeniem
Użytkowanie zgodne
Użytkowanie zgodne
z przeznaczeniem
z przeznaczeniem
To urządzenie jest przeznaczone
do przygotowywania małych ilości produktu na użytek domowy
lub w warunkach zbliżonych
do domowych, do zastosowań
niekomercyjnych.
Urządzenie wolno używać tylko w
pomieszczeniach, w temperatu-
rze pokojowej i na wysokości nie
większej niż 2000 m n.p.m.
Ważne wskazówki
Ważne wskazówki dotyczące
dotyczące bezpieczeństwa
bezpieczeństwa
Proszę dokładnie przeczytać
instrukcję obsługi, starannie ją
przechowywać i postępować
zgodnie z zawartymi w niej wska-
zówkami! Przekazując urządzenie innej osobie należy dołączyć
niniejszą instrukcję.
Urządzenie może być obsługiwane przez dzieci powyżej 8 lat
oraz przez osoby o ograniczo-
nych zdolnościach zycznych,
czuciowych lub umysłowych, albo
nie posiadających odpowiedniego doświadczenia/wiedzy tylko
pod kontrolą osoby odpowiadającej za bezpieczeństwo osoby
obsługującej urządzenie lub po
dokładnym pouczeniu w obsłudze
urządzenia oraz po zrozumieniu
zagrożeń wynikających z obsługi
urządzenia. Nie dopuszczać
dzieci poniżej 8 roku życia do
urządzenia oraz do elektrycznego przewodu zasilającego. Nie
wolno im obsługiwać urządzenia. Dzieciom nie wolno bawić się
urządzeniem. Nie wolno dzieciom
przeprowadzać jakichkolwiek
prac związanych z czyszczeniem
lub konserwacją urządzenia,
chyba że dziecko ma powyżej
8 lat i jest pod stałym nadzorem
osoby odpowiadającej za bezpieczeństwo dziecka.
42
Page 47

Użytkowanie zgodne z przeznaczeniem
pl
W Ostrzeżenie
Niebezpieczeństwo porażenia
prądem!
■ Urządzenie musi być podłą-
czone do sieci elektrycznej
prądu zmiennego poprzez
prawidłowo zainstalowane
gniazdo z uziemieniem. Proszę się upewnić, że układ
przewodów ochronnych
domowej instalacji elektrycznej jest wykonany zgodnie
z przepisami.
■ Urządzenie należy podłączyć
i użytkować zgodnie z parame-
trami podanymi na tabliczce
znamionowej.
■ Urządzenia można używać
tylko wtedy, gdy elektryczny
przewód zasilający i samo
urządzenie nie są uszkodzone.
■ Aby uniknąć zagrożeń, należy
zlecić naprawy urządzenia, jak
np. wymianę uszkodzonego
przewodu zasilającego, tylko
naszemu autoryzowanemu
serwisowi.
■ Nigdy nie zanurzać w wodzie
urządzenia albo elektrycznego
przewodu zasilającego.
■ W przypadku awarii natych-
miast wyjąć wtyczkę
z gniazdka sieciowego albo
wyłączyć prąd.
W Ostrzeżenie
Niebezpieczeństwo na skutek
magnetyzmu!
Urządzenie zawiera magnesy
trwałe, które mogą mieć wpływ
na elektroniczne implanty,
takie jak np. rozruszniki serca
lub pompy insulinowe. Osoby
noszące elektroniczne implanty
proszone są o zachowanie minimalnego odstępu 10 cm od urzą-
dzenia oraz, przy wyjmowaniu,
od następujących części: pojem-
nika na mleko, pojemnika na
wodę i jednostki zaparzania.
W Ostrzeżenie
Niebezpieczeństwo uduszenia!
Nie zezwalać dzieciom na
zabawę opakowaniem, a szczególnie folią. Drobne elementy
przechowywać w bezpiecznym
miejscu, ponieważ mogą zostać
połknięte.
W Ostrzeżenie
Niebezpieczeństwo zranienia!
■ Nie dotykać młynka i nie
wkładać do niego rąk.
■ Nieodpowiednie używanie
urządzenia może prowadzić
do powstania obrażeń.
W Ostrzeżenie
Niebezpieczeństwo
poparzenia!
Spieniacz mleka mocno się
nagrzewa. Po użyciu zaczekać,
aż spieniacz wystygnie – dopiero
teraz można go dotknąć.
W Ostrzeżenie
Niebezpieczeństwo oparzenia!
Użytkować urządzenie tylko
wtedy, gdy spieniacz mleka
jest w całości zmontowany
i zainstalowany.
43
Page 48

pl W skrócie
W skrócie
(patrz ilustracje A, B, C, D i E na początku
instrukcji)
1 Pojemnik na kawę ziarnistą
2 Pokrywa zachowująca aromat
3 Pokrętło regulacji stopnia zmielenia
4 Szuadka
(na mieloną kawę/tabletkę czyszczącą)
5 Zaparzacz (ilustracja E)
a Zaparzacz
b Drzwiczki
c Schowek na skróconą
instrukcję obsługi
d Dźwignia zaparzacza
e Blokada
f Osłona
6 Spieniacz mleka, wyjmowany
(ilustracja C)
a Wylot
b Złącze (rurka do mleka)
c Rurka do mleka z adapterem
d Górna część
e Dysza powietrza
f Tulejka
g Końcówka dyszy
7 Wylot kawy, o regulowanej wysokości
8 Pojemnik na skropliny (ilustracja D)
a Osłona pojemnika na skropliny
b Zbiornik na fusy
c Pojemnik na skropliny z wylotu kawy
d Kratka pod wylotem kawy
e Pływak
9 Wyłącznik sieciowy O / I
10 Przycisk start
11 Przycisk a
12 Przycisk l / m
13 Przycisk k off / i
14 Obrotowe pokrętło „Moc kawy”
15 Obrotowe pokrętło „Wybór napoju”
16 Wyświetlacz
17 Wyjmowany pojemnik na wodę
18 Pokrywa pojemnika na wodę
19 Miarka do kawy
(pomoc w montowaniu ltra wody)
20 Schowek na łyżkę do odmierzania kawy
21 Kabel zasilający
(umieszczany w schowku)
Elementy obsługi
Wyłącznik sieciowy O / I
Wyłącznik zasilania O / I (9) służy do
włączania urządzenia lub całkowitego jego
wyłączania (odcięcie zasilania).
Ważne: Przed wyłączeniem uruchom
program czyszczenia lub wyłącz urządzenie, naciskając przycisk k off / i (13).
Przycisk a
Naciśnij przycisk a (11), aby przygotować
dwa kubki wybranego napoju jednocześnie.
Ten przycisk można włączać dla napojów
bez mleka i bez funkcji aromaDouble Shot.
Przycisk k off / i
Po krótkim naciśnięciu przycisku
k off / i (13) urządzenie rozpoczyna
przepłukiwanie, a następnie wyłącza się.
Po naciśnięciu i przytrzymaniu przycisku
k off / i (13) wyświetlane są ustawienia
użytkownika lub uruchamiany jest program
odkamieniania i czyszczenia.
Przycisk l / m
Naciśnięcie przycisku l / m (12) powo-
duje wytworzenie pary służącej do spieniania mleka. Ten przycisk służy również do
przygotowania gorącej wody.
Przycisk start
Po naciśnięciu przycisku start (10) rozpoczyna się przyrządzanie napoju lub uruchamiany jest program serwisowy.
Aby przerwać pobieranie wcześniej, nacisnąć ponownie przycisk start (10) podczas
przyrządzania napoju.
44
Page 49

Komunikaty na wyświetlaczu
pl
Obrotowe pokrętło „Moc kawy”
To pokrętło (14) służy do
ustawiania mocy kawy lub
wybierania kawy mielonej.
b
c
do
d
Obrotowe pokrętło „Wybór napoju”
e
do
f
g
do
h
k
j
Uwaga: W przypadku wybrania napoju,
którego nie można przygotować, na
wyświetlaczu jest wyświetlany tekst
Nieprawidł. kombinacja. Zmień ustawienie
mocy kawy lub wybierz inny napój.
zmielona kawa
Łagodna
Normalna
Mocna
DoubleShot mocna +
DoubleShot mocna ++
W przypadku takiego
ustawienia mocy kawy
zaparzanie odbywa się
w 2 etapach. Patrz sekcja
„ aromaDouble Shot”.
Pokrętło obrotowe (15) umożliwia wybranie żądanego
napoju i ilości na liżankę.
Pozwala również na zmianę
ustawień użytkownika.
Napoje kawowe bez mleka:
Małe Espresso
Espresso
Małe Café Crème
Café Crème
Duże Café Crème
Napoje kawowe z mlekiem:
Małe Cappuccino
Duże Cappuccino
Małe Macchiato
Macchiato
Duże Macchiato
Płukanie urządzenia
Przepłucz ukł. mleczn.
Złącze rurki do mleka
Aby uzyskać spienione mleko – na przykład
do kawy latte macchiato albo cappucino –
należy dokładnie przymocować złącze
i rurkę do mleka w spieniaczu mleka.
Ważne: jest to też konieczne w celu uzyskania gorącej wody.
Komunikaty na
wyświetlaczu
Na wyświetlaczu (16) jest przedstawiony
nie tylko bieżący stan działania, ale również
różne komunikaty z informacjami o urządzeniu lub zawiadamiające o konieczności
wykonania czynności. Natychmiast po
wykonaniu niezbędnej czynności komunikat
znika i zostaje ponownie wyświetlone menu
wyboru napojów.
aromaDouble Shot
Im dłużej trwa parzenie kawy, tym bardziej
napój będzie gorzki lub będzie charakteryzował się niepożądanym aromatem.
Będzie to miało negatywny wpływ na smak
oraz łatwość przyswajania. Dlatego w celu
parzenia bardzo mocnej kawy urządzenie
TES51... wyposażono w specjalną funkcję
aromaDouble Shot. Po przygotowaniu
połowy ilości, kawa jest mielona i zaparzana ponownie, dzięki czemu uwalniane
są wyłącznie przyjemne aromaty.
45
Page 50

pl Przed pierwszym użyciem
Funkcja aromaDouble Shot jest włączana
przy następujących ustawieniach:
Przed pierwszym użyciem
Informacje ogólne
Odpowiednie pojemniki należy napełniać
tylko czystą, zimną wodą niegazowaną
oraz wyłącznie palonymi ziarnami kawy.
Nie stosować kawy ziarnistej lukrowanej,
karmelizowanej lub z innymi dodatkami
zawierającymi cukier, gdyż powoduje to
zapchanie jednostki zaparzania.
W urządzeniu można ustawić twardość
wody. Fabrycznie ustawiona jest twardość
wody 4. Ustalić twardość wody za pomocą
dołączonego paska testowego. Jeśli
podczas sprawdzania zostanie wykryta
wartość inna niż 4, należy zmienić odpowiednio ustawienie po włączeniu urządzenia (patrz sekcja Twa rdość w o d y).
Uruchomienie urządzenia
■ Usunąć folię ochronną.
■ Ekspres do kawy należy ustawić na
płaskiej i dostosowanej do jego ciężaru,
wodoodpornej powierzchni. Upewnij się,
że otwory wentylacyjne urządzenia nie
są zakryte.
Ważne: Urządzenie użytkować wyłącznie w pomieszczeniach, w których nie
występują temperatury poniżej 0 °C. Jeśli
urządzenie było transportowane lub przechowywane w temperaturze niższej niż
0 °C, przed jego uruchomieniem odczekać
przynajmniej 3 godziny.
■ Wyciągnąć kabel sieciowy ze schowka
(21) i podłączyć go do sieci. Długość kabla
można regulować, cofając kabel lub wyciągając go. W tym celu ustawić urządzenie
tyłem np. na krawędzi blatu i ciągnąć kabel
do dołu lub pchać go do góry.
■ Zamontuj spieniacz mleka. Z urządzenia
należy korzystać po zamontowaniu spieniacza mleka (6).
■ Otworzyć pokrywę pojemnika na
wodę (18).
■ Wyjąć pojemnik na wodę (17), wypłukać
go i napełnić świeżą zimną wodą. Przestrzegać oznaczenia max.
■ Włożyć równo pojemnik na wodę (17)
i docisnąć go w dół.
■ Zamknąć pokrywę pojemnika na
wodę (18).
■ Napełnić pojemnik na kawę ziarnistą (1)
(Przygotowanie z zastosowaniem kawy
mielonej, patrz sekcja „Parzenie z kawy
mielonej”).
■ Nacisnąć wyłącznik sieciowy O / I (9).
Na wyświetlaczu (16) jest prezentowane
menu ustawiania języka wyświetlacza.
■ Do wybierania odpowiedniego języka
wyświetlacza służy górne pokrętło obrotowe (15).
■ Umieść pojemnik zbiorczy pod
wylotem (6a).
■ Nacisnąć przycisk start (10). Wybrany
język zostaje zapisany.
Urządzenie nagrzeje się i rozpocznie się
przepłukiwanie. Część wody wypłynie
wylotem kawy. Urządzenie jest gotowe
do użycia po ukazaniu się menu wyboru
napoju na wyświetlaczu.
46
Page 51

Filtr wody
pl
Wyłączanie urządzenia
Ustawienia fabryczne automatycznego
ekspresu do kawy zapewniają optymalną
pracę urządzenia. Po upływie ustwionego
czasu urządzenie wyłącza się automatycznie (czas można regulować, patrz sekcja
Wyłączenie).
Wyjątek: Urządzenie wyłącza się bez
przepłukiwania w przypadku, gdy pobierana
była tylko gorąca woda lub była wykorzystywana para.
Aby wyłączyć urządzenie ręcznie zanim
to nastąpi, naciśnij przycisk k off / i (13).
Urządzenie rozpocznie przepłukiwanie, a
następnie zostanie wyłączone.
Uwaga: W przypadku uruchomienia
urządzenia po raz pierwszy, włączenia
programu serwisowego lub długiego okresu
bezczynności urządzenia pierwszy napój
nie będzie miał właściwego smaku i nie
należy go pić.
W przypadku korzystania z ekspresu po
raz pierwszy odpowiednio gruba i sztywna
pianka zostanie uzyskana dopiero po napełnieniu kilku pierwszych liżanek.
Na otworach wentylacyjnych urządzenia
mogą zbierać się krople po dłuższym
okresie użytkowania, co jest zjawiskiem
normalnym.
Filtr wody
Używanie ltra wody może zapobiec gromadzeniu się kamienia.
Przed założeniem nowego ltra wody
należy go wypłukać. W tym celu wykonaj
następujące czynności:
■ Wciśnij mocno ltr wody do zbiornika
wody, używając przy tym łyżki do mierzenia kawy (19).
■ Napełnić pojemnik wodą (17) do
znaku max.
■ Naciśnij i przytrzymaj przycisk k off / i
(13) przez co najmniej 3 sekundy – zosta-
nie wyświetlone menu.
■ Naciskaj przycisk k off / i (13), aż
zostanie wyświetlona opcja Brak filtra/
Stary filtr.
■ Za pomocą górnego pokrętła obrotowego
(15) wybierz pozycję Aktywacja filtra.
■ Nacisnąć przycisk start (10).
■ Umieść pojemnik zbiorczy o pojemności
0,5 litra pod wylotem (6a).
■ Nacisnąć przycisk start (10).
■ Woda przepływa przez ltr, płucząc go.
■ Następnie opróżnić naczynie.
Urządzenie jest ponownie gotowe do pracy.
Informacja: Płukanie ltra włącza jednocze-
śnie ustawienie dla wskazania wymiany ltra.
Po wskazaniu Wymień filtr! lub najpóźniej
po 2 miesiącach od założenia ltr traci
skuteczność. Z przyczyn higienicznych
i aby zapobiec zakamienieniu (może to prowadzić do uszkodzenia urządzenia) należy
go wymienić.
47
Page 52

pl Ustawienia menu
Zapasowe ltry dostępne są w sklepach
specjalistycznych lub w serwisie fabrycz-
nym (patrz „Akcesoria”). Jeżeli nie będzie
używany nowy ltr, należy ustawić opcję
Filtr w pozycji Brak filtra/Staryfiltr.
Informacja: Na wskaźniku ltra można
oznaczyć miesiąc założenia nowego
ltra. Można również oznaczyć miesiąc
w powinna nastąpić kolejna wymiana ltra
(najpóźniej za dwa miesiące).
Informacja: Jeżeli urządzenie było nieużywane przez dłuższy czas (np. urlop), należy
przed jego ponownym użyciem wypłukać
ltr. W tym celu napełnij liżankę gorącą
wodą, a następnie wylej wodę.
Ustawienia menu
Korzystając z ustawień menu można
dostosować urządzenie do indywidualnych
potrzeb.
■ Nacisnąć przycisk k off / i (13) na co
najmniej 3 sekundy.
■ Naciskaj przycisk k off / i (13) do
pojawienia się na wyświetlaczu żądanego
menu.
■ Do wybierania odpowiedniego ustawienia
służy górne pokrętło obrotowe (15).
■ Aby potwierdzić, naciśnij przycisk
start (10).
Aby wyjść z menu bez dokonywania zmian,
obróć pokrętło obrotowe Zakończ i naciśnij
przycisk start (10).
Można dokonać następujących ustawień:
Wyłączenie: Tu można ustawić czas od
przygotowania ostatniego napoju, po
którym urządzenie wyłącza się automatycznie. Można ustawić czas od 15 minut do 4
godzin. Ustawiony czas można skrócić, aby
zmniejszyć zużycie energii.
Filtr: Tu można wybrać ustawienia
dotyczące używania ltra wody. Jeśli ltr
wody nie jest używany, wybierz ustawienie
Brak filtra/Stary filtr. Jeśli jest używany,
wybierz ustawienie Aktywacja filtra. Nowe
ltry wody należy przepłukać przed użyciem
(patrz sekcja „Filtr wody”).
Uruchom Calc‘n‘Clean: W tym miejscu
można ręcznie wybrać program serwisowy
(Calc‘n‘Clean / odkamien. / czyszczenie).
Naciśnij przycisk start (10) i uruchom
wybrany program (patrz sekcja „Programy
serwisowe”).
Temp.: Można tutaj ustawić temperaturę
zaparzania (Wysoka / Średnia / Niska).
Język: Tutaj można ustawić język
wyświetlacza.
Twa rdość w o dy: W przypadku tego urzą-
dzenia możliwe jest ustawienie twardości
wody. Prawidłowe ustawienie twardości
wody jest ważne, ponieważ gwarantuje,
że urządzenie będzie we właściwym
czasie pokazywało, kiedy powinno zostać
odkamienione. Fabrycznie ustawiona jest
twardość wody 4.
Twardość wody można ustalić za pomocą
dołączonych pasków testowych lub po
zasięgnięciu informacji w miejscowym
zakładzie dostarczania wody. Jeżeli w domu
jest zainstalowana instalacja zmiękczająca
wodę, proszę wybrać ustawienie Instalacja
zmiękcz.
Pasek testowy zanurzyć na moment
w wodzie i po 1 minucie odczytać wynik.
48
Page 53

Wybór stopnia zmielenia
pl
Stopnie twardości wody i poziomy ustawień.
Poz. Stopień twardości wody
Niemiecki (°dH) Francuski (°fH)
1
2
3
4
Licznik napojów: Spowoduje to wyświetlenie liczby napojów wydanych od początku
eksploatacji urządzenia.
1-7
8-14
15-21
22-30
1-13
14-25
26-38
39-54
Wybór stopnia zmielenia
Żądany stopień zmielenia kawy ustawia się
pokrętłem (3).
W Uwaga!
Stopień zmielenia regulować tylko przy
pracującym młynku do kawy! W przeciwnym razie może dojść do uszkodzenia
urządzenia. Nie wkładać palców do młynka
do kawy.
■ Podczas pracy młynka ustawić pokrętłem
(3) stopień zmielenia kawy od drobnego
(a: Obróć w kierunku przeciwnym do
ruchu wskazówek zegara) do grubszego
(b: Obróć w kierunku zgodnym z ruchem
wskazówek zegara).
Informacja: Nowe ustawienie zauważalne
jest dopiero począwszy od drugiej liżanki.
Wskazówka: Jeśli na wyświetlaczu wyświetla się komunikat Zmień stop. zmielenia!,
ziarna kawy są mielone zbyt drobno.
Ustawić grubszy stopień zmielenia.
Wskazówka: W przypadku ciemno palo-
nych ziaren należy nastawić drobniejsze
mielenie; gdy ziarna są jaśniejsze – grubsze
mielenie.
Parzenie z kawy ziarnistej
Automatyczny ekspres do kawy miele
świeżą kawę do każdego.
Urządzenie musi być gotowe do użycia.
Aby przygotować napój kawowy z mlekiem,
należy najpierw włożyć rurkę do mleka do
pojemnika z mlekiem, a złącze tej rurki
przymocować do spieniacza mlekan.
Ważne: Ponieważ zaschnięte resztki mleka
są trudne do usunięcia, spieniacz do mleka
(6) trzeba koniecznie oczyścić letnią wodą
natychmiast po użyciu i przepłukać, używając programu systemowego Wyczyść ukł.
mleczn.!.
Wskazówka: Aby zapewnić optymalną
jakość kawy, ziarna kawy należy przechowywać w chłodnym miejscu i w zamknięciu.
Ważne: Codziennie napełniać pojemnik na
wodę świeżą, zimną wodą niegazowaną.
Pojemnik musi zawsze zawierać ilość wody
niezbędną do pracy urządzenia.
Przygotowanie
Urządzenie musi być gotowe do pracy.
■ Podgrzaną liżankę (liżanki) podstawić
pod wylot kawy (7).
Wskazówka: Przed przygotowaniem
małego espresso należy zawsze podgrzać
liżankę, np. przepłukując ją gorącą wodą.
■ Obracając górne pokrętło obrotowe (15)
wybierz rodzaj kawy i wymaganą ilość na liżankę. Ustawienia kawy i ilości na liżankę
zostają przedstawione na wyświetlaczu.
■ Obracając górne pokrętło obrotowe (14)
wybierz moc kawy. Wybrane ustawienie
zostanie przedstawione na wyświetlaczu.
Aby przygotować jednocześnie dwie liżanki, naciśnij przycisk a (11) (dotyczy
tylko napojów bez mleka i bez funkcji
aromaDouble Shot).
■ Nacisnąć przycisk start (10).
Kawa jest parzona, a następnie spływa do
liżanki(ek).
49
Page 54

pl Parzenie z kawy mielonej
Uwaga: W przypadku niektórych ustawień
kawa jest przygotowywana w dwóch etapach
(patrz sekcja „ aromaDouble Shot”). Poczekaj
na całkowicie zakończenie procesu.
Naciśnij ponownie przycisk start (10), aby
skrócić proces zaparzania.
Parzenie z kawy mielonej
Automatyczny ekspres do kawy umożliwia
też parzenie kawy z kawy mielonej (nie
z kawy rozpuszczalnej).
Urządzenie musi być gotowe do użycia.
Aby przygotować napój kawowy z mlekiem,
należy najpierw włożyć rurkę do mleka do
pojemnika z mlekiem, a złącze tej rurki
przymocować do spieniacza mlekan.
Uwaga: Funkcja aromaDouble Shot jest
nieaktywna podczas procesu parzenia kawy
z kawy mielonej.
Ważne: Ponieważ zaschnięte resztki mleka
są trudne do usunięcia, spieniacz do mleka
(6) trzeba koniecznie oczyścić letnią wodą
natychmiast po użyciu i przepłukać, używając programu systemowego Wyczyść ukł.
mleczn.!.
Ważne: Codziennie napełniać pojemnik na
wodę świeżą, zimną wodą niegazowaną.
Pojemnik musi zawsze zawierać ilość wody
niezbędną do pracy urządzenia.
Przygotowanie
■ Otworzyć szuadkę na kawę mieloną (4).
■ Wsypać maksymalnie 2 płaskie miarki
kawy mielonej.
Uwaga: Nie sypać do tej szuadki całych
ziaren kawy ani kawy rozpuszczalnej.
■ Zamknąć szuadkę (4).
■ Obracając górne pokrętło obrotowe (15)
wybierz wymagany napój (parzona jest
tylko jedna liżanka).
■ Ustawić dolne pokrętło w płołożeniku
b zmielona kawa.
■ Nacisnąć przycisk start (10).
Kawa jest parzona, a następnie spływa do
liżanki.
Wskazówka: W celu zaparzenia następnej
liżanki kawy powtórzyć czynności.
Pobieranie gorącej wody
W Niebezpieczeństwo oparzenia!
Spieniacz mleka (6) może bardzo się
nagrzewać. Po użyciu odczekać do ostygnięcia, a dopiero potem dotykać.
Przed podgrzaniem wody należy wyczyścić
spieniacz mleka i przymocować do niego
rurkę do mleka przy użyciu złącza tej rurki.
Urządzenie musi być gotowe do pracy.
■ Podgrzaną liżankę lub szklankę podsta-
wić pod wylot spieniacza mleka (6).
■ Naciśnij i przytrzymaj przycisk l / m
(12) przez ok. 3 sekundy. Urządzenie
nagrzeje się. Z wylotu spieniacza
mleka (6) przez około 40 sekund będzie
płynąć gorąca woda.
■ Naciśnij ponownie przycisk l / m (12),
aby skrócić ten proces.
Spienianie mleka
W Niebezpieczeństwo oparzenia!
Spieniacz mleka (6) może bardzo się
nagrzewać. Po użyciu odczekać do ostygnięcia, a dopiero potem dotykać.
Wskazówka: Mleko można najpierw
spienić, a później wlać do niego kawę, lub
można spienić je oddzielnie, a następnie
wlać do kawy.
Urządzenie musi być gotowe do pracy.
■ Umieść wcześniej podgrzaną liżankę
pod wylotem (6a).
■ Włóż rurkę doprowadzającą mleko (6c)
do zbiornika mleka.
■ Naciśnij przycisk l / m (12).
Przycisk l / m (12) zacznie migać, a
urządzenie będzie się nagrzewało przez
ok. 20 sekund.
50
Page 55

Konserwacja i codzienne czyszczenie
pl
W Niebezpieczeństwo oparzenia!
Ze spieniacza mleka wydobywa się pod
wysokim ciśnieniem spienione mleko (6).
Rozpryskujące się mleko może spowodować oparzenia. Nie dotykaj wylotu (6a) ani
nie kieruj go na nikogo.
■ Zakończ proces, naciskając przycisk
l / m (12).
Ważne: Ponieważ zaschnięte resztki mleka
są trudne do usunięcia, spieniacz do
mleka (6) trzeba koniecznie oczyścić letnią
wodą natychmiast po użyciu i przepłukać,
używając programu systemowego Wyczyść
ukł. mleczn.!
Konserwacja i codzienne
czyszczenie
W Niebezpieczeństwo
porażenia prądem!
Przed przystąpieniem do czyszczenia
wyciągnąć wtyczkę z gniazdka.
Nigdy nie zanurzać urządzenia w wodzie.
Nie stosować urządzeń do czyszczenia parą.
■ Przetrzeć obudowę miękką, wilgotną
ściereczką.
■ Nie używać szorstkich ścierek ani szorujących środków czyszczących.
■ Pociągnij pojemnik na skropliny (8c)
z pojemnikiem na fusy (8b). Wyjmij panel
(8a) i kratkę (8d). Opróżnij i wyczyść
pojemnik na skropliny oraz pojemnik
na fusy.
■ Wyjmij pływak (8e) i wyczyść go wilgotną
szmatką.
■ Wnętrza urządzenia (podstaw pojemników) i szuady na zmieloną kawę (nie jest
wyjmowana) nie należy myć i wycierać.
Do zmywarki nie wolno wkładać
następujących elementów: panel
L
(8a), jednostka zaparzania (5a).
Następujące elementy można myć w
zmywarce: pojemnik na skropliny (8c),
M
pojemnik na fusy (8b), kratka (8d),
pokrywa utrzymująca aromat (2),
wszystkie części spieniacza mleka (6)
oraz miarka do kawy mielonej (19).
Ważne: Pojemnik na skropliny i na fusy
należy codziennie opróżniać, aby zapobiec
powstawaniu osadów.
Uwaga: Włączenie zimnego urządzenia
za pomocą przełącznika zasilania O / I (9)
uruchamia automatycznie proces płukania.
Proces płukania włącza się również automatycznie po każdej zaparzonej liżance
kawy. Oznacza to, że system czyści się
■ Pozostałości kamienia, kawy, mleka,
roztworu czyszcząco-odkamieniającego
należy natychmiast usuwać. Takie pozo-
stałości mogą spowodować korozję.
■ Nowe ściereczki gąbczaste mogą zawierać
sole. Sole mogą spowodować nalot rdzy
na stali szlachetnej, dlatego przed użyciem
należy je koniecznie starannie wypłukać.
51
samoczynnie.
Ważne: Jeżeli urządzenie nie było używane
przez dłuższy czas, np. przez okres
wakacji, należy dokładnie wyczyścić całe
urządzenie, łącznie ze spieniaczem mleka
i jednostką zaparzania.
Page 56

pl Konserwacja i codzienne czyszczenie
Czyszczenie spieniacza mleka
Jeśli spieniacz mleka nie był czyszczony
po pobraniu mleka, po pewnym czasie
zostanie wyświetlony komunikat Wyczyść
ukł. mleczn.!
Spieniacz mleka należy czyścić po każdym
użyciu!
Aby przeprowadzić automatyczne wstępne
czyszczenie systemu podawania mleka:
■ Obracając pokrętło obrotowe (15) wybierz
pozycję j.
■ Umieść wysokie, puste naczynie pod
wylotem (6a).
■ Przesuń wylot jak najbliżej naczynia.
■ Umieść końcówkę rurki doprowadzającej
mleko (6c) w naczyniu.
■ Naciśnij przycisk start (10).
Urządzenie automatycznie wlewa wodę do
naczynia, a następnie zasysa ją z powrotem w celu wypłukania systemu podawania
mleka. Po ok. 1 minutę proces płukania
zakończy się automatycznie.
■ Wylej wodę z naczynia i wymyj rurkę
doprowadzającą mleko (6c).
Czyścić regularnie także części mające
kontakt z mlekiem (w zmywarce lub
ręcznie).
W Niebezpieczeństwo oparzenia!
Spieniacz mleka (6) może bardzo się
nagrzewać. Po użyciu odczekać do ostygnięcia, a dopiero potem dotykać.
■ Rozłóż spieniacz mleka na części (6a)
do (6d) (patrz ilustracja C na początku
instrukcji).
■ Poszczególne części należy czyścić roz-
tworem płynu do naczyń i miękką szczoteczką. Jeśli jest to konieczne, należy je
namoczyć w ciepłym roztworze detergentu.
■ Przepłukać wszystkie części czystą wodą
i osuszyć.
Uwaga: Wszystkie części spieniacza mleka
oraz rurka do mleka mogą również być
umieszczane w zmywarce.
■ Ponownie zmontować wszystkie części
i włożyć aż do oporu.
Rozkładanie spieniacza mleka do
czyszczenia:
■ Wyciągnij spieniacz mleka (6), kierując go
do przodu.
52
W Niebezpieczeństwo oparzenia!
Z urządzenia należy korzystać po zamontowaniu spieniacza mleka (6).
Page 57

Porady dotyczące oszczędzania energii
pl
Czyszczenie jednostki zaparzania
Jednostkę zaparzania należy czyścić
regularnie.
Aby przeprowadzić automatyczne wstępne
czyszczenie jednostki zaparzania:
■ Obracając pokrętło obrotowe (15) wybierz
pozycję k.
■ Umieść pustą szklankę pod wylotem (6a).
■ Nacisnąć przycisk start (10).
Następuje płukanie urządzenia.
Wyjmować regularnie jednostkę zaparzania
(5a) w celu czyszczenia – jako uzupełnienie
automatycznego programu czyszczącego
(patrz ilustracja E, umieszczony na
początku instrukcji obsługi).
■ Wyłączyć urządzenie wyłącznikiem
sieciowym O / I (9). Żaden przycisk nie
świeci.
■ Otworzyć drzwiczki (5b) jednostki
zaparzania.
■ Przesunąć czerwoną blokadę (5e)
zaparzacza (5a) do końca w lewo.
■ Wcisnąć dźwignię (5d) całkowicie w dół.
Zaparzacz jest zwolniony.
■ Ostrożnie wyjąć zaparzacz (5a),
chwytając za wgłębienia.
■ Zdjąć osłonę (5f) zaparzacza i starannie
umyć zaparzacz (5a) pod bieżącą wodą.
■ Sitko zaparzacza starannie oczyścić pod
strumieniem wody.
Ważne: Do czyszczenia nie wolno używać
żadnych detergentów, środków czyszczących ani zmywarki.
■ Wytrzeć dokładnie wnętrze urządzenia za
pomocą wilgotnej szmatki i usunąć resztki
kawy.
■ Jednostkę zaparzania (5a) i wewnętrzną
część urządzenia należy wysuszyć.
■ Ponownie założyć osłonę (5f) na zaparzacz i wsunąć zaparzacz (5a) do oporu
w urządzenie.
■ Wcisnąć dźwignię (5d) całkowicie do
góry.
■ Przesunąć czerwoną blokadę (5e) w prawo
do końca i zamknąć drzwiczki (5b).
Porady dotyczące
oszczędzania energii
■ Automatyczny ekspres do kawy należy
wyłączyć, kiedy nie jest używany. W
tym celu naciśnij przycisk k off / i (13).
Urządzenie rozpocznie przepłukiwanie, a
następnie zostanie wyłączone.
■ W miarę możliwości nie przerywać
nalewania kawy lub spienionego mleka.
Przedwczesne przerwanie prowadzi
do zwiększonego zużycia energii i do
szybszego zapełniania pojemnika na
skropliny.
■ Regularnie odkamieniać urządzenie,
aby uniknąć powstawania kamienia.
Kamienny osad prowadzi do zwiększonego zużycia energii.
53
Page 58

pl Programy serwisowe
Programy serwisowe
Wskazówka: Patrz też skrócona instrukcja
obsługi w schowku (5c).
W zależności od użycia w odpowiednich
odstępach czasu będą wyświetlane komunikaty opisane poniżej:
Konieczne odkamien.
lub
Konieczne czyszczenie
lub
Konieczny Calc‘n‘Clean
W tym przypadku należy niezwłocznie
oczyścić lub odkamienić urządzenie za
pomocą odpowiedniego programu. Alternatywnie można połączyć programy odkamieniania i czyszczenia za pomocą funkcji
Calc‘n‘Clean (patrz sekcja „Calc‘n‘Clean”).
Niewykonanie programu serwisowego
zgodnie z instrukcją może spowodować
uszkodzenie urządzenia.
W Uwaga!
Przy każdym programie serwisowym stosować odkamieniacz oraz środek czyszczący
zgodnie z instrukcją. Należy przestrzegać
instrukcji bezpieczeństwa umieszczonych
na opakowaniu środka czyszczącego.
Nigdy nie przerywać programu
serwisowego!
Nie pić powstałej cieczy!
Nigdy nie używać octu, środków na bazie
octu, kwasu cytrynowego ani środków na
bazie kwasu cytrynowego!
Nigdy nie wkładać tabletek odkamieniających lub innych środków odkamieniających
do szuadki na kawę mieloną (4)!
Przed rozpoczęciem każdego programu
serwisowego (Odkamieniania, Czyszczenia
albo Calc‘n‘Clean) wyjąć jednostkę zaparzania, wyczyścić ją zgodnie z instrukcją
i ponownie założyć.
54
Specjalny odkamieniacz w tabletkach
oraz tabletki czyszczące dostępne są
w sklepach i serwisie fabrycznym (patrz
„Akcesoria“).
Odkamienianie
Czas trwania: ok. 25 minuty
Ważne: Jeśli ltr wody jest wstawiony do
pojemnika na wodę (17), ltr ten należy
koniecznie usunąć przed uruchomieniem
programu serwisowego.
Jeśli na wyświetlaczu zostanie wyświetlony
komunikat Konieczne odkamien., naciśnij
przycisk k off / i (13) przez 3 sekundy, a
następnie naciśnij przycisk start (10).
Zostanie uruchomiony program
odkamieniania.
Aby odkamienić urządzenie przed
wyświetleniem monitu, naciśnij przycisk
k off / i (13) przez przynajmniej 3 sekundy.
Następnie naciśnij dwukrotnie przycisk
k off / i (13). Obracaj pokrętło obrotowe (15)
do pojawienia się na wyświetlaczu napisu
Uruchom odkamien. Aby rozpocząć proces
odkamieniania, naciśnij przycisk start (10).
Na wyświetlaczu wskazywane są kolejne
kroki.
Opróżn. poj. na skropliny
Włóż poj. na skropliny
■ Opróżnić pojemnik na skropliny (8)
i z powrotem włożyć.
Uwaga: Jeśli ltr jest aktywny, na wyświe-
tlaczu zostanie przedstawiony monit
o wyjęcie ltra, a następnie ponowne
naciśnięcie przycisku start (10). Wyjmij
ltr, jeżeli jeszcze nie został wyciągnięty.
Nacisnąć przycisk start (10).
Dodaj śr. odkamien.
Naciśnij start
■ Do pustego pojemnika na wodę (17) wlać
letnią wodę do oznaczenia „0,5 l” i roz-
puścić w niej 1 tabletkę odkamieniającą
Bosch TCZ8002.
■ Nacisnąć przycisk start (10).
Page 59

Programy serwisowe
pl
Wstaw pojemnik
Naciśnij start
■ Umieść pojemnik o pojemności przynaj-
mniej 0,5 litra pod wylotem (6a).
■ Nacisnąć przycisk start (10).
Odkamien. rozpoczęte
Program odkamieniający włącza się na ok.
20 minut.
Wycz./Nap. poj. na wod.
Naciśnij start
■ Wypłukać pojemnik na wodę (17) i napeł-
nić go świeżą wodą do oznaczenia max.
■ Nacisnąć przycisk start (10).
Odkamien. rozpoczęte
Program odkamieniania trwa teraz jeszcze
3 minuty, w jego trakcie urządzenie zostanie
przepłukane.
Opróżn. poj. na skropliny
Włóż poj. na skropliny
■ Opróżnić pojemnik na skropliny (8)
i z powrotem włożyć.
Jeżeli ltr jest stosowany, należy go teraz
ponownie założyć. Urządzenie jest odkamienione i gotowe do pracy.
Aby wyczyścić urządzenie przed wyświetleniem monitu, naciśnij przycisk k off / i (13)
przez przynajmniej 3 sekundy. Następnie
naciśnij dwukrotnie przycisk k off / i (13).
Obracaj pokrętło obrotowe (15) do pojawienia się na wyświetlaczu napisu Uruchom
czyszczenie. Aby rozpocząć proces czyszczenia, naciśnij przycisk start (10).
Na wyświetlaczu wskazywane są kolejne
kroki.
Opróżn. poj. na skropliny
Włóż poj. na skropliny
■ Opróżnić pojemnik na skropliny (8)
i z powrotem włożyć.
Otwórz szufladkę
■ Otworzyć szuadkę na kawę mieloną (4).
Włóż śr. czyszcz.
Naciśnij start
■ Włożyć tabletkę czyszczącą Bosch
i zamknąć szuadkę (4).
■ Nacisnąć przycisk start (10).
Czyszczenie rozpoczęte
Program czyszczący włącza się na ok.
8 minut.
Ważne: Przetrzeć urządzenie miękką, wilgotną ściereczką, aby natychmiast usunąć
pozostałości odkamieniacza. Takie pozostałości mogą spowodować korozję. Nowe
ściereczki gąbczaste mogą zawierać sole.
Sole mogą spowodować nalot rdzy na stali
szlachetnej, dlatego przed użyciem należy
je koniecznie starannie przepłukać.
Czyszczenie
Czas trwania: ok. 10 minuty
Jeśli na wyświetlaczu zostanie wyświetlony
komunikat Konieczne czyszczenie, naciśnij
przycisk k off / i (13) przez 3 sekundy, a
następnie naciśnij przycisk start (10).
Zostanie uruchomiony program
czyszczenia.
55
Opróżn. poj. na skropliny
Włóż poj. na skropliny
■ Opróżnić pojemnik na skropliny (8)
i z powrotem włożyć.
Zakończono czyszczenie. Urządzenie jest
gotowe do ponownego użytku.
Calc‘n‘Clean
Czas trwania: ok. 35 minuty
Calc‘n‘Clean łączy funkcję odkamieniania
i czyszczenia. Jeżeli termin obu programów
wypada blisko siebie, ekspres automatycz-
nie proponuje ten program serwisowy.
Ważne: Jeśli ltr wody jest wstawiony do
pojemnika na wodę (17), ltr ten należy
koniecznie usunąć przed uruchomieniem
programu serwisowego.
Page 60

pl Programy serwisowe
Jeśli na wyświetlaczu zostanie wyświetlony
komunikat Konieczny Calc‘n‘Clean, naciśnij
przycisk k off / i (13) przez 3 sekundy,
a następnie naciśnij przycisk start (10).
Zostanie uruchomiony program serwisowy.
Aby uruchomić procedurę Calc’n’Clean
przed wyświetleniem monitu, naciśnij
przycisk k off / i (13) przez przynajmniej
3 sekundy. Następnie naciśnij dwukrotnie
przycisk k off / i (13). Obracaj pokrętło
obrotowe (15) do pojawienia się na wyświetlaczu napisu Uruchom Calc‘n‘Clean. Aby
rozpocząć procedurę Calc‘n‘Clean, naciśnij
przycisk start (10). Na wyświetlaczu wskazywane są kolejne kroki.
Opróżn. poj. na skropliny
Włóż poj. na skropliny
■ Opróżnić pojemnik na skropliny (8)
i z powrotem włożyć.
Otwórz szufladkę
■ Otworzyć szuadkę na kawę mieloną (4).
Włóż śr. czyszcz.
Naciśnij start
■ Włożyć tabletkę czyszczącą Bosch
i zamknąć szuadkę (4).
■ Nacisnąć przycisk start (10).
Uwaga: Jeśli ltr jest aktywny, na wyświe-
tlaczu zostanie przedstawiony monit
o wyjęcie ltra, a następnie ponowne
naciśnięcie przycisku start (10). Wyjmij
ltr, jeżeli jeszcze nie został wyciągnięty.
Nacisnąć przycisk start (10).
Dodaj śr. odkamien.
Naciśnij start
■ Do pustego pojemnika na wodę (17) wlać
letnią wodę do oznaczenia „0,5 l” i roz-
puścić w niej 1 tabletkę odkamieniającą
Bosch TCZ8002.
■ Nacisnąć przycisk start (10).
Wstaw pojemnik
Naciśnij start
■ Umieść pojemnik o pojemności
przynajmniej 1 l pod wylotem (6a).
■ Nacisnąć przycisk start (10).
Calc‘n‘Clean rozpoczęty
Program odkamieniający włącza się na ok.
22 minuty.
Wycz./Nap. poj. na wod.
Naciśnij start
■ Wypłukać pojemnik na wodę (17) i napeł-
nić go świeżą wodą do oznaczenia max.
■ Nacisnąć przycisk start (10).
Calc‘n‘Clean rozpoczęty
Program odkamieniania trwa 10 minut,
w jego trakcie urządzenie zostanie
przepłukane.
Opróżn. poj. na skropliny
Włóż poj. na skropliny
■ Opróżnić pojemnik na skropliny (8)
i z powrotem włożyć.
Jeżeli ltr jest stosowany, należy go ponownie założyć. Zakończono czyszczenie. Urządzenie jest gotowe do ponownego użytku.
Ważne: Przetrzeć urządzenie miękką, wilgotną ściereczką, aby natychmiast usunąć
pozostałości odkamieniacza. Takie pozostałości mogą spowodować korozję. Nowe
ściereczki gąbczaste mogą zawierać sole.
Sole mogą spowodować nalot rdzy na stali
szlachetnej, dlatego przed użyciem należy
je koniecznie starannie przepłukać.
56
Page 61

Ochrona przed zamarzaniem
Dla urządzenia obowiązują warunki
gwarancji wydanej przez nasze przed-
stawicielstwo handlowe w kraju zakupu.
Dokładne informacje otrzymacie Państwo
w każdej chwili w punkcie handlowym,
w którym dokonano zakupu urządzenia.
W celu skorzystania z usług gwarancyinych
konieczne jest przedłożenie dowodu
kupna urządzenia. Warunki gwarancji
regulowane są odpowiednimi przepisami
Kodeksu cywilnego oraz Rozporządzeniem Rady Ministrów z dnia 30.05.1995
roku „W sprawie szczególnych warunków
zawierania i wykonywania umów rzeczy
ruchomych z udziałem konsumentów”.
Zmiany zastrzeżone.
J
To urządzenie jest oznaczone zgodnie
dn. 23.10.2015 poz. 11688) symbolem
przekreślonego kontenera na odpady.
nych oraz niewłaściwego składowania
pl
Ochrona przed
Gwarancja
zamarzaniem
W Aby uniknąć uszkodzeń
spowodowanych zamarzaniem podczas
transportu i przechowywania urządzenia,
należy całkowicie opróżnić urządzenie.
Informacja: Urządzenie musi być gotowe
do pracy, a pojemnik na wodę (17)
napełniony.
■ Umieść duży pojemnik pod wylotem (6a).
■ Naciśnij przycisk l / m (12) i pozwól,
aby urządzenie wytwarzało parę przez 15
sekund.
■ Wyłączyć urządzenie wyłącznikiem
sieciowym O / I (9).
■ Opróżnić zbiornik wody (17) oraz pojem-
nik na skropliny (8).
Akcesoria
W handlu i w serwisie fabrycznym dostępne
są następujące akcesoria.
Akcesoria Numer katalogowy
Handel / Serwis
Tabletki czyszczące TCZ8001 /
Odkamieniacz
w tabletkach
Filtr wody TCZ7003 /
Zestaw pielęgnacyjny TCZ8004 /
Pojemnik na
mleko z pokrywą
„Fresh Lock”
57
00311808
TCZ8002 /
00576694
00575491
00576331
TCZ8009N /
00576165
Ekologiczna utylizacja
z Dyrektywą Europejską 2012/19/UE
oraz polską Ustawą z dnia
2015 r. „O zużytym sprzęcie elek-
trycznym i elektronicznym”
Takie oznakowanie informuje, że
sprzęt ten, po okresie jego użytkowania nie może być umieszczany
łącznie z innymi odpadami pochodzącymi z gospodarstwa domowego.
Użytkownik jest zobowiązany do
oddania go prowadzącym zbieranie
zużytego sprzętu elektrycznego i
elektronicznego. Prowadzący zbieranie, w tym lokalne punkty zbiórki,
sklepy oraz gminne jednostka, tworzą
odpowiedni system umożliwiający
oddanie tego sprzętu. Właściwe
postępowanie ze zużytym sprzętem
elektrycznym i elektronicznym przy-
czynia się do uniknięcia szkodliwych
dla zdrowia ludzi i środowiska naturalnego konsekwencji, wynikających
z obecności składników niebezpiecz-
i przetwarzania takiego sprzętu.
11 wrzesnia
(Dz.U. z
Page 62

pl Samodzielne usuwanie drobnych usterek
Samodzielne usuwanie drobnych usterek
Problem Przyczyna Postępowanie
Za mało lub brak spienionego mleka lub spieniacz
mleka (6) nie zasysa mleka.
Spieniacz mleka (6) lub
wlot spieniacza mleka jest
brudny.
Nieodpowiednie mleko. Stosować mleko o zawartości
Spieniacz mleka (6) jest nie-
prawidłowo zmontowany.
Oczyścić spieniacz mleka (6)
lub wlot spieniacza mleka,
patrz rozdział „Konserwacja
i codzienne czyszczenie”.
tłuszczu 1,5%.
Zanurz części spieniacza
w mleku i mocno dociśnij.
Urządzenie jest
zakamienione.
Brak gorącej wody. Spieniacz mleka (6) lub
wlot spieniacza mleka jest
brudny.
Kawa spływa bardzo wolno
(kropla po kropli) lub nie
spływa wcale.
Kawa nie ma pianki. Nieodpowiedni gatunek
Kawa jest za „kwaśna”. Zbyt gruby stopień zmielenia
Kawa jest za „gorzka”. Zbyt drobny stopień zmiele-
Występują duże różnice
w jakości kawy lub pianki
mlecznej.
Jeśli problem nie może zostać rozwiązany, należy koniecznie skontaktować się
z infolinią! Numery telefonów znajdują się na ostatnich stronach instrukcji.
Ustawiony zbyt drobny
stopień zmielenia lub kawa
zbyt drobno zmielona.
Urządzenie jest mocno
zakamienione.
kawy.
Użyta kawa ziarnista nie jest
świeżo prażona.
Stopień zmielenia nie
odpowiada gatunkowi kawy
ziarnistej.
lub zbyt grubo mielona
kawa.
Nieodpowiedni gatunek
kawy.
nia lub zbyt drobno mielona
kawa.
Nieodpowiedni gatunek
kawy.
W urządzeniu utworzył się
kamień.
Odkamienić urządzenie
zgodnie z instrukcją.
Oczyścić spieniacz mleka (6)
lub wlot spieniacza mleka,
patrz rozdział „Konserwacja
i codzienne czyszczenie”.
Ustawić grubszy stopień
mielenia. Stosować grubiej
mieloną kawę.
Odkamienić urządzenie
zgodnie z instrukcją.
Używać kawy z większą
ilością ziaren Robusty.
Użyć świeższej kawy
ziarnistej.
Ustawić drobny stopień
zmielenia.
Ustawić drobniejszy stopień
zmielenia lub użyć drobniej
zmielonej kawy.
Użyć ciemniej prażonej kawy.
Ustawić grubszy stopień
zmielenia lub użyć grubiej
zmielonej kawy.
Użyć kawy innego gatunku.
Odkamienić urządzenie
zgodnie z instrukcją.
58
Page 63

Samodzielne usuwanie drobnych usterek
pl
Problem Przyczyna Postępowanie
Fusy są zbyt mokre
i mają niejednorodną
konsystencję.
Wewnątrz urządzenia, na
dnie, znajdują się skropliny
(przy wyjętym pojemniku na
skropliny).
Filtr wody nie trzyma się
w zbiorniku (17).
Ustawienia fabryczne
zostały zmienione i muszą
zostać ponownie aktywowane („Reset”).
Wyświetlacz wskazuje Uzu-
pełnij kawę ziarn.! mimo
pełnego pojemnika (1) lub
młynek nie miele kawy.
Wyświetlacz wskazuje
Włóż jedn.
zaparzania
Wyświetlacz wskazuje
Wyczyść jedn. zapar.
Jeśli problem nie może zostać rozwiązany, należy koniecznie skontaktować się
z infolinią! Numery telefonów znajdują się na ostatnich stronach instrukcji.
Ustawiono zbyt wysoki lub
zbyt niski stopień mielenia
albo nie wsypano wystarcza-
jącej ilości kawy mielonej.
Pojemnik na skropliny (8)
został wyjęty zbyt wcześnie.
Filtr wody jest zamontowany
nieprawidłowo.
Zostały wprowadzone
własne, już niepotrzebne
ustawienia.
Ziarna nie wpadają do
młynka (zbyt oleiste ziarna).
Brak jednostki zaparzania
(5) lub nie została ona
rozpoznana.
Zabrudzona jednostka zapa-
rzania (5).
Zbyt duża ilość kawy
mielonej w jednostce
zaparzania (5).
Mechanizm jednostki zapa-
rzania ciężko chodzi.
Ustawić wyższy lub niższy
stopień mielenia, ewentualnie
wsypać dwie płaskie łyżki
pomiarowe kawy mielonej.
Wyjmować pojemnik na skro-
pliny (8) dopiero kilka sekund
po ostatnim pobraniu napoju.
Docisnąć ltr wody w uchwycie w pojemniku na wodę.
Wyłącz urządzenie za
pomocą wyłącznika sieciowego O / I (9). Przytrzymaj
naciśnięte przyciski k off / i
(13) oraz l / m (12) i włącz
urządzenie za pomocą
wyłącznika sieciowego O / I
(9). Następnie potwierdź,
naciskając przycisk
start (10). Ustawienia
fabryczne są już aktywne.
Postukać lekko w pojemnik
na kawę ziarnistą (1).
Ewentualnie użyć innego
gatunku kawy.
Po opróżnieniu pojemnika na
kawę ziarnistą (1) wytrzeć go
suchą szmatką.
Wyłącz urządzenie z zamontowaną jednostką zaparzania
(5), odczekaj trzy sekundy, a
następnie włącz je ponownie.
Wyczyścić jednostkę
zaparzania (5).
Wyczyścić jednostkę
zaparzania (5) (Wsypać
maks. 2 płaskie łyżki kawy
mielonej).
Wyjąć i oczyścić jednostkę
zaparzania, patrz rozdział
„Konserwacja i codzienne
czyszczenie”.
59
Page 64

pl Dane techniczne
Problem Przyczyna Postępowanie
Wyświetlacz wskazuje
Sprawdź poj. na wod.
Wyświetlacz wskazuje
Uruchom ponownie
Wyświetlacz wskazuje
Usterka
Kon. serwis.
Jeśli problem nie może zostać rozwiązany, należy koniecznie skontaktować się
z infolinią! Numery telefonów znajdują się na ostatnich stronach instrukcji.
Nieprawidłowo zainstalowany
pojemnik na wodę.
Woda zawierająca dwutlenek węgla w pojemniku na
wodę.
Zawiesił się pływak w pojemniku na wodę.
Nowy ltr wody nieprzepłukany zgodnie z instrukcją.
W ltrze wody znajduje się
powietrze.
Stary ltr wody. Zainstalować nowy ltr wody.
Zbyt ciepłe urządzenie. Pozostawić urządzenie do
Zabrudzona jednostka
zaparzania.
W urządzeniu wystąpił błąd. Skontaktować się z infolinią.
Poprawnie zainstalować
pojemnik na wodę.
Napełnić pojemnik na wodę
świeżą wodą z kranu.
Wyjąć pojemnik i dokładnie
oczyścić.
Przepłukać ltr wody zgodnie
z instrukcją i włączyć do
eksploatacji.
Trzymać ltr wody tak długo
zanurzony w wodzie, aż przestaną wydobywać się pęche-
rzyki powietrza, z powrotem
zainstalować ltr.
ochłodzenia.
Wyczyścić jednostkę
zaparzania.
Dane techniczne
Złącze elektryczne (napięcie – częstotliwość) 220-240 V~ 50/60 Hz
Moc ogrzewania 1600 W
Maksymalne ciśnienie pompy, statyczne 15 bar
Maksymalna pojemność zbiornika na wodę (bez ltra) 1,7 l
Maksymalna pojemność zbiornika na ziarna kawy 300 g
Długość przewodu 100 cm
Wymiary (wys. x szer. x głęb.) 385 x 280 x 479 mm
Waga pustego urządzenia 9,3 kg
Rodzaj młynka Ceramika
60
Page 65

Inhoud
nl
Inhoud
Leveringsomvang .....................................61
Bestemming van het apparaat..................62
Belangrijke veiligheidsinstructies ..............62
Overzicht ..................................................64
Bedieningselementen ...............................64
Displaymeldingen .....................................65
aromaDouble Shot....................................65
Vóór het eerste gebruik ............................66
Waterlter .................................................67
Menu-instellingen .....................................68
Maalgraad instellen ..................................69
Kofezetten met kofebonen ....................69
Kofezetten met gemalen kofe ..............70
Heet water tappen ....................................70
Melkschuim bereiden................................71
Onderhoud en dagelijkse reiniging ........... 71
Tips voor energiebesparing ...................... 74
Serviceprogramma’s .................................74
Vorstbescherming ....................................77
Toebehoren...............................................77
Afval..........................................................77
Garantie ....................................................77
Eenvoudige problemen zelf oplossen.......78
Technische specicaties ........................... 80
Beste kofeliefhebber,
Gefeliciteerd met uw nieuwe espressoautomaat van Bosch.
Deze gebruiksaanwijzing beschrijft verschil-
lende modellen, die anders zijn uitgerust.
Lees ook de beknopte handleiding.
Ze kan in een speciaal opbergvak (5c)
worden bewaard, zodat ze altijd binnen
handbereik is.
Leveringsomvang
(zie de overzichtsafbeelding voor in de
gebruiksaanwijzing)
a Volautomatisch espressoapparaat
b Beknopte handleiding
c Gebruiksaanwijzing
d Melkschuimer
e Teststrip voor de hardheid van het water
f Maatlepel
61
Page 66

nl Bestemming van het apparaat
Bestemming van het
Bestemming van het
apparaat
apparaat
Dit apparaat is bedoeld voor
de verwerking van normale
huishoudelijke hoeveelheden in
huishoudens of vergelijkbare,
niet-commerciële toepassingen.
Gebruik het apparaat alleen
binnenshuis bij kamertempe-
ratuur en tot 2000 m boven de
zeespiegel.
Belangrijke
Belangrijke
veiligheidsinstructies
veiligheidsinstructies
De gebruiksaanwijzing a.u.b.
zorgvuldig doorlezen, opvolgen
en goed bewaren! Als u dit apparaat aan iemand anders geeft,
lever dan ook deze gebruiksaan-
wijzing mee.
Dit apparaat kan worden
bediend door kinderen vanaf
8 jaar en door personen met
fysieke, sensorische of geestelijke beperkingen of met gebrekkige ervaring en/of kennis,
indien zij onder toezicht staan of
zijn geïnstrueerd in het veilige
gebruik van het apparaat en de
daaruit resulterende gevaren
hebben begrepen. Kinderen
jonger dan 8 jaar dienen uit
de buurt van het apparaat en
het aansluitsnoer te worden
gehouden en mogen het appa-
raat niet bedienen. Kinderen
mogen niet met het apparaat
spelen. Reiniging en onderhoud
mogen niet worden uitgevoerd
door kinderen, tenzij ze 8 jaar
of ouder zijn en onder toezicht
staan.
62
Page 67

Bestemming van het apparaat
nl
W Waarschuwing
Gevaar voor elektrische
schokken!
■ Het apparaat mag uitslui-
tend via een conform de
voorschriften geïnstalleerd
stopcontact met randaarde
op een stroomnet met wissel-
stroom worden aangesloten.
Overtuig u ervan dat het
randaardesysteem van de
elektrische huisinstallatie
conform de elektrotechnische
voorschriften is geïnstalleerd.
■ Het apparaat uitsluitend
aansluiten en gebruiken
volgens de gegevens op het
typeplaatje.
■ Alleen gebruiken wanneer het
aansluitsnoer en het apparaat
niet beschadigd zijn.
■ Om gevaren te vermijden,
mogen reparaties aan het
apparaat, zoals het vervangen
van een beschadigd aansluitsnoer, uitsluitend worden
uitgevoerd door onze Service.
■ Het apparaat en het aansluit-
snoer nooit onderdompelen in
water.
■ Bij storingen direct de stekker
uit het stopcontact trekken of
de netspanning uitschakelen.
W Waarschuwing
Gevaar door magnetisme!
Het apparaat bevat permanente
magneten die elektronische
implantaten zoals pacemakers,
of insulinepompen kunnen
beïnvloeden. Dragers van elek-
tronische implantaten dienen
een minimumafstand van
10 cm tot het apparaat en bij
het wegnemen tot de volgende
delen aan te houden: melkreser-
voir, watertank en zetgroep.
W Waarschuwing
Verstikkingsgevaar!
Laat kinderen niet met verpak-
kingsmateriaal spelen. Bewaar
kleine onderdelen op een veilige
plaats om te voorkomen dat
deze worden ingeslikt.
W Waarschuwing
Gevaar voor letsel!
■ Grijp niet in het maalwerk.
■ Onjuist gebruik van het
apparaat kan letsel tot gevolg
hebben.
W Waarschuwing
Verbrandingsgevaar!
De melkopschuimer wordt zeer
heet. Laat dit na gebruik eerst
afkoelen alvorens het aan te
raken.
W Waarschuwing
Gevaar voor brandwonden!
Gebruik het apparaat alleen
wanneer de melkopschuimer
volledig geassembleerd en
gemonteerd is.
63
Page 68

nl Overzicht
Overzicht
(zie de overzichtsafbeeldingen A, B, C, D
en E voor in de gebruiksaanwijzing)
1 Bonenreservoir
2 Aromadeksel
3 Draaiknop voor maalgraadinstelling
4 Poederlade
(gemalen kofe/reinigingstablet)
5 Zetgroep (Afbeelding E)
a Zetgroep
b Deur
c Opbergvak beknopte handleiding
d Uitwerphendel voor zetgroep
e Vergrendeling
f Afdekplaatje
6 Melkschuimer (Afbeelding C)
afneembaar
a Uitloop
b Aansluiting (melkslang)
c Melkslang met adapter
d Bovenste deel
e Luchtpijpje
f Huls
g Uiteinde
7 Kofe-uitloop in hoogte verstelbaar
8 Lekschaal (Afbeelding D)
a Scherm lekschalen
b Kofedikreservoir
c Lekschaal kofe-uitloop
d Lekplaat kofe-uitloop
e Vlotter
9 Netschakelaar O / I
10 Toets start
11 Toets a
12 Toets l / m
13 Toets k off / i
14 Draaiknop “kofesterkte”
15 Draaiknop “drankkeuze”
16 Display
17 Afneembaar waterreservoir
18 Deksel waterreservoir
19 Maatlepel (handvat voor waterlter)
20 Opbergvak voor maatlepel
21 Netsnoer met opbergvak
Bedieningselementen
Netschakelaar O / I
Met de netschakelaar O / I (9) wordt
het apparaat ingeschakeld of volledig
uitgeschakeld (onderbreking van de
stroomtoevoer).
Belangrijk: Voer voordat u het apparaat
uitschakelt het reinigingsprogramma uit
of gebruik de knop k off / i (13) om het
apparaat uit te zetten.
Toets a
Druk op de toets a (11) als u twee kopjes
van de gekozen drank tegelijk wilt zetten.
Deze toets kan worden geactiveerd voor
dranken zonder melk en zonder de functie
aromaDouble Shot.
Toets k off / i
Als u kort op de knop k off / i (13) drukt,
wordt het apparaat gespoeld en uitgeschakeld. Als u de knop k off / i (13) ingedrukt
houdt, worden de gebruikersinstelling
weergegeven of wordt de ontkalkings- en
reinigingsfunctie gestart.
Toets l / m
Als u op de toets l / m (12) drukt, wordt
er stoom ten behoeve van de melkschuim-
bereiding geproduceerd. Deze toets wordt
ook gebruikt voor het leveren van heet
water.
Toets start
Met een druk op de toets start (10) wordt
de bereiding gestart of een serviceprogramma uitgevoerd. Door tijdens de bereiding nogmaals op de toets start (10) te
drukken, kan het proces vroegtijdig worden
afgebroken.
64
Page 69

Displaymeldingen
nl
Draaiknop “kofesterkte”
Met deze draaiknop (14) kan
de kofesterkte of het gebruik
van voorgemalen kofe
worden ingesteld.
b
c
tot
d
Draaiknop “drankkeuze”
e
tot
f
g
tot
h
k
j
Koffielade
mild
normaal
sterk
DoubleShot sterk +
DoubleShot sterk ++
Bij deze kofesterkte wordt
de kofe in 2 fasen gezet. Zie
“aromaDouble Shot”.
Met deze draaiknop (15)
wordt de gewenste drank
en de hoeveelheid per kop
geselecteerd. Hij wordt ook
gebruikt om gebruikersinstel-
lingen te veranderen.
Kofedranken zonder melk:
Kleine espresso
Espresso
Kleine café crème
café crème
Grote café crème
Kofedranken met melk:
Kleine cappuccino
Grote cappuccino
Kleine macchiato
Macchiato
Grote macchiato
Apparaat spoelen
Melksyst. spoelen
Opmerking: Als een drank geselecteerd
wordt, die niet kan worden bereid, dan verschijnt Ongeldige combinatie op het display.
U dient dan de kofesterkte of uw drankkeuze te wijzigen.
Aansluiting voor melkslang
Als u melkschuim wilt afnemen, bijvoorbeeld voor latte macchiato of cappucino,
moeten de aansluiting en melkslang correct
op de melkschuimer zijn bevestigd.
Belangrijk: dit is ook nodig voor het berei-
den van heet water.
Displaymeldingen
Op het scherm (16) verschijnen, behalve
de actuele bedrijfstoestand, verschillende
meldingen die informatie geven over de
toestand of u meedelen wanneer u dient in
te grijpen. Zodra u de noodzakelijke maatregel hebt uitgevoerd, verdwijnt de melding
en verschijnt het menu voor de drankkeuze
weer.
aromaDouble Shot
Hoe langer het bereiden van de kofe duurt,
des te meer bittere stoffen en ongewenste
aroma’s vrijkomen. Dit heeft een negatieve
invloed op de smaak en maakt de kofe
minder goed verteerbaar. Voor extra sterke
kofe heeft de TES51... daarom een speci-
ale functie: aromaDouble Shot. Wanneer de
helft van de gewenste hoeveelheid bereid
is, wordt verse kofe gemalen en voor de
verdere bereiding gebruikt, zodat alleen de
lekkere aroma’s vrijkomen.
65
Page 70

nl Vóór het eerste gebruik
De functie aromaDouble Shot is actief bij de
volgende instellingen:
Vóór het eerste gebruik
Algemeen
Vul het waterreservoir uitsluitend met zuiver,
koud water zonder koolzuur en het bonenre-
servoir uitsluitend met geroosterde bonen.
Gebruik geen geglaceerde, gekaramelliseerde of met andere suikerhoudende
additieven behandelde kofebonen, want
deze verstoppen de zetgroep.
Bij dit apparaat is de waterhardheid instel-
baar. In de fabriek is de waterhardheid
ingesteld op 4. Bepaal de hardheid van
het gebruikte water met het bijgevoegde
teststrookje. Blijkt uit deze test een andere
waarden dan 4, dan dient het apparaat na
de inschakeling dienovereenkomstig te
worden geprogrammeerd (zie Hardheid
water in het hoofdstuk “ Menu-instellingen”).
Het apparaat in gebruik nemen
■ Verwijder het aanwezige beschermfolie.
■ Plaats de espressoautomaat op een
vlakke, waterbestendige ondergrond met
voldoende draagvermogen. Zorg dat de
ventilatieopeningen van het apparaat niet
geblokkeerd worden.
Belangrijk: Gebruik het apparaat alleen
in vorstvrije ruimten. Als het apparaat bij
temperaturen onder 0° C is getransporteerd
of opgeslagen, dient u ten minste 3 uur te
wachten alvorens het apparaat in gebruik te
nemen.
■ Trek het netsnoer uit het snoervak (21)
en steek de stekker in. De gepaste lengte
kan worden ingesteld door het snoer naar
boven terug te schuiven of naar beneden
uit te trekken. Zet het apparaat daarvoor
met de achterzijde aan bijv. de tafelrand
en trek het snoer naar beneden of schuif
het terug naar boven.
■ Installeer de melkschuimer. Bedien
het apparaat alleen wanneer de melkschuimer (6) volledig is gemonteerd en
geïnstalleerd.
■ Klap het deksel van het waterreservoir
(18) omhoog.
■ Neem het waterreservoir (17) weg, spoel
het uit en vul het met vers, koud water.
Neem hierbij de markering max in acht.
■ Zet het waterreservoir (17) rechtop in het
apparaat zetten en druk het helemaal
naar onderen.
■ Sluit het deksel van het waterreservoir
(18) weer.
■ Vul het bonenreservoir (1) met kofebonen. (Voor de bereiding met
gemalen kofe, zie “Kofezetten met
gemalen kofe”.)
■ Druk op de netschakelaar O / I (9). Op het
display (16) verschijnt het menu voor het
instellen van de displaytaal.
■ Selecteer met de bovenste draaiknop
(15) de gewenste displaytaal.
■ Plaats een kannetje onder de uitloop (6a).
■ Druk op de toets start (10). De geselec-
teerde taal is opgeslagen.
Het apparaat warmt op en spoelt. Er loopt
wat water uit de kofe-uitloop. Als op het
display de drankkeuze verschijnt, is het
apparaat gebruiksklaar.
66
Page 71

Waterlter
nl
Het apparaat uitschakelen
Het espressoapparaat is ingesteld met
standaardinstellingen voor een optimale
werking. Het apparaat schakelt zich na een
geselecteerde tijd automatisch uit (deze tijd
is instelbaar, zie Uitzetten in het hoofdstuk
“Menu-instellingen”).
Uitzondering: Het apparaat wordt zonder
spoelen uitgeschakeld als er alleen heet
water of stoom is geleverd.
Als u eerder het apparaat handmatig
wilt uitschakelen, drukt u op de knop
k off / i (13). Het apparaat wordt gespoeld
en uitgeschakeld.
Opmerking: Bij het eerste gebruik, na de
uitvoering van een serviceprogramma of
als het apparaat gedurende lange tijd niet
is gebruikt, heeft de eerste drank nog niet
het volle aroma; hij kan dan ook beter niet
worden gedronken.
Als u de espressomachine voor het eerst
gebruikt, krijgt u pas een voldoend dikke
en stabiele laag “crema” nadat u de eerste
paar kopje hebt getapt.
Als het apparaat lange tijd achtereen is
gebruikt, kunnen er waterdruppels ver-
schijnen op de ventilatieopeningen. Dat is
normaal.
Waterlter
Een waterlter kan kalkafzetting helpen
voorkomen.
Alvorens een nieuw waterlter kan worden
gebruikt, moet dit gespoeld worden. Hier-
voor gaat u als volgt te werk:
■ Duw het waterlter met behulp van de
maatlepel (19) stevig in het waterreservoir.
■ Het waterreservoir (17) tot aan de
markering max met water vullen.
■ Houd de toets k off / i (13) minstens
3 seconden lang ingedrukt. Het menu
wordt geopend.
■ Druk meerdere keren op de toets
k off / i (13) totdat op het display
Geen/oud Filter staat.
■ Selecteer met de bovenste draaiknop
(15) Filter activeren.
■ Druk op de toets start (10).
■ Plaats een kannetje met een inhoud van
0,5 liter onder de uitloop (6a).
■ Druk op de toets start (10).
■ Er loopt nu water door het lter, om dit
te spoelen.
■ Giet vervolgens het reservoir leeg.
Het apparaat is weer klaar voor gebruik.
Opmerking: Door het lter te spoelen, is
tegelijk ook de instelling voor de indicatie
van de ltervervanging geactiveerd.
67
Page 72

nl Menu-instellingen
Als Filter vervangen verschijnt, of na maxi-
maal 2 maanden is de werking van het lter
uitgeput. Het dient om hygiënische redenen
en opdat het apparaat niet zou verkalken
(het apparaat kan schade oplopen) te
worden vervangen.
Reservelters zijn in de handel of via de
klantenservice (zie “Toebehoren”) verkrijg-
baar. Wordt er geen nieuw lter geplaatst,
draai de instelling filter dan op Geen/oud.
Opmerking: Met de lterindicator kunt u de
maand markeren, waarin u het lter hebt
aangebracht. U kunt ook de maand markeren waarin u het lter de volgende keer moet
vervangen (ten laatste na twee maanden).
Opmerking: Wordt het apparaat langere
tijd niet gebruikt (bijv. vakantie), dan dient
het geplaatste lter te worden gespoeld,
alvorens het apparaat opnieuw wordt
gebruikt. Neem hiervoor een kop warm
water af en giet deze vervolgens weg.
Volgende instellingen zijn mogelijk:
Uitzet ten: Hier kan de tijdspanne worden
ingesteld, waarna het apparaat na de
laatste drankbereiding automatisch wordt
uitgeschakeld. Er kan een tijd tussen
15 minuten en 4 uur worden ingesteld. De
vooraf ingestelde tijdsduur kan ten behoeve
van de energiebesparing worden verkort.
Filter: Hier kunt u instellen of er een
water lter wordt gebruikt. Als er geen
waterlter wordt gebruikt, draait u de knop
naar Geen/oud. Als er wel een water lter
wordt gebruikt, draait u de knop naar Filter
activeren. Nieuwe waterlters moeten vóór
gebruik worden gespoeld (zie “Waterlter”).
Calc‘n‘Clean starten: De serviceprogramma’s (Calc‘n‘Clean / Ontkalken /
Reinigen) kunnen hier handmatig worden
geselecteerd. Druk op de toets start (10) en
voer het geselecteerde programma uit (zie
“Serviceprogramma’s”).
Temperat.: De bereidingstemperatuur
(hoog / gemiddeld / laag) kan hier worden
ingesteld.
Taal: Hier kan de displaytaal worden
ingesteld.
Menu-instellingen
In de menu-instellingen kunt u het apparaat
individueel aanpassen.
■ Houd de toets k off / i (13) minstens
3 seconden ingedrukt.
■ Druk herhaaldelijk op de toets
k off / i (13), tot het gewenste menupunt
op het display verschijnt.
■ Selecteer met de bovenste draaiknop
(15) de gewenste instelling.
■ Bevestig met een druk op de toets
start (10).
Om het menu zonder wijzigingen te verlaten, dient u de keuzeschakelaar op Te r ug te
zetten en vervolgens op de toets start (10)
te drukken.
68
Hardheid water: Bij dit apparaat is de
hardheid van het water instelbaar. De juiste
instelling van de waterhardheid is van
belang, opdat het apparaat tijdig meldt, dat
het moet worden ontkalkt. Af fabriek is als
de waterhardheid vooraf ingesteld.
De hardheid van het water kunt u vaststellen met het meegeleverde teststrookje of
opvragen bij het plaatselijke drinkwaterbedrijf. Stel Onthard.-systeem in als er in
het huis een wateronthardingsinrichting is
geïnstalleerd.
Dompel het teststrookje kort in water onder,
schud het voorzichtig af en na een minuut
kunt u het resultaat aezen.
Page 73

Maalgraad instellen
nl
Waterhardheidsgraden en insteltrappen:
Trap Waterhardheidsgraad
Duits (°dH) Frans (°fH)
1
2
3
4
Drankenteller: Op het display staat
hoeveel dranken er zijn bereid sinds het
apparaat in gebruik is genomen.
1-7
8-14
15-21
22-30
1-13
14-25
26-38
39-54
Maalgraad instellen
Met de draaiknop (3) voor de maalgraad-
instelling kan de gewenste jnheid van de
gemalen kofe worden ingesteld.
W Let op!
Stel de maalgraad alleen bij draaiend maalwerk in! Anders kan het apparaat worden
beschadigd. Niet in het maalwerk grijpen.
■ Stel, terwijl het maalwerk draait, de draaiknop (3) in van jn gemalen kofe
(a: tegen de klok in draaien) tot grof
gemalen kofe (b: met de klok mee
draaien).
Kofezetten met
kofebonen
Deze espresso-automaat maalt voor elke
bereiding verse kofe.
Het apparaat moet klaar zijn voor gebruik.
Als u een kofedrank met melk wilt berei-
den, plaats dan eerst de melkslang in een
melkhouder en bevestig deze vervolgens
met de aansluiting op de melkschuimer.
Belangrijk: Opgedroogde melkresten
zijn lastig te verwijderen, dus moet de
melkschuimer (6) onmiddellijk na gebruik
worden gereinigd en gespoeld met het
programma Melksyst. spoelen.
Tip: Bewaar de bonen voor een optimale
kwaliteit gekoeld en in een afgesloten
verpakking.
Belangrijk: Vul het waterreservoir dagelijks
met vers, koud water zonder koolzuur. In
het waterreservoir (17) dient zich altijd voldoende water te bevinden voor de werking
van het apparaat.
Bereiding
■ Plaats de voorverwarmde kop(pen) onder
de kofe-uitloop (7).
Tip: Voor een kleine espresso is het raad-
zaam om het kopje voor te verwarmen,
bijv. met heet water.
■ Selecteer met behulp van de bovenste
draaiknop (15) de gewenste kofe en
Info: De nieuwe instelling wordt pas bij het
tweede kopje kofe merkbaar.
Opmerking: indien op het display de melding
Maalgraad instellen wordt weergegeven,
worden de kofebonen te jn gemaald. Stel
de maaljnheid grover in.
Tip: Kies een jnere maalgraad voor donker
gebrande bonen en een grovere voor lich-
tere bonen.
69
gewenste hoeveelheid. De geselecteerde
kofe en hoeveelheid worden op het
display aangegeven.
■ Selecteer met behulp van de onderste
draaiknop (14) de gewenste kofesterkte.
De geselecteerde sterkte verschijnt op
het display. Als u twee kopjes tegelijk wilt
zetten, drukt u op de toets a (11) (alleen
voor dranken zonder melk en zonder de
functie aromaDouble Shot).
■ Druk op de toets start (10).
Page 74

nl Kofezetten met gemalen kofe
De kofe wordt gezet en loopt hierna in de
kopje/kopjes.
Opmerking: Bij sommige instellingen
wordt de kofe in twee fasen bereid
(zie “ aromaDouble Shot”). Wacht tot de
bereiding helemaal voltooid is.
Door nogmaals op de toets start (10)
te drukken, kan de bereiding vroegtijdig
worden beëindigd.
Kofezetten met
gemalen kofe
Met deze espressoautomaat kan ook met
gemalen kofe (geen oploskofe) worden
gezet.
Het apparaat moet klaar zijn voor gebruik.
Als u een kofedrank met melk wilt berei-
den, plaats dan eerst de melkslang in een
melkhouder en bevestig deze vervolgens
met de aansluiting op de melkschuimer.
Opmerking: De functie aromaDouble Shot
kan niet worden gebruikt wanneer de kofe
wordt bereid met gemalen kofe.
Belangrijk: Opgedroogde melkresten
zijn lastig te verwijderen, dus moet de
melkschuimer (6) onmiddellijk na gebruik
worden gereinigd en gespoeld met het
programma Melksyst. spoelen).
Belangrijk: Vul het waterreservoir dagelijks
met vers, koud water zonder koolzuur. In
het waterreservoir (17) dient zich altijd voldoende water te bevinden voor de werking
van het apparaat.
Bereiding
■ Open de poederlade (4).
■ Doe er maximaal 2 afgestreken maatle-
pels gemalen kofe in.
Let op: Doe geen hele bonen of oploskof-
e in de poederlade!
■ Sluit de poederlade (4).
■ Selecteer de gewenste drank met behulp
van de bovenste draaiknop (15) (slechts
één kop mogelijk).
■ Zet de onderste draaiknop op
b Koffielade.
■ Druk op de toets start (10).
De kofe wordt gezet en loopt hierna in de
kopje.
Opmerking: Voor een volgende kop kofe
dient deze werkwijze te worden herhaald.
Heet water tappen
W Risico op brandwonden!
De melkschuimer (6) wordt zeer heet. Laat
het systeem na gebruik eerst afkoelen alvo-
rens het aan te raken.
Voordat er heet water wordt bereid, moet
de melkschuimer zijn gereinigd en de melk-
slang met de aansluiting zijn bevestigd.
Het apparaat moet gebruiksklaar zijn.
■ Plaats een voorverwarmd kopje
of glas onder de uitloop van de
melkschuimer (6).
■ Houd de toets l / m (12) ongeveer
3 seconden ingedrukt. Het apparaat
warmt op. Er stroomt ongeveer 40 secon-
den lang heet water uit de uitloop van de
melkschuimer (6).
■ Druk opnieuw op de toets l / m (12)
om het proces af te breken.
70
Page 75

Melkschuim bereiden
nl
Melkschuim bereiden
W Risico op brandwonden!
De melkschuimer (6) wordt zeer heet. Laat
het systeem na gebruik eerst afkoelen alvo-
rens het aan te raken.
Tip: U kunt eerst de melk opschuimen
en dan kofe nemen, ofwel de melk apart
opschuimen en vervolgens op de kofe
gieten.
Het apparaat moet gebruiksklaar zijn.
■ Plaats een voorverwarmde kop onder de
uitloop (6a).
■ Steek de melkslang (6c) in een
melkkannetje.
■ Druk op de toets l / m (12).
De toets l / m (12) knippert, het appa-
raat warmt nu ca. 20 seconden op.
W Risico op brandwonden!
Het melkschuim komt onder hoge druk uit
de melkschuimer (6). Melkspetters kunnen
brandwonden veroorzaken. De uitloop (6a)
mag niet aangeraakt of op personen gericht
worden.
■ Beëindig het proces door op de toets
l / m (12) te drukken.
Belangrijk: Opgedroogde melkresten
zijn lastig te verwijderen, dus moet de
melkschuimer (6) onmiddellijk na gebruik
worden gereinigd en gespoeld met het
programma Melksyst. spoelen.
Onderhoud en
dagelijkse reiniging
W Risico op elektrische schokken!
Trek vóór het reinigen de netstekker uit.
Dompel het apparaat nooit in water.
Gebruik geen stoomreiniger.
■ Veeg de buitenzijde met een zachte,
vochtige doek af.
■ Gebruik geen schurende doeken of reini-
gingsmiddelen
■ Verwijder resten van kalk, kofe, melk,
reinigings- en ontkalkingsoplossingen
altijd onmiddellijk. Onder zulke resten kan
corrosievorming optreden.
■ Nieuwe sponsdoekjes kunnen zouten
bevatten. Deze zouten kunnen een roestlaagje op het roestvrij staal veroorzaken.
Spoel deze doekjes daarom altijd vóór
gebruik grondig uit.
■ Trek de lekschaal (8c) met het kofedikreservoir (8b) naar voren uit het apparaat.
Verwijder het scherm (8a) en de lekplaat
(8d). Giet de lekschaal en het kofedikreservoir leeg en reinig beide onderdelen.
■ Demonteer de vlotter (8e) en reinig hem
met een vochtige doek.
71
Page 76

nl Onderhoud en dagelijkse reiniging
■ Was de binnenkant van de machine
(opname schaal) en de kofelade (niet
uitneembaar) uit.
De volgende onderdelen mogen
niet in de vaatwasser: scherm lek-
L
schalen (8a), zetgroep (5a).
De volgende onderdelen zijn vaat-
wasbestendig: lekschaal voor kofe-
M
uitloop (8c), kofedikreservoir (8b),
lekplaat kofe-uitloop (8d), aromadek-
sel (2), alle delen van de melkopschuimer (6) en poederlepel (19).
Belangrijk: De lekschaal en koffiedikhouder moeten dagelijks worden geleegd
en schoongemaakt om afzettingen te
voorkomen.
Opmerking: Als het apparaat in koude toestand met de netschakelaar O / I (9) wordt
ingeschakeld of na de bereiding van kofe
automatisch wordt uitgeschakeld, wordt
het apparaat automatisch gespoeld. Het
systeem reinigt dus zichzelf.
Belangrijk: Als het apparaat langere tijd
niet is gebruikt (bijv. na een vakantie), maak
het hele apparaat dan grondig schoon,
inclusief het melksysteem en de zetgroep.
Melksysteem reinigen
Als het melksysteem niet is gereinigd nadat
er melk is gebruikt, verschijnt na verloop
van tijd het bericht Melksyst. reinigen! op
het display. Reinig het melksysteem na elk
gebruik!
Het apparaat laat automatisch water in de
kan lopen en zuigt dit via de melkslang
weer op om het melksysteem te spoelen.
Na ca. 1 min stopt het spoelproces
automatisch.
■ Giet de kan leeg en maak de melkslang
(6c) schoon.
Daarnaast dient het melksysteem regelmatig grondig te worden gereinigd (in de
vaatwasser of met de hand).
W Risico op brandwonden!
De melkschuimer (6) wordt zeer heet. Laat
het systeem na gebruik eerst afkoelen alvo-
rens het aan te raken.
Melksysteem voor de reiniging demonteren:
■ Trek de melkschuimer (6) naar voren uit
het apparaat.
■ Neem de verschillende onderdelen (6a)
t/m (6d) van de melkschuimer uit elkaar
(zie afbeelding C aan het begin van de
gebruiksaanwijzing).
Het melksysteem automatisch voorreinigen:
■ Selecteer j met de draaiknop (15).
■ Plaats een hoge, lege kan onder de
tuit (6a).
■ Duw de tuit zo dicht mogelijk naar de
kan toe.
■ Plaats het uiteinde van de melkslang (6c)
in de kan.
■ Druk op de toets start (10).
72
Page 77

Onderhoud en dagelijkse reiniging
nl
■ Reinig de afzonderlijke onderdelen met
een zeepoplossing en een zachte borstel.
Zo nodig in een warme zeepoplossing
laten weken.
■ Spoel alle onderdelen met helder water af
en droog ze af.
Opmerking: Alle delen van de melkopschuimer en de melkslang kunnen ook in de
vaatwasser worden gereinigd.
■ Zet de afzonderlijke onderdelen ineen en
duw de melkschuimer tot aan de aanslag
in het apparaat.
■ Schakel het apparaat met de netscha-
kelaar O / I (9) uit. Er brandt geen enkele
toets meer.
■ Open de deur (5b) van de zetgroep.
■ Schuif de rode grendel (5e) op de zet-
groep (5a) helemaal naar links.
■ Druk de uitwerphendel (5d) helemaal
omlaag. De zetgroep komt los.
■ Pak de zetgroep (5a) beet bij de grepen
en haal de zetgroep er voorzichtig uit.
■ Verwijder de afdekking (5f) van de zet-
groep en reinig de zetgroep (5a) grondig
met stromend water.
■ Reinig de zeef van de zetgroep grondig
onder de waterstraal.
W Risico op brandwonden!
Gebruik dit apparaat alleen wanneer de
melkschuimer (6) volledig is gemonteerd en
geïnstalleerd.
Zetgroep reinigen
Reinig de zetgroep regelmatig.
De zetgroep automatisch voorreinigen:
■ Selecteer k met de draaiknop (15).
■ Plaats een leeg glas onder de uitloop (6a).
■ Druk op de toets start (10).
Het apparaat spoelt.
Aanvullend bij het automatische reinigingsprogramma dient de maalunit (5a) regelmatig te worden verwijderd en gereinigd
(zie afbeelding E aan het begin van deze
gebruiksaanwijzing).
73
Belangrijk: Gebruik bij het reinigen geen
spoel- of reinigingsmiddelen en was de
zetgroep niet in de vaatwasser.
■ Veeg de binnenkant van het apparaat
goed schoon met een vochtige doek en
verwijder alle koferesten.
■ Laat de zetgroep (5a) en de binnenkant
van het apparaat drogen.
Page 78

nl Tips voor energiebesparing
■ Plaats de afdekking (5f) weer op de
zetgroep en schuif de zetgroep (5a) tot de
aanslag in het apparaat.
■ Druk de uitwerphendel (5d) helemaal
omhoog.
■ Schuif de rode vergrendeling (5e) hele-
maal naar rechts en sluit de deur (5b).
Tips voor energiebesparing
■ Zet het volautomatische espressoapparaat uit als u het niet gebruikt. Druk hiervoor op de knop k off / i (13). Het appa-
raat wordt gespoeld en uitgeschakeld.
■ Onderbreek de kofe- of melkschuimbereiding indien mogelijk niet. Een
voortijdig stoppen van de kofe- of
melkschuimbereiding leidt tot een verhoogd energieverbruik en tevens tot meer
restwater in de lekschaal.
■ Ontkalk het apparaat regelmatig, om
kalkafzettingen te voorkomen. Kalkresten
leiden tot een hoger energieverbruik.
Serviceprogramma’s
Tip: Zie ook de beknopte handleiding in het
opbergvak (5c).
W Let op!
Wanneer u het serviceprogramma laat lopen,
dient u altijd ontkalkings- en reinigingsmiddel
volgens de gebruiksaanwijzing te gebruiken.
Neem de veiligheidsinstructies op de verpak-
king van het reinigingsmiddel in acht.
Onderbreek het serviceprogramma in geen
geval! De vloeistoffen niet opdrinken!
Gebruik nooit azijn, middelen op basis van
azijn, citroenzuur of middelen op basis van
citroenzuur!
Doe in geen geval ontkalkingstabletten of
andere ontkalkingsmiddelen in de poederlader (4)!
Verwijder vóór de start van het desbetreffende serviceprogramma (Ontkalken, Reinigen of Calc‘n‘Clean) de zetgroep, reinig
deze volgens de aanwijzingen en zet deze
weer terug.
Speciaal ontwikkelde en geschikte
ontkalkings- en reinigingstabletten zijn
in de handel of via de klantenservice
verkrijgbaar (zie “Toebehoren”).
Ontkalken
Duur: circa 25 minuten.
Afhankelijk van het gebruik verschijnen
op gezette tijden de volgende meldingen op
het display:
Ontkalken nodig!
of
Reinigen nodig!
of
Calc‘n‘Clean nodig!
Dan moet het apparaat onverwijld met het
betreffende programma worden gereinigd of
ontkalkt. Indien nodig kunnen beide processen worden gecombineerd met behulp van
de functie Calc‘n‘Clean (zie “Calc‘n‘Clean”).
Als het serviceprogramma niet volgens de
instructies plaatsvindt, kan het apparaat
worden beschadigd.
74
Belangrijk: Als een waterlter in het waterreservoir (17) geplaatst is, dient dit vóór de
start van het ontkalkingsproces in elk geval
te worden verwijderd.
Als op het display de melding Ontkalken
nodig! verschijnt, dient u de toets
k off / i (13) gedurende 3 seconden
ingedrukt te houden en vervolgens op toets
start (10) te drukken. Het ontkalkingsprogramma wordt gestart.
Om het apparaat tussendoor te ontkalken,
houdt u de toets k off / i (13) gedurende
minstens 3 seconden ingedrukt. Druk
vervolgens tweemaal kort op de toets
k off / i (13).
Draai de bovenste draaiknop (15), tot Ont-
kalken starten op het display verschijnt.
Page 79

Serviceprogramma’s
nl
Om het ontkalkingsproces te starten, drukt
u op de toets start (10).
Het display leidt u door het programma.
Lekbak legen
Lekbak plaatsen
■ Lekschaal (8) leeggieten en weer
terugplaatsen.
Opmerking: Als het waterlter geactiveerd
is, verschijnt op het display een instructie
om het lter te verwijderen en opnieuw op
de toets start (10) te drukken. Verwijder
nu het lter (als u dit nog niet gedaan had).
Druk op de toets start (10).
Ontkalker vullen
start indrukken
■ Vul het lege waterreservoir (17) tot de
markering voor “0,5 l” met lauwwarm
water en los hierin 1 Bosch ontkalkingstablet TCZ8002 op.
■ Druk op de toets start (10).
Houder plaatsen
start indrukken
■ Plaats een kannetje met een inhoud van
minstens 0,5 liter onder de uitloop (6a).
■ Druk op de toets start (10).
Ontkalken bezig
Het ontkalkingsprogramma loopt nu gedu-
rende ca. 20 minuten.
Vul/reinig watertank
start indrukken
■ Spoel het waterreservoir (17) en vul het
tot de markering max met vers water.
■ Druk op de toets start (10).
Ontkalken bezig
Het ontkalkingsprogramma loopt nu gedu-
rende ca. 3 minuten en spoelt het apparaat.
Lekbak legen
Lekbak plaatsen
■ Lekschaal (8) leeggieten en weer
terugplaatsen.
Plaats het lter terug (als u een lter
gebruikt). Het apparaat is ontkalkt en weer
klaar voor gebruik.
Belangrijk: Veeg het apparaat met een
zachte, vochtige doek af om resten van
de ontkalkoplossing direct te verwijderen.
Dergelijke resten kunnen corrosievorming
veroorzaken. Nieuwe sponsdoekjes kunnen
zouten bevatten. Deze zouten kunnen een
roestlaagje op het roestvrij staal veroorza-
ken. Spoel deze doekjes daarom altijd vóór
gebruik grondig uit.
Reinigen
Duur: circa 10 minuten.
Als op het display de melding Reinigen
nodig! verschijnt, dient u de toets k off / i
(13) gedurende 3 seconden ingedrukt te
houden en vervolgens op toets start (10)
te drukken. Het reinigingsprogramma wordt
gestart.
Om het apparaat tussendoor te reinigen,
houdt u de toets k off / i (13) gedurende
minstens 3 seconden ingedrukt. Druk vervolgens tweemaal kort op de toets k off / i
(13). Draai de bovenste draaiknop (15), tot
Reinigen starten op het display verschijnt.
Om het reinigingsproces te starten, drukt u
op de toets start (10).
Het display leidt u door het programma.
Lekbak legen
Lekbak plaatsen
■ Lekschaal (8) leeggieten en weer
terugplaatsen.
Lade openen
■ Open de poederlade (4).
Reiniger vullen
start indrukken
■ Leg een Bosch-reinigstablet in de lade (4)
en sluit deze.
■ Druk op de toets start (10).
75
Page 80

nl Serviceprogramma’s
Reinigen bezig
Het reinigings programma loopt nu
gedurende ca. 8 minuten.
Lekbak legen
Lekbak plaatsen
■ Lekschaal (8) leeggieten en weer
terugplaatsen.
Het apparaat is gereinigd en weer klaar
voor gebruik.
Calc‘n‘Clean
Duur: circa 35 minuten.
Calc‘n‘Clean combineert de functies voor
ontkalking en reiniging. Als het apparaat
ongeveer op hetzelfde moment beide
functies vereist, stelt de espresso-automaat
automatisch dit serviceprogramma voor.
Belangrijk: Als een waterlter in het water-
reservoir (17) geplaatst is, dient dit vóór de
start van het ontkalkingsproces in elk geval
te worden verwijderd.
Als op het display de melding Calc‘n‘Clean
nodig! verschijnt, dient u de toets k off / i
(13) gedurende 3 seconden ingedrukt te
houden
drukken.
gestart.
Om Calc‘n‘Clean tussendoor uit te voeren,
houdt u de toets k off / i (13) gedurende
minstens 3 seconden ingedrukt. Druk vervolgens tweemaal kort op de toets k off / i
(13). Draai de bovenste draaiknop (15),
tot Calc‘n‘Clean starten op het display
verschijnt. Om Calc’n’Clean te starten, drukt
u op de toets start (10).
Het display leidt u door het programma.
en vervolgens op toets start (10) te
Het onderhoudsprogramma wordt
Reiniger vullen
start indrukken
■ Leg een Bosch-reinigstablet in de lade (4)
en sluit deze.
■ Druk op de toets start (10).
Opmerking: Als het waterlter geactiveerd
is, verschijnt op het display een instructie
om het lter te verwijderen en opnieuw op
de toets start (10) te drukken. Verwijder
nu het lter (als u dit nog niet gedaan had).
Druk op de toets start (10).
Ontkalker vullen
start indrukken
■ Vul het lege waterreservoir (17) tot de
markering voor “0,5 l” met lauwwarm
water en los hierin 1 Bosch ontkalkingstablet TCZ8002 op.
■ Druk op de toets start (10).
Houder plaatsen
start indrukken
■ Plaats een kannetje met een inhoud van
minstens 1 liter onder de uitloop (6a).
■ Druk op de toets start (10).
Calc‘n‘Clean bezig
Het ontkalkingsprogramma loopt nu
gedurende ca. 22 minuten.
Vul/reinig watertank
start indrukken
■ Spoel het waterreservoir (17) en vul het
tot de markering max met vers water.
■ Druk op de toets start (10).
Calc‘n‘Clean bezig
Het ontkalkingsprogramma loopt nu gedu-
rende ca. 10 minuten en spoelt het apparaat.
Lekbak legen
Lekbak plaatsen
■ Lekschaal (8) leeggieten en weer
terugplaatsen.
Lade openen
■ Open de poederlade (4).
76
Lekbak legen
Lekbak plaatsen
■ Lekschaal (8) leeggieten en weer
terugplaatsen.
Page 81

Vorstbescherming
J
Gooi verpakkingsmateriaal op een
Voor dit apparaat gelden de garantie-
voor-waarden die worden uitgegeven door
de vertegenwoordiging van ons bedrijf in
het land van aankoop. De leverancier, bij
wie u het apparaat heeft gekocht, geeft
u hierover graag meer informatie. Om
aanspraak te maken op de garantie heeft
u altijd uw aankoopbewijs nodig.
Wijzigingen voorbehouden.
nl
Plaats het lter terug (als u een lter
gebruikt). Het apparaat is gereinigd en weer
klaar voor gebruik.
Belangrijk: Veeg het apparaat met een
zachte, vochtige doek af om resten van
de ontkalkoplossing direct te verwijderen.
Dergelijke resten kunnen corrosievorming
veroorzaken. Nieuwe sponsdoekjes kunnen
zouten bevatten. Deze zouten kunnen een
roestlaagje op het roestvrij staal veroorza-
ken. Spoel deze doekjes daarom altijd vóór
gebruik grondig uit.
Vorstbescherming
W Om vorstschade bij het transport
en de opslag te voorkomen, dient het
apparaat vooraf volledig te worden
leeggemaakt.
Info: Het apparaat moet gebruiksklaar zijn,
het waterreservoir (17) gevuld.
■ Plaats een voldoende grote kan onder de
uitloop (6a).
■ Druk op de toets l / m (12) en laat het
apparaat ongeveer 15 seconden stoom
blazen.
■ Schakel het apparaat met de
netschakelaar O / I (9) uit.
■ Het waterreservoir (17) en de lekschaal
(8) leeggieten.
Afval
milieuvriendelijke manier weg. Dit
apparaat is gekenmerkt in overeenstemming met de Europese richtlijn
2012/19/EU betreffende afgedankte
elektrische en elektronische apparatuur (waste electrical and electronic
equipment – WEEE). De richtlijn
geeft het kader aan voor de in de EU
geldige terugneming en verwerking
van oude apparaten. Raadpleeg uw
gespecialiseerde handelaar voor
de geldende voorschriften inzake
afvalverwijdering.
Garantie
Toebehoren
Onderstaand toebehoren is in de handel of
bij de klantenservice verkrijgbaar.
Toebehoren Bestelnummer
Reinigingstabletten TCZ8001 / 00311808
Ontkalkingstabletten TCZ8002 / 00576694
Waterlter TCZ7003 / 00575491
Onderhoudsset TCZ8004 / 00576331
Melkreservoir met
“Fresh Lock”-deksel
77
Handel /
Klantenservice
TCZ8009N / 00576165
Page 82

nl Eenvoudige problemen zelf oplossen
Eenvoudige problemen zelf oplossen
Probleem Oorzaak Oplossing
Te weinig of geen
melkschuim, of de melkschuimer (6) zuigt geen
melk aan.
Er kan geen warm water
worden genomen.
De kofe loopt slechts
druppelsgewijs of er loopt
helemaal geen kofe
meer.
De kofe heeft geen
“crema”.
De kofe is te “zuur”. De maalgraad is te grof
De kofe is te “bitter”. De maalgraad is te jn
Sterk wisselende kofeof melkschuimkwaliteit.
Het kofedik is niet
compact en te nat.
Lekwater op binnenzijde
apparaatbodem bij ver-
wijderde lekschaal (8).
Als de storing niet kan worden verholpen, neem dan in elk geval contact op met de
hotline! De telefoonnummers staan op de laatste pagina’s van de gebruiksaanwijzing.
De melkschuimer (6) of de
houder van de melkschui-
mer is vuil.
Ongeschikte melk. Gebruik melk met een vetgehalte van
De melkschuimer (6) is
niet correct gemonteerd.
Het apparaat is verkalkt. De machine volgens de gebruiksaan-
De melkschuimer (6) of de
houder van de melkschui-
mer is vuil.
De maalgraad is te jn. De
gemalen kofe is te jn.
Het apparaat is sterk
verkalkt.
Ongeschikte kofesoort. Gebruik een kofesoort met een
De bonen niet meer vers. Gebruik verse bonen.
De maalgraad is niet op
de kofebonen afgestemd.
ingesteld of de gemalen
kofe is te grof.
Ongeschikte kofesoort. Gebruik een donkerder gebrande
ingesteld of de gemalen
kofe is te grof.
Ongeschikte kofesoort. Gebruik een andere kofesoort.
Het apparaat is verkalkt. De machine volgens de gebruiksaan-
De maalgraad is te jn
of te grof ingesteld, of er
is niet genoeg gemalen
kofe gebruikt.
Lekschaal (8) te vroeg
verwijderd.
Reinig de melkschuimer (6) of de
houder van de melkschuimer, zie
“Onderhoud en dagelijkse reiniging”.
1,5%.
Bevochtig de onderdelen van de
melkschuimer en druk ze stevig op
elkaar.
wijzing ontkalken.
Reinig de melkschuimer (6) of de
houder van de melkschuimer, zie
“Onderhoud en dagelijkse reiniging”.
Stel de maalgraad grover in. Gebruik
grover gemalen kofe.
De machine volgens de gebruiksaan-
wijzing ontkalken.
hoger percentage robustabonen.
Stel de maalgraad jn in.
Stel de maalgraad jner in of gebruik
jner gemalen kofe.
soort.
Stel de maalgraad grover in of
gebruik grover gemalen kofe.
wijzing ontkalken.
Stel de maalgraad grover of jner in,
of gebruik 2 afgestreken maatlepels
gemalen kofe.
Lekschaal (8) pas enkele seconden na de laatste drankbereiding
wegnemen.
78
Page 83

Eenvoudige problemen zelf oplossen
nl
Probleem Oorzaak Oplossing
Het waterlter blijft niet
vastzitten in het water-
reservoir (17).
De fabrieksinstellingen
zijn gewijzigd en moeten
opnieuw worden geacti-
veerd (“Reset”).
Op het display verschijnt
Bonen bijvullen!
hoewel het bonenreservoir (1) gevuld is, of het
maalwerk maalt geen
kofebonen.
Op het display verschijnt
Zetgroep plaatsen.
Op het display verschijnt
Zetgroep reinigen.
Op het display verschijnt
Lekbak legen
ondanks lege lekschaal.
Als de storing niet kan worden verholpen, neem dan in elk geval contact op met de
hotline! De telefoonnummers staan op de laatste pagina’s van de gebruiksaanwijzing.
Het waterlter is niet
correct bevestigd.
Er zijn eigen, niet meer
gewenste instellingen
doorgevoerd.
De bonen vallen niet in het
maalwerk (bonen zijn te
olieachtig).
De zetgroep (5) ontbreekt
of is niet herkend.
Verontreinigde zetgroep
(5).
Te veel gemalen kofe in
de zetgroep (5).
Het mechanisme van de
zetgroep beweegt stroef.
Bij een uitgeschakeld
apparaat wordt het legen
niet herkend.
De lekschaal is
verontreinigd.
Druk het waterlter stevig en recht
naar beneden in de tankaansluiting.
Schakel het apparaat met de netschakelaar O / I (9) uit. Houd toets
k off / i (13) en toets l / m (12)
ingedrukt en zet het apparaat met
de netschakelaar O / I (9) aan. Druk
vervolgens op toets start (10). De
fabrieksinstellingen zijn geactiveerd.
Klop zachtjes tegen het bonenre-
servoir (1). Gebruik eventueel een
andere kofesoort. Maak het bonen-
reservoir (1) leeg en veeg het uit met
een droge doek.
Schakel het apparaat uit met de
zetgroep (5) op zijn plaats, wacht
3 seconden en schakel het apparaat
in.
Zetgroep reinigen (5).
Zetgroep (5) reinigen (gebruik
maximaal 2 afgestreken maatlepels
gemalen kofe).
Verwijder en reinig de zetgroep (zie
het hoofdstuk “Onderhoud en dage-
lijkse reiniging”).
Schakel het apparaat in, verwijder
de lekschaal en plaats deze terug.
Reinig de lekschaal grondig.
79
Page 84

nl Technische specicaties
Probleem Oorzaak Oplossing
Op het display verschijnt
Controleer watertank
Op het display verschijnt
Opnieuw starten
Op het display verschijnt
Storing Bel hotline.
Als de storing niet kan worden verholpen, neem dan in elk geval contact op met de
hotline! De telefoonnummers staan op de laatste pagina’s van de gebruiksaanwijzing.
Waterreservoir is onjuist
aangebracht.
Koolzuurhoudend water in
het waterreservoir.
Vlotter in het waterreser-
voir zit vast.
Nieuw waterlter niet
volgens de gebruiksaan-
wijzing gespoeld.
Er zit lucht in het
waterlter.
Waterlter oud. Plaats een nieuw waterlter.
Apparaat te warm. Laat het apparaat afkoelen.
Verontreinigde zetgroep. Reinig de zetgroep.
In het apparaat is een
storing opgetreden.
Breng het waterreservoir juist aan.
Vul het waterreservoir met schoon
leidingwater.
Verwijder het reservoir en reinig dit
grondig.
Spoel het waterreservoir volgens de
gebruiksaanwijzing en neem het in
gebruik.
Dompel het waterlter zo lang onder
in water tot er geen luchtbellen meer
ontsnappen. Breng het lter hierna
weer aan.
Bel de hotline op.
Technische specicaties
Elektrische aansluiting (spanning – frequentie) 220-240 V~ 50/60 Hz
Verwarmingsvermogen 1600 W
Maximale pompdruk, statisch 15 bar
Maximale capaciteit waterreservoir (zonder lter) 1,7 l
Maximale capaciteit bonenreservoir 300 g
Lengte netsnoer 100 cm
Afmetingen (H x B x D) 385 x 280 x 479 mm
Gewicht, leeg 9,3 kg
Type maalwerk keramisch
80
Page 85

Obsah
cs
Obsah
Součást dodávky ......................................81
Použití k určenému účelu .........................82
Důležité bezpečnostní pokyny ..................82
Přehled .....................................................84
Ovládací prvky ..........................................84
Zprávy na displeji......................................85
aromaDouble Shot....................................85
Před prvním použitím ...............................86
Vodní ltr...................................................87
Nastavení v nabídce .................................87
Nastavení mlýnku ..................................... 88
Příprava nápoje ze zrnkové kávy .............89
Příprava nápojů z mleté kávy ...................89
Odebírání horké vody ............................... 90
Příprava mléčné pěny...............................90
Údržba a každodenní čištění .................... 90
Tipy pro úsporu energie ............................93
Programy údržby ......................................93
Ochrana před mrazem..............................96
Příslušenství .............................................96
Likvidace...................................................96
Záruční podmínky .....................................96
Řešení jednoduchých problémů ............... 97
Technické údaje ........................................99
Vážení milovníci kávy,
blahopřejeme k nákupu automatu na
espresso značky Bosch.
Tento návod k použití popisuje různé
modely, které se liší svým vybavením.
Věnujte pozornost přiloženému stručnému
návodu k použití. Můžete ho uložit do
speciální přihrádky (5c).
Součást dodávky
(viz obrázek na začátku návodu)
a Plně automatický přístroj na
výrobu espressa
b Stručná referenční příručka
c Návod k použití
d Napěňovač mléka
e Proužek pro testování tvrdosti vody
f Odměrná lžička
81
Page 86

cs Použití k určenému účelu
Použití k určenému účelu Důležité bezpečnostní
Použití k určenému účelu
Tento spotřebič je určený pro
přípravu množství, které je
běžné v domácnosti, nebo pro
nekomerční použití podobné
jako v domácnosti.
Přístroj používejte pouze ve
vnitřních prostorách při pokojové
teplotě a jen do nadmořské
výšky 2000 m.
Důležité bezpečnostní
pokyny
pokyny
Návod k použití si pečlivě
pročtěte, řiďte se podle něho
a uschovejte si ho! Při předávání přístroje dále přiložte tento
návod.
Tento spotřebič mohou používat
děti starší 8 let a osoby s
omezenými fyzickými, senzorickými nebo duševními schopnostmi nebo s nedostatečnými
zkušenostmi a/nebo znalostmi,
pokud jsou pod dohledem nebo
byly instruovány o bezpečném
použití spotřebiče a pochopily z
toho vyplývající nebezpečí. Děti
mladší 8 let se nesmí zdržovat
v blízkosti spotřebiče a připojovacích kabelů a nesmí spotřebič
obsluhovat. Děti si nesmí se
spotřebičem hrát. Čištění a
údržbu ze strany uživatele nesmí
provádět děti. Výjimka: Děti jsou
starší 8 let a jsou pod dozorem
dospělé osoby.
82
Page 87

Použití k určenému účelu
cs
W Výstraha
Nebezpečí úrazu elektrickým
proudem!
■ Spotřebič smí být k síti stří-
davého proudu připojen jen
pomocí předpisově instalované zásuvky s uzemněním.
Zajistěte předpisovou instalaci
systému ochranných vodičů
elektrické domovní instalace.
■ Přístroj zapojujte a používejte
pouze v souladu s údaji na
typovém štítku.
■ Přístroj používejte jen
tehdy, když samotný přístroj
ani přívodní kabel není
poškozený.
■ Opravy přístroje, např.
výměnu síťového přívodu, smí
provádět pouze náš zákaznický servis, aby nedošlo k
ohrožení.
■ Nikdy neponořujte přístroj
nebo síťový kabel do vody.
■ V případě poruchy ihned
odpojte síťovou zástrčku nebo
vypněte síťové napětí.
W Výstraha
Nebezpečí v důsledku
magnetického pole
Spotřebič obsahuje trvalé
magnety, které mohou ovlinit
elektronické implantáty jako
např. kardiostimulátory nebo
inzulinové dávkovače. Osoby
používající elektronické implantáty by měly dodržovat minimální
odstup od spotřebiče 10 cm a
při odběru také odstup k těmto
součástem: nádoba na mléko,
nádržka na vodu a spařovací
jednotka.
W Výstraha
Nebezpečí udušení!
Nedovolte dětem, aby si hrály
s obalovým materiálem. Drobné
součásti bezpečně uložte, hrozí
nebezpečí spolknutí.
W Výstraha
Nebezpečí poranění!
■ Nesahejte do mlýnku.
■ Chybné použití spotřebiče
může způsobit poranění.
W Výstraha
Nebezpečí popálení!
Pěnič mléka se velmi zahřívá.
Po použití ho nejprve nechte
vychladnout; teprve poté se ho
můžete dotknout.
W Výstraha
Nebezpečí opaření!
Spotřebič používejte pouze
tehdy, je-li pěnič mléka zcela
sestaven a smontován.
83
Page 88

cs Přehled
Přehled
(viz přehledné vyobrazení A, B, C, D a E na
začátku návodu)
1 Zásobník na kávová zrna
2 Víko pro uchování aromatu
3 Otočný volič pro nastavení stupně mletí
4 Přihrádka (na mletou kávu/čisticí tabletu)
5 Spařovací jednotka (obr. E)
a Spařovací jednotka
b Dvířka
c Úložný prostor pro stručný návod
k použití
d Vyhazovací páčka spařovací jednotky
e Pojistka
f Kryt
6 Napěňovač mléka (obr. C) snímatelný
a Výpusť
b Přípojka (hadička na mléko)
c Hadička na mléko s adaptérem
d Horní část
e Vzduchová tryska
f Pouzdro
g Špička trysky
7 Výpusť kávy, výškově nastavitelná
8 Odkapávač (obr. D)
a Panel odkapávače
b Zásobník na mletou kávu
c Odkapávací miska pro výpusť kávy
d Odkapávací mřížka pro výpusť kávy
e Plovák
9 Hlavní vypínač O / I
10 Tlačítko start
11 Tlačítko a
12 Tlačítko l / m
13 Tlačítko k off / i
14 Otočný knoík „síla kávy“
15 Otočný knoík „nápoje“
16 Displej
17 Odnímatelná nádržka na vodu
18 Víko nádržky na vodu
19 Odměrná lžička
(pomůcka pro vkládání vodního ltru)
20 Úložný prostor pro odměrnou lžičku
21 Síťový kabel a jeho úložný prostor
Ovládací prvky
Hlavní vypínač O / I
Hlavní vypínač O / I (9) se používá k zapnutí
spotřebiče nebo k jeho úplnému vypnutí
(odpojení napájení).
Důležité: Před vypnutím spusťte čisticí
program nebo přístroj vypněte tlačítkem
k off / i (13).
Tlačítko a
Stisknete-li tlačítko a (11), připravíte
dva šálky vybraného nápoje současně.
Tlačítko lze použít pouze v případě nápojů
připravovaných bez mléka a bez funkce
aromaDouble Shot.
Tlačítko k off / i
Po krátkém stisknutí tlačítka k off / i (13)
se spotřebič vypláchne a vypne. Po
stisknutí a přidržení tlačítka k off / i (13)
se zobrazí uživatelská nastavení nebo se
spustí funkce odvápnění a čištění.
Tlačítko l / m
Stisknutím tlačítka l / m (12) se vytvoří
pára na přípravu mléčné pěny. Toto tlačítko
slouží také k výdeji horké vody.
Tlačítko start
Tlačítko start (10) zahajuje přípravu nápoje
nebo spouští program údržby. Dalším stisknutím tlačítka start (10) během přípravy
nápoje ukončíte proces přípravy.
84
Page 89

Zprávy na displeji
cs
Otočný knoík „síla kávy“
Tímto otočným knoíkem (14) se nastavuje
intenzita kávy nebo použití
mleté kávy.
b
c
–
d
Otočný knoík „nápoje“
e
–
f
g
–
h
k
j
Zás. ml. k ávy
slabá
normální
silná
DoubleShot silné +
DoubleShot silné ++
Při nastavení této síly se
káva spařuje ve dvou fázích.
Viz “aromaDouble Shot”.
Otočný volič (15) se používá
k výběru požadovaného
nápoje a objemu šálků.
Umožňuje také změnit uživatelské nastavení.
Kávové nápoje bez mléka:
Espresso malé
Espresso
Café Crème malé
Café Crème
Café Crème velké
Kávové nápoje s mlékem:
Cappuccino malé
Cappuccino velké
Macchiato malé
Macchiato
Macchiato velké
Proplach přístroje
Proplach ml.systému
Přípojka pro hadičku na mléko
Pro odběr mléčné pěny – například pro
latte macchiato nebo cappucino – musí být
přípojka a hadička na mléko správně upevněna na pěniči mléka.
Důležité: To je nutné také pro odběr horké
vody.
Zprávy na displeji
Na displeji (16) se zobrazuje nejen aktuální
provozní stav, ale také různé zprávy informující o stavu spotřebiče nebo upozorňující
na nutnost provést nějakou akci. Jakmile
akci provedete, zpráva zmizí a znovu se
zobrazí nabídka nápojů.
aromaDouble Shot
Čím déle se káva spařuje, tím více se uvolňuje hořkých látek a nežádoucího aromatu.
Což negativním způsobem ovlivňuje chuť a
stravitelnost kávy. Model TES51... je proto
vybaven speciální funkcí aromaDouble Shot
pro přípravu velmi silné kávy. Po získání
polovičního množství je semleta a spařena
nová dávka kávy, aby ze spotřebiče vycházely pouze příjemné aromatické vůně.
Funkce aromaDouble Shot se aktivuje při
následujících nastaveních:
Upozornění: Nelze-li vybraný nápoj připravit, na displeji se zobrazí zpráva Neplatná
kombinace. Změňte sílu kávy nebo vybraný
nápoj.
85
Page 90

cs Před prvním použitím
Před prvním použitím
Obecné pokyny
Příslušné zásobníky plňte pouze čistou,
studenou nesycenou vodou a výhradně
praženými zrny. Nepoužívejte kávová
zrna s polevou, karamelizovaná ani jinak
obohacená o složky s obsahem cukru, aby
nedošlo k ucpání spařovací jednotky.
Tento spotřebič umožňuje upravit nastavenou tvrdost vody. Z výroby je tvrdost
vody nastavena na hodnotu 4. Vyzkoušejte
tvrdost vody v místě instalace pomocí přiloženého testovacího proužku.
Bude-li výsledkem zkoušky jiná hodnota
než 4, po zapnutí změňte odpovídajícím
způsobem nastavení na spotřebiči (viz
„Nastavení v nabídce“ – Tv rdos t vody).
Uvedení do provozu
■ Odstraňte ochrannou fólii.
■ Umístěte spotřebič na rovnou voděodol-
nou podložku, která unese jeho váhu.
Zajistěte, aby větrací otvory spotřebiče
nebyly zakryty.
Důležité upozornění: Spotřebič používejte
pouze v prostorách bez mrazu. Pokud byl
spotřebič přepravován nebo skladován při
teplotách nižších než 0° C, pak před uvedením do provozu vyčkejte nejméně 3 hodiny.
■ Vytáhněte síťový kabel z úložného pro-
storu (21) a zapojte jej do zásuvky. Délku
kabelu můžete upravit stažením zpět
nebo dalším povytažením. Nejjednodušší
způsob, jak toho dosáhnout, je umístit spotřebič zadní stranou až na okraj podložky a
táhnout kabel dolů nebo jej tlačit nahoru.
■ Nainstalujte napěňovač mléka. Spotřebič
používejte až po úplném sestavení a
instalaci šlehače mléka (6).
■ Zvedněte víko nádržky na vodu (18).
■ Vyjměte nádržku na vodu (17), vyplách-
něte ji a naplňte čerstvou studenou vodou.
Nenapouštějte vodu nad rysku max.
■ Vraťte nádržku na vodu (17) na místo a
pevně na ni shora zatlačte.
■ Zavřete víko nádržky na vodu (18).
■ Naplňte zásobník (1) zrnkovou kávou.
(Pokyny pro přípravu nápojů z mleté
kávy naleznete v části „Příprava nápojů
z mleté kávy“.)
■ Stiskněte vypínač O / I (9). Na displeji (16)
se zobrazí nabídka pro nastavení jazyka
displeje.
■ Vyberte požadovaný jazyk displeje
pomocí horního otočného voliče (15).
■ Položte vhodnou nádobu pod výpusť (6a).
■ Stiskněte tlačítko start (10). Vybraný
jazyk bude uložen.
Spotřebič se nyní zahřívá a proplachuje.
Z výpusti kávy vyteče malé množství vody.
Když se na displeji zobrazí nabídka nápojů,
spotřebič je připraven k použití.
Vypnutí spotřebiče
Plnoautomat na espresso je z výroby
standardně nastaven na optimální
provoz. Po uplynutí zvolené doby se
přístroj automaticky vypne (časový interval lze naprogramovat, viz „Nastavení
v nabídce“ – Vypnutí).
Výjimka: Spotřebič se vypne bez vypláchnutí pouze v případě, že jste připravovali
horkou vodu nebo páru.
Chcete-li spotřebič vypnout ručně před
provedením této akce, stiskněte tlačítko
k off / i (13). Spotřebič se vypláchne a
vypne.
Upozornění: Při prvním použití spotřebiče,
po proběhnutí programu údržby a v případě,
že spotřebič nebyl delší dobu v provozu,
nebude mít první připravený nápoj plné
aroma a není určen ke konzumaci.
86
Page 91

Vodní ltr
cs
Při prvním použití automatu na espresso
dosáhnete dostatečně husté a stálé pěny
teprve po několika šálcích.
Při intenzivním používání je běžné, že se
na větracích otvorech srazí kapky vody.
Vodní ltr
Vodní ltr může zabránit usazování vodního
kamene.
Nový vodní ltr je nutné před prvním
použitím vypláchnout. Při vyplachování
postupujte takto:
■ Pomocí odměrné lžičky (19) pevně
zatlačte vodní ltr do nádržky na vodu.
■ Naplňte nádržku (17) vodou až po
rysku max.
■ Stiskněte tlačítko k off / i (13) a podržte
je nejméně po dobu tří sekund. Zobrazí
se nabídka.
■ Opakovaně stiskněte tlačítko k off / i
(13), dokud se na displeji nezobrazí text
Filtr starý nebo chybí.
■ Otočným voličem (15) vyberte položku
Aktivovat filtr.
■ Stiskněte tlačítko start (10).
■ Pod výpusť (6a) umístěte nádobu
o objemu 0,5 litru.
■ Stiskněte tlačítko start (10).
■ Filtr bude propláchnut tekoucí vodou.
■ Vyprázdněte nádržku.
Spotřebič je opět připraven k použití.
Poznámka: Současně s propláchnutím
ltru se aktivuje nastavení zprávy Vyměnit
filtr na displeji.
Po zobrazení zprávy Vyměnit filtr nebo
nejpozději po uplynutí dvou měsíců již ltr
nemá potřebnou účinnost. Je třeba vyměnit
jej z hygienických důvodů a také proto,
aby nedošlo k zanesení vodním kamenem
(a následnému poškození spotřebiče).
Náhradní ltry lze získat u prodejců nebo
v zákaznickém servisu (viz „Příslušenství“).
Není-li použit nový ltr, nastavte položku
Filtr na hodnotu starý nebo chybí.
Poznámka: Na posuvném ukazateli si
můžete označit měsíc, ve kterém jste ltr
vložili. Druhá možnost je označit si měsíc,
ve kterém bude třeba ltr příště vyměnit
(nejpozději po dvou měsících).
Poznámka: Pokud spotřebič delší dobu
nepoužíváte (např. během dovolené), je
třeba ltr před použitím spotřebiče propláchnout. Za tím účelem napusťte ze spotřebiče
plný šálek horké vody a vylijte ji.
Nastavení v nabídce
Nastavení spotřebiče můžete přizpůsobit
svým individuálním potřebám pomocí
nabídky na displeji.
■ Stiskněte tlačítko k off / i (13) a držte je
po dobu alespoň 3 sekund.
■ Opakovaně tiskněte tlačítko k off / i (13),
dokud se na displeji neobjeví požadovaná
položka nabídky.
■ Otočným voličem (15) vyberte požado-
vané nastavení.
■ Potvrďte stisknutím tlačítka start (10).
Chcete-li nabídku opustit a ponechat
nastavení na původních hodnotách, otočte
volič do polohy Konec a stiskněte tlačítko
start (10).
87
Page 92

cs Nastavení mlýnku
Nastavit můžete následující hodnoty:
Vypnutí: Zde můžete nastavit časový
interval, po jehož uplynutí od odebrání
posledního nápoje se spotřebič automaticky
vypne. Nastavit lze intervaly v rozmezí od
15 minut do 4 hodin. Za účelem úspory
energie je možné zkrátit přednastavený čas.
Filtr: Zde můžete nastavit, zda je používán
vodní ltr. Pokud vodní ltr není používán,
nastavte možnost Filtr starý nebo chybí.
Zde můžete nastavit, zda je používán vodní
ltr. Pokud vodní ltr není používán, nastavte
možnost Aktivovat filtr. Nové vodní ltry je
třeba před použitím vypláchnout (informace
naleznete v části „Vodní ltr“).
Spustit Calc‘n‘Clean: Zde je možné ručně
vybrat program údržby (Calc‘n‘Clean /
Odvápnění / Čištění). Vybraný program
spustíte stisknutím tlačítka start (10) (viz
„Programy údržby“).
Tepl o ta : Tato položka umožňuje nastavit
teplotu při spařování (Vysoká / Střední /
Nízká).
Úroveň Tvrdost vody
Německo (°dH) Francie (°fH)
1
2
3
4
Počitadlo nápojů: Zde je uvedeno, kolik
nápojů bylo připraveno od prvního spuštění
spotřebiče.
1-7
8-14
15-21
22-30
1-13
14-25
26-38
39-54
Nastavení mlýnku
Otočný volič (3) mění stupeň semletí kávových zrn od hrubého k jemnému.
W Pozor!
Mlýnek seřizujte výhradně za chodu!
V opačném případě může dojít k poškození
spotřebiče. Nesahejte do mlýnku.
■ Je-li mlecí jednotka v činnosti, můžete
podle potřeby nastavovat jemnost pomocí
otočného voliče (3) v rozsahu od jemného
mletí (a: otočení proti směru hodinových
ručiček) po hrubé mletí (b: otočení po
směru hodinových ručiček).
Jazyk: Zde můžete nastavit jazyk displeje.
Tvrd o s t v ody: Tento spotřebič umožňuje
upravit nastavenou tvrdost vody. Správné
nastavení tvrdosti vody je důležité, aby
spotřebič správně informoval o tom, kdy
je třeba spustit odvápňovací program.
Z továrny je tvrdost vody nastavena na
stupeň 4. Skutečnou tvrdost vody můžete
zjistit pomocí přiloženého testovacího
proužku nebo dotazem u místního dodavatele vody. Je-li v domě instalováno zařízení
na změkčování vody, nastavte Změkč.
zařízení.
Testovací proužek krátce ponořte do vody,
jemně setřeste kapky a po uplynutí jedné
minuty se podívejte na výsledek.
88
Poznámka: Nové nastavení se neprojeví
dříve než po druhém šálku kávy.
Upozornění: Pokud se na displeji zobrazí
hlášení Nastavení stup. mletí!, jsou kávová
zrna mleta příliš jemně. Nastavte hrubší
stupeň mletí.
Rada: Pro zrna pražená dotmava volte
jemnější mletí, světlejší zrna melte více
nahrubo.
Page 93

Příprava nápoje ze zrnkové kávy
cs
Příprava nápoje ze
zrnkové kávy
Tento automat na espresso připravuje
každý nápoj z čerstvě mletých zrn.
Spotřebič musí být připraven k použití. Pro
přípravu kávy s mlékem nejdříve vložte
hadičku na mléko do nádoby na mléko a
pomocí přípojky upevněte na pěniči mléka.
Důležité: Zaschlá mléčná usazenina se
těžko odstraňuje, proto je nutné omýt
napěňovač mléka (6) ihned po použití
vlažnou vodou a vypláchnout jej pomocí
programu Proplach ml.systému.
Rada: Pro zaručení optimální kvality skladujte kávová zrna v chladu a uzavřená.
Důležité: Zásobník na vodu plňte každý
den čerstvou a studenou nesycenou vodou.
Nádržka (17) by měla vždy obsahovat
dostatek vody pro provoz spotřebiče.
Příprava nápojů
■ Položte jeden nebo dva předehřáté šálky
pod výpusť kávy (7).
Rada: K předehřátí šálků používejte
horkou vodu.
■ Vyberte požadovaný druh kávy a množství nápoje v šálku otáčením horního
voliče (15). Vybraný nápoj a množství se
zobrazí na displeji.
■ Vyberte požadovanou sílu kávy otáčením
dolního knoíku (14). Na displeji se
zobrazí nastavená síla kávy.
Chcete-li připravit dva šálky současně,
stiskněte tlačítko a (11) (lze použít
pouze pro nápoje připravované bez
mléka a bez funkce aromaDouble Shot).
■ Stiskněte tlačítko start (10).
Káva se spaří a poté nateče do šálku
(šálků).
Upozornění: V některých případech
se káva připravuje ve dvou fázích (viz
„ aromaDouble Shot“). Počkejte, dokud
celý proces neskončí.
Potřebujete-li přípravu kávy ukončit předčasně, stiskněte znovu tlačítko start (10).
Příprava nápojů
z mleté kávy
V tomto automatu na espresso je možné
připravovat nápoje z mleté kávy (nikoli z
instantního kávového prášku).
Spotřebič musí být připraven k použití. Pro
přípravu kávy s mlékem nejdříve vložte
hadičku na mléko do nádoby na mléko a
pomocí přípojky upevněte na pěniči mléka.
Upozornění: Funkci aromaDouble Shot
nelze použít při přípravě nápoje z mleté kávy.
Důležité: Zaschlá mléčná usazenina se
těžko odstraňuje, proto je nutné omýt
napěňovač mléka (6) ihned po použití
vlažnou vodou a vypláchnout jej pomocí
programu Proplach ml.systému.
Důležité: Zásobník na vodu plňte každý
den čerstvou a studenou nesycenou vodou.
Nádržka (17) by měla vždy obsahovat
dostatek vody pro provoz spotřebiče.
Příprava nápojů
■ Otevřete přihrádku (4).
■ Nasypte do ní nejvíce 2 zarovnané
odměrné lžičky mleté kávy.
Pozor: Nepoužívejte celá zrna ani
instantní kávu.
■ Zavřete přihrádku (4).
■ Otočným voličem (15) vyberte požado-
vaný nápoj (lze zvolit jen jeden šálek).
■ Spodní otočný knoík nastavte na
b Zás. ml. k ávy.
■ Stiskněte tlačítko start (10).
89
Page 94

cs Odebírání horké vody
Káva se spaří a poté nateče do šálku.
Upozornění: Chcete-li připravit další šálek
kávy, zopakujte celý postup.
Odebírání horké vody
W Nebezpečí popálení!
Napěňovač mléka (6) se velmi silně zahřívá.
Po použití je nejprve nechte vychladnout;
teprve poté se jich můžete dotknout.
Před odběrem horké vody se musí pěnič
mléka vyčistit a hadička na mléko musí být
upevněna pomocí přípojky.
Spotřebič musí být připraven k použití.
■ Položte předehřátý šálek nebo sklenici
pod výpusť šlehače mléka (6).
■ Stiskněte a přibližně na 3 sekundy
podržte tlačítko l / m (12). Spotřebič
se zahřeje. Zhruba po dobu 40 sekund
bude z výpusti šlehače mléka (6) vytékat
horká voda.
■ Dalším stisknutím tlačítka l / m (12)
proces zastavíte.
Příprava mléčné pěny
W Nebezpečí popálení!
Napěňovač mléka (6) se velmi silně
zahřívá. Po použití je nejprve nechte
vychladnout; teprve poté se jich můžete
dotknout.
W Nebezpečí popálení!
Mléčná pěna vychází z pěniče mléka (6)
pod vysokým tlakem. Při vystříknutí mléka
hrozí opaření. Nedotýkejte se výpusti (6a)
a na nikoho jí nemiřte.
■ Proces lze ukončit stisknutím tlačítka
l / m (12).
Důležité: Zaschlá mléčná usazenina se
těžko odstraňuje, proto je nutné omýt
napěňovač mléka (6) ihned po použití
vlažnou vodou a vypláchnout jej pomocí
programu Proplach ml.systému.
Údržba a každodenní čištění
W Nebezpečí úrazu elektrickým proudem!
Před čištěním spotřebič vždy odpojte od
elektrické sítě.
Nikdy jej neponořujte do vody.
Nepoužívejte parní čističe.
■ Otřete spotřebič zvenčí měkkým vlhkým
hadříkem.
■ Nepoužívejte hrubé utěrky ani abrasivní
čisticí prostředky.
Rada: Mléko můžete zpěnit ještě před
odběrem kávy, nebo můžete mléčnou pěnu
připravit zvlášť a nalít ji do kávy dodatečně.
Spotřebič musí být připraven k použití.
■ Položte předehřátý šálek pod výpusť (6a).
■ Hadičku na mléko (6c) vložte do nádoby
s mlékem.
■ Stiskněte tlačítko l / m (12).
Tlačítko l / m (12) se rozbliká a spotře-
bič se bude asi 20 sekund zahřívat.
90
■ Zbytky vápenatých usazenin, kávy,
mléka, čisticího a odvápňovacího roztoku
vždy ihned odstraňte. Při delším působení mohou způsobit korozi.
■ Nové hadříkové houbičky na čištění
mohou obsahovat soli. Soli mohou
způsobit na ušlechtilé oceli náletovou
rez, proto je před použitím vždy důkladně
propláchněte.
Page 95

Údržba a každodenní čištění
cs
■ Vytáhněte odkapávací misku (8c) se
zásobníkem na mletou kávu (8b) směrem
dopředu. Sejměte panel (8a) a mřížku
(8d). Vyprázdněte a vyčistěte odkapávač
i zásobník na kávu.
■ Vyjměte plovák (8e) a očistěte jej vlhkým
hadříkem.
■ Vytřete vnitřek spotřebiče (uchycení
misek) a zásobník mleté kávy (nelze
vyjmout).
Nemyjte níže uvedené součásti
v myčce nádobí: panel odkapávače
L
(8a), spařovací jednotka (5a).
Níže uvedené součásti lze mýt
v myčce nádobí: odkapávací miska
M
pro výpusť kávy (8c), zásobník
na mletou kávu (8b), odkapávací
mřížka pro výpusť kávy (8d), víko pro
uchování aromatu (2),všechny části
pěniče mléka (6) a lžička na mletou
kávu (19).
Důležité: Odkapávací miska a zásobník
na kávovou sedlinu je třeba vyprazdňovat
a čistit denně, aby se zabránilo tvorbě
usazenin.
Upozornění: Po zapnutí vychladlého spotřebiče vypínačem O / I (9) a při automatickém vypnutí po přípravě kávy se spotřebič
automaticky proplachuje. Systém se tedy
čistí sám.
Čištění mléčného systému
Pokud mléčný systém nebyl vypláchnut po
přípravě mléka, zobrazí se po určitém čase
na displeji následující zpráva: Vyčistit mléč.
systém!
Mléčný systém čistěte bezprostředně
po použití!
Automatické předmytí mléčného systému:
■ Volič (15) otočte do polohy j.
■ Pod výpusť (6a) umístěte vysokou prázd-
nou nádobu.
■ Výpusť posuňte co nejblíže nádoby.
■ Hadičku na mléko (6c) zasuňte do
nádoby.
■ Stiskněte tlačítko start (10).
Spotřebič automaticky vypouští vodu do
nádoby a prostřednictvím hadičky na mléko
ji znovu nasává s cílem vyčistit mléčný
systém. Přibližně po jednu minutu bude
proplachování ukončeno.
■ Vyprázdněte nádobu a vyčistěte hadičku
na mléko (6c).
V pravidelných intervalech navíc mléčný
systém důkladně umývejte (ručně nebo v
myčce).
W Nebezpečí popálení!
Napěňovač mléka (6) se velmi silně
zahřívá. Po použití je nejprve nechte
vychladnout; teprve poté se jich můžete
dotknout.
Demontáž mléčného systému před mytím:
■ Vysuňte napěňovač mléka (6) ze
spotřebiče.
Důležité: Pokud jste spotřebič delší dobu
nepoužívali (např. po dovolené), nejprve jej
celý důkladně vyčistěte, zejména mléčný
systém a spařovací jednotku.
91
Page 96

cs Údržba a každodenní čištění
■ Rozmontujte napěňovač mléka na jed-
notlivé díly (6a až 6d) (viz obrázek C na
začátku návodu k použití).
■ Jednotlivé součásti očistěte měkkým
kartáčkem namočeným ve vodě s čisticím
prostředkem. V případě potřeby je nechte
odmočit v teplé vodě s čisticím prostředkem.
■ Všechny díly vypláchněte čistou vodou a
vysušte.
Upozornění: Všechny části pěniče mléka
a také hadička na mléko mohou být také
čištěny v myčce na nádobí.
■ Poté je znovu sestavte a namontujte zpět
do spotřebiče.
Čištění spařovací jednotky
Spařovací jednotku čistěte pravidelně.
Automatické předmytí spařovací jednotky:
■ Volič (15) otočte do polohy k.
■ Pod výpusť (6a) umístěte prázdnou
sklenici.
■ Stiskněte tlačítko start (10).
Spotřebič se propláchne.
Vedle používání automatického čisticího
programu je třeba spařovací jednotku (5a)
pravidelně vyjímat a čistit (Viz obr. E na
začátku tohoto návodu).
■ Vypněte spotřebič hlavním vypínačem
O / I (9). Všechna tlačítka zhasnou.
■ Otevřete dvířka (5b) spařovací jednotky.
■ Posuňte červenou pojistku (5e) na spařo-
vací jednotce (5a) do levé krajní polohy.
■ Stiskněte vyhazovací páčku (5d) zcela
dolů. Spařovací jednotka se uvolní.
■ Uchopte spařovací jednotku (5a) za
výřezy a opatrně ji vytáhněte.
■ Sejměte kryt (5f) spařovací jednotky a
spařovací jednotku (5a) důkladně vyčistěte pod tekoucí vodou.
W Nebezpečí opaření!
Spotřebič používejte až po úplném sestavení a instalaci šlehače mléka (6).
92
Page 97

Tipy pro úsporu energie
cs
■ Síto spařovací jednotky důkladně vyčistěte pod proudem vody.
Důležité: Při mytí nepoužívejte mycí ani
jiné čisticí prostředky a nevkládejte součásti
do myčky nádobí.
■ Důkladně vytřete vnitřek spotřebiče
vlhkým hadříkem a odstraňte všechny
zbytky kávy.
■ Nechte spařovací jednotku (5a) a vnitřek
spotřebiče úplně oschnout.
■ Na spařovací jednotku nasaďte opět kryt
(5f) a spařovací jednotku (5a) zasuňte do
spotřebiče až na doraz.
■ Stiskněte vyhazovací páčku (5d) zcela
nahoru.
■ Posuňte červenou pojistku (5e) do pravé
krajní polohy a zavřete dvířka (5b).
Tipy pro úsporu energie
■ Pokud plně automatický přístroj na výrobu
espressa nepoužíváte, vypněte jej. Lze
tak učinit stisknutím tlačítka k off / i (13).
Spotřebič se vypláchne a vypne.
■ Přípravu kávy a mléka pokud možno
předčasně nepřerušujte. Zkracování
procesu přípravy a výdeje kávy či mléka
vede k vysoké spotřebě energie a k
nashromáždění většího množství zbytkové vody v odkapávači.
■ Spotřebič pravidelně odvápňujte, aby
nedošlo k vytvoření nánosů vodního
kamene. Vápenaté usazeniny zvyšují
spotřebu energie.
Programy údržby
Rada: Informace najdete také ve stručném
návodu k použití v přihrádce (5c).
Na displeji se za určitých okolností v určitých intervalech mohou zobrazit následující
zprávy:
Je potřebné odvápnění!
nebo
Je potřebné vyčištění!
nebo
Je potřebné Calc‘n‘Clean!
Spotřebič je třeba ihned vyčistit nebo
odvápnit pomocí příslušného programu.
Oba procesy lze také spojit s využitím
funkce Calc‘n‘Clean (viz „Calc‘n‘Clean“).
Neproběhne-li program údržby podle
pokynů, může dojít k poškození spotřebiče.
W Pozor!
Při každém spuštění programu údržby
byste se měli řídit návodem k použití odvápňovacích a čisticích prostředků. Dodržujte
bezpečnostní pokyny uvedené na obalu
čisticího prostředku.
Program údržby v žádném případě
nepřerušujte! Vypuštěné kapaliny nepijte!
V žádném případě nepoužívejte ocet,
výrobky z octa, kyselinu citrónovou ani
výrobky z ní!
Nikdy nevkládejte odvápňovací tablety ani
jiné odvápňovací prostředky do zásuvky
na mletou kávu ani do přihrádky na čisticí
tablety (4)!
Před spuštěním příslušného servisního
programu (Odvápnění, Čištění nebo
Calc‘n‘Clean) vyjměte spařovací jednotku,
podle pokynů ji vyčistěte a znovu vložte.
Speciální odvápňovací a čisticí tablety
zakoupíte v maloobchodních prodejnách a v zákaznických servisech (viz
„Příslušenství“).
93
Page 98

cs Programy údržby
Odstranění vápenatých usazenin
Trvání: přibl. 25 minut
Důležité: Je-li do nádržky na vodu (17)
vložen ltr, musíte jej před spuštěním odvápňovacího programu vyjmout.
Jestliže se na displeji objeví zpráva Je
potřebné odvápnění!, stiskněte tlačítko
k off / i (13) na dobu 3 sekund a poté
stiskněte tlačítko start (10). Spustí se odvápňovací program.
Chcete-li ze spotřebiče odstranit vápenaté usazeniny dříve, než k tomu budete
vyzváni, stiskněte tlačítko k off / i (13) na
dobu alespoň 3 sekund. Potom stiskněte
tlačítko k off / i (13) ještě dvakrát krátce.
Nastavte horní otočný volič (15) do polohy,
při které se na displeji objeví text Spustit
odvápnění. Spusťte proces odstranění usazenin stisknutím tlačítka start (10).
Displej vás provede celým programem.
Prázdná odkap. miska
Vložit odkap. misku
■ Vyprázdněte odkapávač (8) a vložte jej
zpět na místo.
Upozornění: Je-li aktivován vodní ltr,
displej vás ve stanovenou dobu vyzve k
výměně ltru. Po výměně znovu stiskněte
tlačítko start (10). Pokud jste tak dosud
neučinili, vyjměte ltr. Stiskněte tlačítko
start (10).
Probíhá odvápnění
Spustí se odvápňovací program a poběží
asi 20 minut.
Čistit/plnit vodní nádrž
Stisknout start
■ Vypláchněte nádržku (17) a znovu ji
naplňte čerstvou vodou až po rysku max.
■ Stiskněte tlačítko start (10).
Probíhá odvápnění
Odvápňovací program nyní poběží asi
3 minut a vypláchne spotřebič.
Prázdná odkap. miska
Vložit odkap. misku
■ Vyprázdněte odkapávač (8) a vložte jej
zpět na místo.
Vyměňte použitý ltr za nový. Odstraňování
vápenatých usazenin skončilo a spotřebič je
opět připraven k použití.
Důležité upozornění: Pro okamžité odstranění zbytků odvápňovacího roztoku spotřebič otřete měkkým a vlhkým hadříkem.
Pod těmito zbytky se může tvořit koroze.
Nové hadříkové houbičky na čištění mohou
obsahovat soli. Soli mohou způsobit na
ušlechtilé oceli náletovou rez, proto je před
použitím vždy důkladně propláchněte.
Čištění
Trvání: přibl. 10 minut
Naplnit odvápňovač
Stisknout start
■ Nalejte do prázdného zásobníku na vodu
(17) vlažnou vodu až po značku „0,5 l“ a
nechte v ní rozpustit 1 odvápňovací tabletu
Bosch TCZ8002.
■ Stiskněte tlačítko start (10).
Umístit kontejner
Stisknout start
■ Pod výpusť (6a) umístěte nádobu o
objemu nejméně 0,5 litru.
■ Stiskněte tlačítko start (10).
94
Jestliže se na displeji objeví zpráva Je
potřebné vyčištění!, stiskněte tlačítko k off / i
(13) na dobu 3 sekund a poté stiskněte
tlačítko start (10). Spustí se čisticí program.
Chcete-li spotřebič vyčistit dříve, než k
tomu budete vyzváni, stiskněte tlačítko
k off / i (13) na dobu alespoň 3 sekund.
Potom stiskněte tlačítko k off / i (13)
ještě dvakrát krátce. Nastavte horní otočný
volič (15) do polohy, při které se na displeji
objeví text Spustit čištění. Spusťte čištění
stisknutím tlačítka start (10).
Displej vás provede celým programem.
Page 99

Programy údržby
cs
Prázdná odkap. miska
Vložit odkap. misku
■ Vyprázdněte odkapávač (8) a vložte jej
zpět na místo.
Otevřít zásuvku
■ Otevřete přihrádku (4).
Naplnit čisticí modul
Stisknout start
■ Vložte do přihrádky (4) čisticí tabletu
Bosch a zavřete ji.
■ Stiskněte tlačítko start (10).
Probíhá čištění
Spustí se čisticí program a poběží asi
8 minut.
Prázdná odkap. miska
Vložit odkap. misku
■ Vyprázdněte odkapávač (8) a vložte jej
zpět na místo.
Čištění skončilo a spotřebič je opět připraven k použití.
Calc‘n‘Clean
Trvání: přibl. 35 minut
Potom stiskněte tlačítko k off / i (13)
ještě dvakrát krátce. Nastavte horní otočný
volič (15) do polohy, při které se na displeji
objeví text Spustit Calc‘n‘Clean.
Spusťte program Calc‘n‘Clean stisknutím
tlačítka start (10).
Displej vás provede celým programem.
Prázdná odkap. miska
Vložit odkap. misku
■ Vyprázdněte odkapávač (8) a vložte jej
zpět na místo.
Otevřít zásuvku
■ Otevřete přihrádku (4).
Naplnit čisticí modul
Stisknout start
■ Vložte do přihrádky (4) čisticí tabletu
Bosch a zavřete ji.
■ Stiskněte tlačítko start (10).
Upozornění: Je-li aktivován vodní ltr, displej
vás ve stanovenou dobu vyzve k výměně
ltru. Po výměně znovu stiskněte tlačítko
start (10). Pokud jste tak dosud neučinili,
vyjměte ltr. Stiskněte tlačítko start (10).
Program Calc‘n‘Clean spojuje funkce
odvápnění a vyčištění. Je-li třeba provést
oba úkony, kávovar automaticky navrhne
použití tohoto programu údržby.
Důležité: Je-li do nádržky na vodu (17)
vložen ltr, musíte jej před spuštěním programu údržby vyjmout.
Jestliže se na displeji objeví zpráva Je
potřebné Calc‘n‘Clean!, stiskněte tlačítko
k off / i (13) na dobu 3 sekund a poté
stiskněte tlačítko start (10).
Spustí se program údržby.
Chcete-li program Calc’n’Clean spustit
dříve, než k tomu budete vyzváni, stiskněte
tlačítko k off / i (13) na dobu alespoň
3 sekund.
95
Naplnit odvápňovač
Stisknout start
■ Nalejte do prázdného zásobníku na vodu
(17) vlažnou vodu až po značku „0,5 l“ a
nechte v ní rozpustit 1 odvápňovací tabletu
Bosch TCZ8002.
■ Stiskněte tlačítko start (10).
Umístit kontejner
Stisknout start
■ Pod výpusť (6a) umístěte nádobu o
objemu nejméně 1 l.
■ Stiskněte tlačítko start (10).
Probíhá Calc‘n‘Clean
Spustí se odvápňovací program a poběží
asi 22 minut.
Page 100

cs Ochrana před mrazem
J
Obal zlikvidujte způsobem šetrným
k životnímu prostředí. Tento spotřebič
Pro tento přístroj platí záruční podmínky,
které byly vydány naší kompetentní
pobočkou v zemi, ve která byl přístroj
zakoupen.
Záruční podmínky si můžete kdykoliv
vyžádat prostřednictvím svého odborného
prodejce, u kterého jste zakoupili přístroj,
nebo přímo v naší pobočce v příslušné
zemi.
Změny vyhrazeny.
Čistit/plnit vodní nádrž
Stisknout start
■ Vypláchněte nádržku (17) a znovu ji
naplňte čerstvou vodou až po rysku max.
■ Stiskněte tlačítko start (10).
Probíhá Calc‘n‘Clean
Odvápňovací program nyní poběží asi
10 minut a vypláchne spotřebič.
Prázdná odkap. miska
Vložit odkap. misku
■ Vyprázdněte odkapávač (8) a vložte jej
zpět na místo.
Vyměňte použitý ltr za nový. Čištění skončilo a spotřebič je opět připraven k použití.
Důležité upozornění: Pro okamžité odstranění zbytků odvápňovacího roztoku spotřebič otřete měkkým a vlhkým hadříkem.
Pod těmito zbytky se může tvořit koroze.
Nové hadříkové houbičky na čištění mohou
obsahovat soli. Soli mohou způsobit na
ušlechtilé oceli náletovou rez, proto je před
použitím vždy důkladně propláchněte.
Ochrana před mrazem
W Aby při přepravě a skladování
nedošlo k poškození spotřebiče nízkými
teplotami, musí být nejprve zcela
vyprázdněn.
Příslušenství
Následující příslušenství je k dostání
v obchodě a v autorizovaném servisu:
Příslušenství Objednací číslo
V obchodě / V servisu
Čisticí tablety TCZ8001 / 00311808
Odvápňovací
tablety
Vodní ltr TCZ7003 / 00575491
Sada pro údržbu TCZ8004 / 00576331
Nádoba na
mléko s víkem
„Fresh Lock“
TCZ8002 / 00576694
TCZ8009N / 00576165
Likvidace
je označen v souladu s evropskou
směrnicí 2012/19/EU o nakládání s
použitými elektrickými a elektronickými zařízeními (waste electrical and
electronic equipment – WEEE). Tato
směrnice stanoví jednotný evropský
(EU) rámec pro zpětný odběr a recyklování použitých zařízení.
Záruční podmínky
Poznámka: Spotřebič musí být připraven
k použití a nádržka na vodu (17) musí být
naplněna.
■ Pod výpusť (6a) položte objemnější
nádobu.
■ Stiskněte tlačítko l / m (12) a nechte
ze spotřebiče přibližně 15 sekund
vycházet páru.
■ Vypněte spotřebič hlavním vypínačem
O / I (9).
■ Vylijte obsah vodní nádržky (17) a
odkapávače (8).
96
 Loading...