

Page 1
Register your new Bosch now:
www.bosch-home.com/welcome
Sensixx’x DA70 EasyComfort
en Operating instructions
Page 2

Thank you for buying the “Sensixx’x
DA70 EasyComfort” steam iron from
Bosch.
Carefully read through the operating
instructions for the appliance and
safeguard them for future reference.
You can download this manual from the
local home pages of Bosch.
General safety instructions
❐ The iron must not be left unattended while it is connected to the
supply mains.
❐ Remove the plug from the socket before lling the appliance with
water or before pouring out the remaining water after use.
❐ The appliance must be used and placed on a stable surface.
❐ When placed on its stand, make sure that the surface on which the
stand is placed is stable.
❐ The iron should not be used if it has been dropped, if there are
visible signs of damage or if it is leaking water. It must be checked
by an authorized Technical Service Centre before it can be used
again.
❐ With the aim of avoiding dangerous situations, any work or repair
that the appliance may need, e.g. replacing a faulty mains cable,
must only be carried out by qualied personnel from an Authorised
Technical Service Centre.
❐ This appliance can be used by children aged from 8 years and
above and persons with reduced physical, sensory or mental
capabilities or lack of experience and knowledge if they have been
given supervision or instruction concerning use of the appliance in
a safe way and understand the hazards involved. Children shall not
play with the appliance. Cleaning and user maintenance shall not
be made by children without supervision.
❐ Keep the iron and its cord out of reach of children less than 8 years
of age when it is energized or cooling down.
❐ This appliance is designed only for household use up to 2000m
above sea level.
❐
CAUTION. Hot surface.
Surface is liable to get hot during use.
General safety instructions 2
Description 5
Using your appliance 5
1. Filling the water tank 5
2. Heating 6
“i-Temp” technology 6
3. “SensorSecure” function 6
4. Steam settings 7
5. Shot of steam function 7
6. Vertical steam 7
7. Spray 8
8. After ironing 8
Cleaning & Maintenance 9
Descaling systems 9
A “self-clean” 9
B “anti-calc” 9
C “Calc'nClean” function 9
Accessories 10
Trouble shooting 11
Guarantee conditions 11
B O S C H
2
Page 3
Important notices
• This appliance has been designed
exclusively for domestic use and must
not be used for industrial purposes.
• This appliance must be used only for
the purposes for which it was designed,
i.e. as an iron. Any other use will be
considered improper and consequently
dangerous. The manufacturer will not be
held responsible for any damage arising
from misuse or improper use.
• This appliance reaches high
temperatures and produces steam during
use, this could cause scalds or burns in
case of improper use.
- Do not touch the soleplate! Hold the
iron by its handle.
- Do not leave the supply cord hanging
over the table or ironing board, to
prevent the appliance from falling.
- Do not iron clothing while it is being
worn!
- Never spray or aim the steam at
persons or animals!
• Do not allow the power cable to come
into contact with sharp edges or with the
soleplate when it is hot.
• Never rest the iron in a horizontal
position when the soleplate is hot. Rest it
on its heel.
• Do not touch the appliance with wet
hands when in operation.
• This appliance is to be connected and
used in accordance with the information
stated on its characteristics plate.
• This appliance must be connected to
an earthed socket. If it is absolutely
necessary to use an extension cable,
make sure that it is suitable for 16A and
has a socket with an earth connection.
• In special environmental conditions slight
instability may occur.
• The appliance must never be placed
directly under the tap to ll the water
tank.
• Unplug the appliance from the mains
supply after each use, or if a fault is
suspected.
• The electrical plug must not be removed
from the socket by pulling the cable.
• Never immerse the iron in water or any
other uid.
• Do not leave the appliance exposed to
weather conditions (rain, sun, frost, etc.).
Advice on disposal
Our goods come in optimised packaging.
This basically consists in using noncontaminating materials which should be
handed over to the local waste disposal
service as secondary raw materials. Your
local town council can give you information
about how to dispose of obsolete
appliances.
This appliance is labelled in
accordance with European
Directive 2012/19/EU
concerning used electrical and
electronic appliances (waste
electrical and electronic
equipment – WEEE).
The guideline determines the
framework for the return and recycling
of used appliances as applicable
throughout the EU.
B O S C H
3
Page 4
B O S C H
4
Page 5

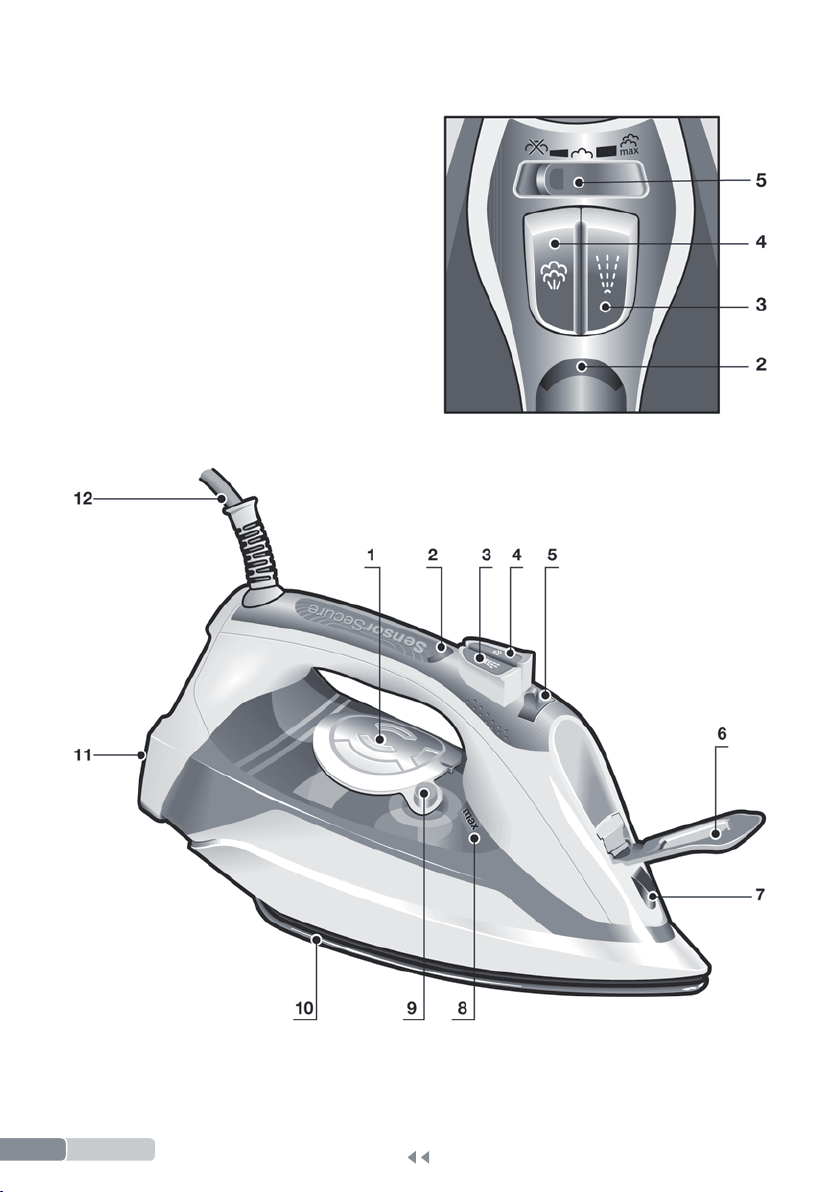
Description
1. "TempOK" indicator lamps
2. “SensorSecure” indicator lamp
3. Spray button
4. Shot of steam button
5. Steam regulator
6. Water inlet lid
7. Spray nozzle
8. Level mark for maximum lling
9. “clean” button
10. Soleplate
11. Heel
12. Power cable
Using your appliance
1. Filling the water tank
This appliance has been designed to use normal tap water.
Important: Do not use additives! The addition of other
liquids, such as perfume, vinegar, starch, condensation
water from tumble dryers or from air conditioning systems
or chemicals will damage the appliance. Any damage
caused by the use of the aforementioned products will
make the guarantee void!
1 Unplug the iron from the mains.
2 Set the steam regulator (5) to the position .
3 Open the water inlet lid (6).
4 Fill the water tank. Never ll beyond the level mark
for maximum lling (8)!
5 Close the water inlet lid.
Tip: To prolong the optimum steam function, you may mix
tap water with distilled water 1:1. If the tap water in your
district is very hard, mix tap water with distilled water 1:2.
45º
B O S C H
5
Page 6

ºC
2. Heating
Remove any labels or protective covering from the
soleplate (10).
1 Plug in the iron.
2 “SensorSecure” function will be activated and the
indicator lamp (2) will ash.
3 The “TempOK” indicator lamp (1) will ash, indicating
that the iron is heating up. When the iron is ready to
use, the indicator lamp will remain lit continuously.
“i-Temp” technology
This technology sets an appropriate temperature, which is
suitable for all fabrics that can be ironed (symbols
The “i-Temp” technology does not apply to fabrics that
cannot be ironed (symbol
Please check the garment care label for details or try
ironing on a part of the fabric not visible normally.
).
).
3. “SensorSecure” function
After the initial heating, “SensorSecure” function switches
off the iron when it is left unattended, thus increasing
security and saving energy.
1 While the handle is gripped, the iron heats up. The
“SensorSecure” indicator lamp (2) will remain lit
continuously.
2 When the handle is released, the “SensorSecure”
function is activated. The “SensorSecure” indicator
lamp (2) will ash.
B O S C H
6
Page 7

4. Steam settings
The steam regulator (5) is used to adjust the amount of
steam produced when ironing.
Steam setting Steam regulator
High steam ow
Medium steam ow
Dry ironing
Tip: Try to iron the fabrics while they are still damp after
washing. Steam will be generated from the fabrics rather
than the iron.
5. Shot of steam function
shot
Shot of steam can be used to remove stubborn wrinkles
or to press in a sharp crease or pleat.
1 Press the shot of steam button (4) repeatedly with
intervals of at least 5 seconds.
6. Vertical steam
Vertical steam can be used to remove creases from
hanging clothes, curtains etc.
1 Hang article of clothing on a clothes hanger.
2 Operate the iron in a vertical position at a distance of
10 cm / 4 in, and press the shot of steam button (4)
repeatedly with pauses of at least 5 seconds.
Important: If the “SensorSecure” indicator lamp (2)
ashes while ironing in a vertical position, it means that
the handle is not properly gripped and the iron will cool
down.
10 cm / 4 in
B O S C H
7
Page 8

7. Spray
Spray can be used to remove stubborn wrinkles.
1 When ironing, press the spray button (3) and water
will spray out of the spray nozzle (7) onto the
garment.
Tip: Do not use the spray function with silk.
8. After ironing
1 Unplug the iron from the mains socket.
2 Empty the water tank.
3 Switch the steam regulator (5) from to and
back again several times (self- cleaning). Set the
steam regulator to the position
.
4 Set the iron aside in a vertical position on its heel (11)
to cool down.
5 Coil the power cable (12) loosely around the heel of
the iron. Store the iron in an upright position.
Tip: For immediate storage of the iron, you may use the
“StoreProtect ” accessory (see “Accessories” section).
B O S C H
8
Page 9

Cleaning & Maintenance
25ml
Attention! Risk of burns!
E
Always unplug the appliance from the mains
supply before carrying out any cleaning or
maintenance operation on it.
1 If the iron is only slightly soiled, pull out the plug
and allow the soleplate (10) to cool down. Wipe the
housing and the soleplate with a damp cotton cloth
only.
2 To keep the soleplate smooth, you should avoid hard
contact with metal objects. Never use a scouring pad
or chemicals to clean the soleplate.
Descaling systems
AntiCal c
A “self-clean”
Each time you use the steam regulator (5), the “self-clean”
system cleans the mechanism of scale deposits.
B “anti-calc”
The “anti-calc” cartridge has been designed to reduce the
build-up of scale produced during steam ironing.
C “Calc'nClean” function
The “Calc'nClean” function helps to remove scale
particles out of the steam chamber.
If the water in your area is very hard, you may use this
function approximately every two weeks.
1 Set the steam regulator (5) to the position
Unplug the iron from the mains socket.
Tip: For deep descaling, it is recommended to use the
descaling liquid (see “Accessories” section). This
procedure should be carried out every 3 months.
Pour a measure (25 ml) of the descaling uid into the
water tank.
2 Fill the water tank up to the level mark for maximum
lling.
.
45º
B O S C H
9
Page 10

3 Plug in the iron.
4 When the lamp “TempOK” (1) remains lit continuously,
unplug the iron (very important!).
5 Hold the iron over a sink.
6 Press the “clean” button (9) and shake the iron back
and forth keeping it in a horizontal position until
approximately one third of the water capacity of the
tank is evaporated. Boiling water and steam will
come out, carrying scale or deposits that might be
there.
7 Release the “clean” button, and gently shake the iron
for some seconds.
8 Repeat steps 6 and 7.
9 Check carefully that the water tank is empty (very
important!).
10 Plug the iron in and heat it up again until the
remaining water has evaporated.
11 Unplug the iron and let the soleplate cool down. Wipe
the soleplate with a damp cotton cloth only.
Accessories
The accessories may be purchased from the customer
service or specialist shops.
Descaling liquid “StoreProtect”
For deep descaling of the steam iron.
Contents: 4 bottles x 25 ml.
Name of the accessory: TDZ1101 Name of the accessory: TDZ1750
Accessory code: 00311715 Accessory code: 00575960
B O S C H
10
Enables an immediate and safe storage of
the iron, even with a hot soleplate.
Page 11

Trouble shooting
Problem Probable cause Solution
The iron does not
heat up.
Water drips out of the
soleplate when using
the “shot of steam”
function.
Steam does not come
out.
Excessive dripping or
steaming.
Smoke comes out
when connecting the
iron for the rst time.
Deposits come out
through the holes in
the soleplate (10).
If none of the above solves the problem, get in touch with
an Authorised Technical Service.
The “SensorSecure” function
has been activated. The iron
is set to stand-by.
You have pressed the shot of
steam button (4) repeatedly
without waiting for 5 seconds
between each press.
Steam regulator (5 ) is set to
position.
No proper closing of “clean”
button (9).
This may be caused by the
lubrication of some of the
internal parts.
Traces of lime scale are
coming out of the steam
chamber.
Grip the handle of the iron to
re-start it.
Wait 5 seconds between each
press of the shot of steam
button.
Set the steam regulator to a
higher position.
Point the iron away from the
ironing area. Actuate a few times
the “clean” button.
This is normal and will stop after
a few minutes.
Carry out a cleaning cycle (see
“Calc'nClean function” section).
Guarantee conditions
The terms of the guarantee for this
appliance are in accordance with that
stated by our representative for the country
in which it is sold.
The details of these conditions can be
obtained from the retailer from whom the
appliance was purchased. The purchase
receipt must be presented when making
any claims against the terms of this
guarantee.
B O S C H
11
Page 12

Customer Service
Great Britain
Bosch Customer Service
Grand Union House
Old Wolverton Road Milton Keynes
MK12 5PT
001 Sensixx’x DA70 GB EasyComfort 03/16
9001192421
UK +44 (0)344 892 8979
IRL +353 (0)1450 2655
www.bosch-home.co.uk
 Loading...