

Page 1
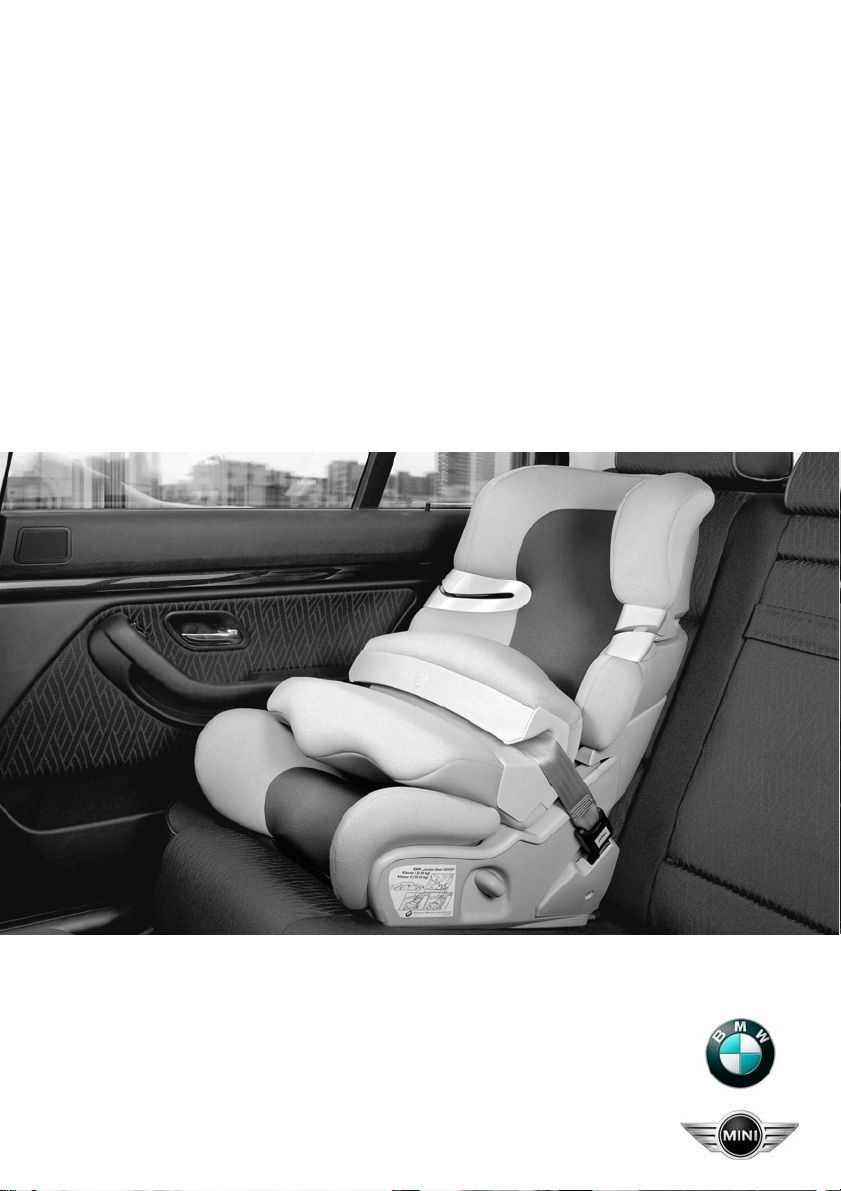
Bedienungsanleitung
Junior Seat ISOFIX
Junior Seat I-II
Junior Seat III
BMW Group
Page 2

Junior Seat ISOFIX
ISOFIX
9-18 kg
9-18 kg
15-25 kg
4
0010 356 Z
Page 3
Junior Seat ISOFIX
2
1
5
13
124
3
11
2221
10
23
9
17Top Tether
6
6
5
14
7
8
15
16
20
18
19
0010 357 Z
Page 4

Junior Seat I
9-18 kg
Junior Seat II
15-25 kg
Junior Seat III
22-36 kg
8
0010 358 Z
Page 5

Junior Seat I-II
1
2
10
9
3
5
6
9
4
6
7
8
0010 359 Z
Page 6

Junior Seat ISOFIX/Junior Seat I-II/Junior Seat III
Operating instructions
Contents
Before use 30
Junior Seat ISOFIX/Junior Seat I-II:
Overview of operating elements 32
Safety instructions for using child restraint systems 33
Use in the car 35
Junior Seat ISOFIX/Junior Seat I-II:
Basic settings 38
Junior Seat ISOFIX for class I (9–18 kg):
Installation with ISOFIX system 39
Removal with ISOFIX system 43
Installation with a three-point automatic-reel belt 44
Junior Seat ISOFIX/Junior Seat I-II for class I (9–18 kg):
Installation with a three-point automatic-reel belt 44
Junior Seat ISOFIX/Junior Seat I-II for class II (15–25 kg):
Installation with a three-point automatic-reel belt 45
Junior Seat III for class III (22–36 kg):
Installation with a three-point automatic-reel belt 46
Care and storage 47
EN
© 2009 BMW AG, Munich/Germany
Reproduction, even in excerpt form, only with the
written consent of BMW AG, Munich.
Printed in Germany on environmentally friendly paper
(bleached without chloride, recyclable).
Subject to printing errors, mistakes and changes.
29
Page 7

Before use
Remarks on the operating
instructions
Please read these operating instructions
carefully before using the child seat.
You should also consult the relevant section
in your car’s owner’s handbook.
When reading the operating instructions, fold
out the parts list. The item numbers in the text
always relate to this illustration:
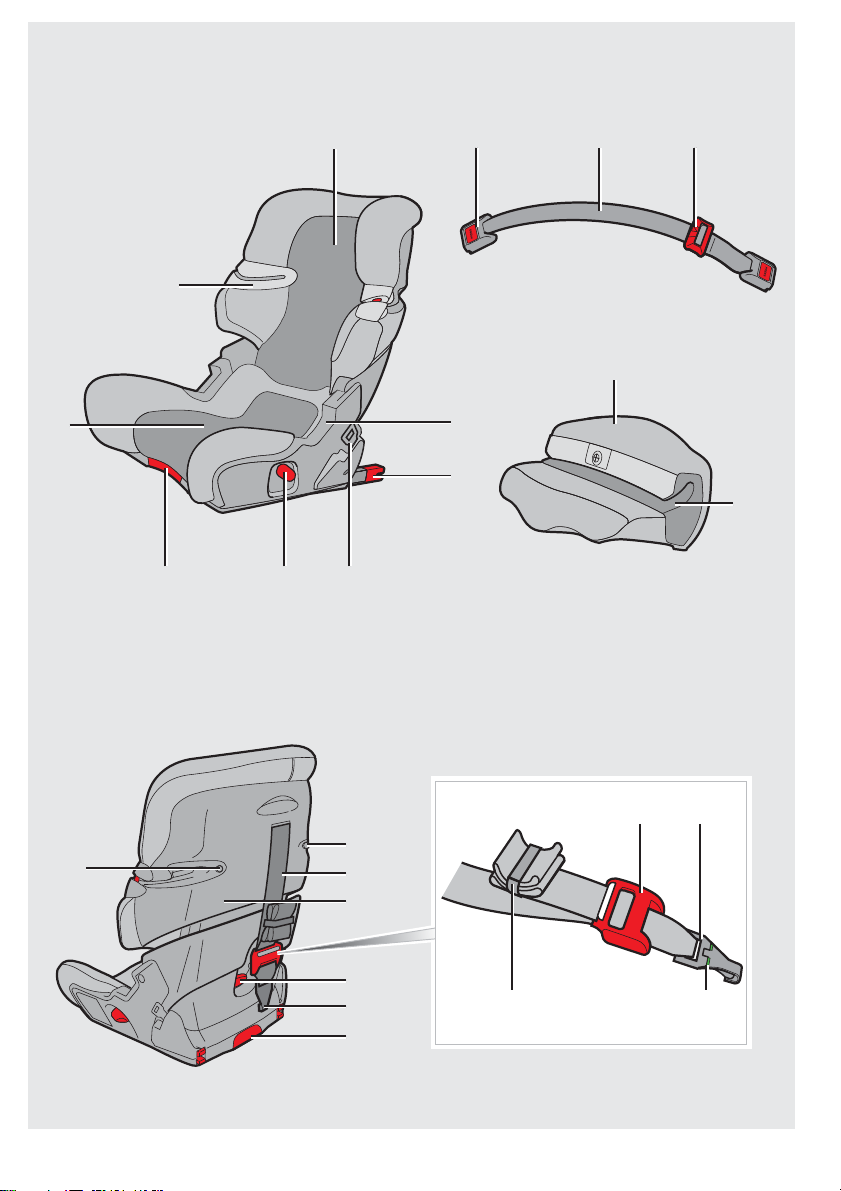
• Junior Seat ISOFIX, see page 5.
• Junior Seat I-II, see page 9.
In order to facilitate easier understanding
of these operating instructions, technical terms and product designations have
largely been avoided. Consequently, the part
designation in these operating instructions
may differ from the part designation in the
manufacturer’s product catalogue.
Symbols used
Denotes instructions or warnings that
you must observe.
Denotes instructions that draw your
attention to special features.
Denotes a movement that must be
completed in the direction indicated by
the arrow.
Denotes the securing of the
Junior Seat with the three-point
automatic-reel belt.
Denotes use of the impact
cushion.
Colours used
The safety belt and the ISOFIX system are
highlighted in colour in these operating
instructions.
•Blue:
Three-point automatic-reel belt
•Red:
Impact cushion strap and ISOFIX system
Legal regulations
The Junior Seat corresponds to the requirements of the law and has a test number in
accordance with the European standard for
child restraint systems (ECE standard).
The E test mark (in a circle) and the approval
number can be found on the orange test label
(sticker) affixed to your child seat.
Relates to measures that help protect
the environment.
Denotes the end of the instruction.
Denotes the securing of the Junior
Seat with the ISOFIX system in size
class B.
B
30
Page 8
ISOFIX system
Approval
ISOFIX is a standard fixing system compliant
with ISO 13216 for child safety systems.
ISOFIX is a stable securing mechanism for
child seats in cars that operates independently
of the vehicle’s seat belt. Two locking arms
with snap locks are used to secure the seat in
place. These engage in the two clips, which
are secured firmly to the car’s frame. The top
tether also functions as a further securing
point and holds the seat in position in the
event of an accident.
The ISOFIX system is intended to help avoid
operating errors.
The BMW Junior Seat ISOFIX can only
be secured using the ISOFIX system for
children of class I (9–18 kg).
Securing with three-point
automatic-reel belt (universal)
Only suitable for use in cars that are
equipped with fixed-installation threepoint automatic-reel belts (compliant with
ECE R16 or equivalent standard).
Junior Seat ISOFIX only:
Securing with ISOFIX + top tether
(universal)
The Junior Seat ISOFIX is a “universal”
child restraint device. It must be additionally secured in place when the ISOFIX system is used using the top tether. Please note
the specifications in your car’s owner’s handbook. The Junior Seat ISOFIX is approved for
ISOFIX size class B.
B
EN
31
Page 9

Junior Seat ISOFIX/Junior Seat I-II:
Overview of operating elements
Junior Seat ISOFIX
1 Shoulder belt guide
2 Back cushion
3 Lap belt guide
4 Locking lever (inclination of the backrest)
5 Seat cushion
6 Fastening screw (back cushion)
7 Backrest
8 Push button (height adjustment of the
backrest)
9 Belt guide (on the impact cushion)
10 Impact cushion
11 Locking arm
12 Buckle tongue
13 Release mechanism (handle with locking
button for retracting the locking arms)
14 Top tether
15 Fastening point (for top tether)
16 Locking arm pull-out mechanism (handle
for pulling out the locking arms)
17 Belt adjuster (on the top tether)
18 Safety hook
19 Colour display for belt tension
20 Velcro fastener
21 Buckle
22 Impact cushion strap
23 Belt adjuster (on the impact cushion strap)
Junior Seat I-II
1 Shoulder belt guide
2 Back cushion
3 Lap belt guide
4 Locking lever (inclination of the backrest)
5 Seat cushion
6 Fastening screw (back cushion)
7 Backrest
8 Push button (height adjustment of the
backrest)
9 Belt guide (on the impact cushion)
10 Impact cushion
Spare parts and accessories
Information on spare parts and accessories
can be obtained from your service partner.
32
Page 10
Safety instructions for using child restraint systems
When using child restraint systems,
you must observe the following safety
measures:
• When using the Junior Seat, you must read
the instructions for use and approvals set out
in these operating instructions.
• Only use the Junior Seat in combination with
a fixed-installation three-point automatic-reel
belt (compliant with ECE R16 or an equivalent
standard).
• The Junior Seat ISOFIX can also be used
with the ISOFIX system.
• Do not make any additions or modifications
to the Junior Seat, since any changes can
reduce the child seat’s protective effects.
• Only use the Junior Seat with fitted seat
covers, since part of the protective effect is
lost if no seat covers are fitted.
• Only use the Junior Seat in combination with
original seat covers, since these form part of
the safety equipment.
• Only use the Junior Seat on the passenger
seat if no passenger airbag is fitted or it has
been disabled.
• Ensure that, when using the Junior Seat
ISOFIX/Junior Seat I-II, the child’s head is
positioned below the upper edge of the seat,
since the seat’s full protective effect cannot
be guaranteed otherwise.
• Ensure that the car seat’s headrests do not
impair the secure installation of the child seat
or your child’s seat position.
• The Junior Seat ISOFIX secured using the
ISOFIX system can only be used for children
of class I (9–18 kg).
• You must also secure the Junior Seat with a
three-point automatic-reel belt or the ISOFIX
system even if the Junior Seat is not being
used.
• Secure luggage and objects inside the car,
otherwise these could injure people in the
event of an accident.
• Protect the Junior Seat from direct sunlight,
since your child could be burned by surfaces
that have been made hot by the sun.
• Secure the Junior Seat so that it is not
trapped or damaged by the front seat or
the car doors.
• Ensure that your child’s head does not go
near the side airbag if your child leans out
of the Junior Seat ISOFIX/Junior Seat I-II.
Otherwise there is a risk of injury should the
side airbag deploy. If necessary, have your
service partner disable the side airbags.
• Ensure that the three-point automatic-reel
belt and the impact cushion strap are not
twisted.
• Never leave your child unattended in the car.
• In the event of an accident, the Junior Seat
is intended to prevent or minimise serious
injury, depending on the type of accident
sustained. If the Junior Seat is damaged or
stressed in an accident, it must be replaced.
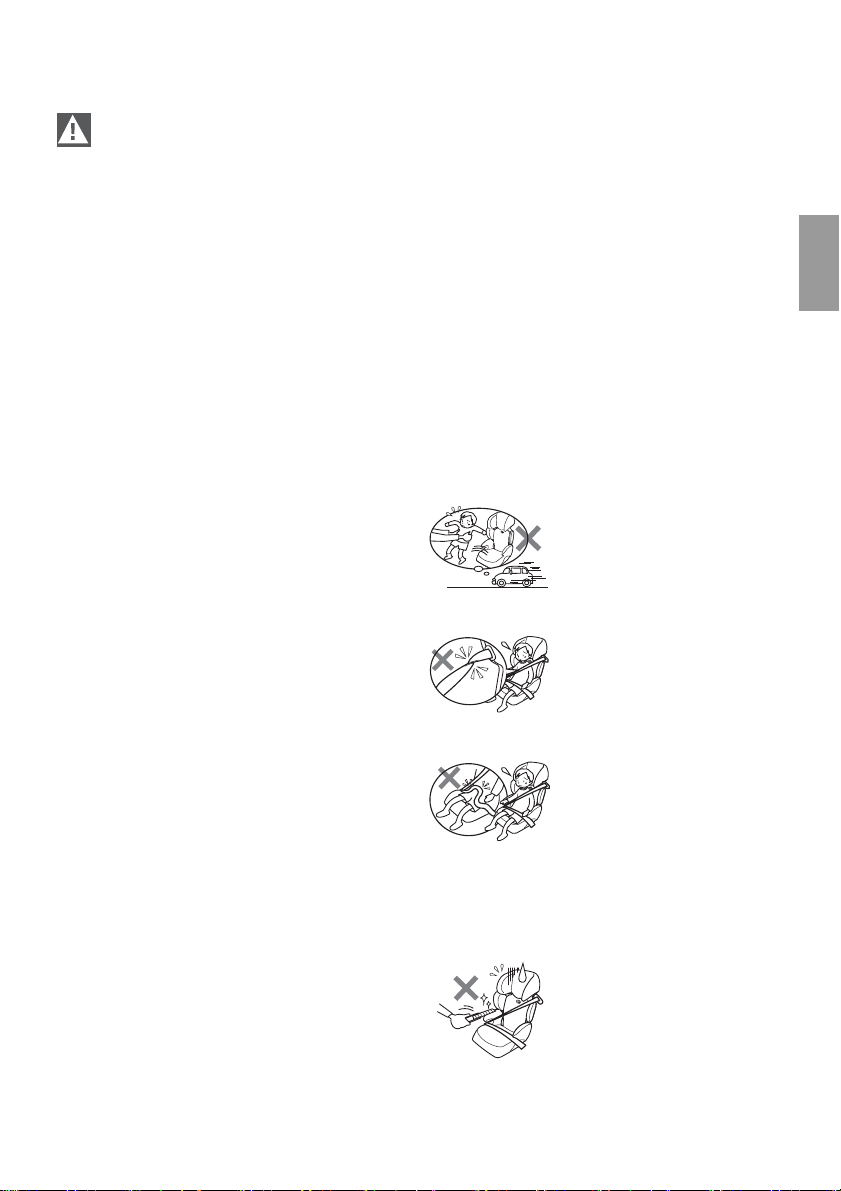
Do not place your child in
the seat while driving, nor
should you remove it from
the seat while driving.
Position the belt securely,
avoiding twisting it, to
buckle the child into the
child seat.
When used without the
impact cushion:
Position the lap belt section
of the three-point
automatic-reel belt low
down to protect your child’s pelvis. Should the
strap run across the abdomen, there is a risk of
the child being crushed in the event of an
accident.
Do not damage or cut the
strap with knives or sharp
objects. If the strap is
damaged or cut, the full
protective effect of the
Junior Seat cannot be guaranteed.
EN
33
Page 11
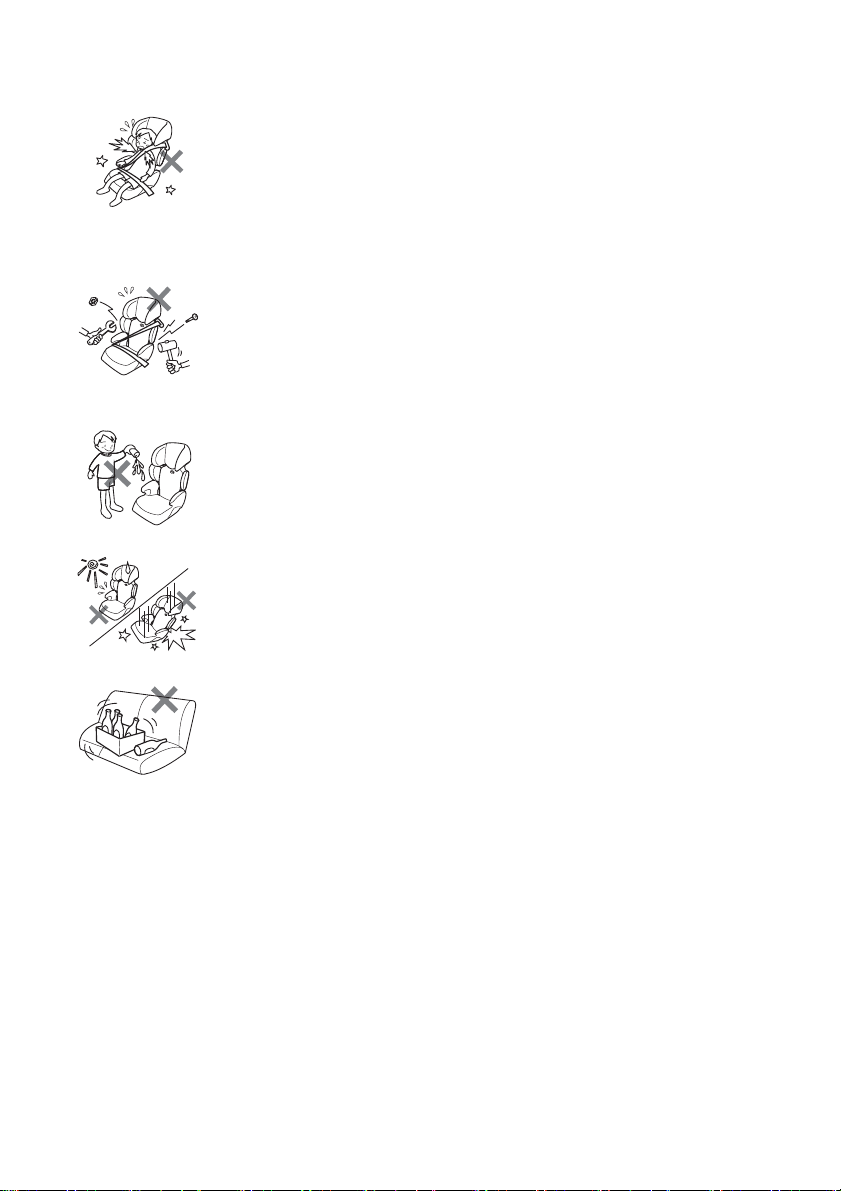
If the shoulder belt section
of the three-point automatic-reel belt runs over
the child’s neck, there is
a risk that the child’s neck
could be crushed. Ensure that the belt does
not run over your child’s neck.
Do not dismantle the child
seat in any way other than
that described in the
operating instructions and
do not replace any parts
with materials other than those specified.
The child seat is made from
sensitive parts. Ensure that
no water or juice is spilt on
it. This could impair the
functioning of the parts.
Do not allow the child seat
to sit in unshaded sunlight
and do not subject it to any
severe shocks or bumps.
Do not leave any sharp or
heavy objects in the car that
could injure passengers.
n an accident, these objects
I
could seriously injure
passengers and children.
34
Page 12
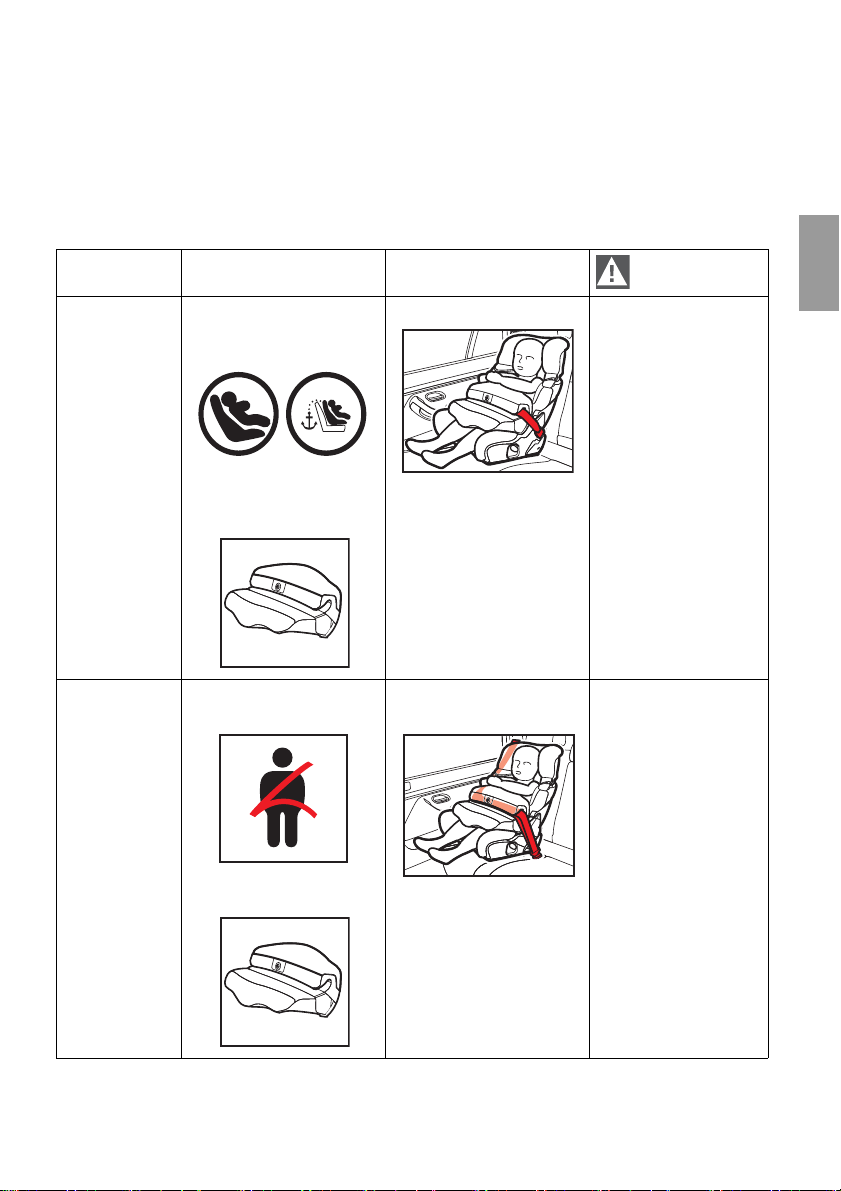
Use in the car
The ECE Directive test label is affixed to the
child seat.
The permissible use of the Junior Seat child seat as a child restraint system is described below.
Class I (9–18 kg)
Junior Seat
ISOFIX
Junior Seat
ISOFIX/
Junior Seat I-II
Securing the child seat Securing the child
ISOFIX-System + top
tether
Size class B
Impact cushion strap • The ISOFIX system is
B
Impact cushion
Three-point automaticreel belt
Impact cushion
Three-point automaticreel belt
Special features
EN
permitted only for
children weighing up
to 18 kg.
• If installed on the
passenger seat, the
passenger airbag
must be disabled!
•The seat must only
be installed in
conjunction with the
top tether.
• If installed in the
middle position on
the back seat, the
middle seat must be
equipped with a
three-point
automatic-reel belt.
• If installed on the
passenger seat, the
passenger airbag
must be disabled!
35
Page 13
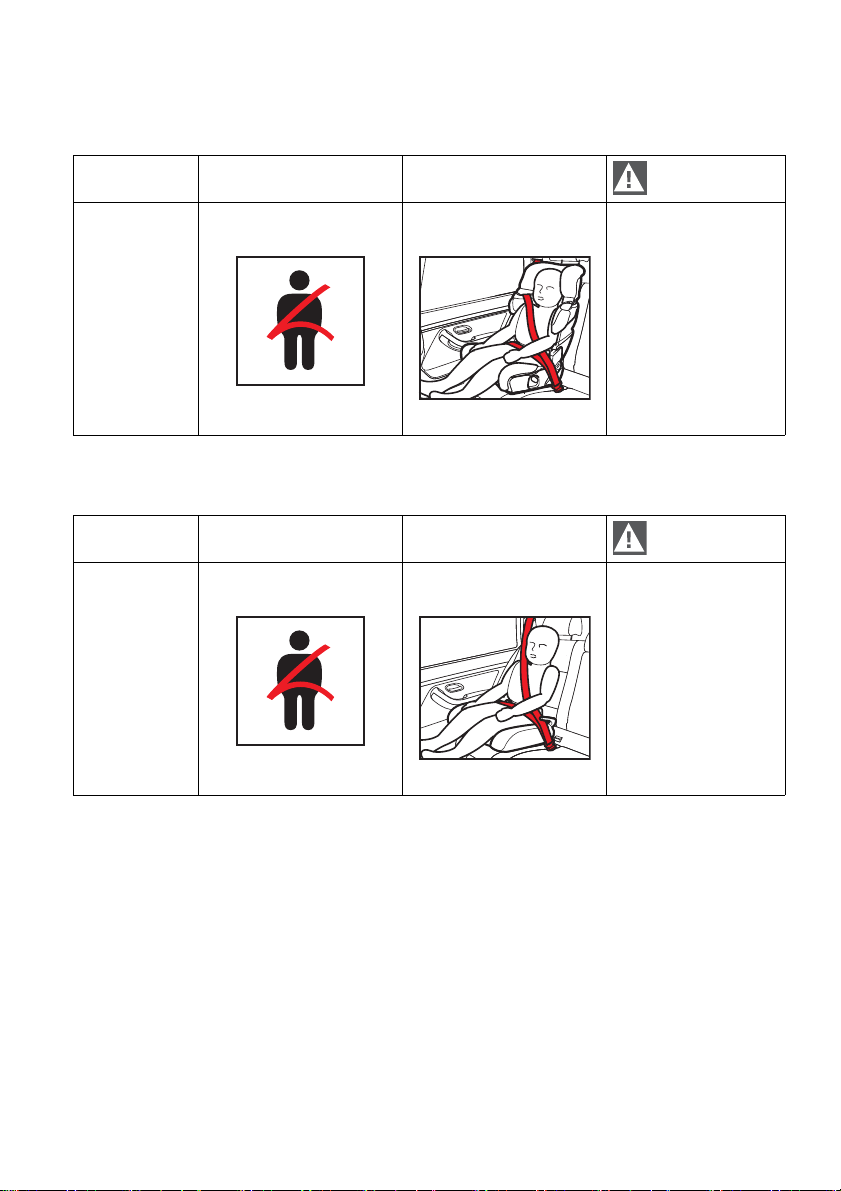
Class II (15–25 kg)
Securing the child seat Securing the child
Junior Seat
ISOFIX/
Junior Seat I-II
Three-point automaticreel belt
Class III (22–36 kg)
Securing the child seat Securing the child
Junior Seat III Three-point automatic-
reel belt
Three-point automaticreel belt
Three-point automaticreel belt
Special features
• If installed in the
middle position on
the back seat, the
middle seat must
be equipped with
a three-point automatic-reel belt.
• If installed on the
passenger seat, the
passenger airbag
must be disabled!
Special features
• If installed in the
middle position on
the back seat, the
middle seat must
be equipped with
a three-point automatic-reel belt.
• If installed on the
passenger seat, the
passenger airbag
must be disabled!
36
Page 14
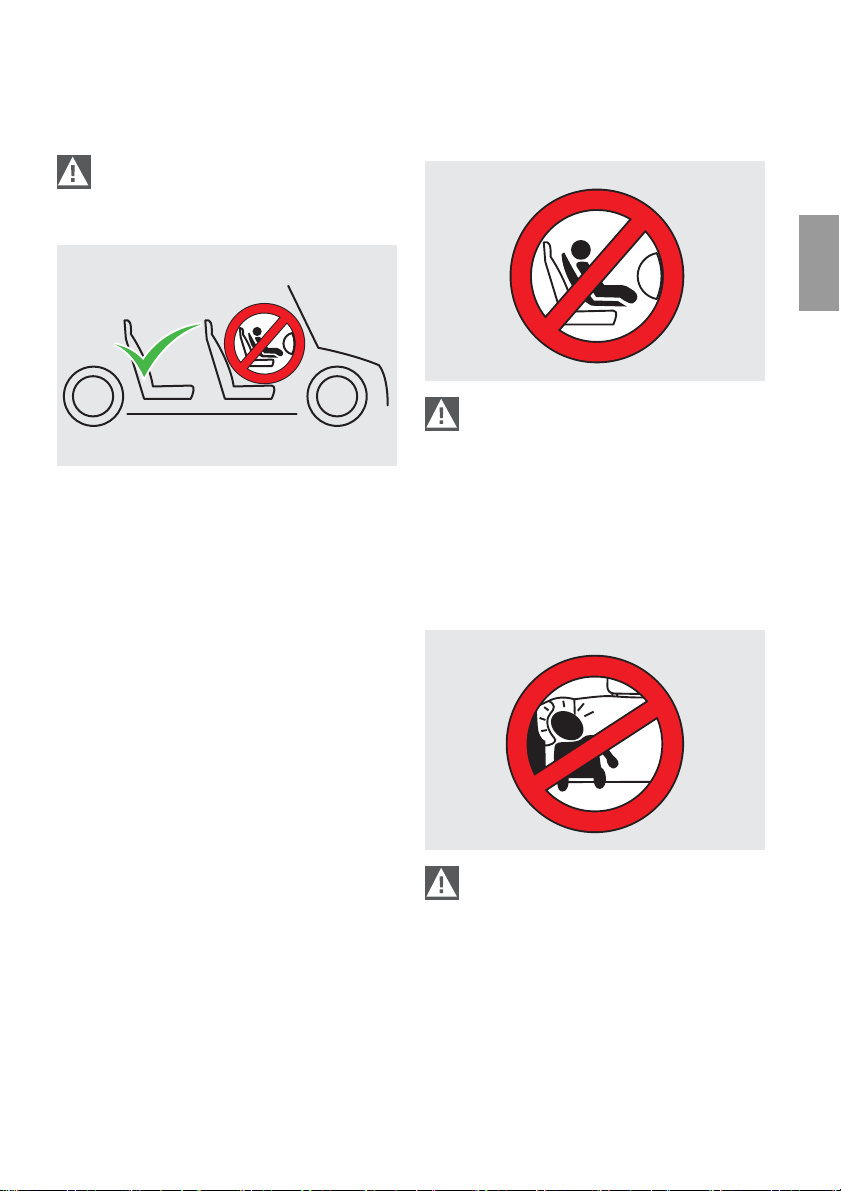
Positioning in the car
A
I
R
B
A
G
Please note that your child’s safety
depends partly on the position of the
child seat in the car.
All seats in your car that are equipped with a
three-point automatic-reel belt are in principle
suitable for fitting the Junior Seat in.
Use on the passenger seat
B
A
R
I
A
Should, in exceptional cases, the child
seat be installed on the passenger seat,
the front airbag on the passenger side must be
disabled.
Detailed information about this can be obtained
’
from your car
service partner.
s owner’s handbook or from your
G
EN
0010 004 Z
The best and most secure place for installation
is the outer seats at the back of the car, since
these are usually already equipped with ISOFIX
mountings and three-point automatic-reel belts.
Use with side airbag
R
I
A
B
E
D
I
S
When using the Junior Seat ISOFIX/
Junior Seat I-II:
If your car has side airbags, ensure that your
child’s head is nowhere near them.
You can obtain detailed information on this
from your service partner.
A
G
0010 040 Z
37
Page 15
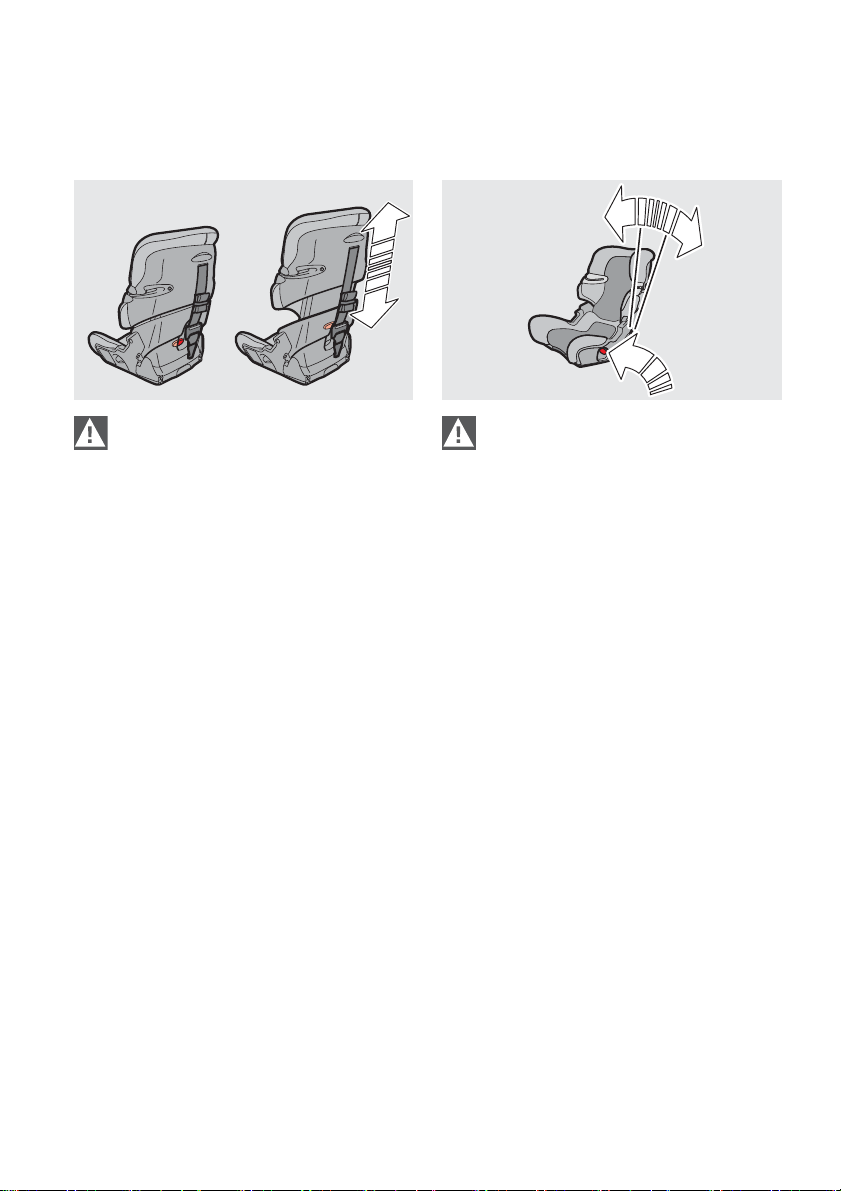
Junior Seat ISOFIX/Junior Seat I-II:
0010 007 Z
0010 008 Z
Basic settings
Adapting the child seat to the size
of the child
The child’s head must under no circum-
stances jut out above the upper edge
of the backrest (7), since otherwise the full
protective effect of the child seat cannot be
guaranteed.
Before installation, the child seat must be
adapted to the size of your child:
1. Press the push button (8) for the height
adjustment firmly in.
2. Select the setting so that your child’s head
does not jut out above the upper edge of
the backrest (7).
3. Check that the push button (8) has
engaged.
Adjusting the inclination of the
backrest
Ensure that the locking lever (4) on the
left and right is fully engaged.
The backrest (7) can be set to two different
inclinations.
To change the inclination, proceed as follows:
1. Release the lock by pushing the locking
lever (4) forward on the left or right side
of the child seat.
2. Select the preferred inclination by tilting
the backrest (7) forwards or backwards.
The locking lever engages when one of the
two inclination positions is reached.
3. Check that the locking levers (4) on the left
and right are fully engaged.
38
Page 16
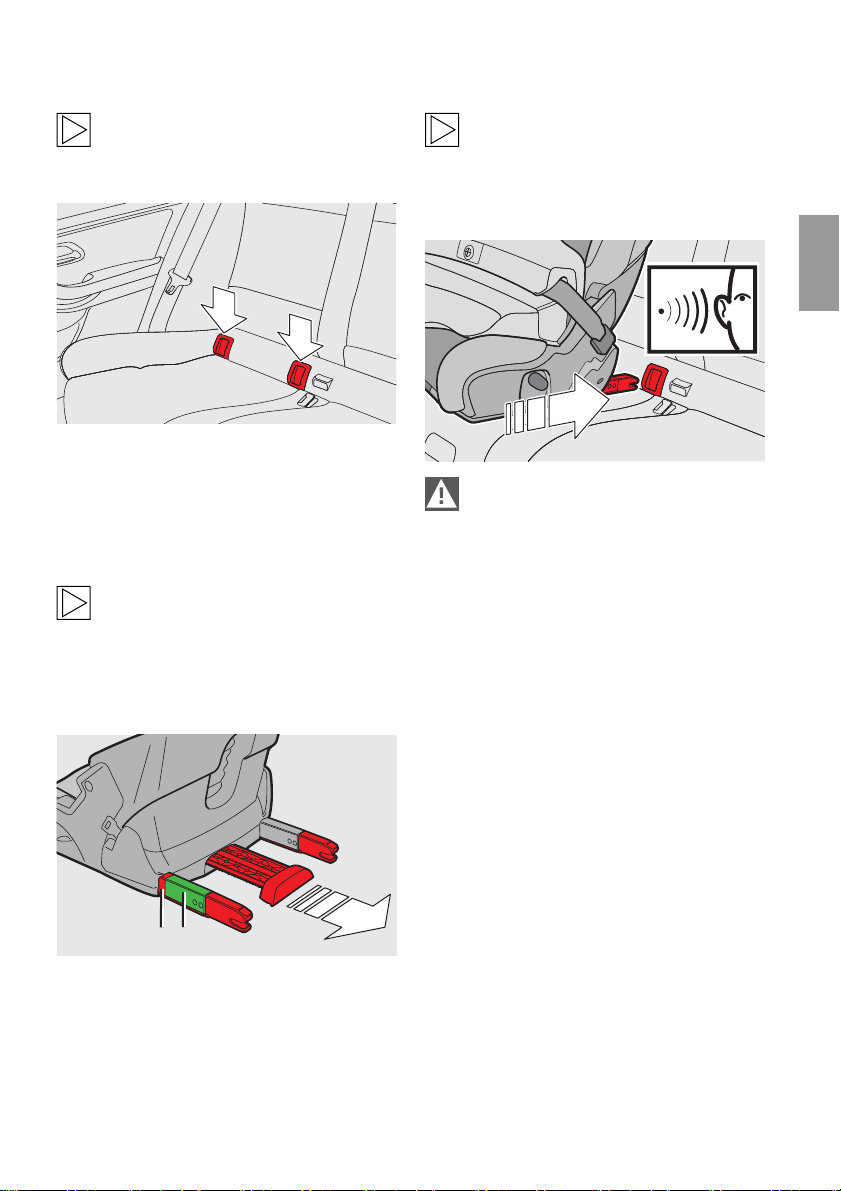
Junior Seat ISOFIX for class I (9–18 kg):
0010 006 Z
B
A
Installation with ISOFIX system
More information about the ISOFIX
mounts can be found in your car’s
owner’s handbook.
Your car has two ISOFIX mounts on each outer
seat in the back.
On some car models, the passenger seat is
also equipped with ISOFIX mounts. Installation
on the passenger seat is performed in the
same way as on one of the rear seats.
When you buy the Junior Seat, have
your service partner show you how it
is installed.
Preparing the ISOFIX system
Repeat the process if necessary until
the locking arms (11) remain extended.
Installing the child seat
If necessary, remove any objects between the car seat and the backrest (7)
of the child seat.
1. Place the child seat in the required seat in
the car and guide the locking arms (11) into
the ISOFIX mounts.
A special safety mechanism (Interlock) draws
in the locking arms (11) when the two locking
arms (11) are locked into the ISOFIX mounts.
2. Push the child seat firmly and with even
pressure against the car seat’s backrest.
The locking arms (11) will audibly and loudly
engage. The child seat is now securely fixed
to the car and cannot be moved.
EN
• Pull the locking arm pull-out (16) outwards
until the locking arms (11) remain extended.
If there are two-colour markings on the
locking arms (11), the red area (A) and the
green area (B) are now visible.
39
Page 17
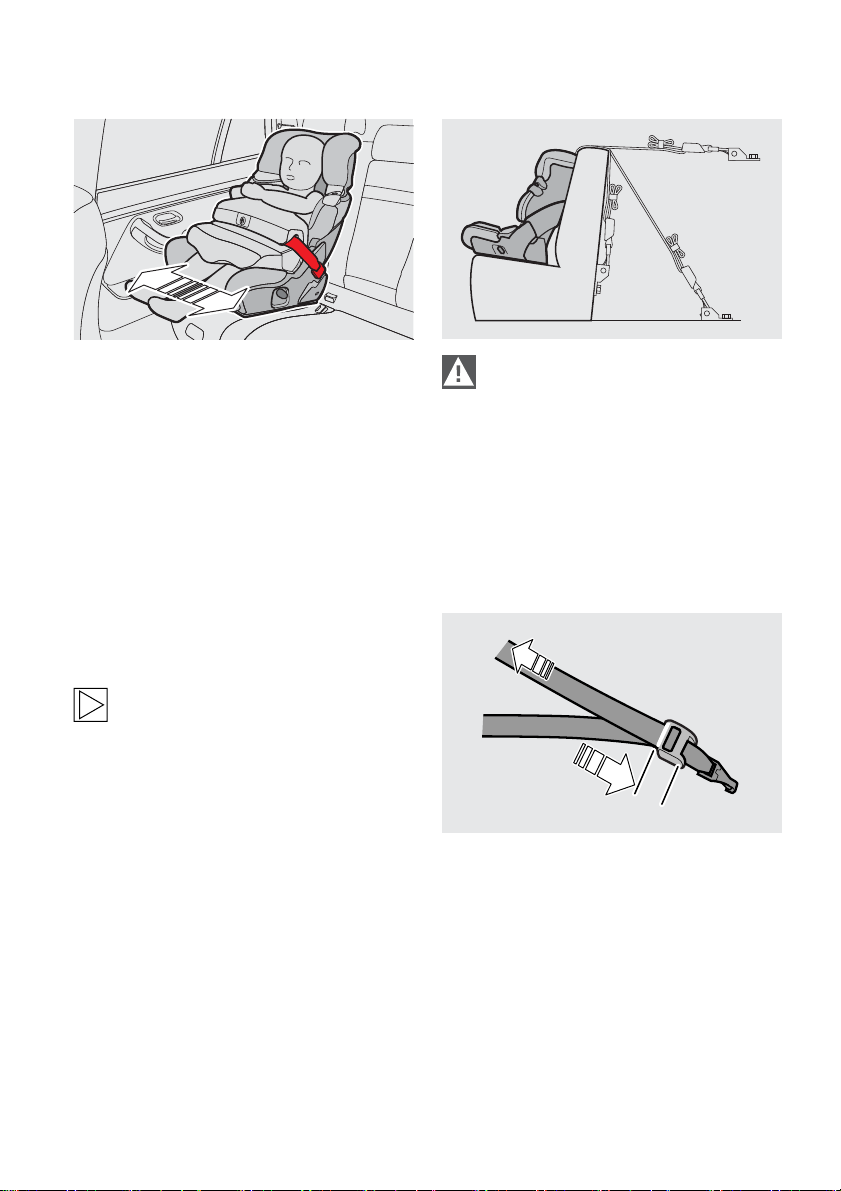
3. Shake the child seat roughly to ensure that
0010 023 Z
0010 086 Z
it is securely attached.
The child seat has been correctly installed if
it lies firmly against the rear seat backrest.
If the locking arms (11) have two-colour
markings, only the green area (B) should
now be visible.
If the child seat can still be moved or the red
area (A) is visible:
4. Push the child seat more firmly against the
car seat’s backrest.
Attaching the top tether
More information about the top tether
securing point in your car can be
obtained from your car’s owner’s handbook.
Only secure the top tether to the securing
point provided specifically for this purpose by
the vehicle manufacturer. If in doubt, consult
your service partner.
Ensure that the top tether (14) is not
twisted.
Ensure that the belt adjuster (17) cannot be
released, for instance by objects in the
luggage compartment.
Your car features a securing point for the top
tether (14). Depending on the type of car, this
is located either on the rear parcel shelf, at the
rear of the seat back or on the floor in the
luggage compartment.
1. Press the belt adjuster (17) together and
extend the top tether (14) by the length
required.
2. Guide the top tether (14) between the seat
back and the headrest through to the
securing point on the car.
3. Secure the safety hook to the securing
point provided for it.
4. Pull the loose end of the top tether (14)
tight.
40
Page 18
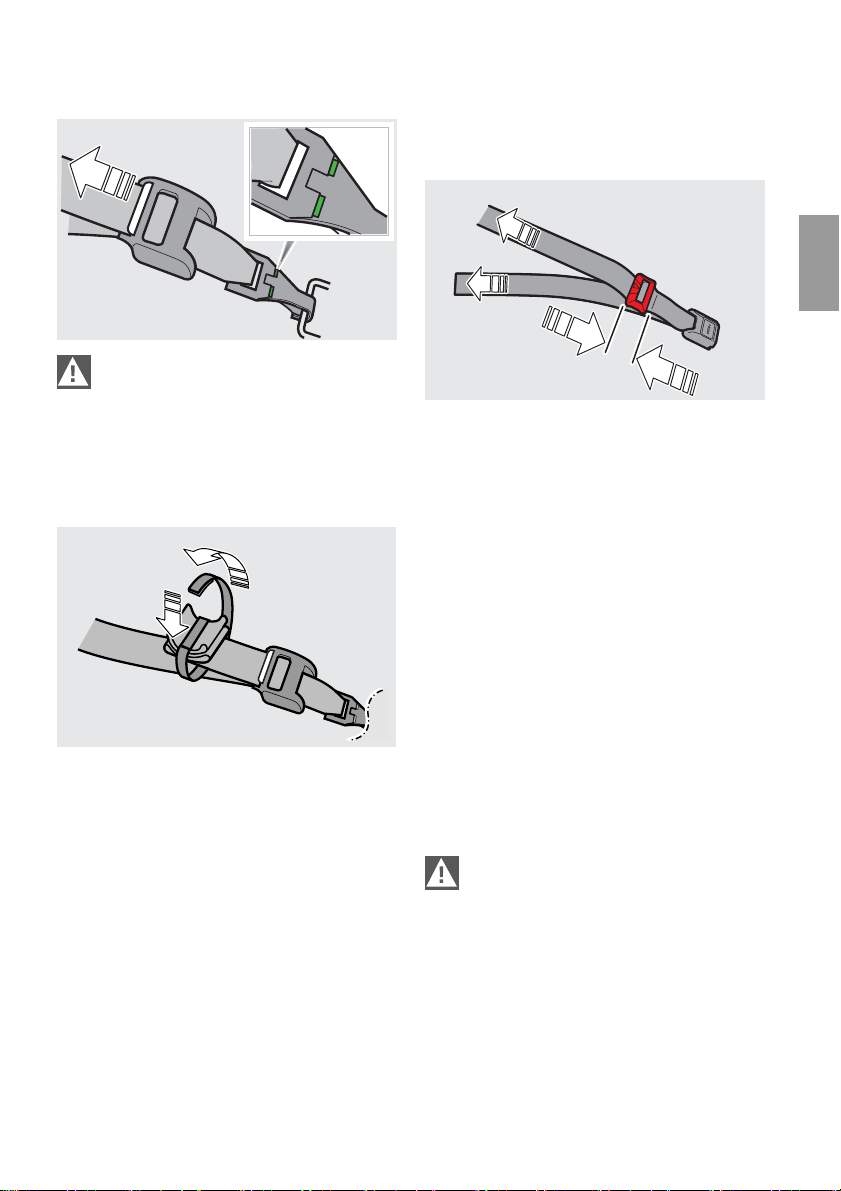
A tension display is fitted to the top of
0010 089 Z
the safety hook (18). The top tether
(14) is not correctly fitted until the colour
display (19) for the belt tension is green.
5. Pull the top tether (14) tight enough for the
colour display (19) to show a green strip.
Modifying the length of the impact
cushion strap
EN
0010 012 Z
Depending on the height and weight of your
child, you may need to lengthen or shorten the
impact cushion strap (22).
1. Release the impact cushion strap (22) from
the child seat by pressing the red button
on the belt buckle (21).
2. Push the belt adjuster (23) together.
The locking device opens.
3. Pull the impact cushion strap (22) towards
the belt buckle (21) to shorten it or in the
opposite direction to lengthen it.
6. Fold the loose end of the top tether (14)
into a fan.
7. Secure the loose end of the top tether (14)
with Velcro fastener (20).
Securing the child with the impact
cushion strap
1. Place the child in the child seat and position the impact cushion (10) in the child’s
lap.
Ensure that the impact cushion
strap (22) is not twisted.
2.
Guide the impact cushion strap (22) through
the belt guide (9) on the impact cushion (10)
and push the belt buckles (21) on the right
and left into the buckle tongues (12) until
they engage in the child seat.
The belt buckles (21) audibly lock into place.
3. Check that both belt buckles (21) are
secure.
41
Page 19
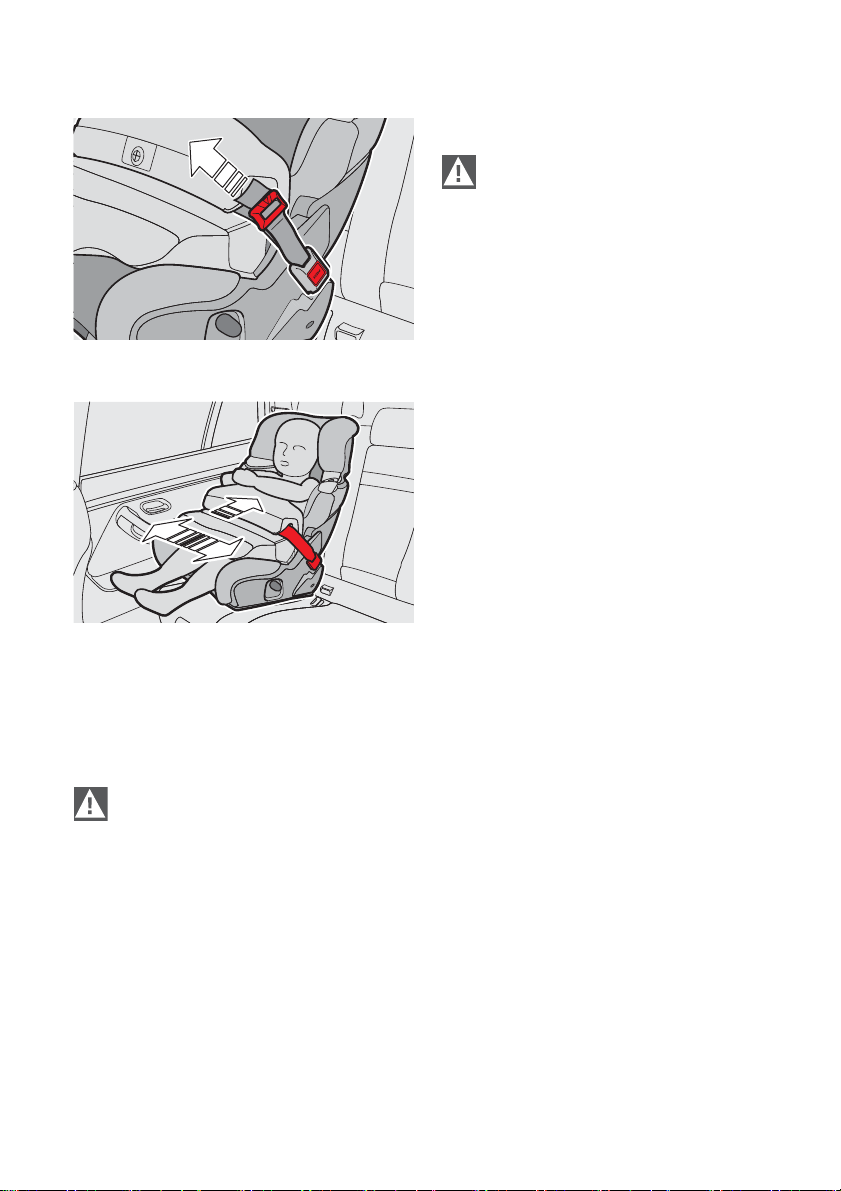
Unbuckling the child
The child seat must remain secured in
the car even if there is no child actually
in the car.
4. Pull the impact cushion strap (22) taut.
5. Push the impact cushion (10) by jiggling it as
close as possible to the child’s body and
then retighten the impact cushion strap (
This keeps the strap excess (free space
between the strap and the body) as minimal as
possible.
The closer the impact cushion (10) is
to the child’s body, the greater the
protective effect.
22
Press the red button on the belt buckle (21)
1.
and remove the impact cushion strap (22).
2. Remove the impact cushion (10) and take
your child out of the child seat.
3. Secure the impact cushion (10) back in
place with the impact cushion strap (22).
).
42
Page 20
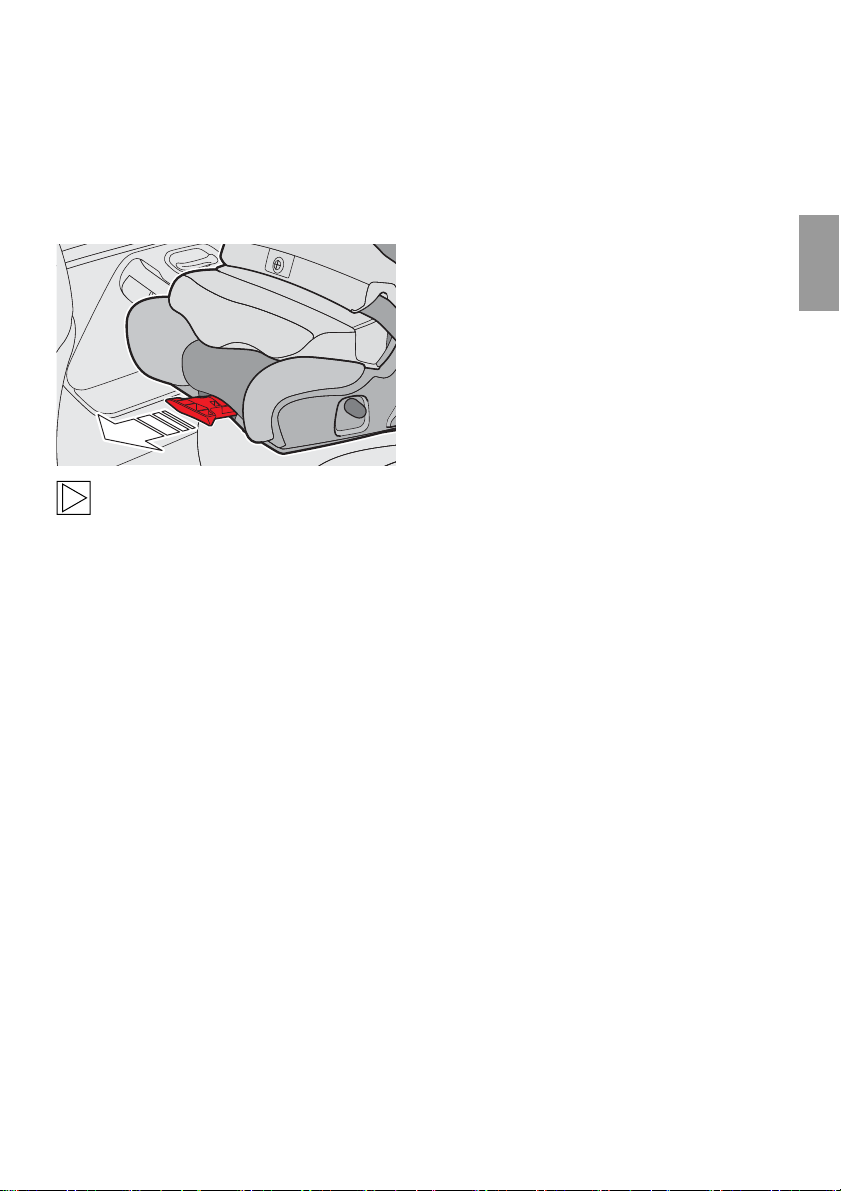
Junior Seat ISOFIX for class I (9–18 kg):
Removal with ISOFIX system
1. Open the belt adjuster (17) on the top
tether (14) and pull the top tether (14)
to lengthen it.
2. Release the safety hook (18) from its
securing point in the car.
0010 013 Z
The release mechanism (13) has
a locking button below the handle.
3. Push the locking button below the release
mechanism (13) to release the lock.
4. Pull the release mechanism (13).
The ISOFIX mechanism is unlocked and the
locking arms (11) are retracted into the child
seat.
EN
5. Remove the child seat, including the
impact cushion (10) and impact cushion
strap (22) from the car.
6. Fold the loose end of the top tether (14)
into a fan.
7. Secure the loose end of the top tether (14)
with Velcro fastener (20).
8. Hang the top tether (14) in the fastening
point (15) on the child seat.
43
Page 21
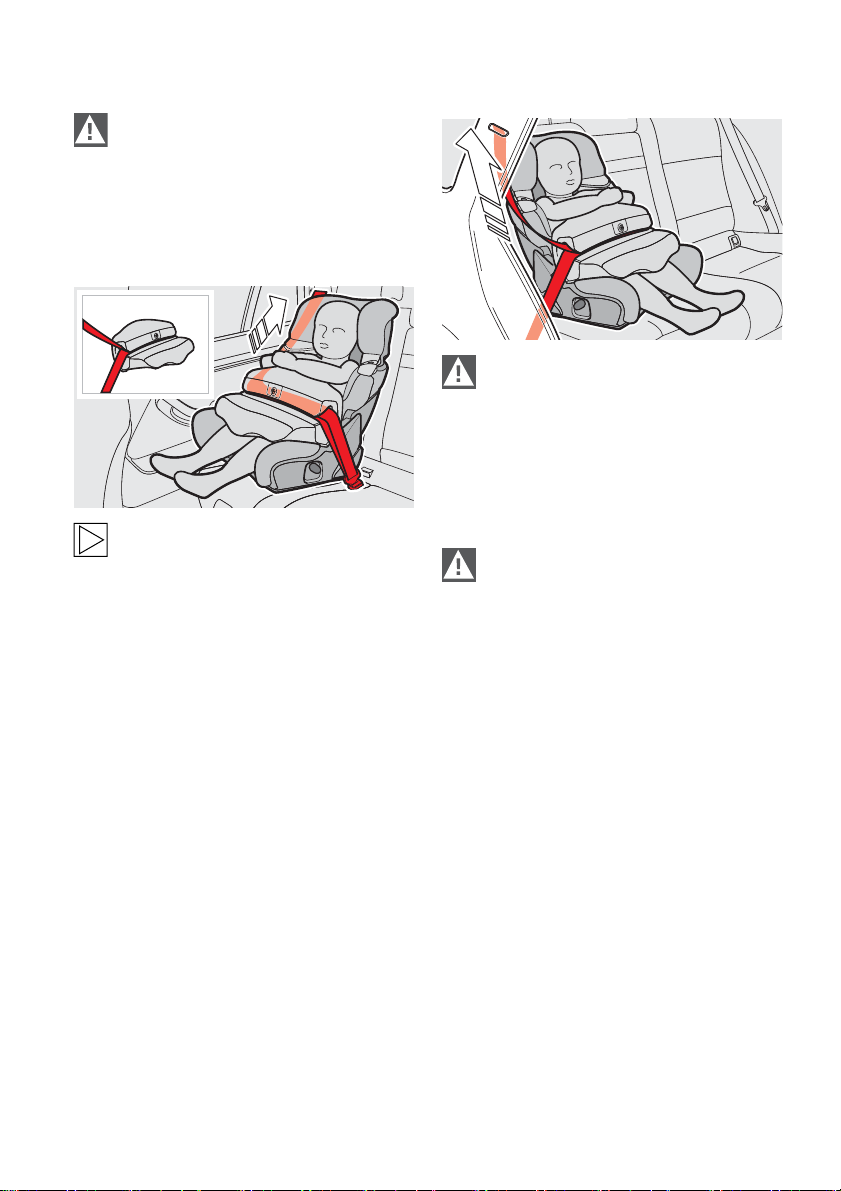
Junior Seat ISOFIX/Junior Seat I-II for class I (9–18 kg):
Installation with a three-point automatic-reel belt
Only use the Junior Seat in combination
with a fixed-installation three-point
automatic-reel belt (compliant with ECE R16
or an equivalent standard).
Ensure that the three-point automatic-reel belt
only runs over the guides marked in red on the
child seat and impact cushion.
Ensure that the three-point automaticreel belt is not twisted.
5. Guide the shoulder and lap strap sections
of the three-point automatic-reel belt
through the belt guide (9) to the impact
cushion (10).
6. Push the buckle tongue into the car’s belt
When using the child seat without the
ISOFIX system, the child seat and the
child must be secured in place with the car’s
three-point automatic-reel belt.
buckle until it engages.
The closer the impact cushion (10) is
to the child’s body, the greater the
protective effect.
1. Junior Seat ISOFIX only:
Hang the top tether (14) in the fastening
point (15) on the child seat.
2. Adapt the height of the backrest (7) to the
child’s requirements (see section
Seat ISOFIX/Junior Seat I-II: Basic settings”).
3. Position the child seat in the required place
in the car.
4. Place the child in the child seat and
position the impact cushion (10) in the
child’s lap.
44
“Junior
7. Pull the three-point automatic-reel belt
taut.
Should, in exceptional cases, the belt length
available for securing the impact cushion not
be sufficient, this belt must be replaced with
a longer belt by your service partner.
Page 22
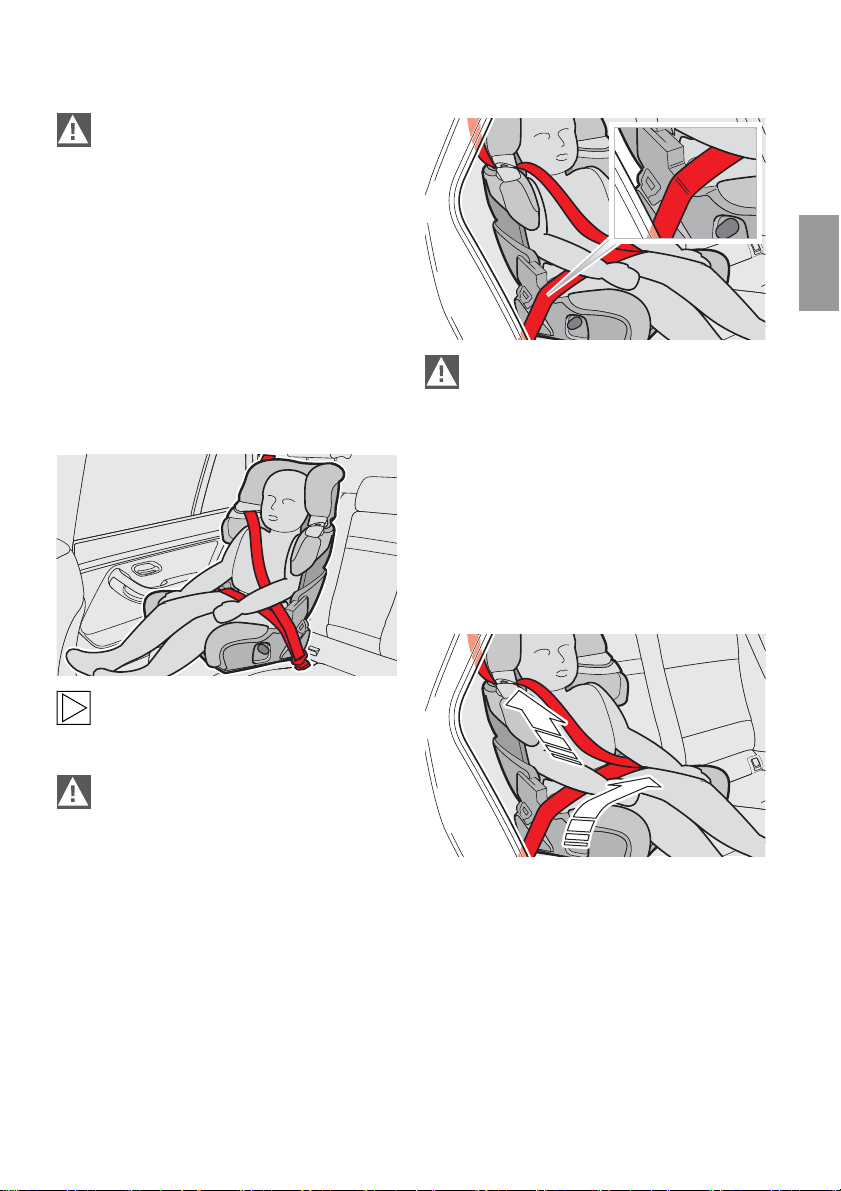
Junior Seat ISOFIX/Junior Seat I-II for class II (15–25 kg):
Installation with a three-point automatic-reel belt
When the Junior Seat for children of
class II (15–25 kg) is used, the use of
the ISOFIX system is not permitted.
Only use the Junior Seat in combination with
a fixed-installation three-point automatic-reel
belt (compliant with ECE R16 or an equivalent
standard).
Ensure that the three-point automatic-reel belt
only runs over the guides marked in red on the
child seat.
If the shoulder section of the three-point automatic-reel belt runs over the child’s shoulder
area, ensure that the three-point automaticreel belt is positioned around two finger
breadths away from the neck.
Ensure that the three-point automaticreel belt is not twisted.
5. Guide the shoulder section of the threepoint automatic-reel belt through the left
or right shoulder belt guide (1) on the child
seat.
6. Guide the lap section of the three-point
automatic-reel belt through the lap belt
guides (3) on the child seat.
7. Push the buckle tongue into the car’s belt
buckle until it engages.
EN
If used without the ISOFIX system, the
seat is secured solely with the car’s
three-point automatic-reel belt.
Select the height of the backrest so that
the shoulder section of the three-point
automatic-reel belt runs above your child’s
shoulder.
1. Junior Seat ISOFIX only:
Hang the top tether (14) in the fastening
point (15) on the child seat.
2. Adapt the height of the backrest (7) to the
child’s requirements (see section
Seat ISOFIX/Junior Seat I-II: Basic settings”).
3. Position the child seat in the required place
in the car.
4. Place the child in the child seat.
“Junior
8. Pull the three-point automatic-reel belt
taut.
45
Page 23
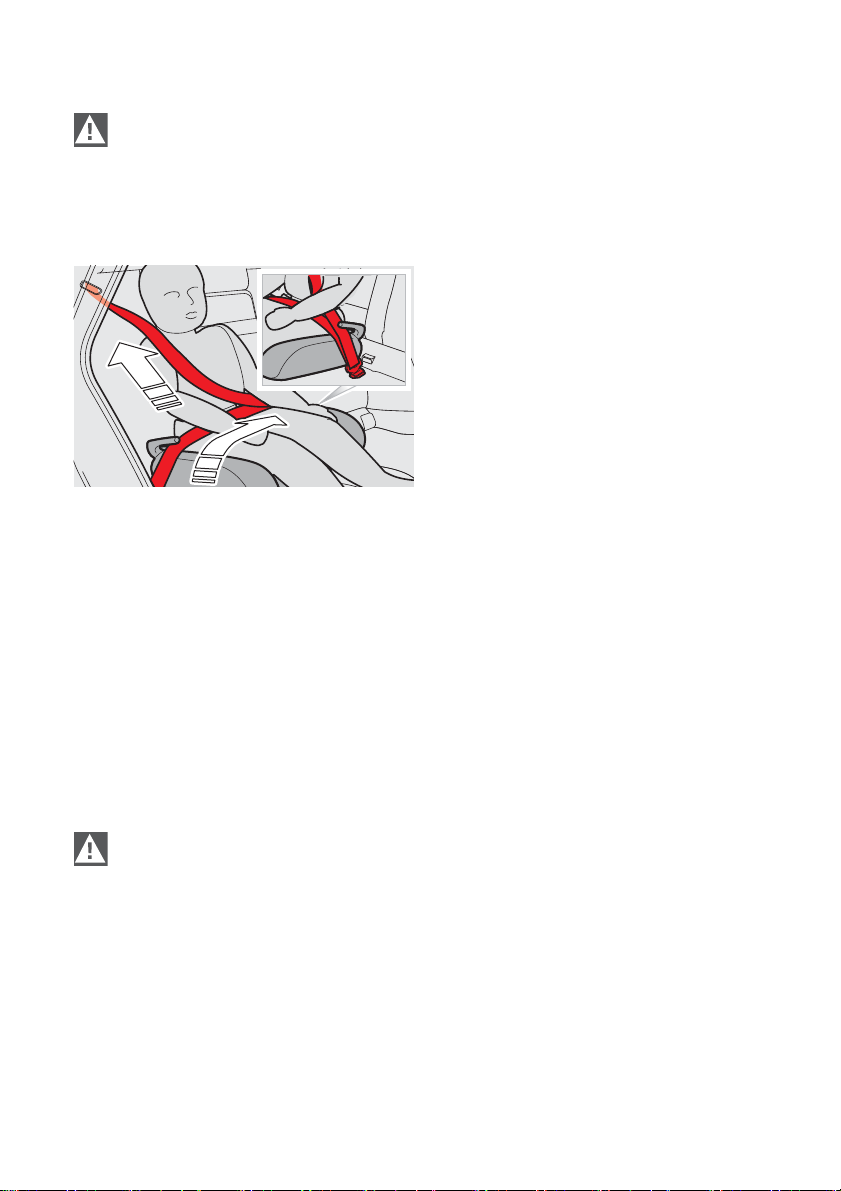
Junior Seat III for class III (22–36 kg):
Installation with a three-point automatic-reel belt
Only use the Junior Seat III in combina-
tion with a fixed-installation three-point
automatic-reel belt (compliant with ECE R16
or an equivalent standard).
Ensure that the three-point automatic-reel belt
is not twisted.
1. Position the Junior Seat III on the required
seat in the car.
2. Place the child on the Junior Seat III.
3. Guide the lap section of the three-point
automatic-reel belt through below the left
and right belt guides.
4. Guide the shoulder section of the three-
point automatic-reel belt over your child’s
shoulder. Ensure that the three-point
automatic-reel belt runs approximately two
finger breadths away from the child’s neck.
5. Push the buckle tongue into the car’s belt
buckle until it engages.
6. Pull the three-point automatic-reel belt
taut.
The closer the three-point automatic-
reel belt is to the child’s body, the
greater the protective effect.
46
Page 24
Care and storage
0010 015 Z
0010 017 Z
Only use the Junior Seat with original
covers or seat covers approved by the
manufacturer, since these form an important
part of the safety equipment.
Never use the Junior Seat without seat covers,
since otherwise the protective effect will be
lost.
The child seat covers are washable.
Wash the covers in accordance with the sewnon care label (inside).
Clean the plastic parts with commerciallyavailable household cleaners.
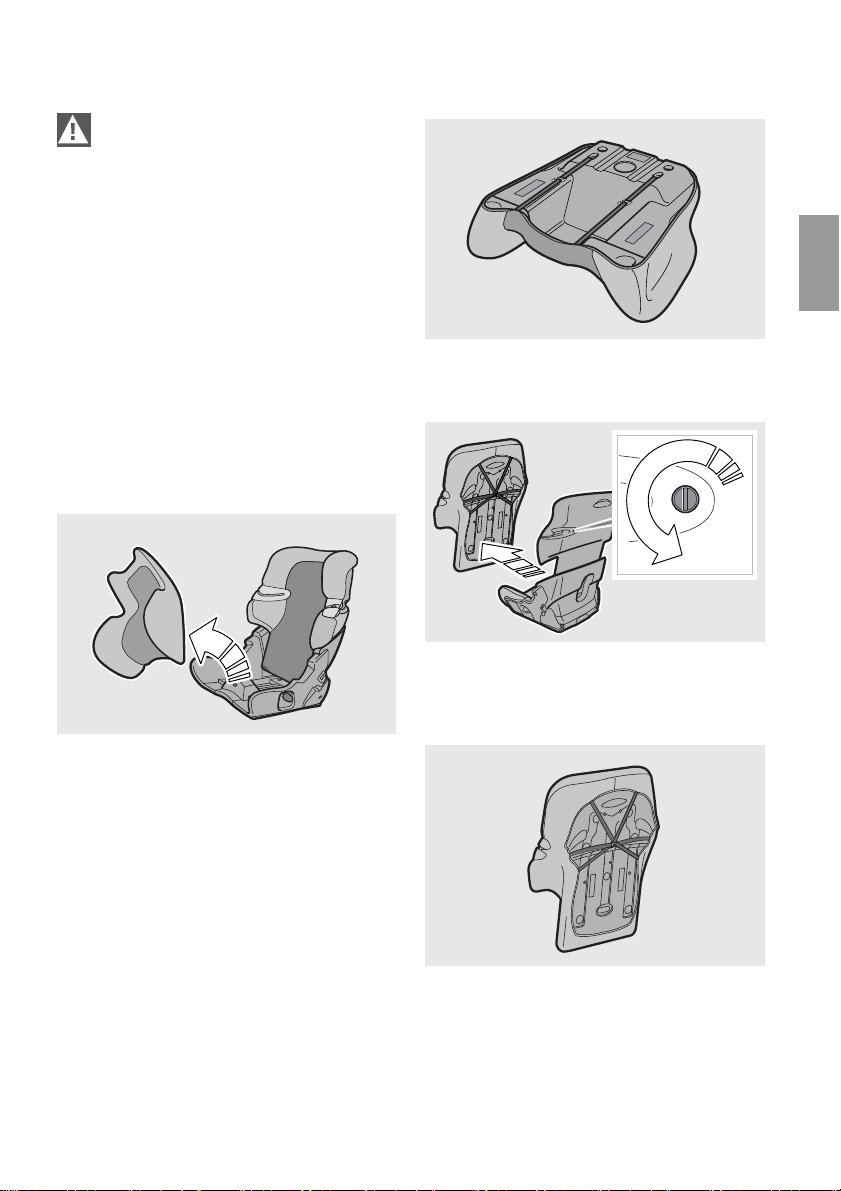
Removing the covers
1. Pull the seat cushion (5) forward and
outwards at an angle.
EN
2. Release the retaining straps and pull the
cover away from the cushion.
3. Remove the back cushion (2) by loosening
the screws (6) on the shoulder belt guides
(1).
0010 014 Z
4. Release the retaining straps on the hook
and pull the cover away from the cushion.
47
Page 25
Cleaning the impact cushion
Disposal
Wash the cover of the impact cushion (10)
with a soft brush and commercially-available
detergent.
Storing the Junior Seat
Store the Junior Seat in a dry place and
protect it from dust and direct sunlight.
Junior Seat ISOFIX
Always store the Junior Seat ISOFIX
with its locking arms (11) retracted.
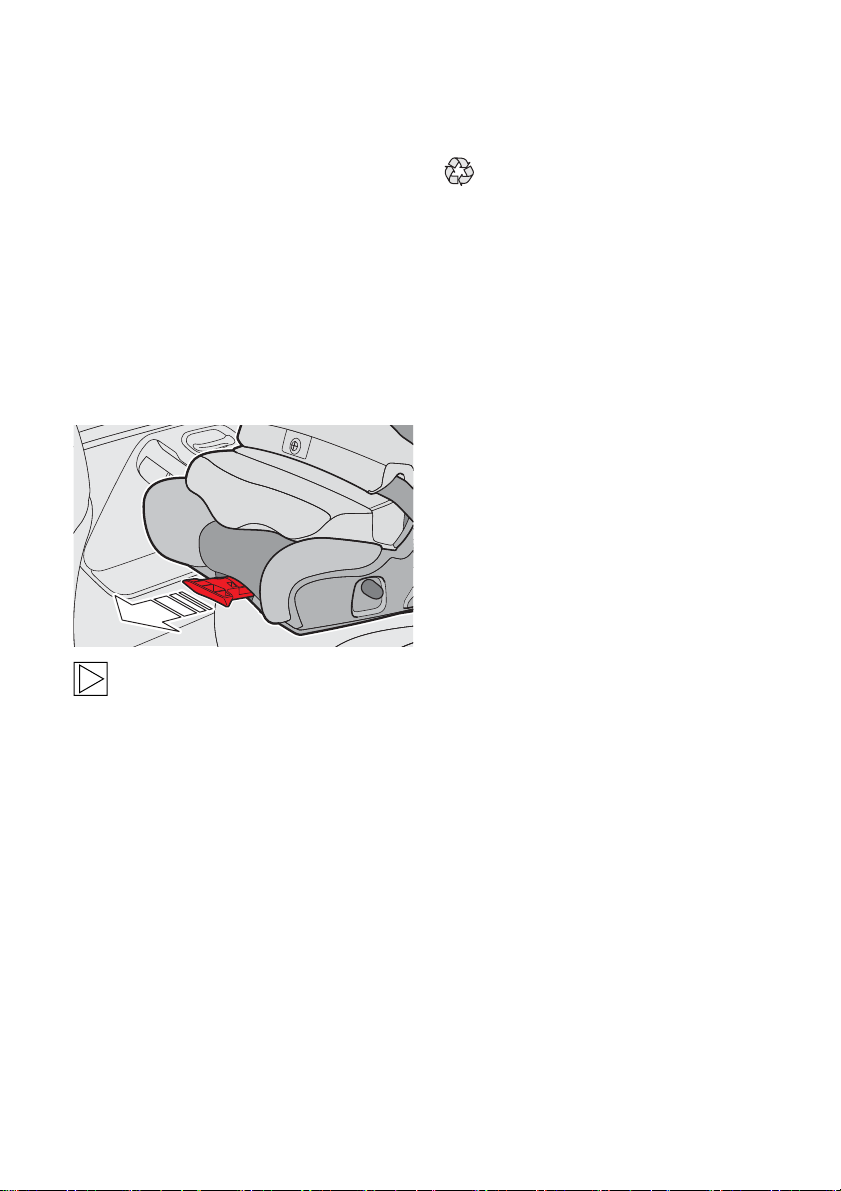
Should the locking arms (11) be extended:
• Pull the release mechanism (13).
The locking arms (11) are unlocked and
retracted into the child seat.
To dispose of the child seat, please
refer to your country’s applicable
environmental regulations.
Always store the impact cushion (10) and
impact cushion strap (22) together, so that
when the ISOFIX system is used again, your
child’s security and safety is guaranteed.
48
Page 26

01 29 2 158 367 5/2009 (Z/Z)
 Loading...