

Page 1
Einbau- und Anschlußanleitung • Installation and connection instructions • Notice de montage et de branchement •
Istruzioni di montaggio e di allacciamento • Handleiding voor inbouw en aansluiting • Monterings- och inkopplingsanvisningar •
Instrucciones para la instalación y conexión • Instrução de montagem e de conexão
D
Sicherheitshinweise
Einbau- und Anschlußvorschriften
– Bei fehlerhafter Installation oder Wartung
können bei elektronischen KraftfahrzeugSystemen Fehlfunktionen auftreten.
– Um eine Zerstörung Ihres Radios zu ver-
meiden, dürfen Sie den fahrzeugseitigen
8 poligen +/- ISO-Stecker nur über ein entsprechendes Blaupunkt-Adapterkabel anschließen.
Für die Dauer der Montage und des Anschlusses beachten Sie bitte folgende Sicherheitshinweise.
– Minus und Pluspol der Batterie abklem-
men.
– Dabei die Sicherheitshinweise des Kfz-
Herstellers beachten.
– Beim Bohren von Löchern darauf achten,
daß keine Fahrzeugteile beschädigt werden.
– Der Querschnitt des Plus- und Minuska-
bels darf 1,5 mm
GB
Safety precautions
2
nicht unterschreiten.
Installation and connection regulations
– In the event that this equipment is installed
or repaired incorrectly, this could cause
malfunctions in the vehicle electronics.
– To avoid causing damage to your radio,
use the corresponding Blaupunkt adapter
cable to connect the 8-pin +/- ISO plug in
the vehicle.
While installing and connecting this equipment, please observe the following safety
notes.
– Disconnect the negative battery termina.
– Observe the car manufacturer’s safety in-
structions.
– If you drill any holes, make sure that you
do not damage any parts of the vehicle.
– The diameter of the positive/negative ca-
ble must not be less than 1.5 mm
F
Indications de sécurité
2
.
Consignes de montage et de branchement
– En cas d’erreur d’installation ou d’entre-
tien, des perturbations peuvent survenir au
niveau des systèmes électroniques du
véhicule.
– Pour ne pas détériorer votre autoradio,
branchez le connecteur ISO +/- 8 pôles
du véhicule uniquement via un câble adaptateur Blaupunkt correspondant.
Pendant le montage et le branchement,
observez les consignes de sécurité suivantes :
– Débrancher le pôle (-) de la batterie.
– Observer ce faisant les indications de sé-
curité du constructeur automobile.
– Veiller à ne pas endommager les pièces
du véhicule en perçant des trous.
– La section transversale du câble (+) et (-)
ne doit pas être inférieure à 1,5 mm
2
.
I
Cenni sulla sicurezza
Disposizioni relative a montaggio ed allacciamento
– Nei casi di installazione o manutenzione
non eseguiti nel modo dovuto, si possono
avere dei disturbi di funzionamento nel sistema elettronico dell’autovettura.
– Al fine di evitare che la vostra autoradio
possa venire distrutta, fate attenzione ad
allacciare la spina ad 8 poli +/-ISO soltanto tramite il corrispondente cavo di adattamento della Blaupunkt.
Durante il montaggio e l’allacciamento osservate per favore le seguenti istruzioni
sulla sicurezza.
– Staccate il polo negativo della batteria.
– Nel fare ciò osservate le istruzioni di sicu-
rezza del fabbricante d’auto.
– Quando praticate dei fori, fate attenzione
a non danneggiare nessuna parte dell’autovettura.
– La sezione dei cavi positivi e negativi non
deve essere mai inferiore a 1,5 mm
NL
Veiligheidsinstructies
Voorschriften voor inbouw en aansluiting
– Bij onjuiste installatie of onderhoud kun-
nen storingen optreden bij elektronische
systemen in de auto.
– Om vernieling van uw autoradio te voor-
komen mag u de achtpolige +/- ISO-stekker aan de zijde van de auto alleen aansluiten via een geschikte Blaupunkt-adapterkabel.
2
ENGLISH DEUTSCHFRANÇAISITALIANO
NEDERLANDS
.
SVENSKAESPAÑOL
PORTUGUÊS
363
Page 2
Einbau- und Anschlußanleitung • Installation and connection instructions • Notice de montage et de branchement •
Istruzioni di montaggio e di allacciamento • Handleiding voor inbouw en aansluiting • Monterings- och inkopplingsanvisningar •
Instrucciones para la instalación y conexión • Instrução de montagem e de conexão
Voor de duur van de montage en de aansluiting dient u de volgende aanwijzingen
voor de veiligheid in acht te nemen:
– Ontkoppel de minpool van de accu.
– Houd u hierbij aan de aanwijzingen voor
de veiligheid van de autofabrikant.
– Let er bij het boren van gaten op dat er
geen onderdelen van de auto beschadigd
raken.
– De doorsnede van de plus- en minkabels
mag niet kleiner zijn dan 1,5 mm
S
Säkerhetsanvisningar
2
.
Föreskrifter för montering och inkoppling.
– Vid felaktig installation eller service kan
felaktigheter uppträda hos elektroniska
system i fordonet.
– För att undvika att radion förstörs får du
endast ansluta den 8-poliga +/-ISO-kontakten i fordonet över en motsvarande Blaupunkt adapterkabel.
Observera följande säkerhetsanvisningar
under montering och anslutning
– Lossa kabeln från batteriets minuspol.
– Iaktta säkerhetsanvisningarna från fordon-
stillverkaren.
– Då du borrar hål måste du se till så att inga
fordonsdelar skadas.
– Tvärsnittsarean hos plus- och minuskablar-
na får inte underskrida 1,5 mm
E
Normas de seguridad
2
.
Especificaciones sobre la instalación y
conexión
– En caso de realizarse una instalación o un
mantenimiento inadecuado, éstos pueden
ocasionar fallos en las funciones de los
sistemas eléctricos del vehículo.
– Para que su radio no sufra daños, debe
conectar el enchufe del vehículo de 8 polos +/- ISO sólo al correspondiente cable
adaptador Blaupunkt.
Durante el montaje y la conexión observe
las siguientes normas de seguridad.
– Desemborne el polo negativo de la bate-
ría.
– Al hacerlo, observe las normas de seguri-
dad del fabricante del vehículo.
– Al taladrar orificios asegúrese de que el
vehículo no sufra ningún daño.
– El diámetro del cable positivo y negativo
no debe ser menor a 1,5 mm
2
.
P
Indicações de segurança
Directivas de montagem e de conexão
– Podem ocorrer erros de funcionamento em
sistemas electrónicos de automóveis devido à uma instalação ou manutenção errada.
– Para evitar a destruição do seu rádio, de-
verá apenas ligar a ficha ISO de 8 pólos
do automóvel através de um respectivo
cabo de adaptação Blaupunkt.
Observe por favor as seguintes indicações
de segurança durante a montagem e a ligação
– Separar por pressão o pólo negativo da
bateria.
– Observar as indicações de segurança do
fabricante do automóvel.
– Ao furar orifícios, deverá observar que não
sejam danificadas partes do automóvel.
– O diâmetro do cabo positivo e negativo não
deve ser inferior a 1,5 mm
2
.
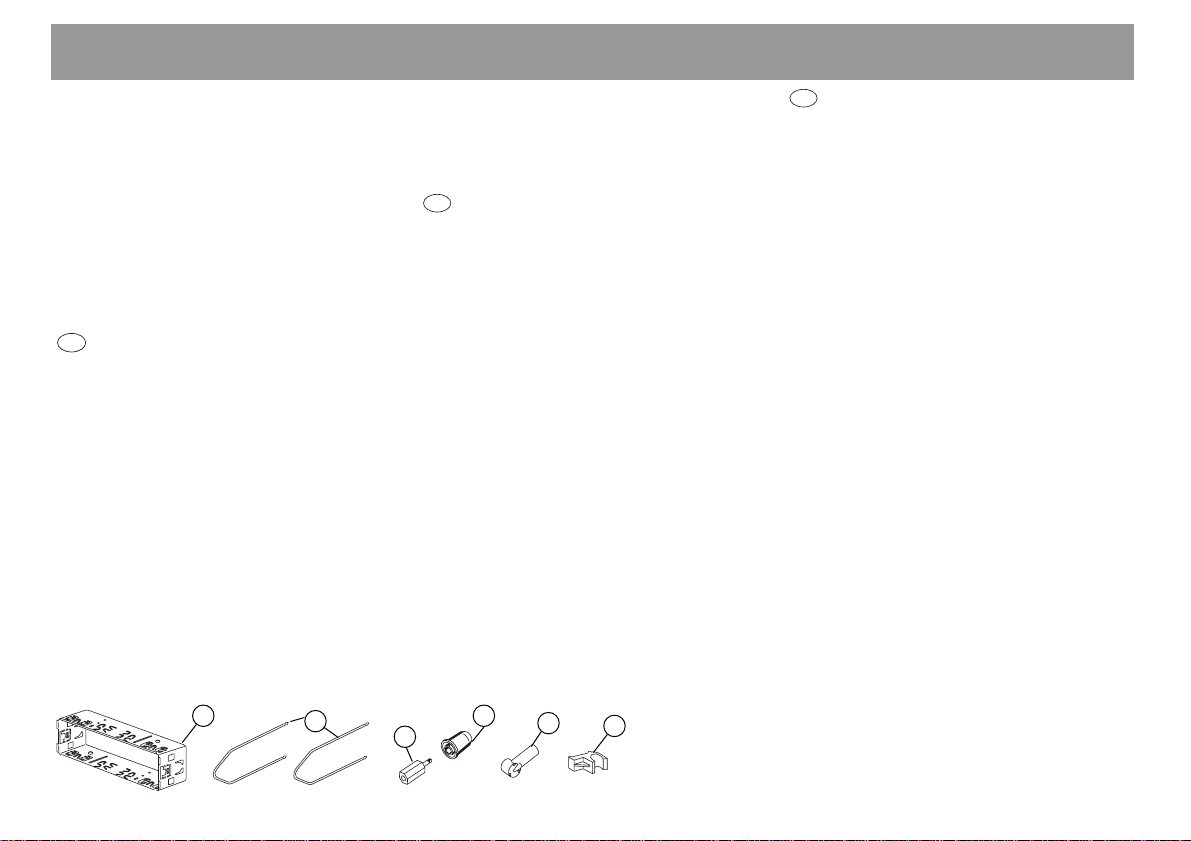
Mitgelieferte Montage- und Anschlußteile
Supplied Mounting Hardware - Materiel de montage fourni - Ferretería de montaje suministrada - Componenti di fissaggio comprese
nella fornitura - Meegeleverde montagematerialen- Medföljande monteringsdetaljer - Elementos de fixação fornecidos.
A
B
C
D
E
F
364
8 622 401 872
Page 3

8 601 910 002
2
2
1
1
12V
10A
per.+12V
Kl.15
12V
Antenne
Einbau- und Anschlußanleitung • Installation and connection instructions • Notice de montage et de branchement •
Istruzioni di montaggio e di allacciamento • Handleiding voor inbouw en aansluiting • Monterings- och inkopplingsanvisningar •
Instrucciones para la instalación y conexión • Instrução de montagem e de conexão
1.
3.
7 607 884 093
7 607 609 093
Tel.-Mute
Sub-Out
7 607 621 126 ( nur / only / uniquement / solo / alleen / endast / sólo /
apenas Alfa Romeo, Citroen, Fiat,
Honda, Lancia, Mercedes, Peugeot,
15A
12V
ENGLISH DEUTSCHFRANÇAISITALIANO
Porsche, Renault, Skoda).
2.
D
C
182
53
A
165
1-20
4.
7 607 882 090
5.
10A
RR = rechts / hinten
RF = rechts / vorn
LF = links / vorn
LR = links / hinten
+
LR
RRRF
LF
+
+
+
4 Ohm
-
4 Ohm
-
4 Ohm
-
4 Ohm
-
6.
B
7.
Schutzfolie / Foil
NEDERLANDS
SVENSKAESPAÑOL
8.
F
E
Antenne
12V
Fig. 4
PORTUGUÊS
365
Page 4

Einbau- und Anschlußanleitung • Installation and connection instructions • Notice de montage et de branchement •
Istruzioni di montaggio e di allacciamento • Handleiding voor inbouw en aansluiting • Monterings- och inkopplingsanvisningar •
Instrucciones para la instalación y conexión • Instrução de montagem e de conexão
C-1 C-2 C-3
C
B
A
14
2
234
2
7
10 131619
9
6
3
1
1
12
581114 17
5
6
345
6
15
AB
18
20
7
8
7
8
1 — 1 Speaker out RR+
2 Telefon Mute 2 Speaker out RR3 Sub Out 3 Speaker out RF+
4 Permanent +12V 4 Speaker out RF5 Aut. antenna 5 Speaker out LF+
6 Illumination 6 Speaker out LF7 Kl.15/Ignition 7 Speaker out LR+
8 Ground 8 Speaker out LR-
br braun, brown, marron, marrone, bruin,
brun, marrón, castanho
rt rot, red, rouge, rosso, rood, röd, rojo,
vermelho
ge/gn gelb/grün, yellow/green, jaune/vert,
giallo/verde, geel/groen, gul/grön,
amarillo/verde, amarelo/verde
or orange, orange, orange, arancio, oranje,
orangefärgad, naranja, cor de laranja
ge/gn
rt
C
C1 C2 C3
10A
Relais
12V
Kl.15 +12V
1 Line Out LR 7 - 13 Bus - In
2 Line Out RR 8 - 14 Bus - Out
3 Line Out Masse / Ground 9 - 15 4 Line Out LF 10 FB + 12V / RC +12V 16 12V
5 Line Out RF 11 Fernbedienung / Remote Control 17 Bus - Masse / GND
6 +12V Amplifier 12 FB - Masse / RC - GND 18 AF - Masse / GND
19 Line In - L
20 Line In - R
RC 08
Equalizer
Amplifier
CD-Changer
Fig.10
366
Telefon Mute (low)
Sub - Out
br
or
rt
12V
 Loading...