


PowerSteamer®
Powerbrush Select
U S E R ’ S G U I D E
1623 SERIES
3Safety Instructions
4Product View
5Assembly
6Special Features
7-11 Operation
12Maintenance and Care
13Troubleshooting
14Consumer Services
14Replacement Parts
15Additional Accessories
16Warranty
ug120-4073_1623_908.indd 1 |
10/14/08 12:59:28 PM |

Thank you for buying a BISSELL deep cleaner
We’re glad you purchased a BISSELL deep cleaner. Everything we know about floor care went into the design and construction of this complete, high-tech home cleaning system. By purchasing this product you are helping BISSELL with our commitment to reducing our impact on the environment through an expanding range of sustainable design efforts.
Your deep cleaner is well made, and we back it with a limited one-year warranty. We also stand behind it with a knowledgeable, dedicated Consumer Services department, so, should you ever have a problem, you’ll receive fast, considerate assistance.
My great-grandfather invented the floor sweeper in 1876. Today, BISSELL is a global leader in the design, manufacture, and service of high quality homecare products like your deep cleaner.
Thanks again, from all of us at BISSELL.
Mark J. Bissell
President and Chief Executive Officer
2 |
w w w . b i s s e l l . c o m |
8 0 0 . 2 3 7 . 7 6 9 1 |
ug120-4073_1623_908.indd 2 |
10/14/08 12:59:28 PM |
IMPORTANT SAFETY INSTRUCTIONS
When using an electrical appliance, basic precautions should be observed, including the following:
Read all instructions before using your PowerSteamer®
 WARNING:To reduce the risk of fire, electric shock, or injury:
■Do not immerse.
■Use only on surfaces moistened by cleaning process.
■Always connect to a properly grounded outlet.
■See Grounding Instructions.
■Unplug from outlet when not in use and before conducting maintenance or troubleshooting.
■Do not leave machine when it is plugged in.
■Do not service machine when it is plugged in.
■Do not use with damaged cord or plug.
■If appliance is not working as it should, has been dropped, damaged, left outdoors, or dropped into water, have it repaired at an authorized Service Center.
■Use indoors only.
■Do not pull or carry by cord, use cord as a handle, close door on cord, pull cord around sharp corners or edges, run appliance over cord, or expose cord to heated surfaces.
■Unplug by grasping the plug, not the cord.
■Do not handle plug or appliance with wet hands.
■Do not put any object into appliance openings, use with blocked opening, or restrict air flow.
■Do not expose hair, loose clothing, fingers or body parts to openings or moving parts.
■Do not pick up hot or burning objects.
■Do not pick up flammable or combustible materials (lighter fluid, gasoline, kerosene, etc.) or use in the presence of explosive liquids or vapor.
■Do not use appliance in an enclosed space filled with vapors given off by oil base paint,paint thinner, some moth proofing substances,flammable dust,or other explosive or toxic vapors.
■Do not pick up toxic material (chlorine bleach, ammonia, drain cleaner, gasoline, etc.).
■Do not modify the 3-prong grounded plug.
■Do not allow to be used as a toy.
■Do not use for any purpose other than described in this User’s Guide.
■Do not operate the appliance unless the belt door is securely assembled in the location provided.
■Do not unplug by pulling on the cord.
■Use only manufacturer’s recommended attachments.
■Use only cleaning products formulated by BISSELL for use in this appliance to prevent internal component damage. See the cleaning fluid section of this guide.
■Keep openings free of dust, lint, hair, etc.
■Do not point attachment nozzle at people or animals
■Keep appliance on a level surface.
■Turn off all controls before unplugging.
■Be extra careful when cleaning stairs.
■Close attention is necessary when used by or near children.
■WARNING: The power cord on this product contains lead, a chemical known to the State of California to cause birth defects or other reproductive harm.
WASH HANDS AFTER HANDLING.
SAVE THESE INSTRUCTIONS.
This model is for household use only. Commercial use of this unit voids the manufacturer’s warranty.
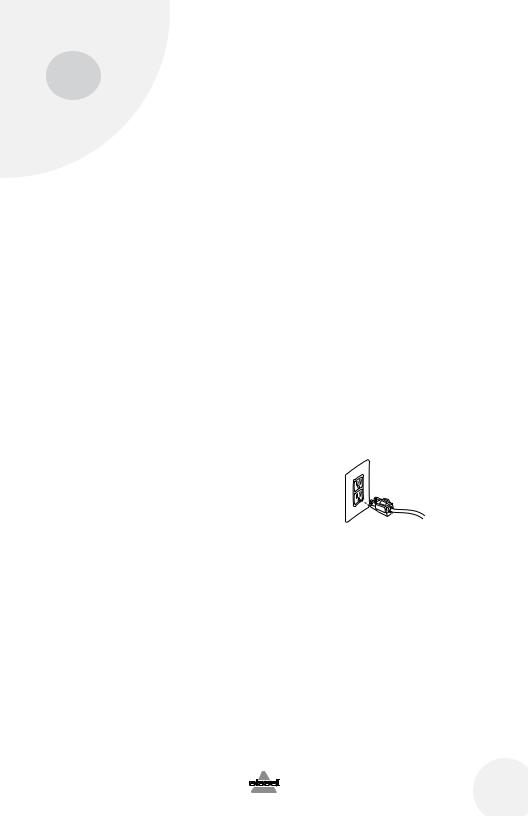
GROUNDING INSTRUCTIONS
This appliance must be connected to a grounded wiring system. If it should malfunction or break down, grounding provides a safe path of least resistance for electrical current, reducing the risk of electrical shock. The cord for this appliance has an equipment-grounding conductor and a grounding plug. It must only be plugged into an outlet that is properly installed and grounded in accordance with all local codes and ordinances.
Grounded
Outlets
 Grounding Pin
 WARNING: Improper
connection of the equipment-grounding conductor can result in a risk of electrical shock. Check with a qualified electrician or service person if you aren’t sure if the
outlet is properly grounded. DO NOT MODIFY THE PLUG. If it will not fit the outlet, have a proper outlet installed by a qualified electrician. This appliance is designed for use on a nominal 120-volt circuit, and has a grounding attachment plug that looks like the plug in the drawing above. Make certain that the appliance is connected to an outlet having the same configuration as the plug. No plug adapter should be used with this appliance.
w w w . b i s s e l l . c o m |
8 0 0 . 2 3 7 . 7 6 9 1 |
3 |
ug120-4073_1623_908.indd 3 |
10/14/08 12:59:28 PM |

Product view |
Spray Trigger |
|
Cord Clip |
|
|
Hose Secure Latch |
Quick Release™ |
|
Cord Wrap |
||
|
||
Ready-to-use Hose |
|
|
|
Power Cord |
|
2-in-1 Crevice Tool |
|
2-in-1 Tank™ with built in measuring cup
Large, Easy-To-Maneuver |
Power Switch |
Wheels |
|
Handle Release |
|
 WARNING:
To reduce the risk of fire and electric shock due to internal component damage, use only BISSELL cleaning fluids intended for use with the deep cleaner. Non-BISSELL cleaning solutions may harm the machine and void the warranty.
Cleaning fluid
Edge Sweep™
Brushes
Ergonomically
Designed Handle™
Tough Stain Tool
Handle Assembly
Upper Body
Assembly
Easy Carry
Handle
Lower Body
Assembly
 Ready Tools™ Dial
Belt Access Door
Removable
Nozzle
 Dirtlifter®
PowerBrush
Keep plenty of genuine BISSELL Fiber Cleansing Formula™ on hand so you can clean and protect whenever it fits your schedule. Always use genuine BISSELL deep cleaning formulas. Non-BISSELL cleaning solutions may harm the machine and will void the warranty.
48 oz. BISSELL |
48 oz. BISSELL |
48 oz. BISSELL |
48 oz. BISSELL |
48 oz. BISSELL |
|||
Fiber Cleansing |
MultiAllergen |
Pet Odor and |
Natural Orange |
Lavender Essence |
|||
Formula™ with |
Removal™ |
Soil Removal™ |
Extract Formula |
Formula with |
|||
Scotchgard™ |
Formula™ with |
Formula with |
with Scotchgard™ |
Scotchgard™ |
|||
Protector |
Scotchgard™ |
Scotchgard™ |
Protector |
Protector |
|||
item # 0710 |
Protector |
Protector |
item # 0740 |
item # 0750 |
|||
|
|
item # 0720 |
item # 0730 |
|
|
|
|
4 |
w w w . b i s s e l l . c o m |
|
|
|
|
|
|
|
|
|
|
|
|||
|
|
|
|
|
|||
43 oz. BISSELL |
32 oz. |
22 oz. |
3X Concentrated |
BISSELL |
BISSELL |
Fiber Cleansing |
Hard Floor |
Tough Stain |
Formula with |
Solutions™ |
PreCleaner™ |
Scotchgard™ |
Formula |
item # |
Protector |
item # |
0400 |
# 0716 |
0482 |
|
|
8 0 0 . 2 3 7 . 7 6 9 1 |
|
ug120-4073_1623_908.indd 4 |
10/14/08 12:59:32 PM |
How to use this guide
This user’s guide has been designed to help you get the maximum satisfaction from your BISSELL deep cleaner. You’ll find assembly and operating instructions, safety precautions, as well as maintenance and troubleshooting instructions. Please read this user’s guide thoroughly before assembling your deep cleaner.
Your deep cleaner comes in five easy to assemble components:
•Handle assembly
•Upper body assembly
•Upper hose rack
•Lower body assembly
•Lower hose rack
Three Phillips head screws are included and can be found taped to the handle assembly.
 Warning:
Do not plug in your cleaner until you have completely assembled it per the following instructions
and are familiar with all instructions and operating procedures.
Tip: Deep cleaning carpeting regularly can reduce dust and allergens in your home.
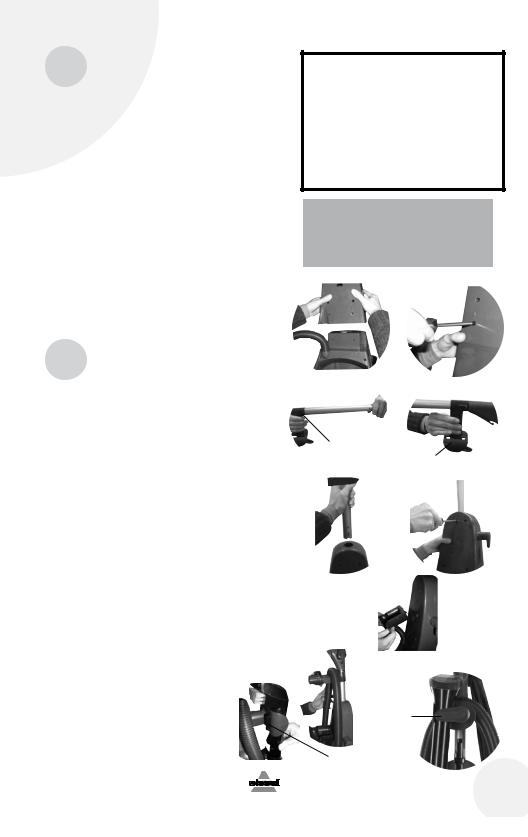
1.
Assembly
The only tool you will need to assemble your |
2. |
cleaner is a Phillips head screwdriver. |
|
1.Slide upper body assembly onto lower body and secure with two screws.
2. |
With the “tabs” on upper hose rack |
Tab |
|
Upper Hose Rack |
|||
|
pointing toward top of handle, attach upper |
||
|
|
||
|
hose rack to handle assembly by sliding it to |
3. |
|
|
top of handle until it can go no further. Turn |
||
|
hose rack until it snaps into place. |
|
|
3. |
Slide handle assembly down into upper body |
|
|
|
until it will go no further and secure with |
|
|
|
screw. |
|
|
4. |
Attach lower hose rack to back of upper |
4. |
|
|
body by pushing into open slots and sliding |
||
|
|
down until it snaps into place.
5.Wrap flex hose around hose rack and secure it into notched out holder as shown.
6. Keep flex hose locked in place with hose |
5. |
secure latch. |
|
6.
Hose
Secure
Latch
Notch
w w w . b i s s e l l . c o m |
8 0 0 . 2 3 7 . 7 6 9 1 |
5 |
ug120-4073_1623_908.indd 5 |
10/14/08 12:59:34 PM |
 Loading...