

Page 1

CHEF-DR®III
Pulsed Field
Electrophor esis Systems
Instruction Manual
and Applications Guide
Catalog Numbers
170-3690
through
170-3703
For Technical Service Call Your Local Bio-Rad Office or in the U.S. Call 1-800-4BIORAD (1-800-424-6723)
Page 2

Warranty
The CHEF-DR III power module, chamber, variable speed pump, and accessories are
warranted against defects in materials and workmanship for 1 year. If any defects occur in the
instruments or accessories during this warranty period, Bio-Rad Laboratories will repair or
replace the defective parts at its discretion without charge. The following defects, however,
are specifically excluded:
1. Defects caused by improper operation.
2. Repair or modification done by anyone other than Bio-Rad Laboratories or an authorized
agent.
3. Damage caused by substituting an alternative chamber or pump.
4. Use of fittings or spare parts supplied by anyone other than Bio-Rad Laboratories
5. Damage caused by accident or misuse.
6. Damage caused by disaster.
7. Corrosion caused by improper solvent* or sample.
This warranty does not apply to parts listed below:
1. Fuses
2. Tubing
3. Electrodes
For any inquiry or request for repair service, contact Bio-Rad Laboratories. Inform BioRad of the model and serial number of your instrument.
Copyright 1992, 1995 Bio-Rad Laboratories
All Rights Reserved
2nd Revision
* The CHEF-DR III chamber is not compatible with chlorinated hydrocarbons (e.g., chloroform), aromatic hydrocarbons (e.g.,
toluene, benzene), or acetone. Use of organic solvents voids all warranties.
Page 3

Table of Contents
Page
Section 1 General Information.....................................................................................1
1.1 Safety............................................................................................................................1
1.2 Overview......................................................................................................................1
1.3 Specifications...............................................................................................................2
1.4 Description of Major Components..............................................................................3
Section 2 Operation........................................................................................................5
2.1 Instrument Set-up.........................................................................................................5
2.2 Electrophoresis Chamber Operation ...........................................................................6
2.3 CHEF-DR III Operation..............................................................................................7
Section 3 Sample Preparation.......................................................................................9
3.1 Agarose Block..............................................................................................................9
3.2 Liquid Samples ..........................................................................................................10
3.3 Preparation of Agarose Embedded Mammalian DNA.............................................10
3.4 Preparation of Agarose Embedded Bacterial DNA ..................................................11
3.5 Preparation of Agarose Embedded Yeast DNA........................................................12
3.6 Restriction Enzyme Digestion of Plugs ....................................................................13
3.7 Hemocytometer Usage ..............................................................................................13
3.8 Estimation of Agarose Plug DNA Concentration.....................................................15
Section 4 Gel Electrophoresis.....................................................................................16
4.1 Casting the Gel...........................................................................................................16
4.2 Buffer Circulation and Temperature .........................................................................17
4.3 Loading the Samples..................................................................................................18
4.4 DNA Size Standards..................................................................................................18
4.5 Electrophoresis...........................................................................................................19
4.6 Separations at Room Temperature ............................................................................19
4.7 Removing and Staining the Gel.................................................................................20
Section 5 Applications..................................................................................................20
5.1 Strategies for Electrophoretic Separations ................................................................20
5.2 Pulsed Field Conditions by DNA Size......................................................................22
5.3 Pulsed Field Conditions by Organism.......................................................................22
5.4 Blotting Megabase DNAs..........................................................................................23
5.5 Separation of DNA Size Standards ...........................................................................25
Section 6 Maintenance.................................................................................................27
6.1 Replacing Electrodes .................................................................................................27
6.2 Fuses...........................................................................................................................27
6.3 Maintenance of the Electrophoresis Cell...................................................................27
Section 7 Troubleshooting Guide ...............................................................................28
Section 8 References.....................................................................................................30
Section 9 Systems, Accessories and Reagents for
Pulsed Field Electrophoresis......................................................................38
Page 4

Section 1
General Information
1.1 Safety
The CHEF-DR III system uses high voltage and current, and should be operated with
care at all times. The safety interlocks are for your protection and should not be circumvented. To avoid shock, set up the CHEF-DR III components in a dry area. Immediately wipe up
any spilled buffers or salt solutions.
When pausing or aborting a run, always check that the current display goes to zero or
OFF. This can take 2–5 seconds while the power supply discharges. It is then safe to remove
the lid from the chamber.
Warning: There are high voltages and currents within the chamber, which can be harmful. Do not attempt to circumvent the safety interlocks. Always turn off the power to the
chamber before working within the gel box.
The Cooling Module is ground isolated. Although there is virtually no current flowing
through the Tygon®tubing into the chiller, avoid assembling or disassembling the tubing
while the CHEF-DR III system is operating.
Definition of Symbols
Caution, risk of electric shock
Caution (refer to accompanying documents)
1.2 Overview
Pulsed field electrophoresis is a technique for resolving chromosome-sized DNAs. By
alternating the electric field between spatially distinct pairs of electrodes, megabase (mb)
sized DNAs are able to reorient and move at different speeds through the pores in an agarose
gel. Overview and applications articles are listed Section 8.
The CHEF-DR III system separates large and small DNA fragments with better resolution, speed, and accuracy, than initial pulsed field methods. DNAs from 100 bases to over 10
megabases (mb) may be effectively resolved. For example, the chromosomal DNA of
Schizosaccharomyces pombe can be resolved in 1 day using a 106° pulse angle, compared to
2 days at 120°. Everything from Yeast Artificial Chromosomes (YACs) to M13 inserts can
be separated with a single instrument. Applications include top down and bottom up mapping (Not I and cosmid cloning, respectively), electrophoretic karyotyping, analysis of tumor
cell DNA rearrangements, mammalian DNA analysis, and testing for bacterial, yeast, and
parasite strain homogeneity.
The CHEF-DR III system uses two leading technologies, CHEF (Clamped Homogeneous
Electric Fields)
215
and PACE (Programmable Autonomously Controlled Electrodes).
216
The
system provides highly uniform, or homogeneous, electric fields within the gel, using an array
of 24 electrodes, which are “clamped” or held to intermediate potentials to eliminate lane distortion. Thus, lanes are straight. The system maintains uniform fields using patented Dynamic
Regulation (US Patent 4,878,008). The electrodes sense changes in local buffer conductivity due to buffer breakdown, change in buffer type, gel thickness, or temperature, and poten-
1
Page 5

tials are readjusted immediately to maintain uniform fields, thus insuring high resolution. In
PACE, the voltage potential of each of the 24 electrodes is regulated independently. Unlike
the CHEF-DR II system, which has a fixed reorientation (field) angle of 120° due the hexagonal geometry of the electrode array, the CHEF-DR III system can generate field angles from
90–120°. In addition, the CHEF-DR III system permits up to three consecutively executing
blocks of run conditions with battery backed-up RAM and automatic restart after power
interruption.
1.3 Specifications
These specifications pertain to the complete CHEF-DR III system. A system including the
Cooling Module is also available.
CHEF-DR III Specifications
Power Module:
Dimensions 43 (depth) x 48 (width) x 17.5 (height) cm
Construction Aluminum chassis
Weight 10 kg
Power supply 350 V maximum, to allow maximum gradient of
9 V/cm, continuously adjustable; built in
Electrical
Maximum amps 0.5 amperes
Allowable voltage gradients 0.6–9 V/cm, in 0.1 V/cm increments
Battery back-up All parameters in memory
Electrode potentials Dynamically regulated (feedback adjustment)
+/- 0.5%
Data entry Keyboard
Functional
Switching range 0.1 sec to 65K sec
Switch angle variable 90–120 degrees (all electronic switching) in 1°
increments
Maximum program blocks 3, with automatic execution
Maximum run time 999 hours per block
Input voltage range 100–120 VAC/50–60 Hz/4 amps
220–240 VAC/50–60 Hz/2 amps
Fuses 0.5 amp Fast Blow for high voltage output
3.15 amp Slow-Blow (100/120 V) or
1.60 amp Slow-Blow (220/240 V)
Environmental
Operating 50 °F (10 °C) to 90 °F (32 °C) temperature
30–80% humidity
Storage 32 °F (0 °C) to 140 °F (60 °C) temperature
10-90% humidity
Electrophoresis cell:
Dimensions 11.4 x 44.2 x 50.3 cm, horizontal format
Construction Cover: Vacuum formed polycarbonate
Base: Injection molded polycarbonate
Lid Safety interlocked
Weight 10.2 kg
Electrodes 24, platinum (0.02 inch diameter)
Temperature monitoring Via precision temperature probe mounted in base
of cell
2
Page 6

Accessories included:
Variable speed pump 120 V, ground isolated. Flow rate 1 liter/min, typi-
cal
Casting stand 14 cm x 13 cm
Comb 10 well comb and comb holder
Tygon tubing 365 cm
Disposable sample plug mold 50 slot
Yeast DNA Standard
S. cerevisiae
YNN295, 2 plugs
Chromosomal grade agarose 5 grams
Pulsed field certified agarose 5 grams
Leveling bubble 1
Fuses 0.5 Amp Fast Blow, 2 spares
Manual 1
Screened cap 1
Cooling Module (Optional):
Weight 14 kg
Construction Aluminum
Dimensions 42 cm long x 23 cm wide x 24 cm high
Cooling capacity 75 watts of input power at 14 °C
Operating range 5 °C–25 °C
Total System Weight 41.7 kg
Note: This equipment complies with the limits for a Class A digital device, pursuant to Part
15 of the FCC rules. These limits provide reasonable protection against harmful interference
when the equipment is operated in a commercial environment. This equipment generates,
uses, and can radiate, radio frequency energy and, if not installed and used in accordance with
the instruction manual, may cause harmful interference to radio communications. Operation
of this equipment in a residential area is likely to cause harmful interference, and the user
will be required to correct the interference at his own expense.
1.4 Description of Major Components
Power Module
The Power Module contains the electronics for pulsed field electrophoresis, including a
350 V power supply, the switching functions, and drivers for the 24 electrodes. The drivers
provide clamped homogeneous electric fields in the electrophoresis cell, and maintain them
regardless of the field angle selected. This dynamic regulation feature modulates the potentials so that the proper voltages are maintained regardless of gel size, or fluctuations in buffer
conductivity or temperature. The fused power supply operates with a maximum voltage gradient of 9 V/cm, or 300 V. The lowest gradient is 0.6 V/cm, or 20 V.
Figure 1.1A shows the relative potentials of each electrode pair when the + 60° vector
(indicated by the arrow) is activated. Net field vector is from NW to SE. The highest potentials are along the SE segment of the hexagon. The potentials gradually decline along the
adjacent segments. The NW segment, directly opposite the SE, has 0 potential, represented in
the diagram as negative terminals. When the - 60° angle is activated, the pattern of electric
charges is as shown in Figure 1.1B. Together, the two pulses result in a 120° included field
angle. Other angles will result in values for the relative electrode potentials, according to predetermined values.
3
Page 7

Figure 1.1. Voltage clamping by the CHEF-DR III system. A. Relative electrode potentials when the
+ 60° field vector is activated. B. Relative electrode potentials when the - 60° field vector is activated.
Electrophoresis Chamber
The CHEF-DR III electrophoresis cell consists of a 44.2 x 50.3cm (17.4" x 19.8") acrylic
box with 24 horizontal electrodes arranged in a hexagon. Gels are electrophoresed horizontally, submerged under recirculated buffer. A 14 x 13 cm (5.5" x 5") gel is cast on a platform in a
separate casting stand, removed, and placed in the center of the hexagon. The platform is held
in place by a frame positioned on the chamber floor. A combination wide/long format is available as an accessory. DNA migration and buffer flow is in the direction of the arrow on the lid.
The heavy duty 0.02" diameter platinum wire electrodes, replaceable for easy maintenance (see Section 6), are individually connected to the 24 pin computer cable,which connects to the power module. They are each sealed with an O-ring and silicone sealant to provide
double protection against leakage. The electrodes will wear out more rapidly when switch
times below 1 second are used, and/or when 9 V/cm gradients are employed.
The two small chambers below the level of the main chamber floor at the front and rear
of the main chamber are used for buffer circulation and priming the pump. Buffer enters the
main chamber through six holes in the floor near the top. A flow baffle just in front of the
holes prevents gel movement. Buffer exits the chamber at the front through the two ports.
The right is for draining, the left for circulation. The base of the chamber has four leveling
screws for even gel submersion in buffer.
The hinged lid contains a safety interlock. The voltage passes directly from the Power
Module through a short-path in the lid interlock. If the lid is opened, the current flow is broken
and voltage to the gel chamber is disrupted. The cell also includes an internal temperature probe,
which monitors buffer temperature in the chamber and regulates cooling by the Cooling Module.
Pump and Accessories
Each system includes a variable speed pump, which provides a suitable flow rate of buffer
through the chamber. Substitution of other pumps could pose a safety hazard and cause
improper flow, and therefore lower resolution. The pump’s power supply is electrically isolated within the power module for safety. Its voltage requirement is independent of the line
voltage supplied to the drive module (e.g. 100, 120, 220, or 240 volts). This pump should not
be plugged into any equipment other than the CHEF-DR III power module.
The pump is connected to Tygon®or plastic tubing. This tubing circulates buffer in and
out of the chamber. The tubing may also pass through a water chiller. In this case, the pump
should be placed after the chiller, so that buffer flows through the chiller and then to the pump.
Typically, the dial is set at 70, for about 0.75 L/min.
+ + + +
+ + + +
+
+
+
+
+
+
+
+
A. + 60° B. - 60°
➤
+
+
+
+
+
+
+
+
+ + + +
+ + + +
+
+
+
+
–
–
–
–
–
–
–
–
+
+
+
+
➤
4
Page 8

Cooling Module
The Cooling Module is a stand alone, portable refrigerated apparatus specifically for use
with the CHEF-DR III system. The variable speed pump circulates electrophoresis buffer
directly through the unique heat exchanger, which is a tube within a tube. Buffer circulates
through the inner stainless steel tube, while liquid refrigerant circulates through the outer copper tube, resulting in rapid and efficient cooling at a rate of 0.75 °C/minute (from ambient
temperature to 14 °C). The temperature probe in the cell regulates cooling by the Cooling
Module, resulting in precise maintenance of buffer temperature.
The complete CHEF-DR III system is shown in Figure 1.2.
Fig. 1.2. The complete CHEF-DR III chiller system, with chamber, power module, variable speed
pump, and Cooling Module.
Section 2
Operation
2.1 Instrument Setup
Place the CHEF-DR III electrophoresis chamber on a level surface, with the power module to the right or on a shelf above. Position the electrophoresis chamber with the two ports
facing you and the lid safety interlock to the rear. If the system includes a Cooling Module,
place it to the left of the chamber. Place the variable speed pump at the rear of the chamber
and connect the plug from the pump to the port labeled PUMP CONNECTOR on the back of
the power module. Level the electrophoresis cell with the leveling feet at each corner by placing the casting platform in the center of the cell, then placing the leveling bubble (provided)
on the casting platform. Putting the casting platform in the center of the cell will level the gel
with respect to the electrophoresis cell.
5
Page 9

Fig. 2.1. Interconnections between components of the CHEF-DR III system.
Attach the power cords for the power module and Cooling Module to the back of each
instrument. Be sure the power module is off. Connect the 25-pin cable from the electrophoresis
chamber to the port labeled OUTPUT TO ELECTROPHORESIS CELL on the front of the
power module. The 25-pin cable has an safety interlock on the end which is attached to the
power module. Connect the coiled interlock cable from the electrophoresis chamber to the
jacks labeled TO INTERLOCK on the power module.
2.2 Electrophoresis Chamber Operation
To connect the cell to the Cooling Module, attach approximately 1–2 feet of 1⁄4 inch ID
Tygon tubing to both the Flow In and Flow Out ports on the Cooling Module, and secure the
tubing with the plastic clamps. Connect the quick release connector to 2 feet of 3⁄8 inch ID
Tygon tubing. Attach the quick release connector to the left front port of the cell. Attach the
other end of the 3⁄8 inch tubing to the 1⁄4 inch tubing from the Flow In of the Cooling Module
using the 3⁄8 to 1⁄4 inch reducer. Place the pump between the outlet of the Cooling Module and
the inlet (rear) of the Electrophoresis Cell. Connect the 1⁄4 inch tubing from the Flow Out of the
Cooling Module to the inlet of the pump using a 3⁄8 to 1⁄4 inch reducer. Connect approximate-
ly 2 feet of 3⁄8 inch Tygon tubing to the outlet of the pump using the 3⁄8 to 3⁄8 straight connector.
Connect a quick release connector to the other end of the 3⁄8 inch tubing. Connect the quick
release connector to the inlet of the cell.
Connect a quick release connector to a 6 inch piece of 3⁄8 inch Tygon tubing, and connect
it to the right front port of the cell. This tube will drain the buffer in the cell.
Connect the 9 pin gray temperature probe cable from the back of the cell to the Remote
Sensor port on the back of the Cooling Module.
Insert the gel frame into the positioning holes in the electrophoresis cell. There are two sets
of three positioning holes. Place the frame only in the holes at the bottom corners of the gel,
opposite the wells, so that the frame is centered in the cell. The outermost holes are for the
optional 21 x 14 cm (8.25 x 5 inch) gel format (See Casting Stand Instruction Manual).
Variable Speed Pump
6
Tygon T ubing
Temperature
Probe Cable
IN
OUT
Cooling
Module
Electrophoresis
Chamber
25 Pin
Cable
Variable Speed
Pump Cable
CHEF DR III
Power Module
Safety Interlock
Cable
TO INTERLOCK
Output to
Electrophoresis Cell
Page 10

If the system includes the Cooling Module, connect the temperature probe cable to the
REMOTE SENSOR port on the rear panel of the Cooling Module. Insert the other end of the
temperature probe cable into the rear of the electrophoresis chamber.
Establish the correct buffer flow before attempting any electrophoresis runs. The optimal flow rate of buffer through the electrophoresis chamber is approximately 0.8–1 liter per
minute (approximately 70 on the pump). When the correct flow rate has been achieved, use
that pump setting for all subsequent electrophoresis runs. Fill the chamber with 2.2 liters of
buffer. Turn on the pump and measure the flow of buffer at the drain port by removing the
clamp from the 6" piece of tubing. Make adjustments to the buffer flow with the pump.
It is beneficial to fine tune the chiller before attempting any electrophoresis runs. Turn on
the chiller and pump approximately 1⁄2 hour before adjusting the temperature. Initially, it will
be necessary to fine tune the temperature setting to achieve a consistent running temperature.
2.3 CHEF-DR III Operation
This section describes general operation. See Sections 3 and 4 for sample preparation,
gel casting, gel running, and staining.
Power Up
The CHEF-DR III front panel display is divided into two sections (see Figure 2.3.). On
the left are, BLOCK, INITIAL SWITCH TIME, FINAL SWITCH TIME, RUN TIME, and
RAISE and LOWER keys. On the right are VOLTS/CM, INCLUDED ANGLE, ACTUAL
CURRENT, PAUSE/START RUN, and RAISE and LOWER keys. At power up, the left display will show 1 with BLOCK lit, indicating Block 1 is active. The right display will show
OFF. The program parameters will be at the default setting or those last set before the power
was turned off, since the battery back-up RAM stores the last program entered. If a program
was in progress or in PAUSE, the run parameters will be retained and the PAUSE mode will
be active (flashing PAUSE light).
Fig. 2.2. Front panel display of the CHEF-DR III system.
Parameter Entry
The CHEF-DR III system has the flexibility of using up to three separate, consecutively
executing Blocks. Each Block has the run parameters of Initial Switch Time, Final Switch Time,
Run Time, Volts/cm, and Included Angle. During a run, Block 1 is run first, then Block 2, then
Block 3. To enter run parameters into Block 1, press BLOCK. The left display should show 1,
indicating Block 1. If not, press RAISE or LOWER on the left side of the display panel until 1
is shown. Enter the Initial Switch Time, Final Switch Time, and Run Time with the RAISE and
LOWER keys on the left side of the display panel. Enter the Volts/cm, and Included Angle with
the RAISE and LOWER keys on the right side of the display panel. If more than 1 Block is
needed, then press BLOCK and go to Block 2 by pressing RAISE. The left display will show
the number 2, indicating Block 2. Continue entering the run parameters as in Block 1. If a third
Block is needed, press BLOCK, go to Block 3 by pressing RAISE, then continue entering the
run parameters as in Block 1. Below are the limits for each of the run parameters.
7
Page 11

Block Program from 1–3 Blocks. Block 1 is run first, then Block 2, then
Block 3. A run time of 0 disables a Block.
Initial Switch Time Adjust from 0.1–65K seconds.
Final Switch Time Adjust from 0.1–65K seconds.
Run Time Adjust from 0.1–999 hours. A run time of 0 disables a Block.
Volts/cm Adjust from 0.6–9.0 volts in 0.1 volt increments.
Included Angle Adjust from 90–120° in 1° increments.
Actual Current Displays the current, in mA, provided by the power supply. This
parameter is not adjustable.
Run Program
When the parameters are set, start the program by pressing PAUSE/START RUN. When
the program is in progress, the left panel display will show the time remaining (hours) in the
current Block with RUN TIME lit, and the right panel display will show the actual current (milliamps) with ACTUAL CURRENT and PAUSE/START RUN lit. After the program is started, it is not possible to edit any of the run parameters. During a run, the RAISE and LOWER
keys are disabled and the remaining keys will operate as follows:
Block Displays the current Block.
Initial Switch Time Displays the set initial switch time for 3 seconds, then displays the
remaining time for the current Block.
Final Switch Time Displays the set final switch time for 3 seconds, then displays the
remaining time for the current Block.
Current Switch Displays the current switch time for 3 seconds, then displays
Time the remaining time for the current Block. This display is activated
by pressing INITIAL SWITCH TIME and FINAL SWITCH TIME
simultaneously.
Run Time Displays the set run time for the current Block for 3 seconds then
displays the remaining time for the current Block.
Volts/cm Displays the set voltage gradient for the current Block for 3 sec-
onds then displays the actual current (in mA) for the current Block.
Included Angle Displays the set included angle for the current Block for 3 seconds,
then displays the actual current (in mA) for the current Block.
Actual Current Displays the actual current for the Block in progress. The indicator
light should be on during a run. If the power supply is at current
limit (500 mA maximum), the light will flash.
Pause/Start Run Initially, this starts the program and the indicator light will be lit.
While the program is running, pressing this key will put the program into PAUSE and the light will flash. Pressing the key again
will restart the program.
In a multi-block program it is possible to examine the run parameters of any Block that
is not currently being displayed by pausing the CHEF-DR III system. While in PAUSE, the
RAISE and LOWER keys are active to scroll through any of the three Blocks. Any parameter in a Block may be displayed by pressing the appropriate key. Editing of run parameters is
not possible once the program has started.
8
Page 12

Program Termination
The program in progress may be manually terminated by holding down PAUSE/START RUN
for 3– 4 seconds. A program can be terminated only while it is in the run mode; it can not be terminated in PAUSE. When the program is terminated two beeps will sound, and the right display will
show OFF. Pressing PAUSE/START RUN again will start the program from the beginning.
When the program terminates under the timer control, the PAUSE/START RUN light
will go off, it will sound two beeps per second for 5 seconds, and the right display will show
OFF. The run timers will be reset and all parameters will be retained. The run parameters
may be used again as is, or further modified, and the program may be started again by pressing PAUSE/START RUN.
Clearing the Program
All parameters in Blocks 1, 2, and 3, can be cleared simultaneously to the default settings when the program is stopped or off. Press RAISE and LOWER on the right side of the
panel for 5 seconds (it will sound 2 beeps per second).
Power Disruption
The CHEF-DR III system has a battery backed-up memory RAM that retains the current
program if the power is interrupted. If the program was in progress (not in PAUSE) when the
power went down, the program will automatically resume after 2 minutes in PAUSE mode
after power is restored. The PAUSE/START RUN light will flash during this 2 minutes.
Section 3
Sample Preparation
3.1 Agarose Blocks
Standard procedures for DNA preparation do not yield intact, high molecular weight
DNA molecules. Large DNA molecules (chromosome-sized) are so fragile that they are
sheared by mechanical forces during isolation. To prevent breakage of large DNA molecules,
intact cells embedded in agarose are lysed and deproteinized in situ. The agarose matrix protects the embedded DNA from shear forces and provides an easy way to manipulate samples. Processed agarose plug-DNA inserts are loaded directly into sample wells of agarose
electrophoresis gels.
The most important and difficult task in preparing cells for imbedding in agarose is to
obtain the proper cell concentration. Although optical density is frequently used, it is not reliable. Different cell lines or strains, plasmid content, and growth media all contribute to the
actual cell number achieved for a particular optical density. Variation in cell number will
cause the amount of DNA per agarose plug to vary greatly leading to over and/or under loading of the sample. To eliminate the need to generate a growth curve for each strain, a hemocytometer provides the most reproducible method for achieving the proper cell concentration
for different types of mammalian, bacterial, yeast, or fungal cells. Instructions for the use of
a hemocytometer can be found in Section 3.7.
Sample inserts are cast in Bio-Rad’s disposable plug mold, catalog number 170-3713.
Each sample mold produces up to fifty 10 x 5 x 1.5 mm agarose plugs. The block thickness
allows rapid and efficient diffusion of enzymes during sample preparation and permits samples to be loaded into wells formed with Bio-Rad’s standard well-forming combs without
excessive trimming.
9
Page 13

3.2 Liquid Samples
High molecular weight DNA can be prepared by standard procedures. DNA fragments of
up to several hundred kilobases do not require preparation in agarose blocks, and can be added
to the wells in liquid form. When working with DNA in the range of 50–200 kb, it may be necessary to use pipette tips with large openings. When running only liquid samples, the best
resolution and sharpness of bands is achieved using a thin well comb (0.75 mm).
3.3 Preparation of Agarose Embedded Mammalian DNA
The buffers, enzymes, and agarose in the following procedure are provided in the CHEF
Mammalian Genomic DNA Plug Kit (catalog number 170-3591; see Section 9 for information).
1. Prepare a cell suspension in isotonic saline or tissue culture medium without fetal bovine
serum. Count the cells and remove 5 x 10⁷cells for each ml of agarose plugs to be made
and place on ice. See Section 3.7 for hemocytometer use. The 50 well plug mold makes
5 ml of agarose plugs. We recommend making slightly more than 5 ml if all fifty wells
are to be used.
2. Prepare a 2% low melt agarose (2% CleanCut™agarose is recommended, catalog num-
ber 170-3594) solution in sterile water and melt using a microwave. Equilibrate the solu-
tion to 50 °C in a water bath.
3. Centrifuge the cell suspension at 1,000 x g for 5 minutes at 4 °C. Resuspend the cells in
one-half the final volume of plugs to made using Cell Suspension Buffer (10 mM Tris, pH
7.2, 20 mM NaCl, 50 mM EDTA) and equilibrate the cell suspension to 50 °C.
4. Combine the cell suspension with an equal volume of 2% CleanCut agarose and mix gen-
tly but thoroughly. This results in a final concentration of 1% agarose. Keeping the
cell/agarose mixture at 50 °C, transfer the mixture to plug molds using sterile transfer
pipettes (Bio-Rad’s disposable transfer pipettes, catalog number 223-9524, are recom-
mended). Allow the agarose to solidify. This step can be expedited by placing the molds
at 4 °C for 10–15 minutes. This also adds strength to the agarose for removal from the
mold.
5. Using a 50 ml conical centrifuge tube, add 5 ml of Proteinase K Reaction Buffer
(100 mM EDTA, pH 8.0, 0.2% sodium deoxycholate, 1% sodium lauryl sarcosine,
1 mg/ml Proteinase K) for each ml of agarose plugs (e.g. use 25 ml of Proteinase K
Reaction Buffer for 5 ml of agarose plugs). Push the solidified agarose plugs, using the
snap off tool provided on the plug mold, into the 50 ml centrifuge tube containing the
Proteinase K solution. Incubate the plugs overnight at 50 °C without agitation.
Note: various cell lines have been incubated up to 4 days in Proteinase K without detri-
mental effects to the quality of DNA.
6. Wash the plugs four times in 50 ml of wash buffer (20 mM Tris, pH 8.0, 50 mM EDTA),
30 minutes to 1 hour each at room temperature with gentle agitation. If the plugs are to
be used in subsequent enzymatic reactions, it is advisable to wash the plugs in 1 mM
PMSF during the second or third wash to inactivate any residual Proteinase K activity.
7. Store the plugs at 4 °C. The plugs are stable for 3 months to 1 year.
8. Maintain the plugs in 1x Wash Buffer for long term storage. However, for subsequent
restriction digestion, the EDTA concentration must be lowered. Wash the plugs to be
restricted for 30 minutes in 0.1x wash buffer or TE. See Section 3.6 for information on
restriction digestion of plugs.
10
Page 14

3.4 Preparation of Agarose Embedded Bacterial DNA
The buffers, enzymes, and agarose in the following procedure are provided in the CHEF
Bacterial Genomic DNA Plug Kit (catalog number 170-3592; see Section 9 for information).
1. Inoculate a bacterial culture into 50 ml of LB Broth or appropriate media and grow with
agitation to an O.D.
600
of 0.8–1.0 at the appropriate temperature.
2. When the desired O.D.
600
is reached, add chloramphenicol to a final concentration of
180 µg/ml and continue incubation up to 1 hour while performing step 3.
Note: Chloramphenicol is used to synchronize ongoing rounds of chromosomal replica-
tion and inhibit further rounds of replication. This step is optional, but regions near the
replication terminus might be under represented. In addition, chloramphenicol will alter
the morphology of the cells over time, causing the appearance of a mixed culture, there-
fore proceed as quickly as possible with step 3.
3. Make a twenty-fold dilution of the above bacterial suspension using 10 µl bacteria, 20 µl Gram
Crystal Violet, and 170 µl saline or PBS. Place a small amount of the bacterial suspension on
a hemocytometer and count at 400x power. See Section 3.7 for hemocytometer use.
4. Prepare a 2% low melt agarose (2% CleanCut agarose is recommended, catalog number
170-3594) solution using sterile water and melt using a microwave. Equilibrate the solu-
tion to 50 °C in a water bath.
5. Remove 5 x 10⁸cells for each ml of agarose plugs to be made. Centrifuge for 3 minutes
in a microcentrifuge. If the volume is too large, spin at 10,000 x g for 5 minutes at
4 °C in an appropriate size tube. Resuspend the cells in one-half the final volume of plugs
to be made using Cell Suspension Buffer (10 mM Tris, pH 7.2, 20 mM NaCl,
50 mM EDTA) and equilibrate the cell suspension to 50 °C.
Caution: Some bacteria may be sensitive to the concentration of EDTA or the osmotic
strength of cell suspension buffer resulting in premature lysis of the bacteria. This pre-
mature lysis will result in DNA that is unacceptable for PFGE. Bacteria such as
Enterococci require 1 M NaCl in the buffer to prevent osmotic imbalance resulting in
lysis. Pseudomonasis sensitive to EDTA concentration, and dilution of the buffer may be
necessary. Most bacteria require no alteration of the buffer, but as stated in the above
procedure, mixing and imbedding of the bacteria should proceed as quickly as possible.
6. Combine the cell suspension with an equal volume of 2% CleanCut agarose and mix gen-
tly but thoroughly. This results in a final concentration of 1% agarose. Keeping the
cell/agarose mixture at 50 °C, transfer the mixture to plug molds using sterile transfer
pipettes (Bio-Rad’s disposable transfer pipettes catalog number 223-9524 are recom-
mended). Allow the agarose to solidify. This step can be expedited by placing the molds
at 4 °C for 10–15 minutes. It also adds strength to the agarose for removal from the mold.
7. Using a 50 ml conical centrifuge tube, add 5 ml of lysozyme buffer (10 mM Tris, pH 7.2,
50 mM NaCl, 0.2% sodium deoxycholate, 0.5% sodium lauryl sarcosine, 1 mg/ml
lysozyme) for each ml of agarose plugs, (e.g. use 25 ml of lysozyme buffer for 5 ml of
agarose plugs). Push the solidified agarose plugs, using the snap off tool provided on the
plug mold, into the 50 ml centrifuge tube containing the lysozyme buffer. Incubate the
plugs 30 minutes to 1 hour at 37 °C without agitation.
Note: Bacteria such as Staphylococcus aureus and some others are insensitive to lysozyme,
therefore lysostaphin must be substituted for lysozyme buffer. Additionally, adding
lysostaphin to the cell suspension immediately prior to embedding with agarose produces
high quality S. aureus plugs.
11
Page 15

8. Remove the lysozyme buffer and rinse the plugs with 25 ml of 1x wash buffer (see step
9 for wash buffer recipe). Add 5 ml of Proteinase K Reaction Buffer (100 mM EDTA, pH
8.0, 0.2% sodium deoxycholate, 1% sodium lauryl sarcosine, 1 mg/ml Proteinase K) for
each ml of agarose plugs. Incubate the plugs overnight at 50 °C without agitation.
Note: various cell lines have been incubated up to 4 days in Proteinase K without detri-
mental effects to the quality of DNA.
9. Wash the plugs four times in 50 ml of wash buffer (20 mM Tris, pH 8.0, 50 mM EDTA),
30 minutes to 1 hour each at room temperature with gentle agitation. If the plugs are to
be used in subsequent enzymatic reactions, it is advisable to wash the plugs in 1 mM
PMSF during the second or third wash to inactivate any residual Proteinase K activity.
10. Store the plugs at 4 °C. The plugs are stable for 3 months to 1 year.
11. Maintain the plugs in 1x Wash Buffer for long term storage. However, for subsequent
restriction digestion, the EDTA concentration must be lowered. Wash the plugs to be
restricted for 30 minutes in 0.1x wash buffer or TE. See Section 3.6 for more information
on restriction digestion of plugs.
3.5 Preparation of Agarose Embedded Yeast DNA
The buffers, enzymes, and agarose in the following procedure are provided in the CHEF
Yeast Genomic DNA Plug Kit (catalog number 170-3593; see Section 9 for more information).
1. Inoculate a single colony into 50 to 100 ml YPG broth or appropriate media. Grow with
aeration to an O.D.
600
of >1.0 at the appropriate temperature for your strain.
2. When the desired O.D.
600
is reached, centrifuge the cells at 5,000 x g, 10 minutes at
4 °C. Decant the supernatant and resuspend in 10 ml cold 50 mM EDTA, pH 8.
3. Determine the cell concentration by adding 10 µl of cells to 990 µl of water. Place the
yeast suspension on a hemocytometer and count at 400x power. See Section 3.7 for hemo-
cytometer use.
4. Prepare a 2% low melt agarose (2% CleanCut agarose is recommended, catalog number
170-3594) solution using sterile water and melt using a microwave. Equilibrate the solu-
tion to 50 °C in a water bath.
5. Remove 6 x 10⁸cells for each ml of plugs to be made. Centrifuge in a microfuge for 3 min-
utes if volumes are small, otherwise centrifuge the cells at 5,000 x g, for 10 minutes at
4 °C. Resuspend the cells in one-half the final volume of plugs to be made using Cell
Suspension Buffer (10 mM Tris, pH 7.2, 20 mM NaCl, 50 mM EDTA) and equilibrate
the cell suspension to 50 °C.
6. Just prior to mixing the cells with agarose, add Lyticase to a final concentration of 1 mg/ml
for each ml of plugs to be made, to the cell suspension and immediately proceed with step 7.
Note: Add Lyticase immediately prior to embedding the cells in agarose. Certain strains
of yeast do not give acceptable DNA when Lyticase is added after the cells have been
embedded into agarose.
7. Immediately combine the cell suspension with an equal volume of 2% CleanCut agarose
and mix gently but thoroughly. This results in a final concentration of 1% agarose.
Keeping the cell/agarose mixture at 50 °C, transfer the mixture to plug molds using ster-
ile transfer pipettes (Bio-Rad’s disposable transfer pipettes catalog number 223-9524 are
recommended). Allow the agarose to solidify. This step can be expedited by placing the
molds at 4 °C for 10–15 minutes, and it also adds strength to the agarose for removal
from the mold.
12
Page 16

8. Using a 50 ml conical centrifuge tube, add 5 ml of lyticase buffer (10 mM Tris, pH 7.2, 50
mM EDTA, 1 mg/ml lyticase) for each 1 ml of plugs. Push the solidified agarose plugs,
using the snap off tool provided on the plug mold, into the 50 ml centrifuge tube contain-
ing the lyticase buffer. Incubate the plugs 30 minutes to 1 hour at 37 °C without agitation.
9. Remove the lyticase buffer and rinse the plugs with 25 ml of 1x wash buffer (see step 10
for wash buffer recipe). Add 5 ml of Proteinase K Reaction Buffer (100 mM EDTA, pH
8.0, 0.2% sodium deoxycholate, 1% sodium lauryl sarcosine, 1 mg/ml Proteinase K) for
each ml of agarose plugs. Incubate the plugs overnight at 50 °C without agitation.
Note: various cell lines have been incubated up to 4 days in Proteinase K without detri-
mental effects to the quality of DNA.
10. Wash the plugs four times in 50 ml of wash buffer (20 mM Tris, pH 8.0, 50 mM EDTA),
30 minutes to 1 hour each at room temperature with gentle agitation. If the plugs are to
be used in subsequent enzymatic reactions, wash the plugs in 1 mM PMSF during the
second or third wash to inactivate any residual Proteinase K activity.
11. Store the plugs at 4 °C. The plugs are stable for 3 months to 1 year.
12. Maintain the plugs in 1x Wash Buffer for long term storage. However, for subsequent
restriction digestion, the EDTA concentration must be lowered. Wash the plugs to be
restricted for 30 minutes in 0.1x wash buffer or TE. See Section 3.6 for more information
on restriction digestion of plugs.
3.6 Restriction Enzyme Digestion of Plugs
1. Place one plug per digest in a sterile 1.5 ml microcentrifuge tube. Incubate the plug with
1 ml of the appropriate 1x restriction enzyme buffer for about 1 hour with gentle agita-
tion at room temperature. Aspirate off the buffer and add 0.3 ml of fresh 1x restriction
enzyme buffer. Add the restriction enzyme (30-50 U per 100 µl plug) and incubate
overnight at the appropriate temperature.
Note: Some restriction enzymes require shorter incubation times for complete digestion
(2-4 hours). This should be determined empirically.
2. After overnight digestion, remove the buffer and add 1 ml of wash buffer.
Note: If the plugs are to be stored for more than 1 day, remove the wash buffer from the tube
and store at 4 °C. This will prevent possible diffusion of small (<100 kb) DNA fragments
out of the agarose plug.
3. Load 1⁄3 to 1⁄2 of a plug (approximately 2 mm) per well and adjust the volume if necessary
on subsequent gels. In addition, always load appropriate size standards.
Note: For a 10 mm wide well use 1⁄2 of the plug (10 mm x 2 mm). For a 5 mm wide well
use 1⁄3 of the plug (5 mm x 2 mm).
3.7 Hemocytometer Usage
A hemocytometer is usually divided into nine large squares (Figure 3.1). Each large square
is 1 x 10⁻⁴cm2or 0.1 mm3; one such square (A) is shown the figure with darkened borders.
The large circle around the center square (B) represents your field of view at 100x power
(10x objective lens, 10x eye piece). The center square (C) is subdivided into 25 smaller
squares. The smaller circle in the center square represents your field of view at 400x power
(40x objective lens, 10x eye piece). These 25 center squares are further divided into 16 squares.
13
Page 17

Fig. 3.1. Hemocytometer grid.
Mammalian or tissue culture cells
Because of the large size, tissue culture cells can be counted at 100x power. Count 10 of
the large squares, five on each side of the hemocytometer. Determine the average cells per
square using the equations:
Cells Counted
= Average Cells per Square
Number of Center Squares
Average Cells per Square x Dilution Factor x 10
4
= Cells per ml
Use the following ratio to determine how many ml of cell suspension to use to achieve the
desired cell concentration for the plugs.
5 x 10⁷Cells Desired
x ml of plugs to be made = ml of cell suspension to use
Actual Cell Concentration
For Example: 230 cells in 10 squares = average of 23 cells /square x 5 (dilution factor)
x 104= 1.2 x 10⁸cells per ml. So for 5 ml of plugs you need 5 ml x 5 x 107cells final concentration divided by 1.2 x 10⁸actual cells concentration = 2.1 ml of cell suspension is required
to make 5 ml of agarose plugs.
Bacteria and yeast cells
Count five to ten of the 25 center squares, at 400x power, to get a representative sample
of your cell suspension. You should have approximately 25 to 75 cells per square. The cells
should be relatively free of clumps. Bacteria which naturally chain or grow in clusters are
relatively easy to count and do not have to be dispersed by chemical or enzymatic methods.
The Grams Crystal Violet aids in the visualization of bacteria.
Use the equations below to determine the cell concentration:
Cells Counted
= Average Cells per Square
Number of Squares
Average Cells per Square x 25 Squares x Dilution Factor x 10
4
= Cells per ml
Use the following ratio to determine how many ml of cell suspension to use to achieve the
desired cell concentration for the plugs.
Desired Cell Concentration
x ml of plugs to be made = ml of cell suspension to use
Actual Cell Concentration
B
14
C
A
Page 18

For Example: 300 bacteria in 5 squares = average of 60 bacteria/square x 25 (squares) x 20
(dilution factor, yeast use 100 for dilution factor) x 104= 3 x 10⁸bacteria per ml. So for 5 ml of
plugs you need 5 ml x 5 x 108cells final concentration ÷ 3 x 10⁸actual cells concentration = 8.33
ml of cell suspension is required.
3.8 Estimation of Agarose Plug DNA Concentration
Two pieces of information are needed to determine DNA concentration:
1. The size in base pairs of the genome. This information is readily available for most organ-
isms, otherwise a best guess is necessary. We use 6 x 10⁹for mammalian, 4.5 x 10⁶for
Escherichia coli and 1.5 x 10⁷for Saccharomyces cerevisiae in the following examples.
2. You need to determine the number of genomes per cell. For example, for stationary growth
phase in yeast or bacterial cells or confluent growth in tissue culture cells, assume one genome
per cell. However, for exponential phase growing cells there is more than one genome per cell.
Make a best guess or assume one per cell which will give the minimum concentration of
DNA. In the below examples we use a value of 1.2 genome equivalents (20%) for mam-
malian cells, 2.5 genome equivalents for bacteria, and 2 genome equivalents for yeast
217
.
Equations for Estimation of DNA Concentration in Agarose Plugs:
(Genome Size bp)(660 g/mole)
= grams DNA/cell (A)
6.02 x 10
23
bp/mole
(grams DNA/cell)(cell/ml) = (grams DNA/ml)(1 x 10
6
µg/ml) = µg DNA/ml (B)
(µg DNA/ml)(genome equivalents) ≅ (µg DNA/ml) (C)
(µg DNA/ml) ≅(µg DNA/plug)
≅ µg DNA/lane (D)
10 plugs/ml 2 lanes/plug
Example Calculations:
Mammalian:
(6 x 10⁹bp)(660 g/mole)
= 6.578 x 10
-12
g DNA/cell (A)
6.02 x 10
23
bp/mole
(6.578 x 10
-12
g/cell)(5 x 107cell/ml) = (B)
(3.289 x 10
-4
g/DNA/ml)(1 x 106µg/ml) = 329 µg DNA/ml
(3.29 µg DNA/ml)(1.2 genome equivalents) ≅ 394 µg DNA/ml (C)
(394 µg DNA/ml) ≅(40 µg DNA/plug)
≅ 20 µg DNA/lanes (D)
10 plugs/ml 2 lanes/plug
15
Page 19

Bacterial:
(4.5 x 10⁶bp)(660 g/mole)
= 4.933 x 10
-15
g DNA/cell (A)
6.02 x 10
23
bp/mole
(4.933 x 10
-15
g DNA/cell)(5 x 108cell/ml) = (B)
(2.467 x 10
-6
g/DNA/ml)(1 x 106µg/ml) = 2.5 µg DNA/ml
(2.5 µg DNA/ml)(2.5 genome equivalents) ≅ 6.25 µg DNA/ml (C)
(6.25 µg DNA/ml) ≅(0.625 µg DNA/plug)
≅ 0.3 µg DNA/lane (D)
10 plugs/ml 2 lanes/plug
Yeast:
(1.5 x 10⁷bp)(660 g/mole)
= 1.644 x 10
-14
g DNA/cell (A)
6.02 x 10
23
bp/mole
(1.644 x 10
-14
DNA/cell)(6 x 108cell/ml) = (B)
(9.864 x 10
-6
g/DNA/ml)(1 x 106µg/ml) = 9.864 µg DNA/ml
(9.864 µg DNA/ml)(2 genome equivalents) ≅ (20 µg DNA/ml) (C)
(20 µg DNA/ml) ≅(2 µg DNA/plug)
≅ 1.0 µg DNA/lane (D)
10 plugs/ml 2 lanes/plug
Section 4
Gel Electrophoresis
4.1 Casting the Gel
Casting the gel requires the use of the following components: casting stand with removable
end plates, the casting platform, a comb and comb holder, and the frame which positions the gel
and platform in the electrophoresis cell. The casting stand provided with the CHEF-DR III
system is 14 cm (5.5") wide x 13 cm (5") long. Optional stands are 21 cm (8.5") wide x
14 cm (5.5") long, and 14 cm (5.5") wide x 21 cm (8.5") long. The gel should be cast on a
level surface. Bio-Rad’s Leveling Table (catalog number 170-4046) is useful for this purpose.
For detailed instructions, refer to the Casting Stand manual.
1. Slide the platform into the casting stand. There is no sidedness to the platform. Position
one end gate over the screws protruding from the casting stand, with the horizontal slot
facing the platform. Slide the edge of the platform into the slot, press down on the end gate,
and gently tighten the screws.
2. Position the other end gate over the screws, and slide it toward the platform until the edge
of the platform is in the slot. Press down on the end gate, and gently tighten the screws.
The slots force the platform against the bottom of the casting stand.
16
Page 20

17
3. To attach the desired comb to the comb holder, place the comb over the 2 metal pins, and
turn the screw clockwise. This causes one pin to move towards the screw, holding the comb
in place. Adjust the height of the comb to 2 mm above the surface of the platform by loos-
ening the screw (counterclockwise), then tightening when the comb is properly positioned.
A thin plastic ruler makes a good height gauge.
4. Place the comb holder with attached comb into one of the two positioning slots on each
side of the casting stand. Check that the bottom of the comb is at least 2 mm above the
surface of the platform. Pour approximately 100 ml of the desired agarose solution (<60 °C)
into the casting stand for a thickness of approximately 5–6 mm. Allow the gel to solidi-
fy for 30 minutes at room temperature.
5. Carefully remove the comb holder and comb; it is sometimes helpful to rock the holder
back and forth slightly during its removal. Sample plugs can be added to the wells with
the gel in the casting stand.
Fig. 4.1. The CHEF-DR III casting stand and comb holder.
4.2 Buffer Circulation and Temperature
Level the electrophoresis cell with the leveling feet at each corner by placing the casting platform in the center of the cell, then placing the leveling bubble (provided) on the casting platform.
Putting the casting platform in the center of the cell will level the gel with respect to the electrophoresis cell. Remove the casting platform after leveling. Position the frame in the electrophoresis
cell by placing the 2 plastic pins into the bottom set of holes (toward the front ports) in the floor of
the cell so that the frame is centered (center hole in each group of 3 holes). Pour 2.0–2.2 liters of
buffer (appropriate concentration of TBE or TAE) into the cell. Switch on the CHEF-DR III power,
then switch on the variable speed pump. Circulate at ~ 0.75 L/min (a setting of ~ 70 on the pump
regulator). Maintain the flow rate at the maximum setting that does not disturb the gel
Note: If the buffer circulation appears slower that normal (i.e. less than 500 ml / min at a set-
ting of 70 on the pump regulator, it is possible that the outlet ports on the electrophoresis cham-
ber are clogged with agarose. Reverse the recirculation flow to unclog the ports. Remove any
agarose debris from the chamber and restore the flow to original condition.
Allow the buffer to equilibrate to the desired temperature. We recommend 14 ˚C buffer
temperature in cell. The electrophoresis buffer can be chilled by the following methods:
1. Attach the Cooling Module (see Cooling Module manual for set-up and operation).
2. Coil pump tubing into a temperature-controlled water bath with the temperature set so
that the buffer temperature in the gel chamber is 14 ˚C.
Page 21

Before beginning the electrophoresis run, check the current output displayed on the
CHEF-DR III power module to insure that the correct buffer concentration is used. The
following values are for 2 liters of buffer at 14 °C circulating through the electrophoresis cell.
Buffer Voltage Current
Concentration Gradient Range
0.5x TBE (at 14 ˚C) 2 V/cm 30–45 mA
0.5x TBE (at 14 ˚C) 3 V/cm 50–65 mA
0.5x TBE (at 14 ˚C) 6 V/cm 115–135 mA
0.5x TBE (at 14 ˚C) 9 V/cm 190–210 mA
1.0x TAE (at 14 ˚C) 2 V/cm 75–90 mA
1.0x TAE (at 14 ˚C) 3 V/cm 115–130 mA
1.0x TAE (at 14 ˚C) 6 V/cm 260–275 mA
1.0x TAE (at 14 ˚C) 9 V/cm 380–410 mA
If the current output is significantly different from the values listed above, drain the buffer, and
add new buffer. Premixed 10x TBE is available from Bio-Rad (catalog number 161-0733).
Concentrations of Buffers
Different final concentrations of electrophoresis buffer have been employed in pulsed
field electrophoresis. Recommended final buffer concentrations are:
0.5x TBE Buffer: 45 mM Tris 10x TBE Buffer: 108 g Tris base
45 mM borate (per liter) 55 g boric acid
1.0 mM EDTA 40 ml 0.5M EDTA,
pH 8.3 pH 8.0
1.0x TAE Buffer: 40 mM Tris 50x TAE Buffer: 242 g Tris base
40 mM acetate (per liter) 57.1 ml glacial acetic
2.0 mM EDTA acid 100 ml 0.5M
pH 8.0 EDTA, pH 8.0
4.3 Loading the Samples
Use one of the following methods to load the sample.
1. Place DNA in a sample plug on a smooth clean surface, and cut to size using a razor
blade or spatula. Samples should be less than 90% of the height of the wells. Place agarose
plugs onto the front walls of the sample wells using a spatula and gently press them to the
bottoms of the wells. Press the plugs firmly against the front walls of the wells. Fill each
sample well with Low Melt Preparative Grade Agarose at an agarose concentration equal
to that of the gel, and allow the agarose to harden at room temperature for 10–15 minutes.
2. Cut the sample plug into blocks and place on each tooth of the comb. Cast around the
comb.The plug will remain in place when the comb is removed.
3. Add liquid samples to the sample wells with the gel positioned under the electrophoresis
buffer in the chamber. Turn the pump off when adding liquid samples to prevent samples
from washing out of the wells. Run the samples into the gel for approximately 5 minutes
before turning the pump back on.
4.4 DNA Size Standards
Bio-Rad recommends running standards in each gel to allow the sizes of unknown samples
to be determined and to verify the electrophoresis conditions. Figure 4.2 shows four Bio-Rad
standards for pulsed field electrophoresis. These come as blocks of 1.0% Low Melt agarose.
Recommended running conditions are given in the figure legend.
18
Page 22

19
Fig. 4.2. Lambda ladder was separated on a 1.0% Molecular Biology Certified Agarose (catalog num-
ber 162-0133) gel in 0.5x TBE, recirculated at 14 °C. The run time was 22 hours at 6 V/cm with a 50 to
90 second switch time ramp at an included angle of 120°.
Saccharomyces cerevisiae
Strain YNN295.
Chromosomes were separated on a 1.0% Pulsed Field Certified Agarose (catalog number 162-0137)
gel in 0.5x TBE, recirculated at 14 °C. The run time was 24 hours at 6 V/cm with a 60 to 120 second
switch time ramp at an included angle of 120°.
Hansenula wingei
Strain YB-4662-VIA. Chromosomes
were separated on a 0.8% Pulsed Field Certified Agarose gel in 1.0x TAE, recirculated at 14 °C. The run
time was 48 hours at 3 V/cm with a 500 second switch time at a included angle of 106°.
Schizosaccharomyces pombe
Strain 972 h-. Chromosomes were separated on a 0.6% Chromosomal
Grade Agarose (catalog number 162-0135) gel in 1.0x TAE, recirculated at 14 °C. The run time was 72
hours at 1.5 V/cm with a 30 minute switch time at a included angle of 106°.
4.5 Electrophoresis
Remove both end gates by loosening the screws. Push the end gates off the edge of the
platform for removal, and slide the platform out of the casting stand. Place the gel and
platform assembly into the frame so that the bottom of the platform rests on the floor of the
cell. Do not remove the gel from the platform. Check the buffer level to insure that the gel is
covered by about 2 mm of buffer. Adjust the buffer flow, if necessary, by using the flow
adjustment knob on the Variable Speed Pump. Enter your run parameters (refer to Section 2
for complete operating instructions).
Prior to the first separation of experimental samples, we recommend an initial separation
of one or more of the four DNA size standards illustrated in Figure 4.2, using the conditions
described in the legend. Obtaining separations similar to those in Figure 4.2 will indicate that
the CHEF-DR III system is functioning properly.
4.6 Separations at Room Temperature
Electrophoresis may be conducted at room temperature, without a chiller, but the buffer
should not be allowed to exceed 30 °C. It is important to maintain the temperature at a steady
value. To facilitate heat transfer, coil 4-5 feet of the Tygon tubing into a bucket of water.
Recirculation of the buffer is required. Change the buffer every 24 hours.
Since heat generation is proportional to the square of the voltage, it is essential to lower
the field strength to 4.5 V/cm or less, depending on the size of DNA to be resolved.
Electrophorese S. cerevisiae chromosomes at 3.8-4.5 V/cm. Gel strength and buffer concen-
tration do not need to be changed, although switch times and run times may be increased
10 to 20% at the lower field strength. The conditions for resolution of S. cerevisiae chromosomes are the same as those given in Table 2, Section 5.3, except that the voltage should be
reduced to 4.5 V/cm when the temperature is 29 °C.
Alternatively, the ionic strength of the buffer may be decreased to 0.25x TBE. In this case,
decrease voltage even more than above or some DNA may not enter the gel. In some cases,
DNA bands may be slightly more diffuse at room temperature than when resolved at 14 °C.
Lambda Ladder S. cerevisiae H. wingei S. pombe
Page 23

4.7 Removing and Staining the Gel
Before removing the gel, make sure the run is completed. The unit will display End. To
stain the gel during a run, push PAUSE/START RUN on the CHEF-DR III system. Remove
the gel (on the platform) from the cell, slide it off the platform into a 0.5 µg/ml ethidium
bromide solution in water, and let the gel stain for 20–30 minutes. (Caution: Ethidium
bromide is a mutagen. Always wear gloves while handling gels or solutions containing the
dye.) Destain the gel in distilled water for 1–3 hours. Visualize the DNA by placing the gel
on a UV transilluminator (254–360 nm). Remove the buffer from the gel box by attaching a
drain tube and allowing the buffer to drain into a 2 liter container with the pump turned off.
Discard used buffer and reclamp the drain tube.
Note: Leaving electrophoresis buffer in the cell with the lid closed, when not in use, may
lead to warpage of the lid. Leave the lid slightly opened without buffer in the cell when
not in use to minimize potential warpage.
Section 5
Applications
5.1 Strategies for Electrophoretic Separations
There are several parameters that must be considered before performing an electrophoretic
separation of very high molecular weight DNA. The separations of large DNA molecules in
agarose gels are affected by agarose concentration, buffer concentration, buffer temperature,
initial and final switch times, voltage, total electrophoresis run time, and field angle.
Agarose Concentration
The agarose concentration affects the size range of DNA molecules separated, and the
sharpness, or tightness, of the bands. Agarose concentrations of 1.0% are useful in separating
DNA molecules up to 3 mb in size. Agarose concentrations in the range of 1.2–1.5% are
typically used for improved band tightness, however run times will increase proportionately.
Gel concentrations below 1.0% (0.5–0.9%) are useful in separations of extremely high molecular weight DNA, greater than 3 mb, though the bands are a bit more diffuse.
There are several agarose types that allow easy handling of low concentration gels. These
agaroses, in concentrations of 0.5–0.8%, can be used to decrease the run time on separation
of large DNA (> 2 mb). An example of this type of agarose is Bio-Rad’s Chromosomal Grade
Agarose (catalog number 162-0135).
Buffer Concentration and Temperature
In pulsed field electrophoresis, DNA mobility is sensitive to changes in buffer temperature. As the buffer temperature increases, the mobility of the DNA increases, but band sharpness and resolution decrease. Chill the buffer to 14 ˚C to maintain band sharpness and to
dissipate heat generated during prolonged runs. Also, buffer recirculation is required to prevent temperature gradients from occurring. High voltage runs (300 V) exceeding 1 day require
buffer changes after each 48 hour period, to prevent buffer degradation. Standard Tris-borate
or TBE, at a concentration of 0.5x, is the most commonly used buffer in pulsed field electrophoresis. Tris-acetate buffer, or TAE, at a concentration of 1.0x, can be used in place of
TBE. Other buffer concentrations are in the range of 0.25–1.0x. In Figure 5.1 two different
gels, one using 0.5x TBE and the other using 1.0x TAE, were run to show the difference in
mobility of DNA in the two buffers.
20
Page 24

Fig. 5.1. Two gels, one in 0.5x TBE and the other in 1.0x TAE, were run to show the difference in
mobility of DNA in the two buffers.
S. cerevisiae
was separated on a 1.0% Pulsed Field Certified
Agarose (catalog number 162-0137) gel with a 60 second switch time for 15 hours, followed by a 90
second switch time for 9 hours, at 6 V/cm. Notice the increased migration of the DNA molecules in the
TAE gel when compared with the TBE gel.
Switch Times
The migration rate of DNA molecules through an agarose gel is dependent on switch
time, voltage (field strength), field angle, and run time. In pulsed field electrophoresis, DNA
molecules are subjected to alternating electric fields imposed for a period called the switch
time. Each time the field is switched, the DNA molecules must change direction or reorient
in the gel matrix. Larger molecules take longer to reorient and therefore have less time to
move during each pulse, so they migrate slower than smaller molecules. Resolution is optimal for DNA molecules with reorientation times comparable to the switch time. So as the
DNA size increases, increase the switch time to resolve the molecules. Under some conditions,
larger molecules may run ahead of smaller ones.
50
Voltage (Field Strength)
DNA migration increases with increases in voltage or field strength. However, greater
migration is accompanied by decreased band sharpness. In general, as the size of the DNA
molecules increases, the field strength should decrease. At high field strengths (6 V/cm) some
very large DNA (>3 mb) cannot be resolved on the gel and the field strength must be reduced.
Moreover, some large DNA molecules will not enter the gels at high field strengths. Therefore,
in selecting the field strength for an experiment, a compromise between run time and resolution has to be made.
Field Angle
The CHEF-DR III system allows separations to be carried out with electric field vectors
oriented in any direction in the plane of the gel (90°–120°). With two field vectors, resolution
of DNA molecules up to 1 mb is independent of the angle between them (Birren, Lai, Clark,
Hood, Science, 1203-1205, 1988). It has been shown that decreasing the included angle from
120° to 94° increases the velocity of the DNA, with the mobilities of large DNAs (>1 mb)
affected to a greater degree by the change in angle than are smaller DNAs (<1 mb). Figure 5.2
shows the effect of the included angle on the separation of yeast chromosomes. Decreasing
the included angle will decrease the resolution of smaller DNAs by causing them to pile up
on each other. This same effect on small DNA can be seen with long switch times. It is recommended that the included angle be decreased (<120°) when separating large DNA
molecules greater than 2 mb.
21
800
600
400
200
Size (kb)
2,400
2,200
2,000
1,800
1,600
1,400
1,200
0
0.0
0.1
0.2
Velocity (cm/hr)
0.3
1.0x TAE
0.5x TBE
0.4
1,000
0.5x TBE 1.0x TAE
Page 25

Figure 5.2. Separation of
S. cerevisiae
chromosomes using angles from 120° to 94°.
Electrophoresis Run Time
The electrophoresis run time is determined by the migration rates of the DNA molecules
under investigation. The migration rates, in turn, are affected by the switch time, field strength,
and field angle. As the migration rate of the DNA molecules decreases, the electrophoresis run
time must increase to adequately resolve the DNA molecules of interest.
5.2 Pulsed Field Conditions by DNA Size
The table below gives suggested run parameters for the various DNA size ranges.
DNA DNA DNA DNA
1-100 kb 0.1 - 2.0 mb 2 - 4 mb > 4 mb
% Agarose 1.0–1.2% 0.8–1.2 % 0.6–1 % 0.5–0.8 %
Buffer 0.5x TBE 0.5x TBE 1.0x TAE 1.0x TAE
Temperature 14 °C 14 °C 14 °C 14 °C
Voltage 6–9 V/cm 4.5–6 V/cm 2–3 V/cm 1.0–2.5 V/cm
Pulse Parameters 0.05–10 sec 10–200 sec 200–1,800 sec 10–60 min
Run Times 2–15 hr 15–30 hr 24–72 hr 72–144 hr
Angle 120° 120° 120°, 106° 106°
5.3 Pulsed Field Conditions by Organism
This table gives run parameters for various types of DNA samples.
DNA Agarose Switch Time Run Time
DNA size (kb) Conc. (seconds) (hours) Voltage Angle [Buffer]
Restriction 0.2
–23 1.2% 0.09 a 3 9 V/cm 120° 0.5x TAE
Fragments
5 kb Ladder 5
–75 1.0% 1–6 b 11 6 V/cm 120° 0.5x TBE
Lambda Ladder 50
–1,000 1.0% 50–90 c 22 6 V/cm 120° 0.5x TBE
Saccharomyces
200–2,200 1.0% 60–120 d 24 6 V/cm 120° 0.5x TBE
cerevisiae
Candida
1,000–4,000 0.8% 120 e 24 3.5 V/cm 106° 1.0x TAE
albicans
240 36
Schizo
- 3,500–5,700 0.8% 1,800 f 72 1.5 V/cm 106° 1.0x TAE
saccharomyces
pombe
Dictostelium
3,600–9,000 0.8% 2,000–7,000 g 158 1.8 V/cm 120° 0.25x TBE
discodium
7,000–9,600 82 1.5 V/cm 120°
(a) 0.09 second single switch time for 3 hours. (b) Ramped switch time from 1 to 6 seconds over 11 hours. (c) Ramped switch time
from 50 to 90 seconds over 22 hours. (d) Ramped switch time from 60 to 120 seconds over 24 hours. (e) 120 second switch time for
24 hours followed by 240 second switch time for 36 hours. (f) 30 minute single switch time for 72 hours. (g) Two blocks, with voltage
change in the second block. Buffer temperature is 10 °C. Cox et al., Proc. Natl. Acad. Sci. USA, 87, 8247-8251 (1990).
22
120° 105° 100° 96° 94°
Page 26

5.4 Blotting Megabase DNAs
†
Southern Blot Transfer
Pulsed field electrophoresis is a powerful technique for physical mapping of genes in
various organisms. To determine the chromosomal location of a gene in a microorganism or
the size of the restriction fragment containing a gene in mammalian systems, large DNA fragments separated by CHEF are transferred onto membranes and detected by Southern hybridization analysis. The procedures described for Southern transfer of DNA from standard agarose
gels onto membranes are applicable to large DNA fragments separated by CHEF, with the
addition of the gel pretreatment step given below.
Gel Pretreatment
Since DNA fragments larger than 20 kb cannot be transferred efficiently, DNA fragments
separated by pulsed field gels must be cleaved before transfer onto membranes. DNA can be
cleaved by using either acid (depurination) or UV irradiation. The depurination reaction is
harder to control and is extremely sensitive to temperature. Exposure to shortwave UV light
is a reliable method for nicking DNA in pulsed field gels before transfer.
Procedure
The following procedure was developed for use with the GS Gene Linker®UV chamber.
For optimal results, this protocol must be followed rigorously.
1. Stain the gel with 1.0 µg/ml ethidium bromide (EtBr) for exactly 30 minutes with constant agi-
tation. Use a fresh dilution of the EtBr stock for each gel. Do not destain the gel prior to nicking.
2. Immediately UV irradiate the gel, using the GS Gene Linker chamber, with 60 mJoules
of energy. Photograph the gel using very short exposures (<1 second) to minimize expo-
sure to UV radiation. The gel can also be destained if desired. Transfer the nicked DNA
to nylon membrane using alkali or neutral conditions (see discussion).
3. Soak the gel in 0.4 N NaOH, 1.5 M NaCl for 15 minutes. Transfer the DNA onto
Zeta-Probe®GT nylon membrane (catalog number 162-0196) using 2 liters of 0.4 N
NaOH, 1.5 M NaCl as the transfer solvent.
4. Set up the capillary transfer as follows, from bottom to top:
A. Corning Pyrex glass dish (28 x 18 x 4 cm).
B. A plexiglass or plastic box for support, about 3 cm high and small enough to fit in
the glass dish (e.g., Eppendorf yellow pipette tip rack).
C. Glass plate (16 x 20 cm).
D. Two sheets of blotting paper as a wick (18 x 30 cm; S&S, GB002).
E. Agarose gel (top side down).
F. Zeta-Probe GT membrane cut to the same size as the gel and prewetted with distilled water.
G. Two sheets of blotting paper (18 x 15 cm; S&S, GB002).
H. A stack of paper towels 10 cm high.
5. Transfer the DNA 24–48 hours.
6. Carefully remove the paper towel and blotting papers. Remove the membrane together
with the gel, turn over the membrane and gel, lay them gel side up, and mark the location
of the wells and the orientation marker on the top of the gel. The position of the wells
can be accurately marked on the membrane by using a fine point permanent marker pen,
cutting through the bottoms of the wells.
7. Neutralize the membrane in 0.5 M Tris, pH 7.0 (neutralization buffer) for 5 minutes,
followed by rinsing briefly in 2x SSC. Transferred DNA can be visualized on the membrane by placing the damp blot on a transilluminator.
23
Page 27

8. Dry the membrane by blotting onto 3MM or other adsorbent paper and proceed with
hybridization. UV crosslinking of the DNA to the membrane is not recommended with
this alkaline transfer method.
†
Contributed by Dr. Eric Lai, University of North Carolina
Discussion
1. The procedure is for gels approximately 6 mm thick. If thicker gels are used, the staining
period may be prolonged to allow diffusion of EtBr into the middle of the gels. DNA that
is not stained with EtBr will not be nicked by the UV light and thus will not be transferred from the gel.
2. If the output of the UV light source is not known and no UV meter is available, you can
titrate your UV light source as follows. Run a CHEF gel with eight lanes of S. cerevisiae
chromosomes as markers using a switch time that will provide resolution from 200–1,000
kb. Stain the gel with EtBr, and photograph with medium-wave 302 nm UV light and
fast film (Polaroid type 667) to minimize nicking of DNA. Note the exposure time of the
photo. Cut the gel into eight strips, each containing a lane of separated yeast chromosomes. UV irradiate the strips with a 254 nm light source for time intervals of 5, 10, 15,
30, 45, 60, 90, and 300 seconds. If a 254 nm light source is not available, 302 nm light can
be used, but exposure times have to be lengthened approximately five-fold. Alkaline transfer the gel strips as described, and stain the gels after transfer. Take a photograph of the
gel strips using the same UV light source, film, and exposure time as before transfer, and
compare it with the photograph before transfer. Choose the time period that results in
80–90% transfer of DNA. Do not choose the time intervals with complete transfer because
most of the transferred DNA fragments will be too short for effective hybridization. If
less than 10 second short-wave UV irradiation is required, you may need to use a 302 nm
light source for taking the picture of the gel and cutting away excess gel area. As a general rule, 10 seconds or less exposure time is needed with a new UV transilluminator.
The UV output will decrease with time, to as little as 30% of its initial rating after 7 years.
3. Presoaking the gel in NaOH prior to transfer decreases background and increases transfer efficiency.
4. Pulsed field gels can also be blotted onto membranes using 20x SSC as the transfer buffer solvent with standard alkaline denaturation followed by neutralization. Alkaline transfer onto nylon
membranes gives as good or better sensitivity as standard transfers onto nitrocellulose filters. The
alkaline procedure is much simpler and faster. In addition, nylon membranes can be reused
many more times than nitrocellulose filters. Some blots may be reused as many as 20 times.
5. DNAs separated on the CHEF-DR III or CHEF Mapper system can also be vacuum transferred onto nylon membranes in 4 hours using a commercial vacuum blotter, such as the
Model 785 Vacuum Blotter (catalog number 165-5000), and NaOH as buffer.
6. The DNA is transferred from the back of the gel (the side opposite the wells) onto the
membrane because irregularities in the surface of the gel frequently occur during solidification of these high percentage gels (1%). These surface artifacts will interfere with the
transfer of the DNAs from the gel. Transfer from the other side of the gel insures smooth
surface contact between the gel and the membrane.
7. It is essential to neutralize the membrane after transfer to prevent changing the pH of the
hybridization buffer during hybridization.
8. It is not absolutely necessary to bake nylon membranes after alkaline transfer since the
DNA should be fixed onto the membrane by NaOH.
9. To monitor the efficiency of the transfer, stain the gel in neutralization buffer for 30 minutes
with 1 µg/ml EtBr. Take a photograph of the post-transferred gel, and compare with the
original picture.
24
Page 28
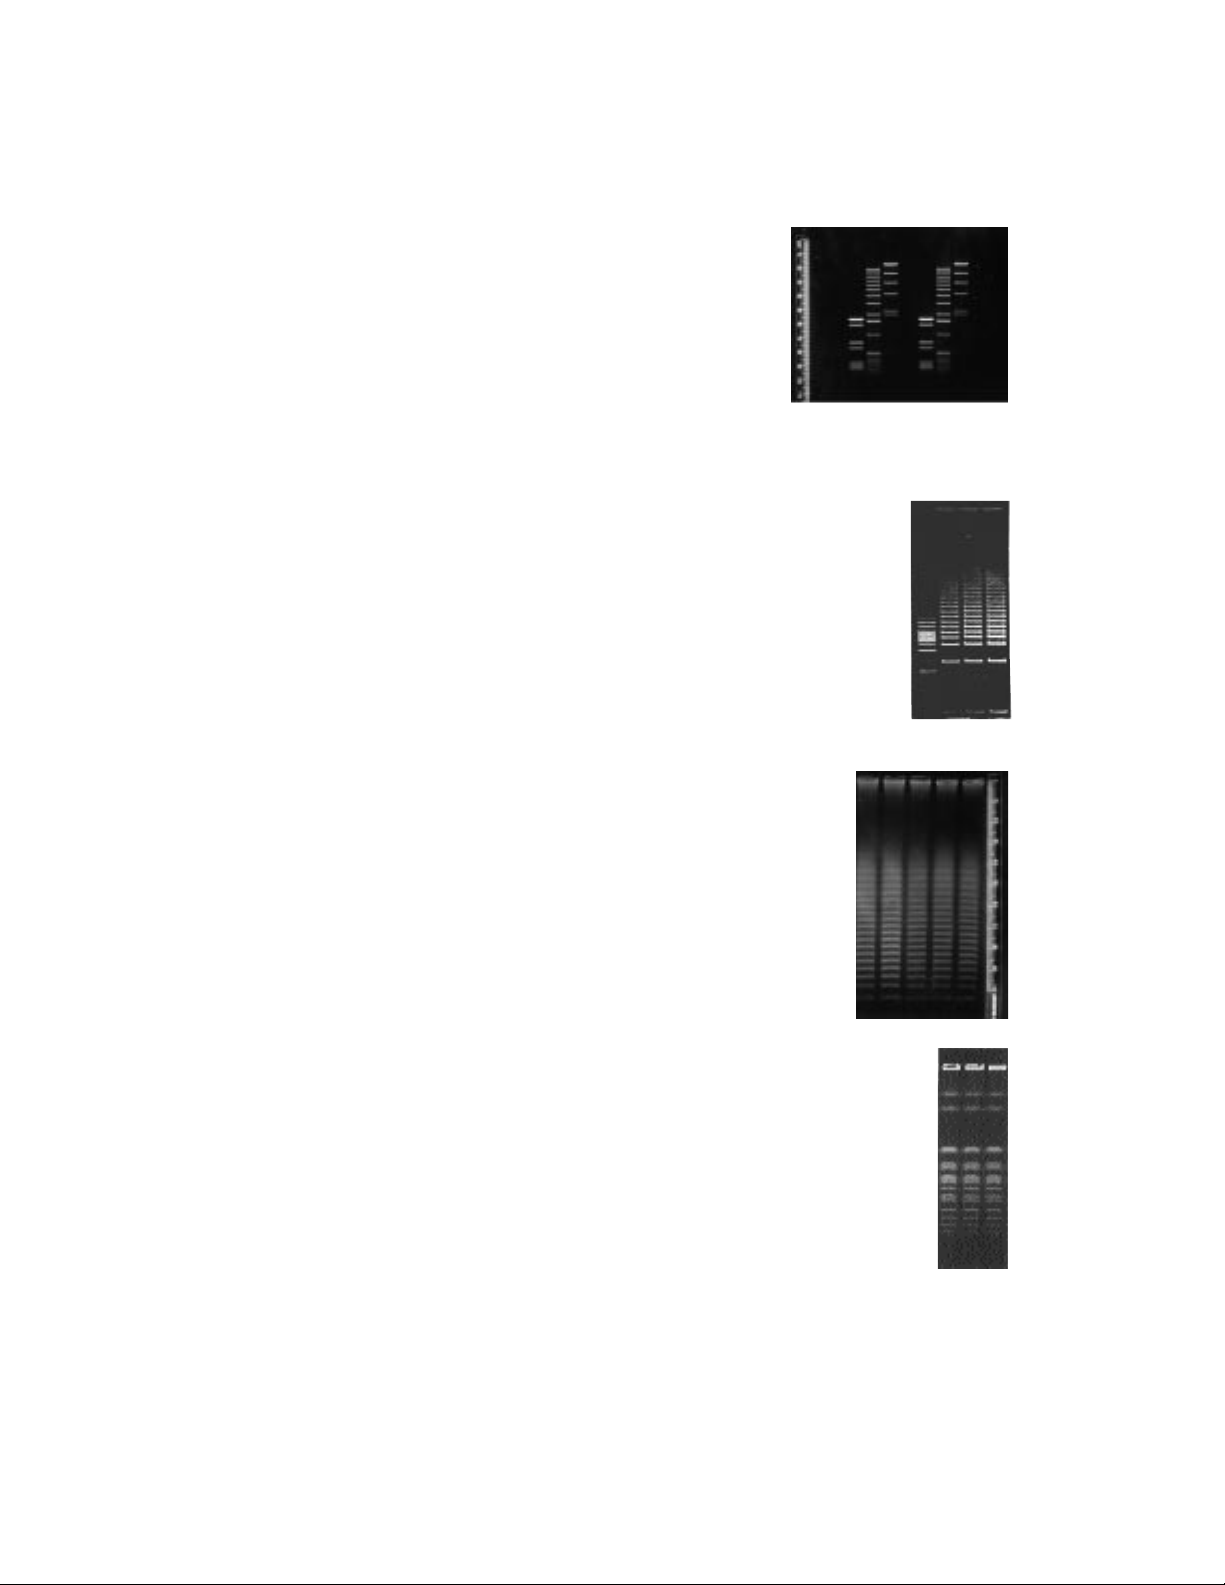
5.5 Separations of DNA Size Standards
1. Restriction fragments
Size Range: 0.2–23 kb
Agarose: 1.2% Molecular Biology Certified
Buffer: 0.5x TBE
Temperature: 14 °C
Switch Time: 0.1 second
Run Time: 3 hours
Angle: 120°
Voltage Gradient: 9 V/cm
2. 5 kb Ladder
Size Range: 5–75 kb
Agarose: 1.0% Molecular Biology Certified
Buffer: 0.5x TBE
Temperature: 14 °C
Switch Time: 1-6 seconds
Run Time: 11 hours
Angle: 120°
Voltage Gradient: 6 V/cm
3. Lambda Ladder
Size Range: 50–1,000 kb
Agarose: 1.0% Molecular Biology Certified
Buffer: 0.5x TBE
Temperature: 14 °C
Switch Time: 50-90 seconds
Run Time: 22 hours
Angle: 120°
Voltage Gradient: 6 V/cm
4. Saccharomyces cerevisiae
Size Range: 240–2,200 kb
Agarose: 1.0% Pulsed Field Certified
Buffer: 0.5x TBE
Temperature: 14 °C
Switch Time: 60–120 seconds
Run Time: 24 hours
Angle: 120°
Voltage Gradient: 6 V/cm
25
Page 29

26
5. Hansenula wingei
Size Range: 1–3.1 mb
Agarose: 0.8% Molecular Biology Certified
Buffer: 1.0x TAE
Temperature: 14 °C
Switch Time: 500 seconds
Run Time: 48 hours
Angle: 106°
Voltage Gradient: 3 V/cm
6. Schizosaccharomyces pombe
Size Range: 3.5–5.7 mb
Agarose: 0.8% Chromosomal Grade
Buffer: 1.0x TAE
Temperature: 14 °C
Switch Time: 1,800 seconds
Run Time: 72 hours
Angle: 106°
Voltage Gradient: 2 V/cm
7. Angle Ramp: S. pombe
Size Range: 3.5–5.7 mb
Agarose: 0.8% Chromosomal Grade
Buffer: 1.0x TAE
Temperature: 14 °C
Block 1 Block 2 Block 3
Switch Time: 1,200 sec. 1,500 sec. 1,800 sec.
Run Time: 24 hours 24 hours 24 hours
Angle: 96° 100° 106°
Voltage Gradient: 2 V/cm 2 V/cm 2 V/cm
8. Voltage Ramp: S. pombe
Size Range: 3.5–5.7 mb
Agarose: 0.8% Chromosomal Grade
Buffer: 1.0x TAE
Temperature: 14 °C
Block 1 Block 2 Block 3
Switch Time: 1,800 sec. 1,500 sec. 1,200 sec.
Run Time: 24 hours 24 hours 24 hours
Angle: 106° 100° 96°
Voltage Gradient: 1.5 V/cm 2 V/cm 2.5 V/cm
Page 30

Section 6
Maintenance of Equipment
6.1 Replacing Electrodes
The gel chamber requires little maintenance except rinsing after every run. Dirt and other
build-up can be removed with laboratory detergent and a fine cloth. Do not bend or break the
electrodes.
Fast switch times (<2 seconds) with high voltage gradients (6-9 V/cm) may lead to
increased electrode failure If one of the electrodes should break, or leak at the O-ring, it may
be replaced. Additional electrodes (catalog number 170-3648) are available from Bio-Rad
Laboratories.
To replace an electrode, turn the gel chamber upside down and remove the six screws. Lift
off the base plate. Remove the hexagonal nut on the wire of the broken electrode, then remove
the hexagonal nut on the electrode to be replaced. Push down firmly on the post to remove the
old electrode. Turn the box over, insert the new electrode, pack with self-leveling silicone
sealant (RTV-type silicone sealer available at most hardware stores), and replace the nut.
Replace the wire and base plate.
If one of the pins to the serial cable bends, use tweezers to carefully straighten it.
Replacement cables may be ordered from Bio-Rad.
6.2 Fuses
If the DC current during a run exceeds 500 mA entering the gel chamber, the 0.5 ampere
FB (fast blow) fuse will blow, and error code F2 will be displayed. Replace the fuse by
unscrewing the cartridge at the front of the drive module. Replace with 0.5 ampere FB fuse
(2 replacement fuses are provided). Make sure the external power supply is off when replacing a fuse.
A power surge may cause the SB (slow blow) line fuse to blow. The LED lights on the
power module will go off. The fuse is at the rear of the drive module. Replace the fuse with
a 3.15 A SB if your line voltage is 100 or 120 VAC, or a 1.6 A SB if your line voltage is 220
or 240 VAC. A 10 Amp fuse is used on the neutral side for 100 and 120 VAC.
Replacement fuses are available from a variety of sources, including Radio Shack®(Tandy
Corporation). The 0.5 A FB fuse can be obtained as catalog number 270-1241, and the 3.15
A SB as catalog number 270-1173 from Radio Shack.
If the unit still does not operate, contact Bio-Rad Laboratories. Do not attempt to open and
repair the power module, or the warranty may be voided.
6.3 Maintenance of the Electrophoresis Cell
When the cell is not in use, even for short periods, all buffer should be removed to pre-
vent damage to the plastics. In addition, the lid should be left slightly opened to minimize
possible warpage.
27
Page 31

Section 7
Troubleshooting Guide
Problem Solution
Equipment
No power 1. Check fuse at back of power module
2. Check source of A/C power
3. Contact Bio-Rad Laboratories
No voltage across electrodes, 1. Check that lid is on
with AC power light on 2. Check that serial cable is fully inserted at both ends
3. Check that coiled interlock cable is firmly attached
4. Confirm that all leads are properly attached
5. Check HV fuse on front panel (0.5 A FB) and replace
if necessary
6. Check that the unit is not set in pause mode
Gel floats away 1. Pump flow rate is too high. Adjust with Variable
Speed Pump.
No or low buffer flow 1. Look for kink in tubing
2. Check Cooling Module; buffer in the heat exchanger
can freeze if the chiller is cooling, but the pump is not on
3. Check pump connection and if the pump is on
4. Electrophoresis chamber outlet port may be clogged.
Reverse buffer recirculation flow to unclog the ports.
Remove agarose debris from the chamber and restore
the flow to original condition.
Gel band patterns appear very 1. Foreign object in chamber (remove thermometer, etc.)
distorted; lanes very curved,
*
2. Insufficient or non-uniform cooling due to low pump
bands sharp, but slanting flow
3. Check that buffer is level with surface of gel. Use
leveling feet.
4. Check that the current is equal for both switch directions
5. Replace damaged electrode
6. Power module fault; contact Bio-Rad Laboratories
7. Not enough buffer in cell (total should be 2.2 liters)
8. Check to insure the electrophoresis chamber is level
(Section 4.2)
* Slight distortion of the outermost lane is normal
Applications
Bands smeary or fuzzy 1. Excessive heating. Lower the voltage or ionic
strength of the buffer.
2. Improper switch interval. See Section 5.1.
3. Gel percentage too low. Increase.
4. Sample degraded. Impure enzymes, or wash cycles
too short (agarose blocks).
5. Agarose impurities. Consult Bio-Rad.
6. Sample overload. Adjust sample concentration.
28
Page 32

Problem Solution
Large DNAs not resolved 1. Lower the voltage to below 2 V/cm
2. Increase switch time or use switch time ramp
3. Agarose impurities
High background in lanes 1. Insufficient washing of samples
2. Sample may be contaminated with RNA or other
material
3. DNA concentration too high
Distorted bands 1. Sample contains too high salt or detergent concentration
2. Buffer breakdown. Change every 48 hours.
3. Wells were distorted. Recast gel.
4. Sample plugs were crushed when placed in wells
5. Pump flow rate too low. Check for kink along tubing.
6. Not enough buffer in cell (total should be 2.2 liters)
Thick bands 1. Use thinner wells
2. Load less sample
Failure Codes
F-0 1. Error detected in the PS processor code during power
up. Contact Bio-Rad Laboratories
F-1 1. Error detected in the DAC processor code during power
up. Contact Bio-Rad Laboratories
F-2 1. The power supply control processor is not getting
adequate feedback from the high voltage power supply during a run. Normal operation will continue and
the display may be changed by pressing a display
mode key.
Check fuses and safety interlock
2. Contact Bio-Rad Laboratories
F-3 1. The DAC external RAM has been corrupted (all
parameters will reset to default values). Normal operation can be resumed by pressing any key on the right
control panel. The battery RAM on the DAC board
did not maintain its data when the power went down.
If this occurs consistently, there may be a hardware
problem on the board, or the battery may be bad.
Contact Bio-Rad Laboratories
F-4 1. If a gross overcurrent is detected (>500 mA), the sys-
tem is put into pause automatically and F-4 is displayed. When the problem is corrected, the run may
be resumed by pressing START.
2. Buffer concentration is too high. Remake the buffer
at the appropriate concentration.
29
Page 33

Section 8
References
8.1 Applications in Pulsed Field Electrophoresis
The following references in pulsed field electrophoresis are primarily from 1987-1989.
The list surveys a wide area of applications and organisms, but is not exhaustive. Underlined
references use the CHEF-DR II pulsed field electrophoresis system.
Organism Reference numbers
Aspergillus 20
Bacteria 8, 49, 55, 80, 90, 93, 120, 128, 149, 152, 190, 195
Candida albicans 92, 110, 111, 112, 150, 170
Caulobacter 52
Dictyostelium 36
Drosophila 64, 204
Epstein-Barr virus 75
Giardia 2
Histoplasma 176
Human 9, 14, 27, 33, 37, 43, 50, 60, 66, 67, 82, 83, 88, 102, 122,
132, 133, 136, 137, 142, 144, 147, 183, 186, 189, 202
Leischmania 61, 69, 103, 135, 156, 163
Mouse 18, 19, 29, 89, 97, 179, 207
Mycoplasma 6, 25, 114, 139
Neurospora 96, 130
Paramecium 68
Plants 72, 187
Plasmodium 10, 42, 86, 138, 161, 171
Pseudomonas 7
S. cerevisiae 3, 23, 31, 54, 87, 91, 123, 124, 151,162, 166, 182, 194,
205, 206
S. pombe 28, 53, 73, 75, 119, 169, 184
Tetrahymena 38
Trypanosoma 113, 192
Ureaplasma 34
Application Reference Numbers
Alkaline blotting 120 , 131
(Zeta-Probe membrane)
Blotting 1, 9, 26, 31, 66, 72, 120, 125, 130, 145, 202
CHEF 13, 20, 26, 28, 30, 31, 36, 37, 39, 42, 45, 56, 57, 58, 61,
85, 91, 93, 94, 96, 107, 121, 123, 136, 139, 143, 145,
151, 156, 162, 163, 168, 171, 173, 197, 198, 201, 202
Chromosome rearrangements 127, 141, 147, 166
30
Page 34

Application Reference Numbers
Circular DNA 8, 75, 78, 79, 104, 118, 159, 160, 163, 164, 190, 207
Cosmid mapping 14, 46, 70, 98, 173, 193
Diagnostics (e.g., cancer) 148
DNA over 5 megabases 20, 72, 130, 197
DNA under 200,000 bases 12, 34, 39, 77, 93
Epstein-Barr virus 75
FIGE 7, 12, 14, 15, 17, 24, 25, 33, 47, 65, 68, 77, 146, 173,
182, 187
FIGE with S. pombe 184
Gene amplification 108, 135, 191
Mapping 1, 18, 59, 66, 87, 134, 140, 199
Minute chromosomes 26, 113
OFAGE 23, 52, 54, 79, 82, 87, 147
On-off pulsing 98, 181
PACE 11, 32, 98
PFGE 16, 50, 102, 137, 138, 140, 153, 155, 189, 184, 202
PFG in acrylamide 84
PHOGE 5
Preparative 45
Ramps 17, 107, 142
Restriction enzymes 105, 120
Review of PFGE 99
RFGE 3, 4, 9, 122, 123, 157, 159, 180
RFLP polymorphism 7, 14, 40, 43, 50, 65, 85, 102, 109, 150
Sample preparation - bacteria 58, 167, 172, 195
Sample preparation - cell lines 167
Sample preparation - general 145, 155, 167, 188
Sample preparation - tissues 106, 167
Sample preparation-YACs 45
Secondary structure analysis 30, 118, 128
Single strand DNA 181
Size standards 39, 74, 116, 200
Strain characterization 35, 69, 71, 121
TAFE 51, 62, 63, 132, 148, 179
Theory 15, 22, 44, 48, 76, 81, 100, 101, 117, 126, 129, 130,
158, 174, 175, 177, 178, 185, 196
Two-D PFG 10, 203
Virus 15, 145
Visualization of DNA (microscope) 154, 168
Yeast artificial chromosomes (YACs) 10, 16, 41, 45, 93, 94, 95, 107, 115, 144, 183, 198
31
Page 35

8.2 Reference List for Pulsed Field Electrophoresis
1. Abel, K. J. and Gross, K. W., Nucl. Acids Res., 16, 2111-2126 (1988).
2. Adams, R. A., Nash, T. E. and Wellems, T. E., Nucl. Acids Res., 16, 4555-4565 (1988).
3. Albig, W. and Entian K-D., Gene, 73, 141-152 (1988).
4. Amler, L.C. and Schwab, M., Molec. and Cell Biol., 9, 4903-4913 (1989).
5. Bancroft, I. and Wolk, C. P., Nucl. Acids Res., 16, 7405-7417 (1988).
6. Bautsch, W., Nucl. Acids Res., 16, 11461-11467 (1988).
7. Bautsch, W., Grothues, D. and Tummler, B., FEMS Microbiol. Let., 52, 255-258 (1988).
8. Beverley, S., Anal. Biochem., 177, 110-114 (1989).
9. Bickmore, W. A., Maule, J. C., Van Heyningen, V. and Porteus, D. J., Somatic Cell Mol. Genet.,
15, 229-236 (1989).
10. Biggs, B. A., Kemp, D. J. and Brown, G. V., Proc. Natl. Acad. Sci. USA, 86, 2428-2432 (1989).
11. Birren, B. W., Hood, L. and Lai, E., Electrophoresis, 10, 302-309 (1989).
12. Birren, B. W., Lai, E., Hood, L. and Simon, M.I., Anal. Biochem., 177, 282-286 (1989).
13. Blocher, D., Einspenner, M. and Zajackowski, J., Int. J. Radiat. Biol., 56, 437-448 (1989).
14. Blonden, L. A., Dunnen, J. T., van Paasen, H. M., Wapenaar, M. C., Grootscholten, P. M.,
Ginjaar, H. B., Bakker, E., Pearson, P. L. and van Ommen, G. J., Nucl. Acids Res., 17, 5611-5621
(1989).
15. Bostock, C. J., Nucl. Acids Res., 16, 4239-4252 (1988).
16. Bowcock, A. M., Herbert, J. M., Wijsman, E., Gadi, I., Cavalli-Sforza, L. L. and Boyd, C. D.,
Proc. Natl. Acad. Sci. USA, 85, 2701-2705 (1988).
17. Bray, P. F., Barsh, G., Rosa, J-P., Luo, X. Y., Magenis, E. and Shuman, M. A., Proc. Natl. Acad.
Sci. USA, 85, 8683-8687 (1988).
18. Brockdorf, N., Amar, L. C. and Brown, S. D., Nucl. Acids Res., 17, 1315-1326 (1989).
19. Brody, H. and Carbon, C., Proc. Natl. Acad. Sci. USA, 86, 6260-6263 (1989).
20. Brown, W. R. and Bird, A. P., Nature, 322, 477-481 (1986).
21. Burke, D. T., Carle, G. F. and Olson, M. V., Science, 236, 806-812 (1987).
22. Cantor, C. R., Gaal, A. and Smith, C. L., Biochemistry, 27, 9216-9221 (1988).
23. Carle, G. F. and Olson, M. V., Nucleic Acids Res., 12, 5647-5664 (1984).
24. Carle, G. F. and Olson, M. V., Science, 232, 65-68 (1986).
25. Chen, T. L. and Manuelidis, L., Genomics, 4, 430-433 (1989).
26. Chen, X. and Finch, L. R., J. Bacteriol., 171, 2876-2878 (1989).
27. Cheng, J-F., Smith, C. L. and Cantor, C. R., Nucl. Acids Res., 17, 6109-6127 (1989).
28. Chikashige, Y., Kinoshita, N., Nakaseko, Y., Matsumoto, T., Murakami, S., Niwa, O. and
Yanagida, M., Cell, 57, 739-752 (1989).
29. Chou, H. S., Nelson, C. A., Godambe, S. A., Chaplin, D. D. and Loh, D. Y., Science, 238, 545-
547 (1987).
30. Chu, G., Electrophoresis, 10, 290-295 (1989).
31. Chu, G., Vollrath, D. and Davis, R., Science, 234, 1582-1585 (1986).
32. Clark, S. M., Lai, E., Birren, B. W., Hood, L. and Simon, M. I., Science, 241, 1203-1205 (1988).
33. Clevers, H. C., Dunlap, S., Wileman, T. E. and Terhorst, C., Proc. Natl. Acad. Sci. USA, 85,
8156-8160 (1988).
34. Cocks, B.G., Pyle, L.E. and Finch, L.R., Nucl. Acids. Res. 17, 6713-6719 (1989).
35. Coetzee, D. J., Kock, J. L. and Pretorius, G. H., J. Microbiol. Methods, 7, 219-225 (1987).
36. Cole, R. A. and Williams, K. L., Nucl. Acids Res., 16, 4891-4902 (1988).
37. Compton, D. A., Weil, M. M., Jones, C., Riccardi, V. M., Strong, L. C. and Saunders, G. F.,
Cell, 55, 827-836 (1988).
38. Conover, R. K. and Brunk, C. F., Molec. and Cell. Biol., 6, 900-905 (1986).
39. Cooney, C. A., Galbraith, J. L. and Bradbury, M. E., Nucl. Acids Res., 17, 5412 (1989).
40. Corcoran, L., Forsyth, K., Bianco, A., Brown, G. and Kemp, D., Cell, 44, 87-95 (1986).
32
Page 36

41. Coulson, A., Waterson, R., Kiff, J., Sulston, J. and Kohara, Y., Nature, 335, 184-186 (1988).
42. Cowman, A. F., Morry, M. J., Biggs, B. A., Cross, G. A. and Foote, S. J., Proc. Natl. Acad. Sci.
USA, 85, 9109-9113 (1988).
43. Craig, J., Fowler, S., Skinner, J. D., Burgoyne, L.A. and McInnes, J. L., Applied and Theor.
Electro., 1, 23-28 (1988).
44. Crater, G. D., Gregg, M. C. and Holzworth, G., Electrophoresis, 10, 310-314 (1989).
45. Cuoto, L. B., Spangler, E. A. and Rubin, E. M., Nucl. Acids Res., 17, 8010 (1989).
46. Deaven, L. L., Hildebrand, C. E., Longmire, J. L. and Moyzis, R. K., Abstract # 77: Human
Genome I Conference, San Diego (1989).
47. Denko, N., Giaccia, A., Peters, B. and Stamato, T. D., Anal. Biochem., 178, 172-176 (1989).
48. Deutsch, J. M., Science, 240, 922-924 (1988).
49. Dingwall, A. and Shapiro, L., Proc. Natl. Acad. Sci. USA, 86,119-123 (1989).
50. Dunham, I., Sargent, C. A., Trowsdale, J. and Cambell, R. D., Proc. Natl. Acad. Sci. USA, 84,
7237-7241 (1987).
51. Edman, J. C., Edman, U., Cao, M., Lundgren, B., Kovacs, J. A. and Santi, D. V., Proc. Natl.
Acad. Sci. USA, 86, 8625-8629 (1989).
52. Ely, B. and Gerardot, C. J., Gene, 68, 323-333 (1988).
53. Fan, J-B., Chikashige, Y., Smith, C. L., Niwa, O., Yanagida, M. and Cantor, C. R., Nucl. Acids
Res., 17, 2801-2818 (1988).
54. Fasullo, M. and Davis, R. W., Molec. and Cell. Biol., 8, 4370-4380 (1988).
55. Ferdows, M. S. and Barbour, A. G., Proc. Natl. Acad. Sci. USA, 86, 5969-5973 (1989).
56. Ferris, S., Freeby, S., Zoller, P., Ragsdale, C. and Stevens, A., Amer. Biotech. Lab., 7, 36-42
(1989).
57. Ferris, S., Sparrow, L. and Stevens, A., Australian J. Biotechnol., 3, 33-35 (1989).
58. Flanagan, J. L., Ventra, L. and Weiss, A. S., Nucl. Acids Res., 17, 814 (1989).
59. Fountain, J. W., Wallace, M. R., Bruce, M. A., Seizinger, B. R., Menon, A. G., Gusella, J. F.,
Michels, V. V., Schmidt, M. A., Dewald, G. W. and Collins, F. S., Science, 244, 1085-1087
(1989).
60. Fulton, T. R., Bowcock, A. M., Smith, D. R., Daneshvar, L., Green, P., Cavalli-Sforza, L. L.
and Donis-Keller, H., Nucl. Acids Res., 17, 271-284 (1989).
61. Galindo, O., Mons, B. and Van Der Berg, F. M., Exp. Parasitol., 34, 245-252 (1989).
62. Gardiner, K., Laas, W. and Patterson, D., Somat. Cell and Molec. Gen., 12, 185-195 (1986).
63. Gardiner, K. and Patterson, D., Electrophoresis, 10, 296-301 (1989).
64. Garza, D., Ajioka, J. W., Burke, D. T. and Hartl, D. L., Science, 246, 641-646 (1989).
65. Gejman, P.V., Sitaram, N., Hsieh, W-T., Gelernter, J. and Gershon, E. S., Applied and Theoret.
Electrophor., 1, 29-34 (1988).
66. Gemmill, R. M., Coyle-Morris, J. F., McPeek, F. D., Ware-Uribe, L. F. and Hecht, F., Gene
Anal. Techn., 4, 119-131 (1987).
67. Gessler, M., Simola, K.O. and Bruns, G. A., Science, 244, 1575-1577 (1989).
68. Gilley, D., Preer, J. R., Aufderheide, K. J. and Polisky, B., Molec. and Cell. Biol., 8, 4765-4772
(1988).
69. Gomez-Eichelmann, M. C., Holz, G., Beach, D., Simpson, A. M. and Simpson, L., Molec. and
Biochem. Parasitol., 27, 143-158 (1988).
70. Graham, M. Y., Otani, T., Boime, I., Olsen, M. V., Carle, G. F. and Chaplin, D., Nucl. Acids
Res., 15, 4437-4448 (1987).
71. Grothues, D. and Tummler, B., FEMS Microbiol. Let., 48, 419-422 (1987).
72. Guzman, P. and Ecker, J. R., Nucl. Acids Res., 16, 11091-11105 (1988).
73. Hahnenberger, K. M., Baum, M. P., Polizzi, C. M., Carbon, J. and Clarke, L., Proc. Natl. Acad.
Sci. USA, 86, 577-581 (1989).
74. Hanlon, D. J., Smardon, A. M. and Lane, M. J., Nucl. Acids Res., 17, 5413 (1989).
75. Harris, A. and Bentley, D. R., Nucl. Acids Res., 16, 4172 (1988).
76. Heller, C. and Pohl, F. M., Nucl. Acids Res., 17, 5989-6003 (1989).
33
Page 37

77. Hennekes, H. and Kuhn, S., Anal. Biochem., 183, 80-83 (1989).
78. Hightower, R., Metge, D. W. and Santi, D. V., Nucl. Acids Res., 15, 8387-8398 (1987).
79. Hightower, R. and Santi, D.V., Electrophoresis, 10, 283-289 (1989).
80. Hockett, R. D., de Villartay, J-P., Pollock, K., Poplack, D. G., Cohen, D. I. and Korsmeyer, S.
J., Proc. Natl. Acad. Sci. USA, 85, 9694-9698 (1988).
81. Hofman, M. D., Schalkwyk, L. C. and Doolittle, W. F., Nucl. Acids Res., 14, 6983-7000 (1986).
82. Holzwarth, G., McKee, C., Steiger, S. and Crater, G., Nucleic Acids Res., 15, 10031-10044
(1987).
83. Inoko, H. and Trowsdale, J., Nucl. Acids Res., 21, 8957-8963 (1987).
84. Ito, T. and Sakaki, Y., Nucl. Acids Res., 16, 9177-9184 (1988).
85. Jabs, E. W., Goble, C. A. and Cutting, G. R., Proc. Natl. Acad. Sci. USA, 86, 202-206 (1989).
86. Janse, C. J., Boorsma, E. G., Ramesar, J., Van Vianen, P., Van der Meer, R., Zenobi, P., Casaglia,
O., Mons, B. and Van der berg, F. M., Exp. Parasitol., 68, 274-282 (1989).
87. Kaback, D. B., Steensma, H. Y. and DeJonge, P., Proc. Natl. Acad. Sci. USA, 86, 3694-3698
(1989).
88. Kenrick, S., Patterson, M., Speer, A., Fischbeck, K. and Davies, K., Cell, 48, 351-375 (1987).
89. Kingsmore, S. F., Snoddy, J., Choubey, D., Lengyel, P. and Seldin, M. F., Immunogenetics, 30,
169-174 (1989).
90. Kohara, Y., Akiyma, K. and Isono, K., Cell, 50, 495-508 (1987).
91. Kolakowski, L. F., Schloesser, M. and Cooperman, B. S., Nucl. Acids Res., 16, 10441-10452
(1988).
92. Kurtz, M., Cortelyou, M., Miller, S., Lai, M. and Kirsch, D., Molec. and Cell Biol., 7, 209-217
(1987).
93. Kuspa, A., Vollrath, D., Cheng, Y. and Kaiser, D., Proc. Natl. Acad. Sci. USA, 86, 8917-8921
(1989).
94. Labella, T. and Schlessinger, D., Genomics, 5, 752-760 (1989).
95. Lai, E., Nucl. Acids Res., 17, 8008 (1989).
96. Lai, E., Nucl. Acids Res., 18, in press (1990).
97. Lai, E., Barth, R. K. and Hood, L., Proc. Natl. Acad. Sci. USA, 84, 3846-3850 (1987).
98. Lai, E., Birren, B. W., Clark, S. M. and Hood, L., Nucl. Acids Res., 16, 10376 (1988).
99. Lai, E., Birren, B. W., Clark, S. M., Simon, M. I. and Hood, L., BioTechniques, 7, 34-42 (1989).
100. Lalande, M., Noolandi, J., Turmel, C., Brousseau, R., Rousseau, J. and Slater, G. W., Nucl. Acids
Res., 16, 5427-5437 (1988).
101. Lalande, M., Noolandi, J., Turmel, C., Rousseau, J. and Slater, G. W., Proc. Natl. Acd. Sci. USA,
84, 8011-8015 (1987).
102. Ledbetter, D.H., Ledbetter, S., van Tuinen, P., Summers, K. M., Robinson, T. J., Nakamura, Y.,
Wolff, R., White, R., Barker, D. F., Wallace, M., Collins, F. S. and Dobyns, W. B., Proc. Natl.
Acad. Sci. USA, 86, 5136-5140 (1989).
103. Lee, M. G-S., Atkinson, B. L., Giannini, H. and Van der Ploeg, L. H., Nucl. Acids Res., 16,
9567-9586 (1988).
104. Levene, S. and Zimm, B., Proc. Natl. Acad. Sci. USA, 84, 4054-4057 (1987).
105. Levine, J. D. and Cech, C. L., Biotechnology, 7, 1033-1036 (1989).
106. Lindsten, T., Lee, N. E. and Davis, M. M., Proc. Natl. Acad. Sci. USA, 84, 7639-7643 (1987).
107. Little, R. D., Porta, G., Carle, G. F., Schlessinger, D. and Urso, M., Proc. Natl. Acad. Sci., 86,
1598-1602 (1989).
108. Looney, J. E., Chi, M., Leu, T-H., Flintoff, W. F., Troutman, W. B. and Hamlin, J. L., Molec. and
Cell. Biol., 8, 5268-5279 (1988).
109. Maeda, N., McEvoy, S. M., Harris, H.F., Huisman, T. H. and Smithies, O., Proc. Natl. Acad. Sci.
USA, 83, 7359-7399 (1986).
110. Magee, B. B., Koltin, Y., Gorman, J. A. and Magee, P. T., Molec. and Cell. Biol., 8, 4721-4726
(1988).
34
Page 38

111. Magee, B. B. and Magee, P. T., J. Gen. Microbiol., 133, 425-430 (1987).
112. Magee, P. T., Rikkerink, E. H. and Magee, B. B., Anal. Biochem., 175, 361-372 (1988).
113. Majiwa, P. A., Young, J. R., Hamers, R. and Mattyssens, G., Gene, 41, 183-192 (1986).
114. Maniloff, J., Nucl. Acids Res., 17, 1268 (1989).
115. Marchuk, D. and Collins, F. S., Nucl. Acids Res., 16, 7743 (1988).
116. Mathew, K. M., Hui, C-F., Smith, C. L. and Cantor, C. R., Biochemistry, 27, 9222-9226 (1988).
117. Mathew, M. K., Smith, C. L. and Cantor, C. R., Biochemistry, 27, 9204-9210 (1988).
118. Mathew, M. K., Smith, C. L. and Cantor, C. R., Biochemistry, 27, 9210-9216 (1988).
119. Matsumoto, T., Fukui, K., Niwa, O., Sugawara, N., Szostak, J. W. and Yanagida, M., Molec.
and Cell. Biol., 7, 4424-4430 (1987).
120. McClelland, M., Jones, R., Patel, Y. and Nelson, M., Nucl. Acids Res., 15, 5985-6005 (1987).
121. McCluskey, K. and Mills, D., J. Cell Biochem. Suppl., O, 13, Part E (1989).
122. Miles, J. S., Bickmore, W., Brook, J. D., McLaren, A. W., Meeham, R. and Wolf, C. R., Nucl.
Acids Res., 17, 2907-2917 (1989).
123. Monia, B. P., Haskell, K. M., Ecker, J. R., Ecker, D. J. and Crooke, S. T., Nucl. Acids Res., 17,
3611 (1989).
124. Mortimer, R. K. and Schild, D., Microbiol. Rev. 49, 181-213 (1985).
125. Muller, U., Stephan, D., Philippsen, P. and Steinmetz, M., EMBO Journal, 6, 369-373 (1987).
126. Noolandi, J., Slater, G. W., Lim, H. A. and Viovy, J. L., Science, 243, 1456-1458 (1989).
127. O’Connell, P., Leach, R., Cawthon, R. M., Culver, M., Stevens, J., Viskochil, D., Fournier, R.
K., Rich, D. C., Ledbetter, D. H. and White, R., Science, 244, 1085-1087 (1989).
128. Ohki, M. and Smith, C. L., Nucl. Acids Res., 17, 3479-3490 (1989).
129. Olschwang, S. and Thomas, G., Nucl. Acids Res., 17, 2363 (1989).
130. Orbach, M., Vollrath, D., Davis, R. and Yanofsky, C., Molec. and Cell Biol., 8, 1469-1473 (1988).
131. Patarapotikul, J. and Langsley, G., Nucl. Acids Res., 16, 4331-4340 (1988).
132. Patterson, D., Gardiner, K., Kao, F-ZT., Tanzi, R. and Watkins, P., Proc. Natl. Acad. Sci. USA,
85, 8266-8270 (1988).
133. Patterson, M., Schwartz, C., Bell, M., Sauer, S., Hofker, M., Trask, B., van den Engh, G. and
Davies, K. E., Genomics, 1, 297-306 (1987).
134. Peltz, G. A., Grundy, H. O., Lebo, R. V., Yssel, H., Barsch, G. S. and Moore, K. W., Proc. Natl.
Acad. Sci. USA, 86, 1013-1017 (1989).
135. Petrillo-Peixoto, M. L. and Beverley, S. M., Molec. and Cell Biol., 8, 5188-5199 (1988).
136. Pohl, T. M., Zimmer, M., MacDonald, M. E., Smith, B., Bucan, M., Poustka, A., Volinia, S.,
Zehetner, G., Wasmuth, J. J., Gusella, J., Lehrarch, H. and Frischauf, A.-M., Nucl. Acids Res.,
16, 9185-9198 (1988).
137. Pologe, L. G. and Ravetch, J. V., Cell, 55, 869-874 (1988).
138. Pritchard, C. A., Goodfellow, P. J. and Goodfellow, P. N., Nature, 238, 273-275 (1987).
139. Pyle, L. E., Corcoran, L. N., Cocks, B. G., Bergemann, A. D., Whitley, J. C. and Finch, L. R.,
Nucl. Acids Res., 16, 6015-6025 (1988).
140. Rappold, G. A. and Lehrach, H., Nucl. Acids Res., 16, 5361-5377 (1988).
141. Resnick, M. A., Skaanild, M. and Nilsson-Tillgren, T., Proc. Natl. Acad. Sci. USA, 86, 2276-2280
(1989).
142. Richards, J. E., Gilliam, T. C., Cole, J. L., Drumm, M. L., Wasmuth, J. J., Gusella, J. F. and
Collins, F. S., Proc. Natl. Acad. Sci. USA, 85, 6437-6441 (1988).
143. Richmond, T., Biotechnol. Lab. News, Feb. 14 (1989).
144. Riethman, H. C., Moyzis, R. K., Meyne, J., Burke, D. T. and Olson, M. V., Proc. Natl. Acad. Sci.
USA, 86, 6240-6244 (1989).
145. Rohozinski, J., Girton, L. E. and Van Etten, J. L., Virology, 168, 363-369 (1989).
146. Roy, G., Wallenburg, J. C. and Chartrand, P., Nucl. Acids Res., 16, 768 (1988).
35
Page 39

147. Rubin, C. M., Carrino, J. J., Dickler, M. N., Leibowitz, D., Smith, S. D. and Westbrook, C. A.,
Proc. Natl. Acad Sci. USA, 85, 2795-2799 (1988).
148. Russo, G., Isobe, M., Gatti, R., Finan, J., Batuman, O., Huebner, K., Nowell, P. C. and Croce,
C. M., Proc. Natl. Acad. Sci. USA, 86, 602-606 (1989).
149. Sanz, J. L., Marin, I., Ramirez, L., Abad, J. P., Smith, C. L. and Amils, R., Nucl. Acids Res., 16,
7827-7832 (1988).
150. Scherer, S. and Stevens, D. A., Proc. Natl. Acad. Sci. USA, 85, 1452-1456 (1988).
151. Schmidt, M. C., Kao, C. C., Rui, P. and Berk, A. J., Proc. Natl. Acad. Sci. USA, 86, 7785-7789
(1989).
152. Schoenline, P. V., Gallman, L. M. and Ely, B., Gene, 70, 321-329 (1988).
153. Schwartz, D. C. and Cantor, C. R., Cell, 37, 67-75 (1986).
154. Schwartz, D. C. and Koval, M., Nature, 338, 520-522 (1989).
155. Schwartz, D. C., Saffran, W., Welsh, J., Haas, R., Goldenberg, M. and Cantor, C. R., Cold Spring
Harb. Symp. Quant. Biol., 47, 189-195 (1983).
156. Searle, S., Campos, A. J., Coulson, M. R., Spithill, T. W. and Smith, D. F., Nucl. Acids Res.,
17, 5081-5095 (1989).
157. Serwer, P., Electrophoresis, 8, 301-304, (1987).
158. Serwer, P., Applied and Theoret. Electrophor., 1, 19-22 (1988).
159. Serwer, P. and Hayes, S. J., Applied and Theoret. Electrophor., 1, 95-98 (1989).
160. Serwer, P. and Hayes, S. J., Biochemistry, 28, 5827-5832 (1989).
161. Sheppard, M., Thompson, J. K., Anders, R. F., Kemp, D. J. and Lew, A. M., Mol. Biochem.
Parasitol., 34, 45-52 (1989).
162. Shih, C-K., Wagner, R., Feinstein, S., Kanik-Ennulat, C. and Neff, N., Molec. and Cell. Biol., 8,
3094-3103 (1988).
163. Simpson, A. M., Suyama, Y., Dewes, H., Campbell, D. A. and Simpson, L., Nucl. Acids Res., 17,
5427-5445 (1989).
164. Simske, J. S. and Scherer, S., Nucl. Acids Res., 17, 4359-4365 (1989).
165. Slater, G. W. and Noolandi, J., Electrophoresis, 10, 413-428 (1989).
166. Smith, C. L., Econome, J. G., Schutt, A., Klco, S. and Cantor, C. R., Science, 236, 1448-1453
(1987).
167. Smith, C. L., Klco, S. R. and Cantor, C. R., In Genome Analysis: A Practical Approach, Davies,
K. E., ed., IRL Press, pp. 41-72 (1988).
168. Smith, C. L., Matsumoto, T., Niwa, O., Klco, S., Fan, J., Yanagida, M. and Cantor, C., Nucl.
Acids Res., 15, 4481-4489 (1987).
169. Smith, S. B., Aldridge, P. K. and Callis, J. B., Science, 243, 203-243 (1989).
170. Snell, R. G. and Wilkins, R. J., Nucl. Acids Res., 14, 4401-4406 (1986).
171. Snewin, V. A., England, S. M., Sims, F. G. and Hyde, J. E., Gene, 76, 41-52 (1989).
172. Sobral, B. W. and Atherly, A. G., BioTechniques, 7, 938 (1989).
173. Sobral, B. W. and Atherly, A. G., Nucl. Acids Res., 17, 7359-7370 (1989).
174. Sor, F., Nucl. Acids Res., 16, 4853 - 4863 (1988).
175. Southern, E. M., Anand, R., Brown, W. R. and Fletcher, D.S., Nucl. Acids Res., 15, 5925-5943
(1987).
176. Steel, P. E., Carle, G. F., Kobayashi, G. S. and Medoff, G., Molec. and Cell Biol., 9, 983-987
(1989).
177. Stellwagen, J. and Stellwagen, N. C., Nucl. Acids Res., 17, 1537-1548 (1989).
178. Stellwagen, N. C. and Stellwagen, J., Electrophoresis, 10, 332-344 (1989).
179. Storb, U., Haasch, D., Arp, B., Sanchez, P., Cazenave, P-A. and Miller, J., Molec. and Cell Biol.,
9, 711-718 (1989).
180. Sutherland, J. C., Emrick, A. B. and Trunk, J., Electrophoresis, 10, 315-317 (1989).
181. Sutherland, J. C., Monteleone, D. C., Mugavero, J. H. and Trunk, J., Analyt. Biochem., 162, 511-
520 (1987).
36
Page 40

182. Thiele, D. J., Molec. and Cell. Biol., 8, 2745-2752 (1988).
183. Traver, C. N., Klapholz, S., Hyman, R.W. and Davis, R. W., Proc. Natl. Acad. Sci. USA, 86,
5898-5902 (1989).
184. Turmel, C. and Lalande, M., Nucl. Acids Res., 16, 4727 (1988).
185. Upcraft, J. A., Boreham, P. F. and Upcraft, P., Nucl. Acids Res., 17, 3315 (1989).
186. US Congress, Office of Technology Assessment, Mapping our Genes- the genome projects, how
big, how fast? OTA-BA-3, Washington, DC. US Government Printing Office (1988).
187. Van Daelen, R. A., Jonkers, J. J. and Zabel, P., Plant Mol. Biol., 12, 341-352 (1989).
188. Van der Bliek, A. M., Baas, F., Ten Houte de Lange, T., Kooiman, P. M., Van der Velde-Koerts,
T. and Borst, P., EMBO J., 6, 3325-3331 (1987).
189. Van der Bliek, A. M., Lincke, C. R. and Borst, P., Nucl. Acids Res., 16, 4841-4851 (1988).
190. Van der Bliek, A. M., Van der Velde-Koerts T., Ling, V. and Borst, P., Molec. and Cell. Biol.,
6, 1671-1678 (1986).
191. Van der Ploeg, L. H., Smith, C. L., Polvere, R. I. and Gottesdiener, K. M., Nucl. Acids Res., 17,
3217-3227 (1989).
192. Van Devanter, D. R., Trammell, H. M. and Von Hoff, D. D., BioTechniques, 7, 143-144 (1989).
193. Van Dilla, M. A., Carrano, A. V., Christensen, M. L., de Jong, P. J., Grey, J., McNinch, J., Trask,
B., van den Engh, G. and Yokobata, K., Abstract #23: Human Genome I, San Diego (1989).
194. Venter, U. and Horz, W., Nucl. Acids Res., 17, 1353-1368 (1989).
195. Ventra, L. and Weiss, A. S., Gene, 78, 29-36 (1989).
196. Viovy, J. L., Electrophoresis, 10, 429-441 (1989).
197. Vollrath, D. and Davis, R., Nucl. Acids Res., 15, 7865-7876 (1987).
198. Vollrath, D., Davis, R., Connelly, C. and Hieter, P., Proc. Natl. Acad. Sci. USA, 85, 6027-6031
(1988).
199. Wallace, M. R., Fountain, J. W., Brereton, A. M. and Collins, F. S., Nucl. Acids Res., 17, 16651667 (1989).
200. Waterbury, P. F. and Lane, M. J., Nucl. Acids Res., 15, 3930 (1989).
201. Wellinger, R. J. and Zakian, V. A., Proc. Natl. Acad. Sci. USA, 86, 973-977 (1989).
202. Wevrick, R. and Willard, H. F., Proc. Natl. Acad. Sci. USA, 86, 9394-9398 (1989).
203. Woolf, T., Lai, E., Kroneberg, M. and Hood, L., Nucl. Acids Res., 16, 3863-3874 (1988).
204. Wu, C-I., Lyttle, T. W., Wu, M-L. and Lin, G-F., Cell, 54, 179-189 (1988).
205. Zakian, V. A. and Blanton, H. M., Molec. and Cell. Biol., 8, 2257-2260 (1988).
206. Zakian, V., Blanton, H., Liebchen, W. and Dani, G., Molec. and Cell Biol., 6, 925-932 (1986).
207. Ichikawa, H., Shimizu, K., Saito, A., Wang, D., Oliva, R., Kobayashi, H., Kaneko, Y., Miyoshi,
H., Smith, C. L., Cantor, C. R., and Ohki, M., Proc. Natl. Acad. Sci. USA, 89, 23-27 (1992).
208. Doggett, N. A., Smith, C. L., and Cantor, C. R., Nucleic Acids Res, 20, 859-864 (1992).
209. Lupski, J. R., Montes de Oca-Luna, R., Slaugenhaupt, S., Pentao, L., Guzzetta, V., Trask, B. J.,
Saucedo-Cardenas, O., Barker, D. F., Killian, J. M., Garcia, C. A., Chakravarti, A., and Patel, P.
I., Cell, 66, 219-232 (1991).
210. Ridley, R. G., White, J. H., McAleese, S. M., Goman, M., Alano, P., de Vries, E., and Kilbey,
B. J., Nucleic Acids Res., 19, 6731-6736 (1991).
211. Ferrin, L. J. and Camerini-Otero, D., Science, 254, 1494-1497 (1991).
212. Tulloch, D. L., Finch, L. R., Hillier, A. J., and Davidson, B. E., J. Bacteriol., 173, 2768-2775 (1991).
213. Reschke, D. K., Frazier, M. E., and Mallavia, L. P., Acta Virol., 35, 519-525 (1991).
214. Wilson, M. R. and Coussens, P. M., Virology, 185, 673-680 (1991).
215. CHEF is licensed to Bio-Rad Laboratories, Inc.
216. PACE (US Patent 5,084,157 issued to California Institute of Technology) is exclusively licensed
to Bio-Rad Laboratories, Inc.
217. Doggett, N. A., Smith, C. L., and Cantor, C. R., Nucleic Acids Res, 20, 859-864 (1992).
37
Page 41

Section 9
Systems, Accessories, and Reagents for Pulsed
Field Electrophoresis
Catalog
Number Product Description
170-3700 CHEF-DR III Chiller System, 120 VAC, includes CHEF-DR III
power module; electrophoresis cell; Cooling Module; variable
speed pump; Tygon tubing, 12 feet; 14 cm wide x 13 cm long casting stand and frame; 10 well comb and comb holder; screened
cap; 50 well disposable plug mold; leveling bubble; cables; 3/8
inch straight tubing connectors, 2; 0.5 A FB fuses, 2;
S. cerevisiae
DNA size standards; Pulsed Field Certified Agarose sample, 5 g;
Chromosomal Grade Agarose sample, 5 g; manual
170-3702 CHEF-DR III Chiller System, 220/240 VAC
170-3703 CHEF-DR III Chiller System, 100 VAC
170-3695 CHEF-DR III System, 100/120 VAC, includes CHEF-DR III power
module; electrophoresis cell; variable speed pump; Tygon tubing,
12 feet; 14 cm wide x 13 cm long casting stand and frame; 10
well comb and comb holder; 50 well disposable plug mold;
screened cap; leveling bubble; cables; 3/8 inch straight tubing
connectors, 2; 0.5 A FB fuses, 2;
S. cerevisiae
DNA size standards; Pulsed Field Certified Agarose sample, 5 g; Chromosomal
Grade Agarose sample, 5 g; manual
170-3697 CHEF-DR III System, 220/240 VAC
170-3654 Cooling Module, 120 V
170-3655 Cooling Module, 220/240 V
170-3688 Cooling Module, 100 V
170-3644 Variable Speed Pump
170-3648 Electrodes, thick gauge (0.02”), 6
170-3711 Screened Caps, 5
170-3622 50 Well Disposable Plug Mold, for casting plugs
170-3689
Standard Casting Stand, includes 14 x 13 cm frame and platform
170-3699 Combination Comb Holder
170-3704 Wide/Long Combination Casting Stand, includes 21 x 14 cm
frame and platform
170-4326 10 Well Comb, 14 cm wide, 1.5 mm thick
170-4325 10 Well Comb, 14 cm wide, 0.75 mm thick
170-4324 15 Well Comb, 14 cm wide, 1.5 mm thick
170-4323 15 Well Comb, 14 cm wide, 0.75 mm thick
38
Page 42

Catalog
Number Product Description
170-4322 20 Well Comb, 14 cm wide, 1.5 mm thick
170-4344 30 Well Comb, 14 cm wide, 1.5 mm thick
170-3623 Preparative Comb, 14 cm wide, 1.5 mm thick, plus 2 outer
sample wells for size standards
170-3627 15 Well Comb, 21 cm wide, 1.5 mm thick
170-3628 30 Well Comb, 21 cm wide, 1.5 mm thick
170-3645 45 Well Comb, 21 cm wide, 1.5 mm thick
170-4046 Leveling Table, 20 cm x 30 cm for casting gels
170-3643 Gel Scoop, for removing gels from chamber
162-0017 Low Melt Preparative Grade Agarose, 25 g
162-0019 Low Melt Preparative Grade Agarose, 100 g
162-0133 Molecular Bology Certified Agarose, 100 g
162-0134 Molecular Bology Certified Agarose, 500 g
162-0135 Chromosomal Grade Agarose, 25 g
162-0136 Chromosomal Grade Agarose, 100 g
162-0137 Pulsed Field Certified Agarose, 100 g
162-0138 Pulsed Field Certified Agarose, 500 g
170-3605 CHEF DNA Size Standards,
S. cerevisiae,
5 blocks
170-3624 CHEF DNA Size Standards, 5 kb ladder, 20 µg
170-3633 CHEF DNA Size Standards,
S. pombe,
5 blocks
170-3635 CHEF DNA Size Standards, lambda ladder, 5 blocks
170-3667 CHEF DNA Size Markers,
H. wingei,
5 blocks
170-3591 CHEF Mammalian Genomic DNA Plug Kit
170-3592 CHEF Bacterial Genomic DNA Plug Kit
170-3593 CHEF Yeast Genomic DNA Plug Kit
165-5031 GS Gene Linker UV Chamber, 120 V
165-5032 GS Gene Linker UV Chamber, 220 V
165-5033 GS Gene Linker UV Chamber, 240 V
165-5034 GS Gene Linker UV Chamber, 100 V
161-0196 Zeta-Probe GT Charged Nylon Membrane, 30 cm x 3.3 m roll
161-0197 Zeta-Probe GT Charged Nylon Membrane, 20 cm x 3.3 m roll
39
Page 43

Catalog
Number Product Description
170-3590 Gene-Lite Chemiluminescent Detection Kit
170-3742 Standard Documentation System, 120 VAC, includes
Mini-Transilluminator, 100 V, DS-34 camera, standard hood,
deep yellow DS-34 camera filter
170-3746 Standard Documentation System, 100 VAC
170-3747 Standard Documentation System, 220/240 VAC
170-3743 Wide/Long Documentation System, 120 VAC, includes Mini-
Transilluminator, 100 V, DS-34 camera, wide/long hood,
deep yellow DS-34 camera filter
170-3748 Wide/Long Documentation System, 100 VAC
170-3749 Wide/Long Documentation System, 220 /240 VAC
170-3745 Mini-Transilluminator, 100 VAC
170-3737 Mini-Transilluminator, 120 VAC
170-3738 Mini-Transilluminator, 220/240 VAC
170-3739 Standard Camera Hood, 5" x 7" (12.7 x 17.8 cm)
170-3740 Wide/Long Camera Hood, 6" x 9" (15.2 x 22.9 cm)
170-3741 DS-34 Camera
170-3744 Deep Yellow DS-34 Camera Filter
40
Page 44

Bio-Rad
M1703690 REV B
Laboratories
ISO 9001 registered www.bio-rad.com
Life Science
Group
Bio-Rad Laboratories Main Office 2000 Alfred Nobel Drive, Hercules, California 94547, Ph. (510) 741-1000, Fx. (510)741-5800
Also in: Australia Ph. 02-9914-2800, Fx. 02-9914-2889 Austria Ph. (1)-877 89 01, Fx. (1) 876 56 29 Belgium Ph. 09-385 55 11, Fx. 09-385 65 54
Canada Ph. (905) 712-2771, Fx. (905) 712-2990 China Ph. (86-10) 2046622, Fx. (86-10) 2051876 Denmark Ph. 39 17 9947, Fx. 39 27 1698
Finland Ph. 90 804 2200, Fx. 90 804 1100 France Ph. (1) 43 90 46 90, Fx. (1) 46 71 24 67 Germany Ph. 089 31884-0, Fx. 089 31884-100
Hong Kong Ph. 7893300, Fx. 7891257 India Ph. 91-11-461-0103, Fx. 91-11-461-0765 Israel Ph. 03 951 4127, Fx. 03 951 4129
Italy Ph. 02-21609.1, Fx. 02-21609.399 Japan Ph. 03-5811-6270, Fx. 03-5811-6272 The Netherlands Ph. 0313 18-540666, Fx. 0313 18-542216
New Zealand Ph. 09-443 3099, Fx. 09-443 3097 Singapore Ph. (65) 272-9877, Fx. (65) 273-4838 Spain Ph. (91) 661 70 85, Fx. (91) 661 96 98
Sweden Ph. 46 (0) 8 627 50 00, Fx. 46 (0) 8 627 54 00 Switzerland Ph. 01-809 55 55, Fx. 01-809 55 00
United Kingdom Ph. 0800 181134, Fx. 01442 259118
000097 Sig 030197Bulletin 0000 US/EG Rev A
 Loading...