

Page 1

Bio-Scale
Columns
Instruction Manual
Catalog numbers
751-0081
751-0083
751-0085
751-0087
™
MT
Page 2

Page 3

Table of Contents
Section 1 Characteristics of Bio-Scale MT2,
MT5, MT10, and MT20 Columns ......................... 1
1.1 Introduction ........................................................... 1
1.2 Column Description ............................................... 1
1.3 Column Specifications ........................................... 2
Section 2 Use of the Bio-Scale MT Columns ..................... 2
2.1 Column Disassembly ............................................. 4
2.2 Column Assembly .................................................. 4
2.3 Column Packing .................................................... 5
2.4 Connections to Chromatography Systems ............. 7
Section 3 Care of the Bio-Scale MT Colums ...................... 8
3.1 Frit Removal .......................................................... 8
3.2 Column Bed Top-Off ............................................. 8
Section 4 Solvent Compatibility Table ................................ 9
Section 5 Product Informations ......................................... 10
Page 4

Page 5

Section 1
Characteristics of the Bio-Scale MT2, MT5, MT10,
and MT20 Columns
1.1 Introduction
The Bio-Scale MT columns have been designed specifically
to provide high resolution chromatography of bio-molecules
when packed with any suitable chromatography media. Typical
packings might include ion exchange, hydrophobic interaction,
hydroxyapatite, or affinity chromatography media.
The Bio-Scale MT range consists of four sizes (2, 5, 10, and
20 ml), allowing easy scale-up of separation and purification
protocols. The column design has been optimized to provide
easy packing, equilibration, bed-height adjustment, and sample
application. All column parts are bio-compatible for preservation of
sample biological activity.
The Bio-Scale MT column range is designed for use with
Bio-Rad’s BioLogic System, as the column fittings are 1/4-28
Super-flangeless. Adaptors and unions are available from Bio-Rad
for connection of these columns to other medium or high pressure
systems.
1.2 Column Description
Each column consists of a borosilicate glass tube held in place by
two endcaps and a plastic safety shield. The lower bed support
consists of a fixed-position frit and a distribution screen assembly.
Bed height adjustment is provided by the upper bed support,
which is positioned and held in place using a threaded lock-nut.
A removable frit protects the top of the bed and supports a thin
distribution screen which insures efficient sample application to the
bed itself.
Each column can be packed with chromatography media using
either dry or slurry packing methods. A minimum particle size of
5 microns is recommended.
Bio-Scale MT Column Instruction Manual 1
Page 6

1.3 Column Specifications
All wetted parts are bio-compatible (Tefzel, polypropylene,
polyphenyl sulfide, borosilicate glass and buna-N rubber) and
resistant to cleaning and sanitation solvents including 1.0 M NaOH
and 25% acetic acid. The column can be used with most common
aqueous buffers and certain organic solvents including alcohols
and acetonitrile. Do not use halogenated hydrocarbons, aromatic
solvents, or tetrahydrofuran (THF). A detailed solvent compatibility
table is given in Section 4.
Table 1. Column Characteristics.
MT2 MT5 MT10 MT20
Column
Volume, ml
Column
Dimension, mm
Maximum
Operating
Pressure, psi
1145 psi = 1 MPa. 14.5 psi = 1 bar. Packing material may not withstand high
pressures. See packing material manufacturer’s specifications.
1.9 – 2.3 4.6 – 5.7 9.5 – 11.3 19.4 – 21.9
7 x 50 – 60 10 x 59 – 72 12 x 84 – 100 15 x 110 – 124
1, 000 750 600 500
2 Bio-Scale MT Column Instruction Manual
Page 7
Section 2
Use of Bio-Scale MT Columns
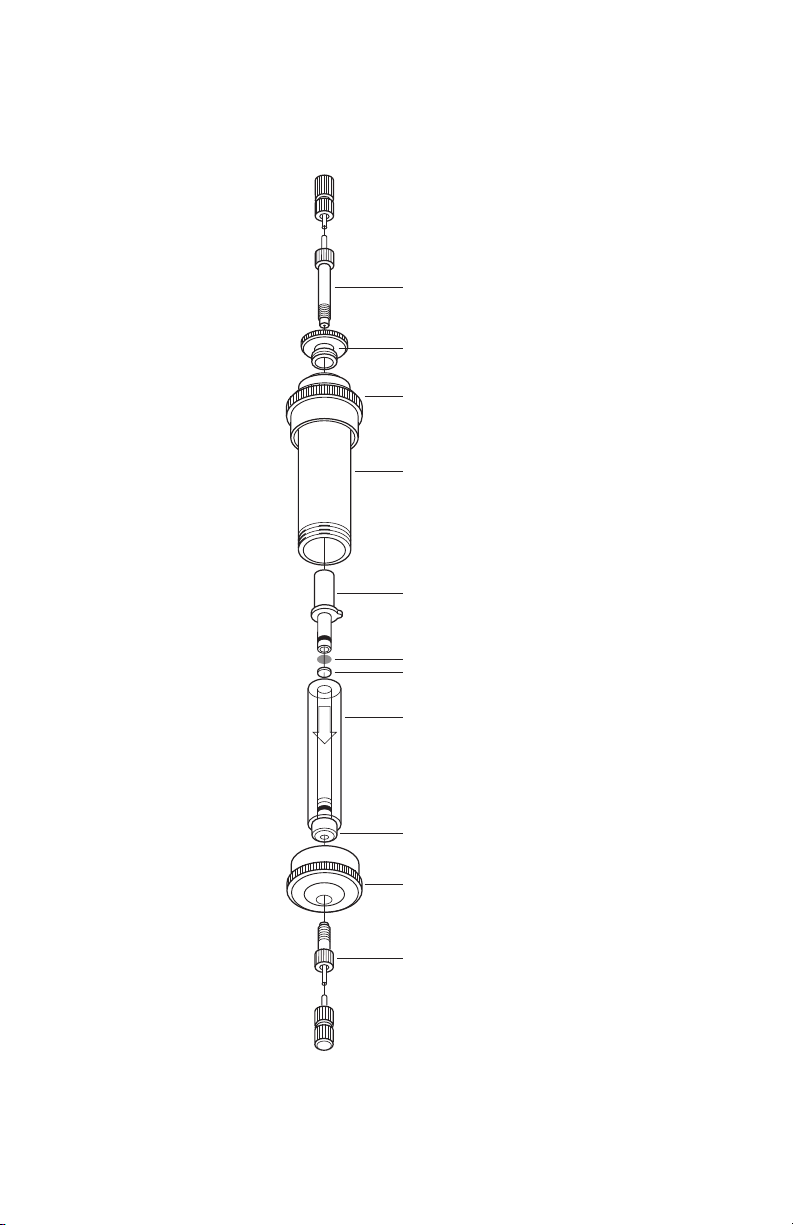
Upper end fitting (1)
Lock nut (2)
Upper end cap (3)
Protective shield (4)
Upper bed support (5)
Distribution screen (6)
Frit (7)
FLOW
Glass column (8)
Fig. 1. Diagram of Bio-Scale MT Column.
Lower bed support (9)
Lower end cap (10)
Lower end fitting (11)
Bio-Scale MT Column Instruction Manual 3
Page 8

2.1 Column Disassembly (part given are in parenthesis)
1. Unscrew and remove the upper (1) and lower (11) end fittings.
2. Unscrew the bottom end cap (10) from the protective shield
(4).
3. Withdraw the borosilicate glass column assembly (8) from the
protective shield.
4. Remove the upper (5) and lower (9) bed supports.
5. If the column is packed, remove the upper and lower
distribution screens (7) and frits (6) using the frit removal tool.
Do not reuse these parts. Rinse the packing material away
with deionized water.
6. Wash all column parts with deionized water to remove dust
and particulates.
2.2 Column Assembly
1. Insert a frit (7) and then a distribution screen (6) into the bottom
of the glass tube (8) (note the orientation of the flow direction
label).
2. Wet the o-ring of the lower bed support (9) with water and
insert it fully into the bottom of the glass tube.
3. Insure that the frit and distribution screen are touching the
lower bed support.
4. Pack the column with the media of choice until a stable bed is
obtained (see Section 2.3).
5. Insert a frit and then a distribution screen into the glass tube,
followed by the upper bed support (5). Be careful not to force
the frit into the top of the bed.
6. Thread the lock nut (2) into the upper end cap (3). Thread the
protective shield (4) onto the upper end cap.
7. Holding the upper end cap assembly upside down, insert the
glass tube and gently rotate it until the upper bed support
locks in place.
8. Attach the lower end cap to the protective shield.
4 Bio-Scale MT Column Instruction Manual
Page 9

9. Gently turn the lock nut until the upper bed support is in the
desired position.
10. Attach upper (1) and lower (11) end fittings.
2.3 Column Packing
Always follow the manufacturer’s instructions for packing a
particular type of media. Generally, slurry packing will give better
chromatographic performance than dry packing. The following
guidelines may be useful:
Dry packing Particle size Ž 20 µm
Slurry packing Particle size < 20 µm
Dry Packing
Assemble the column according to the following figure.
FLOW
Fig. 2 Column tube assembly.
1. Holding the column tube vertically, fill one half with the packing
media.
2. Tap the side of the column until the media settles.
3. Fill the column with the remainder of the media and repeat
step 2.
4. When the column is filled to the desired level, complete the
column assembly as described in Section 2.2, making sure the
flow direction arrow on the glass tube is pointing in the current
direction.
Bio-Scale MT Column Instruction Manual 5
Page 10

5. Attach the column to a pump and start flow at 50% of the
desired operating flow rate.
6. When all the air is expelled from the column, increase the flow
rate to 20% higher than the desired operating flow rate for at
least 5 column volumes.
7. Stop the flow and lower the upper bed support via the lock nut
to remove any head space that might have formed between
the frit and the top of the bed.
8. Equilibrate the column at the desired flow rate prior to sample
application.
Slurry Packing
Slurry Preparation
Dry media should be swollen according to the manufacturer’s
instructions.
Always degas the buffers used for column packing. Adjust the
packing slurry to a 50% (V/V) volume using packing buffer.
Column Packing
1. Assemble the column according to the diagram in Figure 2
and seal the bottom outlet with Parafilm® laboratory film.
2. Fill about 25% of the column with buffer and add the packing
slurry to the desired level.
3. Uncap the bottom outlet and allow the slurry to settle. Remove
the film from the outlet, leaving some liquid above the settled
slurry.
4. Add more slurry to the desired level.
5. Without inserting the upper frit and distribution screen,
assemble the column and connect to a pump. Begin the
flow at 50% of the desired operating flow rate for 3 column
volumes.
6. Stop the pump, remove the upper bed support, and repeat the
above steps until a stable bed at the desired level is obtained.
7. Add 5 mm of buffer to the top of the bed and insert the upper
frit and distribution screen. Assemble the column.
6 Bio-Scale MT Column Instruction Manual
Page 11

8. Pass 5 bed volumes of buffer through the column at a flow
rate 20% higher than the operating flow rate.
9. If necessary, stop the flow and lower the upper bed support
via the lock nut to remove any head space that might have
formed between the frit and the top of the bed.
10. Equilibrate the column at the desired flow rate.
2.4 Connections to Chromatography Systems
Bio-Scale MT columns can be used with any chromatography
system that can provide the appropriate flow rate and pressure.
Each column is supplied with 1/4-28 fittings for connection to
Bio-Rad’s BioLogic System, M6 fittings for connection to FPLC®
systems, and 10-32 fittings for connection to HPLC systems. Inlet
and outlet tubing must be 1/16” OD. Inner diameters of 0.020” or
0.030” in Tefzel®, PTFE or PEEK material are recommended.
Bio-Scale MT Column Instruction Manual 7
Page 12

Section 3
Care of the Bio-Scale MT Columns
3.1 Frit Removal
The top frit may need to be replaced after extensive column use or
if increasing backpressures are noticed. Each column is supplied
with a frit removal tool, polyethylene frit, and distribution screen.
The screen assists in distributing the sample over the entire column
surface and also acts as a pre-filter. The screen should be replaced
every time the frit is changed, refer to Figure 1.
1. Remove the upper and lower end fittings from the column
2. Remove the upper lock nut from the top end cap.
3. Unscrew the lower end cap from the protective shield and
slide out the glass column.
4. Remove the upper bed support from the glass column.
5. Using the frit removal tool, remove the distribution screen and
frit by pressing the hook into the frit in a sideways motion with
slight downward pressure.
6. Add 5 mm of buffer to the top of the resin bed. Place a new
frit and screen into the tube. Insert the upper bed support
and use it to carefully push down the frit and screen until it just
touches the top of the resin bed.
7. Holding the upper end cap assembly upside down, insert the
glass tube and gently rotate it until the upper bed support
locks in place.
8. Attach the lower end cap to the protective shield.
9. Gently turn the lock nut until the upper bed support is in the
desired position.
10. Equilibrate the column at the desired flow rate.
3.2 Column Bed Top-Off
If the top of the bed becomes fouled and column performance is
not restored by a cleaning procedure and frit change, then a few
millimeters of the bed should be removed and replaced with fresh
media.
8 Bio-Scale MT Column Instruction Manual
Page 13

Section 4
Solvent Compatibility Table
Table 2. Solvent Compatibility.
Solvents
Acetic acid (50%)
Acetonitrile
Butanol
Citric acid
Dimethyl formamide (DMF)
Dimethylsulfoxide (DMSO)
Ethanol
Elthylenediamine tetraacetic acid (EDTA)
Formaldehyde (40%)
Formic acid
Glycerol
Goods buffers
Guanadine-HCl (6 M)
Hydrocloric acid (2 M)
Isopropanol
Lactic acid (85%)
Methanol
SDS
Sodium acetate (sat.)
Sodium hydroxide (1 M)
Sodium thiocyanate (3 M)
Sulfuric acid (dilute)
Trifluoroacetic acid (0.1%)
Triton® X-100 detergent
Urea (7 M)
Do not use halogenated hydrocarbons, aromatic solvents, or ethers.
Bio-Scale MT Column Instruction Manual 9
Page 14

Section 5
Product Information
Catalog
Number
751-0081 Bio-Scale MT2 7 x 52 2 1.000
751-0083 Bio-Scale MT5 10 x 64 5 750
751-0085 Bio-Scale MT10 12 x 88 10 600
751-0087 Bio-Scale MT20 15 x 113 20 500
All columns come with 5 extra frits, 5 distribution screens, frit removal tool, 2
o-rings, 2 1/4 x 28 fittings, 2 M6 fittings, and 2 10-32 fittings.
Catalog
Number
751-0091 Bio-Scale 2 Replacement Parts Kit, includes 5 frits, 5
751-0093 Bio-Scale 5 Replacement Parts Kit, includes 5 frits, 5
751-0095 Bio-Scale 10 Replacement Parts Kit, includes 5 frits, 5
751-0097 Bio-Scale 20 Replacement Parts Kit, includes 5 frits, 5
751-0099 Bio-Scale Fittings kit, include 2 Super Flangeless Nuts (1/4 x
Product
Description
Product
Description
distribution screens, 2 o-rings, 1 frit removal tool
distribution screens, 2 o-rings, 1 frit removal tool
distribution screens, 2 o-rings, 1 frit removal tool
distribution screens, 2 o-rings, 1 frit removal tool
28 threads) and 6 ferrules, 2 Flangeless M6 nuts, 4 ferrules and 2
caps, 2 Fingertight II fittings (10-32 threads)
Bed
Dimension, mm
Bed
Volume, ml
Pressure
Limit, psi
FPLC is a registered trademark of Pharmacia Biotech AB.
Parafilm is a registered trademark of American Can Co.
Triton is a registered trademark of Rohm and Haas.
10 Bio-Scale MT Column Instruction Manual
Page 15

Bio-Scale MT Column Instruction Manual 11
Page 16

Bio-Rad
Laboratories, Inc.
Life Science
Group
Web site ww w.bio-rad.com USA 800 424 6723
Australia 61 2 9914 2800 Austria 01 877 89 01 Belgium 09 385 55 11
Brazi l 55 11 3065 7550 Canada 905 364 3 435 China 86 21 6169 8500
Czech Republic 420 241 430 532 Denma rk 44 52 10 00
Finland 09 804 22 00 France 01 47 95 69 65 Ger many 089 31 88 4 0
Greece 30 210 9532 220 Hong Kong 852 2789 33 00
Hungary 36 1 459 6100 India 91 124 4029300 Israel 03 963 6050
Italy 39 02 216 091 Japan 81 3 6361 7000 Korea 82 2 3473 4460
Mexico 52 5 55 488 7670 The Netherlands 0318 540666
New Zealand 64 9 415 2280 Nor way 23 38 41 30
Poland 48 22 331 99 99 Portugal 351 21 472 7700
Russia 7 495 721 14 04 Singapore 65 6415 3188
South Africa 27 861 246 723 Spain 3 4 91 590 5200
Sweden 08 555 1270 0 Switzerland 026 674 55 05
Taiwan 886 2 2578 7189 Thailand 18 00 88 22 88
United Kingdom 020 8328 200 0
Sig 12134006044 Rev B US/EG
 Loading...