

Page 1
Requires Bio-Plex
Manager™ 4.1 software
(or later versions)
Bio Plex®Precision Pro
-
Cytokine Assay
Instruction Manual
TM
For technical support, call your local Bio-Rad office or
in the US, call 1-800-4BIORAD (1-800-424-6723).
For research use only. Not for diagnostic procedures.
Page 2

Table of Contents
Section 1 Introduction . . . . . . . . . . . . . . . . . . . . . . . . . . 1
Section 2 Principle . . . . . . . . . . . . . . . . . . . . . . . . . . . . . 2
Section 3 Required Materials . . . . . . . . . . . . . . . . . . . . .4
Section 4 Recommended Materials . . . . . . . . . . . . . . . . 5
Section 5 Sample Preparation . . . . . . . . . . . . . . . . . . . . 6
Section 6 Standard Preparation . . . . . . . . . . . . . . . . . . . 7
Section 7 Control Preparation (Optional) . . . . . . . . . . . . 9
Section 8 Assay Instructions . . . . . . . . . . . . . . . . . . . . 10
Plan Experiment . . . . . . . . . . . . . . . . . . . . . . . . . . . 10
Prepare Coupled Magnetic Beads . . . . . . . . . . . . . 11
Calibrate Vacuum
Assay Procedure . . . . . . . . . . . . . . . . . . . . . . . . . . 12
Section 9 Data Acquisition . . . . . . . . . . . . . . . . . . . . . . 15
Apparatus . . . . . . . . . . . . . . . . . 11
Section 10 Troubleshooting
Section 11 Safety Considerations . . . . . . . . . . . . . . . . . .24
. . . . . . . . . . . . . . . . . . . . . . 20
Page 3

Section 1
Introduction
Bio-Plex®Precision Pro™ cytokine assays are highly sensitive magnetic
bead-based multiplex assays that allow the accurate measurement of low
levels of cytokines in diverse matrices including serum, plasma, and culture
supernatant. The multiplexing feature makes it possible to quantitate the
level of multiple cytokines in a single well of a 96-well microplate in just
3 hr, using as little as 12.5 µl of serum or plasma, or 50 µl of culture
supernatant.
As one of the most recent additions to the Bio-Plex suspension array
system, these assays incorporate magnetic beads into their design. The
magnetic beads allow the use of an assay protocol similar to nonmagnetic Bio-Plex cytokine assays, with the option of using magnetic
separation of wash steps instead of vacuum filtration (and allows
automation of many of the steps). The 25-bead map in Bio-Plex
Manager™ 4.1 software (or later versions) is required for data acquisition.
These assays are offered in a convenient kit format that includes assay,
reagent, and diluent components in a single box. Standard diluents for
serum and plasma are included, as are additional Iylophilized cytokines
which can be used to prepare user-specified quality controls.
For a current listing of Bio-Plex Precision Pro cytokine assays, visit us on
the Web at www.bio-rad.com/bio-plex/
1
Page 4

Section 2
Principle
Technology
The Bio-Plex
technologies. The first is a novel technology that uses up to 100 unique
fluorescently dyed beads (xMAP technology) that permit the simultaneous
detection of up to 100 different types of molecules in a single well of a
96-well microplate. The second is a flow cytometer with two lasers and
associated optics to measure the different molecules bound to the
surface of the beads. The third is a high-speed digital signal processor
that efficiently manages the fluorescent output.
Assay Format
The principle of these 96-well plate-formatted, bead-based assays is similar
to a captur
desired target cytokine is covalently coupled to internally dyed beads. The
coupled beads are allowed to react with a sample containing the target
cytokine. After a series of washes to remove unbound protein, a
biotinylated detection antibody specific for a different epitope is added to
the reaction. The result is the formation of a sandwich of antibodies around
the target cytokine. Streptavidin-phycoerythrin (streptavidin-PE) is then
added to bind to the biotinylated detection antibodies on the bead surface.
Data Acquisition and Analysis
Data from the reaction are then acquired using the Bio-Plex suspension
array system (or Luminex system), a dual-laser
reader system. The contents of the well are drawn up into the reader.
The lasers and associated optics detect the internal fluorescence of the
individual dyed beads as well as the fluorescent signal on the bead
surface. This identifies each assay and reports the level of target protein
in the well. Intensity of fluorescence detected on the beads indicates the
relative quantity of targeted molecules. A high speed-digital processor
efficiently manages the data output, which is further analyzed and
presented as fluorescence intensity on Bio-Plex Manager™ software, the
accompanying software package.
2
®
suspension array system is built around three core
e sandwich immunoassay. An antibody directed against the
, flow-based microplate
Page 5
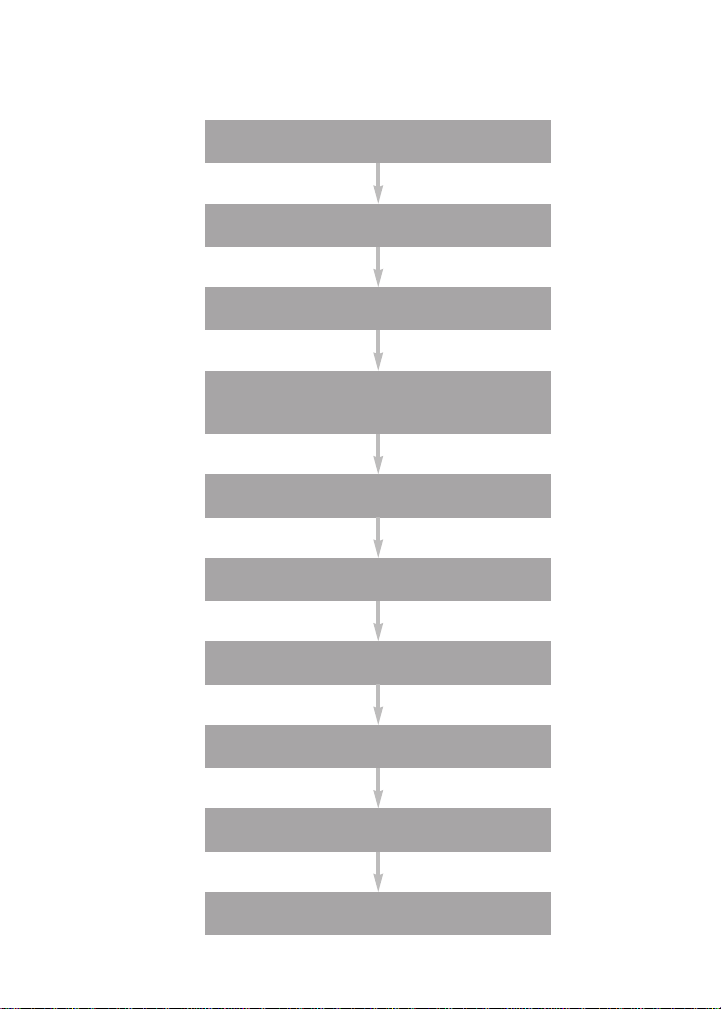
Assay Workflow
Prewet wells
Add beads
Wash
Add standards, controls,
and samples, 1hr
Wash
Add detection antibody, 30 min
Wash
Add streptavidin-PE, 10 min
Wash
Resuspend, acquire data
3
Page 6

Section 3
Coupled magnetic beads (25x) 1 vial
Detection antibodies (10x) 1 vial
Standard 2 vials
Control 1 vial
Standard diluent (serum) 10 ml
Standard diluent (plasma) 10 ml
Sample diluent 15 ml
Assay buffer 75 ml
Wash buffer 150 ml
Detection antibody diluent 15 ml
Streptavidin-PE (100x) 1 vial
Sterile filter plate (96-well) 1 plate
Sealing tape 1 pack of 4
Component Units
Required Materials
Bio-Plex®Precision Pro™ assays are offered in a convenient kit format
that includes assay, reagent, and diluent components all in a single box
(does not require separate reagent and diluent kits). These assays require
the use of Bio-Plex Manager™ software version 4.1 or higher.
Storage and Stability
Kit components should be stored at 4ºC and should never be frozen.
Coupled magnetic beads and str
dark. All components are guaranteed for up to 6 months from the date
of purchase when stored as specified in this manual.
4
eptavidin-PE should be stored in the
Page 7

Section 4
metI
metsySyarrAnoisnepsuSx®elP-oiB
)metsySxenimuLro(
tiKnoitadilaVxelP-oiB
tiKnoitarbilaCxelP-oiB
rekahSetalPretitorciM
4rofrekahs4-STMrelttuhcS-AKI
5264ledoMeniL-baLrosetalporcim
elbapac,tnelaviuqero(rekahSetalP
)mpr001,1–003fo
sutarappAmuucaVetalPretliF
muucavneercSitluMeropilliM
™muruAdaR-oiBrodlofinam
dlofinammuucav
TNATROPMI etalpretliffoesuehT:
enoehtnahtrehtosdlofinam
dehsinimidnitluseryamdeificeps
rof8noitcesees;ecnamrofrepyassa
yassasihtotcificepssnoitcurtsni
rexetroV
rexetrov-inimdnarbRWV
Scientific Instruments Vortex-Genie 2 mixer
riovreseRtnegaeR
tnegaerlm05ratsoC.cnI,gninroC
0784riovreser
Other Materials
noitamrofnIgniredrO
502000-171#golatacdaR-oiB
100302-171#golatacdaR-oiB
060302-171#golatacdaR-oiB
0008023#golatacAKI
VWR catalog #57019-600
R0690MVAM#golataceropilliM
0746-237#golatacdaR-oiB
121-61885#golatacRWV
VWR catalog #58815-234
2784-422#golatacdaR-oiB
Pipets and pipet tips, sterile distilled
water, aluminum foil, absorbent
paper towels, 1.5 ml microcentrifuge
tubes, 15 ml culture tubes
Recommended Materials
For optimal results, the use of the items below is recommended.
5
Page 8

Section 5
Sample Preparation
This section provides instructions for preparing samples derived from
serum, plasma, and culture supernatant. For sample preparations not
mentioned here, consult the publications listed in Bio-Rad bulletin 5297,
available for download at discover.bio-rad.com
Serum and Plasma Samples
Note that for plasma samples, EDTA tubes are recommended; however,
sodium citrate tubes ar
filtered with a 0.22 µm filter to prevent clogging. Hemolyzed samples are
not suitable for Bio-Plex
1. Collect and process the serum or plasma samples and assay
immediately or freeze at –20ºC. Avoid repeat freezing and thawing.
2. Centrifuge the samples at 13,200 rpm for 10 min at 4ºC
to clear the samples of precipitate. Alternatively, carefully filter the
samples with a 0.22 µm filter to prevent instrument clogging.
3. Immediately dilute 1 volume of sample with 3 volumes of sample
diluent. Keep the samples on ice until ready for use.
Culture Supernatant Samples
1. Collect and process the culture supernatant samples and assay
immediately or fr
e acceptable. Extremely lipemic samples may be
®
Precision Pro™ cytokine assays.
eeze at –20ºC. Avoid repeat freezing and thawing.
2. If required, dilute the culture supernatant with culture medium.
Serum-free culture medium should contain carrier protein (such as
BSA) at a concentration of at least 0.5%. Keep the samples on ice
until ready for use.
6
Page 9

Section 6
Serum Serum standard diluent
Plasma Plasma standard diluent
Culture supernatant Same culture medium used
to prepare samples
Sample Standard Diluent
Standard Preparation
Two tubes of Iyophilized cytokine standard are provided in each Bio-Plex
Precision Pro™ cytokine assay. However, only one of the tubes is required per
96-well plate. The product insert provided with the assay lists the
concentration of the reconstituted standard. This procedure will prepare
enough standard to run each dilution in duplicate.
Reconstitute Standards
1. Gently tap the glass vial containing the lyophilized cytokine standard
on a solid surface to ensur
2. Reconstitute 1 vial of lyophilized standard with 500 µl of the
appropriate standard diluent. Do not use assay buffer to dilute
standards.
3. Gently vortex 1–3 sec and incubate on ice for 30 min. Be
consistent with the incubation time for optimal assay performance.
Prepare Standard Dilution Series
The cytokine concentrations specified for the 8-point standard dilution set
have been selected for optimized curve fitting using the 5-parameter
logistic (5PL) or 4-parameter logistic (4PL) r
Manager™ software. Results generated using dilution points other than
those listed in this manual have not been optimized.
1. Label a set of 1.5 ml Eppendorf tubes as shown in the diagram on
the next page.
e the pellet is at the bottom.
egression in Bio-Plex
®
7
Page 10

2. Pipet the appropriate volume of standard diluent into the tubes (see
diagram below). Use serum standard diluent for serum samples,
plasma standard diluent for plasma samples, and culture medium for
culture samples.
3. Add 25.6 µl of the reconstituted standard to the first 1.5 ml tube
containing 374.4 µl of standard diluent. Vortex gently. This is
identified as S1 in the diagram below and in the product insert
provided with assay.
4. Continue making serial dilutions of the standard as shown. After
making each dilution, vortex gently and change the pipet tip after
every transfer.
NOTE: Running an additional two 0 pg/ml blanks is strongly
recommended. Use 50 µl of the appropriate standard diluent as the
blank sample. The 0 pg/ml points should be formatted as blanks,
not as points in the curve, when using Bio-Plex Manager software.
The blank wells are also useful for troubleshooting and determining
LOD.
5. Keep the standards on ice until ready for use. Standards should be
used immediately and should not be frozen for future use.
Standard Dilution Series
8
Page 11

Section 7
Serum Serum standard diluent
Plasma Plasma standard diluent
Culture supernatant Same culture medium used
to prepare samples
Sample Diluent
Control Preparation (Optional)
One tube of lyophilized cytokine control is provided in each Bio-Plex®Precision
Pro™ cytokine assay. The preparation of high, medium, and low controls is
optional to monitor plate-to-plate variations. This section provides instructions
on how to reconstitute the Iyophilized control. The product insert provided with
the assay lists the concentration of the reconstituted control. The reconstituted
control can then be further diluted to prepare any concentration of userspecified quality controls. To ensure optimal assay performance, the cytokine
controls should be prepared in a manner consistent as that used to prepare the
cytokine standards.
Reconstitute Cytokine Controls
1. Gently tap the glass vial containing the lyophilized cytokine control on
a solid surface to ensur
2. Reconstitute 1 vial of lyophilized control with 500 µl of the appropriate
diluent. Do not use assay buffer to dilute controls. This is identified
as C0 in the product insert provided with the assay.
e the pellet is at the bottom.
3. Gently vortex 1 – 3 sec and incubate on ice for 30 min. Be consistent
with the incubation time to ensure optimal assay performance.
4. The reconstituted cytokine control should be further diluted to create
the desired QC samples in the same diluents specified in the table
above. To obtain the concentration of each reconstituted cytokine
control, refer to C0 in the product insert provided with the assay.
9
Page 12

Section 8
Assay Instructions
The following instructions apply to Bio-Plex®Precision Pro™ cytokine
assays. All of the necessary components are provided premixed for ease
of use.
Plan Experiment
1. Assign which wells of a 96-well plate will be used for each standard,
contr
ol, and sample (see the example below).
2. Determine the total number of wells that will be used in the assay.
Include a 25% excess (or add 2 wells for every 8 wells used) to
ensure that enough diluted coupled beads, detection antibodies,
and streptavidin-PE are prepared.
Example Plate
10
Page 13

Prepare Coupled Magnetic Beads
# of Wells 25x Beads (µl) Assay Buffer (µl) Total Volume (µl)
96
48
32
24
240
120
80
60
5,760
2,880
1,920
1,440
6,000
3,000
2,000
1,500
Protect the beads from light by covering the tubes with aluminum foil.
Keep all tubes on ice until r
eady to use.
1. Vortex the coupled beads (25x) at medium speed for 15–20 sec.
2. Prepare a sufficient volume of coupled beads (1x) using assay
buffer. Each well requires 2 µl of coupled beads (25x) adjusted to a
final volume of 50 µl with assay buffer (refer to the example below).
Example Bead Calculations
Calibrate Vacuum Apparatus
The vacuum apparatus must be calibrated at the beginning of the assay
to ensur
e an optimal bead yield. For more detailed instructions, refer to
the Bio-Plex suspension array system hardware instruction manual.
1. Prewet all the wells of a 96-well filter plate with 100 µl of assay buffer.
2. Place the filter plate on the vacuum apparatus and turn on the
vacuum to the maximum level.
3. Press on the filter plate and note the time required to remove the
buffer from the wells by vacuum filtration. The evacuation time
should be 2–5 sec.
If the evacuation time is <2 sec, the pressure is too high. Open the
vacuum control valve slightly and repeat steps 1–3.
If the evacuation time is >5 sec, the pressure is too low. Close the
vacuum control valve slightly and repeat steps 1–3.
11
Page 14

Assay Procedure
mreT snoitceriDdeliateD
hsaW
folµ001ddAreff ubhsawanoe talpretlifehtecalP.llewhcaeot
muucavybreffubehtevomerdnasutarappamuucavdetarbilac
.lewotrepapnaelcahtiwetalpretlifehtfomottobehttolB.noitartlif
.deificepssataepeR
etabucnI
m-uucaV
filter
evomerdnasutarappamuucavdetarbilacanoetalpretlifehtecalP
htiwetalpretlifehtfomottobehttolB.noitartlifmuucavybreffubeht
.lewotrepapnaelca
Gently cover the filter plate with a new sheet of sealing tape. Place
the filter plate on a microplate shaker and then cover with aluminum
foil. Shake the filter plate at room temperature at 1,100 rpm for
30 sec, then at 300 rpm for the specified incubation time.
Bring all buffers to room temperature. Avoid bubbles when pipetting.
A
ssay Key – The following terms are repeated throughout the assay
procedure. Refer to these detailed instructions when wash, incubate, and
vacuum-filter are shown in bold.
1. Equilibrate the diluted standards, samples, and controls at room
temperature for 20 min prior to use.
2. Prewet and block the desired number of wells in a 96-well filter plate
with 100 µl of assay buffer and vacuum-filter. If fewer than 96 wells
ar
e required, mark the plate to identify the unused wells for later use
and cover the unused wells with sealing tape.
3. Vortex the coupled magnetic beads (1x) for 15–20 sec at medium
speed. Add 50 µl to each well and immediately vacuum-filter.
4. Wash twice.
5. Gently vortex the diluted standards, controls, and samples for 1–3
sec. Add 50 µl of standard, contr
the pipet tip after every volume transfer. Incubate for 1 hr.
12
ol, or sample to each well, changing
Page 15

6. While the samples are incubating, perform a 30 sec quick-spin
# of Wells
10x Detection
Antibody (µl)
Total Volume (µl)
96
48
32
24
300
150
100
75
2,700
1,350
900
675
3,000
1,500
1,000
750
Detection Antibody
Diluent (µl)
centrifugation of the detection antibody (10x) prior to pipetting to
collect the entire volume at the bottom of the vial.
7. Prepare a sufficient volume of detection antibodies (1x) using
detection antibody diluent. Each well requires 2.5 µl of detection
antibodies (10x) adjusted to a final volume of 25 µl with detection
antibody diluent (refer to the example below).
Example Detection Antibody Calculations
8. After incubating the samples, slowly remove and discard the sealing
tape, then vacuum-filter.
9. Wash 3 times.
10.
Vortex the detection antibodies gently and add 25 µl to each well.
Incubate for 30 min.
11.
While the detection antibodies are incubating, perform a 30 sec
quick-spin centrifugation of the streptavidin-PE (100x) prior to
pipetting to collect the entire volume at the bottom of the vial.
12. Prepare a sufficient volume of streptavidin-PE (1x) using assay buffer.
Each well requires 0.5 µl of streptavidin-PE (100x) adjusted to a final
volume of 50 µl with assay buffer (refer to the example on the
following page).
13
Page 16

# of Wells
100x
Streptavidin-PE
(µl)
Total Volume (µl)
96
48
32
24
60
30
20
15
5,940
2,970
1,980
1,485
6,000
3,000
2,000
1,500
Assay Buffer (µl)
Example Streptavidin-PE Calculations
13. After the detection antibody incubation, slowly remove and discard
the sealing tape, then vacuum-filter.
14. Wash 3 times.
15.
Vortex the streptavidin-PE (1x) vigorously and add 50 µl to each well.
Incubate for 10 min.
16.
After the streptavidin-PE incubation, slowly remove and discard the
sealing tape, then vacuum-filter.
17. Wash 3 times.
14
18. Add 125 µ
r
esuspend the beads. Acquire the data immediately as described in
l of assay buffer to each well. Incubate for 30 sec to
Section 9.
Page 17

Section 9
Data Acquisition
Bio-Plex®Precision Pro™ cytokine assays require the use of Bio-Plex
Manager™ software version 4.1 or higher. Recommendations for acquiring
data using the Bio-Plex suspension array system are listed below.
Alternatively, refer to the Bio-Plex Manager™ software user guide or the
instructions provided with the Luminex instrument.
Prepare System
1. Empty the waste bottle and fill the sheath fluid bottle before starting
(if HTF not pr
potential data loss.
2. Turn on the reader and microplate platform (and HTF if present). Allow
the system to warm up for 30 min.
3. Select Start up and follow the instructions to prepare the reader
to acquire data. If the system is idle for 4 hr, the lasers will automatically
turn off and a 30 min warm-up period will again be required prior to
acquiring data. Select Warm up and wait for the optics to reach
operational temperature.
Calibrate With High RP1 Target Value
Calibrate using Bio-Plex calibration beads and target values. Daily
calibration is recommended before acquiring data.
esent). This will prevent fluidic system backup and
1.
Select Calibrate and confirm that the default values for CAL1
and CAL2 are the same as the values on the Bio-Plex calibration
bead labels. Use the Bio-Plex High RP1 target value for CAL2
calibration for Bio-Plex Precision Pro cytokine assays.
NOTE: When acquiring data for Bio-Plex Precision Pro cytokine
assays with a Luminex instrument, Luminex software, and Luminex
calibration beads, it is necessary to convert the Luminex CAL2
calibration bead RP1 target value using the following equation:
Bio-Plex High RP1 target value = (Luminex RP1 target value) x 4.55
15
Page 18

Add the new target value to the Luminex software by selecting
Calibrate, then New under the Reporter Channel in the Start
Calibration dialog. Enter the new target value and save it as a new lot.
Then calibrate using the new RP1 target value.
2. Select OK and follow the instructions for CAL1 and CAL 2 calibration.
Prepare Protocol
1. Open a new protocol by selecting File, then New from the main
menu. Locate the steps at the left of the protocol menu.
NOTE: T
o minimize data entry, preset lot-specific Bio-Plex Precision
Pro cytokine assay protocols are available for download at
www.bio-rad.com/bio-plex
2. Select Step 1 (Describe Protocol) and enter information about the
assay
.
3. Select Step 2 (Select Analytes) and choose the panel for Cytokines.
Choose the target proteins for the assays on the plate. Note that this
information will already be entered with the preset downloaded
protocol.
Plate Formatting Example
16
Page 19

4. Select Step 3 (Format Plate) and click on the Plate Formatting tab.
Click on and drag the cursor over all the wells that contain
standards. Then click on and drag the cursor over the wells that
contain blanks. Repeat with to identify all the wells that contain
controls and to identify all the wells that contain samples.
NOTE: If the preset protocol was downloaded, a formatted plate will
already be provided. Make any necessary changes to the preset
formatted plate to match your plate setup.
5. Select Step 4 (Enter Standards Info) to enter standards information.
Note that this information will already be entered with the preset
download protocol.
a) Select each analyte individually from the pull-down cell.
b) Select the Enter Automatically option and then select the most
concentrated value as S1.
c) Enter the concentration of S1 from the product insert provided
with the assay.
d) Enter the dilution factor as 4 and select Calculate. The standards
information will be populated for the selected analyte.
e) Deselect the box for same concentration values for all analytes.
Repeat steps 5a through 5d for each analyte in the assay.
6. Select Step 5 (Enter Controls Info) to enter controls information. This
is where the concentration of the user-specified controls is entered
into the protocol.
a) Select each analyte individually from the pull down cell.
b) Enter the description, concentration, and dilution information for
each user-specified control.
c) Deselect the box for same concentration values for all analytes.
Repeat steps 6a and 6b for each analyte in the assay.
7. Select Step 6 (Enter Sample Info) and enter sample information.
17
Page 20

Acquire Data
1. Shake the assay plate at 1,100 rpm for 30 sec immediately before
acquiring data. Failur
time due to bead settling.
2. Check that the filter plate is flat. While pressing on one end of the
plate, observe the distance that the opposite end of the plate is
raised off a flat surface. If the distance is >1 mm, transfer all contents
to a flat-bottom 96-well plate or another filter plate.
3. Visually inspect the plate and ensure that the assay wells are filled with
buffer prior to placing the plate in the Bio-Plex microplate platform.
4. Slowly remove the sealing tape and any plate cover before placing
the plate in the reader.
5. Select Step 7 (Run Protocol):
a) Specify data acquisition for 100 beads per region.
b)
In Advanced Settings, set the Bead Map to 25 region.
e to do so will result in increased data acquisition
NOTE: Bio-Plex Pr
beads and require the use of the 25 region map available in BioPlex Manager software version 4.1 or higher.
c) In Advanced Settings, set the sample size to 50 µl.
d)
In Advanced Settings, confirm that the default DD gate values
are set to 5000 (low) and 32000 (high).
NOTE: When using a Luminex instrument, set the gates
accor
ding to the Luminex procedure located in the manual.
e) Select Start and save the .rbx file. Then follow the instructions for
data acquisition.
18
ecision Pro cytokine assays contain magnetic
Page 21

6. If acquiring data from more than one plate, empty the waste bottle
and refill the sheath bottle after each plate (if HTF not present). Select
Wash Between Plates and follow the instructions for fluidics
maintenance. Then repeat the Prepare Protocol and Acquire Data
steps.
NOTE: Use the W
run to reduce the possibility of clogging the instrument.
7. When data acquisition is complete, select Shut Down and
follow the instructions.
Reacquire Data
It is possible to acquire data fr
Rerun/Recovery mode located below Start in Step 7 (Run Protocol).
1. Check the wells where data will be acquired a second time.
Any previous data will be overwritten.
2. Remove the buffer by vacuum filtration and add 125 µl of assay
buffer to each well. Cover the filter plate with a new sheet of
sealing tape.
3. Repeat Acquire Data steps 1–6 to acquire data a second time.
The data acquir
however, the data acquisition time will be extended since fewer
beads are present in each well.
ash Between Plates command after every plate
om a well or plate a second time using the
ed should be similar to the data acquired initially;
19
Page 22

Section 10
Troubleshooting Guides
This troubleshooting guide addresses problems that may be encountered with
®
Bio-Plex
listed below, review the possible causes and solutions provided. This will assist
you in resolving problems directly related to how the assay steps should be
performed. Poor assay performance may also be due to the Bio-Plex array
reader. To eliminate this possibility, we highly recommend use of the Bio-Plex
validation kit. This kit will validate all the key functions of the array reader and
assist the user in determining whether or not the array reader is functioning
properly.
Possible Causes Possible Solutions
High Inter-Assay CV
Standards were not
reconstituted consistently
Precision Pro™ cytokine assays. If you experience any of the problems
Incubate the reconstituted
standards for 30 min on ice. Always
be consistent with the incubation
time and temperature.
Reconstituted standards and
diluted samples were not stored
properly
High Intra-Assay CV
Bottom of filter plate not dry
20
Reconstituted standards and diluted
samples should be prepared on ice
as instructed. Prior to plating, the
reconstituted standards and diluted
samples should be equilibrated to
room temperature.
Dry the bottom of the filter plate with
absorbent paper towel (preferably
lint-free) to prevent crosscontamination.
Page 23

Possible Causes Possible Solutions
Pipetting technique
Reagents and assay components
were not equilibrated to room
temperature prior to plating
Contamination with wash
buffer during wash steps
Slow pipeting samples and
reagents across the plate
Pipet carefully and slowly when
adding standards, samples,
detection antibodies, and
streptavidin-PE, especially when
using a multichannel pipet. Use a
calibrated pipet. Change pipet tip
after every volume transfer.
All reagents and assay components
should be equilibrated to room
temperature prior to plating.
During the wash steps, be careful
not to splash wash buffer from one
well to another. Be sure that the
wells are filtered completely and that
no residual volume remains. Also,
be sure that the microplate shaker
setting is not too high. Reduce the
microplate shaker speed to minimize
splashing.
Sample pipeting across the entire
plate should take less than 4 min.
Reagent pipeting across the entire
plate should take less than 1 min.
21
Page 24

Possible Causes Possible Solutions
Low Bead Count
Miscalculation of bead dilution
Check your calculations and be
careful to add the correct volumes.
Beads clumped in multiplex
bead stock tube
Vacuum on for too long when
aspirating buffer from wells
Did not shake filter plate enough
before incubation steps and prior
to reading
Reader is clogged
Low Signal or Poor Sensitivity
Standards reconstituted incorrectly
Detection antibody or
streptavidin-PE diluted incorrectly
Vortex for 15–20 sec at medium
speed before aliquoting beads.
Do not apply vacuum to the filter
plate for longer than 10 sec after the
buffer is completely drained from
each well.
Shake the filter plate at 1,100 rpm
for 30 sec before incubation steps
and immediately before reading
the plate.
Refer to the troubleshooting guide
in the Bio-Plex hardware
instruction manual.
Follow the cytokine standard
instructions carefully.
Check your calculations and be
careful to add the correct volumes.
22
Page 25

Possible Causes Possible Solutions
High Background Signal
Incorrect buffer was used
(for example, assay buffer
used to dilute standards)
Use sample matrix or serum
standard diluent to dilute
cytokine standards.
Spiked “0 pg/ml” wells by mistake
Streptavidin-PE incubated
too long
Poor Recovery
Expired Bio-Plex reagents were
used
Incorrect amounts of components
were added
Microplate shaker set to an
incorrect speed
Pipetting technique
Be careful when spiking standards.
Do not add any antigens in the 0
(blank) point.
Follow the procedure incubation
time.
Check that reagents have not
expired. Use new or unexpired
components.
Check your calculations and be
careful to add the correct volumes.
Check the microplate shaker speed
and use the recommended setting.
Setting the speed too high may
cause splashing and contamination.
Use the recommended plate shaker.
Pipet carefully and slowly when
adding standards, samples,
detection antibodies, and
streptavidin-PE, especially when
using a multichannel pipet. Use a
calibrated pipet. Change pipet tip
after every volume transfer.
23
Page 26

Section 11
Safety Considerations
Eye protection and gloves are recommended while using this product.
Consult the MSDS for additional information.
Human Source Material. Treat As Potentially Infectious.
The Bio-Plex
human origin. This material should be handled as if capable of
transmitting infectious agents. Please use universal precautions. The
material has been tested by an FDA approved test and found negative
for HBsAg, HIV 1/2 Ab, HIV-1 Ag, and HCV. No test method can provide
total assurance that hepatitis B virus, hepatitis C virus, human
immunodeficiency virus, or other infectious agents are absent. These
components should be handled at Biosafety Level 2 containment [US
Government publication: Biosafety in Microbiological and Biomedical
Laboratories (CDC, 1999)]. Handle Bio-Plex Precision Pro serum and
plasma standard diluents as potentially biohazardous material under at
least Biosafety Level 2 containment.
®
Precision Pro™ cytokine assays contain components of
24
Page 27

xMAP is a trademark of Luminex Corp.
Costar is a trademark of Coming Costar Corporation. Eppendorf is a trademark of
Eppendorf-Netheler-Hinz GmbH. Luminex 100 and xMAP are trademarks of Luminex
Corporation. Multiscreen is a trademark of Millipore Corporation. Vortex-Genie is a trademark
of Scientific Industries, Inc.
By purchasing this kit, which contains fluorescent labeled microsphere beads authorized by
Luminex, you, the customer, acquire the right under Luminex's patent rights* to use this kit or
any portion of this kit, including without limitation the microsphere beads contained herein, only
with Luminex’s laser-based fluorescent analytical test instrumentation known under the name
of Luminex 100, for example as marketed by Bio-Rad Laboratories, Inc. in the Bio-Plex
system.
*Including, but not limited to US patent 5,981,180; 6,046,807; 6,057,107.
25
Page 28

Bio-Rad Laboratories, Inc.
Life Science
Group
06-0143 0305 Sig 1106
10008318 US/EG Rev A
Bio-Rad
Laboratories, Inc.
Web site www.bio-rad.com USA 800 4BIORAD Australia 02 9914 2800
Austria 01 877 89 01 Belgium 09 385 55 11 Brazil 55 21 3237 9400
Canada 905 712 2771 China 86 21 6426 0808
Czech Republic 420 241 430 532 Denmark 44 52 10 00
Finland 09 804 22 00 France 01 47 95 69 65 Germany 089 318 84 0
Greece 30 210 777 4396 Hong Kong 852 2789 3300
Hungary 36 1 455 8800 India 91 124 4029300/5013478 Israel 03 963 6050
Italy 39 02 216091 Japan 03 5811 6270 Korea 82 2 3473 4460
Mexico 55 5200 05 20 The Netherlands 0318 540666
New Zealand 64 9415 2280 Norway 23 38 41 30 Poland 48 22 331 99 99
Portugal 351 21 472 7700 Russia 7 095 721 14 04
Singapore 65 6415 3188 South Africa 27 0861 246 723
Spain 34 91 590 5200 Sweden 08 55512700 Switzerland 061 717 95 55
Taiwan 886 2 2578 7189/2578 7241 United Kingdom 020 8328 2000
2000 Alfred Nobel Dr.
Her
cules, CA 94547 USA
1-800-424-6723 (in the US)
 Loading...