

Page 1

GRADIENT PUMP MAINTENANCE KIT
FOR THE BIOLOGIC SYSTEM
CATALOG NUMBER 750-0164
The BioLogic System Gradient Pump require minimal maintenance to stay in good working condition.
This maintenance kit includes the piston seals, check valves, and piston wipers for routine maintenance of the pump heads.
1. Replacing a piston seal. (Refer to Figure 1.)
a. Disconnect all tubing from the pump head.
b. Using the supplied Allen wrench, remove the four Pump Head Module Assembly screws on
the
face
of the Pump Head Module in the order shown. Gently pull the pump head away
from the Workstation.
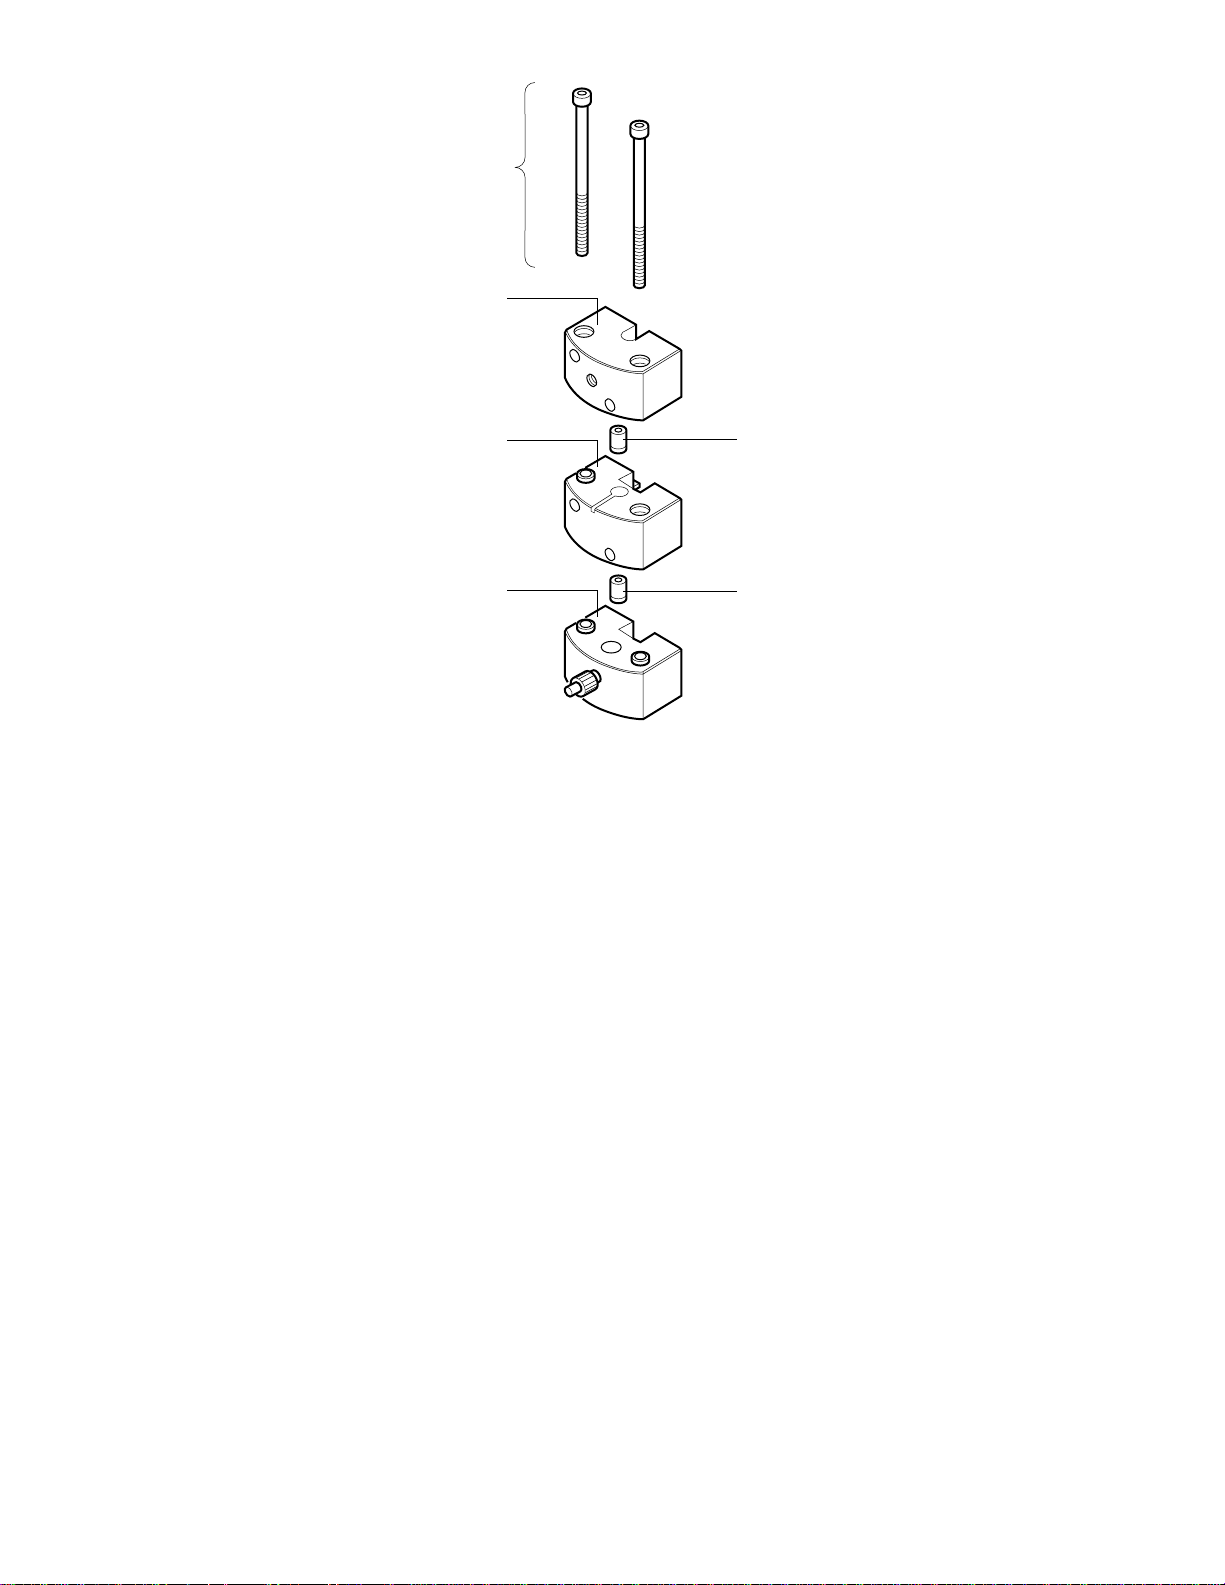
Figure 1. BioLogic Workstation Gradient Pump Mechanism Parts
c. Remove the washout block from the back of the pump head module by gently pulling it away.
d. Note that there are two piston seals per pumphead. Always replace both seals at the same
time. Once a piston seal is removed from its gland, it cannot be reused. It is recommended to
pre-condition the new seals by soaking or sonicating them in water for several minutes.
Always shake off or blot excess moisture from the seals before installation.
e. Using the Piston Seal Removal Tool, pry the seal from the gland. To do this, you insert the tip
of the Seal Removal Tool into the seal and gently pry the seal away. (See Figure 2.)
f. To install a new seal, line it up with the gland and use the Washout Block to seat the seal.
g. When both seals have been replaced, reassemble the pump head by reversing the
sequence shown in Figure 1. Firstly, wipe the pistons with a dampened cloth to ensure that
no crystallized salt residues are present which could damage the new seals. Then, position
Bio-Rad Laboratories, 2000 Alfred Nobel, Hercules CA 94547 • Phone (510) 741-1000
WASHOUT
BLOCK
SPRING RETAINER
PISTON WIPER
PUMP HEAD
MODULE
ASSEMBLY
SCREWS
PUMP HEAD
MODULE
1
4
3
2
Page 2

the Washout Block onto the pistons and set the pump head module back onto the Washout
Block on the BioLogic Workstation. (The Washout Block guides the pump head module in the
reattachment process and protects the pistons.)
h. Replace the four screws until the pump head module is secure on the Workstation but do not
overtighten.
Figure 2. Removing the Piston Seals (view showing the back of the Pump Head Module)
2. Cleaning and replacing a check valve.
a. Remove the Pump Head Module from the Workstation. Refer to Figure 1 and the previous
procedure.
b. Remove the two Pump Head Module Assembly screws at the
top
of the module. See Figure
3.
NOTE: Never remove the top screws without first removing the Pump Head Module from the
Workstation.
The pump head can now be separated into three parts and the two check valves will be
accessible.
c. To clean the check valves, remove them from the assembly and clean by sonication in a bath
of warm water with detergent or in a bath of methanol. After sonication, rinse thoroughly.
Using a syringe, inject filtered, deionised water through the check valve.
d. Reassemble the pump head with either a cleaned check valve or a new check valve.
Because the orientation of the check valve is critical, they are designed to fit into the pump
head module in one direction only.
e. Reassemble the pump head as shown in Figure 3. Replace the two pump head module
assembly screws and tighten firmly.
f. Position the Washout Block over the pistons and set the pump head module back onto the
Washout Block on the BioLogic Workstation. See Figure 1. (The Washout Block guides the
pump head module in the reattachment process and protects the pistons.)
g. Replace the four screws until the pump head module is secure on the Workstation but do not
overtighten.
GLAND
BACK OF PUMP
HEAD MODULE
PISTON SEALS
PISTON SEAL
REMOVAL TOOL
Page 3
PUMP HEAD
MODULE
ASSEMBLY
SCREWS
OUTLET HEAD
PUMPING HEAD
PRIMING HEAD
Figure 3. Pump Head Module Assembly
CHECK VALVE
CHECK VALVE
3. Replacing the Piston Wiper
Piston wipers are available in the event that they are lost during any of the pump maintenance
procedures. If the piston wiper has fallen out of the spring retainer, simply place a new piston
wiper onto the piston which then rests on the spring retainer. See Figure 1.
4. Plumbing the Gradient Pump
a. For inlets to the Gradient Pump, it is essential to use the wide-bore tubing supplied with your
system, which is 1/8” OD (0.062” ID) 37)(.
Note: Using smaller bore tubing will not provide sufficient flow of liquid to the Gradient Pump.
This will lead to entrapment of air bubbles in the pump heads which in turn causes an erratic
delivery of liquid and may stall the pump.
b. The remainder of the Gradient Pump system is plumbed with 1/16” OD (0.020” ID) Tefzel
tubing.
Daily Maintenance
Washing behind the piston seal extends seal life. Insert a 10 ml syringe filled with deionised water
in the Washout Port luer fitting. Each pumphead should get a 10 ml washout once per day,
preferably at the end of the day's operation. Run off water exits the pump through the Washout
Drain between the two pump heads. It can be collected in a small beaker.
Page 4

Storage of the Workstation
If the BioLogic System will be stored for a long period, be sure to remove all traces of buffer salts from
the Workstation pump heads, valves and monitors by flushing extensively with deionized water followed by a 20 % solution of ethanol to prevent microbial growth.
Technical Assistance
For additional help, contact your local Bio-Rad representative. In the United States, call Technical
Service at 1-800-4BIORAD.
Ordering Information
750-0160 Inlet line "dipper" filters (6)
750-0161 Piston Seals (4)
750-0162 Check Valves (1)
750-0164 Gradient Pump Maintenance kit
750-0165 Piston Wipers (4)
4106054 Rev C
 Loading...