

Page 1
Quick Guide
Activity 1: Determine the Reaction
Rate in the Presence or Absence
of an Enzyme
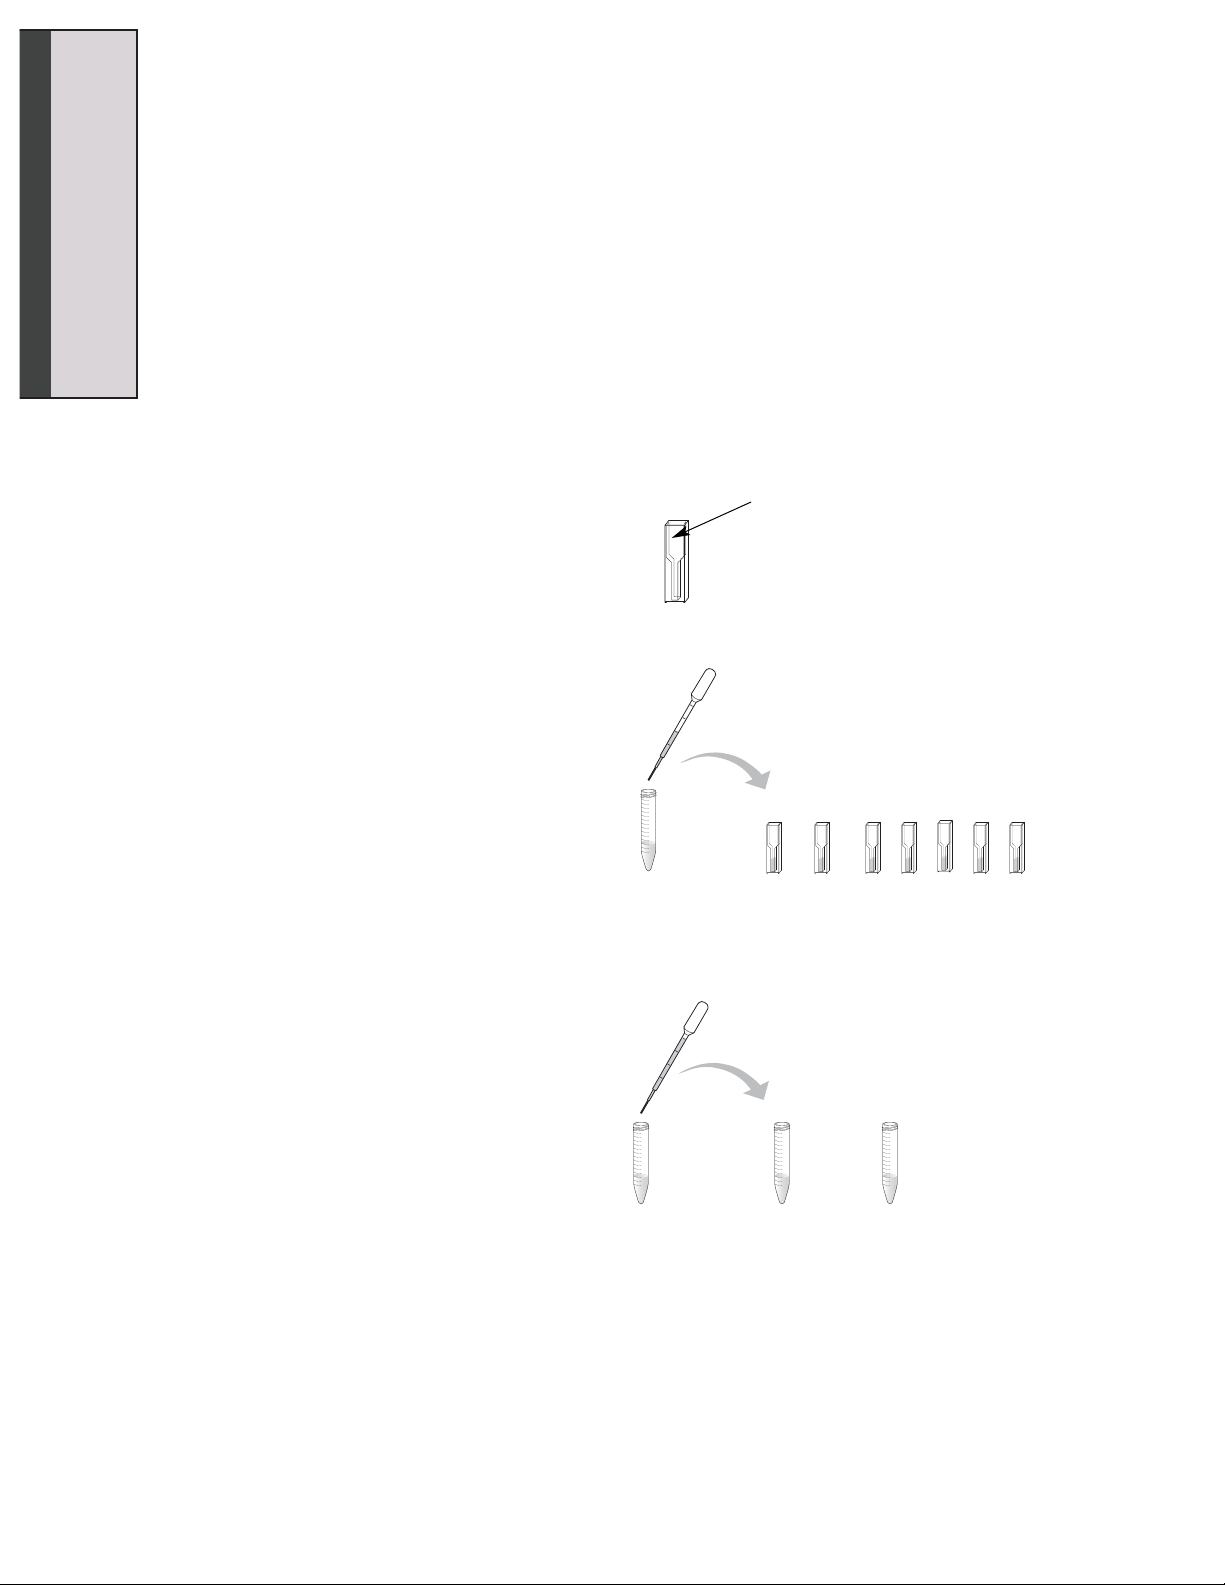
1. Find your 15 ml conical tubes labeled
“Stop Solution”, “1.5 mM Substrate”,
“Enzyme” and “Buffer”. Write your initials
on each tube.
2. Label five cuvettes E1–E5.
3. Label the two remaining cuvettes “Start”
and “End”.
4. Using a clean DPTP, pipet 500 µl of stop
solution into each labeled cuvette. Rinse
the DPTP well with water.
5. Label one empty 15 ml conical tube
“Enzyme Reaction” and the other
“Control”.
6. Using a clean DPTP, pipet 2 ml of 1.5 mM
substrate into the 15 ml conical tube
labeled “Enzyme Reaction”. Use the
same DPTP and pipet 1 ml of 1.5 mM
substrate into the conical tube labeled
“Control”. Rinse the DPTP well with
water.
7. Label one DPTP “E” for enzyme and the
other “C” for control. Only use the DPTP
labeled “E” for the enzyme reaction tube
and the DPTP labeled “C” for the control
reaction tube.
26
Quick Guide
QUICK GUIDE
Label up here
Stop Solution
1.5 mM Substrate ControlEnzyme reaction
Start
End
E1 E2
E3
E4 E5
Page 2
Read and understand steps 8–11 fully
before proceeding. These steps are time
sensitive!
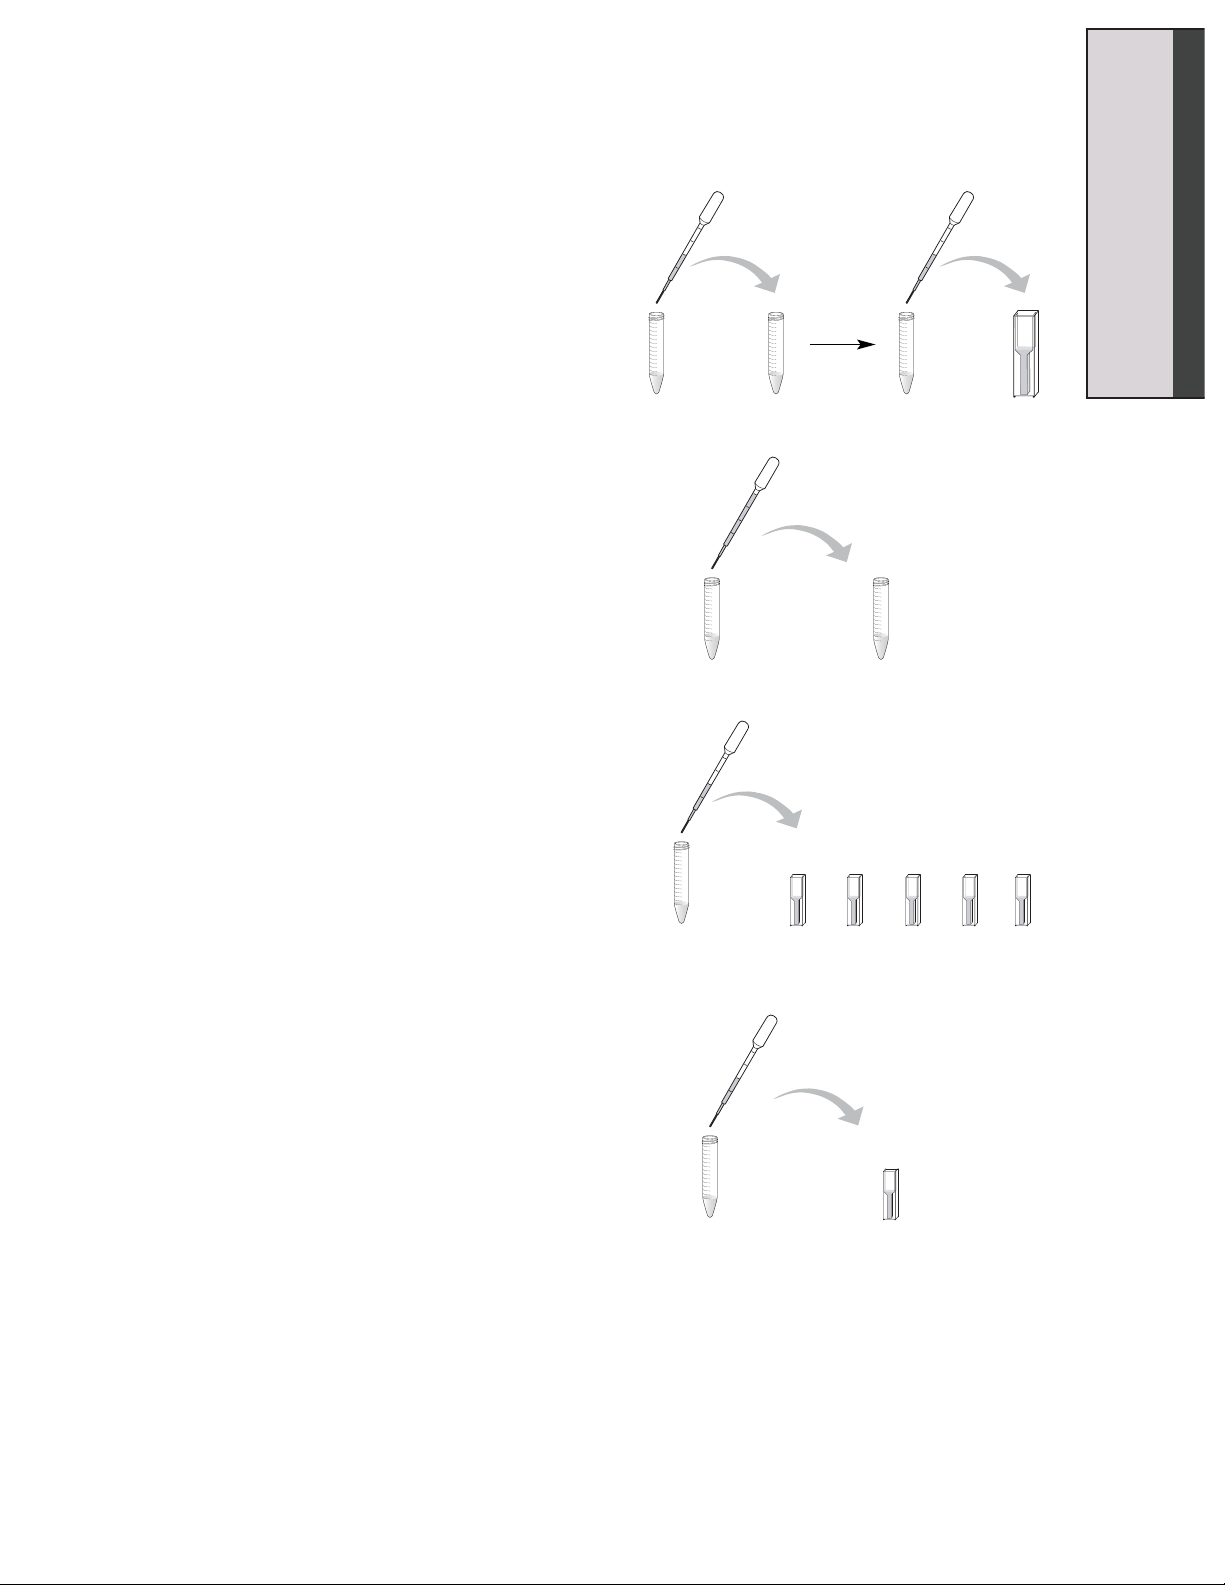
8. Using the DPTP labeled “C”, pipet 500 µl
of buffer into the 15 ml conical tube
labeled “Control” and gently mix. Once
you have mixed the buffer with the
substrate, remove 500 µl of this solution
and add it to your cuvette labeled “Start”.
9. Using the DPTP labeled “E”, pipet 1 ml of
enzyme into the 15 ml conical tube
labeled “Enzyme Reaction”. Gently mix,
then START YOUR TIMER.
10. At the times indicated, use the DPTP
labeled “E” to remove 500 µl of the
solution from the “Enzyme Reaction”
tube and add it to the appropriately
labeled cuvette containing the stop
solution.
11. After all the enzyme samples have been
collected, use the DPTP labeled “C” to
remove 500 µl of the solution from the
“Control” reaction tube and add it to the
cuvette labeled “End”.
12. Proceed with the analysis of your
samples. After you have finished your
analysis, rinse out your reaction (conical)
tubes, cuvettes, and DPTPs with copious
water and save them for later activities.
Note: Do not discard unused stock solutions.
They will be used for the next activity.
27
Quick Guide
QUICK GUIDE
Enzyme
reaction
E1
1 min
E2
2 min
E3
4 min
E4
6 min
E5
8 min
Control
End
8 min
Buffer Control
Enzyme Enzyme reaction
Control Start
Page 3
Quick Guide
Activity 2: Determine the Effect of
Temperature on the Reaction Rate
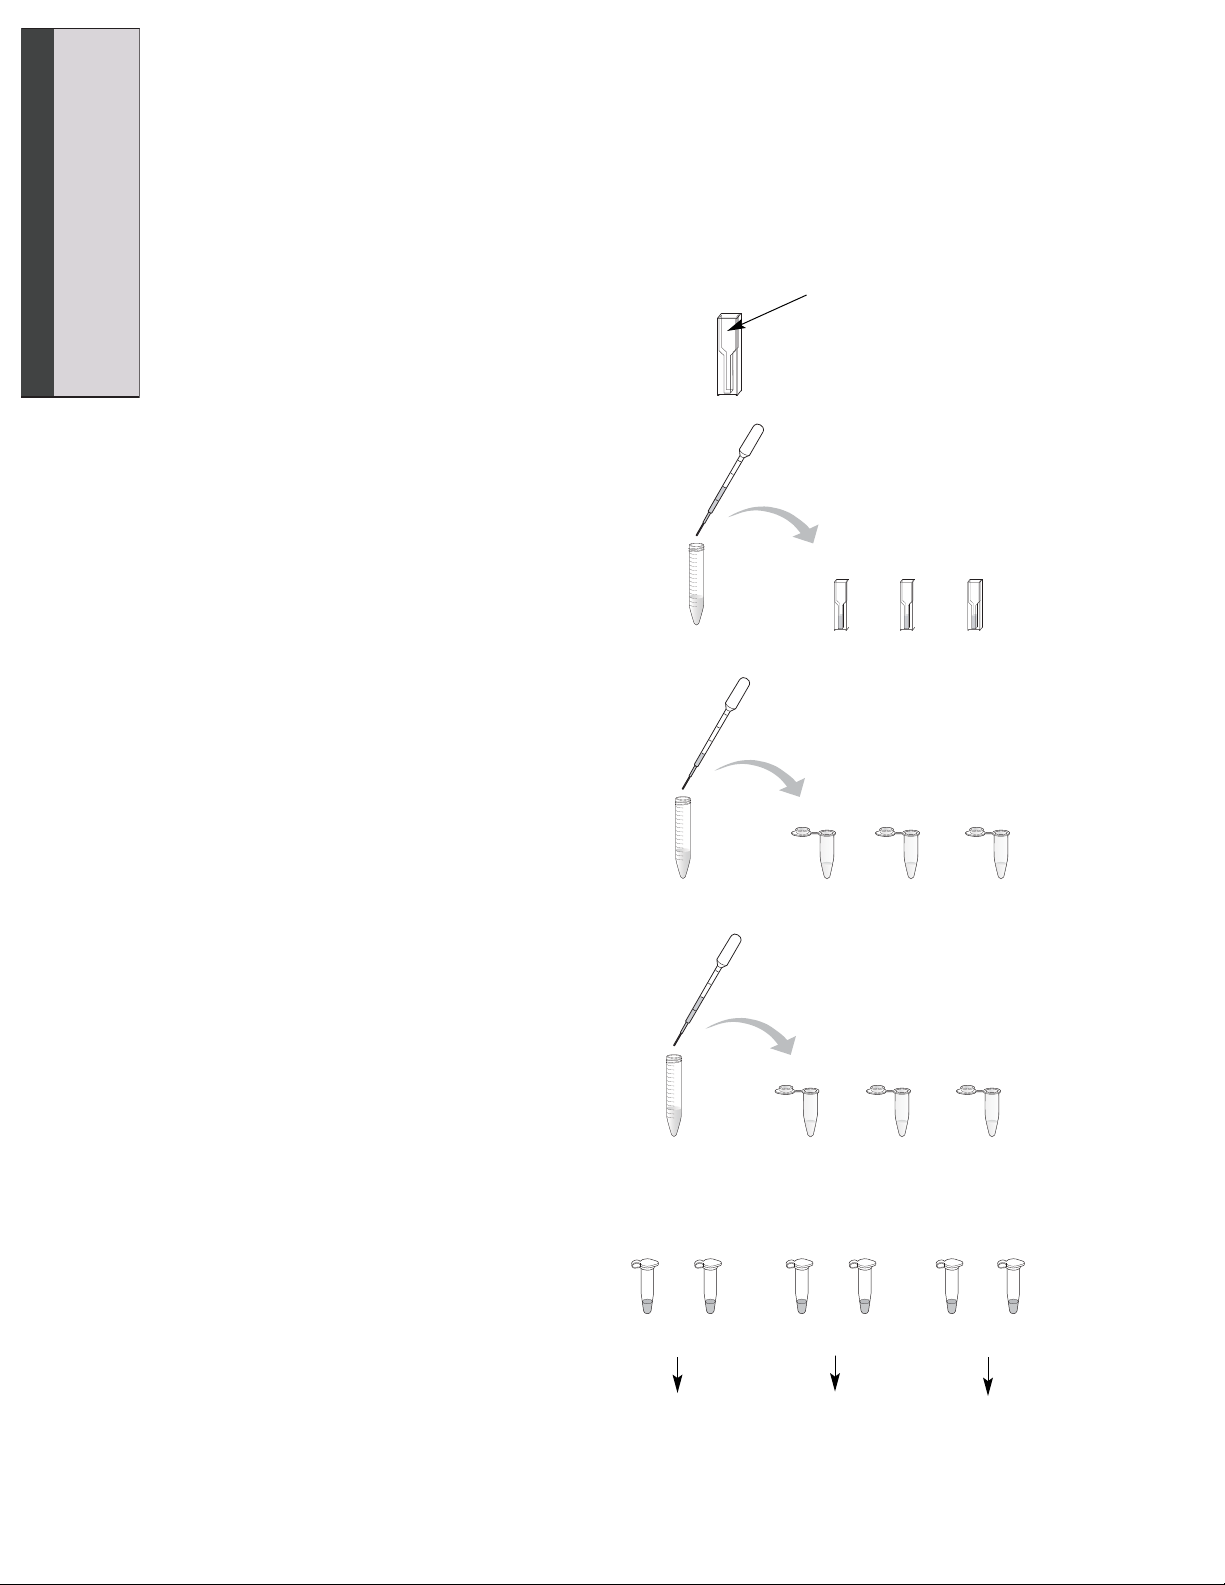
1. Label your cuvettes “0°C”, “22°C”, and
“37°C”.
2. Using a clean DPTP, pipet 500 µl of stop
solution into each cuvette. Wash the
DPTP out thoroughly with water.
3. Label three 1.5 ml microcentrifuge tubes
“0°C Enzyme”, “22°C Enzyme”, and
“37°C Enzyme”. Using a clean DPTP,
pipet 250 µl of enzyme into each
microcentrifuge tube. Rinse out the
DPTP thoroughly with water.
4. Label three 1.5 ml microcentrifuge tubes
“0°C Substrate”, “22°C Substrate”, and
“37°C Substrate”. Using a clean DPTP,
pipet 500 µl of 1.5 mM substrate into
each microcentrifuge tube. Rinse out the
DPTP thoroughly with water.
5. Place the tubes labeled “0°C Enzyme”
and “0°C Substrate” in the ice cup. Place
the tubes labeled “22°C Enzyme” and
“22°C Substrate” on your lab bench.
Place the tubes labeled “37°C Enzyme”
and “37°C Substrate” in the beaker of
warm water at 37°C. Allow the tubes to
equilibrate to their respective temperatures for at least 5 minutes.
28
QUICK GUIDE
Quick Guide
Label up here
Stop Solution
0°C
22°C 37°C
Enzyme
0°C
Enzyme
22°C
Enzyme
37°C
Enzyme
1.5 mM Substrate
0°C
Substrate
0°C
Substrate
22°C
Substrate
37°C
Substrate
0°C
Enzyme
0°C
22°C
Enzyme
Room
Temperature
37°C
Enzyme
37°C
22°C
Substrate
37°C
Substrate
Page 4
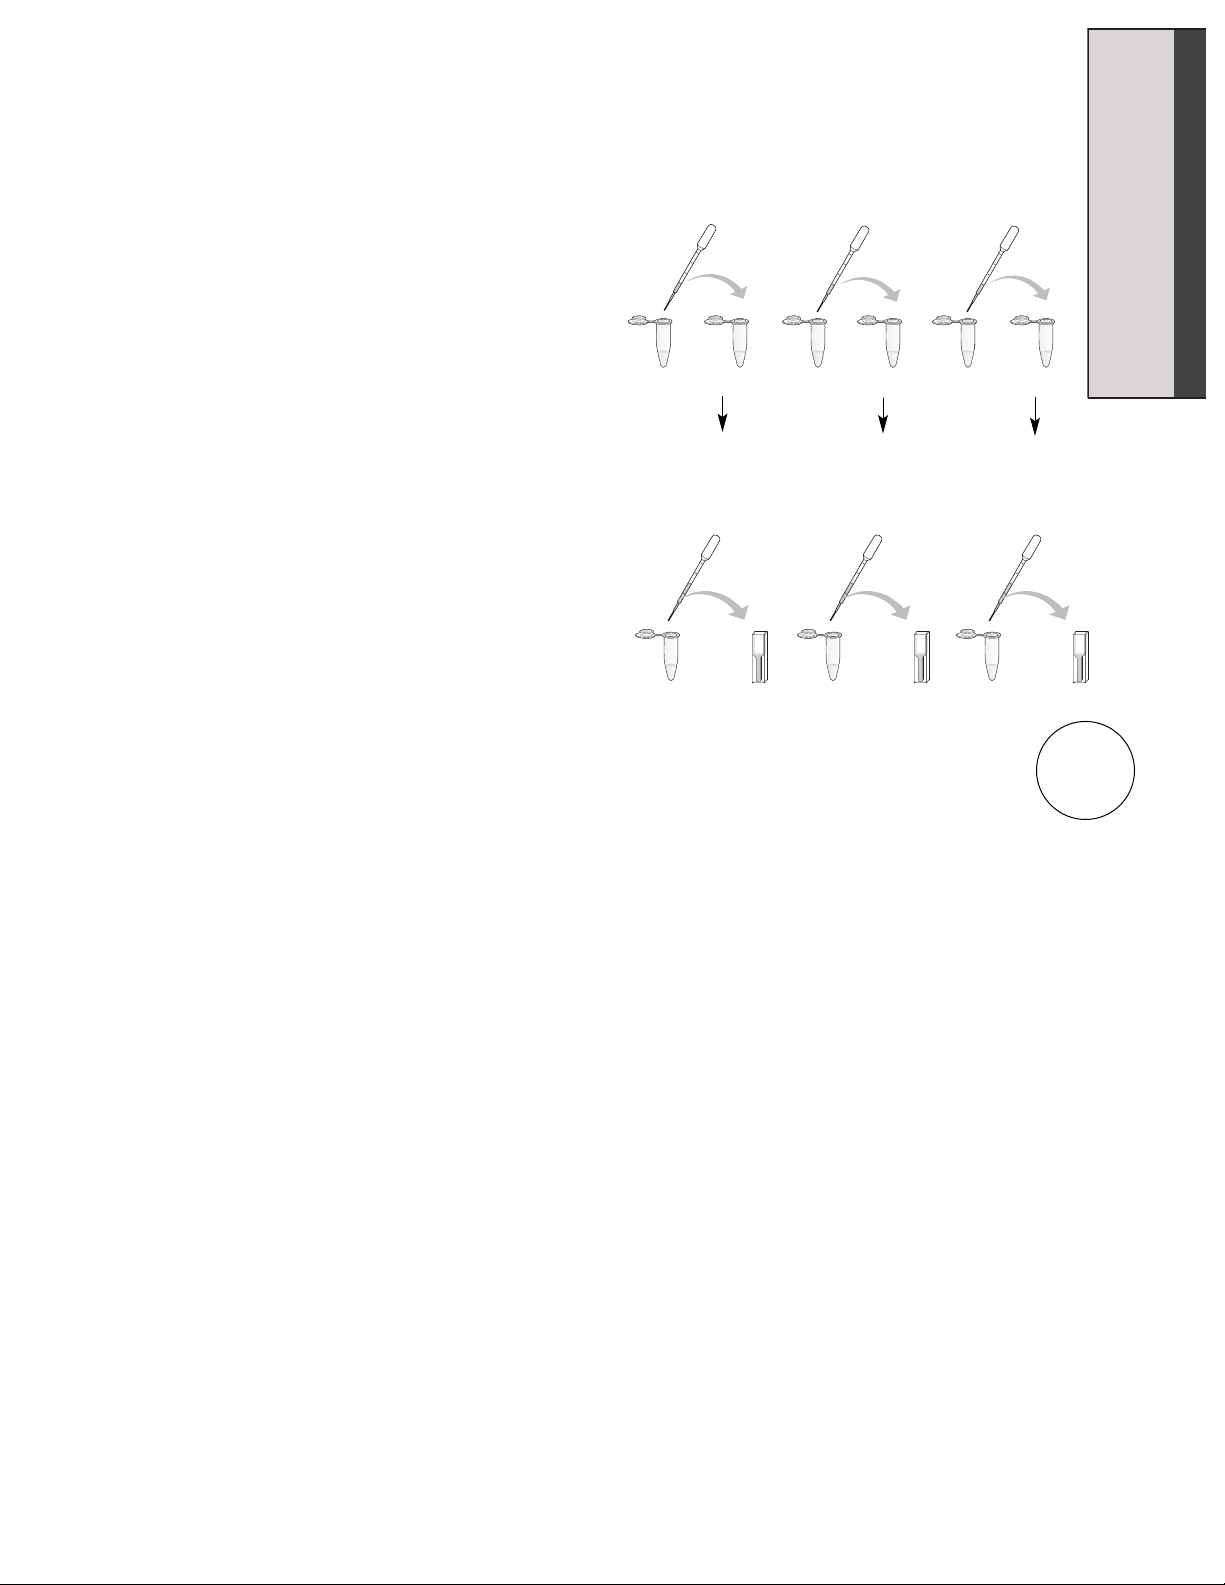
6. Have a stopwatch ready. Using a clean
DPTP, pipet the 250 µl of enzyme from
the tube labeled “0°C Enzyme” into the
tube labeled “0°C Substrate”, and place
the tube now containing your enzyme
and substrate mix back on ice. Add the
22°C enzyme to the 22°C substrate
solution, and place that tube back on the
lab bench. Add the 37°C substrate to the
37°C enzyme solutions, and put that tube
back into the 37°C water bath. START
YOUR TIMER.
7. After 2 minutes, use a clean DPTP for
each temperature reaction to transfer
500 µl of your reaction to the appropriately
labeled cuvette containing the stop
solution.
8. Proceed with the analysis of your
samples. After you have finished your
analysis, rinse out the cuvettes and
DPTPs with copious water and save
them for later activities.
Note: Do not discard unused stock solutions.
They will be used for the next activity.
29
Quick Guide
QUICK GUIDE
0°C
0°C S
22°C S 37°C S
0°C E
0°C
22°C E
Room
Temperature
37°C E
37°C
0°C
S+E
22°C22°C
S+E
37°C
37°C
S+E
2 min
Page 5

Quick Guide
Activity 3: Determine the effect of
pH on the Reaction Rate
1. Label your cuvettes “pH 5.0”, “pH 6.3”,
and “pH 8.6”.
2. Using a clean DPTP, pipet 500 µl of stop
solution into each cuvette. Wash the
DPTP out thoroughly with water.
3. Using a clean DPTP, pipet 250 µl of
3.0 mM substrate into each microcentrifuge
tube labeled “pH 5.0”, “pH 6.3” and “pH
8.6” by your instructor. Wash the DPTP
out thoroughly with water.
4. Have a stopwatch ready. Using a clean
DPTP, add 250 µl of enzyme to each of
the labeled microcentrifuge tubes.
START YOUR TIMER.
5. After 2 minutes, using a clean DPTP for
each pH reaction, transfer 500 µl of your
reaction to the appropriately labeled
cuvette containing the stop solution.
6. Proceed with the analysis of your samples.
After you have finished your analysis,
rinse out the cuvettes and DPTPs with
copious water and save them for later
activities.
Note: Do not discard unused stock solutions.
They will be used for the next activity.
30
QUICK GUIDE
Quick Guide
Label up here
Stop Solution
pH 5.0
pH 6.3 pH 8.6
3.0 mM substrate
Enzyme
pH 5.0 pH 6.3 pH 8.6
pH 5.0
pH 5.0
pH 6.3
pH 6.3
pH 8.6
pH 8.6
2 min
Page 6

Quick Guide
Activity 4: Determine the Effect of
Enzyme Concentration on the
Reaction Rate
1. Label one 15 ml conical tube “Low
Concentration Enzyme”. Using a clean
DPTP, pipet 1 ml of buffer into the tube.
Wash out the DPTP with water. Pipet
1 ml of high concentration enzyme to
your tube labeled “Low Concentration
Enzyme” and mix. Wash out the DPTP
thoroughly with water.
2. Label three cuvettes “H1–H3” (for high
enzyme concentration time points) and
the remaining three cuvettes “L1–L3” (for
low enzyme concentration time points).
Only label on the upper part of the
cuvette face.
3. Using a clean DPTP, pipet 500 µl of stop
solution into each cuvette. Wash out the
DPTP thoroughly with water.
4. Label one clean DPTP with an “H” for
high enzyme concentration and a second
clean DPTP with an “L” for low enzyme
concentration.
31
QUICK GUIDE
Quick Guide
Label up here
Buffer
Low
concentration
enzyme
High
concentration
enzyme
Stop Solution
H1
H2
H3
L1 L2
L3
Page 7

Please read steps 5–7 fully before
proceeding. These steps are time sensitive!
5. Using the DPTP labeled with an “H”,
pipet 250 µl of 1.5 mM substrate into
your 15 ml conical tube containing
enzyme labeled “High Concentration
Enzyme”.
6. Using the DPTP labeled with an “L”, pipet
250 µl of 1.5 mM substrate into your
15 ml conical tube containing enzyme
labeled “Low Concentration Enzyme”.
START YOUR TIMER.
7. At the times indicated, use the correctly
labeled DPTP to remove 500 µl from the
15 ml conical tubes labeled “High
Concentration Enzyme” and “Low
Concentration Enzyme”, and add it to the
appropriately labeled cuvette that already
contains the stop solution.
8. Proceed with the analysis of your
samples. After you have finished your
analysis, rinse out reaction tubes,
cuvettes, and DPTPs with copious water
and save them for later activities.
Note: Do not discard unused stock solutions.
They will be used for the next activity.
32
QUICK GUIDE
Quick Guide
1.5 mM Substrate
High concentration enzyme
1.5 mM Substrate
Low concentration enzyme
High concentration
enzyme
H1
1 min
H2
2 min
H3
8 min
Low concentration
enzyme
L1
1 min
L2
2 min
L3
8 min
Page 8

Quick Guide
Activity 5: Determine the Effect of
Substrate Concentration on the
Reaction Rate
1. Label one clean 15 ml conical tube “Low
Concentration Substrate” and one clean
15 ml conical tube “High Concentration
Substrate”.
2. Using a clean DPTP, pipet 1.5 ml of 1.5 mM
substrate into the 15 ml conical tube
labeled “High Concentration Substrate”.
Rinse the DPTP thoroughly with clean
water.
3. Using a clean DPTP, pipet 1.25 ml of
buffer into the 15 ml conical tube labeled
“Low Concentration Substrate”. Rinse
the DPTP thoroughly with water and then
pipet 250 µl of 1.5 mM substrate into the
15 ml conical tube labeled “Low
Concentration Substrate” and mix. Rinse
the DPTP thoroughly with water.
4. Label your cuvettes “H1–H3” (for high
substrate concentration time points) and
“L1–L3” (for low substrate concentration
time points). Only label on the upper part
of the cuvette face.
5. Using a clean DPTP, pipet 500 µl of stop
solution into each cuvette. Rinse the
DPTP thoroughly with water.
6. Label one DPTP as “H” for high substrate
concentration and a second DPTP as “L”
for low substrate concentration.
33
QUICK GUIDE
Quick Guide
1.5 mM Substrate
High concentration substrate
Buffer 1.5 mM Substrate
Low
concentration
substrate
Label up here
Stop Solution
H1
H2 H3
L1
L2 L3
Page 9

Please read and understand steps 7–9
fully before proceeding. These steps are
time sensitive!
7. Using a clean DPTP, pipet 750 µl of
enzyme into your 15 ml conical tube of
substrate labeled “High Concentration
Substrate”.
8. Using a clean DPTP, pipet 750 µl of
enzyme into your 15 ml conical tube of
substrate labeled “Low Concentration
Substrate”. START YOUR TIMER.
9. At the times indicated, use the correctly
labeled DPTP to remove 500 µl from the
15 ml centrifuge reaction tubes labeled
“High Concentration Substrate” and “Low
Concentration Substrate” and add it to
the appropriately labeled cuvette that
contains the stop solution.
10. Proceed with the analysis of your
samples. After you have finished your
analysis, rinse out the reaction tubes,
cuvettes, and DPTPs with copious water
and save them for later activities.
Note: Do not discard unused stock solutions.
They will be used for the next activity.
34
QUICK GUIDE
Quick Guide
Enzyme
High concentration substrate
Enzyme
Low concentration substrate
High
concentration
substrate reaction
H1
1 min
H2
2 minH38 min
Low
concentration
substrate reaction
L1
1 min
L2
2 min
L3
8 min
Page 10

Quick Guide
Activity 6: Test the Ability of
Mushroom Extracts to Increase
the Reaction Rate
1. Write down the name of your mushroom
_______________________
2. Weigh out approximately 1 gram of
mushroom and put it into a mortar.
3. Add 2 ml of extraction buffer for every
gram of mushroom into the mortar. To
calculate the amount of extraction buffer
you need, multiply the weight (in grams)
of the mushroom by 2 and add that many
milliliters.
Weight of mushroom ____ g x 2 = _____ ml
4. Using a pestle, grind your mushroom to
produce a slurry.
5. Strain the solid particles out of your slurry
using a piece of filter paper or cheese
cloth into a 1.5 ml microcentrifuge tube.
Alternatively, if you have a centrifuge,
scoop the slurry into a 1.5 ml
microcentrifuge tube and then pellet the
solid particles by spinning at top speed
for 2 minutes. Note: You will need at
least 250 µl of extract to perform the
enzymatic reaction.
6. Label your cuvettes “1–6”. Only label on
the upper part of the cuvette face.
35
QUICK GUIDE
Quick Guide
Extraction buffer
Label up here
Page 11

7. Using a clean DPTP, pipet 500 µl of stop
solution into each cuvette. Rinse out the
DPTP thoroughly with water.
8. Label a 15 ml conical tube with the type
of mushroom you are using and then
using a clean DPTP, pipet 3 ml of substrate
into the tube.
Please read and understand steps 9–10
fully before proceeding. These steps are
time sensitive!
9. Using a clean DPTP, pipet 250 µl of your
enzyme extract into your 15 ml conical
tube of substrate. START YOUR TIMER.
10. At the times indicated, remove 500 µl of
mushroom extract/substrate mixture from
the reaction tube, and add it to the
appropriately labeled cuvette that already
contains the stop solution.
11. Using a clean DPTP, add 500 µl of
extraction buffer to cuvette #6. Clean the
DPTP and then add one drop of mushroom
extract. This will serve as the “blank” for
this experiment.
12. Proceed with the analysis of your
samples. After you have finished your
analysis, rinse out the reaction tubes,
cuvettes, and DPTPs with copious water
and save them for later activities.
Note: Do not discard unused stock solutions.
They will be used for the next activity.
36
QUICK GUIDE
Quick Guide
Stop Solution
1
2 3
4
5 6
Reaction
Tube
1
1 min
2
2 min
3
4 min
4
6 min
5
8 min
1.5 mM Substrate
Empty reaction tube
Mushroom extract
Reaction tube
with substrate
Extraction
buffer
Cuvette #6
Mushroom extract
Page 12

Life Science
Group
10-0100 0210 Sig 1109
5947 Rev A US/EG
Bio-Rad
Laboratories, Inc.
Web site www.bio-rad.com USA 800 424 6723 Australia 61 2 9914 2800 Austria 01 877 89 01 Belgium 09 385 55 11 Brazil 55 31 3689 6600
Canada 905 364 3435 China 86 20 8732 2339 Czech Republic 420 241 430 532 Denmark 44 52 10 00 Finland 09 804 22 00 France 01 47 95 69 65
Germany 089 31 884 0 Greece 30 210 777 4396 Hong Kong 852 2789 3300 Hungary 36 1 459 6100 India 91 124 4029300 Israel 03 963 6050
Italy 39 02 216091 Japan 03 6361 7000 Korea 82 2 3473 4460 Mexico 52 555 488 7670 The Netherlands 0318 540666 New Zealand 0508 805 500
Norway 23 38 41 30 Poland 48 22 331 99 99 Portugal 351 21 472 7700 Russia 7 495 721 14 04 Singapore 65 6415 3188 South Africa 27 861 246 723
Spain 34 91 590 5200 Sweden 08 555 12700 Switzerland 061 717 95 55 Taiwan 886 2 2578 7189 United Kingdom 020 8328 2000
 Loading...