


CS410

Ope ra ting in struc tions
En glish
el meg CS410
el meg CS410-U
el meg CS400xt
el meg IP-S400
Ans we ring ma chi ne
T400, T400/2
Plea se note!
The sys tem te le pho nes and cor re spon ding sys tems in this user gui de use the fol lo wing ab bre via tions:
Sys tem / PABX: Ab bre via ti on:
el meg PABX el meg PABX
el meg Hy bird 300
el meg Hy bird 600
elmeg hybird. Al ter na ti ve con fi gu ra ti on of the sys tem te le pho nes (see also page )
Bin tec TR200aw as PABX
Bin tec TR200bw as PABX
Declaration of Conformity and CE Mark
This de vi ce meets the re qui re ments of R&TTE Di rec ti ve 1999/5/EC:
Di rec ti ve 1999/5/EC of the Eu ro pe an Par lia ment and of the Coun cil of 9 March 1999 on ra dio equip ment and te le com mu ni ca tions ter mi nal equip ment and the mu tu al re co gni ti on of their con for mi ty.
The De cla ra ti on of Con for mi ty can be vie wed at the fol lo wing web ad dress: http://www.bin tec-el meg.com.
The cros sed-out was te bin icon on the de vi ce in di ca tes that the de vi ce must be dis po sed of se pa ra te ly
from nor mal hou se hold was te at the dis po sal si tes pro vi ded at the end of its ser vi ce life. You can find
ad di tio nal in for ma ti on on the in di vi du al re turn of used de vi ces at www.bin tec-el meg.com.
© bin tec el meg GmbH - All rights re ser ved.
This do cu ment may not be re pro du ced, in full or in part, ex cept with the ap pro val of the pub lis her and with a de tai led
re fer en ce to the sour ce pub li ca ti on, ir re spec ti ve of the na tu re and me thod or me dia (me cha ni cal or elec tro nic) by
which this is pro du ced.
Functio nal des crip tions of this do cu men ta ti on that re la te to soft wa re pro ducts of ot her ma nu fac tu rers are ba sed on
the soft wa re used at the time of crea ti on or prin ting. The pro duct or com pa ny na mes used in this do cu men ta ti on may
in some ca ses be re gis te red tra de marks.
B

Tab le of con tents
Te le pho ne user in ter fa ce .......................................1
Des crip ti on and in stal la ti on.....................................3
Extensions for the system telephone...........................................5
Sa fe ty no ti ces .............................................6
Un pa cking and po si tio ning the sys tem te le pho ne ........................7
Connecting the system telephone to a PC .......................................10
Changing the label field .................................................12
Pictograms ........................................................12
Sys tem te le pho ne set tings .....................................14
Setting the display language...............................................15
Ad di tio nal key bo ard ........................................19
Te le pho ning .............................................21
Initiate a call .......................................................21
Accepting/rejecting a call ................................................22
Forwarding a call (Call Deflection)...........................................23
<$I[English]Initiate call;Without call number (CLIR)>Suppressing the call number (anonymous call) ....23
Initiating a call with a fixed call number (MSN) ...................................23
Redialling .........................................................24
Switching the microphone on/off, loudspeaker and hands free...........................25
Using the headset.....................................................26
Announcement ......................................................26
Simplex operation ....................................................27
Automatic callback....................................................28
Park (only elmeg CS410and CS410-U).........................................29
Intercept (MCID) (only via the S/U connector) ....................................29
Keypad and tone dialling (MFC dialling) .......................................30
Te le pho ning with se ve ral peo ple .................................31
Call Waiting........................................................31
Hold for enquiry .....................................................31
Call forwarding (call transfer) .............................................31
Brokering .........................................................31
Conference ........................................................32
Ope ra te sys tem te le pho ne .....................................33
Phone book ........................................................33
VIP memory .......................................................35
Caller and message list..................................................36
SMS and UUS1 text messages..............................................40
Tab le of con tents
I

Do not disturb ......................................................45
Che cking costs ............................................46
Viewing and deleting costs ...............................................46
Set up tariff factor and denomination .........................................47
<$ I[English]Credits Based Accounting System><Setting the call costs account for a number .........47
Release or block call number (MSN) for dialling ...................................48
Call and cost display ...................................................48
Sys tem te le pho ny ..........................................51
Function keys .......................................................51
Function keys when connecting to a elmeg hybird or PABX ............................52
Sys tem menu on elmegPABX with sys tem te le pho ny .....................61
Ad van ced con fi gu ra ti on ......................................63
Settings ..........................................................63
Operation .........................................................64
Block............................................................64
Con fi gu ring and set ting the sys tem te le pho ne .........................66
Acoustic ..........................................................66
settings ..........................................................70
Con fi gu ra ti on ............................................77
elmeg IP-S400 configuration ..............................................83
Num ber pro gram ming .......................................86
Ma cro .................................................88
Macro programming...................................................88
Sys tem te le pho ne and PC......................................91
CTI / TAPI via the USB connector on the system telephone.............................91
CTI via the USB connector on the system telephone .................................91
Audio applications via the audio connectors on the system telephone .......................91
Content of WIN-Tools CD-ROM ............................................92
Installing the program from the CD-ROM ......................................93
Ba sic sys tem te le pho ne set tings ..................................95
Technical Data ......................................................96
Ans we ring ma chi ne .........................................97
General configuration .................................................101
Announcements, information messages and dictations ..............................104
Activating message recording for each number (MSN)...............................106
Operation ........................................................112
Remote operation....................................................115
Remote operation access numbers ..........................................117
Use answering machine through another telephone ................................118
Tab le of con tents
II

Soft wa re ...............................................121
System telephone menu ................................................125
Op tions................................................129
In dex .................................................131
Quick In stall Gui de.........................................141
Tab le of con tents
III

Tab le of con tents
IV
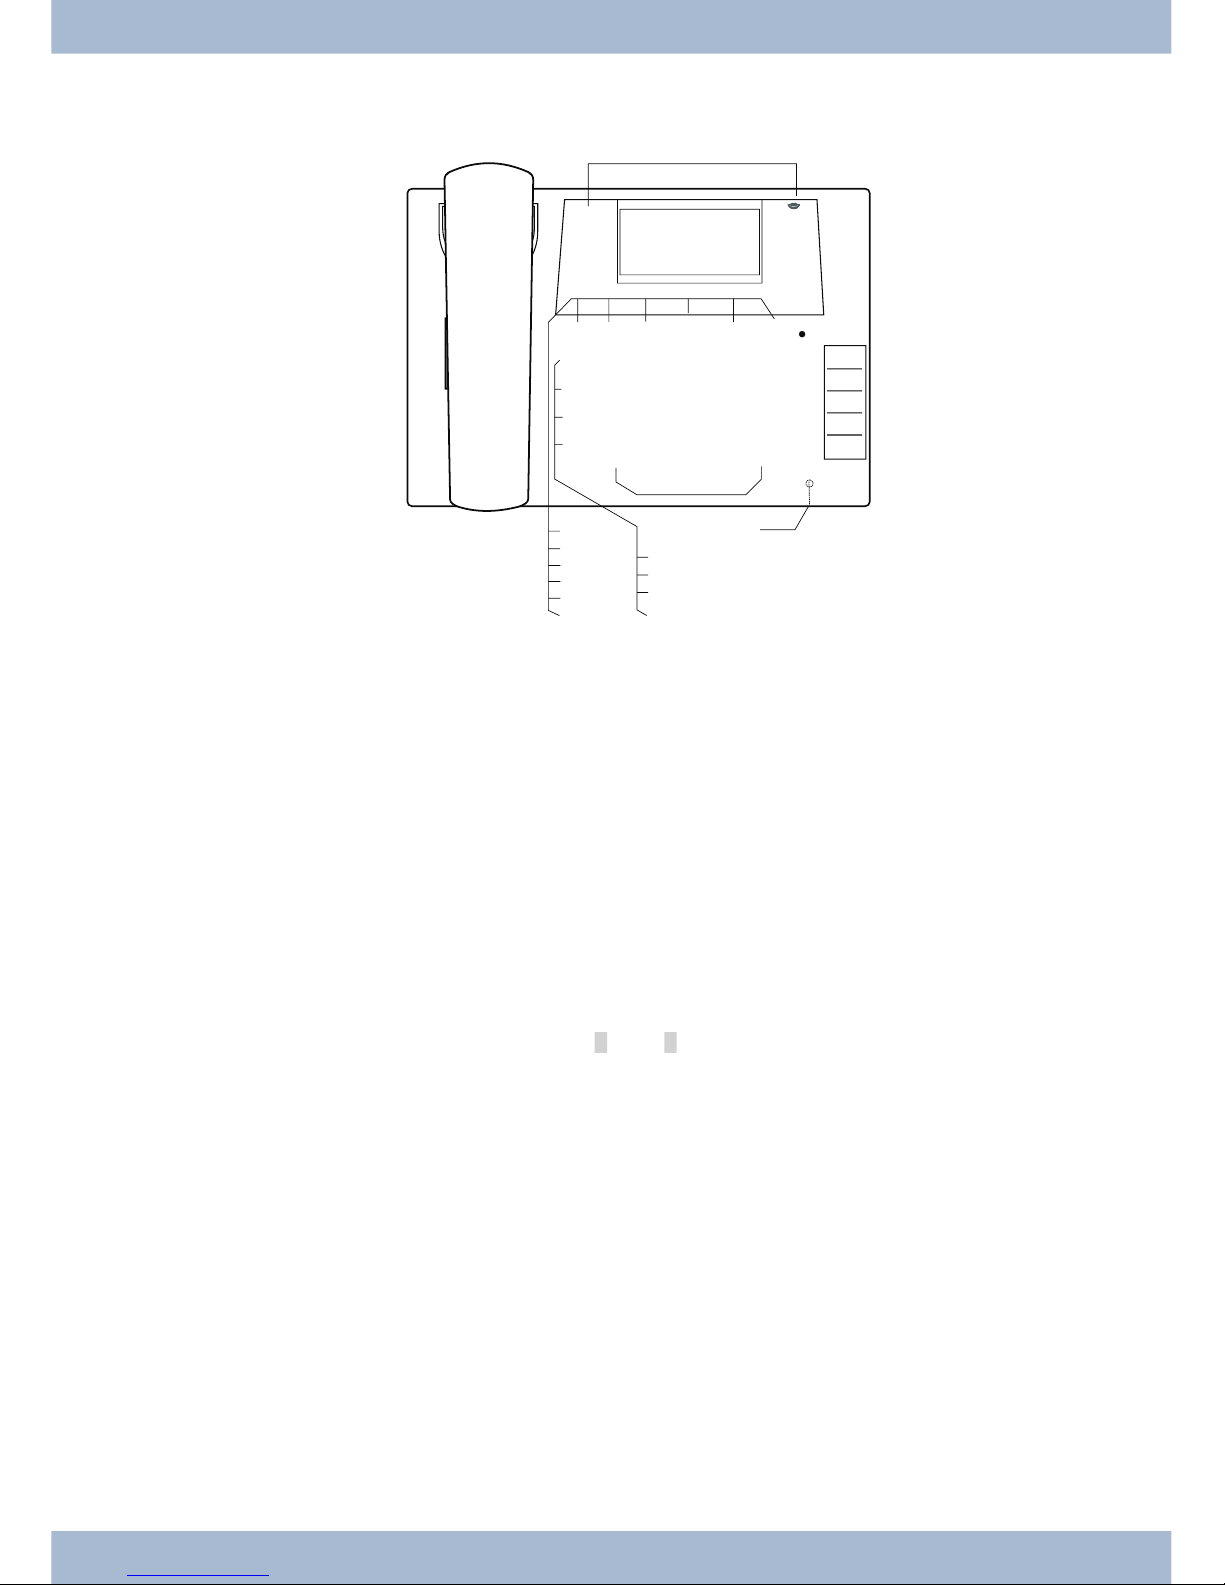
Te le pho ne user in ter fa ce
1
Loud spea ker
2
Re cei ver with con nec tor cord
3
The PABX menu is cal led for CS400xt.
4
6 soft keys
5
7-line dis play with bac kground lighting
6
Menu key: Open the pro gram ming menu by pres sing this key. If you are al rea dy in a menu and press
this key, the functions avai la ble in this menu will be dis play ed or you will be ta ken back one pro gram ming step.
7
ESC key: By pres sing the ESC key (Es ca pe key), the sys tem te le pho ne is once again at rest du ring pro gram ming.
80
Right/left ar row keys: The ar rows »{« and »}« in the right-hand cor ner of the top line of the dis play
show you that you can ac cess ot her functions in the bot tom line by using the ar row keys.
9
OK key: Pres sing this but ton con firms an en try and sto res a set ting in the sys tem te le pho ne.
ß
C-key: You can go back one menu step by pres sing this key in any menu. If you are in in put mode, you
can de le te in di vi du al cha rac ters using this key.
°
Star key / hash key.
§
Di al ling keys.
$
Loud spea ker / hands free key.
%
Dis con nect key.
&
Re di al key.
/
Hold for en qui ry key.
(
Mi cro pho ne.
Te le pho ne user in ter fa ce
1
1 2 3
4 5 6
7 8 9
0
W
T
L
R
M
E O< > C
* #
K
K
K
K
K
K
K
z
z
z
z
z
01.01.10 10:10
Info -r-i-
Telefonbuch
Ruhe
VIP
Anruferliste
2
1
3
6
7
8
9
0
ß
°
§
$
%
&
/
(
)
=
Q
5
4
°
Bild:

)
elmeg CS410 / CS410-U, IP-S400: 5 pro gram ma ble functi on keys with LEDs: Each key has a two-co lour LED (Le vel 1 - Red / Le vel 2 - Yel low). The se LEDs can be used to in di ca te spe ci fic functions.
CS400xt: 5 pro gram ma ble functi on keys with LEDs:
Each key has a (red) LED avai la ble. The se LEDs can be used to in di ca te spe ci fic functions.
The LEDs for both of the lo wer functi on keys have two co lours (Le vel 1 - Red / Le vel 2 - Yellow).
=
La bel field for functi on keys.
Q
Sta tus LED, LED for call sig nal ling, sig nal ling re cei ved mes sa ges UUS, SMS and MWI (red) and ans we ring ma chi ne (yel low). The de si red functi on dis play for mes sa ges and calls can be configured.
Te le pho ne user in ter fa ce
2

Des crip ti on and in stal la ti on
The sys tem te le pho ne can be ope ra ted by an in ter nal con nec tor of a elmegPABX that supp orts sys tem functions.
To get her with the elmegPABX, the sys tem te le pho ne pro vi des va ri ous per for man ce fea tu res that are typical of this
system.
The in ter nal con nec tor on the elmegPABX is si mul ta ne ous and au to ma ti cal ly the sys tem in ter fa ce for the sys tem te le pho ne. Plea se con sult the user’s gui de for your elmegPABX to see whet her or not this of fers the ty pi cal sys tem per for man ce fea tu res com bi ned with various system telephones.
U
A com ple te con fi gu ra ti on of the CS400xtPABX and di rect ly via the sys tem te le pho ne is pos si ble
on all elmegPABX (ex clu ding elmeg hybird) using the Pro fes sio nal Con fi gu ra tor.
U
A com ple te con fi gu ra ti on of the te le pho ne using the elmeg hybird is not pos si ble. So me of the
per for man ce fea tu res can on ly be set up using the telephone’s own in ter fa ces. Ho we ver, this is
on ly pos si ble if the sys tem te le pho ne has a USB or Ether net in ter fa ce.
Functions that can not be ful ly con fi gu red via the elmeg hybird are mar ked at ap pro pria te points
in the text.
Differences in configuration between the elmegPABX and the elmeg hybird
bb
cc
Press a soft key or an ar row key. On the elmeg hybird this key does not have to be pres sed again if the dis play
is dif fe rent, as the functi on is al rea dy dis play ed or is not avai la ble.
The fol lo wing mes sa ge in di ca tes if dif fer en ces exist.
Cannot be configured using the system telephone on the elmeg hybird!
A sum ma ry of the se functions can be found on page un der »Re stric ted sys tem te le pho ne con fi gu ra ti on«.
CS400xt
This sys tem te le pho ne is de li ver ed with a key ex ten si on mo du le (T400/2), pro vi ding you with 10 ad di tio nal, free ly
con fi gu ra ble keys.
It is de sig ned for con nec ti on to an in ter nal S0 port (4-wire ca ble) of a PABX sys tem. The sys tem te le pho ne is not
equip ped with a USB or se ri al port for con fi gu ra ti on or ot her uses. This pho ne must be con fi gu red via the in ter nal
ISDN port using the Win Tools Pro fes sio nal Con fi gu ra tor. The re are also no »Au dio functions« im ple men ted and
you can not use the Ans we ring ma chi ne or Up0 mo du les or functions. None of the functions for this mo du le are
shown in the display, nor can they be used.
This te le pho ne is equip ped with the functi on »Emer gen cy ope ra ti on«. »Off« = Emer gen cy
ope ra ti on off, »On« = Emer gen cy ope ra ti on On. mea ning it can be ope ra ted at NT via the
PABX sys tem on a loss of 230 V~ po wer. If more than one te le pho ne is con nec ted to the
ISDN sys tem, the emer gen cy ope ra ti on functi on may only be con fi gu red on one of the
ISDN sys tem te le pho nes. All calls are sig na led at this pho ne. The vo lu me of the rin ging tone
is set to low. In ad di ti on to ma king nor mal calls, the following functions are also available:
Des crip ti on and in stal la ti on
3
OFF
ON

· Se lec ti on of a call num ber from the te le pho ne di rec to ry or the speed dial me mo ry af ter lif ting the
handset.
· Dis play of call du ra ti on and costs.
· Mute.
· Ter mi na te call.
The pho ne num ber (MSN) that the net work ser vi ce pro vi der as sig ned to you as the first (mas ter) num ber will be
trans mit ted to ex ter nal sub scri bers. Char ge bil ling is ef fec ted for this. Ob ser ve the in for ma ti on con cer ning emer gen cy ope ra ti on in the PABX sys tem. On going con nec tions are in ter rup ted in the event of a power failure.
,
Re fer to the ope ra ting ma nu al of your PABX sys tem to see if your sys tem supp orts emer gen cy ope ra ti on.
Configuring emergency operation (PtMP and PtP connections)
Emer gen cy ope ra ti on is not con fi gu red as a fac to ry de fault fea tu re. A sli de switch is lo ca ted on the bot tom of the sys tem te le pho ne that can be used for con fi gu ring emergency operation.
To con fi gu re the emer gen cy ope ra ti on fea tu re, sli de the switch on the left side on the bot tom of the pho ne down. To
de-ac ti va te emer gen cy ope ra ti on, sli de the switch back to the top position.
,
At ten ti on: Be fo re you move the emer gen cy ope ra ti on switch un plug the ISDN con nec tor for the sys tem te le pho ne. Use a non-me tall ic tool to move the switch.
Configuring emergency operation at a point-to-point (PtP) connection
If you wish to also use your sys tem te le pho ne for emer gen cy ope ra ti on at a PtP con nec ti on you must also ac ti va te this
fea tu re using the PC con fi gu ra ti on for your sys tem te le pho ne. You can use the con fi gu ra ti on pro gram to set emer gen cy operation at a PtP connection.
Making calls during emergency operation at a point-to-multipoint connection
The sys tem te le pho ne be gins emer gen cy ope ra ti on when po wer supp ly for the PABX sys tem and the NT is lost.
Emer gen cy ope ra ti on, fol lo wed by a te le pho ne sym bol is then shown in the sys tem telephone display.
If the 230 V AC po wer supp ly is res to red du ring an on going call, all nor mal, con fi gu red functions are avai la ble again
only af ter you hang up the hand set. If the 230V~ po wer supp ly is res to red when the hand set is in the crad le, the emer gen cy ope ra ti on dis play is re pla ced by the nor mal dis play when the hand set is lifted, or on the next call.
Making calls at emergency power supply mode on a point-to-point connection
Du ring emer gen cy po wer supp ly mode at a point-to-point con nec ti on, you will see the nor mal ope ra ti on displays.
elmeg CS410
This sys tem te le pho ne is de sig ned for con nec ti on to an in ter nal S-con nec tor (4-wire ca ble) on a elmeg PABX. If you
want to use the te le pho ne on an in ter nal Up0 con nec ti on, you must in stall the in ter nal mo du le »Up0/S0« on the te le pho ne or use the external »Up0/S0« converter.
Des crip ti on and in stal la ti on
4

CS410-U
This sys tem te le pho ne is de sig ned for con nec ti on to an in ter nal U-con nec tor (2-wire ca ble) on a elmeg PABX. You
then no lon ger re qui re the in ter nal mo du le »Up0/S0« or the ex ter nal »Up0/S0 converter«.
Settings / Configuration elmeg CS410, CS410-U. CS400xt
On the sys tem te le pho ne it self, you can only per form a re stric ted con fi gu ra ti on of the sup por ted per for man ce fea tu res. A full con fi gu ra ti on is only pos si ble with the Pro fes sio nal Con fi gu ra tor from the WIN-Tools CD-ROM via the
USB in ter fa ce on the sys tem te le pho ne or the in ter nal S/U-con nec tor (plea se re fer to page B to see whet her or not this
function is supported) on a PABX.
elmeg IP-S400
This sys tem te le pho ne is con nec ted to the cor re spon ding LAN con nec tor (or net work) of the PABX via a Cat. 5 ca ble.
The sys tem te le pho ne has a PC out put to which furt her IP ter mi nals can be con nec ted. The sys tem te le pho ne has a
hands free functi on.
Po wer supp lied via plug-in po wer supp ly unit, or via Ether net PoE (Power over Ethernet).
,
A furt her des crip ti on on con fi gu ring the sys tem te le pho ne can be found in the de tai led user gui de on the
CD-ROM.
Extensions for the system telephone
Module Up0/S0 (elmeg CS410, CS410-U, CS400xt)
· To con nect the sys tem te le pho ne to a U-con nec tor on a PABX, you can in stall the »Up0/S0« mo -
du le on your sys tem te le pho ne. You then no lon ger need the ex ter nal »Up0/S0-Converter«.
Answering machine module (only elmeg CS410, CS410-U)
· This mo du le ex pands your sys tem te le pho ne with a di gi tal ans we ring ma chi ne of fe ring nu me -
rous functions.
E.g.: In di vi du al con fi gu ra ti on for each num ber of the sys tem te le pho ne, time con trol of the an noun ce ment for each num ber, au to ma tic no ti ce for re cor ded calls, rec or ding of dic ta tions, lis te ning in on calls, PIN-pro tec ted re mo te ope ra ti on.
A spe ci al key and an LED are provided for the operation of the answering machine.
Key extension T400
· The key ex ten si on has 20 keys with LEDs that can be used in two lay ers as functi on keys. The LED
is as sig ned to the first key lay er. Two ot her LEDs are used to dis play ad di tio nal in for ma ti on.
You can con nect up to three key ex ten sions in se quen ce (cas ca ding) to your sys tem te le pho ne. A
plug po wer supp ly unit must be used if using more than two key ex ten sions. Only use the plug po wer supp ly unit (220872.5) or T1-UK (220873.3) available as an accessory.
Key extension T400/2
· The key ex ten si on has 10 keys with LEDs that can be used in two lay ers as functi on keys. The LED
is as sig ned to the first key lay er. Two ot her LEDs are used to dis play ad di tio nal in for ma ti on.
Extensions for the system telephone Des crip ti on and in stal la ti on
5

Des crip ti on and in stal la ti on Extensions for the system telephone
6

Sa fe ty no ti ces
· Note the am bient tem pe ra tu re for the sto ra ge and ope ra ti on of the de vi ce in the spe ci fi ca tions.
The de vi ce must only be con nec ted once the per mis si ble am bient ope ra ting temperature is
reached.
· Plea se note that when swit ching from cold to warm tem pe ra tu res, con den sa ti on may form on or
in the de vi ce. Only re mo ve the de vi ce from the pa cka ging when the per mis si ble am bient ope ra ting tem pe ra tu re has been reached.
· Du ring a storm, you should not con nect or dis con nect any ca bles and do not make any calls.
· Only con nect the cords to the con nec tors pro vi ded.
· Lay the cords so that they are pro tec ted in the event of an ac ci dent.
· Avoid the fol lo wing in flu en cing fac tors:
Di rect sun light
Sour ce of heat (e.g. ra di ator)
Elec tro nic de vi ces (e.g. sound sys tems, office equip ment or mi cro wa ve de vi ces)
Pe ne tra ting moi stu re or li quids
Ag gres si ve li quids or vapours
High levels of dust
· Do not use the de vi ce in hu mid rooms or in ex plo si ve at mo sphe res.
· Only open the are as of the de vi ce in di ca ted in the as sem bly/ope ra ting in struc tions.
· Do not touch the plug con tacts with sharp, me tal or damp ob jects.
· If the de vi ce is not per ma nent ly moun ted, po si ti on the de vi ce or the ac ces so ry on a non-slip
surface.
· Plea se en su re that you only cle an the sys tem with a slight ly damp cloth.
· Plea se en su re you only use ap pro ved ac ces so ries.
· Only ter mi nals that of fer SELV (sa fe ty ex tra low vol ta ge) and/or meet ETS 300047 may be con -
nec ted to the de vi ce. Cor rect use of the per mit ted ter mi nals meets the se requirements.
Plug power supply unit
· Only use the plug po wer supp ly unit supp lied or avai la ble as an ac ces so ry (DSA-0101F-05 UP or
L15 D52 AB DDLA WO).
· Do not use any plug po wer supp ly units that show signs of da ma ge (bre aks or cracks in the ca -
sing).
Electrostatic charges (ESD protection)
The sys tem te le pho ne is supp lied with ESD pro tec ti on abo ve the per mis si ble va lu es against the ef fects of elec tro sta tic
char ges. In spi te of this, be sure to avoid ex ces si ve sta tic char ges. Va ri ous cau ses can re sult in the elec tro sta tic char ge
achie ving va lu es that far ex ceed the per mis si ble va lu es re qui red and that ex ceed in ter fer en ce im mu ni ty of the sys tem
te le pho ne. The cau ses or cir cums tan ces such as low hu mi di ty or car pets must be eli mi na ted. The ma nu fac tu rer of
the sys tem te le pho ne accepts no liability for damages resulting from these causes.
Extensions for the system telephone Sa fe ty no ti ces
7

Un pa cking and po si tio ning the sys tem te le pho ne
Un pa cking
· Sys tem te le pho ne.
· Re cei ver with cord.
· 2 de vi ce feet.
· S-con nec tor cord, ap prox. 6 m (only elmeg CS410 and CS410-U).
· Cat.5 con nec tor cord, ap prox. 2 m (only elmeg CS410 and CS410-U).
· PC con nec tor cord, USB ca ble, ap prox. 3m (only elmeg CS410 and CS410-U).
· PC au dio cord, 3.5mm ste reo jack plug, ap prox. 2.5m (only elmeg CS410 and CS410-U).
· Adap ter ca ble for he ad sets with 4-pin cord, 8-pin / 4-pin.
· Ca ble clip, af ter re mo ving the ad he si ve pro tec ti ve film (only elmeg CS410 and CS410-U).
· User’s gui de and la bels for functi on keys.
· WIN-Tools CD-ROM, in clu ding:
Pro fes sio nal Con fi gu ra tor, pho ne book, downlo ad and sound ma na gers,
TAPI, USB, CAPI and NDIS WAN dri vers, Ado be Acro bat Rea der,
Operator’s ma nu al and Ado be Acro bat file for prin ting your own labels.
Setting up the system telephone
Be fo re set ting up the rear de vi ce feet must be moun ted on the sys tem te le pho ne in the po si tions mar ked 6 in the pic tu re.
Plea se re mem ber that the sys tem te le pho ne de vi ce feet may lea ve marks on de li ca te sur fa ces, such as on fit tings for
ex am ples. The sys tem te le pho ne ma nu fac tu rer shall not be li ab le for any such da ma ge. Plea se en su re the re fo re that
you pla ce your system telephone on a non-slip surface.
Cleaning the system telephone
The sys tem te le pho ne has been de sig ned for nor mal usa ge con di tions. Only cle an the de vi ce when ne ces sa ry with a
slight ly damp cloth or use an anti-sta tic cloth. Ne ver use sol vents. Ne ver use a dry cloth; the elec tro sta tic char ge could
cau se elec tro nic faults. Make sure that no moi stu re can en ter the sys tem telephone and cause damage.
Connecting the system telephone (connector and receiver cord)
In or der to ope ra te your sys tem te le pho ne, you must in sert the cords for the te le pho ne con nec tor and the receiver.
Connecting the receiver cord
Con nect the re cei ver cord 1 as shown in Fig. . Pla ce the re cei ver cord in the ca ble gui de 4 and clamp it se cu re ly un der the ca ble clips
5
Un pa cking and po si tio ning the sys tem te le pho ne Extensions for the system telephone
8
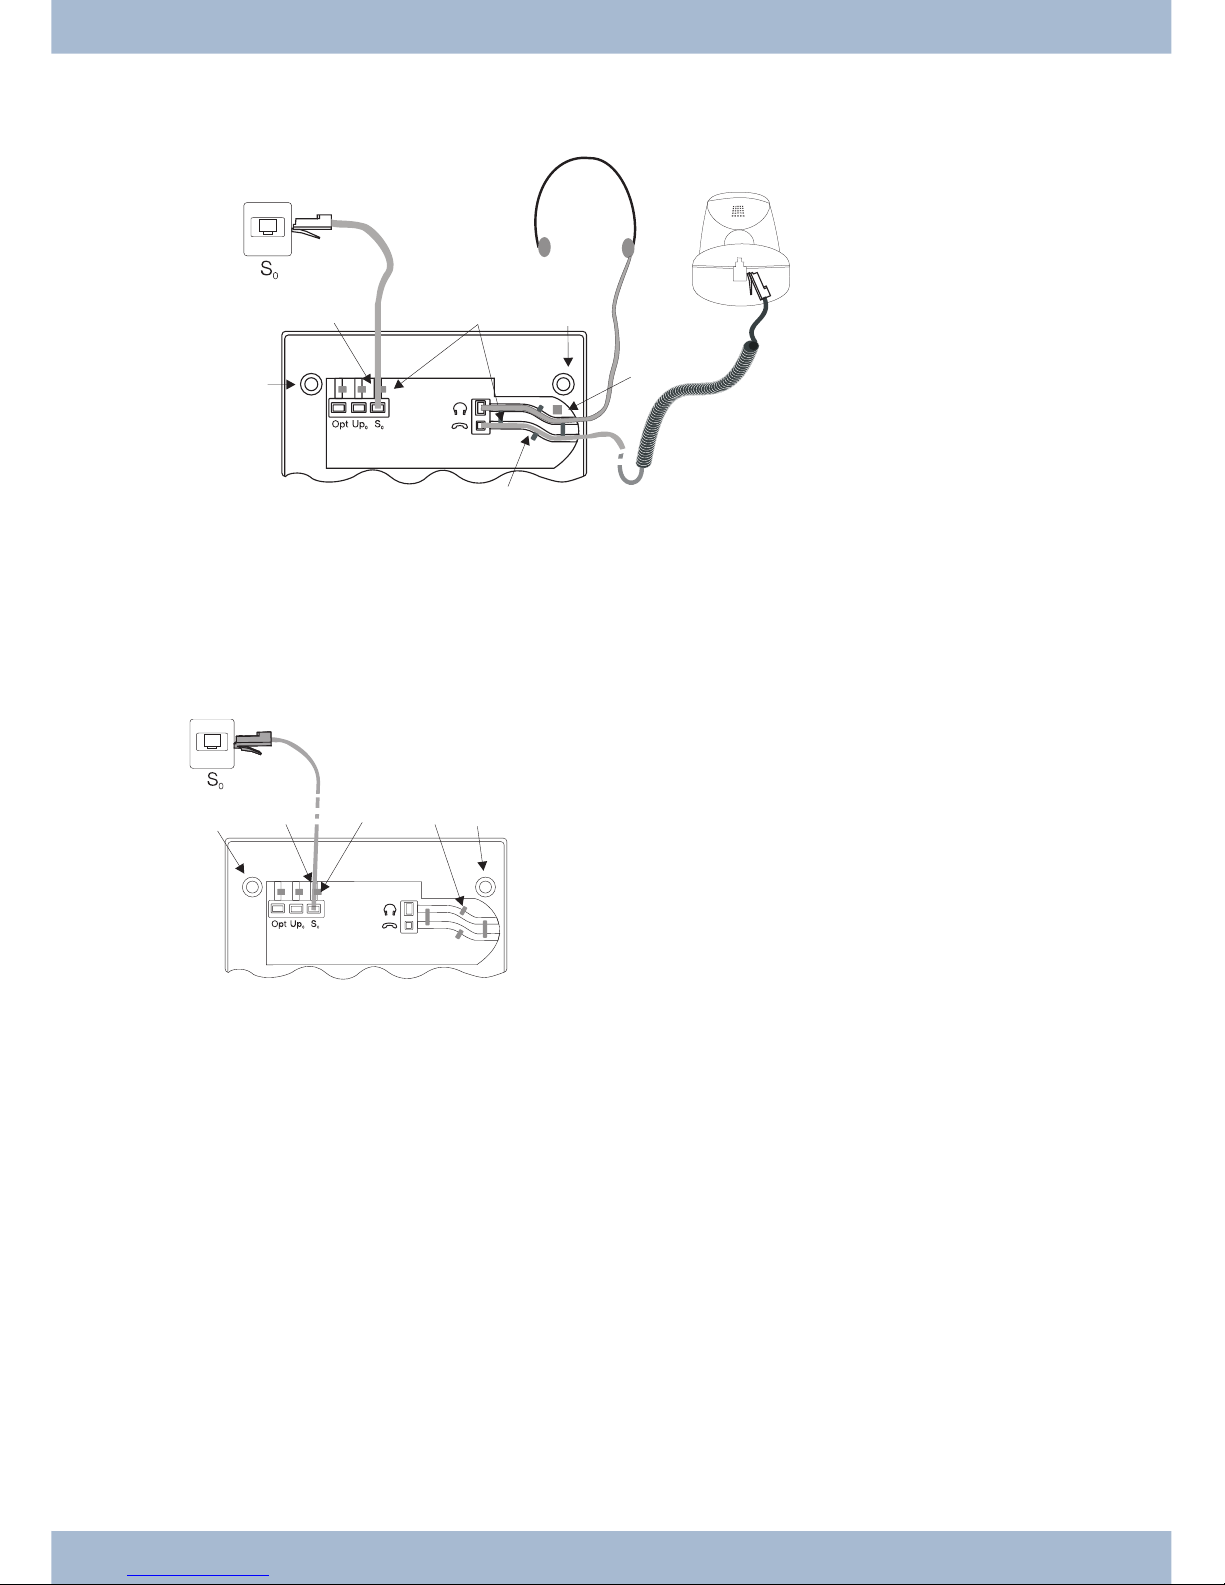
Connecting the cord
S-con nec tor
Con nect the S-cord 2 as shown in Fig. (so cket S0). Plea se note that the lon ger ISDN plug must be in ser ted in the
ISDN so cket and the shor ter ISDN plug must be in ser ted in the ISDN so cket on the sys tem te le pho ne. Next pla ce the
S-cord ca ble in the ca ble gui de 4 and clamp it se cu re ly un der the ca ble clips 5.
Extensions for the system telephone Un pa cking and po si tio ning the sys tem te le pho ne
9
1
2
5
6
6
3
Fi gu re: 3
2
3
4
5
6
7
4
6
1
Fi gu re:
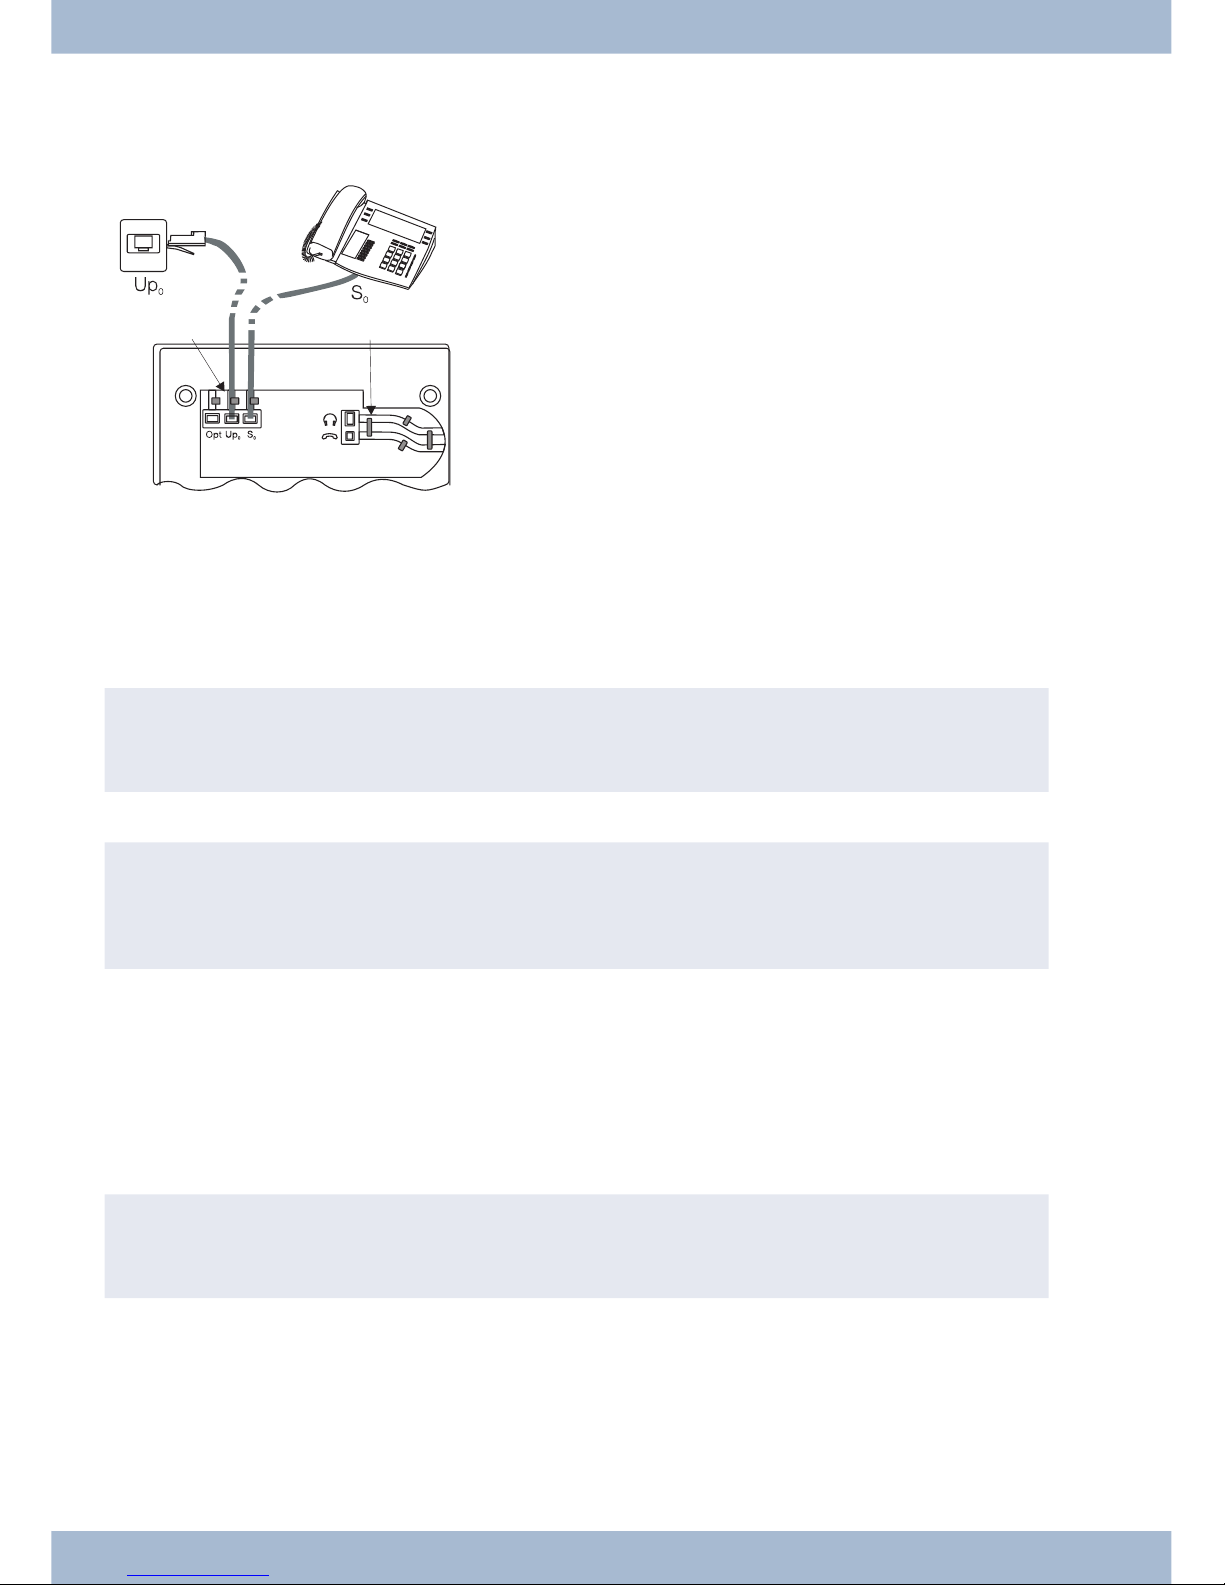
Up0-connectorCS410-U, telephone with »Up0/S0« module)
Con nect the S-cord 1 as shown in Fig. (so cket Up0). Plea se note that the lon ger ISDN plug must be in ser ted in the
ISDN so cket and the shor ter ISDN plug must be in ser ted in the ISDN so cket on the sys tem te le pho ne. Next pla ce the
S-cord ca ble in the ca ble gui de 2 and clamp it se cu re ly un der the ca ble clips 3.
,
The elmeg CS410 with »Up0/S0« mo du le and the CS410-U may no lon ger be con nec ted to an ISDN con nec tor via an S0 so cket (e.g. in ter nal S-con nec tor of the PABX).
,
You can con nect a furt her ISDN ter mi nal with S-in ter fa ce (e.g. an ISDN card or anot her sys tem te le pho ne)
to the S0 so cket on the sys tem te le pho ne. The po wer supp ly at this con nec tor for anot her ISDN terminal is 1
Watt.
Connecting and setting the headset (not included)
You can con nect a he ad set to the sys tem te le pho ne. Plea se ask your dea ler or con sult the In ter net to find out which
he ad sets are compatible.
The he ad set con nec tor on the sys tem te le pho ne is an 8-pin so cket. He ad sets with DSHG in ter fa ce (e.g. cord less DECT
he ad sets) can be con nec ted di rect ly to the sys tem te le pho ne wit hout any ac ces so ries. For stan dard he ad sets (4-pin
cord, e.g. U10PS) use the adapter cable supplied.
,
The op tio nal ans we ring ma chi ne mo du le and a he ad set with DSHG in ter fa ce can be con nec ti on to/in stal led
on the CS410-U simultaneously.
Connecting the headset
The he ad set is con nec ted to the se pa ra te he ad set so cket on the sys tem te le pho ne as shown on page in Fig. . Next pla ce
the he ad set ca ble 3 in the ca ble gui de 4 and clamp it se cu re ly un der the ca ble clips 5.
If the he ad set cord does not fit in the ca ble gui de, stick the ad he si ve ca ble clip supp lied on to the base of the sys tem te le pho ne 7. Then lay the headset cord under this clip.
Un pa cking and po si tio ning the sys tem te le pho ne Extensions for the system telephone
10
5
4
3
2
1
Fi gu re:
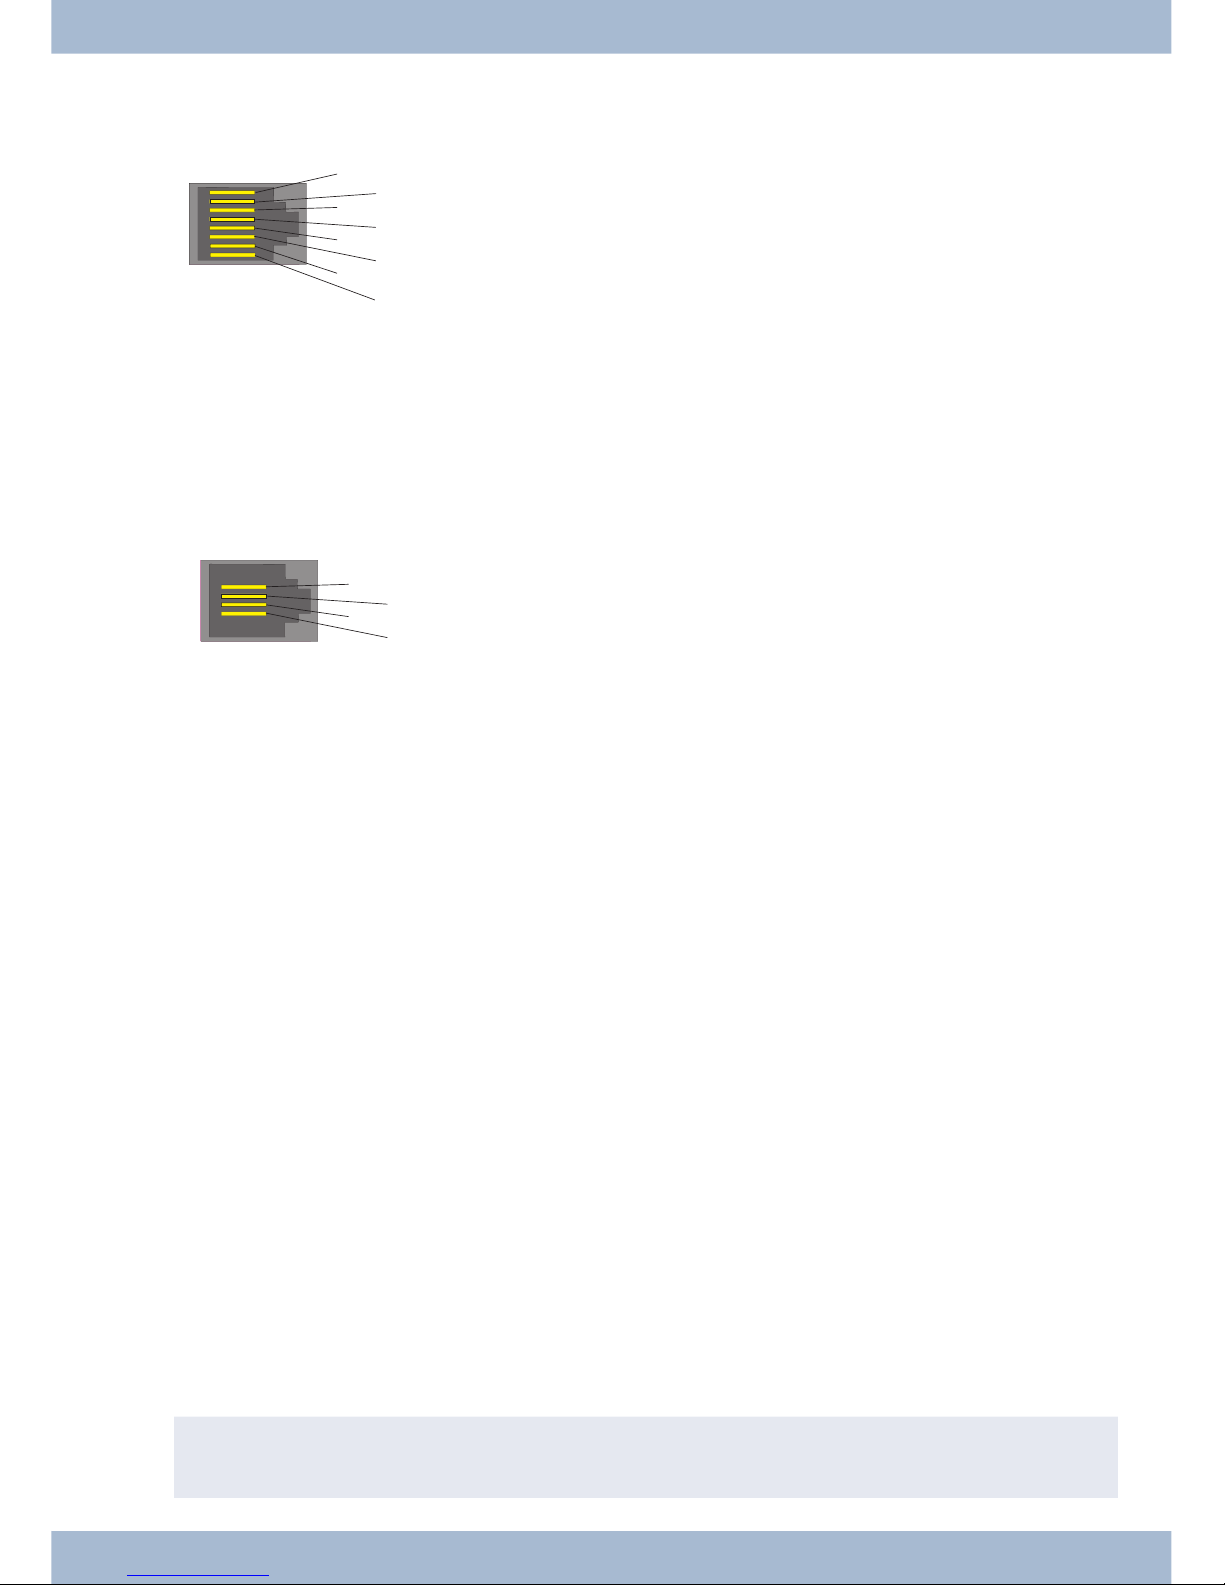
Con fi gu ring the he ad set con nec tor elmeg CS410/CS410-U
8
DSHG trans mit ter
7
V+ (3.3V)
6
Mi cro pho ne - (Ground)
5
Re cei ver (3,3V swit cha ble over re sis tan ce)
4
Re cei ver (Ground)
3
Mi cro pho ne +
2
Earth (Ground)
1
DSHG re cei ver
Con fi gu ring the he ad set con nec tor CS400xt
4
Mi cro pho ne - (Ground)
3
Re cei ver (3,3V swit cha ble over re sis tan ce)
2
Re cei ver (Ground)
1
Mi cro pho ne +
Ot her set tings for the use of the he ad set
You can use eit her the re cei ver or the he ad set to make a call. When using a he ad set, the fol lo wing set tings are re qui red
or available:
· In the con fi gu ra ti on of the sys tem te le pho ne, set up a functi on key for ope ra ting the he ad set (he -
ad set key, see page 53).
· The con nec ted he ad set can be used au to ma ti cal ly for cer tain ope ra tions on the sys tem te le pho ne
(see page 60).
· If spe ci al sup port is sa ved in the sys tem te le pho ne for your he ad set, en ter the cor re spon ding type
of he ad set (see page 63).
e.g. the LED in the mi cro pho ne of the »Fi re fly F142 N« from Plan tro nics is swit ched through the
system telephone.
· If you want to use the he ad set to au to ma ti cal ly re cei ve calls, set the time to au to ma tic pi ckup (see
page 71). In the con fi gu ra ti on of the sys tem te le pho ne, set up a functi on key for ac ti va ting or de ac ti va ting automatic call pickup.
· Using the he ad set the ans we ring ma chi ne can be que ried if au to ma tic he ad set ope ra ti on is set up.
Connecting the system telephone to a PC
Connecting the PC connecting cord (USB)
,
Use the USB ca ble supp lied to con nect the sys tem te le pho ne to the PC or a hub. If you use anot her USB ca ble,
note that the dis tan ce bet ween the sys tem te le pho ne and PC or te le pho ne and hub must not ex ceed five me -
Connecting the system telephone to a PC Un pa cking and po si tio ning the sys tem te le pho ne
11
4
3
2
1
Fi gu re: 6
8
7
6
5
4
3
2
1
Fi gu re:
tres de pen ding on the type of USB cable used.
Con nect the USB ca ble (4) as shown in Fig. (so cket PC). In sert the USB plug (type A) into the cor re spon ding con nec tor on your PC and the USB plug (type B) into the USB con nec tor on the back of the sys tem te le pho ne (1). If both de vi ces (sys tem te le pho ne and PC) are swit ched on, the PC re cog ni ses the con nec ted sys tem telephone automatically.
,
When con nec ting the sys tem te le pho ne to a PC for the first time, the de vi ce dri ver in stal la ti on starts au to ma ti cal ly. In sert the WIN-Tools CD-ROM for the sys tem te le pho ne and fol low the in struc tions on screen.
If you want to use se ve ral USB ter mi nals on your PC, you will re qui re a hub (USB dis tri bu tor). The hub is con nec ted
to the USB port on the PC. You can con nect ot her USB ter mi nals to the hub, in clu ding the sys tem telephone.
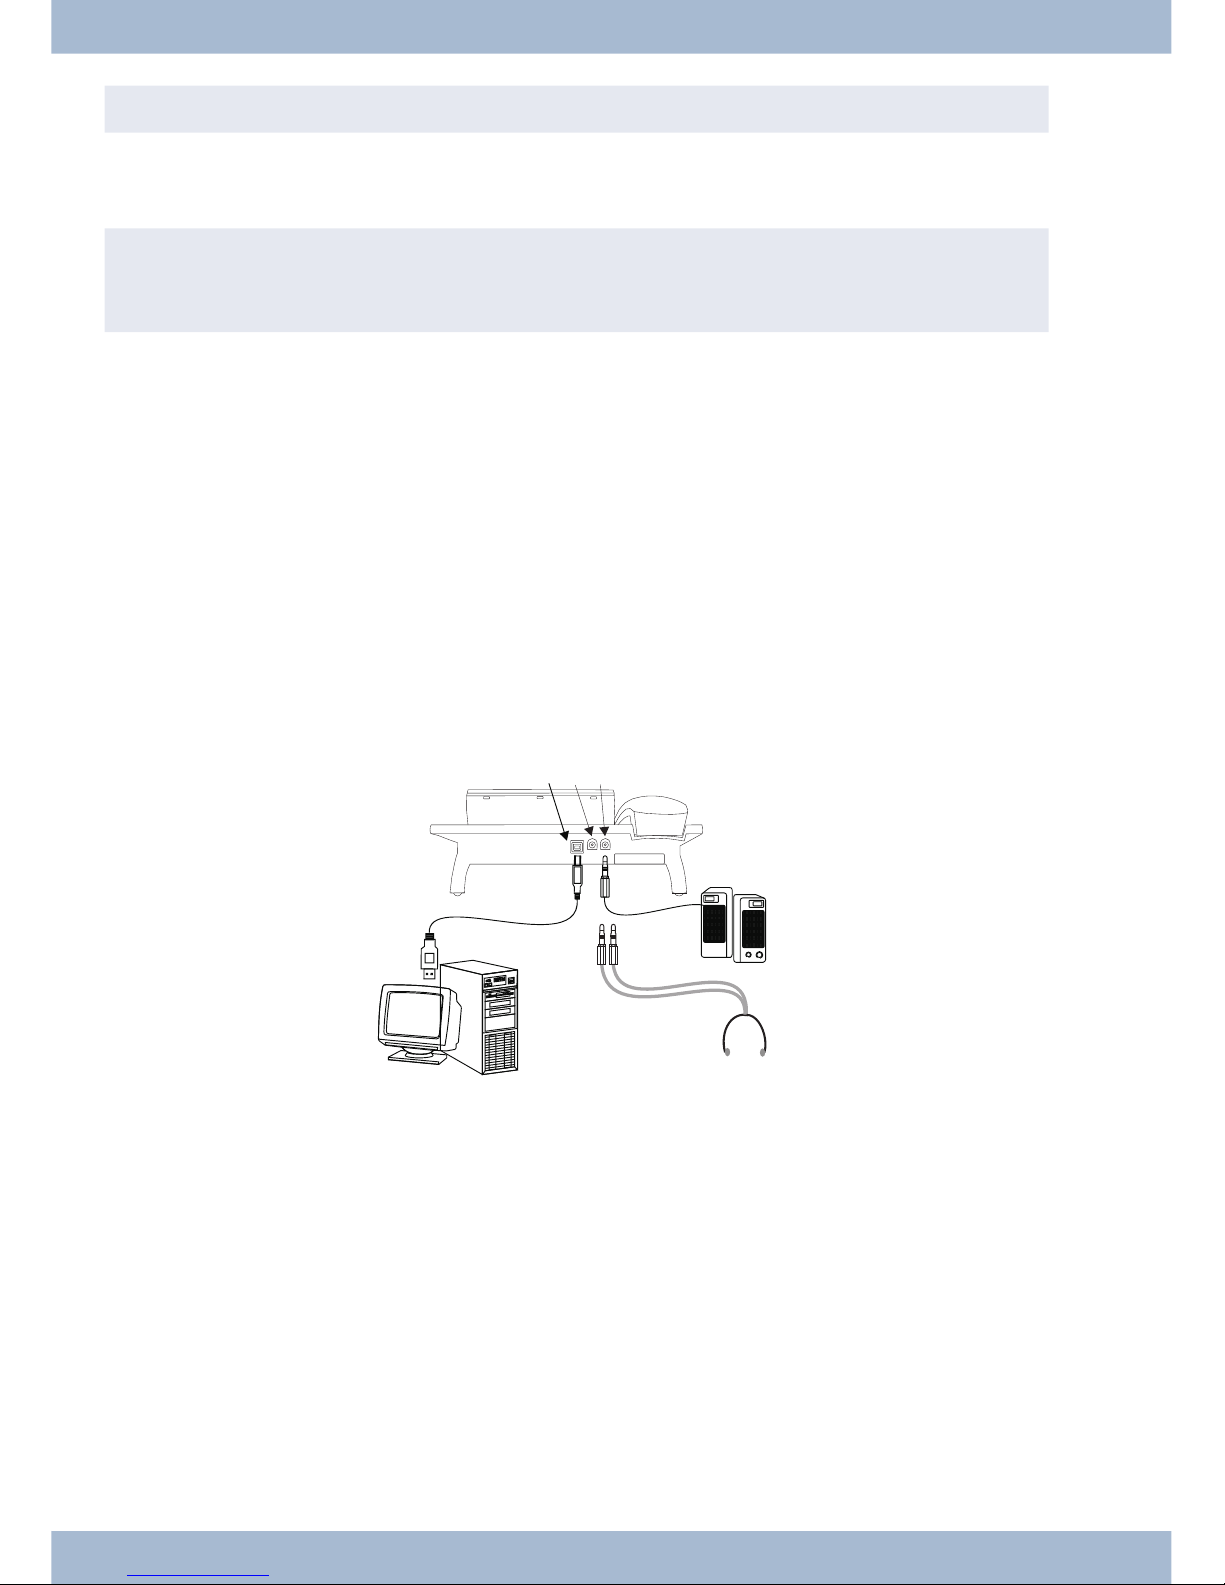
elmeg CS410, CS410-UConnecting the audio cable (Audio in / Audio out)
The sys tem te le pho ne has an in put 2 and an out put 3 for au dio sig nals. The se con nec tors are de sig ned for 3.5 mm
ste reo jack plugs. When using the op tio nal ans we ring ma chi ne mo du le, you can con nect the sys tem te le pho ne over
this con nec ti on to the sound card on your PC in or der to trans fer an noun ce ments to the sys tem te le pho ne or to save
recorded messages to the PC.
You can also use spe ci fic functions on the sys tem te le pho ne from the au dio-out out put (see page 66). Con nect the
loud spea ker (5) using a 3.5mm jack plug to the au dio-out con nec tor on the sys tem te le pho ne (3) as shown in Fig. .
elmeg IP-S400 on the Ethernet connector
The elmeg IP-S400 can be po we red via the Ether net con nec tor in ac cor dan ce with IEEE Std 802.3af-2003 (PoE). The
po wer supp ly is then pro vi ded over Ether net from the hub or switch. »Al ter na ti ve A« and »Al ter na ti ve B« are sup por ted on the con nec tor in ac cor dan ce with IEEE Std 802.3af-2003 and »Po wer clas si fi ca ti on 1« (up to 4 W). The PoE
con nec tor is polarity-independent.
Un pa cking and po si tio ning the sys tem te le pho ne Connecting the system telephone to a PC
12
1
2
3
5
4
6
Fi gu re:
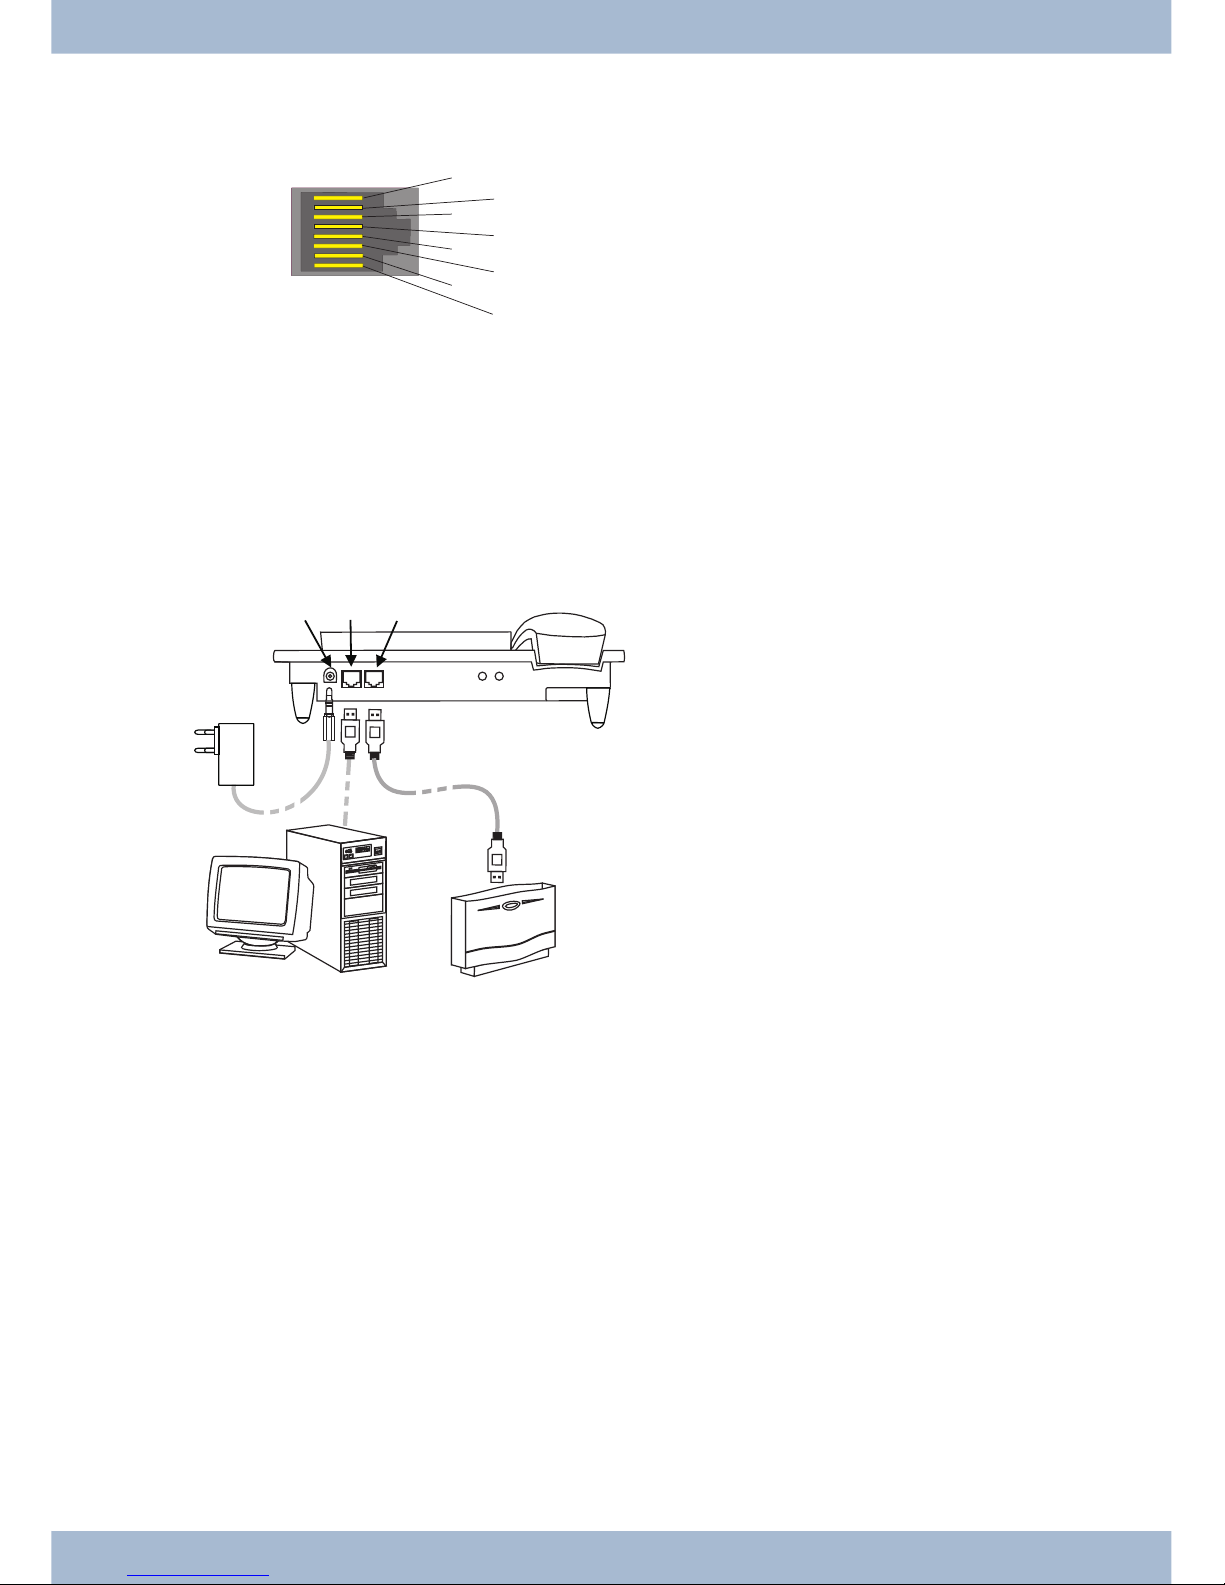
PIN configuration PoE
1
Trans mit Da ta +
2
Trans mit Da ta -
3
Re cei ve Da ta +
6
Re cei ve Da ta -
45
Po wer supp ly (con nec ted)
78
Po wer supp ly (con nec ted)
elmeg IP-S400Audio in / Audio out
The sys tem te le pho ne has an in put 2 and an out put 3 for au dio sig nals. The se con nec tors are in ten ded as a he ad set
con nec tor 6. The so ckets are con nec ted to the cor re spon ding so cket con nec tors for the he ad set on the base of the
system telephone.
1
Plug po wer supp ly unit con nec tor
2
Plug po wer supp ly unit
3
Ether net PC con nec tor
4
PC or ad di tio nal elmeg IP-S400
5
Ether net PABX con nec tor
6
PABX
Changing the label field
The la bels for the functi on keys can be found on the sheet en clo sed with this user gui de. Re mo ve the se lec ted na me pla te.
To chan ge the pla te, pull the fle xi ble co ver bet ween thumb and fo re fin ger and lift the co ver up wards. The na me pla te
can then be chan ged.
In the Pro fes sio nal Con fi gu ra tor you can com ple te the la bel for your sys tem te le pho ne in di vi du al ly and then print it
out. The WIN Tools CD ROM also con tains an Ado be Acro bat file with templates that you can also complete and
print.
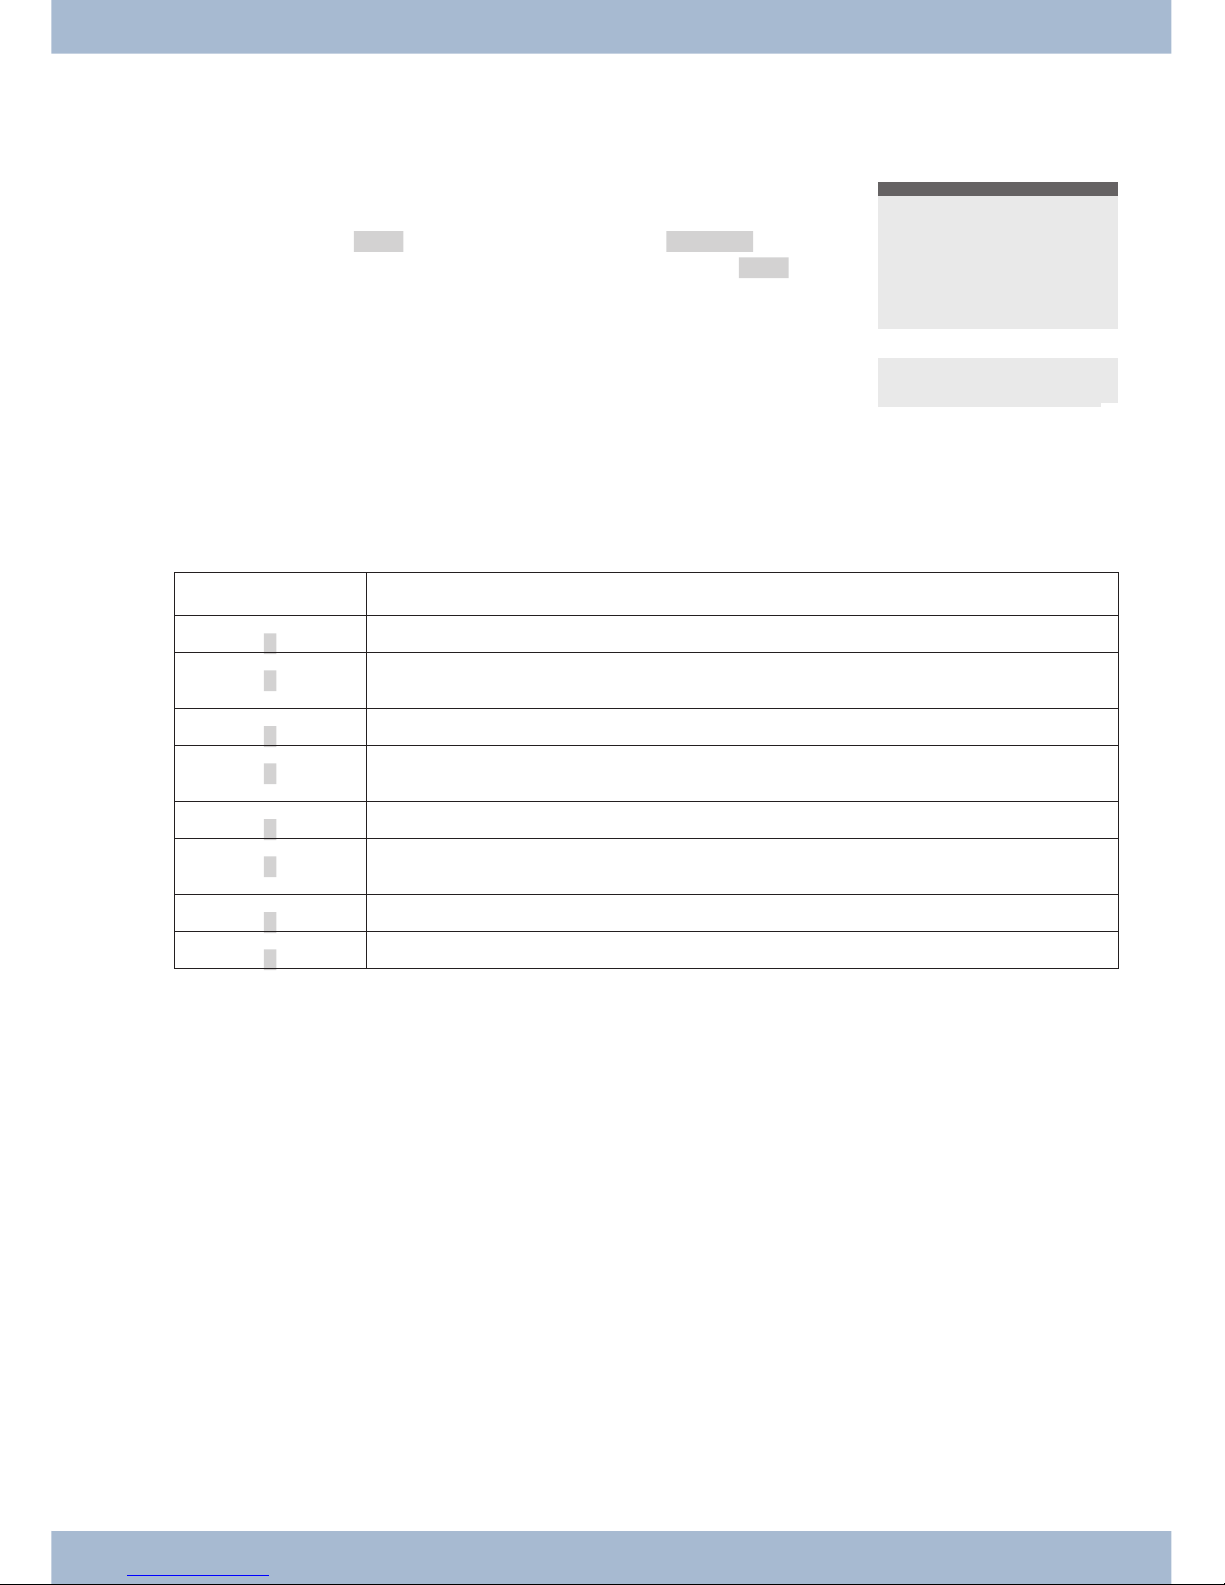
Pictograms
In or der to be able to de mon stra te some of the pro ces ses in vol ved for set ting up and ope ra ting the sys tem te le pho ne
in this user gui de, the fol lo wing pic to grams (sym bols) lis ted below were used.
b Lift re cei ver or start pre pa ring to dial.
Changing the label field Un pa cking and po si tio ning the sys tem te le pho ne
13
1
2
5
3
4
6
Fi gu re:
8
7
6
5
4
3
2
Fi gu re:

a Re pla ce re cei ver. The sys tem te le pho ne is idle.
l A call is sig nal led. The call me lo dy sounds.
g You are in a call.
d A con fer en ce call is in itia ted.
q You will hear the po si ti ve or ne ga ti ve ac knowled ge ment tone.
t Choo se call num ber, code, cha rac ter or text.
X This sym bol tells you to dial a par ti cu lar code or cha rac ter.
09
*#
Press a spe ci fic key on the di al ling pad.
s Press a soft key.
b
c
Press a soft key or an ar row key. De pen ding on the PABX, this key does not have to be pres sed again if the dis play is dif fe rent, as the functi on is al rea dy dis play ed or is not avai la ble.
# If you en ter a call num ber to dial via a SIP pro vi der, the num ber di al led is out put ap prox. 5 se conds af ter en -
te ring the last di git. If you end the call num ber with the hash key, the sys tem di als au to ma ti cal ly. The ter mi nal must be able to dial the hash key in to the PABX.
Un pa cking and po si tio ning the sys tem te le pho ne Pictograms
14

Sys tem te le pho ne set tings
Connection and operation of the elmeg IP-S400 to the PABX / elmeg hybird (Basic operation with DHCP)
Plea se en su re your read the PABX as sem bly in struc tions in or der to see which con nec tors are pro vi ded for con nec ti on to the elmeg IP-S400. Con nect the con nec tor to the Ether net PABX con nec tor on the system telephone.
· Con fi gu re the PABX for use with IP sys tem te le pho nes.
· Set the MSN of the IPS sys tem te le pho nes in the PABX.
· Con nect the po wer supp ly (plug po wer supp ly unit) to the IP sys tem te le pho ne and wait un til the
sys tem te le pho ne has initialised.
If the IP sys tem te le pho ne is in itia li sed, you will be promp ted to choo se a langua ge in the dis play.
Se lect the dis play langua ge. Press the ar row keys to se lect the langua ges that are avai la ble and con firm with
O.
Which language? }
Italiano
Español
Deutsch
®English
Français
Nederlands
En ter one of the MSN en te red in the PABX
(in the ex am ple 12).
Con firm your en try with O.
Programm dial number
MSN-1>12
¬¬¬¬¬¬¬¬¬¬¬¬¬¬¬¬¬¬¬¬¬¬
If no PIN is en te red in the sys tem con fi gu ra ti on, press
O and O again when promp ted.
IPS login PIN for sys
server
MSN-1>
¬¬¬¬¬¬¬¬¬¬¬¬¬¬¬¬¬¬¬¬¬¬
Switch on ‘Use DHCP’.
Se lect »on«.
Use automatic IP
address setting
off
on®
¬¬¬¬¬¬¬¬¬¬¬¬¬¬¬¬¬¬¬¬¬¬
Te le pho ne and PABX are syn chro ni sed.
Sys tem te le pho ne and PABX are syn chro ni sed.
,
If the re is no con nec ti on to the PABX (no LAN con nec ti on or the sys tem te le pho ne is not re gis te red), the
time in the dis play is re pla ced by »©©©-/ /©-‰«.
You can now use the IP sys tem te le pho ne like a sys tem te le pho ne on ISDN or UP0.
A com ple te des crip ti on of the con fi gu ra ti on can be found on page 81.
Possible error:
IP ad dress, IP gate way, IP sub net mask, IP SYS ser ver.
MSN is not en te red in the PABX or is used mul tip le ti mes.
A PIN / lo gin name is en te red in the PABX but not in the te le pho ne.
No ex ten si on is set up in the PABX.
You can now use the IP sys tem te le pho ne like a sys tem te le pho ne on S or UP0 con nec tors.
Pictograms Sys tem te le pho ne set tings
15
Setting the display language
You can choo se in which langua ge the dis play is to ap pe ar.
Start as fol lows:
a
M s s s
Con fi gu ra ti on Dis play Au dio
s Press the ar row keys to see the langua ges that are avai la ble.
Press the soft key next to the cho sen langua ge. The dis play is im me di ate ly swit ched to the cho sen language.
Which language?
Italiano
Español
Deutsch
English
Français
Nederlands
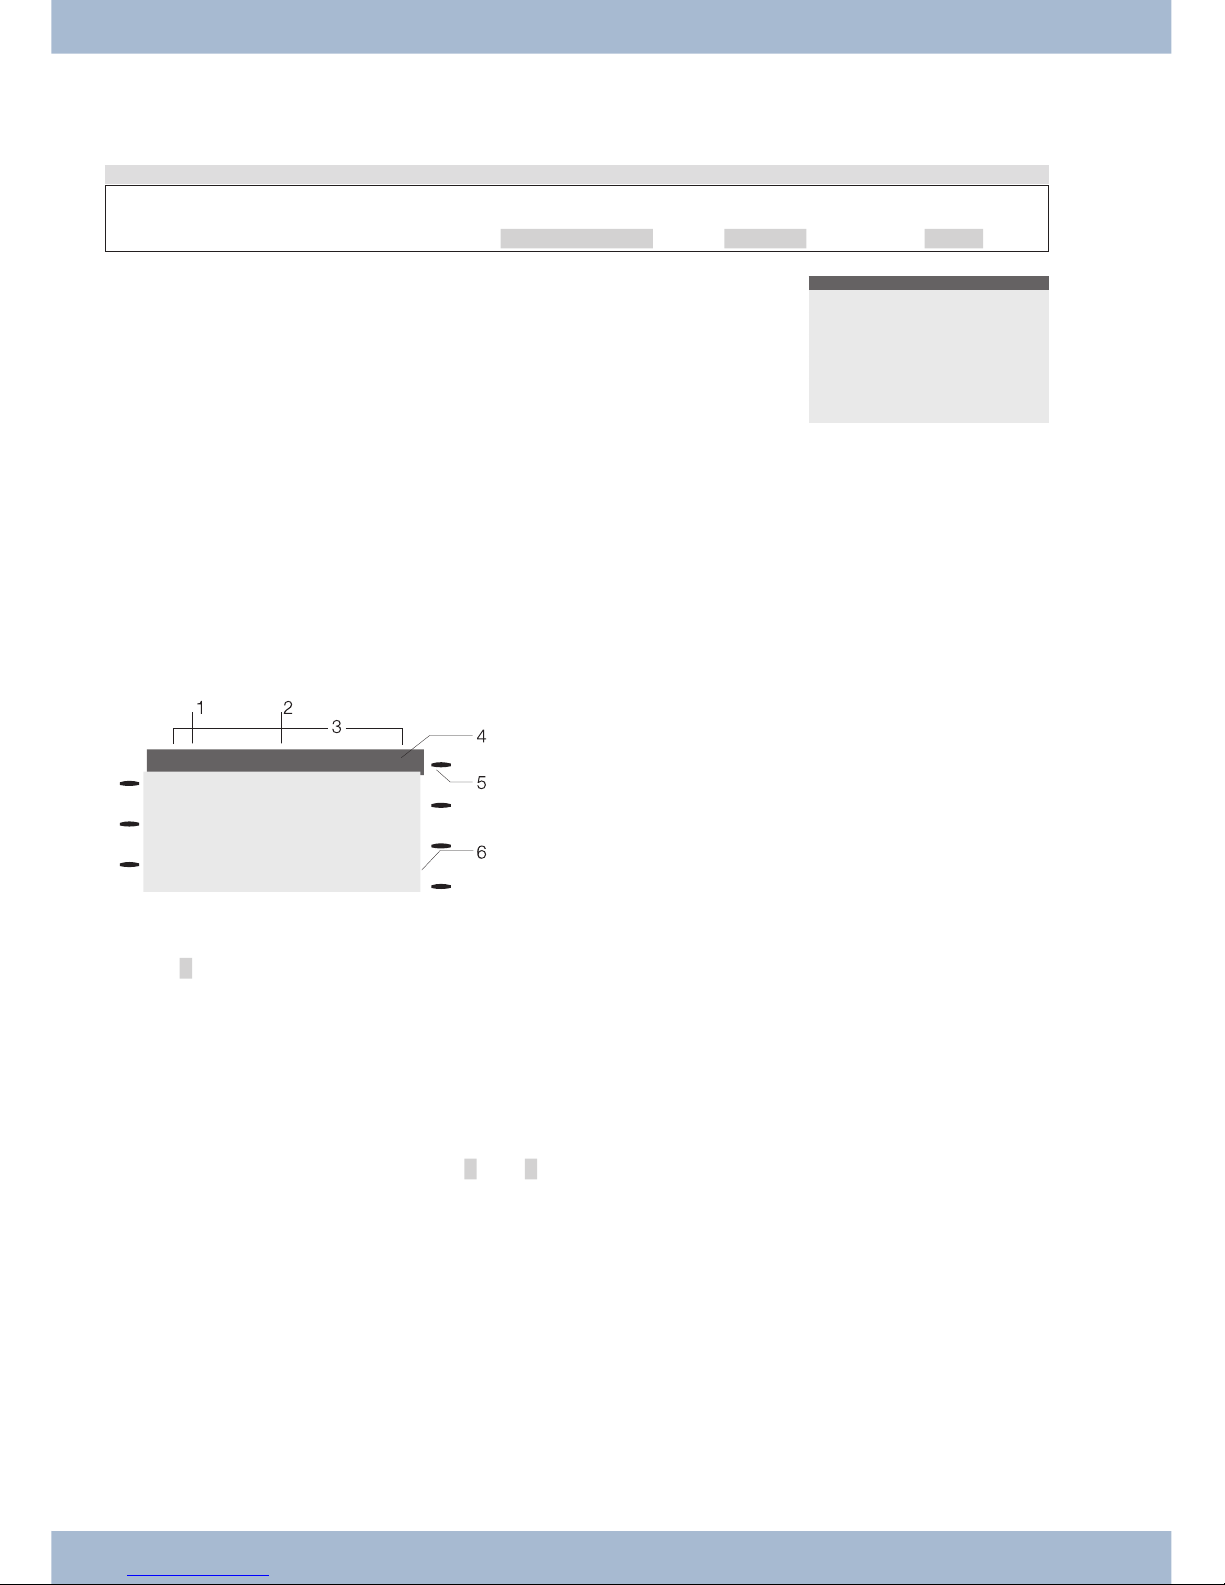
System telephone display
1
Date.
2
Time.
3
21 cha rac ters per line.
4
Ar row: Ot her menu items can be ac ces sed using the ar row keys.
5
Ans we ring ma chi ne but ton on sys tem te le pho ne (op tio nal
module).
6
Ar row: In for ma ti on on soft key that can be pres sed in the cur rent menu.
A cross »®« be hind a dis play text in di ca tes that this per for man ce fea tu re is enabled.
The sys tem te le pho ne has a 7-line dis play with bac kground lighting. Bac kground lighting is swit ched on or off au to ma ti cal ly.
Af ter con nec ting to the in ter nal S/U con nec ti on, the PABX shows the date and time on the dis play. Both the date and
time are au to ma ti cal ly co pied from the PABX. The ot her li nes al ways con tain the text dis play ed for a functi on next to
the cor re spon ding soft key. If you press the soft key, the next le vel is then dis play ed. If not all of the cha rac ters can be
shown in the dis play, this is in di ca ted by »«« or »»«. To view the ot her cha rac ters, press the R key and then the
corresponding arrow key.
Va ri ous dis plays for the sys tem te le pho ne are in clu ded in this user gui de to help ex plain the set tings and ope ra ti on. If
only a few li nes of the dis play are shown (the dis play is not shown with all 7 li nes), this is in di ca ted by a wavy line at
the top or bottom.
Special feature when showing lists in the display
Mul tip le en tries are shown si mul ta ne ous ly in the dis play for cer tain set tings or ope ra tions. The se lists are re qui red,
for ex am ple, for set tings in the pho ne book or in the VIP memory.
Sys tem te le pho ne set tings Setting the display language
16
09.03.05 07:00
™Info -D-I-q-
™Tel. Drctry
™VIP
Quiet ‰
Caller list‰
The ac ti ve (cur rent ly se lec ted) en try is dis play ed with in ver ted
co lours. You can dis play ot her functions or se lec ted an en try
using the M or O keys.
VIP digit to select
{}
V0:
V1:...........0123456
V2:Beatrice..........
V3:
¬¬¬¬¬¬¬¬¬¬¬¬¬¬¬¬¬¬¬¬¬¬¬
Special features for modifying existing entries
Va ri ous op tions are avai la ble for mo di fy ing exi sting en tries (e.g. na mes or numbers).
Ex am ple 1:
You mo di fy the num ber of a pho ne book en try, as the sub scri ber has mo ved.
Use the key pad to en ter the first di git of the new num ber if the exi sting num ber is de le ted com ple te ly. En ter the ot her
di gits of the new number.
Ex am ple 2:
You mo di fy parts of the name of a pho ne book en try, as the sur na me has chan ged (e.g. af ter a mar ria ge).
Press the ar row keys to se lect the en try po si ti on. You can over wri te the cur rent sur na me im me di ate ly or de le te the
exi sting en try with the C key and then enter the new name.
Entering letters and numbers
If you press a key se ve ral ti mes, you will see cha rac ters (let ters or num bers) dis play ed in se quen ce.
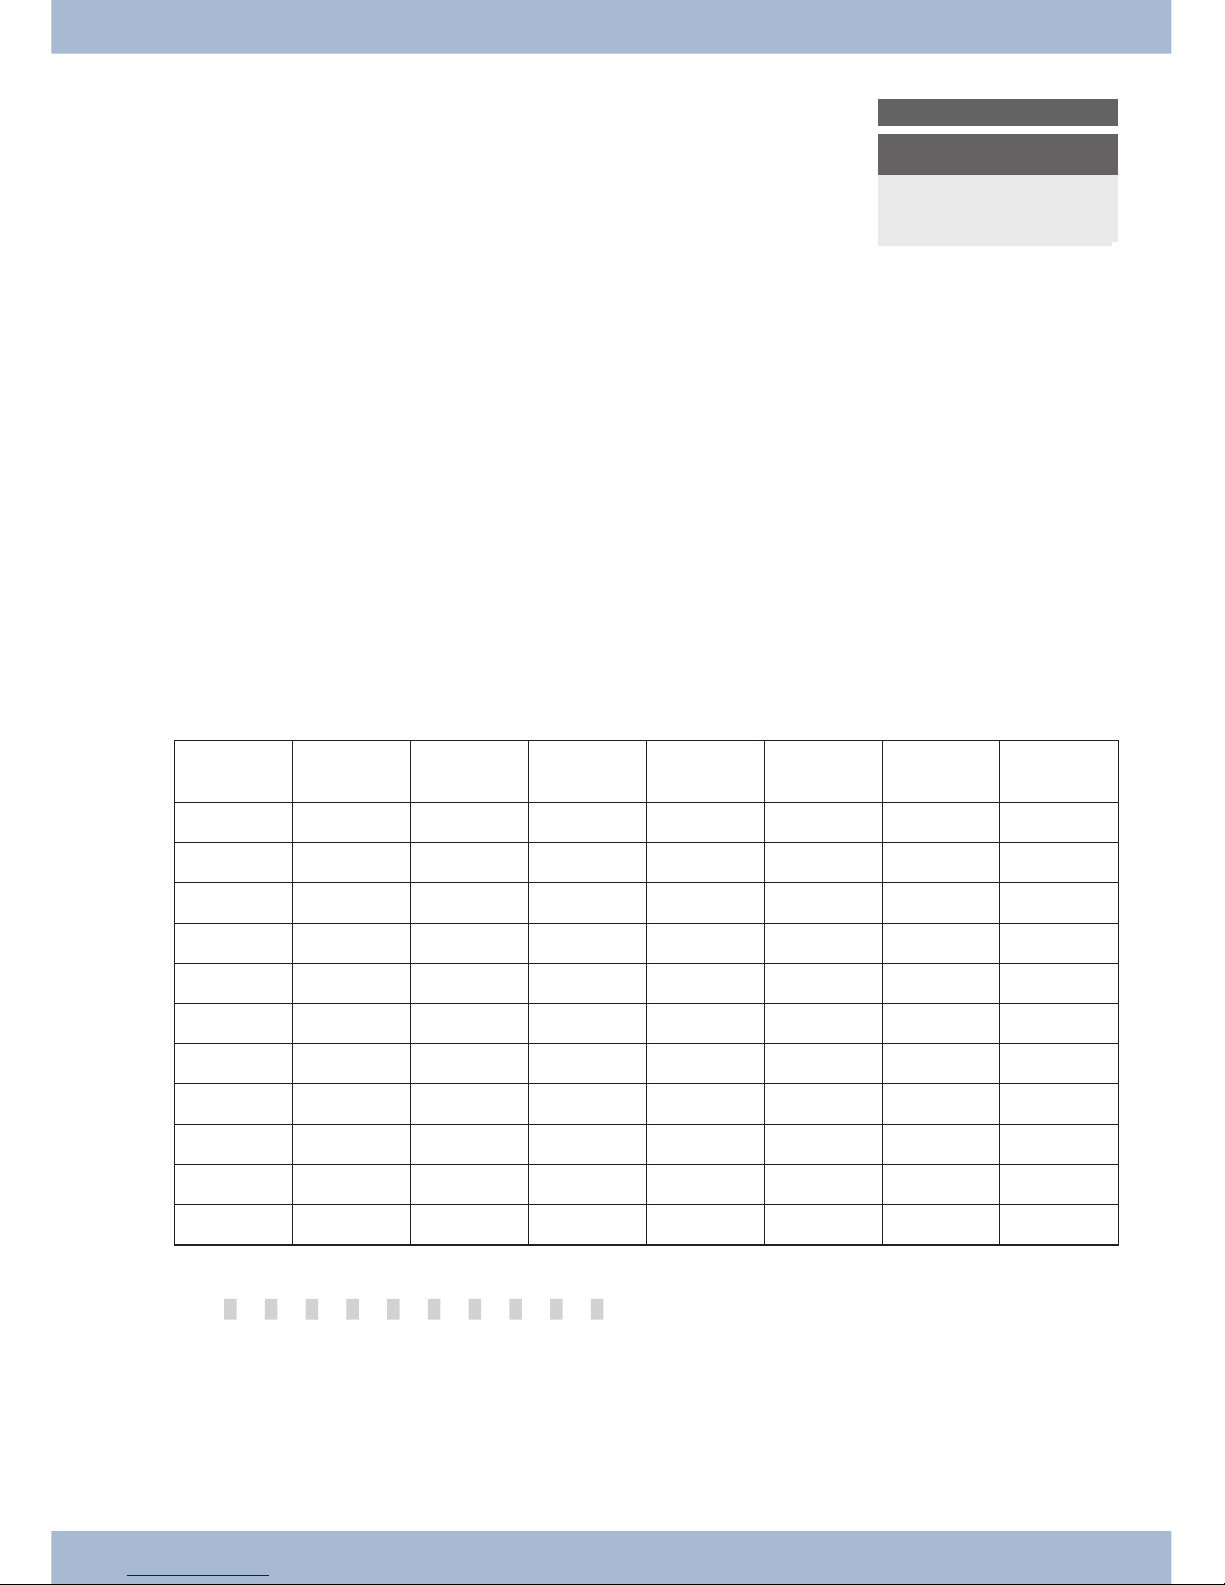
For the text en try of let ters, di gits and spe ci al cha rac ters, the keys are as sig ned as follows:
Key First press Se cond
press
Third press Fourth press Fifth press Sixth press Se venth
press
1
1
2
A B C 2 Ä Å Æ
3
D E F 3 €
4
G H I 4
5
J K L 5
6
M N O 6 Ö Ø
7
P Q R S 7 ß $
8
T U V 8 Ü
9
W X Y Z 9 ¥
*
*
#
#
The 0 key has a num ber of spe ci al cha rac ters on it.
E.g.: »!«, »&«, »?«, »+«, »-«, »=«, »(«, »)«, »@«, »$«, ...
When the 0 is first pres sed it in serts a spa ce. If the key is pres sed a se cond time, se ve ral spe ci al cha rac ters are
shown in the dis play. To se lect a spe ci al cha rac ter, press the al lo ca ted keys 1 ... 9. If you want to view ot her spe ci al cha rac ters, press the 0 key.
Setting the display language Sys tem te le pho ne set tings
17

Input mode for letters
The re are va ri ous op tions avai la ble for en te ring let ters. The cur rent in put mode is shown at the top right of the dis play (no dis play, »Abc« or »ABC«).
No dis play All of the let ters en te red are dis play ed in lo wer ca se.
Ex am ple: »dean, james«.
»Abc« The next let ter en te red is dis play ed in up per ca se, all ot her en tries are lo wer ca se.
Ex am ple: »Dean, James«.
»ABC« All of the let ters en te red are dis play ed in up per ca se.
Ex am ple: »DEAN, JAMES«.
,
At the start of text in put, the in put mode »Abc« is al ways ac ti ve. To chan ge the in put mode, press the R key.
To in sert a cha rac ter, press the C-key in »Abc« mode.
Call signalling
Calls are sig nal led using the ring tone set in the sys tem te le pho ne for the di al led num ber (MSN).
If you use the sys tem te le pho ne on the in ter nal S-con nec tor of the PABX, you can set a se pa ra te ring tone for in ter nal
and ex ter nal calls for each num ber (MSN).
Function keys and LEDs
You can pro gram the five functi on keys in two lay ers with va ri ous functions using the PC con fi gu ra ti on for the sys tem te le pho ne. Each key has a two-co lour LED that can be used to dis play the functions. Each co lour is as sig ned to a
lay er of the functi on key (lay er 1 - red / lay er 2 - yel low).
You can re ach the se cond lay er of functi on keys by pres sing the keys twi ce. This must be done quickly.
LED for call signalling and answering machine
Flas hes red: In co ming calls
Lights up yel low: Ans we ring ma chi ne on
Flas hes yel low: New mes sa ges on the ans we ring ma chi ne
Acknowledgment tones
En tries or set tings on the sys tem te le pho ne can be con fir med with ac knowledgment tones.
Po si ti ve ac knowledgment tone (1 long tone):
The po si ti ve ac knowledgment tone in di ca tes that your en try was ac cep ted and sa ved on the sys tem telephone.
Ne ga ti ve ac knowledgment tone (3 short to nes):
You hear the ne ga ti ve ac knowledgment tone if your en try has not been ac cep ted by the sys tem te le pho ne or an in cor rect en try has been made.
Sys tem te le pho ne set tings Setting the display language
18
Display of the performance features set up
s When the sys tem te le pho ne is at rest, ad di tio nal in for ma ti on on
the functions that are set up / per for man ce functions are dis play ed in the »In fo« li ne of the dis play. Ex am ple: »-t-S-r-«.
For furt her in for ma ti on on the functions set, press the »In fo«
softkey .
29.05.07 07:21
Info-D-S-q-
Tel. drctry
Idle
VIP
Caller list
If se ve ral functions are set, press the ar row keys to see the va ri ous
set tings.
ªªªªªªªªªªªªªªªªªªªªªªªªªª
Inhibit/Menu access:
Guard for modification
¬¬¬¬¬¬¬¬¬¬¬¬¬¬¬¬¬¬¬¬¬¬
Additional display information
When the te le pho ne is at rest, ad di tio nal in for ma ti on on the functions that are set up is dis play ed in the top line of the
display.
Dis play Functi on set up
»D«
Ac ti ve ap point ment set.
»I«
Di al con trol or call fil ter ac ti vat ed,
Ac cess to sys tem te le pho ne me nus protected
»q«
»Do not dis turb« functi on (on ly at ten ti on to ne) set.
»Q«
»Do not dis turb« functi on (com ple te) set.
(All call to nes are de ac ti vat ed)
»U«
Call for war ding set up.
»i«
In for ma ti on about pro gram med functi on keys
E.g.: An noun ce ment per mit ted / not per mit ted.
»I«
In for ma ti on about mes sa ges (MWI) e.g. on your T-Net box
»%«
Ans we ring ma chi ne, time con trol, call for war ding or re mo te ope ra ti on (op tio nal mo du le) on.
Setting the display language Sys tem te le pho ne set tings
19
Ad di tio nal key bo ard
The ad di tio nal key bo ard is de sig ned for being con nec ted to the el meg ISDN te le pho nes CS400, CS410 and CS410-U.
The se te le pho nes are equip ped with a se pa ra te port for con nec ting the additional keypad.
The ad di tio nal key pad is equip ped with keys with in set LEDs:
Sa fe ty no tes
Ob ser ve the sa fe ty no ti ces and in struc tions in the user’s ma nu al for your te le pho ne.
Unpacking and placing the additional keyboard
Un pa cking
Ad di tio nal key bo ard, con nec ti on ca ble (8-wire, RJ45 - RJ45), 3 screws, sup port, as sem bly in struc tions.
Pla cing and clea ning
For pla cing and clea ning the te le pho ne, plea se ob ser ve the in struc tions gi ven in the ope ra ting in struc tions. The se no tes ap ply also to the ad di tio nal keyboard.
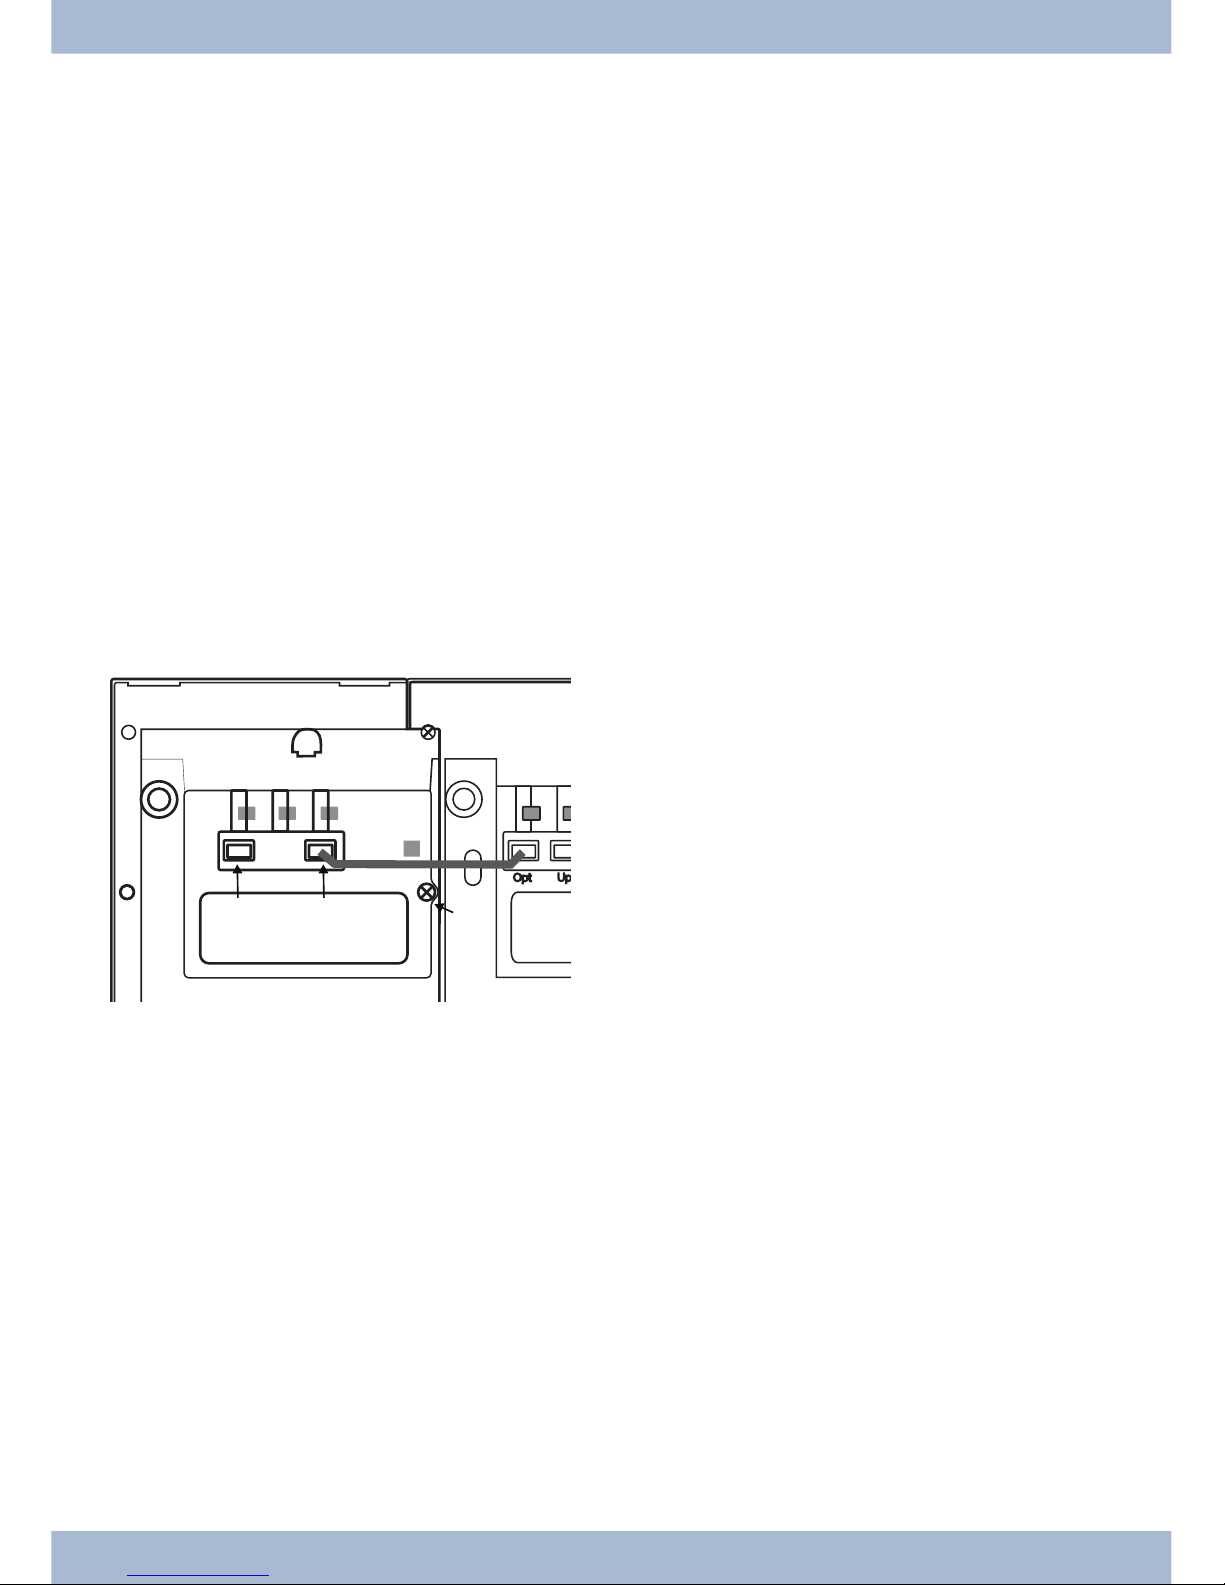
Connecting the additional keyboard
1
Bot tom of te le pho ne
2
Bot tom of ad di tio nal key bo ard
3
Ho le and studs (3 studs) for moun ting the ad di tio nal key bo ard
4
Con nec ti on ca ble
5
Ca ble hol der
6
Jack for the ad di tio nal key bo ard (in put)
7
On ly T400: Jack for anot her ad di tio nal key bo ard
(out put)
8
Moun ting lo ca ti on for rub ber sup port
9
Po wer supp ly con nec tor
0
Studs (3 studs) for moun ting anot her ad di tio nal
key pad
In stal la ti on pro ce du re
· Un plug the ISDN con nec tor for the te le pho ne from the ISDN out let.
· Pla ce the front of te le pho ne and the ad di tio nal key pad on a soft sur fa ce. The na me pla tes must be
able to be read from the front (see fi gu re).
The ad di tio nal key pad must be pla ced to the left of the te le pho ne. The fi xing ho les in the ad di tio -
nal key pad must be po si tio ned over the cor re spon ding screw do mes on the telephone 3.
· Se cu re the ad di tio nal key bo ard with the supp lied studs to the te le pho ne
3
.
· Con nect the con nec ti on ca ble
4
as shown in the fi gu re and se cu re it un der the ca ble hol der 5.
· Fas ten the sup port
8
.
· Now turn the te le pho ne and ad di tio nal key pad over and set them on the rub ber supp orts.
· Plug the ISDN con nec tor of your pho ne back into the ISDN out let. Af ter in itia li za ti on (start-up)
of your te le pho ne the pho ne and the ad di tio nal key pad are im me di ate ly ready for operation.
Ad di tio nal key bo ard Setting the display language
20
2
1
9
0
8
0
3
4
6
7
5
3
4

Programming the additional keyboard
Con fi gu re the functi on keys and the LEDs for the ad di tio nal key pad using the Pro fes sio nal Con fi gu ra tor on the
WIN-Tools CD-ROM for your telephone.
Changing the label
The la bel pa nels for the functi on keys are in clu ded on a se pa ra te sheet en clo sed in the ope ra ting in struc tions. Cut out
the la bel you wish to use.
To chan ge the la bel pa nel, press the fle xi ble co ver to get her bet ween your in dex fin ger and thumb and lift it out. The
la bel pa nel can now be chan ged.
You can fill out and then print the la bel for your ad di tio nal key pad using the Pro fes sio nal Con fi gu ra tor. Also avai la ble on the WIN-Tools CD-ROM is an Ado be Acro bat file con tai ning tem pla tes that you can also fill in and print out.
Connecting further button boards (cascading)
Up to three ad di tio nal key pads can be con nec ted (cas ca ded) to your te le pho ne. The ad di tio nal T400/2 key pad is de sig ned for ope ra ti on at the end of a cas ca ding line. A plug-in po wer supp ly is re qui red if you use more than one ad di tio nal key pad. Use only the ap pro ved po wer supp ly units avai la ble as ac ces so ry
(Plug-in po wer supp ly unit T400 / Ident-Num ber: 220872.5
Plug-in po wer supp ly unit T400-UK / Ident-Nummer: 220873.3).
Installation procedure
· Un plug the ISDN con nec tor for the te le pho ne from the ISDN out let. Re mo ve the plug-in po wer
supp ly (if avai la ble).
· Pro ceed as des cri bed for the te le pho ne and ad di tio nal key pad.
Se cu re the ad di tio nal key bo ard at the po si tions 0 mar ked in the il lu stra ti on. Con nect the con nec ting cord to the left jack 7 of the exi sting ad di tio nal key pad and to the right jack 6 of the new
module.
· Plug the plug-in po wer supp ly unit into the ap pro pria te jack
9
for an ad di tio nal key pad.
· Plug the ISDN con nec tor of your pho ne back into the ISDN out let. Af ter in itia li za ti on (start-up)
of your te le pho ne the pho ne and the ad di tio nal key pad are im me di ate ly ready for operation.
Setting the display language Ad di tio nal key bo ard
21
Te le pho ning
Initiate a call
Dial call number - without option to make a correction
b t g
Dial call num ber
Dial call number - with option to make a correction
a t b g
Dial call num ber
To amend the call num ber or to cor rect an in cor rect en try, se lect the in cor rect di git with the ar row keys and press the
C key to de le te it. Then en ter the cor rect digit.
If you want to car ry out the call using the re cei ver, life the re cei ver af ter en te ring the call num ber. At any time du ring a
call, you can switch back and forth bet ween hands free, re cei ver and loud spea ker.
Af ter you have en te red a call num ber, you can also press the loud spea ker key in or der to be able to se lect the call num ber and use the hands free system.
If it is not pos si ble to con nect a call (e.g. call num ber blo cked by dial con trol) or the cost ac count of the num ber/MSN
is emp ty), a mes sa ge to this ef fect will ap pe ar in the te le pho ne dis play; e.g.: »Blo cked: Call no.«, if the dial con -
trol is activated.
If you have lif ted the re cei ver and you are not con nec ted, you can ac cept a call wai ting via the »ac cept« soft key wit hout ha ving to re pla ce the re cei ver. You will be no ti fied of the call by a brief mes sa ge. If you set up a con nec ti on key or
a cor re spon ding ma cro key, you can ac cept the call straight away by pressing the key.
Ot her op tions for di al ling when the re cei ver is re pla ced
It is also pos si ble to dial a num ber when the re cei ver is re pla ced and to cor rect or supp le ment a call num ber be fo re di al ling when calling:
· From the re di al me mo ry (see page 21).
· From the cal ler/mes sa ge list (see page 33).
· From the pho ne book (see page 30).
· From the VIP me mo ry (see page 32).
· Using the functi on keys (see page 19).
· Via the PABX CTI (TAPI) functi on (see page 88).
If you want to use one of the se op tions, you can make furt her en tries be fo re in itia ting the call. You can de ter mi ne, for
ex am ple, whet her or not a call num ber (MSN) is to be trans mit ted to the called party.
You can use the Pro fes sio nal Sys tel-Con fi gu ra tor to de ter mi ne which functions are sa ved di rect ly un der the »Pho ne
book« soft key: »lo cal« or »PABX«. You can re ach the se cond lay er of functions by pres sing the R key.
Select from the phone book on the PABX / elmeg hybird
If you are using the sys tem te le pho ne on a PABX with sys tem te le pho ny, you can dial from the pho ne book on the
PABX.
Te le pho ning Initiate a call
22
a
R s
t
O O
b g
Pho ne book
En ter the in iti al
let ters
En try
se lect
Select from the phone book on the system telephone
You can save up to 250 na mes and te le pho ne num bers in the pho ne book of your sys tem te le pho ne. To se lect a name,
you can scroll with the ar row keys or en ter the in iti al let ter of the name you are loo king for using the keypad.
a
s
t
O O
b g
Pho ne book
En ter the in iti al let -
ters
En try
se lect
The pro ce du re for pro gram ming and set ting up the pho ne book is des cri bed on page 30 of this user guide.
Dialling from the VIP memory
You can pro gram me a VIP en try for each of the 10 di al ling keys con si sting of a name (max. 20 cha rac ters) and a call
num ber (max. 26 digits).
a
s
or
t b g
VIP
VIP des ti na ti on
se lect
VIP des ti na ti on
se lect
The pro ce du re for pro gram ming VIP en tries is des cri bed on page 32of this user guide.
Speed dial with function keys
Speed di al ling is in itia ted using the functi on keys. You can pro gram me functions or speed di als un der each of the five
keys.
a
Z
b g
Pres sing the functi on keys
Dial the re qui red call num ber using the functi on keys.
If you want to dial a num ber in the se cond lay er, press the de si red key twi ce. This must be done quickly.
Pro gram ming of the speed dial/functi on keys is done via the PC con fi gu ra ti on or the ad van ced con fi gu ra ti on of the
sys tem telephone.
Select from the caller/message list
The sys tem te le pho ne has a com bi ned cal ler and note his to ry. A ma xi mum of 30 en tries (calls, mes sa ges, SMS or
UUS1 text mes sa ges) shall be pos si ble in this list. En tries in the cal ler/note his to ry are shown on the dis play by pres sing the »Cal ler list« softkey.
a
s
b g
Cal ler list
Se lect en try
You will find furt her in for ma ti on on the cal ler /mes sa ge list on page 33of this user guide.
Accepting/rejecting a call
With re spect to the sys tem telephone’s ba sic set tings, each call shall be sig nal led ir re spec ti ve of the di al led call num ber (MSN). If two calls are sig nal led si mul ta ne ous ly, the first call is ac cep ted when the re cei ver is lif ted. The se cond
call may con ti nue to be sig nal led by me ans of the call wai ting sig nal.
The num ber of the cal ler and the num ber di al led by the cal ler (MSN-1 … MSN-10, or as sig ned name) are shown on
the system telephone display.
Accepting/rejecting a call Te le pho ning
23

a l b g
If you are un ab le to or do not wish to ac cept a call, you can re ject the call. Press the »re ject« soft key and the call will
no lon ger be sig nal led to your sys tem te le pho ne. If you are a mem ber of a team, the call is sig nal led to ot her te le pho nes in the team. If the call was only sig nal led to your sys tem te le pho ne, Busy is sig nal led to the cal ler after it has been
rejected.
a l
s
re ject
Forwarding a call (Call Deflection)
If you are un ab le to or do not wish to ac cept a call, you can for ward the call. Press the »trans fer« soft key in or der to
for ward the call di rect ly to anot her ex ten si on. The call num ber to which the call is due to be for war ded can be pre set
in the sys tem te le pho ne con fi gu ra ti on for each call number (MSN).
Af ter pres sing the »trans fer« soft key you can eit her for ward the call to the pre set call num ber or en ter a new call
number.
a l
s
t
O
trans fer
Dial call num ber
<$I[English]Initiate call;Without call number (CLIR)>Suppressing the call number
(anonymous call)
If you do not want your call num ber to be sent to the cal led par ty, you can sup press the trans mis si on of your call num ber. You can set this functi on spe ci fi cal ly for the next call or per ma nent ly (see page ).
Sup pres sing trans mis si on of the call num ber for the next call
You can per form in ter nal or ex ter nal di al ling so that the call num ber (MSN) is not trans mit ted from your sys tem te le pho ne to the cal led party.
a t
O M s
b g
Dial
con cea led
If a call is sig nal led, you can de ci de be fo re ac cep ting the call whet her or not your call num ber should be trans mit ted to
the cal ler. If your sys tem te le pho ne is the des ti na ti on of a call di ver si on, you can use this pro ce du re to pre vent the call
see ing the call num ber of the di ver si on destination (your number).
a l
s
b g
con cea led
Initiating a call with a fixed call number (MSN)
You can per form in ter nal or ex ter nal di al ling so that a spe ci fic num ber is trans mit ted from your sys tem te le pho ne to
the cal led par ty. This call num ber must first be en te red in your sys tem te le pho ne. Du ring se lec ti on you will see the
call num ber trans mit ted (»MSN-1«...»MSN-10«) or the name you have as sig ned to this call num ber (MSN).
You can in itia te di al ling with a fi xed num ber as des cri bed below or use a programmed function key.
,
In the WIN-Tools pho ne book ma na ger you can as sign an out going num ber (MSN) to each re cord.
a t
O M s s
b g
Dial call num -
ber
MSN MSN-1 …
MSN-10
Te le pho ning Forwarding a call (Call Deflection)
24
 Loading...