

Page 1

Dear «aurora» Customer
032907.52.04_0910_a430/a440/a450_EN
BERNINA has added another great sewing and embroidery
computer to the very successful aurora product line. The new
aurora 450 has a new hook system which enables you dear
BERNINA customer to make wider stitches.
Now BERNINA offers three different aurora models – the
BERNINA customer can choose their perfect sewing and
embroidery computer according to her needs and wishes. All
aurora models have the capability to add the world famous
BERNINA Stitch Regulator. The aurora 440 QE has this great
presser foot included in the standard accessories.
The aurora 430 / 440 QE / 450 are designed to give you the
best sewing features possible. If you choose to expand your
creative possibilities by exploring the world of embroidery, you
can connect your sewing computer to your home PC and
purchase an embroidery module from your BERNINA Dealer,
and you can become an embroidery virtuoso.
I wish you great satisfaction and a wonderful experience with
your new aurora sewing and embroidery computer.
H.P. Ueltschi
President
BERNINA International AG
CH - 8266 Steckborn
www.bernina.com
Page 2

Safety instructions
032907.52.04_0910_a430/a440/a450_EN
2
IMPORTANT SAFETY INSTRUCTIONS !
When using an electrical appliance, basic safety precautions should always be followed, including
the following:
Read all instructions before using this sewing computer. When the sewing computer is not in use,
it should be disconnected from the electricity supply by removing the plug from the outlet.
DANGER
To reduce the risk of electrical shock:
1. An appliance should never be left
unattended when plugged in.
2. Always unplug this sewing computer
from the electrical outlet immediately
after using and before cleaning.
WARNING
To reduce the risk of burns, fire, electrical
shock or injury to persons:
1. Do not allow to be used as a toy. Close
attention is necessary when this sewing
computer is used by or near children
and infirm persons. This sewing
computer is not intended for use by
persons (including children) with
reduched physical, sensory or mental
capabilities, or lack of experience and
knowledge, unless they have been
given supervision or instruction concerning use of the sewing computer by a
person responsible for their safety.
Children should be supervised to
ensure that they do not play with the
sewing computer.
2. Use this sewing computer only for its
inten ded use as described in this
manual. Use only attachments recommended by the manu facturer as
contained in this manual.
3. Never operate this sewing computer if:
• it has a damaged cord or plug,
• it is not working properly
• it has been dropped or damaged,
• it has fallen into water
Return the sewing computer to the nea-
rest authorized BERNINA dealer or
service center for examination, repair,
electrical or mechanical adjustment.
4. Never operate the sewing computer
with any air vents blocked. Keep
ventilation openings of the sewing
computer and foot controller free from
accumulation of lint, dust and fabric
remnants and the like.
5. Keep fingers away from all moving
parts. Special care is required around
the sewing needle.
6. Always use the BERNINA original
stitch plate. The wrong plate can cause
needle breakage.
7. Do not use bent needles.
8. Do not pull or push fabric while
stitching, this may deflect the needle,
causing it to break.
9. Turn power switch to «0» (off) when
making any adjust ments in the needle
area, such as threading or changing
the needle, threading the bobbin or
changing the presser foot etc.
10. Always unplug the sewing computer
from the electrical outlet when removing covers, lubricating or when making
any other user servicing adjustments
mentioned in this instruction manual.
11. Never drop or insert any object into any
openings on the sewing computer.
12. Do not use the sewing computer
outdoors.
13. Do not operate where aerosol (spray)
products are being used or where
oxygen is being administered.
14. To disconnect, turn all controls to the
off («0») position then remove the plug
from the outlet.
15. Do not unplug by pulling on the cord,
instead, grasp the plug before pulling.
16. No responsibility will be taken on behalf
of BERNINA for any possible damage
as the result of misuse of the sewing
computer.
17. Under no circumstances should the
sewing computer be left unattended
when using the embroidery module.
18. This sewing computer is provided with
double insulation (except USA / Canada). Use only identical replacement
parts. See instructions for servicing of
double-insulated machines.
SERVICING DOUBLE-
INSULATED
PRODUCTS
In a double-insulated product, two systems
of insulation are provided instead of
grounding. No grounding means is provided on a double-insulated product nor
should a means for grounding be added to
the product. Servicing a double-insulated
product requires extreme care and knowledge of the system and should only be
done by qualified service personnel.
Replacement parts for a double-insulated
product must be identical to those parts in
the product. A double insulated product is
marked with the words «DOUBLE INSULATION» or «DOUBLE INSULATED».
The symbol may also be marked on
the product.
This sewing and embroidery computer
is intended for household use only.
SAVE THESE
INSTRUCTIONS!
Page 3

Contents
032907.52.04_0910_a430/a440/a450_EN
Your sewing computer 4 - 22
Accessories 4-7
Details aurora 430 / 440 QE / 450 8-9
Setting up the sewing computer 10-17
Thread tension 17
Important facts on threads and needles 18-19
Stitch plate, Feed dog and Fabric feed 20-21
Presser foot pressure, Balance 22
Cleaning / Trouble shooting 57-58
Display 23 - 29
Display 23
Function buttons 24-25
Memory 26-29
3
Applications 30 - 56
Stitch selection 430 / 440 QE / 450 30-32
Temporary altered stitch memory 33
Application of practical stitches, Quilt stitches, Decorative stitches 34-47
Buttonholes - Important information 48
Application of buttonholes / Eyelets / Button sew - on 49-56
All about embroidery 59 - 80
Details 59
Accessories 60-62
Setting up the embroidery computer 63-67
Important embroidery information 67-69
Embroidery operating requirements 70
Bernina embroidery software 70-71
Software - EC on PC 72-77
Starting to embroider 78
Mega-Hoop 79-80
Stitch summary 81-83
Index 84 - 85
Page 4

4
Key to signs
032907.52.04_0910_a430/a440/a450_EN
4
Key to signs
C
!
Supplementary information!
Helpful tips!
Please refer to the safety
instructions! Risk of injury!
Very important!
Risk of damage!
All rights reserved.
In order to improve the product, and for our customers' benefit, all of the
sewing and embroidery computer's features, parts, and accessories are
subject to unannounced changes and alterations at any time.
27
28
Additional information on the corresponding subject you
will find on the
relevant page.
Text
Herbert Stolz
Drawings
Müller-Melzer ID, Kreuzlingen
Design concept
Susanne Ribi
Copyright
2008 BERNINA International AG, Steckborn
Page 5

5
Accessories
032907.52.04_0910_a430/a440/a450_EN
Accessories
9
7
10
1
Presser feet*
Standard accessories:
5
3
4
8
1 5 bobbins (one in bobbin case)
2 Needle selection 130/705H
3 Seam ripper
4 Brush
5 Seam guide
6
6 Height compensating tool
7 3 spool discs
8 Small screwdriver
Accessories
• foot control
• instruction manual
• power cable
• warranty card
• Free Hand System presser foot lifter
• slide-on table
• seam guide for slide-on table
• Instructional presentation CD-ROM
9 Angular torx key
10 Foam pad
11 Oiler filled
aurora 430 / 440 QE
2
11
aurora 450
1
, 1C
430/440
450
Reverse pattern
foot
Straight stitch
Practical and
decorative stitch
Quilt stitch
•
Eyelets
•
Securing
20
, 20C
440
450
Open embroidery
foot
Embroidery,
Appliqué, Satin
stitch seams,
Monograms
2
, 2A
430
450
Overlock foot
Overlock seam,
Overlock hem,
Narrow satin stitch
•
For knits and
wovens
•
Edge finishing
37
440
Patchwork foot
1/4” / 6mm
Patchwork with 1/4”
or 1/8” (6mm/3mm)
seam allowance
3A
Automatic buttonhole foot with
slide
4
Zipper foot
Sewing in zippers,
Straight stitch
Buttonholes on
smooth fabrics,
Darning
42
440
BSR foot
Straight stitch, Freehand
quilting
5
Blindstitch foot
Blind hem,
Edge stitching,
Straight stitch
Blindstitch
for hems and
•
blindstitch
applique
50
440
Walking foot
For fabrics which stick or tend
to slip; Quilting,
Straight stitch, Quilt stitch
Decorative stitch
• sewing difficult fabrics, e.g.
velvets, matching plaids,
squares, etc.
9
Darning foot
Darning, Monograms or freehand
embroidery
Straight stitch,
Basting stitch
Darning
•
•
sewing on
buttons
Compensation
plate for sewing
buttonholes**
Improves the fabric
feed when sewing
buttonholes in
difficult fabrics
* can vary from country to country
** Optional accessories
Page 6
6
Accessories
032907.52.04_0910_a430/a440/a450_EN
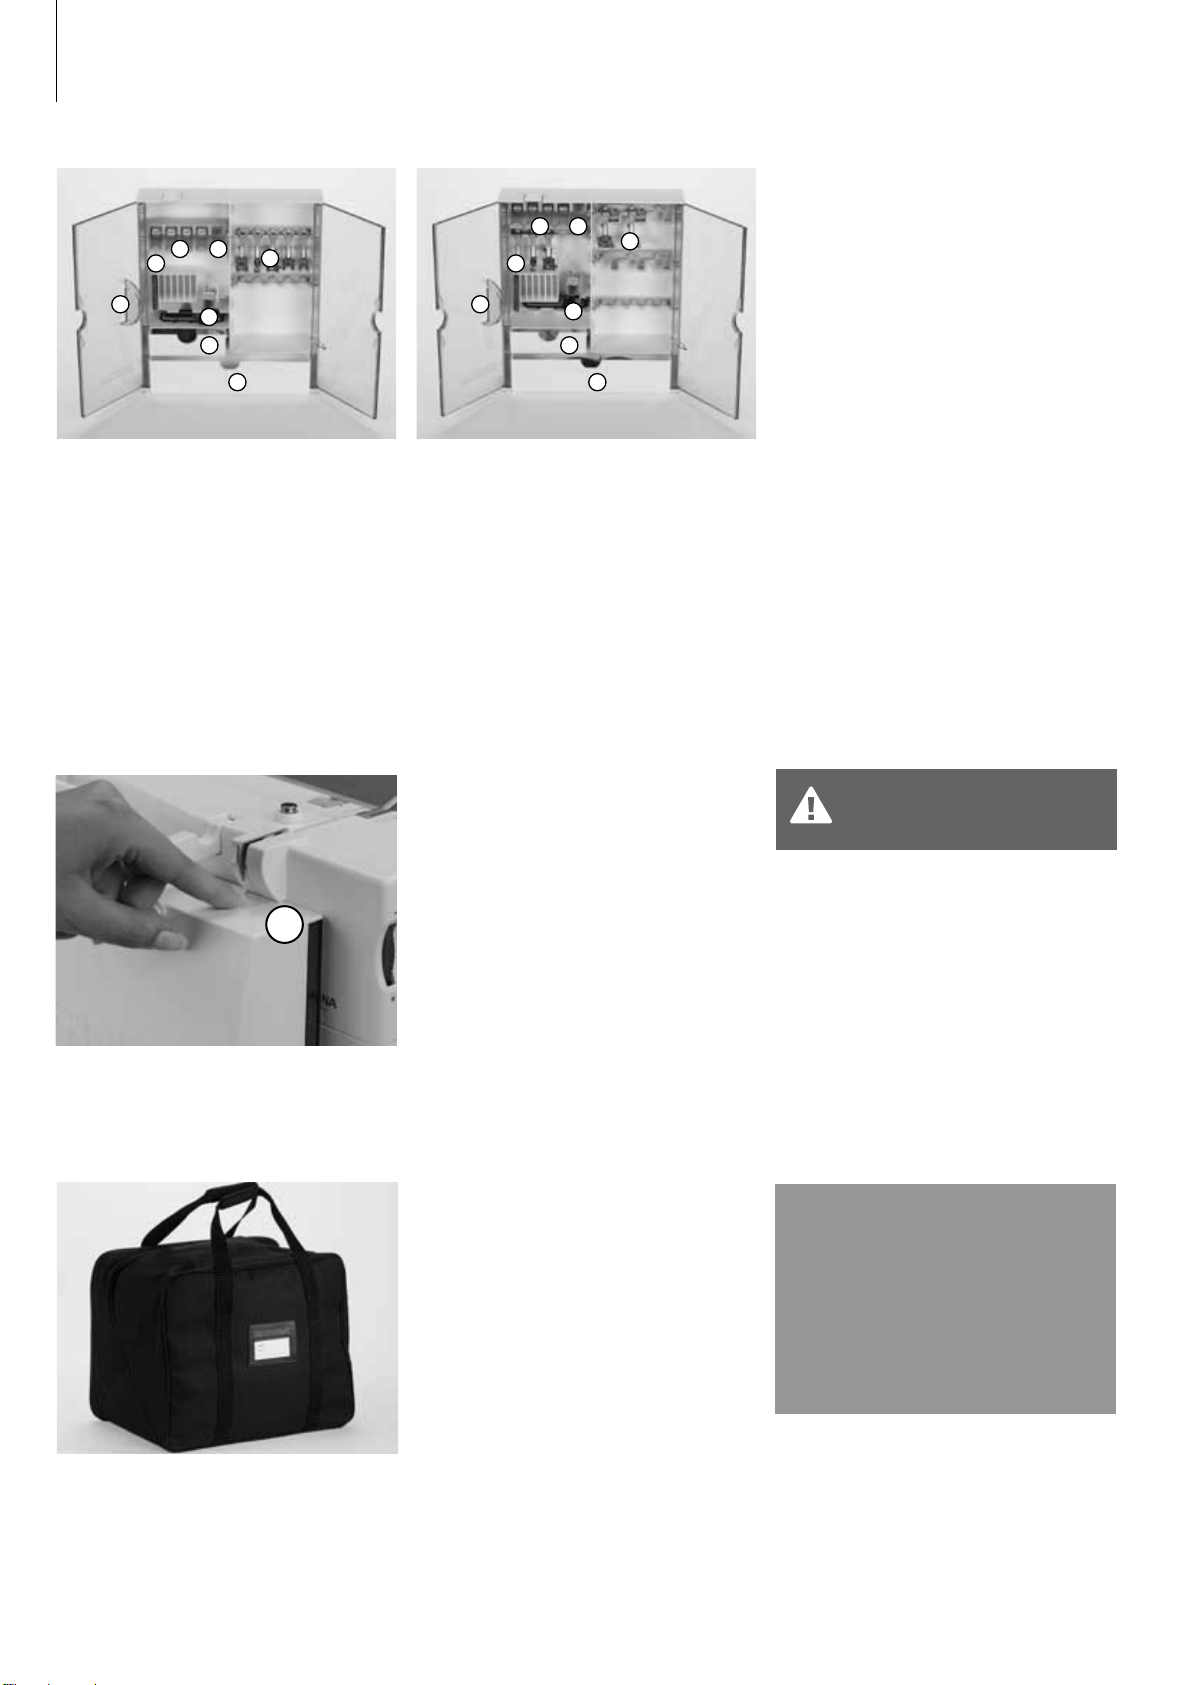
Accessory box 430 / 440 QE Accessory box 450
D
F
D
F
H H
E
E
J J
Free standing accessory box
• On the back of the box, pull both feet out
until they click into place
• stand box in desired position
G
B B
C C
A
G
Storing accessories
Standard accessories are supplied in a
plastic bag. The box is equipped with one
small and one large drawer (B and C) as
well as compartments for bobbin holders
D and presser feet E. (Additional compart-
ments and drawers are available as
optional extras).
Attaching the accessory box to the
sewing computer
• close the doors
• push feet back into position
• attach the box to the sewing computer
(catch A must engage); inserting the
presser foot lifter into the opening J
Removing the accessory box
• press catch A on the top of the box
• remove box to the rear
• push the bobbins into the compartments
provided
• to remove a bobbin, press the compart-
ment holder F lightly
• insert presser foot into holder E
• Buttonhole foot with slide no. 3A can be
stored in compartment G
• the needle selection box can be stored in
compartment H
First lower the presser foot
lifter!
Reinforced soft cover
• protects from dust and dirt
• protects sewing computer when
transporting
• compartments for accessories
C
The cover and accessory box
come with the sewing
computer. The cover should
be used to protect the sewing
computer when it is not in use.
The foot control, power cable,
sewing table and instruction
manual can be stored in the
cover.
Page 7

Optional accessories
032907.52.04_0910_a430/a440/a450_EN
BERNINA Specialty Presser Feet
The standard selection of presser feet covers most normal sewing requirements, but we recommend the use of
BERNINA specialty presser feet for specific sewing tasks such as quilting, heirloom sewing, home decorating,
tailoring, etc. They are available from your BERNINA dealer.
Optional accessories
7
3
Buttonhole foot
Buttonholes
32
Pintuck foot
Straight stitch
•
Sewing pintucks
in fine fabrics
8
Jeans foot
Straight stitching in
thick, firm fabrics
35
Invisible zipper
foot
Sewing in zippers,
Straight stitch
10C/10
Edge stitch foot
Straight stitch
Stitching edges
•
39
Embroidery foot
Zig-zag stitch,
Decorative stitches
•
Buttonhole
seams
•
sewing decorative stitches
14
Zipper foot with
guide
Sewing in zippers,
Straight stitch
43
Freemotion
couching foot
Straight stitch
•
Attaching cords
in a curved effect
18
Button sew-on
foot
Sewing on buttons,
hooks and eyes
57
Patchwork foot
with guide 1/4” /
6mm
Patchwork with 1/4”
or 1/8” (6mm/3mm)
seam allowance
21
Braiding foot
Zig-zag stitch
Couching with
•
wool to 3mm or
light cord
Punching-Kit
only 430/440 QE
Straight stitch
•
felting
We recommend to use the BERNINA lens
set for more sewing comfort (better view of
needle area).
Straight Stitch Plate 450 Straight Stitch Plate 430 / 440 QELens set
Page 8

Details
032907.52.04_0910_a430/a440/a450_EN
8
Details
11
12
13
17
10
9
26
7
29
30
31
25
27
28
23
22
21
1824
19
20
16
14
15
Front view
8
5
2
1
6
3 4
32
38
33
35
34
Back view
36
37
Page 9

Front view
032907.52.04_0910_a430/a440/a450_EN
1 Bobbin cover
2 Stitch plate
3 Attachment base for special accessories
4 Darning hoop connection
5 Presser foot
6 Needle clamp
7 Thread guide
8 Needle threader
9 Thread take-up cover
10 Thread path
11 Thread take-up
12 Holder for stitch card
13 Bobbin winder with on/off switch and thread
cutter
14 Stitch selection buttons
15 «clr» (clear) button
16 #-button (hash)
17 Stitch width buttons
18 Stitch length buttons
19 «mem» (Memory / Operating buttons)
20 Alphabet / Motif scroll buttons
21 Balance / BSR button
22 Securing function button
23 Pattern begin button
24 Display
25 Needle position buttons
26 Needle stop up/down button
27 Mirror image button
28 Slide speed control
29 Start / Stop - button
30 Pattern end button
31 Quick reverse button
32 FHS (Free Hand System) connection
41
Side view (Head frame)
40
42
38
39
43
Details
9
Back view
33 Horizontal spool pin
34 Carrying handle
35 Rear thread guideng
36 CFL sewing light
37 Slide-on table socket
38 Bobbin pre-tension
Side view (Head frame)
39 Tension adjustment wheel
40 Presser foot pressure
41 Presser foot lifter
42 Thread cutter on head frame
43 Magnifying glass holder
Side view (handwheel)
44 Handwheel
45 Spool pin (vertical, collapsible)
46 Power switch on/off («0»)
47 Power plug socket
48 PC connection
49 Embroidery module connection
(optional accessory)
50 Foot control socket
51 Drop feed dog
51
49
50
48
44
45
46
47
Side view (handwheel)
Page 10

10
032907.52.04_0910_a430/a440/a450_EN
Setting up the sewing computer
Power switch / Power cable
C
The power cable
• plug A into sewing computer
• plug B into wall socket
Foot control cable
• plug C into sewing computer
Foot control
D
Refer to the
safety instructions
!
A
B
The power switch (D)
The switch is on the handwheel side
I the sewing computer is switched on («I»)
0 the sewing computer is switched off («0»)
The sewing light is switched on and off with
the power switch.
Important! (USA/Canada
only)
This sewing computer has a
po la rized plug (one blade
wider than the other). To
re duce the risk of electrical
shock, this plug is intended
to fit in a polarized outlet
only one way. If the plug
does not fit fully in the outlet,
reverse the plug. If it still
does not fit, contact a
qualified electrician to install
the proper outlet. Do not
modify the plug in any way!
i
Sewing speed
• control the sewing speed by depressing
the foot control
• raise or lower the needle by tapping on
the foot control with your heel
B
A
C
Cable tidy
• wind the cable around the spool
• insert the plug into A
When sewing
• unwind the cable to the desired length
and slip into B or C
Important!
(USA/Canada only)
Use only foot controller
type LV1 with sewing
computer model aurora 430 /
440 QE / 450.
Page 11

Setting up the sewing computer
032907.52.04_0910_a430/a440/a450_EN
11
CFL Sewing Light
Contrary to an ordinary bulb, the CFL
sewing light has a better illumination and a
longer life.
Please note that a defec tive
CFL sewing light must ONLY
be replaced by an authorized
technician. The sewing
computer must be brought to
an authorized BERNINA
dealer!
Free Hand System (FHS) presser foot lifter
Your dealer can adjust the
FHS if necessary.
C
Raising and lowering the presser foot
• knee-operated presser foot lever to raise
and lower the presser foot - your hands
remain free to guide the fabric
• with your knee push lever to the right
• the feed dog is lowered simultaneously
• the feed dog is raised as soon as the
first stitch is sewn
Attaching the presser foot lifter
• insert the lever into respective opening
- you should be able to operate the FHS
with your knee in your normal sitting
position
Slide-on table
Larger sewing surface
• the slide-on table increases the sewing
surface
To attach
• raise needle and presser foot
• slide over free-arm to the right until it
engages
Always raise needle and
presser foot when attaching
or removing the slide-on
table!
To remove
• raise needle and presser foot
• use slight pressure - with your thumb
against the housing and the index against
the table - to slide it off to the left
Seam guide
• slide into extension table guides from left
or right
• can be moved over full table length
Scale
• «0» corresponds to the center needle
position
Page 12
12
Setting up the sewing computer
032907.52.04_0910_a430/a440/a450_EN
Threading the upper thread
A
• attach the appropriate spool disc;
diameter of spool determines disc size.
There must be no clearance between the
disc and the spool
• take thread through rear guide A
• then into slit of upper thread tension
• pull thread down to the right of the
take-up cover to B
• take thread up to the left of the
cover to C in the direction of the arrow,
placing it in the take-up lever
• take thread down and through guides D
and E
Attaching the thread spool
• raise the needle and presser foot
• turn the power switch to «0» (off)
• attach the foam pad
• place thread spool on spool holder in
such way that the thread unwinds
clockwise
C
B
D
E
Refer to the
safety instructions!
!
Page 13

13
Threading the Double Needle
032907.52.04_0910_a430/a440/a450_EN
A
Setting up the sewing computer
Threading the First Thread
• place thread spool on horizontal spool
pin and thread
• guide the thread to the front in the slit
and past the tension disc A on the right
side
• thread sewing computer as usual and
thread the right needle
Threading the Second Thread
• when using the supplementary spool pin
(vertical) always attach the foam pad
(prevents the thread from getting caught
on the spool pin)
• place thread spool on the additional
spool pin and thread
• guide the thread to the front in the slit
and past the tension disc A on the left
side
• thread the left needle
• threads must not be twisted together
By using the Supplementary
thread guide (special accesso-
C
A
ries), thread winds off the
spool much easier.
Threading the Triple Needle
• two thread spools and one full bobbin
are needed
• place one thread spool on horizontal
spool pin
• place second thread spool and the
bobbin, separated by a spool disc, on
additional spool pin (both spools have to
turn in the same direction)
• thread as usual by guiding two threads
on the left side of the tension disc A and
one thread on the right side of the disc
Page 14

14
Setting up the sewing computer
032907.52.04_0910_a430/a440/a450_EN
Needle threader
A
B
Press lever down
• Raise needle
• Lower presser foot
• Hold thread to the left and back
• Press down lever A, guiding the thread
around hook B to the right, to the needle
Thread cutter
Guide thread in front of the needle
• Pull thread from the front into the thread
guide until it catches (wire hook) and pull
from the back forwards over the thread
cutter on the right side of the CFL sewing
light
• The thread is cut and at the same time
held in place
Thread cutter on head frame
• pull both threads from front to back over
the cutter
• the threads release automatically as
soon as the first stitch is sewn
A
Release lever
• Release lever A
• Put the thread under the foot and pull
the thread backwards or
• Put the thread under the foot, then pull it
from front to back over the thread cutter
on left side of the head frame
Double and triple needles
must be threaded by hand.
C
Supplementary spool pin
Collapsible vertical spool pin
• essential aid for sewing with more than
one thread, i.e. double needle work
• turn pin up to stop when sewing
A
• we recommend to use foam pad A for
better stabilizing of the spool and even
unwinding of the thread
Page 15

15
Winding the bobbin
032907.52.04_0910_a430/a440/a450_EN
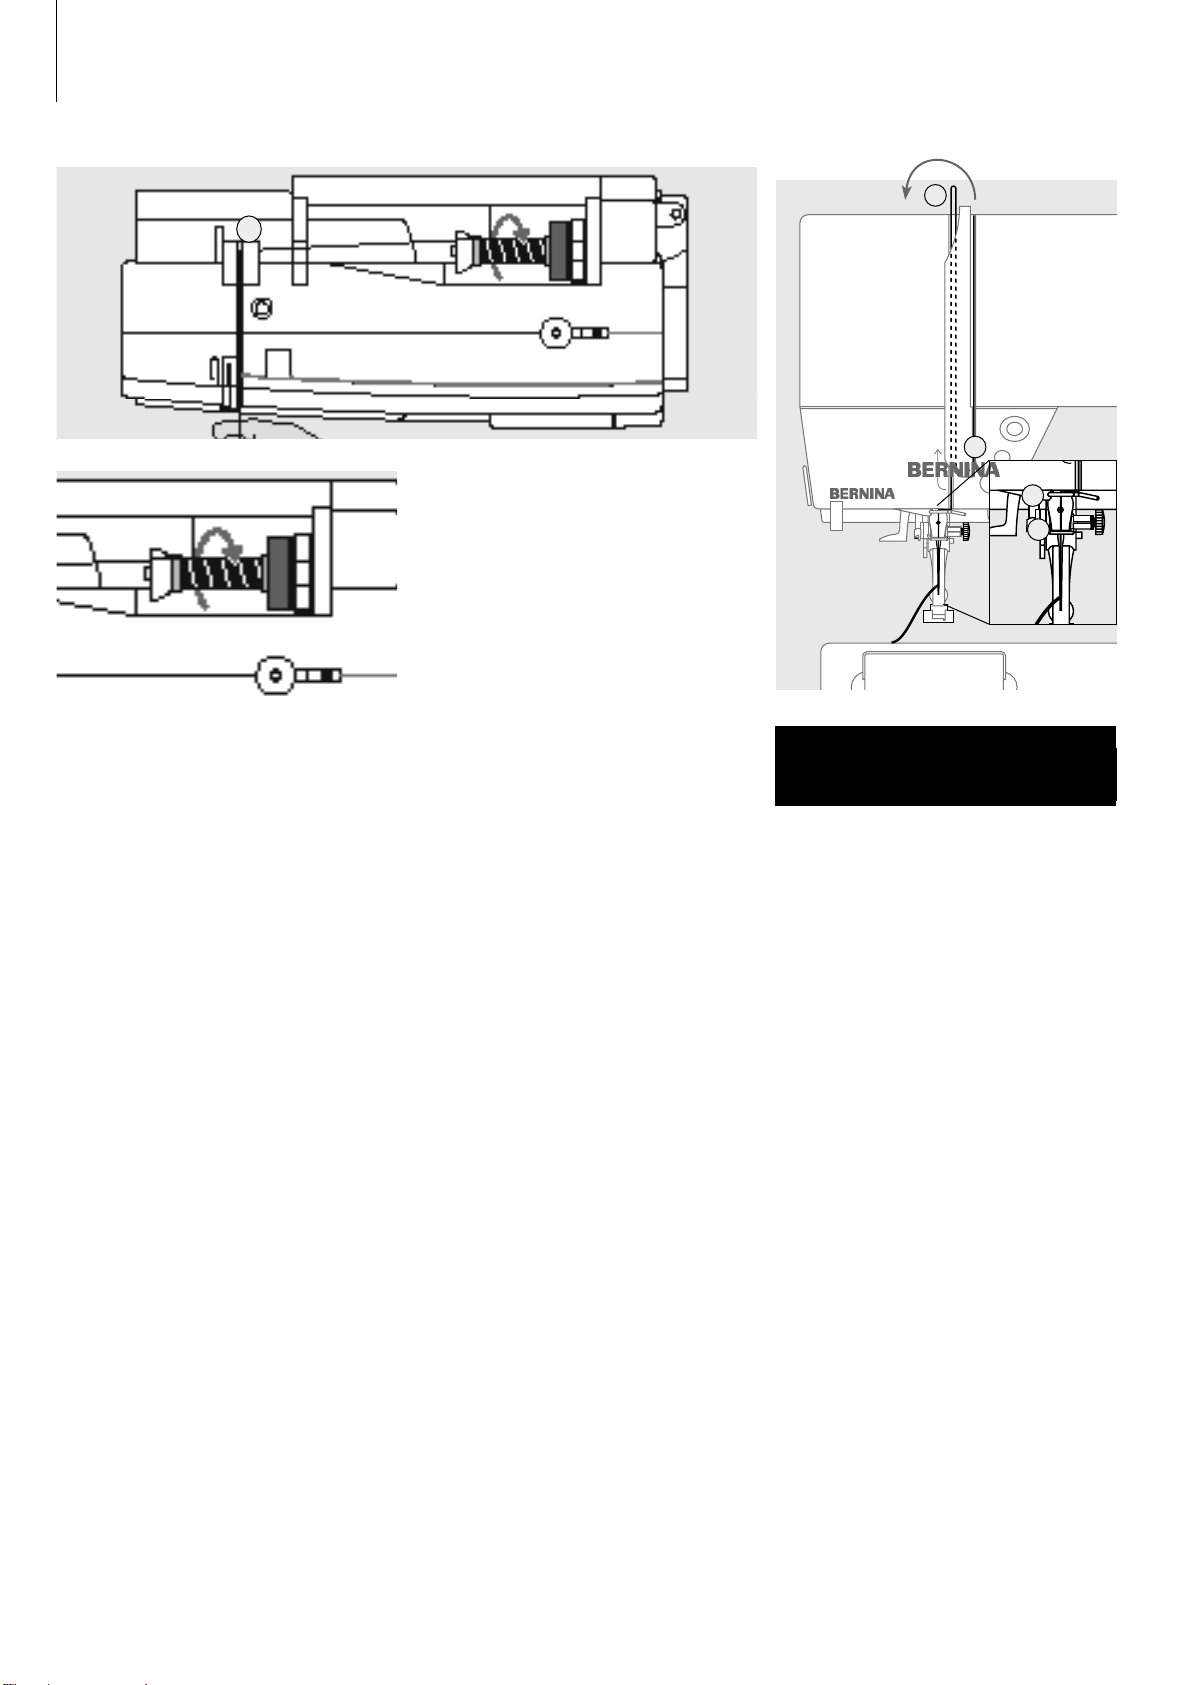
Winding the bobbin
• turn power switch to «I» (on)
• place empty bobbin on spindle
Threading the bobbin
• place thread on spool pin
• attach appropriate spool disc - diameter
of thread spool determines disc size
• following the direction of the arrow, take
thread through the rear guide and
around the pre-tension stud
Setting up the sewing computer
• wind the thread two to three times
around the empty bobbin and cut off any
excess thread on the thread cutter
• push engaging lever against bobbin, the
winder works automatically
• the motor will stop automatically when
the bobbin is full
Thread cutter
• pull thread over thread cutter when
removing the bobbin • then proceed as mentioned above
Winding the bobbin while sewing or
embroidering
• place thread spool on vertical spool
then, following the direction of the arrow,
take thread through the thread guide
and around the pre-tension stud
Inserting the bobbin
Inserting the bobbin
Insert the bobbin so that the thread winds
clockwise.
Pulling the thread under the spring
Pull the thread into the slit, then to the left
under the spring.
Clockwise turning of the bobbin
The bobbin must turn clockwise.
C
The bobbins are inserted and
threaded in the same way in
the aurora models 430, 440 QE
and 450.
Page 16

Setting up the sewing computer
032907.52.04_0910_a430/a440/a450_EN
16
Bobbin case*
A
To remove the bobbin case
• raise the needle
• turn power switch to «0» (off)
• open the bobbin cover
• grasp the latch of the bobbin case
• remove case
* pictures = aurora 450
Changing the needle
To insert the bobbin case
• hold the bobbin case latch
• aurora 430 / 440 QE: the finger on the
case should point upwards
• aurora 450: bobbin case opening points
up
• insert so that it clicks into place
• close the bobbin cover
Bobbin thread cutter
• insert the bobbin case
• take the thread over cutter A and cut it
• the bobbin thread does not have to be
brought up as the loose end is just the
right length to start sewing
Refer to the
safety instructions!
!
Removing the needle
• raise the needle
• turn power switch to «0» (off)
• lower the presser foot
• loosen the needle clamp screw
• pull the needle down to remove
Inserting the needle
• flat side of needle to the back
• insert the needle as far as it will go
• tighten the needle clamp screw
Refer to the
safety instructions!
!
Page 17

Changing the presser foot
032907.52.04_0910_a430/a440/a450_EN
Setting up the sewing computer
17
Changing the presser foot
• raise the needle and presser foot
• turn power switch to «0» (off)
• raise the clamping lever
• remove the presser foot
Thread tension
For example:
A
The basic setting
• is indicated when the red line on the
tension adjustment wheel is in line with
the marking A
Tension Needle
Metallic thread ca. 3 90
Monofilament ca. 2–4 80
Attaching the presser foot
• guide the foot upwards over the cone
• press the clamping lever down
• the tension does not need adjusting for
normal sewing work
C
For special sewing work,
the thread tension can be
adjusted to suit the selected
fabric and stitch pattern.
Thread tension settings
Perfect stitch formation
• the stitch formation is in the fabric
Upper thread tension too tight
• the lower thread is pulled more to the
right side of the fabric
• to reduce the upper thread tension turn
tension adjustment wheel to 3 - 1
Upper thread tension too loose
• the upper thread is pulled more to the
wrong side of the fabric
• to increase the upper thread tension turn
tension adjustment wheel to 5 - 10
Page 18

Important facts about thread and needles
032907.52.04_0910_a430/a440/a450_EN
18
Important facts about thread and needle
With the right combination of thread and needle optimum sewing results are achieved.
The following are the guidelines: replace needle when starting a new sewing project.
Thread
The thread is chosen according to use. For a perfect sewing
result, thread and material quality play an important role. It is
recommended to use quality brand threads.
Cotton thread
• cotton threads are particularly suitable for cotton fabrics
• mercerized cotton threads have a slight sheen
Polyester thread
• polyester thread is suitable for practically all sewing needs
• it has a high tensile strength and is particularly colorfast
• polyester thread is more flexible and is recommended where a
strong and elastic seam is required
Guidelines Needle No.
fine fabrics:
fine thread (darning thread,
embroidery thread) 70–75
mediumweight fabrics:
normal thread 80–90
heavyweight fabrics:
heavier thread 100, 110, 120
Needle, thread and fabric
The correct needle size depends on the selected thread and
fabric. Fabric type and structure determine which thread weight,
needle size and needle tip should be used.
Needle summary
BERNINA requires needle system 130/705 H. This system
number refers to shank shape as well as to length and form of the
needle point.
Checking the needle condition
The needle condition should be checked and the needle replaced
regularly. A defective needle not only damages the fabric but also
the sewing computer.
130 / 705 H S 70
Shank diameter
= 0.7 mm (needle size)
Needle point
e.g. medium ball point
Needle scarf
Flat shank
Shank length
Needle/thread combination
In order to check the needle/thread compatibility, the correct size thread must correspond with the correct size needle.
Correct needle/thread
combination
When sewing, the thread should travel
smoothly down the long groove on the
front of the needle.
Too thin thread or too thick needle
The sewing thread has too much play in
the groove. This could lead to skipped
stitches and damage to the thread.
Too thick thread or too fine needle
The thread rubs on the edges of the
groove and can get jammed. This can
break the thread.
Page 19

Needle summary
032907.52.04_0910_a430/a440/a450_EN
Many materials are easier to sew if the appropriate needle is used.
Important facts about thread and needles
19
Type of needle
Universal
130/705 H
Jersey/Stretch
130/705 H-S
130/705 H-SES
130/705 H-SUK
Leather
130/705 H-LL
130/705 H-LR
Jeans
130/705 H-J
Microtex
130/705 H-M
Quilting
130/705 H-Q
Model
Normal point, slightly rounded
Ball point
Cutting point
Very fine point
Especially fine point
Fine point
Suitable for
For nearly all natural and
synthetic fabrics (woven and
knitted)
Jersey, stretch fabrics
Natural and synthetic leather and
plastic
Heavyweight fabrics such as
denim, canvas, overalls
Micro fiber fabrics and silk
Straight and topstitching
Needle size
60 –100
70–90
90–100
80–110
60–90
75–90
Embroidery
130/705 H-E
Metafil
130/705 H-MET
Cordonnet/
Topstitching
130/705 H-N
Wing needle
130/705 HO
Double wing
needle
130/705 H-ZWI-HO
Double needle
130/705 H-ZWI
Large eye, slight ball point
Large eye
Small ball point, long eye
Wide needle (wing)
Needle distances for 430 / 440 QE /
450: 1,0 / 1,6 / 2,0 / 2,5 / 3,0 / 4,0;
plus 6,0 / 8,0 for 450
Embroidery on all natural and
synthetic fabrics
Sewing with metallic threads
Topstitching with thick thread
Hemstitching
Special effects with hemstitch
embroidery
Visible hems in stretch fabrics,
pintucks, decorative sewing
75–90
75-90
80–100
100–120
100
70–100
Triple needle
130/705 H-DRI
Special needles are available at your BERNINA dealer.
Needle distance 3.0
Decorative sewing
80
Page 20

Stitch plate, feed-dog and fabric feed
032907.52.04_0910_a430/a440/a450_EN
20
Stitch plate
A A
9mm (inch- or mm-measurements) just
aurora 450
Stitch plate markings
• the stitch plates are marked with vertical
lines in millimeters or inches
• mm measurements are at the front
• inch measurements are at the back
• the measurements correspond to the
distance from the needle to the line
Feed dog
5,5mm (inch- or mm-measurements)
• needle insertion point is position 0
(center needle position)
• the mm/inch measurements are marked
to the right and left
• the lines help to guide the fabric for
sewing seams and for topstitching
• the horizontal markings are helpful for
sewing corners and buttonholes, etc.
Button flush with housing =
Sewing position
Removing the stitch plate
• turn power switch off («0»)
• raise the presser foot and needle
• lower the feed dog
• press the stitch plate down at the
back right corner until it flips up
• remove the stitch plate
Replacing the stitch plate
• place the stitch plate over the opening A
and press down until it clicks into place
Button depressed = Darning position
• for freehand sewing, e.g. darning,
freehand embroidery, freehand quilting
• for embroidery with the embroidery
module
Button on handwheel side
Feed dog and fabric feed
Let the fabric feed evenly.
Feed dog and stitch length
With each stitch the feed dog moves
forward by one step. The length of this
step is determined by the stitch length
selected.
Pulling, pushing or holding back the fabric will result in uneven stitches.
With an extremely short stitch length, the
steps are also very short. The fabric moves
under the foot quite slow ly, even at full
sewing speed.
Buttonholes, satin stitch and de co rative
stitches are all sewn with a very short stitch
length.
Page 21

21
Stitch plate, feed-dog and fabric feed
1
1
032907.52.04_0910_a430/a440/a450_EN
Feed dog and fabric feed with height compensating tool
The feed dog works accurately when the
foot is level.
Uneven layers
To solve this problem, place one, two or
three compensating plates as required
behind the needle under the presser foot
to level it.
If the foot is at an angle, e.g. when sewing
over thick to thin or vice-versa, the feed
dog cannot grip and feed the fabric and the
fabric might jam.
To correct the height in front of the foot,
place one or more plates to the right of the
foot close to the needle. Sew until the foot
is level again and remove the plates.
Feed dog and sewing corners
The space between the two rows of the
feed dog is relatively large due to the
width of the stitch plate hole.
Place one or more plates as close as
possible to the edge of the fabric on the
right side of the presser foot. This allows
for better feeding of the fabric when
sewing corners.
Page 22

Presser foot pressure and Balance
032907.52.04_0910_a430/a440/a450_EN
22
Presser foot pressure
Dial on head frame
• the pressure is adjusted at the left side of the head frame
Standard pressure
• for normal sewing work
• default = 47
• the default setting is always visible, it
blinks
Increased pressure
• for firm fabrics
• improves fabric feed
Balance
Different fabrics, threads, stabilizers and interfacings can affect programmed stitches so,
that sometimes they might not join or might overlap, i.e. the stitches that make up the
pattern are too close together or too far apart.
These effects can be corrected with the Balance so that the stitch formation can be
adjusted where necessary to suit the fabric.
Balance for practical and decorative stitches
When sewing soft fabrics such as jersey or tricot, the fabric tends to stretch under the
presser foot which also stretches the stitch being sewn. For example, the Honeycomb
stitch opens up and is too long. Thicker fabrics might cause the stitch to overlap, making
it too short. Correcting with the Balance is very easy. Test-sew first!
Reduced pressure
• for jerseys and loose knits
• to prevent fabric from stretching
• adjust pressure so that the fabric still
feeds correctly
Do not forget to reset the
balance by pressing the
C
balance or clr button after
sewing with adjusted balance
values.
Stitch formation too long Stitch formation too close Desired stitch formation
• press the Balance button
• press the left Needle position button =
shorter stitch length (maximum 9 steps)
• press the Balance button
• press the right Needle position button =
longer stitch length (maximum 9 steps)
Page 23

Display
032907.52.04_0910_a430/a440/a450_EN
aurora 430 / 440 QE aurora 450
Screen display
23
3
2
1
5
10
8
7
9
15
19
16 17 18
20
11 12 13
22
21
1 Satin stitch: dense, short zig-zag stitch
2 Stitch length: basic setting blinks
constantly
3 Stitch length: actual value
4 Stitch width: basic setting blinks
constantly
5 Stitch width: actual value
6 Needle position: 11 positions
7 Presser foot pressure: basic setting
blinks
8 Arrow and presser foot symbol: blink
when presser foot is raised and the
sewing computer is started
9 Feed dog symbol: blinks when feed
dog is not lowered in the BSR mode
and embroidery mode
3
4
6
14
23
2
1
10 Triple digital display
a. Presser foot indicator: displays
matching foot for selected stitch
b. Presser foot pressure: displays
presserfoot pressure during
adjusting
c. Balance: displays the balance
steps during balancing
11 Balance: visible when the
Balance button is pressed
12 Buttonhole: visible when
buttonhole is selected
13 «mem»: visible when Memory
is open
14 Stitch: graphic or numeric
15 Needle stop up / down: default stop
up/ in BSR mode down
5
10
8
7
9
15
19
16 17 18
20
11 12 13
21
4
6
14
22
23
16 Mirror image: left / right
17 Pattern begin/Pattern end
18 Continuous reverse sewing
19 Securing function
20 BSR: Bernina Stitch Regulator
21 Cleaning notification: visible when the
sewing computer must be cleaned/oiled
22 Service notification: visible when the
sewing computer must be taken for a
service to the BERNINA dealer
23 Alphabet
Page 24

24
032907.52.04_0910_a430/a440/a450_EN
Functions
Function buttons
Stitch width
• left button = narrows the stitch width
• right button = widens the stitch width
• keep button pressed = quick steps
• the basic setting of the selected stitch
blinks constantly
Pattern begin
• press the button
• the needle moves to the beginning of a
stitch or stitch program
Securing function (with 4 stitches)
• press the button before starting to sew =
individual stitches or stitch combination
will be secured at the beginning
• press the button during an individual
stitch = the stitch will be secured at the
end
• the sewing computer stops
• press the button during stitching a stitch
combination = the stitch combination will
be secured at the end
• the sewing computer stops
Stitch length
• left button = shortens the length
• right button = elongates the length
• keep button pressed = quick steps
• the basic setting of the selected stitch
blinks constantly
Mirror image (left/right)
• press the button
• mirror image of selected stitch will be
sewn
Needle up/down
In the basic setting the arrow points up.
• press the button briefly:
• the needle will go up or down (same as
tapping on the foot control)
• press the button longer:
• the needle will go down
• the arrow on the display points down
• the sewing computer stops with the
needle down
• press the button longer again:
• the needle will go up
• the arrow on the display points up
• the sewing computer stops with the
needle up
Needle position
• left button = needle to the left
• right button = needle to the right
• keep button pressed = quick steps
• total of 11 needle positions: 5 left,
5 right and 1 center
«clr» (clear)
• press the button
• stitch length, stitch width, needle
positions are returned to basic settings
• active functions are deleted
Exception:
needle stop down
Balance / BSR
Balance
• press the button
• the balance symbol on the display is
active
• press the left arrow of the needle
position = subtracts space between
stitches
• press the right arrow of the needle
position = adds space between stitches
• press the button again = the balance is
turned off, the altered stitch returns to the
basic settings
• altered needle position settings remain
during the balance process
Slide speed control
• the motor speed can be freely adjusted
from minimum to maximum with the slide
control
• when winding the bobbin thread the
speed of the winder can be regulated,
when the sewing computer is not sewing
BSR
• with the attached BSR foot the BSR
function is switched on and off by
pressing the button
mem (Memory)
• press the -button
• «mem» will appear on the display
• the empty memory spaces (90) or (60)
and the cursor blink
• use the left arrow and the -button
to scroll and program stitches, letters and
numbers
Page 25

25
Functions
032907.52.04_0910_a430/a440/a450_EN
Reverse sewing
quick reverse:
• press the button
• sews in reverse until the button is
released
• programs buttonholes
• programs darning length
• seam end in securing program no. 5
• manual securing at beginning and end of
seam
continuous reverse:
• press button until a beep is heard before
sewing and the symbol is visible on the
display
• the sewing computer sews the chosen
stitch in reverse
• to cancel: press button until a beep is
heard before sewing and the symbol
goes off
Pattern end / Pattern repeat
press the button while sewing
• the sewing computer stops at the end of
the active single stitch or the active stitch
in a stitch combination (in Memory)
press and release button before sewing
• the Pattern end symbol appears on the
display
• a single stitch or the first stitch of a stitch
combination in the Memory will be sewn
1x, the sewing computer will stop
• when continuing to sew the Pattern end
function is turned off again and the
Pattern end symbol disappears
press button until a beep is heard before
sewing
• the Pattern end symbol appears on the
display
• a stitch or stitch combination in the
Memory will be sewn 1x
• the Pattern end function is active as long
as the button is pressed again until a
beep is heard before sewing
• the Pattern end symbol on the display
disappears
Start-Stop button
• starts and stops the sewing computer
when operating it without foot control
• starts and stops the sewing / embroidery
computer in the embroidery mode with
attached embroidery module
• starts and stops the BSR function when
BSR foot is attached and plugged in;
without foot control
Stitches
• in single mode, press the arrow buttons
to scroll through all stitch patterns
Alphabets, numbers
• press the center-button
• one of the existing fonts will appear on
the display
• press the Alphabet button to select the
font
• press the right button to scroll letters,
numbers and special characters forwards (A B C...)
• press the left button to scroll special
characters backwards ( ] [ ) ...)
Letters/numbers/special characters
A B C D E F G H I J K L M N
O P Q R S T U V W X Y Z Ä Ö Ü
Å Æ Œ Ø Ñ È É Ê À Â
1 2 3 4 5 6 7 8 9 0
_ - . ' ! + = & ÷ ? % ç @ ( ) [ ]
#-button
Standard = graphic display
• press button and enter desired stitch
number
• the stitch will be displayed graphically
(image)
Alternative = numeric display
• press button until a short beep is heard
• the display of the active stitch will change
from graphic (image) to numeric (num-
ber)
• further stitches will now be displayed
numerically (number)
switch again to standard display in the
same manner
Entering 3 digit stitch numbers:
• press button until the number «1»
appears
• now enter the other two numbers
Page 26

26
Functions - Memory
032907.52.04_0910_a430/a440/a450_EN
Memory
Memory buttons
• use the left button to scroll the contents
backwards
• use the center button to open and close
the Memory
• use the
forward scroll
-button to save and
Programming practical and decorative stitches
Any combination of 90 (aurora 440 QE) or
60 (aurora 430 / 450) stitches, letters or
numbers can be saved in Memory, which
is long term-memory. They remain saved
until deleted by the user. Power failures or
disconnection from the electricity supply do
not affect the Memory. Alterations to the
stitch length, width or needle position can
be made at any time. Individual stitches,
letters or numbers can be deleted or
overwritten.
Open Memory
• press the
• the cursor on the left and the available
number of empty memory spaces (e.g.
60) start to blink, and «mem» appears
These stitch patterns and programs can not be programmed:
Buttonholes / securing stitch No. 5, No. 61 (450)
C
Eyelets No. 20, 21 (450), No. 18, 19 (440), No. 17 (430)
Button sew-on program No. 19 (450), No. 17 (440), No. 16 (430)
Darning program No. 22 (450), No. 20 (440), No. 18 (430)
Large fly stitch No. 23 (450)
Basting stitch No. 24 (450), No. 21 (440), No. 19 (430)
-button
• select desired stitch
• stitch image appears on the display
• press the -button
• the stitch is programmed
• the number of available Memory spaces
appears
• select the next stitch
• press the -button to save,
continue in the same manner
Sew begin
When the foot control or the
Start - Stop - button is pressed,
the sewing computer automatically starts sewing the stitch
combination from the beginning.
Page 27

27
aurora 430 / 440 QE aurora 450
032907.52.04_0910_a430/a440/a450_EN
Functions - Memory
A B
Example A:
Sewing a stitch combination continuously
• press the -button
• select stitch, e.g. No. 155 (440) or 126
(430)
• press the -button, select new
stitch, e.g. stitch No. 92 (440) or 69
(430), press the
-button, etc.
• sew the stitch combination
• press the
-button = the stitch
combination will be saved
• during the process of saving an
hourglass is visible on the display
Example B:
Combining stitch and function (Mirror
image) and sewing continuously
• program desired stitch, e.g. No. 159
(440) or 130 (430)
• activate Mirror image, program mirrored
stitch No. 159 (440) or 130 (430)
Example A:
Sewing a stitch combination continuously
• press the -button
• select stitch, e.g. No. 143
• press the -button, select new
stitch, e.g. stitch No. 95, press the
-button, etc.
• sew the stitch combination
• press the -button = the stitch
combination will be saved
• during the process of saving an
hourglass is visible on the display
Example B:
Combining stitch and function (Mirror
image) and sewing continuously
• program desired stitch, e.g. No. 152
• activate Mirror image, program mirrored
stitch No. 152
• sew stitch combination, the stitches
alternate (original and mirror image)
Decorative stitch combinations with embroidery thread
• gives stitches a fuller appearance
Stitch combinations on double fabric
• bottom layer does not pucker
Stitch combinations on single fabric
• always use an appropriate stabilizer as a backing
• remove after sewing
• thread the lower thread in the finger of the bobbin case for best results
(430 / 440 QE)
• sew stitch combination, the stitches
alternate (original and mirror image)
Page 28

28
Functions - Memory
032907.52.04_0910_a430/a440/a450_EN
Programming alphabets and numbers
Open Memory
• press the -button
• the cursor on the left and the available
number of empty memory spaces (e.g.
60) start to blink, and «mem» appears
Example: Programming letters and numbers
• open Memory, select font
• enter letters and/or numbers
• the entered letter or number appears on the display
• activate the Securing function
• the sewing computer secures at the beginning of the entered combination
• to save the combination press the -button
• during the process of saving an hourglass is visible on the display
• trim connecting threads
Select alphabet
• press the Alphabet button to select the
alphabet of your choice
• the letter A in the alphabet of your choice
appears on the display
Programming letters/numbers
• select letter/number
• press (save) button = letter/
number is programmed
• the number of empty Memory spaces is
indicated
• select the next letter/number
• program, using etc.
• programming several words
• to insert a space, select ( _ )
• program, using
• program the next word
• if adjustments are made to the stitch
length or width, all programmed letters
and/or numbers will be affected
• if only single letters or numbers are to be
altered, each letter must be altered
individually
Block capitals
Double block capitals
Script (Italics)
Kyrillic capitals (450)
A
A
Page 29

29
Corrections in Memory
032907.52.04_0910_a430/a440/a450_EN
Functions - Memory
Balance in Memory
• the contents of the Memory as a whole
can be balanced as follows:
• close Memory
• touch the Balance button
• open Memory, now balance
the entire contents of the Memory with
both needle position buttons
The contents of the Memory remain saved
even when the sewing computer is
disconnected from the electrical supply.
They can be recalled at any time.
Overwriting individual stitches, letters
or numbers
• press the
to the stitch you wish to overwrite
or left button and scroll
The contents of the Memory will be lost if
the sewing computer is switched off
without pressing the -button before
closing the Memory, as they were not
saved.
• select new stitch number / letter /
number, new stitch length/width or
needle position
• press
• the original stitch is corrected (over-
written)
-button (to save)
Deleting individual stitches, letters or
numbers
• press the -button or left button and
scroll until the stitch you wish to delete
appears on the display
• press the «clr»-button
• the desired stitch/letter/number is
deleted
Delete complete Memory contents
• press the «clr»-button, keep depressed
and press the
• release both buttons
• leave Memory by pressing again
Stitch selection
• stitches1–10:
press the appropriate button; stitch
graphic and basic width and length
settings appear on the display
• stitches11–99:
press the #-button and the appropriate
number
• stitches from 100
press the #-button longer until a «1»
appears in display, then enter the last
two digits of the stitch
Leaving Memory
• press the -button
• during the process of saving an
hourglass is visible on the display
• all entries are saved
• Memory closes
• the word «mem» disappears from the
display
Select button 0 and stitch
No. 10 will be selected
C
(Standard buttonhole)
Page 30

Application of practical stitches
11
23
21
25
20
22
26
27
28
24
032907.52.04_0910_a430/a440/a450_EN
30
Stitch selection
Straight stitch
All non-stretch fabrics. All
straight stitch work
Zig-zag
Most fabric types. All simple
zig-zag such as clean finishing
fine fabrics. Sewing on elastic
and lace
Vari-overlock
Primarily for fine jerseys,
stretch overlock seams and
hems
Running stitch
Most types of fabric. Mending,
patching, reinforcing seams,
etc.
Securing stitch
All types of fabric. Secures the
beginning and end of seams
sewn with straight stitch
Triple straight and triple
zig-zag
Reinforced seams in tough,
heavy fabrics, topstitching
Blindstitch
Most types of fabric. Blind
hems, scallop edging effect on
soft jerseys and fine fabrics,
decorative seams
Double overlock
All types of knit. Overlock =
sew and neaten in one
operation, decorative seams
Super stretch
Open seam for all super-stretch
fabrics
Standard buttonhole
Fine to mediumweight fabrics.
Blouses, shirts, trousers,
bedlinens, etc.
Narrow buttonhole
Light- to mediumweight fabrics.
Blouses, dresses, trousers,
children’s and baby clothes,
crafts
Stretch buttonhole
All stretch fabrics made from
cotton, wool, silk and synthetic
fibers
aurora 430
Keyhole buttonhole
Heavyweight, non-stretch
fabrics. Jackets, coats, trousers, leisure wear
Straight stitch buttonhole
For reinforcing buttonholes,
pocket edges, especially for
stitching buttonholes in leather
or imitation leather
Hand-look buttonhole
Light- to mediumweight woven
fabrics. Blouses, dresses,
leisure wear, bedding
Darning program
Automatic darning for fine and
mediumweight fabrics
Basting stitch
Basting seams, hems, quilts,
etc.
Reinforced overlock
Medium-to heavyweight knits
and toweling, overlock seams,
flat joining seams
Gathering stitch
Most types of fabric. Gathering
with shirring elastic. Butted
seams = butting two pressed
edges and sewing together
Universal stitch
Firm fabrics such as felt and
leather. Flat joining seams,
visible seams, sewing on
elastic, decorative seams
Sewn-out zig-zag
Clean finishing woven fabrics,
reinforcing edges, attaching
elastic, decorative seaming
Lycra stitch
All two-way stretch fabrics, flat
joining seams and hems,
reinforced seaming on underwear
Stretch stitch
All stretch fabrics, open seam
in sportswear
Button sew-on program
For buttons with 2 and 4 holes
Straight stitch eyelet
Opening for cords and narrow
ribbons, decorative work
Jersey stitch
Natural, blended or synthetic
fabrics and delicate knits.
Visible seams and hems.
Mending jersey/interlock
Honeycomb stitch
Most types of interlock and
woven fabrics. Visible seams
and hems, etc.
Knit overlock
All knits, machine or handmade, overlock seam. Sews and
finishes edges in one operation
Page 31

31
aurora 440 QE
23
24
31
16
17
25
29
28
21
22
13
14
15
20
27
26
30
032907.52.04_0910_a430/a440/a450_EN
Application of practical stitches
Round buttonhole
For medium- to heavyweight
fabrics of all types. Clothing,
jackets, coats, rainwear
Keyhole buttonhole
Heavyweight, non-stretch
fabrics. Jackets, coats, trousers, leisure wear
Straight stitch buttonhole
For reinforcing buttonholes,
pocket edges, especially for
stitching buttonholes in leather
or imitation leather
Straight stitch eyelet
Opening for cords and narrow
ribbons, decorative work
Darning program
Automatic darning for fine and
mediumweight fabrics
Basting stitch
Basting seams, hems, quilts,
etc.
Gathering stitch
Most types of fabric. Gathering
with shirring elastic. Butted
seams = butting two pressed
edges and sewing together
Universal stitch
Firm fabrics such as felt and
leather. Flat joining seams,
visible seams, sewing on
elastic, decorative seams
Sewn-out zig-zag
Clean finishing woven fabrics,
reinforcing edges, attaching
elastic, decorative seaming
Lycra stitch
All two-way stretch fabrics, flat
joining seams and hems,
reinforced seaming on underwear
Stretch stitch
All stretch fabrics, open seam
in sportswear
Hand-look buttonhole
Light- to mediumweight woven
fabrics. Blouses, dresses,
leisure wear, bedding
Button sew-on program
For buttons with 2 and 4 holes
Narrow zig-zag eyelet
Opening for cords and narrow
ribbons, decorative work
Stretch overlock
Mediumweight knits, toweling
and firm wovens. Overlock
seams, flat joining seams
Jersey stitch
Natural, blended or synthetic
fabrics and delicate knits.
Visible seams and hems.
Mending jersey/interlock
Honeycomb stitch
Most types of interlock and
woven fabrics. Visible seams
and hems, etc.
Reinforced overlock
Medium-to heavyweight knits
and toweling, overlock seams,
flat joining seams
Knit overlock
All knits, machine or handmade, overlock seam. Sews and
finishes edges in one operation
Page 32

Application of practical stitches
13
032907.52.04_0910_a430/a440/a450_EN
32
aurora 450
Round buttonhole
For medium- to heavyweight
fabrics of all types. Clothing,
jackets, coats, rainwear
Round buttonhole with a
square end
For medium- to heavy-weight
fabrics: clothing, jackets, coats,
rain clothing
Keyhole buttonhole
Heavyweight, non-stretch
fabrics. Jackets, coats,
trousers, leisure wear
Keyhole buttonhole with a
tapered end
For firm, non-stretchable
fabrics: jackets, coats, leisurewear
Narrow zig-zag eyelet
Opening for cords and narrow
ribbons, decorative work
Straight stitch eyelet
Opening for cords and narrow
ribbons, decorative work
Darning program
Automatic darning for fine and
mediumweight fabrics
Large fly stitch
For medium- to heavy-weight
fabrics. To reinforce pocket
openings, zippers and plackets
Jersey stitch
Natural, blended or synthetic
fabrics and delicate knits.
Visible seams and hems.
Mending jersey/interlock
Honeycomb stitch
Most types of interlock and
woven fabrics. Visible seams
and hems, etc.
Universal stitch
Firm fabrics such as felt and
leather. Flat joining seams,
visible seams, sewing on
elastic, decorative seams
Sewn-out zig-zag
Clean finishing woven fabrics,
reinforcing edges, attaching
elastic, decorative seaming
Hand-look buttonhole
Light- to mediumweight woven
fabrics. Blouses, dresses,
leisure wear, bedding
Straight stitch buttonhole
For reinforcing buttonholes,
pocket edges, especially for
stitching buttonholes in leather
or imitation leather
Button sew-on program
For buttons with 2 and 4 holes
Basting stitch
Basting seams, hems, quilts,
etc
Gathering stitch
Most types of fabric. Gathering
with shirring elastic. Butted
seams = butting two pressed
edges and sewing together
Stretch overlock
Mediumweight knits, toweling
and firm wovens. Overlock
seams, flat joining seams
Lycra stitch
All two-way stretch fabrics, flat
joining seams and hems,
reinforced seaming on underwear
Stretch stitch
All stretch fabrics, open seam
in sportswear
Reinforced overlock
Medium-to heavyweight knits
and toweling, overlock seams,
flat joining seams
Page 33

33
Temporary altered stitch Memory
032907.52.04_0910_a430/a440/a450_EN
Temporary altered stitch Memory
Temporary altered stitch Memory
• for all types of stitches and materials
• altered stitch length, stitch width and
needle position will be saved automatically
• sewing of an altered stitch (e.g. zig-zag)
• selecting and sewing another stitch (e.g.
straight stitch)
• when returning to the individually altered
zig-zag the alterations will remain
• the Altered stitch Memory can contain
as many stitches as needed
Reset to basic settings
• individual stitches can be reverted to
basic settings manually
• press the «clr» button
• when turning the sewing computer off all
altered stitch settings in the Altered stitch
Memory will be deleted
Application:
• especially valuable when using two
alternating applications such as finishing
edges, zig-zag, adjusting vari-overlock to
suit the material
• straight stitch seam: use altered stitch
length
• blindstitch: altering stitch width and stitch
length to suit material
C
The temporary altered stitch
memory can hold as many
stitch alterations as needed
(these are stitch length, stitch
width, needle position, mirror
image and balance).
Page 34

Practical stitches - Application
032907.52.04_0910_a430/a440/a450_EN
34
Straight Stitch
Stitch:
Needle:
Thread:
Feed dog:
Presser foot:
Straight stitch No. 1
size and type suitable for the fabric selected
cotton or polyester
up
430 / 440 QE: Reverse pattern foot No. 1
450: Reverse pattern foot No. 1C
Straight Stitch
• after turning the sewing computer on,
the Practical Stitch appears
Application
• suitable presser foot to be selected
according to the technique, e.g. manual
darning
• suitable for all fabrics
Adjust the stitch length to suit
the fabric
For example use a longer stitch
length (approximately 3 - 4mm)
with denim, a shorter length
(2 - 2.5mm) with batiste.
Adjust the stitch length to suit
the thread
For example use a longer stitch
length (approximately 3 - 5mm)
when sewing with cordonnet
thread for topstitching.
Activate needle stop down
Prevents the fabric from slipping
when you stop to adjust stitch or
pivot.
Triple Straight Stitch Seam
Stitch:
Needle:
Thread:
Feed dog:
Presser foot:
Triple straight stitch No. 6
Jeans or 80-90 universal
cotton or polyester
up
430 / 440 QE: Reverse pattern foot No. 1
450: Reverse pattern foot No. 1C,
Jeans foot No. 8 (optional accessory)
Open Seam
• durable seam for firm and densely
woven fabrics such as denim and
corduroy
• reinforced seam subject to hard wear
For heavy layers or very
densely woven fabrics:
A Jeans needle or Jeans foot
No. 8 will help when sewing very
heavy fabrics, such as denim or
canvas.
Decorative top stitch
Lengthen out stitch and use as a
decorative top stitch with denim.
Page 35

Edge stitching
032907.52.04_0910_a430/a440/a450_EN
Practical stitches - Application
35
Stitch:
Needle:
Thread:
Feed dog:
Presser foot:
Narrow edgestitching
Outer edges
• place edge of fold against the guide on
the Blindstitch foot
• select needle position at desired
distance from the folded edge
Straight stitch No. 1
size and type suitable for the fabric selected
cotton, polyester or cordonnet (topstitching)
up
Blindstitch foot No. 5
430 / 440 QE: Reverse pattern foot No. 1
450: Reverse pattern foot No. 1C
Edge stitch foot No. 10 (optional accessory)
C
Hem edges
• place edge of fold against the guide on
the Blindstitch foot (inside upper edge of
hem)
• select needle position right to sew along
the upper edge
Needle position
• left for outer edge
• right for inner edge (hem edges)
Presser foot
• Blindstitch foot No. 5
Foot No. 5:
use any left or far right needle
position
Foot No. 10:
all needle position
Wide edgestitching
Guiding the fabric
Presser foot as a guide:
• guide the folded edge along the edge of
the presser foot
Stitch plate as a guide:
• guide the folded edge along the marks
on the stitch plate (for stitching 3/8” to
1 1/8” (1 to 2.5cm) from the edge)
Seam guide as a guiding aid:
• insert the seam guide into the hole on
the back of the presser foot shaft
• adjust as desired
• tighten the screw
• guide the folded edge along the seam
guide
• to sew parallel lines, guide the seam
guide along a previously sewn line of
stitches
Edgestitching with seam guide
• a big help when sewing parallel
lines, grids, etc.
Needle position
• adjust the needle position to select
desired distance between rows of
topstitching or from fabric edge
Presser foot
• 430 / 440 QE: Reverse pattern foot No. 1
• 450: Reverse pattern foot
No. 1C
Page 36

36
Practical stitches - Application
032907.52.04_0910_a430/a440/a450_EN
Securing stitch (straight stitch)
Feed dog:
Presser foot:
Darning program
Stitch:
Needle:
Thread:
Securing stitch No. 5
size and type suitable for the fabric selected
cotton or polyester
up
430 / 440 QE: Reverse pattern foot No. 1
450: Reverse pattern foot No. 1C
Securing stitch
• for all fabrics
• secures beginning and end of seam
Sewing long seams
• quicker securing at beginning and end of
seam
• exact, regular and safe securing in all
fabrics
Seam begin
• the sewing computer secures seam
automatically (5 stitches forward,
5 stitches reverse)
• continue with straight stitch forward
Seam end
• press the Quick reverse
button on head frame; the
sewing computer secures
automatically (5 stitches
reverse, 5 stitches forward)
• the sewing computer stops automatically when securing is complete
Stitch:
Needle:
Thread:
Feed dog:
Presser foot:
430: Darning program No. 18
440 QE: Darning program No. 20
450: Darning program No. 22
size and type suitable for the fabric selected
darning thread
up
Automatic buttonhole foot No. 3A
430 / 440 QE: Reverse pattern foot No. 1
450: Reverse pattern foot No. 1C
Quick darning of holes or worn areas
Replaces threads with the grain in all
fabrics.
Preparation
• stretch fabric into darning hoop; prevents
puckering
Move project accordingly for a wider and/or
longer darning area.
Darning with Reverse pattern foot
No. 1C, No. 1 (automatic stitch count)
• insert the needle in the top left of the
worn area
• sew the first vertical row and stop the
sewing computer
• press the quick reverse button on head
frame (length is programmed)
• complete the Darning program, the
sewing computer stops automatically
• clear the program by pressing the «clr»
button
Reinforcement
• use fine fabric or interlining as
a backing
Darning with the Automatic buttonhole
foot with slide No. 3A
• only for small tears and worn areas for a
darn of maximum 1 1/2” (3cm) in length
• same procedure as with foot No. 1C,
No.1
Corrections of the automatic darning
area
• if the darning becomes distorted, correct
with the Balance (see page 22 for more
information on the Balance function)
Page 37

37
Manual darning
032907.52.04_0910_a430/a440/a450_EN
Practical stitches - Application
Stitch:
Needle:
Thread:
Feed dog:
Presser foot:
Straight stitch No. 1
size and type suitable for the fabric selected
darning thread
down
Darning foot No. 9
Darning holes or worn areas
Replaces both lengthways and crossways
threads in all fabrics.
Preparation
• stretch fabric into darning hoop
(optional accessory) to prevent
distortion
• use the slide-on table
Sewing
• move the darning hoop smoothly by
hand
• work from left to right without using
pressure
• when changing direction on top and on
bottom, move in curves (avoid points as
this prevents holes and thread
breakage)
• work in different lengths so that the
thread is «lost» in the fabric
Poor stitch formation
• if the thread is lying on the right
side of the fabric, the hoop is
being moved too quickly
• if there are knots on the wrong
side of the fabric, the hoop is
being moved too slowly
Thread breaks
• if thread breakage is a problem, it could be that the hoop
is not being moved smoothly
1. Stitch over the hole
• sew the first rows to cover the hole (not
too close, sewing beyond the worn area)
• work the rows in irregular lengths
• turn work by a quarter turn - 90°
2. Cover the first rows
• sew over the first rows - not too close for
a soft finish
• turn work by a half turn - 180°
3. Complete darning
• sew loosely and in same direction as 2nd
rows
Page 38

38
Practical stitches - Application
032907.52.04_0910_a430/a440/a450_EN
Zig-zag Stitch
Stitch:
Needle:
Thread:
Feed dog:
Presser foot:
Zig-zag stitch No. 2
size and type suitable for the fabric selected
cotton or polyester
up
430 / 440 QE: Reverse pattern foot No. 1
450: Reverse pattern foot No. 1C
Zig-zag Stitch
• suitable for all fabrics
• overcasting
• elastic seams
• decorative sewing
Oversewing Edges
• guide edge of fabric into the center of
the presser foot
• do not select too wide a width or too
long a stitch – the edge should lie flat
and not roll
• needle goes into fabric on one side and
over the edge into the air on the other
side
• use a fine darning thread for lightweight
fabric
Oversewing edges
If edges roll, use the Vari-overlock stitch and foot No. 2A (450) /
No. 2 (430 / 440 QE).
Embroidery with satin stitch
Experiment with adjusting the
stitch width for new decorative
effects.
Satin Stitch
• dense stitch used for appliqué,
embroidery, etc.
• shorten stitch length, satin stitch
setting will be indicated by
parallel lines on stitch length bar
Sewing on Elastic, Shirring Elastic/Cord
Stitch:
Stitch width:
Needle:
Thread:
Feed dog:
Presser foot:
430: Universal stitch No. 24
440 QE: Universal stitch No. 26
450: Universal stitch No. 29
depends on width of elastic
type and size to suit the fabric selected
cotton or polyester
up
430 / 440 QE: Reverse pattern foot No. 1
450: Reverse pattern foot No. 1C
Embroidery foot No. 6 (optional accessory)
Sewing on Elastic
• for gathering long lengths of fabric
• for ruffles and flounces in fine fabrics,
outer garments, sportswear, children’s
and doll clothing, crafts, etc.
• works well for gathered sleeve edges
and neck openings
Preparation
• cut elastic to length required
Sewing
• oversew the elastic, adjusting the stitch
width to be slightly wider than the
elastic
• needle must not pierce the elastic
• after sewing, adjust the gathers evenly
Secure the beginning and end
of elastic
Sew a few straight stitches
backwards and forwards to
secure the elastic.
Quick hem finish
• for children’s or doll clothing
• sew sleeve edges with elastic
before sewing seams
Page 39

39
Stretch Overlock Seam
032907.52.04_0910_a430/a440/a450_EN
Practical stitches - Application
Stitch:
Needle:
Thread:
Feed dog:
Presser foot:
Vari-overlock seam
440 QE: Stretch overlock No. 23
450: Stretch overlock No. 26
universal, ballpoint or stretch
cotton or polyester
up
430 / 440 QE: Overlock foot No. 2, Reverse pattern foot No. 1
450: Overlock foot No. 2A, Reverse pattern foot No. 1C
Closed Seam
• overlock seam in coarse or loose knits
Sewing
• sew stretch overlock along the fabric
edge
• the stitch should sew over the edge of
the fabric on the right swing of the
needle
Stitch:
Needle:
Thread:
Feed dog:
Presser foot:
Vari-overlock No. 3
size and type suitable for the fabric selected
cotton or polyester
up
430 / 440 QE: Overlock foot No. 2, Reverse pattern foot No. 1
450: Overlock foot No. 2A, Reverse pattern foot No. 1C
Overlock foot No. 2A, No. 2 is specially
designed for overlock stitches. The pin on
the foot allows for more thread in each
stitch so that the elasticity of the seam is
maintained.
Closed seam
Stretchy seam in fine, soft knits such as
silk jersey and interlock.
Sewing
• guide the raw edge along the pin on the
overlock foot
• the stitch will form over the pin and over
the edge of the fabric
Page 40

40
Practical stitches - Application
032907.52.04_0910_a430/a440/a450_EN
Double overlock seam
Stitch:
Needle:
Thread:
Feed dog:
Presser foot:
Double overlock No. 8
size and type suitable for the fabric selected
cotton or polyester
up
430 / 440 QE: Reverse pattern foot No. 1
450: Reverse pattern foot No. 1C
Closed seam
Overlock seam in loose knits and cross
seams in knits and jerseys.
Sewing
• guide the raw edge along the pin on the
overlock foot
Knits and jersey
• use a new Jersey needle to
prevent damaging the loops
Sewing stretch fabrics
• if neccessary use a stretch
needle (130/705H-S) =
needle point slides between
the fibers
Flat Joining Seam
Needle:
Thread:
Feed dog:
Presser foot:
Stitch:
440 QE: Stretch overlock No. 23
450: Stretch overlock No. 26
universal, ballpoint or stretch
cotton or polyester
oben
430 / 440 QE: Reverse pattern foot No. 1
450: Reverse pattern foot No. 1C
Flat Joining Seam
• fabric edges are overlapped and the
stitch is placed on the seam allowance
which produces a very flat, durable
seam
• ideal for fluffy, thick materials such as
terry cloth, felt and leather
Sewing
• sew stretch overlock along the fabric
edge
• the stitch should sew over the edge of
the top layer of fabric on the right swing
of the needle
Fabric and thread
When using a matching thread
color, this seam is hardly visible
in fluffy fabrics.
Page 41

41
Zipper
032907.52.04_0910_a430/a440/a450_EN
Practical stitches - Application
Stitch:
Needle:
Thread:
Feed dog:
Presser foot:
Needle position:
Straight stitch No. 1
size and type suitable for the fabric selected
cotton or polyester
up
Zipper foot No. 4
Zipper foot No. 14 (optional accessory)
far right or far left
Preparation
• baste seam closed and clean finish the
seam allowance
• baste or pin zipper in place so that
fabric folded edges meet over the
center of the zipper
Sewing
• open zipper a little
• start sewing from top left
• position the foot so the needle stitches
along the edge of the zipper coils
• stop in front of the pull (needle position
down), raise the presser foot and close
zipper again
• continue to sew to the base of the
zipper (needle position down)
• turn fabric and sew across the seam
(needle position down)
• turn fabric again and sew second side
of the zipper from bottom to top
Variation: Sew both sides of zipper from
bottom to top
• suitable for all fabrics with nap or grain
(e.g. velvet)
• prepare zipper as described above
• start sewing in the seam of the zipper
end and sew first side from bottom to
top
• sew the second side the same way
from bottom to top
Zipper as a decorative element
• sew a visible zipper into the
fabric as a decorative element
To sew around the zipper pull
• close the zipper and sew up to
about 2” (5cm) away from the
pull
• stop with the needle down in
the fabric, raise the presser
foot. Open zipper, pulling the
tab below the needle; lower
presser foot and continue to
sew
Starting to sew
• hold threads firmly when
starting to sew and pull the
fabric gently behind the needle
for a few stitches
Zipper tape or firm fabric
• for even stitch formation use a
90 - 100 needle
Piecing stitch / Straight stitch
Stitch:
Needle:
Stitch length:
Thread:
Feed dog:
Presser foot:
Straight stitch No. 1
size and type suitable for the fabric selected
1.5mm–max.2mm
cotton or polyester
up
Patchwork foot No. 37 (optional accessory 430 / 450)
Patchwork foot No. 57 (optional accessory)
Patchwork foot
Accuracy is essential when sewing
patches together. The side edges of the
Patchwork foot are exactly 1/4” (6mm)
from the center needle position. The center
indents on either side of the foot indicate
the needle insertion point and the two
additional indents marking 1/4” (6mm) in
front of and behind the needle. When you
sew at a foot’s width, the seam allowances
will always be of the exact width and it is
easy to turn the work while maintaining the
same width. Piecing patchwork is sewn
with a straight stitch. A stitch length of
1.5-2mm is ideal.
It is not necessary to secure the stitches
for these relatively short seam lengths.
Attach the slide-on table for
precise and easier work.
Page 42

42
Practical stitches - Application
032907.52.04_0910_a430/a440/a450_EN
Blind hem
wrong side
of fabric
Stitch:
Needle:
Thread:
Feed dog:
Presser foot:
Blind hem No. 7
size and type suitable for the fabric selected
cotton or polyester/monofilament
up
Blindstitch foot No. 5
Blind hem
For invisible hems in medium to heavy
cotton, wool and blended fabrics.
Preparation
• finish raw edges
• fold the hem and baste or pin in place
• fold the garment back over the right
side of the fabric to expose the finished
lower edge (see drawing)
• place work under the presser foot with
the guide positioned against the folded
back fabric
Sewing
• the needle should just pierce the edge
of the fold (as with hand sewing)
• adjust the stitch width to suit the fabric
• after sewing about 4” (10cm), check
both sides of fabric and adjust width
again if necessary
Fine stitch width adjustment
• test-sew and adjust the stitch
width if necessary. The needle
should only just pierce the
edge of the fold
• guide the folded edge evenly
along the metal guide on the
foot = even depth
wrong side of fabric
right side of fabric
Basting stitch
Stitch:
Needle:
Thread:
Feed dog:
Presser foot:
430: Basting stitch No. 19
440 QE: Basting stitch No. 21
450: Basting stitch No. 24
size and type suitable for the fabric selected
cotton/polyester/darning thread
down
Darning foot No. 9
Basting stitch
• for all work which requires a very long
stitch
• for basting seams, hems, quilts, etc.
• temporary joining
• easy to remove
Preparation
• pin work horizontally to basting direction
to prevent the layers slipping
Securing/fixing the thread
• sew a few basting stitches at
the beginning and end of a
seam
Basting
• use a fine darning thread for
basting as it is easier to
remove
Basting (temporary joining)
• position work under the presser foot and
sew one stitch; hold threads when
starting to sew
• pull work from behind to the required
length of the stitch
• sew one stitch and repeat the procedure
Page 43

43
Decorative stitches
032907.52.04_0910_a430/a440/a450_EN
Decorative stitches - Application
Stitch:
Needle:
Thread:
Feed dog:
Presser foot:
A B C
A decorative stitch with preset
width and length
B decorative stitch with
reduced width
C decorative stitch with
shortened length
Decorative stitch
size and type suitable for the fabric selected
cotton, decorative
up
430 / 440 QE: Reverse pattern foot No. 1
450: Reverse pattern foot No. 1C
Open embroidery foot No. 20 (optional accessory for aurora 430 / 450),
Embroidery foot No. 6 (optional accessory),
Reverse Pattern foot with clear sole No. 34 (optional accessory),
Embroidery foot with clear sole No. 39 (optional accessory)
Decorative stitches
• for any material
• to decorate and embellish
Stitch selection
• press appropriate button
Altering the basic settings
• stitches can be adjusted to suit your own
tastes
• reduce stitch width, e.g. for doll clothes
Altering stitch width
>
wider
<
narrower
Altering stitch length
<>
shorter
longer
Decorative stitches on single
layer of fabric
• always use stabilizer as a
backing and remove stabilizer
after sewing is complete
Deleting functions
• press the «clr» button
• delete special functions
individually by pressing the
appropriate function button
Activate needle stop down
when sewing long seams
• prevents fabric slipping when
stopping to adjust it
Activate pattern end function
while sewing
• sewing computer stops after
each active stitch
combining with functions
B A
• every stitch can be combined with
different functions
• more than one function can be used
with individual stitches
Method
• select stitch A
• sew
• select function (e.g. mirror image) B
• sew
Combining basic settings and
functions
• you can achieve some exciting effects
by combining basic settings with various
functions
Deleting functions
• press the «clr» button
• delete special functions individually by
pressing the appropriate function button
Page 44

44
Decorative stitches - Application
032907.52.04_0910_a430/a440/a450_EN
Hand-look quilt stitch
Stitch:
Needle:
Upper thread:
Bobbin thread:
Feed dog:
Presser foot:
430: Quilt stitch No. 49
440 QE: Quilt stitch No. 44, No. 60, No. 61
450: Quilt stitch No. 62
size and type suitable for the fabric selected
monofilament
30/2 cotton thread
up
430 / 440 QE: Reverse pattern foot No. 1
450: Reverse pattern foot No. 1C
Walking foot No. 50 (optional accessory for aurora 430 / 450)
Hand-look quilt stitch
Suitable for all fabrics and work which
should look «hand sewn».
Sewing test
• the bobbin thread is pulled to the right
side
1 stitch is visible (bobbin thread)
1 stitch is invisible (monofilament) =
hand-look effect
Upper thread tension
• depending on the fabric = increase the
tension (6–9)
Balance
• adjust stitch with the Balance if
necessary
Perfect corners
• activate Pattern end and
Needle stop down and pivot
the work
• when pivoting make sure that
the fabric does not become
distorted
Monofilament breaks
• sew more slowly
• reduce upper thread tension
slightly
Freehand quilting
Needle:
Thread:
Feed dog:
Presser foot:
Stitch:
Straight stitch No. 1
size and type suitable for the fabric selected
monofilament or cotton
down
Darning foot No. 9, Quilting foot No. 24 (optional accessory)
Quilting foot No. 29 (optional accessory)
Freehand quilting
• for all freehand quilt work
Preparation
• pin and baste top layer, batting, and
lining together
• attach the slide-on table
Holding the work
• hold the fabric with both hands like an
embroidery frame
• start in the center and work out toward
the edges
Quilting a design
• turn the work using smooth, round
movements to form the design of your
choice
Stipple quilting
• technique covers the entire surface of
the fabric
• the lines of stitching are rounded without
any sharp corners; they never cross nor
touch one another
Page 45

45
Freehand quilting with BSR
032907.52.04_0910_a430/a440/a450_EN
BSR foot - Application
Stitch:
Needle:
Thread:
Feed dog:
Presser foot:
Straight stitch No. 1
size and type suitable for the fabric selected
monofilament or cotton
down
BSR foot No. 42
BSR (BERNINA Stitch Regulator)
function
This function using the BSR presser foot
allows for free-motion quilting (sewing)
using the straight stitch and a pre-selected
stitch length (up to 4mm). The BSR
presser foot reacts to the movement of the
fabric under the foot and controls the
speed of the sewing computer up to the
maximum possible speed.
The following applies: the faster the fabric
is moved the higher the speed of the
sewing computer. A regulated set stitch
length is maintained within a certain speed,
independent of the movement of the fabric.
If the fabric is moved too fast an acoustic
signal is heard, provided the beeper
function has been previously activated.
(see page 46).
By activating the BSR
function the sewing computer sews either continuously
at a reduced motor speed
(mode 1, standard) or on
moving the fabric (mode 2).
As long as the BSR presser
foot is illuminated red,
adjustments like threading
and changing the needle, for
example must not be carried
out. The sewing computer is
still in BSR mode and the
needle will engage while
fabric is moved unintentionally!
Without fabric feed the BSR
mode is turned off after
approx. 7 seconds and the
red light goes off.
Please refer to the Safety
Instructions!
BSR function can be sewn in 2 separate modes of operation
• BSR mode 1 is the active standard
• on pressing the foot control or the
Start-/Stop button, the needle starts to
move continuously
• moving the fabric under the foot will
engage the sewing computer to accelerate
• through the continuous needle movement securing in the same position is
possible without pressing an additional
button
For an even sewing start (one single stitch) the foot control must be
C
pressed and the fabric moved simultaneously. This also applies for
sewing points and straight stitching within a round form.
• press external button No. 2 of the stitch
selection (see page 29) to engage BSR
mode 2
• the sewing computer only starts if the
foot control or Start-/Stop button is
pressed and the fabric moved simultaneously
• the movement of the fabric determines
the sewing speed
• for securing, the «Securing function»
button must be pressed
• press external button No. 1 of the stitch
selection to engage BSR mode 1
When resuming work with the BSR presser foot after exiting the function,
the BSR mode that was active at the time of exiting the BSR function will
be activated, even if the sewing computer was turned off in the meantime.
Page 46

46
BSR foot - Application
032907.52.04_0910_a430/a440/a450_EN
Preparation
C
• it is not possible to switch to
BSR mode, once a buttonhole
is selected
• select straight stitch first
• lower the feed dog
• presser foot pressure must be reduced
depending on the fabric type and
thickness
• attach the desired presser foot sole
to the BSR presser foot
• removing sole: press both buttons
(see arrows) on each side of the foot
• slide the sole down the groove at an
angle
• attaching the sole: slide the sole up in
the groove until it clicks into place
Using the following functions in the BSR mode
Needle stop down (default)
• the arrow points down on the display =
the sewing computer stops with needle
down, when taking foot off foot control
Needle stop up
• press the needle stop button (arrow
points up) = the sewing computer stops
with needle up, when taking foot off foot
control
Raise or lower the needle
• press the needle stop button longer - or
by pressing the heel on the foot control,
the needle can be lowered or raised
Securing with Start-/Stop button (only
mode 1)
• place fabric under presser foot, then
lower presser foot
• press needle stop button twice to take
up lower thread
• hold upper and lower thread and press
the Start-/Stop button to start the BSR
mode
• sew 5-6 securing stitches
• press the Start-/Stop button to stop the
BSR mode
• cut the threads
• press the Start-/Stop button to restart
the BSR mode and continue the quilting
Securing function (only mode 2)
• press the «Securing function»
button
• press the foot control or Start - Stop
- button
• short securing stitch sequence will be
sewn as soon as the fabric is moved
under the presser foot. After the sequence is sewn the set stitch length will
be activated and the securing function
will be automatically deactivated
Activating/deactivating the beeper
(acoustic signal)
• press mode 1 or 2 long
• an acoustic tone will beep indicating
beeper activation
• an acoustic tone beeps to indicate the
sewing computer is running at maximum
motor speed
• sewing with min. stitch length = maximum movement of fabric under the
presser foot is slower
• keep mode button (1 or 2) pressed a
while again to deactivate the beeper
• the beeper remains as selected (on or
off) when exiting the BSR mode
• attach the BSR presser foot to the
sewing computer and plug the cable into
the green socket until it clicks into place
• «BSR» blinks on the left side on the
display
• press the BSR button
• «BSR» is visible on the display =
Mode 1 (Standard)
• the basic stitch length setting is 2mm
• set the desired stitch length
• when sewing small forms and stippling,
stitch length of 1mm - 1.5mm is suggested
When exceeding a certain
speed, adhering to regular stitch
C
Free hand quilting without BSR
activation
• press the BSR/Balance button -
• the BSR symbol blinks on the left side
• normal free hand quilting can now
length cannot be guaranteed.
Make sure that the lens on the
bottom of the BSR foot is not
dirty (fingerprints, etc.). Clean
lens periodically with soft,
slightly damp cloth.
«BSR 1» goes off
on the display
be sewn with the BSR foot, without
automatic regular stitch length
Page 47

47
Activating the BSR sewing function
032907.52.04_0910_a430/a440/a450_EN
BSR foot - Application
1. With the foot control
• plug in the foot control
• lower the presser foot
• start the BSR mode by pressing
the foot control, the «BSR active»
symbol appears on the display
• a red light appears on the presser
foot
• the foot control must be pressed
continuously during sewing
• the speed of the sewing computer will
be regulated by the movement of the
fabric
• by releasing the foot control the BSR
mode will be stopped
2. With the Start-Stop button
• unplug the foot control
• lower the presser foot
• start the BSR mode by pressing the
Start-Stop button, the «BSR
active» symbol appears on the
display
• a red light appears on the presser
foot
• the speed of the sewing computer will
be regulated by the movement of the
fabric
• press the Start-/Stop button again or
actuate the presser foot lifter to stop the
BSR mode
Holding the work
• hold and guide the taut fabric with both
hands
• if the fabric is moved abruptly (sudden
stops or quick acceleration), some
stitches may turn out slightly shorter or
longer
• continuous movement of the fabric (no
abrupt movements) under the foot will
provide best results
• move the fabric in one direction for best
results
Using the Start-/Stop button to deactivate the BSR function
In mode 1:
• if the fabric is not moved for about
7 seconds, the BSR mode deactivates
(display switches to BSR) and the red
light on the presser foot goes out
In mode 2:
• if the quilting is stopped by stopping to
move the fabric, an additional stitch will
be sewn depending on the needle
position. The sewing computer will
always stop with the needle up, even if
the arrow in the screen points down
BSR-mode deactivation
• pull out the plug of the BSR presser foot
connection cable on the sewing computer
• remove the BSR presser foot
Page 48

48
Buttonholes
032907.52.04_0910_a430/a440/a450_EN
Buttonholes - Important information
aurora 430 / 440 QE
Thread tension
• thread the bobbin thread through the finger of the bobbin case
= the bobbin tension is a little tighter
• this gives the beads on the right side of the fabric a slightly
rounded appearance
• the buttonhole looks more attractive
• gimp reinforces buttonholes and enhances their appearance
• sew both beads at the same speed
Marking buttonhole
Manual buttonhole
• mark the buttonhole length in the
desired position
• use Buttonhole foot No. 3C, 3 (optional
accessory)
Automatic buttonhole
• mark the length of just one buttonhole
• after sewing the first buttonhole, the
length for all subsequent buttonholes is
automatically programmed
• mark only the beginning of all subsequent buttonholes
• use Automatic buttonhole foot No. 3A
aurora 450
Thread tension
• set upper thread tension to 2.5 (Buttonhole symbol)
• the bobbin tension is a little tighter which gives the beads on
the right side of the fabric a slightly rounded appearance
• the buttonhole looks more attractive
• gimp reinforces buttonholes and enhances their appearance
• sew both beads at the same speed
Using the compensation plate (in
some countries only available as
optional accessory) is recommended when sewing buttonholes in difficult fabrics. It can be
used with the Automatic buttonhole foot No. 3A or the buttonhole foot No. 3B.
Keyhole buttonhole
• mark the bead length only
• the correct length eye will be added
when the buttonhole is sewn
Test sewing
• always sew a test sample on the fabric
with stabilizer you intend to use
• select the buttonhole type you intend to
use
• sew the buttonhole in the same
direction on the fabric (with or against
the grain)
• cut the buttonhole open
• push the button through
• adjust the buttonhole length if
necessary
Bulky buttons
• with bulky buttons (roll crown, bulge-
rimmed etc.) add approx. 3-5mm to the
buttonhole length (depending on the
size and bulk of the button)
To adjust the bead width:
• alter the stitch width
Stitch length adjustments:
• Stitch length adjustments affect both
buttonhole beads (spacing between the
stitches)
• reprogram the buttonhole length after
changing the stitch length
If a buttonhole is to be sewn at
right angles to a seam, we
recommend the use of the height
compensating plates for buttonholes (available as optional
accessory). Place the plates from
the back between fabric and
bottom of slide foot up to the
thick part of the fabric and push
to front.
Page 49

49
Correct interfacings or stabilizers for buttonholes
032907.52.04_0910_a430/a440/a450_EN
Buttonholes
• for best results always sew buttonholes
on area that is lined with interfacing
• the interfacing should suit the fabric
type
Buttonholes with cord
Cord
• use cording to reinforce buttonholes and
enhance their appearance
• the loop of the cord should be at the end
of the buttonhole most subject to wear
cord loop = where button is sewn on
• position the work accordingly
• for thick and fluffy fabrics an embroidery
stabilizer can be used. The fabric feeds
better
Ideal cords
• Perle cotton No. 8
• strong hand-sewing thread
• fine crochet yarn
Hooking the cord in the Automatic
buttonhole foot with slide No. 3A
• insert the needle at the beginning of the
buttonhole
• raise the presser foot
• guide the cord under the foot to the right
• hook the cord over the pin at the back of
the foot
• bring the cords to the front of the foot
• pull them into the slit
Sewing
• sew the buttonhole in the usual manner,
do not hold the cord tightly
• the buttonhole will form over the cord,
covering it
Page 50

50
Buttonholes
032907.52.04_0910_a430/a440/a450_EN
Hooking the cord onto presser foot
No. 3C, No. 3 (special accessory)
• insert the needle at the beginning of the
buttonhole
• raise the presser foot
• hook the cord over the center pin on the
front of the foot
Securing the cord
• pull the cord through the buttonhole until
the loop disappears into the end of it
• pull the ends of the cord through to
wrong side of the fabric
• knot or secure with stitches
• place both ends of the cord in the
grooves on the sole of the foot and pull
them to the back
• lower the presser foot
Cutting buttonholes open
• using the seam ripper, cut from the ends
towards the middle
• in order not to cut the ends of short
buttonholes by mistake, place a pin at
the end of the buttonhole for additional
security
Sewing
• sew the buttonhole in the usual manner,
do not hold the cord tightly
• the buttonhole will form over the cord,
covering it
Buttonhole cutter and block (special
accessory)
• place the fabric on the wood
• place the cutter in the center of the
buttonhole
• press down on the cutter with your hand
or a hammer
Page 51

51
Buttonhole - Balance
032907.52.04_0910_a430/a440/a450_EN
A B
C
Buttonholes
When all buttonholes have
been sewn, return Balance to
the normal setting!
Balance for automatic and manual
buttonholes
• any Balance alterations to the manual
and auto length buttonholes affect both
beads identically because they are sewn
in the same direction
• the keyhole or eye is balanced as
follows:
• sew straight stitches until the sewing
computer changes to the keyhole or eye,
then stop the sewing computer
• press the Balance button
Keyhole is distorted to the right
(picture A):
• press the right Needle position button =
the keyhole will be corrected to the left
• sew a test!
Keyhole is distorted to the left
(picture B):
• press the left Needle position button =
the keyhole will be corrected to the right
• sew a test!
Page 52

52
Buttonholes
032907.52.04_0910_a430/a440/a450_EN
Buttonholes
3
2 1
aurora 430
No. 10 Standard buttonhole
No. 11 Narrow buttonhole
No. 12 Stretch buttonhole
No. 13 Keyhole buttonhole
No. 14 Straight stitch buttonhole
No. 15 Hand-look buttonhole
Buttonholes are not only practical
closures, they can also be used for a
decorative effect.
aurora 440 QE
No. 10 Standard buttonhole
No. 11 Narrow buttonhole
No. 12 Stretch buttonhole
No. 13 Round buttonhole
No. 14 Keyhole buttonhole
No. 15 Straight stitch buttonhole
No. 16 Hand-look buttonhole
Preparation
• 430 / 440 QE: thread the lower thread in
the finger of the bobbin case
• 450: set upper thread tension to 2.5
(Buttonhole symbol)
• use Buttonhole foot with slide No. 3A or
Buttonhole foot No. 3C, No. 3 (special
accessories)
aurora 450
No. 10 Standard buttonhole
No. 11 Narrow buttonhole
No. 12 Stretch buttonhole
No. 13 Round buttonhole
No. 14 Round buttonhole with square end
No. 15 Keyhole buttonhole
No. 16 Keyhole buttonhole with tapered
end
No. 17 Heirloom buttonhole
No. 18 Straight stitch buttonhole
• Select the buttonhole of your choice, the
following appears on the display:
1 Buttonhole graphic
2 Buttonhole symbol
3 Presser foot indicator
Manual buttonhole
Stitch:
Needle:
Thread:
Feed dog:
Presser foot:
any buttonhole
size and type suitable for the fabric selected
cotton or polyester
up
Buttonhole foot No. 3C, No. 3 (optional accessory)
Preparation
• select the desired buttonhole
• display shows:
• buttonhole graphic
• presser foot indicator No. 3A
• the buttonhole symbol (the first
step blinks on the display)
The active step blinks on the display. Sew
both beads at the same speed.
C
Sewing buttonholes manually
is ideal if you only need to
sew one; also for repairing
existing buttonholes.
The number of steps depends
on the type of buttonhole
selected.
A manual buttonhole cannot
be saved.
Page 53

4-step standard buttonhole
032907.52.04_0910_a430/a440/a450_EN
Buttonholes
1. sew the first bead forward up to the
length mark, stop the sewing computer
• press the Quick reverse button
2. sew reverse straight stitch, stop the
sewing computer at the first stitch
(buttonhole begin)
• press the Quick reverse button
3. sew the top bartack and the second
bead, stop the sewing computer
• press the Quick reverse button
4. sew the bottom bartack and securing
stitches
53
5 step keyhole buttonhole
1. sew straight stitch forwards, stop the
sewing computer
• press the Quick reverse button
2. sew the eye and the first bead in
reverse, stop the sewing computer at
the first stitch (buttonhole begin)
• press the Quick reverse button
3. sew straight stitch forwards and stop the
sewing computer at the keyhole
• press the Quick reverse button
4. sew the second bead in reverse, stop
the sewing computer at the first stitch
(buttonhole begin)
• press the Quick reverse button
5. sew bartack and securing stitches
Page 54

54
Buttonholes
032907.52.04_0910_a430/a440/a450_EN
Automatic buttonhole
Stitch:
Needle:
Thread:
Feed dog:
Presser foot:
Buttonhole (all types)
size and type suitable for the fabric selected
cotton or polyester
up
Automatic buttonhole foot No. 3A
Automatic buttonhole
• the lens on automatic buttonhole foot 3A
automatically registers the length of the
buttonhole for exact duplication
• the active step blinks on the screen
• both beads are sewn in the same
direction
Buttonhole in long term memory
Saving programmed buttonholes in
long term memory
• after programming press the button
• the buttonhole is now saved in long term
memory
Opening saved buttonholes
Programmed saved buttonholes can be
opened for re-use even after the sewing
computer has been disconnected.
• select the buttonhole
• press the
• sew the programmed buttonhole
• only one of any style buttonhole can be
saved, if a new length is saved with
saved buttonhole
-button
, it overwrites the previously
The slide foot must lie
perfectly flat on the fabric. If
the slide foot lies on a seam,
the length cannot be measured accurately.
Sewing speed
• sew at moderate speed for
best results
• sew all buttonholes at the
same speed for consistent
bead density
Exact duplicates
• the auto function ensures
that each buttonhole will be
exactly the same length as
the previous one
Double sewn keyhole buttonholes
• keyhole buttonholes can be
sewn twice on thick fabrics
• after sewing the first button-
hole, do not move the work
• simply tap the foot control
once to begin sewing again
Page 55

Programming the standard and stretch buttonhole
032907.52.04_0910_a430/a440/a450_EN
Buttonholes
1. sew the first bead forwards, stop the
sewing computer
• press the Quick reverse button
• «auto» is indicated on the display =
the buttonhole length is programmed
2. the sewing computer sews reverse
straight stitch automatically
55
Deleting the programming
Press the «clr»-button to delete
C
the program.
Programming the round and keyhole buttonhole
3. the first bartack
4. the second bead forwards
5. the second bartack and securing
stitches
• sewing computer stops and returns
automatically to buttonhole begin
• all subsequent buttonholes will be sewn
to exactly the same length (no need to
press the Quick reverse button)
1. sew the straight stitch forward, stop the
sewing computer
• press the Quick reverse button
• «auto» is displayed on the display =
buttonhole length is programmed
2. the sewing computer automatically sews
the eye
3. the first bead in reverse
4. sews straight stitches forwards
5. sews second bead in reverse
6. sews bartack and securing stitches
• the sewing computer stops and returns
automatically to buttonhole begin
• all subsequent buttonholes will be sewn
to exactly the same length (without
pressing the Quick reverse button)
Page 56

56
Eyelet / Button sew-on program
032907.52.04_0910_a430/a440/a450_EN
Eyelets
Stitch:
Needle:
Thread:
Feed dog:
Presser foot:
430: Straight stitch eyelet No. 17
440 QE: Straight stitch eyelet No. 19
450: Straight stitch eyelet No. 21
440 QE: Narrow zig-zag eyelet No. 18
450: Narrow zig-zag eyelet No. 26
size and type suitable for the fabric selected
cotton / polyester
up
430 / 440 QE: Reverse pattern foot No. 1
450: Reverse pattern foot No. 1C
Sewn eyelet
• opening for cord and narrow ribbon
• for decorative work, children’s clothing,
crafts
• cannot be saved
Sewing eyelets
• select eyelet
• sew program
• sewing computer stops automatically
when finished
• sewing computer is ready to sew the
next eyelet
Cutting eyelets open
• use an eyelet punch
Eyelets
• ideal as eyes for soft toys, dolls
or puppets
More marked appearance
• thread bobbin thread in finger
on bobbin case (430 / 440 QE)
= tighter bobbin tension
• for embellishment or as a
reinforced opening for ties etc.
Button sew-on program
Stitch:
Stitch width:
Needle:
Thread:
Feed dog:
Presser foot:
430: Button sew-on program No. 16
440 QE: Button sew-on program No. 17
450: Button sew-on program No. 19
depends on distance between the holes
size and type suitable for the fabric selected
cotton or polyester
down
Darning foot No. 9
Button sew-on foot No. 18 (optional accessory)
Sewing on buttons
• sews buttons with 2 or 4 holes
• buttons being sewn on for decorative
purposes only can be stitched without
forming a thread shank
• the shank (= thread length between
button and fabric) can be made shorter
or longer as required with foot No. 18
Beginning and finishing threads
• the threads are secured and can be
trimmed
• after sewing on the button, pull the upper
thread ends through to the wrong side
and knot
Sewing on buttons with darning
foot No. 9
• select Button sew-on program
• check distances between holes with the
handwheel and adjust stitch width if
necessary
• sew the securing stitches; hold the
threads when starting to sew
• sew
• sewing computer stops automatically
when program is completed and is ready
for the next button
Page 57

57
Cleaning
032907.52.04_0910_a430/a440/a450_EN
If the sewing computer is stored in a cold room, it should be brought to a warm room about one hour before use.
Cleaning and maintenance
Cleaning the stitch plate
Periodically remove thread lint and
remnants which collect under the stitch
plate and the hook.
• turn power switch to «0» (off) and pull
out plug from electrical outlet
• remove presser foot and needle
• open the free arm cover
• press the stitch plate down at the back
right corner, lift and remove
• clean the area with the lint brush
• replace the stitch plate
Cleaning the screen and
the sewing computer
• wipe with a damp cloth
Cleaning the hook
aurora 430 / 440:
• turn power switch to «0» (off) and pull
out plug from electric outlet
• remove the bobbin case
• push the release lever to the left
• let down the locking lever and the black
hook race cover
• remove the hook
• clean the hook race, never use a sharp
instrument
• replace the hook, turning the
handwheel if necessary so that the
hook driver is on the left
• close the hook race cover and secure
with the locking lever, the locking pin
must engage
• check by turning the handwheel
• insert the bobbin case
aurora 450:
• turn power switch to «0» (off) and pull
out plug from electric outlet
• remove the bobbin case
• clean the hook race, never use a sharp
instrument
• insert the bobbin case
Lubricating
• turn power switch to «0» (off) and pull
out plug from electric outlet
• squeeze one drop of oil into the hook
race
• run the sewing computer for a short time
without thread to prevent oil soiling your
work
Disconnect plug from the
socket before cleaning or
lubricating!
Never use alcohol, petrol,
C
white spirit or any type of
solvent to clean the sewing
computer!
Cleaning notification
• visible on the display when the sewing
computer must be cleaned/oiled (after
approx. 180,000 stitches)
• if the sewing computer was cleaned the
display can be cleared by pressing the
«#» button twice
• the display can be cleared temporarily
by pressing the «clr» button but will
appear again when restarting the
sewing computer
• after clearing with «clr» for the third time
the cleaning notification will only appear
again after a further approx. 180,000
stitches
Service notification
• visible on the display when the sewing
computer must be taken for a service to
the BERNINA dealer (after approx.
2,000,000 stitches)
• if the service was done by the BERNINA
dealer the stitch counter will be on «0»
again and the display does not appear
anymore
• the display can be cleared temporarily
by pressing the «clr» button but will
appear again when restarting the sewing
computer
• after clearing with «clr» for the third time
the service notification does not appear
anymore - the next service notification
will be at approx. 4,000,000 stitches
Enviromental Protection
BERNINA is committed to the protection of the environment. We strive to
minimize the environmental impact of
our products by continuously improving product design and our technology of manufacturing.
At end of life please dispose this product in
an environmentally responsible way
according to the national directive. Do not
throw away this product with your
household waste. In case of doubt, please
contact your dealer.
Page 58

Trouble shooting
032907.52.04_0910_a430/a440/a450_EN
58
Trouble shooting
In most cases you will be able to identify and remedy faults by checking the following.
Check whether:
• the upper and lower threads are threaded correctly
• the needle is inserted correctly with the flat side to the back
• the needle size is correct – check the needle/thread table on p. 18
• the needle tip and shaft are undamaged
• the sewing computer is clean – brush out any thread lint
• the hook race is clean
• any threads are trapped between the tension discs or under the bobbin case spring
Fault
Uneven stitch
formation
Skipped stitches
Upper thread
breaks
Lower thread
breaks
Needle breaks
Cause
Upper thread too tight/too slack
Lower thread too tight/too slack
Poor quality needle
Needle inserted incorrectly
Poor quality thread
Needle/thread combination is incorrect
Incorrectly threaded
Incorrect needle system
Needle bent or blunt
Poor quality needle
Needle inserted incorrectly
Incorrect needle point
Upper thread tension too tight
Incorrectly threaded
Poor quality or old thread
Stitch plate or hook tip damaged
Lower thread tension too tight
Stitch hole in the stitch plate has been
damaged
Needle blunt or bent
Needle not correctly inserted
Fabric was pulled
Fabric was pulled when thick material
used
Poor quality thread, unevenly wound or
knotted
Repair
Reduce/increase upper thread tension
Reduce/increase lower thread tension
Use a needle with flat side of the shank to the back
The flat side of the shank must be to the back
Use quality threads (Isacord, Mettler, Gütermann)
Match the needle to the thread size
Check upper thread threading path/lower thread threading path
Use needle system 130/705 H
Use good quality needles
Use new, good quality needles (BERNINA).
Insert needle as far as it will go
Match the needle type to the fabric
Reduce upper thread tension
Check upper thread threading path
Use good quality thread
Have the sewing-/embroidery computer checked by a dealer
Reduce lower thread tension
Have the sewing-/embroidery computer checked by a dealer
Use a new needle
Tighten the needle clamp screw
Do not pull the fabric during sewing
Use the correct presser foot for thick material (e.g. Jeans foot
No. 8)
Use height compensating tool when sewing over a thick seam
Use quality thread
Sewing computer
fails to run or runs
slowly
Embroidery process
is interrupted or can
not be started
Thread is caught in
the area of the
take-up lever
Plug not properly inserted
Sewing computer is not running at room
temperature
Sewing computer is not switched on
e.g. upper thread broken, feed-dog not
lowered etc.
Embroidery software or EC on PC can not
be installed
Upper thread breaks
Insert plug properly
Use sewing computer at room temperature
Switch sewing computer on (to «I»)
Follow the animated recommendations in the display
Ask your BERNINA dealer
If the lower thread breaks and the thread is trapped in the area
of the take-up lever, proceed as follows:
• power switch to «0» (off)
• remove the screw on the head frame with the angular Torx key
• pull head frame to the left
• remove remnants of thread
• attach head frame and tighten screw
Page 59

Embroidery
032907.52.04_0910_a430/a440/a450_EN
Details of the embroidery module
2
3
Setting up the embroidery computer
1 Embroidery surface
2 Embroidery arm
3 Embroidery hoop connection
1
4 Accessory box
5 Connecting lug right
6 Connecting lug center
59
Front view
Back view
4
6
1
8
8
5
7 Sewing computer connecting cable
8 Cable holder
The side view (handwheel) of
the sewing and embroidery
C
7
computer with the cable
connections are shown on
page 9 of the sewing computer
instruction manual.
Page 60

60
Standard accessories
032907.52.04_0910_a430/a440/a450_EN
Standard accessories
Large oval embroidery hoop
(145x255mm)
Template for embroidery hoop
Netforupperthreadspools–pullover
upper thread spool for even spooling
Embroidery presser foot No. 26 Embroidery needle range
Embroidery software BERNINA /
mouse pad
USB connecting cable for PC
embroidery software
Carrying bag
Page 61

61
Optional accessories
032907.52.04_0910_a430/a440/a450_EN
Optional accessories
Small embroidery hoop (72x50mm)
(for normal use and free arm embroidery). Blue template for normal use
Red template for free arm embroidery
Medium embroidery hoop (100x130mm)
Template for medium embroidery hoop
Straight stitch plate 450 Straight stitch plate 430 / 440 QEAdapter for free arm embroidery
Mega-Hoop (150x400mm)
Template to Mega-Hoop
BERNINA Multiplespoolholder BERNINA Embroidery software
BERNINA embroidery cards /
Mini Box plus or Magic Box plus
BERNINA border embroidery software
Suitcase system for sewing computer
and embroidery module
Refer to the Accessories catalogue for
more information on sewing, embroidery
and quilting accessories or
www.bernina.com
Page 62

62
Optional accessories
032907.52.04_0910_a430/a440/a450_EN
Connecting the adapter for free arm embroidery
The adapter is used for embroidering tubular items (sleeves, trousers, infant items, socks, etc.) on the free arm of the sewing
computer.
Attaching the adapter to the sewing
computer
• push the adapter behind the free arm
towards the sewing computer so that the
connecting lugs engage in the base
plate of the sewing computer
Free arm embroidery hoop
• the small, oval embroidery hoop is
specially designed for free arm embroidery
Attaching the module to the adapter
• place the module on the adapter with
the front edge of the module as close as
possible to the L-shaped guide on the
adapter
• push the module towards the guide from
the left until the connecting lugs engage
in the base plate of the adapter
Removing the adapter
• remove the module from the adapter
• the rear right corner of the adapter is
designed to be used as a grip
• hold the adapter with this grip and
remove from the base plate of the
sewing computer
Only the small hoop can
be used for free arm
embroidery.
Page 63

63
Attaching the module
032907.52.04_0910_a430/a440/a450_EN
Attaching the module
Attaching the module
• place the module on the sewing computer behind the free arm
• push the module from the left towards
the sewing computer so that the connecting lugs engage in the base plate
• Unplug foot control
Connecting the cable
• plug with flat side to the front
• insert the plug into the socket on the
right hand side of the sewing computer
Releasing the cable
• the cable connects the module to the
sewing computer
• pull the cable out of the holder on the
back of the module
Removing the module
• grip the back right corner to lift the
module and remove to the left
When connecting the embroidery module, attention
must be paid that all items
are on a flat and even
surface!
Always separate the module
and sewing computer for
transportation. Never transport them attached.
Releasing the cable
• pull out the plug
Storing the cable on the module
• insert the cable into both cable holders
• press cable gently to secure
Page 64

64
032907.52.04_0910_a430/a440/a450_EN
Preparing for embroidery
Preparing the embroidery computer for embroidery
18 19
Embroidery presser foot No. 26
• attach the Embroidery presser foot
No. 26
• raise the presser foot so that the
embroidery hoop can be attached
Needles for embroidery
• depending on the embroidery thread
use needle size 75 to 90
• use special embroidery or Metafil needle
for embroidery or metallic thread
• use an undamaged needle
• raise the needle so that the embroidery
hoop can be attached
Threading upper and bobbin thread
Threading the upper thread
• attach foam pad and place the upper
thread spool
• slide net over upper thread spool when
using sleek embroidery thread
• this prevents the upper thread from
slipping and gives an even thread feed
Threading the bobbin thread
• aurora 430 / 440 QE: for embroidery,
insert the thread into the finger of the
bobbin
• aurora 450: thread spring guide of
embroidery bobbin case when
embroidering
Lower the feed dog
• press the button on the right side of the
sewing computer to lower the feed dog
While embroidering the
bobbin can also be wound,
C
just like in sewing.
Spool pin
When using metallic or specialty
threads, using the vertical spool
pin and the supplementary thread
guide (optional accessory) may
also help avoid problems.
15
Adjusting the thread tension
The thread tension is adjusted manually.
• set the thread tension to 2.5-4.5 (aurora
430 / 440 QE) and 2.5 (aurora 450)
• adjustments for difficult or unusual
fabrics can be made if necessary
14
BERNINA can not guarantee
the stitching quality if
cardboard bobbins are used.
Page 65

65
Hooping the fabric
032907.52.04_0910_a430/a440/a450_EN
Preparing for embroidery
Centering
• determine the center of the fabric to be
embroidered
• mark with a fabric marker or chalk
Embroidery template
• there is a template for each embroidery
hoop
• the embroidery surface is marked in 3/8”
(1cm) squares
• the center and corners are marked with
holes for transferring marks to fabric
• place the template in the inner hoop so
that the word BERNINA is at the front
(by the arrows) and can be read
• the template will engage automatically in
the inner hoop
• there are finger holes for removing the
template from the small and medium
hoops, and special attachment clips for
the large hoop template
Using the embroidery hoop
• loosen the screw(s)
• remove the inner hoop
• the arrows on both hoops should match
• the arrows on the large, medium and
Mega-Hoop are in the centre on the
front, and the arrows on the small hoop
on the right
Hooping the fabric
• place fabric on top of the outer hoop
• place the marked center point in the
center of the template on inner hoop
• match the arrows of inner and outer
hoops
• place inner hoop on top of fabric and
outer hoop and press into place,
loosening screws to accommodate
fabric. Tighten screws
• remove template
Page 66

66
Preparing for embroidery
032907.52.04_0910_a430/a440/a450_EN
Embroidery stabilizers
C
When using paper backed
adhesive stabilizer make sure
that there is no adhesive
residue on needle, stitch plate
and hook area.
Tear-away stabilizers
• similar to interfacing; tears like paper
• one or more layers can be used
• available in different weights
• for more stability, apply to the wrong side
of the fabric with temporary spray
adhesive before hooping
• carefully tear away excess stabilizer from
the back of the embroidery after stitching
• stabilizer will remain under larger
embroidered areas
Application:
• for all wovens and non-stretchables
Iron-on interfacing
• must be preshrunk by soaking in warm
water
• this is pressed (fused) to the wrong side
of the fabric
• iron-on interfacings are available in a
variety of weights and should be selected to suit the fabric being used
• removable iron-on interfacing is also
available
Application:
• to provide body and shape for fabrics
onto which motifs will be placed
• use in conjunction with appropriate
stabilizer
Cut-away stabilizers
• one or more layers can be used
• available in light- and heavyweight
• for more stability, apply to the wrong
side of the fabric with temporary spray
adhesive before hooping
• carefully cut away from the back of the
embroidery after stitching
• stabilizer will remain under larger
embroidered areas
Application:
• for all stretchable fabrics
Paper backed adhesive stabilizer
• place stabilizer in hoop, paper side up
• use a pointed object (e.g. scissors) to
score the paper and remove it to reveal
the self-adhesive surface
• position the piece of fabric to be
embroidered on the stabilizer
Application:
• intended for delicate fabrics such as
jersey or silk, or hard to hoop fabrics
such as velvets
• for pieces, sections and materials that
can not be hooped
Spray adhesive
• do not use spray adhesive near or
directly at embroidery computer
• use spray to stick stabilizer to wrong
side of fabric for more stability
• sparingly use spray adhesive and spray
form a distance of 25-30cm to stabilizer
• place fabric and sprayed stabilizer flat
on each other and press together
Application:
• on stretchable fabrics and knits to
prevent distortion
• appliqué: exact securing of appliqués for
embroidery
• smooth fabrics: to prevent shifting
• cutwork: to fix cut-out pieces on stabili-
zers, e. g. pockets on trousers, collars
etc.
• for fabrics that easily crush or otherwise
be marked by hooping: use spray
adhesive on the stabilizer, hoop the
stabilizer, then fix the sections to be
embroidered onto the stabilizer
Spray starch for additional stiffening
• spray starch is ideal for stiffening fine,
soft or loosely woven fabrics
• spray the area to be embroidered, let
dry or press gently with a warm iron
• always use an additional stabilizer such
as water soluble stabilizer on the wrong
side of the fabric
Application:
• ideal for fine, loosely woven fabrics, e.g.
batiste, fine linen, etc.
Page 67

67
Water soluble stabilizer for fabric with a
032907.52.04_0910_a430/a440/a450_EN
pile and lace embroidery
• water soluble stabilizer looks like plastic
wrap
• dissolve stabilizer in warm water when
embroidery is complete
• water soluble stabilizers are ideal
protection for fabrics with a thick or
looped pile such as toweling. It also
prevents the embroidery threads from
sinking into the fabric or the fabric
threads from poking out between the
stitching
• place on top of toweling and high nap
fabrics backed by appropriate stabilizer
for fabric and motif
• use spray adhesive to fix stabilizer if
necessary
• for fabric with a pile, reinforce with
additional, suitable stabilizer on the
wrong side if necessary
Important embroidery information
• for lace embroidery place one or two
layers of water soluble stabilizer in hoop
(as the motif is not embroidered on any
fabric, only the thread embroidered motif
is left)
• after dissolving lay the motif down flat
and let dry
• water soluble stabilizer can also be
removed by gently tearing it away when
used as a topping on non-washable
fabrics like velvet
Application:
• ideal for toweling, velvet, bouclé knits,
etc.
• ideal for fine, sheer fabrics such as
organdy, batiste, etc.
• recommended for use as a stabilizer
with low stitch count motifs
• use heavier water soluble stabilizer to
stitch lace motifs
Important embroidery information
Choosing an embroidery motif
• simple motifs with a low stitch count are
suitable for embroidery on fine fabric
• large-scale, densely embroidered motifs
(e.g. with multiple color and embroidery
direction changes) are suitable for
medium- and heavyweight fabrics
Embroidery test
• always stitch an embroidery test on a
sample fabric. Adjust color, thread
quality, needle, stitch density, tension,
etc. to suit the motif if necessary
• for the test use the same fabric and
stabilizer that you will use on the project
Scaling/Sizing motifs
• motifs can be scaled/sized with
the BERNINA embroidery software on
the PC
• extensive scaling up or down of motifs
may lead to unsatisfactory results
Page 68

68
Important embroidery information
032907.52.04_0910_a430/a440/a450_EN
Different stitch types
Underlay stitches
• underlay stitches are the foundation of a
motif and are used to stabilize the base
fabric and hold it in shape. They also
prevent the covering stitches of the motif
from sinking into the knit or the nap of
the fabric
Satin stitch
• the needle moves left to right and
viceversa. The result is a very dense,
covering zig-zag stitching to fill the
shape
• satin stitching fills are ideal for narrow
and small shapes. Satin stitching is,
however, not suitable for larger areas,
since wide stitches are too loose and do
not cover the fabric properly. In addition
there is the danger that with too long
stitches the threads could catch on
something which would damage the
embroidery
Step stitch
• a fill stitch with stitches of specified
length sewn in rows used primarily to fill
large areas quickly
Fancy-fill stitches
• to give areas a special effect
• stitches that create a motif with an area
to be filled
Outline stitches
• usually straight or satin stitches
• used to define a specific area or areas
• examples are: straight stitch, double run,
triple run, satin
Jump stitches
• long stitches that skip over fabric after
one part of the motif finishes and the
next begins
• before and after the jump stitch securing
stitches are sewn
• jump stitches are trimmed before the
next color starts to embroider
Page 69

69
Embroidery threads
032907.52.04_0910_a430/a440/a450_EN
Important embroidery information
One of the most important elements in
successful embroidery is the quality of the
thread. We strongly recommend that you
purchase thread from a reputable BERNINA dealer in order to avoid irregularities,
thread breakage, etc. which so often occur
with poor quality threads.
Embroidery is particularly effective if you
use glossy rayon or polyester embroidery
threads as upper threads. They are
available in a wide range of colors for
beautiful embroidery.
Polyester threads
Polyester with a brilliant sheen is a hard
wearing colorfast thread and has a high
tensile strength. It is suitable for all types
of embroidery, especially children’s
clothing and items which will be washed
often or subject to much wear and tear.
Rayon threads
Rayon is a soft viscose fiber with a brilliant
sheen and suitable for fine, delicate
embroidery, or items that will not receive
excessive wear and tear.
Metallic wrapped polyester thread
Metallic thread is a light- to mediumweight
thread suitable for special effects in
embroidery.
Embroidery needle
• correct size thread must correspond with
correct size needle
• replace needle regularly
When sewing with metallic
threads, we recommend the
C
C
use of the vertical spool pin
and the supplementary thread
guide (optional accessory).
It is recommended to use a
130/705H Metafil needle and to
reduce the speed.
18
19
Bobbin threads
Bobbin-Fil (special bobbin thread)
Bobbin-Fil is an especially soft and light
polyester thread suitable for bobbin thread.
This special bobbin thread ensures a
steady thread tension and an optimal
intertwining of the upper and bobbin
thread. The thread produces even stitching on both, the right and wrong side of
the fabric.
Darning and embroidery thread
Fine mercerized cotton thread suitable for
embroidery (Mettler 60 weight suggested),
which is embroidered on cotton fabric.
Use white bobbin thread or
match color with fabric.
C
Page 70

70
032907.52.04_0910_a430/a440/a450_EN
Requirements / Embroidery software
Requirements for embroidery operations
BERNINA applies the widely used USB
technology to their Sewing/Embroidery
systems. In order to avoid undesirable
interaction between BERNINA’s individual
USB devices and other USB devices,
BERNINA recommends taking the
following precautions:
• Avoid turning the aurora Sewing/
Embroidery System or other USB
devices on and off in short intervals.
• When using an embroidery software
with dongle, do not unplug the dongle
while the software is running!
• During the embroidery stitch out
process, do not unplug the USB cable.
• Before turning off the aurora Sewing/
Embroidery System, always close the
embroidery software and then unplug
the USB cable.
• If you intend to use a USB HUB device
or other USB devices, BERNINA
recommends using the USB Standard of
Version 2.
• BERNINA recommends closing all
running computer programs while
embroidering wiht the embroidery
software / EC on PC programs.
System requirements of your PC
Minimum requirements
Pentium 3 CPU, 800 MHz or higher
Windows XP Prof. and Home Service
Pack 2
256MB RAM, 2 USB ports,
500MB available space
8GB Hard Disk Memory,
16 Bit True Color Graphic Card
Recommended requirements
Pentium 4 CPU, or higher
Windows XP Prof. and Home Service
Pack 2
Windows Vista
512 MB RAM or higher, 2 USB ports,
20GB Hard Disk Memory,
750MB available space,
32GB or higher True Color Graphic Card
The «aurora» embroidery system is
operated by the BERNINA embroidery
software PC embroidery software and
directly on the personal computer by the
EC on PC software.*
When the aurora Sewing/
Embroidery System is in the
embroidery mode, the foot
control must be unplugged.
To avoid errors with embroidery via personal computer no
virus scanner must be activated.
If the aurora 430 / 440 QE / 450
is connected to the computer
via a USB hub, the system can
cause difficulties when turning
off the aurora 430 / 440 QE /
450 with running embroidery
software (depending on the
PC configuration). These
difficulties are easily remedied
by rebooting the PC. Stitching
in the already started motif
can be resumed at the last
stitch with the function
«Embroidery sequence
control» and «Saved embroidery position» (see page 76).
* the term PC basically applies to PC and laptop
BERNINA embroidery software
BERNINA embroidery software
The software is necessary to open and
edit (rotate, scale etc.) embroidery
designs.
Refer to enclosed CD-ROM for user
instructions.
BERNINA EC on PC software
(Embroidery Control on Personal
Computer)
The PC software EC on PC will be
installed automatically with embroidery
software. Motifs can be positioned and
embroidered with this software.
Page 71

71
Embroidery software
032907.52.04_0910_a430/a440/a450_EN
1
EditorLite ArtDesign
Turning on the sewing and embroidery
computer
• power switch on «I» (on)
• connect the USB connection cable to
the personal computer and the designated connection on the right side of the
sewing computer (1)
Opening motifs
• click on the «Open» icon in the toolbar
• the "Open" menu will open. Select your
files
• open the desired motif with a double-
click and work on it if required
Starting embroidery software
• double-click on the embroidery software
icon on your Windows desktop or select
Start / Program / embroidery software
Starting to embroider
• first, REMOVE the HOOP
• click on the icon «Write to Machine» (1)
• activate the aurora models field in the
opened window
• press «OK» (3)
• the software EC on PC will be started:
• after a few seconds the embroidery
module icon appears in the display of
the embroidery computer
• embroidery foot No. 26 will be
displayed
• the embroidery module arm
moves: the embroidery module is
being calibrated
• attach hoop
• the needle position must now match the
hoop centre (use hoop template). If not,
realign the hoop (see p. 77).
C
Important
It is strongly recommended to
save all relevant changes of the
design before starting the
stitchout process.
Page 72

72
Software EC on PC
032907.52.04_0910_a430/a440/a450_EN
Embroidery process - EC on PC
PC display
Motif
• the motif is displayed in color
• the smallest possible hoop for the
selected motif is displayed
• the needle position (marked by a fine
green cross) is at the start point of the
first color
Displays on the PC
Connection between PC and embroidery computer
• during data transfer, the connection
between PC and embroidery computer
is checked
• if the connection is interrupted, a
notification in red appears
• place the cursor on the red element
(without a mouse click)
• an animation will start showing the user
that all cable connections have to be
checked
Embroidery requirements
• program checks whether:
• the presser foot is raised (for
calibration)
• the feed dog is lowered
• the needle is in the highest position
(so that the embroidery arm can
move)
• the presser foot is lowered (for the
embroidery process)
• each element which is not in the correct
position will be highlighted in orange on
the display
Example:
• place the cursor on the orange element
(without a mouse click)
• an animation will be started showing
how the element is positioned in the
correct location
• here the presser foot should be raised
Page 73

73
Software EC on PC
032907.52.04_0910_a430/a440/a450_EN
Motif size
• display of the motif name, width and
height in mm
Color information / Color selection
• place the cursor on the desired color;
the spool will be enlarged and the
following information will be displayed:
• thread brand / color number
• position of the current color / total
number of all colors
• embroidery time of this color
• total stitch count of this color
• click on the desired color
• the active color will be highlighted in
color in the embroidery motif
• the embroidery hoop will move to the
start point of the color selected
• double-click on a color = the embroidery
process can be started directly with this
color (see also «Changing embroidery
color sequence manually», page 76)
Embroidery time and stitch count
• display in minutes of the total embroidery time of the motif selected
• display of the total stitch count of the
motif selected
• scrolling forward though
colors can be done with
«F3» on the computer
keyboard
• click on arrow = return to
Color summary
If the embroidery process is
started now, always the first
C
color is stitched.
If the embroidery sequence of
the color should be changed,
you must double-click on the
corresponding color or select
the «Embroidery sequence
control» - see page 76.
Color summary
• each color of the motif is represented as
a spool in the original color
• for more than four colors scroll through
further colors with the now visible right
scroll arrow
Embroidery progress
• colors already embroidered are indicated by an empty vertical spool
• the remaining total embroidery time as
well as the embroidery time of the active
color will be displayed
Page 74

74
Software EC on PC
032907.52.04_0910_a430/a440/a450_EN
Start-Stop icon on the PC display
• is gray (inactive) if the calibration was
not successful
• is blue if starting the embroidery process
is possible
• click with the mouse on the icon
• the embroidery hoop will move and the
hoop will be checked
• if the hoop is missing or a wrong one
was attached, this will be illustrated to
the user in an animation
• mouse-click on the animation, and the
starting screen reappears
• during the transfer of the data from the
PC to the embroidery module an hour
glass is visible in the display of the
embroidery computer
• as soon as the blinking Start-Stop icon
is displayed, the embroidery computer is
ready to embroider
• the process is confirmed and the
animation closed
• the process is interrupted and the
previous screen appears
Embroidery hoop
• the recommended embroidery hoop will
be highlighted on the display
• the attached embroidery hoop will be
marked with a green bar
• non selectable embroidery hoops will be
indicated by a «No Parking» icon
• the embroidery hoop size will be
displayed in mm
• the arrow (in place of the Start-/Stop
symbol) indicates that a mouse-click will
take you back to the starting screen
• if the necessary requirements for the
starting are met, the animation tells you
that the embroidery computer is now
ready to start the embroidery process by
pressing the Start-/Stop button
• the embroidery process can only be
stopped by pressing the Start-/Stop
button on the embroidery computer
Page 75

75
Functions on the display
032907.52.04_0910_a430/a440/a450_EN
EC on PC - Functions
Show grid
1. a large cursor - a blue cross - indicates
the hoop center. In addition to the blue
cross, there is a green cross for the
centre of Mega-Hoop position 1 and a
red cross for the centre of Mega-Hoop
position 3
2. the grid is now visible, the motif can be
positioned better
3. the grid and the cursor are switched off
Positioning of motif within the hoop
• this option is available when the positioning mode is active
• place the cursor on the motif (within the
blue hoop)
• the cursor becomes a small hand
• left-click and drag the motif to the
desired position
• release mouse button and drop the motif
in place
• if the motif is positioned outside the
embroidery area the color of the frame
changes from blue to red
• for better positioning activate the grid if
required
Zoom (4 levels)
• display of the motif will be enlarged by
one level with each mouse click
• the fifth click will bring you back to the
starting position
• user defined viewing:
• place the cursor on the visible arrows
without clicking
• the embroidery motif is moved
horizontally or vertically
• press the ctrl button simultaneously to
move the motif faster
Accurate positioning of motif in the
hoop
• click on the icon with the cursor and the
positioning mode will be activated
• it can also be activated with «F4» on the
computer keyboard
• by clicking on the directional arrow(s)
move the motif within the embroidery
hoop to the desired position in small
steps
• with the four arrows on the keyboard the
motif can be positioned exactly
• the embroidery motif moves by 0.2mm
each time the key is pressed
Position hoop
1. the hoop will be moved until the needle
is exactly in the center of the motif
2. the hoop will be moved until the needle
is exactly in the center of the hoop, a
blue point will appear in the middle of
the icon
3. the hoop will be moved until the needle
is exactly on the beginning of the
selected color
• this procedure can also be done with
«F2» on the computer keyboard
shows that the icon has
several functions. These can
be activated by clicking on
them again.
Note:
If the Start-/Stop button is clicked on when
a motif is highlighted with a red frame, the
embroidery process will not start because
the motif can not be embroidered in the
selected position. Move the embroidery
motif first until the frame changes from red
to blue.
• if the «Ctrl» key is pressed as well, the
motif moves by 2mm
Single/Multi color motif
• if the icon is inactive, the colors will be
embroidered individually, which is
standard
• if the icon is active, the complete motif
will be embroidered in one color without
stopping
• the embroidery motif and the color
information will be displayed in one color
Page 76

76
EC on PC - Functions
032907.52.04_0910_a430/a440/a450_EN
Checking the hoop type
(e.g. after hoop change)
• place the cursor on the embroidery arm
• the embroidery arm becomes blue
• by clicking on the embroidery arm the
hoop will move and the attached hoop
will be shown on the display
Embroidery sequence
control / Changing embroidery color sequence manually
1. embroidery sequence control
• the embroidery motif can
be read stitch by stitch with
the arrow keys
• if the «Ctrl»- key is
pressed in addition, the
steps will be increased to
min. 10 stitches
• with «Page up = forward»
or «Page down =
backward» the steps will
be increased to 100
stitches
• click on the symbol again:
the hoop returns to the first
stitch in the motif
2. embroidery process interruption in case of thread breakage / thread end
• clicking on the icon will
return the embroidery
hoop to the last stitch
before thread breakage
Move hoop
• the embroidery hoop will be highlighted
in blue when the cursor is in the hoop
• click the mouse to move the hoop to the
selected place. It moves virtually on
screen and physically on the embroidery
module
• the cursor indicates the needle position
Colors skipped in the sequence will be displayed as
C
3. embroidery sequence selectable as
• select function
• click on desired thread spool
already embroidered colors by
an empty vertical spool.
However they can still be
selected by clicking on the
icon again. If the last color is
not embroidered at the end, a
green check appears on the
Start-Stop icon after completion of the color. By clicking
with the cursor on the green
check, it disappears and
additional colors can be
embroidered.
• before re-starting go back a few
stitches with the arrow keys if
necessary
desired
Check motif size
• check if the position of the motif and the
position of the fabric match
• the corners of the frame are shown by
circles
• by clicking on the circles clockwise in turn
the motif stitching area is read and
checked with 4 steps
• the corners can also be selected with
«F5», «F6», «F7» and «F8»
• with the Mega-Hoop, use F5 to F8 to
travel to the corners. Move the hoop
between the upper and lower corners
Saved embroidery position
• is only visible when the embroidery
sequence control is active and the
embroidery process has already started
for the current motif
Resuming embroidery after interruption
due to power failure:
• switch on PC and embroidery computer
• start embroidery software and EC on
PC, see p. 71
• click on «Embroidery sequence control»
• clicking on the «Arrow» icon visible next
to it will return the embroidery hoop to
the last stitch
• before re-starting go back a few stitches
manually if necessary
Page 77

77
Moving the hoop for threading upper
032907.52.04_0910_a430/a440/a450_EN
and bobbin thread
• the hoop can be moved in case it
interferes when threading the needle
(e.g. when rethreading after thread
break or color change)
Position 1:
• mouse-click the symbol or press «F9»
• the hoop moves to the centre, so that
the needle is in the hoop centre
• rethread upper thread
Position 2:
• raise presser foot
• mouse-click the symbol again or press
«F9»
• the hoop travels to the far left position
• the bobbin can now be replaced or
refilled
• click on the Start-/Stop or the hoop
moving function symbol or press F9 to
move the hoop back to its previous
position to resume the stitching
• press the Start-/Stop button to continue
embroidering
EC on PC - Functions
The embroidery module must
be calibrated before the
initial application.
Checking if needle and hoop centre
match (only with oval hoop)
• this becomes necessary if the actual
hoop centre does not match the hoop
centre as displayed in the screen
• hoop adjustment has to be done only
once as it is valid for all embroidery
hoops
• place the template in the hoop
• press «F12» button
• select the oval attached hoop
• place the center of the template with the
arrow keys exactly underneath the
needle
• press the «shift» key (keep depressed)
• click with the mouse on the now visible
icon (next to the «Position hoop» icon)
• the adjustment will be saved
Connection error
If the connection is interrupted during the
embroidery process the PC and the cable
become red.
Provided that the USB cable is correctly
plugged in and the connection is not
re-established automatically (PC and cable
gray), take the following steps:
• close the EC on PC appli-
cation by clicking on «close»
or by «Alt F4»
• check all cables
• switch off sewing and embroidery
computer and switch it on again
• disconnect USB cable and plug it in
again
• switch PC off and on again
• re-start EC on PC by clicking on
«Write to Machine»
• click on «Saved embroidery
position» (see Saved embroidery
position, page 76)
Page 78

78
Starting to embroider
032907.52.04_0910_a430/a440/a450_EN
Attaching the embroidery hoop
Starting to embroider
Attaching the embroidery hoop
• raise needle and embroidery presser
foot
• hold the hoop with the right side of the
fabric up and the attaching mechanism
to the left
• pass the hoop under the embroidery
presser foot
• squeeze the ends of the attaching
mechanism on the side of the hoop
• position the center points of the hoop
(small attachment clamps) over the
bracket of the embroidery arm
• push the hoop down until it engages
• release the attaching mechanism of the
hoop
Starting to embroider with the StartStop button on head frame
• lower the presser foot
• keep the Start-/Stop button pressed
• the embroidery computer will sew
approx. 7 stitches and stop automatically
• raise the presser foot
• cut the thread tail at the beginning of
motif
• lower the presser foot
• press the Start-/Stop button to resume
the stitching
Interrupting embroidery
• press the Start-/Stop button during
embroidering
• the embroidery computer will stop
immediately
• the animation that appears can shift
when activated
• some of the functions can now be
selected again, or press the blue return
arrow to return to the starting screen
Removing the hoop
• press both ends on the hoop attaching
mechanism towards each other
• pull up to remove the hoop
Completing the color
• lower the presser foot again
• press the Start-/Stop button again
• the embroidery computer embroiders all
the sections in the activated color
• the embroidery computer stops auto-
matically when complete
Changing color
• the embroidery computer is automatically ready to embroider the next color
• change color of the upper thread
accordingly
• embroider with the new color
Cutting thread ends after embroidery
• raise the presser foot
• remove the embroidery hoop from the
embroidery arm
• cut threads and any connecting threads
close to the motif
• take care that the bobbin thread is not
cut too closely to the stitch plate when
removing the embroidery hoop. This
prevents tangling when starting again
Page 79

79
Mega-Hoop (special accessory)
032907.52.04_0910_a430/a440/a450_EN
Mega-Hoop
Open or create motif
• open a motif (refer to page 71 on how to
open a motif)
• the «Mega-Hoop» file contains Mega-
Hoop-compatible stock designs. Select
one and edit it if wished
• or create your own Mega-Hoop designs
Starting the embroidery process
• refer to page 71 on how to start
embroidering
Repositioning the Mega-Hoop
• an animated symbol appears when it is
time to reposition the hoop
• raise the presser foot
• press the front push button on the hoop
and move the hoop to the indicated
position
Checking the hoop position
• click the tick in the animated symbol or
press the Start-/Stop button on the
embroidery computer to complete the
repositioning of the hoop
• the hoop moves = the hoop position is
being checked
• press the Start-/Stop symbol in the
display to continue the embroidery
Repositioning the Mega-Hoop into
Position 1:
• carefully move the hoop until it engages
into position 1 (top)
Position 2:
• pull or push the hoop until it engages
into position 2 (centre)
Position 3:
• carefully move the hoop until it engages
into position 3 (bottom)
Removing the Mega-Hoop
• move the hoop into position 2
• press the two push buttons at the hoop
coupling together and lift hoop out
C
Upper thread
After repositioning the hoop, the
upper thread must be tightened
by rewinding the spool a little by
hand.
Embroidering borders
A border can either consist of several
small motifs or long sequenced designs.
With continuous designs, the end point of
one sequence very often is also the
starting point of the next sequence. EC on
PC will help you to easily find the exact
joining position, even if the fabric needs
rehooping.
Preparation:
With border embroidery, a line along the
border is usually marked on the fabric.
Use the template to hoop the fabric,
matching the marked line with one of the
vertical lines on the template.
Embroidering:
• start embroidery software
• open the design
• the start of the design is marked with a
circle and
the end with a cross
• mark the starting point of the design on
the fabric as required
• click the «Write to Machine» symbol to
start EC on PC
Page 80

80
Mega-Hoop
032907.52.04_0910_a430/a440/a450_EN
Moving the hoop
Positioning the motif:
• click the area within the hoop to move
the hoop - on-screen and physically - to
the selected place. The new needle
position (green cross) is displayed
(clicked place = needle position)
use the arrow keys to position the hoop:
move it until the needle is exactly on the
selected point
• click on the zoom symbol until the motif
can be easily viewed in the screen
• click «Move motiv» symbol
• move the motif until the green cross
(needle position) and the motif starting
point (circle) match (see p. 75)
use the arrow keys on the keypad to
accurately position the motif
Note:
If the starting and end point of a motif are
in the centre, they can be redefined in
embroidery software (refer to user
instructions p. 259)
Page 81

81
Summary stitches
032907.52.04_0910_a430/a440/a450_EN
aurora 430
1 - 28 Practical stitches
Summary stitches aurora 430
1 Straight stitch
2 Zig-zag
3 Vari-overlock
4 Running stitch
5 Securing stitch
6 Triple straight and triple zig-zag
7 Blindstitch
8 Double overlock
9 Super stretch stitch
10 Standard buttonhole
11 Narrow buttonhole
12 Stretch buttonhole
13 Keyhole buttonhole
14 Straight stitch buttonhole
15 Hand-look buttonhole
16 Button sew-on program
17 Straight stitch eyelet
18 Darning program
19 Basting stitch
20 Reinforced overlock
21 Gathering stitch
22 Jersey stitch
23 Honeycomb stitch
24 Universal stitch
25 Sewn-out zig-zag
26 Lycra stitch
27 Stretch stitch
28 Knit overlock
29 - 44 / 66 - 150 Decorative stitches
45 - 65 Quilt stitches
Page 82

82
Summary stitches aurora 440 QE
032907.52.04_0910_a430/a440/a450_EN
aurora 440 QE
1 - 31 Practical stitches
1 Straight stitch
2 Zig-zag
3 Vari-overlock
4 Running stitch
5 Securing stitch
6 Triple straight and triple zig-zag
7 Blindstitch
8 Double overlock
9 Super stretch stitch
10 Standard buttonhole
11 Narrow buttonhole
12 Stretch buttonhole
13 Round buttonhole
14 Keyhole buttonhole
15 Straight stitch buttonhole
16 Hand-look buttonhole
17 Button sew-on program
18 Narrow zig-zag eyelet
19 Straight stitch eyelet
20 Darning program
21 Basting stitch
22 Gathering stitch
23 Stretch overlock
24 Jersey stitch
25 Honeycomb stitch
26 Universal stitch
27 Sewn-out zig-zag
28 Lycra stitch
29 Stretch stitch
30 Reinforced overlock
31 Knit overlock
32 - 63 Quilt stitches
64 - 180 Decorative stitches
Page 83

83
aurora 450
032907.52.04_0910_a430/a440/a450_EN
1 - 33 Practical stitches
1 Straight stitch
2 Zig-zag
3 Vari-overlock
4 Running stitch
5 Securing stitch
6 Triple straight and triple zig-zag
7 Blindstitch
8 Double overlock
9 Super stretch stitch
10 Standard buttonhole
11 Narrow buttonhole
12 Stretch buttonhole
13 Round buttonhole
14 Round buttonhole with a square end
15 Keyhole buttonhole
16 Keyhole buttonhole with a tapered end
17 Heirloom buttonhole
18 Straight stitch buttonhole
19 Button sew-on program
20 Zig-zag eyelet
21 Straight stitch eyelet
22 Darning program
23 Large fly stitch
24 Basting stitch
25 Gathering stitch
26 Stretch overlock
27 Jersey stitch
28 Honeycomb stitch
29 Universal stitch
30 Sewn-out zig-zag
31 Lycra stitch
32 Stretch stitch
33 Reinforced overlock
Summary stitches aurora 450
34 - 60 / 74 - 163 Decorative stitches
61 - 73 Quilt stitches
Page 84

84
Index
032907.52.04_0910_a430/a440/a450_EN
Index
A
Accessories
Box 6
Embroidery 60-62
Sewing 5-7
Software 70
Adapter 62
Altering stitches
Buttonholes 48
Decorative stitches 43
Display 23
Stitch length 24
Stitch width 24
Automatic buttonhole
Automatic buttonhole foot with
slide 3A 5
Programming buttonholes 55
B
Balance
Buttonholes 51
In Memory 29
Practical and decorative
stitches 22
Basting stitch 42
Blind hem
Presser foot 5
Sewing 42
Bobbin winder pre-tension 9
BSR
Activating BSR function 45
Beeper 46
Deactivating 47
Free motion quilting 46
Functions 46
Sewing 47
Buttonholes
4-step standard 53
5-step keyhole 53
Automatic buttonhole 54-55
Automatic buttonhole foot
with slide 3A 5
Balance 51
Buttonhole in long term memory 54
Corded buttonholes 49-50
Feeding aid/compensation plate 5
Information 48
Interfacings and stabilizers 49
Keyhole buttonhole 55
Manual buttonhole 52-53
Overview 52
Overview and brief descriptions 30-32
Programming the length
of buttonholes 55
Standard buttonhole 55
Stretch buttonhole 55
Thread tension 48
Button sew-on program 56
C
Carrying bag 6
Carrying handle 8
CFL sewing light 11
Cleaning 57
Combining stitch patterns
Correcting in Memory 29
Overview of contents 26
Practical and decorative stitches 26
Corded buttonholes 49-50
Cover
Thread take-up cover 9
D
Darning 36-37
Details
Embroidery module 59
Sewing-/embroidery computer 8, 9
E
EC on PC
Display on PC 72-74
Embroidery functions 75-77
Interrupted connection 77
System requirements 70
Edge-stitching 35
Embroidery (EC on PC)
Display on PC 72-74
Embroidery presser foot 64
Embroidery stabilizers 66-67
Free-arm embroidery 62
Needles 19
Optional accessories 61-62
Preparing 64
Stabilizers 66-67
Stitch types 68
Thread tension 64
Threads 69
Trouble shooting 58
Embroidery designs
Functions 75-77
Opening a design 71
Selecting 71
Single- or multicolored motifs 75
Zoom 75
Embroidery module
Attaching/removing 63
Attaching/removing hoops 78
Details 59
Suitcase system (optional accessory) 61
Embroidery process
Embroidery progress 73
Hour glass 74
Starting 78
Embroidery software 61, 70-71
Embroidery stabilizers 66
Embroidery template 65
F
Fabric
Centering 65
Hooping the fabric 65
Needle and thread 18
Failures
EC on PC 72, 77
Trouble shooting 58
Feed-dog
Position 20
Raised / lowered 20
Foam pads 5
Foot control 10
Connecting 10
Needle up/down 10
Fonts 28
Free Hand System presser foot lifter 11
Functions 24-25
Alphabets, numbers 25
Balance 24
Clear 24
Memory 24
Mirror image 24
Needle positions 24
Needle stop up/down 24
Pattern begin 24
Pattern end, Pattern repeat 25
Pound key 25
Reverse sewing 25
Securing 24
Speed control 24
Start-Stop 25
Stitch length 24
Stitch pattern 25
Stitch width 24
G
Grid (guiding lines) 75
H
Hand-look quilt stitch 44
Handwheel 9
Height compensating plates 5, 21
Heirloom buttonhole 32
Hoops
Attaching/removing 78
Display 74
Hooping 65
Hooping the fabric 65
Mega-Hoop 79-80
Move hoop function 76
Optional accessories 61
Positioning 76
Selecting 74
Template 65
L
Lens set 7
List of contents 3
Long time Memory 54
Lower thread
Accessories 5
Embroidery bobbin case 64
Inserting the bobbin 15
Removing the bobbin case 16
Winding the bobbin 15
Lubricating 57
M
Maintenance (cleaning, lubricating,
servicing) 57
Memory
Correcting in Memory 29
Display 23
Page 85

85
Index
032907.52.04_0910_a430/a440/a450_EN
Leaving Memory 29
Programming alphabets 28
Programming practical and
decorative stitches 26
Samples 27
Mirror image
Display 23
Mirror image (left/right)
function button 24
N
Needle
Changing the needle 16
Embroidery 60, 64
Holder 8
Information 18, 19
Needle stop up/down 24
Needle summary 19
Needle up/down 24
Setting the needle position 8, 24
Threading 14
Twin and triple needle 13
Needle system 18
O
Optional accessories
Embroidery 61-62
Sewing 7
Overlock
Application 39-40
Overlock foot 5
Stitch patterns 30-33, 81-83
Outline stitch 68
Overview
Display 23
Embroidery module 59
Function buttons 24-25
Sewing-/embroidery computer 8-9
Stitch patterns 30-32, 81-83
P
Patchwork
Patchwork foot 5
Power cable
Connection 10
Power switch 10
Practical stitches
Basting stitch 42
Blind hem 42
Darning program 36
Edge-stitching 35
Flat joining seam 40
Manual darning 37
Overlock seams 39-40
Overview 83
Patchwork 41
Securing program 36
Stitch selection 29
Straight stitch 34
Triple straight stitch 34
Zig-zag stitch 38
Zipper 41
Presser foot
Display 23
BSR 5, 45
Changing the presser foot 17
Presser foot pressure 22
Standard accessories 5
Q
Quilting
Free-motion quilting 44
Quilting stitches 44
Quilting with BSR 45
Stipple quilting 44
R
Reinforced overlock 32
Running stitch
Practical stitch 30
Presser foot 5
S
Satin stitch 68
Safety instructions 2
Save, Memory 26-29
Alphabets 28
Correcting in Memory 29
Deleting in Memory 29
Function buttons 24-25
Numbers 28
Opening in Memory 26
Programming 26-28
Samples 27
Temporary altered stitch memory 33
Screen
Display 23
Cleaning 57
Seam guide (presser foot) 5, 35
Seam guide on slide-on table 11
Settings
Balance 22
Presser foot pressure 22
Thread tension 17
Setting up the sewing-/embroidery
computer
Embroidery module 63-67
Sewing computer 10-17
Sewing
Accessories 5-7
Function buttons 24-25
Letters (Alphabets) 25, 28
Reverse sewing 25
Sewing corners 21
Sewing stitch combinations 26-28
Sewing with BSR 45
Special characters 25
Using compensating plates 21
Sewing light (CFL light) 11
Sewing-on elastic 38
Sewing speed
Foot control 10
Speed control 24
Slide-on table 11
Spool discs 5
Spool pin
Horizontal spool pin 12
Supplementary spool pin 13, 14
Stabilizer 49
Stitch patterns
Display 23
Overview 81-83
Selecting 29
Stitch plate
Attaching/removing 20
Cleaning 57
Optional accessories 7, 61
T
Thread
Embroidery related 69
Information 18
Threading
Lower thread 15, 64
Twin and tripple needle 13
Upper thread 12, 64
Thread cutter 9, 14, 15, 16
Thread guide 8
Thread take-up 8
Thread take-up cover 8
Thread tension
Buttonholes 48
Embroidery 64
Tension adjusting wheel 9
Tension disc 13
Upper thread 17
Trouble shooting 58
Triple straight stitch 34
Twin and triple needle
Threading a twin/triple needle 13
U
Underlay stitch 68
Upper thread
Threading 12, 64
Upper thread tension 17, 64
V
Vari-Overlock 39
W
Winding the bobbin 15
Z
Zig-zag stitch 38
Zipper 41
09/10 EN 032 907 52 04
Page 86

032907.52.04_0910_a430/a440/a450_EN
 Loading...