

Page 1

L8542863 GB
Rev. 04/06/03
RADIO CONTROL MANAGEMENT SYSTEM
A D VA N TA G E
Instruction manual
UNIONE NAZIONALE COSTRUTTORI
AUTOMATISMI PER CANCELLI, PORTE
SERRANDE ED AFFINI
Page 2

2
3
ADVANTAGE
RR.1WBV
RR.2WBV
T2WV
T4WV
ADVANTAGE
RR.1WIV
RR.2WIV
PRX
PTXATM
RS232
USB
LO.T2WMR
CU 2WV
CU 4WV
RollKey
TO.GO 2-V
TO.GO 4-V
Page 3

3
ADVANTAGE
Radio control management system
This product has been conceived and developed to provide a simple, effective management of the installation and
maintenance of radio control systems.
The ADVANTAGE system includes:
• The “ADVANTAGE” palm programmer
• A CD-ROM with “Advantage” management software for PC with Windows operating system
• A USB port cable for communication between the programmer and the USB port of a PC.
• A RS232 serial port cable for communication between the programmer and the serial port of a PC.
• A PRX cable for connecting the programmer to compatible receivers.
• A PTXATM cable for connecting the programmer to “T2/4 WV” transmitters.
The following 433.92 MHz rolling code receivers are compatible with the ADVANTAGE system:
RR.1WBV - RR.2WBV (in a plastic box)
RR.1WIV - RR.2WBV (with Molex connection).
The following 433.92 MHz rolling code transmitters are compatible with the ADVANTAGE system:
“Atmosfera” series: T2WV - T4WV
“Cupido” series: CU2WV - CU4WV
“Rollkey” series: Elegant - Deluxe
LO.T2WMR
TO.GO-V
Certain advanced functions (e.g. code programming) are only possible with “Atmosfera” T2/4 WV or TO.GO-V
transmitters.
Other future products not included in this list may be compatible with the ADVANTAGE system. Consult the specific
product documentation for more information.
FOREWORD
All the radio receivers have a memory for storing their relative transmitters.
The number of transmitters a receiver can store is dependent on the size of memory available in the receiver, and is
normally 512 or 2048.
The installation and management of radio systems in plants using a great quantity of transmitters (e.g. companies,
public buildings, apartment blocks, etc.) can be very complicated. This is where ADVANTAGE becomes the ideal
solution since it offers the possibility to:
• Create a database file on PC for each individual receiver being managed, associating each transmitter recorded on
the receiver with its owner’s name and surname, notes, telephone number, address, etc.
• Record all the transmitters in the programmer memory before going to the installation location and then download
the file onto the receiver and start-up the system.
• Record a large quantity of transmitters in one single operation. For this purpose special packages of transmitters with
sequenced codes are available for order.
• Remove a transmitter that has been lost or stolen.
In a traditional receiver the system memory would have to be completely erased and then the whole block of
transmitters in the system would have to be recorded from scratch.
• Temporarily disable certain specific transmitters in a plant.
• Effortlessly manage transmitter button and receiver channel associations in multi-channel receiver and transmitter
systems.
• Protect the receiver with a personal access code to prevent counterfeits.
• Restore operation of an installation in the event of a fault or damage..
Page 4
4
5
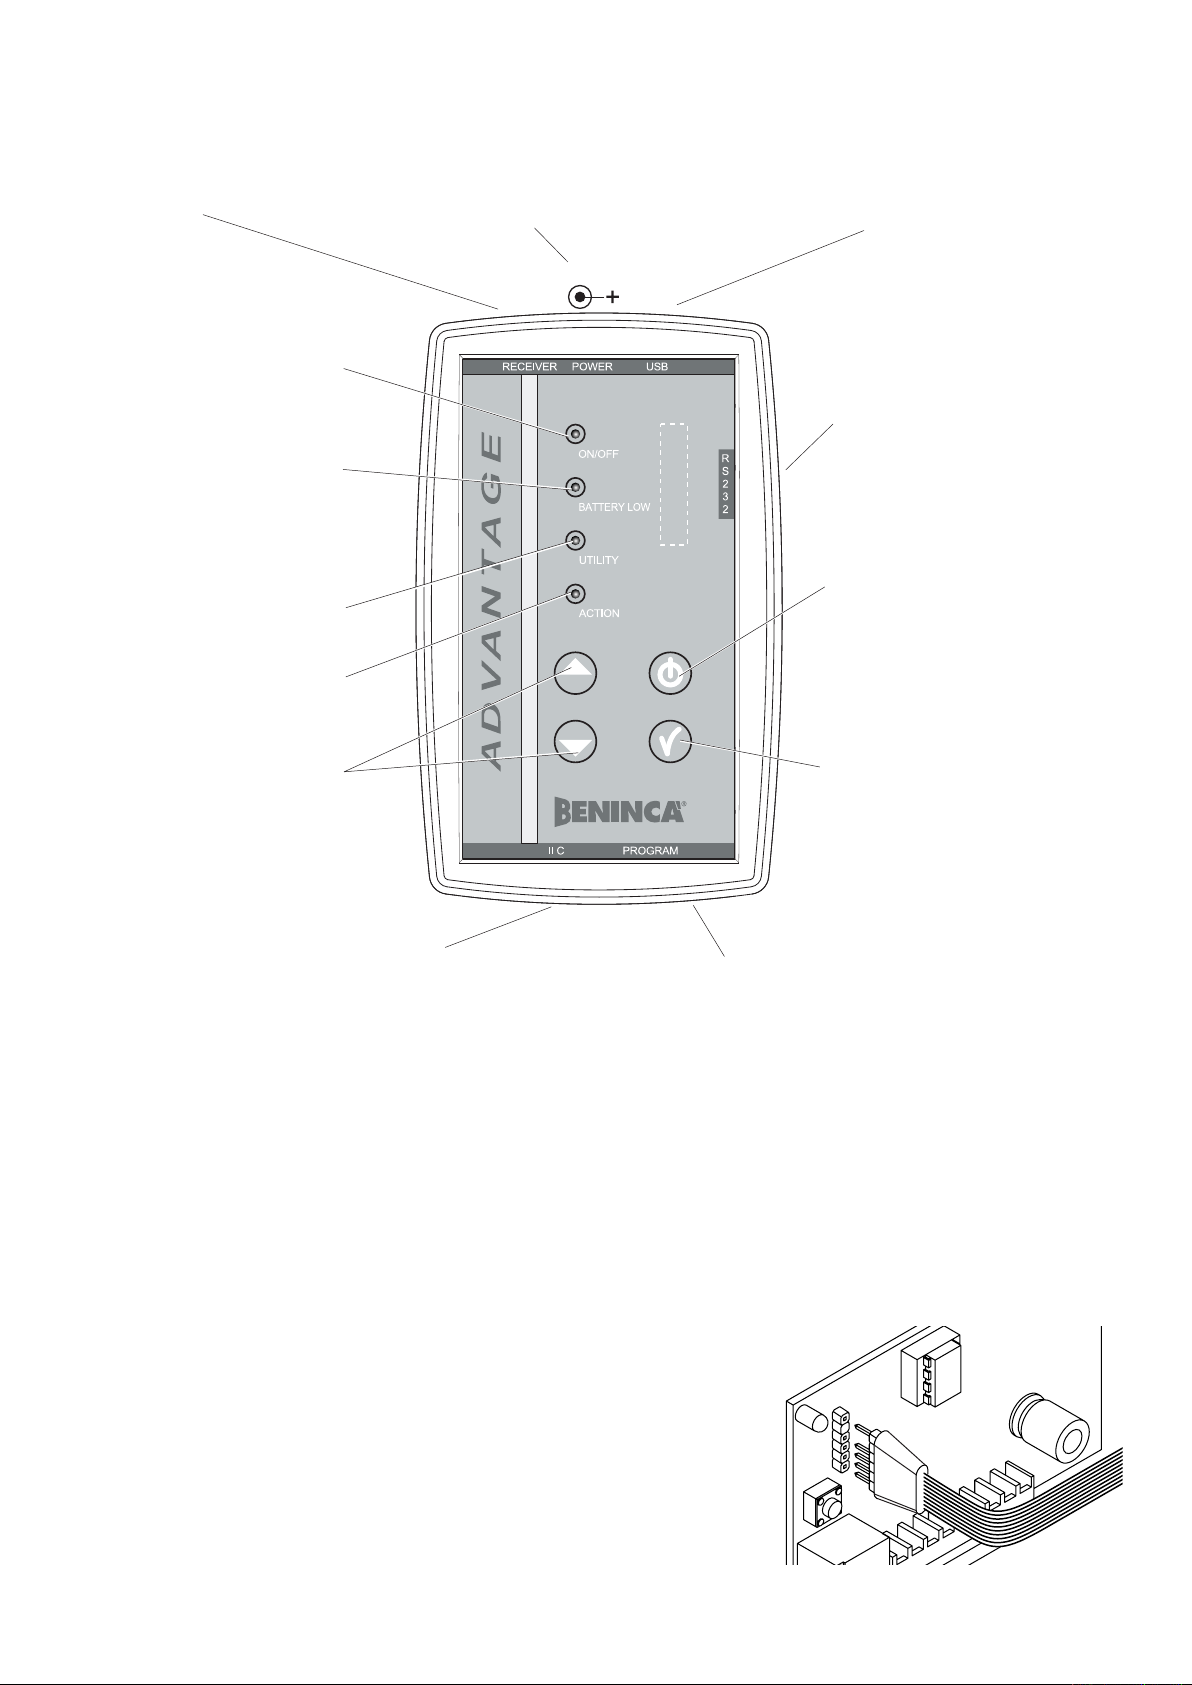
THE ADVANTAGE PROGRAMMER
The ADVANTAGE palm programmer is central core of the system, since it acts as a communication interface between
the “Advantage” software installed on the computer and the radio components (i.e. receivers and transmitters).
It has a built-in receiver for 433.92MHz rolling code transmitters, which can store up to 2048 transmitters.
This receiver acts as buffer memory to contain the data read by another receiver or by an Advantage file resident on
PC.
The receiver can also read via radio the code of a compatible transmitter and record it in an Advantage file.
Connecting the programmer to a receiver
The compatible receivers have a pin-strip connector (see figure to right) for the
PRX cable.
The other end of the cable has a jack that is plugged into the RECEIVER
input.
The Battery
A 9Vdc Ni-Mh160mAh battery powers the programmer when the mains supply
is not available. When the battery is fully charged it gives the programmer an
autonomy of about 2 hours.
The battery can be charged about 1000 times before having to be changed
with another battery having the same characteristics.
RECEIVER jack:
Use the PRX cable to plug the
programmer into the receiver.
POWER jack:
The 12Vdc power unit input plugs the
programmer into the mains supply and
recharge the built-in battery.
USB jack:
Use the USB cable to plug the
programmer into a PC by a USB port.
RS232 jack:
Use the serial cable to plug the
programmer into a PC by a serial port
(COM).
For use of the serial port see section
“The RS232 port”.
ON/OFF button:
Press for 3 sec’s to turn on/off the
programmer
OK button:
Starts the selected function entering the
programming procedure.
ON/OFF LED: On when the power is on
or the battery is charged.
LOW BATTERY LED:
Without the 12Vdc power unit
connected:
Led off: battery charged
Slow blinking: battery flat
With the 12Vdc power unit connected:
Fast blinking: battery is under charge
Led On: charging complete
Led Off: no battery
UTILITY LED:
The BLINKING changes sequence
to indicate which function has been
selected
ACTION LED: the LED indicates the
function status.
Select buttons pq:
Select a programming function by
pressing these buttons. The Utility
LED changes blink sequence to indicate
the function
IIC protocol jack:
Not used.
PROGRAM jack:
Use the PTXATM cable to plug the programmer into compatible transmitters.
This type of connection is only required when using the transmitter code cloning/
programming functions. During normal use the programmer and transmitter
communicate via radio.
12Vdc
Page 5
5
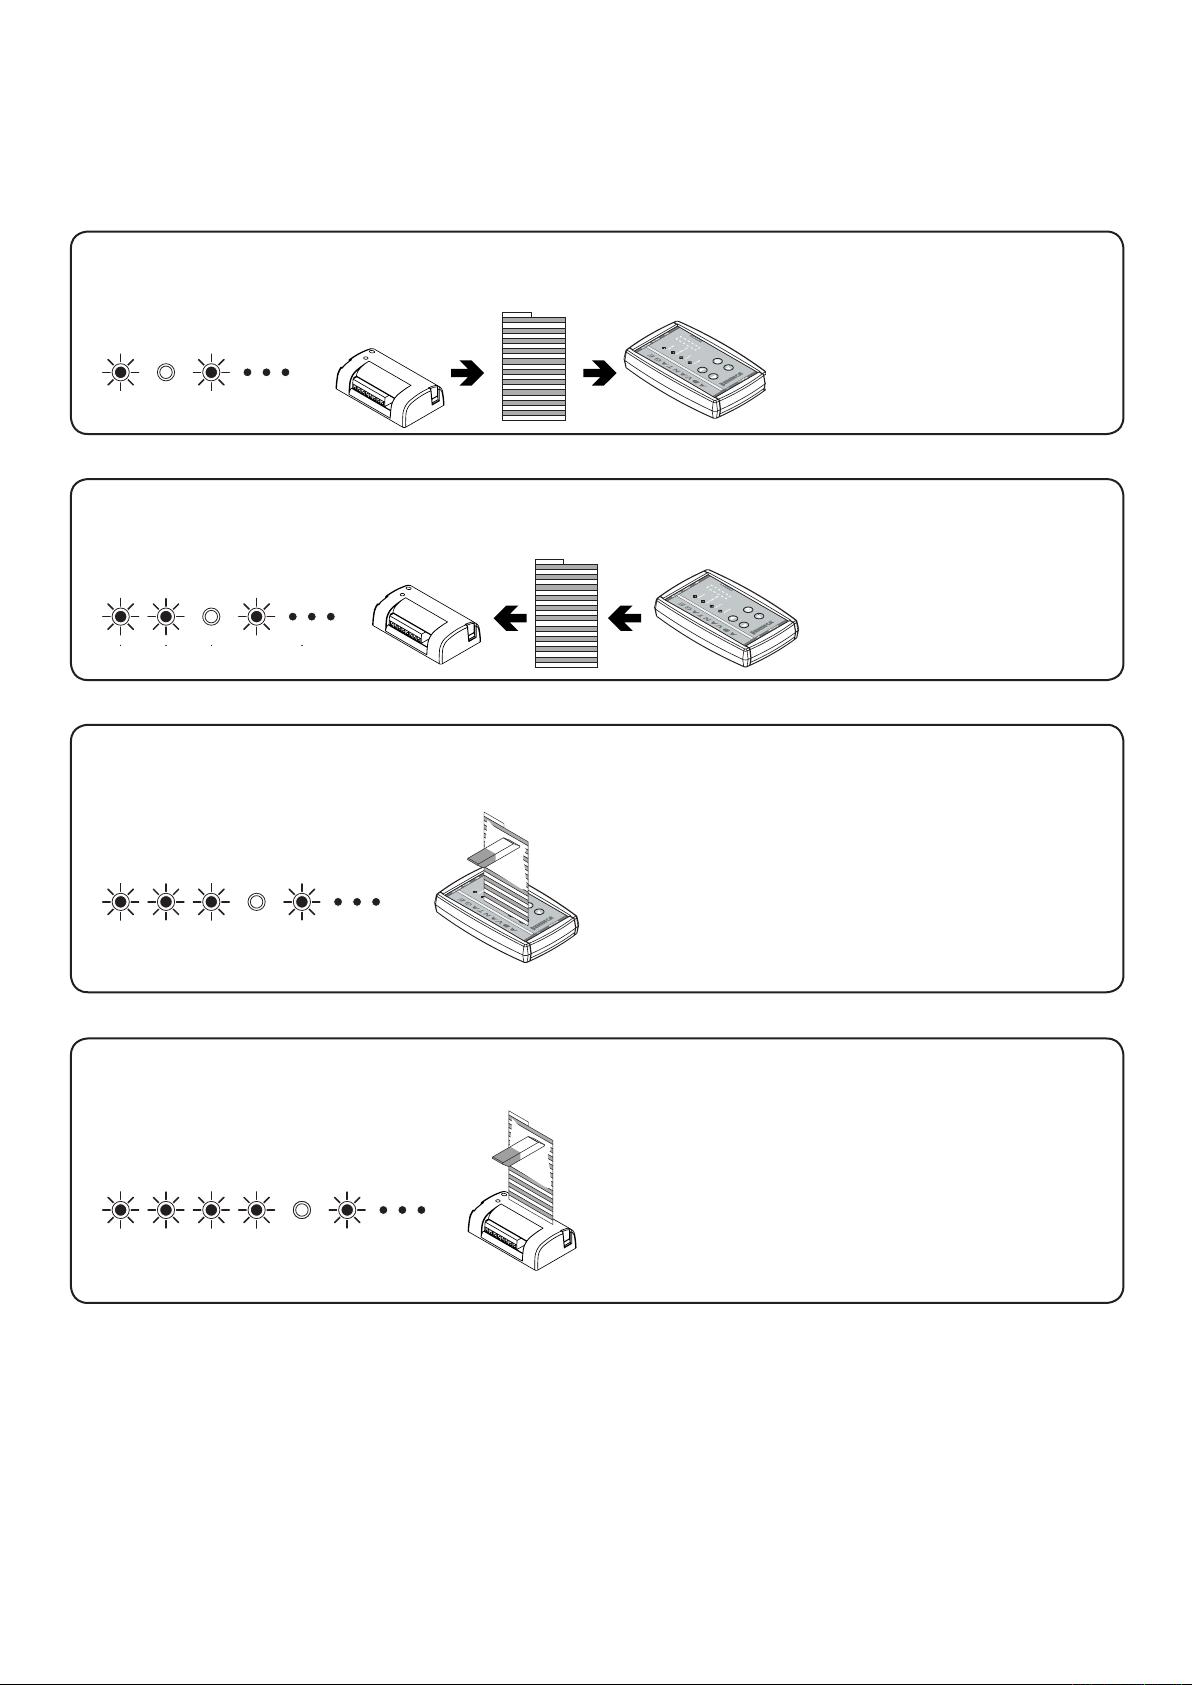
Using the programmer:
1) Press the ON/OFF button for 3 seconds to turn on the programmer (when the mains supply is connected or the built-
in battery is charged).
2) The UTILITY LED is normally off. If one of the select buttons pq is pressed the LED will start blinking.
The following blinking sequences indicate which function has been selected:
1 blink followed by a 1 sec pause – Read Memory Menu
The programmer reads the receiver memory and records it in its buffer memory.
2 blinks followed by a 1 sec pause – Write Memory Menu
The programmer reads its internal buffer memory and records it in the receiver memory.
3 blinks followed by a 1 sec pause – Cancel Buffer Memory Menu
The programmer cancels its buffer memory, including any password, so it is ready for a new reading.
4 blinks followed by a 1 sec pause – Cancel Receiver Memory Menu
The programmer cancels the receiver memory, including any password.
3) Select a function and press the OK button to confirm.
The ACTION LED indicates the programmer status:
Action LED off
No procedure in progress.
Action LED blinking
Data transfer in progress from/to the programmer
Action LED On
Transmission error (i.e. bad connection or incompatible receiver/transmitter)
If programming is completed successfully, the Action LED stops blinking and the programmer is ready for a new
procedure.
Page 6

6
7
THE ADVANTAGE SOFTWARE 1.04
The Advantage software plays the most important function in the system: management of the receiver memory.
The system is based on the concept that each receiver has a memory that records a list (database file) of the transmitter
codes.
This file can be created directly by the Advantage software or read by a receiver via the Advantage programmer and
transferred to PC for management by the software.
So the internal memory of the programmer acts as interface between receiver and software allowing files to be
transferred from receiver to PC and vice-versa.
What’s more the programmer can receive a transmitter code via radio signal and transmit it to the software.
Software installation
• Insert the “Advantage” CD-ROM.
• Double click on the file Advantage.exe, a dialogue window will open asking which directory to use to save the
program (default C:\Advantage). Click on “Browse..” to change directory.
Having selected the target directory a new sub-directory will be created called Advantage1.04, containing all the files
required to run the software. To uninstall the program on the PC just erase the whole sub-directory.
USB Drivers
1 – Connect the programmer to the PC using the USB cable
2 – Turn on the programmer.
The first time the USB port is used to connect the Advantage programmer to the Computer the PC operating system
will automatically start-up the procedure “Guided installation of new
hardware”.
• When the first dialog box opens select the option “Search for a driver
suited to peripheral” and click “Forward”.
• In the next dialog box select the option “Specify a route”, and click
“Forward”
• In the dialogue box that follows, press “Browse”. Enter the
“VCP_driverXP” directory under the Advantage directory and press
“Forward”.
• The required driver is automatically loaded by the operating system,
press “End” to confirm.
The above operation should be carried out twice. In the first phase, the
“USB <-> Serial” driver is loaded, in the second phase, the “USB Serial
Port” driver is loaded.
This procedure will only be performed the first time the Advantage
programmer is connected to the PC.
In the future the operating system will automatically recognise the
peripheral.
Never turn off or disconnect the programmer while the software is running.
Always follow this procedure:
1 – Turn off the programmer before plugging it into the PC by the USB
cable
2 – Turn on the palm programmer
3 - Start the Advantage software
4 – At the end of the work session, exit the program (File>Exit)
5 – Disconnect the USB peripheral (see Windows guide)
6 – Turn off the palm programmer
7 – Unplug the USB cable
Page 7

7
BEFORE STARTING
Before using the Advantage software it is best to get acquainted with certain basic operating principles.
SINGLE USER/MULTI-USER MODE
The software can be used in two modes:
Single user mode
The software will always be used by the same operator or all operators will be allowed to have free access to all
the installation files. In this case, at the first start-up select “Single User”. The user’s details only have to be entered
during this first start-up, after which the software and the files are freely accessible (no password is required).
Multi-user mode
The program is going to be shared by several users. In this case select “Multi-user”.
By selecting this mode:
- The details of each individual user have to be registered.
- Each user is given an individual Login/Password.
- An installation file can only be accessed by the user who created it and cannot be shared by other users.
Caution: When in this mode, if a user loses or forgets the password, access to all the files created by that
given user will be denied.
TRANSMITTER AND SYNC COUNTER STATUS
Every transmitter on file is described by a text in a specific colour coding for each status:
Green:
The transmitter is enabled, the Sync Counter is enabled and is greater than 0.
This mode represents all the transmitters enabled and read by a receiver or recorded with the “Add
TX by programmer” function. The Sync Counter is greater than 0 indicating a “real” transmitter.
Blue
The transmitter is enabled, the Sync Counter is enabled and is equal to 0.
This is similar to the “green” status, indicating the transmitters recorded in “Add TX by keyboard”
mode. The Sync Counter is equal to 0 indicating a “virtual” transmitter.
The code is recorded and enabled but no transmitter signal has been recorded up to now. The
moment the transmitter sends a signal to the receiver the Sync Counter increases its value, changing
the TX to “real”.
Black:
The transmitter is enabled, the Sync Counter is disabled.
This mode represents all the “clonable” transmitters. With Sync Counter disabled the code can be
duplicated unlimitedly. By disabling the Sync Counter of even just one transmitter plant security is put
at serious risk since it becomes equivalent to fixed code receiver system.
Red:
The transmitter is disabled.
This mode represents all the disabled transmitters, regardless of their Sync Counter status. The
transmitter code remains in the receiver memory but all its signals are ignored. They can be enabled
by using the “Modify TX” function.
Purple:
Transmitter added manually
This is used temporarily by the “Compare memory” functions to highlight transmitters added manu-
ally to the receiver and recorded on file.
REGISTER A NEW USER
• Start the Advantage.exe application by double clicking the icon.
• The first time the application is run the “Register a new user” dialog box is
opened and requests: Name/Surname/Login/Password1/Password2, (max. 10
characters each).
Select the software user mode: Single user or Multi-user as described above.
If Single user is selected, fill in all the boxes even if the Login and Password will
no longer be requested.
If Multi-user is selected, the data will be recorded as the first user. Additional
users can be registered using the “Add a new user” menu.
Page 8

8
9
WORK AREA
LEGEND
1 Installation name:
The name given to the current installation
2 Address:
The address of the current installation
3 Num TX:
The number of transmitters in the current installation
4 Size:
How much memory is taken up by the current instal-
lation (512 or max 2048 transmitters)
5 Menu bar: File/Modify/...:
Access to the various software functions.
See the descriptions of each individual menu below.
6 Quick menu function keys:
New/Open/Save/Add Tx by programmer/Print.
Press the button to interrupt any read or write
memory procedure in progress
7 Status Bar:
The bar is gradually filled to show how much time is
left before completing the read or write procedure
8 Key Rec#: The memory location of the transmitter is
shown. If a transmitter code is already stored in that
location, the “Modify TX” box is shown when clicking
the key.
9 Communication:
The status of the connection between software and
programmer.
TIME OUT: Programmer disconnected, a bad connec-
tion or no power.
OK: Programmer connected. The programmer soft-
ware version is also displayed.
10 Code
The code of the transmitter, which is expressed in
hexadecimal format, i.e. including numbers 0 to 9 and
letters A-B-C-D-E-F.
11 Memory size: It indicates the memory size of the re-
ceiver.
12 Active keys: The existing links between the key
number of the transmitter and the output channel key
number of the receiver are shown.
13 Procedure in progress
A description of the procedure being performed (e.g.
read, write, programming, etc).
14 Name, surname and notes:
Fill in the boxes with the “Modify TX” function to cre-
ate an unequivocal identification of each transmitter
recorded on file.
1 2 4
7
5
6
8
9
10
12
14
11
3
13
Page 9

9
FILE MENU
New
Create a new installation.
The “Installation data” dialog box is opened and requests:
Size of the receiver memory that will store the file. Select 512 TX or 2048
TX.
Configuration CH1/2/3/4:
The relay contact mode of each channel can be set as follows:
0 Bistable mode
(i.e. each control signal will change the relay status)
1 Pulse mode - default
(i.e. the relay will change status for 1 sec, then return to its initial
status)
2/90 Dwell mode
Select the number of seconds the relay will remain switched.
Installation name, address, town.
Fill in these boxes so that each installation is unequivocally differentiated
from any other.
Open
Open an existing installation.
The dialog box shows the main installation data stored on file. Select an
installation and press OK to confirm.
The “Delete” button will eliminate an installation from the file.
In multi-user mode only the installations created by the current user will
be shown.
Save
Record the changes made to the installation.
Confirmation is requested.
Save as...
Records a copy of the current installation.
A “Installation data” dialog box is opened where the new installation data
can be entered.
Print
Print a list of all the transmitters on file based on the selected view options
(see View menu).
Avoid printing in the “TX Record id” View mode, since this will print the
whole list of the receiver, including empty memory locations.
Exit
Exit the work session.
Page 10

10
11
MODIFY MENU
Modify installation data
Change the data of the current installation offering the same options
shown when creating a new installation (see menu bar File>New)
Change Password
Enter a password for the current installation (max 6 characters). The password has to be repeated as confirmation. The password is then recorded
on the receiver, thereby preventing transmitters from being recorded
manually. The password is requested at every attempt to read or write on
the receiver.
N.B.: If no password protection is required leave the box empty and press
OK. The reset receiver procedure (both from Menu Utilities>Reset receiver
and from the programming button) will cancel the password.
Add TX by keyboard
To insert a group of transmitters this function requests the codes of the
lowest and highest transmitters. All the codes within the lowest and highest range will be automatically recorded on file.
For this purpose transmitter packages are offered on order with sequenced codes. The package specifies the codes of the first (i.e. lowest
code) and last (i.e. highest code) transmitters.
This procedure also allows “Virtual” codes to be recorded for transmitters
that do not actually exist but can be programmed at a later date and are
recorded automatically (see “Program TX” function)
All transmitters recorded by this procedure have Sync Counter=0
(i.e. text in blue).
The NumTX option avoids the need to calculate the highest hexadecimal
TX code if several virtual codes are being recorded. Just enter the hexadecimal code of the first TX in the “SN First TX” box and the quantity of virtual
TX’s being recorded in the “NumTX” box. The program will automatically
record the new virtual TX’s with progressive hexadecimal codes.
See note on “Hexadecimal coding” at page 15.
It is also possible to random create new TX codes, by activating (R) the
“Automatic enetering“ dialogue box and indicating the number of codes
to be created in the Num TX field.
Add TX by programmer
This function allows one or more transmitters to be recorded on archive
by remote control:
- Enter the quantity of TX’s being recorded on file and press OK.
- The system will go in standby mode waiting to receive the codes.
- Position each transmitter next to the programmer and progressively
press any button on each transmitter being recorded.
- When the last code has been received, the system exits the standby
mode and returns to the main screen.
Transmitters recorded in this way always have Sync Counter >0 (green).
The button puts the programmer in standby waiting to receive a single
code, without opening the “TX quantity being recorded ” dialog box.
Delete TX
The selected transmitter is removed from the current file.
Warning!:
The cancellation can not be restored.
Page 11

11
T2/4WV
TO.GO-V
PTXA
TM
PTXA
TM
Program TX
The connected transmitter is programmed and assigned the transmitter
code currently selected from file. The original transmitter code will be
overwritten.
Open the casing of an “Atmosfera” T2WV or T4WV transmitter and use
the PTXATM cable to plug it into the “PROGRAM” jack of the programmer
as shown to the right.
For “TO.GO” transmitters it is sufficient to open the battery housing, as
indicated aside.
Select “Program TX”, and click on OK to confirm.
The end of the procedure is indicated by the message “The transmitter
has been programmed successfully”.
TX programming can:
Automatically add extra transmitters.
Initially create a given number of “virtual” transmitters by the “Add TX by
keyboard” function (Sync Counter 0 – text in blue), recording codes on file
that do not actually refer to any existing or “real” transmitter.
Whenever necessary a transmitter programmed with a virtual code will
be automatically recorded on the receiver as normal, “real” rolling-code
transmitters.
Cloning a transmitter.
Program a new transmitter with the same code as a transmitter with the
Sync Counter disabled (see Menu Modify>modify TX).
This will have created a “clone” of the transmitter with exactly the same
functionalities as its original.
This function makes it possible to add a virtually infinite number of new
transmitters to the receiver, without having to access the plant.
Modify selected TX
This opens the dialogue box for the selected transmitter/s configuration
(see “Select all” Menu):
In addition to the text fields for Name/Surname/Notes, this function configures:
- The association between transmitter button (B1/B2/B3/B4) and receiver
channel (RL1/RL2/RL3/RL4).
- Enable(R)/Disable (£) transmitter.
See “Disable TX” function
- Enable(R)/Disable (£) Sync Counter
Sync Counter:
Disabling the Sync Counter has the same effect as removing the rollingcode algorhythm control on the receiver for the transmitter in question.
This creates a clonable transmitter that can be duplicated an unlimited
number of times and these “clones” will be automatically recorded the
moment they send a radio signal to the receiver.
Cloning is possible using the “Program TX” function (see below) by programming the transmitter code with Sync Counter disabled, on all “clone”
transmitters.
Select all
Select all transmitters.
The transmitters which are not listed in the current display mode will not
be selected. To modify all transmitters stored in the archive, select the
“Num record TX” function in the Display Menu.
To select a group of transmitters:
To select a block of transmitters in sequence
Keep the Shift (Ò) button pressed and click on the first and last transmitter,
all intermediate transmitters are selected.
To select an assortment of transmitters
Keep the Ctrl button pressed and click on each individual transmitter to
select. The Ctrl button can also be used to remove individual transmitters
from the selection.
Page 12

12
13
VIEW MENU
TX record id
Default view mode. The complete memory of the file is shown, ordered by
memory location id.
Avoid printouts in this mode.
Active TX
Only the enabled transmitters are shown (i.e. text in green or blue).
Inactive TX
Only the disabled transmitters are shown (i.e. text in red).
TX Sync 0
Only the transmitters with Sync Counter=0 are shown (i.e. text in blue).
TX Sync other than 0
Only transmitters with Sync Counter other than 0 (green colour) are displayed.
TX with Sync disabled
Only the transmitters with Sync Counter disabled are shown (i.e. text in
black).
Page 13

13
UTILITIES MENU
Read receiver
Read the memory of the receiver connected to the programmer. Any open
archives will be closed to allow the creation of a new archive. If a password is required it will now be requested. The “New installation” dialog
box will be opened to assign a name to the archive being read.
The programmer works merely as a bridge, so its buffer memory is not
affected.
Write receiver
The contents of the current file are written on the receiver connected to
the programmer.
The programmer works merely as a bridge, so its buffer memory is not
affected.
Any data recorded previously on the receiver will be overwritten.
Reset receiver
The receiver memory is completely erased, including any password.
Read programmer
Read the buffer memory of the programmer. Any open archives will be
closed to allow the creation of a new archive. If a password is required it
will now be requested. The “New installation” dialog box will be opened to
assign a name to the archive being read.
Write on programmer
The contents of the current file is written on the programmer buffer
memory.
Any data found previously on the programmer buffer memory is overwritten.
Reset programmer
The buffer memory is completely erased, including any password.
Obsolete memory import
This allows the reading of a memory of receivers series LO.R1/2WCV and
R1/2WBV.
Nevertheless, it is not possible to connect the receiver directly to the
Advantage programmer. The EPROM memory must be removed from the
obsolete receiver and should be installed in a new compatible one.
If, after reading, the memory is modified by wri ting, the latter will lose its
compatibility with the old receiver and must be used only with the compatible receiver.
Press the button to interrupt any read or write memory procedure in
progress.
Important:
When a file is transferred from PC to the receiver memory the Name/
Surname/Notes fields are not recorded
As a result if a receiver or the programmer buffer memory is read this data
will be missing.
Page 14

14
15
OPTIONS MENU
Create a new user
To create a new user the same “register a new user” dialog box is shown
as the first time the program is started.
A new user can now be created.
Every new user will have a personal login/password and a personal plant
file, which cannot be shared with other users.
Modify user details
Modify the details (name/surname/login/password) of the user currently
authorised by the system.
Search
Enter a reference in the box to search the current file and then click on the
search button.
Searches can be made on both the texts (i.e. name/surname/notes) and
transmitter codes. Select the box that refers to the field where the search
has to be made.
Compare programmer memory
Compare the current file with the programmer buffer memory.
If any transmitters are not contained in the file they are automatically recorded.
Any transmitters added in this way are highlighted in purple.
Compare receiver memory
Compare the current file with the receiver memory.
If any transmitters are not contained in the file they are automatically recorded.
The transmitters added in this way are highlighted in purple.
Select language
Select a language from the list.
Page 15

15
COMMUNICATION MENU
Connect COM_
This allows for the connection of the Advantage programmer to the default port (see “Search Port”), so that memory reading/writing operations,
reset, etc. can be carried out.
Disconnect COM_
This allows for the disconnection of the programmer. It is therefore possible to work Off-line on the archive (i.e. with no need to connect the programmer to the PC). Default setting.
Search Port
All ports available are detected by the COM of the PC to which the
programmer is connected. If the programmer is detected, it will be automatically connected. On the rear bar the message COMMUNICATION
OK appears and, if connected, the software version of the receiver is
displayed.
The port number is stored in memory and given by default for the selection of the current work.
Select Port
If the programmer is not detected with the “Search Port” function, a manual research can be carried out: select the available ports one by one and
enter the “Connect COM_” control for each single port selected.
If the programmer is not detected, check the following:
the programmer is switched on (LED ON), connected and powered correctly (to mains or battery).
The drivers are correctly installed. If a UBS cable is in use, see “ USB
Driver “ section.
If a RS232 cable is used, check the internal setting of the Dip-Switch.
Page 16

16
17
INCREASING THE SYNC COUNTER
After the system is started up the Sync Counter of each transmitter recorded on the receiver will increase every time a
signal is received. This constant synchronisation between receiver and transmitter is an essential factor in the security
of rolling-code systems.
To maintain this security level every rewrite procedure on an installation (e.g. to add or cancel transmitters) must only be
performed after an update of the database stored on PC.
This update avoids the possibility that, after a modification is made, the receiver Sync Counter has a lower value than
the transmitter Sync Counter, which would result in the transmitter not being recognised
by the receiver.
To update an installation:
1 Open the installation database.
2 Hook the receiver up to the Advantage programmer that must then be connected to
the PC or, alternatively, upload the receiver on the buffer memory and just connect PC
and programmer.
3 Open the Options Menu and select Compare receiver memory if the update is being
made directly from the receiver, otherwise select Compare programmer memory if the
update is being made from the programmer buffer.
4 At the end of the procedure the Sync Counters will be updated, the text and notes
fields will be left unchanged and any transmitters added manually will be highlighted
in purple.
Now any change can be made to the Advantage archive and then downloaded onto the receiver memory with the assu-
rance that all the transmitters will be recognised when the operation of the installation is restored.
RESTORING A DAMAGED INSTALLATION
If a receiver is damaged, the first action to take is verify the state of the EPROM memory.
Remove the EPROM from the damaged receiver and mount it in a new receiver of the same model. If the EPROM has
not been damaged this simple operation will restore the system.
If the EPROM has lost the transmitter data, proceed as follows:
1 Open the Advantage archive for the damaged installation.
2 Disable all the transmitter Sync Counters and save the changes.
3 Download the archive of a new receiver and start up the installation.
4 Leave the plant in operation for enough time to allow all the transmitters to synchronise with the new receiver.
5 When this process is complete use the Compare Memory function to update the installation database.
6 Enable the Sync Counters of all the transmitters and save the changes.
7 Rewrite the memory.
The installation functionalities have now been restored.
EPROM
Page 17

17
NOTES AND TIPS ON THE USE OF ADVANTAGE
1 In installations managed by the Advantage system, always work on the software file and try not to record transmitters
manually because, as they are not recorded on file, this could be a cause of confusion.
2 Always protect the receivers with a password.
3 Assign a clear, unequivocal name to each transmitter so that any future work on the plant is clear and simple.
4 Each transmitter of the Advantage system becomes strictly personal.
Inform all users of this fact to avoid confusion about the transmitter assignment. If a transmitter is lost or stolen and
has to be changed, be sure to trace the correct code to substitute.
5 Always create a number of “virtual” codes.
This will allow transmitters to be added in the future, which will then be automatically recorded on the receiver when
sending the first signal, thereby maintaining duplication security.
These “virtual” codes should be chosen with special care not to use identical codes on different plants.
6 Only use the clone functions when strictly necessary, since they reduce system security against code duplicating.
HEXADECIMAL CODING
Each transmitter code is identified by a number expressed in hexadecimal numbering.
Hexadecimal numbering (i.e. based on 16 numbers instead of 10) uses some letters of the alphabet to represent the
numbers from 10 to 15, as shown in the table below:
0 1 2 3 4 5 6 7 8 9 10 11 12 13 14 15
0 1 2 3 4 5 6 7 8 9
A B C D E F
As a result, when recording “virtual” codes, this numbering system must always be used.
There are a maximum of 7 figures available, so the codes will range from 0 and FFFFFFF.
SAFETY BACK-UP
It is good practise to periodically create a safety copy of the Advance.dat file located in the program’s main directory.
This file contains all essential data (i.e. users, plant files, etc) for restoring system operation.
THE RS232 PORT
The default setting for communication between the programmer and the Advantage software is the USB port using the
USB cable provided.
If the PC does not have a USB port, the RS232 serial port can be used with the RS232 cable provided.
If this is the case:
• Open the programmer case by opening the cover on the battery compartment and unscrewing the 4 screws.
• Move Jumper JP so that it bridges Jumper JP1 and opens Jumper JP2
This will disable the USB port and enable the RS232 port. To restore the USB port return the jumper to Jumper JP2
thereby opening Jumper JP1.
JP1
JP2
USB
JP1
JP2
RS232
Page 18

18
QUICK GUIDE TO CONNECTIONS
1
If it is not already installed, load the Advantage software and USB driver,
see the “Software Advantage” section
2
Switch off the Advantage programmer and connect it to the PC by the
USB port of the programmer and the USB cable provided.
If the PC does not have a USB port, an RS232 port can be used, see “Use
of the RS232 port”.
3
Switch off the radio receiver and connect it to the Advantage programmer
using the PRX cable provided.
(The radio receiver can also be connected later, during the data transfer
from the programmer)
4
Turn on the programmer, which has to be hooked up to its mains power
unit provided or, alternatively it must have sufficient battery charge.
If the receiver is connected its LED will light up Orange.
5
Start the Advantage software on the PC.
Select the Communication > Connect COM Menu.
If the software does not recognise the programmer the message “Communication Error” appears, select the “Search Port” function in the Communication Menu to carry out an automatic research and “Select Port” if
the automatic research is not successful.
If the software is using the wrong language change it by the Options>Change
Language menu.
6
Now practice with these functions to get to know the Advantage system:
1 Create a new installation file.
2 Record a series of transmitters in the various modes.
3 Complete the Name/Notes dialog boxes to personalize the transmit-
ters
4 Save the file on PC
5 Record the current file on the buffer and/or on the receiver.
7 Read the buffer and/or receiver memory to make sure the transmitters
have been recorded.
8 Turn on the receiver and check that the recorded transmitters work
properly.
USB
CABLE
PRX
CABLE
1
2
3
Page 19

Advantage 1.07 update _ L8542XXX_R0
ADVANTAGE 1.07
The modifications made to the software with version 1.07 are described in this document.
For any further information, please refer to instructions supplied together with the programmer (Advantage 1.04).
BACK-UP FOLDER
At each start of the program, Advantage 1.07 makes a copy of the database (Advance.dat file) in folder C:\Advantage\Backup\.
Folders are organized as follows: Backup\year\month\day\time_minutes_seconds.
Backup files older than 180 days are erased automatically.
DISPLAY MENU - ENTER ORDER
Remote control codes are listed in the database in entering chronological order.
INSTALLATION DATA WINDOW
A “Load Data” button is provided in order to allow copy of installation data of an existing archive.
REMOTE CONTROL ENTERING WINDOW
Selection boxes: "copia nome" (copy name) - "copia cognome" (copy surname) - "copia note" (copy notes)
They allow to apply the same text string to fields Name/Surname/Notes to a multiple selection of remote controls.
Page 20

AUTOMATISMI BENINCÀ SpA - Via Capitello, 45 - 36066 Sandrigo (VI) - Tel. 0444 751030 r.a. - Fax 0444 759728
 Loading...