


Washing Machine |
EV 6102 |
Plně automatická pračka
Automatická pračka
Pralka automatyczna
1 - EN

1 Important safety instructions
This section contains safety instructions that will help protect from risk of personal injury or property damage. Failure to follow these instructions shall void any warranty.
General safety
•This product should not be used by persons with physical, sensory or mental disorders or unlearned or inexperienced people (including children) unless they are attended by a person who will be responsible for their safety or who will instruct them accordingly for use of the product.
•Never place the product on a carpet-covered floor; Otherwise, lack of airflow beneath the machine will cause electrical parts to overheat.
This will cause problems with your product.
•Do not operate the product if the power cable
/ plug is damaged. Call the Authorized Service Agent.
•Have a qualified electrician connect a
16-Ampere fuse to the installation location of the product.
•If the product has a failure, it should not be operated unless it is repaired by the Authorized
Service Agent. There is the risk of electric shock!
•This product is designed to resume operating in the event of powering on after a power interruption. If you wish to cancel the programme, see "Cancelling the programme" section.
•Connect the product to a grounded outlet protected by a fuse complying with the values in the "Technical specifications" table. Do not neglect to have the grounding installation made by a qualified electrician. Our company shall not be liable for any damages that will arise when the product is used without grounding in accordance with the local regulations.
•The water supply and draining hoses must be securely fastened and remain undamaged. Otherwise, there is the risk of water leakage.
•Never open the loading door or remove the filter while there is still water in the drum. Otherwise, risk of flooding and injury from hot water will occur.
•Do not force open the locked loading door. The loading door will be ready to open just a few minutes after the washing cycle comes to an end. In case of forcing the loading door to open, the door and the lock mechanism may get damaged.
•Unplug the product when not in use.
•Never wash the product by spreading or pouring water onto it! There is the risk of electric shock!
•Never touch the plug with wet hands! Never unplug by pulling on the cable, always pull out by grabbing the plug.
•Use detergents, softeners and supplements suitable for automatic washing machines only.
•Follow the instructions on the textile tags and
on the detergent package.
•The product must be unplugged during installation, maintenance, cleaning and repairing procedures.
•Always have the installation and repairing procedures carried out by the Authorized Service Agent. Manufacturer shall not be held liable for damages that may arise from procedures carried out by unauthorized persons.
Intended use
•This product has been designed for domestic use. It is not suitable for commercial use and it must not be used out of its intended use.
•The product must only be used for washing and rinsing of laundry that are marked accordingly.
•The manufacturer waives any responsibility arisen from incorrect usage or transportation.
Children's safety
•Electrical products are dangerous for the children. Keep children away from the product when it is in use. Do not let them to tamper with the product.
•Do not forget to close the loading door when leaving the room where the product is located.
•Store all detergents and additives in a safe place away from the reach of the children.
2 Installation
Refer to the nearest Authorised Service Agent for installation of the product. To make the product ready for use, review the information in the user manual and make sure that the electricity, tap water supply and water drainage systems are appropriate before calling the Authorized Service Agent. If they are not, call a qualified technician and plumber to have any necessary arrangements carried out.
C Preparation of the location and electrical, tap water and waste water installations at the place of installation is under customer's responsibility.
B Installation and electrical connections of the product must be carried out by the Authorized Service Agent. Manufacturer shall not be held liable for damages that may arise from procedures carried out by unauthorized persons.
A Prior to installation, visually check if the product has any defects on it. If so, do not have it installed. Damaged products cause risks for your safety.
C Make sure that the water inlet and discharge hoses as well as the power cable are not folded, pinched or crushed while pushing the product into its place after installation or cleaning procedures.
Appropriate installation location
•Place the machine on a rigid floor. Do not place it on a long pile rug or similar surfaces.
•Total weight of the washing machine and the dryer -with full loadwhen they are placed on top of each other reaches to approx. 180
2 - EN
kilograms. Place the product on a solid and flat floor that has sufficient load carrying capacity!
•Do not place the product on the power cable.
•Do not install the product at places where temperature may fall below 0ºC.
•Place the product at least 1 cm away from the edges of other furniture.
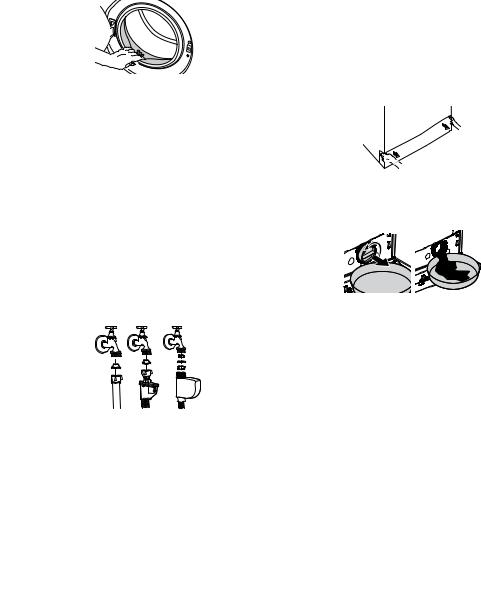
Removing packaging reinforcement
Tilt the machine backwards to remove the packaging reinforcement. Remove the packaging reinforcement by pulling the ribbon.
Removing the transportation locks
A Do not remove the transportation locks before taking out the packaging reinforcement.
A Remove the transportation safety bolts before operating the washing machine! Otherwise, the product will be damaged.
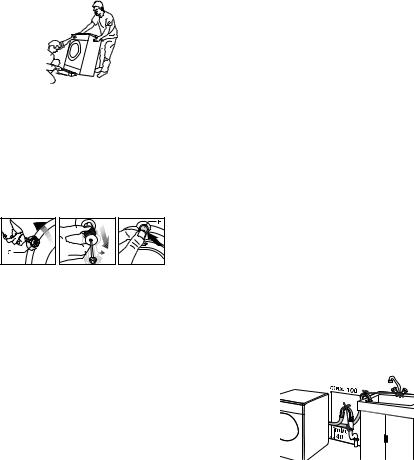
Loosen all the bolts with a suitable spanner until they rotate freely (C). Remove transportation safety bolts by turning them gently. Attach the plastic covers supplied in the User Manual bag into the holes on the rear panel. (P)
C Keep the transportation safety bolts in a safe place to reuse when the washing machine needs to be moved again in the future.
C Never move the product without the transportation safety bolts properly fixed in place!
Connecting water supply
C The water supply pressure required to run the product is between 1 to 10 bars (0.1 – 10 MPa). It is necessary to have 10 – 80 liters of water flowing from the fully open tap in one minute to have your machine run smoothly. Attach a pressure reducing valve if water pressure is higher.
C If you are going to use the double water-inlet product as a single (cold) water-inlet unit, you must install the supplied stopper to the hot water valve before operating the product. (Applies for the products supplied with a blind stopper group.)
C If you want to use both water inlets of the product, connect the hot water hose after removing the stopper and gasket group from the hot water valve. (Applies for the products supplied with a blind stopper group.)
A Models with a single water inlet should not be connected to the hot water tap. In such a case the laundry will get damaged or the product will switch to protection mode and will not operate.
A Do not use old or used water inlet hoses on the new product. It may cause stains on your laundry.
1.Connect the special hoses supplied with the product to the water inlets on the product. Red hose (left) (max. 90 ºC) is for hot water inlet, blue hose (right) (max. 25 ºC) is for cold water
inlet.
A Ensure that the cold and hot water connections are made correctly when installing the product. Otherwise, your laundry will come out hot at the end of the washing process and wear out.
Tighten all hose nuts by hand. Never use a wrench when tightening the nuts. Open the taps completely after making the hose connection to check
for water leaks at the connection points. If any leaks occur, turn off the tap and remove the nut. Retighten the nut carefully after checking the seal. To prevent water leakages and damages caused by them, keep the taps closed when the machine is not in use.
Connecting to the drain
•The end of the drain hose must be directly connected to the wastewater drain or to the washbasin.
A Your house will be flooded if the hose comes out of its housing during water discharge. Moreover, there is risk of scalding due to high washing temperatures! To prevent such situations and to ensure smooth water intake
and discharge of the machine, fix the end of the discharge hose tightly so that it cannot come out.
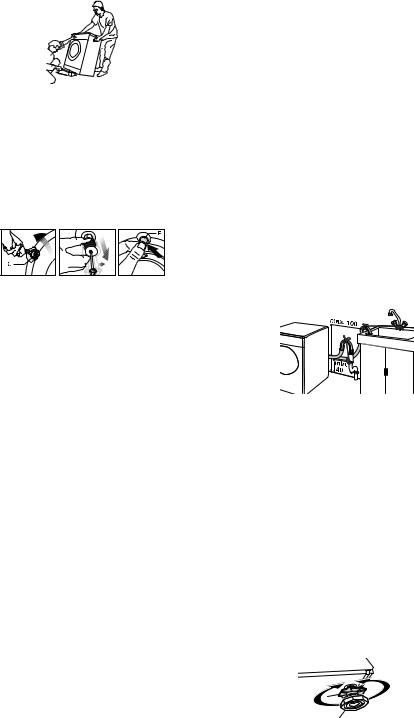
•The hose should be attached to a height of at least 40 cm, and 100 cm at most.
•In case the hose is elevated after laying it on the floor level or close to the ground (less than
40 cm above the ground), water discharge becomes more difficult and the laundry may come out excessively wet. Therefore, follow the heights described in the figure.
•To prevent flowing of dirty water back into the machine and to allow for easy discharge, do not immerse the hose end into the dirty water or do not drive it in the drain more than 15 cm. If it is too long, cut it short.
•The end of the hose should not be bent, it should not be stepped on and the hose must not be pinched between the drain and the machine.
•If the length of the hose is too short, use it by adding an original extension hose. Length of the hose may not be longer than 3.2 m.
3 - EN

To avoid water leak failures, the connection |
the production. It is not harmful for the product. |
|
between the extension hose and the drain |
Disposing of packaging material |
|
hose of the product must be fitted well with an |
Packaging materials are dangerous to children. |
|
appropriate clamp as not to come off and leak. |
Keep packaging materials in a safe place away |
|
Adjusting the feet |
from reach of the children. |
|
A In order to ensure that the product operates |
Packaging materials of the product are |
|
more silently and vibration-free, it must stand |
manufactured from recyclable materials. Dispose of |
|
level and balanced on its feet. Balance the |
them properly and sort in accordance with recycled |
|
machine by adjusting the feet. Otherwise, the |
waste instructions. Do not dispose of them with |
|
product may move from its place and cause |
normal domestic waste. |
|
crushing and vibration problems. |
Transportation of the product |
|
Loosen the lock nuts on the feet by hand. Adjust |
Unplug the product before transporting it. Remove |
|
the feet until the product stands level and balanced. |
water drain and water supply connections. Drain |
|
Tighten all lock nuts again by hand. |
the remaining water in the product completely; |
|
|
see, "Draining remaining water and cleaning the |
|
|
pump filter". Install transportation safety bolts |
|
|
in the reverse order of removal procedure; see, |
|
|
"Removing the transportation locks". |
|
|
C Never move the product without the |
|
A Do not use any tools to loosen the lock nuts. |
transportation safety bolts properly fixed in |
|
Otherwise, they will get damaged. |
place! |
|
Electrical connection |
Disposing of the old product |
|
Connect the product to a grounded outlet |
Dispose of the old product in an environmentally |
|
protected by a fuse complying with the values in |
friendly manner. |
|
the "Technical specifications" table. Our company |
Refer to your local dealer or solid waste collection |
|
shall not be liable for any damages that will arise |
centre in your area to learn how to dispose of your |
|
when the product is used without grounding in |
product. |
|
accordance with the local regulations. |
For children's safety, cut the power cable and break |
|
• Connection must comply with national |
the locking mechanism of the loading door so |
|
regulations. |
that it will be nonfunctional before disposing of the |
|
• Power cable plug must be within easy reach |
product. |
|
after installation. |
3 Preparation |
|
• The voltage and allowed fuse or breaker |
|
|
Things to be done for energy saving |
||
protection are specified in the “Technical |
||
Following information will help you use the product |
||
specifications” section. If the current value of |
||
in an ecological and energy-efficient manner. |
||
the fuse or breaker in the house is less than 16 |
||
• Operate the product in the highest capacity |
||
Amps, have a qualified electrician install a 16 |
||
allowed by the programme you have selected, |
||
Amp fuse. |
||
but do not overload; see, "Programme and |
||
• The specified voltage must be equal to your |
||
consumption table". |
||
mains voltage. |
||
• Always follow the instructions on the detergent |
||
• Do not make connections via extension cables |
||
packaging. |
||
or multi-plugs. |
||
• Wash slightly soiled laundry at low |
||
B Damaged power cables must be replaced by |
||
temperatures. |
||
the Authorized Service Agents. |
||
• Use faster programmes for small quantities of |
||
First use |
||
lightly soiled laundry. |
||
Before starting to use the product, make sure |
||
• Do not use high temperatures for laundry that is |
||
that all preparations are made in accordance |
||
not heavily soiled or stained. |
||
with the instructions in sections "Important safety |
||
• Do not use detergent in excess of the amount |
||
instructions" and "Installation". |
||
recommended on the detergent package. |
||
To prepare the product for washing laundry, |
||
Sorting the laundry |
||
perform first operation in Cotton-90 programme. |
||
• Sort laundry according to type of fabric, colour, |
||
Before starting the programme, put max. 100 |
||
and degree of soiling and allowable water |
||
g of powder anti-limescale into the main wash |
||
temperature. |
||
detergent compartment (compartment nr. II). If the |
||
• Always obey the instructions given on the |
||
anti-limescale is in tablet form, put only one tablet |
||
garment tags. |
||
into compartment nr. II. Dry the inside of the bellow |
||
Preparing laundry for washing |
||
with a clean piece of cloth after the programme has |
||
• Laundry items with metal attachments such as, |
||
come to an end. |
|
C Use an anti-limescale suitable for the washing |
|
|
underwired bras, belt buckles or metal buttons |
|
|
|
will damage the machine. Remove the metal |
||
machines. |
|
|
||
|
|
pieces or wash the clothes by putting them in a |
||
C Some water might have remained in the |
|
|
||
|
|
laundry bag or pillow case. |
||
product due to the quality control processes in |
|
|||
• Take out all substances in the pockets such as |
||||
|
|
|||
|
4 - EN |
|
||
|
coins, pens and paper clips, and turn pockets |
while after the programme comes to an end. |
|||||||
|
inside out and brush. Such objects may |
A In case of misplacing the laundry, noise and |
|||||||
|
damage the product or cause noise problem. |
vibration problems may occur in the machine. |
|||||||
• Put small size clothes such as infant's socks |
Using detergent and softener |
||||||||
|
and nylon stockings in a laundry bag or pillow |
Detergent Drawer |
|
|
|||||
|
case. |
|
|
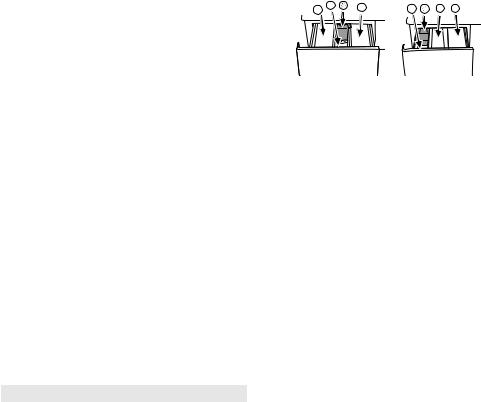
The detergent drawer is composed of three |
|||||
• Place curtains in without compressing them. |
compartments: |
|
|
|
|||||
|
Remove curtain attachment items. |
- (1) for prewash |
|
|
|
||||
• Fasten zippers, sew loose buttons and mend |
- (2) for main wash |
|
|
|
|||||
|
rips and tears. |
|
|
– (3) for softener |
|
|
|
||
• Wash “machine washable” or “hand washable” |
– (*) in addition, there is siphon piece in the softener |
||||||||
|
labeled products only with an appropriate |
compartment. |
|
|
|
||||
|
programme. |
|
|
|
|
|
|
||
• Do not wash colours and whites together. New, |
3 2 |
1 |
3 |
2 1 |
|||||
|
dark coloured cottons release a lot of dye. |
||||||||
|
Wash them separately. |
|
|
|
|
|
|
||
• Tough stains must be treated properly before |
|
|
|
|
|||||
|
washing. If unsure, check with a dry cleaner. |
|
|
|
|
||||
• Use only dyes/colour changers and limescale |
|
|
|
|
|||||
|
removers suitable for machine wash. Always |
|
|
|
|
||||
|
follow the instructions on the package. |
Detergent, softener and other cleaning agents |
|||||||
• Wash trousers and delicate laundry turned |
• Add detergent and softener before starting the |
||||||||
|
inside out. |
|
|
washing programme. |
|
|
|||
• Keep laundry items made of Angora wool in the |
• Never open the detergent drawer while the |
||||||||
|
freezer for a few hours before washing. This will |
washing programme is running! |
|
||||||
|
reduce pilling. |
|
|
• When using a programme without prewash, |
|||||
• Laundry that are subjected to materials such as |
do not put any detergent into the prewash |
||||||||
|
flour, lime dust, milk powder, etc. intensely must |
compartment (compartment nr. I). |
|||||||
|
be shaken off before placing into the machine. |
• In a programme with prewash, do not put |
|||||||
|
Such dusts and powders on the laundry may |
liquid detergent into the prewash compartment |
|||||||
|
build up on the inner parts of the machine in |
(compartment nr. I). |
|
|
|||||
|
time and can cause damage. |
|
|
• Do not select a programme with prewash if you |
|||||
Correct load capacity |
|
|
are using a detergent bag or dispensing ball. |
||||||
The maximum load capacity depends on the type |
Place the detergent bag or the dispensing ball |
||||||||
of laundry, the degree of soiling and the washing |
directly among the laundry in the machine. |
||||||||
programme desired. |
|
|
• If you are using liquid detergent, do not forget |
||||||
The machine automatically adjusts the amount |
to place the liquid detergent cup into the main |
||||||||
of water according to the weight of the loaded |
wash compartment (compartment nr. II). |
||||||||
laundry. |
|
|
Choosing the detergent type |
|
|||||
A Follow the information in the “Programme |
The type of detergent to be used depends on the |
||||||||
|
and consumption table”. When overloaded, |
type and colour of the fabric. |
|
|
|||||
|
machine's washing performance will drop. |
• Use different detergents for coloured and white |
|||||||
|
Moreover, noise and vibration problems may |
laundry. |
|
|
|
||||
|
occur. |
|
|
• Wash your delicate clothes only with special |
|||||
Laundry types and their average weights in the |
detergents (liquid detergent, wool shampoo, |
||||||||
following table are given as examples. |
etc.) used solely for delicate clothes. |
||||||||
|
|
|
|
|
• When washing dark coloured clothes and |
||||
|
Laundry type |
|
Weight (g) |
|
|||||
|
|
|
quilts, it is recommended to use liquid |
||||||
|
Bathrobe |
|
1200 |
|
|||||
|
|
|
detergent. |
|
|
|
|||
|
Duvet cover |
|
700 |
|
• Wash woolens with special detergent made |
||||
|
Bed Sheet |
|
500 |
|
specifically for woolens. |
|
|
||
|
Pillowcase |
|
200 |
|
A Use only detergents manufactured specifically |
||||
|
Tablecloth |
|
250 |
|
for automatic washing machines. |
||||
|
|
|
|
|
A Do not use soap powder. |
|
|
||
|
Towel |
|
200 |
|
|
|
|||
|
|
|
|
|
Adjusting detergent amount |
|
|||
|
Men’s shirt |
|
200 |
|
|
||||
|
|
|
The amount of washing detergent to be used |
||||||
|
|
|
|
|
|||||
Loading the laundry |
|
|
depends on the amount of laundry, the degree |
||||||
Open the loading door. Place laundry items loosely |
of soiling and water hardness. Read the |
||||||||
manufacturer's instructions on the detergent |
|||||||||
into the machine. Push the loading door to close |
|||||||||
package carefully and follow the dosage values. |
|||||||||
until you hear a locking sound. Ensure that no items |
|||||||||
• Do not use amounts exceeding the dosage |
|||||||||
are caught in the door. |
|
|
|
|
|
|
|||
C The loading door is locked while a programme |
quantities recommended on the detergent |
|
package to avoid problems of excessive |
||
is running. The door can only be opened a |
||
|
||
5 - EN |
|
foam, poor rinsing, financial savings and finally, environmental protection.
•Use lesser detergent for small amounts or lightly soiled clothes.
•Use concentrated detergents in the
recommended dosage.
Using softeners
Pour the softener into the softener compartment of the detergent drawer.
•Use the dosages recommended on the package.
•Do not exceed the (>max<) level marking in the softener compartment.
•If the softener has lost its fluidity, dilute it with water before putting it in the detergent drawer.
Using bleaches
•Select a programme with prewash and add the bleaching agent at the beginning of the prewash. Do not put detergent in the prewash compartment.
•Do not use bleaching agent and detergent by mixing them.
Tips for efficient washing
•Use just a little amount (approx. 50 ml) of bleaching agent and rinse the clothes very well as it causes skin irritation. Do not pour the bleaching agent onto the clothes and do not use it for coloured clothes.
•When using oxygen based bleaches, follow the instructions on the package and select a programme that washes at a lower temperature.
•Oxygen based bleaches can be used together with detergents; however, if its thickness is not the same with the detergent, put the detergent first into the compartment nr. "II"
in the detergent drawer and wait until the detergent flows while the machine is taking in water. Add the bleaching agent from the same compartment while the machine is still taking in
water.
Using limescale remover
•When required, use limescale removers manufactured specifically for washing machines only.
•Always follow instructions on the package.
|
Light colours and whites |
Colors |
Dark colors |
Delicates/Woolens/ |
|
|
(Recommended temperature |
(Recommended |
(Recommended |
Silks |
|
|
range based on soiling level: |
temperature range based |
temperature range |
(Recommended |
|
|
40-90ºC) |
on soiling level: cold-40ºC) |
based on soiling |
temperature range |
|
|
|
|
level: cold-40ºC) |
based on soiling level: |
|
|
|
|
|
cold-30ºC) |
|
|
It may be necessary to pre- |
Powder and liquid |
Liquid detergents |
Prefer liquid detergents |
|
Heavily soiled |
treat the stains or perform |
detergents recommended |
suitable for |
produced for delicate |
|
prewash. Powder and liquid |
for colours can be used at |
colours and dark |
clothes. Woollen and |
||
clothes |
detergents recommended |
dosages recommended |
colours can be |
silk clothes must be |
|
(difficult stains |
|||||
for whites can be used at |
for heavily soiled clothes. |
used at dosages |
washed with special |
||
such as |
dosages recommended for |
It is recommended to use |
recommended |
woollen detergents. |
|
grass, coffee, |
|||||
fruits and |
heavily soiled clothes. It is |
powder detergents to |
for heavily soiled |
|
|
recommended to use powder |
clean clay and soil stains |
clothes. |
|
||
blood.) |
|
||||
detergents to clean clay and |
and the stains that are |
|
|
||
|
|
|
|||
|
soil stains and the stains that |
sensitive to bleaches. Use |
|
|
|
|
are sensitive to bleaches. |
detergents without bleach. |
|
|
|
Normally |
Powder and liquid detergents |
Powder and liquid |
Liquid detergents |
Prefer liquid detergents |
|
recommended for whites |
detergents recommended |
suitable for |
produced for delicate |
||
soiled clothes |
can be used at dosages |
for colours can be used at |
colours and dark |
clothes. Woollen and |
|
(For example, |
recommended for normally |
dosages recommended |
colours can be |
silk clothes must be |
|
stains caused |
soiled clothes. |
for normally soiled clothes. |
used at dosages |
washed with special |
|
by body on |
|
Use detergents without |
recommended for |
woollen detergents. |
|
collars and |
|
bleach. |
normally soiled |
|
|
cuffs) |
|
|
|||
|
|
clothes. |
|
||
|
|
|
|
||
|
|
|
|
|
|
|
Powder and liquid detergents |
Powder and liquid |
Liquid detergents |
Prefer liquid detergents |
|
Lightly soiled |
recommended for whites |
detergents recommended |
suitable for |
produced for delicate |
|
can be used at dosages |
for colours can be used at |
colours and dark |
clothes. Woollen and |
||
clothes |
recommended for lightly |
dosages recommended for |
colours can be |
silk clothes must be |
|
(No visible |
|||||
soiled clothes. |
lightly soiled clothes. Use |
used at dosages |
washed with special |
||
stains exist.) |
|||||
|
detergents without bleach. |
recommended |
woollen detergents. |
||
|
|
||||
|
|
|
for lightly soiled |
|
|
|
|
|
clothes. |
|
6 - EN
4 Operating the product
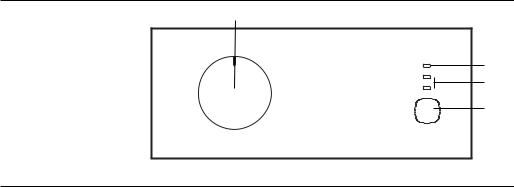
Control panel |
1 |
|
1 - Programme Selection knob (Uppermost position On / Off)
2 - Door open indicator
3 - Programme Follow-up indicator
4 - Start / Pause button
2
3
4
Preparing the machine |
shorter washing cycle compared to the Cotton |
||||
Make sure that the hoses are connected tightly. |
programme. |
||||
Plug in your machine. Turn the tap on completely. |
For curtains and tulle, use the Synthetic 40˚C |
||||
Place the laundry in the machine. Add detergent |
programme. As their meshed texture causes |
||||
and fabric softener. |
excessive foaming, wash the veils/tulle by putting |
||||
Programme selection |
little amount of detergent into the main wash |
||||
Select the programme suitable for the type, quantity |
compartment. Do not put detergent in the prewash |
||||
and soiling degree of the laundry in accordance |
compartment. |
||||
with the "Programme and consumption table" and |
• Woollens |
||||
the temperature table below. Select the desired |
Use this programme to wash your woolen clothes. |
||||
programme with the Programme Selection button. |
Select the appropriate temperature complying |
||||
|
|
|
|
with the tags of your clothes. Use appropriate |
|
|
|
Heavily soiled white cottons and linens. |
|
detergents for woolens. |
|
90˚C |
|
(coffee table covers, tableclothes, |
|
Additional programmes |
|
|
|
towels, bed sheets, etc.) |
|
For special cases, additional programmes are |
|
|
|
Normally soiled, coloured, fade proof |
|
available in the machine. |
|
|
|
linens, cottons or synthetic clothes |
|
C Additional programmes may differ according to |
|
60˚C |
|
(shirt, nightgown, pajamas, etc.) and |
|
the model of the machine. |
|
|
|
lightly soiled white linens (underwear, |
|
• Prewash Cotton |
|
|
|
etc.) |
|
Prefer this programme only for heavily soiled cotton |
|
|
|
|
|
clothes. |
|
40˚C- |
Blended laundry including delicate |
|
|||
|
C Not using this programme with prewash will |
||||
30˚C- |
|
textile (veil curtains, etc.), synthetics and |
|
||
Cold |
|
woolens. |
|
save energy, water, detergent and time. |
|
|
|
• Cotton Economic |
|||
|
|
|
|
||
C Programmes are limited with the highest spin |
By washing normally soiled cotton and linen laundry |
||||
speed appropriate for that particular type of |
in this programme, you can ensure higher energy |
||||
fabric. |
|
|
and water efficiency than other cotton programmes |
||
C When selecting a programme, always consider |
do. Actual water temperature may be different from |
||||
the type of fabric, colour, degree of soiling and |
the stated wash temperature. When you load the |
||||
permissible water temperature. |
machine with less laundry (e.g. ½ capacity or less), |
||||
C For further programme details, see |
programme time may automatically get shorter |
||||
in the later stages. In this case, energy and water |
|||||
"Programme and consumption table". |
|||||
consumption will reduce for a more economic |
|||||
Main programmes |
|||||
Depending on the type of fabric, use the following |
wash. This feature is provided in the models with |
||||
the remaining time indicator. |
|||||
main programmes. |
|||||
• Delicate 30 |
|||||
• Cottons |
|||||
Use this programme to wash your delicate clothes. |
|||||
Use this programme for your cotton laundry (such |
|||||
It washes with a gentle action without any interim |
|||||
as bed sheets, duvet and pillowcase sets, towels, |
|||||
|
|||||
bathrobes, underwear, etc.). Your laundry will be |
spin compared to the Synthetics programme. |
||||
washed with vigorous washing action for a longer |
• Hand Wash |
||||
washing cycle. |
Use this programme to wash your woolen/delicate |
||||
• Synthetics |
clothes that bear “not machinewashable” tags |
||||
Use this programme to wash your synthetic |
and for which hand wash is recommended. It |
||||
clothes (shirts, blouses, synthetic/cotton blends, |
washes laundry with a very gentle washing action |
||||
etc.). It washes with a gentle action and has a |
to not to damage clothes. |
||||
7 - EN
• Mini 30
Use this programme to wash your lightly soiled cotton clothes in a short time.
Special programmes
For specific applications, select any of the following programmes.
• Rinse
Use this programme when you want to rinse or starch separately.
• Spin + Pump
Use this programme to apply an additional spin cycle for your laundry or to drain the water in the machine.
C If you wish to drain the water only without spinning your laundry, select the Spin+Pump programme and press "Start / Pause" button.
Machine will switch to spin step once it completes the program step. Press "Start /
Pause" button to stop the machine as soon as you see the drum rotating. And cancel this programme by turning Programme Selection knob to any other position.
Programme and consumption table
EN |
|
|
|
|
|
|
|
|
|
|
|
|
|
Programme |
|
LoadMax.(kg) |
ProgrammeDuration (~min) |
ConsumptionWater (l) |
ConsumptionEnergy (kWh) |
Speed***Max. |
|
|
|
|
|
|
|
|
|
|
|
|
|
|
Cottons |
90 |
6 |
130 |
52 |
1.71 |
1000 |
|
|
|
|
|
|
|
Prewash-Cottons |
60 |
6 |
118 |
60 |
1.44 |
1000 |
|
|
|
|
|
|
|
Cottons |
40 |
6 |
80 |
52 |
0.59 |
1000 |
|
|
|
|
|
|
|
Cottons |
Cold |
6 |
80 |
52 |
0.10 |
1000 |
|
|
|
|
|
|
|
Cotton Economic |
60** |
6 |
130 |
49 |
0.93 |
1000 |
|
|
|
|
|
|
|
Cotton Economic |
60** |
3 |
128 |
45 |
0.81 |
1000 |
|
|
|
|
|
|
|
Cotton Economic |
40** |
3 |
113 |
45 |
0.62 |
1000 |
|
|
|
|
|
|
|
Synthetics |
60 |
2.5 |
113 |
65 |
1.02 |
1000 |
|
|
|
|
|
|
|
Synthetics |
40 |
2.5 |
105 |
64 |
0.56 |
1000 |
|
|
|
|
|
|
|
Synthetics |
Cold |
2.5 |
66 |
62 |
0.10 |
1000 |
|
|
|
|
|
|
|
Delicate |
30 |
2 |
61 |
47 |
0.26 |
1000 |
|
|
|
|
|
|
|
Woollens |
40 |
1.5 |
54 |
50 |
0.35 |
1000 |
|
|
|
|
|
|
|
Hand wash |
30 |
1 |
41 |
34 |
0.20 |
1000 |
|
|
|
|
|
|
|
Mini 30 |
30 |
2.5 |
29 |
72 |
0.21 |
800 |
|
|
|
|
|
|
|
8 - EN
• : Selectable
**: Energy Label programme (EN 60456 Ed.3)
***If maximum spin speed of the machine is lower then this value, you can only select up to the maximum spin speed.
C Water and power consumption may vary subject to the changes in water pressure, water
hardness and temperature, ambient temperature, type and amount of laundry, selection of auxiliary functions and spin speed, and changes in electric voltage.
Starting the programme |
to use "Spin+Pump" programme. See |
Press Start / Pause button to start the programme. |
"Spin+Pump" |
Programme follow-up light showing the startup of |
Re-spinning the laundry |
the programme will turn on. |
Unbalanced load control system can prevent |
Progress of programme |
spinning because of unbalanced load of laundry in |
Progress of a running programme can be followed |
the machine. If you would like to spin again: |
from the Programme Follow-up indicator with the |
Rearrange the laundry in the machine. Select |
lights "Running" and "End/Cancel". |
Spin+Pump programme and press “Start / Pause" |
C If the machine does not pass to the spinning |
button. |
step, automatic unbalanced load detection |
End of programme |
system might have been activated due to the |
"End/Cancel" light on the programme follow-up |
unbalanced distribution of the laundry in the |
indicator will light up once the programme comes |
machine. |
to an end; and "Door Open" symbol flashes for |
Loading door lock |
1-2 minutes until the door is ready to open. When |
There is a locking system on the loading door of the |
"Door Open" symbol is steadily illuminated, the |
machine that prevents opening of the door in cases |
door can be opened. |
when the water level is unsuitable. |
To turn off the machine, turn program selection |
If you want to open loading door when the machine |
knob to "On / Off" position. Take out your laundry |
is in use, press "Start / Pause" button to pause the |
and close the loading door. The machine will be |
machine. "Door Open" light will start flashing when |
ready for the next run. |
the machine is switched to Pause mode. Machine |
Door Open |
checks the level of the water inside. If the level |
"Door Open" symbol is illuminated when the door is |
is suitable, "Door Open" light illuminates steadily |
ready to open. It flashes until the door gets ready to |
within 1-2 minutes and the loading door can be |
open. If the "Door Open" symbol is not illuminated, |
opened. |
do not force the door to open. The symbol's light is |
If the level is unsuitable, "Door Open" light turns off |
steady when the door is ready to open. |
and the loading door cannot be opened. If you are |
5 Maintenance and cleaning |
obliged to open the loading door when the "Door |
|
Open" light is off, you have to cancel the current |
|
Service life of the product extends and frequently |
|
programme; see "Cancelling the programme". |
faced problems decrease if cleaned at regular |
Switching the machine to pause mode |
intervals. |
Press the "Start / Pause" button to switch the |
Cleaning the detergent drawer |
machine to pause mode while a programme is |
Clean the detergent drawer at regular intervals |
running. "Running" light starts flashing on the |
(every 4-5 washing cycles) as shown below in order |
|||
Programme Follow-up indicator to show that the |
||||
to prevent accumulation of powder detergent in |
||||
machine has been switched to the pause mode. |
||||
time. |
||||
When the loading door is ready to be opened, |
||||
|
|
|
||
"Door Open" light will illuminate continuously. |
|
|
|
|
Adding or taking out laundry |
|
|
|
|
|
|
|
||
Press "Start / Pause" button to switch the machine |
|
|
|
|
to pause mode. When the machine is switched to |
|
|
|
|
pause mode, "Running" light flashes. Wait until the |
|
|
|
|
|
|
|
||
Loading Door can be opened. Open the Loading |
|
|
|
|
Door and add or take out the laundry. |
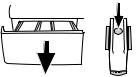
Press the dotted point on the siphon in the softener |
|||
Close the Loading Door. Press "Start / Pause" |
||||
compartment and pull towards you until the |
||||
button to start the machine. |
||||
compartment is removed from the machine. |
||||
C The door can be opened if the water level is |
||||
C If more than normal amount of water and |
||||
suitable. Door open symbol flashes until the |
||||
softener mixture starts to gather in the softener |
||||
loading door gets ready to be opened. The |
||||
compartment, the siphon must be cleaned. |
||||
symbol's light is steady when the door is ready |
||||
Wash the detergent drawer and the siphon with |
||||
to open. You can open the door to add/take |
||||
plenty of lukewarm water in a washbasin. Wear |
||||
out laundry. |
||||
protective gloves or use an appropriate brush to |
||||
Cancelling the programme |
||||
avoid touching of the residues in the drawer with |
||||
To cancel the programme, turn the Programme |
||||
your skin when cleaning. Insert the drawer back |
||||
Selection knob to select another programme. |
||||
into its place after cleaning and make sure that it is |
||||
Previous programme will be cancelled. "End/ |
||||
seated well. |
||||
Cancel" light will flash continuously to notify that the |
||||
Cleaning the loading door and the drum |
||||
programme has been cancelled. |
||||
Residues of softener, detergent and dirt may |
||||
C If you start a new programme after cancelling |
||||
accumulate in your machine in time and may cause |
||||
the previous one, this new programme will start |
||||
unpleasant odours and washing complaints. To |
||||
without draining the water in the machine. |
||||
avoid this, use the Drum Cleaning programme. |
||||
C If you must certainly open the loading door |
||||
If your machine does not have a Drum Cleaning |
||||
when the “Door Open” light is off, you need |
||||
|
|
|
||
9 - EN |
||||
programme, use Cotton-90 programme. Before starting the programme, put max. 100 g of powder anti-limescale into the main wash detergent compartment (compartment nr. II). If the antilimescale is in tablet form, put only one tablet into compartment nr. II. Dry the inside of the bellow with a clean piece of cloth after the programme has come to an end.
C Repeat Drum Cleaning process in every 2 months.
C Use an anti-limescale suitable for the washing machines.
After every washing make sure that no foreign substance is left in the drum.
If the holes on the bellow shown in the figure is blocked, open the holes using a toothpick.
C Foreign metal substances will cause rust stains in the drum. Clean the stains on the drum surface by using cleaning agents for stainless steel. Never use steel wool or wire wool.
Cleaning the body and control panel
Wipe the body of the machine with soapy water or non-corrosive mild gel detergents as necessary, and dry with a soft cloth.
Use only a soft and damp cloth to clean the control panel.
A Never use sponge or scrub materials. These will damage the painted and plastic surfaces.
Cleaning the water intake filters
There is a filter at the end of each water intake valve at the rear of the machine and also at the end of each water intake hose where they are connected to the tap. These filters prevent foreign substances and dirt in the water to enter the washing machine.
Filters should be cleaned as they do get dirty.
Close the taps. Remove the nuts of the water intake hoses to access the filters on the water intake valves. Clean them with an appropriate brush. If the filters are too dirty, take them out by means of pliers and clean them. Take out the filters on the flat ends of the water intake hoses together with the gaskets and clean thoroughly under running water. Replace the gaskets and filters carefully in their places and tighten the hose nuts by hand.
Draining remaining water and cleaning the pump filter
The filter system in your machine prevents solid items such as buttons, coins and fabric fibers clogging the pump impeller during discharge of
washing water. Thus, the water will be discharged without any problem and the service life of the pump will extend.
If the machine fails to drain water, the pump filter is clogged. Filter must be cleaned whenever it is clogged or in every 3 months. Water must be drained off first to clean the pump filter.
In addition, prior to transporting the machine (e.g., when moving to another house) and in case of freezing of the water, water may have to be drained completely.
A Foreign substances left in the pump filter may damage your machine or may cause noise problem.
In order to clean the dirty filter and discharge the water:
Unplug the machine to cut off the supply power.
A Temperature of the water inside the machine may rise up to 90 ºC. To avoid burning risk, filter must be cleaned after the water in the machine cools down.
Open the filter cover by pulling it from both sides at the top.
C You can remove the filter cover by slightly pushing downwards with a thin plastic tipped tool, through the gap above the filter cover. Do not use metal tipped tools to remove the cover.
Follow the steps below to discharge the water.
Place a large container in front of the filter to catch water from the filter. Loosen pump filter (anticlockwise) until water starts to flow. Fill the flowing water into the container you have placed in front of the filter. Always keep a piece of cloth
handy to absorb any spilled water. When the water inside the machine is finished, take out the filter completely by turning it.
Clean any residues inside the filter as well as fibers, if any, around the pump impeller region. Install the filter.
Seat the tabs in the lower part into their places first, and then press the upper part to close.
10 - EN

6 Technical specifications
Models |
EV 6102 |
Maximum dry laundry capacity (kg) |
6 |
Height (cm) |
84 |
Width (cm) |
60 |
|
|
Depth (cm) |
45 |
|
|
Net weight (±4 kg.) |
59 |
|
|
Electrical input (V/Hz) |
230 V / 50Hz |
|
|
Total current (A) |
10 |
|
|
Total power (W) |
2200 |
|
|
Spin speed (rpm max.) |
1000 |
|
|
Stand-by mode power (W) |
1.00 |
|
|
Off-mode power (W) |
0.20 |
|
|
C Technical specifications may be changed without prior notice to improve the quality of the product.
C Figures in this manual are schematic and may not match the product exactly.
C Values stated on the product labels or in the documentation accompanying it are obtained in laboratory conditions in accordance with the relevant standards. Depending on operational and environmental conditions of the product, these values may vary.
This appliance’s packaging material is recyclable. Help recycle it and protect the environment by dropping it off in the municipal receptacles provided for this purpose. Your appliance also contains a great amount of recyclable material. It is marked with this label to indicate the used appliances that should not be mixed with other waste. This way, the appliance recycling organised by your manufacturer will be done under the best possible conditions, in compliance with European Directive 2002/96/EC on Waste Electrical and Electronic Equipment. Contact
your town hall or your retailer for the used appliance collection points closest to your home. We thank you doing your part to protect the environment.
Dark wash |
Dark wash |
Synthetics |
Cottons |
Pre-wash |
Main |
Rinse |
Wash |
Spin |
Delicates |
Pet hair |
|
|
|
|
|
wash |
|
|
|
|
removal |
Drain |
Anti- |
Duvet |
Child- |
Hand |
Baby |
Cotton |
Woolens |
expres 14 |
Daily |
mini 30 |
|
creasing |
(Bedding) proof lock |
Wash |
|
Eco |
|
Super short |
|
|
|
|
|
|
|
|
|
|
|
express |
|
|
Daily |
Rinse hold |
Start/ |
No spin |
Quick |
Finished |
Cold |
Temperature Self |
Lingerie |
Eco Clean |
|
express |
|
Pause |
|
wash |
|
|
|
Clean |
|
|
Mixed 40 |
Super 40 |
Extra rinse |
Freshen |
Shirts |
Jeans |
Sport |
Time delay Intensive |
Fasion |
Anti- |
|
|
|
|
up |
|
|
|
|
|
care |
allergic |
11 - EN

7 Troubleshooting
Programme cannot be started or selected.
•Washing machine has switched to self protection mode due to a supply problem (line voltage, water pressure, etc.). >>> Press and hold Start / Pause button for 3 seconds to reset the machine to factory settings. (See "Cancelling the programme")
Water in the machine.
•Some water might have remained in the product due to the quality control processes in the production. >>> This is not a failure; water is not harmful to the machine.
Machine vibrates or makes noise.
•Machine might be standing unbalanced. >>> Adjust the feet to level the machine.
•A hard substance might have entered into the pump filter. >>> Clean the pump filter.
•Transportation safety bolts are not removed. >>> Remove the transportation safety bolts.
•Laundry quantity in the machine might be too little. >>> Add more laundry to the machine.
•Machine might be overloaded with laundry. >>> Take out some of the laundry from the machine or distribute the load by hand to balance it homogenously in the machine.
•Machine might be leaning on a rigid item. >>> Make sure that the machine is not leaning on anything.
Machine stopped shortly after the programme started.
•Machine might have stopped temporarily due to low voltage. >>> It will resume running when the voltage restores to the normal level.
Programme time does not countdown. (On models with display)
•Timer may stop during water intake. >>> Timer indicator will not countdown until the machine takes in adequate amount of water. The machine will wait until there is sufficient amount of water to avoid poor washing results due to lack of water. Timer indicator will resume countdown after this.
•Timer may stop during heating step. >>> Timer indicator will not countdown until the machine reaches the selected temperature.
•Timer may stop during spinning step. >>> Automatic unbalanced load detection system might be activated due to the unbalanced distribution of the laundry in the drum.
C Machine does not switch to spinning step when the laundry is not evenly distributed in the drum to prevent any damage to the machine and to its surrounding environment. Laundry should be rearranged and re-spun.
Foam is overflowing from the detergent drawer.
•Too much detergent is used. >>> Mix 1 tablespoonful softener and ½ l water and pour into the main wash compartment of the detergent drawer.
C Put detergent into the machine suitable for the programmes and maximum loads indicated in the “Programme and consumption table”. When you use additional chemicals (stain removers, bleachs and etc), reduce the amount of detergent.
Laundry remains wet at the end of the programme
•Excessive foam might have occurred and automatic foam absorption system might have been activated due to too much detergent usage. >>> Use recommended amount of detergent.
C Machine does not switch to spinning step when the laundry is not evenly distributed in the drum to prevent any damage to the machine and to its surrounding environment. Laundry should be rearranged and re-spun.
A If you cannot eliminate the problem although you follow the instructions in this section, consult your dealer or the Authorized Service Agent. Never try to repair a nonfunctional product yourself.
12 - EN
2820522269_EN/170811.1427
13 - CZ

1 Důležité bezpečnostní pokyny
Tento oddíl obsahuje bezpečnostní pokyny, které pomohou s ochranou před zraněním osob nebo poškozením majetku. Nedodržení těchto pokynů způsobí ztrátu nároku na čerpání záruky.
Obecné bezpečnostní pokyny
•Tento výrobek by neměly používat osoby s fyzickými, smyslovými či duševními poruchami nebo neproškolené či nezkušené osoby (včetně dětí), pokud jim nepomáhá osoba odpovědná za jejich bezpečnost nebo někdo, kdo je řádně navede při používání výrobku.
•Nikdy nestavte výrobek na podlahu pokrytou kobercem; jinak by došlo k přehřívání elektrických součástek vlivem nedostatečného proudění vzduchu pod přístrojem. Tím by mohly vzniknout potíže s vaší pračkou.
•Nepoužívejte stroj, pokud je napájecí kabel nebo zástrčka poškozena. Kontaktujte autorizovaný servis.
•Požádejte kvalifikovaného elektrikáře, aby namontoval pojistku 16 A do oblasti instalace výrobku.
•Pokud dojde k poruše výrobku, neměl by se používat, dokud jej neopraví autorizovaný
servis. Hrozí riziko zásahu elektrickým proudem!
•Tento výrobek by měl pokračovat v provozu po případném výpadku elektrické energie. Pokud si přejete program zrušit, postupujte podle oddílu "Stornování programu".
•Připojte výrobek k uzemněné zásuvce chráněné pojistkou v souladu s hodnotami v tabulce "Technické specifikace". Nezapomeňte zajistit, aby vám uzemnění provedl kvalifikovaný elektrikář. Naše společnost nenese odpovědnost za žádné škody vzniklé tím, že výrobek používáte bez uzemnění v souladu s místními předpisy.
•Hadice pro přívod a odvod vody musejí být řádně upevněny a zůstat bez poškození. Jinak hrozí riziko úniku vody.
•Nikdy neotevírejte vkládací dvířka a nevyjímejte filtr, když je voda v bubnu. Jinak vzniká riziko zaplavení nebo zranění vlivem horké vody.
•Neotevírejte zamčená vkládací dvířka silou. Vkládací dvířka budou připravena k otevření pár minut po skončení pracího cyklu. V případě, že otevřete vkládací dvířka silou, může dojít k poškození dveří a mechanismu zámku.
•Pokud výrobek nepoužíváte, odpojte jej.
•Nikdy nemyjte výrobek tak, že na něj nalijete vodu! Hrozí riziko zásahu elektrickým proudem!
•Nikdy se nedotýkejte zásuvky mokrýma rukama! Nikdy neodpojujte přístroj taháním za kabel, vždy tahejte až za zástrčku.
•Používejte pouze prací prostředky, změkčovadla a doplňky vhodné pro automatické pračky.
•Dodržujte pokyny na oděvech i na obalech pracích prášků.
•Výrobek je nutno odpojit během instalace, údržby, čištění a oprav.
•Činnosti instalace a oprav musí vždy provádět
zástupci autorizovaného servisu. Výrobce neodpovídá za škody vzniklé činnostmi, které provedou neoprávněné osoby.
Určené použití
•Tento produkt byl vyroben pro domácí použití. Není vhodný pro komerční použití a nesmí se používat mimo stanovené použití.
•Spotřebič lze používat jen na mytí a oplachování látek s příslušným označením.
•Výrobce nenese odpovědnost za nesprávné používání či přepravu.
Bezpečnost dětí
•Elektrické výrobky jsou nebezpečné pro děti. Udržujte děti mimo dosah stroje, když je v provozu. Nedovolte jim hrát si se strojem.
•Nezapomeňte zavírat dvířka, když odejdete z místnosti, kde je výrobek umístěn.
•Všechny prací prostředky a doplňky skladujte na bezpečném místě mimo dosah dětí.
2 Instalace
O instalaci produktu požádejte nejbližší autorizovaný servis. Aby byl výrobek připraven k použití, pročtěte si informace v návodu k použití a zajistěte, aby byla elektřina, přívod vody a systém pro odvod vody správné, než kontaktujete autorizovaný servis. Pokud nejsou, přivolejte kvalifikovaného mechanika a instalatéra, aby provedl všechny nezbytné úpravy. C Za přípravu umístění a elektrických,
vodovodních a odpadních instalací na místě pro umístění přístroje odpovídá zákazník.
B Instalace a elektrická zapojení výrobku musí provést pracovník autorizovaného servisu. Výrobce neodpovídá za škody vzniklé činnostmi, které provedou neoprávněné osoby.
A Před instalací vizuálně zkontrolujte, zda výrobek nevykazuje známky poškození. Pokud ano, nenechávejte jej instalovat. Poškozené výrobky jsou bezpečnostním rizikem.
C Zkontrolujte, zda přívodní a odpadové hadice i napájecí kabel nejsou zkroucené, stisknuté nebo rozdrcené při nasouvání výrobku na místo po instalaci nebo čištění.
Vhodné umístění pro instalaci
•Postavte spotřebič na pevnou plochu. Neumisťujte jej na koberec s dlouhým vlasem ani na podobné plochy.
•Celková hmotnost pračky a sušičky - s plnou náplní - pokud je umístíte na sebe, dosahuje cca 180 kilogramů. Umístěte výrobek na pevnou rovnou plochu s dostatečnou nosností!
•Neumisťujte výrobek na napájecí kabel.
•Neinstalujte výrobek do míst, kde může teplota klesnout pod 0°C.
•Umístěte výrobek s odstupem od okrajů ostatního nábytku nejméně 1 cm.
Sejmutí výztuh obalů
Nakloňte stroj dozadu pro sejmutí výztuh obalů. Sejměte výztuhy obalů tak, že zatáhnete za stuhu.
14 - CZ
|
Všechny matice utahujte rukou. Na utahování |
|
|
matic nikdy nepoužívejte klíč. Po připojení hadic |
|
|
zcela otevřete kohoutky, abyste zkontrolovali, zda |
|
|
ve spojích nedochází k únikům vody. Pokud zjistíte |
|
|
úniky, vypněte kohout a sejměte matici. Znovu |
|
|
matici pečlivě utáhněte, zkontrolujte také těsnění. |
|
|
Abyste předešli únikům vody a následným škodám, |
|
Odstraňování přepravních zámků |
udržujte kohouty uzavření, když stroj nepoužíváte. |
|
|
||
A Nesnímejte přepravní zámky předtím, než |
Připojení k odpadu |
|
vyjmete výztuhy obalů. |
||
A Sejměte bezpečnostní šrouby pro přepravu, |
• Konec odpadové hadice přímo připojte k |
|
než spustíte pračku, jinak dojde k poškození |
odpadu nebo do vany. |
|
výrobku. |
A Pokud se hadice odpojí z umístění při zaplnění |
|
Uvolněte všechny šrouby vhodným klíčem, |
vodou, mohlo by dojít k zatopení vašeho domu. |
|
dokud se volně neotáčejí (C). Odstraňte přepravní |
Navíc hrozí riziko opaření z důvodu vysokých |
|
bezpečnostní šrouby tak, že jimi jemně otočíte. |
teplot při praní! Aby nedocházelo k těmto |
|
Upevněte plastové kryty umístěné v sáčku s |
situacím a zajistili jste plynulý přívod i odvod |
|
Příručkou pro obsluhu do otvorů na zadním panelu. |
vody ze stroje, upevněte konec odpadové |
|
(P) |
hadice řádně, aby se nemohl uvolnit. |
|
|
• Hadici připevněte do výšky nejméně 40 cm a |
|
|
nejvýše 100 cm. |
|
|
• Pokud je hadice zvednutapoté, co ležela na |
|
|
zemi nebo v její blízkosti (méně než 40 cm nad |
|
C Uschovejte přepravní bezpečnostní šrouby na |
zemí), je odčerpání vody ztíženo a prádlo může |
|
být při vyjímání z pračky příliš mokré. Proto |
||
bezpečném místě pro další použití, když bude |
||
dodržujte výšku uvedenou na obrázku. |
||
třeba pračku v budoucnosti znovu přemístit. |
||
|
||
C Nikdy nepřemisťujte spotřebič bez řádně |
|
|
upevněných bezpečnostních přepravních |
|
|
šroubů! |
|
|
Připojování vody |
|
|
C Přívodní tlak vody nutný pro spuštění výrobku |
|
|
je 1 až 10 barů (0,1 – 10 MPa). V praxi to |
|
|
znamená, že za minutu musí z vašeho plně |
|
|
otevřeného kohoutku vytéct 10 - 80 litrů, aby |
• Aby nedošlo k návratu špinavé vody zpět |
|
vaše pračka běžela správně. Připevněte ventil |
do stroje a zajistilo se snadné vypouštění, |
|
na omezení tlaku, pokud je tlak vody vyšší. |
neponořujte konec hadice do špinavé vody |
|
C Pokud hodláte používat výrobek dvojitým |
a neveďte jej do odpadu déle než na 15 cm. |
|
vstupem vody jako přístroj s jediným |
Pokud je příliš dlouhá, seřízněte ji. |
|
(studeným) přívodem vody, musíte nainstalovat |
• Konec hadice neohýbejte, nestoupejte na něj a |
|
dodanou ucpávku do ventilu pro horkou vodu, |
neskládejte jej mezi odpadem a pračkou. |
|
než výrobek spustíte. (Platí pro výrobky dodané |
• Pokud je hadice příliš krátká, použijte originální |
|
se záslepkou.) |
prodlužovací hadici. Hadice nesmí být delší než |
|
C Pokud chcete používat oba vstupy vody |
3,2 m. Aby nedošlo k úniku vody, spoj mezi |
|
s výrobkem, připojte hadici horké vody po |
prodlužovací hadicí a odvodní hadicí výrobku |
|
demontáži zarážky a těsnění z ventilu horké |
musí být správně sevřený vhodnou svorkou, |
|
vody. (Platí pro výrobky dodané se záslepkou.) |
aby nesklouzl a nedošlo k úniku. |
|
A Modely s jediným přívodem vody nepřipojujte |
Upravování nožek |
|
ke kohoutku s horkou vodou. V takovém |
A Má-li váš spotřebič fungovat tišeji a bez vibrací, |
|
případě se prádlo poškodí nebo se výrobek |
musí stát rovně a vyváženě na nožkách. |
|
přepne do ochranného režimu a nespustí se. |
Vyrovnejte spotřebič pomocí nožek. Jinak se |
|
A Nepoužívejte staré nebo použité přívodní |
může výrobek přesouvat v prostoru a způsobit |
|
hadice na nový výrobek. Mohly by zanechat |
potíže s vibracemi a drcením. |
|
skvrny na vašem prádle. |
Povolte blokovací matice na nožkách. Upravte |
|
1. Připojte zvláštní hadice dodávané s pračkou |
nožky, dokud výrobek není rovný a vyvážený. |
|
k přívodním ventilům pračky. Červená hadice |
Všechny matice znovu utáhněte rukou. |
|
(levá) (max. 90°C) je na horkou vodu, modrá |
|
|
hadice (pravá) (max. 25°C) je na studenou |
|
|
vodu. |
|
|
A Zajistěte, aby připojení studené a teplé vody |
|
|
bylo provedeno správně, když stroj instalujete. |
|
|
Jinak by na konci pracího cyklu mohlo prádlo |
A Na uvolnění blokovacích matic nepoužívejte |
|
být horké a poškozené. |
|
15 - CZ

žádné nástroje. Jinak by se mohly poškodit.
Elektrické zapojení
Připojte výrobek k uzemněné zásuvce chráněné pojistkou v souladu s hodnotami v tabulce "Technické specifikace". Naše společnost nenese odpovědnost za žádné škody vzniklé tím, že výrobek používáte bez uzemnění v souladu s místními předpisy.
•Připojení by mělo splňovat místní předpisy.
•Po instalaci musí být zástrčka napájecího kabelu snadno dostupná.
•Napětí a povolená ochrana pojistek nebo přerušovače jsou uvedeny v oddíle „Technické parametry“. Pokud je aktuální hodnota pojistky nebo přerušovače v domě nižší než 16 A, požádejte kvalifikovaného elektrikáře o instalaci pojistky o 16 A.
•Stanovené napětí musí být shodné s napětím ve vaší síti.
•Neprovádějte spojení pomocí prodlužovacích kabelů či rozdvojek.
B Poškozené napájecí kabely smí vyměňovat jen zástupci autorizovaného servisu.
První použití
Než začnete výrobek používat, zkontrolujte, zda jsou všechny kroky příprav provedeny v souladu s pokyny v oddílech "Důležité bezpečnostní pokyny" a "Instalace".
Pro přípravu výrobku na praní prádla proveďte nejprve činnost v programu Bavlna 90. Než spustíte program, vložte max. 100 g prášku proti vodnímu kameni do prostoru pro hlavní praní (přihrádka č. II). Pokud je přípravek ve formě tablety, vložte jednu tabletu do přihrádky č. II. Vysušte vnitřek čistým kusem hadru poté, co program skončí.
C Použijte přípravek proti vodnímu kameni vhodný pro pračky.
C Ve výrobku mohla zbýt trocha vody z důvodu procesů kontroly kvality ve výrobě. Není pro výrobek škodlivá.
Likvidace obalů
Obalové materiály jsou nebezpečné pro děti. Obalové materiály skladujte na bezpečném místě mimo dosah dětí.
Obalové materiály vašeho spotřebiče jsou vyrobeny z recyklovatelných materiálů. Likvidujte je řádně a třiďte je v souladu s pokyny pro recyklaci odpadu.
Nelikvidujte jej společně s běžným domovním odpadem.
Přeprava výrobku
Odpojte výrobek před přepravou. Odstraňte spojení pro odpad vody a přívod vody. Vyčerpejte zbývající vodu z výrobku; viz "Vypouštění zbývající vody a čištění filtru čerpadla". Nainstalujte bezpečnostní šrouby pro přepravu v opačném pořadí oproti demontáži; viz "Odstraňování přepravních zámků". C Nikdy nepřemisťujte spotřebič bez řádně
upevněných bezpečnostních přepravních šroubů!
Likvidace starého produktu
Starý produkt zlikvidujte způsobem přátelským vůči
životnímu prostředí.
Informace, jak zlikvidovat váš produkt, získáte u vašeho místního prodejce nebo ve středisku sběrných surovin v místě vašeho bydliště.
Pro bezpečnost dětí před likvidací produktu přestříhněte přívodní kabel a ulomte zamykací mechanismus dvířek pračky tak, aby nebyl funkční.
3 Příprava
Co udělat pro úsporu energie
Následující informace vám pomohou používat výrobek ekologicky a účelně.
•Výrobek používejte na nejvyšší kapacitu povolenou pro zvolený program, nepřetěžujte jej; viz "Tabulka programů a spotřeby".
•Vždy dodržujte pokyny na obalu pracího prášku.
•Mírně znečištěné prádlo perte na nízké teploty.
•Používejte rychlejší programy pro menší množství mírně znečištěného prádla.
•Nepoužívejte vysokou teplotu na prádlo, které není silně znečištěné či ušpiněné.
•Nepoužívejte prací prášek nad množství doporučené na balení prášku.
Třídění prádla
•Prádlo roztřiďte podle typu látky, barvy a stupně zašpinění a povolené teploty vody.
•Vždy dodržujte pokyny uvedené na oděvech.
Příprava oděvů na praní
•Předměty s kovovými částmi, jako jsou podprsenky s kosticí, spony pásků a kovové knoflíky, mohou poškodit pračku. Vyjměte kovové části nebo perte oděvy v sáčku na prádlo nebo v povlečení na polštář.
•Vyjměte z kapes všechny předměty, jako jsou mince, pera a svorky, kapsy otočte a vykartáčujte. Tyto předměty mohou poškodit výrobek nebo způsobit hlučnost.
•Oděvy malých rozměrů, jako jsou dětské ponožky a nylonové punčochy, vložte do sáčku na prádlo nebo do povlečení na polštář.
•Záclony vkládejte dovnitř bez stlačování. Předměty pro upevnění záclon sejměte.
•Upevněte zipy, přišijte volné knoflíky a spravte trhliny a praskliny.
•Oděvy označené jako „lze prát v pračce“ nebo „perte v ruce“ perte jen s využitím vhodného programu.
•Neperte barevné a bílé prádlo společně. Nové, tmavé bavlněné oděvy mohou pouštět barvu.
Perte je odděleně.
•Hrubé nečistoty musí být před praním řádně ošetřeny. Pokud si nejste jisti, poraďte se v
čistírně.
•Používejte jen barviva/měniče barev a odstraňovače vodního kamene vhodné pro pračky. Vždy postupujte podle pokynů na obalu.
•Kalhoty a jemné prádlo perte naruby.
•Prádlo z angorské vlny před praním dejte na několik hodin do mrazničky. To sníží pelichání.
•Prádlo, které je ve styku s materiály, jako je mouka, vodní kámen, sušené mléko atd. je nutno před vložením do pračky protřepat. Tyto
16 - CZ
 Loading...