Beko DIS 5831, DIS 1522, DIS 1520, DFS 2531, DFS 1511 User manual [EN]
...
Dishwasher
Instruction Manual
DIS 5831 DIS 1522 DIS 1520 DFS 2531 DFS 1511 DFS 1511 S
DSFS 1530 DSFS 1530 S DMS 3511 DIS 5630 DIS 5930

Dear customer,
Please read carefully right through this instruction booklet before installing or operating your dishwasher. The following instructions should prevent the risk of personal injury and/or damage to the appliance.
Please keep these documents in a safe place for later reference.
This operating manual has been written for several different machines, and some of the features mentioned here may not apply to your particular model.
Explanation of symbols
Throughout this User Manual the following symbols are used:  Important information or useful hints about usage
Warning for hazardous situations with regard to life and property Warning for electric shock
This product was manufactured using the latest technology in environmentally friendly conditions.

Dishwasher
Instruction Manual
DIS 5831 DIS 1522 DIS 1520 DFS 2531 DFS 1511 DFS 1511 S
DSFS 1530 DSFS 1530 S DMS 3511 DIS 5630 DIS 5930

Dear customer,
Please read carefully right through this instruction booklet before installing or operating your dishwasher. The following instructions should prevent the risk of personal injury and/or damage to the appliance.
Please keep these documents in a safe place for later reference.
This operating manual has been written for several different machines, and some of the features mentioned here may not apply to your particular model.
Explanation of symbols
Throughout this User Manual the following symbols are used:  Important information or useful hints about usage
Warning for hazardous situations with regard to life and property Warning for electric shock
This product was manufactured using the latest technology in environmentally friendly conditions.

CONTENTS
1. Dishwasher |
3 |
Cleaning the interior of the machine |
22 |
||
2. Important safety instructions |
5 |
Cleaning the filters |
22 |
||
Cleaning the hose filter |
23 |
||||
General safety |
5 |
||||
Cleaning the impellers |
23 |
||||
Intended use |
5 |
||||
6. Troubleshooting |
25 |
||||
Children’s safety |
6 |
||||
3. Installation |
7 |
|
|
|
|
Appropriate installation location |
7 |
|
|
|
|
Connecting water supply |
7 |
|
|
|
|
Connection to the drain |
8 |
|
|
|
|
Adjusting the feet |
9 |
|
|
|
|
Aquasafe+ |
9 |
|
|
|
|
Electrical connection |
9 |
|
|
|
|
Initial use |
9 |
|
|
|
|
Disposing of packaging material |
10 |
|
|
|
|
Transportation of the product |
10 |
|
|
|
|
Compliance with the WEEE Directive |
|
|
|
|
|
and Disposing of the Waste Product: |
10 |
|
|
|
|
Compliance with RoHS Directive: |
10 |
|
|
|
|
4. Prewashing |
11 |
|
|
|
|
Tips for energy saving |
11 |
|
|
|
|
Water softening system |
11 |
|
|
|
|
Adjusting the water softening system |
11 |
|
|
|
|
Adding salt |
12 |
|
|
|
|
Detergent |
13 |
|
|
|
|
Adding detergent |
13 |
|
|
|
|
Tablet detergents |
14 |
|
|
|
|
Rinse aid |
15 |
|
|
|
|
Silverware basket |
18 |
|
|
|
|
Collapsable lower basket wires |
18 |
|
|
|
|
Collapsable lower basket wires |
|
|
|
|
|
(2 & 4 pieces) |
19 |
|
|
|
|
Adjusting the height of empty upper |
|
|
|
|
|
basket |
20 |
|
|
|
|
Adjusting the height of loaded upper |
|
|
|
|
|
basket |
21 |
|
|
|
|
5. Maintenance and cleaning |
22 |
|
|
|
|
Cleaning the outer surface of the |
|
product |
22 |

1 Getting To Know Your Machine
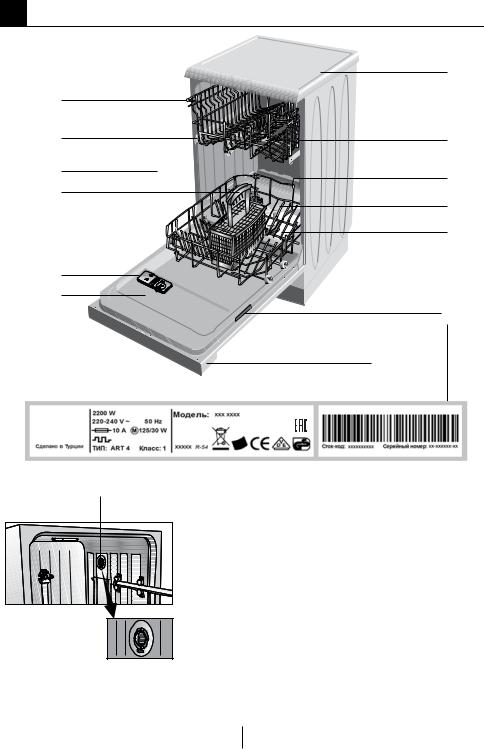
View of the Machine
|
12 |
1 |
|
2 |
11 |
3 |
10 |
|
4 |
||
9 |
||
|
||
|
8 |
5 6
14
7
14 |
1. |
Upper dish basket with shelf |
|
2. |
Guide rail for the upper dish basket |
||
|
|||
|
3. |
Salt container |
|
|
4. |
Cutlery basket |
|
|
5. |
Detergent dispenser |
|
|
6. |
Door |
|
|
7. |
Control panel |
|
|
8. |
Filters |
|
|
9. |
Lower sprayer arm |
|
|
10. |
Lower basket |
|
|
11. |
Upper sprayer arm |
|
|
12. |
Housing (depends on the model) |
|
|
13. |
Turbo fan heat drying system (depends on |
|
|
14. |
the model) |
|
|
Model and serial tag |
3 EN

Technical Specifications
Permitted water pressure: 0,3 –10 bar (= 3 – 100 N/cm² = 0,01-1,0Mpa) Electrical connection: 220-240 Volts, 10 Amps (see type plate)
Energy efficiency class “A” Electrical Safety class-1
Output: 1900-2200 W
Heat output: 1800 W
This device corresponds to the following EU directives: 2006/95/EC: Low Voltage Directive
2004/108/EC: EMV Directive
DIN EN 50242: Electrical dishwasher for home use Testing procedures for practical service conditions
Because we continually strive to improve our products, we may change our specifications and designs without prior notice.
Note for Testing Institutes
The necessary information for performance testing will be provided upon request. The request can be done by e-mail through:
dishwasher@standardloading.com
Please do not forget to write the model code and stock code information of the appliance besides your contact information in the e-mail. The model code and stock code information can be found on the rating label, which is placed on the side of the door.
4 EN

2 Important safety instructions
This section contains safety instructions that will help to get protected from risk of personal injury or property damage Failure to follow these instructions shall void all warranties.
General safety
•Never place the product on a carpet-covered floor; otherwise, lack of airflow beneath the product will cause electrical parts to overheat. This will cause problems with your product.
•Do not operate the product if the power cable / plug is damaged! Call the Authorised Service Agent.
•Connect the product to a grounded outlet protected by a fuse complying with the values in the “Technical specifications” table. Do not neglect to have the grounding installation made by a qualified electrician. Manufacturer shall not be liable for any damages that will arise when the product is used without grounding in accordance with the local regulations.
•The water supply and draining hoses must be securely fastened and remain undamaged.
•Unplug the product when not in use.
•Never wash the product by spreading or pouring water onto it! There is the risk of electric shock!
•Never touch the plug with wet hands! Never unplug by pulling on the cable, always pull out by grabbing the plug.
•The product must be unplugged during installation, maintenance,
5
cleaning and repairing procedures.
• Always have the installation and repairing procedures carried out by the Authorised Service Agent. Manufacturer shall not be held liable for damages that may arise from procedures carried out by unauthorised persons.
• Never use chemical solvents in the product. They bring forth risk of explosion.
• When you pull the upper and lower baskets out completely, the door of the product will bear all the weight of the baskets. Do not put other loads on the door; otherwise, the product may tilt.
• Never leave the door of the product open apart from loading and unloading procedures.
• Do not to open the door of the product when it is running unless necessary. Be careful for the rush of hot steam when you need to open the door.
Intended use
This appliance is intended to be used in household and similar applications such as:
•staff kitchen areas in shops, offices and other working environments;
•farm houses;
•by clients in hotels, motels and other residential type environments;
•bed and breakfast type environments;
•Only dishwasher safe detergents, rinse aids and additives must be used.
EN

•The manufacturer waives any responsibility arisen from incorrect usage or transportation.
•The service life of your product is 10 years. During this period, original spare parts will be
available to operate the appliance properly.
•This product should not be used by persons with physical, sensory or mental disorders or
unlearned or inexperienced people (including children) unless they are attended by a person who will be responsible for their safety or who will instruct them accordingly for use of the product.
Children’s safety
•Electrical products are dangerous for the children. Keep children away from the product when it is in use. Do not let them to tamper with the product.
•Do not forget to close the door of the product when leaving the room where it is located.
•Store all detergents and additives in a safe place away from the reach of the children.
6 EN

3 Installation
Refer to the nearest Authorised Service Agent for installation of your product. To make the product ready for use, make sure that the electricity, tap water supply and water drainage systems are appropriate before calling the Authorised Service Agent. If they are not, call a qualified technician and plumber to have any necessary arrangements carried out.
CPreparation of the location and electrical, tap water and waste water installations at the place of installation is under customer's responsibility.
flat floor that has sufficient load carrying capacity! The product must be installed on a flat surface in order for the door to be closed comfortably and securely.
· Do not install the product at places where temperature may fall below 0ºC.
· Place the product at least 1 cm away from the edges of other furniture.
· Place the product on a rigid floor.
Do not place it on a long pile rug or similar surfaces.
BInstallation and electrical connections must be carried out by the Authorised Service Agent. Manufacturer shall not be held liable for damages that may arise from procedures carried out by unauthorised persons.
BPrior to installation, visually check if the product has any defects on it. If so, do not have it installed.
Damaged products cause risks for your safety.
AMake sure that the water inlet and discharge hoses are not folded, pinched or crushed while pushing the product into its place after installation or cleaning procedures.
When placing the product, pay attention not to damage the floor, walls, piping, etc. Do not hold the product from its door or panel to move it.
Appropriate installation location
·Place the product on a solid and
ADo not place the product on the power cable.
·Make sure that you select a location that will allow you to load and unload the dishes in a fast and comfortable manner.
·Install the product in a place close to the tap and the drain hole. Select the installation location
by considering that it will not be changed after the connections are made.
Connecting water supply
CWe recommend attaching a filter on the house/apartment supply water inlet to protect the machine from damages that may arise from impurities (sand, dirt, rust, etc.) coming from the urban water supply system or from your own water system as well as to prevent complaints such as yellowing or sludge accumulation at the end of washing.
7 EN

Permitted water temperature: up to 25°C
The dishwasher may not be connected to open warm water devices or flowthrough water heaters.
·Do not use old or used water inlet hose on the new product. Use the new water inlet hose supplied with the product.
·Connect the water inlet hose directly to the water tap. Pressure coming from the tap should be minimum 0.3 and maximum
10 bars. If the water pressure exceeds 10 bars, a pressure relief valve should be installed in between.
CUse a screw-on hose connector to connect the water inlet hose to a water tap with a ¾ inch external thread. If required, use a filter insert to filter deposits from the pipes.
1009 |
·Open the taps completely after making the connections to check for water leaks.
AFor your safety, close the water inlet tap completely after the washing programme is over.
Connection to the drain
Water discharge hose can directly be connected to the drain hole or sink’s drainage. The length of this connection must be min. 50 cm and max. 100 cm from the floor.
max 100 cm |
<![if ! IE]> <![endif]>110 |
|
<![if ! IE]> <![endif]>100 |
| <![if ! IE]> <![endif]>12cm |
<![if ! IE]> <![endif]>70 80 90 |
min 50 cm |
<![if ! IE]> <![endif]>60 |
min 4cm |
<![if ! IE]> <![endif]>50 |
| <![if ! IE]> <![endif]>40 |
|
1011 |
<![if ! IE]> <![endif]>30 |
| <![if ! IE]> <![endif]>10 |
|
|
<![if ! IE]> <![endif]>20 |
|
<![if ! IE]> <![endif]>0 |
Ø |
21 |
|
|
18 |
|
|
Ø |
|
|
|
A discharge hose longer than 4 meters causes dirty washing.
Attach the water discharge hose to the drainpipe without bending it.
Tightly fix the water discharge hose to the drainpipe in order to prevent any dislocation of the water discharge hose during operation of the product.
C Drainpipe must be connected to the sewage system and it should not be connected to any surface water.
8 EN
 Loading...