


it |
Instructions d’installation |
Istruzioni di installazione |
|
|
Instrucțiuni de instalare |
|
K54285EB_K54275NEB / HEB - Hettich |
|
4578346306/AC |
min |
mm |
|
No wooden back wall
| <![if ! IE]> <![endif]>1788 mm |
|
|
mm |
| <![if ! IE]> <![endif]>- |
|
560 |
|
. |
|
||
| <![if ! IE]> <![endif]>1778 |
min |
|
|
|
|
|
|
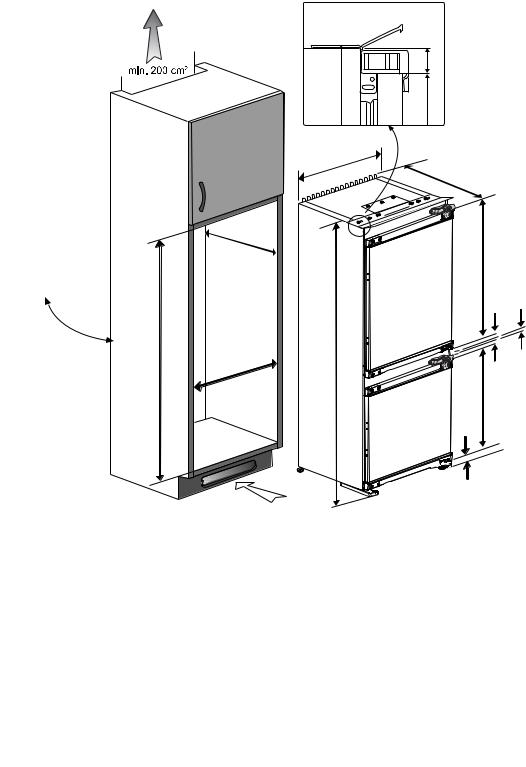
min. 200 cm2
mm1775 540mm
<![if ! IE]><![endif]>1775 mm
| <![if ! IE]> <![endif]>32 mm |
|
| <![if ! IE]> <![endif]>1001 mm |
|
545 |
mm |
|
| <![if ! IE]> <![endif]>1001 mm |
|
| <![if ! IE]> <![endif]>mm |
<![if ! IE]> <![endif]>16 mm |
| <![if ! IE]> <![endif]>71 |
|
| <![if ! IE]> <![endif]>629 mm |
|
40 mm |
|
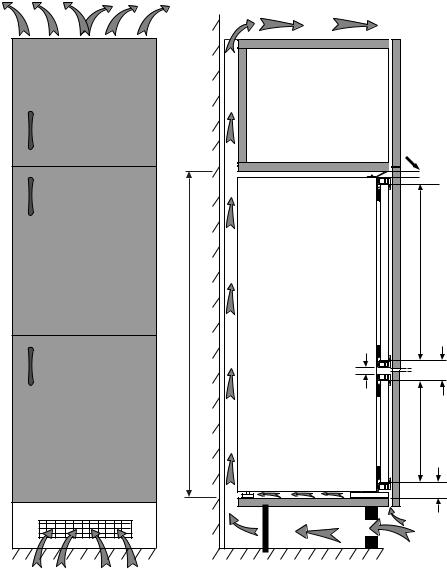
The back wall of the wooden cabinet must be left open completely to kitchen wall in order to allow sufficient air circulation to cool down the condenser unit for energy efficiency.
Die Rückseite des Holzschranks muss zur Küchenwand hin vollständig offen bleiben, damit eine ausreichende Luftzirkulation für die Abkühlung des Kondensators zur Gewährleistung der Energieeffizienz sorgt.
La paroi arrière du meuble en bois doit être laissée complètement ouverte contre le mur de la cuisine, afin de permettre une circulation d’air suffisante pour refroidir le produit.
La parete posteriore dell’armadio in legno deve essere lasiata completamente aperta verso la parete della cucina per consentire una circolazione d’aria sufficiente a raffreddare il condensatore per garantire una sufficiente alimentazione.
Pentru a avea eficiență energetică, partea posterioară a dulapului către peretele bucătăriei trebuie să fie lăsată complet deschisă, pentru a permite o circulație de aer suficientă care să răcească condensatorul.
Enerji tasarrufu için buzdolabı arkasında yeterli hava sirkülasyonu sağlanmalıdır. Bu amaçla buzdolabının içine yerleștirileceği ahșap kabinin arka yüzeyi kapatılmamalıdır.
1
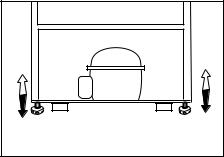
Adjusting the legs
If your refrigerator is unbalanced:
You can balance your refrigerator by turning the legs of it as illustrated in the figure. The corner where the leg exists is lowered when you turn in the direction of black arrow and raised when you turn in the opposite direction. Taking help from someone to slightly lift the refrigerator will facilitate this process.
Füße einstellen
Wenn Ihr Kühlschrank nicht absolut gerade steht:
Sie können den Kühlschrank – wie in der Abbildung gezeigt – durch Drehen der Füße ausbalancieren. Wenn
Sie in Richtung des schwarzen Pfeils drehen, senkt sich die Ecke, an der sich der Fuß befindet. Beim Drehen in Gegenrichtung wird die Ecke angehoben. Diese Arbeit fällt erheblich leichter, wenn ein Helfer das Gerät etwas anhebt.
Réglage des pieds
Si votre réfrigérateur est déséquilibré:
Vous pouvez l’équilibrer en tournant les pieds de celui-ci comme illustré sur le dessin ci-dessus. Pour abaisser le produit, veuillez tourner les pieds dans le sens inverse des aiguilles d’une montre (flêches noires). Pour monter le produit, veuillez tourner dans le sens contraire (flêches blanches). Lever légèrement l’avant du produit, avec l’aide d’une personne tierce, vous faciltera le procesus.
Regolazione dei piedini
Se il frigorifero non è in equilibrio:
È possibile bilanciare il frigorifero ruotando i piedini come illustrato in figura. L’angolo in cui i piedini sono più bassi quando girati in direzione della freccia nera e rialzati quando girati in direzione opposta. Un aiuto per sollevare leggermente il frigorifero faciliterà tale processo.
Ajustarea picioarelor
Dacă frigiderul este neechilibrat:
Puteți echilibra frigiderul prin rotirea picioarelor sale așa cum este reprezentat în schiță.
Colțul unde există piciorul se coboară atunci când rotiți în direcția săgeții negre și se ridică atunci când rotiți în direcția opusă. Acest procedeu va fi mai ușor dacă cineva vă ajută să ridicați ușor frigiderul.
Ayakların Ayarlanması
Buzdolabınız dengesiz duruyor ise:
Buzdolabınızın ayaklarını șekildeki gibi döndürerek dengeli durmasını sağlayabilirsiniz. Siyah ok yönüne döndürüldüğünde ayağın bulunduğu köșe alçalır, diğer yöne döndürüldüğünde ise yükselir. Bu ișlem yapılırken birinden dolabı hafifçe kaldırması için yardım almanız kolaylık sağlayacaktır.
2
<![endif]>1778-1788 mm
min 200 cm2
|
L mm ** |
|
|
<![if ! IE]> <![endif]>1001 mm |
|
| <![if ! IE]> <![endif]>16 mm |
4 mm |
<![if ! IE]> <![endif]>71 mm |
|
||
|
<![if ! IE]> <![endif]>629 mm |
|
|
|
<![if ! IE]> <![endif]>40 mm |
200 cm2 |
*If the subject parts are not included in the product you have purchased, then it is valid for other models (see page 4/5).
*Falls Teile nicht zum Lieferumfang des erworbenen Produktes zählen, gelten sie für andere Modelle (siehe Seite 4/5).
*Si les pièces concernées ne sont pas incluses dans le produit que vous avez acheté, elles sont valables pour d'autres modèles (voir page 4/5).
*Se le parti in oggetto non sono incluse nell'apparecchio acquistato, significa che sono da intendersi per altri modelli (vedi pagina 4/5).
*În cazul în care unele componente nu sunt incluse în produsul pe care l-ați achiziționat, atunci sunt valabile pentru alte modele (vezi pagina 4/5).
*Satın almıș olduğunuz üründe ilgili parçalar yoksa bașka modeller için geçerlidir (sayfa 4/5'e bakın).
3

Torx |
Wood |
Plastic Sheet |
* |
x 27 |
|
(T) |
(W) |
(PS) |
|
||
x2 |
x27 |
|
x4 |
|
|
|
|
Metric |
Wood |
|
|
* Spares included |
|
(2T) |
(1TW) |
|
|
|
x2 |
x10 |
|
|
|
* Ersatzteile inklusive |
|
|
|
|
|
* Pièces incluses |
|
|
|
|
|
* Ricambi inclusi |
|
|
|
|
|
* Piese incluse |
|
|
|
|
|
* Dahil olan parçalar |
|
|
|
|
|
* 7
PS
4 3
2
1
90°
x10 |
x 4 |
x 2 |


 '2T' x 2
1
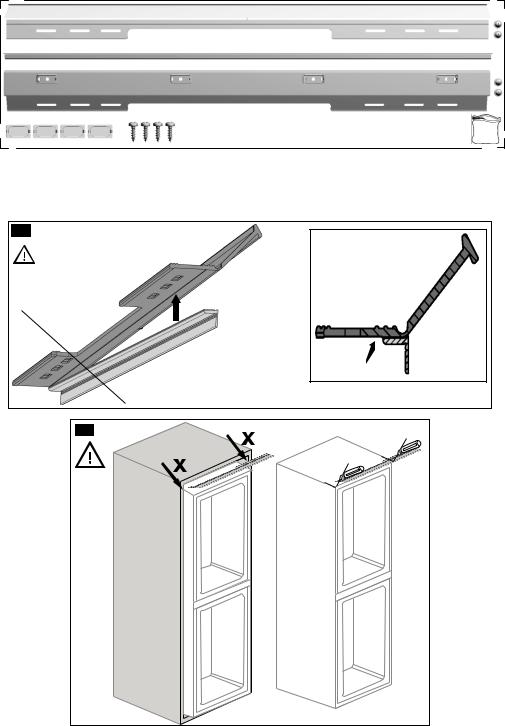
Note: Installation step for 2, screws for connecting top plastic part should not be screwed very hard, because of moving the plastic part easily left or right side.
Hinweis: Installationsschritt 2, Die Schrauben zum Fixieren des Kunststoffteils sollten nicht zu fest angezogen werden, da sich das Kunststoffteil ansonsten nach links oder rechts verschieben kann.
Remarque: A l'étape 2 de l'installation, les vis pour fixer l’accessoire en plastique sur la partie supérieure ne doivent pas être vissées à fond, afin d’éviter tout déplacement latéral de cette pièce pendant le vissage.
Nota: Fase di installazione per 2, viti per connettere la parte in plastica superiore non devono essere serrate, per consentire il movimento della parte in plastica a sinistra o a destra.
Notă: Instalare - pasul 2, șuruburile pentru conectarea părții superioare din plastic nu ar trebui să fie înșurubate foarte tare, pentru ca aceasta să poată fi mișcată ușor de la stânga la dreapta.
Not: 2 numara ile gösterilen montaj adımında üst bağlantı plastiğini kaydırabilmek için bağlantının yapıldığı vidaları tam sıkmayınız.
4
**L>10 mm
**L<10 mm
* 1
**see page 3 siehe Seite 3 voir page 3 vedi pagina 3 vezi pagina 3 sayfa 3'e bakın
1.A
1.B |
5 |
 Loading...