


Refrigerator |
||
User manual |
||
|
|
Réfrigérateur |
|
|
Manuel d'utilisation |
|
|
Refrigerador |
|
|
Manual del usuario |
|
|
BBBF3019IMWESS |
|
|
BBBF3019IMWE |
|
|
BBBF3019IMWECF |
EWWERQWEW |
|
|
EN |
FR |
ES |

Please read this manual before using the product!
Dear Valued Customer,
We wish you to get the best results from your product that has been manufactured meticulously at modern plants and tested with detailed quality control checks.
For this reason, we recommend that you read this user manual thoroughly before starting the product. If you hand over the product to someone else, please remember to give the user manual as well.
This manual will help you use your appliance in a fast and safe way.
•Please read this user manual carefully before installing and using the product.
•Always follow the applicable safety instructions.
•Keep the user manual in an easily accessible place for further use.
•Please read all the other documents provided with the product.
Please keep in mind that this manual may apply to several product models. This manual expressly indicates the differences between various models.
C |
Important information and useful |
hints. |
|
|
|
A |
Risk of injury and property |
damage. |
B Risk of electric shock.
Packaging materials of this product has been manufactured from recyclable materials in accordance with the National Environment Regulations.

CONTENT
1 |
Important Instructions Regarding |
|
Safety and Environment |
3 |
|
2 |
Refrigerator |
7 |
|
|
|
3 |
Display Appearance |
8 |
3.1 On/Off Function. . . . . . . . . . . . . . . . . . . . . . 9
3.2 General Display Appearance . . . . . . . . . . . . 9
3.4 Quick Fridge Function . . . . . . . . . . . . . . . . 10
3.3 Fresh Food Compartment Setting Function . 10
3.6 Quick Freeze Function . . . . . . . . . . . . . . . . 11
3.5 Freezer Compartment Setting Function. . . . 11
3.7 Special Fridge Compartment . . . . . . . . . . . 12
12
3.9. Vacation Function . . . . . . . . . . . . . . . . . . . 13
3.10. Ice Machine . . . . . . . . . . . . . . . . . . . . . . 13
3.8 Eco Function . . . . . . . . . . . . . . . . . . . . . . . 13
3.12 Child Lock/Key Lock . . . . . . . . . . . . . . . . 14
3.11 Water Dispenser . . . . . . . . . . . . . . . . . . . 14
3.14 Filter Reset . . . . . . . . . . . . . . . . . . . . . . . 15
3.13 Sabbath Mode. . . . . . . . . . . . . . . . . . . . . 15
3.15 Temperature Unit Change Screen . . . . . . 16
4 Preparation |
17 |
4.1 Things to Do for Energy Saving . . . . . . . . 17
4.2 Recommendations About the Fresh Food Compartment . . . . . . . . . . . . . . . . . . . . . 17
4.3 Initial use . . . . . . . . . . . . . . . . . . . . . . . . 17
5 Operating the product |
18 |
5.1 Dual Cooling System. . . . . . . . . . . . . . . . . 18 5.2 Freezing Fresh Food . . . . . . . . . . . . . . . . . 18 5.3 Recommendations for Storing Frozen Food. 18 5.4 Placing the Food . . . . . . . . . . . . . . . . . . . . 18 5.5 Information About Deep Freezing . . . . . . . . 19 5.6 Blue Light . . . . . . . . . . . . . . . . . . . . . . . . . 20 5.7 Ioniser . . . . . . . . . . . . . . . . . . . . . . . . . . . 20
5.8 Description and Cleaning of the Odour Filter 20 |
||
5.9 Door Open Warning . . . . . . . . . . . . . . . . . |
20 |
|
5.10 |
Interior Lighting . . . . . . . . . . . . . . . . . . . . |
20 |
5.11 |
Sabbath Mode: . . . . . . . . . . . . . . . . . . . . |
21 |
5.12 Vacation Function . . . . . . . . . . . . . . . . . . |
21 |
|
5.13 Water Filter . . . . . . . . . . . . . . . . . . . . . . |
21 |
|
5.14 Water connection . . . . . . . . . . . . . . . . . . |
22 |
|
5.15 Attaching/Removing the Internal Filter to/from |
||
|
the Refrigerator. . . . . . . . . . . . . . . . . . . . |
22 |
5.16 |
Using the Internal Water Dispenser. . . . . . |
24 |
5.17 Water Dispensing . . . . . . . . . . . . . . . . . . |
24 |
|
5.18 |
Before Using the Water/Ice Dispenser. . . . |
25 |
5.19 |
Icebox. . . . . . . . . . . . . . . . . . . . . . . . . . . |
25 |
5.20 |
Door Shelves. . . . . . . . . . . . . . . . . . . . . . |
26 |
5.21 Adjustable Door Shelf . . . . . . . . . . . . . . . |
26 |
|
5.22 |
Glass Shelves . . . . . . . . . . . . . . . . . . . . . |
26 |
5.23 |
Motor Glass Shelves . . . . . . . . . . . . . . . . |
27 |
5.24 |
Humidity-Controlled Crisper . . . . . . . . . . . |
27 |
5.25 |
Special Fridge Compartment . . . . . . . . . . |
28 |
5.26 |
Freezer Drawers . . . . . . . . . . . . . . . . . . . |
28 |
5.27 |
Hinge Adjustment . . . . . . . . . . . . . . . . . . |
29 |
5.28 |
Changing the Direction of the Door . . . . . |
29 |
6 Care and cleaning |
30 |
|
6.1 Avoiding Bad Odours. . . . . . . . . . . . . . . . 30
6.2 Protecting the Plastic Surfaces . . . . . . . . 30
6.3 Cleaning the Inner Surface . . . . . . . . . . . . 31
6.4 Stainless Steel Outer Surfaces . . . . . . . . . . 31
7 Troubleshooting |
32 |
|
|
|
2 / 35 EN |
Refrigerator / User Manual |
|
|
|
|
|
|
1 Important Instructions Regarding Safety and Environment
This chapter contains safety information that will help you avoid the risk personal injury or property damage. Failure to follow these instructions shall render any product warranty void.
Intended use
WARNING:
Keep ventilation openings, in A the appliance enclosure or in the built-instructure, clear of
obstruction.
WARNING:
Do not use mechanical devices or other means to
A accelerate the defrosting process, other than those recommended by the manufacturer.
WARNING:
A Docircuit.not damage the refrigerant
WARNING:
Do not use electrical appliances inside the food
A storage compartments of the appliance, unless they are of the type recommended by the
manufacturer.
This appliance is intended to be used in household and similar applications such as
–staff kitchen areas in shops, offices and other working environments;
–farm houses and by clients in hotels, motels and other residential type environments;
–bed and breakfast type environments;
–catering and similar non-retail applications.
1.1. General Safety
•Persons with physical, sensory or mental disabilities; persons who lack experience and information and
children should not approach, enter or play with the product.
•Failure to follow the instructions and uncontrolled use of the product lead to dangerous results!
•Unplug the product if you encounter a failure during use.
•If the product malfunctions, it must not be operated until repaired by the authorised service provider. Risk of electric shock!
•Plug the product into a grounded socket protected by a fuse that corresponds to the value on its nameplate. Have a qualified electrician ground the product. Our company cannot be held responsible for damages resulting from the failure
to use the product with a grounded socket pursuant to local regulations.
•Unplug the product when not in use.
•Never wash the product by spreading or pouring water onto it! Risk of electric shock!
•Never touch the plug with wet hands!
•Never unplug the product by pulling the cable. Always pull the plug by holding the socket.
•Do not plug the refrigerator if the wall socket is loose.
|
3 / 35 EN |
Refrigerator / User Manual |
|
|
|

Important instructions regarding safety and environment
•Never connect your refrigerator to energy saving devices. Such systems are harmful to your product.
•Unplug the product during installation, care, cleaning and repairing procedures.
•Always have the Authorised Service Provider install the product and establish its electrical connections. The manufacturer cannot be held responsible for damages caused by procedures performed by unauthorised persons.
•Do not eat cone ice cream or ice cubes immediately after you take them out
of the freezer compartment! This may cause frostbite in your mouth!
•Do not touch frozen food with wet hands! They may stick to your hand!
•Do not put bottled or canned liquid beverages in the freezer compartment. They may burst!
•Never use steam or steam cleaners to clean or defrost the refrigerator. Steam gets into contact with the live parts in your refrigerator, causing short circuit or electric shock!
•Do not use mechanical devices or other means to accelerate the
defrosting process other than those recommended by the manufacturer.
•Never use the parts in your refrigerator such as the door and drawer as a means of support or step. This may cause the product to tip over or damage the parts of it.
•Do not damage the parts where the refrigerant is circulating with drilling or cutting tools. The refrigerant that might blow out when the gas channels of the evaporator, pipe extensions or surface coatings are punctured causes skin irritations and eye injuries.
•Do not cover or block the ventilation holes in your refrigerator with any object.
•Place the beverage with higher proofs tightly closed and vertically.
•Do not use gaseous sprays near the product since there is the risk or fire or explosion!
•Flammable items or products that contain flammable gases (e.g. spray) as well as explosive materials should never be kept in the appliance.
•Do not place vessels filled with liquid onto the product. Splashing water on an electrical part may cause electric chock or the risk of fire.
•Do not store items that need precise temperature adjustment (such as vaccines, heat-sensitive medication, science materials etc.) in the refrigerator.
•If you are not going to use the product for a long time, unplug it and remove the food in it.
•If there is a blue light on the refrigerator, do not look at this light with optical tools.
•Exposing the product to rain, snow, sun or wind is dangerous in terms of electrical safety.
•In products with mechanical control (thermostat), wait for 5 minutes to plug in the product again after unplugging.
•Do not overload the refrigerator. Objects in the refrigerator may fall down when the door is opened, causing injury or damage. Similar problems may arise if any object is placed onto the product.
•If the product has a door handle, do not pull the handle when re-locating the product. The handle might be loose.
|
4 / 35 EN |
Refrigerator / User Manual |
|
|
|
|
|
|

Important instructions regarding safety and environment
•Be careful not to jam your hand or any other body part in the moving parts of the refrigerator.
•Do not put your hand or any other foreign materials into the ice machine while it is operating.
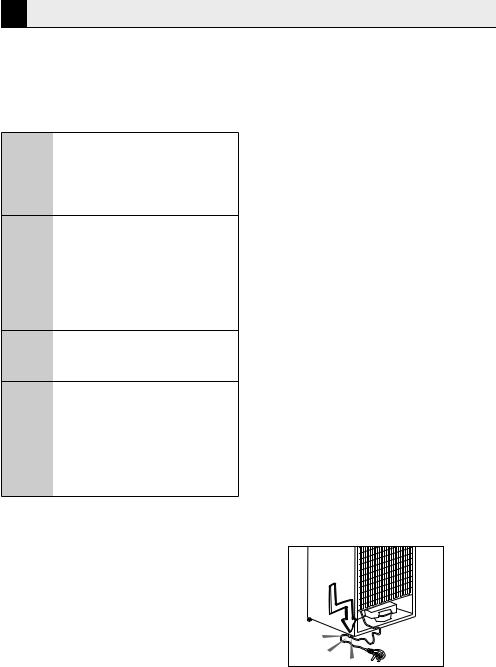
1.1.1 Hydrocarbon (HC) Warning
•If your product's cooling system contains R600a:
This gas is flammable. Therefore, pay attention not to damage the cooling system or the piping during use and transportation. If damaged, keep the product away from potential fire sources that may cause it to catch fire and ventilate the room where the product is placed.
If the product is damaged and if you see gas leak, please
C keep away from the gas. It may cause frostbite when it gets into contact with the skin.
(including R134)
Ignore this warning if the cooling C systemR134a. of your product contains
Type of gas used in the product C is stated on the type plate which
is on the left wall inside the refrigerator.
WARNING:
A Neverfor disposal.throw the product into fire
1.1.2 For Products with a Water Dispenser/Ice Machine
•Pressure for cold water inlet shall be maximum 90 psi (620 kPa). If your water pressure exceeds 80 psi (550 kPa), use a pressure limiting valve in
your mains system. If you do not know how to check your water pressure, ask for the help of a professional plumber.
•If there is a risk of water impact in your installation, always use a water impact protection equipment in that installation. Please consult professional plumbers if you are not sure if there is water impact in your installation.
•Do not make installation on the hot water inlet.
•Use drinking water only.
•Take the necessary measures against the freezing risk of the hoses. The water temperature operating range must be 0.6°C (33°F) minimum and 38°C (100°F) maximum.
WARNING:
Never connect the product A to a cold water mains with a
pressure of 550 kPa (80 psi) or above.
1.2. Intended Use
•This product has been designed for domestic use. It is not suitable for commercial use and it must not be used out of its intended use.
•It must be used only for storing food.
•The manufacturer will not take any responsibility for damages resulting from improper use or transport.
•Original spare parts will be available for 10 years after the purchase date of the product.
1.3. Children's Safety
•If there is a lock on the door of the product, the key should be kept out of the reach of children.
•Do not let children play with the product.
|
5 / 35 EN |
Refrigerator / User Manual |
|
|
|
Important instructions regarding safety and environment
DANGER:
Before disposing your old refrigerator or freezer:
• Children may get locked
A• Remove the doors.
•Leave the shelves to prevent children from getting inside the product easily.
1.4.Compliance with theinside.
WEEE Directive and Disposing
the Waste Product:
This product conforms to the EU
WEE Directive (2012/19 EU). This product bears a classification symbol
for waste electrical and electronic equipment (WEEE). This product has
been manufactured from high quality parts and materials which can be
reused and are suitable for recycling. Therefore, do not dispose the product with normal domestic waste or other waste at the end of its service life.
Take it to a collection centre for recycling electrical and electronic equipment. Please consult local authorities to learn about the locations of such collection centres.
|
DANGER: |
|
Risk of Fire or Explosion: |
|
• This product uses flammable |
|
refrigerant. |
|
• Do not use mechanical devices |
|
to defrost the refrigerator. |
|
• Do not use chemicals for |
|
cleaning. |
A |
• Do not pierce the refrigerant |
pipe. |
|
|
• If the refrigerant pipe is pierced, |
|
it must be repaired only by |
|
licensed service personnel. |
|
• Please consult the repair/user |
|
manual before cleaning the |
|
product. All safety instructions |
|
must be followed. |
|
• Dispose the product according to |
|
federal or local regulations. |
1.5. Compliance with the RoHS Directive:
The unit you have purchased conforms to the EU RoHS Directive (2011/65/EU). It does not contain harmful or prohibited materials specified in the Directive.
1.6. Packaging Information
•Packaging materials of the product have been manufactured from recyclable materials in accordance with our National Environment Regulations. Do not dispose the packaging materials with normal domestic waste or other types of waste. Take these materials to a recycling point designated by local authorities.
|
6 / 35 EN |
Refrigerator / User Manual |
|
|
|
|
|
|
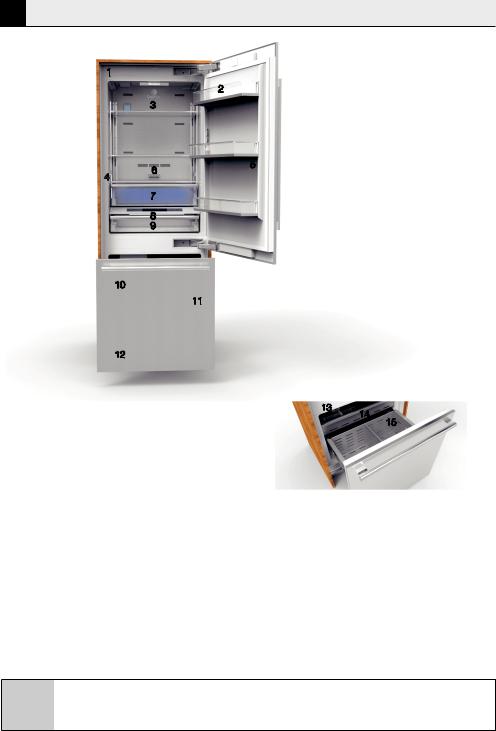
2 Refrigerator
1
|
|
2 |
|
3 |
|
4 |
6 |
5 |
|
||
|
|
|
|
7 |
|
|
8 |
|
|
9 |
|
10
11
12
13 14 15
1.Water filter |
|
9.Special temperature compartment |
2.Door shelf |
|
10.Ice machine |
3.Body shelf (adjustable height) |
11.Barcode label (identification plate) |
|
4.Water dispenser |
|
12.Condenser |
5.Gallon door shelf (adjustable height) |
13.Icebox |
|
6.Odour filter |
|
14.Upper drawer |
7.Crisper / Everfresh compartment |
15.Lower drawer |
|
8.Control display |
May not be available in all models |
|
|
||
Figures in this user manual are schematic and may not match the product exactly. If your C product does not have the relevant parts, the information applies to other models.
|
7 / 35 EN |
Refrigerator / User Manual |
|
|
|

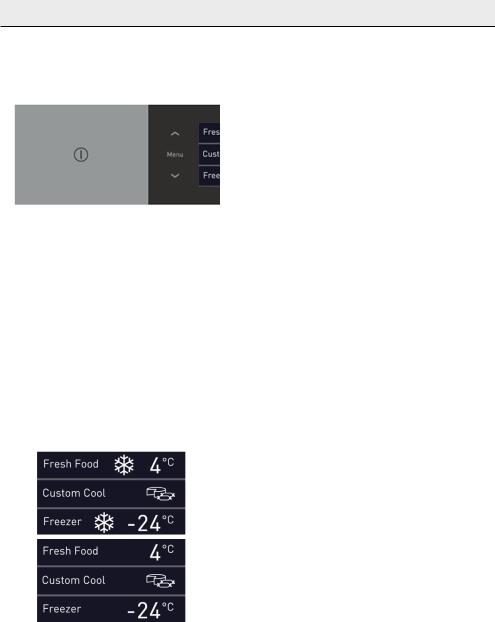
3 Display Appearance
On/Off |
Button for |
Buttons for |
Buttons for |
||||||
button |
moving the main |
moving the upper |
moving the lower |
||||||
|
menu |
body shelf |
body shelf |
||||||
|
upwards |
upwards and |
upwards and |
||||||
|
|
|
|
|
downwards |
downwards |
|||
|
|
|
|
|
|
|
|
|
|
|
|
|
|
|
|
|
|
|
|
|
|
|
|
|
|
|
|
|
|
|
|
|
|
|
|
|
|
|
|
|
|
|
|
|
|
|
|
|
|
|
|
|
|
|
|
|
|
|
|
Button for moving the main menu downwards
May not be available in all models
Figures in this user manual are schematic and may not match the product exactly. If your C product does not have the relevant parts, the information applies to other models.
|
8 / 35 EN |
Refrigerator / User Manual |
|
|
|
|
|
|
Operating the Product
3.1 On/Off Function
Press the button to switch on the product. The product will be switched on in 10 seconds. Press and hold the on/off button for 3 seconds to switch off.
Just press the on/off button to switch on the product again. The display will turn off in 10 seconds.
3.2 General Display Appearance
This is the main screen you will see when you open the door of the product. The product consists of 3 main compartments.
• Fresh food compartment.
• Special fridge compartment
• Freezer compartment
You can see the current temperatures of these compartments on the display. The snow symbol on the screen will be displayed
during quick cooling/freezing.
|
9 / 35 EN |
Refrigerator / User Manual |
|
|
|
Operating the Product
3.3 Fresh Food Compartment Setting Function
This function allows you to set the temperature of the fresh food cooling compartment.
You can use "+" and "-" keys to set the temperature of the refrigerator to 1, 2, 3, 4, 5, 6, 7, 8°C (33-34-35-36-37-38-39-40-41-42-43- 44-45-46°F) respectively.
Note: You must wait for 24 hours for the refrigerator to reach the desired temperature.
3.4 Quick Fridge Function
When you press the Quick Fridge button, the temperature of the compartment will be lower than the adjusted values.
You can use this function to rapidly cool the food you've placed in the fridge compartment.
If you want to cool large amounts of fresh food, it is recommended to activate this feature before putting the food into the fridge. When the quick fridge function is enabled, the quick fridge indicator becomes on and the set value is adjusted to 1 ºC automatically. A snow symbol will be displayed on the main screen when the quick fridge function is enabled. Press the Off key to deactivate this function. The snow symbol will disappear and the product will return to its previous settings. If you do not deactivate it,
the quick fridge function will deactivate itself automatically after 2 hours or when the fridge compartment reaches the required temperature. This function will not be recalled when power restores after a power failure.
|
10 / 35 EN |
Refrigerator / User Manual |
|
|
|
|
|
|

Operating the Product
3.5 Freezer Compartment Setting Function
It allows you to set the temperature of the freezer compartment. You can use "+" and "-" keys to set the temperature of the freezer compartment to -18, -19, -20, -21, -22,-23, -24 °C (0, -1, -2, -3, -4, -5, -6, -7, -8, -9, -10, -11, -12°F) respectively.
3.6 Quick Freeze Function
If you want to freeze large amounts of fresh food, press the quick freeze button before putting the food into the freezer compartment.
When the quick freeze function is enabled, the quick freeze indicator becomes and the set value is adjusted to -27°C automatically. Press the Off key to deactivate this function. The quick freeze indicator will go off and the product will return to its normal settings. If you do not cancel it, the
quick freeze will cancel itself automatically after 25 hours or when the freezer compartment reaches the required temperature. This function will not be recalled to resume when power restores after a power failure.
|
11 / 35 EN |
Refrigerator / User Manual |
|
|
|

Operating the Product
3.7 Special Fridge Compartment
Foods can be stored in 4 different modes in this compartment. You can select "Delicatessen", "Vegetable", "Meat" and "Fish" modes from the menu.
Delicatessen: It is the special fridge mode you can use to store your cheese and breakfast food.
Vegetables: It is the special fridge mode you can use to store your vegetables.
Meat: It is the special fridge mode you can use to store your meat.
Fish: It is the special fridge mode you can use to store your fish.
|
12 / 35 EN |
Refrigerator / User Manual |
|
|
|
|
|
|

Operating the Product
3.8 Eco Function
Eco mode is the function you can use the operate your product with less power.
It is used to enable/disable the eco mode function. The Eco mode indicator remains on when the Eco mode function is enabled.
The refrigerator will start operating in the economy mode at leash 6 hours after the Eco mode has been turned "ON".
3.9. Vacation Function
You can enable this mode if you are going on holiday or will not use the product for a long time. Your food in the freezer compartment will keep their cold state ad continue to be preserved. Do not place food in the fresh food compartment when this mode is enabled.
You can press the on/off key from the Vacation mode menu to enable/disable the Vacation function.
3.10. Ice Machine
It is the automatic ice machine used to take ice from the product. You can use this menu to turn the ice machine "on" or "off". Ice cubes accumulate in the icebox.
|
13 / 35 EN |
Refrigerator / User Manual |
|
|
|

Operating the Product
3.11 Water Dispenser
You can use this menu to turn the water dispenser "on" or "off". Push the water dispenser latch with your glass to take water from your refrigerator.
3.12 Child Lock/Key Lock
The child lock page is a feature for preventing children from changing the product settings.
A lock symbol will appear on the display and the lock will be enabled 5 seconds after you have pressed "on" key on the child lock page. Buttons are inactive when this function is enabled. When you press any key to deactivate the lock, you will see "Cancel child lock?" on the display. You can exit this mode by pressing "Yes".
|
14 / 35 EN |
Refrigerator / User Manual |
|
|
|
|
|
|

Operating the Product
3.13 Sabbath Mode
This product has a Sabbath feature. Lights of the refrigerator will not become on, the display will not operate and the door open alarm cannot be
activated while the Sabbath mode is active. You can use "On" or "Off" features to activate/deactivate this mode.
3.14 Filter Reset
The water filter is used to filter foreign particles in the water and it has a limited service life. This menu is used to track the replacement time of the Water Filter used in the refrigerator. The counter starts when "reset" is selected from this menu after a filter has been installed. You can see the
remaining days for the filter to complete its service life. The display gives a warning when the filter needs to be replaced.
NOTE: Change the filter when you see this warning.
Once the filter replacement warning has been displayed, you will see the filter replacement page once a day unless you press reset.
|
15 / 35 EN |
Refrigerator / User Manual |
|
|
|

Operating the Product
3.15 Temperature Unit Change Screen
You can set the temperature unit to Centigrade or
Fahrenheit from this menu.
|
|
|
|
||
|
C |
There might be a layer if your display keys do not function. In this case, clean with a |
|
||
|
|
dry and clean cloth. |
|
|
|
|
|
|
|
|
|
|
|
|
|
|
|
|
|
|
16 / 35 EN |
Refrigerator / User Manual |
|
|
|
|
|
|
|
|
|
|
|
|
|
4Preparation
4.1Things to Do for Energy Saving
Connecting your refrigerator to
A systems that save energy is dangerous as they may cause damage on the product.
•Do not leave the doors of your refrigerator open for a long time.
•Do not put hot food or drinks in your refrigerator.
•Do not overload the refrigerator. Cooling capacity will fall when the air circulation in the refrigerator is hindered.
•Do not place the refrigerator in places subject to direct sunlight. Install the product at least 30 cm away from heat sources such as hobs, ovens, heater units and stoves and at least 5 cm away from electrical ovens.
•Pay attention to store your food in refrigerator in closed containers.
•You can remove the drawer shelf of the freezer compartment to fill the freezer compartment with maximum amount of food. The given energy consumption value of the refrigerator has been determined with the freezer compartment shelf or the drawer removed and the refrigerator filled with maximum amount of food. There is no harm in using a shelf or drawer according to the shapes and sizes of food to be frozen.
•Thawing the frozen foods in the fridge compartment both saves energy and reserves the quality of the foods.
|
Temperature of the room where |
C your refrigerator is located should at |
|
|
least be 10ºC/50°F. Operating your |
|
refrigerator under cooler conditions is |
|
not recommended with regard to its |
|
efficiency. |
|
Inside of your refrigerator must be |
C cleaned thoroughly. |
|
C |
If two coolers are to be installed side |
|
by side, there should be at least 4 cm |
distance between them.
4.2 Recommendations About the
Fresh Food Compartment
•Make sure that the food does not touch the temperature sensor in fresh food compartment. To allow the fresh food compartment to keep its ideal storage temperature, the sensor must not be hindered by food.
•Do not place hot foods or beverages inside the product.
4.3 Initial use
Before using the product, make sure that all preparations have been made in accordance with the instructions given in the "Important
instructions regarding safety and environment" and "Installation Instruction" chapters.
•Clean the interior of the refrigerator as recommended in the “Maintenance and cleaning” section. Before you start the refrigerator, make sure that the interior is dry.
•Plug the refrigerator in a grounded socket. The interior illumination is lit when the door of the refrigerator is opened.
•Operate the refrigerator for 6 hours without placing any food in it and do not open its door unless it is necessary.
17 / 35 EN

5 Operating the product
5.1 Dual Cooling System
Your refrigerator is equipped with two separate cooling systems to cool the fresh food compartment and freezer compartment. Thus, the air and odour in the fresh food compartment and the frozen food compartment do not get mixed. Thanks to these two separate cooling systems, cooling speed is much higher than that of other refrigerators. Also additional power saving is provided since the defrosting is performed separately.
5.2 Freezing Fresh Food
•Wrap the foods or place them in a covered container before putting them in the refrigerator.
•Hot foods and beverages must cool down to the room temperature before you put them in the refrigerator.
•The foodstuff that you want to freeze must be fresh and in good quality.
•Divided the food into portions according to your family's daily or meal based consumption needs.
•Pack the foods in an airtight manner to prevent them from drying even if they are going to be stored for a short time.
•Materials to be used for packaging must be tear-proof and resistant to cold, humidity, odor, oils and acids and they must also be airtight. Moreover, they must be well closed and they must be made from easy-to-use materials that are suitable for deep-freezers.
•Frozen food must be used immediately after they are thawed and they should never be refrozen.
•Do not freeze too large quantities of food at one time. The quality of the food is best
preserved when it is frozen right through to the core as quickly as possible.
•Placing warm food into the freezer compartment causes the cooling system to operate continuously until the food is frozen solid.
5.3 Recommendations for Storing Frozen Food
•Frozen foods you purchase must be stored according to the conditions and temperature determined by the food manufacturer.
•Note the following to ensure that the high quality achieved by the frozen food manufacturer and the food retailer is maintained:
1.Put packages in the freezer as quickly as possible after purchase.
2.Make sure that the content of the package is labeled and dated.
3.Check whether the "Use By" or "Best Before" date on the packaging is expired or not.
5.4 Placing the Food
Freezer |
Various frozen food such |
|
compartment |
as meat, fish, ice cream, |
|
shelves |
vegetables etc. |
|
|
|
|
Egg tray |
Eggs |
|
|
|
|
Fridge |
Food in pans, covered plates |
|
compartment |
||
and closed containers |
||
shelves |
||
|
||
|
|
|
Door shelves |
Small and packaged foods |
|
of fridge |
or beverages (such as milk, |
|
compartment |
fruit juice, beer and etc.) |
|
|
|
|
Crisper |
Vegetables and fruits |
|
|
|
|
Special fridge |
Delicatessen products |
|
compartment |
(cheese, butter, salami etc.) |
|
|
|
|
18 / 35 EN |
Refrigerator / User Manual |
|
|
|
|
|
|
Operating the Product
5.5 Information About Deep Freezing
Food must be frozen as rapidly as possible when they are put in a refrigerator in order to keep them in good quality.
You can keep the freshness of food for many months (at -18 °C / 0°F or lower temperatures in the deep freezer).
C Divided the food into portions according to your family's daily or meal based consumption needs.
C Pack the foods in an airtight manner to prevent them from drying even if they are going to be stored for a short time.
Materials to be used for packaging the foodstuff must be tear-proof and resistant to cold, humidity, odor, oils and acids.
Foods to be frozen should not be allowed to come in contact with the previously frozen items to prevent them from getting thawed partially.
C Frozen food must be used immediately after they are thawed and they should never be re-frozen.
Fridge and freezer systems with dual cooling systems have been designed to maintain net, consistent temperature and appropriate humidity levels to meet long food life expectations. The dual cooling system prevents fresh food smells from getting mixed with frozen foods or ice and it does not freeze the humidity in the air within the fresh food compartment.
Freezer |
Fridge |
|
|
|
|
|
|
Compartment |
Compartment |
Remarks |
|
|
|||
Setting |
Setting |
|
|
|
|
|
|
|
|
|
|
||||
-18°C / 0°F |
4°C / 39°F |
This is the recommended normal setting. |
|
||||
-20°C / -4°F |
3°C / 37°F |
These settings are recommended when the ambient |
|
||||
temperature is above 30°C/86°F. |
|
||||||
|
|
|
|
||||
|
|
|
Use when you wish to freeze your food in a short time. Your |
|
|||
Quick Freeze |
4°C / 39°F |
refrigerator will return to its previous mode when the process is |
|
||||
|
|
|
over. |
|
|
||
|
|
|
Use these settings if you think that your fridge compartment |
|
|||
-24°C / -12°F |
2°C / 35°F |
is not cold enough because of the hot ambient conditions or |
|
||||
|
|
|
frequent opening and closing of the door. |
|
|||
|
|
|
Use this function when you place too much into the fridge |
|
|||
-18°C / 0°F or |
Quick Fridge |
compartment or when you need to cool your food quickly. It is |
|
||||
colder |
recommended that you activate Quick Fridge function 4-8 hours |
|
|||||
|
|
||||||
|
|
|
before placing the food. |
|
|
||
|
Recommended Operating Temperature: Fridge: 4°C / 39°F |
Freezer: -18°C / 0°F |
|||||
|
|
|
|
|
|
|
|
|
|
|
|
19 / 35 EN |
|
Refrigerator / User Manual |
|
|
|
|
|
|
|
|
|
Operating the Product
5.6 Blue Light
(May not be available in all models)
Crispers of the refrigerator are illuminated with a blue light. Foods stored in the crisper continue their photosynthesis by means of the wavelength effect of blue light, and thus they preserve their freshness and increase their vitamin content.
5.7 Ioniser
(May not be available in all models)
Air is ionised by means of the ioniser system in the air duct of the fridge compartment. Thanks to this system, air-borne bacteria and odorising molecules are eliminated.
5.8 Description and Cleaning of the Odour Filter
(May not be available in all models)
The odour filter prevents bad odours on your filter. To clean the odour filter:
1.Pull the cover on which the odour filter is installed towards yourself from the front section and remove it.
2.Leave the filter under sunlight for 12 hours. The filter will be cleaned during this period.
3.Install the filter back into its place.
C Odor filter must be cleaned once a year.
5.9 Door Open Warning
(May not be available in all models)
An audible warning will be heard if the door of the product remains open for 1 minute. You can silence this audible warning by pressing any key on the control panel or closing the door.
5.10 Interior Lighting
A LED-type lamp is used for interior lighting. Please consult the authorised service provider about any problem with this lamp. Lamp/lamps used in this product is/are not suitable for house/room lighting. The intended purpose of this lamp is to help the user place foods into the fridge/freezer safely and easily.
|
20 / 35 EN |
Refrigerator / User Manual |
|
|
|
|
|
|

Operating the Product
5.11 Sabbath Mode:
(May not be available in all models)
This mode has been designed for short-term use. Lighting means, the display and the door open alarm will be disabled when the Sabbath mode is active. With this mode, a stable cooling performance is aimed when storing meals and
vegetables. For this reason, it is not recommended to use this mode when the product is being used often or has just been loaded. The Sabbath mode is activated by pressing the "ON" key on the Sabbath screen under the menu and it is displayed on the screen. Door buttons can be locked and unlocked with the mechanical switch when desired. You need to press the "OFF" key on the menu to deactivate the Sabbath mode.
For low ambient temperatures (lower than 10°C), it is recommended to set the refrigerator temperatures to -18/ 6 °C before activating the Sabbath mode.
For high ambient temperatures (higher than 35°C), it is recommended to set the refrigerator temperatures to -24/ 2 °C before activating the Sabbath mode.
Leaving the product in the Sabbath mode for a long time may cause the foods to spoil at high temperatures.
5.12 Vacation Function
To activate this function, disconnect the power from the control panel. Empty the unit and fix the doors so that they remain ajar to let fresh air enter the unit and keep the interior of the unit dry. Select and activate the vacation mode from the control display of your product.
5.13 Water Filter
The water filter is used to filter foreign particles in the water and it has a limited service life. The water filter does not filter out the microorganisms in the water.
Your product is equipped with an internal water filter to be used within the refrigerator. Part number of the filter is 4874960100. You can use this part number when ordering filter for replacement.
C Service life of the water filter is 6 months.
|
21 / 35 EN |
Refrigerator / User Manual |
|
|
|

Operating the Product
5.14 Water connection
(May not be available in all models)
Your refrigerator may be equipped with an external or internal filter. Look at the figures below and follow the instructions to install the water filter:
A Please see the installation instruction to connect the product to the mains.
5.15 Attaching/Removing the Internal Filter to/from the Refrigerator
First of all, turn "OFF" the ice machine and water dispenser from the control display of the product.
To install the filter to the product:
1.Slightly press the front side of the water filter lid, which is located at the top-left corner of the fresh food compartment, to open it.
2.As seen in the figure, push the water filter into its slot in an angled position. Then keep the filter in a horizontal position and press on the lid to close it.
To remove the filter from the product:
1.Slightly press the front side of the water filter lid, which is located at the top-left corner of the fresh food compartment, to open it.
2.Keep the water filter in a downwards angled position, pull it towards yourself and remove it.
C |
It is normal that a few drops of water |
drip after the water filter has been |
|
|
removed. |
3.Slightly push the water filter lid upwards to close it.
4.Select the "ON" mode to exit this mode.
If you want to use the ice machine and the water dispenser without the water filter, install the bypass cover the same way you install the water filter.
C |
The water dispenser or ice machine |
||
can never be used without the water |
|||
|
|
filter or by-pass cover installed. |
|
|
|
Otherwise, water will come out from |
|
|
|
that part. |
|
|
|
|
|
|
|
|
|
|
|
|
|
|
|
|
|
|
|
|
|
|
|
|
|
|
22 / 35 EN |
Refrigerator / User Manual |
|
|
|
|
|
|

Operating the Product
C |
All air must be discharged from the |
system and the filter must help with |
|
|
cleaning the water lines when the |
|
water filtering system is being used |
|
for the first time or after replacing |
|
the filter. For models with a water |
|
dispenser, drain 15 liters (4 gallons) of |
|
water. If you are not going to use the |
|
water filtering system, you can remove |
|
the filter and switch the water filter to |
|
by-pass mode. |
|
23 / 35 EN |
Refrigerator / User Manual |
|
|
|

Operating the Product
5.16 Using the Internal Water Dispenser
(May not be available in all models)
After connecting the refrigerator to the water supply or replacing the water filter, press and hold the water dispenser latch for 5 seconds and use a durable container to clean the water system. Then release the latch for 5 seconds, and keep performing these procedures until water flows. When the water starts to flow, repeat the same steps until you discharge 15 liters of water. This procedure will discharge the air in the filter and water dispenser to make the water system ready to use. Water may rush from the dispenser when air comes from the system.
It will take the water 24 hours to cool down to the temperature of the refrigerator after draining large amounts of water and during the first filling process.
The water dispenser will stop dispensing to prevent flooding after the
C user has taken water continuously for 60 seconds. Press the dispenser latch again to continue taking water.
Please call the authorised service if A you see water leakage on the product
after it has been connected to the water supply.
It is normal that a few drops of water C drop from the dispenser after you have
taken water.
5.17 Water Dispensing
Press the water dispenser latch and hold a vessel under it at the same time.
Release the dispenser latch to stop dispensing water.
C It is normal for the first few glasses of water taken from the dispenser to be warm after the product has just been connected to the water supply.
C If the water dispenser has not been used for a long time or if it is going to be used for the first time, dispose of the first 6 glasses of water to get clean water.
|
24 / 35 EN |
Refrigerator / User Manual |
|
|
|
|
|
|

Operating the Product
5.18 Before Using the Water/Ice
Dispenser
•A separate water pump must be used if the water pressure is lower than 1 bar or if a demijohn is going to be used.
•Water system of the refrigerator must be connected to the cold water line. It must not be connected to the hot water line.
•The water pressure must be between 1-5.5 bars for the water dispenser to operate smoothly.
•You must wait for 12 hours approximately to get ice from the ice machine. If the ice in the icebox is not sufficient, the ice machine might not dispense ice cubes.
A |
Do not use the water dispenser |
before reading and confirming |
|
|
"1.1.2 For products with a water |
|
dispenser" on page 5. |
5.19 Icebox
The icebox is used to collect ice cubes coming from the ice machine. Do not pour water into the box to make ice. Otherwise, it may break. The icebox cannot be used to store foods.
To remove the icebox, pull the freezer drawer completely and take out the icebox. To install it again, take out the drawer carrier and align the bottom of the box with the carrier. Please see the figure below.
C Ice cubes may stick to each other if not used for 5 days. For this reason, you can crush the ice cubes sing the ice cube scoop provided with the appliance.
The ice machine must be turned off from the control display when the ice storage container is removed.
|
25 / 35 EN |
Refrigerator / User Manual |
|
|
|
Operating the Product
5.20 Door Shelves
To remove a door shelf, hold the shelf from the lower section, lift it and slide it outwards. Please see the figure.
C |
If opening the door is limited with |
90°, you may have to remove the |
|
|
door shelves before removing a |
|
storage drawer or glass shelf. |
5.21 Adjustable Door Shelf
(May not be available in all models)
Press and hold the buttons at the right and left-hand sides to adjust the door shelf to the desired position without having to remove it. To remove the adjustable door shelf, press and hold the buttons, lift the shelf completely and pull it towards yourself. To install the door shelf back, put it into its place on the door and slide it downwards by pressing the buttons. Please see the figure.
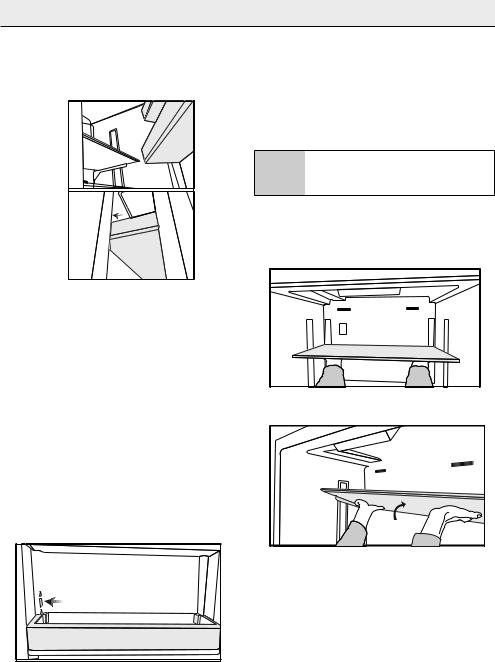
5.22 Glass Shelves
(May not be available in all models)
Height of the glass shelves on your product can be adjusted manually or with rear hangers.
Please follow the instructions below to remove, install and adjust a glass shelf.
AATTENTION:
Glass shelves must be unloaded.
1.Hold the shelves with rear hangers as shown below. Your hands must be at the rear section. Make sure you are holding the shelf tightly from the bottom.
2.Lift the front section of the glass shelf as shown below and bring it to an angled position.
3.Once it is angled, tabs on the hangers will be released and the glass shelf will move up and down. Thus you can adjust the position.
4.To remove the glass shelf, bring it to the maximum height and pull towards yourself.
5.To install the glass shelf, place the pins at the rear corner of the shelf into the slots through the gap at the top and slide it downwards in an angled manner.
|
26 / 35 EN |
Refrigerator / User Manual |
|
|
|
|
|
|
Operating the Product
ATTENTION:
AYou must wait for the glass shelves to reach room temperature before immersing them in water for cleaning.
ATTENTION:
The door may not be closed if the Adoor shelves are positioned at the same level as glass shelves. Make
sure than the door is closed after placing the shelves.
5.23 Motor Glass Shelves
(May not be available in all models)
Having rear hangers, the electronic glass shelves are adjusted with the buttons at the left side of the control display through a motor. You can use these buttons to move it up and down.
ATTENTION:
ASince the glass shelves are controlled electronically, please do not attempt to adjust them manually.
AATTENTION:
The electronic shelf can bear 45 kg maximum while moving.
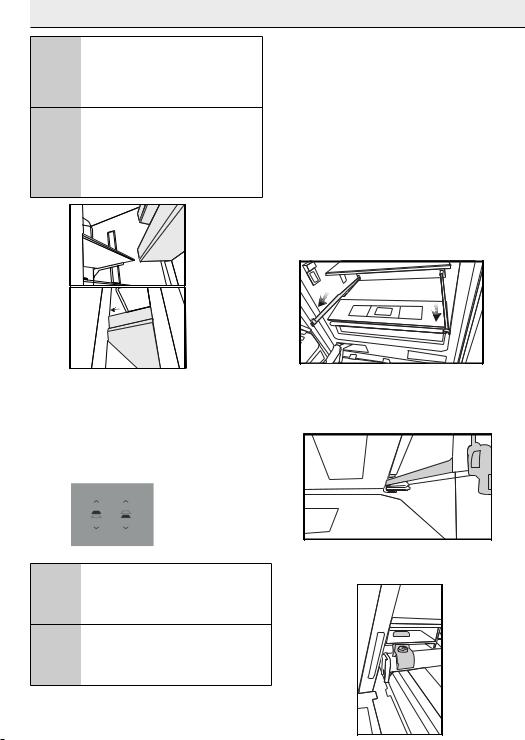
5.24 Humidity-Controlled Crisper
(Crisper Compartment)
(May not be available in all models)
Thanks to its humidity control feature, it keeps the humidity rates of fruits and vegetables at a certain level and keeps foods fresh for a longer period.
To remove the crisper:
1.Pull the crisper until it stops.
2.Slightly lift the front section of the drawer and take it out completely.
To install the crisper:
1.Pull the rails completely.
2.Place the gap at the rear corners of the crisper to the detail located at the rear corners of the rails.
3. Place the detail at the front section of the rail to the gap at the front part of the crisper.
|
27 / 35 EN |
Refrigerator / User Manual |
|
|
|

Operating the Product
|
|
C |
Make sure that the details at the |
|
right and left-hand sides are fixed |
|
when installing the crisper. |
|
|
C |
Never leave the vegetables in their |
|
plastic bags in the crisper. If they are |
|
left in their plastic bags they will rot |
|
in a short period of time. |
|
|
The humidity-controlled crisper feature preserves the humidity of your vegetables, allowing you
to store them for a long time without having to keep them in their bags. If you do not prefer the vegetables to get into contact with other vegetables due to hygienic reasons, you can use perforated paper, foam or a similar material instead of plastic bags.
While the vegetables are being replaced, their specific weights should be taken into
consideration. Heavy and hard vegetables must be placed at the bottom of the crisper and light and soft vegetables must be on the upper part.
Pears, kiwis, tomatoes, cucumbers, apricots, peaches, broccolis, lettuces, cabbages, parsley and spinach are fruits and vegetables that emit ethylene gas. Do not place them into the same crisper with other fruits and vegetables. The ethylene gas emitted by these foods cause other fruits and vegetables to ripen sooner and to rot in a shorter span of time.
Do not remove the main body of the crisper from the refrigerator separately unless you have to do so.
ATTENTION:
AIf there is a blue light on the refrigerator, do not look at the blue light with optical tools.
5.25 Special Fridge Compartment
You can control the temperature in this section to store your food such as fish, meat, vegetables and delicatessen products for a long time. To do so, select the type of the food you want to store from the display of the refrigerator and place your food into the special fridge compartment.
C Removal/installation procedures of the special fridge compartment are same as that of the humiditycontrolled crisper.
5.26 Freezer Drawers
The freezer compartment store your foods at a temperature between -24°C and -18°C to keep them fresh for a long time.
To Remove the Freezer Crisper:
1.Pull the crisper until it stops.
2.Slightly lift the front section of the drawer and take it out completely.
To Install the Freezer Crisper:
1. Pull the rails completely.
|
|
|
|
|
|
|
|
|
|
|
28 / 35 EN |
Refrigerator / User Manual |
||
|
|
|
||
|
|
|
|
|
Operating the Product
2. Place the gap at the rear corners of the crisper to the detail located at the rear section of the rails.
3. Place the detail at the front section of the rail to the gap at the front part of the crisper.
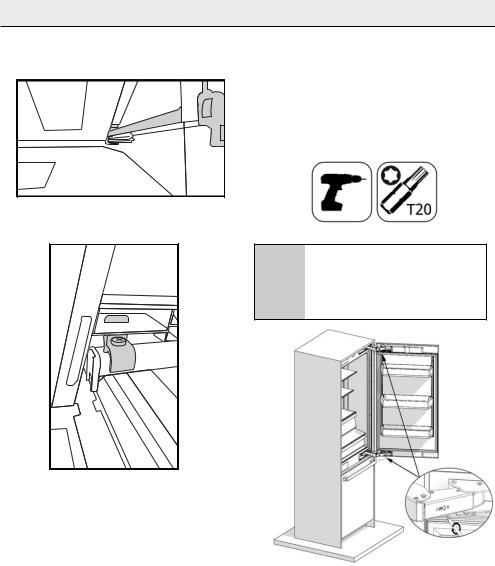
5.27 Hinge Adjustment
When adjusting the hardness of the hinge:
•Hardness of the lower and upper door hinges of the fresh food compartment is performed with the help of a drill. Set the hinge adjustment screw to position "1" from position "0".
ATTENTION:
AThis adjustment must be made after the door has been installed and opened completely.
5.28 Changing the Direction of the Door
Please see the installation instructions provided in the bag.
|
29 / 35 EN |
Refrigerator / User Manual |
|
|
|
 Loading...