


AUDIO BCA2000
B-CONTROL
User’s Manual
Version 1.0 February 2004
ENGLISH
B-CONTROL  AUDIO BCA2000
IMPORTANT SAFETY INSTRUCTIONS
CAUTION: To reduce the risk of electric shock, do not remove the top cover (or the rear section). No user serviceable parts inside; refer servicing to qualified personnel.
WARNING: To reduce the risk of fire or electric shock, do not expose this appliance to rain and moisture.
This symbol, wherever it appears, alerts you to the presence of uninsulated dangerous voltage inside the enclosure—voltage that may be sufficient to constitute a risk of shock.
This symbol, wherever it appears, alerts you to important operating and maintenance instructions in the accompanying literature. Please read the manual.
DETAILED SAFETY INSTRUCTIONS:
1)Read these instructions.
2)Keep these instructions.
3)Heed all warnings.
4)Follow all instructions.
5)Do not use this apparatus near water.
6)Clean only with dry cloth.
7)Do not block any ventilation openings. Install in accordance with the manufacturer’s instructions.
8)Do not install near any heat sources such as radiators, heat registers, stoves, or other apparatus (including amplifiers) that produce heat.
9)Do not defeat the safety purpose of the polarized or grounding-type plug. A polarized plug has two blades with one wider than the other. A grounding type plug has two blades and a third grounding prong. The wide blade or the third prong are provided for your safety. If the provided plug does not fit into your outlet, consult an electrician for replacement of the obsolete outlet.
10)Protect the power cord from being walked on or pinched particularly at plugs, convenience receptacles, and the point where they exit the unit.
11)Only use attachments/accessories specified by the manufacturer.
12)Use only with the cart, stand, tripod, bracket, or table specified by the manufacturer, or sold with the apparatus. When a cart is used, use caution when moving the cart/apparatus combination to avoid injury from tip-over.
13)Unplug this apparatus during lightning storms or when unused for long periods of time.
14)Refer all servicing to qualified service personnel. Servicing is required when the apparatus has been damaged in any way, such as power supply cord or plug is damaged, liquid has been spilled or objects have fallen into the apparatus, the apparatus has been exposed to rain or moisture, does not operate normally, or has been dropped.
2

B-CONTROL  AUDIO BCA2000
B-CONTROL  AUDIO
AUDIO
High-Speed USB 2.0 Multi-Channel Audio/MIDI Control Interface with ADAT® Support, Surround Outputs and Extensive Monitor Control Section
sHigh-performance analog input section with 2 state-of-the-art studio-grade IMP “Invisible”BCA2000Mic Preamps, +48 V phantom power plus line and Hi-Z guitar inputs
sUltra-flexible input/output configuration supported by a comprehensive LED audio routing indicator plus button (status) LEDs
sAdjustable studio-grade analog input dynamic control (noise gate + limiter) prevents distorted input signals or A/D converter overload
sFully equipped USB/MIDI interface with 1 MIDI In/2 MIDI Outs individually selectable for 16 / 32 MIDI channels
sVersatile digital input and output formats like ADAT®, ADAT® S/MUX, AES/EBU and S/PDIF, including DOLBY DIGITAL® and DTS® support
sSimultaneous use of 3 analog input sources (1 mono + 1 stereo), digital input sources plus full multichannel playback @ 24-bit/96 kHz
sHigh-resolution 2 x 12 element LED level indicator for stereo In / Out signals plus 2-element LED level indicator for input and output channels 3 - 8
sHigh-speed USB 2.0 interface with 24-bit/96 kHz supports 8 In + 8 Out channels simultaneously (analog and digital) with low latency ASIO 2 & WDM drivers
sFully equipped master and monitor sections with 100-mm faders, individual level controls for 2 speakers, 2 phones and direct monitor function plus separate dim, mute and mono functions
sHigh-quality components and exceptionally rugged construction for long life and durability
sDesigned in Germany. Manufactured under ISO9000 certified management system
3

B-CONTROL  AUDIO BCA2000
FOREWORD
Dear Customer,
welcome to the team of BCA2000 users, and thank you very much for expressing your confidence in us by purchasing the B-CONTROL.
Writing this foreword for you gives me great pleasure, because it represents the culmination of many months of hard work delivered by our engineering team to achieve a very ambitious goal: to deliver an outstanding USB audio/ MIDI control interface, whose extremely flexible connections let it assume
the central control role in almost any computer studio. The task of designing our new B-CONTROL certainly meant a great deal of responsibility, which we assumed by focusing on you, the discerning computer user and musician. Meeting your expectations also meant a lot of work and night shifts. But it was fun, too. Developing a product usually brings a lot of people together, and what a great feeling it is when all who participated in such a project can be proud of what they’ve achieved.
It is our philosophy to share our enjoyment with you, because you are the most important member of the BEHRINGER team. With your highly competent suggestions for new products you’ve made a significant contribution to shaping our company and making it successful. In return, we guarantee you uncompromising quality as well as excellent technical and audio properties at an extremely reasonable price. All of this will enable you to give free rein to your creativity without being hampered by budget constraints.
We are often asked how we manage to produce such highquality equipment at such unbelievably low prices. The answer is quite simple: it’s you, our customers! Many satisfied customers mean large sales volumes enabling us to get better purchasing terms for components, etc. Isn’t it only fair to pass this benefit on to you? Because we know that your success is our success too!
I would like to thank all of you who have made the B-CONTROL possible. You have all made your own personal contributions, from the developers to the many other employees at this company, and to you, the BEHRINGER user.
My friends, it’s been worth the effort!
Thank you very much,
Uli Behringer
TABLE OF CONTENTS
1. INTRODUCTION ......................................................... |
5 |
||
1.1 |
Before you get started ................................................... |
5 |
|
|
1.1.1 |
Shipment ............................................................... |
5 |
|
1.1.2 |
Initial operation ...................................................... |
5 |
|
1.1.3 |
Warranty .............................................................. |
5 |
1.2 |
System requirements ..................................................... |
5 |
|
|
1.2.1 |
Outline of functions for High-Speed USB .............. |
|
|
|
(USB 2.0) .............................................................. |
5 |
|
1.2.2 |
Outline of functions for Full-Speed USB .............. |
5 |
2. INSTALLATION ........................................................... |
6 |
|
2.1 |
Driver installation—Part 1 ............................................... |
6 |
2.2 |
Hardware connection/driver installation—Part 2 .......... |
6 |
2.3 |
Control panel software .................................................. |
6 |
3. CONTROL ELEMENTS AND CONNECTIONS |
............. 8 |
||
3.1 |
Control surface ............................................................... |
8 |
|
|
3.1.1 |
Input section ......................................................... |
8 |
|
3.1.2 |
Main/Monitor section ............................................ |
9 |
|
3.1.3 |
Dynamics section ................................................. |
9 |
3.2 |
The rear panel .............................................................. |
10 |
|
4. AUDIOROUTING ...................................................... |
11 |
|
4.1 |
Input routing .................................................................. |
11 |
4.2 |
Output routing ............................................................... |
12 |
|
4.2.1 Output routing in ADAT® mode ........................... |
12 |
|
4.2.2 Output routing in 2-CHANNEL mode .................. |
13 |
4.3 |
First steps with the B-CONTROL ................................. |
13 |
5. APPLICATIONS ........................................................ |
14 |
|
5.1 |
Mobile studio ................................................................. |
14 |
5.2 |
Project studio ................................................................ |
15 |
5.3 |
Professional studio ....................................................... |
16 |
5.4 Basis recording session .............................................. |
17 |
|
5.5 |
Multi-channel recording with 5.1 surround monitoring 18 |
|
6. CONNECTIONSAND FORMATS ............................... |
20 |
|
6.1 |
Glossary ....................................................................... |
20 |
6.2 |
Audio connections ....................................................... |
22 |
6.3 |
Digital inputs and outputs ............................................. |
22 |
6.4 |
MIDI connectors ............................................................ |
23 |
7. SPECIFICATIONS ..................................................... |
23 |
|
8. WARRANTY .............................................................. |
24 |
|
4

B-CONTROL  AUDIO BCA2000
1. INTRODUCTION
Welcome to the family of BCA2000 users and thank you for expressing your confidence in BEHRINGER products by purchasing the B-CONTROL.
The BCA2000 is an extremely flexible USB audio and MIDI interface with a unique design concept that will effectively support you in your computer-based music and audio endeavors.
Our goal in designing the B-CONTROL was to create an intuitive, flexible and optically attractive product that gives you comfortable control (instead of those tiny knobs and buttons found on so many interfaces) and plenty of connectivity options, so that you can concentrate on what’s really important: your music. That’s why we started by creating a mixing console with a clean, concise layout: ultra-precise 100-mm faders, a highresolution LED level display, rugged construction, our ultra lownoise IMP “invisible” microphone preamplifiers and an extensive monitor section—features you’ve come to expect from a BEHRINGER mixing console. Then we added a multitude of interface functions: full 24-bit/96 kHz support in multichannel operation, optical and coaxial digital connectors that support all common formats, simultaneous reproduction of eight input and eight output channels, 6 analog outputs for subgroup/stem or 5.1 surround reproduction and a simultaneously usable USB MIDI interface. All of this makes the BCA2000 a one-of-a-kind high-speed USB audio/MIDI interface featuring a comfortable mixing console design.
+The following user’s manual is intended to familiarize you with the unit’s control elements, so that you can master all the functions. After having thoroughly read the user’s manual, store it at a safe place for future reference.
1.1Before you get started
1.1.1 Shipment
The BCA2000 was carefully packed at the assembly plant to assure secure transport. Should the condition of the cardboard box suggest that damage may have taken place, please inspect the unit immediately and look for physical indications of damage.
+Damaged equipment should NEVER be sent directly to us. Please inform the dealer from whom you acquired the unit immediately as well as the transportation company from which you took delivery. Otherwise, all claims for replacement/ repair may be rendered invalid.
+To assure optimal protection of your B-CONTROL during use or transport, we recommend utilizing a carrying case.
+Please always use the original packaging to avoid damage due to storage or shipping.
+Never let unsupervised children play with the B-CONTROL or with its packaging.
+Please dispose of all packaging materials in an environmentally friendly fashion.
1.1.2 Initial operation
Please make sure the unit is provided with sufficient ventilation, and never place the B-CONTROL on top of an amplifier or in the vicinity of a heater to avoid the risk of overheating.
A power supply unit which meets the necessary safety requirements is enclosed for connecting the B-CONTROL to the mains.
1.1.3 Warranty
Please take a few minutes and send us the completely filled out warranty card within 14 days of the date of purchase to assure unproblematic warranty processing in the future. You may also register online at www.behringer.com. The serial number needed for the registration is located at the bottom of the unit. Failure to register your product may void future warranty claims.
1.2 System requirements
Operating system |
Windows® XP |
Computer |
Windows® PC with USB connector |
Processor |
Intel Pentium Processor 1.2 GHz or better |
Chip set |
Intel chip set recommended |
USB modes |
Full eight-channel input/output operation |
|
with 24-bit/96 kHz with USB 2.0 |
|
interface (High-Speed USB, 480 Mbps) |
+When connecting to a Full-Speed USB interface (12 Mbps, also known as USB 1.1), only limited operation is possible (see 1.2.2).
1.2.1 Outline of functions for High-Speed USB (USB 2.0)
Audio inputs:
sSimultaneous recording of three analog signals (1 x mono, 1 x stereo) and one stereo digital signal.
sAlternatively, simultaneous recording of eight audio channels at 44.1 kHz or at 48 kHz with the optical input in ADAT® format (four-channel recording at 24-bit/96 kHz with ADAT® S/MUX).
sSupport for S/PDIF, AES/EBU, ADAT®, and ADAT® S/MUX digital audio formats.
Audio outputs:
sSimultaneous reproduction of eight output signals (six analog and one stereo digital signal). The stereo digital output signal is available in parallel on both the coaxial and optical outputs.
sAlternatively, reproduction of eight digital signals at 44.1 or 48 kHz via the optical output in ADAT® format (four-channel reproduction at 24-bit/96 kHz with ADAT® S/MUX), also available in parallel on analog outputs 1 to 6 and the coaxial digital output.
sSupport for S/PDIF, AES/EBU, ADAT®, ADAT® S/MUX, DOLBY® DIGITAL and DTS® digital audio formats.
MIDI:
sSimultaneous use of all MIDI inputs and outputs.
1.2.2 Outline of functions for Full-Speed USB
Audio inputs:
sSimultaneous recording of three analog signals (1 x mono, 1 x stereo) and one stereo digital signal.
sAlternatively, simultaneous recording of four ADAT® channels at 44.1 and 48 kHz.
sSupport of S/PDIF, AES/EBU and ADAT® digital audio formats.
Audio outputs:
sSimultaneous reproduction of two stereo signals, available in parallel on the analog and digital outputs.
sAlternatively, reproduction of four ADAT® channels at 44.1 kHz or 48 kHz via the optical output, also available in parallel on all analog outputs and on the coaxial digital output.
sSupport of S/PDIF, AES/EBU, ADAT®, DOLBY® DIGITAL and DTS® digital audio formats.
MIDI:
sAdditionally, simultaneous use of all MIDI functions.
1. INTRODUCTION |
5 |

B-CONTROL  AUDIO BCA2000
2.INSTALLATION
2.1Driver installation—Part 1
Start your Windows® XP computer and insert the BEHRINGER driver CD.
Install the Microsoft Hotfix Patch:
sIn Windows Explorer, select the CD/DVD drive in which the BEHRINGER driver CD is located
sOpen the “KB822603” folder
s Double-click the command file in your language (e.g. “English.CMD”)
sFollow the instructions in the dialog box by clicking “Next >”
sAfter the final step, click “Finish”. The computer will now restart.
2.2 Hardware connection/ driver installation—Part 2
Connect your computer via USB to the BCA2000 and power up the B-CONTROL. The “Found New Hardware Wizard” opens up.
sSelect “Install from a list or specific location (Advanced)” and click “Next >”
sSelect “Search for the best driver in these locations”
sCheck the “Include this location in the search” box and click “Browse”
sSelect the CD/DVD drive with the BEHRINGER driver CD and the folder “Drivers”* and click “Next >”
sIf you now get an error message (“Driver software has not passed Windows Logo testing”), ignore the message and click on “Continue anyway” (whether or not you get the error message depends on the configuration of your computer)
sAfter software installation is complete, the “Behringer BCA2000 bootloader” prompt appears; click “Finish”.
The “Found New Hardware Wizard” will automatically start again. This procedure is almost identical to the previous one:
sSelect “Install from a list or specific location (Advanced)” and click “Next >”
sSelect “Search for the best driver in these locations”
sSelect the “Include this location in the search” box and click “Browse”
sSelect the CD/DVD drive with the BEHRINGER driver CD and the folder “Drivers”* and click “Next >”
sIf you get the same error message again (“Driver software has not passed Windows Logo testing”), ignore the message and click on “Continue anyway” (again, whether or not you get the error message depends on the configuration of your computer)
sAfter software installation is complete, the “BEHRINGER BCA2000” prompt appears; click on “Finish”.
After another computer restart, a small BCA2000 control panel icon appears in the task bar (“Task Bar Notification Area”). This concludes the installation procedure.
*If you downloaded the driver from the internet, you will first need to decompress the file. During installation, select the location on your hard drive where you saved the decompressed driver.
2.3 Control panel software
The control panel software gives you access to all global B-CONTROL settings and is integrated into your computer system during driver installation. To launch the control panel software, click on the BCA2000 control panel symbol in the task bar at the bottom right of your screen.
Any changes to settings in the control panel are immediately effective, with the exception of the “Driver Latency/Buffer Size” setting: if you move the fader, a message pops up informing you that the new latency/buffer size setting will be effective after you close the control panel.
ADAT® 96 kHz operation is indicated in all windows (right field), along with the current sample rate, ASIO and USB driver version and firmware version.
The following settings can be made in the Setup window:
Dig. 2-Ch. Output Format: The format for two-channel digital output is switchable between AES/EBU and S/PDIF. Format selection has an effect on both the coaxial and the optical output, unless the OPTICAL OUT button ( 

 ) is set to “ADAT”.
Clock Select: Selects a wordclock synchronization source. DIG. 2-CH./ADAT enables external synchronization via the optical or coaxial input (which input serves as the synchronization source is determined by the DIGITAL IN button (  ). ADAT® synchronization is only possible via the optical input with an ADAT® signal present. To synchronize to a 96 kHz signal, select
S/MUX (ADAT IN). When set to INTERNAL, the BCA2000 synchronizes itself to the sample rate selected in your audio software.
MIDI Port B Select: In this field, MIDI OUT B can be configured as a MIDI THRU. When THRU mode is activated, this output forwards incoming data with no additional processing. If OUT is selected, the OUT B/THRU connector can be addressed by the computer as a second MIDI output, giving you a total of 32 MIDI channels.
ASIO Direct Monitoring: This setting determines which signal is monitored during recording. If Digital is selected, only the input signal will be heard with no latency (delay). In Analog mode, both the recorded tracks and the input signal (the signal being recorded) are heard simultaneously; the mix between the two can be adjusted via the MONITOR BALANCE fader ( 

 ). In both modes, only the output signal is heard when the audio software is in playback mode. Switching between recording and playback mode is accomplished via your audio software.
Driver Latency/Buffer Size: Here you can adjust the latency (system-inherent audio signal delay) in order to optimize your computer’s performance. The lower the latency (and consequently the buffer size), the higher the CPU usage. When the processor workload is too high, you will notice frequent pauses in audio playback (as the processor catches up). If you change this setting, a message will appear stating that your changes will take effect only after you close the control panel.
The USB INFO window (fig. 2.2) allows you to adapt the B- CONTROL to the USB connection you are using. If you are running your B-CONTROL on Full-Speed USB, only limited functionality is available. The table shows which input/output combinations are possible with your USB interface.
The BLOCK DIAGRAM window (fig. 2.3) shows the entire audio signal flow of your BCA2000 and serves as a good source of information if you don’t have the user’s manual handy.
6 |
2. INSTALLATION |

B-CONTROL  AUDIO BCA2000
Fig. 2.1: Control panel software SETUP window
Fig. 2.2: Control panel software USB INFO window
Fig. 2.3: Control panel software BLOCK DIAGRAM window
2. INSTALLATION |
7 |
B-CONTROL  AUDIO BCA2000
3. CONTROL ELEMENTS AND CONNECTIONS
The various control elements of your BCA2000 are described in this chapter. All controls and connections are explained in detail, and there are several useful tips on their use.
3.1 Control surface
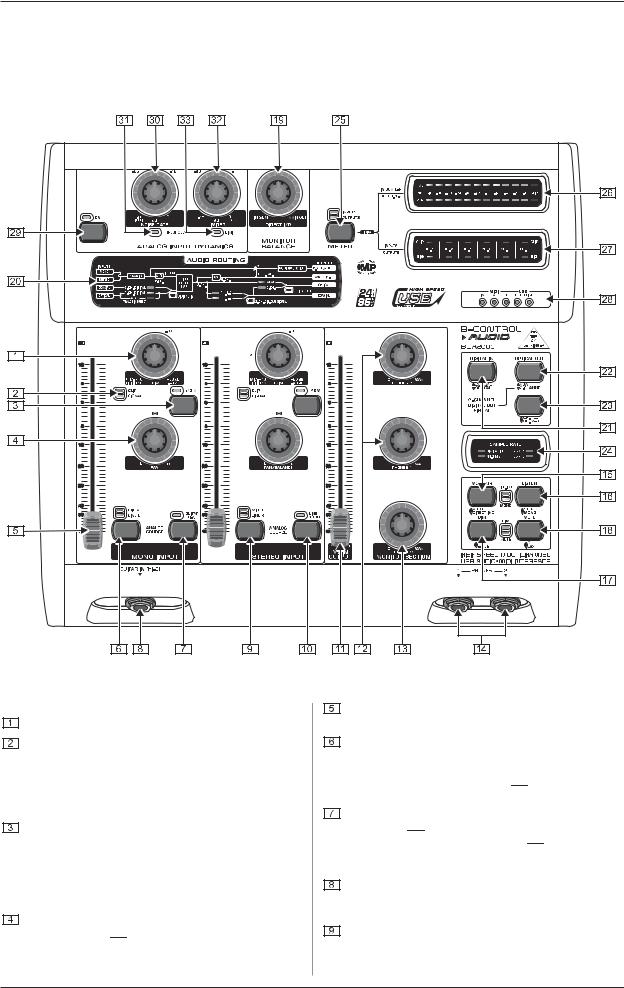
Fig. 3.1: The BCA2000’s control elements
3.1.1 Input section
The TRIM control adjusts the level of input signals.
The CLIP and SIGNAL LEDs show the input signal level. SIGNAL illuminates when there is an incoming signal, whereas CLIP illuminates when the level is too high and could cause distortion. If this happens, turn the TRIM control counterclockwise slightly und the CLIP LED no longer illuminates.
The +48 V button activates phantom power for a condenser microphone connected to the XLR input.
+Be sure to mute your audio system before you activate the phantom power supply to prevent audible and potentially damaging switch-on thumps from reaching your monitor speakers.
PAN positions the signal in the stereo field. If the LINE STEREO button 

 is pressed, the PAN control adjusts the BALANCE between L and R signals in the stereo input channel.
The 100-mm channel faders control the level of the input signal that is routed to the A/D converter.
MIC A and LINE L are the two possible positions of this switch, which controls the input that is routed to a particular channel. The corresponding LEDs indicate the input you selected. If GUITAR HI-Z switch 

 is pressed, the left MIC A/LINE L switch is deactivated.
The GUITAR (HI-Z) button feeds the guitar signal from the guitar input 

 into the mono input channel. This button overrides the MIC A/LINE L button

 : when GUITAR (HI-Z) is activated, MIC A or LINE L can no longer be selected.
The GUITAR IN (HI-Z) input allows you to directly connect an electric guitar or other high-impedance signal (e.g. passive pickups of acoustic instruments).
MIC B/LINE R is the input selection button for the stereo input channel. Select between MIC B and LINE R (the right line input). The corresponding LEDs indicate the selected input.
8 |
3. CONTROL ELEMENTS AND CONNECTIONS |
 Loading...