

Page 1

INSTRUCTION MANUA L
FOR
BE2000E
Digital Voltage Regulator
Publication: 9287500995
Revision: B Jan-15
Page 2

Page 3

9287500995 Rev B i
Caution
Note
Preface
This instruction manual provides information about the installation and operation of the BE2000E Digital
Voltage Regulator. To accomplish this, the following information is provided:
• General information
• Human-Machine Interface (HMI)
• Functional description
• Installation
• BESTCOMS™ Software
• Maintenance and Troubleshooting
• Specifications
Conventions Used in this Ma nua l
Important safety and procedural information is emphasized and presented in this manual through
warning, caution, and note boxes. Each type is illustrated and defined as follows.
Warning!
Warning boxes call attention to conditions or actions that may cause
personal injury or death.
Caution boxes call attention to operating conditions that may lead to
equipment or property damage.
Note boxes emphasize important information pertaining to installation
or operation.
BE2000E Preface
Page 4

ii 9287500995 Rev B
Basler Electric does not assume any responsibility to compliance or noncompliance with national code, local code,
For terms of service relating to this product and software, see the Commercial Terms of Products and Services
document available at www.basler.com/terms.
This publication contains confidential information of Basler Electric Company, an Illinois corporation. It is loaned for
and options are subject to modification without notice. Over time, improvements and revisions may be made to this
The English-language version of this manual serves as the only approved manual version.
12570 State Route 143
Highland IL 62249-1074 USA
www.basler.com
info@basler.com
Tel: +1 618.654.2341
Fax: +1 618.654.2351
© 2015 by Basler E lectric
All rights reserved
First printing: May 2011
Warning!
READ THIS MANUAL. Read this manual before installing, operating, or maintaining the BE2000E
Note all warnings, cautions, and notes in this manual as well as on the product. Keep this manual with
the product for reference. Only qualified personnel should install, operate, or service this system.
Failure to follow warning and cautionary labels may result in personal injury or property damage.
Exercise caution at all times.
To prevent personal injury or equipment damage, only qualified personnel should install, operate, or
service this system.
or any other applicable code. This manual serves as reference material that must be well understood prior to
installation, operation, or maintenance.
confidential use, subject to return on request, and with the mutual understanding that it will not be used in any
manner detrimental to the interests of Basler Electric Company and used strictly for the purpose intended.
It is not the intention of this manual to cover all details and variations in equipment, nor does this manual provide
data for every possible contingency regarding installation or operation. The availability and design of all features
publication. Before performing any of the following procedures, contact Basler Electric for the latest revision of this
manual.
Preface BE2000E
Page 5

9287500995 Rev B iii
Contents
General Information .................................................................................................................................... 1
Features .................................................................................................................................................... 1
Human-Machine Interface .......................................................................................................................... 3
Front Panel Controls and Indicators .......................................................................................................... 3
Initial Adjustments ..................................................................................................................................... 4
Making Settings Changes ......................................................................................................................... 5
Front Panel Operation ........................................................................................................................... 5
Setting Level Indication .......................................................................................................................... 6
Communication Port ................................................................................................................................ 11
Functional Description ............................................................................................................................. 13
BE2000E Function Blocks ....................................................................................................................... 13
Analog Inputs ....................................................................................................................................... 13
Contact Input Circuits .......................................................................................................................... 14
Communication Port ............................................................................................................................ 15
Microprocessor .................................................................................................................................... 15
Power Input Stage ............................................................................................................................... 15
Power Supply ....................................................................................................................................... 15
Power Amplifier Stage ......................................................................................................................... 15
Front Panel Indicators .......................................................................................................................... 15
Front Panel Switches ........................................................................................................................... 15
Relay Output ........................................................................................................................................ 15
BE2000E Operating Features ................................................................................................................. 16
Operating Modes ................................................................................................................................. 16
Reactive Droop Compensation ............................................................................................................ 16
Underfrequency ................................................................................................................................... 17
Protection ............................................................................................................................................. 17
Generator Soft Start ............................................................................................................................. 18
Installation ................................................................................................................................................. 19
Mounting .................................................................................................................................................. 19
Connections ............................................................................................................................................. 22
BE2000E Terminations ........................................................................................................................ 22
Generator Voltage Sensing Inputs ....................................................................................................... 24
Phase B Line Current Sensing Input ................................................................................................... 24
Raise and Lower Contact Inputs .......................................................................................................... 24
Var/Power Factor Control Contact Input .............................................................................................. 24
Parallel Generator Compensation ....................................................................................................... 24
Analog (Auxiliary) Adjust ...................................................................................................................... 24
Power Supply Inputs ............................................................................................................................ 24
Chassis Ground ................................................................................................................................... 24
Power (Field) Output ............................................................................................................................ 25
Relay Output ........................................................................................................................................ 25
Communication Port ............................................................................................................................ 25
BE2000E Connections for Typical Applications .................................................................................. 26
Preliminary Setup .................................................................................................................................... 31
Adjustments ............................................................................................................................................. 31
Storage .................................................................................................................................................... 31
BESTCOMS™ Software ............................................................................................................................. 33
Installation ............................................................................................................................................... 33
Installing BESTCOMS™-BE2000E ...................................................................................................... 33
Connecting the BE2000E and PC ....................................................................................................... 33
Starting the BESTCOMS™-BE2000E Application ................................................................................... 33
Initial Adjustments ................................................................................................................................ 34
Establishing Communicat io n ............................................................................................................... 35
BE2000E Contents
Page 6

iv 9287500995 Rev B
Changing Settings ................................................................................................................................... 36
Sending and Receiving Settings ............................................................................................................. 36
Sending Settings .................................................................................................................................. 36
Receiving Settings ............................................................................................................................... 37
Saving Settings to BE2000E Memory.................................................................................................. 37
Setting Definitions .................................................................................................................................... 37
System Configuration .......................................................................................................................... 37
System Settings ................................................................................................................................... 37
Setting Adjustments ............................................................................................................................. 38
Control Gain ......................................................................................................................................... 41
Analysis ................................................................................................................................................ 43
Protection and Relay Settings ............................................................................................................. 48
Metering, Operation and Alarms .......................................................................................................... 49
PID Data .................................................................................................................................................. 52
PID Calculation Based on Input Values ............................................................................................... 53
Adding to the PID List .......................................................................................................................... 54
Removing a PID List Record ............................................................................................................... 54
Retrieving Existing Data from the PID List .......................................................................................... 54
Settings Files ........................................................................................................................................... 54
Printing Settings Files .......................................................................................................................... 54
Saving Settings Files ........................................................................................................................... 55
Uploading Settings Files ...................................................................................................................... 55
Password Protection ................................................................................................................................ 55
Changing the Password ....................................................................................................................... 55
Updating Embedded Firmware ................................................................................................................ 56
Terminating Communication ................................................................................................................... 59
Maintenance and Troubleshooting ......................................................................................................... 61
Preventative Maintenance ....................................................................................................................... 61
Troubleshooting ....................................................................................................................................... 61
Generator Voltage Does Not Build ...................................................................................................... 61
Low Generator Output Voltage ............................................................................................................ 62
High Generator Output Voltage ........................................................................................................... 62
Poor Voltage Regulation ...................................................................................................................... 63
Generator Output Unstable (Hunting) .................................................................................................. 63
OVEREXCITATION SHUTDOWN Indicator Is Annunciating .............................................................. 63
LOSS OF GENERATOR SENSING Indicator Is Annunciating ........................................................... 64
OVEREXCITATION LIMITING Indicator Is Annunciating .................................................................... 64
UNDERFREQUENCY ACTIVE Indicator Is Annunciating ................................................................... 64
No Droop .............................................................................................................................................. 65
Specifications ............................................................................................................................................ 67
Operating Power .................................................................................................................................. 67
Generator Voltage Sensing ................................................................................................................. 67
Generator Current Sensing .................................................................................................................. 67
Contact Input Circuits .......................................................................................................................... 67
Common Alarm Output ........................................................................................................................ 67
Field Output ......................................................................................................................................... 67
AVR Operating Mode ........................................................................................................................... 68
FCR (Manual) Operating Mode ........................................................................................................... 68
Var Operating Mode............................................................................................................................. 68
PF Operating Mode.............................................................................................................................. 68
Parallel Compensation ......................................................................................................................... 68
Communication Port ............................................................................................................................ 68
Field Overvoltage Protection ............................................................................................................... 68
Field Overcurrent Protection ................................................................................................................ 68
Generator Overvoltage Protection ....................................................................................................... 69
Soft-Start Function ............................................................................................................................... 69
Analog (Auxiliary) Input ........................................................................................................................ 69
Contents BE2000E
Page 7

9287500995 Rev B v
Metering ............................................................................................................................................... 69
Environment ......................................................................................................................................... 70
Type Tests ........................................................................................................................................... 70
UL Approval ......................................................................................................................................... 70
CSA Certification .................................................................................................................................. 70
CE Compliance .................................................................................................................................... 70
Physical ................................................................................................................................................ 70
Revision History ........................................................................................................................................ 71
BE2000E Contents
Page 8

vi 9287500995 Rev B
Contents BE2000E
Page 9

9287500995 Rev B 1
General Information
The BE2000E is an electronic, solid-state, microprocessor-based control device. The BE2000E regulates
the output voltage of a brushless, ac generator by controlling the current into the generator exciter field.
Input power to the BE2000E is from a multi-pole, high-frequency, permanent magnet generator (PMG).
The BE2000E is supplied in an encapsulated package designed for behind-the-panel mounting. The
BE2000E is held in place by thread-forming screws that thread into its plastic shell. Front panel indicators
(LEDs) annunciate regulator status and system conditions. BE2000E connections are made through
quarter-inch, quick-connect terminals on the rear panel. A nine-pin DB-9 type connector on the rear panel
provides communication between the BE2000E and an IBM compatible PC.
Features
BE2000E units have the following features and capabilities:
• Four control modes: automatic voltage regulation (AVR), manual or field current regulation (FCR),
power factor (PF) regulation, and reactive power (var) regulation.
• Programmable stability settings.
• Soft start control with an adjustable time setting in AVR control mode.
• Overexcitation (OEL) limiting in AVR, var, and PF control modes.
• Underfrequency (volts/hertz) regulation.
• Crowbar circuitry protects the field.
• Overtemperature protection.
• Three-phase or single-phase generator voltage (RMS) s ens ing/re gu lat ion in A VR mode .
• Single-phase generator current sensing for metering and regulation purposes.
• Field current and field voltage sensing.
• Four contact sensing inputs for system interface.
• One common output relay for alarm indication and trip functions.
• Six protection functions (overexcitation shutdown, generator overvoltage shutdown, BE2000E
overtemperature shutdown, loss of generator sensing shutdown, overexcitation limiting and
crowbar shutdown).
• Generator paralleling with reactive droop compensation and reactive differential compensation.
• Front-panel human-machine interface (HMI) indicates system and BE2000E status and gives the
ability to make setting changes at the front panel.
• Rear RS-232 communication port for personal computer communication using BESTCOMS™-
BE2000E Windows® based software for fast, user-friendly, setup and control.
BE2000E General Information
Page 10

2 9287500995 Rev B
General Information BE2000E
Page 11
9287500995 Rev B 3
SELECT
This pushbutton selects a function for adjustment. Successive presses of
be adjusted.
UP
This pushbutton increases the setting level of the function being adjusted.
DOWN
This pushbutton decreases the setting level of the function being adjusted.
UP
SELECT DOWN
Manual Mode
Loss of Sensing
Over VoltageCoarse Voltage
1 - 3 Phase Sensing
Manual Mode On/Off
2
1
3
Over Excitation
MODE STATUS
Over Temperature
Under Frequency
VAR/PF Active
If - Limit
Stability Range
Fine Voltage
ADJUSTMENTS
Manual Mode Adj.
VAR/PF Select
VAR/PF Adj.
Under Frequency
Droop
Gain
6
4
5
7
8
12
10
GEN/LAG
9
11
MAX
ABSORB/LEAD
MIN
Digital
R
Regulator
BE2000E
Human-Machine Interface
The BE2000E Human-Machine Interface (HMI) consists of front panel controls and indicators and a rear
panel communication port.
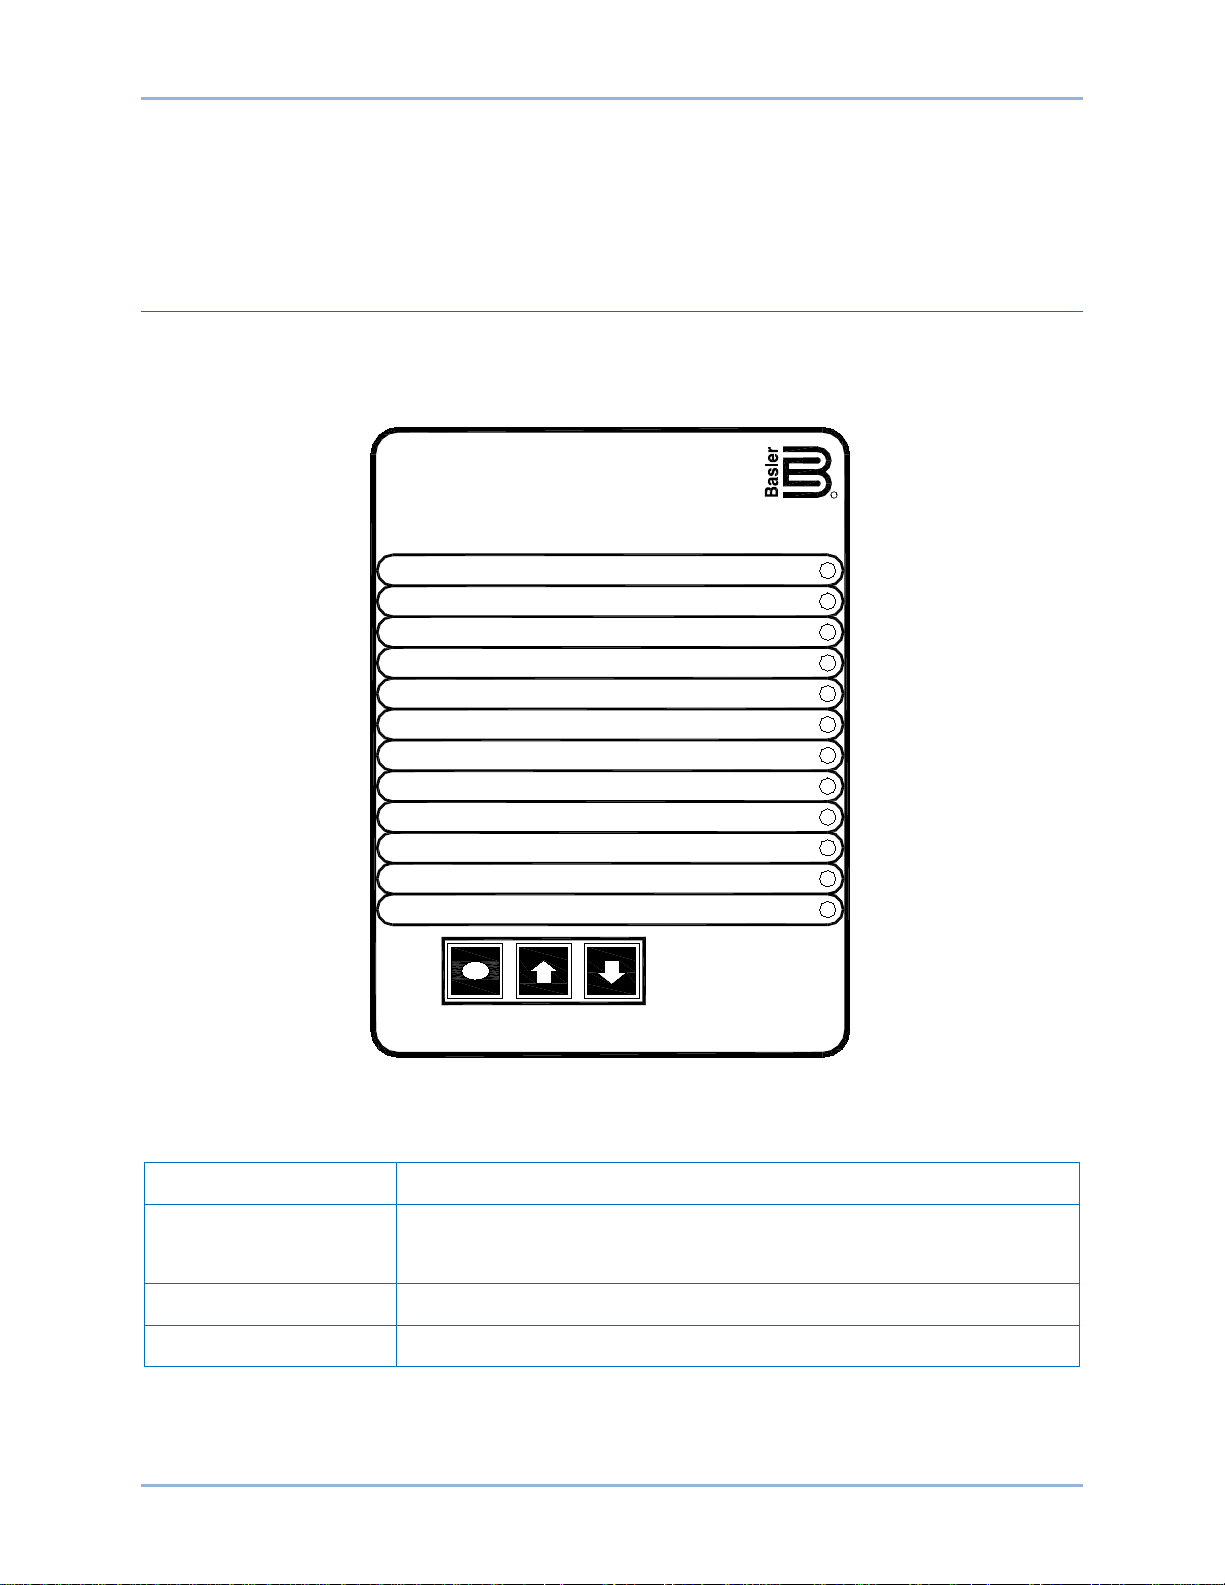
Front Panel Controls and Indicators
BE2000E front panel controls and indicators consist of 12 red LEDs and three pushbuttons. Figure 1
illustrates the front panel controls and indicators of the BE2000E. The LEDs indicate control mode and
status conditions and are also used when adjusting settings at the front panel.
Table 1. BE2000E Front Panel Control Descriptions
Control Description
the SELECT pushbutton scrolls through the list of BE2000E functions to
Figure 1. BE2000E Front Panel Indicators
BE2000E Human-Machine Interfac e
Page 12

4 9287500995 Rev B
Over Excitation
This LED blinks rapidly when the Overexcitation Protection feature is enabled and
an overexcitation condition.
Over Temperature
LED #11
This LED blinks rapidly when the internal temperature of the BE2000E has
exceeded its limit and causes the unit to shut down.
Under Frequency
LED #7
This LED blinks rapidly during an under frequency condition.
Var/PF Active
LED #5
This LED blinks rapidly when operating in Var or Power Factor mode.
If – Limit
This LED blinks rapidly when the field current exceeds the programmed
powered up following an overexcitation limiting condition.
Manual Mode
LED #3
This LED blinks rapidly when operating in Manual mode.
Loss of Sensing
This LED blinks rapidly when a loss of generator sensing voltage is detected. The
generator sensing condition.
Over Voltage
This LED blinks rapidly when the generator output voltage exceeds the setpoint
when the BE2000E is powered up following a generator overvoltage condition.
Caution
Table 2. BE2000E Front Panel Mode Status Indicator Descriptions
Indicator Description
LED #12
LED #4
LED #2
LED #1
the field voltage exceeds the setpoint (80 V default) for 15 seconds. The
BE2000E will shut down when an overexcitation condition is detected. The Over
Excitation LED blinks for 5 seconds when the BE2000E is powered up following
overexcitation limit. It will continue to flash until the overexcitation condition
ceases or the overexcitation time delay expires and the BE2000E shuts down.
The Overexcitation Limiting LED flashes for 5 seconds when the BE2000E is
BE2000E will shut down. The Loss of (Generator) Sensing LED flashes for 5
seconds when the BE2000E is powered up following shutdown for loss of
for 0.75 seconds. The BE2000E will shut down when a generator overvoltage
condition is detected. The (Generator) Overvoltage LED flashes for 5 seconds
Read and understand the operation of the individual adjustments
before attempting any initial adjustments.
Initial Adjustments
Before starting the generator, the procedures in the following paragraphs should be performed.
Remove the 5-ampere fuse before starting the generator for the first time. Perform all preliminary engine
governor adjustments without the regulator energized.
After initial governor adjustments are complete, reinstall the 5-ampere fuse, and connect only the power
input leads or PMG leads to the regulator. Remove all other regulator connections that may be present
and temporarily insulate them.
Start and run the generator at rated speed. The regulator will perform the self-test and enter a shutdow n
mode. At this time, initial adjustments can be made. To do this, step through each adjustment using the
“SELECT” button. For each adjustment, press the “UP” or “DOWN” button to obtain the desired level on
the LED bar graph.
After the initial adjustments are made, shut down the generator and connect the remaining regulator
leads. The generator may be started and final adjustments may be performed on the regulator.
Human-Machine Interface BE2000E
Page 13

9287500995 Rev B 5
Making Settings Changes
The following paragraphs describe how the HMI is used to make setting changes.
Front Panel Operation
The LEDs indicate control mode and status conditions and are also used when adjusting settings at the
front panel. Repeatedly pressing the “SELECT” button steps through the various adjustments, starting
with the “Coarse Voltage” adjustm ent and progres s ing thr oug h to the “Fine Voltage” adjustment. The next
press of the “SELECT” button exits the adjustment mode.
When in the adjustment mode, only the adjustment LEDs will be lit. All mode status LEDs will be turned
off. Adjustment LEDs are of two types. The first type is the LED that indicates the function being adjusted.
This LED blinks slowly (approximately once per second). The second type is the LED that indicates the
level of adjustment. This LED is on steady. The level of adjustment is changed by pressing the “UP” or
“DOWN” button. When an adjustment level LED (on steady) overlaps the function LED (slow blinking), the
LED will remain in the slow blinking mode. If no button is pressed for a period of one minute, the regulator
saves the settings and exits the adjustment mode. If regulator power is interrupted before the automatic
save feature is commanded, that level of adjustment will be lost.
When the regulator is not in the adjustment mode and either the “UP” or “DOWN” button is pressed, the
regulator enters the “Fine Voltage” adjustment mode and changes the generator fine voltage set point by
0.1V. Successive presses of the “UP” or “DOWN” button shall continue to adjust the fine voltage setting.
Pressing the “SELECT” button causes the regulator to exit the adjustment mode. Mode status LEDs blink
approximately twice per second.
Table 3. BE2000E Front Panel Adjustment Indicator Descriptions
Indicator Description
Fine Voltage
LED #11
Gain
LED #10
Stability Range
LED #9
Droop
LED #8
Under Frequency
LED #7
VAR/PF Adjust
LED #6
VAR/PF Select
LED #5
Manual Mode Adj.
LED #4
Manual Mode
On/Off
LED #3
This LED blinks slowly when the "Fine Voltage" level is selected for adjustment
via the front panel push-buttons.
This LED blinks slowly when the "Gain" adjustment is selected for fine tuning of
loop gain via the front panel push-buttons.
This LED blinks slowly when selecting the desired "Stability Range" via the front
panel push-buttons.
This LED blinks slowly when the "Droop" percentage level is selected for
adjustment via the front panel push-buttons.
This LED blinks slowly when the "Under Frequency" knee point is selected for
adjustment via the front panel push-buttons.
This LED blinks slowly when the level of the programmed mode (VAR or Power
Factor) is selected for adjustment via the front panel push-buttons.
This LED blinks slowly when selecting the programmed mode (VAR, Power
Factor, or none(AVR)) via the front panel push-buttons. When in this adjustment
mode, LED #1 is on solid for none (AVR), LED #2 is on solid for Power Factor
mode, and LED #3 is on solid for VAR mode.
This LED blinks slowly when the "Manual Mode" (field current) regulation set point
is selected for adjustment via the front panel push-buttons.
This LED blinks slowly when selecting or deselecting "Manual Mode" (field current
regulation) as the active operating mode via the front panel push-buttons. When
in this adjustment mode, LED #1 is on if Manual Mode is off, LED #2 is on if
Manual Mode is on.
BE2000E Human-Machine Interfac e
Page 14

6 9287500995 Rev B
LED #1
via the front panel push-buttons.
Coarse Voltage – LED #1 Blinking Slowly
Increment: 6 Vac
Increase
Decrease
Minimum
Value
Maximum
Value
Minimum
Value
Maximum
Value
12
563
600.00
558
600
11
521
557
516
552
10
479
515
474
510 9 437
473
432
468 8 395
431
390
426
7
353
389
348
384
6
311
347
306
342 5 269
305
264
300 4 227
263
222
258
3
185
221
180
216
2
143
179
138
174 1 95
137
95
132
Single-phase/Three-phase select – LED #2 Blinking Slowly
LED
MODE
12
N/A
11
N/A
10
N/A
9
N/A 8 N/A 7 N/A
6
N/A
Indicator Description
1 - 3 Phase Sensing
LED #2
This LED blinks slowly when selecting single or three phase sensing via the front
panel push-buttons. When in this adjustment mode, LED #1 is on if single phase
sensing is selected, LED #3 is on if three phase sensing is selected.
Coarse Voltage
This LED blinks slowly when the "Coarse Voltage" level is selected for adjustment
Setting Level Indication
Indication of a setting level is provided by the 12 front panel LED indicators. The upper limit of a setting
range is represented by the top LED which is labeled GEN/LAG and MAX. The lower limit of a setting
range is represented by the bottom LED which is labeled MIN and ABSORB/LEAD. The setting range for
each LED is summarized in Tables 4 through 15. LEDs in the tables are numbered from 1 to 12 with 1
being the lowermost LED (labeled MIN/ABSORB/LEAD) and 12 being the uppermost LED (labeled
GEN/LAG/MAX.
Table 4. Coarse Voltage Adjust Setting Ranges
Maximum Adjustment Range
LED
Human-Machine Interface BE2000E
Table 5. Sensing Mode (Single-phase/Three-phase) Select
Page 15

9287500995 Rev B 7
Single-phase/Three-phase select – LED #2 Blinking Slowly
LED
MODE
5
N/A
4
N/A
3
Three-phase
2
N/A
1
Single-phase
Manual Mode On/Off – LED #3 Blinking Slowly
LED
MODE
12
N/A
11
N/A
10
N/A
9
N/A
8
N/A
7
N/A
6
N/A
5
N/A
4
N/A
3
N/A
2
ON
1
OFF
Manual Mode Adjust – LED #4 Blinking Slowly
Increment: 0.01 Adc
LED
Minimum Value
Maximum Value
12
2.75
3
11
2.50
2.74
10
2.25
2.49
9
2.00
2.24
8
1.75
1.99
7
1.50
1.74
6
1.25
1.49
5
1.00
1.24
4
0.75
0.99
3
0.50
0.74
2
0.25
0.49 1 0
0.24
Table 6. Manual Mode (On/Off) Select
Table 7. Manual Mode (If – Limit) Adjustment Ranges
Adjustment Range: 0 to 3 Adc
BE2000E Human-Machine Interfac e
Page 16

8 9287500995 Rev B
AVR (OFF) / VAR / PF Select – LED #5 Blinking Slowly
LED
MODE
12
N/A
11
N/A
10
N/A 9 N/A 8 N/A
7
N/A
6
N/A 5 N/A 4 N/A
3
Var
2
PF 1 AVR
VAR Control Adjust – LED #6 Blinking Slowly
Increment: 1.0%
LED
Minimum Value *
Maximum Value *
12
84
100
11
67
83
10
51
66
9
34
50
8
17
33
7 1 16 6 -16
0
5
-33
-17
4
-49
-34 3 -66
-50 2 -83
-67
1
-100
-84
Table 8. On-Line Operating Mode (AVR (OFF)/VAR/PF) Select
Table 9. VAR Control Adjustment Ranges
Maximum Adjustment Range: −100% (absorb) to +100% (generate)
* Minimum and maximum values may differ from the Table 9 value s if
the value has been changed in BESTCOMS™-BE2000E software.
BESTCOMS-BE2000E has 0.5 percent resolution compared to the
1.0 percent resolution of the HMI.
Human-Machine Interface BE2000E
Page 17

9287500995 Rev B 9
Power Factor Control Adjust – LED #6 Blinking Slowly
Increment: 0.01
LED
Minimum Value †
Maximum Value †
12
0.66
0.60
11
0.73
0.67
10
0.80
0.74
9
0.86
0.81
8
0.93
0.87
7
1.0
0.94
6
-0.94
-0.99
5
-0.87
-0.93
4
-0.80
-0.86
3
-0.74
-0.79
2
-0.67
-0.73
1
-0.60
-0.66
Underfrequency Adjust – LED #7 Blinking Slowly
Increment: 0.1 Hz
LED
Minimum Value
Maximum Value
12
63.0
65.0
11
60.9
62.9
10
58.8
60.8
9
56.7
58.7
8
54.6
56.6
7
52.5
54.5
6
50.5
52.4
5
48.4
50.4
4
46.3
48.3
3
44.2
46.2
2
42.1
44.1
1
40.0
42.0
Table 10. Power Factor Control Adjustment Ranges
Maximum Adjustment Range: +0.6 (lag) to –0.6 (lead)
† Minimum and maximum values may differ from the Table 10 values if
the value has been changed in BESTCOMS-BE2000E software.
BESTCOMS-BE2000E has 0.001 resolution compared to the 0.01
resolution of the HMI.
Table 11. Underfrequency Adjustment Ranges
Maximum Adjustment Range: 40 to 65 Hz
BE2000E Human-Machine Interfac e
Page 18

10 9287500995 Rev B
Droop Adjust – LED #8 Blinking Slowly
Increment: 0.25%
LED
Minimum Value *
Maximum Value *
12
9.25
10.00
11
8.5
9.00
10
7.75
8.25
9
6.75
7.50
8
6.00
6.50
7
5.25
5.75
6
4.25
5.00 5 3.5
4.00
4
2.75
3.25
3
1.75
2.5
2 1 1.5 1 0
0.75
Stability Range Select – LED #9 Blinking Slowly
Adjustment Range per LED: 1
Frame/Poles
LED
Range Selected
12
N/A 11
N/A
10
N/A 9
N/A
Programmable
8
21
1,000/6 7 7
740/6 6 6
1,000/4 5 5
740/4 4 4
570/4 3 3
430/4 2 2
360/4 1 1
Table 12. Droop Adjustment Ranges
Adjustment Range: 0 to 10%
* Minimum and maximum values may differ from the Table 12 values if
the value has been changed in BESTCOMS-BE2000E software.
BESTCOMS-BE2000E has 0.01% resolution compared to the 0.25
percent resolution of the HMI.
Table 13. Stability Range Selection Settings
Human-Machine Interface BE2000E
Page 19

9287500995 Rev B 11
Gain Adjust – LED #10 Blinking Slowly
0.5 to 4.5 kg for AVR and 0 to 100 kg for FCR
When the unit is operating in AVR, PF, and var modes, gain adjustments are made to
increments: AVR kg = 0.01 FCR kg = 0.1
LED
Minimum Value *
Maximum Value *
AVR
FCR
AVR
FCR †
12
4.17
11.1
4.50
12
11
3.84
10.1
4.16
11
10
3.50
9.1
3.83
10
9
3.17
8.1
3.49 9 8
2.84
7.1
3.16
8
7
2.50
6.1
2.83 7 6
2.17
5.1
2.49
6
5
1.84
4.1
2.16 5 4
1.50
3.1
1.83
4
3
1.17
2.1
1.49
3
2
0.85
1.1
1.16
2
1
0.5 0 0.84
1
Fine Voltage Adjust – LED #11 Blinking Slowly
Increment: 0.1V
The adjustment range for Fine Voltage Adjust is based on the fine voltage
Adjustment Band Setting.
Table 14. Gain Adjustment Ranges
Maximum Adjustment Range:
AVR kg. When in FCR mode, gain adjustments are made to FCR kg. Front Panel
* Minimum and maximum values may differ from the Table 14 values if
the gain value has been changed in BE2000E software.
† BESTCOMS-BE2000E software allows a maximum FCR kg setting
of 1,000 kg. A kg setting of 12 or more entered in BESTCOMSBE2000E will be reduced to 12 with the first push of the HMI
“DOWN” pushbutton when adjusting FCR kg via the front panel.
Table 15. Fine Voltage Adjust Setting Ranges
Maximum Adjustment Range: –15% to +15%
adjustment band setting. The default adjustment range is –10% to +10%. See
the BESTCOMS Software chapter for information about the Fine Voltage
Communication Port
A communication port is located on the rear panel and consists of a female RS-232 (DB-9) connector.
The communication port serves as an interface for programming (setup) of the BE2000E. Figure 2
illustrates the location of the communication port.
Programming requires a standard 9-pin serial communication cable connected between the BE2000E and
an IBM-compatible PC or handheld computer operating with BESTCOMS-BE2000E software.
BESTCOMS-BE2000E operates with systems using Windows® XP 32-bit SP2/SP3, Windows Vista 32-bit
(all editions), Windows 7 32-bit (all editions), and Windows 7 64-bit (all editions). BESTCOMS-BE2000E
is supplied with the BE2000E. A detailed description of BESTCOMS-BE2000E is provided in the
BESTCOMS Software chapter.
BE2000E Human-Machine Interfac e
Page 20
12 9287500995 Rev B
P 0007
-41
WARNING! LIVE TERMINALS
AND HEATSINKS
Figure 2. Location of Communication Port
Human-Machine Interface BE2000E
Page 21
9287500995 Rev B 13
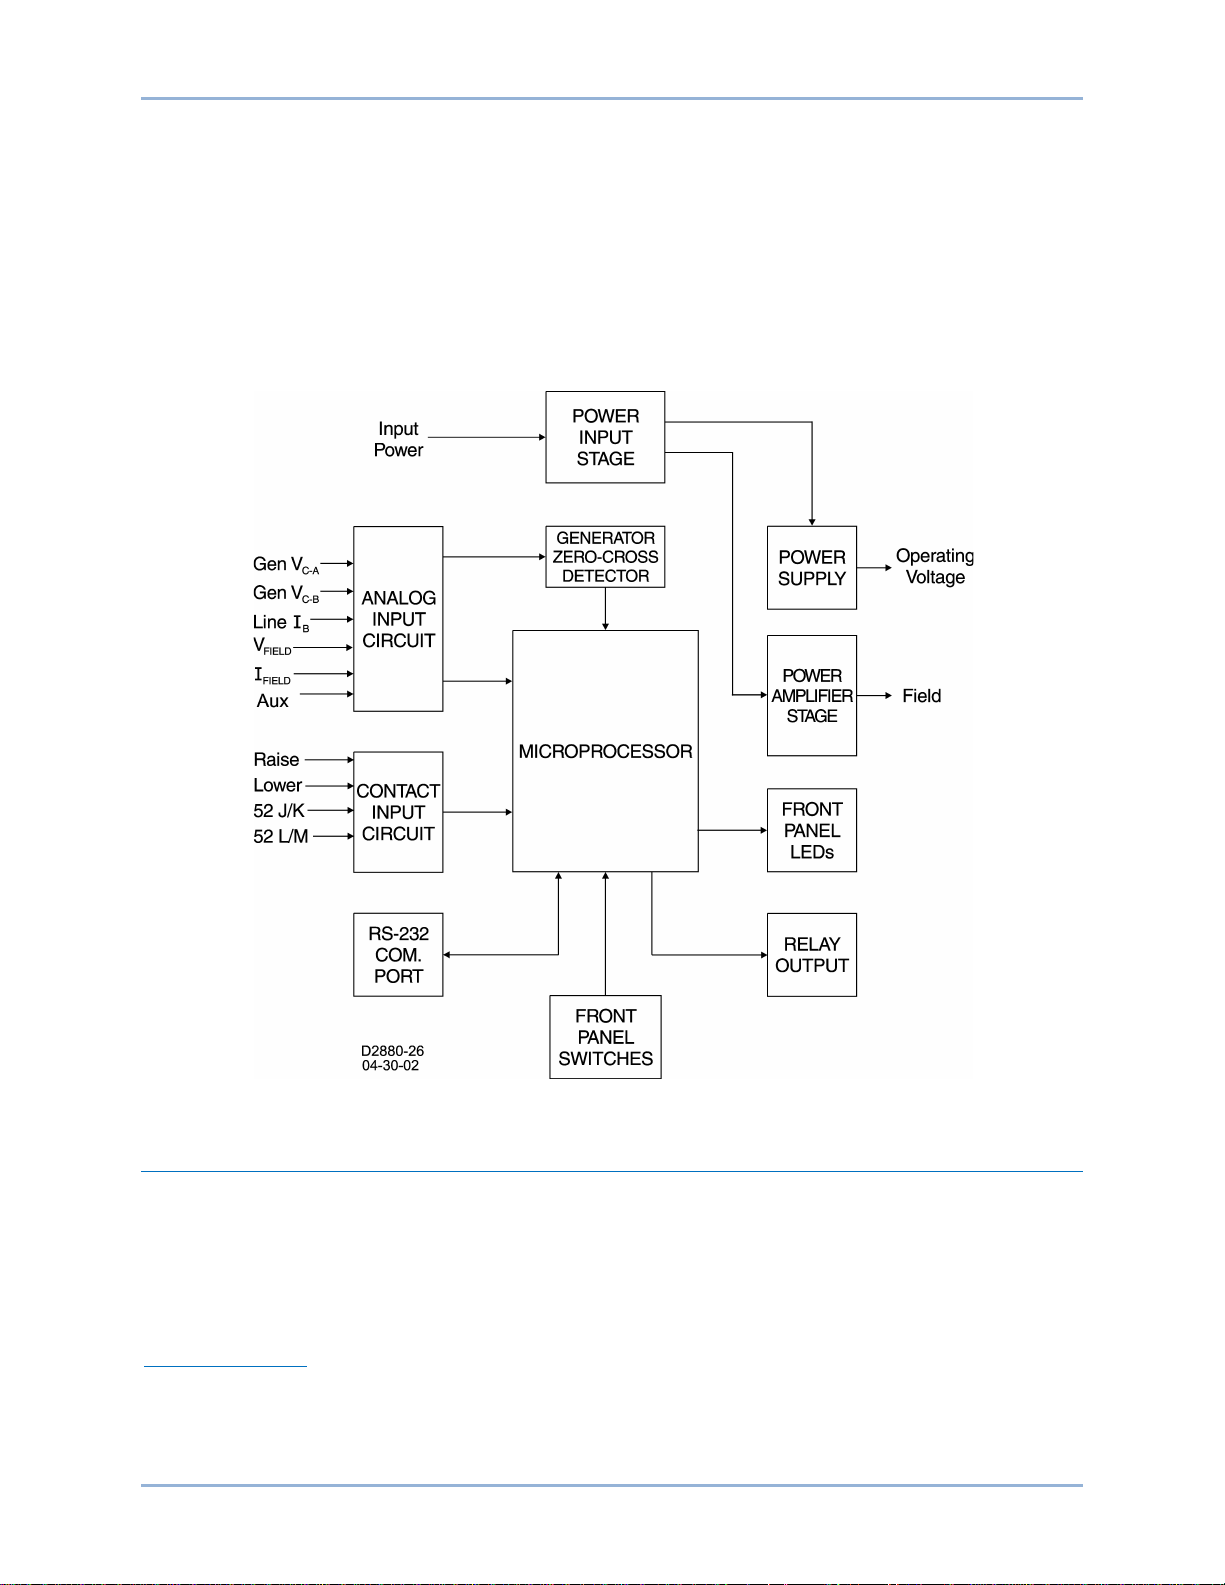
Functional Description
This chapter describes how the BE2000E functions and explains its operating features. To ease
understanding, BE2000E functions are illustrated in the block diagram of Figure 3. A detailed description
of each function block is provided in the paragraphs under the heading of BE2000E Function Blocks.
BE2000E operating features include four operating modes, four protective functions, startup provisions,
reactive droop compensation, underfrequency compensation, and an auxiliary analog input. A detailed
description of each operating feature is provided in the paragraphs under the heading of BE2000E
Operating Features.
Figure 3. Simplified Block Diagram
BE2000E Function Blocks
The following paragraphs describe each of the function blocks illustrated in Figure 3. The function of each
block is explained along with the operation of all function block inputs and outputs.
Analog Inputs
Six analog voltage and current inputs may be sensed and brought to the BE2000E input.
Generator Voltage
Generator voltage is monitored at terminals E1 (A-phase), E2 (B-phase), and E3 (C-phase). Nominal
voltages of up to 600Vac may be sensed at these terminals. Voltage applied to these inputs is scaled and
conditioned before being applied to the input of the ADC. The voltage signal from phase C and A (V
the generator is used by the ADC to calculate the rms value of generator voltage across phases C and A.
BE2000E Functional Description
C-A
) of
Page 22

14 9287500995 Rev B
Caution
Likewise, the voltage signal from phase C and B (V
) of the generator is used by the ADC to calculate
C-B
the rms value of generator voltage across phases C and B. The rms value of generator phase B to phase
A voltage (V
phase C to phase B (V
) is calculated by the microprocessor from the phase C to phase A signal (V
B-A
) signal.
C-B
Additionally, the generator phas e C to phase A (V
) signal is applied to a filtered zero cross detector
C-A
) and the
C-A
circuit. This signal is applied to the microprocessor and is used to calculate generator frequency.
Phase B Line Current
The phase B line current (IB) signal is developed through a customer supplied current transformer (CT)
and monitored through terminals CT1 and CT2. Current up to 5 amperes rms may be monitored at these
terminals. The current monitored at these terminals is scaled and conditioned by an internal current
transformer and active circuitry for use by the ADC. The signal applied to the ADC is used to calculate the
rms value of phase B line current.
Additionally, the phase angle between phase B line current and phase C to phase A generator voltage is
calculated for use during Droop and Var/ Pow er Fact or oper at ion .
Field Voltage (
VFIELD
)
Voltage across the regulator field output terminals, F+ and F–, is monitored, scaled, and conditioned
before being applied to the ADC. This signal is used to calculate the dc value of field voltage for use in
system protection.
Field Current (I
FIELD
)
Current through the main power output switch is converted to a proportional voltage level. This voltage
signal is scaled and conditioned before being applied to the input of the ADC. The result is used to
calculate the dc value of field current for use in the Manual mode of operation as well as protection of the
system.
Analog (Auxiliary) Input
If the dc voltage is removed from the Analog (Auxiliary) Input, the
operating setpoint will return to the original value.
This input allows adjustment of the BE2000E regulation setpoint by the application of a positive or
negative dc voltage across terminals A and B. Voltage up to +3 Vdc may be applied at this input. The
circuit induces a 1,000-ohm burden on the dc source. The application of a +3 Vdc signal corresponds to a
+30 percent change in setpoint.
Contact Input Circuits
Four contact input circuits powered from an internal 13 Vdc supply provide input control from usersupplied contacts.
Raise
Closing a contact across terminals 6U and 7 causes the active operating setpoint to increase. This
function is active as long as the contact is closed.
Lower
Closing a contact across terminals 6D and 7 causes the active operating setpoint to decrease. This
function is active as long as the contact is closed.
Functional Description BE2000E
Page 23

9287500995 Rev B 15
Var/Power Factor Control (52J/K)
Closing a contact across terminals 52J and 52K disables var/power factor control. An open contact
enables the BE2000E to control the generator reactive power in either the var or the power factor mode.
For more information, refer to the Parallel Generator Compensation (52L/M) contact input.
Parallel Generator Compensation (52L/M)
Closing a contact across terminals 52L and 52M disables parallel operation. An open contact enables
parallel operation and the BE2000E operates in reactive droop compensation mode.
The 52J/K input has priority. Therefore, if the 52J/K and the 52L/M inputs are both open, the system
operates in var/power factor mode.
Communication Port
The communication port provides the interface for user programming (setup) of the BE2000E. Connection
is made to the female RS-232 (DB-9) connector with a user-supplied, standard 9-pin cable. The
communication port is optically isolated and is powered from a transformer-isolated supply.
Microprocessor
The microprocessor is the heart of the BE2000E and performs measurement, computation, control, and
communication functions by the use of its embedded programming and the nonvolatile settings stored in
its memory.
Power Input Stage
Input power is applied to terminals 3 and 4 from the PMG. It is rectified and filtered before being applied
to the power amplifier and the power supply. Input power is single-phase in the range of 180 to 240 Vac
at a frequency of 200 to 360 hertz.
Power Supply
The internal switch-mode power supply receives power from the power input stage and supplies power at
the required dc voltage levels to the internal circuitry of the BE2000E.
Power Amplifier Stage
The power amplifier receives power from the power input stage and supplies a controlled amount of
power to the exciter field via terminals F+ and F–. The amount of power supplied to the exciter field is
based on gating pulses received from the microprocessor. The power amplifier uses a solid state power
switch to provide the required power to the exciter field. Power amplifier output to the field is rated up to
75 Vdc at 3 Adc continuous and 150 Vdc at 7.5 Adc for 10 seconds.
Front Panel Indicators
Twelve front panel LED indicators light to indicate various operating modes, protective functions, and
adjustments. The Human-Machine Interface chapter provides more information about the front panel
indicators.
Front Panel Switches
Changes to settings can be made at the front panel using the three pushbutton switches. These pushbuttons are labeled Select, Up, and Down. The Human-Mac hin e Inter face ch apter prov ides more information about the front panel switches.
Relay Output
A common alarm output contact is provided through terminals AL1 and AL2. This normally open, form A
contact annunciates alarm or generator trip conditions and closes in the event of a protective shutdown or
transfer. The relay output is non-latching.
BE2000E Functional Description
Page 24

16 9287500995 Rev B
Warning!
BE2000E Operating Features
The following paragraphs describe the characteristics of each BE2000E operating feature.
Operating Modes
The BE2000E provides up to four modes of operation selectable through Windows® communication
software. Automatic voltage regulation mode, Manual mode, Var mode, and Power Factor mode are
standard features.
Automatic Voltage Regulation Mode
In Automatic Voltage Regulation (AVR) mode, the BE2000E regulates rms generator output voltage. This
is accomplished by sensing generator output voltage and adjusting dc output excitation current to
maintain voltage at the regulation setpoint. The regulation setpoint is adjusted by the R aise and Low er
contact inputs, front panel switches, or through Windows communication software. The regulation point
may also be modified by the Droop function or the Underfrequency function under certain conditions.
Manual Mode
In Manual mode, also known as Field Current Regulation (FCR) mode, the BE2000E maintains dc
excitation current at a set level. The current-level setpoint is adjustable from 0 to 3 Adc by the Raise and
Lower contact inputs, front panel switches, or through Windows communication software.
The Manual mode excitation level must be evaluated prior to enabling
this feature. If the level of excitation current is inappropriate for the
generator, severe damage to the generator may occur.
Var Control Mode
In Var Control mode, the BE2000E maintains generator vars (volt-amperes, reactive) at a set level when
paralleling with an infinite bus. The BE2000E calculates generator vars using the sensed generator output
voltage and current quantities and then adjusts the dc excitation current to maintain vars at the setpoint.
Var control is enabled and disabled through the front panel switches or Windows communication
software. When the software is turned on, var control is enabled or disabled through the var/Power Factor
Control (52J/K) contact input circuit. The var setpoint is adjustable from 100 percent absorb to 100
percent generate through the Raise and Lower contact inputs, front panel switches, or through Windows
software.
Power Factor Control Mode
In Power Factor Control mode, the BE2000E maintains generator power factor at a set level when
paralleling with an infinite bus. The BE2000E calculates generator power factor using the sensed
generator output voltage and current quantities and then adjusts the dc excitation current to maintain
power factor at the setpoint. Power factor control is enabled or disabled through the front panel switches
or Windows software. When the software is turned on, it is enabled or disabled through the var/Power
Factor Control (52J/K) contact input circuit. The power factor setpoint is adjustable between 0.6 lag and
0.6 lead through the Raise and Lower contact inputs, front panel switches or through Windows
communication software.
Reactive Droop Compensation
The BE2000E provides a reactive droop compensation feature to assist in the sharing of reactive load
during parallel generator operation. When this feature is enabled, the BE2000E calculates the reactive
portion of the generator load using the sensed generator output voltage and current quantities and then
modifies the voltage regulation setpoint accordingly. A unity power factor generator load results in almost
no change in generator output voltage. A lagging power factor generator load (inductive) results in a
Functional Description BE2000E
Page 25

9287500995 Rev B 17
reduction of generator output voltage. A leading power factor generator load (capacitive) results in an
increase of generator output voltage. Droop is adjustable up to 10 percent with rated, nominal B-phase
line current (5 amperes applied through terminals CT1 and CT2) and 0.8 power factor. The droop feature
is enabled and disabled through the Parallel Generator Compensation contact input circuit (terminals 52L
and 52M). The 52J/K input must also be closed to disable droop.
Underfrequency
Generator Underfrequenc y
When generator frequency drops below the selected knee frequency setpoint, the voltage setpoint is
automatically adjusted by the BE2000E so that generator voltage follows the selected PU (per unit) V/Hz
curve. When operating on the selected PU V/Hz curve, the Underfrequency Active indicator flashes on
the front panel and in BESTCOMS™-BE2000E software. The knee frequency is adjustable from 40 to 65
hertz and the PU V/Hz curve may be set to a slope from 1 to 3 in increments of 0.01 through the Windows
communication software. The default is 59 Hz and a slope of 1.
Engine Unloading
The engine unloading feature modifies the underfrequency curve. This feature becomes active when the
generator frequency decreases a programmable amount (Unloading Activation - Frequency) below the
knee frequency setpoint, and when the speed change rate is greater than the Unloading Activation - Rate.
The amount of droop while engine unloading is active is adjusted by the Unloading Droop - Percentage
(%) setting. The amount of time engine unloading is active is set by Unloading Droop - Time (sec.).
Engine unloading adjustments are made through BESTCOMS-BE2000E software.
Unloading Activation - Frequency (Hz) is entered as a value below the underfrequency corner where the
engine unloading feature may be activated. A frequency value of 0.9 to 9.0 Hz can be entered in 0.1 Hz
increments. The default value is 0.9 Hz.
Unloading Activation - Rate (Hz/25 ms) of 0 to 25.5 Hz per 25 ms can be entered in 0.1 Hz per 25 ms
increments. The engine unloading feature is activated when the frequency rate of change exceeds the
setting of this field. The default value is 0.1.
Unloading Droop - Percentage (%) field defines the percent drop in generator output voltage for each 1.5
percent decrease in generator frequency when operating in the Engine Unloading mode. The Unloading
Droop Percentage is adjustable from 1 to 20 percent in 1 percent steps. The default value is 10 percent.
Unloading Droop - Time (sec) value defines the length of time that the Engine Unloading mode may be
active before control is passed to the normal Underfrequency mode of operation. Droop time is adjustable
from 1 to 5 seconds in 1 second increments. The default value is 1 second.
Protection
The BE2000E has the six protective functions listed below:
• Overexcitation shutdown
• Generator overvoltage shutdown
• BE2000E overtemperatur e s hutdow n
• Loss of generator sensing shutdown
• Overexcitation limiting
• Crowbar shutdown
Each function, except Crowbar Shutdown, has a corresponding front panel indicator that lights when the
function is active. An active function (except Crowbar Shutdown) is also annunciated through the
Windows communication software.
Overexcitation Shutdown (Field Voltage)
This function is enabled or disabled through BESTCOMS-BE2000E software. When enabled, if field
voltage exceeds the setpoint (80 Vdc default), the Overexcitation Shutdown indicator flashes on the front
panel and in the Windows communication software, the relay output closes after 15 seconds and the
BE2000E Functional Description
Page 26

18 9287500995 Rev B
BE2000E shuts down. When the BE2000E is powered up following an over-excitation shutdown, the
Overexcitation Shutdown indicator will flash for 5 seconds.
Generator Overvoltage Shutdown
The BE2000E monitors the sensed generator output voltage. If it exceeds the overvoltage setpoint (a
percent of nominal) for 0.75 seconds, the Generator Overvoltage indicator flashes on the front panel LED
and in the Windows communication software, the relay output closes and the BE2000E shuts down.
When the BE2000E is powered up following a generator overvoltage shutdown, the Generator
Overvoltage indicator will flash for 5 seconds. The default setpoint is 120 percent of nominal.
BE2000E Overtemperature Shutdown
A temperature sensor within the BE2000E continually monitors the temperature of the device. If the
temperature exceeds 70° C (158° F), the BE2000E Over temp er ature indic at or flas hes on the front pan el
and in the Windows communication software, the relay output closes and the BE2000E shuts down.
Loss of Generator Sensing Shutdown
The BE2000E monitors the sensed generator output voltage and takes protective action if a loss of
sensing voltage is detected. For single-phase sensing, a sensed voltage of less than 50 percent of
nominal is interpreted as a loss of sensing. For three-phase sensing, the total loss of a sensed phase or
an imbalance between phases of more than 20 percent nominal is interpreted as a loss of sensing. When
sensing input continuity is not lost, an adjustable time delay of 0 to 25 seconds is present when a loss of
sensing condition is detected. If sensing input continuity is lost, the time delay is disabled.
If a loss of sensing occurs, the Loss of Generator Sensing indicator flashes on the front panel and in the
Windows communication software, the relay output closes, and the BE2000E shuts down. When the
BE2000E is powered up following a loss of generator sensing shutdown, the Loss of Sensing indication
will flash for 5 seconds.
This function is disabled when a generator short circuit condition is detected or when sensed frequency
drops below 12 Hz. A generator short-circuit is determined when the phase B CT current exceeds 3PU
(>15 Aac sensing current). Loss of sensing is not active during soft start time.
Overexcitation Limiting (Field Current)
The BE2000E has a field current limit that is factory preset at 6.5 amperes. The limit is adjustable from 0
to 7.5 amperes with an adjustable time delay that has a range of 0 to 10 seconds. Both settings are made
through the Windows communication software. When the overexcitation limit is exceeded, the
Overexcitation Limiting indicator flashes on the front panel and in the Windows communication software.
When the adjustable time delay expires, the relay output closes and the BE2000E shuts down. When the
BE2000E is powered up following overexcitation limiting, the Overexcitation Limiting indicator will flash for
5 seconds.
Crowbar Shutdown
The Crowbar Shutdown Circuit protects the generator rotor from overcurrent damage resulting from a
shorted BE2000E power switch. During operation, if the field voltage exceeds the setpoint and the power
stage receives no gating pulses for 1.5 seconds, the Crowbar Circuit activates and places a short-circuit
across the BE2000E input power terminals. This protects the generator by blowing the input power fuse
and removing operating power from the device.
Generator Soft Start
The BE2000E incorporates an adjustable soft start feature that controls the time for generator voltage to
ramp to the regulation setpoint. The ramp rate is adjustable from 1 to 120 seconds in 1 second
increments through the Windows communication software. The underfrequency feature is also active
during soft start and takes priority in control of the generator voltage. The default setting is 7 seconds.
Functional Description BE2000E
Page 27

9287500995 Rev B 19
Installation
The BE2000E is delivered in a sturdy carton to prevent shipping damage. Upon receipt, check the part
number against the requisition and packaging list for agreement. Inspect for damage, and if there is
evidence of such, immediately file a claim with the carrier and notify your sales representative or a sales
representative at Basler Electr ic.
If the unit is not installed immediately, store it in the original shipping package in a moisture- and dust-free
environment.
Mounting
The BE2000E is normally located in the generator conduit box. It is designed for behind the panel
mounting and requires a cutout for front panel viewing and access. Mounting hardware consists of six
customer supplied, #12 thread-forming screws that pass through mounting holes in the conduit box and
thread into the plastic shell of the BE2000E. The unit must be mounted where the ambient temperature
does not exceed the allowable environmental conditions called out in the General Information chapter.
BE2000E package dimensi ons are shown in Figure 4. Cutout and drilling dimensions are shown in Figure
5.
BE2000E Installation
Page 28

20 9287500995 Rev B
Figure 4. BE2000E Dimensions
Installation BE2000E
Page 29

9287500995 Rev B 21
Figure 5. Cutout and Drilling Dimensions
BE2000E Installation
Page 30

22 9287500995 Rev B
Note
Connections
BE2000E connections are dependent on the application. Incorrect wiring may damage the unit.
Be sure that the BE2000E is hard-wired to earth ground with no
smaller than 12 AWG copper wire attached to the ground terminal on
the rear of the unit case. When the unit is configured in a system with
other devices, it is recommended to use a separate lead to the ground
bus from each device.
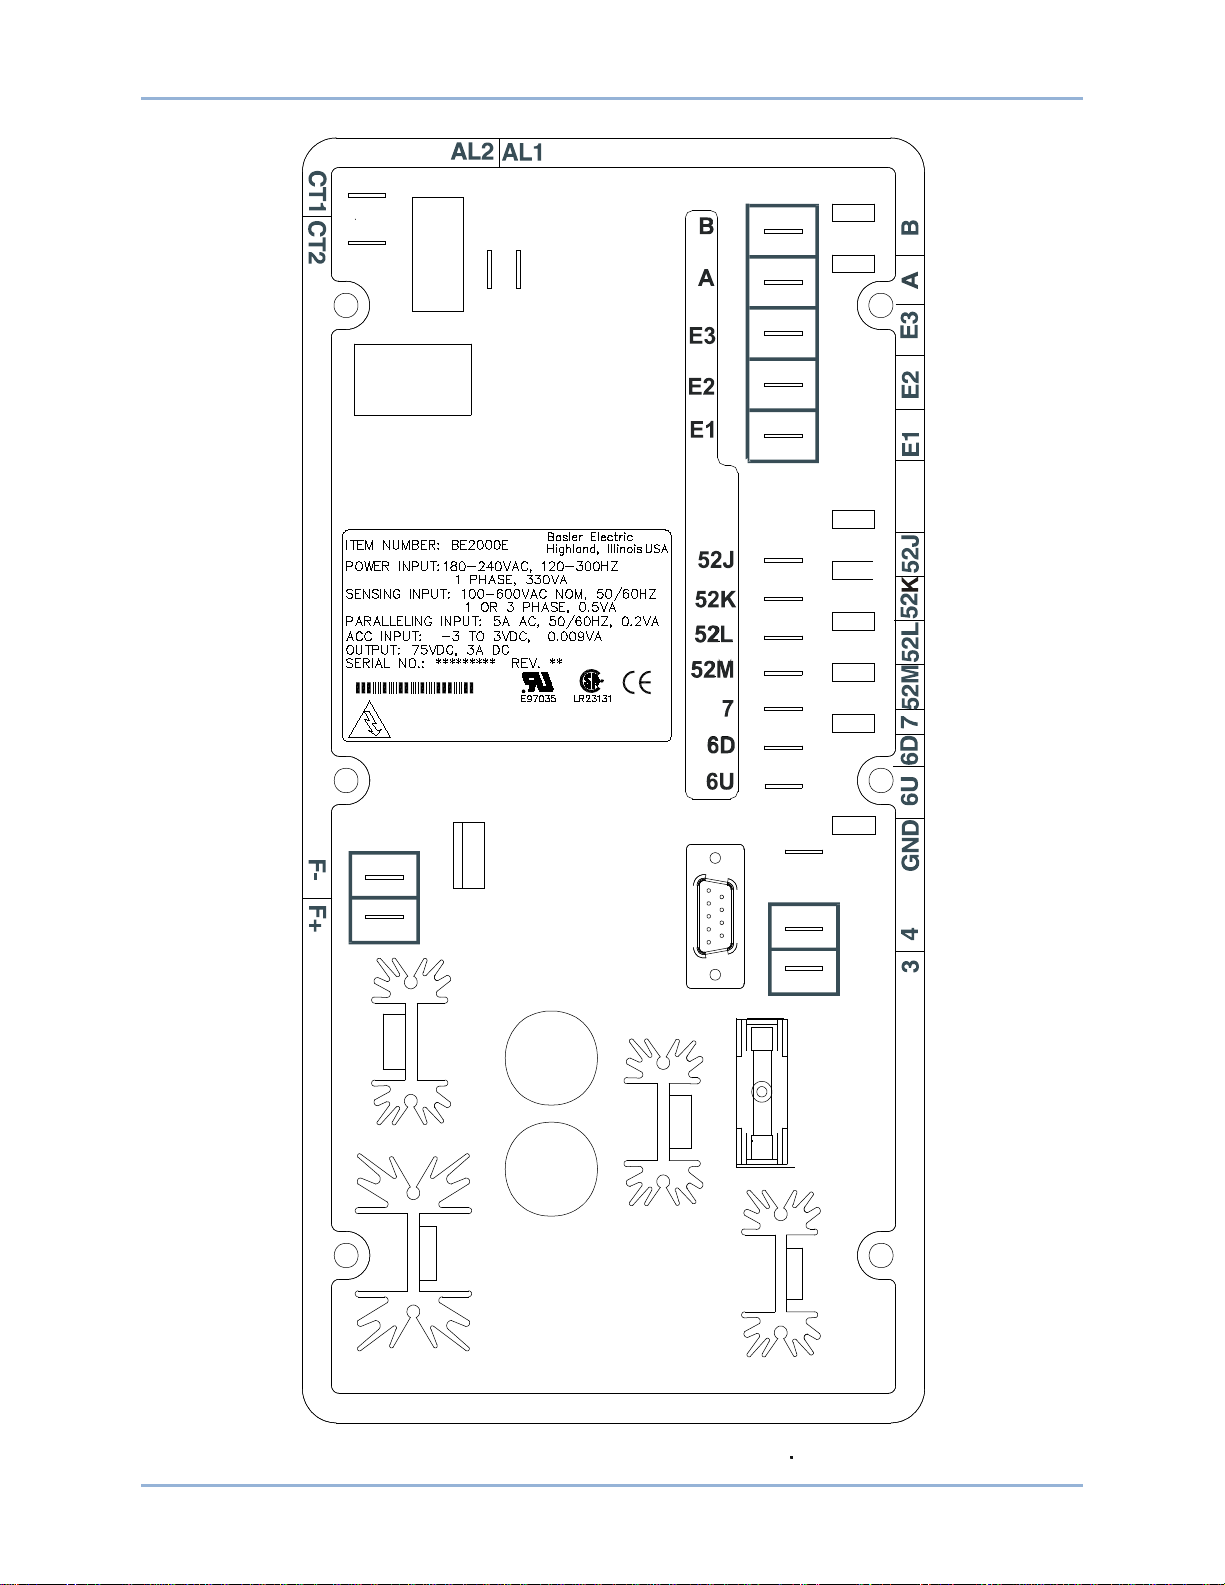
BE2000E Terminations
BE2000E units have two types of interface terminals (Figure 6). One type is quarter-inch, quick-connect
terminals and the other is a nine-pin DB9 connector. All terminals are located on the rear of the unit. The
quarter-inch, quick-connect terminal labels are located on the rear of the case. Wires performing common
functions, such as voltage sensing leads, should be grouped together. The nine-pin DB-9 type connector
is used for temporary interface with both IBM compatible PCs and hand-held computers.
Figure 6 shows the terminal connections located on the rear panel of the BE2000E. Except as noted
above, connections should be made with minimum wire size of 14 AWG.
Installation BE2000E
Page 31

9287500995 Rev B 23
P 0007-41
WARNING! LIVE TERMINALS
AND HEATSINKS
Figure 6. BE2000E Rear Panel Terminals
BE2000E Installation
Page 32

24 9287500995 Rev B
Sensing
Generator
Phase
Terminal
A
E1
B
E2 C E3
A
E1
C
E2, E3
Caution
Generator Voltage Sensing Inputs
The generator voltage sensing terminals are labeled E1, E2, and E3. A single-phase sensing connection
is obtained by connecting the C-phase sensing input to terminals E2 and E3. Table 16 lists the terminal
assignments for three-phase and single-phase generator voltage sensing.
Table 16. Generator Voltage Sensing Ter min als
3-Phase
1-Phase
Phase B Line Current Sensing Input
Generator line current is stepped down through a user-supplied current transformer (CT). Secondary
current from that transformer is applied to terminals labeled CT1 and CT2.
Raise and Lower Contact Inputs
Remote setpoint adjustment may be accomplished by connecting a single-pole, double-throw (SPDT),
spring return, center-off switch to the terminals labeled 6U, 7, and 6D. To connect this switch, the center
pole, or common terminal, must be connected to terminal 7. The other two terminals are connected to
terminals 6U and 6D. This remote adjust switch may be mounted up to 150 feet (45 meters) away from
the BE2000E when using twisted, shielded cable.
Var/Power Factor Control Contact Input
A customer supplied enable/disable contact for this function connects to the terminals labeled 52J and
52K. This function is disabled by a closed contact.
Parallel Generator Compensation
A customer supplied enable/disable contact for this function connects to the terminals labeled 52L and
52M. This function is disabled by a closed contact.
Analog (Auxiliary) Adjust
If the dc voltage is removed from the Analog (Auxiliary) Input, the
operating setpoint will return to the original value.
This input allows adjustment of the BE2000E regulation setpoint by the application of a positive or
negative dc voltage across termi nals A and B. Voltage up to +3 Vdc may be applied at this input. The
circuit induces a 1,000-ohm burden on the dc source. The application of a +3 Vdc signal corresponds to a
+30 percent change in setpoint.
Power Supply Inputs
Power input terminals are labeled 3 and 4.
Chassis Ground
The chassis ground terminal is labeled GND.
Installation BE2000E
Page 33

9287500995 Rev B 25
Pin
Function
Name
Direction
1
N/C
----
N/A
2
Transmit Data
TXD
From BE2000E
3
Receive Data
RXD
To BE2000E
4
N/C
----
N/A
5
Signal Grou nd
GND
N/A
6
N/C
----
N/A
7
N/C
----
N/A
8
N/C
----
N/A
9
N/C
----
N/A
Power (Field) Output
The field output terminals for connection to the generator exciter field are labeled F+ and F–.
Relay Output
The common alarm relay output contact may be accessed at the terminals labeled AL1 and AL2. The
relay output is normally open.
Communication Port
The RS-232 port on the rear panel uses a DB-9 female connector. Figure 7 illustrates the pin
assignments of the communication port and Table 17 identifies the RS-232 connector pin functions. A
standard communication cable terminated with a DB-9 male connector is used for PC or hand-held
computer interface with the BE2000E as shown in Figure 8.
Figure 7. Communication Port Pin Assignments
Table 17. Communication Port Pin Functions
BE2000E Installation
Page 34

26 9287500995 Rev B
Figure 8. Personal Computer to BE2000E Connections
BE2000E Connections for Typical Applications
Figures 9 through 12 illustrate typical applications using the BE2000E. Figure 9 shows an application
where the BE2000E is connected for three-phase voltage sensing. Figure 10 shows an application with
single-phase voltage sensing while Figure 11 illustrates an application with a single-phas e gen er ator.
Figure 12 illustrates the connection of two BE2000E devices used in a Cross-Current (Reactive
Differential) application. Note that the 0.1 ohm resistor shown may have to vary. When operating in
parallel reactive differential mode (cross current), attention must be paid to the use of the burden resistor
shown in Figure 12. The burden resistor should have a value approximately 10 times the cross current
loop resistance for proper differential operation. The value of 0.1 ohm is a suggested value. The voltampere (VA) capacity of the paralleling current transformers should be considered after sizing the burden
resistor.
Installation BE2000E
Page 35

9287500995 Rev B 27
Figure 9. Typical Connections with ABC Rotation and Three-Phase Sensing
BE2000E Installation
Page 36

28 9287500995 Rev B
Figure 10. Typical Connections with ABC Rotation and Single-Phase Sensing
Installation BE2000E
Page 37

9287500995 Rev B 29
Figure 11. Typical Connections to a Single-Phase Generator
BE2000E Installation
Page 38

30 9287500995 Rev B
GEN 1
GEN 2
CTB1
CTB2
BE2000E
CTB1
CTB2
BE2000E
0.1
0.1
CT
CT
LOAD
CCC
ENABLE
CONTACT
P0064-04
Figure 12. Cross-Current (Reactive Differential) Connections for Two Generators
Figure 13. Cross-Current (Reactive Differential) Connections for Three or More Generators
Installation BE2000E
Page 39

9287500995 Rev B 31
Preliminary Setup
Before starting the generator and BE2000E for the first time, proceed as follows.
Warning!
Use caution when working around the rear of the BE2000E.
Dangerous voltage levels are present at the exposed heatsinks when
the unit is energized.
1. Tag and disconnect all wiring to the BE2000E. Be sure to insulate the wire terminals to prevent a short.
2. Start the prime mover and perform all engine governor adjustments.
3. After all initial governor adjustments have been made, shut down the prime mover.
4. Connect only the power input terminals of the BE2000E to an auxiliary power source in the specified
power input range. An ICRM (Inrush Current Reduction Module) may be required.
5. Perform all initial BE2000E settings by using the front panel HMI, connecting a handheld operating with
BESTCOMS™-BE2000E software, or connecting a PC operating with BESTCOMS-BE2000E to the rear
communications port of the BE2000E.
6. Connect the rest of the BE2000E leads using the tagged identification.
7. Start the prime mover/generator and perform the final adjustments at rated speed and load.
8. After the initial startup, the BE2000E should not require any further adjustments unless there is a
change in the system.
Adjustments
All adjustments are made using external switching, the front panel HMI or with BE2000E software via the
rear panel communication port. See the BESTCOMS Software chapter for more information about making
adjustments with BESTCOMS-BE2000E.
Storage
This device contains long-life aluminum electrolytic capacitors. For devices that are not in service (spares
in storage), the life of these capacitors can be maximized by energizing the device for 30 minutes once
per year.
BE2000E Installation
Page 40

32 9287500995 Rev B
Installation BE2000E
Page 41

9287500995 Rev B 33
BESTCOMS™ Software
BESTCOMS-BE2000E provides a communication link between the BE2000E and the user. This software
enables the user to enter all BE2000E settings and read all system metering values through an easy to
use graphical interface. PID (Proportional + Integral + Derivative) software within the application enables
the user to establish proper PID parameters based on a specified generator and/or exciter time constants.
Within BESTCOMS-BE2000E, unit settings can be saved in a computer file and used later to configure
other units with the same settings.
Installation
BESTCOMS-BE2000E operates with systems using Windows® XP 32-bit SP3, Windows Vista 32-bit SP 1
(all editions), Windows 7 32-bit (all editions), Windows 7 64-b it (all ed itions ) , and Window s 8. The
minimum recommended operating requirements are listed below:
• IBM compatible PC, 1.0 GHz or faster
• 256 MB RAM
• CD-ROM drive
• One available serial port
Installing BESTCOMS™-BE2000E
BESTCOMS-BE2000E software contains a setup utility that installs the program on your PC. An uninstall
utility is loaded with the program that can be used to remove the software from your PC if desired. Use
the following procedure to install BESTCOMS-BE2000E.
1. Insert the CD-ROM into the PC CD-ROM drive.
2. When the BESTCOMS Setup and Documentation CD menu appears, click the Install button for
the BESTCOMS application. The setup utility automatically installs BESTCOMS-BE2000E on
your PC.
When the software is installed, a Basler Electric folder is added to the Windows® program menu. This
folder is accessed by clicking the Start button and pointing to Programs. The Basler Electric folder
contains icons for the BESTCOMS for BE2000E program and a BESTCOMS for BE2000E uninstall utility.
Connecting the BE2000E and PC
Connect a communication cable between the rear RS-232 connector of the BE2000E and the appropriate
communication port of the PC. Refer to the Installation chapter for the location of the BE2000E RS-232
connector and for the required connections between the BE2000E and a PC.
Starting the BESTCOMS™-BE2000E Application
The BESTCOMS-BE2000E application is started by clicking the Windows® Start button, pointing to
Programs, the Basler Elect ric folder, and then clicking the BESTCOMS for BE2 000E icon. At startup, a
splash screen with the pro gram title and versio n number is display ed briefly (Figure 14). Af ter this dialog
box is displayed, the System Configuration screen is displayed (Figure 15).
BE2000E BESTCOMS™ Software
Page 42

34 9287500995 Rev B
Caution
Figure 14. BESTCOMS-BE2000E - Splash Screen
Figure 15. System Configuration Screen
Initial Adjustments
Read and understand the operation of the individual adjustments
before attempting any initial adjustments.
Before starting the generator, the procedures in the following paragraphs should be performed.
Remove the 5-ampere fuse before starting the generator for the first time. Perform all preliminary engine
governor adjustments without the regulator energized.
BESTCOMS™ Software BE2000E
Page 43

9287500995 Rev B 35
After initial governor adjustments are complete, reinstall the 5-ampere fuse, and connect only the power
input leads or PMG leads to the regulator. Remove all other regulator connections that may be present
and temporarily insulate them.
Start and run the generator at rated speed. The regulator will perform the self-test and enter a shutdow n
mode. At this time, initial adjustments can be made.
After the initial adjustments are made, shut down the generator and connect the remaining regulator
leads. The generator may be started and final adjustments may be performed on the regulator.
Establishing Communication
Communication between BESTCOMS-BE2000E and the BE2000E must be established before viewing
metering values or reading or changing settings. BESTCOMS-BE2000E screen settings are updated only
after communication is opened or the communication settings have been changed.
Open the BE2000E communication port by clicking on Communications on the menu bar, hovering the
mouse pointer over Open Comm Port, and clicking RS-232 Port. Figure 16 illustrates the menu selections
for opening the BE2000E communication port.
Figure 16. Communications Port Menu Selection
When RS-232 Port is selected, the Password dialog box of Figure 17 appears and prompts you to enter a
password. Each BE2000E is delivered with "OEM" as the default password. See the Password Protection
sub-section for information about changing the password.
Figure 17. Password Dialog Box
After the correct password is entered, the Communication Initialization screen of Figure 18 is displayed.
Select Com 1, Com 2, Com 3, or Com 4 as the active communication port on your PC and click the
Initialize butt on. BESTC OMS-BE2000E initializes communication by obtaining the configuration settings
from the BE2000E.
Figure 18. Communication Initialization Screen
BE2000E BESTCOMS™ Software
Page 44

36 9287500995 Rev B
Caution
Note
Changing Settings
Do not disconnect the communications cable while the BE2000E and
PC are communicating.
Settings are arranged into six groups:
• System Configuration
• Setting Adjustments
• Control Gain
• Analysis
• Protection Settings
• Metering, Operation, and Alarms
BESTCOMS-BE2000E may display the dialog box of Figure 19 when
initializing BE2000E communication, obtaining BE2000E configuration
settings or performing other tasks. It’s important to wait until the box
disappears before trying to execute communication commands.
Issuing commands while the Wait dialog box is present may disrupt
communication between BESTCOMS-BE2000E and the BE2000E.
Figure 19. Wait Dialog Box
Each setting group has a corresponding button that can be selected to access that group of settings. The
six setting groups can also be accessed by clicking Screens on the menu bar and then selecting the
desired setting group from the list. Once a setting group is accessed, the individual settings of the group
can be viewed and changed.
A setting is changed by clicking within the setting field and typing the new setting. The range limit of a
setting can be viewed by double-clicking the setting. Any setting changes made on a setting group screen
must be sent to the BE2000E before viewing other screens. Otherwise, the setting changes will be lost. A
single setting change can be sent to the BE2000E by pressing the Enter key on your PC keyboard.
Multiple setting changes can be sent to the BE2000E by clicking the SendToUnit button. Settings can
also be sent to the BE2000E by clicking Communications on the menu bar and clicking Send To Unit.
Sending and Receiving Sett ings
When communication is enabled, BE2000E settings can be sent or received through BESTCOMSBE2000E.
Sending Settings
Settings changes are sent to the BE2000E by clicking the SendToUnit button. This causes the settings
displayed on the current settings screen to become the BE2000E settings. Settings can also be sent to
the BE2000E by clicking Communications on the menu bar and clicking Send To Unit. Individual setting
BESTCOMS™ Software BE2000E
Page 45

9287500995 Rev B 37
changes can be sent to the BE2000E by pressing the Enter key on your PC keyboard after changing the
setting.
Receiving Settings
BE2000E settings are retrieved by clicking the GetFromUnit button. This causes the BE2000E settings to
be displayed on the settings screen. Settings can also be received from the BE2000E by clicking
Communications on the menu bar and clicking Get From Unit.
Saving Settings to BE2000E Memory
Settings are saved in nonvolatile memory (EEPROM). In the event of a power loss, these are the settings
that are active at power up. If settings are changed and sent to the BE2000E but not sent to EEPROM,
the changed settings are lost if BE2000E operating power is lost. When exiting BESTCOMS-BE2000E or
closing communication, you are asked if you want to save the settings to EEPROM. This question is
asked even if no settings changes were made.
When communication is enabled, setting changes are saved to EEPROM by clicking the EEPROM
button. The opportunity to save settings to EEPROM is also given through a dialog box when exiting
BESTCOMS-BE2000E or closing communication.
Setting Definitions
Each of the six setting groups has a corresponding BESTCOMS-BE2000E screen. The settings of each
screen are categorized by one or more tabs. In the following paragraphs, settings are arranged and
defined according to the organization of the BESTCOMS-BE2000E screens and tabs.
System Configuration
The System Configuration screen consists of one tab labeled System Settings. Click the Configure button
to access the System Configuration screen or click Screens on the menu bar and click System
Configuration.
System Settings
System settings are shown in Figure 20 and are described in the following paragraphs.
Sensing Voltage. This setting is used to configure the BE2000E for either single-phase or three-phase
sensing voltage.
Version Numbers. These two version numbers are read-only. They indicate the BE STC OM S-BE2000E
software version and the BE2000E embedded software version. If a BE2000E version number is not
shown, then the PC and software have not communicated with the BE2000E. The BE2000E version
number is indicated only when communication between the BE2000E and BESTCOMS-BE2000E occurs.
Bus PT Ratio. The ratio of the bus sensing transformer is entered in this setting field. This ratio allows the
voltage displayed through BESTCOMS-BE2000E to match the actual bus output voltage. A ratio of 1 to
150 may be entered in increments of 0.01
Regulator Sensing Voltage (V). The nominal gener ator lin e-to-line ac voltage obtained from the generator
sensing transformer is entered in this setting field. Voltages within the ranges of 100 to 140 Vac, 200 to
280 Vac, or 340 to 560 Vac may be entered in 0.1 Vac increments. A setting of 600 Vac is also possible.
Regulator Sensing Current (A). This read-only field indicates the rated output of the current transformer
(CT) that supplies the BE2000E with B-phase generator line current.
Rated KVAR Value. This read-only field displays the rated kvar value.
Voltage Low-Line Scale Factor. This setting defines the scale value applied to the voltage setpoint, the
fine voltage adjust band limits, and the line voltage dependent protection thresholds when the 52JK input
is configured as Low-Line Override.
BE2000E BESTCOMS™ Software
Page 46

38 9287500995 Rev B
Figure 20. System Configuration Screen
Generator PT Ratio. The ratio of the generator sensing transformer is entered in this setting field. This
ratio allows the voltage displayed through BESTCOMS-BE2000E to match the a ctual gen er ator outp ut
voltage. A ratio of 1 to 150 may be entered in increments of 0.01.
Generator CT Ratio. The ratio of the generator B-phase current transformer is entered in this setting field.
This ratio allows the current displayed by the BE2000E to match the actual B-phase generator output
current. A ratio of 1 to 1,000 may be entered in increments of 0.1. Note: A 500:5 CT has a ratio of 100.
52 JK Function
VAR/PF Enable. This setting selects var or PF control mode. This is the default selection for the
BE2000E.
Low-Line Override. When selected, the voltage setpoint, the fine voltage adjust band limits, and the line
voltage dependent protection thresholds are scaled by the Voltage Low-Line Scale Factor setting.
Single-Phase Override. When selected, single-phase/three-phase sensing mode dependent protection is
changed to single-phase mode. Phase imbalance monitoring for loss of sensing detection is disabled.
Low-Line and Single-Phase Override. When selected, both t he low-line override and single-phase
override functions operate simultaneously.
Setting Adjustments
The Setting Adjustments screen consists of three tabs: Setpoint, Startup, and Engine Unloading.
Setpoint Tab
The Setpoint tab settings o f the Setting Adjustme nts screen are shown in Figure 21. Each setting of the
Setpoint tab is described in the following paragraphs.
Automatic Voltage Regulator (AVR) - AVR Setpoint (V). This setting field is used to enter the desired
generator output terminal voltage. The AVR setpoint value range depends on the regulator sensing
voltage and band setting.
Fine Voltage Adjustment - Band Setting (%). The Band Setting determines the minimum and maximum
adjustment allowed to the AVR Setpoint. This value is expressed as a percentage of the Regulator
BESTCOMS™ Software BE2000E
Page 47

9287500995 Rev B 39
Sensing Voltage (see Figure 20). Band Setting values are entered as a percentage over a range of 0 to
15 percent in 0.1 percent increments.
Droop - Setpoint (%). This setting controls the reactive droop compensation feature of the BE2000E. The
setpoint value is based on a 0.8 power factor load and determines the amount of change permitted in the
generator voltage setpoint when the BE2000E responds to a reactive load. The setpoint value is
adjustable from 0 to 10 percent in increments of 0.01 percent.
Field Current Regulator (FCR) - FCR Setpoint (A). This setting defines the field current setpoint when
operating in Manual mode. The FCR Setpoint field accepts a value of 0 to 3 Adc in increments of 0.01
Adc.
Figure 21. Setting Adjustments Screen, Setpoint Tab
Reactive Power Control (VAR) - VAR Setpoint (% of nom.). The VAR Setpoint determines the level of
generator vars maintained by the BE2000E when operating in Var Control mode. Values from –100 to
+100 percent in 1.0 percent increments may be entered in the VAR Setpoint field.
Power Factor Control (PF) - PF Setpoint. The PF Setpoint determines the level of generator power factor
maintained by the BE2000E when operating in Power Factor Control mode. PF Setpoint values are
adjustable from –0.6 to –1 (1) or 0.6 to +1 in 0.001 increments.
Startup Tab
The Startup tab settings of the Setting Adjustment screen are shown in Figure 22. Each setting of the
Startup tab is described in the following paragraphs.
Startup Control - Gen Soft Start Time (sec). This setting defines the time limit for the generator soft-start
voltage offset. The soft-start time can be set from 1 to 120 seconds in 1 second increments.
Underfrequency Setting - Corner Frequency (Hz). The Corner Frequency setting defines the value of
frequency that causes the BE2000E to adjust the voltage setpoint so that the generator voltage follows
the selected volts per hertz slope. A value of 40 to 65 hertz can be entered in this setting field in 0.01
increments.
Underfrequency Setting - Slope (Volts/Hz). The slope for generator underfrequency protection is selected
with this setting. A slope setting of 1 to 3.00 can be entered in increments of 0.01. The slope is a per-unit
setting.
BE2000E BESTCOMS™ Software
Page 48

40 9287500995 Rev B
Figure 22. Setting Adjustments Screen, Startup Tab
Engine Unloading Tab
The Engine Unloading tab settings of the Setting Adjustment screen are shown in Figure 23. Each setting
of the Engine Unloading tab is described in the following paragraphs.
Unloading Activation - Frequency (Hz).
This frequency is entered as a value below the underfrequency corner where the engine unloading
feature may be activated. A frequency value of 0.9 to 9.0 Hz can be entered in 0.1 Hz increments.
Unloading Activation - Rate (Hz/25 ms)
The engine unloading feature is activated when the frequency rate of change exceeds the setting of this
field. An unloading activation rate of 0 to 25.5 Hz per 25 ms can be entered in 0.1 Hz per 25 ms
increments.
Unloading Droop - Percentage (%)
The value in this field defines the percent drop in generator output voltage for each 1.5 percent decrease
in generator frequency when operating in the Engine Unloading mode. The Unloading Droop Percentage
is adjustable from 1 to 20 percent in 1 percent st eps .
Unloading Droop - Time (sec)
This value defines the length of time that the Engine Unloading mode may be active before control is
passed to the normal Underfrequency mode of operation. Droop time is adjustable from 1 to 5 seconds in
1 second increments.
BESTCOMS™ Software BE2000E
Page 49

9287500995 Rev B 41
Frame/Poles
Time Constants
Stability Range
Generator (T’do)
Exciter (Texc)
360/4
1.0
0.17
1
430/4
1.5
0.25
2
570/4
2.0
0.33
3
740/4
2.5
0.42
4
1,000/4
3.0
0.50
5
740/6
3.5
0.58
6
1,000/6
4.0
0.67
7
Figure 23. Setting Adjustments Screen, Engine Unloading Tab
Control Gain
The Control Gain screen consists of one tab labeled Control Gain. Click the Gain button to access the
Control Gain screen or click Screens on the menu bar and click Control Gain.
Control Gain Tab
Control gain settings are shown in Figure 24 and are described in the following paragraphs.
Stability Range - This setting selects one of 7 preset stability ranges within the BE2000E. A guide for
selecting the stability range is provided in Table 18. A setting of 21 enables the entry of custom stability
settings through the BESTCOMS-BE2000E PID window. Information about the PID window is provided
later under the heading of PID Window. When the Stability Range is set at 21, the PID button may be
selected to access the PID window. A Stability Range setting of 1 through 7 disables the PID button and
prevents access to the PID window.
Table 18. BE2000E Stability Range Settings
AVR/FCR - Proportional Gain KP. This setting selects the proportional constant (KP) stability parameter.
The BE2000E supplies a value that is equivalent to KP multiplied by the error between the voltage
setpoint and the actual generator output voltage. KP values of 0 to 1,000 may be entered in increments of
0.01.
Observe the following guidelines when tuning the KP value. If the transient response has too much
overshoot, then KP should be decreased. If the transient response is too slow, then KP should be
increased.
BE2000E BESTCOMS™ Software
Page 50

42 9287500995 Rev B
Figure 24. Control Gain Screen
AVR/FCR - Integral Gain KI. This setting selects the integral constant (KI) stability parameter. The
BE2000E supplies a value that is equivalent to KI multiplied by the integral of the error between the
voltage setpoint and the actual generator output voltage. KI values of 0 to 2,000 may be entered in
increments of 0.01.
Increasing the value of KI decreases the time required to reach steady state.
AVR/FCR - Derivative Gain KD. This setting selects the derivative constant (KD) stability parameter. The
BE2000E provides an output value that is equivalent to KD multiplied by the derivative of the error
between the voltage setpoint and the actual generator output voltage. KD values of 0 to 1,000 may be
entered in increments of 0.01.
Increasing the value of KD reduces transient response ringing.
AVR/FCR - Loop Gain Kg=>AVR. This setting adjusts the loop-gain level of the PID algorithm for AVR.
Loop Gain values of 0.5 to 4.5 may be entered for AVR operation in increments of 0.01.
AVR/FCR - Loop Gain Kg=>FCR. This setting adjusts the loop-gain level of the PID algorithm for FCR.
Loop Gain values of 0 to 1,000 may be entered FCR operation in increments of 0.01.
VAR/PF - PF Integral Gain KI. This setting adjusts the integral gain and determines the characteristic of
the BE2000E dynamic response to a changed PF setting. PF KI values of 0 to 1,000 may be entered in
increments of 0.01.
VAR/PF - Var Integral Gain KI. This setting adjusts the integral gain and determines the characteris tic of
the BE2000E dynamic response to a changed var setting. Var KI values of 0 to 1,000 may be entered in
increments of 0.01.
VAR/PF - VAR<=Loop Gain Kg=>PF. This setting adjusts the loop-gain level of the PI algorithm for var or
power factor control. Loop Gain values of 0 to 1,000 may be entered for var and power factor operation in
increments of 0.01.
OEL - Integral Gain KI. This setting controls the rate at which the BE2000E responds during an
overexcitation event. KI values of 0 to 1,000 may be entered in increments of 0.01.
OEL - Loop Gain Kg. This setting adjusts the loop-gain level of the PID algorithm for the over-excitation
limiting function. Loop Gain values of 0 to 1,000 may be entered in increments of 0.01.
BESTCOMS™ Software BE2000E
Page 51

9287500995 Rev B 43
Analysis
Click the Analysis button or click Screens on the menu bar and click Analysis to view the Analysis screen.
The Analysis screen consists of four tabs: VAR, PF, AVR, and FCR. Each of the tabs displays four
metered sensing values and has six alarm signal indicators. Metered sensing values include Vrms (rms
voltage), Ifd (dc field current), reactive power (vars), and power factor (PF). Alarm signal indicators
include Overexcitation Shutdown, Generator Overvoltage, Unit Overtemperature, Loss of Generator
Sensing, Overexcitation Limiting, and Underfrequency Active.
The operating status and control mode of the BE2000E determine which tabs of the Analysis screen are
enabled and can be accessed by the user. Table 19 lists the BE2000E operating status and control
modes that enable the four tabs of the Analysis screen.
Table 19. Analysis Screen Tab Combinations
Control Mode Operating Status Tab Enabled
AVR OFF AVR
AVR PF AVR, PF
AVR VAR AVR, VAR
FCR N/A FCR
Control mode and operating status selections are made at the Operation tab of the BESTCOMSBE2000E Metering screen and are discussed later in this chapter.
AVR Tab
Figure 25 illustrates the settings, sensing values, and alarm signal indicators of the AVR tab. The settings
of the AVR tab make it possible to increm ent and decrement the AVR setpoint of the BE2000E. The
sensing values and alarm signal indicators of the AVR tab are also displayed by the other tabs of the
Analysis screen.
Voltage Step Response - AVR Setpoint (V) (Nominal). This read-only field indicates the AVR setpoint.
(The AVR setpoint is set by using the Setpoint tab of the Setti ng Ad justments screen). The voltage
displayed in the AVR Setpoint field is selected by clicking the adjacent button. Clicking this button sends
the AVR Setpoint value to the BE2000E and changes the color of the button from gray to red.
Voltage Step Response - Increment of AVR Setpoint (V). These two fields indicate the increase that
occurs to the AVR setpoint when the corresponding Increment button is clicked. The "% increase" field is
used to set and indicate the percentage that the AVR setpoint is increased when the Increment button is
clicked. The "AVR Setpoint =" field indicates the value of voltage that corresponds to the "% increase"
field. Any setpoint value within range and higher than setpoint value be can also be typed into the "AVR
Setpoint =" field which updates the “% increase” field also. The AVR setpoint changes to this value when
the adjacent button is clicked. When clicked, the Increment button changes from gray to red to indicate
that the AVR setpoint has increased to the value in the "AVR Setpoint =" field.
Voltage Step Response - Decrement of AVR Setpoint (V). These two fields indicate the change that will
occur to the AVR setpoint when the corresponding Decrement button is clicked. The "% decrease" field is
used to set and indicate the percentage that the AVR setpoint is decreased when the Decrement button is
clicked. The "AVR Setpoint =" field indicates the value of voltage that corresponds to the "% decrease"
field. Any setpoint value within range and lower than setpoint value can also be typed into the "AVR
Setpoint =" field which updates the “% decrease” field also. The AVR setpoint changes to this value when
the adjacent button is clicked. When clicked, the Decrement button changes from gray to red to indicate
that the AVR setpoint has decreased to the value in the "AVR Setpoint =" field.
Voltage Step Response - Meter. The meter in the AVR tab shows the value selected. If an AVR setpoint
value is sent by increase, decrease or setpoint button the meter shows the corresponding value and
meter value text box also displays it. Any value within the range can either be input to meter value text
box or selected by dragging the pointer in the meter using mouse. This value can then be sent to the unit
by pressing Send button.
BE2000E BESTCOMS™ Software
Page 52

44 9287500995 Rev B
Figure 25. Analysis Screen, AVR Tab
The setpoint value currently set in the unit by any of the above methods is displayed in the current
setpoint textbox. To return to the nominal setting, the button adjacent to AVR Setpoint (V) (Nominal)
should be pressed. If the AVR Analysis screen is left without returning to nominal setpoint, a message
box (Figure 26) is shown which allows the user to return to nominal setpoint by pressing YES or remain at
the current setpoint by pressing NO.
Figure 26. Message Box - Return to AVR Nominal Setpoint
FCR Tab
Figure 27 illustrates the settings, sensing values, and alarm signal indicators of the FCR tab. The settings
of the FCR tab make it possible to increment and decrement the FCR setpoint of the BE2000E. The
sensing values and alarm signal indicators of the FCR tab are also displayed by the other tabs of the
Analysis screen.
Field Current Step Response - FCR Setpoint (A). This read-only field indicates the FCR setpoint. (The
FCR setpoint is set by using the Setpoint tab of the Setting Adjustments screen). The current disp lay ed in
the FCR Setpoint field is selected by clicking the adjacent pushbutton. Clicking this button sends the FCR
Setpoint value to the BE2000E and changes the color of the pushbutton from gray to red.
BESTCOMS™ Software BE2000E
Page 53

9287500995 Rev B 45
Figure 27. Analysis Screen, FCR Tab
Field Current Step Response - Increment of FCR Setpoint (A). These two fields indicate the increase that
occurs to the FCR setpoint when the corresponding Increment button is clicked. The "% increase" field is
used to set and indicate the percentage that the FCR setpoint is increased when the Increment button is
clicked. The "FCR Setpoint =" field indicates the value of current that corresponds to the "% increase"
field. Any setpoint value within range and higher than setpoint value can also be typed into The "FCR
Setpoint =" field which updates the “% increase” field also. The FCR setpoint changes to this value when
the adjacent button is clicked. When clicked, the Increment button changes from gray to red to indicate
that the FCR setpoint has increased to the value in the "FCR Setpoint =" field.
Field Current Step Response - Decrement of FCR Setpoint (A). These two fields indicate the change that
will occur to the FCR setpoint when the corresponding Decrement button is clicked. The "% decrease"
field is used to set and indicate the percentage that the FCR setpoint is decreased when the decrement
button is clicked. The "FCR Setpoint =" indicates the value of current that corresponds to the "%
decrease" field. Any setpoint value within range and lower than setpoint value can also be typed into The
"FCR Setpoint =" field which updates the “% decrease” field also. The FCR setpoint changes to this value
when the adjacent button is clicked. When clicked, the Decrement button changes from gray to red to
indicate that the FCR setpoint has decreased to the value in the "FCR Setpoint =" field.
Field Current Step Response - Meter. The meter in the FCR tab shows the value selected. If an FCR
setpoint value is sent by increase, decrease or setpoint button the meter shows the corresponding value
and meter value text box also displays it. Any value within the range can either be input to meter value
text box or selected by dragging the pointer in the meter, using mouse. This value can then be sent to the
unit by pressing Send button.
The setpoint value currently set in the unit by any of the above methods is displayed in the current
setpoint textbox. To return to the nominal setting the button adjacent to FCR Setpoint (I) (Nominal) should
be pressed. If the FCR Analysis screen is left without returning to nominal setpoint a message box is
shown (Figure 28) which allows the user to return to nominal setpoint by pressing YES or remain at the
current setpoint by pressing NO.
BE2000E BESTCOMS™ Software
Page 54

46 9287500995 Rev B
Figure 28. Message Box to Return to FCR Nominal Setpoint
PF Tab
Figure 29 illustrates the set tings, sensing va lues, and alarm signal indicator s of the PF tab. Each setting
of the PF tab is described in the following paragraphs.
Figure 29. Analysis Screen, PF Tab
Power Factor Step Response - Power Factor Setpoint (Nominal). This read-only field indicates the PF
setpoint. (The PF setpoint is set by using the Setpoint tab of the Setting Adjustments screen). The value
displayed in the PF Setpoint field is selected by clicking the adjacent button. Clicking this button sends the
PF Setpoint value to the BE2000E and changes the color of the button from gray to red.
Power Factor Step Response - Increment of PF setpoint. This field indicates the increase that occurs to
the PF setpoint when the corresponding increment button is clicked. Any setpoint value within the range
and higher than setpoint value can be input to this filed. The PF setpoint changes to this value when the
adjacent button is clicked. When clicked, the Increment button changes from gray to red to indicate that
the PF setpoint has increased to the value in the field.
Power Factor Step Response - Decrement of PF setpoint. This field indicates the decrease that occurs to
the PF setpoint when the corresponding Decrement button is clicked. Any setpoint value within the range
and lower than setpoint value can be input to this filed. The PF setpoint changes to this value when the
adjacent button is clicked. When clicked, the Increment button changes from gray to red to indicate that
the PF setpoint has decreased to the value in the field.
Power Factor Step Response - Meter. The meter in th e PF tab shows the value selected. If a PF setpoint
value is sent by increase, decrease or setpoint button the meter shows the corresponding value and
BESTCOMS™ Software BE2000E
Page 55

9287500995 Rev B 47
meter value text box also displays it. Any value within the range can either be input to meter value text
box or selected by dragging the pointer in the meter using mouse. This value can then be sent to the unit
by pressing Send button.
The setpoint value currently set in the unit by any of the above methods is displayed in the current
setpoint textbox. To return to the nominal setting the button adjacent to PF Setpoint (Nominal) should be
pressed. If the PF Analysis screen is left without returning to nominal setpoint a message box is shown
(Figure 30) which allows the user to return to nominal setpoint by pressing YES or remain at the current
setpoint by pressing NO.
Figure 30. Message Box to Return to PF Nominal Setpoint
VAR Tab
Figure 31 illustrates the settings, sensing values, and alarm signal indicators of the VAR tab. Each setting
of the VAR tab is described in the following paragraphs.
VAR Step Response - VAR Setpoint (Nominal). This read-only field indicates the VAR setpoint. (The VAR
setpoint is set by using the Setpoint tab of the Setting Adjustments screen). The value displayed in the
VAR Setpoint field is selected by clicking the adjacent button. Clicking this button sends the VAR Setpoint
value to the BE2000E and changes the color of the button from gray to red.
VAR Step Response - Increment of VAR setpoint. This field indicates the increase that occurs to the VAR
setpoint when the corresponding increment button is clicked. Any setpoint value within the range and
higher than setpoint value can be input to this filed. The VAR setpoint changes to this value when the
adjacent button is clicked. When clicked, the Increment button changes from gray to red to indicate that
the VAR setpoint has increased to the value in the field.
VAR Step Response - Decrement of VAR setpoint. This field indicates the decrease that occurs to the
VAR setpoint when the corresponding decrement button is clicked. Any setpoint value within the range
and lower than the setpoint value can be input to this field. The VAR setpoint changes to this value when
the adjacent button is clicked. When clicked, the Increment button changes from gray to red to indicate
that the VAR setpoint has decreased to the value in the field.
VAR Step Response - Meter. The meter in the VAR tab shows the value selected. If an VAR setpoint
value is sent by increase, decrease or setpoint button the meter shows the corresponding value and
meter value text box also displays it. Any value within the range can either be input to meter value text
box or selected by dragging the pointer in the meter using mouse. This value can then be sent to the unit
by pressing Send button.
The setpoint value currently set in the unit by any of the above methods is displayed in the current
setpoint textbox. To return to the nominal setting the button adjacent to VAR Setpoint (Nominal) should
be pressed. If the VAR Analysis screen is left without returning to nominal setpoint a message box
(Figure 32) is shown which allows the user to return to nominal setpoint by pressing YES or remain at the
current setpoint by pressing NO.
BE2000E BESTCOMS™ Software
Page 56

48 9287500995 Rev B
Figure 31. Analysis Screen, VAR Tab
Figure 32. Message box to return to VAR Nominal Setpoint
Protection and Relay Settings
The Protection and Relay Settings screen consists of one tab labeled Protection. Click the Protection
button to access the Protection screen or click Screens on the menu bar and click Protection/Relay.
Protection Tab
Protection settings are shown in Figure 33 and are described in the following paragraphs.
OEL - Current Level (A). The value of current in this field determines the excitation level that will cause
the BE2000E to issue an overexcitation limit alarm. A current level of 0 to 7.5 A may be entered in 0.001
increments. When the level of field current increases above the value of this field, the OVEREXCITATION
SHUTDOWN LED on the front panel lights and the OEL time delay starts timing down.
OEL - Alarm Time Delay (sec). The value of this field determines the time delay between when the
BE2000E recognizes an overexcitation condition and the BE2000E Alarm output (terminals AL1, AL2)
closes. A time delay of 0 to 10 seconds may be entered in 1 second increments.
Field Overvoltage - Voltage Level (Vdc). The voltage value in this field determines the field voltage level
that will cause the BE2000E to issue an overexcitation limit alarm. When the field voltage increases
above the value of this field, the OVEREXCITATION SHUTDOWN LED on the front panel lights. If the
alarm condition exists for more than 15 seconds, the BE2000E Alarm output (terminals AL1, AL2) closes.
BESTCOMS™ Software BE2000E
Page 57

9287500995 Rev B 49
Figure 33. Protection Settings Screen
Loss of Sensing Voltage - Time Delay (sec). The value of this field determines the time delay between
when a loss of sensing voltage is recognized and the BE2000E responds according to the Hardware
Shutdown and LOS Option options selected. A time delay of 0 to 25 seconds may be entered in 1 second
increments.
Generator Overvoltage - Voltage Level (%). The value of this field is expressed as a percentage and
determines the level of generator voltage required to initiate a generator overvoltage condition. An
overvoltage percentage value of 105 to 120 percent may be entered in 1 percent increments. A generator
overvoltage condition lights the GENERATOR OVERVOLTAGE LED on the front panel and closes the
Alarm output at BE2000E terminals AL1 and AL2 after a delay of 0.75 seconds.
Metering, Operation and Alarms
The Metering, Operation and Alarms screen is viewed by clicking the Metering button or by clicking
Screens on the menu bar and clicking Metering/Operation. Information displayed on the Metering,
Operation and Alarms screen can be frozen by clicking the Metering button while viewing the screen or by
clicking Metering on the menu bar and clicking Disable Meter ing. Metering can be resumed by clicking the
Metering button or by clicking Metering on the menu bar and clicking Enable Metering. The Metering,
Operation and Alarms screen consists of two tabs: Operation and Alarm/Status.
Operation Tab
Operation tab metering values, setpoint values and control functions are illustrated in Figure 34.
Gen Voltage (V). These metering values report the status of the V
voltages and are the products of the voltage sensed at terminals E1, E2, and E3 and the Generator PT
ratio. All metering values are updated once each second. When single-phase sensing is used (System
Configuration screen, Sensing Voltage) and the BE2000E sensing voltage terminals (E1, E2, and E3) are
connected as shown in the Installation chapter, all of the generator voltage metering values will be
identical.
A-B
, V
C-B
, V
, and V
C-A
generator
AVG
Gen Current (A). This metering value indicates the level of the B-phase generator current and is the
product of the current input to CT1 and CT2 and the CT ratio. Generator current is monitored through
BE2000E terminals CT1 and CT2.
BE2000E BESTCOMS™ Software
Page 58

50 9287500995 Rev B
3IVVA
BAVG
××=
cosΦ
3IVW
BAVG
×××=
sinΦ3IVVAR
BAVG
×××=
Figure 34. Metering, Operation and Alarms - Operation Tab
Gen Frequency (Hz). This metering value indicates the frequency of the monitored generator voltage.
Field Voltage (V). This metering value indicates the value of voltage being supplied from the BE2000E
output (terminals F+ and F–) to the generator field.
Field Current (A). This metering value indicates the amount of current flowing from the BE2000E output
(terminals F+ and F–) to the generator field.
Aux DC Input (V). This metering value indicates the level of dc control voltage applied from a remote
device to BE2000E terminals A and B. The displayed value correlates to the generator voltage setpoint.
Phase Angle (Degree). This metering value indicates the phase angle difference (in degrees) between the
generator voltage and the generator current.
Apparent Power (VA). This value is the calculated product of the metered generator voltage (V
AVG
),
metered generator current (Ib), and the square root of 3. See Equation 1.
Equation 1. Apparent Power Equation
Real Power (W). This value is the calculated product of the metered generator voltage (V
generator current (I
), square root of 3 and the cosine of the metered phase angle. See Equation 2.
B
), metered
AVG
Equation 2. Real Power Equation
Reactive Power (var). This value is the calculated product of the metered generator voltage (VAVG),
metered generator current (I
) square root of 3 and the sine of the metered phase angle. See
B
Equation 3.
Equation 3. Reactive Power Equation
BESTCOMS™ Software BE2000E
Page 59

9287500995 Rev B 51
Φ=÷= COSVAWPF
Power Factor. This value is the calculated result of dividing the Real Power (W) value by the Apparent
Power (VA) value. See Equation 4.
Equation 4. Power Factor Equation
Operating Status. The Operating Status controls and indicators include three buttons and three
corresponding indicators. Operating Status buttons are labeled PF, VAR, and OFF. Clicking the PF button
changes the color of the adjacent PF indicator to green and causes the BE2000E to maintain the desired
power factor regulation point. The power factor regulation point can be set within the range of 0.6 lead to
0.6 lag. Clicking the VAR button changes the color of the adjacent VAR indicator to green and causes the
BE2000E to maintain the desired var regulation point. The var regulation point can be set within the range
of 100 percent absorb to 100 percent generate. Clicking the OFF button changes the color of the adjacent
OFF indicator to red and disables power factor and var regulation.
Operation of the Operating Status controls is determined by the status of the contacts connected across
the BE2000E Var/PF Control terminals (52J, 52K). When these contacts are open, the Operating Status
controls are enabled. Closing the contacts at terminals 52J and 52K disables the Operating Status
controls and interrupts regulation of vars or power factor until the contacts are opened again.
Setpoint - Voltage (V). This setting field can be used to enter the desired generator output terminal
voltage. The voltage setpoint can also be entered at the Setting Ad justments screen, Setpoint tab,
Automatic Voltage Regulator (AVR) - AVR Setpoint (V). The background color of this field is green when
operating in AVR mode and power factor and var regulation is disabled.
Setpoint - Current (A). This setting defines the field current setpoint when operating in FCR mode. The
current setpoint can also be entered at the Setting Adjustments screen, Setpoint tab, Field Current
Regulator (FCR) - FCR Setpoint. Current values from 0 to 3 Adc may be entered in increments of 0.01
Adc. The background color of this field is green when operating in FCR mode.
Setpoint - Var (% of nom.). This setting determines the level of generator vars maintained by the
BE2000E when operating in var mode. The var setpoint can also be entered at the Setti ng Ad justme nts
screen, Setpoint tab, Reactive Power Control (VAR) - VAR Setpoint (% of nom.). The background color of
this field is green when the BE2000E is operating in AVR mode and is regulating the var setpoint.
Setpoint - Power Factor. This setting determines the level of power factor regulation maintained by the
BE2000E. The power factor setpoint can also be entered at the Setting Adjustments screen, Setpoint tab,
Power Factor Control (PF) - PF Setpoint. Power Factor setpoint values are adjustable from –0.6 to –1 (1)
or 0.6 to +1 in 0.001 increments. The background color of this field is green when the BE2000E is
operating in AVR mode and is regulating the power factor setpoint.
Control Mode. Click ing the AVR button changes the color of the adjacent AVR indicator to green and
enables the AVR operating mode. When operating in AVR mode, the BE2000E regulates the generator
output voltage at the AVR setpoint. Clicking the FCR button changes the color of the adjacent FCR
indicator to green and enables the FCR operating mode. When operating in FCR mode, the BE2000E
maintains the field current at the FCR setpoint.
Fine Adjustment. Raise and Lower buttons control the fine adjustment of the operating setpoint. (The fine
adjustment through the front panel push buttons only controls the voltage setpoint.) Raise and Lower
buttons perform the same function as closing the appropriate set of contacts connected to the External
Adjust terminals (6D and 7 to decrease, 6U and 7 to increase) of the BE2000E. In AVR mode, each click
of the Raise button increases the voltage setpoint 0.01 volts; each click of the Lower button decreases
the voltage setpoint 0.01 volts. The minimum and maximum limits for fine adjustment of the voltage
setpoint are controlled by the Regulator Sensing Voltage setting (System Configuration screen) and the
Fine Voltage Adjustment - Band setting (Setting Adjustments screen). Fine adjustment of the voltage
setpoint can be increased/decreased no higher/lower than the Regulator Sensing Voltage setting
plus/minus the Band setting. For example, a Regulator Sensing Voltage setting of 100 volts and a Band
setting of 10 percent allows the Fine Adjustment function to increase the voltage setpoint to a maximum
of 110 volts and decrease the voltage setpoint to a minimum of 90 volts. For VAR, PF or FCR modes, the
Raise and Lower buttons allow fine adjustment over the entire adjustment range.
BE2000E BESTCOMS™ Software
Page 60

52 9287500995 Rev B
Alarm/Status Tab
The Alarm/Status tab indicators provide the status of BE2000E protection functions, control modes, and
contact inputs. Alarm/Status tab indicators are illustrated in Figure 35 and are described in the following
paragraphs.
Figure 35. Metering, Operation and Alarms - Alarm/Status Tab
Protection Alarms. Protection Alarm indicators provide the status of BE2000E protection functions. Alarm
indicators include Overexcitation Shutdown, Overexcitation Limiting, Underfrequency, Generator
Overvoltage, Loss of Generator Sensing, and Unit Overtemperature. When a BE2000E protection
function detects an alarm condition, the appropriate indicator changes from black to red.
Control Status. The VAR/PF Mode Active indicator changes from black to red when the BE2000E is
operating in AVR mode and correction of power factor or vars is selected. The Low-Line Override Active
indicator changes from black to red when low-line override is active. The Single-Phase Override Active
indicator changes from black to red when single-phase override is active. The Low-Line and Single-Phase
Override Active indicator changes from black to red when both the low-line and single-phase override
functions are active. The Manual Mode Active indicator changes from black to red when the FCR control
mode is active.
Switch Status. Switch Status indicators indicate when the BE2000E control inputs are open or closed.
The 52JK switch open indicator changes from black to red when the user-supplied contacts at terminals
52J and 52K are closed. When this control input is open, selection of PF or VAR mode can be made on
the Operation tab of the Metering, Operation, and Alarms screen. The 52LM switch closed indicator
changes from black to r e d when the us er -supplied contacts at terminals 52L and 52M are closed. When
this control input is closed, parallel control and droop is inactive.
Metering Signal. The Meter ing Signa l ind icator of the Alarm/Status tab flashes to indicate when metering
is active. When the Metering button is clicked or Metering on the menu bar is clicked followed by Disable
Metering, the Metering Signal indicator stops flashing and the metering functions stop being updated.
PID Data
BESTCOMS-BE2000E enables generator stability to be set through the automatic calculation of PID
parameters. PID stands for Proportional, Integral, Derivative. The word proportional means that the
response of the BE2000E output is proportional or relative to the amount of change that is observed.
BESTCOMS™ Software BE2000E
Page 61

9287500995 Rev B 53
Integral means that the BE2000E output is proportional to the amount of time that a change is observed.
Integral action eliminates offset. Derivative means that the BE2000E output is proportional to the required
rate of excitation change. Derivative action avoids excitation overshoot.
BESTCOMS-BE2000E automatically calculates PID values after the user selects the generator
frequency, generator time constant (T'do), and exciter time constant (Texc). With BESTCOMS-BE2000E
software, the user may generate new PID numbers, add to a PID list file, and update the AVR gain
settings.
The PID window (Figure 36) is accessed by clicking the PID button. The PID button can be clicked only
when the Stability Range setting of the Control Gain screen is set at a value of 21. (A setting of 21
enables the entry of custom stability settings through the PID window.) Then, when a field of the Control
Gain screen is changed or selected, the PID button changes from gray to yellow and the button can be
clicked to view the PID window. After the PID number s are modified , calcu lat ed, and updated, the PID
window is closed by clicking the Update Setting Sc reen button. The modified PID values are then shown
on the Control Gain screen.
Figure 36. PID Window
PID Calculation Based on Input Values
The available range for the exciter time constant depends on the value entered for the generator time
constant. (The default value for the exciter time constant is the generator time constant divided by 6.) The
generator time constant value selected must be in the range of 1.00 to 15.00 seconds and in 0.05
increments. When the generator time constant value is 1.00, the available exciter time constant range is
0.03 to 0.50 in 0.01 second increments. When the generator time constant value is 15.00, the available
exciter time constant range is 0.30 to 3.00 in 0.01 second increments.
For example, when T'do is set at 2.0 seconds, Texc is 0.33. After specifying the input values, a set of PID
parameters (output data) is generated automatically. If T'do is set at 5.00 seconds, then Texc is 0.83
seconds. The calculated KP is 155.47, KI is 138.72, KD is 48, and Kg is 1.
PID parameters can be directly removed from, added to, or modified in the PID List Data. PID parameters
may also be saved into a file (pidlist.dat).
BE2000E BESTCOMS™ Software
Page 62

54 9287500995 Rev B
Caution
Adding to the PID List
Improper PID numbers will result in poor system performance or
system damage.
PID parameters can be added to a list and recalled for operation and comparison. To add to the list, type
a name for the generator (or other appropriate information) in the generator information box. Select the
generator time constant. Observe the PID gain parameters in the Field Output Data fields. If these gain
parameters are appropriate, click the Add to PID List button. Check for the new parameters by pulling
down the PID List (click the Down arrow). The new gain and time constant parameters should be
displayed.
Removing a PID List Record
PID parameters can also be removed from the list. To remove a list (record), pull down the PID List and
select the record or list so that the gain and time constant parameters are displayed. Click the Remove
Record button and the listed record is deleted.
Retrieving Existing Data from the PID List
To retrieve existing data, pull down the PID List and select the record or list so that the gain and time
constant parameters are displayed and highlighted. Click the Get from a List button and the listed record
input and output data displays in the boxes.
Settings Files
BESTCOMS-BE2000E enables you to print a list of BE2000E settings, save BE2000E settings to a file,
and open a settings file and upload those settings to a BE2000E. a settings file may also be opened and
edited within any text editing software.
Printing Settings Files
A printout of BE2000E settings can be useful for record keeping or comparison purposes. BE2000E
settings are printed by clicking the print icon or clicking File on the menu bar and then clicking Print. Wh en
the print command is given, a print dialog box prompts you to select a printer. Once the printer is
selected, a second dialog box (Figure 37) provides the opportunity to add a title and comments to the
settings list. Each entry is limited to a maximum of 60 characters. After this information is entered, OK is
clicked and the report is printed.
Figure 37. User Information Dialog Box for Settings List
BESTCOMS™ Software BE2000E
Page 63

9287500995 Rev B 55
Caution
Note
Saving Settings Files
Saving BE2000E settings to a file for uploading to other BE2000E units saves setup time when
configuring multiple units to the same configuration. A settings file can also be created in BESTCOMSBE2000E without being connected to a BE2000E. The settings of the desired screens can be changed
and these settings can then be saved to a file. Once a settings file is created, it can be edited using any
text editing software, and then saved for uploading.
A settings file is created by clicking the save icon or by clicking File on the menu bar and then clicking
Save. When the file command is given, a dialog box asks if you want to save the current settings into a
BE2000E data file. Clicking Yes displays a Save As dialog box where the settings are assigned a file
name and then saved. All BE2000E settings files are automatically given a *.BE2 extension by
BESTCOMS-BE2000E.
Uploading Settings Files
A BE2000E settings file downloaded from a BE2000E or created within BESTCOMS-BE2000E can be
uploaded to multiple BE2000E units. Only a BE2000E settings file with a .BE2 extension can be uploaded
to a BE2000E unit. Before uploading a file, communication must be initiated with the BE2000E that is to
receive the settings. Refer to the paragraphs under the headings Starting the BESTCOMS-BE2000E
Application.
Before uploading a settings file, remove operating power from the
BE2000E, disconnect the field wiring from terminals F+ and F–, and
reapply operating power to the BE2000E.
The upload process is started by clicking the open icon or clicking File on the menu bar and then clicking
Open. A dialog box is then displayed (Figure 38) reminding you that the BE2000E should be off-line
before uploading settings. Clickin g Yes loads the settings into BE2000E memory.
Figure 38. Settings Upload Dialog Box
Password Protection
Password protection guards against unauthorized changing or viewing of BE2000E settings. A single
password protects all BE2000E settings. The BE2000E is delivered with a default password of OEM.
Changing the password provides security against unauthorized changes to settings. Once changed, the
password should be stored in a secure location. If the user-defined password is lost or forgotten,
BESTCOMS-BE2000E must be reloaded to restore the default password.
Changing the Password
A password change can be made only after communication between
BESTCOMS-BE2000E and the BE2000E is established.
BE2000E BESTCOMS™ Software
Page 64

56 9287500995 Rev B
A new password can be programmed by performing the following steps:
1. Click Communications on the menu bar and click Password Change on the drop-down menu. The
Change Password dialog box of Figure 39 appears.
2. Type the current password in the "Enter your access password" field of the Change Password
dialog box and press the Enter key on your keyboard.
3. Another dialog box will appear with instructions for making the password change. Click the OK
button and type a new password (8 alphanumeric characters, maximum) in the "Enter your new
password" field.
4. Press the Enter or Tab key on your keyboard to advance the cursor into the field labeled "Re-
enter your new password". Type the new pass wor d ag ain to confir m the ch ang ed pass wor d and
press the Enter key. Wh en the Enter key is pressed, the new password is enabled and a dialog
box appears to remind you to keep your password in a secure location.
Figure 39. Password Dialog Box
Updating Embedded Firmwar e
The BE2000E uses non-volatile flash memory for storing its embedded firmware (operating program) and
can be reprogrammed by connecting the RS-232 port, located on the on the back of the device, to a
Windows® compatible PC running the Embedded Program Loader software. It is not necessary to
physically replace EPROM c hips to upd ate the progr a m.
The process of updating th e embedded firmware can be s tarted by clicking BE2000ELoad on the menu
bar and clicking Uploading Embedded Software. A warning window, Figure 40
BE2000E should be disconnected from the generator and bus before c ontinuing with this procedure and
the current settings file sh ould be backed up since uploading may replac e some settings with defaults.
Clicking No will cancel this procedure.
Figure 40. Embedded Software Uploading
BESTCOMS™ Software BE2000E
, will be displayed . The
Page 65

9287500995 Rev B 57
Click Yes to proceed with software uploading. When Yes is clicked, the following screen (Figure 41) is
shown to select the communication port. When Initialize is selected, PC Software reads, checks within
ranges and saves all settings. The following progress bar (Figure 42) is shown while in process.
Figure 41. Communication Settings
Figure 42. Reading & Checking Settings Progress Bar
The BE2000E Embedded Program Loader (Figure 43) will be displayed.
Clicking the Get Device Information button displays the current device’s model number, style number,
application program version, and serial number in the lower left hand corner of Figure 43.
Figure 43. BE2000E Embedded Program Loader
BE2000E BESTCOMS™ Software
Page 66

58 9287500995 Rev B
Caution
If power is lost or communication is interrupted during transfer, the unit
will not recover and will no longer be operational.
Clicking the Start Transfer Data button displays the Settings File Saved? window (Figure 44
No in the Settings File Saved window will return the user to the BE2000E Embedded Program Loader
screen (Figure 43). Clicking Yes will display the Open Dialog box (Figure 45).
Figure 44. Settings File Saved Dialog Box
). Clicking
Figure 45. Open Dialog Box
Select the location of the embedded firmware update file, select the file, and click Open. The embedded
firmware will begin transferring from the PC to the BE2000E. A progress bar, as displayed in Figure 46
marks the progress of the transfer.
BESTCOMS™ Software BE2000E
Page 67

9287500995 Rev B 59
Figure 46. Transferring Hex File Dialog Box
The BE2000E unit will reboot automatically upon completion of the transfer. The new information from the
device will be displayed in the lower right hand corner of the Embedded Program Loader dialog box. See
Figure 43. Close the BE2000E Embedded Program Loader. PC software then loads the default settings.
The saved settings will be loaded back into the unit (Figure 47) and checked again (Figure 48).
Figure 47. Reading & Checking Settings
Figure 48. Sending Saved Settings
Terminating Communicat ion
BE2000E communication is terminated by clicking on Communications on the menu bar, and clicking
Close Comm Port. You are asked if you want to save the settings to EEPROM. This question is asked
even if no changes were made to the BE2000E settings. When you execute the Close command (with a
Yes or No to save settings to EEPROM), communication with the BE2000E is terminated. If you choose
to exit BESTCOMS-BE2000E (by clicking File o n the menu bar and the n Exit) without first closing
communication, you are still given the opportunity to save the settings to EEPROM.
BE2000E BESTCOMS™ Software
Page 68

60 9287500995 Rev B
BESTCOMS™ Software BE2000E
Page 69

9287500995 Rev B 61
Maintenance and Troubleshooting
Preventative Maintenance
The only preventive maintenance required on the BE2000E is to periodically check that the connections
between the BE2000E and the system are clean and tight. BE2000E units are manufactured using stateof-the-art, surface-mount technology. As such, Basler Electric recommends that no repair procedures be
attempted by anyone other than Basler Electric personnel.
Troubleshooting
If you do not get the results that you expect from the BE2000E, first check the programmable settings for
the appropriate function. Use the following troubleshooting procedures when difficulties are encountered
in the operation of your excitation system.
Generator Voltage Does Not Build
Step 1. Verify that all wiring is properly connected. Refer to Figures 9 through 13.
If wiring is improperly connected or loose, reconnect wiring properly.
If wiring connections are correct, proceed to Step 2.
Step 2. Verify that the generator is spinning at rated speed.
If the generator is not up to rated speed, increase generator speed to the rated value.
If the generator is spinning at rated speed, proceed to Step 3.
Step 3. Check for correct input power to the BE2000E. Refer to the General Information chapter for
input power requirements.
If voltage is not present, refer to the generator manual for repair procedures.
If voltage is present, proceed to Step 4.
Step 4. Verify that the fuse is not open.
Replace any open fuse.
If no fuses are open, proceed to Step 4.
Step 5. Verify that the front panel OVEREXCITATION SHUTDOWN indicator is not lit.
If the front panel OVEREXCITATION SHUTDOWN indicator (field voltage) is lit, check the
generator and/or load conditions. Interrupt input power or shut down the generator for a
minimum of one minute.
If the front panel OVEREXCITATION SHUTDOWN indicator is not lit, proceed to Step 6.
Step 6. Verify that the front panel OVEREXCITATION LIMITING indicator is not lit.
If the front panel OVEREXCITATION LIMITING indicator is lit, check the generator and load
conditions. Also check the field current limit setpoint for the correct level. Interrupt input power
or shut down the generator for a minimum of 1 minute.
If the front panel OVEREXCITATION LIMITING indicator is not lit, proceed to Step 7.
Step 7. Verify that the BE2000E soft start settings are correct. Too long of a soft start setting may give
the appearance of no buildup.
If the soft start settings are incorrect, adjust the settings.
If the soft start settings have no effect, proceed to Step 8.
BE2000E Maintenance and Troubleshooting
Page 70

62 9287500995 Rev B
Step 8. Replace the BE2000E unit.
If replacing the BE2000E unit does not correct the malfunction, then the generator is defective.
Consult with the generator manufacturer.
Low Generator Output Voltage
Step 1. Verify that the voltage adjustment is not set too low.
If the voltage adjustment is too low, adjust it to the correct setpoint.
If the voltage adjustment is correct, proceed to Step 2.
Step 2. Verify that the underfrequency knee setpoint is not greater than the generator frequency.
If the underfrequency setpoint is too high, adjust the setpoint below the rated generator
frequency.
If the underfrequency setpoint is correct, proceed to Step 3.
Step 3. Verify that the generator is spinning at rated speed.
If the generator is not up to rated speed, increase the generator speed to the rated level.
If the generator is spinning at rated speed, proceed to Step 4.
Step 4. Check for correct input power to the BE2000E. Refer to the General Information chapter for
input power requirements.
If the BE2000E input voltage is low, refer to the PMG manual for PMG.
If the voltage is at the required level, proceed to Step 5.
Step 5. Verify that the sensing potential transformer (if used) has the correct turns ratio and is operating
correctly.
If the turns ratio of the sensing potential transformer is incorrect, replace the sensing potential
transformer.
If the sensing potential transformer is operating correctly, proceed to Step 6.
Step 6. Verify that the front panel OVEREXCITATION LIMITING indicator is not lit.
If the front panel OVEREXCITATION LIMITING indicator is lit, check the generator and/or load
conditions. Also check the field-current limit setpoint for the correct level. Interrupt input power
or shut down the generator for a minimum of one minute.
If the front panel OVEREXCITATION LIMITING indicator is not lit, proceed to Step 7.
Step 7. Low generator output voltage may occur when operating in droop mode with an inductive load.
If the low voltage condition is not caused by the droop function, proceed to Step 8.
Step 8. Replace the BE2000E unit.
High Generator Output Voltage
Step 1. Verify that the voltage adjustment is not set too high.
If the voltage adjustment is too high, adjust it to the correct setpoint.
If the voltage adjustment is correct, proceed to Step 2.
Step 2. Verify that the sensing potential transformer (if used) has the correct turns ratio.
If the turns ratio of the sensing potential transformer is incorrect, replace the sensing potential
transformer with the correct one.
If the sensing potential transformer is correct, proceed to Step 3.
Step 3. High generator output voltage may occur when operating in droop mode with a capacitive load.
If the high voltage condition is not caused by the droop function, proceed to Step 4.
Maintenance and Troubleshooting BE2000E
Page 71

9287500995 Rev B 63
Step 4. Replace the BE2000E unit.
Poor Voltage Regulation
Step 1. Verify that the case of the BE2000E is properly grounded.
If the BE2000E is not properly grounded, connect a dedicated ground wire to the quarter-inch
fast-on connector labeled GND on the rear of the BE2000E case.
If the BE2000E is properly grounded, proceed to Step 2.
Step 2. Check for grounded field leads.
If the field leads are grounded, isolate them from groun d.
If the field leads are not grounded, proceed to Step 3.
Step 3. Check for grounded PMG leads.
If the PMG leads are grounded, isolate them from ground.
If the PMG leads are not gr ound ed, pr oc eed to Step 4.
Step 4. Verify that the generator frequency is not dropping below the BE2000E underfrequency setpoint
when load is applied to the generator.
If the generator frequency is dropping below the underfrequency setpoint, reduce the setpoint if
possible. Also check the prime mover and generator for proper sizing in relation to the applied
load.
If poor regulation is not related to BE2000E underfrequency operation, proceed to Step 5.
Step 5. Verify that regulation is not being affected by normal droop operation.
If droop operation is not affecting regulation, proceed to Step 6.
Step 6. Replace the BE2000E unit.
Generator Output Unstable (Hunting)
Step 1. Verify that the governor for the prime mover is operating properly.
If the governor is not operating properly, troubleshoot using the manufacturer's suggested
procedures.
If the governor is operating properly, proceed to Step 2.
Step 2. Verify that the sensing and input power leads are connected securely.
If the sensing or input power leads are not connected securely, tighten the connections.
If the sensing or input power lead connections are secure, proceed to Step 3.
Step 3. Verify that the BE2000E Stability Range is set to the proper range.
If the Stability Range setting is incorrect, reset the Stability Range.
If the Stability Range setting is correct, proceed to Step 4.
Step 4. Verify that the Stability Lev el is proper ly set.
If the Stability Level is not properly set, reset the Stability Level.
OVEREXCITATION SHUTDOWN Indicator Is Annunciating
Step 1. Verify that the field overvoltage setpoint is adjusted properly.
If not properly adjusted, readjust the field overvoltage setpoint.
If properly adjusted, proceed to Step 2.
BE2000E Maintenance and Troubleshooting
Page 72

64 9287500995 Rev B
Step 2. Check for generator overloading.
If the generator is operating with a larger than rated load, shed load.
If the generator is operating with a rated or less than rated load, proceed to Step 3.
Step 3. Replace the BE2000E.
If replacing the BE2000E does not correct the malfunction, proceed to Step 4.
Step 4. Refer to the generator manual. Generator is defective.
LOSS OF GENERATOR SENSING Indicator Is Annunciating
Step 1. Verify that the voltage sensing leads are properly connected.
If the sensing leads are not properly connected, correct the connections.
If the sensing lead connections are correct, proceed to Step 2.
Step 2. For single-phase sensing, verify that E2 and E3 are connected.
If E2 and E3 are not connected, connect them both to phase C sensing voltage.
If E2 and E3 are properly connected, proceed to Step 3.
Step 3. Verify that the sensing potential transformer (if used) has the correct turns ratio and is
functioning properly.
If the sensing potential transformer has the wrong turns ratio or is malfunctioning, replace it.
If the sensing potential transformer is correct and functioning properly, proceed to Step 4.
Step 4. Verify that the generator out put volta ge is present on al l phases .
If the generator is missing a phase, refer to the generator manual. Generator is defective.
If generator output voltage is balanced on all phases, proceed to Step 5.
Step 5. Replace the BE2000E.
OVEREXCITATION LIMITING Indicator Is Annunciating
Step 1. Check for generator overloading.
If the generator is operating with a larger than rated load, shed load.
If the generator is operating with a rated or less than rated load, proceed to Step 2.
Step 2. Verify that the BE2000E output (field) current limit is not set too low.
If the output current limit setpoint is too low, adjust for the proper setting.
If the output current limit is set properly, proceed to Step 3.
Step 3. Verify that the generator exciter field is not shorted.
If the generator exciter field is shorted, replace the generator.
If the generator exciter field is not shorted, proceed to Step 4.
Step 4. Replace the BE2000E.
If replacing the BE2000E does not correct the malfunction, proceed to Step 5.
Step 5. Refer to the generator manual. Generator is defective.
UNDERFREQUENCY ACTIVE Indicator Is Annunciating
Step 1. Verify that the generator is operating at rated speed.
If the generator is not operating at rated speed, adjust the generator speed.
If the generator is operating at the rated speed, proceed to Step 2.
Maintenance and Troubleshooting BE2000E
Page 73

9287500995 Rev B 65
Step 2. Verify that the underfrequency setpoint is correct.
If the underfrequency setpoint is incorrect, adjust it to the correct value.
No Droop
Step 1. Verify that the BE2000E 52L/M contact input is open.
If the 52L/M contact input is not open, it must be opened to enable the droop function.
If the 52L/M contact input is open, proceed to Step 2.
Step 2. Verify that the BE2000E 52J/K contact input is closed or the Var/PF function is disabled via the
Windows® software. Var/PF operation must be disabled for droop operation. If Var/PF operation
is disabled, proceed to Step 3.
Step 3. Verify that the BE2000E droop setting is not adjusted to 0% droop.
If the droop setting is adjusted to 0% droop, increase the setpoint above 0%.
If the droop setting is adjusted to above 0%, proceed to Step 4.
Step 4. Check for an open in the circuit connected to BE2000E CT1 and CT2.
If there is an open circuit, repair as necessary.
If there is no open circuit, proceed to Step 5.
Step 5. Verify that all connections are correct according to Figures 4-6 and 4-7.
If connections are incorrect, correct the problem.
If connections are correct, proceed to Step 6.
Step 6. Verify that the load being applied to the generator for droop testing is not purely resistive.
If only a resistive load is being applied to the generator, apply an inductive load and retest.
If the load being applied to the generator is inductive, proceed to Step 7.
Step 7. Verify that your BE2000E is compatible with the current sensing transformer (5 A secondary)
being used. For example, a current sensing transformer with a 1 ampere output rating would
produce very little droop since your BE2000E has a 5 ampere current transformer input.
If the current transformer input is incorrect, replace the current sensing transformer for
compatibility.
If the current transformer input is correct, proceed to Step 8.
Step 8. If the above steps fail to correct the malfunction, replace the BE2000E unit.
BE2000E Maintenance and Troubleshooting
Page 74

66 9287500995 Rev B
Maintenance and Troubleshooting BE2000E
Page 75

9287500995 Rev B 67
Specifications
BE2000E electrical and physical specifications are listed in the following paragraphs. The adjustment
increments shown apply to the PC software. Adjustment increments for the Front Panel Controls are
listed in the Human-Machine Interface chapter.
Operating Power
Single-Phase .............................. 180 to 240 Vac
Frequency Range ....................... 120 to 300 Hz
Burden ........................................ 330 VA
Terminals.................................... 3, 4
Generator Voltage Sensing
Type ........................................... 1-phase/3-phase, 4 ranges, 50/60 Hz
Terminals.................................... E1, E2, E3
Burden ........................................ <1 VA per phase
Range 1 ...................................... 120 Vac (100 to 140 Vac)
Range 2 ...................................... 240 Vac (200 to 280 Vac)
Range 3 ...................................... 480 Vac (400 to 560 Vac)
Range 4 ...................................... 600 Vac
Generator Current Sensing
Type ........................................... 1-phase (BØ), 50/60 Hz
Rating ......................................... 5 Aac maximum continuous
Burden ........................................ <0.1 VA
Terminals.................................... CT1, CT2
Contact Input Circuits
Type ........................................... Dry Contact
Interrogation Voltage .................. 13 Vdc
Terminals
Unit/Parallel Control ................... 52L, 52M
Raise .......................................... 6U, 7
Lower .......................................... 6D, 7
var/PF Enable ............................ 52J, 52K
Common Alarm Output
Type ........................................... Form A
Rated Load ................................. 7 Aac/7 Adc continuous
Make ........................................... 30 Aac/30 Adc, carry for 0.2 seconds
Break .......................................... 7 Aac/0.1 Adc
Operating Voltage ...................... 240 Vac/250 Vdc max im um
Terminals.................................... AL1, AL2
Field Output
Continuous Rating ...................... 75 Vdc, 3.0 Adc
10 Second Forcing Rating
200 Vac Power Input: ................. 150 Vdc, 7.5 Adc
Field Resistance: ........................ 18 Ω minimum
Terminals:................................... F+, F–
BE2000E Specifications
Page 76

68 9287500995 Rev B
AVR Operating Mode
Adjustment Range ...................... See generator voltage sensing
Voltage Regulation ..................... ±0.25% over load range at rated PF and constant generator frequency
Temperature Drift ....................... ±0.5% for a 40°C change
Response Time .......................... ≤ 1 cycle
Underfrequency (V/Hz)
Characteristic ............................. Slope from 1 to 3 PU is adjustable in 0.01 increments
Range ......................................... 40 to 65 Hz
Increment ................................... 0.01 Hz
FCR (Manual) Operating Mode
Adjustment Range ...................... 0 to 3 Adc
Increment ................................... 0.01 A
Var Operating Mode
Adjustment Range ...................... 100% to –100%
Increment ................................... 0.1%
PF Operating Mode
Adjustment Range ...................... 0.6 lead to 0.6 lag
Increment ................................... 0.001
Parallel Compensation
Modes ......................................... Reactive Droop and Reactive Differential (cross-current)*
Droop
Adjustment Range ...................... 0 to 10%
Increment ................................... 0.01%
* Burden can exceed 1 VA if external resistors are added to the CT circuit.
Communication Port
Interface ..................................... Full Duplex RS-232
Connection ................................. DB-9 connector on rear panel
Baud ........................................... 4800
Data Bits ..................................... 8
Parity .......................................... None
Stop Bit ....................................... 1
Field Overvoltage Protection
Pickup ......................................... 0 to 250 Vdc
Time Delay ................................. 15 seconds (fixed)
Field Overcurrent Protection
Pickup
Adjustment Range ...................... 0 to 7.5 Adc
Increment ................................... 0.001 Adc
Time Delay
Adjustment Range ...................... 0 to 10 seconds
Increment ................................... 1 second
Specifications BE2000E
Page 77

9287500995 Rev B 69
Generator Overvoltage Protection
Pickup
Range ......................................... 105 to 120% of setpoint
Increment ................................... 1.0%
Time Delay
Fixed Setting .............................. 0.75 seconds
Soft-Start Function
Time Adjust Range ..................... 1 to 120 seconds
Increment ................................... 1 second
Analog (Auxiliary) Input
Voltage Range ........................... –3 Vdc to +3 Vdc
Setpoint Range .......................... –30% to +30% shift
Burden ........................................ 1 kΩ
Terminals.................................... A, B
Metering
Accuracy of all metering values assumes 25°C, 50/60 Hz and less than 20% THD.
Generator Voltage
Range ......................................... 10 V to 79 kV
Accuracy..................................... 0.5%
Generator Current
Range ......................................... 0.1 to 5,000 A (5 A CTs)
Accuracy..................................... 0.5%
Frequency
Range ......................................... 40 to 65 Hz
Accuracy..................................... 0.2 Hz
Field Voltage
Range ......................................... 0 to 200 Vdc
Accuracy..................................... 5.0%
Field Current
Range ......................................... 0 to 8.0 Adc
Accuracy..................................... 0.5%
Power (Apparent, Real and Reactive)
Range ......................................... 0 to 99 MVA, MW and Mvar
Accuracy..................................... 3.0%
Power Factor
Range ......................................... –1.0 to –0.6, +0.6 to +1.0
Accuracy..................................... 0.02
Phase Angle
Range ......................................... 0 to 360°
Accuracy..................................... 2°
BE2000E Specifications
Page 78

70 9287500995 Rev B
Environment
Operating Temp ......................... –40°C to +70°C (–40°F to +158°F)
Storage Temp ............................ –40°C to +85°C (–40°F to +185°F)
Type Tests
Shock ......................................... 20 G in 3 perpendicular planes
Vibration ..................................... 1 G at 5 to 26 Hz
0.036” double amplitude (27 to 52 Hz)
5 G at 53 to 500 Hz
Salt Fog .......................................... Tested per MIL-STD-810E
UL Approval
The BE2000E is recognized to applicable Canadian and US safety standards and requirements by UL.
Standards used for evalu ati on:
• UL6200
• CSA C22.2 No. 14
CSA Certification
The BE2000E was tested and has met the certification requirements for electrical, plumbing and/or
mechanical products.
Standards used for evaluation:
• CSA C22.2 No. 14
CE Compliance
This product has been evaluated and complies with the relevant essential requirements set forth by the
EU legislation.
EC Directives:
• Low Voltage Devices (LVD) – 2006/95/EC
• Electromagnetic Compatibility (EMC) – 2004/108/EC
Harmonized Standards used for evaluation:
• BS EN 50178 - Electronic Equipment for use in Power Installations
• EN 61000-6-4 - Electromagnetic Compatibility (EMC), Generic Standards, Emission Standard for
Industrial Environments
• EN 61000-6-2 - Electromagnetic Compatibility (EMC), Generic Standards, Immunity for Industrial
Environments
• IEC 60092-504:2001, Corr. 1:2011 – Electric a l Ins tallat ions in Ships – Part 504
Physical
Weight: ....................................... 1.52 lb (6 90 g)
Specifications BE2000E
Page 79

9287500995 Rev B 71
Software
Version and Date
2.00.00, Apr-11
• Initial release
2.01.00, Oct-14
• Added 52 JK function settings and metering
• Added Windows® 8 compatibility
Manual
Revision and Date
—, May-11
• Initial release
A, Nov-12
• Corrected operating power frequency range and burden in the
Converted manual into new style and structure
B, Dec-14
• Added settings and metering descriptions for the 52 JK function
• Moved Specifications into a new chapter
Revision History
BESTCOMS™ software changes are listed in Table 20. The corresponding revisions made to this
instruction manual are summarized in Table 21. Revisions are listed in chronological order.
Table 20. BESTCOMS Software Revision History
Change
Table 21. Instruction Manual Revision History
Change
General Specifications chapter
• Added Storage statement in the Installation chapter
•
settings in the BESTCOMS Software chapter
• Added CE, CSA, and UL to the Specifications chapter
• Moved Revision History into a new chapter
BE1-11f Revision History
Page 80

72 9287500995 Rev B
Revision History BE1-11f
Page 81

Page 82

www.basler.com
12570 State R oute 143
Highland IL 62249-1074 USA
Tel: +1 618.654.23 4 1
Fax: +1.618. 654.2351
email: info@basler.com
P.A.E. Les Pins
67319 Wasselonne Cedex
FRANCE
Tel: +33 3.88.87.1010
Fax: +33 3.88. 87.0808
email: franceinfo@basler.com
No. 59 Heshun Road Loufeng District (N)
Suzhou Indus trial Park
215122 Suzhou
P.R. CHINA
Tel: +86 512. 8227.2880
Fax: +86 512.8227.2887
email: chinainfo@basler.com
111 North Bridge Road
15-06 Peninsul a Plaz a
Singapore 1 79098
Tel: +65 68.4 4.6445
Fax: +65 68.44.8902
email: singaporeinfo@basler.com
 Loading...