

Page 1
INSTRUCTION MANUAL
FOR
MULTIPLE SHOT RECLOSING RELAY
BE1-79M
P0046-01
Publication: 9170100990
Revision: N 04/12
Page 2

Page 3

INTRODUCTION
This instruction manual provides information about the operation and installation of the BE1-79M Multiple
Shot Reclosing Relay. To accomplish this, the following information is provided:
General Information and Specifications
Controls and Indicators
Functional Description
Installation
Testing
Maintenance
WARNING!
To avoid personal injury or equipment damage, only qualified personnel should
perform the procedures in this manual.
NOTE
Be sure that the BE1-79M is hard-wired to earth ground with no smaller than
12 AWG copper wire attached to the ground terminal on the rear of the unit
case. When the BE1-79M is configured in a system with other devices, it is
recommended to use a separate lead to the ground bus from each unit.
9170100990 Rev N BE1-79M Introduction i
Page 4

First Printing: January 1986
Printed in USA
© 2009-2012 Basler Electric, Highland Illinois 62249 USA
All Rights Reserved
April 2012
CONFIDENTIAL INFORMATION
of Basler Electric, Highland Illinois, USA. It is loaned for confidential use,
subject to return on request, and with the mutual understanding that it will not
be used in any manner detrimental to the interest of Basler Electric.
It is not the intention of this manual to cover all details and variations in equipment, nor does this manual
provide data for every possible contingency regarding installation or operation. The availability and design
of all features and options are subject to modification without notice. Should further information be
required, contact Basler Electric.
For terms of service relating to this product and software, see the Commercial Terms of Products and
Services document available at www.basler.com/terms
.
Basler Electric
12570 State Route 143
Highland IL 62249-1074 USA
www.basler.com, info@basler.com
PHONE +1 618.654.2341 FAX +1 618.654.2351
ii BE1-79M Introduction 9170100990 Rev N
Page 5

REVISION HISTORY
The following information provides a historical summary of the changes made to this instruction manual
(9170100990) of the BE1-79M.
Manual
Revision and Date
N, 04/12
M, 01/11
L, 06/09
K, 11/06
J, 06/98
I, 01/97
H
Change
Improved accuracy of Pilot timings.
Improved Figures 3-6 and 4-11.
Removed reference to test set from Figure 5-1.
Standardized case and cover drawings in Section 4.
Updated Note 2 for Style Chart in Section 1.
Updated Figure 2-1 to match latest board layout.
Updated Storage statement in Section 6.
Removed In-House Repair from Section 6.
Removed BE1-79M Test Set from Section 6.
Updated power supply options descriptions in Style Chart.
Added manual part number and revision letter to page footers.
Added Notes 1 and 4 to style chart in Section 1.
Deleted reference to Service Manuals.
Replaced Power Supply paragraph on page 3-6 starting with “Basler
Electric enhanced the power supply…”
Deleted Figure 3-4 and added Table 3-3.
Corrected the Figure numbering following Figure 3-4.
Changed the burden data for new power supply in Table 1-2.
Separated Section 4 into two sections. Now Section 5 is TESTS and
ADJUSTMENTS.
Revised all numbers referring to figures, tables, and sections involved
in this change.
Added new dimension figures to include all options available (S1
Double-Ended and both mounting positions).
Added case ground to Figure 4-9.
Changed the format of the manual.
Corrected Figure 1-1 by adding 7, 8 to note #2.
Changed Specifications to reflect the updates in the Outputs, RFI,
and Surge Withstand Capability.
Clarified first paragraph on page 3-3.
Changed “INST” to “2
Added disconnects to 20 and 11 in Figure 4-3.
Revised Section 5, paragraph 1 to include both Service Manual
numbers.
Corrected an error on page 5-2.
Changed Introduction to include Service Manual, Publication
9170100623.
Added new Figures 4-3 and 4-9.
ND
TIME DELAY” in Figure 3-7.
9170100990 Rev N BE1-79M Introduction iii
Page 6

Manual
Revision and Date
G
F
E
D
C
B
A
—, 01/86
Change
Changed Style Number Identification Chart first character from A to B
in response to ECA 12237.
Changed operational Test Procedure, Section 4 to improve
procedures and correct typographical error.
Added old Style Number Identification Chart to Section 7.
Manual revised to support the following relay changes:
o Six additional control output options.
o Two additional reclose time delay options.
o Y-type power supply option.
o Reset timer 1-100 second time delay option.
o Four additional special contact assignments options.
o A four function field selectable logic switch.
o Moved sensing input power module from outside the case to
inside the case.
Added Section 7, Difference Data, to support BE1-79M Relay revision
D and previous.
Operational test procedure revised.
Pages 5-5 and 5-6 added.
Section 6 added.
Page 3-9: Subsection entitled Reclosing Event Memory
rewritten for
clarification.
Pages 4-2 through 4-5: Operational test procedure revised.
Pages 5-2 through 5-4: Subsection entitled Test Plug Adapter
added.
Added Qualifications to specifications listing, revised isolation test
and dielectric test.
Page 3-2: Added footnote to Table 3-1.
Added two paragraphs beginning with “Each reclose attempt…”
Page 3-7 Figure 3-2 corrected.
Page 3-3: Subsection entitled Instantaneous Trip Enable clarified.
Manual revised to reflect software changes, which introduced an
additional category (Unsuccessful Reclosers) to the Reclose Event
Memory.
Initial release
iv BE1-79M Introduction 9170100990 Rev N
Page 7

CONTENTS
SECTION 1 • GENERAL INFORMATION ................................................................................................ 1-1
SECTION 2 • HUMAN-MACHINE INTERFACE ....................................................................................... 2-1
SECTION 3 • FUNCTIONAL DESCRIPTION ........................................................................................... 3-1
SECTION 4 • INSTALLATION .................................................................................................................. 4-1
SECTION 5 • TESTS AND ADJUSTMENTS ............................................................................................ 5-1
SECTION 6 • MAINTENANCE .................................................................................................................. 6-1
SECTION 7 • DIFFERENCE DATA .......................................................................................................... 7-1
9170100990 Rev N BE1-79M Introduction v
Page 8

vi BE1-79M Introduction 9170100990 Rev N
Page 9

SECTION 1 • GENERAL INFORMATION
TABLE OF CONTENTS
SECTION 1 • GENERAL INFORMATION ................................................................................................ 1-1
Purpose .................................................................................................................................................. 1-1
Application.............................................................................................................................................. 1-1
Model and Style Number ....................................................................................................................... 1-2
Style Number Example ....................................................................................................................... 1-2
Style Number Change ........................................................................................................................ 1-2
Compatibility ....................................................................................................................................... 1-2
Specifications ......................................................................................................................................... 1-4
Temperature ....................................................................................................................................... 1-4
Figures
Figure 1-1. Style Number Identification Chart ........................................................................................... 1-3
Tables
Table 1-1. Burden (Nominal) Per Non-isolated Sensing Contact .............................................................. 1-6
Table 1-2. Power Supplies ........................................................................................................................ 1-6
9170100990 Rev N BE1-79M General Information i
Page 10

ii BE1-79M General Information 9170100990 Rev N
Page 11

SECTION 1 • GENERAL INFORMATION
Purpose
The BE1-79M Multiple Shot Reclosing Relay automatically recloses circuit breakers, which have been
tripped by protective relays or other devices in power transmission and distribution systems.
• Over 90% of faults occurring on overhead lines may be cleared by momentarily de-energizing the
line. Once the circuit breaker has been opened to de-energize the line, the BE1-79M provides a
reliable automatic reclosure. The advantages are:
• Improved Service Continuity - returns the line to service quickly, preserving line integrity and
minimizing outage effects on critical loads.
• System Stability - prevents disjointing of the system grid.
• Higher Line Loading - decreases likelihood of loss of line.
Application
Four major factors should be considered when establishing a reclosing philosophy.
• Desired number of reclosure attempts.
• Time delay between breaker opening and reclosure.
• Supervisory control.
• System coordination.
The first major factor is the desired number of reclosure attempts. Where most faults are attributable to
heavy tree exposure, as in distribution networks, multiple reclosure attempts are common. This is
possible because of low voltage levels and is desirable considering customer inconvenience during
outages. The BE1-79M is programmable for up to four reclosure attempts per sequence. This allows
tailoring of the reclosing sequence to the specific needs of the circuit.
The second major factor is the time delay between breaker opening and reclosure. On subtransmission
and distribution networks, it is necessary to ensure that motors are no longer running and that local
generation is off-line prior to attempting reclosure. At the same time, a rapid reclosure minimizes damage,
ionization, and system shock in transmission networks. After the first reclosure attempt, additional
attempts are generally delayed to allow for de-ionization of the interrupter. The BE1-79M incorporates one
instantaneous reclosing attempt with bypass capability, and up to three individually adjustable, timedelayed, reclosing attempts.
A third major factor to be considered in reclosing is supervisory control. Supervisory control allows the
operator to maintain control of the system at all times. The BE1-79M has inputs available to bypass the
instantaneous reclose attempt and to drive the relay to LOCKOUT inhibiting relay operation at any time.
In addition, a separate input is available which may be used to initiate a pilot reclosing sequence.
The fourth major factor is system coordination. The BE1-79M has outputs available which may be used to
block or enable instantaneous tripping of the circuit breaker and block a transformer's automatic load tap
changer operation during a reclosing sequence.
9170100990 Rev N BE1-79M General Information 1-1
Page 12

Model and Style Number
The electrical characteristics and operational features included in a specific relay are defined by a
combination of letters and numbers, which constitutes the device's style number. The style number
together with the model number describe the features and options in a particular device and appear on
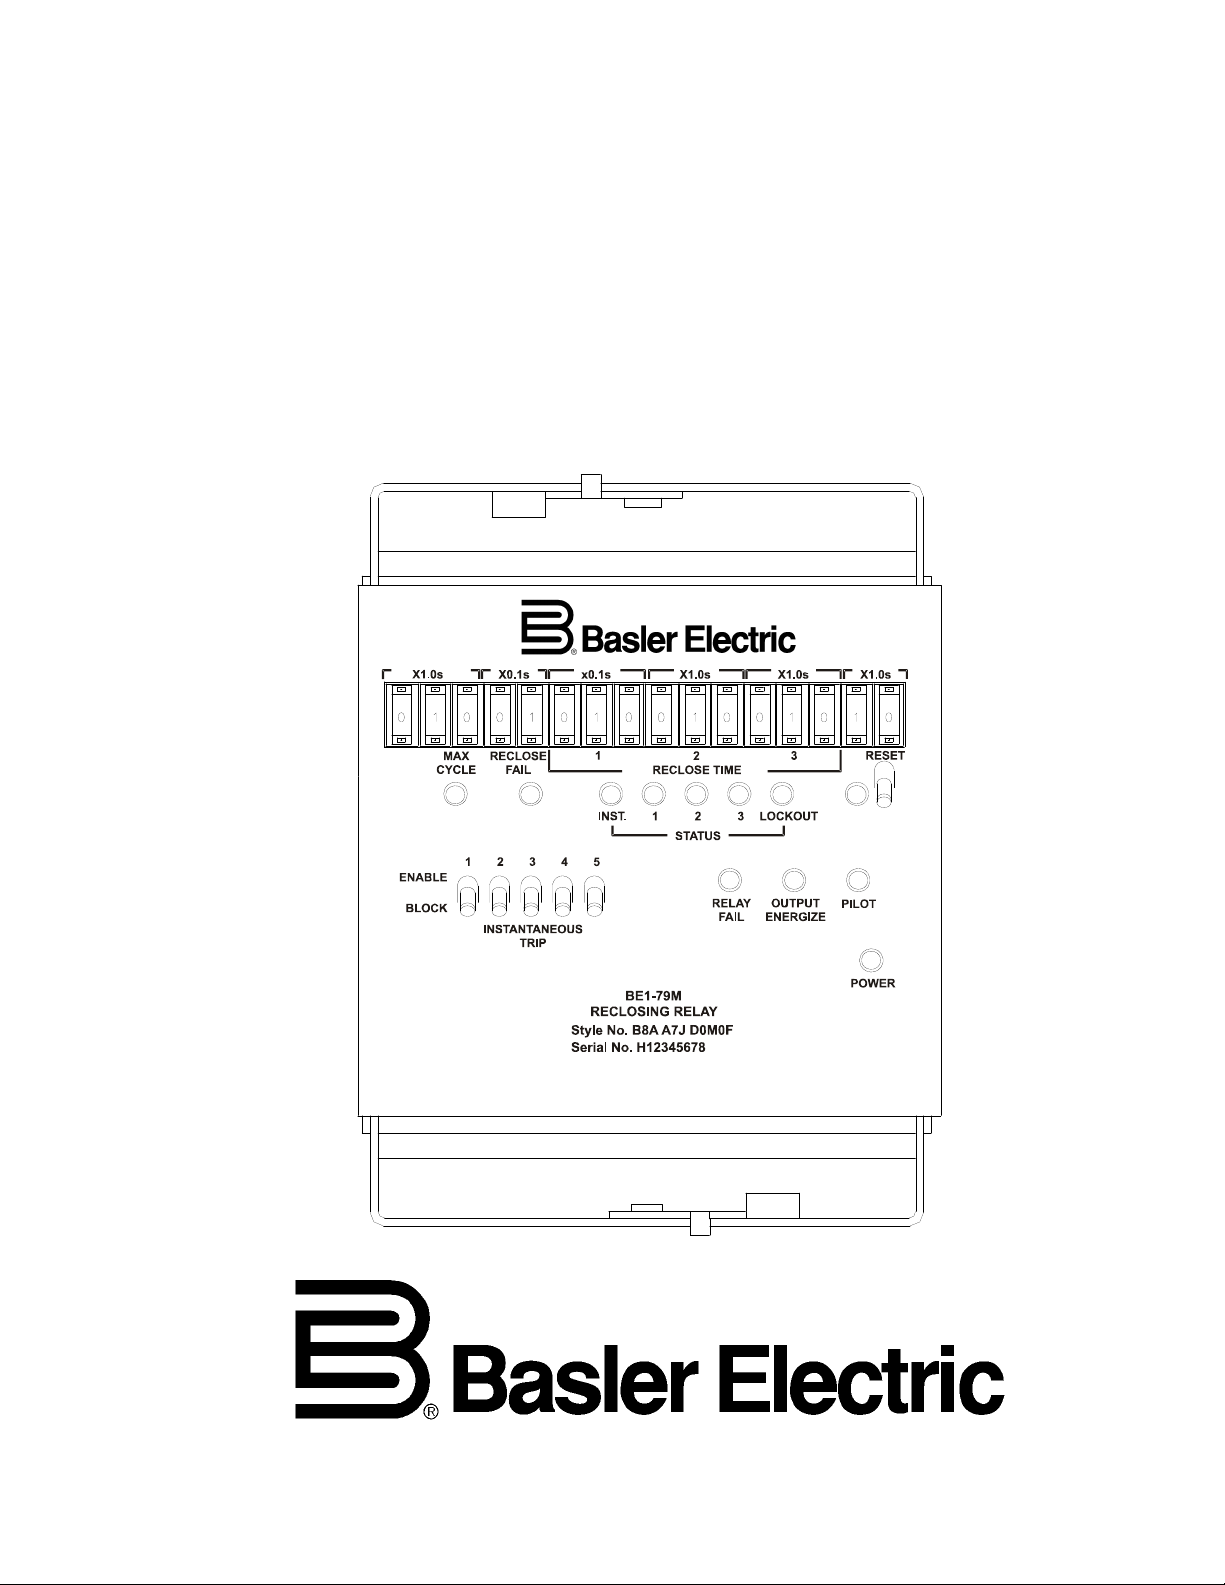
the front panel, drawout cradle and inside the case assembly. The model number BE1-79M designates
the relay as a Basler Electric, Class 100, Multiple Shot Reclosing Relay. The BE1-79M style chart is
shown in Figure 1-1.
Style Number Example
The following style number identification chart illustrates the features and options for BE1-79M relays. For
example, if the style number were BE1-79M B6A A6J C0L0F, the device would have the following
features:
BE1-79M Model Number
B Multiple shot
6 Lockout and reset with reclose fail and maximum cycle
A Instantaneous trip enable
A6 Reclose time delay adjustable from 0.1 to 99.9 seconds
J Operating power derived from 125 Vdc or 120 Vac source
C Reset time delay adjustable from 10 to 1000 seconds
0 Standard contact assignment
L Non-isolated contact sensing
0 No option 3 available
F Semi-flush mounting
Style Number Change
Effective November 18, 1991 (serial number 2812 and subsequent), the BE1-79M Multiple Shot
Reclosing Relay, style number identification for multiple shot is changed from A to B. This style number
change was made to differentiate relays with sensing input power module on the outside of the case
(style number A) and relays with the sensing input power module inside the case (style number B).
Section 7 of this manual provides difference data for style number A relays.
Compatibility
Relays with style number B are backwards compatible. That is, they may be used in place of relays with
style number A. The only exception is for a relay with a type Z power supply (250 Vdc/230 Vac) and
isolated sensing. For details, see section 7 of this manual.
Relays with style number A are NOT forward compatible. They may NOT be used in place of relays with
style number B.
1-2 BE1-79M General Information 9170100990 Rev N
Page 13
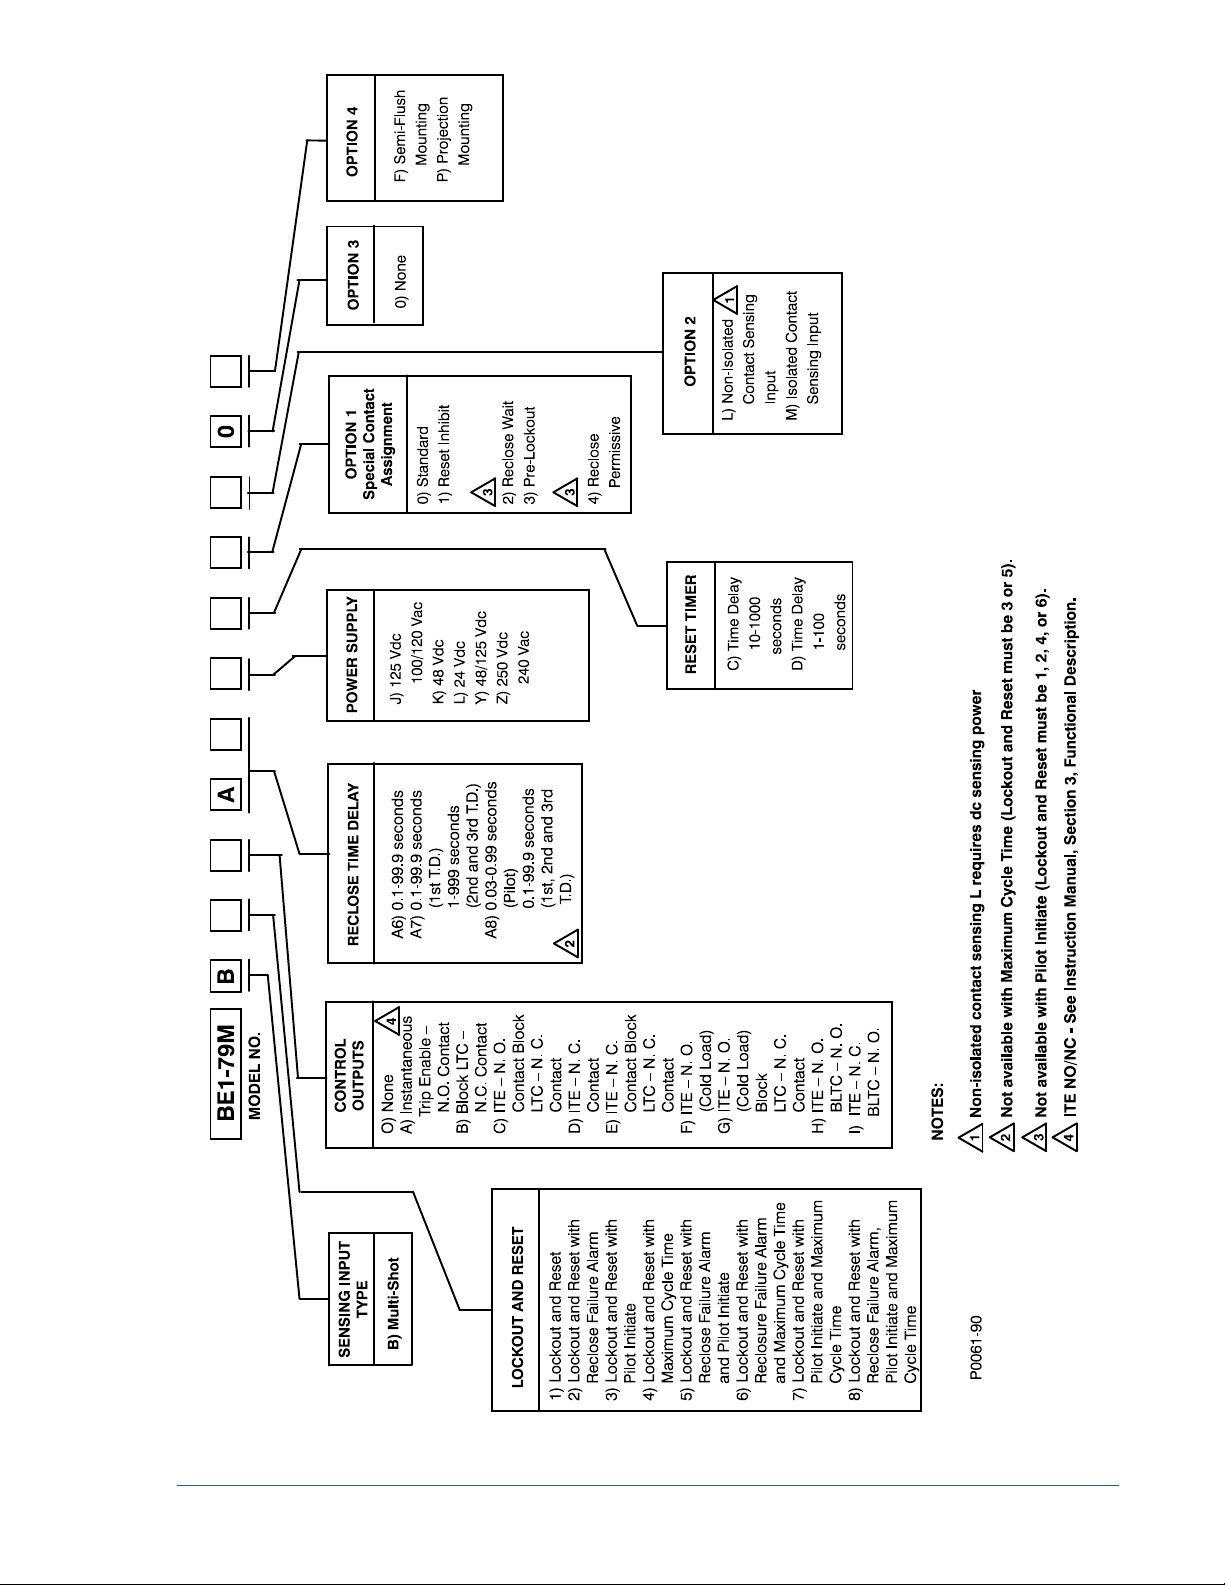
Figure 1-1. Style Number Identification Chart
9170100990 Rev N BE1-79M General Information 1-3
Page 14

Specifications
isolated sensing,
Accurate within 1% of
increments or
Accurate within 1% of setting or 0.5 seconds,
The BE1-79M Relay is available with the following features and capabilities.
Contact Sensing
Reclose Initiate
Breaker (52b)
Pilot Initiate
Instantaneous Reclose
Bypass
Drive to Lockout
Power Supply
Outputs
Timing
The contact sensing circuits require user-supplied contacts with a
minimum rating of 0.025 A at 250 Vdc. Sensing current is supplied by
the relay in styles with isolated sensing. Styles with non-isolated
sensing require an applied sensing voltage equal to the relay dc power
supply input rating. Burden per contact for nondependent on power supply type, is listed in Table 1-1.
Refer to Table 1-2.
Output contacts are rated as follows:
Resistive
120 Vac Make, break, and carry 7 Aac continuously.
250 Vdc Make and carry 30 Adc for 0.2 seconds, carry 7 Adc
continuously, break 0.3 Adc.
500 Vdc Make and carry 15 Adc for 0.2 seconds, carry 7 Adc
continuously, break 0.3 Adc.
Inductive
120 Vac, 125 Vdc, 250 Vdc Break 0.3 A (L/R = 0.04)
Reclose
Pilot (Optional)
Reset
Reclose Fail (Optional) Adjustable from 0.1 to 9.9 seconds in 0.1 second increments. Accurate
Maximum Cycle (Optional) Adjustable from 1 to 1000 seconds in 1 second increments. Accurate
Temperature
Operating
Storage
1-4 BE1-79M General Information 9170100990 Rev N
Adjustable from 00.1 to 99.9 seconds in 0.1 second increments.
Accurate within 1% of setting or 0.05 seconds, whichever is greater.
Optionally adjustable from 1 to 999 seconds in one second increments
for the second and third reclose time delays.
setting or 0.5 seconds, whichever is greater.
Optionally adjustable from 0.03 to 0.99 seconds in 0.01 increments.
Accurate to within ±0.01 seconds of setting. If reclose time delay option
A8 is not specified, pilot reclose time is ≤ 0.035 seconds.
Adjustable from 10 to 1,000 seconds in 10-second
optionally adjustable from 1 to 100 seconds in 1 second increments. A
setting of 00 indicates a 1000 second reset time or optionally a 100
second reset time.
whichever is greater.
within 1% of setting or 0.05 seconds, whichever is greater.
within 1% of setting or 0.5 seconds, whichever is greater.
–40°C (–40°F) to 70°C (158°F)
–65°C (–85°F) to 100°C (212°F)
Page 15

Radio Frequency
Relay Systems to Radiated Electromagnetic Interference from
nd held
perpendicular planes without structural damage or degradation of
sweeps, 15 minutes each sweep, without structural damage or
ugh 4 and 11 through 20, the maximum voltage
applied must be no greater than 300 V because of the MOV
1989 Standard Surge Withstand
1989 Standard Surge Withstand
Interference (RFI)
Maintains proper operation when tested for interference in accordance
with IECC C37.90.2-1989, Trial-Use Standard Withstand Capability of
Transceivers, and 99-1188, field tested using a 5 watt, ha
transceiver operating at random frequencies centered around 144 MHz
and 440 MHz, with the antenna located 6 inches from the relay in both
horizontal and vertical planes.
Shock
Vibration
Isolation
Surge Withstand Capability
Oscillatory
Fast Transient
In standard tests, the relay has withstood 15g in each of three mutually
performance.
In standard tests the relay has withstood 2g in each of three mutually
perpendicular planes swept over the range of 10 to 500 Hz for six
degradation of performance.
At terminals 1 thro
suppressors employed at these locations. At the remaining terminals,
2,500 Vac at 60 Hz for one minute may be applied in accordance with
IEC 255-5 and ANSI/IEEE C37.90-1989 (Dielectric Test).
Qualified to ANSI/IEEE C37.90.1Capability (SWC) Tests for Protective Relays and Relay Systems.
Qualified to ANSI/IEEE C37.90.1Capability (SWC) Tests for Protective Relays and Relay Systems.
Impulse Test
GOST-R Certification
Weight
Case Size
Qualified to IEC 255-5.
GOST-R certified per the relevant standards of Gosstandart of Russia.
13 lbs (5.9 kg)
S1; Refer to Section 4, Installation.
9170100990 Rev N BE1-79M General Information 1-5
Page 16

Table 1-1. Burden (Nominal) Per Non-Isolated Sensing Contact
Power Supply Type K J L Z
Nominal Burden Per Input 0.75 W 1.60 W 0.70W 2.20 W
NOTE: For type Y Power supply, use burden for type K or type J power supply depending on nominal
operating voltage.
Table 1-2. Power Supplies
Type
K (midrange) 48 Vdc 24 to 150 Vdc 5.4 W
J (midrange)
L (low range) 24 Vdc 12 to 32 Vdc * 5.3 W
Y (midrange)
Z (high range)
∗ Type L power supply may initially require 14 Vdc to begin operating. Once operating, the voltage may
be reduced to 12 Vdc and operation will continue.
Nominal
Input Voltage
125 Vdc 24 to 150 Vdc 5.3 W
120 Vac 90 to 132 Vac 13.2 VA
48 Vdc 24 to 150 Vdc 5.4 W
125 Vdc 24 to 150 Vdc 5.3 W
250 Vdc 68 to 280 Vdc 5.4 W
240 Vac 90 to 270 Vac 14.1 VA
Input Voltage Range
Burden at
Nominal
1-6 BE1-79M General Information 9170100990 Rev N
Page 17

SECTION 2 • HUMAN-MACHINE INTERFACE
TABLE OF CONTENTS
SECTION 2 • HUMAN-MACHINE INTERFACE ....................................................................................... 2-1
Controls and Indicators .......................................................................................................................... 2-1
Figures
Figure 2-1. Location of Controls and Indicators ........................................................................................ 2-1
Tables
Table 2-1. BE1-79M Controls and Indicators (Refer to Figure 2-1) .......................................................... 2-2
Table 2-2. Logic Switch (S23) Positions and Functions Enabled
.............................................................. 2-4
9170100990 Rev N BE1-79M Human-Machine Interface i
Page 18

ii BE1-79M Human-Machine Interface 9170100990 Rev N
Page 19

SECTION 2 • HUMAN-MACHINE INTERFACE
Controls and Indicators
Figure 2-1 illustrates the location of controls and indicators on the front panel. Table 2-1 explains the callouts shown in Figure 2-1. Table 2-2 lists the functions enabled per logic switch (S23) position.
Figure 2-1. Location of Controls and Indicators
9170100990 Rev N BE1-79M Human-Machine Interface 2-1
Page 20

Table 2-1. BE1-79M Controls and Indicators (Refer to Figure 2-1)
delayed reclosure attempts. Individually thumbwheel
al. Thumbwheel
adjustable from 10 to 1000 seconds in 10 second
adjustable from 0.1 to 9.9 seconds in 0.1 second
Locator Control or Indicator Function
A RECLOSE TIME
Controls (1, 2, 3)
B RESET Control
C RESET Switch
D RESET LED
E PILOT or RESET INHIBIT
LED (Optional)
Establish reclose time delays for corresponding time-
adjustable from 00.1 to 99.9 seconds in 00.1 second
increments or if reclose time delay option is A7, second and
third RECLOSE TIME thumbwheels are adjustable from
001 to 999 seconds in one second increments. A setting of
000 on a RECLOSE TIME thumbwheel indicates the
reclosing attempt is not desired and sends the relay to
lockout at this point in the reclosing sequence.
Establishes automatic reset interv
increments. Optionally adjustable from 1 to 100 seconds in
1 second increments. A setting of 00 indicates a reset time
of 1000 seconds or optionally, 100 seconds.
Momentary toggle switch, which extinguishes STATUS
LEDs (except LOCKOUT). Accessible by linkage, which
extends through bottom of front cover.
ON when relay is in RESET.
With PILOT option, LED is ON when pilot output relay coil
is energized. Remains ON until activation of manual
RESET lever, power loss, or when relay reaches RESET if
STATUS LED reset is optionally selected by logic switch
S23. With RESET INHIBIT option, LED is ON when reset
inhibit input is closed.
F POWER LED
G OUTPUT ENERGIZE LED
H RELAY FAIL LED
I STATUS LEDs
(INST., 1, 2, 3)
(LOCKOUT)
J INSTANTANEOUS TRIP
(Optional)
K RECLOSE FAIL LED
(Optional)
L RECLOSE FAIL Control
(Optional)
ON when the power supply is delivering a nominal ±12 Vdc
to internal circuitry.
ON when reclose output relay coil is energized.
ON when relay is not operable. Also ON during power-up
sequence.
Latched ON to indicate progression of reclosing sequence.
Extinguished by RESET lever, power loss, or when relay
reaches RESET if STATUS LED reset is optionally
selected by logic switch S23.
ON when relay is in LOCKOUT. (Non-latching.)
Five toggle switches, which enable or block instantaneous
tripping of circuit breaker. Numbers correspond to the relay
state or a specific trip depending on the type of reclosing
sequence in progress.
ON when circuit breaker 52b contact does not open within
selected time after reclose output has been energized.
Limits duration of reclose command signal. Thumbwheel
increments. For a setting of 00, the reclose command
signal is continuous until the breaker closes.
M MAX. CYCLE LED
(Optional)
2-2 BE1-79M Human-Machine Interface 9170100990 Rev N
ON when maximum cycle limit, as established by the MAX.
CYCLE control, has been exceeded.
Page 21

Locator Control or Indicator Function
With MAX. CYCLE, establishes maximum cycle limit
sequence until RESET or LOCKOUT). Thumbwheel
Field selectable, 16 position switch (S23) enables
N MAX. CYCLE or PILOT TIME
Control (Optional)
(maximum allowable interval from initiation of reclosing
adjustable from 1 to 1000 seconds in 1 second increments.
A setting of 000 allows a 1000-second maximum cycle.
With reclose time delay option A8 (PILOT TIME), the two
least significant digits are used for the pilot time delay for a
pilot reclose attempt. Thumbwheel adjustable from 0.03 to
0.99 seconds. A setting of .00, .01, and .02 is equivalent to
.03 setting.
O NORMAL/TEST Switch
P
Logic Switch
With Power-up to Reclose enabled, relay will close the breaker during powerup if relay was in RESET when powered down and Pilot Initiate or Reclose
Initiate is present during power-up.
Provides selection of relay operating mode.
combinations of the following functions.
• Memory save
• Power-up to reclose
• Recognition dropout
• Status LED reset
Refer to Table 2-2 for switch positions and functions
enabled. To be enabled, function changes require relay
power removal and power-up after setting switch position.
CAUTION
9170100990 Rev N BE1-79M Human-Machine Interface 2-3
Page 22

Table 2-2. Logic Switch (S23) Positions and Functions Enabled
Position Functions Enabled
0∗∗
1 RD
2 SL
3 SL RD
4
5
6
7
8 MS
9 MS RD
A MS SL
B MS SL RD
C MS
D MS
E MS
PR∗
PR∗
PR∗
PR∗
PR∗
PR∗
PR∗
RD
SL
SL RD
RD
SL
F MS
NOTES:
∗∗ Default position from factory
RD = Recognition Dropout
SL = Status LED Reset
PR∗ = Power-up to Reclose (Refer to Caution preceding Table 2-2)
MS = Memory Save
PR∗
SL RD
2-4 BE1-79M Human-Machine Interface 9170100990 Rev N
Page 23

SECTION 3 • FUNCTIONAL DESCRIPTION
TABLE OF CONTENTS
SECTION 3 • FUNCTIONAL DESCRIPTION ........................................................................................... 3-1
General .................................................................................................................................................. 3-1
Functional Description ........................................................................................................................... 3-1
Contact Sensing ................................................................................................................................. 3-1
Contact Interface ................................................................................................................................ 3-3
Logic Switch ....................................................................................................................................... 3-3
Thumbwheels ..................................................................................................................................... 3-4
Instantaneous Trip Enable (Optional) ................................................................................................ 3-4
Microprocessor ................................................................................................................................... 3-4
Program Monitor ................................................................................................................................. 3-4
Power Loss Detector .......................................................................................................................... 3-4
Outputs ............................................................................................................................................... 3-5
Power Supply ..................................................................................................................................... 3-5
Operational Characteristics .................................................................................................................... 3-6
Power-Up............................................................................................................................................ 3-6
Reset ...................................................................................................................................................... 3-7
Lockout ................................................................................................................................................... 3-7
Reclosing Sequences ......................................................................................................................... 3-8
Reclose Fail ........................................................................................................................................ 3-8
Maximum Cycle .................................................................................................................................. 3-8
Block Load Tap Changer.................................................................................................................... 3-8
Control Outputs and Special Contact Assignments ......................................................................... 3-11
Reclosing Event Memory ..................................................................................................................... 3-11
Purpose ............................................................................................................................................ 3-11
Data Retrieval ................................................................................................................................... 3-12
Data Retention ................................................................................................................................. 3-12
Clearing Stored Data ........................................................................................................................ 3-13
Figures
Figure 3-1. Functional Block Diagram ....................................................................................................... 3-2
Figure 3-2. Contact Sensing Board Link Position
Figure 3-3. Recognition Dropout Timing
Figure 3-4. Power-up Flow Chart
Figure 3-5. Reclosing Sequences
Figure 3-6. Reclosing Flow Chart
Tables
Table 3-1. Function of Sensing Contacts .................................................................................................. 3-1
Table 3-2. Output Contacts
Table 3-3. Wide Range Power Supply Voltage Ranges
Table 3-4. REM Data Retrieval Modes
...................................................................................... 3-3
................................................................................................... 3-4
.............................................................................................................. 3-7
............................................................................................................. 3-9
............................................................................................................ 3-10
....................................................................................................................... 3-5
........................................................................... 3-6
.................................................................................................... 3-12
9170100990 Rev N BE1-79M Functional Description i
Page 24

ii BE1-79M Functional Description 9170100990 Rev N
Page 25

SECTION 3 • FUNCTIONAL DESCRIPTION
sequence. This contact is also required during the
General
The BE1-79M Multiple Shot Reclosing Relay is a microprocessor-based device, which responds to the
state of external contacts. In responding, the Relay provides automatic reclosure once the circuit breaker
has opened to de-energize the line. Refer to Section 1 for major factors to consider when establishing a
reclosing philosophy.
Functional Description
The following paragraphs describe the Relay circuit functions illustrated in Figure 3-1.
Contact Sensing
Depending on style, contact-sensing current is obtained either directly from the Multiple Shot Reclosing
Relay or from any power source with a voltage rating the same as the Relay power supply dc input voltage. When the Relay provides the contact sensing current, isolated contact sensing is employed. When
another power source provides the contact sensing current, non-isolated contact sensing is employed.
Relays with a Y type wide range power supply have a field selectable link (J2) on the contact sensing
board to match the nominal power supply input voltage of 48 Vdc or 125 Vdc. Selection must be done at
the time of installation and prior to application of power. This option is factory set for 125 Vdc. Figure 3-2
shows the link set to the 125 Vdc position.
Table 3-1. Function of Sensing Contacts
Contacts Designation Function
Pilot Initiate
(Optional)
(Note ∆1)
Breaker 52b
Reclose Initiate
(Note ∆2)
Instantaneous
Reclose Bypass
Drive to Lockout DTL
NOTES:
∗ If the appropriate initiate contact (RI or PI) is not received within the corresponding period, the relay
is forced to the lockout state.
∆1. Input is Reset Inhibit (RES INH) if option 1 is 1.
∆2. Input is Reclose Wait (REC WAIT) if option 1 is 2. Input is Reclose Permissive (RP) if option 1 is 4.
PI
RI
IRB
Form A contact which, when closed, initiates a pilot reclosing
(Optional)
sequence to initiate each reclose attempt. ∗
Form B auxiliary contact of the controlled breaker utilized to
determine the state of the breaker.
Form A contact which, when closed, initiates a normal reclosing
sequence. This contact is also required during the sequence to
initiate the individual time delays and subsequent reclose output
closures. ∗
Form A contact which, when closed, cause the instantaneous
reclosure attempt to be bypassed.
Form A contact which, when closed, instantaneously drives the
Multiple Shot Reclosing Relay into lockout.
9170100990 Rev N BE1-79M Functional Description 3-1
Page 26

RECLOSE
RECLOSE
FAIL
PILOT/
TRIP
INSTANTANEOUS
ENABLE
TAP
LOAD
BLOCK
CHANGER
LOCKOUT
FAIL
RELAY
BUFFER
DRIVER
RELAY
FAIL
INST.
1
2
3
LOCKOUT
MAX
RECLOSE
OUTPUT
PILOT/
RESET
CYCLE
FAIL
ENERGIZE
LED INDICATORS
PROGRAM
MONITOR
REGULATOR
VOLTAGEPOWER
SUPPLY
POWER
POWER
LOSS
DETECTOR
RECOGNITION DROPOUT
STATUS LED RESET
MEMORY
SEQUENCE
RECLOSE
MICROPROCESSOR
ENABLE
TRIP
INST.
MEMORY SAVE
POWER UP TO RECLOSE
RESET
MAX
THUMBWHEELS
CYCLE/
FAIL
RECLOSE
RECLOSE
1 2 3
B
U
F
F
E
R
CONTACTINTERFAC
E
RECLOSE
INITIATE
(RI)
BREAKER
(52B)
PILOT
INITIATE
(PI)
INST
RECLOSE
BYPASS
(IRB)
DRIVE
TO
LOCKOUT
(DTL)
10-21-91
D714-006
BE1-79M
LOGIC SWITCH
RESET
INHIBIT
PILOT
TIME
INPUT IS RESET INHIBIT (RES INH) IF OPTION 1 IS 1.
INPUT IS RECLOSE WAIT (REC WAIT) IF OPTION 1 IS 2.
INPUT IS RECLOSE PERMISSIVE (RP) IF OPTION 1 IS 4.
321
1
2
3
PRE-LOCKOUT
Figure 3-1. Functional Block Diagram
3-2 BE1-79M Functional Description 9170100990 Rev N
Page 27

Figure 3-2. Contact Sensing Board Link Position
Recognition and response to closure of the sensing contacts is time dependent. All contact sensing inputs
must be present for a minimum of 6 milliseconds before recognition. For a reclosing sequence to begin,
the 52b contact closure must occur within 17.5 milliseconds after either RI or PI has dropped out. For a
longer output recognition (200 milliseconds), logic switch S23 provides a field selectable option (recognition dropout). If RI and PI are initiated simultaneously, PI takes priority. If a Pilot reclosing sequence is
initiated, IRB has no effect. DTL overrides all other inputs. The function of each set of sensing contacts is
described in Table 3-1.
Contact Interface
Contact interface circuits provide current limiting, filtering, and optoisolation. This interfacing translates the
state of the individual sensing contacts to logic levels. These logic levels are entered onto the data bus,
via buffers, for use by the microprocessor.
Logic Switch
Logic switch S23, is a field selectable, 16-position switch (0 through F), that enables any combination of
four functions. Refer to Table 2-2 for logic switch positions and functions enabled. The four functions are
Memory Save, Power-up to Reclose, Recognition Dropout, and Status LED Reset.
Memory Save
•
at which the reclosing sequence was interrupted. Within 100 milliseconds of when power is reapplied, the relay will resume the reclosing sequence. Memory save function will occur ONLY if the
relay was in a reclosing sequence. It will not occur if the relay was in RESET, RELAY FAIL, or
LOCKOUT.
•
Power-up to Reclose
programmed reclose after power is restored if the breaker is open (52b) and normal initiate (RI or
PI) is present.
•
Recognition Dropout
seconds. The relay initiates a reclosing sequence if a 52b occurs within 200 milliseconds of an RI
Figure 3-3
or PI. illustrates the recognition dropout timing relationship.
Status LED Reset - After a reclosing sequence, the relay initiates STATUS LED reset (INST., 1, 2,
•
3, and PILOT) when the relay reaches RESET.
- When power is lost, the relay initiates the memory circuit to store the exact point
- When power is lost during a RESET condition, the relay initiates a first
- This function replaces the standard recognition dropout time of 17.5 milli-
9170100990 Rev N BE1-79M Functional Description 3-3
Page 28

RI, PI
52b
RECOGNITION
DROPOUT TIME
6-17-91
D806-008
Switch S23, on the edge of the contact sensing board, is accessible by removing the drawout cradle from
the case. When S23 is changed to select different functions, the relay must be powered down and power
reapplied to enable selected functions.
Figure 3-3. Recognition Dropout Timing
Thumbwheels
Front panel thumbwheel switches allow the user to program various time settings and limit reclosure
attempts. The switches select individual diodes, producing binary coded decimal words, which are read
by the microprocessor.
Instantaneous Trip Enable (Optional)
Five front panel toggle switches allow the user to select ENABLE or BLOCK instantaneous tripping of the
circuit breaker. Instantaneous tripping may be enabled or disabled for any single trip or combination of
trips. The microprocessor interrogates the individual switches at appropriate times to determine the
desired state of the instantaneous trip enable output contacts. When LOCKOUT or RESET occurs and
normally open ITE, the instantaneous trip enable output contacts are closed while the breaker is closed if
instantaneous trip enable switch 1 is in the enable position.
Microprocessor
The BE1-79M uses an 8-bit, low power, CMOS microprocessor which performs all timing and decisionmaking functions.
Program Monitor
Operation of the microprocessor is monitored by the program monitor. In normal operation, the microprocessor outputs pulses at regular intervals. If these pulses are disrupted, the program monitor stops
microprocessor operation and forces the output buffers to high impedance. This causes all output contacts to assume their normal states and lights the RELAY FAIL LED. If this situation is the result of
something other than hardware failure, it may be remedied by momentarily interrupting operating power.
Power Loss Detector
The power loss detector circuit compares the output of the power supply to a reference voltage. If the
power supply output falls below the reference voltage, the power loss detector circuit sends an interrupt
signal to the microprocessor. Upon receipt of this signal, the microprocessor stores status data in the nonvolatile reclose sequence memory. This data indicates the progression of a reclosing sequence or state of
the Multiple Shot Reclosing Relay at the time power was lost. At this point, the relay fail contacts close
and all further functions of the relay cease until input power is removed and restored. When power is
restored, the microprocessor uses this data, if logic switch S23 memory save function is enabled and the
power loss occurred during a reclosing sequence, to resume operation from the point of power loss. The
relay compensates for any change of state of the breaker which may have occurred during power off.
However, the remaining least significant digits of the maximum cycle time, reclose delay time, and the
remaining reclose fail time are not stored. If the two most significant digits of the remaining maximum
3-4 BE1-79M Functional Description 9170100990 Rev N
Page 29

cycle time at power loss are 00, the least significant digit is seen as 9 on power restoration. If the relay is
in RESET when power is lost and logic switch S23 power-up to reclose function is enabled, the relay will
close the breaker during power-up if RI or PI is present.
Outputs
Output commands from the microprocessor light LED indicators and are amplified by driver circuits to
energize the coils of the output relays. Individual output contacts and their functions are listed in Table
3-2.
Table 3-2. Output Contacts
Output Contacts Function
Reclose
Lockout Normally open contacts are closed to indicate lockout.
Relay Fail
Reclose Fail
(Optional)
Pilot (Optional)
Pre-lockout (Optional)
Instantaneous Trip
Enable (Optional)
Block Load Tap
Changer (Optional)
Normally open contacts are closed to energize the closing coil of the controlled
circuit breaker.
Normally closed contacts will be closed to indicate a malfunction of the
microprocessor or power supply. (These contacts open on the completion of the
power-up sequence.)
Normally open contacts are closed to indicate that the breaker has not
responded to the reclose command output in the allotted time.
Normally open contacts are closed to energize the closing coil of the controlled
circuit breaker on the first reclosure attempt of a pilot initiated reclosing
sequence.
Normally open contact that is closed to signify that the last programmed reclose
attempt is taking place.
Normally open or normally closed contacts change state to enable an
instantaneous tripping scheme during the reclosing sequence. These contacts
are controlled by the front panel switches and the selected reclosing sequence.
A normally open ITE will close to enable instantaneous tripping, and a normally
closed ITE will open to enable instantaneous tripping.
Normally closed or normally open contacts change state to disable automatic
load tap changer operation during a reclosing sequence.
Power Supply
Basler Electric enhanced the power supply design for unit case relays. This new design created three,
wide range power supplies that replace the four previous power supplies. Style number identifiers for
these power supplies have not been changed so that customers may order the same style numbers that
they ordered previously. The first newly designed power supplies were installed in unit case relays with
EIA date codes 9638 (third week of September 1996). A benefit of this new design increases the power
supply operating ranges such that the 48/125 volt selector is no longer necessary. Specific voltage ranges
for the three new power supplies and a cross reference to the style number identifiers are shown in Table
3-3.
Relays with a Y type power supply also have a field selectable link (J2) on the contact sensing board to
match the power supply nominal input voltage of 48 Vdc or 125 Vdc. The contact sensing functional
description at the beginning of this section described the field selectable link J2.
9170100990 Rev N BE1-79M Functional Description 3-5
Page 30

Table 3-3. Wide Range Power Supply Voltage Ranges
Power Supply Style Chart Identifier Nominal Voltage Voltage Range
Low Range L 24 Vdc
Mid Range J, K, Y
High Range Z
∗ 14 Vdc required to start the power supply.
Relay operating power is developed by the wide range, isolated, low burden, flyback switching, solid-state
power supply. Nominal +12/–12 Vdc is delivered to the relay internal circuitry. Input (source voltage) for
the power supply is not polarity sensitive. A red LED turns ON to indicate that the power supply is functioning properly.
48, 125 Vdc,
120 Vac
125, 250 Vdc,
120, 240 Vac
12 to 32 Vdc ∗
24 to 150 Vdc,
90 to 132 Vac
62 to 280 Vdc,
90 to 270 Vac
Operational Characteristics
Due to the microprocessor-based design of the BE1-79M Multiple Shot Reclosing Relay, many of its
operational characteristics are not apparent in the block diagram. The remaining information in this section is focused on the software-controlled features of the relay.
Power-Up
The application of operating power results in one of four states as illustrated in Figure 3-4. Depending on
conditions and the RESET delay setting, the interval from power application to the resultant state may be
from 10 to 1000 seconds or optionally from 1 to 100 seconds. When the resultant state is reached, the
relay fail output contacts open and the RELAY FAIL LED is extinguished.
3-6 BE1-79M Functional Description 9170100990 Rev N
Page 31

POWER IS
APPLIED
D0757-12
IS
MEMORY SAVE
ENABLED
?
N
IS
CIRCUIT
BREAKER
OPEN
?
N
START
RESET
TIMER
BREAKER
OPEN BEFORE
RESET
?
N
Y Y
Y
Y
POWER
LOST DURING
REC. SEQ.
?
N
IS
POWER UP
TO RECLOSE
ENABLED
?
N
RESTORE OUTPUT
STATES
(OPEN RELAY FAIL)
< 0.1 SEC.
Y
POWER
LOST WHILE IN
RESET
?
Y
N
RESET
N
TIMED
OUT
?
Y
RESET
LOCKOUT PROGRAMMED
RECLOSE WITH FIRST
RECLOSE
CONTINUE
RECLOSING
SEQUENCE
Figure 3-4. Power-up Flow Chart
Reset
A reclosing sequence may only be initiated when the relay is in RESET. RESET is indicated by a front
panel LED. For the relay to reach RESET, the controlled breaker must remain closed for the duration of
the reset time delay setting. If the breaker reopens prior to this time, the relay will proceed to the next
reclosing attempt. If the number of programmed reclosing attempts has been exhausted, the relay will
drive to LOCKOUT.
Lockout
LOCKOUT, a state inhibiting relay operation, is produced by any of the following conditions:
• Number of breaker openings exceeds the number of programmed reclosure attempts
• Closure of the drive-to-lockout input contacts
• Reclose failure
• Duration of a reclosing sequence exceeds the maximum cycle setting
9170100990 Rev N BE1-79M Functional Description 3-7
Page 32

The lockout output contacts close and the LOCKOUT LED lights to indicate lockout. LOCKOUT is terminated when the controlled breaker is closed (manually or by other means) and remains closed for the
duration of the reset time delay setting.
Reclosing Sequences
The BE1-79M Multiple Shot Reclosing Relay can generate three types of reclosing sequences. Each type
is described in the following paragraphs and illustrated in Figure 3-5 and Figure 3-6.
Reclose Initiated Sequence
•
stantaneous reclosing attempt followed by up to three time-delayed reclosing attempts. All
reclose command outputs occur through the reclose output contacts in this sequence.
•
Reclose Initiated Sequence with Instantaneous Reclose Bypass
IRB signals, this sequence produces up to three time-delayed reclosing attempts. All reclose
command outputs occur through the reclose output contacts in this sequence.
•
Pilot Initiated Sequence
taneous reclosing attempt through the pilot output contacts, and up to two time-delayed reclosing
attempts through the reclose output contacts. The time-delayed reclosing attempts are controlled
by RECLOSE TIME delay settings 2 and 3. RECLOSE TIME delay setting 1 is bypassed in this
sequence (unless set to 000, in which case the relay drives to LOCKOUT). The IRB signal has no
influence on this sequence.
Each reclose attempt requires the presence of either the RI or PI contact input before the respective
reclose sequence can be performed. The RI input must also be present prior to each individual time
delay.
When a Pilot Initiated reclose sequence has been started by the presence of the PI input, the associated
closure of the reclose output relay also requires the presence of the PI input. If the breaker re-opens after
the instantaneous closure of the reclose output relay, then the RI or PI input must be present in order for
the second reclose time delay to occur. The RI or PI input must also be present for the third time delay.
The flow chart of Figure 3-6 is a simplified representation of reclosing sequence initiation and progression. In actual operation all reclosing attempts are continuous (as indicated by the dashed lines) unless
limited by the reclose fail or maximum cycle options. The number of reclosing attempts may be limited by
adjusting any one of the reclose time delay settings to 000. This produces LOCKOUT when a breaker trip
occurs at this point in a reclosing sequence.
- Initiated by the 52b and RI signals, this sequence produces one in-
- Initiated by the 52b, RI, and
- Initiated by the 52b and PI signals, this sequence produces one instan-
Reclose Fail
The reclose fail option allows the user to limit the duration of reclose command outputs. If the breaker fails
to respond to the reclose command in the allotted time, the reclose fail and lockout contacts close and
their associated LEDs light. The first reclosure attempt in a pilot initiated reclosing sequence is continuous
regardless of the reclose fail setting. All reclose command outputs are continuous if the reclose fail option
is not present or if the RECLOSE FAIL setting is 00.
Maximum Cycle
The maximum cycle option limits the duration of a reclosing sequence as determined from sequence
initiation (presence of 52b and RI or PI) to automatic relay RESET or LOCKOUT. If RESET or LOCKOUT
is not reached in the allotted time, the MAX. CYCLE LED lights and the relay drives to LOCKOUT.
Block Load Tap Changer
The optional block load tap changer output contacts are opened to disable automatic transformer load tap
changer operations while a reclosing sequence is in progress.
3-8 BE1-79M Functional Description 9170100990 Rev N
Page 33

RECLOSE INITIATED SEQUENCE
RESET
IF
ITEC
S1E
{
1ST
ITEC
IF
S2E
TD1
TRIP RECL.
{
2ND
S3E
IF
ITEC
TRIP RECL.
TD2
{
3RD
S4E
ITEC
IF
TD3
RECL.
{
4TH
TRIP
TRIP
ITEC
IF
S5E
5TH
IF
ITEC
S1E
LOCKOUT
BREAKER
CLOSED
BREAKER
OPEN
OPEN
BREAKER
CLOSED
BREAKER
S1E
ITEC
IF
RESET
4TH
S5E
IF
ITEC
TRIP
TRIP
3RD
{
RECL.
TD3
IF
ITEC
S4E
2ND
{
TD2
RECL.TRIP
ITEC
IF
S3E
1ST
{
RECL.TRIP
TD1
LOCKOUT
S1E
ITEC
IF
RECLOSE INITIATE SEQUENCE W ITH INSTANTANEOUS RECLOSE BYPASS SIGNAL
OPEN
BREAKER
CLOSED
BREAKER
S2E
IF
ITEC
1ST
{
S1E
ITEC
IF
RESET
S1E
ITEC
IF
S5E
IF
ITEC
TRIP
TRIP
3RD
{
RECL.
TD3
IF
ITEC
S4E
2ND
TD2
RECL.
LOCKOUT
TRIP
{
INST.
4TH
PILOT INITIATED SEQUENCE
6-19-91
D741-008
BE1-79M
1
1
1
1
IF CONTROL OUTPUT IS "F" OR "G", ITEC W ILL BE OPEN.
TRIP RECL.
TRIP RECL.
ITEC = INSTANTANEOUS TRIP ENABLE OUTPUT CONTACT S CLOSED.
S_E =
INST.
TD_
= INSTANTANEOUS RECLOSURE (NO INTENTIONAL DELAY).
= RECLOSURE TIME DELAY SETTING.
= UNKNOWN TIME INTERVAL < RESET TIME SETTING.
INSTANTANEOUS TRIP SW ITCH
NOTES:
INST.
2
2
IF RECLOSE TIME DELAY OPTION IS A8, THEN THIS IS PILOT TIME DELAY.
Figure 3-5. Reclosing Sequences
9170100990 Rev N BE1-79M Functional Description 3-9
Page 34

Figure 3-6. Reclosing Flow Chart
3-10 BE1-79M Functional Description 9170100990 Rev N
Page 35

Control Outputs and Special Contact Assignments
Control output contacts and special contact assignments are options controlled by software. The functions
of these contacts are as follows:
I.T.E. Cold Load, Normally Open Option
•
in the LOCKOUT condition. Thus, when a breaker is manually closed from LOCKOUT, the output
will be open until the relay goes to reset. The normal I.T.E. option (NOT I.T.E. cold load) has the
instantaneous trip enable output closed immediately after the breaker is manually closed.
•
Pre-lockout Alarm Output, Normally Open Option
diately whenever the relay is attempting the last programmed reclose attempt. This output is
mutually exclusive with the pilot reclose output. This output will remain closed until the relay
reaches RESET.
•
Reset Inhibit Input Option
lights the RESET INHIBIT LED. When the input contact opens, the reset timer continues timing
from the point of interruption and the RESET INHIBIT LED extinguishes. The reset inhibit input is
mutually exclusive with the pilot initiate input, and the RESET INHIBIT LED is mutually exclusive
with the PILOT LED.
•
Reclose Wait Input Option
contacts remain in the previous state, unless the reclose or pilot outputs are energized prior to the
input closing. If the reclose or pilot outputs are energized when reclose wait is closed, the outputs
will open. When reclose wait input opens, reclosing will continue in the sequence to the next time
delay or LOCKOUT. The reclose wait input replaces the reclose initiate input and RI is not required to initiate the reclosing sequence. Closing the 52b input initiates the reclosing sequence.
•
Reclose Permissive Input Option
controlled delay timers and manual STATUS LED reset. The RESET LED flashes during this
condition. An energized reclose or pilot output is de-energized when the reclose permissive contact opens. When the reclose permissive input contact closes, reclosing continues in the
sequence to the next time delay or LOCKOUT.
A full reclose sequence (one instantaneous, followed by up to three time reclosures is enabled when the
reclose permissive contact is closed and the 52b input contact is closed. The reclose initiate input is
replaced by the reclose permissive input.
IRB and PI are latching inputs with this option. IRB and PI latch if closed when 52b input is closed and
reclose permissive input contact is open. A reclose permissive input is required for a reclose sequence.
- A closed reset inhibit input inhibits the reset timer from timing and
- A closed reclose wait input inhibits all timers from timing. All output
- An open reclose permissive contact inhibits all front-panel-
- The instantaneous trip enable output will remain open
- The pre-lockout alarm output will close imme-
Reclosing Event Memory
Purpose
In the normal service mode, the reclosing event memory (REM) increments software counters to record
significant events of the reclosing sequence. When the relay is reset, the accumulated data is transferred
to and stored in a nonvolatile memory. The data is retained even though power is lost. Only data accumulated prior to the last reset is retained in the non-volatile memory. If the relay loses power during a
reclosing sequence, the data accumulated during this uncompleted sequence will not be saved.
The REM counts and stores the cumulative number of attempts made in the following categories.
• Instantaneous reclosures
• First time-delayed reclosures
• Second time-delayed reclosures
• Third time-delayed reclosures
• Pilot reclosures
• Unsuccessful reclosures
Maximum count is 999 attempts per event type. Drive-to-Lockout events are not counted. REM is not
affected when the relay is in the test mode or by the position of the logic switch, S23, (reclose sequence
memory save enable).
9170100990 Rev N BE1-79M Functional Description 3-11
Page 36

Data Retrieval
In order to retrieve data from REM, the relay must first be taken out of service and placed in the test
mode. Do this by setting the logic board NORMAL/TEST switch (see Figure 2-1) to the TEST position.
Then set the front panel RESET thumbwheel switch to 00. The relay is now ready for data retrieval.
Before proceeding, notice that the following controls and indicators are re-defined whenever the REM
function is in use.
RECLOSE TIME thumbwheel #3 (least significant digit only)
is to be retrieved. Refer to for event and switch positions.
STATUS LEDs (INST., #1 and #2)
is correct. The STATUS LEDs will be ON as shown in .
RECLOSE TIME thumbwheel #1 (3 digits)
nually rotated so that RESET LED and STATUS #3 LED are both ON.
STATUS LED #3
RESET LED
To retrieve REM data, complete the following procedure.
• Remove relay from service and position NORMAL/TEST switch to TEST.
• Position RESET thumbwheel switch to 00.
• Select the type of event (MODE) desired by setting RECLOSE TIME thumbwheel #3 as indicated
in Table 3-4.
• Verify that the desired mode is selected by observing the INST., #1, and #2 STATUS LEDs.
• Observe the STATUS LED #3 and RESET LED. These indicators identify whether the number
selected on RECLOSE TIME #1 thumbwheel is less (STATUS LED #3 ON) or greater (RESET
LED ON) than the number stored in memory.
• Position RECLOSE TIME #1 thumbwheel until both STATUS LED and RESET LED are ON.
When both indicators are ON, the selected number on RECLOSE TIME #l thumbwheel setting is
equal to the stored number.
- Means "<" (less than).
- Means ">" (greater than).
Table 3-4
- Verify that the digit selected on RECLOSE TIME thumbwheel #3
- Indicates the number of accumulated events when ma-
Table 3-4. REM Data Retrieval Modes
- Selects the type of event for which data
Table 3-4
RECLOSE TIME
Type of Event
Instantaneous 0 0 0 0
1st time delayed 1 0 0 1
2nd time delayed 2 0 1 0
3rd time delayed 3 0 1 1
Pilot reclosure 4 1 0 0
Unsuccessful reclosures 5 1 0 1
None Any other 1 1 1
NOTE: A "1" in the STATUS Indication column indicates LED is ON.
#3 Thumbwheel
(Least Significant Digit)
Data Retention
To retain data stored in memory and resume the event count,
• Position the NORMAL/TEST switch on the logic board to NORMAL.
• Return front panel controls to their regular settings.
• Place the relay back in service.
STATUS LED
INST #1 #2
3-12 BE1-79M Functional Description 9170100990 Rev N
Page 37

Clearing Stored Data
To clear the data from memory,
• Toggle the RESET lever once
• Position the NORMAL/TEST switch on the logic board to NORMAL.
• Return front panel controls to their regular settings.
• Place the relay back in service.
It is a good practice to verify that the memory is cleared by repeating the data retrieval procedure and
observing the results.
9170100990 Rev N BE1-79M Functional Description 3-13
Page 38

3-14 BE1-79M Functional Description 9170100990 Rev N
Page 39

SECTION 4 • INSTALLATION
TABLE OF CONTENTS
SECTION 4 • INSTALLATION .................................................................................................................. 4-1
General .................................................................................................................................................. 4-1
Relay Operating Precautions ................................................................................................................. 4-1
Dielectric Test ........................................................................................................................................ 4-1
Mounting ................................................................................................................................................ 4-1
Connections ........................................................................................................................................... 4-9
Figures
Figure 4-1. Panel Cutting/Drilling, Semi-Flush, S1 Case .......................................................................... 4-2
Figure 4-2. S1 Case Dimensions, Rear View, Double Ended, Semi-Flush Mount
Figure 4-3. S1 Case Dimensions, Side View, Double Ended, Semi-Flush Mount
Figure 4-4. Panel Cutting/Drilling, Double Ended, Projection Mount, S1 Case
Figure 4-5. S1 Case Dimensions, Rear View, Double Ended, Projection Mount
Figure 4-6. S1 Case Dimensions, Side View, Double Ended, Projection Mount
Figure 4-7. S1 Case Cover Dimensions, Front View
Figure 4-8. Sensing Input Connections
Figure 4-9. External Terminal Connections
Figure 4-10. Typical Output Connections
Figure 4-11. Typical Internal Connections
................................... 4-3
.................................... 4-4
........................................ 4-5
...................................... 4-6
...................................... 4-7
................................................................................. 4-8
..................................................................................................... 4-9
............................................................................................. 4-10
................................................................................................ 4-11
............................................................................................... 4-12
9170100990 Rev N BE1-79M Installation i
Page 40

ii BE1-79M Installation 9170100990 Rev N
Page 41

SECTION 4 • INSTALLATION
General
When not shipped as part of a control or switchgear panel, the relays are shipped in sturdy cartons to
prevent damage during transit. Immediately upon receipt of a relay, check the model and style number
against the requisition and packing list to see that they agree. Visually inspect the relay for damage that
may have occurred during shipment. If there is evidence of damage, immediately file a claim with the
carrier and notify the Regional Sales Office, or contact the Sales Representative at Basler Electric, Highland, Illinois.
In the event the relay is not to be installed immediately, store the relay in its original shipping carton in a
moisture and dust free environment. When the relay is to be placed in service, it is recommended that the
operational test procedure (Section 5) be performed prior to installation.
Relay Operating Precautions
Before installation or operation of the relay, note the following precautions:
1. The relay is a solid-state device. If a wiring insulation test is required, remove the connection
plugs and withdraw the cradle from its case.
2. When the connection plugs are removed, the relay is disconnected from the operating circuit and
will not provide system protection. Always be sure that external operating (monitored) conditions
are stable before removing a relay for inspection, test, or service.
3. Be sure the relay case is hard wired to earth ground using the ground terminal on the rear of the
unit. It is recommended to use a separate ground lead to the ground bus for each relay.
Dielectric Test
In accordance with IEC 255-5 and ANSI/IEEE C37.90-1989, one-minute dielectric (high potential) tests up
to 2500 Vac (45-65 Hz) may be performed except across open contacts, which may be tested up to 1,500
Vac. Note that this device employs decoupling capacitors to ground from terminals 3, 4, 5, 6, 7, 8, 9, and
10. At 2500 Vac, a leakage current of approximately 5 mA per terminal is to be expected.
Mounting
Because the relay is of solid-state design, it does not have to be mounted vertically. Any convenient
mounting angle may be chosen. Relay outline dimensions and panel drilling diagrams are shown in
Figures 4-1 through 4-7.
9170100990 Rev N BE1-79M Installation 4-1
Page 42

Figure 4-1. Panel Cutting/Drilling, Semi-Flush, S1 Case
4-2 BE1-79M Installation 9170100990 Rev N
Page 43

Figure 4-2. S1 Case Dimensions, Rear View, Double Ended, Semi-Flush Mount
9170100990 Rev N BE1-79M Installation 4-3
Page 44

.75
(19.1)
(157.2)
6.19
(49.53)
1.95
10-32 SCREWS
(7.9)
.31
10-32 SCREWS
(102.4)
4.03
4.03
(102.4)
(7.9)
.31
MOUNTING PANEL
(55.75)
2.195
P0066-64
Figure 4-3. S1 Case Dimensions, Side View, Double Ended, Semi-Flush Mount
4-4 BE1-79M Installation 9170100990 Rev N
Page 45

Figure 4-4. Panel Cutting/Drilling, Double Ended, Projection Mount, S1 Case
9170100990 Rev N BE1-79M Installation 4-5
Page 46

Figure 4-5. S1 Case Dimensions, Rear View, Double Ended, Projection Mount
4-6 BE1-79M Installation 9170100990 Rev N
Page 47

.75
(19.1)
(157.2)
6.19
(49.53)
1.95
10-32 SCREWS
(7.9)
.31
10-32 SCREWS
(102.4)
4.03
4.03
(102.4)
(7.9)
.31
(55.75)
2.195
P0066-67
TERMINAL EXTENSION (TYP.)
FOR DETAILED INSTRUCITONS,
SEE THE TERMINAL PROJECTION
MOUNTING KIT SUPPLIED.
.25
(6.4)
5/16-18 STUD
2 PLACES
MOUNTING PANEL
Figure 4-6. S1 Case Dimensions, Side View, Double Ended, Projection Mount
9170100990 Rev N BE1-79M Installation 4-7
Page 48

P0066-68
Figure 4-7. S1 Case Cover Dimensions, Front View
4-8 BE1-79M Installation 9170100990 Rev N
Page 49

Connections
BE1-79M
4
3
OPERATING
POWER
8 5 7 6 10 9
PI RI DTL 52b IRB
-
+
SENSING
POWER
NON-ISOLATED SENSING
1 1
11
ISOLATED SENSING
IRB52bDTLRIPI
9106758
POWER
3
4
BE1-79M
OPERATING
LEGEND:
RI RECLOSE INITIATE SENSING INPUT CONTACTS
DTL DRIVE-TO-LOCKOUT SENSING INPUT CONTACTS
52b CIRCUIT BREAKER SENSING INPUT CONTACTS
IRB INSTANTANEOUS RECLOSE BYPASS SENSING INPUT CONTACTS
PI PILOT INITIATE SENSING INPUT CONTACTS (OPTIONAL)
RST INH RESET INHIBIT SENSING INPYT CONTACTS (OPTIONAL)
REC WAIT RECLOSE WAIT SENSING INPUT CONTACTS (OPTIONAL)
RP RECLOSE PERMISSIVE SENSING INPUT CONTACTS (OPTIONAL)
IF OPTION 1 IS 1
PI IS REPLACED WITH RST INH.
IF OPTION 1 IS 2
RI IS REPLACED WITH REC WAIT.
IF OPTION 1 IS 4
RI IS REPLACED BY RP.
1
11-14-91
D729-006
BE1-79M
Incorrect wiring may result in damage to the relay. Be sure to check model and style number against the
options listed in the Style Number Identification Chart before connecting and energizing a particular relay.
NOTE
Be sure the relay case is hard-wired to earth ground with no smaller than 12
AWG copper wire attached to the ground terminal on the rear of the relay
case. When the relay is configured in a system with other protective devices, it
is recommended to use a separate lead to the ground bus from each relay.
Connections should be made with minimum wire size of 14 AWG except as noted for the ground wire.
Typical external connections are shown in Figures 4-8 through 4-10. Internal connections are shown in
Figure 4-11.
Figure 4-8. Sensing Input Connections
9170100990 Rev N BE1-79M Installation 4-9
Page 50

#1 AND #2
19
20
17
18
15
16
13
14
11
12
9
10 8
7
6
5
4
3
2
1
SOLID-STATE PROTECTIVE RELAY
Reclosing
}
OUTPUT CONTACT
EXTERNAL CONNECTIONS
}
OUTPUT CONTACT
EXTERNAL CONNECTIONS
11-16-95
D772-004
GND
CASE GROUND
Figure 4-9. External Terminal Connections
4-10 BE1-79M Installation 9170100990 Rev N
Page 51

51
50
K4
K1
K7
K2
79M
15
79M
14
79M
19
79M
16
79M
20
79M
17
18
79M
52
TC
52
CC
LOCKOUT
ALARM
RELAY
FAIL
ALARM
RECLOSE
FAIL
ALARM
79M
11
K6
79M
13
K3
79M
1
K5
2
79M
CHANGER
TAP
LOAD
79M
12
52a 52b
+
-
1
1
LEGEND:
79M MULTIPLE SHOT RECLOSING RELAY
50 INSTANTANEOUS OVERCURRENT RELAY
51 TIME OVERCURRENT RELAY
52 CIRCUIT BREAKER
52a CIRCUIT BREAKER AUXILIARY CONTACTS
52b CIRCUIT BREAKER AUXILIARY CONTACTS
K1 RECLOSING OUTPUT CONTACTS
K7 PILOT RECLOSING OUTPUT CONTACTS
(LOCKOUT AND RESET-3, 5, 7, 8)
K2 LOCKOUT ALARM OUTPUT CONTACTS
K3 RECLOSE FAIL ALARM OUTPUT CONTACTS
(LOCKOUT AND RESET-2, 5, 6, 8)
K5 BLOCK LOAD TAP CHANGER OUTPUT CONTACTS
(CONTROL OUTPUT-B, C)
K4 INSTANTANEOUS TRIP ENABLE OUTPUT CONTACTS
(CONTROL OUTPUT-A, C)
TC TRIP COIL
CC CLOSING COIL
CONTROL CIRCUIT FUSING (IF USED)
MAY BE NO OR NC
1
5-13-91
D729-007
BE1-79M
K6 RELAY FAIL ALARM OUTPUT CONTACTS
9170100990 Rev N BE1-79M Installation 4-11
Figure 4-10. Typical Output Connections
Page 52

Figure 4-11. Typical Internal Connections
4-12 BE1-79M Installation 9170100990 Rev N
Page 53

SECTION 5 • TESTS AND ADJUSTMENTS
TABLE OF CONTENTS
SECTION 5 • TESTS AND ADJUSTMENTS ............................................................................................ 5-1
General .................................................................................................................................................. 5-1
Required Test Equipment ...................................................................................................................... 5-1
Operational Test .................................................................................................................................... 5-1
Reclosing Event Memory (REM)............................................................................................................ 5-6
Data Retrieval ..................................................................................................................................... 5-6
Data Retention ................................................................................................................................... 5-6
Clearing Stored Data .......................................................................................................................... 5-6
Figures
Figure 5-1. Operational Test Setup ........................................................................................................... 5-2
9170100990 Rev N BE1-79M Tests and Adjustments i
Page 54

ii BE1-79M Tests and Adjustments 9170100990 Rev N
Page 55

SECTION 5 • TESTS AND ADJUSTMENTS
General
Procedures in this section are for use in testing and adjusting a relay for the desired operation in a protective scheme. If a relay fails an operational test, or if an adjustment discloses a faulty relay, refer to Section
6, Maintenance.
Required Test Equipment
Minimum test equipment required for relay testing and adjustment is listed below. Refer to Figure 5-1 for
the test setup.
NOTE
Commercially available frequency relay test sets with frequency and time
generating accuracies exceeding those of the relay, and including electronic
switching, may be used.
• Appropriate ac or dc power source for relay operation.
• Appropriate ac source for frequency sensing. (A source with frequency stability of 0.00002 Hz must
exhibit phase noise of less than 90 db for accurate measurement. The accuracy and stability of this
source is necessary as the relay precisely measures the period between positive going zerocrossings of the applied waveform and responds instantaneously to the sensed condition.)
• Hardware (battery, and lamp, multimeter, etc.) or method of determining that the output contacts
close.
Operational Test
The following procedure verifies operation of the relay.
CAUTION
Performing the Operational Test Procedure with the relay in the NORMAL
Mode will increment the reclosing event memory. Prior to initiating the Operational Test Procedure, record the contents of the reclosing event memory.
Care must be taken not to exceed output contact ratings.
STEP 1. Connect the circuit as shown in Figure 5-1. K1 is a latching relay with a set of Form B aux-
iliary contacts to simulate a controlled breaker. If the Pilot Initiate option is not present, S4
and the connections to terminals 8 and 14 are not needed.
STEP 2. Press and release switch S7 (K1 reset) to assure that K1-auxiliary contacts are open (breaker
closed). Set thumbwheel switches as indicated below.
RESET (Note 1) 60.0 seconds (06 setting)
RECLOSE TIME (Note 2 and Note 3)
1 05.0 seconds (050 setting)
2 10.0 seconds (100 setting)
3 15.0 seconds (150 setting)
RECLOSE FAIL Inhibited (00 setting)
MAX. Cycle 1000.0 seconds (000 setting)
NOTES:
1. If reset timer option is D, set RESET to 60.
2. If reclose time delay option is A7, set RECLOSE TIME 2 to 010 and RECLOSE TIME 3 to
015.
3. If reclose time delay option is A8, set PILOT TIME to 99.
9170100990 Rev N BE1-79M Tests and Adjustments 5-1
Page 56

Figure 5-1. Operational Test Setup
STEP 3. If Instantaneous Trip Enable option is present in your unit, place all INSTANTANEOUS TRIP
toggle switches in the Block position. Apply relay operating power. POWER LED and RELAY
FAIL LED should light. In 60 seconds, RELAY FAIL LED should go out and RESET LED
should light. If the BLTC option is present, a continuity check should show continuity between
terminals 1 and 2. If BLTC NO option is present, a continuity check should NOT show continuity between terminals 1 and 2.
STEP 4. Set test timer to zero. Close RI switch (S1). If option 1 is 2 (Reclose Wait) do NOT close RI.
Place switch S5 to the RECLOSE position (terminal 15). Press and quickly release switch S6
(K1 latch) to simulate breaker opening. The OUTPUT ENERGIZE LED should light briefly.
The INST. STATUS LED should light and stay lit. Timer should indicate 50 milliseconds or
less. The RESET LED should light in 60 seconds.
STEP 5. Toggling the front panel RESET lever should extinguish the INST. STATUS LED.
STEP 6. Close switch S3 (IRB). Reset the timer. Press and release switch S6 (K1 latch) to simulate
breaker opening. After a short interval, the OUTPUT ENERGIZE LED should light briefly and
the STATUS 1 LED should light. Timer should indicate 5 ±0.05 seconds. If the BLTC NC option is present, a continuity check should NOT show continuity between terminals 1 and 2. If
BLTC NO option is present, a continuity check should show continuity between terminals 1
and 2.
STEP 7. Reset the timer. Press and release switch S6 (K1 latch) to simulate breaker opening. After a
short interval, the OUTPUT ENERGIZE LED should light briefly and the STATUS 2 LED
should light. Timer should indicate 10 ±0.1 seconds.
STEP 8. Reset the timer. Press and release switch S6 (K1 latch). After a short interval, the OUTPUT
ENERGIZE LED should light briefly and the STATUS 3 LED should light. Timer should indicate 15 ±0.15 seconds.
5-2 BE1-79M Tests and Adjustments 9170100990 Rev N
Page 57

STEP 9. Press and release switch S6 (K1 latch) to simulate breaker opening. LOCKOUT LED should
light immediately. If the BLTC NC option is present, a continuity check should show continuity
between terminals 1 and 2. If the BLTC NO option is present, a continuity check should NOT
indicate continuity between terminals 1 and 2.
STEP 10. Press and release switch S7 (K1 reset) to simulate breaker closed. Reset the timer. In 60
seconds, the LOCKOUT LED should go out and the RESET LED should light. Toggling the
front panel RESET lever should extinguish the STATUS 1, 2, and 3 LEDs. If automatic reset
of STATUS LEDs is selected on logic switch S23, the STATUS 1, 2, and 3 LEDs will extinguish when the relay reaches RESET.
STEP 11. Press and release switch S2 (DTL). The RESET LED should go out and the LOCKOUT LED
should light. A continuity check across terminals 19 and 20 should indicate continuity. In approximately 60 seconds, the LOCKOUT LED should go out and the RESET LED should light.
Open switch S3 (IRB).
STEP 12. Change RECLOSE TIME 1 thumbwheel setting to 000. Press and release switch S6 (K1
latch). The RESET LED should go out and the INST. LED should light. Press and release S6
again. The LOCKOUT LED should light. A continuity check across terminals 19 and 20
should indicate continuity. Press and release switch S7 (K1 reset). In 60 seconds, the
LOCKOUT LED should go out and the RESET LED should light. Toggling the front panel
RESET lever should extinguish the INST. LED. If automatic reset of STATUS LEDs is selected on logic switch S23, the STATUS INST. LED will extinguish when the relay reaches
RESET. Change RECLOSE TIME 1 thumbwheel setting to 050.
NOTE
Steps 13 and 14 apply only to units with the Pilot Initiate option. (Lockout and
Reset 3, 5, 7, or 8.)
STEP 13. Reset the timer. Open switch S1 (RI). If option 1 is 4 (Reclose Permissive) do NOT open S1.
Close switch S4 (PI). Place switch S5 to the PILOT position (terminal 14). Press and release
switch S6 (K1 latch). The PILOT LED should light. The timer should indicate 50 milliseconds or
less. If reclose time delay option is A8, PILOT TIME delay will be 0.99 ±0.005 seconds.
STEP 14. Before the relay reaches RESET, reset the timer. Place switch S5 to the RECLOSE position
(terminal 15). Press and release switch S6 (K1 latch). After 10 seconds, the OUTPUT ENERGIZE LED should light briefly and the STATUS 2 LED should light. The timer should indicate 10
±.10 seconds. In 60 seconds the RESET LED should light. Toggling the front panel RESET
lever should extinguish the STATUS 2 and PILOT LEDs. If automatic reset of STATUS LEDs is
selected on logic switch S23, the STATUS 2 and PILOT LEDs will extinguish when the relay
reaches RESET. Open switch S4 (PI). Close switch S1 (RI). If option 1 is 2 (Reclose Wait) do
NOT close S1.
NOTE
Steps 15 through 17 apply only to units with the Instantaneous Trip Enable
option. (Control Outputs A, C, D, E, F, G, H, or I.)
STEP 15. Set RECLOSE TIME 1, 2, and 3 thumbwheel switches to 010. (If reclose time delay option is
A7, set RECLOSE TIME 2 and 3 to 001). Verify that the RESET LED is lit. Simultaneously
place all INSTANTANEOUS TRIP toggle switches in the ENABLE position. Verify that switch
S23 (IRB) is still open (reference step 11).
NOTE
Step 16 should be performed in less than 60 seconds to prevent the relay from
going into RESET.
9170100990 Rev N BE1-79M Tests and Adjustments 5-3
Page 58

STEP 16. Prepare for continuous continuity testing between terminals 17 and 18. Initial test should indi-
cate continuity if I.T.E. NO option is selected. If I.T.E. NC option is selected, all continuity
indications will be the opposite of that described for this step.
a. Press and release S6. The INST. LED should light, and there should be continuity between
terminals 17 and 18.
b. Press and release S6. In 1 second, the STATUS 1 LED should light, and there should be
continuity between terminals 17 and 18.
c. Press and release S6. In 1 second, the STATUS 2 LED should light, and there should be
continuity between terminals 17 and 18.
d. Press and release S6. In 1 second, the STATUS 3 LED should light and continuity between
terminals 17 and 18 should exist.
e. Press and release S6. The LOCKOUT LED should light.
f. Press and release S7. There should be continuity between terminals 17 and 18. If Control
Output option is F or G (I.T.E. Cold Load), terminals 17 and 18 will NOT have continuity.
Disconnect continuity tester.
STEP 17. In 60 seconds, the RESET LED should light and the LOCKOUT LED should extinguish. Tog-
gling the front panel RESET lever should extinguish the STATUS 1, 2, 3, and INST. LEDs. If
automatic reset of STATUS LEDs is selected, the STATUS 1, 2, 3, and INST. LEDs will extinguish when the relay reaches RESET. Place all INSTANTANEOUS TRIP switches into the
BLOCK position.
NOTE
Step 18 applies only to units with the Reclose Failure options (i.e., - Lockout
and Reset options 2, 5, 6, or 8).
STEP 18. Disconnect the test circuit from terminal 16. Set RECLOSE FAIL thumbwheel setting to 50 (i.e.,
5.0 seconds). Press and release switch S6 (K1 latch). The INST. and OUTPUT ENERGIZE
LEDs should light. In approximately 5 seconds, the OUTPUT ENERGIZE LED should go out
and the RECLOSE FAIL and LOCKOUT LEDs should light. Check for continuity between terminals 12 and 13. Press and release switch S7 (K1 reset). Wait for RESET LED to light.
Toggling the front panel RESET lever should extinguish the INST. LED. If automatic reset of
STATUS LEDs is selected on logic switch S23, the STATUS INST. LED will extinguish when
the relay reaches RESET. Reconnect the test circuit to terminal 16.
STEP 19. Set MAX. CYCLE thumbwheel setting to 020. If present, set RECLOSE FAIL thumbwheel
setting to 00. Press and release switch S6 (K1 latch). The INST. and OUTPUT ENERGIZE
LEDs should light. In approximately 20 seconds, the MAX. CYCLE and LOCKOUT LEDs
should light. Press and release switch S7 (K1 reset) and wait for RESET LED to light. Toggling
the front panel RESET lever should extinguish the INST. LED. If automatic reset of STATUS
LEDs is selected on logic switch S23, INST. LED will extinguish when the relay reaches RESET. Reconnect the test circuit to terminal 16.
NOTE
Step 19 applies only to units with the Maximum Cycle options (i.e., - Lockout
and Reset options 4, 6, 7, or 8).
STEP 20. Close RI and IRB input switches.
STEP 21. Press and release S7 (K1 reset) and allow reclose time delay to expire.
5-4 BE1-79M Tests and Adjustments 9170100990 Rev N
Page 59

NOTE
Steps 20 through 23 apply only to units with option 1, special contact assignment 3 (Pre-lockout).
STEP 22. After the breaker recloses and before reset time delay expires, press and release S6 (K1 latch),
and allow time delay to expire.
STEP 23. Monitor terminals 14 and 16 for continuity. Repeat Step 22 until the last programmed reclose
occurs. When the last programmed reclose occurs, terminals 14 and 16 should have continuity.
NOTE
Step 24 applies only to units with option 1, special contact assignment 1
(Reset Inhibit).
STEP 24. Repeat Steps 20 and 21, but close the Reset Inhibit input (PI) before the reset time delay
expires. Verify RESET INHIBIT LED lights when reset inhibit input is closed. After 60 seconds,
verify relay is NOT RESET.
STEP 25. Open Reset Inhibit input and verify relay advances to reset after the remaining time expires
(from the point reset was interrupted in Step 24), and RESET INHIBIT LED extinguishes.
NOTE
Step 26 applies only to units with option 1, special contact assignment 2
(Reclose Wait).
STEP 26. Initially leave Reclose Wait input (RI) open. Repeat Steps 20 through 22, but close the Reclose
Wait (RI) input while reclose time delay is timing.
STEP 27. Verify that after five seconds expires, no reclose occurs.
STEP 28. Open Reclose Wait input and verify relay recloses after the remaining time expires (from the
point reclose was interrupted in Step 26.)
NOTE
Step 29 applies only to units with option 1, special contact assignment 4
(Reclose Permissive).
STEP 29. Repeat Steps 20 and 21, but before reclose time delay expires, open the Reclose Permissive
(RI) input.
STEP 30. Verify that RESET LED flashes and no reclose occurs after reclose time delay expires.
STEP 31. Close Reclose Permissive (RI) input and verify relay recloses after the remaining time expires
(from the point reclose was interrupted in Step 29.)
CAUTION
Performing the Operational Test Procedure has incremented the reclosing event
memory. Record the contents of the reclosing event memory or clear the memory entirely before placing the relay into normal service operation.
This concludes the operational test procedure.
9170100990 Rev N BE1-79M Tests and Adjustments 5-5
Page 60

Reclosing Event Memory (REM)
Data Retrieval
The following procedure is an example of retrieving data from the Reclosing Event Memory.
STEP 1. Remove the relay from service.
STEP 2. Position the NORMAL/TEST switch (on logic board) to TEST.
STEP 3. Position RESET thumbwheels to 00.
STEP 4. Adjust RECLOSE TIME 3 LSD thumbwheel to the desired type of event data to be retrieved.
(Refer to Table 3-4).
STEP 5. Verify that the appropriate STATUS LEDs light. The correlation between the STATUS LEDs
and the RECLOSE TIME 3 (LSD) verify proper memory addressing.
STEP 6. Position RECLOSE TIME 1 thumbwheels to 000.
STEP 7. Observe STATUS 3 LED and RESET LED. These two LEDs guide the operator as to wheth-
er the RECLOSE TIME 1 thumbwheel number is less than or greater than the actual number
of events stored in memory.
STEP 8. Begin with MSD of RECLOSE TIME l and increase setting until RESET LED lights, and
STATUS LED goes out. Setting is now greater than event count in memory. Decrease setting
one number.
STEP 9. Increase the setting on RECLOSE TIME 1, 2nd MSD, until RESET LED lights, and then
decrease the setting one number.
STEP 10. Increase the setting on RECLOSE TIME 1, LSD, until the STATUS LED 3 and RESET LED
light. The number shown on RECLOSE TIME 1 setting equals the number of events recorded.
Data Retention
To retain the data that is stored in memory and resume the event count, proceed as follows:
STEP 1. Position the NORMAL/TEST switch (on the logic board) to NORMAL.
STEP 2. Return all front panel controls to their normal service positions.
STEP 3. Return relay to service. Relay will resume normal operation and the event count from that
point.
Clearing Stored Data
To clear the old data from memory before returning the relay to normal service, proceed as follows:
STEP 1. Toggle RESET lever once. This action clears memory. Memory clear can be verified by
keeping RECLOSE TIME l at 000, and by rotating the LSD of RECLOSE TIME 3 from 0
through 5. The STATUS 3 and RESET LEDs should light at each setting.
STEP 2. Position the NORMAL/TEST switch (on the logic board) to NORMAL.
STEP 3. Return all front panel controls to their normal service position.
STEP 4. Return the relay to service. The relay will resume normal operation and begin a new count of
events.
5-6 BE1-79M Tests and Adjustments 9170100990 Rev N
Page 61

SECTION 6 • MAINTENANCE
TABLE OF CONTENTS
SECTION 6 • MAINTENANCE .................................................................................................................. 6-1
General .................................................................................................................................................. 6-1
Storage ................................................................................................................................................... 6-1
Test Plug ................................................................................................................................................ 6-1
9170100990 Rev N BE1-79M Maintenance i
Page 62

ii BE1-79M Maintenance 9170100990 Rev N
Page 63

SECTION 6 • MAINTENANCE
General
BE1-79M Multiple Shot Reclosing Relay requires no preventive maintenance other than a periodic operational test (refer to Section 5, Tests and Adjustments, for operational test procedure). If factory repair is
desired, contact the Customer Service Department of the Power Systems Group, Basler Electric, for a
return authorization number prior to shipping.
Storage
This device contains long-life electrolytic capacitors. For devices that are not in service (spares in storage), the life of these capacitors can be maximized by energizing the device for 30 minutes once per
year.
Test Plug
Test plug (Basler P/N 10095) provides a quick, easy method of testing relays without removing them from
the case. The test plug is simply substituted for the connection plug. This provides access to the external
stud connections as well as to the internal circuitry.
The test plug consists of a black and red phenolic molding with twenty electrically separated contact
fingers connected to ten coaxial binding posts. The ten fingers on the black side are connected to the
inner binding posts (black thumbnuts) and tap into the relay internal circuitry. The ten fingers on the red
side of the test plug are connected to the outer binding posts (red thumbnuts) and to the relay case
terminals.
When testing circuits connected to the bottom set of case terminals, the test plug is inserted with the
numbers 1 through 10 facing up. When using the test plug in the upper part of the relay, the numbers 11
through 20 are face up. It is impossible, due to the construction of the test plug, to insert it with the wrong
orientation.
9170100990 Rev N BE1-79M Maintenance 6-1
Page 64

6-2 BE1-79M Maintenance 9170100990 Rev N
Page 65

SECTION 7 • DIFFERENCE DATA
TABLE OF CONTENTS
SECTION 7 • DIFFERENCE DATA .......................................................................................................... 7-1
General .................................................................................................................................................. 7-1
Differences ............................................................................................................................................. 7-1
Compatibility........................................................................................................................................... 7-1
Connections ........................................................................................................................................... 7-1
Test Plug Adapter .................................................................................................................................. 7-3
Function .............................................................................................................................................. 7-3
Assembling Adapter to Test Plug........................................................................................................... 7-4
Figures
Figure 7-1. External Connections .............................................................................................................. 7-3
Figure 7-2. Sensing Input Connections
Figure 7-3. Test Plug and Adapter
Figure 7-4. Improvised Test Setup
Tables
Table 7-1. Test Adapters ........................................................................................................................... 7-4
..................................................................................................... 7-4
............................................................................................................ 7-5
............................................................................................................ 7-5
9170100990 Rev N BE1-79M Difference Data i
Page 66

ii BE1-79M Difference Data 9170100990 Rev N
Page 67

SECTION 7 • DIFFERENCE DATA
General
This section provides the information necessary to support BE1-79M Multiple Shot Reclosing Relays,
Revision D and previous.
Differences
BE1-79M Multiple Shot Reclosing Relay, Revision F added the following features and capabilities.
•
Six additional control output options
• Two additional reclose time delay options
• Y-type power supply option
• Reset timer 1-100 second time delay option
• Four additional special contact assignment options
• A four function, 16 position, field selectable logic switch
• Moved sensing input power module from outside the case to inside the case
The following style number identification chart is applicable to relays, revision D and previous, and will
identify those relay features and capabilities. Disregard information contained in Sections 2 through 6 of
this instruction manual that are peculiar to relays, revision F and subsequent. For installation, testing, and
maintenance of revision D and previous relays, the following information is necessary.
Compatibility
Revision E and subsequent are backward compatible with revision D and previous with one exception.
This exception is a relay with a type Z power supply (250 Vdc/230 Vac) and isolated sensing. To use a
relay revision E or subsequent in a revision D or previous relay installation (case), the external sensing
module (part number 9170206101 or part number 9170206102) must be removed from the wiring scheme
and connected for isolated sensing as shown in Figure 4-8. All other revision E and subsequent relays
may be installed into existing installations (cases) without rewiring.
NOTE
Be sure the relay case is hard-wired to earth ground with no smaller than 12
AWG copper wire attached to the ground terminal on the rear of the relay
case. When the relay is configured in a system with other protective devices, it
is recommended to use a separate lead to the ground bus from each relay.
Connections
External connections for the contact sensing inputs are made at the power module on the rear of the relay
case (Figure 7-1). External connections for the output contacts are made at the relay case terminals. If a
type Z power supply has been selected, external connections for the contact sensing inputs are made at
the sensing input module located external to the relay. The sensing input module may be located remotely from the relay. Typical sensing input module connections wired to the remote power module are shown
in Figure 7-2. Connections should be made using a minimum wire size of 14 AWG stranded wire except
as noted for the ground wire.
9170100990 Rev N BE1-79M Difference Data 7-1
Page 68

OPTION 3
OPTION 4
OPTION 2
OPTION 1
SUPPLY
B
POWER
BE1-79M
MODEL NO.
SENSING INPUT
TYPE
B) Multi-shot
LOCKOUT & RESET
J) 125 Vdc
100/120 Vac
K) 48 Vdc
L) 24 Vdc
Z) 250 Vdc
230 Vac
O) Standard
L) Non-Isolated
Contact
Sensing Input
M) Isolated
Contact
Sensing Input
0) None
F) Semi-Flush
Mounting
P) Projection
Mounting
1) Lockout and Reset
2) Lockout and Reset
with Reclose Failure
Alarm
3) Lockout and Reset
with Pilot Initiate
4) Lockout and Reset
with Maximum Cycle
Time
5) Lockout and Reset
with Reclose Failure
Alarm and Pilot
Initiate
6) Lockout and Reset
with Reclose Failure
Alarm and Maximum
Cycle Time
7) Lockout and Reset
with Pilot Initiate
and Maximum Cycle
Time
8) Lockout and Reset
with Reclose Failure
Alarm, Pilot Initiate,
and Maximum Cycle
Time
CONTROL OUTPUTS
0) None
A) Instantaneous
Trip Enable -
B) Block LTC-N.C.
Contact
C) ITE-N.O.
Contact
Block LTC-
N.C. Contact
RECLOSE TIME DELAY
A6) 0.1-99.9 sec.
10-1000 sec
C) Time Delay
RESET TIMER
0
NOTE:
2 Pilot Initiate Option required
(L.O. & Reset must be 3, 5, 7, 8)
N.O. Contact
D) ITE-N.C. Contact
E) ITE-N.C. Contact
Block LTC-
N.C. Contact
F) ITE-N.O. (Cold
Load)
G) ITE-N.O. (cold
Load)
Block LTC-
N.C. Contact
H) ITE N.O.
BLTC N.O.
I) ITE N.C.
BLTC N.O.
1) Reset Inhibit
2) Reclose Wait
3) Pre-Lockout
4) Reclose
Permissive
3
SPECIAL CONTACT
ASSIGNMENT
3
Y) SWITCHABLE
48Vdc OR
125Vdc
A7) 0.1-99.9 sec.
(1st T.D.)
(Pilot)
A8) 0.03-0.99 sec
1-999 sec.
(2nd & 3rd T.D.)
0.1-99.9 sec.
(1st, 2nd & 3rd T.D.)
2
1-100 sec
D) Time Delay
3 Not available with Pilot Initiate
(L.O. & Reset must be 1, 2, 4, or 6)
BE1-79M
D677-004
1-17-97
STYLE NUMBER IDENTIFICATION CHART
7-2 BE1-79M Difference Data 9170100990 Rev N
Page 69

19
20
17
18
15
16
13
14
11
12
9
10 8
7
6
5
4
3
2
1
SOLID-STATE PROTECTIVE RELAY
Reclosing
TB1
G 10 89 67 5 4 3
#1 AND #2 OUTPUT
CONTACT EXTERNAL
CONNECTIONS
AND POWER SUPPLY
FOR CONTACT INPUTS
EXTERNAL CONNECTIONS
EXTERNAL
OUTPUT CONTACT
CONNECTIONS
POWER MODULE (NOTE 1)
11-16-95
D806-011
NOTE:
1. When projection mounting has been selected, the power module must be removed prior to installation
and then attached to the rear of the mounting panel after the relay has been installed. External
contact sensing inputs are then wired to the power module.
Figure 7-1. External Connections
Test Plug Adapter
Function
Relays revision D and previous have voltage-dropping resistors mounted externally on the back side of
the case. These resistors are part of the internal circuitry, despite their external location. When using test
plug, (Basler part number 10095), with these relays, compensating resistors must be added. For ease of
use, Basler Electric has manufactured test plug adapters with internal compensating resistors. Table 7-1
provides the appropriate test plug adapter part number for each power supply type. The test plug adapter
is shown attached to the test plug in Figure 7-3. The adapter should be attached to the test plug before it
is inserted into the relay.
If the correct adapter is not available, a test setup may be improvised by inserting the proper resistors in
series with certain test plug terminals as shown in Figure 7-4. Notice that supplementary terminals (not
supplied by Basler Electric) have been added for convenience in making the connections.
9170100990 Rev N BE1-79M Difference Data 7-3
Page 70

Table 7-1. Test Adapters
P/N 9 1702 06 107 WITH PI
5 4 3 2 1 7
PI RI DTL 52b IRB
-
+
SENSING
POWER
NON-ISOLATED SENSING
LEGEND:
RI RECLOSE INITIATE SENSING INPUT CONTACTS
DTL DRIVE-TO-LOCKOUT SENSING INPUT CONTACTS
52b CIRCUIT BREAKER SENSING INPUT CONTACTS
IRB INSTANTANEOUS RECLOSE BYPASS SENSING INPUT CONTACTS
PI PILOT INITIATE SENSING INPUT CONTACTS (OPTIONAL)
6-19-91
D806-009
BE1-79M
9106758
POWER
OPERATING
3
4
TB1
POWER MODULE
3 4 5 6 7
TB1
250 Vdc
230 Vac
TB2
TB1
SENSING
MODULE
P/N 9 1702 06 108 WITHOUT PI
250 Vdc
WITH TYPE Z
POWER SUPPLY
230 Vac
250 Vdc
TB1
POWER MODULE
TB1
4
3
OPERATING
POWER
8 5 7 6 10 9
P/N 9 1702 06 102 WITHOUT PI
MODULE
SENSING
TB2
12345
P/N 9 1702 06 101 WITH PI
TB1
7
6
7
IRB52bDTLRIPI
POWER SUPPLY
WITH TYPE Z
ISOLATED SENSING
Power Supply Type Test Adapter Part Number
24 V None required
48 V 9170111100
125 V 9170111102
230 V
9170111104 ∗
CAUTION
∗ The surface of 230 V units may become hot.
Assembling Adapter to Test Plug
STEP 1. Remove top and bottom covers of test adapter by removing the 4 retaining screws.
STEP 2. Remove ten black thumbnuts from test plug.
STEP 3. The studs of the test plug may be entered into the ten matching holes of the adapter. Before
STEP 4. Replace the ten black thumbnuts. Firmly hand-tighten each thumbnut.
STEP 5. Replace top and bottom covers and fasten using 4 retaining screws removed in step 1.
7-4 BE1-79M Difference Data 9170100990 Rev N
Figure 7-2. Sensing Input Connections
assembling the test plug to the adapter, it necessary to orient the two units to each other by
holding the black side of the test plug UP as it engages the adapter. (The adapter itself is
held topside UP - i.e. front panel letters are upright)
Page 71

1
2
3
4
5
6
7
8
10
9 9
10
8
7
6
5
4
3
2
1
R5
R4
R2
R3
R1
TEST PLUG
TERMINALS
SUPPLEMENTARY
TERMINALS
6-19-91
D806-010
BE1-79M
Figure 7-3. Test Plug and Adapter
Figure 7-4. Improvised Test Setup
9170100990 Rev N BE1-79M Difference Data 7-5
Page 72

7-6 BE1-79M Difference Data 9170100990 Rev N
Page 73

Page 74

®
12570 State Route 143
Highland IL 62249-1074 USA
www.basler.com, info@basler.com
Phone +1 618.654.2341 Fax +1 618.654.2351
 Loading...