

Page 1

BeoConnect
(For Windows)
Introduction
Daily use
Launch BeoConnect
Connect to products
Make music available
Make photos and websites available
Installation
Settings
Manage products
Registration
Version and updates
What to do if …
Close or uninstall BeoConnect
Formats and requirements
Terms of use
Page 2

Introduction
BeoConnect enables you to transfer music from
your computer to a Bang & Olufsen product, such as
BeoSound 5, and to use features such as coloured
favourite lists. BeoConnect is the connecting link
between your favourite media player, for example
iTun e s® or Windows Media Player® and your Bang &
Olufsen product.
BeoConnect is available as a free download from
www.bang-olufsen.com.
Guide to BeoConnect
This Guide gives you information on how to use and
install BeoConnect.
Page 3
Daily use
Principles of operation and interaction
Tray icon
The tray icon changes colours depending on its state:
- When no products are connected, the icon is white.
- When BeoConnect is connecting to a product, the icon
switches between white and black.
- When a product is connected, the icon is black.
- While copying is in progress, the icon switches between red
and black.
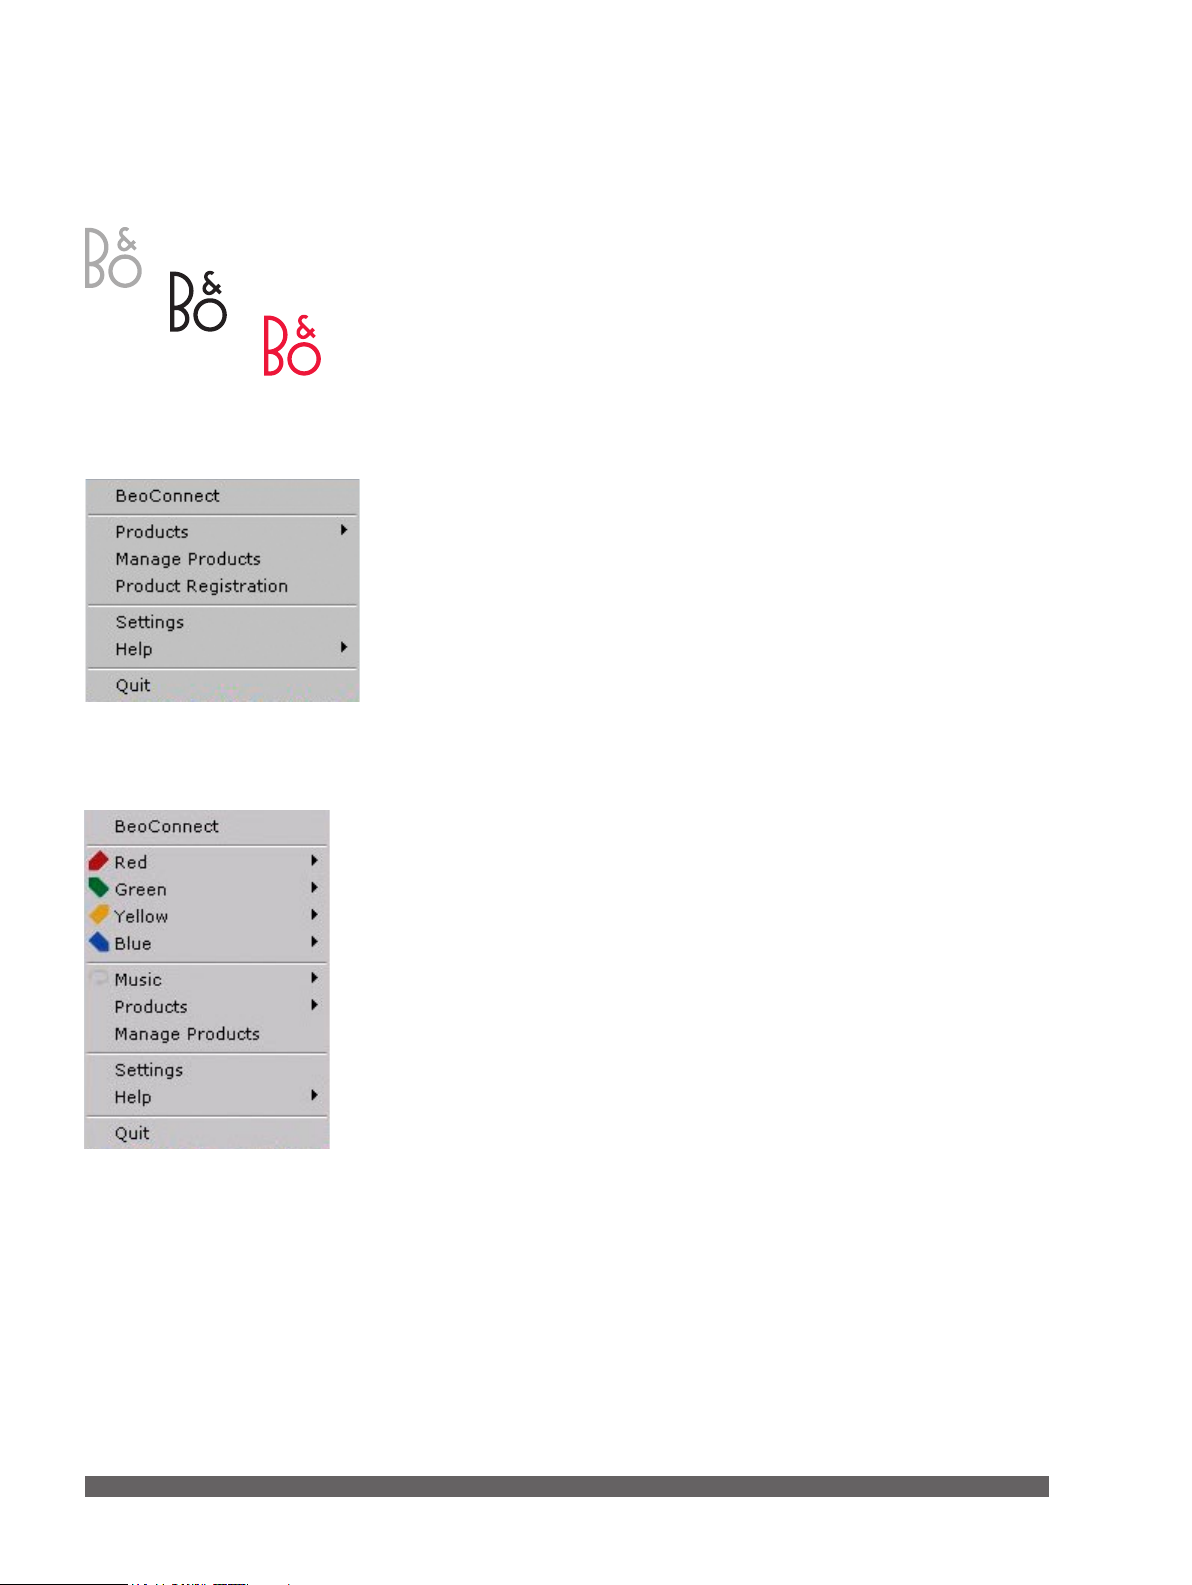
Right-click menu – no product connected.
Right-click menu
Depending on whether a product is connected or not, the
right-click menu contains different menu items allowing you
to access the different functions and features of BeoConnect.
The menu items are described in more details in the respective
chapters.
Right-click menu – product connected.
3
Page 4
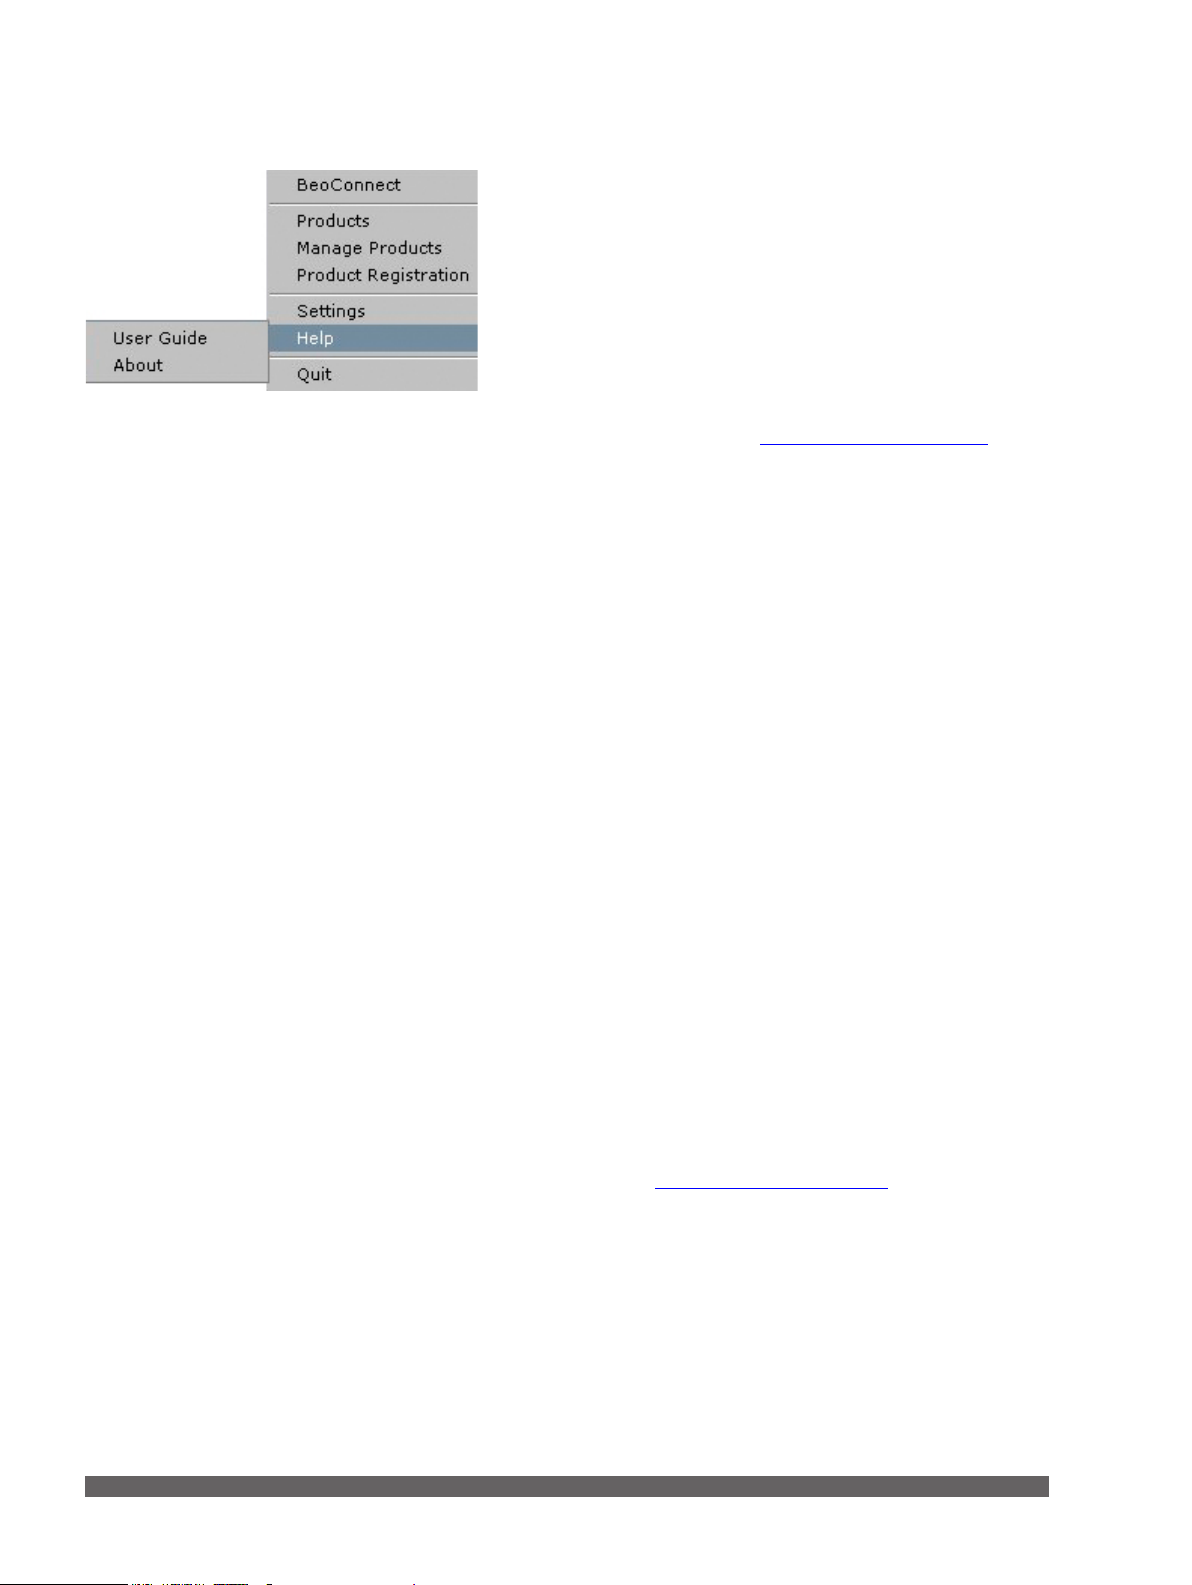
‘Help’ menu.
The ‘Help’ menu
Selecting ‘User Guide’ in the menu opens this Guide. The
‘About’ menu offers you a dialogue box with version
information and a possibility to check for updates. The online
User Guide and updates are only available if the computer is
connected to the internet.
Copy and map music
Before you can copy and map music, you must add your
product to the ‘Product List’, refer to ‘Manage products’. Later
in the Guide you nd detailed information on how to launch
BeoConnect, connect products, and copy and map music.
Copy and map your music …
> Launch the program and open the right-click menu.
> Select ‘Products’ and connect to the desired product if the
product is not connected automatically.
> Highlight a coloured favourite list and select the music to
be mapped, or …
> … highlight ‘Music’, then highlight ‘Select’ and right-click
to select the music to be copied. Then select ‘Start copying’.
Launch BeoConnect
When the copying is in progress, the tray icon switches
between red and black and when the copying process has
completed, the tray icon becomes black.
Launch BeoConnect …
> If the program does not launch automatically, click
’BeoConnect‘ in the ‘Start’ menu.
The program checks for updates. If any updates are available,
you can choose to update the program, before you continue
the launch process. Earlier connected products are listed as
well as Bang & Olufsen products present on the network.
Some products are detected automatically, others need to be
added manually. Refer to ‘Manage products’. If ‘Auto Connect’
is activated, the connection process begins.
You can set BeoConnect to launch automatically when you
switch on the computer in the ‘Settings’ menu.
4
Page 5
Connect to products
If music les have previously been selected for copying or a
playlist has been mapped to a coloured favourite list,
copying starts automatically upon connection.
Connection to a product on the network, such as BeoSound 5,
can take place either manually or automatically.
Connection takes place in the following situations:
– When a product is selected from ‘Products’ in the right-click
menu.
– If ‘Auto Connect’ is activated in the ‘Settings’ menu, the
program connects to the last connected product when it
launches. ‘Auto Connect’ is activated by default.
– When credentials for a product are submitted.
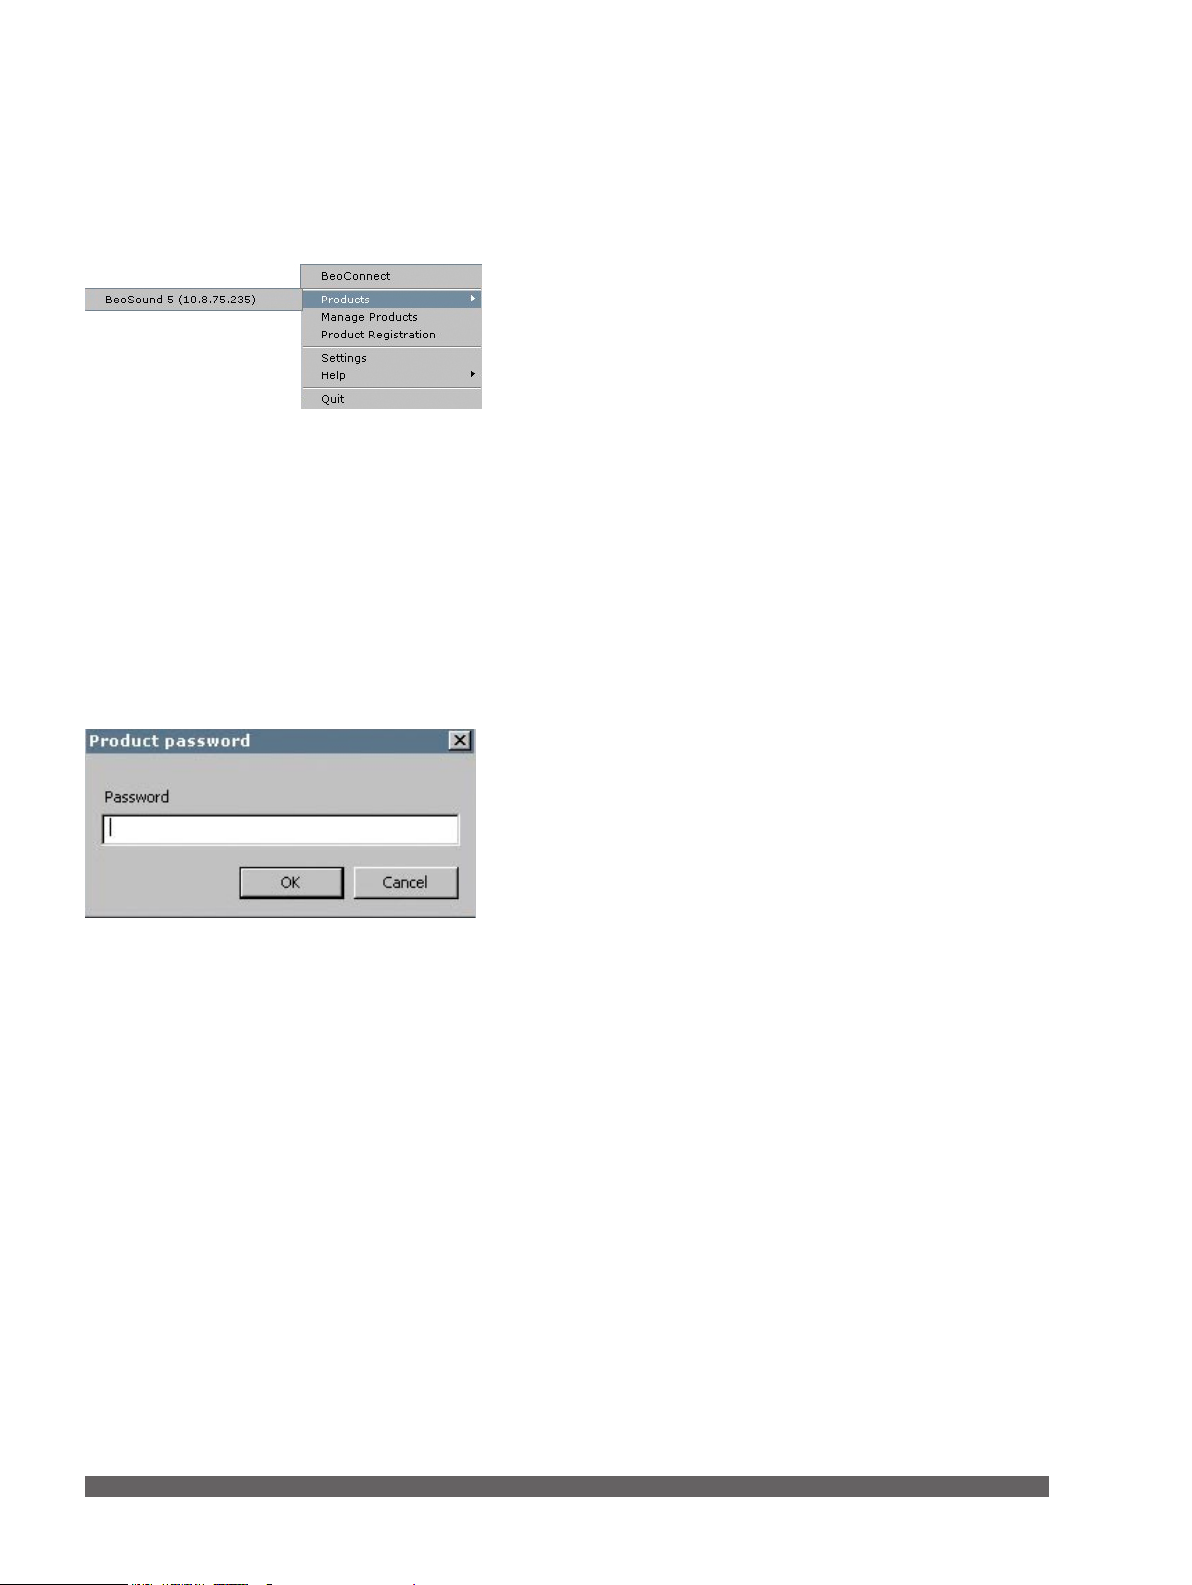
Connect or disconnect to a product …
> Open the right-click menu and highlight ‘Products’ to
display a list of available products.
> Click on a desired product to connect it, or to disconnect it
if it is already connected.
When a product is connected the tray icon is black.
You are prompted to enter a password for your Bang & Olufsen
product if BeoConnect does not have the password or has
an incorrect password for a product it is trying to connect to.
If the password on your Bang & Olufsen product has been
changed, you must also change it here. For further information
about passwords, please contact your Bang & Olufsen retailer.
‘Product password’ dialogue box.
A product cannot be found on the network
If a product cannot be found on the network, ‘Unable to
connect to selected product’ is shown on the screen. You may
have to add the product manually.
5
Page 6
Make music available
Mapping of coloured favourite lists is remembered for the
ve most recently connected products. For further
information about coloured favourite lists, refer to the guide
enclosed with the connected product.
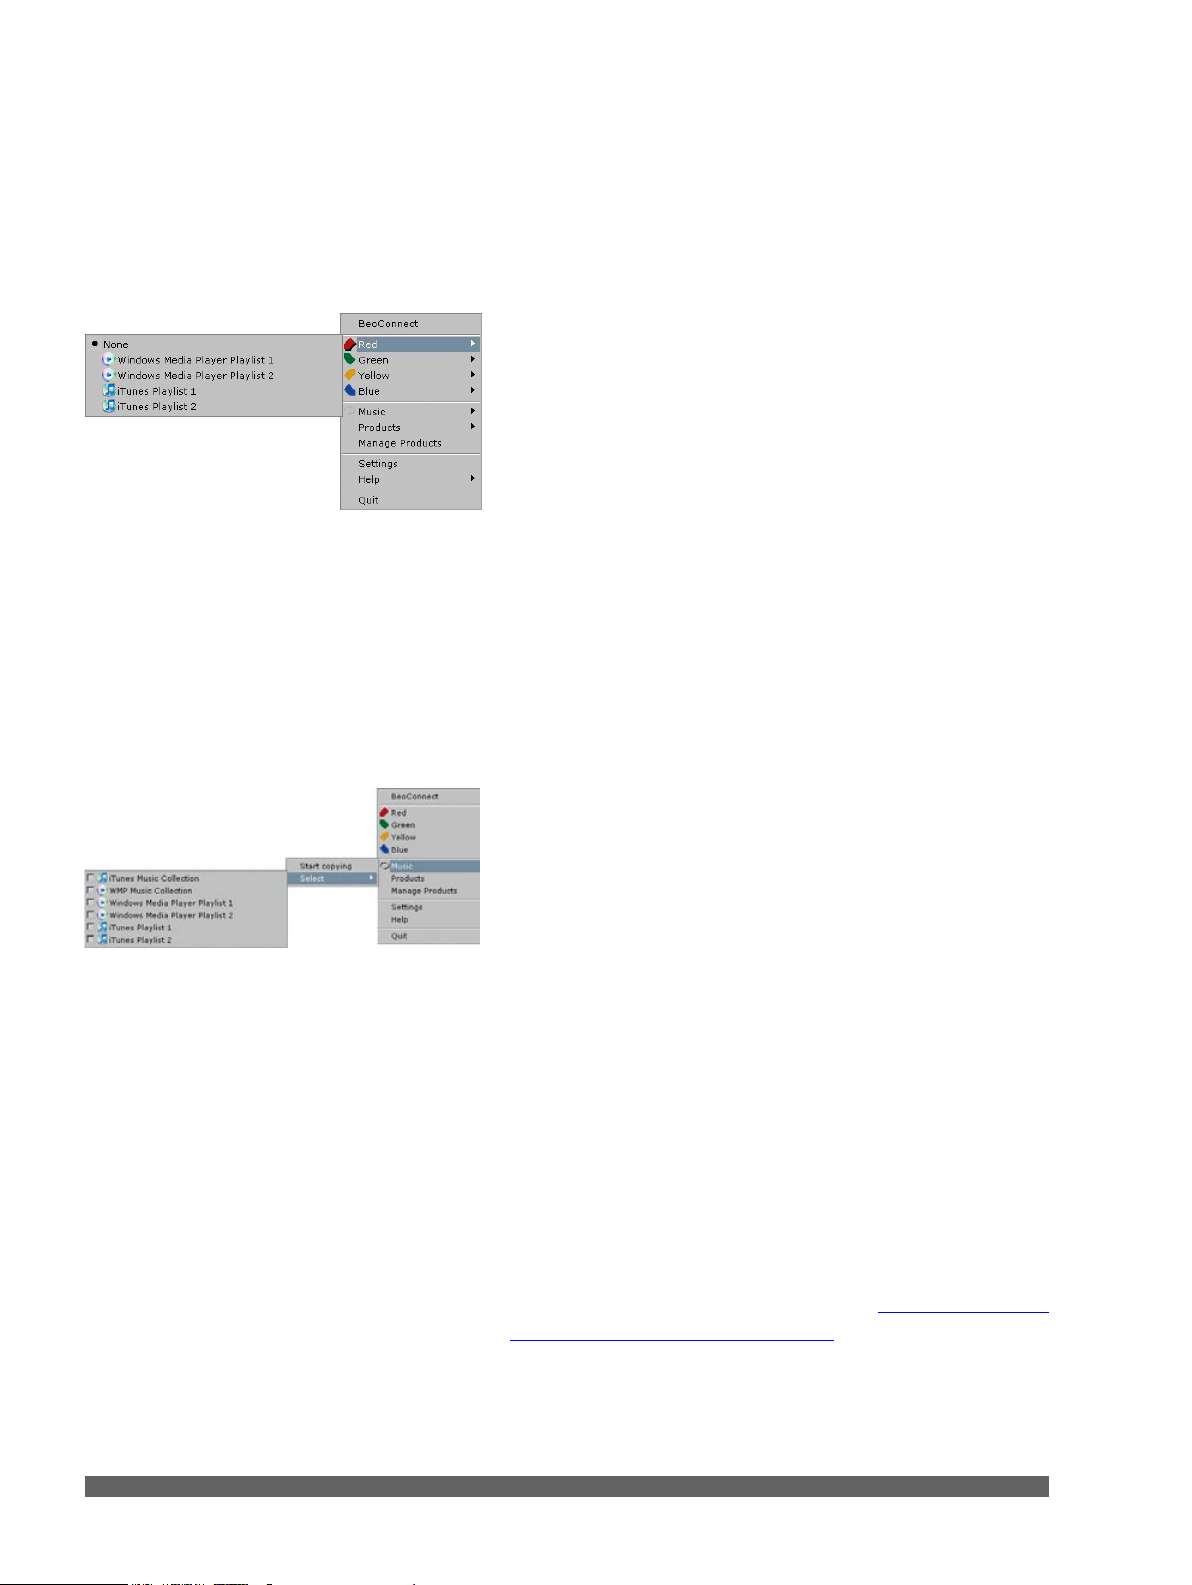
Map coloured favourite lists
Select a playlist from Windows Media Player or iTunes and
map it to a coloured favourite list on the connected product.
Mapping of contents in the playlist then starts.
Map a coloured favourite list …
> Open the right-click menu and highlight a coloured
favourite list, such as ‘Red’, to bring up available playlists.
> Select a playlist. The copy process begins. When the
process has completed, the tray icon becomes black.
Remove mapping of a coloured favourite list …
> Open the right-click menu and highlight a coloured
favourite list.
> Select ‘None’ to remove the mapping of the coloured
favourite list, if you do not want future changes in the
coloured favourite list to be transferred to the connected
product. This will not remove the coloured favourite list
from your product. To remove music from your Bang &
Olufsen product, refer to the Guide enclosed with your
product.
Playlists and music collections.
Select music to be copied
Copy playlists and media collections to the connected product.
Select music to be copied …
> Open the right-click menu and highlight ‘Music’.
> Highlight ‘Select’.
> Right-click to select one or more playlists or media
collections to be copied. If you do not want a selected
playlist to be copied, remove the tick.
Start copying of selected playlists and media collections …
> Open the right-click menu and highlight ‘Music’.
> Select ‘Start copying’. The copy process begins. When the
process has completed, the tray icon becomes black.
Copy media changes
If changes are made in your media player, a copy process of
changed playlists and media collections begins. The changes
are then copied to the connected product. Refer to the section
about copying progress in this chapter. If a copy process is
already in progress, copying continues and the changes are
copied afterwards.
6
Page 7

Status window.
Copying Progress
A copy process starts upon mapping of coloured favourite
lists, selection of playlists or media collections. Changes will be
copied upon connection to a product.
Copying media …
BeoConnect copies valid tracks, cover art if present, and
indicates with a black tray icon when the copy process has
completed. For information about supported le formats, refer
to ‘Formats and requirements.
> Left-click the tray icon while copying is in progress to bring
up a status window.
> Click ‘OK’ to remove the window.
While copying is in progress no operations can be performed in
BeoConnect other than cancelling the copy.
Copying can only take place if Windows Media Player or iTunes
is running, and the les are valid. If the product disk is full or
network connection is lost, copying is suspended. When the
product disk is no longer full, the copying process resumes.
If ‘Overwrite Files’ in the ‘Settings’ menu is activated and
BeoConnect is copying a le that is identical in name, but not
in size and/or timestamp with an existing le, the existing le
is overwritten. If ‘Overwrite Files’ in the ‘Settings’ menu is
deactivated and BeoConnect is copying a le that is identical
in name, but not in size and/or timestamp with an existing le,
the le is duplicated.
Cancel a copying process …
> Click ‘Cancel copy’ to cancel the copying process.
7
Page 8

Make photos and websites
available
Make photos available
To access your photos and smaller video clips on your product
you must rst make them available on your computer and then
copy the les manually. BeoConnect will ensure that a network
drive is mapped on your computer to your product.
Make your photos available …
> Place photos and video clips on your computer.
> Open ‘Explorer’. Mark and copy selected les.
> Select the drive which is mapped to your BeoMaster 5. You
can select which network drive should be shared in the
BeoConnect’s ‘Settings’ menu.
> Paste your photos and video clips to the ‘Photo’ folder. You
can create subfolders in the ‘Photo’ folder to help you sort
and organise the les.
> Photos and video clips are now available when you activate
BeoMaster 5 via your television.
Make Websites available
In Internet Explorer you can create favourites and copy them
as shortcuts to BeoMaster 5 and thereby be able to open the
websites as stored favourites on your television.
Make your Websites available …
> Open ‘Explorer’ and select the folder in which the
favourites are stored as shortcuts on your computer. In
Windows XP shortcuts are stored in: ‘C:\Documents and
Settings\<your username>\Favorites’. Refer to ‘Windows
Help’ to determine the location.
> Mark and copy selected shortcuts.
> In ‘Explorer’ select the drive which is mapped to your
BeoMaster 5. You can select which network drive should
be shared in the BeoConnect’s ‘Settings’ menu.
> Paste the favourites from your computer to the ‘Favorites’
folder on the mapped network drive. You may copy to
already created folders or create your own folders.
> The websites are now available for browsing on your
television.
Refer to your ‘Windows Help’ to learn more about how to
copy and move les and folders.
8
Page 9

BeoConnect installation program.
Installation
Install BeoConnect on the computer
> Launch the installation program and click to select a
language. A welcome message appears.
> Click to accept the End User License Agreement (EULA)
when prompted.
> Select a path for installation of BeoConnect when
prompted. A BeoConnect shortcut is added to the ‘Start’
menu and the installation program detects which media
players are installed.
> Select whether the setting ‘Launch BeoConnect at start-up’
should be activated, so that BeoConnect launches when
the computer is switched on and copying and mapping of
selected music takes place automatically. Select whether
the settings ‘Use Windows Media Player with BeoConnect’
and ‘Use iTunes with BeoConnect’ should be activated, so
that your playlists in Windows Media Player and/or iTunes
becomes available.
> The installation has completed and the launch process
begins.
Installation is cancelled if:
– The operating system is not compatible. Refer to ‘Formats
and requirements.
– The BeoConnect version is older than the existing version
on the computer.
– The EULA is not accepted.
If BeoConnect is already installed, a repair or upgrade option is
presented instead depending on the current version:
– If the BeoConnect version is newer than the existing
version, you are prompted to accept the EULA after which
installation continues.
– If the BeoConnect version is the same as the existing
version, you can repair this version after which installation
continues. All settings are preserved if BeoConnect is
repaired or upgraded. Consequently, playlists and music
collections set to be copied and mapped are still copied and
mapped after repairing or upgrading.
9
Page 10

Settings
You can make changes in the ‘Settings’ menu to adjust
BeoConnect to your needs.
Make settings for BeoConnect …
> Open the right-click menu and select ‘Settings’.
> Make your preferred settings.
> Click ‘OK’ to store the settings and leave the menu, ‘Apply’
to store without leaving the menu, or ‘Cancel’ to leave the
menu without storing.
‘BeoConnect Language’
Select the language to be used by BeoConnect.
‘Multimedia Player Selection’
Select which media players should be activated. Only playlists
and music collections from activated media players are shown.
‘Auto Connect Settings’
Select whether BeoConnect should connect to the last
connected product automatically when the program is
launched.
‘Settings’ menu.
‘File Overwrite Settings’
Select whether a le should be overwritten automatically if
an existing le of the same name is present on the connected
product, but with different size and/or timestamp.
‘Start-up’
Select whether BeoConnect should launch automatically when
the computer is switched on.
‘Map BeoSound 5 to drive’
Select or change the drive to be used to map a BeoSound 5/
BeoMaster 5. This drive will be used as shared network drive
for photos, video clips, and websites so you can see them on
your television via BeoMaster 5.
10
Page 11

Manage products
‘Manage Products’ dialogue box.
Products are detected automatically by BeoConnect when
possible, but they can also be added manually. Manually added
products can be deleted again. You must select which of the
found and added products should be present in the ‘Product
List’ and change the limit of products in this list.
Add a product manually …
> Open the right-click menu and select ‘Manage Products’.
> Click ‘Add’ to bring up a ‘Product Credentials’ window.
> Enter the ‘IPV4 Address’, ‘Host Name’, ‘User Name’ and
‘Share Name’.
> Click ‘OK’ to add the product or ‘Cancel’ to cancel the
operation.
For IP-address and host name, refer to ‘What to do if …’.
For information on user name and share name, refer to your
Bang & Olufsen retailer.
Delete a manually added product …
> Open the right-click menu and select ‘Manage Products’.
> Click on the product you wish to delete in the ‘Manually
Added Products’ list.
> Click ‘Delete’ to delete the product.
‘Product Credentials’ dialogue box.
Add a product to the ‘Product List’ …
> Open the right-click menu and select ‘Manage Products’.
> Click on a desired product in either ‘Detected Products’ or
‘Manually Added Products’ to highlight it.
> Click the respective arrow tab in the middle of the window
to add the product.
A manually added product is followed by an * in the ‘Product
List’.
11
Page 12

Remove products from the ‘Product List’ …
> Open the right-click menu and select ‘Manage Products’.
> Click on a desired product in the ‘Product List’ to highlight
it and click ‘Remove’ to remove it.
> You can click ‘Remove All’ to remove all products from the
list.
Change the limit of products in the ‘Product List’ …
> Open the right-click menu and select ‘Manage Products’.
> At the ‘Product List Limit’ eld select the number of
products that can be added to the ‘Product List’. The
maximum number is ve.
Registration
You must open an online registration page to be able to
register BeoSound 5/BeoMaster 5 and get access to online
services such as net radio stations, from the product.
Register your product …
> Open the right-click menu when no product is connected
and select ‘Product Registration’ to open the product
registration page.
> Enter the required information.
Registration cannot take place if there is no internet
connection.
12
Page 13

Version and updates
Version information
The ‘About’ dialogue box shows version information and a
button to check for updates.
See version information …
> Open the right-click menu and click on ‘BeoConnect‘ to
bring up a dialogue box which shows the current version
and a button to check for updates.
> Click ‘OK’ to remove the box.
‘About’ dialogue box.
‘Check for updates’ dialogue box.
Software updates
You can check for and download available software updates.
Check for updates …
> Open the right-click menu and click on ‘BeoConnect’.
> Click the button ‘Check for updates’.
> If updates are available, click ‘Update’ to update the
software or ‘OK’ to remove the box.
If there is no Internet connection, the message ‘Unable to
check for updates’ is shown.
13
Page 14

What to do if …
BeoConnect cannot
nd a media
player or detects
an incompatible
version …
BeoConnect
detects a BeoPlayer
version …
A product is
not found
automatically …
Why does my
product disconnect …
If Windows Media Player 11 or iTunes 8 are not installed or
the version is lower than required, you are notied. You must
install or upgrade one of the above-mentioned versions. If
both media players are installed and one of them is a lower
version than required, you are asked to upgrade that media
player. You can still use the other media player.
You are notied if BeoPlayer is not compatible, that is if the
version is lower than 5.04. If it is compatible you are asked
to use BeoConnect to copy and map media to your product.
If the BeoPlayer version is compatible with BeoConnect and
BeoPlayer’s N.Music is not closed, you are prompted to close it.
A product may not be found automatically if it is connected
to your computer via a wireless system. To add a product
manually, refer to ‘Manage products’.
If another product is selected, BeoConnect disconnects from
the current product and connects to the new product. If the
program is closed, disconnection takes place as well. If a
product is otherwise disconnected, make sure that your home
network is working.
I want to nd the
IP-address and
host name for my
BeoSound 5 …
I want to nd the
IP-address and
host name for my
BeoMaster 5 stand
alone …
> Switch on BeoSound 5 and move the lever to ‘MODE’.
> Use the wheel to highlight ‘SETTINGS’.
> Press the right arrow button twice, immediately followed by
GO to activate customer service settings.
> Move the lever to ‘NETWORK INFO’. You can then see the
host name and IP-address of your BeoSound 5.
> Switch on BeoMaster 5 and bring up the menu overlay on
the television.
> Press the menu button on the remote control and press 9
to open the ‘Conguration’ menu.
> Press the red button followed by GO to open the customer
service settings ‘Network info’ and ‘Product info’.
> Use the arrow buttons to move to ‘Network Info’ and press
the centre button (GO). You can then see the host name
and IP-address of your BeoMaster 5.
14
Page 15

You do not want
your products to
start up, when
BeoConnect
launches …
You can deactivate the ‘Auto Connect’ function in the ‘Settings’
menu. Refer to ‘Settings’.
Does BeoPlayer
change when
BeoConnect is
installed …
If the BeoPlayer version is compatible with BeoConnect and
BeoPlayer’s N.Music is not closed, you are prompted to close it.
A compatible BeoPlayer version, which is 5.04 or higher, loses
some functions, when BeoConnect is installed. BeoPlayer will
enter stand alone mode for N.Music. Consequently, all media
handling operations and copying of coloured favourite lists
and playlists are disabled and you can only play back the les
stored in BeoPlayer. If you only have your music les stored in
BeoMaster 5, the N.Music folder in BeoPlayer may be empty.
15
Page 16

Close or uninstall BeoConnect
Close BeoConnect
You can close the program at any time, unless a transfer is in
progress.
Close BeoConnect …
> Open the right-click menu and select ‘Quit’ to close the
program.
Uninstall BeoConnect
You can at any time uninstall BeoConnect from your computer.
To re-establish BeoPlayer as it was before installation of
BeoConnect, you must re-install BeoPlayer.
Be aware that settings made to make N.Music stand alone in
BeoPlayer are deleted.
How to uninstall …
> To uninstall BeoConnect, select the ‘Start’ menu, highlight
BeoConnect, and then select ‘Uninstall BeoConnect’.
The program can also be uninstalled via ‘Add & Remove
Programs‘ in Windows.
16
Page 17

Formats and requirements
File formats
Copying of unsupported formats, DRM protected music,
and photos is not possible. Photos are accessed via a shared
network drive. Available cover art is copied as a jpeg le
accompanying a track. To see which music le formats are
supported, refer to the product specications for your Bang &
Olufsen product.
Requirements
A number of requirements needs to be fullled for BeoConnect
to function. Music les have to be placed locally, for example
on the local hard disk or a USB memory stick.
Minimum software requirements:
– The operating system must be at least Windows XP SP3,
Windows Vista SP1, or Windows 7, both 32-bit and 64 bit.
– Windows Media Player 11 and/or iTunes 8.
Acknowledgements and liability
Product names mentioned in this guide may be
trademarks or registered trademarks of other
companies.
Windows is a registered trademark of Microsoft Corporation in
the United States and other countries.
iTunes is a trademark of Apple Inc., registered in the U.S. and
other countries.
1002
17
Page 18

End User License Agreement
(EULA)
Use of this Bang & Olufsen software requires that you accept
the terms and conditions of this End User License Agreement.
Continuing to download the software constitutes an implicit
acceptance of the terms of this Agreement.
The software is provided “as is” without warranty of any
kind, neither expressed nor implied, including, but not limited
to the implied warranties of merchantability and tness for
a particular purpose. Bang & Olufsen explicitly disclaims all
liability for loss or damage including, but not limited to, direct
damage, direct loss, loss of prots, consequential loss, personal
injury and injury to personal property which may result from
downloading the software, using the software, inability to use
the software or defects in the software. Additionally Bang &
Olufsen shall in no way be obligated to update the software,
hereunder to correct defects in the software, should this be
necessary.
Neither installation nor use of the software nor acceptance of
the terms of this Agreement permit you to use any name, logo
or trademark used or registered by Bang & Olufsen. Reverse
engineering, decompilation, dissembling of the software or any
of its content is prohibited. Rental, leasing, networking, resale,
or redistribution of the software is also prohibited.
Bang & Olufsen strongly advise you not to download illegal
music. Bang & Olufsen is under no circumstances liable for
any content stored using the software, and Bang & Olufsen
does not provide you with any license or permission to use any
name or any intellectual property right, including any rights,
patents or trademarks.
Copyright Bang & Olufsen A/S. Bonjour function used by
BeoConnect Product is licensed under the Apache License,
Version 2.0 (the “License”); you may not use this le except
in compliance with the License. You may obtain a copy of
the License at “http://www.apache.org/licenses/LICENSE-
2.0” Unless required by applicable law or agreed to in writing,
software distributed under the License is distributed on an “AS
IS” BASIS, WITHOUT WARRANTIES OR CONDITIONS OF ANY
KIND, either express or implied. See the License for the specic
language governing permissions and limitations under the
License.
18
 Loading...