


V2.0
Aztech WIPC408HD
Wireless N Pan/Tilt High Definition IP Camera

AZTECH WIPC408HD IP CAMERA USER MANUAL V2.0
© Copyright 2013 All rights reserved. Ver1.0
No part of this document may be reproduced, republished, or retransmitted in any form or by any means whatsoever, whether electronically or mechanically, including, but not limited to, by way of photocopying, recording, information recording, or through retrieval systems without the express written permission. We reserve the right to revise this document at any time without the obligation to notify any person and/or entity. All other company or product names mentioned are used for identification purposes only and may be trademarks of their respective owners.
LIMITATION OF LIABILITY AND DAMAGES
THE PRODUCT AND THE SOFTWARES WITHIN ARE PROVIDED "AS IS," BASIS. THE MANUFACTURER AND MANUFACTURER’S RESELLERS (COLLECTIVELY REFERRED TO AS “THE SELLERS”) DISCLAIM ALL WARRANTIES, EXPRESS, IMPLIED OR STATUTORY, INCLUDING WITHOUT LIMITATION THE IMPLIED WARRANTIES OF NON-INFRINGEMENT, MERCHANTABILITY OR FITNESS FOR A PARTICULAR PURPOSE, OR ANY WARRANTIES ARISING FROM COURSE OF DEALING, COURSE OF PERFORMANCE, OR USAGE OF TRADE. IN NO EVENT WILL THE SELLERS BE LIABLE FOR DAMAGES OR LOSS, INCLUDING BUT NOT LIMITED TO DIRECT, INDIRECT, SPECIAL WILLFUL, PUNITIVE, INCIDENTAL, EXEMPLARY, OR CONSEQUENTIAL, DAMAGES, DAMAGES FOR LOSS OF BUSINESS PROFITS, OR DAMAGES FOR LOSS OF BUSINESS OF ANY CUSTOMER OR ANY THIRD PARTY ARISING OUT OF THE USE OR THE INABILITY TO USE THE PRODUCT OR THE SOFTWARES, INCLUDING BUT NOT LIMITED TO THOSE RESULTING FROM DEFECTS IN THE PRODUCT OR SOFTWARE OR DOCUMENTATION, OR LOSS OR INACCURACY OF DATA OF ANY KIND, WHETHER BASED ON CONTRACT, TORT OR ANY OTHER LEGAL THEORY, EVEN IF THE PARTIES HAVE BEEN ADVISED OF THE POSSIBILITY OF SUCH DAMAGES. THE ENTIRE RISK AS TO THE RESULTS AND PERFORMANCE OF THE PRODUCT OR ITS SOFTWARE IS ASSUMED BY CUSTOMER. BECAUSE SOME STATES DO NOT ALLOW THE EXCLUSION OR LIMITATION OF LIABLITY FOR DAMAGES, THE ABOVE LIMITATION MAY NOT APPLY TO THE PARTIES. IN NO EVENT WILL THE SELLERS’ TOTAL CUMULATIVE LIABILITY OF EACH AND EVERY KIND IN RELATION TO THE PRODUCT OR ITS SOFTWARE EXCEED THE AMOUNT PAID BY CUSTOMER FOR THE PRODUCT.
2

AZTECH WIPC408HD IP CAMERA USER MANUAL V2.0
|
|
|
|
Index |
|
1 |
INTRODUCTION ........................................................................................................................... |
5 |
|||
2 |
FUNCTION AND FEATURES ..................................................................................................... |
6 |
|||
3 |
APPEARANCE AND INTERFACE............................................................................................. |
7 |
|||
|
3.1 |
|
APPEARANCE ............................................................................................................................ |
7 |
|
|
3.2 |
|
INTERFACE OF EQUIPMENT ....................................................................................................... |
8 |
|
4 |
NETWORK CONNECTION ......................................................................................................... |
9 |
|||
|
4.1 |
|
CONNECTION INSTRUCTION ...................................................................................................... |
9 |
|
|
4.2 |
|
VISIT INSTRUCTION ................................................................................................................ |
10 |
|
5 |
VISIT IP CAMERA FROM LAN ................................................................................................ |
10 |
|||
|
5.1 |
|
SET IP ADDRESS ..................................................................................................................... |
10 |
|
|
5.2 |
VISIT IP CAMERA ................................................................................................................... |
12 |
||
|
5.2.1 |
Menu Column..................................................................................................................... |
13 |
||
|
5.2.2 |
Video Displaying Area ....................................................................................................... |
13 |
||
|
5.2.3 |
Browse SD Card................................................................................................................. |
14 |
||
|
5.2.4 |
Capture .............................................................................................................................. |
14 |
||
|
5.2.5 |
Record................................................................................................................................ |
14 |
||
|
5.2.6 |
Playback ............................................................................................................................ |
14 |
||
|
5.2.7 The control of Pan/Tilt ....................................................................................................... |
15 |
|||
|
5.3 |
|
NOTICE (FOR INITIAL USE) ..................................................................................................... |
15 |
|
6 |
VISIT IP CAMERA FROM WAN ............................................................................................... |
15 |
|||
|
6.1 |
|
PORT FORWARDING................................................................................................................. |
15 |
|
|
6.2 |
|
DDNS .................................................................................................................................... |
16 |
|
|
6.2.1 |
Manufacturer’s Domain Name........................................................................................... |
17 |
||
|
6.2.2 Third Party Domain Name................................................................................................. |
17 |
|||
7 |
OTHER SETTINGS..................................................................................................................... |
18 |
|||
|
7.1 |
|
VIDEO SETTING PAGE ............................................................................................................. |
18 |
|
|
7.1.1 |
Video Setting ...................................................................................................................... |
18 |
||
|
7.1.2 |
Audio Setting...................................................................................................................... |
19 |
||
|
7.1.3 |
Image Setting ..................................................................................................................... |
19 |
||
|
7.2 |
NETWORK SETTING PAGE ....................................................................................................... |
20 |
||
|
7.2.1 |
Basic Network Setting ........................................................................................................ |
20 |
||
|
7.2.2 |
WIFI Setting....................................................................................................................... |
20 |
||
|
7.2.3 |
Remote Access Setting........................................................................................................ |
21 |
||
|
7.3 |
|
ALARM SETTING PAGE............................................................................................................ |
21 |
|
|
7.3.1 |
External Alarm Input ......................................................................................................... |
21 |
||
|
|
|
|
|
|
|
|
|
|
|
3 |
|
|
|
|
|
|

AZTECH |
|
WIPC408HD IP CAMERA USER MANUAL V2.0 |
|
|||
|
|
|
|
|
|
|
|
|
|
7.3.2 |
Motion Detection Setting ................................................................................................... |
22 |
|
|
|
|
7.3.3 |
Alarm Mode Setting ........................................................................................................... |
22 |
|
|
|
|
7.3.4 |
Alarm Time Setting / Schedule ........................................................................................... |
23 |
|
|
|
|
7.4 |
ADVANCE SETTING ................................................................................................................. |
24 |
|
|
|
|
7.4.1 |
User Management.............................................................................................................. |
24 |
|
|
|
|
7.4.2 |
Auto Capture Setting.......................................................................................................... |
25 |
|
|
|
|
7.4.3 |
E-mail Setting .................................................................................................................... |
26 |
|
|
|
|
7.4.4 |
FTP Setting ........................................................................................................................ |
26 |
|
|
|
|
7.5 |
SYSTEM SETTING PAGE........................................................................................................... |
27 |
|
|
|
|
7.5.1 |
Device Information Checking ............................................................................................ |
27 |
|
|
|
|
7.5.2 |
Date and Time Setting........................................................................................................ |
28 |
|
|
|
|
7.5.3 |
Default Setting ................................................................................................................... |
28 |
|
|
|
|
7.5.4 |
System Log Checking ......................................................................................................... |
29 |
|
8 |
ADVANCED APPLICATION...................................................................................................... |
29 |
||||
|
|
|
8.1 |
ANDROID AND IPHONE MOBILE APPLICATION SET UP ............................................................ |
29 |
|
|
|
|
8.2 |
MOBILE PHONE BROWSING .................................................................................................... |
30 |
|
|
|
|
8.3 |
USING OTHER WEB BROWSER TO VISIT THE DEVICE............................................................... |
30 |
|
|
|
|
8.4 |
MULTI DEVICE MONITOR SYSTEM.......................................................................................... |
31 |
|
9 |
TECHNICAL PARAMETERS .................................................................................................... |
32 |
||||
10 |
SUPPLEMENTARY SECTION.............................................................................................. |
33 |
||||
|
|
|
10.1 PORT FORWARDING REFERENCES ........................................................................................... |
33 |
||
|
|
|
10.1.1 |
Aztech DSL1015EW(S) ...................................................................................................... |
34 |
|
|
|
|
10.1.2 |
Aztech DSL1016EN(S2) ........................................................ |
Error! Bookmark not defined. |
|
|
|
|
10.1.3 |
Aztech DSL7000GRV(S) .................................................................................................... |
35 |
|
|
|
|
10.1.4 |
Aztech DSL7000GR(SME) ................................................................................................. |
36 |
|
|
|
|
10.1.5 |
Linksys E1500 Router ........................................................................................................ |
37 |
|
|
|
|
10.1.6 |
DLink DVG-N5402SP........................................................................................................ |
38 |
|
|
|
|
10.1.7 |
2wire 2700 HGV-2 ............................................................................................................. |
39 |
|
4

AZTECH WIPC408HD IP CAMERA USER MANUAL V2.0
1 Introduction
The IP Camera combines a high quality digital video camera with network connectivity and a powerful web server to bring clear video to your mobile phone/desktop from anywhere on your local network or over the Internet.
Your IP Camera package should contain the following items, If any of the listed items are missing, please contact your reseller from where you purchased the camera for assistance.
The Package includes:
∙IP Camera
∙Resource CD Utility with User Manual and MDMS Software
∙5V Power Adapter
∙Easy Start Guide
∙LAN Cable
If you select the device with Wifi function, it has built-in Wifi module and transmitting antenna in package.
5

AZTECH WIPC408HD IP CAMERA USER MANUAL V2.0
2Function and Features
∙32-bits RISC processor and special video encoder which can be up to 3M pixels encoding performance
∙Support H.264 Main Profile@Level3.0 compression format, bit rate is smaller, and the image is more clear. It is more convenient for transferring through Internet and save more storage space.
∙720P/VGA/QVGA/QQVGA resolution optional. User can change some specification according to their demands to satisfy his own visual preference.
∙Support 3 kinds of video stream, suitable for Local, Internet and Cross-platform view.
∙Built-in microphone, and also support to connect external audio capturing device (like MIC phone or sound pick-up) to capture the audio. External speaker can play the voice sent to the live scene, to achieve two-way intercom function. Audio support G.711 and G.726 types.
∙Built-in Pan/Tilt, horizontally 350°, vertically 1 00°. This equipment is smart and beautiful, very easy to install and use in many occasions.
∙Support IR and color filter change automatically, no any color difference.
∙Built-in web server, support video view and parameter settings by browser; use one port to send all the data, it facilitates network setting.
∙Support 802.11b/g /n protocol, can build up wireless monitoring.
∙Support mobile phone viewing.
∙Support UPNP, port forwarding automatically on the router.
∙Support maximum 32G SD card for video and picture storage.
∙Motion detection and alarm pin can be connected to external sensors to detect environmental situation.
∙Alarming recording can be stored by email, SD card, and FTP server. External alarm can be open when detecting unforeseen events. It also sends alarm info to the alarm server.
∙Infrared LED for night vision covers 5m area, to realize 24 hours monitoring.
∙Support three level of user authority.
∙Support online upgrade.
∙Manufacturer attached a label at the bottom of each IP Camera, it include Device ID, DDNS. When IP Camera is connected to the internet, this URL can be used to visit the device.
∙Manufacturer provides free software, support Multi-view, Long time recording, video replay etc.
∙Support video view by other browsers like as Firefox, Safari etc.
6

AZTECH WIPC408HD IP CAMERA USER MANUAL V2.0
3 Appearance and Interface
3.1 Appearance
Figure 1
1 |
– Infrared Lights |
6 |
– Wifi Indicator |
2 |
– Lens |
7 |
– Wireless Antenna |
3 |
– Photovaristor |
8 |
– Shell |
4 |
– Internal Mic |
9 |
– Heat Dissipation Hole |
5 |
– Power Indicator |
10 – SD Card Slot |
|
Remarks:
∙Power Indicator: it will turn RED if equipment was powered on.
∙WIFI Indicator: If there is a WIFI module in the equipment, and there is data transferring by WIFI, it will begin to blink.
7

AZTECH WIPC408HD IP CAMERA USER MANUAL V2.0
3.2 Interface of Equipment
Figure 2
1 Power Input Socket: Connect DC adaptor, its output should be 5V power specification. 2 WIFI Antenna Hole: Install the WIFI antenna.
3 RESET Button: Press the RESET button and hold on more than 10 seconds, the equipment will restart and recover to the factory default settings. The Pan/Tilt will move around for one circle and finally focus to the center.
4 RJ45 Ethernet Socket: RJ45 Ethernet socket is 10/100M self-adjust. The equipment can connect to all kinds of network devices, such as hub, router, switch, etc.
5 Audio Input Socket: Audio input socket is designed for connecting external microphone or line-in audio signal. Please refer to 7.1.2 and select right settings.
6 Audio Output Socket: Audio output socket is for line-out audio player, such as
headphone, speaker, etc.
7 Alarm Output Socket: The alarm output socket is connected with a relay in the IP camera. IP camera will control the switch to trigger the alarm bell or buzzer to alarm. The relay is able to control the switch of a alarm whose voltage is no more than 36V, and current is lower than 2A. Please refer to the Figure 3 for the connection of an external alarm.
Output Pins
Switch
Alarm
Alarm power
Figure 3
8 Alarming Input Pin: Please refer to the schematic Diagram of Figure 4 for how external detector collects alarm information.
8

AZTECH WIPC408HD IP CAMERA USER MANUAL V2.0
PIR
Input
pins
Switch
PIR Power
Figure 4
The detector should be switched type (always on or always off). If the detector has detected the smoke or people or animal to enter the area, the detector will switch on or switch off. And it will send the external alarm signal into the IP camera.
4 Network Connection
Figure 5
IP Camera can be connected with other PC through router, switch or hub to establish a network. Figure 5 shown connections.
4.1 Connection Instruction
Before visiting the IP Camera, you should firstly connect it to the Network, supply the power to it, and check if the light of RJ45 Socket is normal to make sure all of the communication links are fluency. The connection method likes as Figure 5.
1)IP Camera-1 and IP Camera-2 are connected separately to 2 different LANs.
2)And these 2 LANs are already connected to the Internet. In order to get the LANs to be connected to the Internet, they are required to be equipped with router and to apply for the communication link from the local Internet Service Provider (ISP) and connect to it by ADSL or optical fiber, etc.
9

AZTECH WIPC408HD IP CAMERA USER MANUAL V2.0
3) PC-3 is connected to the Internet.
4.2 Visit Instruction
To visit the IP Camera, you should do some settings of IP Camera and Internet besides
getting the communication link fluency.
1)The PC and IP Camera are in the same LAN. If you want to use this PC to visit the IP Camera, you need to make sure their IP address is at the same segment. Otherwise you need to do the reset of the IP Camera’s IP address. For example, the IP Camera-1’s IP address in Figure 5 is 192.168.1.139 (at the segment of 192.168.1), while the PC-1’s IP address is 192.168.0.175 (at the segment of 192.168.0), then you will be not able to visit the IP Camera through the PC-1. You need to change the IP Camera-1’s IP address to 192.168.0.139 firstly.
2)The PC and IP Camera are in different LANs, but they are all connected to Internet. For the IP Camera-1 and PC-2 in Figure 5, if you want to visit IP Camera-1 by PC-2, you should firstly do the setting as 1) to make sure that you can visit IP Camera-1 through PC-1 and then do the setting of router-1 (do the port forwarding from the router). The PC-2’s visit application could be sent through router-1 to IP Camera-1. Normally, PC-2 could only send the information to router-1, if you don’t do the setting of router-1, then PC-2 could not visit IP Camera-1.
5 Visit IP Camera from LAN
5.1 Set IP Address
The IP addresses of IP Camera and PC should be at the same segment, in Figure 5, the IP Camera-1 can’t be visited. Run the WIPC408HD Utility in the CD, click Search button, and then select the IP Camera to reset the IP Camera’s IP address, as the Figure 6.
10

AZTECH WIPC408HD IP CAMERA USER MANUAL V2.0
Figure 6
If you have the firewall software in your PC, when you run the WIPC408HD Utility, it may pop up a window to say if you want to block this program or not, then you should choose not to block.
IP Camera by default use dynamic IP Address and HTTP port 8081. If you don’t have this software, you could also press down the reset button (Figure 2) to go back the factory setting. Then you could use this defaulted IP address to visit the IP Camera.
Setting Instruction:
∙Please carefully check the “Local PC information” on the top left corner which lists the PC configuration. If there are several network adapters in the PC, please select the one you are using and make sure the IP address of IP Camera is as the same segment of the PC.
∙Change the content of “IP config” on the right to make sure the content is the same as “Local PC information”.
∙If you don’t want to have a fixed IP Address, you could also tick the “Set IP automatically” to get the IP address from the router automatically (If can’t get IP from router.
∙Put the user name and password into “Authentication” (By default, the user name
11

AZTECH WIPC408HD IP CAMERA USER MANUAL V2.0
is: admin, password is: admin). Click “Update”. The setting will take effect now. Select the device in list box, click “Browse” button, it will open the Browser automatically and pop up a window at the same time which requires to inputting the user name and password. Then you see the home page of the IP Camera-1, just as below Figure 7.
Figure 7
5.2 Visit IP Camera
If you are using Internet Explorer or compatible browser to visit it for the first time (use other browsers, please refer to 8.2), you will be required to install the ActiveX before viewing the video. As Figure 7, click “Download ActiveX (when first use)”. The dialog just as Figure 8 will pop up accordingly. Click “Run”, then it will download and install the ActiveX automatically.
Figure 8
After the ActiveX installation, click the “Video View” as Figure 7, then you will enter the video view home page as below Figure 9.
12

AZTECH WIPC408HD IP CAMERA USER MANUAL V2.0
Figure 9
5.2.1 Menu Column
There are 2 kinds of menu, one is Main Menu, the other is Sub Menu. The Main Menu lies at the top of the interface, including View, Media, Network, Alarm, Advanced and System; SubMenu lies on the right of the interface, and different Main Menus are in line with different Submenus.
5.2.2 Video Displaying Area
The video displaying area corresponds to the resolution, the higher the resolution is, the larger the displaying area will be. If motion detection was set, when it has detected any movements of the certain area, it will show a pane to call user’s attention.
Figure 10 is status column at the bottom of video displaying area.
Figure 10
1 Displaying connection status.
2 If user has clicked the “Record” button in the Figure 9, here will show “Rec”, means the video is being recorded. If click the “Record” button again, it will stop recording.
3 Zoom Out Button
4 Zoom In Button
5 File Saving Path Setting: User can click it to browse a file saving path to save the recorded video and snapshots.
6 Talk-back Button: Click it, and the stereo equipment which was connected to the IP
13
AZTECH WIPC408HD IP CAMERA USER MANUAL V2.0
Camera will play the achieved audio. Click it again, the speaker will stop playing.
7 Audio Play Button: Click it to play the audio getting from IP Camera, click it again, it will
disable this function.
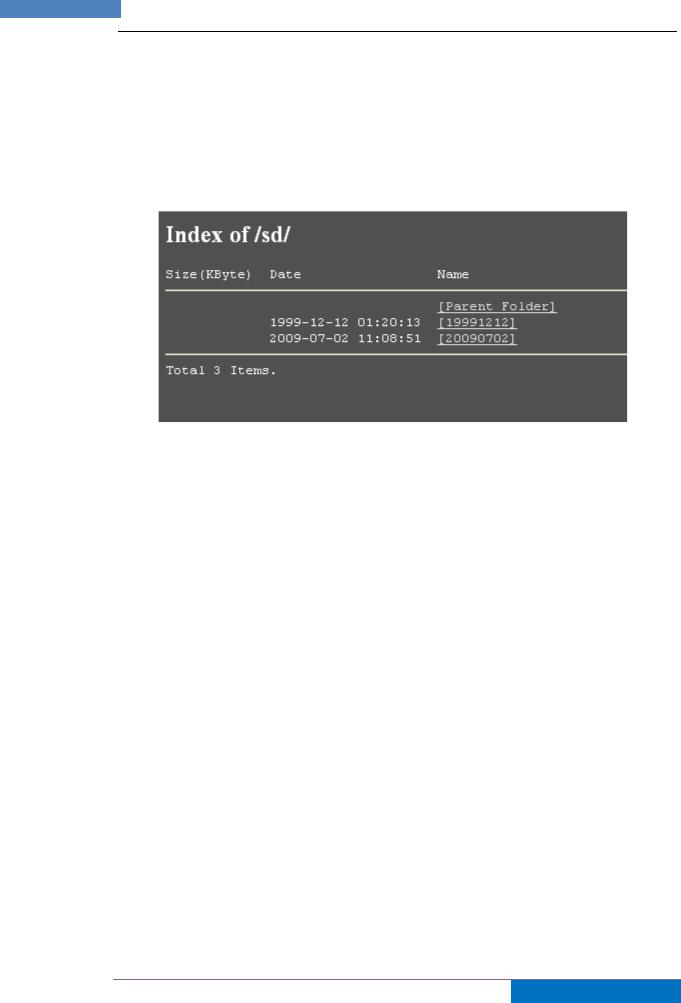
5.2.3 Browse SD Card
When SD Card inserted, click the submenu, the pop-up page will display the content in SD Card like the Figure 11.
Figure 11
In above figure, text in [ ] is catalog info, click sub catalog to browse the recorded images and videos. The images will be displayed when you click them and the videos will be downloaded and played by the video player in user’s computer automatically when click the video.
Note:
∙Insert SD Card first before turning ON the IP Camera.
∙Proper SD Card Placement – metal contacts facing on top.
5.2.4 Capture
Click the “Capture” button, which could take photos for the current video and store the image at the present path.
5.2.5 Record
Click “Record” button, which could record the video with audio and store it at the present path. When recording, there will be an indicated symbol in the status of video display area to show you it is recording. Click the “Record” button again, and then the record stops.
5.2.6 Playback
Click “Playback” button, it will pop up a player which could play the video stored on your PC disk.
14
 Loading...