

Page 1
RCL
RCL
Programmer’s
Manual
Monarch
®
Programmer’s
Manual
^R|$|DR|^
^R|1|R|30|50|70|20|0|0|0|1|1|1|0|0||^ PRICE
^R|2|R|250|50|100|20|0|0|0|1|1|1|0|0||^ PRICE PER EACH
^R|3|R|350|50|40|20|0|0|0|1|1|1|0|0|ea.|^ EA. CONSTANT
^R|4|R|30|100|40|20|0|0|0|1|1|1|0|0|SKU|^ SKU CONSTANT
^R|5|R|100|100|150|20|0|0|0|1|1|0|0|0||^ PRODUCT ID
^R|6|R|30|130|170|20|0|0|0|1|1|1|0|0||^ PRODUCT NAME
^R|7|R|210|130|20|20|0|0|0|1|1|1|0|0||^ SIZE
^R|8|R|300|130|70|20|0|0|0|1|1|1|0|0||^ CONTENTS
^R|9|R|30|175|30|30|30|0|0|0|k|1|2|100|0||^ BAR CODE (PRODUCT ID)
^T|A|R|383|203|1|2|3|4|5|6|7|8|9|^
^P|A|1|$9.99|$0.416|||6387910981|KB DIAPERS|SM|24_PK|6387910981|^
9460™ Printer
$0.416 ea.
$0.416 ea.
$9.99
SKU 6387910981
KB DIAPERS SM 24-pk.
TC9460RCL Rev AB 12/07 ©2000 Paxar Americas, Inc. a subsidiary of Avery Dennison Corp. All rights reserved.
$9.99
SKU 6387910981
KB DIAPERS SM 24-pk.
$9.99
SKU 6387910981
KB DIAPERS SM 24-pk.
$0.416 ea.
Page 2
Each product and program carries a respective written warranty, the only warranty on
which the customer can rely. Paxar reserves the right to make changes in the product,
the programs, and their availability at any time and without notice. Although Paxar has
made every effort to provide complete and accurate information in this manual, Paxar
shall not be liable for any omissions or inaccuracies. Any update will be incorporated
in a later edition of this manual.
©2000 Paxar Americas, Inc. a subsidiary of Avery Dennison Corp. All rights reserved.
No part of this publication may be reproduced, transmitted, stored in a retrieval system,
or translated into any language in any form by any means, without the prior written
permission of Paxar Americas, Inc.
WARNING
This equipment has been tested and found to comply with the limits for a Class A digital
device, pursuant to Part 15 of the FCC Rules. These limits are designed to provide
reasonable protection against harmful interference when the equipment is operated in a
commercial environment. This equipment generates, uses, and can radiate radio
frequency energy and, if not installed and used in accordance with the instruction
manual, may cause harmful interference to radio communications. Operation of this
equipment in a residential area is likely to cause harmful interference in which case the
user will be required to correct the interference at his own expense.
CANADIAN D.O.C. WARNING
This digital apparatus does not exceed the Class A limits for radio noise emissions from
digital apparatus set out in the Radio Interference Regulations of the Canadian
Department of Communications.
Le présent appareil numérique n’émet pas de bruits radioélectriques dépassant les
limites applicables aux appareils numériques de la classe A prescrites dans le
Réglement sur le brouillage radioélectrique édicte par le ministère des Communications
du Canada.
Tra de marks
Monarch®, 917, 9403, 9800, 9805, 9820, 9830, 9835, 9840, and 9856 are trademarks of
Paxar Americas, Inc.
Paxar® is a trademark of Paxar Corporation.
Avery Dennison® is a trademark of Avery Dennison Corporation.
Microsoft and MS-DOS are registered trademarks of Microsoft in the U.S. and other countries.
Windows is a registered trademark of Microsoft in the U.S. and other countries.
TrueType is a trademark of Apple Computer, Inc.
Hewlett-Packard is a registered trademark of Hewlett-Packard Company.
CG Triumvirate and CG Triumvirate Bold are trademarks of AGFA Corporation.
Adobe and Acrobat are trademarks of Adobe Systems Incorporated which may be registered in certain
jurisdictions.
Centronics is a registered trademark of Centronics Data Computer Corporation.
Avery Dennison Printer Systems Division
170 Monarch Lane
Miamisburg, Ohio 45342
Page 3

TABLE OF CONTENTS
Getting Started ....................................................................................... 1-1
Sketch a Format .................................................................................... 1-2
Defining Fields using the ^R Command................................................ 1-4
Creating the Format using the ^T Command ........................................ 1-8
Specify Print Data and Quantity using the ^P Command ...................... 1-9
Creating the Data Stream.................................................................... 1-10
Downloading the Data Stream ............................................................ 1-11
Modifying a Format ............................................................................. 1-12
Fields and Formats ................................................................................ 2-1
Using Field Types................................................................................. 2-1
Positioning a Field on a Format............................................................ 2-6
Specifying Field Data............................................................................ 2-7
Using the Printer Library....................................................................... 2-8
Command Reference.............................................................................. 3-1
Syntax Conventions .............................................................................. 3-3
Change Communication Parameters (^A) ............................................. 3-4
Clear Error Status (^C).......................................................................... 3-5
Delete Batches (^F) .............................................................................. 3-6
Set Supply Length (^L).......................................................................... 3-7
Library Management (^l) ....................................................................... 3-8
Select Printer Operation Mode (^O).................................................... 3-10
Print (^P) ............................................................................................. 3-11
Define Field (^R)................................................................................. 3-12
Request Printer Status (^S)................................................................. 3-18
Sleep Mode (^s) .................................................................................. 3-18
Table of Contents i
Page 4

Define Format (^T).............................................................................. 3-19
Adjust Print Contrast (^tavg) ............................................................... 3-20
Font Download ({W)............................................................................ 3-21
Response Reference.............................................................................. 4-1
Syntax Conventions .............................................................................. 4-1
Status Response (\S) ............................................................................ 4-2
Status Flags .......................................................................................... 4-3
Library Inventory Response (\lI)............................................................ 4-6
Troubleshooting..................................................................................... 5-1
Printing Diagnostics Labels .................................................................. 5-1
Reading the Diagnostic Label............................................................... 5-2
Resetting Printers ................................................................................. 5-2
If You Receive an Error Message.......................................................... 5-2
If the PC and Printer Aren't Communicating.......................................... 5-3
General Errors ...................................................................................... 5-5
Machine Faults...................................................................................... 5-6
RCL Samples...........................................................................................A-1
ii Preface
Flash Memory Errors............................................................................. 5-8
Hard Printer Failure Errors ................................................................... 5-9
Returning the Printer to Monarch.......................................................... 5-9
Normal Printing ..................................................................................... A-2
Error Recovery ...................................................................................... A-3
Testing Print Contrast ........................................................................... A-3
Format Sample 1................................................................................... A-4
Page 5

Format Sample 2................................................................................... A-5
Format Sample 3................................................................................... A-6
Format Sample 4................................................................................... A-7
Format Sample 5................................................................................... A-8
Printer Pin Outs ...................................................................................... B-1
Table of Contents iii
Page 6

iv Preface
Page 7

PREFACE
This manual describes how to use RCL commands with the Monarch®
Sierra Sport 2™ 9460™ printer. With these commands, you can
♦ create and print labels.
♦ configure and operate the printer.
You should have some programming background and a thorough
knowledge of the host you will use with the printer. Following is a
summary of the manual.
Chapter 1 Getting Started
Describes how to create and print labels.
Chapter 2 Fields and Formats
Explains how you use fields and formats.
Chapter 3 Command Reference
Describes each RCL command and gives examples.
Chapter 4 Response Reference
Explains how the printer responds to certain
commands.
Appendix A RCL Samples
Lists sample formats and data streams.
Appendix B Printer Pin Outs
Lists the pin outs for the 9460 printer.
Preface v
Page 8
Terms to Know
Review the following list of terms before you read this manual.
Term Definition
Batch Data stream containing information specifying
the format, the number of copies, and the data
for printing.
Continuous mode Operation mode in which the printer dispenses
labels in a continuous strip.
Data stream Sequence of one or more RCL commands.
Decrementing fields Fields where data decreases by one for each
label in a batch.
Dot Smallest unit of print on a label. A dot is
1/203rd of an inch on the printer. You measure
it across the width of the printhead.
Field Area containing data on a format.
Format Layout of the printed label, containing one or
more fields.
Incrementing fields Fields where data increases by one for each
Indexed supplies Supplies with pre-printed black marks on them.
Length axis Length of a format measured in the feed
On-demand mode Operation mode in which the printer dispenses
Supplies Tags, labels, or receipt paper the printer prints
vi Preface
label in a batch.
The printer detects these marks or apertures to
determine proper supply registration. Nonindexed supplies do not have these marks.
direction. Use this axis to position a field up or
down on a supply. The maximum length is 2436
dots (12 inches).
labels one at a time. The operator must press
F to print each one.
on.
Page 9
Term Definition
Top-of-form Position where the supply stops for the start of
printing. You may adjust the top of the form to
compensate for supply variations and peel
mode.
Width axis Width of a format or supply. Use this axis to
position a field left or right on a format. The
maximum width is 384 dots (1.89 inches).
Conventions of this Manual
Text in the Century Gothic font indicates an example or syntax
description. For example,
^C¦^.
Related Documentation
Manual Explains how to…
Operator’s
operate the printer.
Handbook
1-Station Battery
operate the single-station battery charger.
Charger Operating
Instructions
AC Adapter
operate the AC adapter.
Operating
Instructions
4-Station Battery
operate the four-station battery charger.
Charger Operating
Instructions
Installing a Linerless
Platen Roller
Carrying Your 9460
Printer
Programmer's
install the platen roller used with linerless
supplies.
use the shoulder strap, belt, handle and clip for
the printer.
use the MPCL language to run the printer.
Manual*
*This manual is located on Monarch’s web site (www.monarch.com)
for downloading.
Preface vii
Page 10

viii Preface
Page 11

GETTING STARTED
1
Your Monarch® Sierra Sport 2™ 9460™ printer uses the RCL
control language to print labels. There are several RCL
commands. However, you need only three commands to design and
print labels.
The printer prints on labels, tags, and receipt
paper. For simplicity, this manual refers to all of
these supplies as labels.
The label design is called a format. A format consists of one or more
fields, which contain data.
To create a label:
1. Sketch a format to resemble how you want the label to look.
2. Define the fields using the ^R command.
3. Create the format using the ^T command.
4. Specify print data and the quantity using the ^P command.
5. Create the data stream.
6. Download the data stream from the host to the printer.
7. Modify the format as necessary.
This chapter guides you through this procedure, using a sample label
for an item in an appliance store. The description of each step refers
to the sample label. At the end of each step is an example of
information you need to create the sample appliance label.
See Chapter 3, “Command Reference,” for more information on RCL
commands.
Getting Started 1-1
Page 12

Sketch a Format
When you sketch a format, you must decide which fields to print,
where the fields appear, and how the fields appear (size, normal or
inverse printing, etc.).
You might also find it helpful to use the following grid, which is
measured in dots and appears in actual size. You may want to make
copies of this grid for use with formats you design in the future.
A dot is 1/203rd of an inch.
1-2 Getting Started
Page 13
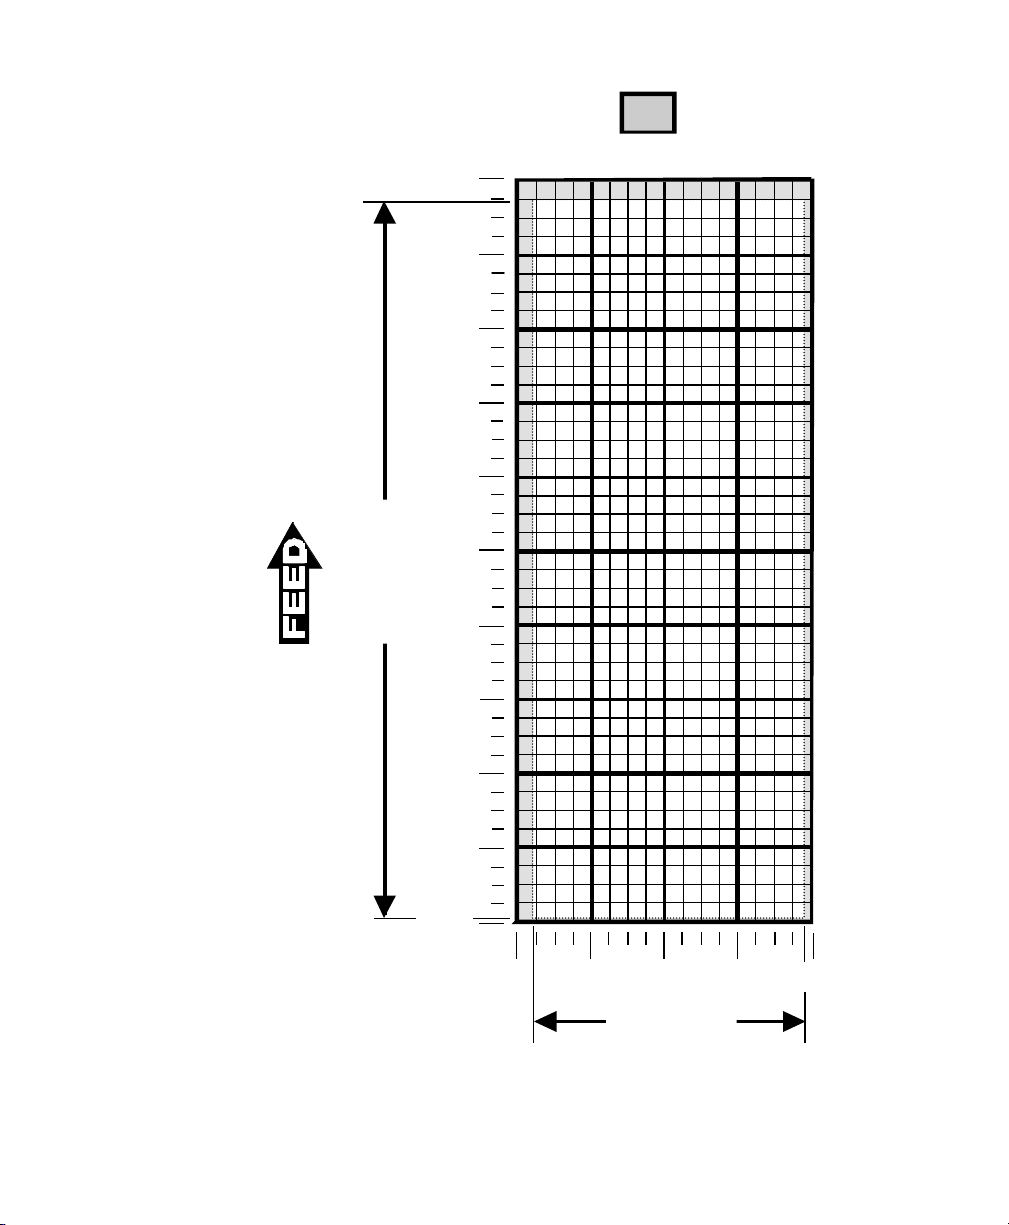
Supply Layout
(Dots)
0
28
104.8
209.6
314.4
419.2
Image Length
524
628.8
- Indicates
no-print area
1043
733.6
838.4
943.2
1048
0
23
104.5 209
Image Width
313.5
418
406
Getting Started 1-3
Page 14
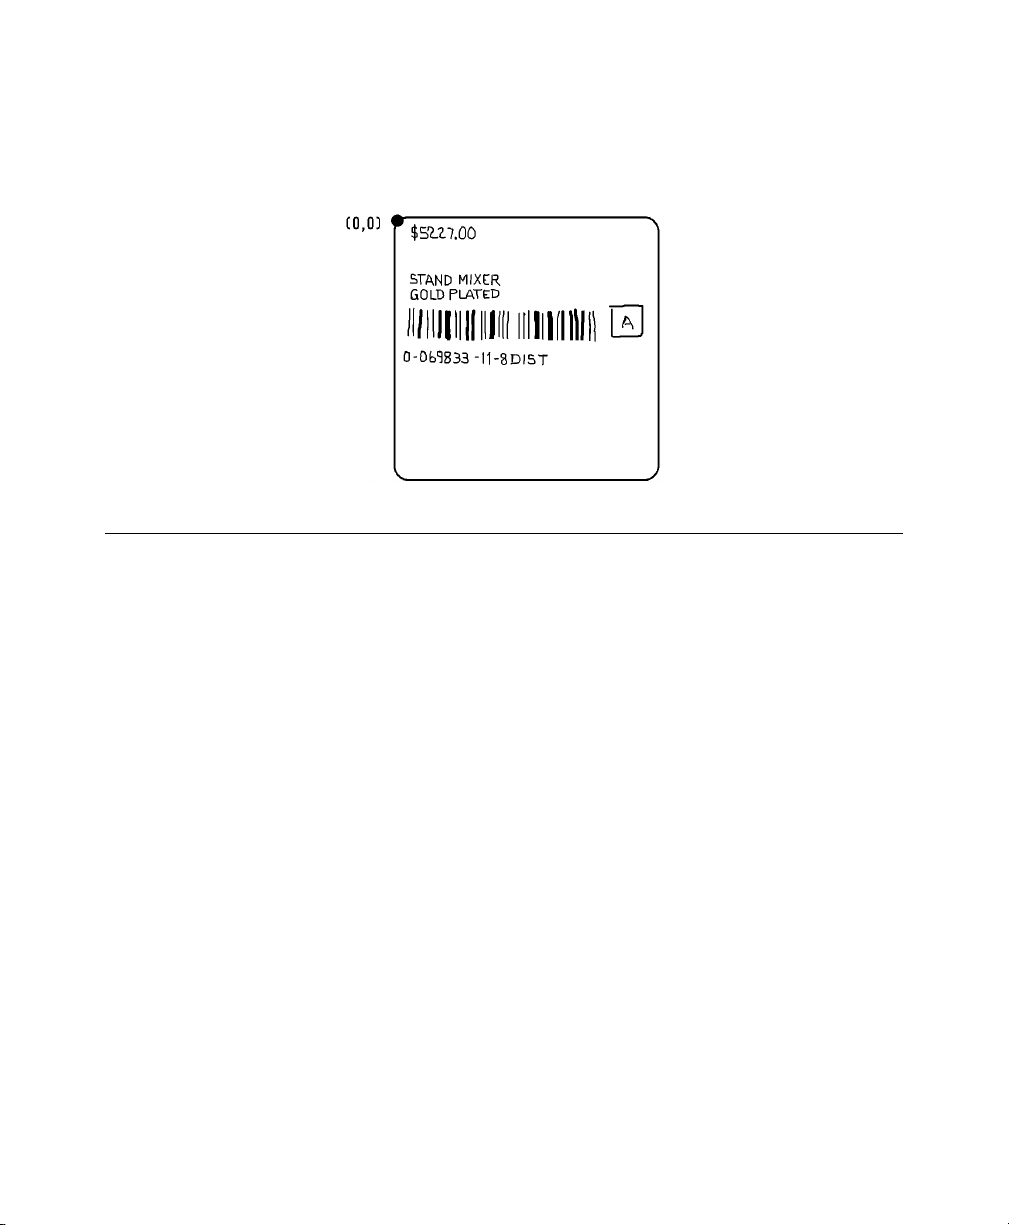
Example
The sample appliance label must contain (from top-to-bottom) the
price, a two-line description, a UPCA bar code to identify the item, and
two secondary data fields. In the following steps, you will create the
sample appliance label, shown below as a hand-drawn sketch.
Defining Fields using the ^R Command
When you define the fields for your format using the ^R command, you
specify
♦ location
♦ type
♦ rotation
♦ size
♦ type of printing
♦ the data (optional).
A summary of the command appears after the example.
See “Define Field (^R)” in Chapter 3 for the syntax and descriptions or
see Chapter 2, “Fields and Formats” for more general information.
1-4 Getting Started
Page 15

Example
In the following data stream, ^R¦$¦DR¦^ deletes all current fields and
formats, and all the other commands define the fields on the appliance
label.
^R¦$¦DR¦^ DELETE CURRENT FIELDS
^R¦1¦R¦20¦10¦354¦25¦0¦0¦0¦8¦1¦1¦0¦0¦¦^ PRICE FIELD
^R¦2¦R¦20¦85¦340¦25¦0¦0¦0¦8¦1¦1¦0¦0¦¦^ DESC FIELD 1
^R¦3¦R¦20¦105¦340¦25¦0¦0¦0¦8¦1¦1¦0¦0¦¦^ DESC FIELD 2
^R¦4¦R¦20¦130¦340¦60¦0¦0¦0¦a¦3¦0¦48¦0¦¦^ UPCA
^R¦5¦R¦345¦142¦30¦25¦0¦0¦0¦8¦1¦1¦0¦0¦¦^ "A" IN BOX
^R¦6¦R¦10¦200¦300¦25¦0¦0¦0¦8¦1¦1¦0¦0¦¦^ UNDER UPCA
^R¦7¦R¦330¦130¦50¦50¦0¦0¦0¦A¦3¦0¦0¦0¦¦^ BOX
Command Summary
The ^R command deletes or defines a field. To define a field, specify
the following items:
♦ field identifier
♦ position of the field
♦ length and width of the field
♦ field type
♦ attributes, such as rotation, justification, and multipliers.
Due to space limitations in this manual, this
command summary appears on two pages. In a
data stream, this command must appear on one
line.
Getting Started 1-5
Page 16

^R¦1¦R¦50¦50¦10¦35¦
Length Function R only. Length of the field in
dots (1-1015). Length+Length Coordinate may
not exceed 1015.
Width Function R only. Width of the field in
dots (1-383). Width+Width Coordinate may not
exceed 383.
Length Coordinate Function R only. Point along
length axis where the field starts (1-1015).
Width Coordinate Function R only. Point along width
axis where field starts (10-383). Together, Width
Coordinate and Length Coordinate specify the upper-left
corner of the field.
Function R (add field) or DR (delete field).
Field Identifier 0-9, A-Z, a-z, :, ;, <, =, >, ?, @, [, \, ], -,
and ‘. Use $ to delete all fields and formats. Monarch
recommends you use only alphanumeric characters for this field.
Command Identifier
Continued on next page
1-6 Getting Started
Page 17

0¦0¦0¦10¦4¦4¦0¦0¦¦^
Fixed Data Function R only. Up to 200 bytes
of fixed data for the field, or the starting number
for an incrementing/decrementing field.
Data Attributes Function R only. 0 (line,
graphic, variable text, or bar code that doesn’t
increment/decrement), 1 (fixed data), 2
(incrementing field), or 3 (decrementing field).
Printing Attributes Function R only. 0 (line,
graphic, or if text, black characters on white), 1
(white characters on black-- text only), or 16-406
(height of bar code in dots)
Multiplier 2 Function R only. 0 (graphic, line, or
wide element width of UPC, EAN or Code 128 bar
code), 1-4 (text height multiplier), or 2-16 (wide
element (thick line) width of all other bar codes).
Multiplier 1 Function R only. 0 (graphic), 1-4 (text
width), 1-8 (narrow element (thin line) width of bar code),
or 1-10 (thickness of a line in dots).
Field Type Function R only. A (lines), a (UPCA), b (UPCA
+2), c (UPCA +5), d (UPCE), e (UPCE + 2), f (UPCE + 5), g
(EAN 13), h (EAN 8), j (EAN 13+5), k (Code 39), l (I 2 of 5),
m (Codabar), n (Code 128 set a), o (Code 128 set b), p
(Code 128 set c), q (MSI), E-Z (graphics), or 1-16 (a font
identifier).
Justification Function R only. 0 (left-justified or non-text
field), 1 (centered), or 2 (right-justified).
Rotation Function R only. 0 (0 degrees) or 1 (90 degrees).
Use this field only with text or bar code fields.
Text Field Type Function R only. Enter 0 (fixed-length field). Use
this field with text fields only.
Getting Started 1-7
Page 18
Creating the Format using the ^T Command
You create the format by specifying the fields on the format. Be sure
to download the fields used in the format before defining the format.
To define a format, use the ^T command. Following the example is a
summary of this command. See “Define Format (^T)” in Chapter 3 for
the syntax and descriptions.
Example
The following command incorporates the fields into the format for the
appliance label. The format has identifier 1, dimensions of 380 by 380
dots, and contains fields 1-7.
^T¦1¦R¦380¦380¦1¦2¦3¦4¦7¦5¦6¦^ FORMAT DEFINITION
Command Summary
The ^T command combines pre-defined fields into a format. Specify a
format identifier, the width and length of the format, and a list of fields
in the order they appear on the label.
^T¦1¦R¦380¦380¦1¦2¦3¦4¦7¦5¦6¦^
Field_1 ... Field_n Function R only. Field
identifiers to use on label.
Length Function R only. Format length in dots
(1-1015).
Width Function R only. Format width in dots (1-383).
Function R (add format) or DR (delete format).
Format Identifier 0-9, A-Z, a-z, :, ;, <, =, >, ?, @, [, \, ], -, or
‘. Monarch recommends you use only alphanumeric characters
in this field.
Command Identifier
1-8 Getting Started
Page 19

Specify Print Data and Quantity using the ^P
Command
Use the ^P command to specify the data and quantity of labels to
print. Following the example is a summary of the ^P command. See
“Print (^P)” in Chapter 3 for the syntax and descriptions.
Example
The following command prints one copy of the appliance label using
♦ $5227.00 as the price.
♦ STAND MIXER and GOLD PLATED as the description.
♦ 12345678901 in the UPCA bar code.
♦ A and 0 -069833 -11 -8 DIST as the secondary data.
^P¦1¦1¦$5227.00¦STAND MIXER¦GOLD PLATED¦
12345678901¦¦A¦0 -069833 - 11 -8 DIST¦^ PRINT FORMAT
Command Summary
The ^P command prints labels. Specify the format to use, the number
of copies, and the data to use.
^P and {W are the only two commands that you
can spread over multiple lines. All others must fit
on one line.
^P¦1¦1¦ACME HARDWARE¦43373737376¦^
Field_1 ... Field_n Data for each field in the format.
Quantity Number of labels to print (1-9999).
Identifier Format identifier. Enter any of the following
characters: 0-9, A-Z, a-z, :, ;, <, =, >, ?, @, [, \, ], -, and ‘.
Command Identifier
Getting Started 1-9
Page 20

To make your data streams more readable, put a carriage return
and/or line feed after each ¦ character. For example
^P¦A¦10¦
Field 1¦
Field 2¦
Field 3¦^
Carriage returns and line fields are also valid characters to include in
a field’s data.
Creating the Data Stream
Enter the data stream in a file using your host, and then download the
whole data stream at once.
The first line (delete all current fields and formats) is not
necessary unless you are going to download other
fields or formats with the same identifiers.
Example
Following is the entire appliance label data stream.
1 ^R¦$¦DR¦^ DELETE CURRENT FIELDS
2 ^R¦1¦R¦20¦10¦354¦25¦0¦0¦0¦8¦1¦1¦0¦0¦¦^ PRICE FIELD
3 ^R¦2¦R¦20¦85¦340¦25¦0¦0¦0¦8¦1¦1¦0¦0¦¦^ DESC FIELD 1
4 ^R¦3¦R¦20¦105¦340¦25¦0¦0¦0¦8¦1¦1¦0¦0¦¦^ DESC FIELD 2
5 ^R¦4¦R¦20¦130¦340¦60¦0¦0¦0¦a¦3¦0¦48¦0¦¦^ UPCA
6 ^R¦5¦R¦345¦142¦30¦25¦0¦0¦0¦8¦1¦1¦0¦0¦¦^ "A" IN BOX
7 ^R¦6¦R¦10¦200¦300¦25¦0¦0¦0¦8¦1¦1¦0¦0¦¦^ UNDER UPCA
8 ^R¦7¦R¦330¦130¦50¦50¦0¦0¦0¦A¦3¦0¦0¦0¦¦^ BOX
9 ^T¦1¦R¦380¦380¦1¦2¦3¦4¦7¦5¦6¦^ FORMAT DEFINITION
10 ^P¦1¦1¦$5227.00¦STAND MIXER¦GOLD PLATED¦
12345678901¦¦A¦0 -069833 -11 - 8 DIST¦^ PRINT FORMAT
1-10 Getting Started
The large numbers to the left of the example identify the
commands and are not part of the data stream.
Page 21

This data stream
♦ deletes all current field and format definitions from the printer
(command 1).
♦ defines fields 1-7 (commands 2-8).
♦ defines format 1, specifying it consists of fields 1-7 (command 9).
♦ prints the format pictured below (command 10).
Downloading the Data Stream
To download an RCL data streams from a PC to a printer either use
communications software or the DOS COPY command.
To download a data stream from a PC:
1. Determine the printer’s current communication parameters by
printing a diagnostic label. See the Operator’s Handbook.
2. Connect your printer to the serial port of the PC using Monarch
cable 12029314 (9 pin) or 12029315 (25 pin).
Getting Started 1-11
Page 22

3. Set the PC’s communication parameters to match the printer’s
communication parameters. You can use the DOS MODE
command or a communications package that transfers ASCII
files.
Example: MODE COM1:9600,N,8,1,P
This command sets communication parameters for COM1 to 9600
baud, no parity, 8 word length, and 1 stop bit. It also retries
communications until the printer accepts the transmission.
If you use the MODE command, use DTR flow
control in the printer. If you’re using a
communications package, see its documentation.
4. Set the flow control to match on the printer and PC. To set it on
the printer, see the Operator’s Handbook. To set it on the PC,
use a communications utility.
5. Send the data stream file to the printer’s serial port. If you’re
using a communications package, see its documentation. If you
used the MODE command in step 3, use the COPY command:
Example:
This command sends the file PRINT.DST (containing a data
stream) to port COM1. The data stream can have any file
extension.
COPY PRINT.DST COM1
To download a data stream from another host, see the host’s
documentation.
Modifying a Format
You may modify the format as often as you need. Go back to the
appropriate point in this procedure and repeat the steps.
1-12 Getting Started
Page 23

FIELDS AND FORMATS
2
This chapter includes detailed information about
♦ using field types.
♦ positioning a field on a format.
♦ specifying the field data.
♦ using the printer library.
Using Field Types
Fields may contain
♦ text
♦ bar codes
♦ lines/boxes
♦ graphics.
Text Fields
Text fields include letters, numbers, and special printing and nonprinting characters. When creating a text field, specify which font to
use. You can use one of several printer-resident fonts or one of your
own.
A field can contain up to 200 characters. Use carriage returns and/or
line feeds in the data to avoid having the field run off the label.
If a character is not in the font the printer is using, the printer prints a
space in place of the character. See “Font Download,” in Chapter 3
for information about downloading other fonts. Also, see “Library
Management,” in Chapter 3 for information about deleting fonts.
Fields and Formats 2-1
Page 24
Incrementing and decrementing fields are special types of fields. They
change by one for each label in a batch. For example, for an
incrementing field, if the first label has 001 on it, the second would
have 002, etc. Decrementing fields are the same, but the number
would decrease for each label. You specify the starting number in the
fixed data field of the ^R command. Include leading zeros for the
starting number to make it the same length as the maximum number.
For example, if the first number is 1 and the maximum number is 999,
enter 001 for the starting number. The printer calculates the number
for each label. These fields must always be numeric and no more than
11 digits long. Also, only one text field and only one bar code field per
format can be incrementing or decrementing.
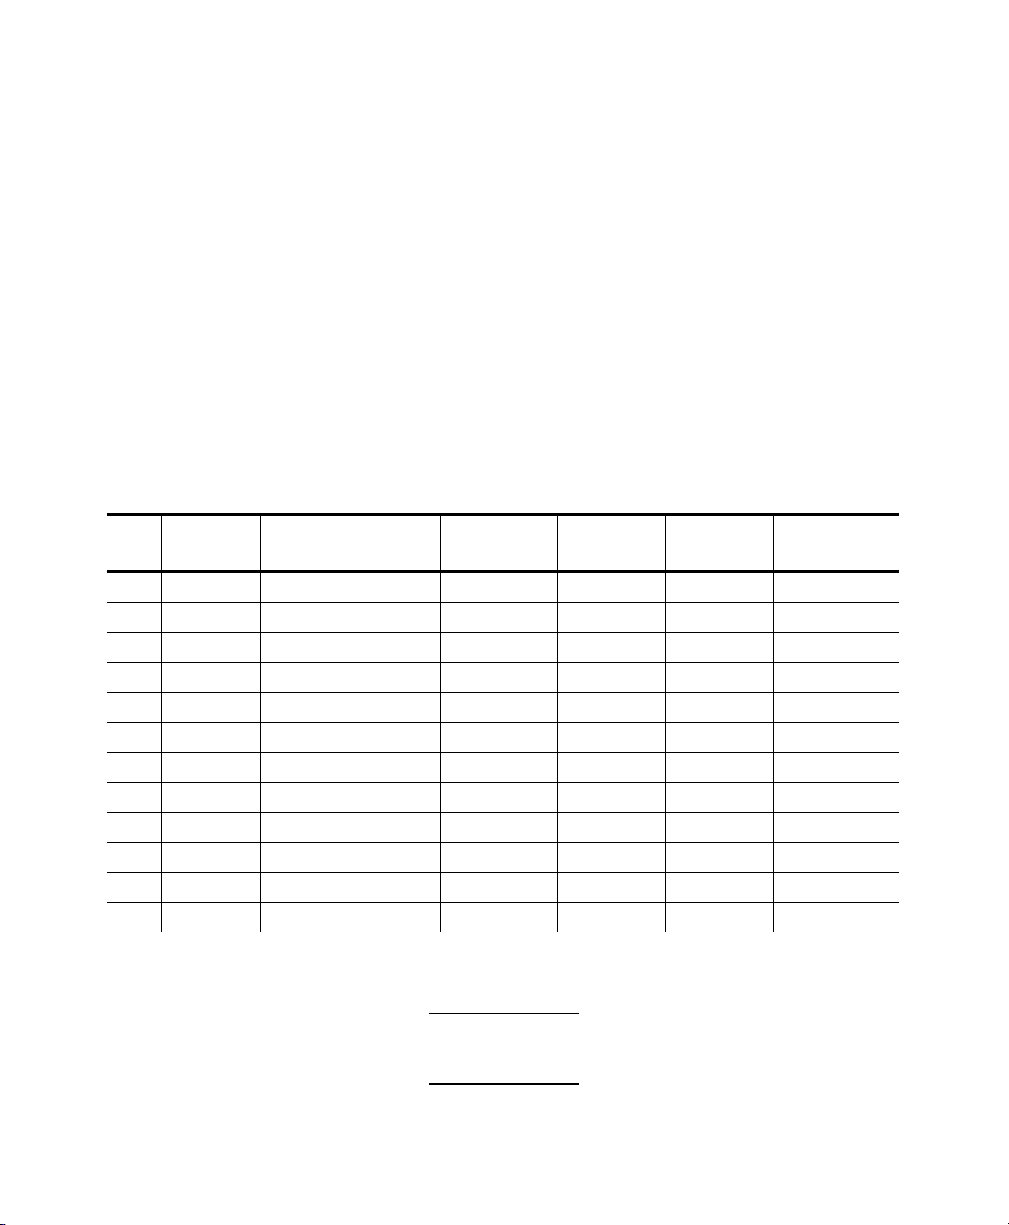
Standard Fonts
The printer uses CG Triumvirate Bold™ and CG Triumvirate Bold
Condensed™ as standard fonts, described in the following table.
Identifiers 1-6 are for CG Triumvirate Bold. Identifiers 7-12 are for CG
Triumvirate Bold Condensed.
ID Point
Size
Character
Set
Cell
Height*
Default
Width
Default
Height
Memory
1 6.5 Alphanumeric 20 8 11 3248
2 8 Alphanumeric 25 10 14 3820
3 10 Alphanumeric 30 12 17 4864
4 12 Alphanumeric 35 15 22 6704
5 18 Numeric 51 47 52 3632
6 22 Numeric 63 56 63 4896
7 6.5 Alphanumeric 20 6 11 2688
8 8 Alphanumeric 24 8 15 3808
9 10 Alphanumeric 30 10 18 4656
10 12 Alphanumeric 35 11 22 6260
11 18 Numeric 49 42 50 3376
12 22 Numeric 59 50 60 4768
* The height of your field must be at least this amount, or the field will
not print.
Cell Height, Default Width, and Default Height are
in dots.
2-2 Fields and Formats
Page 25

Bar Code Fields
Bar codes encode data so a scanner can read it. You can use one of
the following bar codes available in the printer.
Bar codes produced using single dot elements may
not be scannable.
♦ UPCA (+2, +5, +Price CD)
♦ UPCE (+2, +5)
♦ EAN8 (+2, +5)
♦ EAN13 (+2, +5, +Price CD)
♦ Interleaved 2 of 5 (also with Barrier Bar)
♦ Code 39
♦ Codabar
♦ Code 128 (sets A, B, and C)
♦ MSI.
You cannot add or delete bar codes other than the ones included with
the printer.
Bar codes cannot be incrementing or decrementing unless there is
another incrementing or decrementing field on the same format.
Do not use an MSI bar code with an incrementing
text field. This combination may cause the check
digit on the MSI bar code to be incorrect.
Fields and Formats 2-3
Page 26

Note the following items about bar codes:
♦ Codabar uses “A” as the start and stop character, unless you
include another start/stop character in the print batch data.
♦ Bar codes can accept 200 characters for their input data. To keep
the data from running off the label, use carriage return and/or new
line characters in the data.
♦ I 2 of 5 bar codes pad the field data to the left with a zero when you
give it an odd number of data characters.
♦ The printer calculates check digits and adds them to the bar code
data for all bar codes with system check digits.
♦ If you assign too few characters to bar codes that require a certain
number of characters, an error occurs. If you assign too many
characters, the printer truncates the data and an error occurs.
Code 128 Bar Code Fields
Code 128 bar codes use four characters to perform special functions.
To use the function characters in a bar code, imbed the corresponding
sequence (preceded by a tilde (~)) in the bar code’s data (you specify
the data with the ^P or ^R command). For example, suppose your
data is 1234. You might enter 123~2034 to use function 4.
Function 1 Char. Sets: A, B, C Enter: ~200
If ~200 occurs in position 1 or 2 of the data, the scanner treats the
data as fitting the UCC standard. If ~200 occurs in any other position,
the scanner treats it is a field separator.
Function 2 Char. Sets: A, B Enter: ~201
If the scanner reads ~201 anywhere in the data, it stores the data
temporarily and prefixes it to the data in the next Code 128 bar code it
reads.
Function 3 Char. Sets: A, B Enter: ~202
If the scanner reads ~202 anywhere in the data, it treats the entire bar
code as instructions to program the scanner.
2-4 Fields and Formats
Page 27

Function 4 Char. Sets: A, B Enter: ~203
Character sets A and B consist of characters 0-127 of the ASCII
chart. However, using function 4, you can access characters 128-
256. For example, the character “a” is ASCII 97. By preceding “a”
with ~203 in your data, you change the “a” to ASCII 225 (97+128). A
single ~203 shifts only the next character. Two ~203’s shift the data
until the end of the bar code or until another two ~203’s appear.
Line Fields
The lines you print can be vertical or horizontal. You can also create
boxes. See “Creating a Box Field” in Chapter 3 for more information.
Thick lines use more battery power during printing.
Graphic Fields
You can print graphics, such as a logo, on your labels. Using almost
any PC drawing program, create graphics and save them as black and
white .PCX files. Graphics remain in printer memory until you delete
them.
See “Library Management (^l)” in Chapter 3 to learn how to download
or delete graphics.
Dark cells of graphics cannot exceed 20 percent of
a tag or label or 50 percent of any square inch of
the tag or label.
Fields and Formats 2-5
Page 28

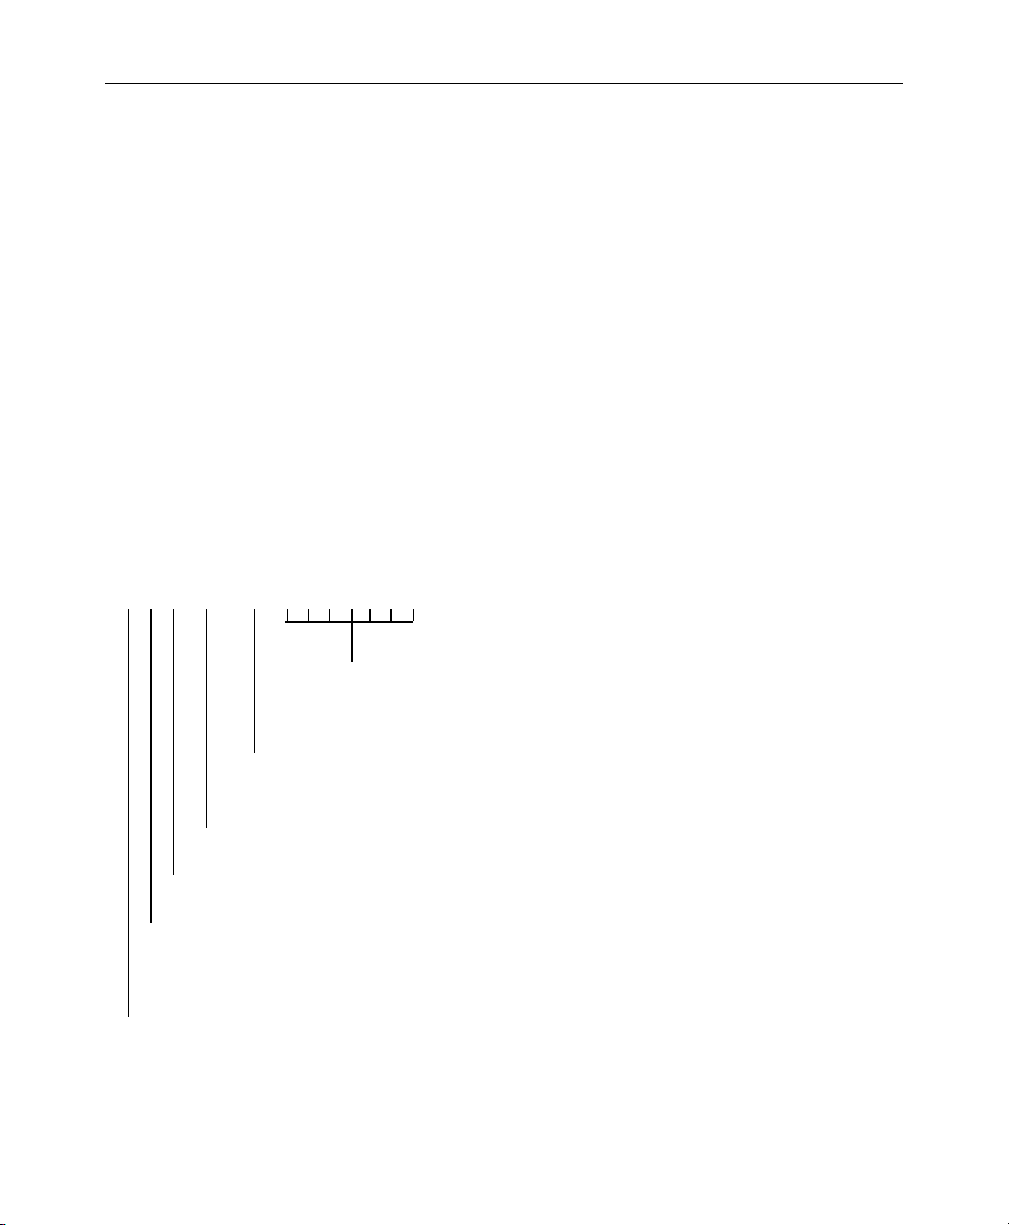
Positioning a Field on a Format
You use a coordinate system to place a field on a format. The
following diagram shows this system.
The (0,0) coordinate is the upper left-hand corner of the format. For
example, to position a field at (40,30) move 40 dots to the right of (0,0)
and 30 dots down.
The maximum length of a format is 1015 dots (5 inches). The
maximum width of a format is 383 dots (1.89 inches). Use supplies up
to a maximum of 2.05 inches (416 dots) wide. Contact Monarch if you
have special label requirements.
2-6 Fields and Formats
Page 29

There are limitations to where you can place fields. The following
diagram shows these limitations.
(20 dots, or 0 dots if not peeled)
Peel Zone
No Print Zone
(23 dots)
Image
Length
Image
Width
Image Area
(1015 dots x 383 dots max.)
Label
Width
No Print zone
*
Acceleration Zone (8 dots)
For continuous mode, this amount is
*
a maximum of 40 dots, and for peel mode,
this amount is a maximum of 10 dots.
If you use supplies less than 412 dots
wide, make this amount at least 12 dots.
Label
Length
Deceleration Zone
(5 dots)
Specifying Field Data
For fixed data, specify the data when you define the field with the ^R
command. For variable data, specify the data when you print the
format with the ^P command.
For example, you would specify a field containing the store name with
the ^R command because the store name does not change from batch
to batch. However, you would specify a field containing a price with
the ^P command because the price may change with each batch.
Fields and Formats 2-7
Page 30

Using the Printer Library
The printer has a library where it stores
♦ formats
♦ fields
♦ fonts
♦ graphics.
By using this library, you can easily create your formats. For
example, suppose you have a graphic you want to appear in several
formats. Download the graphic once. Then, use the graphic in as
many data streams as you want. Use the ^l command to request an
inventory of the library. To add or delete items from the library, use
the following commands.
Command Function
^T Adds or deletes formats.
^R Adds or deletes fields.
^l Adds or deletes graphics.
{W Adds fonts.
^l Deletes fonts.
See Chapter 3, “Command Reference” for information about these
commands.
2-8 Fields and Formats
Page 31

COMMAND REFERENCE
3
This chapter describes the RCL commands in detail, and they
appear in alphabetical order. Following is a summary of each
command.
Command Description
^A Change Communication Parameters
Changes the printer’s baud rate, parity, word length,
and flow control.
^C Clear Error Status
Clears batch errors from memory.
^F Delete Batches
Deletes all batches or only the current batch from the
printer.
^L Set Supply Length
Specifies the type of supply in the printer and where
data prints vertically on the label.
*
^l
(lower-case
L)
Library Management
Adds or deletes graphics, deletes fonts, formats, and
fields from the printer library, or takes inventory of the
printer library.
^O Select Printer Operation Mode
Sets the printer to on-demand or continuous dispense
mode.
^P Print
Specifies batch data and prints a specified number of
labels.
Continued on the next page
Command Reference 3-1
Page 32

Continued from the previous page
Command Description
^R Define Field
Defines or deletes a field from the printer library.
^S* Request Printer Status
Returns the printer’s status to the data collection
terminal.
^s Sleep Mode
The 9460 printer ignores this command.
^T Define Format
Creates or deletes a format.
^tavg Adjust Print Contrast
Darkens or lightens the print by a specified percentage
from the printer’s default (not current) setting.
{W** Font Download
Sends a font to the printer from the host.
* These commands sometimes request a response from the printer.
To learn more about printer responses, see Chapter 4, "Response
Reference."
** This command does not use a ^ character.
The following pages provide descriptions and syntax for each
command. See Appendix A, "RCL Samples" for data stream samples.
3-2 Command Reference
Page 33

Syntax Conventions
Following is the structure of an RCL command. This general syntax
does not apply to the {W command.
Each command (except {W) begins and ends with a
caret character (^). A split vertical bar (¦)
separates each field in the commands.
^Cmd_id¦field_1¦...¦field_n¦^space comment
Field Description
^ Starting token.
cmd_id Command identifier.
field_1 ...
field_n
Fields supplying information to the command. Not all
commands have these fields. When you need to use the
following characters in these fields, substitute the
corresponding sequence instead.
Character Sequence
Split vertical bar (¦) ~124
Caret (^) ~094
Left Brace ({) ~123
Tilde (~) ~126
Sometimes the instructions say to leave the field blank.
To do so, enter only a split vertical bar.
^ Ending token.
space A space character (required if you specify a comment).
comment Optional. Enter any comment between this point and the
end of the line.
All RCL commands (except {W and ^P) must fit on
one line. Sometimes they appear on two lines in
this manual due to space limitations.
Command Reference 3-3
Page 34

Change Communication Parameters (^A)
Use this command to change the printer’s
♦ baud rate
♦ parity
♦ word length
♦ flow control.
The printer always uses one stop bit. The new values take effect
immediately.
The parameters you set with this command override the values
specified in the printer’s online setup. Although the online setup may
offer more choices for these parameters, the values listed here are
recommended for RCL data streams.
Always change the communications parameters on the printer before
the host. If you change the host’s parameters first, you must change
the printer’s parameters online (rather than using this command). See
the Operator’s Handbook for more information.
Syntax
^A¦baud_rate¦parity¦word_length¦flow_control¦^
baud_rate 2 1200
parity N None (use only for word_length 8)
3-4 Command Reference
3 2400
4 4800
5 9600
6 19200
7 38400*
*On some printer/terminal systems, 38400 may not
be a reliable baud rate. If you have problems, lower
the baud rate.
E Even (use only for word_length 7)
Page 35

word_length 8 8 bits (use only for N parity)
7 7 bits (use only for E parity)
flow_control X XON/XOFF
C RTS/CTS
D DTR
If you change the flow control from DTR to
XON/XOFF, the printer sends an XON character after
it reconfigures the serial port.
If the flow control parameters for the host and printer do not match,
and you try downloading data streams to the printer, they will work, but
eventually you will receive an overrun error.
Example
^A¦5¦N¦8¦X¦^
This command configures the printer for 9600 baud, no parity, an 8-bit
word length, and XON/XOFF flow control.
Clear Error Status (^C)
The Clear Error Status command clears batch errors from memory. In
general, batch errors involve software problems (e.g., invalid
commands or bad data). Correct the error, send this command (or
press the left-hand A key) and continue operation.
System errors involve hardware or operation problems (e.g., low
battery, out of paper). The printer clears system errors automatically
when you correct the condition.
See "Status Flags" and "Clearing Status Bits" in Chapter 4, “Response
Reference” for more information.
Syntax
^C¦^
Command Reference 3-5
Page 36

Delete Batches (^F)
The Delete Batches command removes the current batch after it prints
the next complete label or removes all batches immediately. To
remove the current batch manually, press the left-hand A key for 3-5
seconds.
Syntax
^F¦function¦^
function A Remove all batches
C Remove the current batch
Example
^F¦A¦^
This command removes all batches from the printer.
3-6 Command Reference
Page 37

Set Supply Length (^L)
Supply Length
The Set Supply Length command sets the type of supply you are using
and defines where data prints vertically on the form. It also prints a
blank label. The following diagrams illustrate how supply length is
determined on various types of supplies.
Syntax
^L¦supply_type¦vertical_pos¦^
supply_type The type of supplies you're using.
F Indexed (black mark)
C Non-indexed (no black mark)
vertical_pos The printer ignores this parameter.
Example
^L¦F¦X¦^
This command informs the printer it is using indexed supplies. It also
prints a blank label.
Command Reference 3-7
Page 38

Library Management (^l)
The Library Management command
♦ adds black and white .PCX graphics to the printer library.
♦ deletes all graphics, fonts, formats, and fields from the printer
library. You must delete a font library before replacing it.
♦ takes inventory of the printer library. The printer responds with the
Library Inventory response described in Chapter 4, “Response
Reference.”
The letter for this command is a lower-case L, not
the number one.
To download a graphic, use any communications program. For
example, if you use the DOS MODE and COPY commands, you would:
1. Set your PC communication parameters and serial port with the
MODE command.
2. Download the ^l command to the serial port using the COPY
command.
3. Download the .PCX file to the serial port. If you use COPY,
include the /b switch.
When downloading a graphic, do not interrupt the
previous procedure or send a graphic that exceeds
the space allotted. Either of these conditions may
lock the printer. To unlock the printer, turn it off
3-8 Command Reference
and then on again.
Page 39

Syntax
^l¦function¦memory¦identifer¦mem_req¦^
function A Add a graphic.
D Delete all graphics, fonts, fields, or formats.
I Take inventory.
memory If function is A, enter R (printer RAM). Otherwise, leave
this field blank (but remember to include the split vertical
bar).
identifier The graphic identifier. Enter $ to delete all graphics or
fonts. If function is I, leave this field blank (but
remember to include the split vertical bar).
mem_req If function is A, enter the amount of memory for the
graphic in bytes. Use the value listed for the file when
you use the DOS DIR command.
If the function is D, enter either A (to delete all fonts
and graphics) or G (to delete all graphics, fields, and
formats).
Example
^l¦A¦R¦H¦5734¦^
This command specifies the header information for graphic H, which is
5734 bytes long. After receiving this command, send the graphic file
to the printer.
Command Reference 3-9
Page 40

Select Printer Operation Mode (^O)
The Select Printer Operation Mode command sets the printer to print
and feed
♦ continuously (without pause) until the end of the batch.
♦ on-demand, or one at a time. The user must press F to print each
label.
Continuous mode is the default print mode. After the printer mode has
been changed, the printer stays at that mode until it is changed again.
Syntax
^O¦mode¦^
mode C Continuous mode
D On-demand mode
Example
^O¦D¦^
This command sets the printer to on-demand mode.
3-10 Command Reference
Page 41

Print (^P)
The Print command prints a batch of labels using a specified format.
If the printer battery loses power, replace the
battery. The printer remembers the last batch.
However, if you replace the battery without power
loss, you’ll lose the batch.
Syntax
^P¦identifier¦quantity¦field_1¦...¦field_n¦^
identifier The format identifier. Enter any of the following
characters: 0-9, A-Z, a-z, :, ;, <, =, >, ?, @, [, \, ], -, and
‘.
quantity The number of labels to print (1 to 9999). If you are
using on-demand mode, the quantity must be two or
greater.
field_1 ...
field_n
The data for each field in the format. Provide data in
the same order as the format definition. Text fields can
contain up to 200 characters.
To make your data streams more readable, put a carriage return
and/or line feed after each ¦ character. For example
^P¦A¦10¦
Field 1¦
Field 2¦
Field 3¦^
Carriage returns and line fields are also valid characters to include in
a field’s data.
Example
^P¦1¦1¦ACME HARDWARE¦43373737376¦^
This command prints one label using format 1, which contains two
fields. Field 1 is ACME HARDWARE, and field 2 is 43373737376.
Command Reference 3-11
Page 42

Define Field (^R)
The Define Field command specifies information the printer must know
about a field. In defining the location of this field, determine where the
upper-left corner of the field is.
A field definition stays in the printer until you erase it with this
command. You can store a maximum of 30 field definitions in the
printer and use up to 30 fields per format. The printer discards
definitions overflowing into unavailable space.
You can use a field in multiple formats.
Syntax
^R¦identifier¦function¦w-coord¦l- coord¦width¦length¦
txtfld_type¦rotation¦justification¦field_type¦mul_1¦mul_2¦prt_attrib¦
data_attrib¦fixed_data¦^
The syntax for this command is spread over three
lines due to space limitations in this manual. In an
actual data stream, the command must fit on one
line.
identifier The field identifier. Enter any of the following
function R Add
3-12 Command Reference
characters: 0-9, A-Z, a-z, :, ;, <, =, >, ?, @, [, \, ], -,
and ‘. For more readable data streams, Monarch
recommends that you use only alphanumeric
characters. You cannot change this identifier after
you create the field.
To delete all fields and formats, enter $.
If you want to add a field with the same identifier as
an existing field, delete the existing field first.
DR Delete
Page 43

Use the following parameters only when function is R.
w-coord The point along the width axis where the field starts
(10 to 383). The value you enter is a measurement
(in dots) from the left side of the supply to the point
(as the feed direction points away from you).
W-coord and l-coord specify the upper-left corner of
the field.
l-coord The point along the length axis where the field starts
(1 to 1015). The value you enter is a measurement
(in dots) from the bottom of the supply to the point
(as the feed direction points away from you).
width The width of the field in dots (1 to 383).
The sum of w-coord and width may not exceed 383,
which is the width of the printhead.
length The length of the field in dots (1 to 1015).
The sum of l-coord and length may not exceed
1015. If the field is a bar code, enter at least 46 for a
scannable bar code.
For the field to print, length must be at least the cell
height of the font you use. See Chapter 2, “Fields
and Formats,” for the cell heights. For a bar code,
the minimum height is 16 dots. (A dot is 1/203rd of
an inch.)
txtfld_type Text fields only. The size type of the data for the
field. Enter 0 (fixed length field).
rotation Text and bar code fields only. The rotation of data
within the field. Rotation occurs in a
counterclockwise direction using the lower-left corner
of the field as an anchor.
0 0-degree rotation
1 90-degree rotation
Command Reference 3-13
Page 44

justification Text fields only. The placement for the data in the
field. For non-text fields, enter 0.
0 Left Justification
1 Centered
2 Right Justification
Monarch recommends that you use left justification
for incrementing and decrementing fields.
field_type The field type identifier.
A Lines
a UPCA
b UPCA+2
c UPCA+5
d UPCE
e UPCE+2
f UPCE+5
g EAN13
h EAN8
j EAN13+5
k Code 39
l Interleaved 2 of 5
m Codabar
n Code 128 set A
o Code 128 set B
p Code 128 set C
q MSI
E-Z Graphics
1-16 Font Identifier
3-14 Command Reference
For information about Code 128 bar codes and
resident text identifiers (fonts), see Chapter 2,
“Fields and Formats.”
Page 45

mul_1 The first multiplier of the field. The meaning of this
field depends on the field type.
Text Width multiplier of the font.
1 Multiply by 1
2 Multiply by 2
3 Multiply by 3
4 Multiply by 4
Bar code Narrow element (thin line) width of the
bar code (1-8).
Line Enter the line thickness in dots (1-10).
Graphic Enter 0.
mul_2 The second multiplier of the field. The meaning of
this field depends on the field type.
Text Height multiplier of the font.
1 Multiply by 1
2 Multiply by 2
3 Multiply by 3
4 Multiply by 4
Bar code Wide element (thick line) width of the
bar code.
0 UPC, EAN, and Code 128 bar
codes
2-16 All other bar codes
Graphic
or Line Enter 0.
prt_attrib The printing attributes. The meaning of this field
depends on the field type.
Text 0 Black characters on white
1 White characters on black
Printing white characters on black
drains the printer battery quickly.
Monarch recommends that you do not
choose this option for incrementing or
decrementing fields.
Bar code Height of the bar code in dots (16-406).
A dot is 1/203rd of an inch.
Graphic
or Line Enter 0.
Command Reference 3-15
Page 46

data_attrib The field attributes.
0 The field is a line, graphic, or a variable text or
bar code that neither increments nor
decrements.
1* The field data never changes (text).
2*# Incrementing field (text or bar code).
3* Decrementing field (text or bar code).
* These fields require you to enter something in the
fixed_data field.
# Do Not use an MSI bar code with an incrementing
text field. This combination may cause the check
digit on the MSI bar code to be incorrect.
fixed_data If the field never changes, enter up to 200 bytes of
data in this field. Or, if it is an incrementing or
decrementing field, enter the starting number in this
field. Otherwise, leave it blank (but include the split
vertical bar).
If you enter something in this field, when you print the
format with the ^P command, leave the part (for data)
corresponding to this field blank. Be sure to include
the split vertical bar to delimit the field.
Except for the single incrementing or decrementing
field per format, you cannot use this field for a bar
code.
To create a new line, use carriage return and/or line
feed.
Example
^R¦1¦R¦50¦50¦10¦35¦0¦0¦0¦10¦4¦4¦0¦0¦¦^
This command defines a field that is at point (50,50) and is 10 dots
wide and 35 dots long. This field is fixed, left justified, and not rotated.
Also, this field uses font 10 and is 4 times as wide and high than
normal.
3-16 Command Reference
Page 47

Creating a Box Field
A box is a special field. To create one, use the ^R command, except
you follow this procedure, too.
1. Enter A for field_type.
2. Choose the coordinates for the upper-left corner of the box. For
example, if you choose (20,30), the corner would be 20 dots to
the right and 30 dots down from the upper-left corner of the
format. Enter those values for w-coord and l-coord. For
example, enter 20 for l-coord and 30 for w-coord.
3. Choose the coordinates for the lower-right corner of the box. For
example, if you choose (50,70), the corner would be 50 dots to
the right and 70 dots down from the upper-left corner of the box.
4. Calculate the difference between the first coordinates of each
corner and the difference between the second coordinates of
each corner. Enter the results of your calculations in width and
length, respectively. For example, enter 30 for length (50 - 20),
and 40 (70 - 30) for width.
Neither width nor length can be zero.
The following diagram explains the relationship between the fields you
use.
Command Reference 3-17
Page 48

Request Printer Status (^S)
The Request Printer Status command asks the printer for its current
state. The printer responds with the Status response described in
Chapter 4, “Response Reference.”
Syntax
^S¦^
If the printer has a low battery or the receive buffer
is full, you can still receive the Status response by
sending an ENQ character (hexadecimal 5) to the
printer.
Sleep Mode (^s)
The 9460 printer ignores this command.
3-18 Command Reference
Page 49

Define Format (^T)
The Define Format command creates or deletes a format. A format
definition stays in the printer until you erase it with this command.
You can store up to 15 format definitions. The printer discards
definitions overflowing into available space.
Syntax
^T¦identifier¦function¦width¦length¦field_1¦...¦field_n¦^
identifier The format identifier. Enter any of the following
characters: 0-9, A-Z, a-z, :, ;, <, =, >, ?, @, [, \, ], -, and
‘. Monarch recommends you use only alphanumeric
characters in this field.
If you want to use the same identifier as a format already
in the printer, delete the format in the printer first.
function R Add format
DR Delete format
Use the following parameters only when function is R.
width The format width in dots (1-383). A dot is 1/203rd of an
inch.
length The format length in dots (1-1015).
field_1...
field_n
A list of up to 30 field identifiers used to print this label.
These identifiers are from the identifier field of the ^R
command. List them as they appear from top to bottom
on the format. You can list fields appearing side-by-side
in any order. If the fields are not in order, an error
occurs.
Example
^T¦1¦R¦380¦380¦1¦2¦3¦4¦7¦5¦6¦^
This command defines format 1 and stores it in RAM. The dimensions
are 380 dots wide by 380 dots high, with fields 1 through 7.
Command Reference 3-19
Page 50

Adjust Print Contrast (^tavg)
The Adjust Print Contrast command lightens or darkens the print by a
specified amount.
Syntax
^tavg¦direction¦amount¦^
direction Adjustment direction.
+ Darkens the print
- Lightens the print
amount Adjustment amount. If you’re darkening the print,
enter a number from 1-35. If you’re lightening the
print, enter a number from 1-15. To return the print
contrast to the default setting, enter 0.
Example
^tavg¦+¦35¦^
This command darkens the print to a value of 35.
3-20 Command Reference
Page 51

Font Download ({W)
The Font Download command sends information about new fonts to the
printer.
If you download a font that is greater than 64K, the
printer will reject the download.
This command is only for new fonts. If you want to download a font
using a number of an existing font, you must delete the existing font
first. The standard fonts that the printer comes with are described in
Chapter 2, “Fields and Formats.”
Contact your sales representative to obtain new fonts for the printer or
to see if any fonts you have will work with the printer.
Be sure to always back up your fonts.
Syntax
{W,identifier,A,R,mem- req¦
font_data¦
}
This command starts with a { character and ends
with a } character, instead of using the ^ character
in both places, as the other commands do.
identifier The font identifier.
mem-req One-sixteenth of the memory (in bytes) needed to
save the font image. For example, if the font requires
1600 bytes, enter 100. This value ranges from 0 to
2048.
font_data The data representing the font images.
Command Reference 3-21
Page 52

3-22 Command Reference
Page 53

RESPONSE REFERENCE
4
The printer sends two different responses, depending on your
request.
♦ Status Response (Printer Status Request)
♦ Library Inventory Response (Inventory Request)
These responses appear on your host. See the following sections for
more information.
Syntax Conventions
Printer responses have the following structure.
\response_ltr¦field_1¦...¦field_n¦\
Field Description
\ Starting token for a response.
response_ltr Response identifier letter.
field_1 ... field_n Information fields.
\ Ending token for a response.
The printer separates the information fields with a
split vertical bar (¦).
Response Reference 4-1
Page 54

Status Response (\S)
The printer responds to the Request Printer Status (^S) command with
the Status response. See “Status Flags” in this chapter for more
information.
If the battery is low or the receive buffer is full, you
can still receive the Status response by sending an
ENQ character (hexadecimal 05) to the printer.
Syntax
\S¦0¦version¦status_flag_1¦status_flag_2¦status_flag_3¦ last_batch¦\
version The software version.
status_flag_1,
status_flag_2,
status_flag_3
Three status flags, each represented by a byte.
Because each bit in these bytes represents a
different error, you must translate the bytes into a
bit string to determine the status of the printer.
For example, you might receive @ for
status_flag_1, which translates to 01000000. By
consulting "Status Flags" in this chapter, you see
this means there are no errors.
last_batch Two bytes in the format Px , where x is the identifier
of the format used in the last batch. The identifier
is a space if you haven't run any batches since you
powered on or reset the computer.
Example
\S¦0¦1.0¦@¦@¦@¦P1¦\
This response indicates the printer is running version 1.0 software,
and no errors occurred in the batch that used format 1.
4-2 Response Reference
Page 55

Status Flags
There are three status flags. Each flag is a byte long, and each bit of
the flag specifies a different error.
Status Flag 1
The following table describes the meaning of each bit in status flag 1.
Bit Description
7 0 (constant).
6 1 (constant).
5 0 (constant).
4 General Printer Status
Describes if the printer is working correctly (0) or an error
occurred (1).
3 0 (constant).
2 Supply Feed Status
Describes whether the supplies are loaded (0) or not (1).
1 Printhead Status
Describes whether the printhead is working correctly (0) or it
has bad dots or a driver problem (1).
0 Power Status
Describes whether the power is okay (0) or there is a low
battery or other power supply problem (1). A low battery
condition occurs when the battery voltage falls below 7 volts.
When this problem occurs, you can use only the ENQ
character to request the printer’s status.
Response Reference 4-3
Page 56

Status Flag 2
The following table describes the meaning of each bit in status flag 2.
Bit Description
7 0 (constant)
6 1 (constant)
5 0 (constant)
4 0 (constant)
3 0 (constant)
2 0 (constant)
1 0 (constant)
0 0 (constant)
Status Flag 3
The following table describes the meaning of each bit in status flag 3.
Bit Description
7 0 (constant)
6 1 (constant)
5 Command Status
Describes whether the last command downloaded to the printer
was successful (0) or not (1).
4 0 (constant)
3 0 (constant)
2 0 (constant)
1 0 (constant)
0 Supply Status
Describes whether the printer can see a sense mark on the
supplies (0) or not (1).
4-4 Response Reference
Page 57

Status Flag Examples
This section gives examples of the status flags under various
conditions. These examples do not cover all cases. Going left to
right, these bit strings list bit 7 to bit 0. Each example lists
♦ the bit string for each flag.
♦ the ASCII character corresponding to the bit string.
Condition: Ready to print, no previous errors.
Flag 1 01000000 @
Flag 2 01000000 @
Flag 3 01000000 @
Condition: Invalid command.
Flag 1 01010000 P
Flag 2 01000000 @
Flag 3 01100000 ,
Condition: Out of paper.
Flag 1 01010100 T
Flag 2 01000000 @
Flag 3 01000000 @
Condition: There is a problem with the printhead.
Flag 1 01010010 R
Flag 2 01000000 @
Flag 3 01000000 @
Condition: The battery or power supply is low and the printer is
currently printing.
Flag 1 01110001 Q
Flag 2 01000000 @
Flag 3 01000000 @
Response Reference 4-5
Page 58

Clearing Status Bits
When you correct printhead, paper out, temperature, or voltage errors,
the printer clears the status bits automatically. You must clear the
other status bits with the Clear Error Status (^C) command or by
pressing the left-hand A key. For more information, see “Clear Error
Status (^C)” in Chapter 3.
Library Inventory Response (\lI)
The printer responds to an inventory request from the Library
Management (^l) command with the Library Inventory response.
Syntax
\lI¦report¦\
report A report describing the contents of the printer library. This
report appears on the printer’s screen and lists the amount
of free and used memory (for fonts and graphics), and the
formats, fields, fonts, and graphics stored in the printer.
Example
\lI¦mem used: n/a
mem free: n/a
templates: 1,D,e,@
print regions: 5,G,j,{
fonts: 1:1000,2:1001,3:1003,16:16
graphics: E,F,H
¦\
This response specifies that the printer contains four formats (1, D, e,
and @), four fields (5, G, j, and {), four fonts (1, 2, 7, and 16), and
three graphics (E, F, and H).
4-6 Response Reference
Page 59

TROUBLESHOOTING
5
This chapter explains how to reset the printer, call Technical
Support, and gives explanations of your printer's errors. The errors
are classified by type and are listed in order. Call Technical Support
if you receive any error message not listed in this chapter.
If you have trouble loading supplies or performing maintenance, refer
to your Operator's Handbook.
Follow the directions provided with the error description to correct the
problem. If you cannot clear an error, turn off the printer, wait several
seconds and then turn on the printer. Call Technical Support if you
receive any error message not listed in this chapter.
To clear a data error, press the left A button. If a formatting error
occurs, the label prints, but data may be missing.
Printing Diagnostics Labels
From the Diagnostics menu, select Printer. You will see:
Test Label
Sensors
E D
1. From the Printer menu, select Test Label. You will see:
Diag Label
Test Pattern
E D
2. From the Test Label menu, select Diag Label. The diagnostic
label prints and you return to the Test Label menu. The
diagnostic label shows the printer's configuration, as well as the
model number and software version number.
See the Operator's Handbook to learn how to print
two other types of diagnostics labels: the test
pattern and the grey scale.
Troubleshooting 5-1
Page 60

Reading the Diagnostic Label
Following is the diagnostic label:
M9460 – v. 1.0
1. Mode – Indexed
2. Baud Rate - 9600
3. Comm – 8, None, 1
4. Flow Control - DTR
5. Sleep – n/a
6. Print Contrast - +35
Print Total - 00000335
Resident Font ID’s -
1,2,16
The label lists the mode, communication parameters, print contrast
setting, the number of inches printed and the fonts resident in the
printer. (Sleep mode is not applicable.)
Resetting Printers
Sometimes the printer receives mixed signals and loses its ability to
communicate. If this happens, reset the printer and attempt
communication again. To reset the printer, turn off the printer, wait 15
seconds, and turn it back on.
When you turn off the printer, all the information set through the online
configuration packets (A-M) is saved. See the sections in Chapter 2,
"Configuring the Printer," for more information about each packet.
If You Receive an Error Message
Any time you receive a message that is not described in this manual,
or the recommended action does not solve the problem, call Technical
Support.
5-2 Troubleshooting
Page 61

If the PC and Printer Aren't Communicating
If your PC is having trouble communicating with your printer, follow
these steps:
1. Check any messages that occur at the printer and at the
computer. See the following error message listing in this chapter
for more information.
2. Make sure you are using the correct printer cable.
3. Make sure the cable is plugged into the correct port on the
computer.
4. Compare your printer's communications settings (especially flow
control) with the settings on your PC. Your printer and PC
communications should match. Print the diagnostics labels to
identify the printer's communications settings.
5. Make sure the printer is online (ready to receive data).
If all of the above are correct, reset your printer. Try the function
again. If you still can't establish communications, call Technical
Support.
Troubleshooting 5-3
Page 62

Calling Technical Support
Follow these steps before you call:
1. Make sure your PC and printer are properly connected.
2. Record any error messages that occurred.
3. Try to recreate the problem, if you can.
4. Check your port settings. Your problem may be corrected simply
by changing the communication settings.
5. List any changes that have recently been made to the system.
Try to record what you did when the problem occurred.
6. Reset your printer. For information on resetting your printer, see
"Resetting Printers."
7. Reboot your computer. Refer to your computer documentation
for specific instructions.
If these steps do not solve the problem, call Technical Support at the
number listed on the back of this manual.
Have the following information ready before you call:
♦ computer brand name and software, or terminal brand name and
model
♦ Monarch printer model
♦ printer serial number
♦ support agreement, contract number, or invoice information
♦ customer number
5-4 Troubleshooting
Page 63

General Errors
using the COPY command.
General errors indicate that incorrect data was received from the host.
After checking the packet and correcting the problem, transmit the
print job again.
Error Code Description
400 The character immediately following { is invalid.
404 The number or string that is currently being
processed is too long.
409 The printer memory is full. Delete unnecessary
formats or graphics from memory. If you are
using a graphic file that is very large, consider
using another mapping method (such as run
length encoding) to reduce the required memory.
410 Parity on the printer does not match the parity
on the host. Check the parity setting under
SETUP options.
411 Framing error. The printer cannot communicate
with the host. Make sure the host is turned on,
communication cables are connected correctly,
port settings are correct, and communications
are active. Check the baud rate, word length,
and stop bits to make sure they match those at
the host. Do not toggle between Microsoft
Windows and MS-DOS while using the COPY
command, or you will receive a framing error.
Exit Windows before
Re-transmit the data.
412 There is a problem with flow control between the
printer and the host. Make sure the printer and
the host flow control settings match (both are
DTR or both are XON/XOFF). If the error
persists, call Technical Support.
413 Online receive queue is full. Check your
printer's XON/XOFF or DTR SETUP values to be
sure there isn't a flow control problem.
414 The internal keyboard buffer is full or you need a
new keypad. Call Technical Support.
Continued on the next page
Troubleshooting 5-5
Page 64

Continued from the previous page
Error Code Description
415 The buffer size you defined exceeds the total
available in your machine.
611 Font, bar code or density is invalid. The font,
bar code or density in the batch does not fit the
format.
614 Portion of field off tag. There may be an invalid
character in the packet. Make sure you did not
enter O for zero.
Machine Faults
Machine faults occur when there is a problem with the printer.
Error Code Description
750 Printhead is overheated. Turn off the printer to
let the printhead cool. If the error persists, call
Technical Support.
For errors 751-753, Check the
♦ supply tracking
♦ supply marks
♦ black mark sensor position
♦ supply roll for binding.
If the error continues to appear, change the supply.
751 Printer did not sense a black mark when
752 Printer sensed a mark in the wrong place.
753 Printer sensed a mark that is too long.
5-6 Troubleshooting
expected. The supply may be jammed.
Page 65

756 The printer is out of supplies. Load supplies.
757 Load supplies. The calibrated supply length
differs by plus or minus .25 inches from the
format.
758 Check supply. Either the supply is not seen, or
the on-demand sensor is broken. Check for a
label jam. Clear the supply path or reload
supplies. This error may occur if you remove a
label too quickly in on-demand mode. The
printer does not recalibrate after this error.
762 Low battery. Recharge the battery.
765 Printhead failure. You need a new printhead.
768 Printhead has more than 10 bad dots or is not
connected.
If you receive error 765 or 768, you can get the printer repaired if you
have an on-site maintenance agreement. If you do not have an
agreement, return the printer to Monarch as described later in this
chapter.
790 The printer is busy. Turn off the printer. Wait
two seconds and turn it back on. Resend the
packets. If the problem continues, call
Technical Support.
791 The printer has an error pending. Turn off the
printer. Wait two seconds and turn it back on.
Resend the packets. If the problem continues,
call Technical Support.
Troubleshooting 5-7
Page 66

Flash Memory Errors
The following errors occur when a problem occurs with the printer's
flash memory.
Error Code Description
800 A directory in flash memory is full.
801
802 A directory in flash memory cannot be found.
803 There is no directory in flash memory.
810 A file in flash memory is not open.
811 A file in flash memory is already open.
812 The file in flash memory is full.
813 You cannot access flash memory.
820 An error occurred in the flash program.
821 An error occurred while erasing flash memory.
822 There is a flash ID error.
If you receive any of these errors (except 801), the printer needs to be
serviced. Call 1-800-543-6650
Flash memory is full. Re-flash the printer.
5-8 Troubleshooting
Page 67

Hard Printer Failure Errors
Call Technical Support if you receive any hard printer failure errors.
Error Code Description
904 No memory for native layer.
907 Low RAM error.
909 RAM corrupted.
911 Version string mismatch.
SYSTEM
ERROR
VECTOR ##
## can be:
2 Bus Error
3 Address Error
4 Illegal Instruction
5 Zero Division
6 CHK, CHK2 Instructions
7 TRAP Instructions
8 Privilege Violation
9 Trace
10 Line 1010 Emulator
24 Spurious Interrupt
48 User-defined vectors (48-255)
This error is fatal. If you receive it, reset and/or
re-flash the printer. If the error persists, call
Monarch at the number listed on the back of this
manual for instructions. Return the printer to
Monarch if they determine you should do so.
Returning the Printer to Monarch
To send the printer back to Monarch, use the original packaging (box
and packing material) and include the documentation. Use the
following address:
Monarch ERC
200 Monarch Lane
Door 39
Miamisburg, OH 45342
The warranty does not apply if you do not follow these instructions.
Troubleshooting 5-9
Page 68

5-10 Troubleshooting
Page 69

RCL SAMPLES
A
Use the sample data streams and formats in this section as
models. There are samples for
♦ normal printing
♦ error recovery
♦ testing print contrast
♦ various formats.
The large numbers to the left of each command in
this chapter identify the commands and are not part
of the data stream.
RCL Samples A-1
Page 70

Normal Printing
1 ^R¦$¦DR¦^
2 ^R¦1¦R¦10¦10¦370¦42¦0¦0¦0¦2¦1¦1¦0¦0¦¦^
3 ^R¦2¦R¦90¦50¦290¦60¦0¦0¦0¦a¦3¦0¦48¦0¦¦^
4 ^R¦3¦R¦10¦140¦290¦42¦0¦0¦0¦2¦1¦1¦0¦0¦¦^
5 ^R¦4¦R¦10¦200¦290¦42¦0¦0¦0¦2¦1¦1¦0¦0¦¦^
6 ^T¦1¦R¦300¦300¦1¦2¦3¦4¦^
7 ^P¦1¦1¦ACME HARDWARE¦43373737376¦Hammer¦$19.95¦^
This data stream
♦ deletes all existing fields and templates (command 1).
♦ defines fields (commands 2-5).
♦ creates a format with the fields (command 6).
♦ prints one copy of the format pictured below (command 7).
A-2 RCL Samples
Page 71

Error Recovery
1 ^S¦^
2 ^C¦^
3 ^F¦A¦^
This data stream
♦ requests the printer’s status (command 1).
♦ clears the print error status bits from the status flags (command 2).
♦ removes all queued batches from the printer (command 3).
Testing Print Contrast
1 ^tavg¦+¦35¦^
2 ^P¦1¦1¦ACME HARDWARE¦43373737376¦Hammer¦$19.95¦^
This data stream
♦ darkens the print to a value of 35 (command 1).
♦ prints a label for you to see the new contrast setting
(command 2).
It assumes you've already loaded the fields and format. The ^P
command is for the format created in the “Normal Printing” sample in
this appendix.
RCL Samples A-3
Page 72

Format Sample 1
^R¦$¦DR¦^
^R¦1¦R¦20¦10¦300¦36¦0¦0¦0¦10¦1¦1¦0¦0¦¦^
^R¦2¦R¦20¦85¦200¦36¦0¦0¦0¦10¦1¦1¦0¦0¦¦^
^R¦3¦R¦20¦160¦200¦36¦0¦0¦0¦10¦1¦1¦0¦0¦¦^
^T¦1¦R¦384¦406¦1¦2¦3¦^
^P¦1¦1¦ITEM: JUMPSUIT¦SIZE: MEDIUM¦PRICE: $52.99¦^
This data stream prints the following label.
A-4 RCL Samples
Page 73

Format Sample 2
^R¦$¦DR¦^ DELETE ALL CURRENT FIELDS AND FORMATS
^R¦1¦R¦20¦10¦200¦35¦0¦0¦0¦10¦1¦1¦0¦0¦¦^ ITEM TEXT
^R¦2¦R¦160¦15¦200¦21¦0¦0¦0¦7¦1¦1¦0¦0¦¦^ ITEM FIELD
^R¦3¦R¦20¦85¦200¦35¦0¦0¦0¦10¦1¦1¦0¦0¦¦^ SIZE TEXT
^R¦4¦R¦160¦90¦200¦21¦0¦0¦0¦7¦1¦1¦0¦0¦¦^ SIZE FIELD
^R¦5¦R¦20¦150¦200¦35¦0¦0¦0¦10¦1¦1¦0¦0¦¦^ PRICE TEXT
^R¦6¦R¦160¦155¦200¦21¦0¦0¦0¦7¦1¦1¦0¦0¦¦^ PRICE FIELD
^T¦1¦R¦384¦406¦1¦2¦3¦4¦5¦6¦^ FORMAT DEFINITION
^P¦1¦1¦ITEM:¦BURGER¦SIZE:¦LARGE¦PRICE:¦$1.99¦^ PRINT
This data stream prints the following label.
RCL Samples A-5
Page 74

Format Sample 3
^R¦$¦DR¦^
^R¦1¦R¦10¦10¦42¦370¦0¦1¦0¦2¦1¦1¦0¦0¦¦^
^R¦2¦R¦90¦90¦290¦60¦0¦0¦0¦a¦3¦0¦48¦0¦¦^
^T¦1¦R¦300¦300¦1¦2¦^
^P¦1¦1¦ACME HARDWARE¦43373737376¦^
This data stream prints the following label.
A-6 RCL Samples
Page 75

Format Sample 4
^R¦$¦DR¦^ DELETE CURRENT FIELDS
^R¦1¦R¦100¦10¦200¦31¦0¦0¦1¦1¦1¦1¦0¦0¦¦^
^R¦2¦R¦100¦200¦200¦31¦0¦0¦1¦1¦1¦1¦0¦0¦¦^
^R¦3¦R¦100¦250¦200¦31¦0¦0¦1¦1¦1¦1¦0¦0¦¦^
^T¦1¦R¦384¦406¦1¦2¦3¦^
^P¦1¦5¦ACE GROCERY¦Chicken Soup¦$1.95¦^
This data stream prints the following label.
RCL Samples A-7
Page 76

Format Sample 5
^P¦1¦1¦Thrifty Cards & Gifts¦Greeting Card¦$1.25¦^
This data stream, which uses the format defined in
sample 4, prints the following label.
A-8 RCL Samples
Page 77

PRINTER PIN OUTS
B
You use the printer with a host. The following table explains the
printer’s pin outs, so you can understand how the two devices are
connected.
ANSI/EIA-232-D
Contact # Circuit Description
6 CC DSR (Data Set Ready)
1 CF Received Line Signal Detector
4 CD DTR (Data Terminal Ready)
5 AB Signal Ground
2 BB Received Data (RXD)
3 BA Transmitted Data (TXD)
8 CB Clear to Send (CTS)
7 CA Request to Send (RTS)
9 CE Ring Indicator
Printer Pin Outs B-1
Page 78

B-2 Printer Pin Outs
Page 79

INDEX
--\--
\lI response, 4-6
\S response, 4-2
--^--
^A (change communication parameters)
command, 3-4
^C (clear error status) command, 3-5
^F (delete batches) command, 3-6
^l (library management) command, 3-8
^L (set supply length) command, 3-7
^O (select printer operation mode)
command, 3-10
^P (print) command, 3-11
^R (define field) command, 3-12
^S (request printer status) command,
3-18
^s (sleep mode) command, 3-18
^T (define format) command, 3-19
^tavg (print contrast) command, 3-20
--B--
bar code fields, 2-3
baud rate, 3-4
box fields, creating, 3-17
--C--
calling technical support, 5-4
change communication parameters
command (^A), 3-4
clear error status command (^C), 3-5
Code 128 bar codes, 2-4
commands
adjust print contrast, 3-20
change communication parameters,
3-4
clear error status, 3-5
define field, 3-12
define format, 3-19
delete batches, 3-6
font download, 3-21
--{--
{W (font download) command, 3-21
--A--
adjust print contrast command (^tavg),
3-20
library management, 3-8
print, 3-11
reference, 3-1
Index 1
Page 80

request printer status, 3-18
select printer operation mode, 3-10
set supply length, 3-7
sleep mode, 3-18
syntax conventions of, 3-3
communication between PCs and printers,
5-3
continuous mode, description, 3-10
conventions
command syntax, 3-3
--E--
errors
flash memory, 5-8
general, 5-5
hard printer failures, 5-9
machine faults, 5-6
PC/printer communication, 5-3
receiving messages, 5-2
recovery sample, A-3
response syntax, 4-1
--D--
darkening print, 3-20
data streams
creating, 1-10
downloading, 1-11
decrementing fields, example, 2-2
define field command (^R), 3-12
define format command (^T), 3-19
delete batches command (^F), 3-6
diagnostics
flash memory errors, 5-8
general errors, 5-5
hard printer failure errors, 5-9
machine fault errors, 5-6
printing labels, 5-1
reading the label, 5-2
--F--
fields
bar code, 2-3
decrementing, 2-2
defining, 1-4
graphic, 2-5
incrementing, 2-2
line, 2-5
specifying data, 2-7
text, 2-1
types, 2-1
flash memory errors, 5-8
flow control, 3-4
fonts
CG Triumvirate Bold, 2-2
CG Triumvirate Bold Condensed, 2-2
description, 2-2
download command ({W), 3-21
2 Index
Page 81

format creation
--L--
creating the data stream, 1-10
defining the fields using the ^R
command, 1-4
defining the format using the ^T
command, 1-8
designing the format, 1-2
downloading the data stream, 1-11
modifying the format, 1-12
specifying print data and quantity using
the ^P command, 1-9
formats
creating, 1-1
defining, 1-8
modifying, 1-12
samples, A-4
--G--
general errors, 5-5
getting started, 1-1
graphics
labels
creating and printing, 1-1
designing, 1-2
library
inventory response, 4-6
management command (^l), 3-8
printer, 2-8
lightening print, 3-20
line fields, 2-5
--M--
machine faults, 5-6
--N--
normal printing sample, A-2
--O--
on-demand mode, description, 3-10
--P--
adding to the library, 3-8
fields, 2-5
--H--
hard printer failure errors, 5-9
--I--
incrementing fields, example, 2-2
inventory, taking, 3-8
parity, 3-4
PC/printer communication, 5-3
pin outs, B-1
positioning a field on a format, 2-6
print command (^P), 3-11
print contrast, adjusting, 3-20
printers, resetting, 5-2
printing diagnostics labels, 5-1
Index 3
Page 82

problems
flash memory errors, 5-8
general errors, 5-5
getting technical support, 5-4
hard printer failure errors, 5-9
machine fault errors, 5-6
PC/printer communication, 5-3
--R--
RCL samples, A-1
reading the diagnostic label, 5-2
receiving error messages, 5-2
references
command, 3-1
response, 4-1
request printer status command (^S),
3-18
resetting printers, 5-2
responses
library inventory, 4-6
reference, 4-1
status, 4-2
status
clearing bits, 4-6
flag 1, 4-3
flag 2, 4-4
flag 3, 4-4
flag examples, 4-5
response, 4-2
status request command (^S), 3-18
syntax conventions for
commands, 3-3
responses, 4-1
--T--
tags, creating and printing, 1-1
technical support, 5-4
testing print contrast sample, A-3
text fields, 2-1
--W--
word length, 3-4
4 Index
syntax conventions of, 4-1
returning the printer to Monarch, 5-9
--S--
samples, A-2
select printer operation mode command
(^O), 3-10
set supply length command (^L), 3-7
sleep mode command (^s), 3-18
Page 83

Page 84

 Loading...