

Page 1

028028
SNAP Operator’s Guide
Avery Dennison®
SNAPTM 500
Gen 1 – 1/0, 1/1
Gen 2 – 1/0, 1/1, 2/0, 2/1
05581393 Rev. 1.0 Oct 2014
© 2014 Avery Dennison Corp. All rights reserved
Page 2

WARNING
Operator’s Guide—SNAP™ 500
This device complies with Part 15 of the FCC Rules. Operation is subject to the
following two conditions:
1) this device may not cause harmful interference, and
2) this device must accept any interference that may cause undesired operations.
This Class A digital apparatus meets all requirements of the Canadian Interference
Causing Equipment Regulations. Cet appareil numerique de la classe A respecte
toutes les exigences du Reglement sur le material broilleur du Canada
Page 3

Operator’s Guide—SNAP™ 500
Table of Contents
1.0 INTRODUCTION 4
2.0 OPERATION 5
2.1
Printer Description 5
2.1.1 Components 5
2.2
Loading Supplies (Stock and Ink) 6
2.2.1 Load Ink 6
2.2.2 Load Stock 10
2.2.3 Threading Diagrams – Gen 1 14
2.2.4 Threading Diagrams – Gen 2 14
2.3
Printing Labels 16
2.3.1 Printer Control Panel 16
2.3.2 Printing 17
2.3.3 Feeding the stock 17
2.3.4 Errors 17
2.3.5 End of Day 18
2.3.6 Clearing Print Jobs 18
2.3.7 Setting / Adjusting Voice Button Volume 18
3.0 MAKING ADJUSTMENTS 19
3.1
Print Head Adjustments 19
3.1.1 Adjusting Print Head Pressure 19
3.1.2 Adjusting Density (Darkness) 20
3.2
Virtual Control Panel 21
3.2.1 Operating Panel 21
3.2.2 Show Settings Button 22
3.2.3 Print/Cut Adjust Tab 22
3.2.4 Options Tab 23
3.2.5 Versions/History Tab 24
3.2.6 Print Quality (VCP Arbor Tension Adjust Tab) 25
4.0 MAINTENANCE 27
4.1
Print Heads 27
4.1.1 Handling Print heads 27
4.1.2 Cleaning Procedures 27
4.2
Print Head Replacement 28
4.3
Lubrication 30
4.4
Rotary Knife Assembly Cleaning 30
Page 4

4
1.0 Introduction
NOTES call attention to information that is especially significant to
understanding and operating the equipment.
CAUTION notices inform you of actions or situations in which the
printer might be damaged.
WARNING notices describe situations in which lack of attention or
insufficient equipment knowledge could cause either personal injury or
damage to the printer.
Operator’s Guide—SNAP™ 500
Page 5
User’s Manual—SNAP™ 500
2.0 Operation
2.1 Printer Description
2.1.1 Components
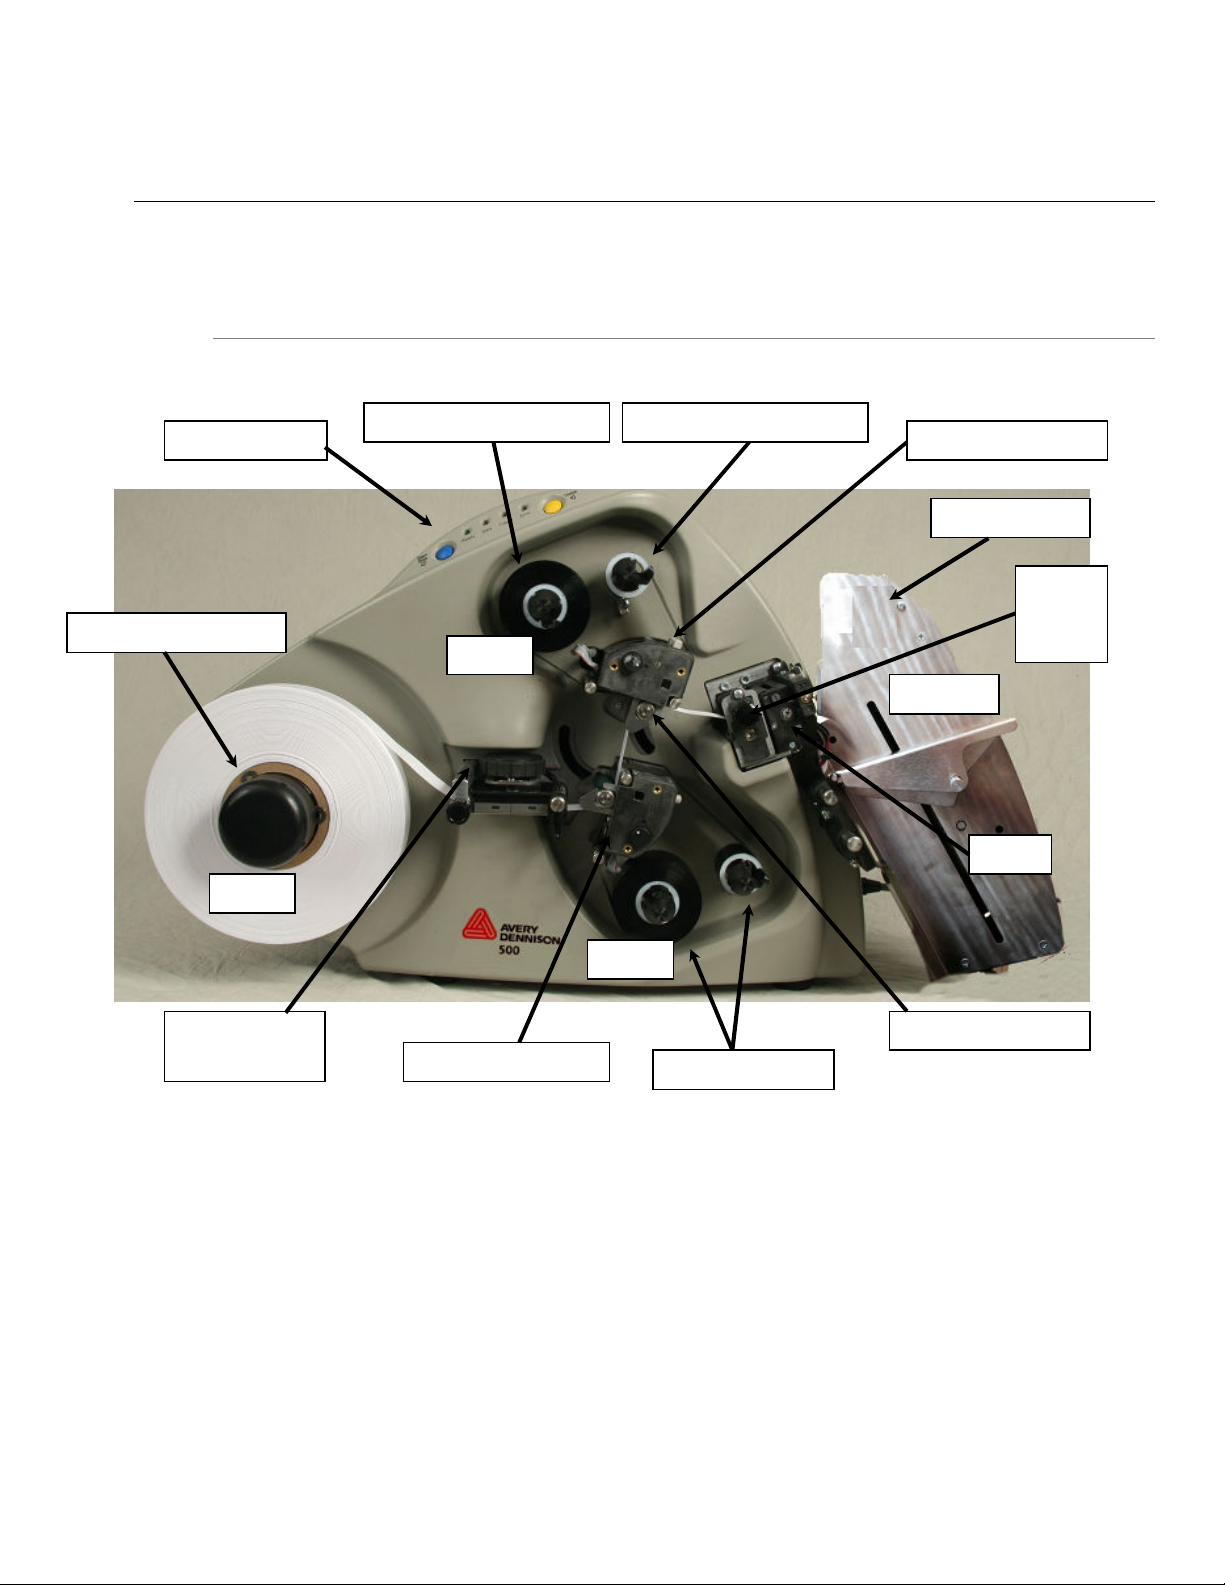
5
Stock Arbor Knob
Stock
Upper Ink Unwind Arbor
Ink
Upper Ink Rewind Arbor
Upper Print Station Control Panel
Label Counter
Stock
Feed
Knob
Stacker
Knife
Ink
Stock Guide
Knob
Lower Print Station
Lower Ink Arbors
Upper Print Roller
Page 6
6
2.2 Loading Supplies (Stock and Ink)
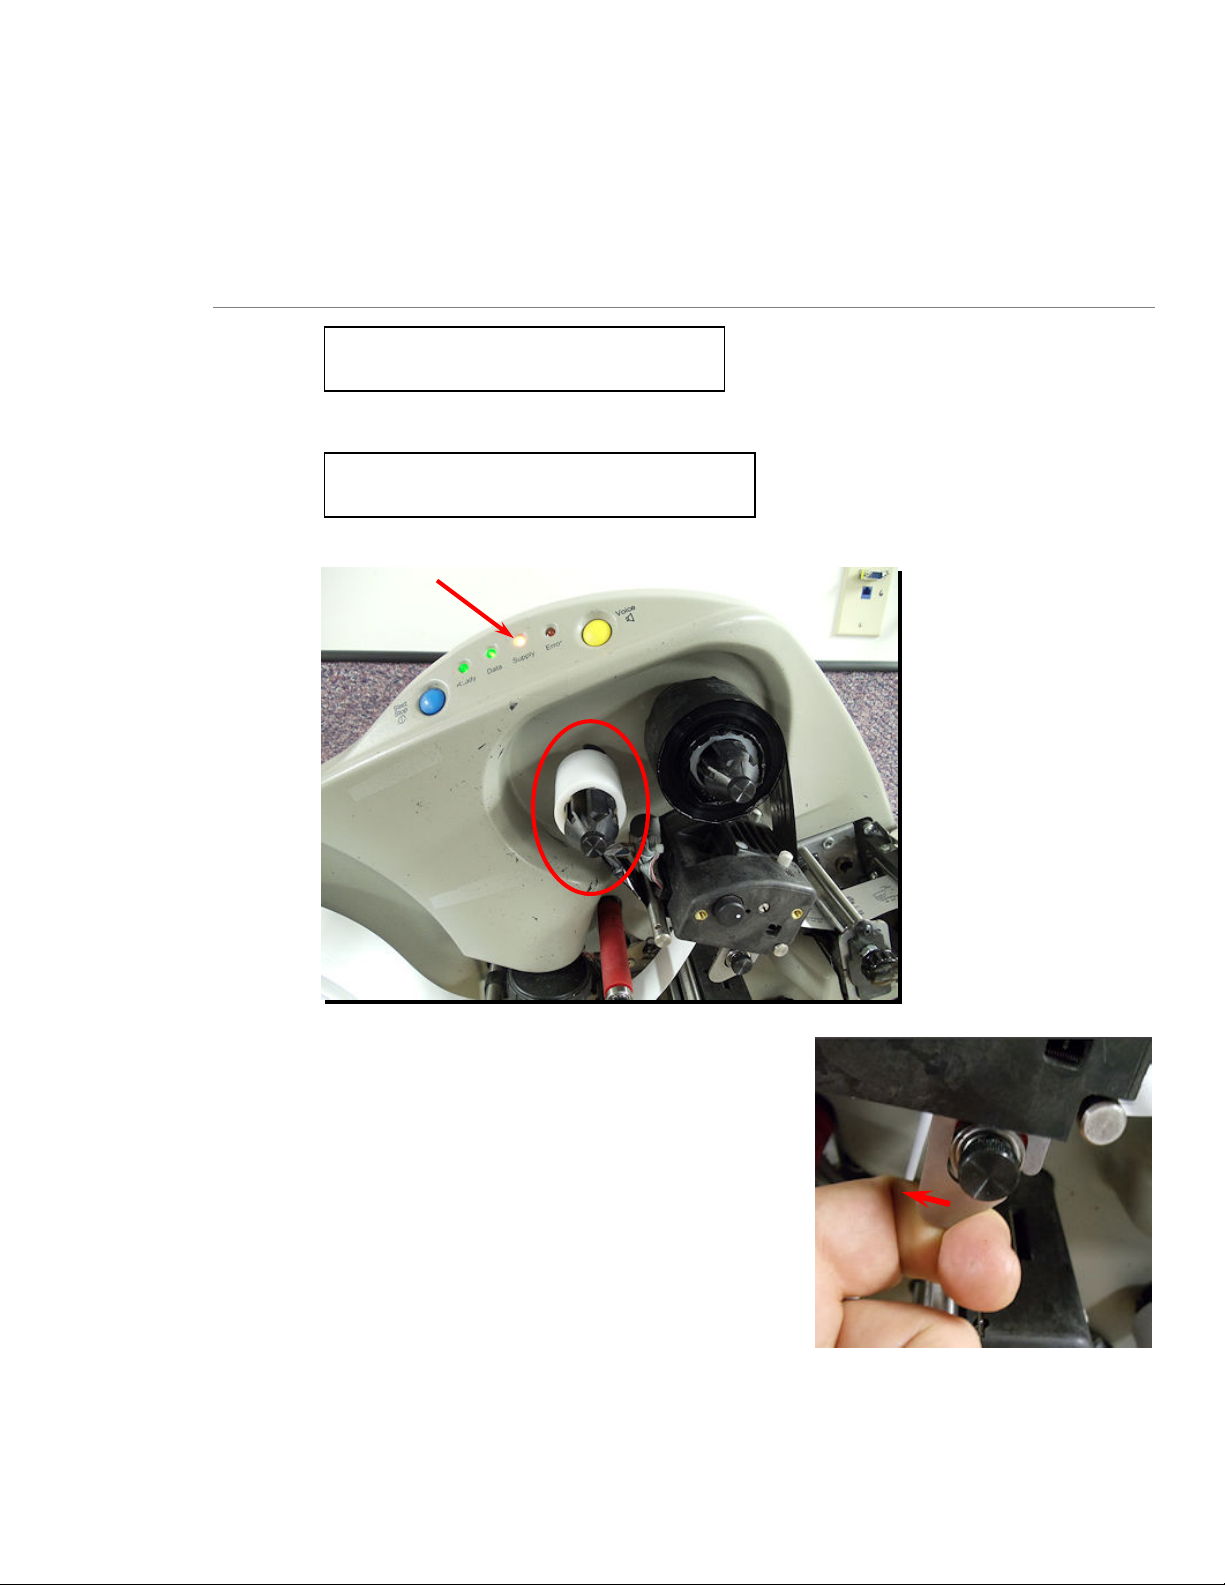
2.2.1 Load Ink
Note: The ink should be 6mm wider
than stock.
Operator’s Guide—SNAP™ 500
Note: When the ink rewind core is full,
replace it with an empty core.
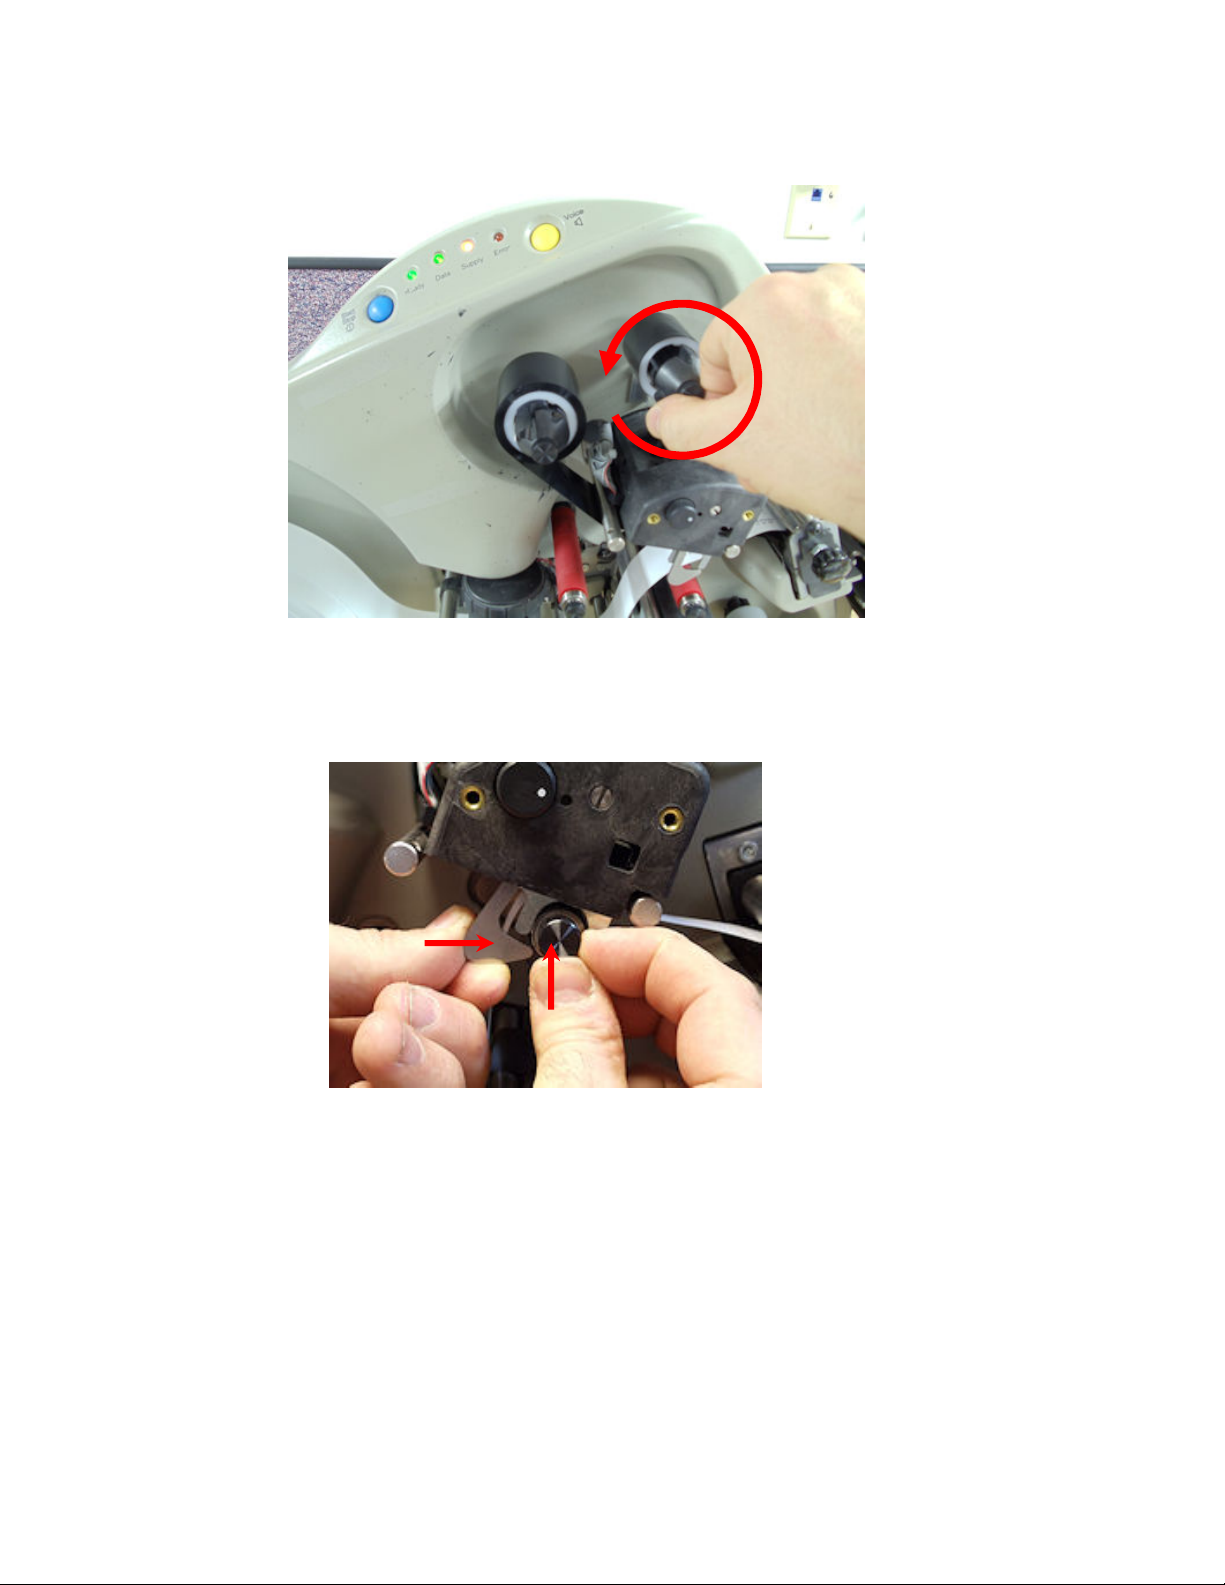
1. Open the Upper Print Roller.
Page 7
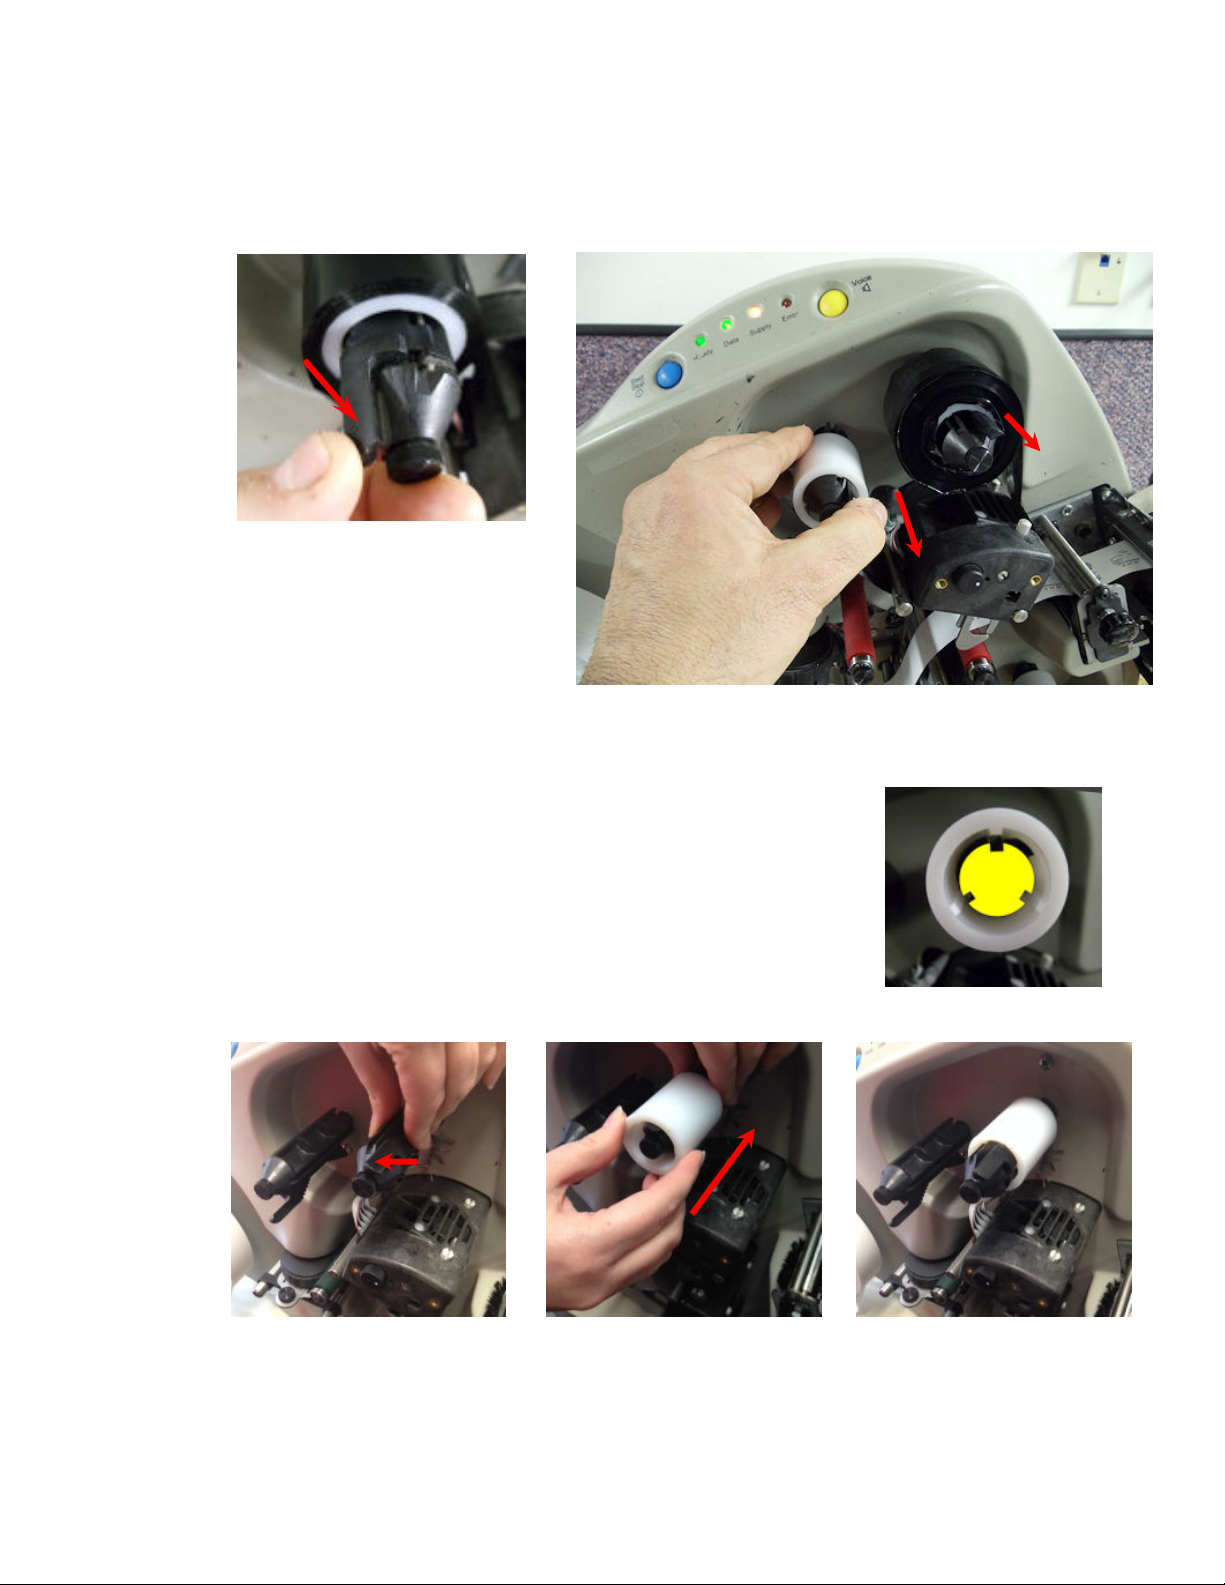
User’s Manual—SNAP™ 500
2. Press latch. Remove cores from Upper Ink Supply Arbor and Upper Ink Rewind
Arbor.
7
3. Install an empty ink core on the Upper Ink Rewind Arbor.
a. Press latch.
b. Rotate the core to align the spines.
c. Slide empty ink core on arbor until it stops.
d. Release the latch.
Page 8
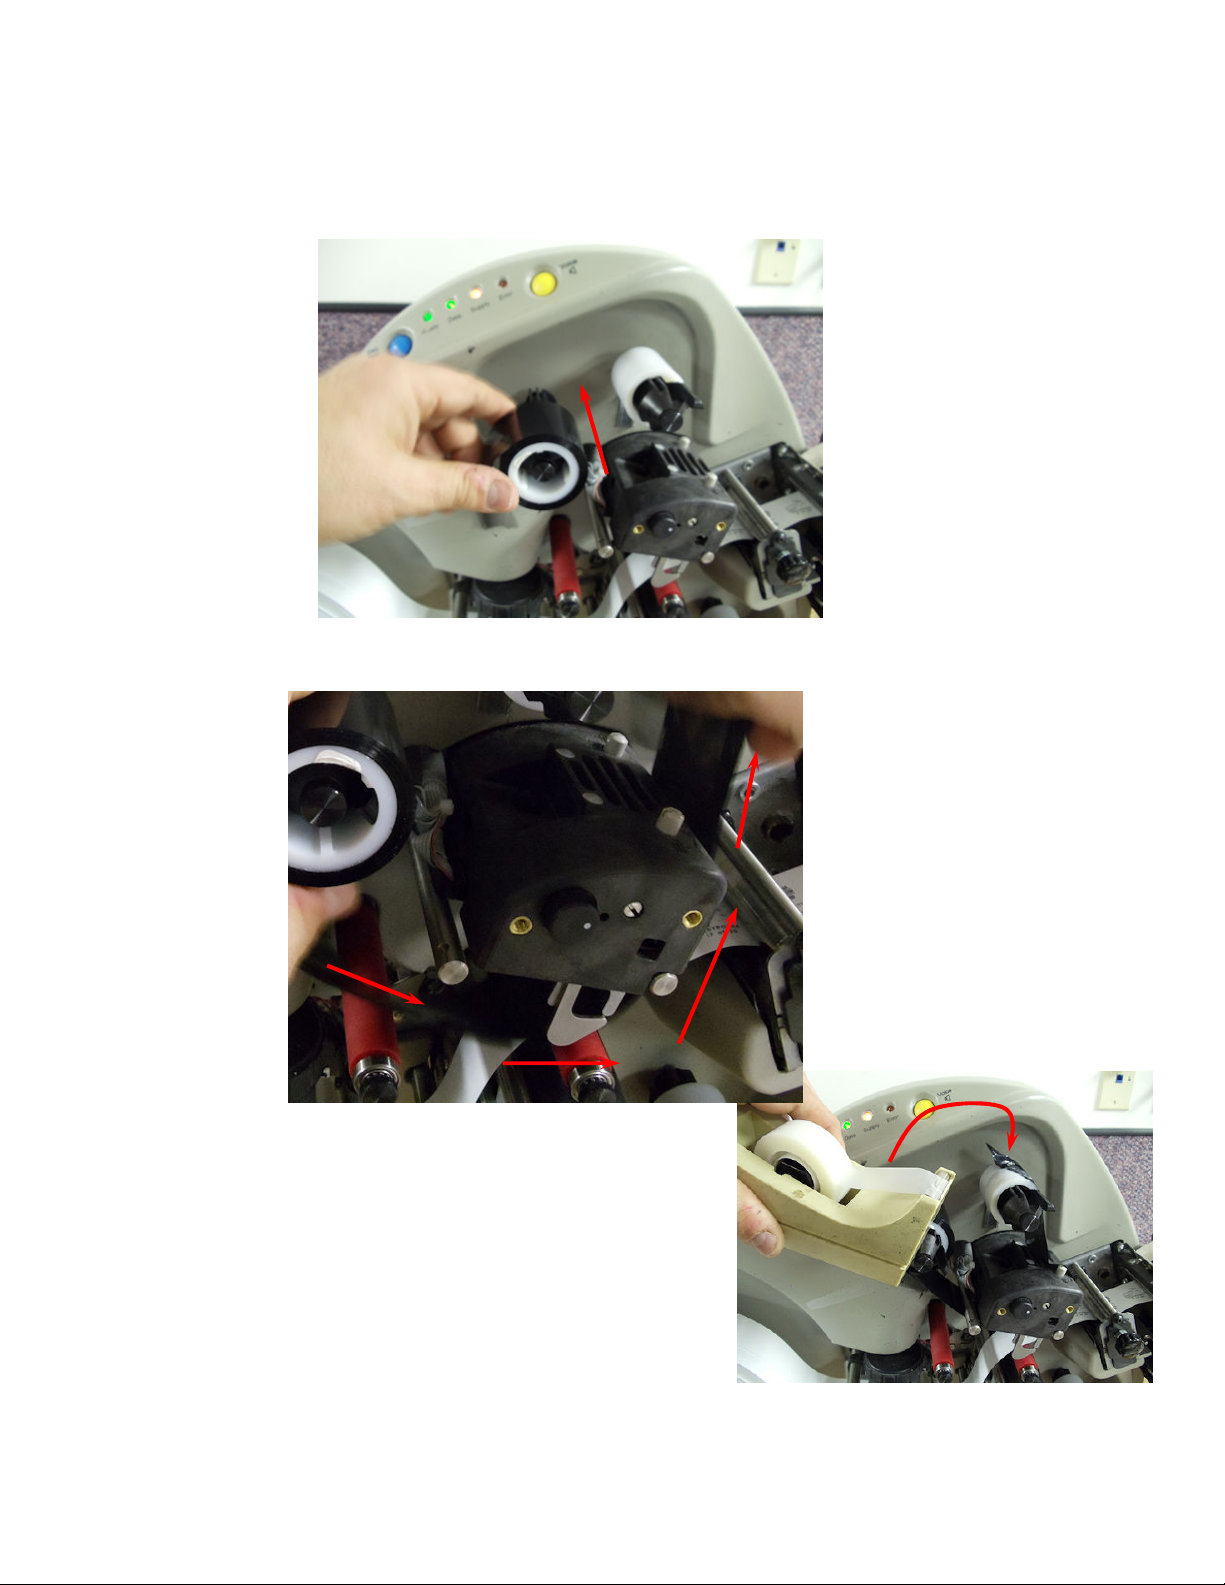
8
4. Remove the plastic packaging from ink.
5. Install on the Upper Ink Supply Arbor.
6. Thread ink as shown below.
Operator’s Guide—SNAP™ 500
7. Attach ink to the rewind core.
Page 9
User’s Manual—SNAP™ 500
8. Wind several rotations.
9
9. Close the Print Roller.
10. Follow same procedure for bottom ink station.
Page 10
10
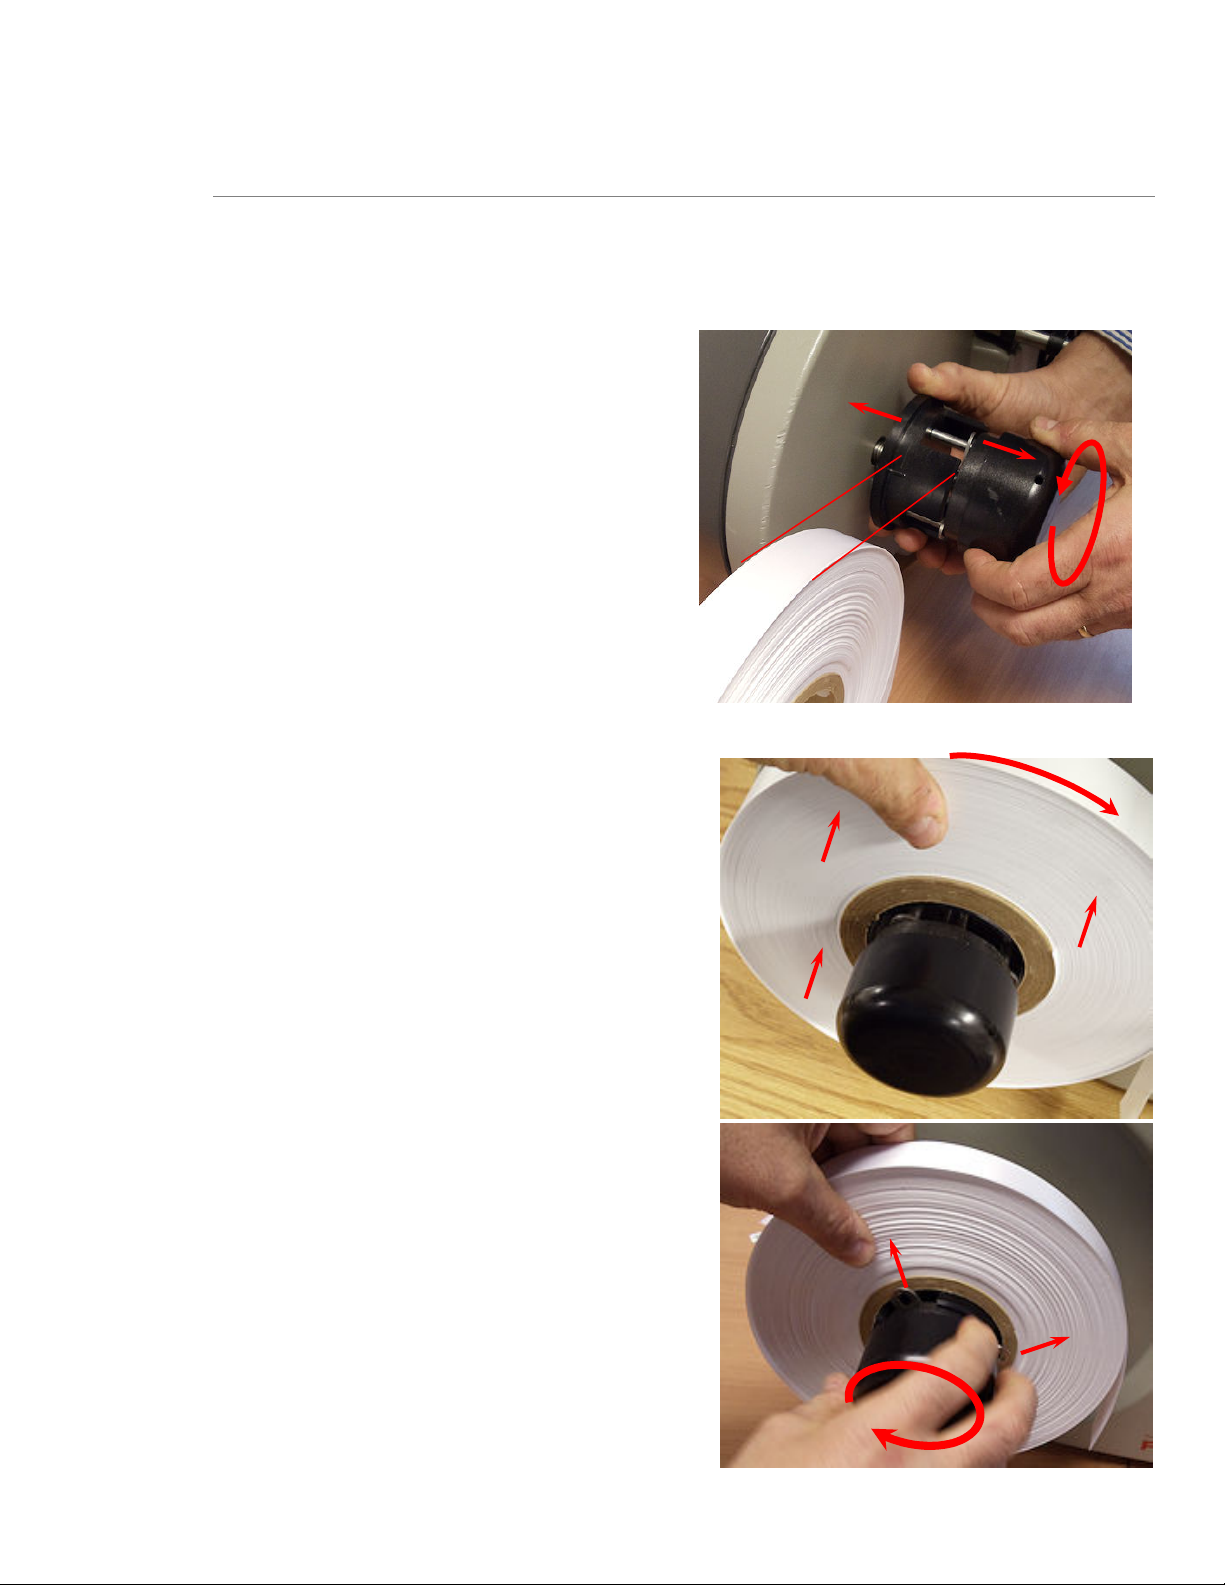
2.2.2 Load Stock
1. Remove packaging from stock and discard.
2. Cut off tape holding the end of the stock.
3. Rotate the Stock Arbor Knob
counterclockwise to retract the
“fingers”. Open wider than width of the
stock.
Operator’s Guide—SNAP™ 500
4. Slide stock on with the top edge pulling
towards the stacker.
5. Rotate the Stock Arbor Knob
clockwise quickly to extend the fingers
that hold the stock.
Page 11
User’s Manual—SNAP™ 500
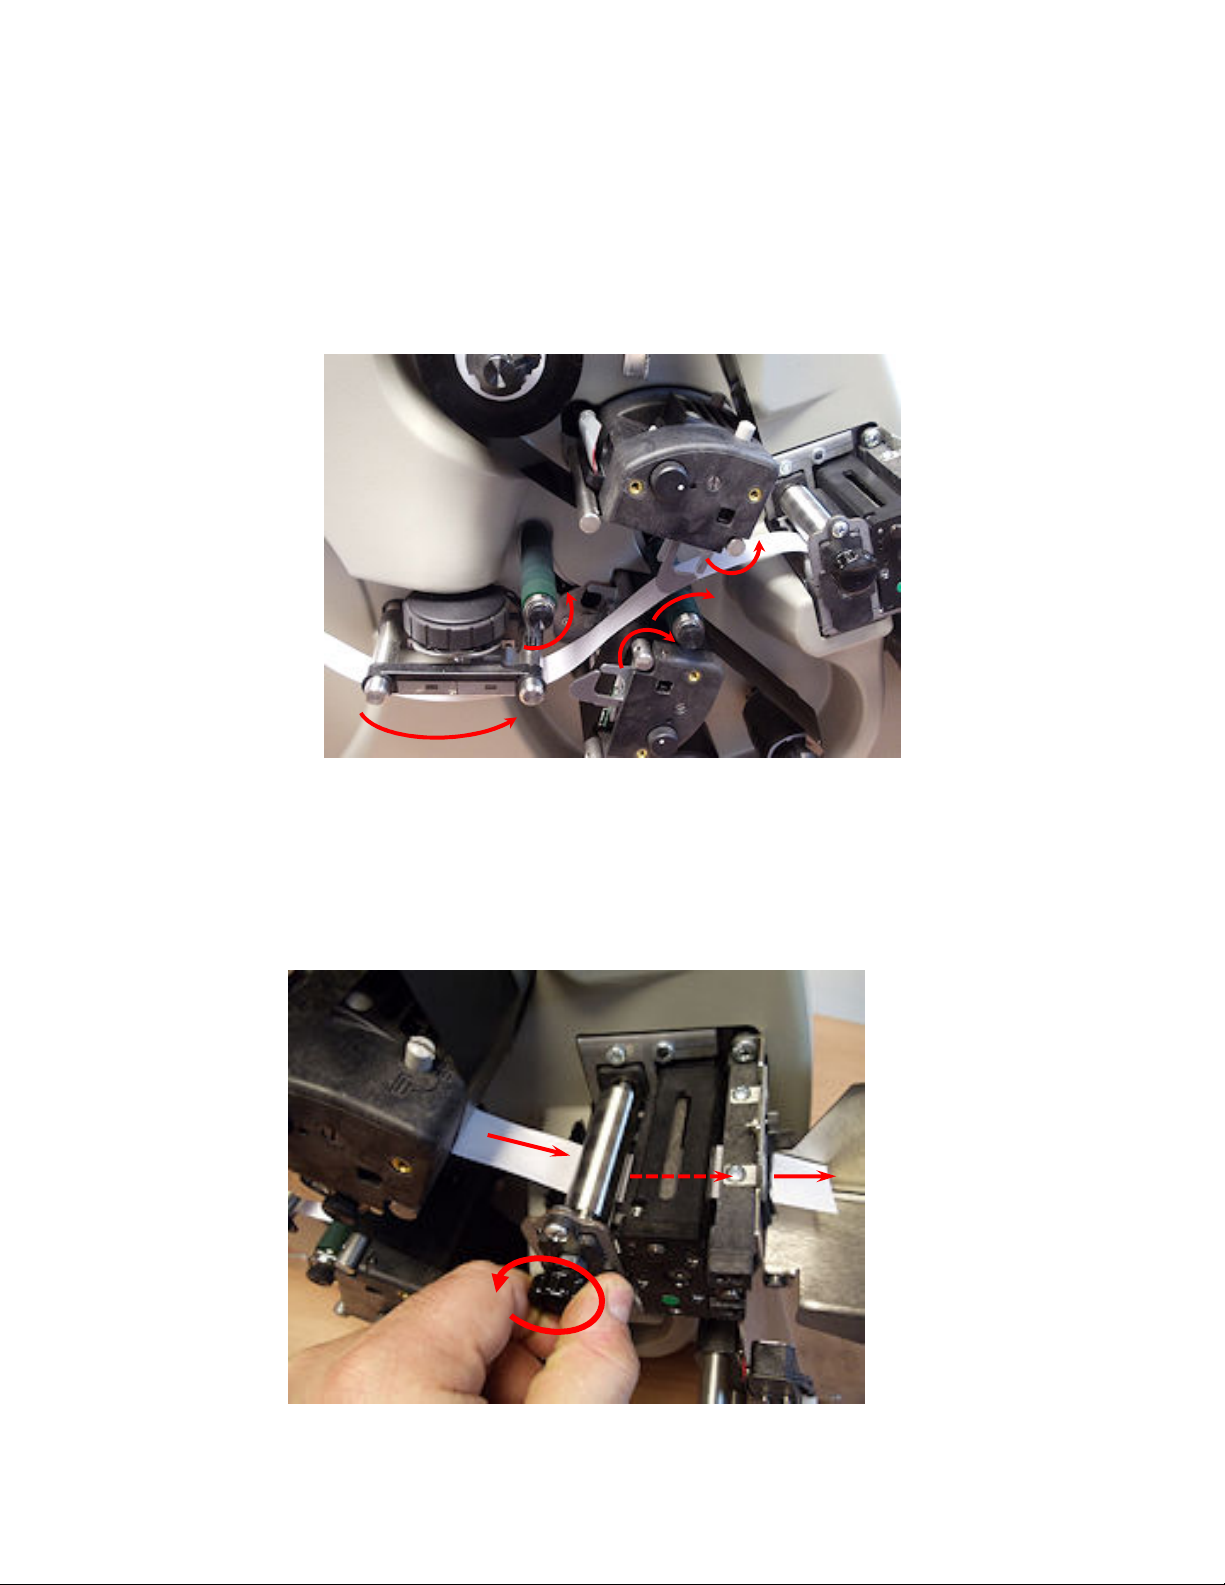
6. Open all print rollers.
7. Pull stock from the top of the stock roll.
8. Thread as shown.
11
9. Hold the stock with left hand against the feed roller.
10. Turn the Stock Feed Knob counter-clockwise to move the stock through the knife into
the stacker.
Page 12

12
11. Remove slack from the supply.
12. Close Print Rollers from right to left.
Operator’s Guide—SNAP™ 500
13. Remove slack between Print Rollers.
Page 13

User’s Manual—SNAP™ 500
14. Rotate the Stock Guide Knob to center the stock.
13
15. Adjust stacker as shown.
Page 14

14
2.2.3 Threading Diagrams – Gen 1
SNAP 500 1 over 1 (Gen 1)
Operator’s Guide—SNAP™ 500
2.2.4 Threading Diagrams – Gen 2
Snap 500 2 over 1
Page 15

User’s Manual—SNAP™ 500
Snap 500 2 over 0
15
Snap 500 1 over 1
(Gen 2)
Snap 500 1 over 0
Page 16

16
2.3 Printing Labels
2.3.1 Printer Control Panel
• The Start/Stop Button is a blue button.
o Data light is on, pressing the Start/Stop Button starts printing.
o If the printer is running, pressing the Start/Stop Button stops printing.
• The Ready Light is a green light -> ready to accept print jobs.
• The Data Light green light -> labels are ready to print.
o If the Data Light is flashing, you are at “end of day”
• The Supply Light is a yellow light:
o tape or ink supply needs attention
o stacker is full.
Operator’s Guide—SNAP™ 500
o flashes when sensor being used.
o displays a problem with an accessory attached.
• The Error Light is a red light -> problem exists
• The Voice Button is a yellow button -> printer status
Page 17

User’s Manual—SNAP™ 500
2.3.2 Printing
• Print job sent -> Data Light comes on.
• Press the Start/Stop Button to begin printing.
• The stacker moves to the correct position.
• The printer starts
• If the printhead opens, the printer will produce a “leader” - longer piece of unprinted
material. Any labels on this leader are reprinted.
• Cut labels drop onto the top of the stacker.
• Stacker moves down so that the incoming labels always to to the top of the stack in
the same position.
2.3.3 Feeding the stock
17
Press and hold the Start/Stop Button to feed labels.
Release Start/Stop button to stop.
If you are in the middle of printing a batch, feeding the tape will cause
the printed labels between the printhead and the knife to feed through
without cutting. These labels will be re-printed the next time you start
printing. The batch quantity will be correct.
2.3.4 Errors
There are two ways to determine errors:
1. Press the Voice Button. Listen for the error.
2. The Printer Status box on the Virtual Control Panel in PCMate Platinum also shows the
error.
Correct the problem and press the Start/Stop Button to start printing again.
Page 18

18
2.3.5 End of Day
To avoid wasting labels between print jobs, the printer stops before finishing a job. The Data
Light will flash.
Send another print job. The previous print job finishes and the next starts without waste.
Press Start/Stop Button if there are no more jobs to print the remaining labels.
2.3.6 Clearing Print Jobs
Press and hold both the Start/Stop and Voice Buttons simultaneously to clear jobs.
Release to clear one job.
Continue to hold to clear all job.
2.3.7 Setting / Adjusting Voice Button Volume
Operator’s Guide—SNAP™ 500
1. Press and hold the Voice button ->“Press Start for Test Pattern.”
2. Press the Voice button -> “Press Start for Demos.”
3. Press the Voice button.->“Press Start to Set Volume.”
4. Press the Start / Stop button-> “Press Start for Volume Level 3.” Etc.
5. Press the Start/Stop button -> “Volume Set to Level x. Returning to Print Mode.”
Page 19

User’s Manual—SNAP™ 500
3.0 Making Adjustments
3.1 Print Head Adjustments
3.1.1 Adjusting Print Head Pressure
CAUTION: For extended print head life, use the lighter print pressure
setting whenever possible.
1. For stock < 25mm, use a flat blade screwdriver to depress both buttons and turn them ¼
turn (90 degrees) counterclockwise until they are in the upper position.
19
> 25mm
2. For stock >25mm and < 50mm, use the flat blade screwdriver to depress both buttons
and turn them clockwise until they are in the lower position.
CAUTION: Ensure that both buttons on the print head are in the same
position. These are the only two positions for the buttons.
Page 20

20
3.1.2 Adjusting Density (Darkness)
The nominal contrast setting is in the center of the rotation.
1. To increase print density, rotate the contrast knob clockwise.
2. To decrease print density, rotate the contrast knob counterclockwise.
Operator’s Guide—SNAP™ 500
CAUTION: For extended print head life, use the lowest print contrast
the produces acceptable print quality.
Page 21

User’s Manual—SNAP™ 500
3.2 Virtual Control Panel
3.2.1 Operating Panel
PCMate Platinum has a Virtual Control Panel (VCP) that shows at the bottom of the screen
when a SNAP 500 printer is properly connected.
21
Printer Selection Box
Printer Controls and Lights
Printer Status
If more than one printer is connected, select the printer of interest from the Printer Selection
Box.
The Printer Controls and Lights panel shows buttons and lights the same as the printer.
Instead of a Voice Button, there is a Printer Status drop down box.
The Printer Status boxes show the Batch ID, quantity, and printer status.
The Batch Control section has buttons to Show Settings, Clear Batch, and Clear All.
Batch Control
Page 22

22
3.2.2 Show Settings Button
Click on the “Show Settings” button.
Operator’s Guide—SNAP™ 500
3.2.3 Print/Cut Adjust Tab
Print Adjust allows you to move the print with relation to the cut. There is one print
adjustment for each print station. Each step is 0.003” or .076mm.
Cut Adjust will help the printer cut in the right place relative to a sense mark on pre-printed
tape. Use only with pre-printed stock.
Both of these adjustments can be made while the printer is running.
Page 23

User’s Manual—SNAP™ 500
3.2.4 Options Tab
23
Use the Options Tab to:
• Select the printer language.
• Disable a verifier (not available on SNAP 500)
• Disable the cutter. This can be used for rewinding labels.
• Set a print speed different from the format. You may set a speed. Disregard
“Translate” setting.
• Disable flagging or job separator labels. Disregard “Side step”
• Disable sensemark type.
• Change Date and Time Setting.
• Change Transfer Type – disregard.
Page 24

24
3.2.5 Versions/History Tab
Operator’s Guide—SNAP™ 500
Use the Versions/History tab to check the following:
• Printer serial number is “Printer ID”
• Software version should be the latest approved version.
• Actual Printhead Resolution should be 305dpi.
Check various counts.
Page 25

User’s Manual—SNAP™ 500
3.2.6 Print Quality (VCP Arbor Tension Adjust Tab)
25
Use the Arbor Tension Adjust tab for print quality enhancements.
• Use Top Left Arbor, Top Right Arbor, and Bottom Arbor adjustments for ink
adjustments.
• For ink wrinkling, you can adjust the tensions of the arbors to remove the wrinkles.
Too little tension will cause wrinkling. Too much tension might break the ink.
Use the Stock Arbor adjustment to help tracking problems.
Page 26

26
Operator’s Guide—SNAP™ 500
Page 27

User’s Manual—SNAP™ 500
4.0 Maintenance
4.1 Print Heads
NOTE: Clean print heads:
1. Every 2-4 hours with alcohol and a cotton pad
2. Every 8 hours with alcohol and Velcro.
4.1.1 Handling Print heads
1. Keep print heads in their original anti-static bags.
2. Wear an anti-static wrist strap. Fasten the clip end of
the anti-static wrist strap to a metal portion of the
printer.
3. Wear anti-static gloves.
4. Do not touch any terminals extending from the print
head or the print line.
27
4.1.2 Cleaning Procedures
1. Before cleaning any part of your SNAP 500 printer, turn
off the power.
2. Apply alcohol to pad
3. Scrub head with pad.
4. Apply alcohol to loop side of a Velcro.
5. Scrub firmly with Velcro. Let dry 5 minutes.
6. Clean the print rollers.
7. Clean sensors with a dry cotton or foam swab.
CAUTION: Do not use alcohol to clean sensors.
Page 28

28
4.2 Print Head Replacement
Replace head when:
• Voids in the printing
Operator’s Guide—SNAP™ 500
• Lines of missing print
• Print quality does not improve after cleaning
1.
Turn off the power to the printer.
2. Remove the tape and ink supplies from the printer
for easier print head removal.
3. Follow handling techniques listed above.
4. Unplug the cables that connect to the print head.
5. Press the two grey tabs on the top of the print station.
Reach underneath and remove the print head from the
print station.
Page 29

User’s Manual—SNAP™ 500
6. Remove the new print head from the antistatic bag.
7. Place the new print head assembly onto the plastic
mount bracket underneath the print station.
29
8. Carefully, align the clips into the bracket as shown.
Push it up until it clicks into position.
9. Reconnect the print head cable connectors, making sure that the connectors are seated
tightly.
WARNING: If the cables are not connected correctly, the print head
will be destroyed when the power to the printer is turned
on. Check to see that the cable is tight by observing from
underneath the print head.
Page 30

30
4.3 Lubrication
The SNAP 500 ball bearings do not require lubrication.
Two (2) oil-impregnated bronze bushings in the auxiliary rollers of the feed assembly that do
require lubrication.
Caution: AVERY DENNISON recommends lubricating the bronze
bushings with one drop of multi-use oil once every month
during normal operation.
Operator’s Guide—SNAP™ 500
4.4 Rotary Knife Assembly Cleaning
WARNING: When adjusting, removing, or replacing the knife assembly,
you must turn off the power to the printer to avoid personal injury.
1. Turn off the power to the printer.
2. Using the Feed Roller knob, back the tape out of the
knife.
Page 31

User’s Manual—SNAP™ 500
3. Using a Phillip’s head screwdriver, loosen the
retaining screw on the outboard end of the knife.
4. Lift knife up and out.
31
5. Clean the knife with alcohol and cotton swab. Tap the knife on a hard surface to remove
cut pieces.
WARNING: Keep your fingers out of the knife assembly to avoid
personal injury.
Page 32

32
6. Align the “D” on the knife with the “D” in the printer.
7. To insert the new knife assembly, slide it down
vertically into the space between the Auxiliary Feed
and the Nip Rollers.
Operator’s Guide—SNAP™ 500
8. Ensure alignment is correct and knife is seated.
9. Retighten the screw.
Page 33

User’s Manual—SNAP™ 500
33
Page 34

34
Operator’s Guide—SNAP™ 500
Avery Dennison
170 Monarch Lane
Miamisburg, OH 45342
1-800 543-6650 (In the U.S.A.)
1-800-387-4740 (In Canada)
www.averydennison.com
028028
 Loading...