

Page 1
Manual Rewind Option
Manual Rewinder Option
06/01 Rev. 2.09 1
Page 2

Manual Rewind Option
Contents
Contents ...............................................................................................................................2
General.................................................................................................................................3
Copyright ..........................................................................................................................................3
Error handling and search ....................................................................................................4
Media fixation .......................................................................................................................5
Technical Specification.........................................................................................................7
Technical Service .................................................................................................................8
Mechanic ..........................................................................................................................................8
Rewinder complete ................................................................................................................... 8
Support foot............................................................................................................................... 9
Media guiding.......................................................................................................................... 10
Clamp handle .......................................................................................................................... 11
Roll profile ............................................................................................................................... 11
Guiding disc ............................................................................................................................ 12
Tooth belt tighten part ............................................................................................................. 13
Stepper motor ......................................................................................................................... 14
Tooth belt ................................................................................................................................ 15
Gear plate ............................................................................................................................... 16
Sensor wedge ......................................................................................................................... 17
Dancer arm spring................................................................................................................... 18
Dancer arm ............................................................................................................................. 19
Electronic........................................................................................................................................20
Sensor ..................................................................................................................................... 20
Activate rewinder..................................................................................................................... 21
Adjust rewinder sensor............................................................................................................ 22
Diagram, component, wiring............................................................................................... 24
Component peripherial board 99054-xx-6......................................................................................25
Diagram peripherial board99054-xx-6............................................................................................26
Adjustment peripherial board .........................................................................................................27
Wiring .............................................................................................................................................28
Appendix............................................................................................................................. 32
Tooling and work materials ............................................................................................................32
Parameter menu.............................................................................................................................33
INDEX................................................................................................................................. 35
06/01 Rev. 2.09 2
Page 3

Manual Rewind Option
General
Copyright
This User Manual and its contents are subject to copyright. The publisher’s prior written
consent must be obtained for reproduction of the manual as whole or part thereof.
Names are generally given without any reference to existing patents, registered patterns or
designs, or trademarks. The omission of a corresponding not does not imply that the names
can be used freely. All trademarks are acknowledged.
The manufacturer reserves the right to technical and other alterations without prior notice.
The publisher cannot warrant the accuracy of the content of this manual.
Note: Please follow the notes shown in this text - it will help to cover all
situations and keep your engine working.
06/01 Rev. 2.09 3
Page 4

Manual Rewind Option
Error handling and search
To verify functionality of mechanical and electronically functions - if there is not a evidently
defect - use status report ‘STA0 to STA3’ (see User Manual) - printout to check the unit.
06/01 Rev. 2.09 4
Page 5

Manual Rewind Option
Media fixation
characteristics possible reason solution
media moves on core forgotten clamp handle check and fix it
media sticks not to core fix media
core size to wide change core
media moves to inner dancer arm adjust dancer arm
or outer side bent
media guiding wrong adjust guiding
adjusted (ring)
rewind option not fix rewinder to
mounted properly printer
rewind unit is not stepper not plugged in plug in stepper
moving correctly motor
stepper motor defect check and change
stepper
sensor not plugged in check and plug in
characteristics possible reason solution
option board defect check and replace
or not there or insert
sensor wedge not check and adjust
mounted correctly
tooth belt defect check and change
belt tighten loose check and adjust
wrong direction direction programmed check and change
of movement wrong
stepper connection wrong check and change
06/01 Rev. 2.09 5
Page 6

Manual Rewind Option
(wiring)
printer falls to support not adjusted check and adjust
head side well
roll to heavy check and use
smaller roll
printer stand is not flat move printer to flat
surface
dancer arm is not moving spring is out of function check
guiding roll is not moving maybe dirty check and clean
06/01 Rev. 2.09 6
Page 7

Manual Rewind Option
Technical Specification
- drive stepper motor
- sense of position infra red sensor
- rewind speed self adjusting
- max. roll as used printer (see User Manual)
4250 g TTX 450/650 Puma/Lion
7250 g TTX 950 Tiger
- direction of movement user selectable
clock - counter clockwise
- used media self adhesive-, cardboard- and
plastic media up to 240 g/qm
- label size see printer manual
- electrical specification see printer manual
- environment specification operating temperature: +5 to +35 Grad C
storage temperature: -20 to +70 Grad C
humidity: 45 to 75% not condensing
- construction solid version build from strong aluminium
and stainless steal, all mobile axles pivoted
open assembly of parts and components for
easy, plain operating and service
06/01 Rev. 2.09 7
Page 8
Manual Rewind Option
Technical Service
Mechanic
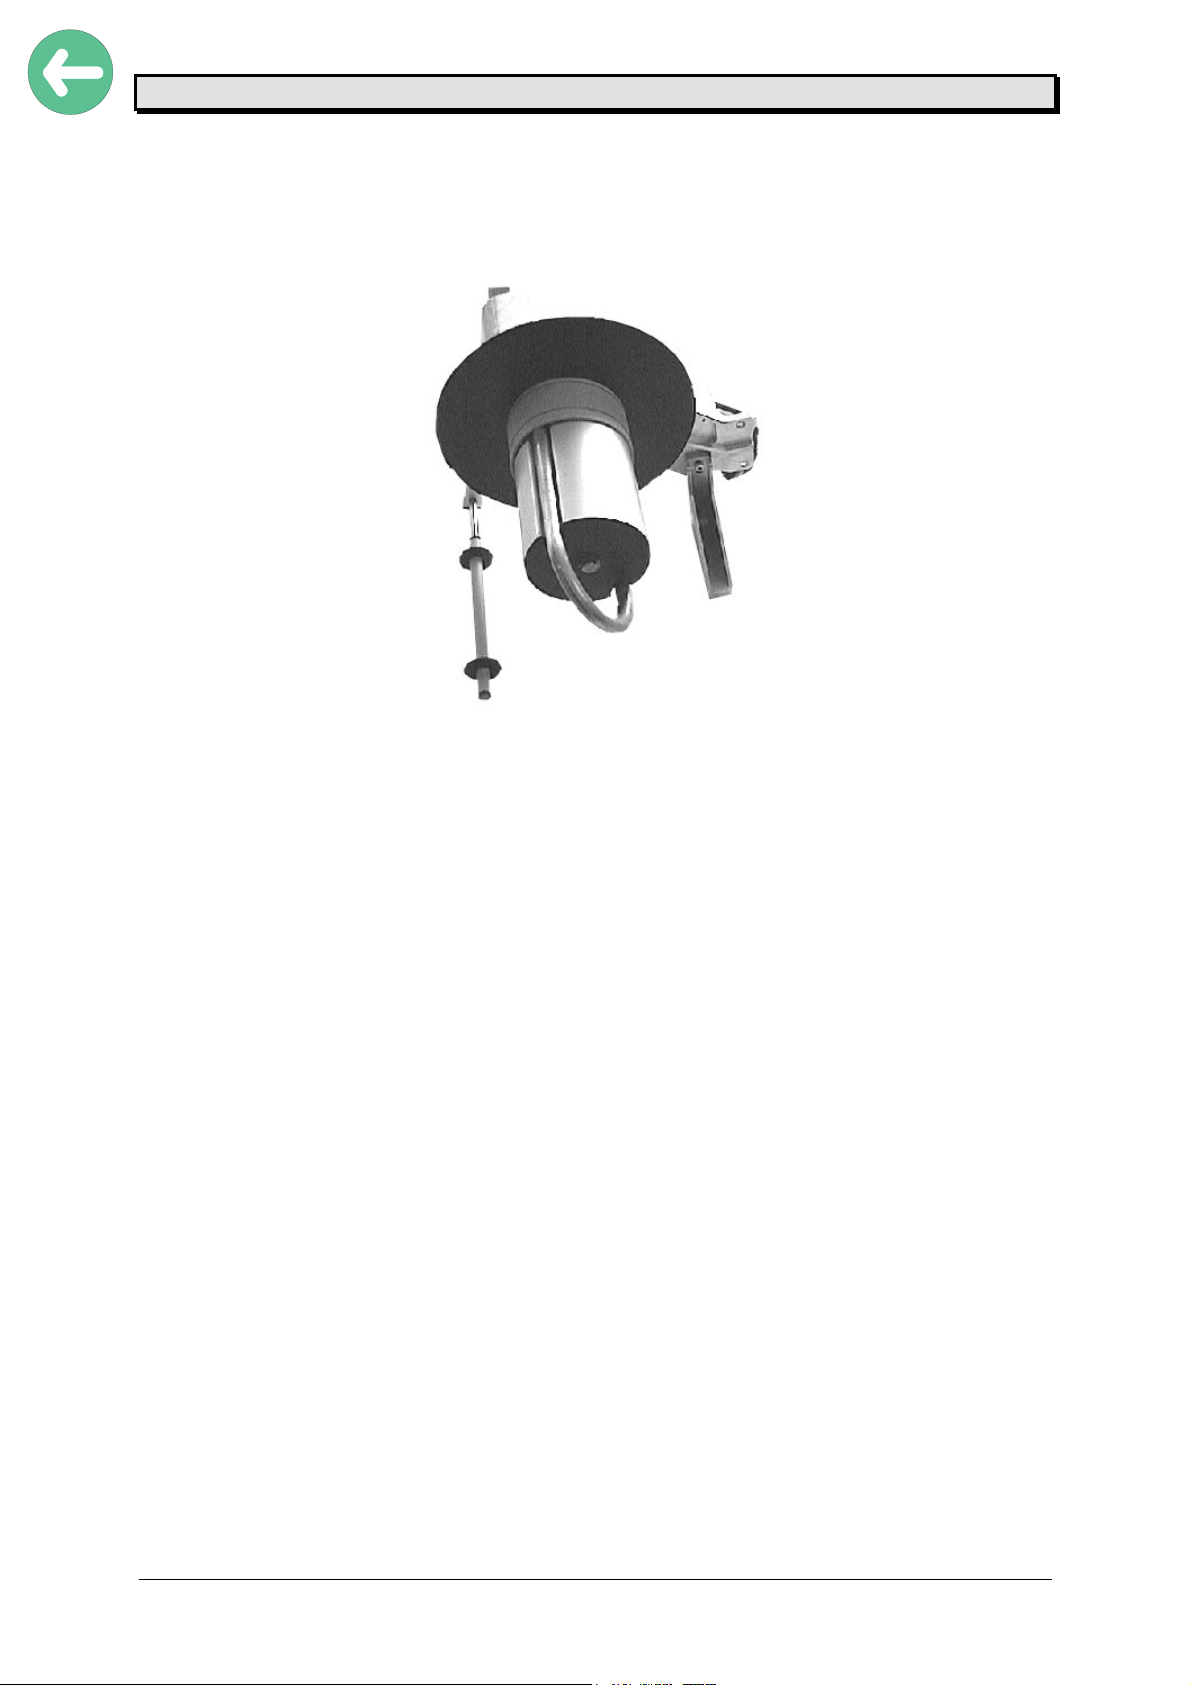
Rewinder complete
Before mounting the rewinder option
an other option has to be disassembled
(like cutter, or infeed).
Assembly/Disassembly rewinder
- set printer to a flat surface
- the surface has to big enough
to hold as well the support foot
- mount the rewinder with two
hexagonal screws - use the defined
holes
- adjust the support foot in a way
that the weight of the rewound roll
is absorbed by the support
- small differences are regulated by the
rubber feet
- connect the sensor cable to the
responding connector at the front
of the printer
- select option on the display and
activate the option (PEPH)
- select direction at the display
(see User Manual)
Steppermoto
Sensor
- adjust sensor (as described under electronic)
Attention: The rewind option is now ready to operate - all other options are
deactivated!
06/01 Rev. 2.09 8
Page 9
Manual Rewind Option
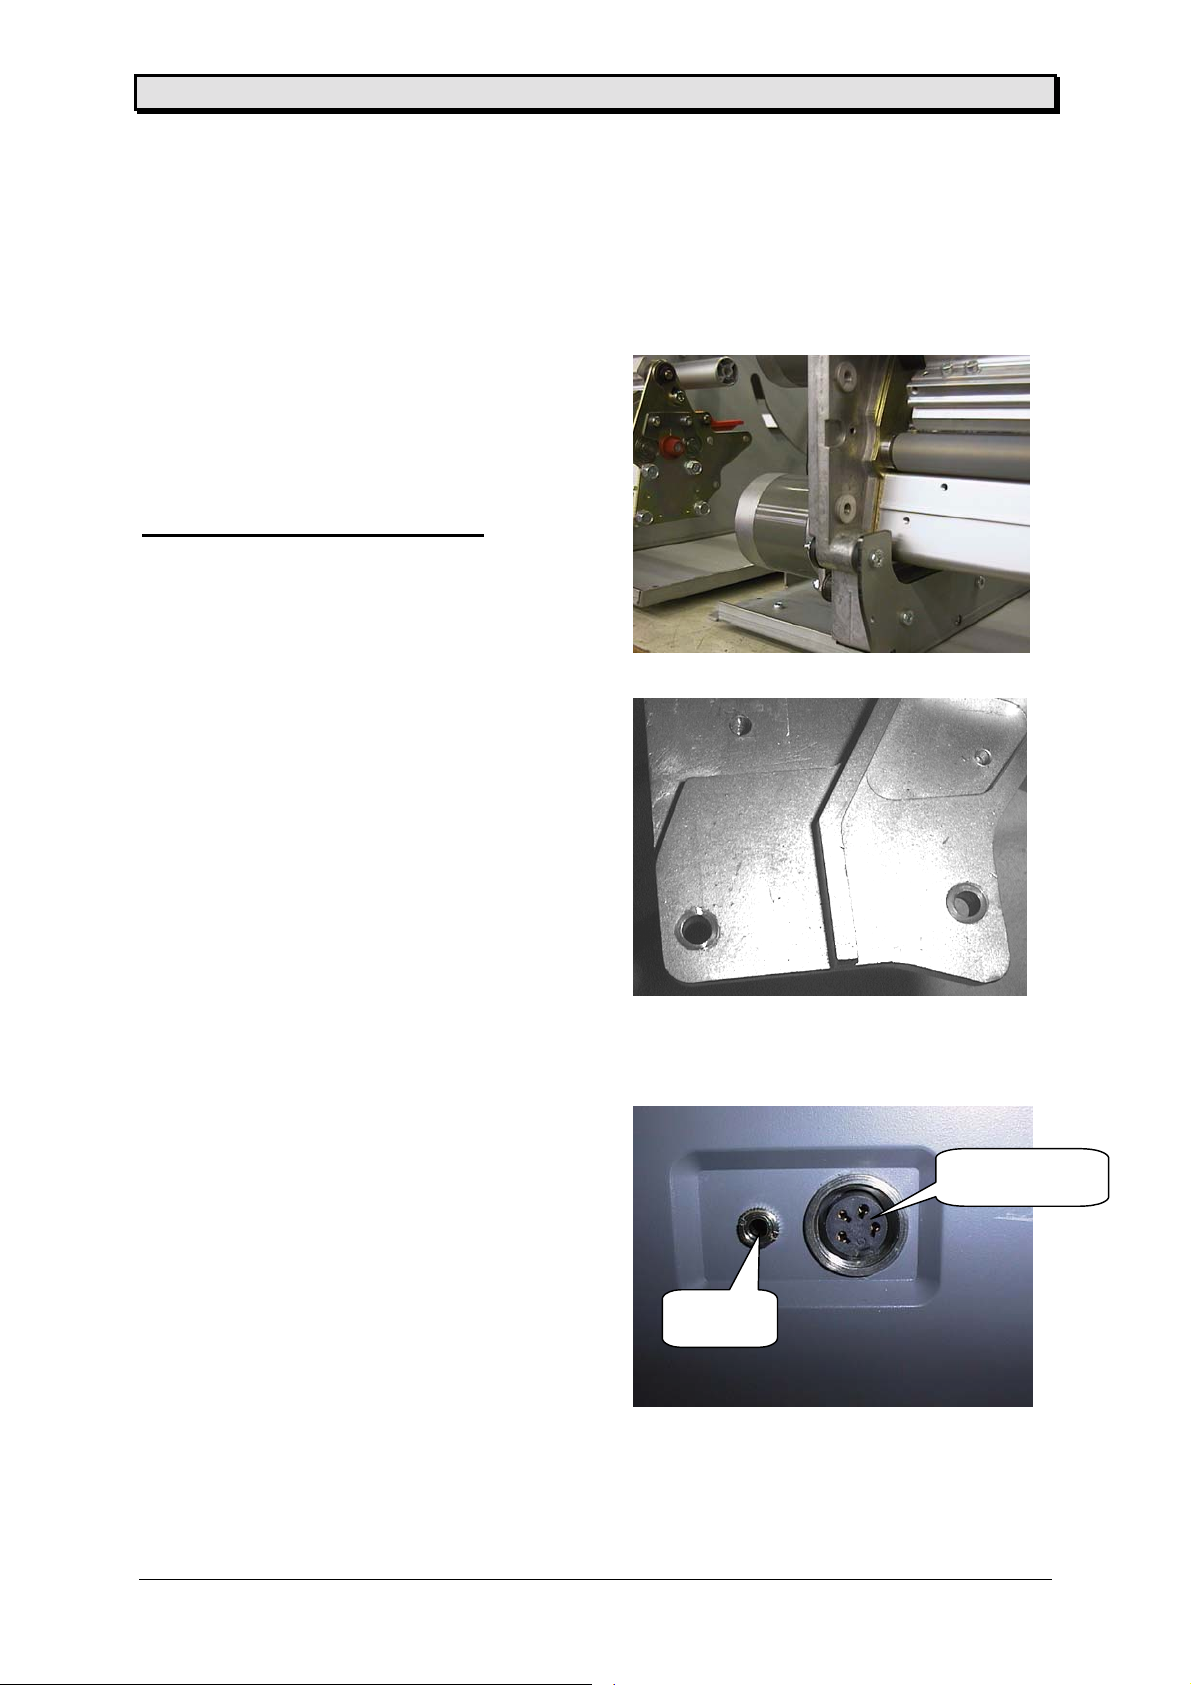
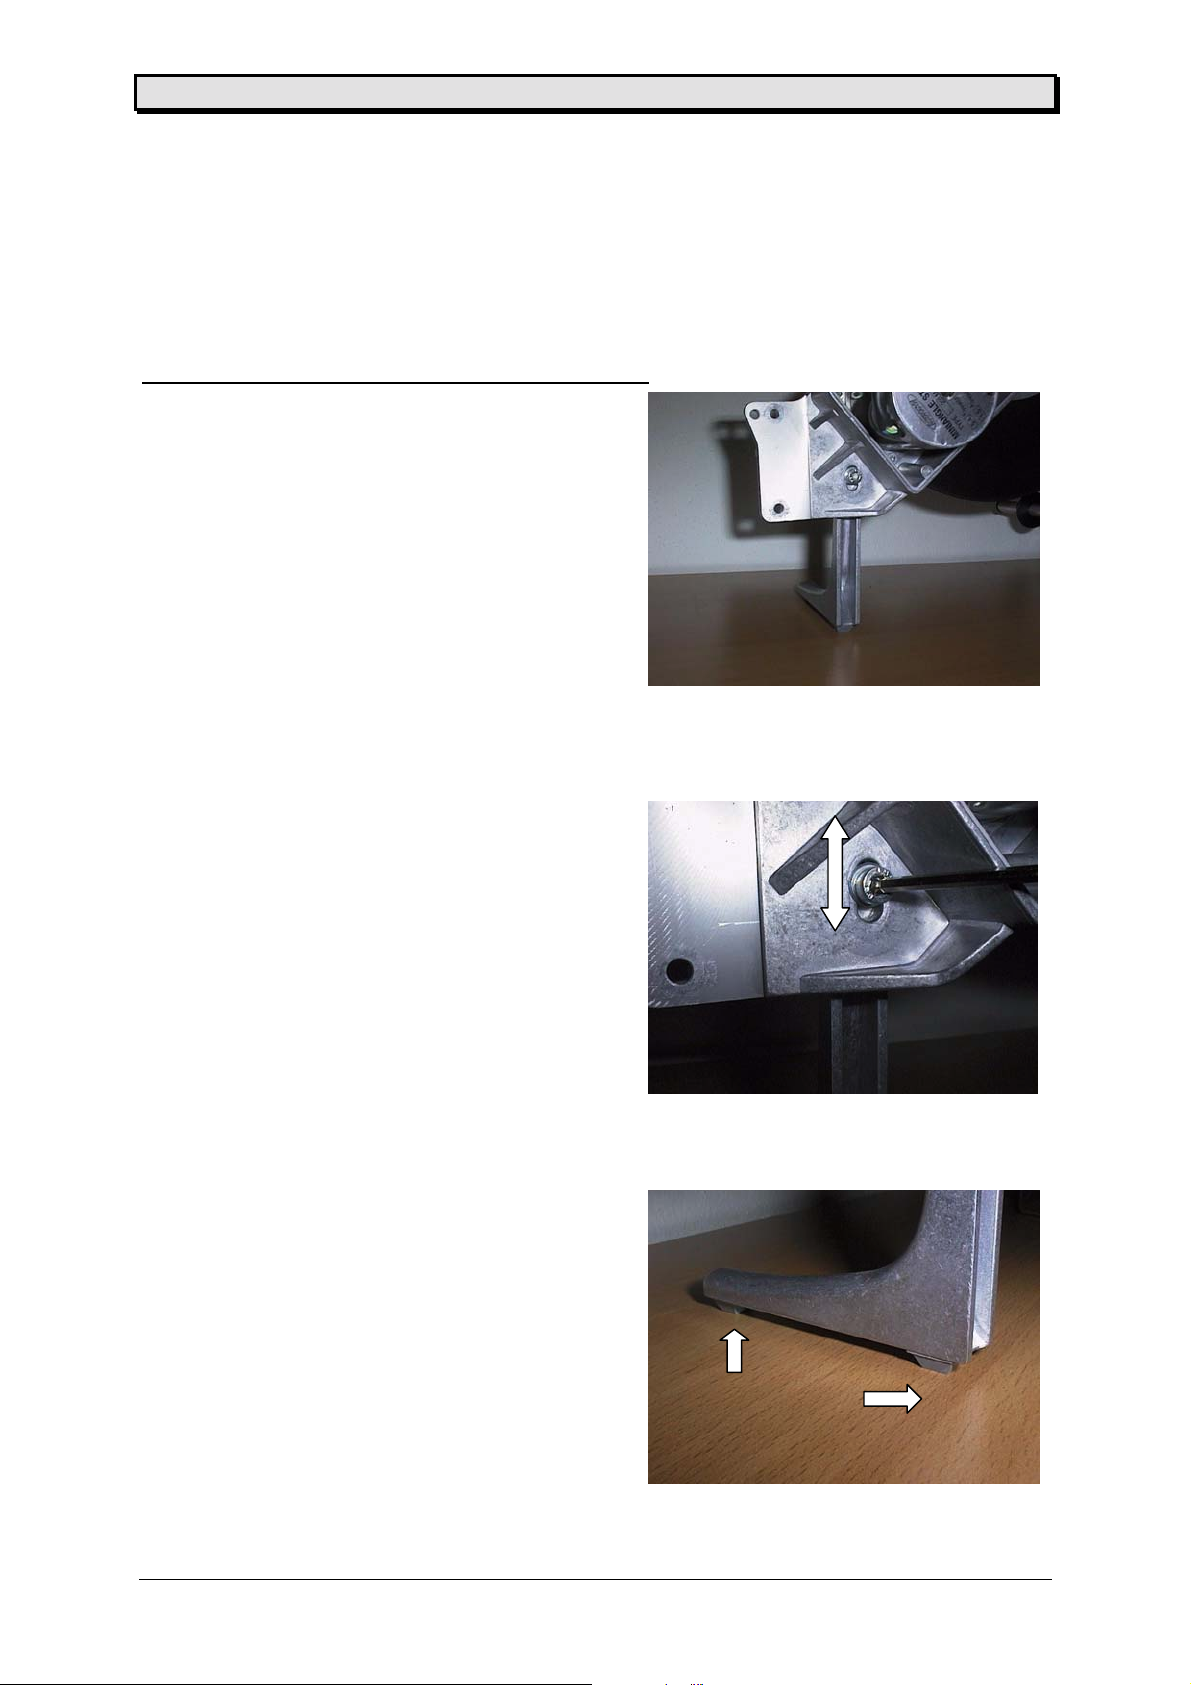
Support foot
The support foot is used to balance the weight of the printer and the rewound material on the
rewind roll. The maximum roll weight of the biggest printer is more than 7000 g - so you can
see that the function of this part is very important.
Assembly/Disassembly/Adjustment support foot
• set printer with the mounted rewind
option to a flat surface
• loose support foot by opening the
hexagonal screw
• press the rubber feet to the surface and
close the screw again
• adjust the support foot that it is parallel
to the metal casting
• tighten the screw very well
Tooling
hexagonal socket SW 4
06/01 Rev. 2.09 9
Page 10

Manual Rewind Option
Media guiding
The media guiding of the rewind option is used to control the movement of the media before
the media is rewound. Otherwise the media will run outside or inside on the rewind core.
Assembly/Disassembly/Adjustment media guiding
• the roll can be disassembled complete
from the dancer arm (together with
the guiding rings)
• open the lock washer as shown on the
picture
• the roll can be removed from the axle
• sometimes it is possible that the roll has
collected glue or dust - then it is
necessary to clean the roll
• the plastic bearing can be replaced as well
if it is necessary
• the guiding rings can be adjusted by
moving the rings on the roll
• the roll is fixed to the lower position as
well with a lock washer
Sicherungsring
Tooling
screw driver small
06/01 Rev. 2.09 10
Page 11

Manual Rewind Option
Clamp handle
Using the clamp handle you will fix either a core or the media itself to the rewind core!
The core and the handle are available in 3“ and 4“ diameter.
Assembly/Disassembly clamp handle
• responding to the used method you will
use the handle with a core or without
• using the paper core you have to fix the
material (with a sticky label) to the core
• after fixing the media with the handle
to the profile it should not be possible
move the media on the core
Roll profile
Same as the handle the roll profile is available
in a diameter of 3“ and 4“ - at the rear side you
can see two fixation points and flat area of the
axle guiding. Mounting the profile to the disc
watch this points.
Assembly/Disassembly roll profile
• the roll profile is mounted to the
guiding disc and fixed to a axle in
the centre
• disassemble the profile by open the
lock washer by hand (see picture)
• the profile can be removed
• the guiding disc is fixed with a separate
lock washer to the axle
Tooling
screw driver small
06/01 Rev. 2.09 11
Page 12

Manual Rewind Option
Guiding disc
The guiding disc is used to control the movement of the rewound material during rewind
operation. The covered part of the guiding disc is as well the transport part (a gear wheel is
part of the disc). Fixed with a lock washer to the axle - the guiding disc shows two holes for
the roll profile to fix it there.
Assembly / Disassembly guiding disc
• before disassembling the disc - the
tooth belt should be relived (see tooth belt)
• after removing the lock washer the disc
can be removed
• now you can reach the tooth belt - the
tooth belt tighten part and the gear of
the stepper motor
• as well the sensor - the sensor, sensor
wedge, dancer arm spring can be
watched
Tooling
screw driver small
06/01 Rev. 2.09 12
Page 13

Manual Rewind Option
Tooth belt tighten part
The tooth belt tighten part is used to tighten the tooth belt in a proper way - this means
mechanical tolerances given by production and assembly can be controlled.
Assembly/Disassembly tooth belt tighten part
• open two cross recessed screws and
the back cover part can be removed
• remove cover carefully over the stepper
motor
• as well during assembly and
disassembly the wires should be
watched
• the two hexagonal screws of the
tighten part are now visible
• the screw in the long hole is used to
tighten the belt
• open the screw - move the part in the
direction you think of and close the
screw
• to remove the tighten part the roll profile
and the guiding disc have to be removed
before (see roll profile and guiding disc)
Tooling
cross recessed head size 1
hexagonal socket SW 3
06/01 Rev. 2.09 13
Page 14

Manual Rewind Option
Stepper motor
The stepper motor is the driving part of the unit. Driven and controlled by the printer - is the
only intelligent part on the rewinder the optical encoder of the dancer arm. Controlling speed
and position of the rewinder.
Assembly/Disassembly stepper motor
• open two cross recessed screws and
the back cover part can be removed
• remove cover carefully over the stepper
motor
• as well during assembly and
disassembly the wires should be
watched
• the two hexagonal screws of the
tighten part are now visible
• the fore hexagonal screws of the
stepper motor are now easy to reach
open them and the stepper can be r
removed
• the gear is pressed to the axle and
can not be removed
• during assembly watch the position
of the stepper - otherwise the motor
cable will block the cover
Tooling
cross recessed head size 1
hexagonal socket SW 3
06/01 Rev. 2.09 14
Page 15

Manual Rewind Option
Tooth belt
The tooth belt is transferring the power from the stepper motor to the guiding disc and has to
be controlled from time to time.
Assembly/Disassembly tooth belt
• remove roll profile and guiding disc
(see roll profile and guiding disc)
• the tooth belt can be removed c
controlled and maybe changed
• to insert the belt again follow
the steps below
• insert tooth belt around stepper gear
and tighten part (tighten part has to
be open)
• mount guiding disc to axle
• hold down the belt with a small screw
driver in the area of the motor gear
(see picture)
• moving guiding disc slow to slip the
belt over the gear
• secure guiding disc
Tooling
screw driver small
06/01 Rev. 2.09 15
Page 16

Manual Rewind Option
Gear plate
The gear plate is used to give more stability to the dancer arm mounting!
Assembly/Disassembly gear plate
• remove roll profile and guiding disc
(see roll profile and guiding disc)
• open the two hexagonal socket screws
• the gear plate can be removed
Tooling
hexagonal socket SW 3
screw driver small
06/01 Rev. 2.09 16
Page 17

Manual Rewind Option
Sensor wedge
This part is controlling position and speed of the stepper motor (controlled by the dancer
arm).
Assembly/Disassembly sensor wedge
• remove roll profile and guiding disc
(see roll profile and guiding disc)
• open the two hexagonal socket
screws
• the gear plate can be removed
•open lock washer on the axle
• pressure spring and wedge can
be removed
• the dancer arm axle is locked
with a second lock washer
Tooling
screw driver small
hexagonal socket SW 3
06/01 Rev. 2.09 17
Page 18

Manual Rewind Option
Dancer arm spring
The dancer arm spring gives a defined zero position to the dancer arm. If this position is not
working on your unit - maybe the spring is not working properly.
Assembly/Disassembly dancer arm spring
• remove roll profile and guiding disc
(see roll profile and guiding disc)
• open the two hexagonal socket screws
• the gear plate can be removed
• dancer arm spring can be removed
Tooling
screw driver small
hexagonal socket SW 3
06/01 Rev. 2.09 18
Page 19

Manual Rewind Option
Dancer arm
The dancer arm is a very important part - controlling more then one mission. First of all the
dancer arm is controlling that the media is always rolled up with the same friction. Second
the media is controlled and guided to the right position - the speed of the stepper motor is as
well controlled by the dancer arm.
Attention: It is clear that the dancer arm is very important for the correct
function of the unit. Never use the dancer to move the unit
or to carry it!
Assembly/Disassembly dancer arm
• remove roll profile and guiding disc
(see roll profile and guiding disc)
• open the two hexagonal socket
screws
• the gear plate can be removed
• remove lock washer from axle
• pressure spring and wedge can be
removed
• remove the second lock washer
from the axle - the axle can be
removed
Tooling
screw driver small
hexagonal socket SW 3
Attention: The dancer arm is an assembly and can not be disassembled!
06/01 Rev. 2.09 19
Page 20

Manual Rewind Option
Electronics
Sensor
The sensor (light transmission) is used to control the position together with the sensor
wedge. Different light sensibility is measured by the sensor and results in a different speed.
Assembly / Disassembly sensor
1. Remove roll profile and guiding disc (see Roll
profile and Guiding disc).
2. Remove back cover (1) (see back cover).
3. Unplug cable (2) from the connector on the light
sensor board (3).
4. Remove screw (4) and light sensor board.
Tooling
cross recessed head size 1
screw driver small
1
3
4
2
06/01 Rev. 2.09 20
Page 21

Manual Rewind Option
Activate rewinder
As an additional option the rewinder is a part of the TTX group Using the rewinder first time,
the software function has to be activated. Therefore use the printer menu.
1. Select SYSP
2. Select PEPH
3. Select RWND
4. Choose direction of rotation and select between DIRL (left – counter clockwise) and DIRR
(right –clockwise) – seen frontal towards the rewind core.
Fig. 1: Left side: Setting DIRL; Right side: Setting DIRR.
Attention: During OFFLINE Mode the rewinder is not moving. The rewinder is switched ON
and OFF using the CUT key !
Using the DIRR mode will result in not using the complete possible movement area of the
dancer arm. This is done via software (no additional adjustment necessary) – the reason for
is the angel of the dancer arm together with bigger outside diameter. So it is better to use
only a part of the movement area.
If there is no media in the media end sensor and is the sensor activated the rewinder is not
moving – as well not by pressing CUT.
The display is showing ST13 if the feed motor is not moving and the rewinder is not reaching
home position after 4 seconds of constant maximum speed.The rewinder will be switched
OFF.
Is the feed motor running and the rewinder is unable to reach the home position after 4
seconds of constant run – the rewinder will be re started ! Reason for – maybe the stepper
motor was blocked and has to be re started.
06/01 Rev. 2.09 21
Page 22

Manual Rewind Option
Adjusting the rewinder sensor
To adjust differences given by assembly and parts – we have given the possibility to adjust
the sensor via potentiometer.
PRINTER
home position (end1)
variabel speed
Fig. 2: End positions of the dancer.
home position (end2)
First please check the sensor by using the menu point SCHK.
The point Wxxx will show the value of the sensor depending on the position of the dancer
arm (between 0 ... 255).
!
The difference between the two end points must be bigger then 100!
If the difference between the two end points is not big enough, use the potentiometer on the
rewinders light sensor board (Fig. 3:) to set the current through the sensor. To do so,
proceed as follows:
Fig. 3: Left side: Pot. (arrows) on the light sensor board; Right side: Use the slot in
the housing to set the pot. from outside.
1. Turn the potentiometer at the rewinder (Fig. 3:, arrows) clockwise to its limit.
2. Activate the sensor check for sensor W.
3. Move the dancer in succession to both end positions. Keep an eye on the printer display:
The difference between both displayed values in the end positions must be greater than
110.
If the difference between the values is smaller, please check if the peripherals board is set
correctly.
06/01 Rev. 2.09 22
Page 23

Manual Rewind Option
30 mA
P1
Z0131.cdr
Fig. 4: Setting the peripheral board: disconnect the sensor, set the current by
means of P1 to 30 mA.
If the difference is big enough the sensor itself has to be adjusted now.
1. Select SYSP.
2. Select PEPH.
3. Select RWND.
4. Select RADJ (behind DIRL and DIRR) and select YES by using ENTER or leave the menu
by using ESC.
5. First adjust the home position of the dancer - RNUL. Acknowledge with ENTER – shown
is the momentary sensor value, by moving the dancer, the value is changing. By pressing
ENTER the value is overtaken by the program.
Attention: Do not set the value at the limit position but the position ~ 5 mm before!
6. Acknowledge the value by pressing ENTER. The display switches to REND.
7. Acknowledge by pressing ENTER – move the dancer arm to the opposite position (close
to the support foot, shown is the actual value of the sensor. Accept as well by pressing
ENTER – the value will be accepted.
Attention: Do not set the value at the limit position but the position ~ 5 mm before!
Watch carefully that the difference between the two shown values is bigger the
100 !
Is the program step broken by using the ESC key the printer is using default
values – maybe ending with mail functions.
06/01 Rev. 2.09 23
Page 24

Manual Rewind Option
Diagrams, components, wiring
06/01 Rev. 2.09 24
Page 25

Manual Rewind Option
Component peripherial board 99054-xx-6
06/01 Rev. 2.09 25
Page 26

Manual Rewind Option
06/01 Rev. 2.09 26
Diagram peripherial board99054-xx-6
Page 27

Adjustment peripherial board
g
Manual Rewind Option
CN 6 test point
CN 4 main stepper connector
JP 2 signal / power
connectin
to dispenser
Additional
information – this
board can be used
for:
- applicator option
- cutter option
- rewinder option
- infeed option
- cutter / stacker
option
CN5 signals :
touch down – digital signal
that the applicator base
plate get in contact with the
surface of He product !
Applicator moves back.
Peripherial board 99054
Poti P 1 infrared sensor
CN 5 touch down
home sensor
Poti R 41 label present sensor
CN 3 infrared sensor
30 mA
P1
Depending on the mounted option – this sensor is used in
different ways :
- cutter / stacker
- cutter
- infeed
- rewinder
-
for
no adjustment necessary
use Poti P1 to adjust the sensor
unplugged sensor as illustrated.
label present sensor
Poti R 41 to adjust between test point CN 6 and
ground a value of 2.5 Volt (no media in and cover
closed)
no adjustment necessary
set current to 30 mA by use of P1 with
Z0131.cdr
(manual application) use
06/01 Rev. 2.09 27
Page 28

Wiring
Manual Rewind Option
06/01 Rev. 2.09 28
Page 29

Manual Rewind Option
06/01 Rev. 2.09 29
Page 30

Manual Rewind Option
06/01 Rev. 2.09 30
Page 31

Manual Rewind Option
06/01 Rev. 2.09 31
Page 32

User / Service Manual Power Stacker
Appendix
Tooling and work materials
hexagonal socket SW 3
hexagonal socket SW 4
cross recessed head size 1
screw driver size 1
06/01 Rev. 2.09
32
Page 33

User / Service Manual Power Stacker
Parameter menu
OFFLINE
INFO PRTP IFAC SYSP JCLR SCLR OTHR
STA0
STA1
STA2
STA3
DOT1
DOT2
PSPD
MTYP
MLEN
MWID
PUNO
BCHI
UPCA
CSPD
CPOS
CWID
CDIS
ASPD
ADIS
MPOS
PORT
SPOL
BMOD
<20H
BAUD
PARI
DBIT
SBIT
HAND
PRID
EMUL
NACH
SENS
PUNS
FMOD
OMOD
SMOD
EXTR
SGMO
CODE
HRES
HVOF
CLCK
USMD
DOWN
LCLR
CCLR
ICLR
ADJS
MCHK
SCHK
PCHK
FACT
SERV
NULL
HADJ
ACSC
XPOS
YPOS
SSPD
GAP
CMOD
DMOD
Nur mit Messer / cutter only
Spender mit Applikator / dispenser with applicator
Für Spender (MPOS – auch mit Abreißkante) / dispenser only (MPOS – tear off as well)
Nur mit Scanner / scanner only
Nur mit Color Option / with color option only
Nur für Service / for service only
LREP
CSET
MEND
SCAN
SERR
PEPH
Standard / standard
06/01 Rev. 2.09
33
Page 34

User / Service Manual Power Stacker
OFFLINE
INFO PRTP IFAC SYSP JCLR SCLR OTHR
EMUL
NACH
SENS
PUNS
FMOD
OMOD
MMOD
SMOD
D_HD
EXTR
CODE
HRES
CLCK
USMD
LREP
CSET
MEND
SCAN
SERR
PEPH
RWND DIRL
DIRR
RADJ
06/01 Rev. 2.09
34
Page 35

INDEX
User / Service Manual Power Stacker
C
clamp handle ................................... 5, 11
construction ........................................... 7
Copyright.............................................. 3
D
dancer arm5, 6, 10, 12, 14, 16, 17, 18,
19
dancer arm spring.......................... 12, 18
drive....................................................... 7
E
electrical specification............................ 7
Electronics ........................................... 20
Error handling ........................................ 4
G
gear plate........................... 16, 17, 18, 19
General.................................................. 3
guiding disc11, 12, 13, 15, 16, 17, 18,
19, 20
L
label size................................................ 7
M
R
RADJ....................................................23
REND...................................................23
rewind speed..........................................7
Rewinder, activate ...............................21
RNUL ...................................................23
roll profile11, 12, 13, 15, 16, 17, 18, 19,
20
S
search ....................................................4
sense of position .................................... 7
sensor ..........................5, 7, 8, 12, 17, 20
sensor wedge.............................5, 17, 20
ST 13 ...................................................21
stepper motor.......5, 7, 12, 14, 15, 17, 19
support foot ........................................ 8, 9
T
Technical Service...................................8
Technical Specification ..........................7
Tooling9, 10, 11, 12, 13, 14, 15, 16, 17,
18, 19, 20, 32
tooth belt ..............................5, 12, 13, 15
Tooth belt tighten part .......................... 13
max. roll ................................................. 7
Mechanic ............................................... 8
Media fixation ........................................ 5
media guiding .................................. 5, 10
media moves ......................................... 5
U
W
N
notes ..................................................... 3
06/01 Rev. 2.09
used media ............................................7
wiring................................................6, 24
work material........................................32
wrong direction.......................................5
35
 Loading...