

Page 1

Service Manual Full Size Sensor
User / Service
Manual
Full Size Sensor
11/07 Rev. 1.03 1
Page 2

Service Manual Full Size Sensor
Chapter 0 General
11/07 Rev. 1.03 2
Page 3

Service Manual Full Size Sensor
Copyright
General notes:
This Service Manual and its contents are subject to copyright. The publisher’s prior written
consent must be obtained for reproduction of the manual as a whole or part thereof.
Names are generally given without any reference to existing patents, registered patterns or
designs, or trademarks. The ommision of a corresponding note does not imply that the
names can be used freely. All trademarks are acknowledged.
The manufacturer reserves the right to technical and other alterations without prior notice.
The publisher cannot warrent the accuracy of the content of this manual.
Note: Please follow the notes shown in this text - it will help to cover all
situations and keep your engine working.
If in the manual is used the name TTX 650 - it is as well meant the
TTX 450 and TTX 950 the Puma and Tiger or the S 45 and S 95 !
11/07 Rev. 1.03 3
Page 4

Service Manual Full Size Sensor
Contents
CHAPTER 0 GENERAL............................................................................................. 2
Copyright.........................................................................................................................3
General notes: ................................................................................................................3
Contents..........................................................................................................................4
CHAPTER 1 INITIATION ........................................................................................... 5
Media limitation...............................................................................................................6
Unpack............................................................................................................................6
Assemble Option.............................................................................................................7
Change position of pressure lever ..................................................................................7
Remove media guiding ...................................................................................................7
Mount full size sensor .....................................................................................................8
CHAPTER 2 SET UP MODE.................................................................................... 13
Adjustment of the sensor ..............................................................................................14
Initialise or activate option.............................................................................................15
Check Sensor ...............................................................................................................15
CHAPTER 3 INFORMATION PRINTOUT / PARAMETER...................................... 16
Parameter Menu ...........................................................................................................17
Status printout...............................................................................................................18
Status............................................................................................................................18
ST05 Media is not more in the gap sensor ...................................................................18
ST08 Media is not reaching the gap sensor.................................................................. 18
Status reports................................................................................................................19
CHAPTER 4 MAINTENANCE, CLEANING AND SERVICE .................................... 23
Maintenance and cleaning............................................................................................23
Service..........................................................................................................................23
CHAPTER 7 APPENDIX.......................................................................................... 23
Spare parts ...................................................................................................................24
INDEX...........................................................................................................................26
11/07 Rev. 1.03 4
Page 5

Service Manual Full Size Sensor
Chapter 1 Initiation
11/07 Rev. 1.03 5
Page 6
Service Manual Full Size Sensor
Media limitation
Please watch carefully, that the full size sensor can only be used with cardboard material
(notched) ! The sensor is a digital sensor – means only 0 and 1 – self adhesive media can
not be used.
The minimum media width – used with the full size sensor – has to be 36 mm ! If the full size
sensor is mounted to the unit – as well the standard sensor can not be used for smaller
material.
The optional full size sensor can be moved from
Printer can be moved from - to (mm)
TTX 450 16 – 93
TTX 650 16 – 134
TTX 950 16 – 165
Unpack
Normally the full size sensor is supplied mounted to the printer (installed) ! If this is not the
case – the option can be retrofitted by a service technician !
Attention: To activate the sensor please follow the instruction shown in chapter set up
mode.
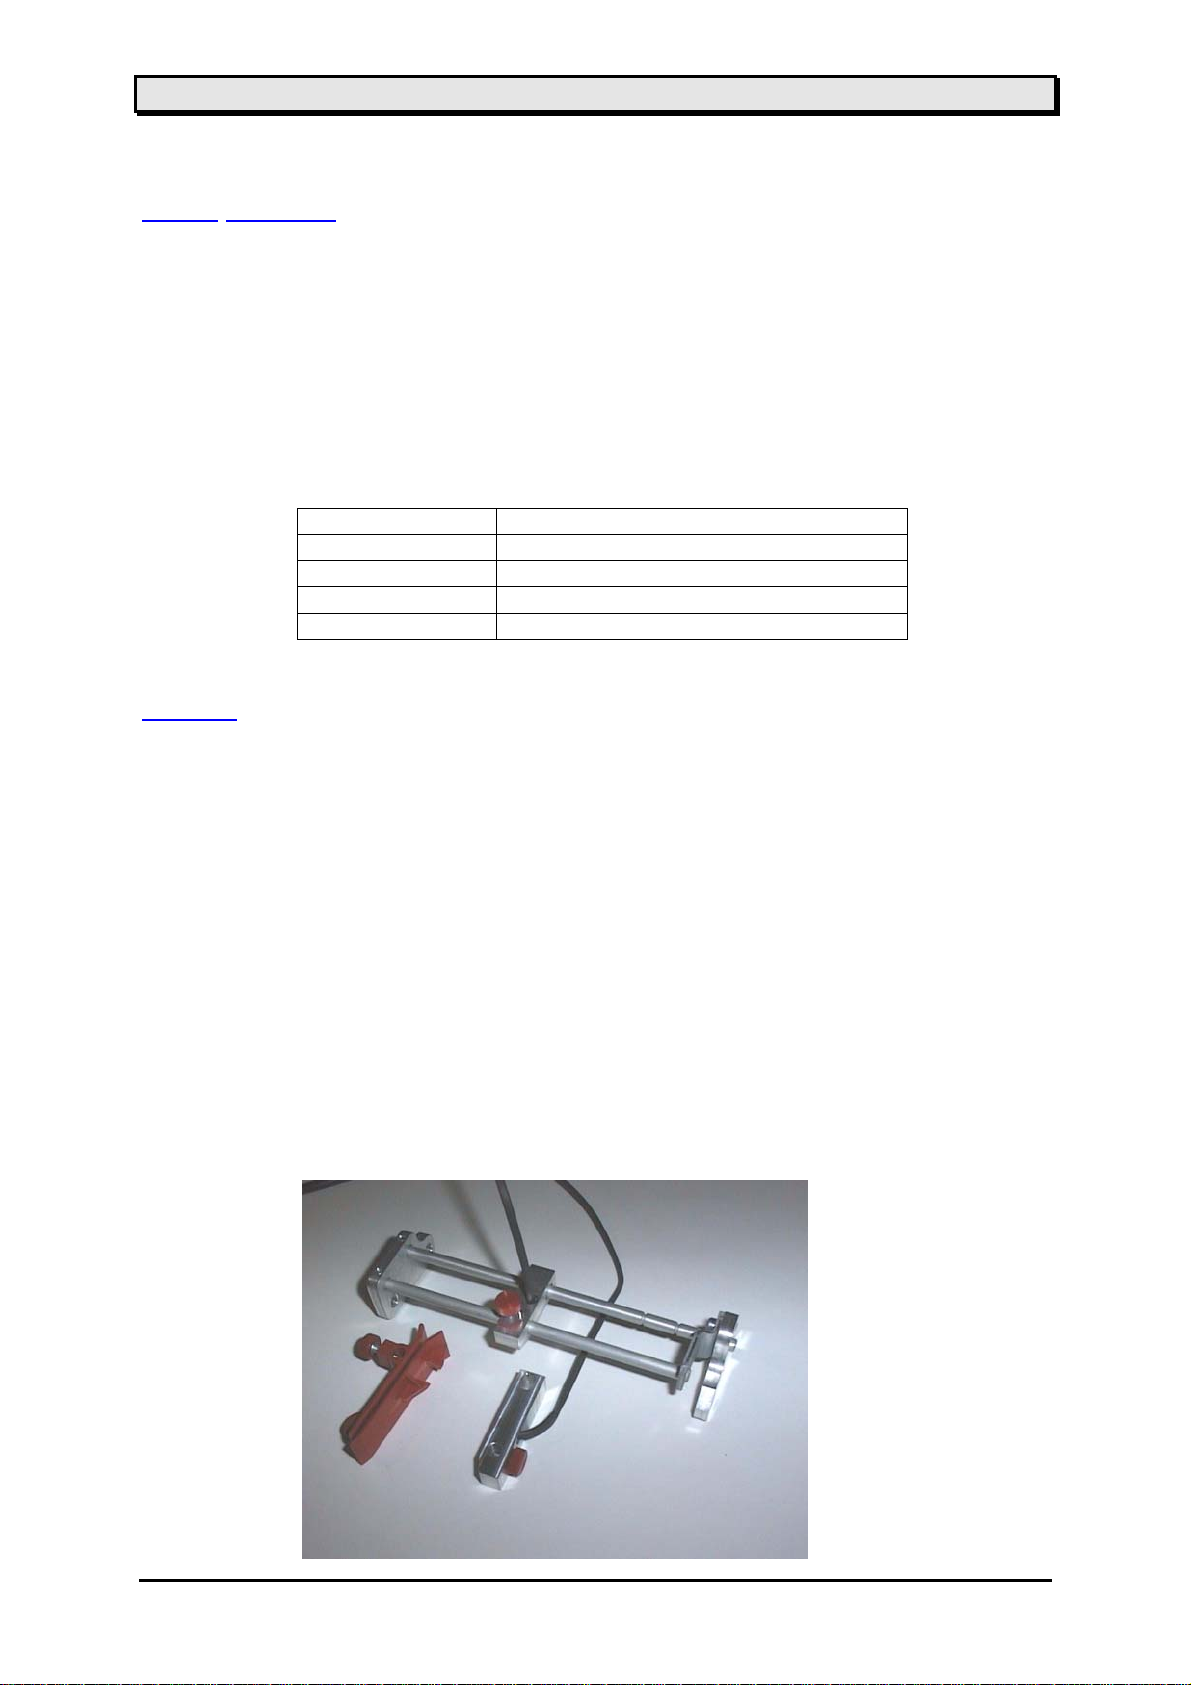
Please check if all parts are delivered
2 additional axle
1 outer side plate
1 inner side plate
1 steal part inner
1 sensor assy. ( 2 parts – 1 cable)
1 outer media guiding
11/07 Rev. 1.03 6
Page 7
Service Manual Full Size Sensor
Assemble Option
Change position of pressure lever
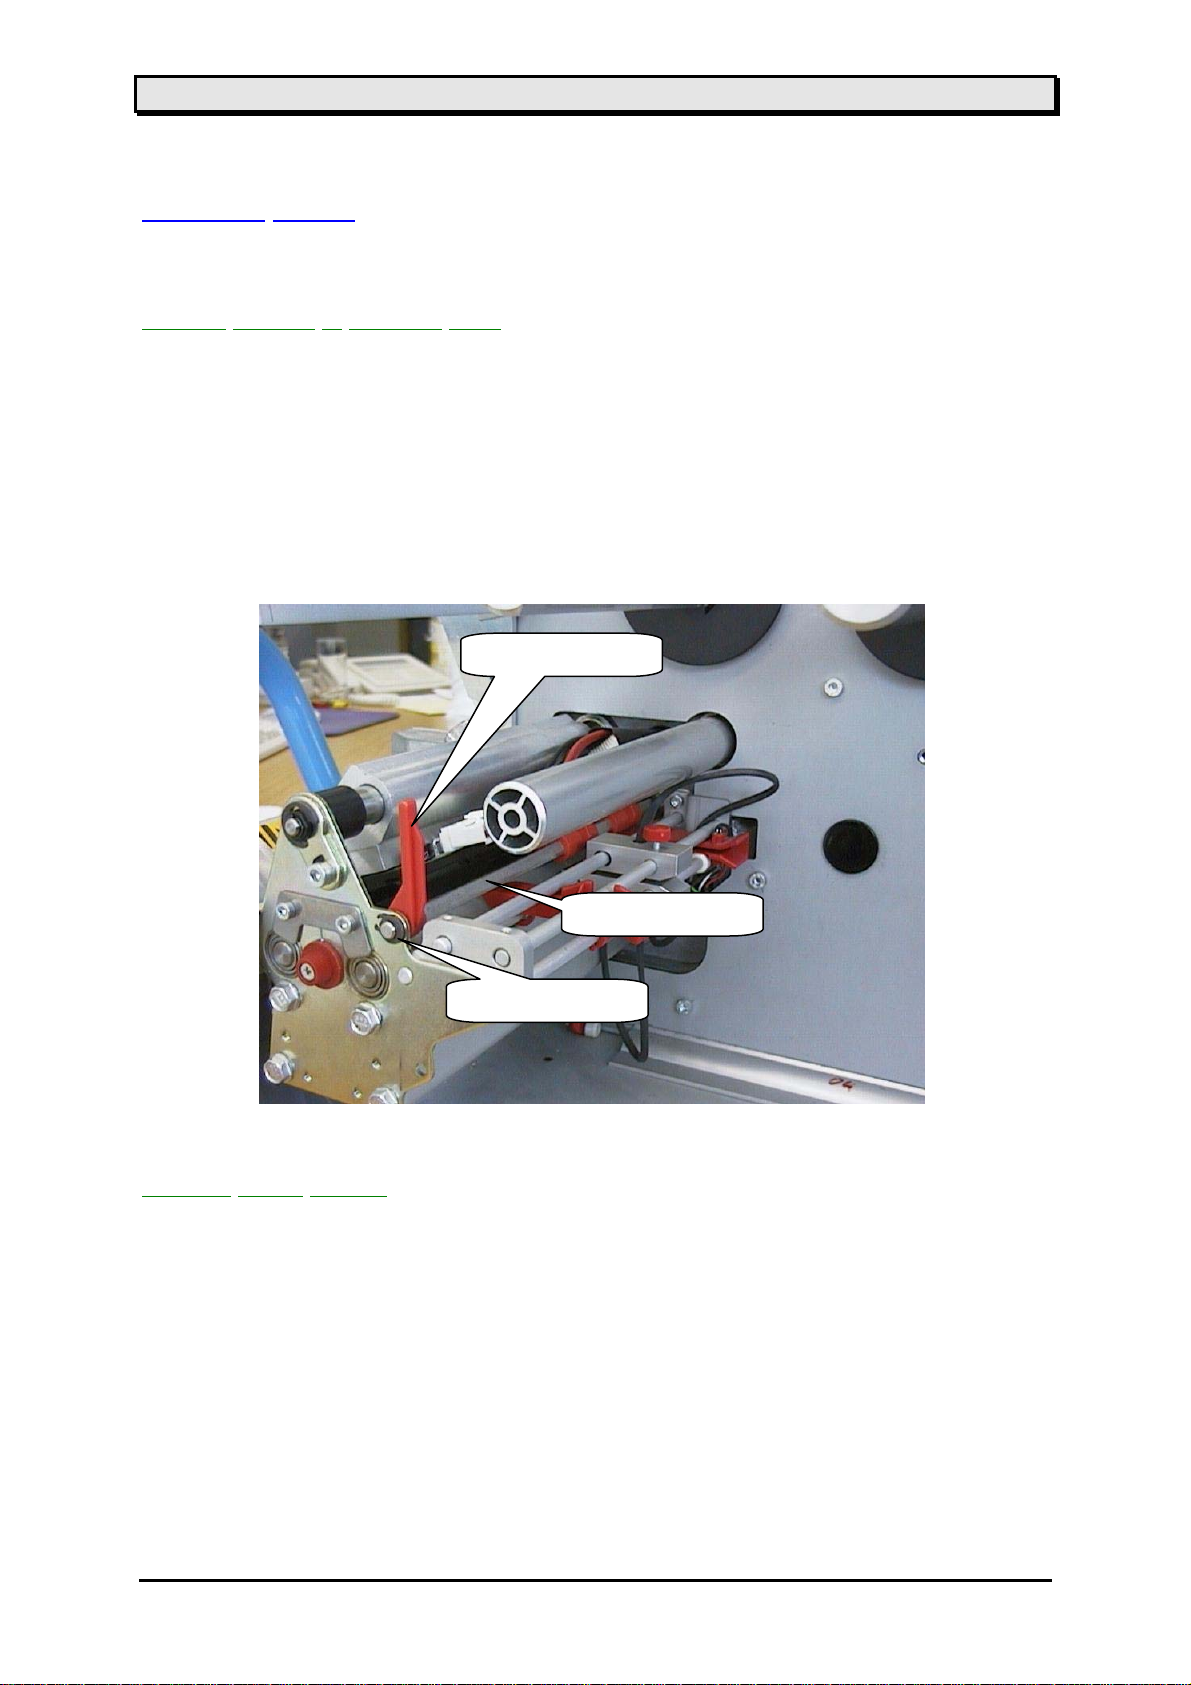
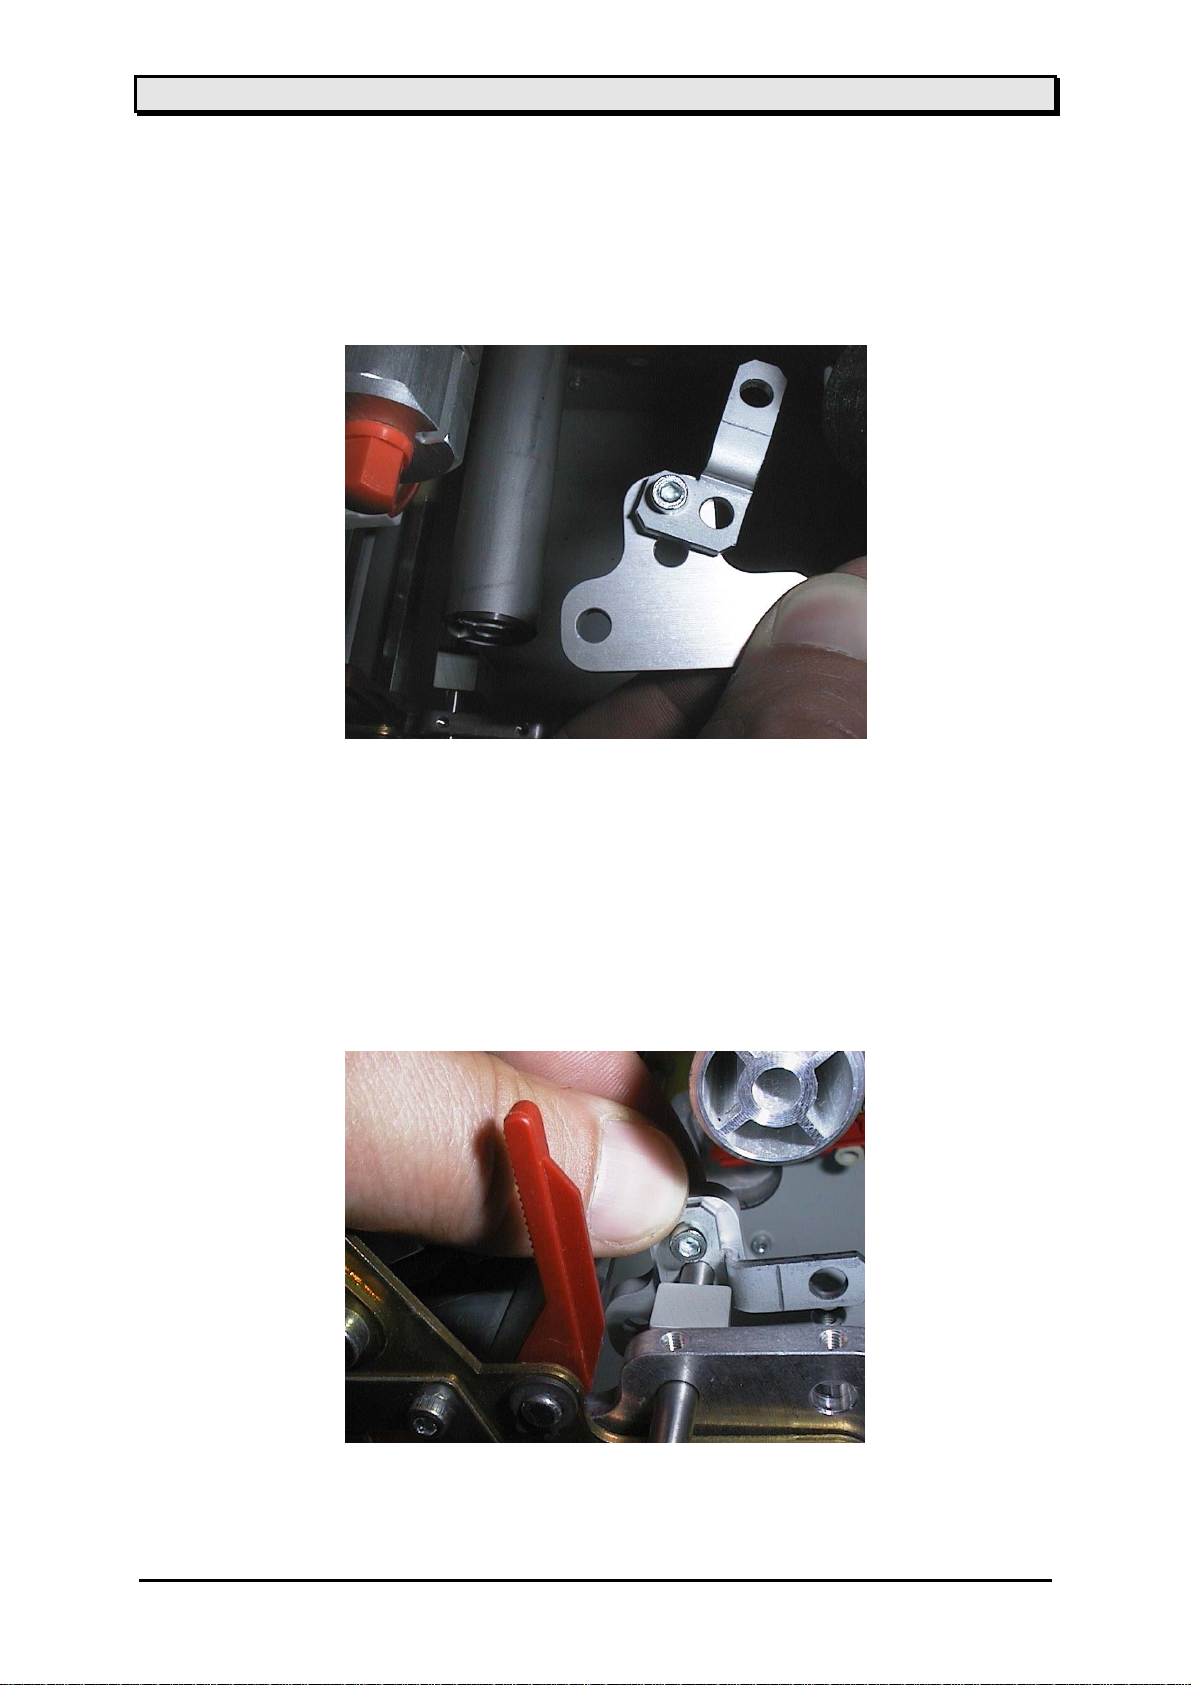
The lever position has to be changed from its normal position to a
position rotated 90 degrees (see photo).
Open the lock washer, push back the axle – remove the lever from the
axle – rotated the lever (90 degree) and pull the lever back to the axle.
Move the axle back into the hole of the metal plate and lock it with the
washer.
pressure lever
axle
lock washer
Remove media guiding
The old media guiding has to be removed from the unit. Therefore loosen the two
axles (locked with bushes) – open as well the hexagonal screws of the guiding (if
there) – and remove the axles to the front of the steel plate.
Attention: The inner guiding (with the sensor) will be used again – the outer
guiding can be thrown away . The new one (delivered with the sensor)
will be used.
11/07 Rev. 1.03 7
Page 8

Mount full size sensor
Move the outer side plate from the inner side to the steel plate (see picture) and insert
the old axles into the drilled holes to lock the plate in this position. Take care that the
axles are inserted just 1 cm.
The upper – front axle has to be moved into the hole of the side plate (near print
head) – and the upper part of the full size sensor has to be slipped onto.
Service Manual Full Size Sensor
11/07 Rev. 1.03 8
Page 9
Service Manual Full Size Sensor
Screw the metal plate to the inner side plate
Attention: Take care that the screw is not tighten – both parts should be able to
move.
Slip the assemble to the upper – front axle. The end of the axle has to end with the
inner side of the plate (please take care about that) and fix the axle by using the
hexagonal screw in the plate.
Attention: Now you can tighten the screw fixing metal plate and inner side plate
together.
11/07 Rev. 1.03 9
Page 10

Service Manual Full Size Sensor
Now the other parts of the full size sensor can be mounted to the other axles – please
follow the shown sequence
outer media guiding
lower part of the sensor
inner media guiding
Then insert the upper – rear axle into the outer side plate – the upper part of the
full size sensor (rear hole) has to slide on the axle
The two lower axles slip into the holes of the inner side plate and have to be adjusted
in a way that 1,8 mm (+/- 0,1 mm) of the axles are looking out of the inner side plate
Fix the axles by use of the hexagonal screws.
1,8 mm
11/07 Rev. 1.03 10
Page 11

Service Manual Full Size Sensor
The upper – rear axle fits into the hole of the metal part
Guide the cable of the full size sensor the same way the other sensor cable is guided
into the printer (trough the metal casting)
Press the inner side plate against the metal casting – the two axles fit into the holes in
the metal casting
Press the outer side plate against the steel plate and fix it with the hexagonal screws
in a way that the whole assembly is fixed secure
Take care that the inner media guiding is fixed in the correct position to the axle (iiner
zero line)
11/07 Rev. 1.03 11
Page 12

Service Manual Full Size Sensor
Connect the connector of the sensor cable to CN 10 on the I/O board as shown on
the picture below
CN 10
11/07 Rev. 1.03 12
Page 13

Service Manual Full Size Sensor
Chapter 2 Set up mode
11/07 Rev. 1.03 13
Page 14

Service Manual Full Size Sensor
Adjustment of the sensor
After the sensor is mounted to the printer – it has to be adjusted to the position of the gap on
the media .
Both parts of the sensor are equipped with screws – used to fix the sensor on the axle. Both
parts have to be adjusted in the correct position ! Then activate the sensor and test it.
11/07 Rev. 1.03 14
Page 15

Service Manual Full Size Sensor
Initialise or activate option
After you have mounted the option correctly to the printer - and the necessary adjustment
the option can be activated
This can be done by changing the parameter in the Firmware.
• switch on the unit display shows OFF
• press FEED and CUT at the display shows INFO
same time
• press CUT until display shows SYSP
• press ENTER display shows EMUL
• press CUT until display shows SENS
• select until display shows FULL
• press ENTER to accept beep
• press FEED and CUT display shows SYSP
• press FEED and CUT display shows OFF
Attention: The option is now activated - all other option’s are deactivated!
Check Sensor
The sensor of the full size sensor – used to detect the presence of a label – can be
checked.
Select in the printer menu the function SCHK – go to menu point U xx and test the function
of the sensor.
Without media a shown in the display ‚U 0‘
with media is shown ‚U 15‘
11/07 Rev. 1.03 15
Page 16

Service Manual Full Size Sensor
Chapter 3 Information printout / parameter
11/07 Rev. 1.03 16
Page 17

Service Manual Full Size Sensor
Parameter Menu
OFFLINE
INFO PRTP IFAC SYSP JCLR SCLR OTHR
STA0
STA1
STA2
STA3
DOT1
DOT2
PSPD
MTYP
MLEN
MWID
PUNO
BCHI
UPCA
CSPD
CPOS
CWID
CDIS
ASPD
ADIS
MPOS
PORT
SPOL
BMOD
<20H
BAUD
PARI
DBIT
SBIT
HAND
PRID
EMUL
NACH
SENS
PUNS
FMOD
OMOD
SMOD
EXTR
SGMO
CODE
HRES
HVOF
CLCK
USMD
DOWN
LCLR
CCLR
ICLR
ADJS
MCHK
SCHK
PCHK
FACT
SERV
NULL
HADJ
ACSC
XPOS
YPOS
SSPD
GAP
CMOD
DMOD
Nur mit Messer / cutter only
Spender mit Applikator / dispenser with applicator
Für Spender (MPOS – auch mit Abreißkante) / dispenser only (MPOS – tear off as well)
Nur mit Scanner / scanner only
Nur mit Color Option / with color option only
Nur für Service / for service only
LREP
CSET
MEND
SCAN
SERR
PEPH
Standard / standard
11/07 Rev. 1.03 17
Page 18

Service Manual Full Size Sensor
Status printout
Attention: Status printout is not available during infeed operation - there is no media to
print to!
Status
ST05 Media is not more in the gap sensor
from version 1.15 for TTX 650
1.00 for TTX 450/950
Action: Check the length inside your format
press ON/OFF to accept the message
ST08 Media is not reaching the gap sensor
Action: insert media (check the sensor)
press ON/OFF to accept the message
11/07 Rev. 1.03 18
Page 19

Status reports
ST 00
ST 01
ST 02
ST 03
ST 04
ST 05
ST 06
ST 07
ST 08
ST 09
ST 10
ST 11
ST 12
ST 13
ST 14
NOVRAM error (factory set)
NOVRAM write error
no material in SNGL sensor
stacker full
material end
printhead overheated
ribbon end
gap not found
ramcard error
ramcard error
barcode reading error or media broken for rewinder
cut sensor not found, dispenser second feeder, nothing
Service Manual Full Size Sensor
ST 15
ST 16
ST 17
ST 18
ST 19
ST 20
ST 21
ST 22
ST 23
ST 24
ST 25
ST 26
ST 27
ST 28
ST 29
head sensor not found (system will be locked)
applicator home position not found
dispenser pressure roller not closed
dispenser backing paper rewinder full
applicator – touch down not found
EASY PLUG wrong command (imedeate)
EASY PLUG wrong command between #ER and #Q
EASY PLUG command without #ER
EASY PLUG not known command
receive error RS 232
spooler overflow
EASY PLUG wrong size or print adjustment
EASY PLUG counter overflow
EASY PLUG field outside print area
EASY PLUG logo number doesn’t exist
11/07 Rev. 1.03 19
Page 20

ST 30
ST 31
ST 32
ST 33
ST 34
ST 35
ST 36
ST 37
ST 38
ST 39
ST 40
ST 41
ST 42
ST 43
ST 44
Service Manual Full Size Sensor
EASY PLUG logo buffer to small
EASY PLUG logo number error
EASY PLUG postbarcode not OK
EASY PLUG range command #PA to #IM wrong
COLOR PANEL color code not found
COLOR PANEL logo does not fit to the card
COLOR PANEL color card not found or programmable
EASY PLUG speedo error
receive error RS 232
receive error RS 232
ID matrix barcode error
ST 45
ST 46
ST 47
ST 48
ST 49
ST 50
ST 51
ST 52
ST 53
ST 54
ST 55
ST 56
ST 57
ST 58
ST 59
no read of scanner
scanner not programmable (system will be locked)
stacker full (standard)
acess denied for setting printer to zero
11/07 Rev. 1.03 20
Page 21

ST 60
ST 61
ST 62
ST 63
ST 64
ST 65
ST 66
ST 67
ST 68
ST 69
ST 70
ST 71
ST 72
ST 73
ST 74
Service Manual Full Size Sensor
memory allocation error (system will be locked)
font allocation error (system will be locked)
update or numberfield overflow
wrong board installed for selected peripherie option
interrupt error (system stands)
TDI stepper does not respond
headstrobe checksum wrong (system will be locked)
speedo system error
speedo scaling wrong
ST 75
ST 76
ST 77
ST 78
ST 79
ST 80
ST 81
ST 82
ST 83
ST 84
ST 85
ST 86
ST 87
ST 88
ST 89
EASY CARD wrong name of file in #FO command
EASY CARD field number not found
EASY CARD syntax of #YT or #YB command wrong
EASY CARD number of data field to big
EASY CARD quantity of variable characters = 0
EASY CARD no card found
DATA BASE not enough space for index file
DATA BASE no possibility to build index file
DATA BASE no possibility to sort index file
DATA BASE barcode onformation nor found in
11/07 Rev. 1.03 21
Page 22

K
A
–
p
p
p
p
p
p
p
p
p
p
pr
ST 90
ST 91
ST 92
ST 93
ST 94
ST 95
ST 96
ST 97
ST 98
ST 99
database contains identical records
barcode not readable
EASY CARD undefined error
EASY PLUG undefined error
INTERFACE undefined error
SYSTEM undefined derror
just warning – self confirming
must be confirmed by the user
Service Manual Full Size Sensor
POFF
FAIL
SCAN
OPEN
LOC
DAT
STOP
SNGL
WAIT
HOST
INIT
DOWN
UP
.LDR
.EMU
.SYS
SORT
----
LOAD
Power OFF
Image card could not be formatted
Scanner was unable to decode the information
cover open –switch is open
the printer is locked
data receive mode
rinter in STOP mode
rinter in single start mode
rinter in wait condition
rinter stopped by host
rinter is initialised
TDI table goes u
TDI table goes down
rinter in loader mode
rinter in interpretermode
rinter in system mode
data base information is sorted
inter was switched on to early after power down
barcodes loaded from card
rinter is switched OFF
11/07 Rev. 1.03 22
Page 23

Service Manual Full Size Sensor
Chapter 4 maintenance, cleaning and service
Maintenance and cleaning
Clean on a regular basis the feed roller of the infeed unit - as well of the printer - and the
metal parts from paper dust and glue!
If you are not cleaning regularly problem with the feed system can occur.
Service
No special service is needed !
Chapter 7 Appendix
11/07 Rev. 1.03 23
Page 24

Spare parts
Service Manual Full Size Sensor
Part Number : 99904-xx-2 (450-Puma)
Part Number : 99984-xx-2 (650-Lion)
Part Number : 99985-xx-2 (950-Tiger)
Bezeichnung : Fullsize Lichtschranke ZSB
Identification : full size punch sensor assy.
11/07 Rev. 1.03 24
Page 25

Service Manual Full Size Sensor
g
g p
Part Number : 99908-xx-0
Bezeichnung : Flansch vorne
Identification : front flange
Part Number : A1679
Bezeichnung : ZSB Rändelschraube
Identification : Thumb screw assy.
Part Number : 99910-xx-0
Bezeichnung : Materialführung vorn
Identification : front media guiding
Part Number : A0216 (TTX x50 / TTX 67x
/ Wildcats (plus))
A1816 (64-xx / Chess x)
Bezeichnung : Lichtschranke ZSB
Identification : sensor assy.
Part Number : 99909-xx-0
Bezeichnung : Flansch hinten
Identification : rear flan
Part Number : 99979-xx-0
Bezeichnung : Halteblech
Identification : mountin
Part Number : 99907-xx-0 (450-Puma)
Part Number : 99986-xx-0 (650-Lion)
Part Number : 99987-xx-0 (950-Tiger)
Bezeichnung : Achse
Identification : axle
Part Number : 99926-xx-0 (450-Puma)
Part Number : 99927-xx-0 (650-Lion)
Part Number : 99925-xx-0 (950-Tiger)
Bezeichnung : Achse (mit Nut)
Identification : axle (with slot)
11/07 Rev. 1.03 25
e
art
Page 26

Service Manual Full Size Sensor
INDEX
A
activate Infeed............................................................................................................................. 15
Adjustment of the sensor ........................................................................................................4, 14
Appendix ..................................................................................................................................... 23
Assemble Option.......................................................................................................................4, 7
C
Change position of pressure lever ............................................................................................ 4, 7
Check Sensor..........................................................................................................................4, 15
cleaning....................................................................................................................................... 23
Contents........................................................................................................................................ 4
copyright........................................................................................................................................3
Copyright.......................................................................................................................................3
CUT............................................................................................................................................. 15
E
EMUL ..........................................................................................................................................15
Error ..............................................................................................................................................5
Error handling................................................................................................................................5
F
FEED...........................................................................................................................................15
G
General.................................................................................................................................. 2, 3, 4
General notes............................................................................................................................3, 4
I
INDEX ..................................................................................................................................... 4, 26
INFO............................................................................................................................................15
Information printout ..................................................................................................................... 16
Initialise or activate option.......................................................................................................4, 15
Initiation......................................................................................................................................... 5
M
maintenance................................................................................................................................23
Maintenance and cleaning...................................................................................................... 4, 23
Media limitation ......................................................................................................................... 4, 6
Mount full size sensor ...............................................................................................................4, 8
11/07 Rev. 1.03 26
Page 27

Service Manual Full Size Sensor
N
notes.............................................................................................................................................. 3
O
operation ..................................................................................................................................... 18
other........................................................................................................................................3, 15
P
parameter..............................................................................................................................15, 16
Parameter Menu......................................................................................................................4, 17
PEPH........................................................................................................................................... 15
R
Remove media guiding .............................................................................................................4, 7
S
Service ............................................................................................................................ 1, 3, 4, 23
Set up mode................................................................................................................................13
Spare parts..............................................................................................................................4, 24
ST05........................................................................................................................................4, 18
ST08........................................................................................................................................4, 18
Status................................................................................................................................4, 18, 19
Status printout......................................................................................................................... 4, 18
Status reports..............................................................................................................................19
SYSP...........................................................................................................................................15
U
Unpack......................................................................................................................................4, 6
11/07 Rev. 1.03 27
 Loading...