

Page 1
DESPERTADOR RADIOCONTROLADO
Instrucciones de utilización y de seguridad
SVEGLIA RADIOCONTROLLATA
Indicazioni per l’uso e per la sicurezza
RÁDIO DESPERTADOR
Instruções de utilização e de segurança
RADIO ALARM CLOCK
Operation and Safety Notes
FUNKWECKER
Bedienungs- und Sicherheitshinweise
5
Z31408A/Z31408B/
Z31408C/Z31408D
86663_aur_Funkwecker_Cover_LB5.indd 2 21.01.13 13:27
Page 2
ES Instrucciones de utilización y de seguridad Página 7
IT / MT Indicazioni per l’uso e per la sicurezza Pagina 26
PT Instruções de utilização e de segurança Página 46
GB / MT Operation and Safety Notes Page 65
DE / AT / CH Bedienungs- und Sicherheitshinweise Seite 83
86663_aur_Funkwecker_Cover_LB5.indd 3 21.01.13 13:27
Page 3
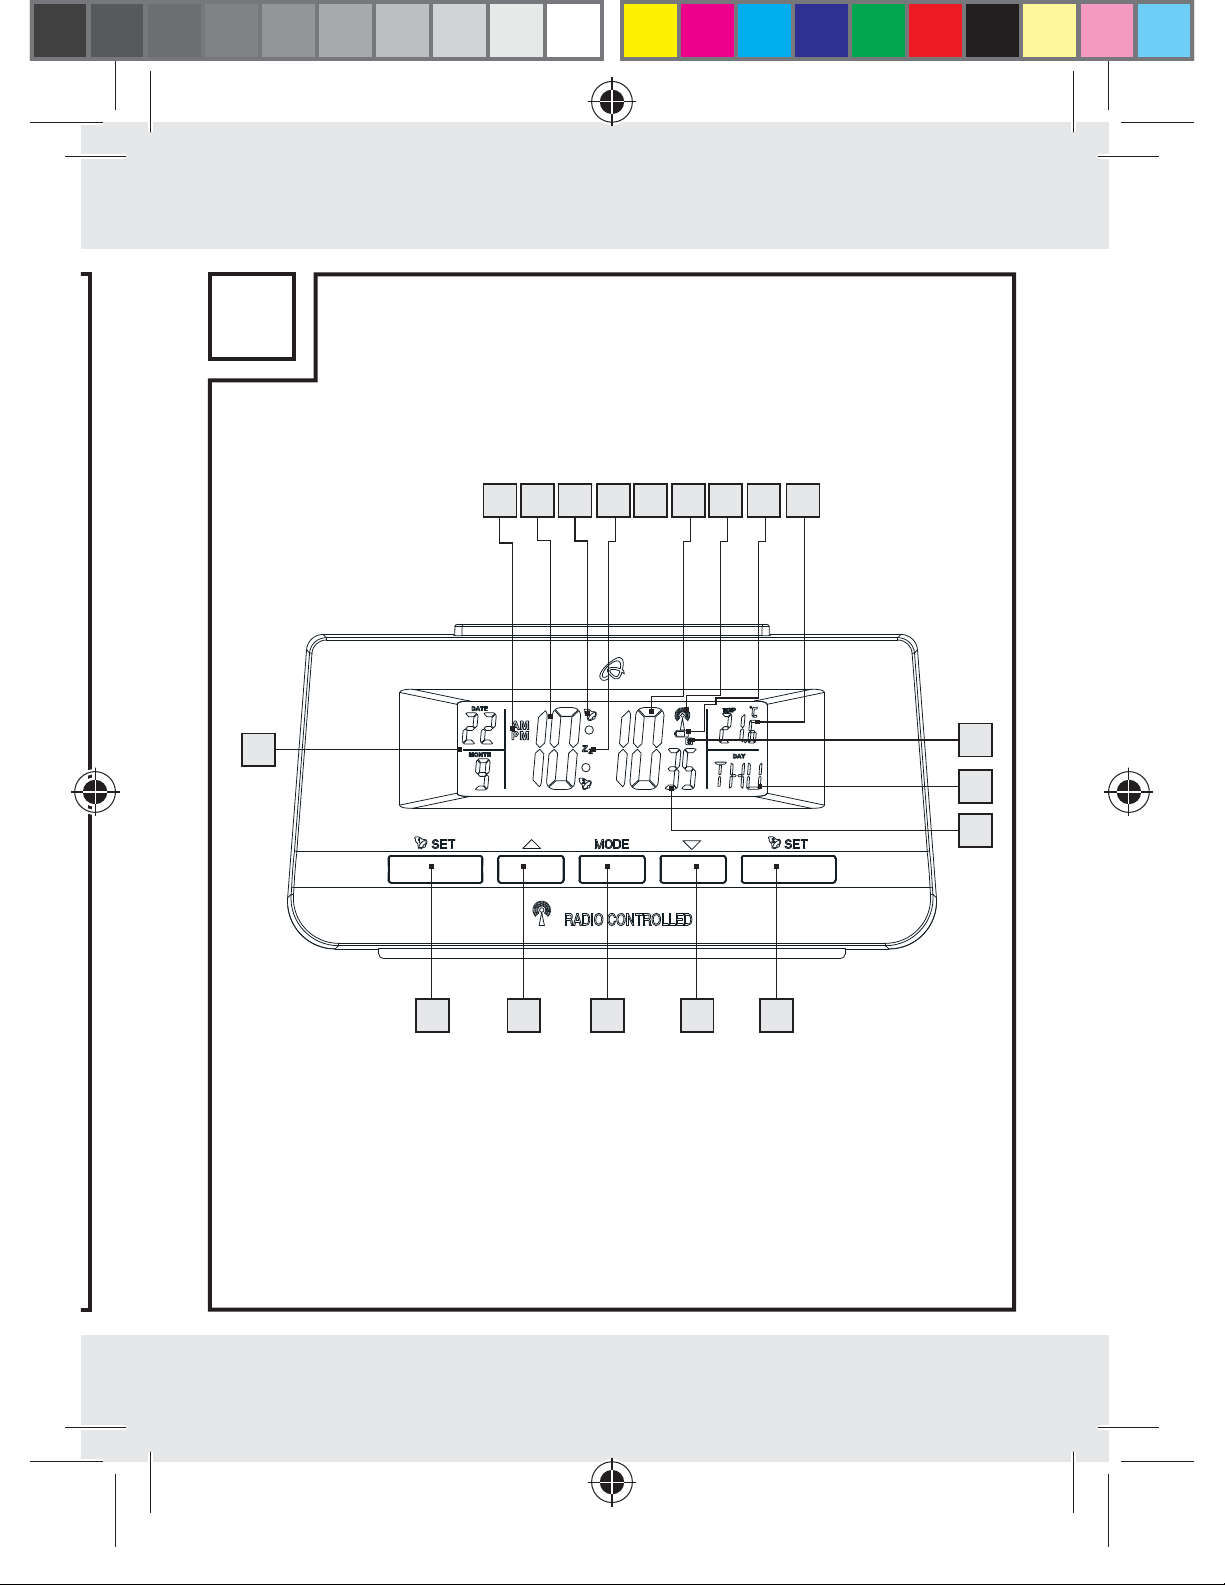
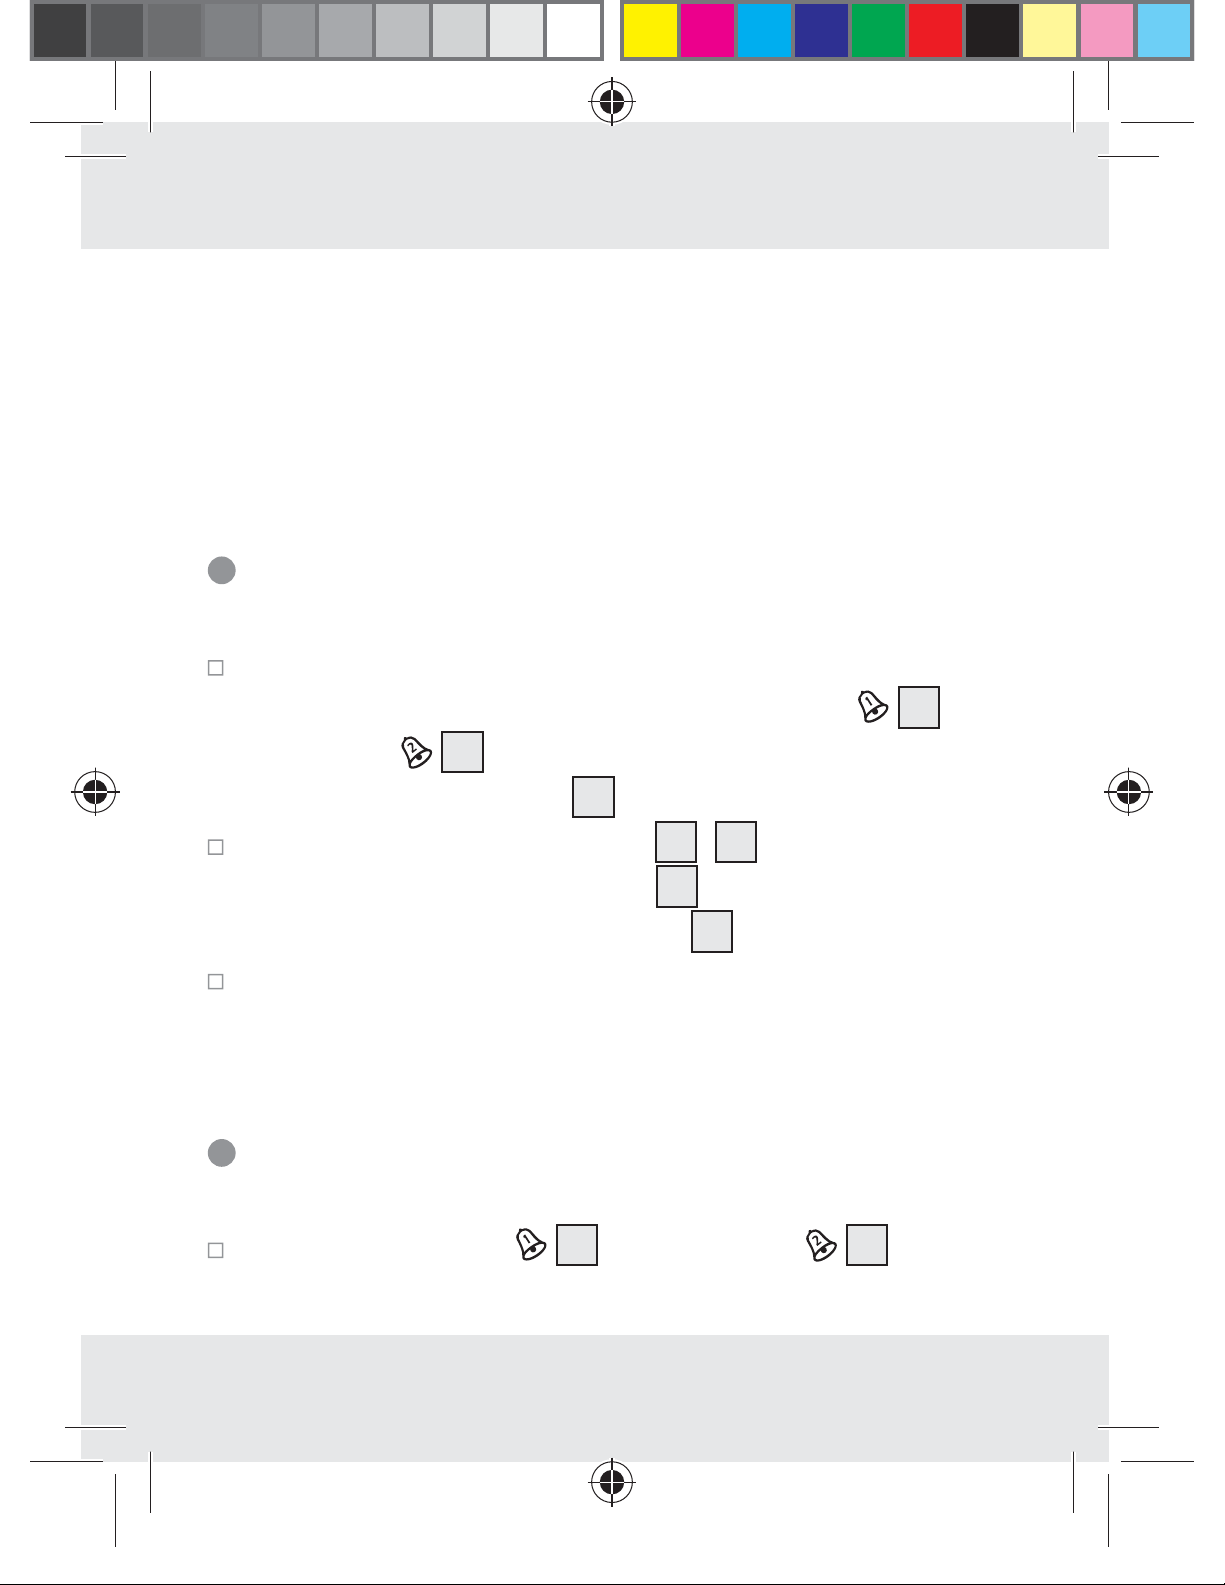
A
21 3 4
5
18
17
16
15
14
13 11
6
7
8
9
10
12
86663_aur_Funkwecker_Content_LB5.indd 3 21.01.13 13:26
Z31408A/Z31408B
3
Page 4
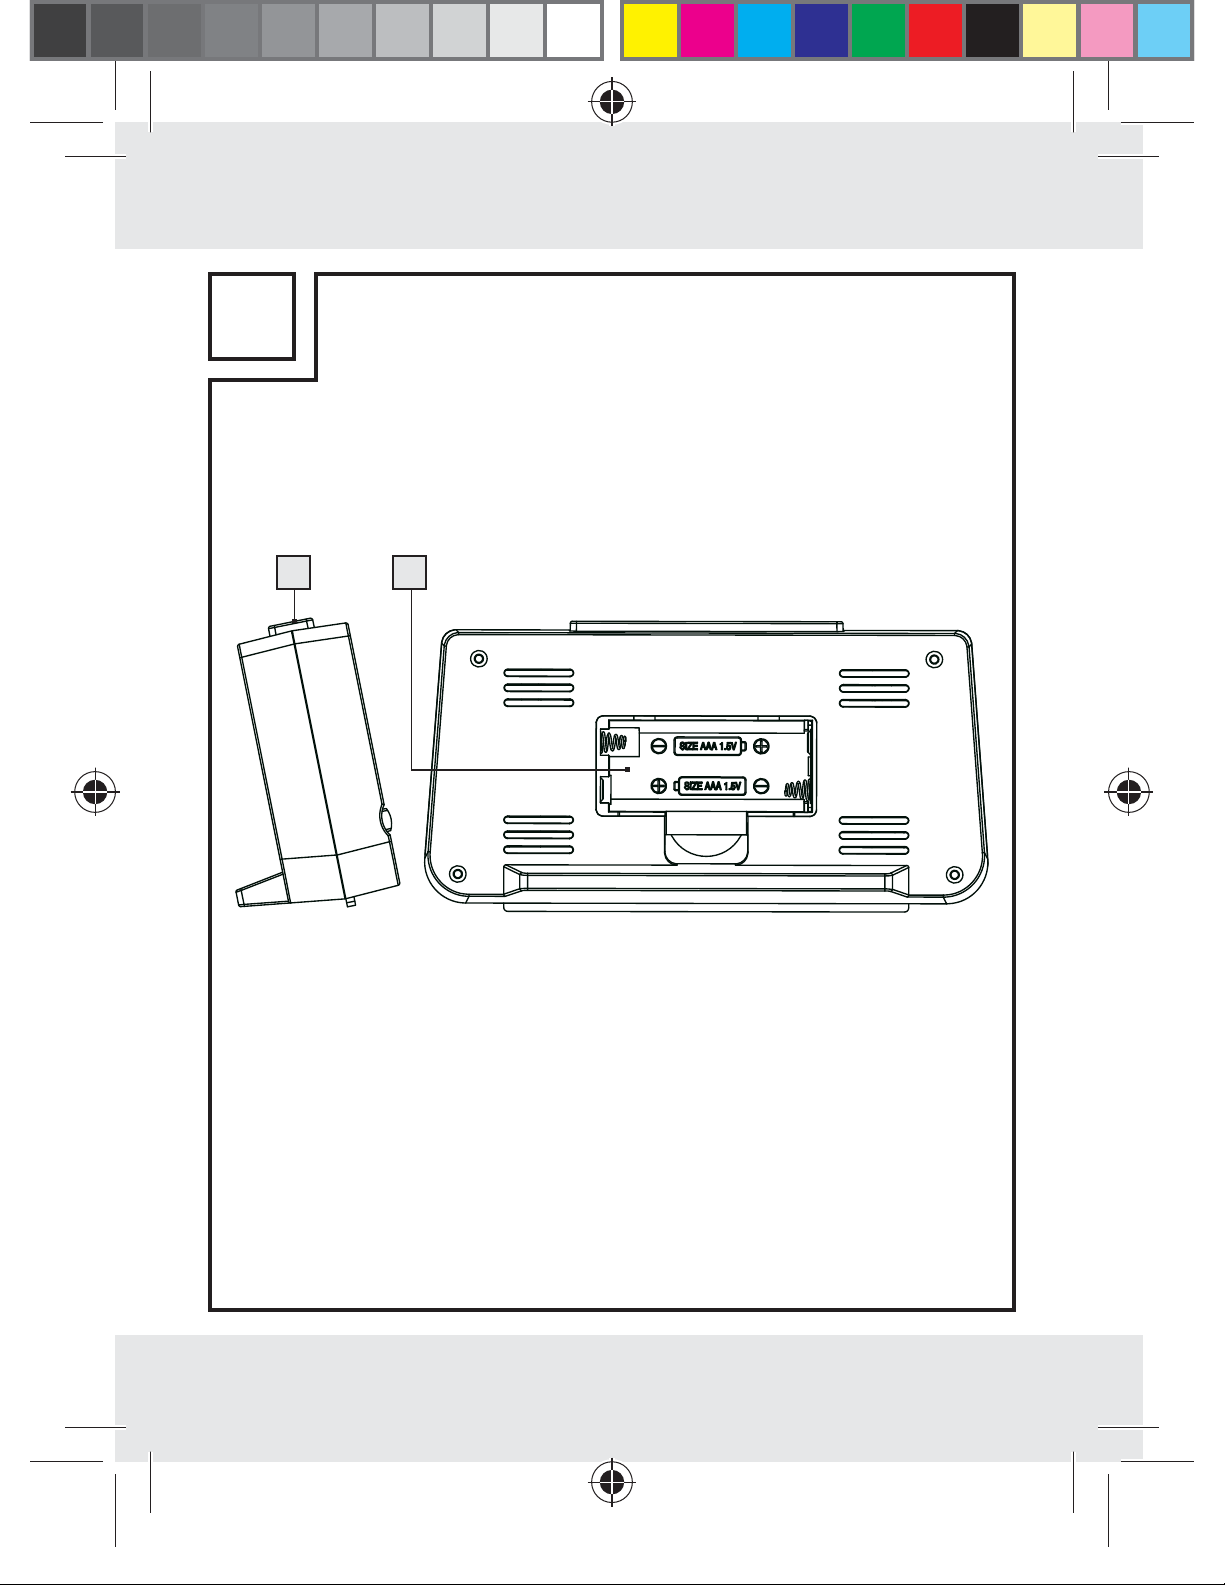
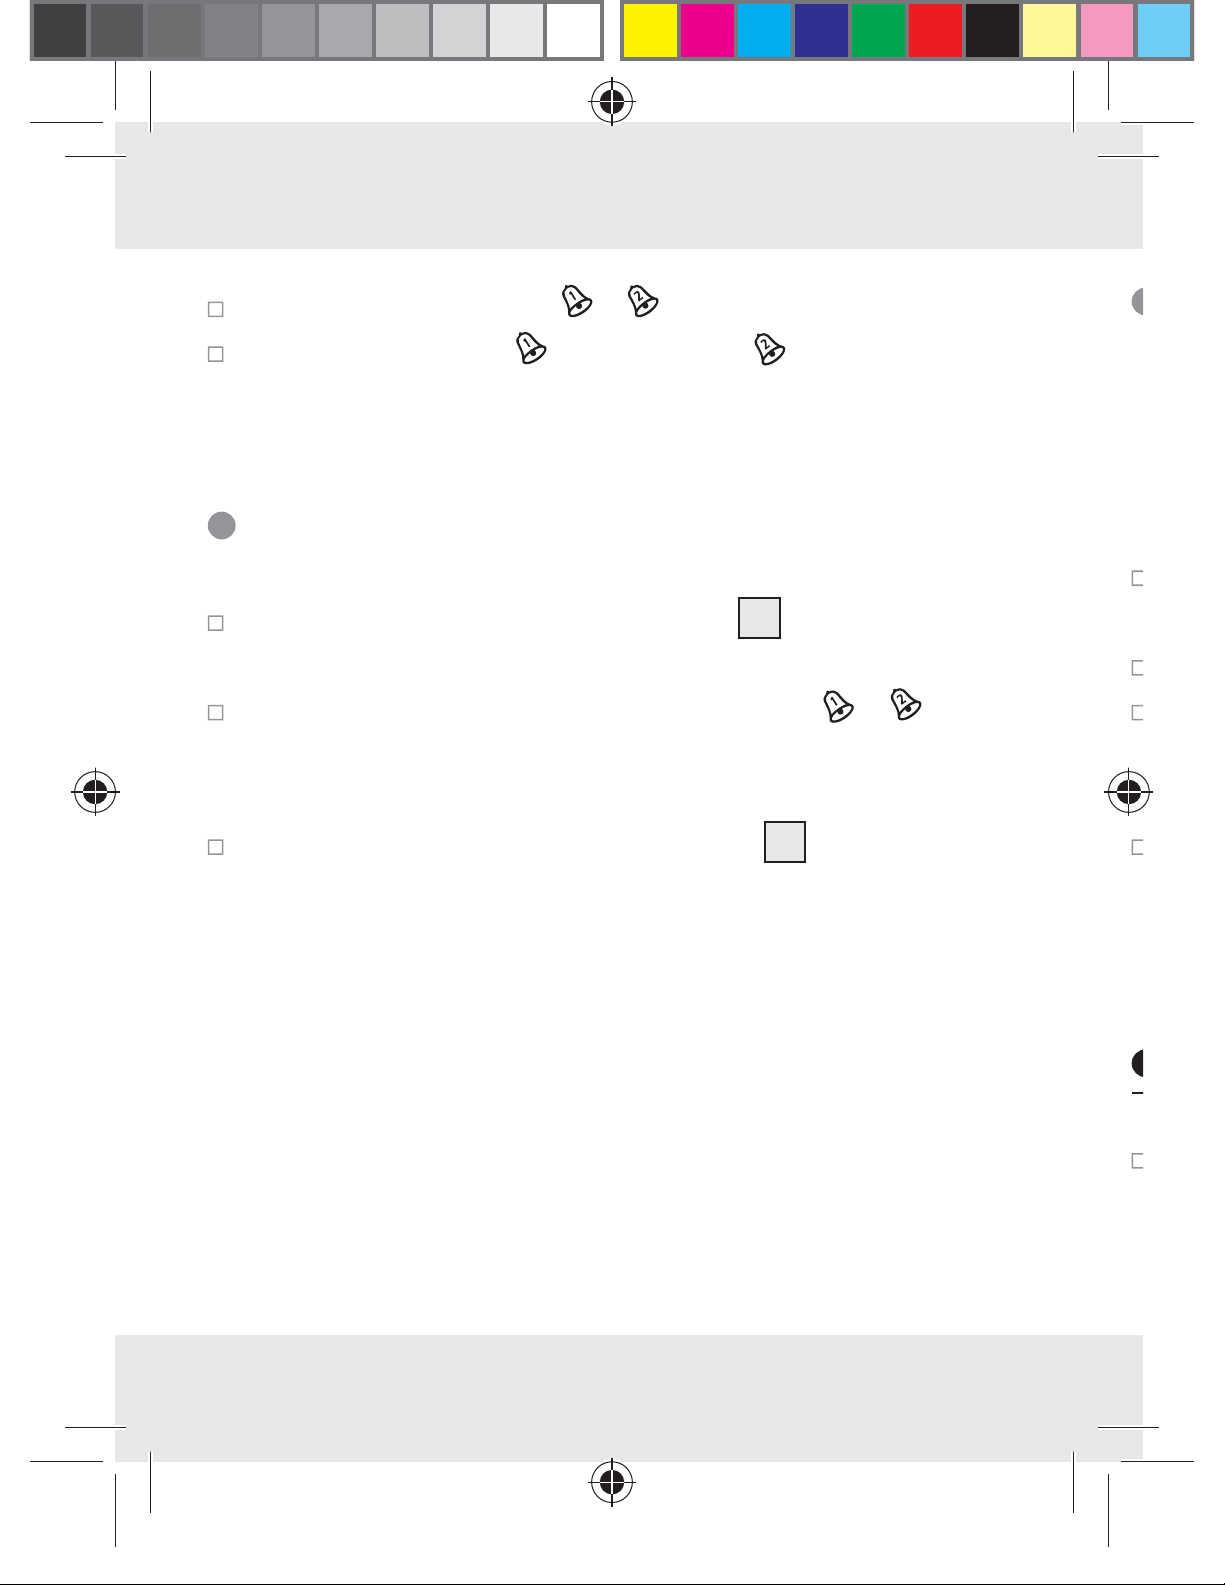
B
19 20
AAA 1.5V
AAA 1.5V
Z31408A/Z31408B
4
86663_aur_Funkwecker_Content_LB5.indd 4 21.01.13 13:26
Page 5
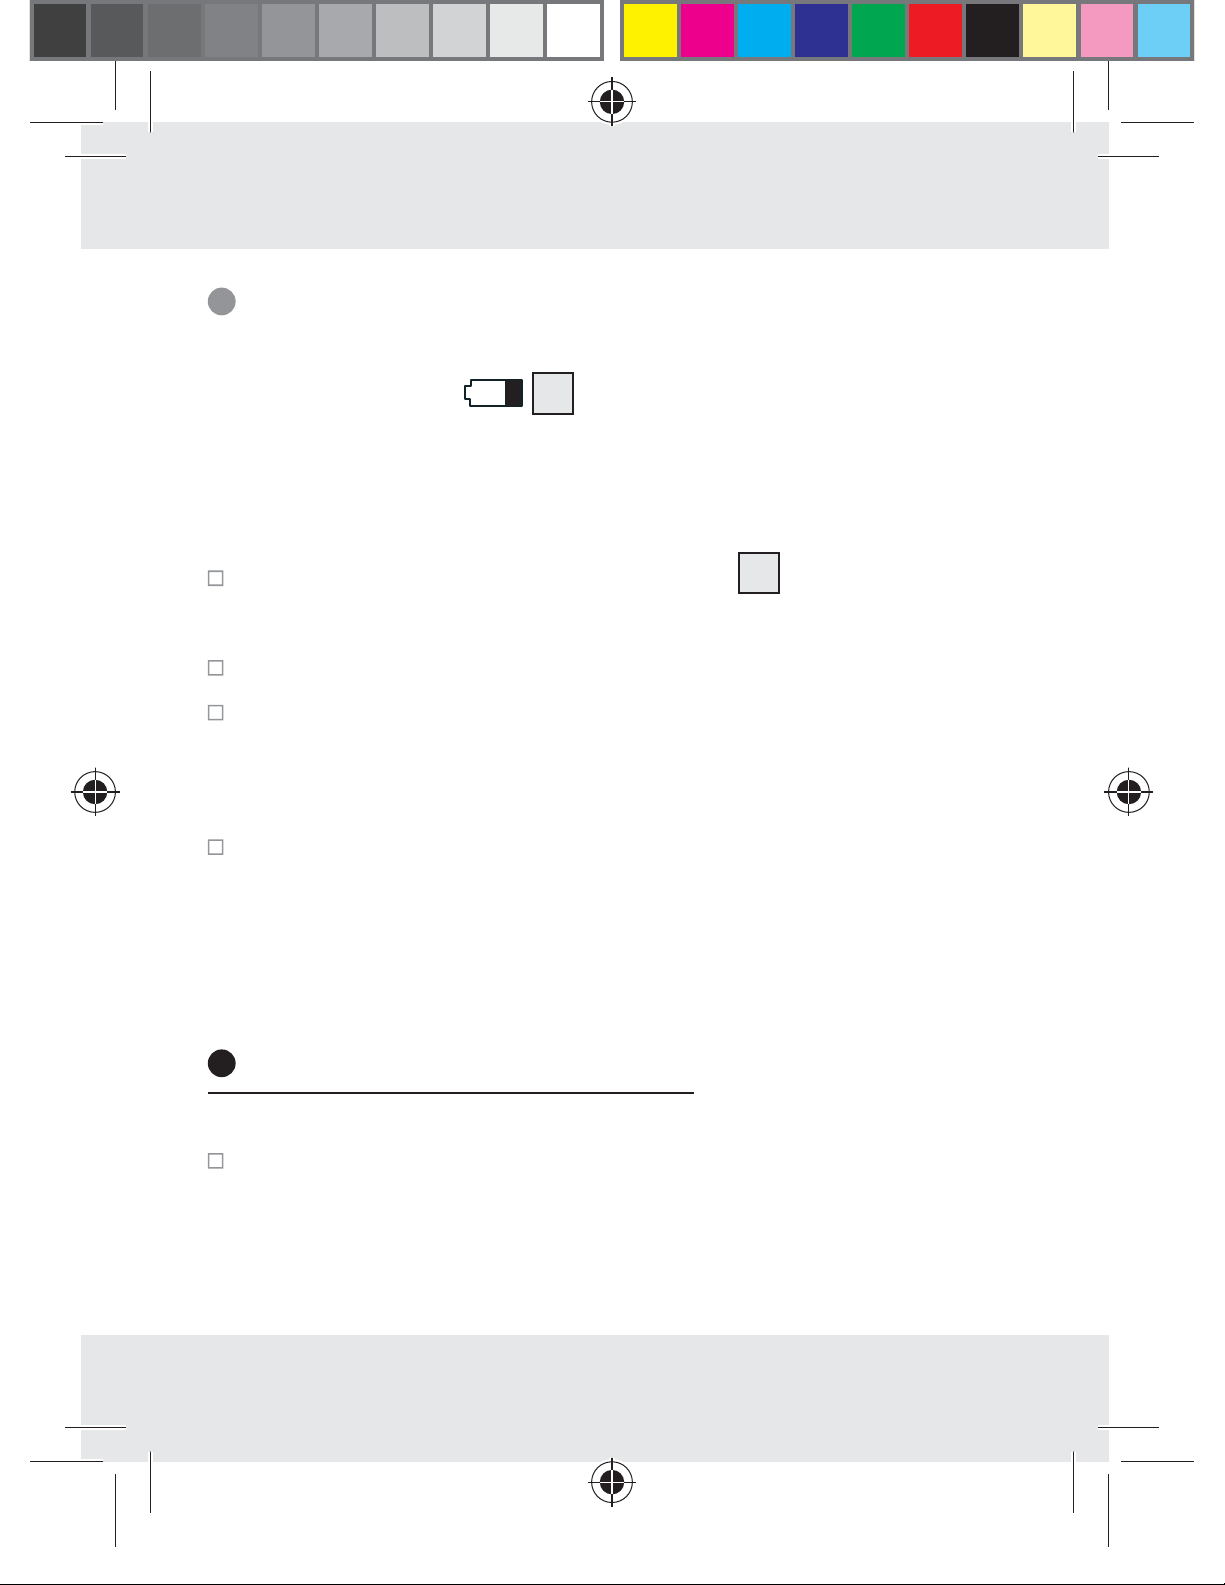
C
16
18 17 2 3 4 5 6
14 13 12 11 10
1
9
7
15
8
Z31408C/Z31408D
5
86663_aur_Funkwecker_Content_LB5.indd 5 21.01.13 13:26
Page 6
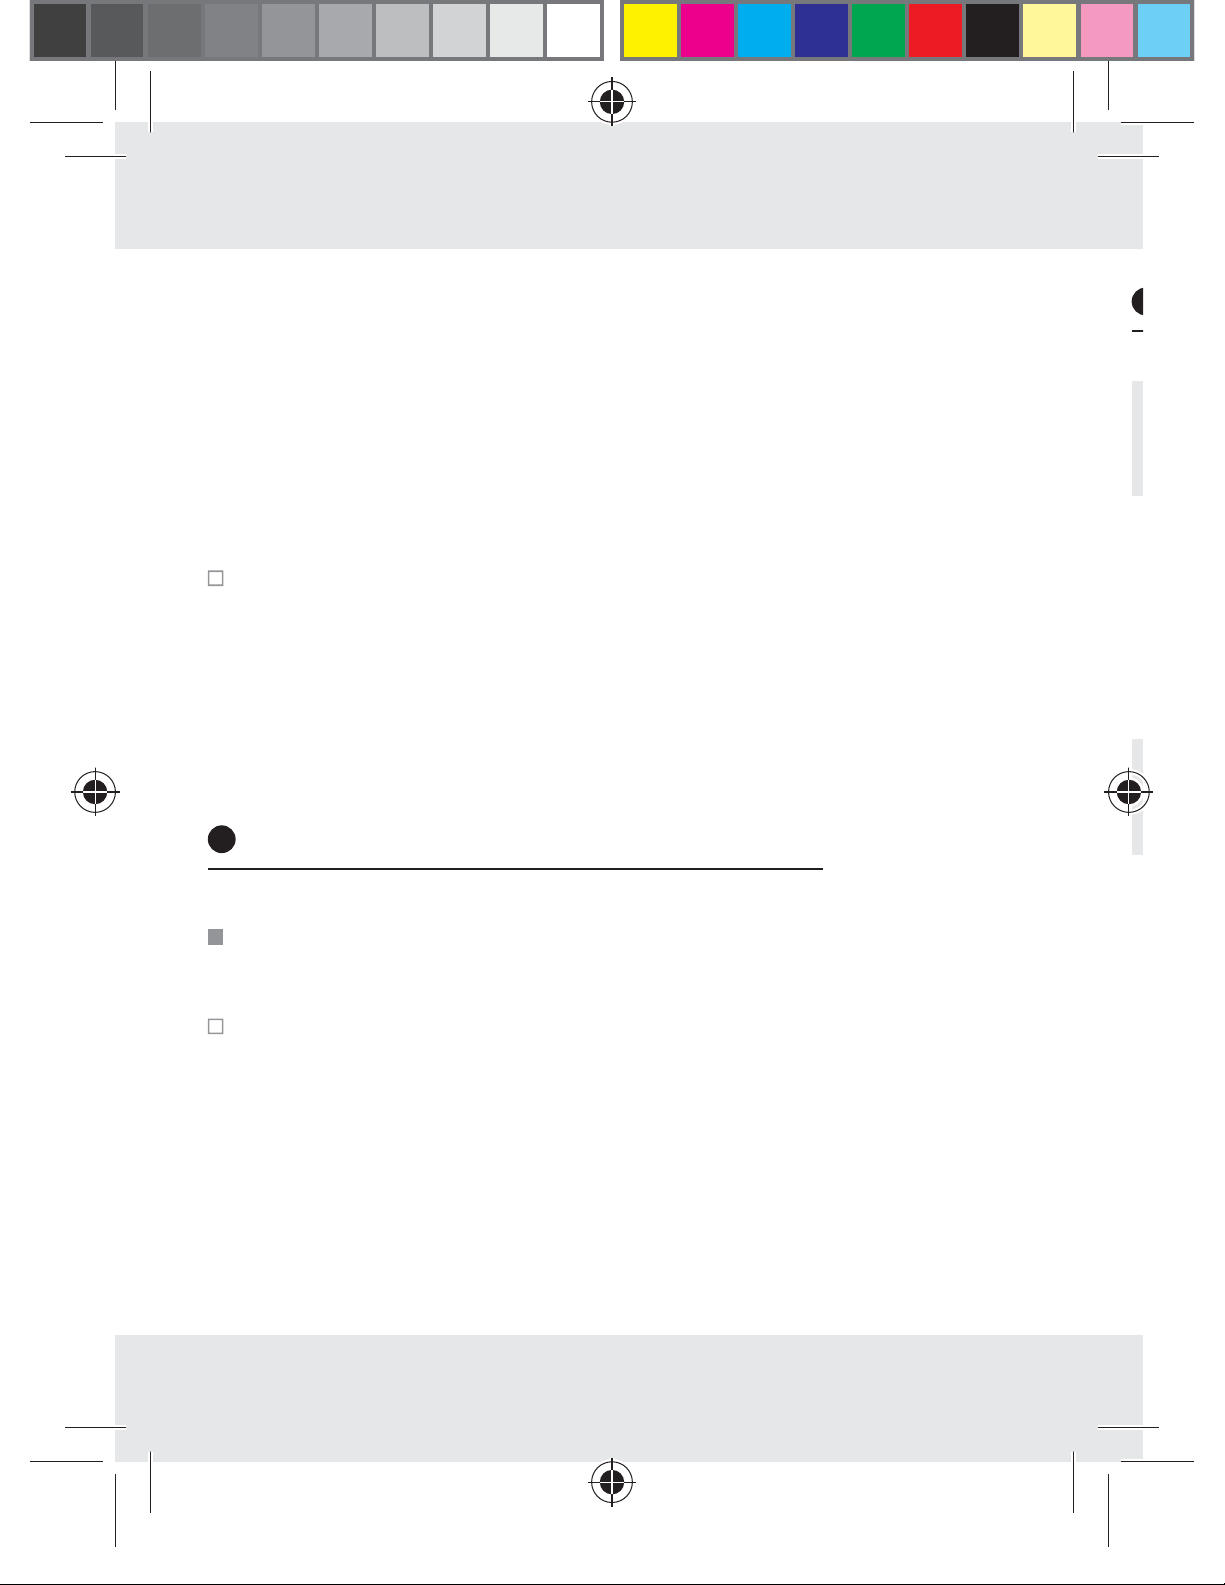
S
M
E
L
E
D
19 20
I
Z31408C/Z31408D
6
86663_aur_Funkwecker_Content_LB5.indd 6 21.01.13 13:26
I
Page 7
Índice
Introducción
Uso adecuado ..........................................................Página 8
Descripción de las piezas ........................................Página 9
Características técnicas ............................................Página 10
Volumen de suministro .............................................Página 10
Seguridad
Indicaciones generales de seguridad .....................Página 11
Indicaciones de seguridad sobre las pilas .............Página 13
Manejo ....................................................................Página 14
Puesta en funcionamiento del despertador ............Página 15
Uso de la indicación de hora 12 / 24 ....................Página 17
Visualizar la temperatura en °C / °F .......................Página 17
Ajuste manual de la zona horaria y el idioma ......Página 18
Programar la alarma ................................................Página 19
Activar / desactivar la alarma ..................................Página 19
Usar la tecla SNOOZE/ LIGHT ...............................Página 20
Cambiar las pilas......................................................Página 21
Eliminación de fallos ...................................Página 21
Limpieza y mantenimiento ...................Página 22
Eliminación ..........................................................Página 23
Informaciones
Declaración de conformidad ...................................Página 25
7 ES
86663_aur_Funkwecker_Content_LB5.indd 7 21.01.13 13:26
Page 8

Introducción
1
1
1
1
1
1
1
1
1
1
2
Despertador radiocontrolado
Introducción
Conserve adecuadamente estas instrucciones.
Adjunte toda la documentación en caso de
entregar el aparato a un tercero.
Uso adecuado
El aparato muestra la hora en el modo 12 / 24 (en horas,
minutos y segundos), el día de la semana, la fecha y la
temperatura ambiente. El aparato dispone de dos alarmas
diferentes.
Este aparato sólo es apto para su funcionamiento
en habitaciones cerradas y con temperaturas ambientes
normales. Cualquier uso o modificación del aparato distinto
a lo indicado se considerará como no adecuado y podrá
conllevar riesgos de lesiones y / o daños en el aparato. El fabricante no asume responsabilidad alguna por daños provocados por un uso indebido del producto. Este aparato
no ha sido diseñado para usos industriales.
8 ES
86663_aur_Funkwecker_Content_LB5.indd 8 21.01.13 13:26
Page 9
,
Descripción de las piezas
1
Alarma 1
2
Símbolo ZZ (SNOOZE)
3
Alarma 2
4
Indicador de minutos
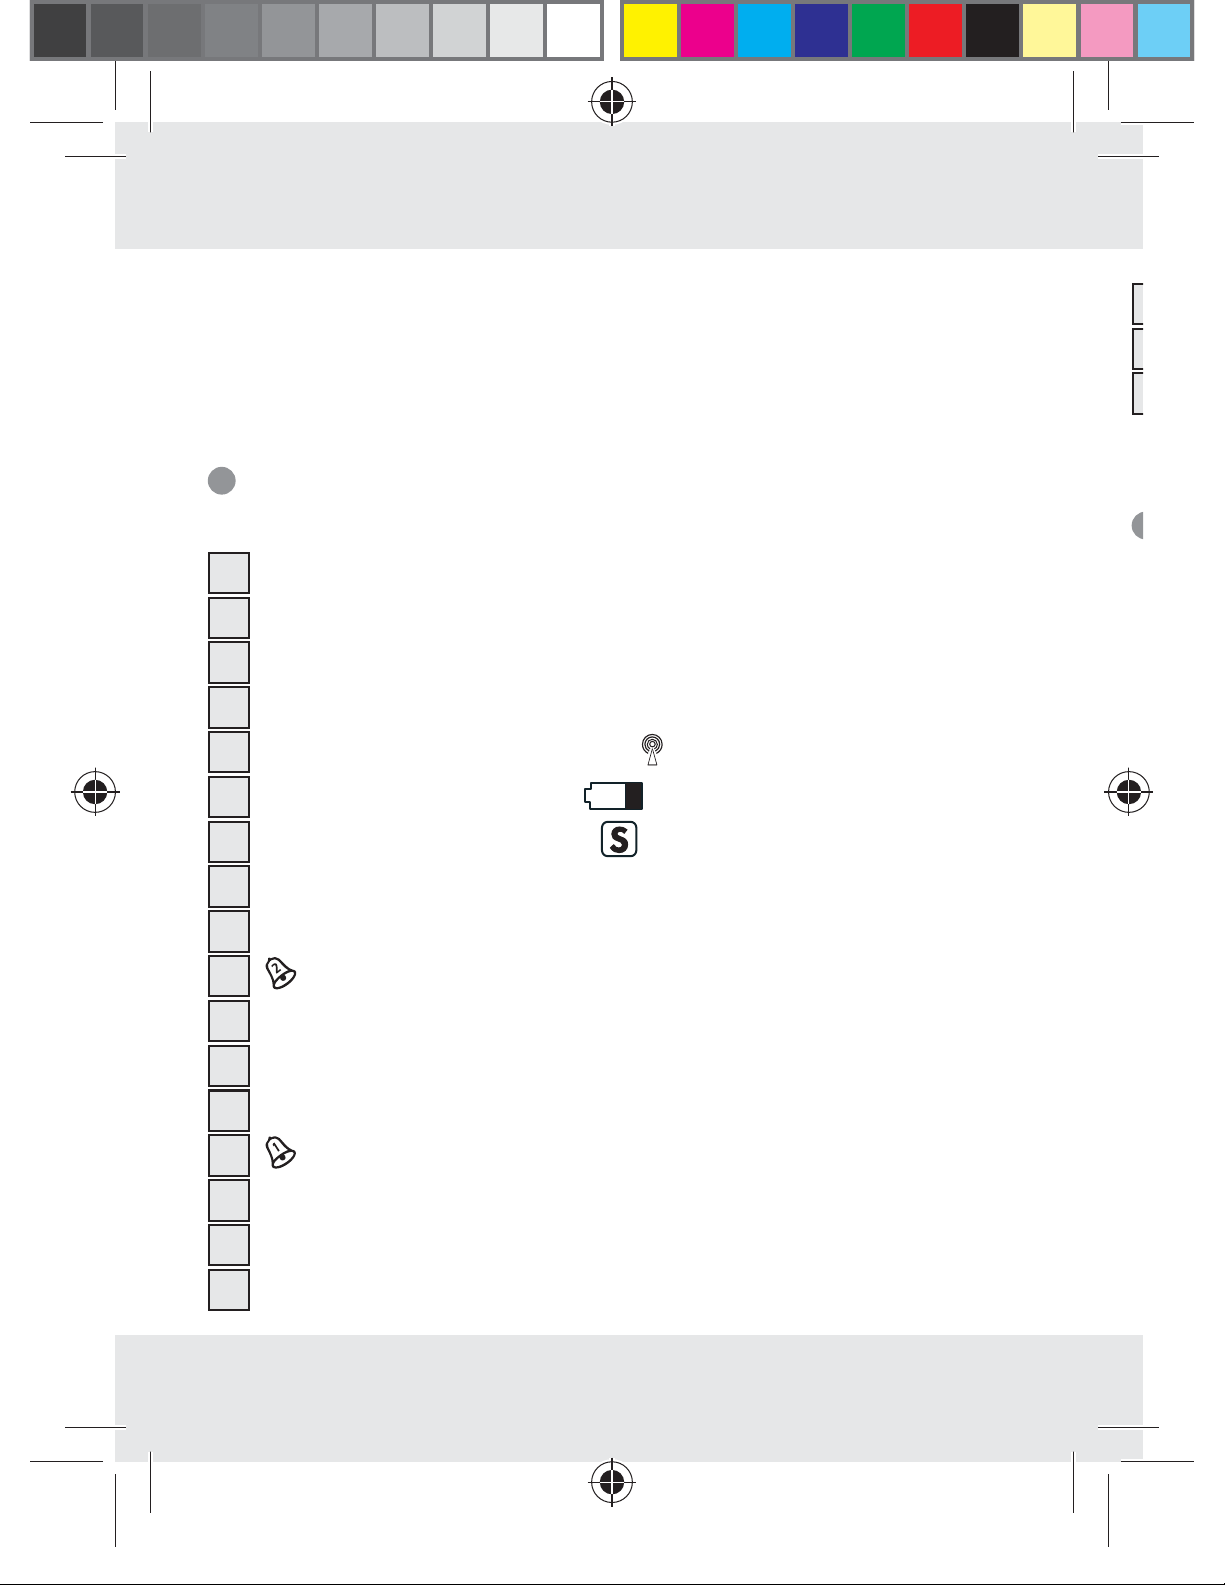
5
Símbolo de radiofrecuencia
6
Símbolo de pila
7
Símbolo de horario de verano
8
Indicador de segundos
9
Temperatura interior
Introducción
10
Tecla SET (Alarma 2)
-
11
Tecla DOWN (“abajo”)
12
Tecla MODE (“ajuste”)
13
Tecla UP (“arriba”)
14
Tecla SET (Alarma 1)
15
Indicador del día de la semana
16
Indicador de la fecha
17
Indicador de horas
18
Símbolo AM / PM (formato de 12 horas)
19
Tecla SNOOZE- / LIGHT
20
Compartimento para pilas
9 ES
86663_aur_Funkwecker_Content_LB5.indd 9 21.01.13 13:26
Page 10
Introducción
c
e
y
D
Características técnicas
Tipo de pila: 2 x 1,5 V AAA
Rango de temperatura: –9,9 °C - + 49,9 °C
14,2 °F - +121,8 °F
Nota: Cuando la temperatura es superior a + 49,9 °C
se muestra “HH” en la pantalla.
Cuando la temperatura es inferior a –9,9 °C se muestra
“LL” en la pantalla.
Color:
Z31408A: carcasa negra vertical
Z31408B: carcasa plateada vertical
Z31408C: carcasa negra ancha
Z31408D: carcasa plateada ancha
Volumen de suministro
¡
1 despertador radiocontrolado
2 pilas, 1,5 V
(AAA)
1 manual de instrucciones
10 ES
86663_aur_Funkwecker_Content_LB5.indd 10 21.01.13 13:26
Page 11
Seguridad
Seguridad
Lea todas las advertencias e indicaciones de seguridad. El incumplimiento de las advertencias
e indicaciones de seguridad puede provocar incendios
y / o lesiones graves.
¡CONSERVE TODAS LAS INDICACIONES DE SEGURIDAD Y ADVERTENCIAS PARA FUTURAS CONSULTAS!
Indicaciones generales de
seguridad
¡PELIGRO DE
MUERTE Y ACCIDENTE PARA NIÑOS!
No deje nunca a los niños sin vigilancia
con el material de embalaje. Existe peligro de asfixia.
A menudo los niños no son conscientes de los peligros.
Mantenga siempre a los niños fuera del alcance del
aparato. El aparato no es un juguete.
11 ES
86663_aur_Funkwecker_Content_LB5.indd 11 21.01.13 13:26
Page 12
Seguridad
Aquellas personas (incluidos niños) con limitaciones
físicas, sensoriales o psíquicas o sin la experiencia
y / o los conocimientos suficientes sólo podrán utilizar
el aparato bajo la supervisión de una persona responsable de su seguridad o habiendo recibido de
esta persona las indicaciones necesarias para utilizar
el aparato. Los niños deben ser vigilados para evitar
que jueguen con el aparato.
¡PELIGRO DE MUERTE! Las
pilas podrían ser ingeridas, lo cual podría resultar
mortal. En caso de ocurrir, solicite inmediatamente
ayuda médica.
No ponga el aparato en funcionamiento si está da-
ñado. Los aparatos dañados pueden resultar mortales.
Tenga en cuenta que los daños producidos por manejo
incorrecto, no seguimiento del manual de instrucciones
o manipulación por parte de personas no autorizadas,
están excluidos de la garantía.
No desarme nunca el aparato. Puede existir un peligro
considerable para el usuario si se realizan reparaciones incorrectas. Las reparaciones deben ser realizadas
por técnicos profesionales.
12 ES
86663_aur_Funkwecker_Content_LB5.indd 12 21.01.13 13:26
Page 13
Seguridad
Indicaciones de seguridad
sobre las pilas
Retire las pilas del aparato si no piensa utilizarlo
durante un período de tiempo prolongado.
.
,
¡PRECAUCIÓN! ¡PELIGRO DE EX-
PLOSIÓN! ¡No recargue nunca las pilas!
¡Cuando coloque las pilas observe la polaridad co-
rrecta! Ésta se indica en el compartimento de las pilas.
Cuando fuera necesario, limpie los contactos de las
pilas y del aparato antes de introducirlas.
Utilice únicamente el tipo de pila indicado. En caso
contrario existe peligro de explosión.
Extraiga siempre inmediatamente las pilas usadas del
aparato. ¡Existe un elevado riesgo de sulfatación!
La inobservancia de estas indicaciones puede provocar
la descarga de las pilas más allá de su tensión final.
86663_aur_Funkwecker_Content_LB5.indd 13 21.01.13 13:26
En dicho caso podrían sulfatarse (derrame). ¡En caso
de que las pilas se sulfaten, retírelas inmediatamente
para evitar daños en el aparato!
¡Las pilas no deben desecharse junto con la basura
doméstica!
13 ES
Page 14
Seguridad / Manejo
U
a
A
c
D
¡Todos los usuarios están obligados por ley a desechar
las pilas de forma adecuada!
Mantenga las pilas lejos del alcance de los niños. No
tire las pilas al fuego. No cortocircuite las pilas y no
intente desarmarlas.
Evite el contacto con la piel, ojos y mucosas. ¡En caso
de contacto con el ácido de las pilas, lave la zona
afectada con abundante agua o consulte a un médico!
Manejo
Coloque el aparato sobre una base estable.
No coloque el aparato cerca de fuentes de interfe-
rencias como televisores, ordenadores, muros gruesos,
etc. Ello puede afectar a la recepción de la señal de
radiofrecuencia.
No instale el aparato en edificios de hormigón armado
(p. ej.: aeropuertos, rascacielos, fábricas o sótanos).
La señal de radiofrecuencia podría debilitarse considerablemente.
No inicie la recepción en un vehículo en movimiento
(p. ej. coche o tren). La recepción de la señal de
14 ES
86663_aur_Funkwecker_Content_LB5.indd 14 21.01.13 13:26
Page 15
Manejo
r
!
radiofrecuencia puede interferir con la electrónica del
vehículo.
No deje el aparato durante un largo período de
tiempo expuesto a temperaturas inferiores a – 20 °C.
Puesta en funcionamiento del
despertador
Nota: retire la cinta protectora antes de usar el apa-
rato por primera vez.
Abra el compartimento de las pilas
en el lado posterior del aparato.
20
que se encuentra
,
Introduzca dos pilas (AAA).
Nota: tenga en cuenta la polaridad correcta. Ésta
se indica en el compartimento de las pilas.
Cierre el compartimento de las pilas.
Una vez colocadas las pilas, el despertador comenzará
a recibir automáticamente la señal de radiofrecuencia.
Al cabo de 3–10minutos se mostrarán la hora y fecha
correctas. Durante la recepción se desactivan las teclas
DOWN
11
y SNOOZE / LIGHT
19
. Puede detener la
15 ES
86663_aur_Funkwecker_Content_LB5.indd 15 21.01.13 13:26
Page 16

Manejo
C
u
L
L
recepción de la señal de radiofrecuencia pulsando la tecla
DOWN. Mantenga pulsada la tecla DOWN para iniciar
de nuevo la recepción.
Nota: durante la recepción de la señal no cambie la ubicación del despertador. De lo contrario podrían producirse
fallos durante la recepción.
Señal de radiofrecuencia (DCF):
La señal DCF (emisor de señal horaria) consiste en impulsos
horarios emitidos por uno de los relojes más precisos del
mundo, cerca de Francfort del Meno, Alemania, que tiene
una desviación de 1 segundo en 1 millón de años.
Su despertador radiocontrolado recibe esta señal en condiciones perfectas hasta una distancia de aprox. 1.500 km
en torno a Fráncfort del Meno. La recepción de la señal
de radiofrecuencia dura por lo general entre 3 y 10 minutos aprox.
La recepción se puede ver considerablemente influenciada
por ciertos impedimentos (por ej. por paredes de hormigón)
o fuentes de distorsión (por ej. otros aparatos eléctricos).
16 ES
86663_aur_Funkwecker_Content_LB5.indd 16 21.01.13 13:26
Page 17
Manejo
Cambie la ubicación del despertador (p. ej., cerca de
una ventana), cuando existan problemas de recepción.
Uso de la indicación de hora 12 / 24
Presione la tecla UP
de hora de 12 y 24 horas.
-
-
Nota: el símbolo AM se muestra en la pantalla LC
cuando el formato de 12 horas está activado, indicando
que la hora corresponde a la mañana.
Visualizar la temperatura en °C / °F
La temperatura interior actual
LCD.
Presione la tecla DOWN
13
para cambiar entre el formato
9
se muestra en la pantalla
11
para cambiar la escala
)
86663_aur_Funkwecker_Content_LB5.indd 17 21.01.13 13:26
de temperatura Celsius a Fahrenheit, y viceversa.
17 ES
Page 18
Manejo
E
N
T
F
Ajuste manual de la zona
horaria y el idioma
Mantenga pulsada la tecla MODE
3 segundos. El indicador de minutos
Pulse la tecla UP o DOWN
11, 13
12
durante aprox.
4
parpadea.
, para configurar
la zona horaria deseada (–12 horas hasta +12 horas).
Nota: si se encuentra en un país con recepción de se-
ñal DCF, pero con desviación de la hora actual, puede
utilizar el ajuste de la zona horaria para ajustar la
hora actual.
Por ejemplo, si se encuentra en un país en el que la
hora local está adelantada una hora con respecto a la
hora centroeuropea (MEZ), ajuste la zona horaria a
+01. La hora sigue siendo controlada mediante DCF,
I
pero muestra una hora más.
Pulse la tecla MODE para confirmar el ajuste.
Realice del mismo modo el ajuste de las horas, minutos,
año, día e idioma del día de la semana.
Nota: se pueden configurar los siguientes idiomas:
GER = alemán
ENG = inglés
DAN = danés
18 ES
86663_aur_Funkwecker_Content_LB5.indd 18 21.01.13 13:26
Page 19
ESP = español
NET = neerlandés
ITA = italiano
Manejo
.
.
FRA = francés
Programar la alarma
-
El despertador cuenta con dos funciones de alarma.
Presione y mantenga pulsada la tecla SET
tecla SET
El indicador de horas
Pulse la tecla UP o DOWN
horas. Pulse la tecla MODE
trada. El indicador de minutos
10
, para ajustar Alarma1 o Alarma2.
17
de la alarma parpadea.
11, 13
12
, para ajustar las
para confirmar la en-
4
parpadea.
14
o la
Pulse la tecla UP o DOWN para ajustar los minutos.
Pulse la tecla MODE para confirmar el ajuste.
,
Activar / desactivar la alarma
Pulse la tecla SET
14
o la tecla SET
activar la alarma correspondiente.
86663_aur_Funkwecker_Content_LB5.indd 19 21.01.13 13:26
10
, para
19 ES
Page 20
Manejo
E
a
a
El símbolo de alarma o se muestra en la pantalla.
Pulse la tecla SET o la tecla SET , para activar la
alarma correspondiente.
l
Usar la tecla SNOOZE/ LIGHT
Presione la tecla SNOOZE / LIGHT
función de retraso de la alarma.
La alarma enmudece y las indicaciones o y ZZ
parpadean. La señal de alarma se repite al cabo de
aprox. 5 minutos.
Presione la tecla SNOOZE / LIGHT
la función de retraso de la alarma.
Nota: presione cualquier tecla, excepto la tecla
SNOOZE / LIGHT, para detener la señal de alarma.
Nota: la pantalla se ilumina al presionar la tecla
SNOOZE / LIGHT.
19
para activar la
19
, para activar
20 ES
86663_aur_Funkwecker_Content_LB5.indd 20 21.01.13 13:26
Page 21
Manejo / Eliminación de fallos
.
Cambiar las pilas
El símbolo de pila
6
aparece en la pantalla cuando
las pilas se están agotando. Procure cambiar las pilas lo
antes posible.
Abra el compartimento de las pilas
20
que se encuentra
en el lado posterior del aparato.
Retire las pilas usadas.
Introduzca dos pilas (AAA).
Nota: tenga en cuenta la polaridad correcta. Ésta
está indicada en el compartimento de las pilas.
Cierre el compartimento de las pilas.
Nota: los datos en memoria se pierden al cambiar
las pilas.
Eliminación de fallos
El aparato contiene componentes electrónicos sensibles.
Por ello podría sufrir interferencias por otros equipos
de transmisión por radio que se encuentren en las
proximidades. Estos equipos pueden ser, por ejemplo,
21 ES
86663_aur_Funkwecker_Content_LB5.indd 21 21.01.13 13:26
Page 22
Eliminación de … / Limpieza y mantenimiento
P
p
c
L
n
a
teléfonos móviles, equipos de radiotelefonía, equipos
de radioaficionados, controles remotos, así como otros
tipos de mandos a distancia y hornos microondas. Si se
muestran indicaciones de error en la pantalla, retire
aparatos de este tipo que se encuentren en las inme-
diaciones.
Las descargas electrostáticas pueden provocar pertur-
baciones en el funcionamiento. En caso de producirse
este tipo de anomalías, retire unos instantes las pilas
e introdúzcalas de nuevo.
Limpieza y mantenimiento
No utilice en ningún caso líquidos o productos de
limpieza ya que éstos dañarían el aparato.
Limpie el aparato sólo por fuera con un paño suave y
seco.
i
l
22 ES
86663_aur_Funkwecker_Content_LB5.indd 22 21.01.13 13:26
Page 23
Eliminación
Eliminación
El embalaje está compuesto por materiales no
contaminantes que pueden ser eliminados en el
centro de reciclaje local.
-
Puede consultar las posibilidades de eliminación del
producto al final de su vida útil en la administración de su
comunidad o ciudad.
No elimine el producto al final de su vida útil
junto con los desechos domésticos. Deseche el
producto adecuadamente. Proteja así el medio
ambiente. Infórmese en la oficina competente
de su administración sobre los puestos de recogida y sus horarios de atención al público.
Las pilas defectuosas o usadas deben reciclarse según lo
indicado en la directiva 2006/66/CE. Para ello entregue
las pilas o el aparato en los puntos de recogida indicados.
23 ES
86663_aur_Funkwecker_Content_LB5.indd 23 21.01.13 13:26
Page 24
Eliminación
N
D
ú
m
v
c
1
L
c
E
¡Daños medioambientales debidos a
Pb
Las pilas no deben eliminarse junto con los residuos domésticos. Las pilas pueden contener metales pesados tóxicos
que deben tratarse conforme a la normativa aplicable a los
residuos especiales. Los símbolo químicos de los metales
pesados son: Cd = Cadmio, Hg = Mercurio, Pb = Plomo.
Las pilas usadas deben entregarse en un punto de recolección específico para ello.
un reciclaje incorrecto de las pilas!
24 ES
86663_aur_Funkwecker_Content_LB5.indd 24 21.01.13 13:26
Page 25
Informaciones
Informaciones
Declaración de conformidad
Nosotros OWIM GmbH & Co. KG, Stiftsbergstraße 1,
D-74167 Neckarsulm, declaramos en responsabilidad
única que el producto: Despertador radiocontrolado,
modelo nº: Z31408A / Z31408B / Z31408C / Z31408D
versión: 02/2013, al que esta declaración hace referencia,
cumple las normas / y los documentos normativos de
1999 / 5 / EC.
La declaración de conformidad completa puede ser
consultada en la página: www.owim.com.
EMC
25 ES
86663_aur_Funkwecker_Content_LB5.indd 25 21.01.13 13:26
Page 26

Indice
S
L
o
a
d
m
n
d
d
e
a
Introduzione
Utilizzo conforme alle norme ................................... Pagina 27
Descrizione dei componenti .................................... Pagina 28
Dati Tecnici................................................................ Pagina 29
Volume di fornitura ................................................... Pagina 30
Misure di sicurezza
Avvisi di sicurezza generali ..................................... Pagina 30
Indicazioni di sicurezza relative alle batterie ......... Pagina 32
Funzionamento................................................ Pagina 34
Messa in funzione della sveglia radiocontrollata..... Pagina 35
Utilizzo della visualizzazione 12 / 24 ore .............Pagina 37
Visualizzazione della temperatura in °C / °F ........ Pagina 37
Impostazione manuale dell‘ora, del fuso
orario e della lingua del giorno della settimana .... Pagina 38
Impostazione dell’allarme ........................................ Pagina 39
Attivazione / Disattivazione dell’allarme ................. Pagina 40
Utilizzo del tasto SNOOZE / LIGHT .......................Pagina 40
Sostituzione delle batterie ........................................ Pagina 41
Eliminazione dei guasti ............................ Pagina 42
l
Pulizia e cura ..................................................... Pagina 42
Smaltimento ....................................................... Pagina 43
Informazioni
Dichiarazione di conformità .................................... Pagina 44
26 IT/MT
86663_aur_Funkwecker_Content_LB5.indd 26 21.01.13 13:26
Page 27
Sveglia radiocontrollata
Introduzione
Conservate per bene queste istruzioni. Consegnate anche tutti i documenti di questo prodotto
quando lo date a terzi.
Utilizzo conforme alle norme
Introduzione
L‘apparecchio mostra il tempo in modalità 12 / 24 ore (in
ore, minuti e secondi), il giorno della settimana, la data e
la temperatura ambiente. L‘apparecchio dispone inoltre di
due diversi orari d‘allarme. L’apparecchio è adatto solamente per un utilizzo in ambienti chiusi e in presenza di una
normale temperatura ambiente. Altri utilizzi o modifiche
dell’apparecchio si intendono non conformi alle modalità
d’uso previste e determinano rischi di lesioni a persone
e / o danni all’apparecchio. Il produttore non si assume
alcuna responsabilità per eventuali danni derivanti da un
27 IT/MT
86663_aur_Funkwecker_Content_LB5.indd 27 21.01.13 13:26
Page 28
Introduzione
1
1
2
T
C
d
N
v
C
v
C
Z
Z
Z
Z
utilizzo diverso da quello previsto. L’apparecchio non è
destinato all’utilizzo commerciale.
Descrizione dei componenti
1
Allarme 1
2
Simbolo ZZ (SNOOZE)
3
Allarme 2
4
Visualizzazione dei minuti
5
Simbolo del segnale radio
6
Simbolo della batteria
7
Simbolo dell‘ora legale
8
Visualizzazione dei secondi
9
Temperatura interna
10
Tasto SET (Allarme 2)
11
Tasto DOWN (“verso il basso”)
12
Tasto MODE (“Impostazione”)
13
Tasto UP (“verso l’alto”)
14
Tasto SET (Allarme 1)
15
Visualizzazione del giorno della settimana
16
Visualizzazione della data
17
Visualizzazione delle ore
28 IT/MT
86663_aur_Funkwecker_Content_LB5.indd 28 21.01.13 13:26
Page 29

Introduzione
18
Simbolo AM- / PM (formato a 12 ore)
19
Tasto SNOOZE / LIGHT
20
Vano portabatterie
Dati Tecnici
Tipo di batteria: 2 x 1,5 V AAA
Campo di misurazione
della temperatura: –9,9 °C - + 49,9 °C
14,2 °F - +121,8 °F
Nota: con una temperatura misurata di oltre + 49,9 °C
viene visualizzato “HH“ sul display.
Con una temperatura misurata inferiore di –9,9 °C viene
visualizzato “LL“ sul display.
Colore:
Z31408A: involucro nero di taglio
Z31408B: involucro grigio di taglio
Z31408C: involucro nero largo
Z31408D: involucro grigio largo
29 IT/MT
86663_aur_Funkwecker_Content_LB5.indd 29 21.01.13 13:26
Page 30
Introduzione / Misure di sicurezza
Volume di fornitura
1 Sveglia radiocomandata
2 Batterie, 1,5 V
1 Istruzioni d’uso
AAA
Misure di sicurezza
Leggere tutte le istruzioni e gli avvisi
di sicurezza. Negligenza nell’attenersi alle istruzioni e agli
avvisi di sicurezza può portare ad una scossa elettrica, ad
un incendio e / o a ferite pericolose.
CONSERVARE TUTTE LE ISTRUZIONI E GLI AVVISI DI
SICUREZZA PER CONSULTARLI IN FUTURO!
Avvisi di sicurezza generali
PERICOLO DI
MORTE E DI INCIDENTE PER BAMBINI! Vietare l’accesso al materiale d’im-
30 IT/MT
86663_aur_Funkwecker_Content_LB5.indd 30 21.01.13 13:26
Page 31

Misure di sicurezza
ballaggio ai bambini, se non sotto sorveglianza di un
adulto. Sussiste il pericolo di soffocamento dei bambini
con il materiale d’imballaggio. I bambini non sono in
grado di valutare l’entità dei pericoli. Tenere l‘apparecchio fuori dalla portata dei bambini. L‘apparecchio
non è un giocattolo.
Non fare utilizzare questo apparecchio da persone
(ivi inclusi bambini) con capacità fisiche, sensoriali o
mentali limitate. Inoltre il prodotto non può essere utii
i
lizzato da persone che non conoscono il suo funzio-
namento. In questo caso, una persona responsabile per
la sicurezza deve supervisionare o dare indicazioni
su come il prodotto debba essere utilizzato. I bambini
devono essere sorvegliati al fine di impedire che essi
giochino con l’apparecchio.
PERICOLO DI MORTE! Le batterie
possono essere ingoiate con conseguente pericolo di
vita. Se è stata ingoiata la batteria, rivolgersi immedia-
tamente alle cure di un medico.
Non metta in funzione l’apparecchio se è danneggiato.
Apparecchi danneggiati possono mettere a repentaglio
la Sua vita.
31 IT/MT
86663_aur_Funkwecker_Content_LB5.indd 31 21.01.13 13:26
Page 32

Misure di sicurezza
Prendere in considerazione il fatto che i danneggia-
menti ad opera di maneggio scorretto, violazione
delle istruzioni d’uso e causati da interventi di perso-
nale non autorizzato sono esclusi dalla garanzia.
Non smontare in nessun caso l’apparecchio. A causa
di riparazioni scorrette l’utente può essere esposto a
gravi pericoli. Faccia eseguire le riparazioni da perso-
nale qualificato.
Indicazioni di sicurezza
relative alle batterie
Rimuovere dall’apparecchio le batterie non utilizzate
per parecchio tempo.
ATTENZIONE! PERICOLO DI ESPLO-
SIONI! Non ricaricare mai le batterie!
Prestare attenzione alla polarità corretta quando
vengono inserite le batterie! La polarità è riportata
nel vano batteria.
Se necessario, pulire i contatti della batteria e dell’ap-
parecchio prima di inserire le batterie.
32 IT/MT
86663_aur_Funkwecker_Content_LB5.indd 32 21.01.13 13:26
Page 33

Misure di sicurezza
Utilizzare solamente batterie del tipo indicato. In caso
contrario sussiste il pericolo di esplosione.
Rimuovere immediatamente le batterie esauste dall’ap-
parecchio. Sussiste un notevole pericolo di perdita!
In caso di mancata osservanza di tali avvertenze, la
batteria può scaricarsi attraverso la sua tensione finale.
-
Sussiste inoltre il pericolo di perdite. In caso di perdite
dalla batteria mentre questa si trova nell’apparecchio,
estrarla subito per evitare danni all‘apparecchio mede-
simo!
Non smaltire le batteria con i rifiuti domestici!
Ogni utilizzatore ha per legge l‘obbligo di smaltire le
batterie in maniera corretta!
Tenere le batterie fuori dalla portata dei bambini, non
gettare le batterie nel fuoco, non cortocircuitarle e
non aprirle.
Evitare il contatto con pelle, occhi e mucose. In caso
di contatto con l’acido della batteria sciacquare ab-
bondantemente il punto interessato e / o rivolgersi
alle cure mediche!
-
33 IT/MT
86663_aur_Funkwecker_Content_LB5.indd 33 21.01.13 13:26
Page 34

Funzionamento
N
c
g
‘
u
S
d
a
N
d
c
Funzionamento
Fare attenzione a che l’apparecchio sia posto su una
superficie stabile.
Non porre l’apparecchio nei pressi di fonti di disturbo
quali televisore, computer, murature spesse, ecc. La ricezione dell’apparecchio potrebbe essere ridotta.
Non porre l’apparecchio in edifici in cemento armato,
quali ad esempio aeroporti, grattacieli, fabbriche o
cantine. La ricezione del segnale radio può essere
fortemente disturbata.
Non avviare la ricezione in un automezzo in movi-
mento, quale automobile o treno. La ricezione del
segnale radio può disturbare il sistema elettronico
dell’automezzo.
Non esporre l’apparecchio per un periodo di tempo
prolungato a temperature inferiori a –20 °C.
l
t
l
34 IT/MT
86663_aur_Funkwecker_Content_LB5.indd 34 21.01.13 13:26
Page 35

Funzionamento
Messa in funzione della sveglia
radiocontrollata
Prima del primo uso, rimuovere la pellicola protettiva.
Aprire il vano portabatterie
parecchio.
Inserire due batterie (AAA).
20
posto sul retro dell’ap-
,
Nota: nel fare ciò osservare la corretta polarità. La
polarità è riportata nel vano batteria.
Chiudere il vano portabatterie.
Non appena le batterie sono state inserite, la sveglia radiocomandata avvia automaticamente la ricezione del segnale radio. Dopo 3–10minuti vengono visualizzate
l‘ora e la data corrette. Durante la ricezione sono disattivati
tutti i tasti ad eccezione del tasto DOWN
SNOOZE / LIGHT
19
. È possibile arrestare la ricezione
11
e del tasto
del segnale radio premendo il tasto DOWN. Per riavviare
la ricezione, premere e tenere premuto il tasto DOWN.
Nota: durante la ricezione non modificare la posizione
della sveglia radiocomandata. In caso contrario è possibile
che vi siano disturbi di ricezione.
35 IT/MT
86663_aur_Funkwecker_Content_LB5.indd 35 21.01.13 13:26
Page 36

Funzionamento
S
u
Segnale radio (DCF):
Il segnale DCF (trasmettitore dell‘orario) è costituito da impulsi di orari trasmessi da uno degli orologi più esatti del
mondo, situato nelle vicinanze di Francoforte sul Meno
(Frankfurt / Main) in Germania – subisce una variazioni
di 1 solo secondo nell’arco di in 1 milione di anni.
In condizioni ottimali, la sveglia radiocontrollata acquistata
riceve questi segnali fino a una distanza di circa 1.500 km
intorno a Francoforte sul Meno. Il processo di ricezione
del segnale radio dura di regola dai 3 ai 10 minuti.
La ricezione può essere limitata notevolmente da ostacoli
(ad es. muri di cemento) o fonti di interferenza (ad es. da
altre apparecchiature elettriche). Qualora la sveglia radiocomandata avesse difficoltà di ricezione, modificare
se necessario la sua posizione (ponendola ad esempio
nei pressi di una finestra).
36 IT/MT
t
86663_aur_Funkwecker_Content_LB5.indd 36 21.01.13 13:26
Page 37

Funzionamento
Utilizzo della visualizzazione
-
12 / 24 ore
Premere il tasto UP
orario passando da quello a 12 ore a quello a 24
ore e viceversa.
Nota: in caso di utilizzo del formato a 12 ore, AM
indica la mattina, PM
13
, per commutare il formato
il pomeriggio.
Visualizzazione della
temperatura in °C / °F
Sul display a cristalli liquidi viene visualizzata la temperatura interna attuale
Premere il tasto DOWN
scale di temperatura Celsius e Fahrenheit.
9
.
11
, per commutare tra le
37 IT/MT
86663_aur_Funkwecker_Content_LB5.indd 37 21.01.13 13:26
Page 38

Funzionamento
N
G
E
D
E
N
T
F
Impostazione manuale dell‘ora,
del fuso orario e della lingua del
giorno della settimana
Premere e mantenere premuto il tasto MODE
circa 3 secondi. Lampeggia la visualizzazione dei minuti
Premere il tasto UP o DOWN
il fuso orario desiderato (da –12 ore a + 12 ore).
Nota: qualora l’utilizzatore si trovasse in un paese di
ricezione del segnale DCF ma appartenente a un altro
fuso orario, è possibile utilizzare l’impostazione del
fuso orario per impostare l’orario effettivamente in uso.
Qualora ad esempio l’utilizzatore si trovasse in un paese dove l’orario locale ha un’ora di differenza in meno
4
.
11, 13
, per impostare
12
per
I
rispetto all’orario mitteleuropeo (CET), impostare il comando del fuso orario su +01. L’ora dipende sempre
dal segnale orario DFC, ma mostra un’ora in più.
Confermare il dato inserito premendo il tasto MODE.
Impostare le ore, i minuti, l‘anno, il giorno e la lingua
del giorno della settimana nello stesso modo.
38 IT/MT
86663_aur_Funkwecker_Content_LB5.indd 38 21.01.13 13:26
Page 39

Funzionamento
Nota: sono disponibili le seguenti lingue:
GER = Tedesco
ENG = Inglese
DAN = Danese
ESP = Spagnolo
-
NET = Olandese
ITA = Italiano
FRA = Francese
i
.
-
-
Impostazione dell’allarme
La sveglia radiocomandata dispone di due funzioni
d‘allarme. Premere e tenere premuto il
o il tasto SET
10
, per impostare l‘allarme1 o l‘al-
larme2. La visualizzazione delle ore
tasto SET
17
dell‘orario
14
d‘allarme lampeggia sul display.
Premere il tasto UP o DOWN
11, 13
, per impostare
le ore. Confermare il dato inserito premendo il tasto
MODE
12
. La visualizzazione dei minuti
4
lampeg-
gia sul display.
Premere il tasto UP o DOWN, per impostare i minuti.
Confermare il dato inserito premendo il tasto MODE.
39 IT/MT
86663_aur_Funkwecker_Content_LB5.indd 39 21.01.13 13:26
Page 40

Funzionamento
l
c
a
Attivazione / Disattivazione
dell’allarme
Premere il tasto SET
14
o il tasto SET
tivare l‘allarme interessato.
Il simbolo dell‘allarme o compare sul display a
cristalli liquidi.
Premere il tasto SET o il tasto SET, per disattivare
l‘allarme interessato.
10
, per at-
Utilizzo del tasto SNOOZE / LIGHT
I
Mentre risuona il segnale acustico di allarme premere
il tasto SNOOZE / LIGHT
19
, per attivare la funzione
di ripetizione dell’allarme.
Il segnale acustico di allarme si interrompe e sul display
lampeggiano
o e Zz. Il segnale di allarme risuona
nuovamente dopo circa 5 minuti.
Premere ogni tasto a scelta, eccetto il tasto SNOOZE /
LIGHT
19
, per disattivare la funzione di Snooze (ripe-
tizione della suoneria).
40 IT/MT
86663_aur_Funkwecker_Content_LB5.indd 40 21.01.13 13:26
Page 41

Funzionamento
Nota: premere un tasto a scelta eccetto il tasto
SNOOZE / LIGHT, per arrestare il segnale d‘allarme.
Nota: l‘illuminazione di sfondo si accende, se si
-
preme il tasto SNOOZE / LIGHT.
Sostituzione delle batterie
Il simbolo della batteria
6
compare sul display a
cristalli liquidi, se le batterie sono deboli. Fare attenzione
a che le batterie vengano sostituite per tempo.
Aprire il vano portabatterie
parecchio.
Rimuovere le batterie usate.
20
posto sul retro dell’ap-
Inserire due batterie (AAA).
Nota: nel fare ciò osservare la corretta polarità.
Essa viene mostrata nel vano portabatterie.
Chiudere il vano portabatterie.
-
86663_aur_Funkwecker_Content_LB5.indd 41 21.01.13 13:26
Nota: con la sostituzione delle batterie i danni memo-
rizzati saranno cancellati.
41 IT/MT
Page 42

Eliminazione dei guasti / Pulizia e cura
P
c
L
c
’
Eliminazione dei guasti
L’apparecchio contiene componenti elettronici sensibili.
E’ quindi possibile che apparecchi di trasmissione radio eventualmente posti nelle immediate vicinanze lo
disturbino. Ciò vale ad esempio per telefoni mobili,
apparecchi ricetrasmittenti portatili, ricetrasmittenti per
CB, comandi radio telecomandati / altri telecomandi
e forni a microonde. Qualora sul display si visualizzassero errori, rimuovere tali apparecchi dalle immediate vicinanze dell’apparecchio.
Scariche elettrostatiche possono provocare disturbi di
funzionamento. In caso di tali disturbi di funzionamento
rimuovere brevemente le batterie e in seguito inserirle
di nuovo.
Pulizia e cura
Non fare mai uso di liquidi e di detergenti che potreb-
bero danneggiare l’apparecchiatura.
l
Pulire l’apparecchiatura solo sulla sua superficie
esterna servendosi di una pezza morbida e asciutta.
42 IT/MT
86663_aur_Funkwecker_Content_LB5.indd 42 21.01.13 13:26
Page 43

Smaltimento
Smaltimento
.
r
La confezione è prodotta in materiale riciclabile
e biodegradabile, smaltibile nei luoghi di raccolta differenziati.
Potete informarvi sulle possibilità di smaltimento del prodotto
consumato dall‘amministrazione comunale e cittadina.
Per la salvaguardia della tutela ambientale,
quando il prodotto non funziona più non smaltirlo nei rifiuti domestici bensì nei luoghi adatti
di raccolta. Informarsi presso l’amministrazione
competente sui centri di raccolta e i relativi orari
di apertura.
Le batterie difettose o esauste devono essere riciclate secondo la direttiva 2006 / 66 / CE. Smaltire le batterie o
l’apparecchio nei centri di raccolta previsti.
-
Danni ambientali dovuti a uno smalti-
Pb
86663_aur_Funkwecker_Content_LB5.indd 43 21.01.13 13:26
mento non corretto delle batterie!
43 IT/MT
Page 44

Smaltimento / Informazioni
n
s
E
Le batterie non devono essere smaltite nella spazzatura
domestica. Esse possono contenere metalli pesanti velenosi
e devono essere trattate quali rifiuti speciali. I simboli chimici
dei metalli pesanti sono: Cd = Cadmio, Hg = Mercurio,
Pb = Piombo. Per questo motivo consegnare le batterie
esauste presso un punto di raccolta comunale.
Informazioni
Dichiarazione di conformità
Noi, OWIM GmbH & Co. KG, Stiftsbergstraße 1,
D-74167 Neckarsulm, dichiariamo sotto la nostra esclusiva
responsabilità che il prodotto: Sveglia radiocontrollata,
modelli n.: Z31408A / Z31408B / Z31408C / Z31408
D, versione: 02/2013, alla quale si riferisce questa
I
dichiarazione, è conforme alle norme / documenti normativi
di cui alla Direttiva 1999 / 5 / CE.
44 IT/MT
86663_aur_Funkwecker_Content_LB5.indd 44 21.01.13 13:26
Page 45

i
Informazioni
i
In caso di necessità, tale documentazione può essere
scaricata dal sito Internet www.owim.com.
EMC
i
45 IT/MT
86663_aur_Funkwecker_Content_LB5.indd 45 21.01.13 13:26
Page 46

Índice
R
O
a
p
p
a
a
p
n
d
a
Introdução
Utilização correcta ................................................... Página 47
Descrição das peças ................................................Página 48
Dados técnicos ......................................................... Página 49
Material fornecido ....................................................Página 50
Segurança
Indicações gerais de segurança .............................Página 50
Indicações de segurança relativas às pilhas ..........Página 52
Utilização .............................................................. Página 53
Colocar o rádio despertador em funcionamento ... Página 54
Utilizar a indicação de 12/24 horas ..................... Página 56
Indicar a temperatura em ºC / ºF ............................ Página 57
Configurar manualmente a hora, o fuso
horário e o idioma do dia da semana .................... Página 57
Configurar alarme .................................................... Página 58
Activar / Desactivar alarme...................................... Página 59
Utilizar o botão SNOOZE / LIGHT ......................... Página 59
(
Substituir as pilhas .................................................... Página 60
Resolução de avarias ................................ Página 61
Limpeza e conservação ........................... Página 62
r
Eliminação ............................................................ Página 62
Informações
Declaração de conformidade ................................. Página 64
46 PT
86663_aur_Funkwecker_Content_LB5.indd 46 21.01.13 13:26
Page 47

Rádio despertador
Introdução
Guarde cuidadosamente este manual de instruções. Ao entregar o aparelho a terceiros, entregue também todos os documentos.
Utilização correcta
Introdução
O aparelho exibe as horas no modo de 12 / 24 horas
(em horas, minutos e segundos), o dia da semana, a data,
as fases da lua e a temperatura ambiente. O aparelho
possui duas horas de alarme distintas. O aparelho apenas
pode ser utilizado em espaços fechados e a uma temperatura ambiente normal. Qualquer outra utilização ou
alteração do aparelho será considerada indevida e pode
provocar ferimentos e / ou danificar o aparelho. O fabricante
não assume qualquer responsabilidade por danos resultantes
de uma utilização incorrecta. Este aparelho não se destina
a uso industrial.
47 PT
86663_aur_Funkwecker_Content_LB5.indd 47 21.01.13 13:26
Page 48

Introdução
T
A
d
N
a
C
c
C
Z
Z
Z
Z
Descrição das peças
1
Alarme 1
2
Símbolo ZZ (SNOOZE)
3
Alarme 2
4
Indicação dos minutos
5
Símbolo de radiofrequência
6
Símbolo de pilha
7
Símbolo de hora de Verão
8
Indicação de segundos
9
Temperatura interior
10
Botão SET (Alarme 2)
11
Botão DOWN (“para baixo“)
12
Botão MODE (“configurar”)
13
Botão UP (“para cima“)
14
Botão SET (Alarme 1)
15
Indicação de dia da semana
16
Indicação da data
17
Indicação das horas
18
Símbolo AM/ PM (formato de 12 horas)
19
Botão SNOOZE / LIGHT
20
Compartimento das pilhas
48 PT
86663_aur_Funkwecker_Content_LB5.indd 48 21.01.13 13:26
Page 49

Introdução
Dados técnicos
Tipo de pilha: 2 x 1,5 V AAA
Amplitude de medição
da temperatura: – 9,9 °C - + 49,9 °C
14,2 °F - +121,8 °F
Nota: com uma temperatura medida superior a + 49,9 °C
a indicação “HH” surge no visor.
Com uma temperatura medida inferior a –9,9 °C a indicação “LL” surge no visor.
Cor:
Z31408A: Caixa longitudinal preta
Z31408B: Caixa longitudinal prateada
Z31408C: Caixa larga preta
Z31408D: Caixa larga prateada
49 PT
86663_aur_Funkwecker_Content_LB5.indd 49 21.01.13 13:26
Page 50

Introdução / Segurança
Material fornecido
1 rádio despertador
2 pilhas, 1,5 V
1 manual de instruções
AAA
Segurança
Leia todas as indicações de segurança e
instruções. A inobservância das indicações de segurança e
instruções pode provocar ferimentos graves e / ou incêndio.
GUARDE TODAS AS INDICAÇÕES DE SEGURANÇA
E INSTRUÇÕES PARA FUTURA CONSULTA!
Indicações gerais de segurança
PERIGO DE MORTE E DE
ACIDENTES PARA BEBÉS E CRIANÇAS! Nunca deixe as crianças sem vigi-
lância com o material da embalagem. Existe perigo
50 PT
86663_aur_Funkwecker_Content_LB5.indd 50 21.01.13 13:26
Page 51

Segurança
de asfixia através do material de embalagem. As
crianças subestimam frequentemente os perigos.
Mantenha sempre o aparelho fora do alcance das
crianças. O produto não é um brinquedo.
Este aparelho não deve ser utilizado por pessoas (in-
cluindo crianças) com capacidades físicas, sensoriais
ou mentais limitadas ou pessoas sem experiência e/
ou conhecimento, a não ser que estas sejam supervisionadas por algéum responsável pela sua segurança
ou desta recebam instruções acerca do funcionamento
.
do aparelho. As crianças devem ser vigiadas para
assegurar que não brincam com o aparelho.
PERIGO DE MORTE! As pilhas podem
ser ingeridas, o que constitui perigo de morte. Se
uma pilha for ingerida, procure imediatamente auxílio
médico.
Não coloque o aparelho em funcionamento se este
estiver danificado. Os aparelhos danificados representam perigo de morte.
Tenha em atenção que a garantia não abrange danos
causados por um manuseamento inadequado, pela
inobservância do manual de instruções ou por uma
intervenção por pessoal não autorizado.
51 PT
86663_aur_Funkwecker_Content_LB5.indd 51 21.01.13 13:26
Page 52

Segurança
Nunca desmonte o aparelho. Reparações incorrectas
podem representar perigos significativos para o utilizador. Permita que as reparações sejam efectuadas
apenas por pessoal especializado.
Indicações de segurança
relativas às pilhas
Retire as pilhas do aparelho se este não for utilizado
durante muito tempo.
CUIDADO! PERIGO DE EXPLOSÃO!
Nunca recarregue as pilhas!
Ao colocar as pilhas, tenha em atenção a polaridade
correcta! Esta é indicada no compartimento das pilhas.
Se necessário, limpe os contactos das pilhas e do
aparelho antes da sua colocação.
Utilize apenas pilhas do tipo indicado. Caso contrário,
existe perigo de explosão.
Retire de imediato as pilhas gastas do aparelho. Caso
contrário, existe elevado risco de derrame!
52 PT
86663_aur_Funkwecker_Content_LB5.indd 52 21.01.13 13:26
Page 53

Segurança / Utilização
Em caso de inobservância das indicações mencionadas,
as pilhas podem ser descarregadas para além da
sua voltagem final. Neste caso, subsiste o perigo de
derrame. Se as pilhas começarem a derramar ácido
dentro do aparelho, retire-as imediatamente para evitar danos no mesmo!
As pilhas não devem ser depositadas no lixo doméstico!
Cada consumidor é legalmente obrigado a eliminar
correctamente as pilhas!
Mantenha as pilhas fora do alcance das crianças, não
as atire para o fogo, proteja-as contra curto-circuitos
e não as desmonte.
Evite o contacto com a pele, olhos e mucosas. No
caso de contacto com o ácido da pilha, lave a zona
.
,
afectada com água em abundância e / ou consulte
um médico!
Utilização
Certifique-se de que o aparelho está assente numa
base estável.
53 PT
86663_aur_Funkwecker_Content_LB5.indd 53 21.01.13 13:26
Page 54

Utilização
A
n
a
b
S
a
D
e
N
a
n
S
O
s
d
n
Não instale o aparelho nas proximidades de fontes de
interferência tais como televisor, computador, muros
largos, etc. A recepção do sinal de radiofrequência
pode ser assim reduzida.
Não instale o aparelho em edifícios em betão armado,
tais como aeroportos, arranha-céus, fábricas ou caves.
A recepção do sinal de radiofrequência pode ser fortemente influenciado.
Não inicie a recepção num veículo em movimento
como, por exemplo, num automóvel ou comboio. A
recepção do sinal de radiofrequência pode interferir
com o sistema electrónico dos veículos.
Não exponha o aparelho a temperaturas inferiores a
–20 °C durante um período de tempo prolongado.
i
r
Colocar o rádio despertador em
funcionamento
Antes da primeira utilização remova a película de
protecção.
Abra o compartimento das pilhas
do aparelho.
54 PT
20
na parte traseira
86663_aur_Funkwecker_Content_LB5.indd 54 21.01.13 13:26
Page 55

Utilização
,
.
Insira duas pilhas (AAA).
Nota: Tenha em atenção a polaridade correcta.
Esta é indicada no compartimento das pilhas.
Feche o compartimento das pilhas.
Assim que a pilha estiver colocada, o rádio despertador
inicia a recepção do sinal. Após 3–10 minutos é indicada
a hora e a data correctas. Durante a recepção, todos os
botões à excepção do botão DOWN
SNOOZE- / LIGHT
19
são desactivados. Pode interromper
11
e do botão
a recepção do sinal de radiofrequência, prima o botão
DOWN. Prima e mantenha premido o botão DOWN para
reiniciar a recepção.
Nota: Não mude o local do rádio despertador durante
a recepção. Caso contrário, podem surgir interferências
na recepção.
Sinal de radiofrequência (DCF):
O sinal DCF (emissor de sinal temporal) consiste em impulsos temporais, emitidos por um dos relógios mais precisos
do mundo, nas proximidades de Frankfurt/Main, Alemanha – varia 1 segundo em 1 milhão de anos.
55 PT
86663_aur_Funkwecker_Content_LB5.indd 55 21.01.13 13:26
Page 56

Utilização
A
O seu rádio despertador recebe estes sinais em excelentes
condições até uma distância de cerca de 1500 km de
Frankfurt / Main. Normalmente, a recepção do sinal de
radiofrequência tem uma duração de aprox. 3–10 minutos.
A recepção do sinal pode ser limitada de forma significativa por obstáculos (por ex. paredes em betão) ou fontes
de interferência (por ex. outros aparelhos eléctricos). Se
necessário, altere a localização do rádio despertador
(por ex., aproximando-o de uma janela), caso se verifiquem
dificuldades de recepção.
Utilizar a indicação de 12/24 horas
Prima o botão UP
de 12 horas e de 24 horas.
Nota: O símbolo AM representa, no formato de
12 horas, a manhã, PM
56 PT
13
para alternar entre o formato
representa a tarde.
86663_aur_Funkwecker_Content_LB5.indd 56 21.01.13 13:26
Page 57

Utilização
.
Indicar a temperatura em °C /°F
A temperatura ambiente actual
Prima o botão DOWN
de temperatura Celsius e Fahrenheit.
11
9
é indicada no visor LCD.
para alternar entre as escalas
Configurar manualmente a hora, o
fuso horário e o idioma do dia da
semana
Mantenha a tecla MODE
12
premida durante aprox.
3 segundos. A indicação dos minutos
tente.
Prima o botão UP ou DOWN
o fuso horário desejado (–12 horas até + 12 horas).
Nota: Caso se encontre num país em que ainda re-
ceba o sinal de radiofrequência DCF, mas cuja hora
real é divergente, pode utilizar o ajuste do fuso horário
para configurar a hora real.
Caso se encontre, por exemplo, num país cuja hora
local seja uma hora antes do fuso horário do centro
11, 13
4
fica intermi-
para configurar
57 PT
86663_aur_Funkwecker_Content_LB5.indd 57 21.01.13 13:26
Page 58

Utilização
da Europa (CET), ajuste o fuso horário para +01. O
relógio está ainda controlado pelo DCF, mas o horário
passa a apresentar mais uma hora.
Prima o botão MODE para confirmar a sua introdução.
Configure a hora, os minutos, o ano, o dia e o idioma
do dia da semana da mesma forma.
Nota: Estão disponíveis os seguintes idiomas:
GER = Alemão
ENG = Inglês
DAN = Dinamarquês
ESP = Espanhol
NET = Neerlandês
ITA = Italiano
FRA = Francês
Configurar alarme
O rádio despertador dispõe de duas funções de
alarme. Prima e mantenha premido
ou o botão SET
alarme 2. A indicação das horas
10
para configurar o alarme 1 ou
17
o botão SET
na hora de alarme
pisca no visor.
58 PT
14
86663_aur_Funkwecker_Content_LB5.indd 58 21.01.13 13:26
Page 59

Utilização
Prima o botão UP ou DOWN
as horas. Prima o botão MODE
sua introdução. A indicação dos minutos
.
termitente no visor.
Prima o botão UP ou DOWN para configurar os minu-
11, 13
12
para confirmar a
para configurar
4
fica in-
tos. Prima o botão MODE para confirmar a sua introdução.
Activar / Desactivar alarme
Prima o botão SET
activar o respectivo alarme.
14
ou o botão SET
10
para
O símbolo de alarme ou surge no visor LCD.
Prima o botão SET ou o botão SET para desacti-
var o respectivo alarme.
Utilizar o botão SNOOZE / LIGHT
Prima durante o sinal de alarme o botão SNOOZE/
LIGHT
19
para activar a função de adormecer.
59 PT
86663_aur_Funkwecker_Content_LB5.indd 59 21.01.13 13:26
Page 60

Utilização
O sinal de alarme pára e as indicações ou e Zz
piscam no visor. O sinal de alarme é emitido novamente após aprox. 5 minutos.
Prima um qualquer botão, à excepção de SNOOZE /
LIGHT
19
para desactivar a função de snooze.
Nota: Prima um qualquer botão, à excepção de
SNOOZE / LIGHT para parar o sinal de alarme.
Nota: A iluminação de fundo acende quando prime
o botão SNOOZE / LIGHT.
Substituir as pilhas
O símbolo de pilha
6
surge no visor LCD quando as
pilhas estão fracas. Certifique-se de que substitui as pilhas
atempadamente.
Abra o compartimento das pilhas
20
na parte traseira
do aparelho.
Retire as pilhas gastas.
Insira duas pilhas (AAA).
Nota: Tenha em atenção a polaridade correcta.
Esta é indicada no compartimento
60 PT
das pilhas.
86663_aur_Funkwecker_Content_LB5.indd 60 21.01.13 13:26
Page 61

Utilização / Resolução de avarias
Feche o compartimento das pilhas.
Nota: se demorar mais tempo, perderá todos os
valores gravados.
Resolução de avarias
O aparelho contém componentes electrónicos sensíveis.
Por isso, é possível que aparelhos com radiotransmissão na proximidade imediata deste interfiram com o
seu funcionamento. Estes podem ser por ex. telemóveis,
walkie-talkies, aparelhos remotos CB, telecomandos e
microondas. Caso surjam indicações de erro no visor,
afaste tais aparelhos da proximidade do aparelho.
Cargas electroestáticas podem causar interferências
no funcionamento. No caso de interferências no funcionamento deste tipo, retire as pilhas durante um
curto espaço de tempo e volte a colocá-las.
61 PT
86663_aur_Funkwecker_Content_LB5.indd 61 21.01.13 13:26
Page 62

Limpeza e conservação / Eliminação
A
a
e
e
A
P
e
p
P
p
Limpeza e conservação
Nunca utilize líquidos ou detergentes, pois estes
danificam o aparelho.
Limpe o aparelho apenas por fora com um pano
seco e macio.
Eliminação
A embalagem é feita de materiais não poluentes
que podem ser eliminados nos contentores de
reciclagem locais.
As possibilidades de reciclagem dos artigos utilizados
poderão ser averiguadas no seu Município ou Câmara
Municipal.
r
r
Não deposite o seu produto usado no lixo
doméstico, a favor da protecção do ambiente.
Proceda antes a uma eliminação responsável.
Pode obter informações sobre os pontos de
62 PT
86663_aur_Funkwecker_Content_LB5.indd 62 21.01.13 13:26
Page 63

Eliminação
recolha e os respectivos horários junto da administração responsável.
As pilhas avariadas ou gastas têm de ser recicladas de
acordo com a directiva 2006/66/CE. Entregue as pilhas
e / ou o aparelho nos locais específicos destinados à sua
recolha.
Pb
Danos ambientais devido à eliminação
incorrecta das pilhas!
As pilhas não devem ser eliminadas no lixo doméstico.
Podem conter metais pesados tóxicos e são consideradas
resíduos perigosos. Os símbolos químicos dos metais
pesados são os seguintes: Cd = cádmio, Hg = mercúrio,
Pb = chumbo. Como tal, deposite as pilhas utilizadas num
ponto de recolha adequado do seu município.
63 PT
86663_aur_Funkwecker_Content_LB5.indd 63 21.01.13 13:26
Page 64

S
O
T
C
D
Informações
Informações
Declaração de conformidade
A empresa OWIM GmbH & Co. KG, Stiftsbergstraße 1,
D-74167 Neckarsulm, declara, sob exclusiva responsabilidade que o produto: Rádio despertador, modelo-n.º.:
Z31408A /Z31408B / Z31408C / Z31408D, versão:
02/2013, ao qual se refere a presente declaração, se
encontra em conformidade com as normas / documentos
I
normativos da Directiva 1999 / 5 / CE.
Pode encontrar a declaração de conformidade completa
em www.owim.com.
EMC
I
64 PT
86663_aur_Funkwecker_Content_LB5.indd 64 21.01.13 13:26
Page 65

Table of Contents
Introduction
Intended use ............................................................... Page 66
Description of parts .................................................... Page 67
Technical information ................................................. Page 68
Included items ............................................................. Page 69
-
Safety
General safety information ........................................ Page 69
Battery safety instructions ........................................... Page 71
Operation ............................................................... Page 72
Setting the radio-controlled alarm clock
into operation ............................................................. Page 73
Using the 12 / 24 hour display ................................. Page 75
Display temperature in °C /°F .................................. Page 75
Setting the time, time zone and weekday manually ....Page 76
Setting the alarm ......................................................... Page 77
Activating / Deactivating the alarm ........................... Page 78
Using SNOOZE / LIGHT button ................................ Page 78
Changing the batteries ............................................... Page 79
Troubleshooting................................................ Page 79
Cleaning and care ........................................... Page 80
Disposal .................................................................... Page 80
Information
Declaration of conformity........................................... Page 82
65 GB/MT
86663_aur_Funkwecker_Content_LB5.indd 65 21.01.13 13:26
Page 66

Introduction
1
1
1
1
1
1
1
1
1
1
2
Radio alarm clock
Introduction
Keep this manual in a safe place. If you pass
the product on to anyone else, please ensure
that you also pass on all the documentation.
Intended use
The clock shows the time in 12 / 24-hour mode (in hours,
minutes and seconds), the day of the week, the date and
the room temperature. The clock is also equipped with two
different alarm times. The clock is only suitable for operation in enclosed spaces at normal room temperature. Any
other use or modification of the clock constitute improper
use and may result in injury and / or damage to the clock.
The manufacturer is not liable for damage caused by improper use. The clock is not intended for commercial use.
66 GB/MT
86663_aur_Funkwecker_Content_LB5.indd 66 21.01.13 13:26
Page 67

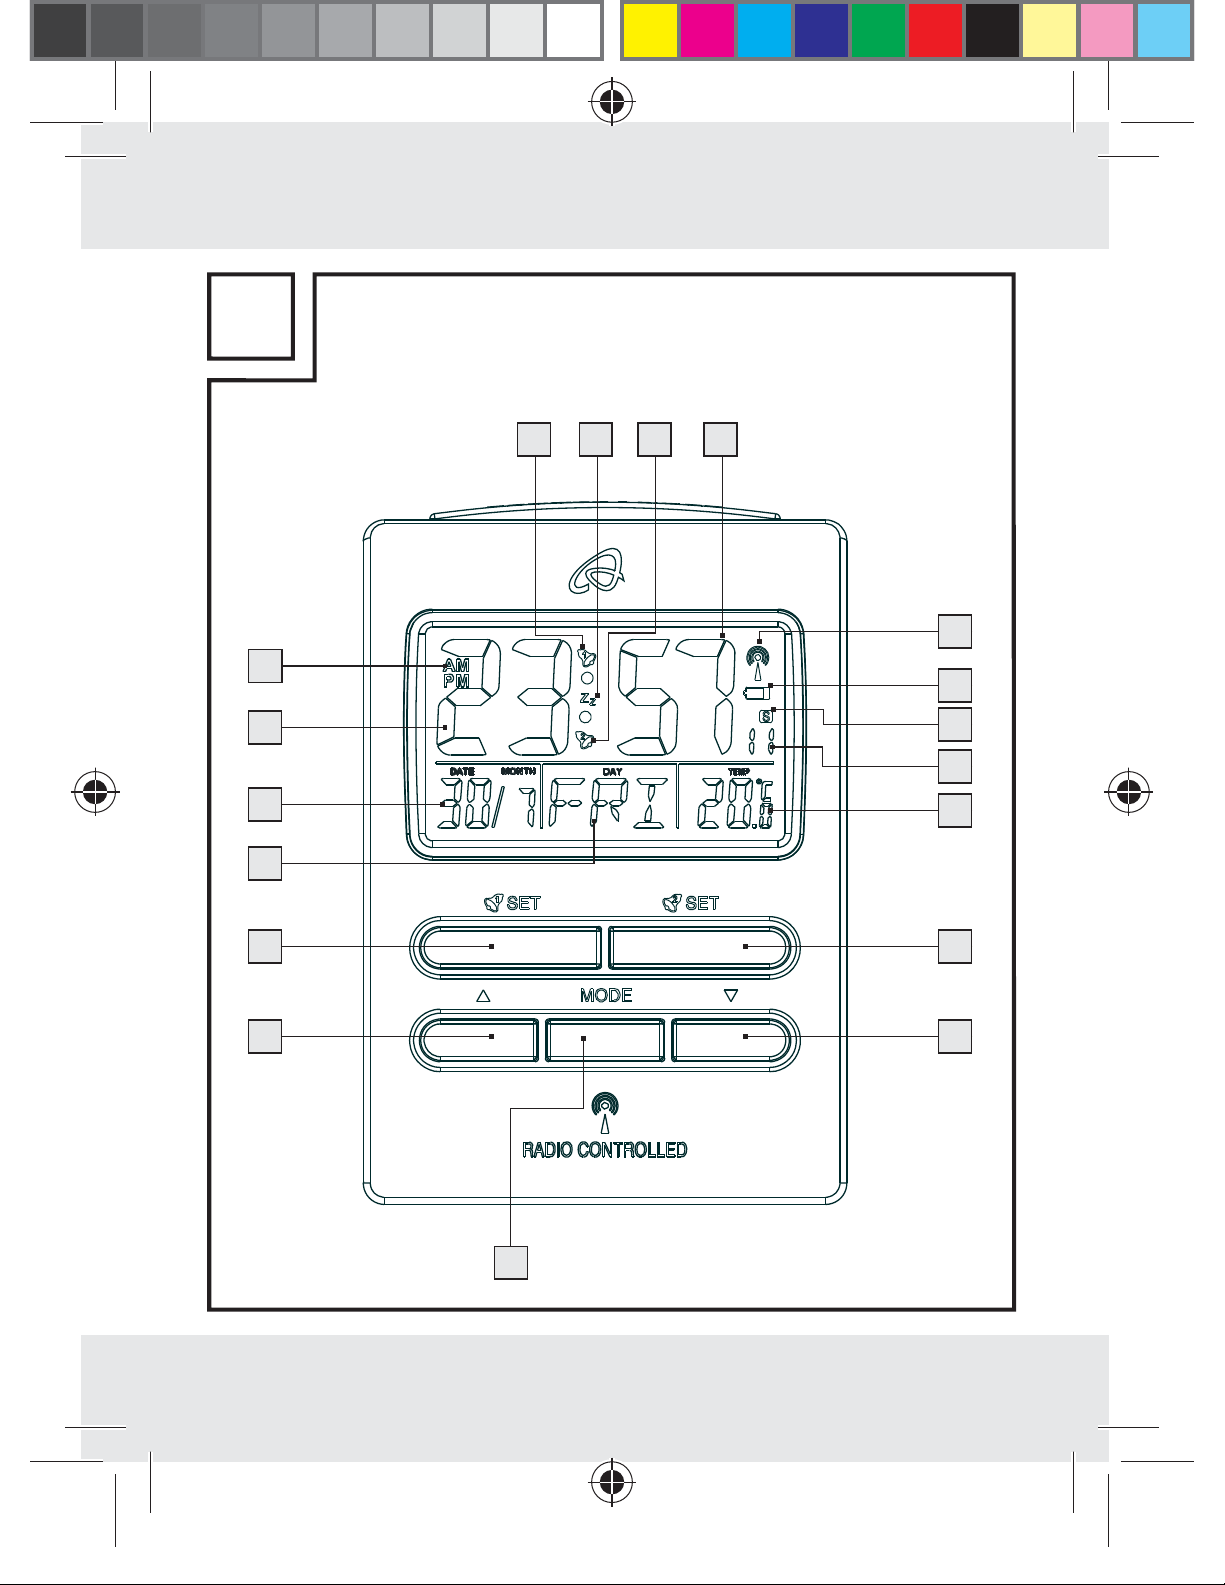
Description of parts
1
Alarm 1
2
ZZ symbol (SNOOZE)
3
Alarm 2
4
Minute display
5
Radio symbol
6
Battery symbol
7
Summer time symbol
8
Second display
9
Inside temperature
Introduction
10
SET button (Alarm 2)
11
DOWN button (“downwards“)
12
MODE button (“set”)
13
UP button (“upwards“)
14
SET button (Alarm 1)
15
Weekday display
16
Date display
17
Hour display
18
AM / PM symbol (12-hour format)
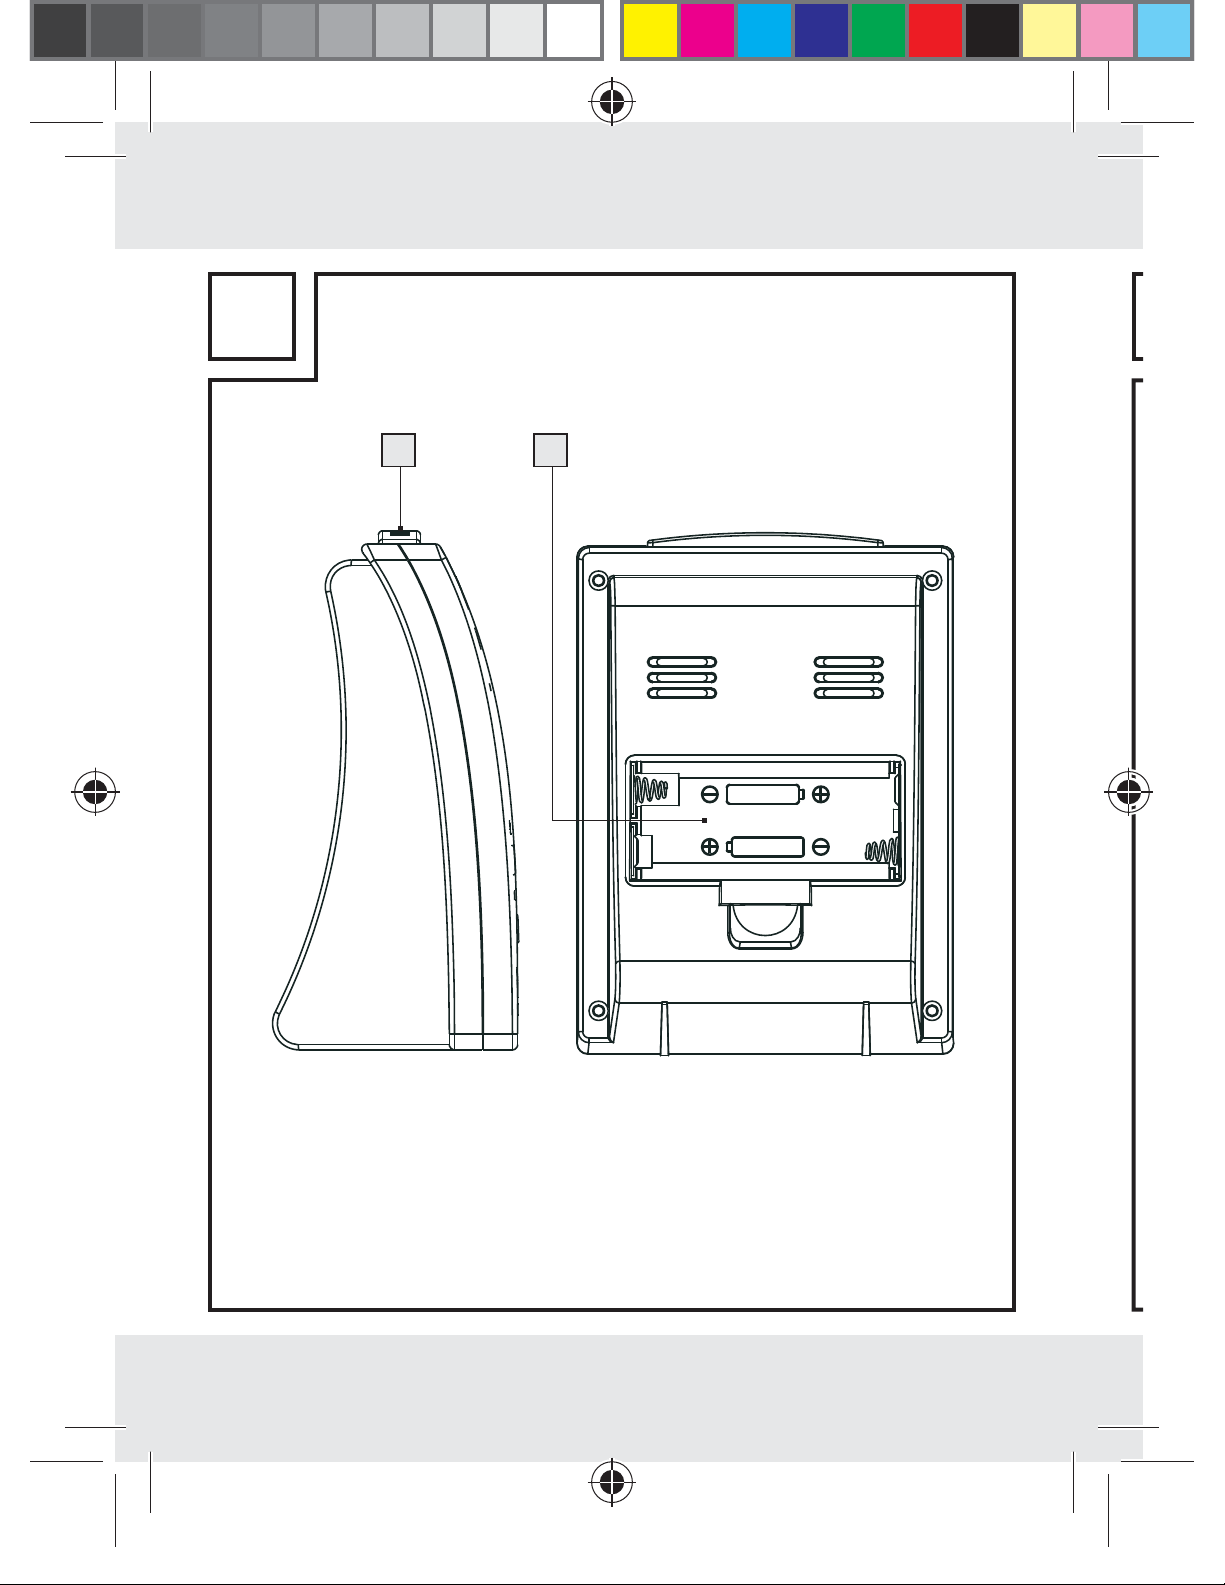
19
SNOOZE / LIGHT button
20
Battery compartment
67 GB/MT
86663_aur_Funkwecker_Content_LB5.indd 67 21.01.13 13:26
Page 68

Introduction
1
2
1
n
a
K
Technical information
Battery type: 2 x 1.5 V AAA
Temperature
measurement range: –9.9 °C - + 49.9 °C
14.2 °F - + 121.8 °F
Note: If the temperature measured is more than + 49.9 °C,
“HH” will appear in the display.
If the temperature measured is less than –9.9 °C, “LL” will
appear in the display.
Colour:
Z31408A: tall with black housing
Z31408B: tall with silver housing
Z31408C: wide with black housing
Z31408D: wide with silver housing
i
I
68 GB/MT
86663_aur_Funkwecker_Content_LB5.indd 68 21.01.13 13:26
Page 69

Included items
1 radio-controlled alarm clock
Introduction / Safety
2 1.5 V
1 operating instructions
,
instructions. Failure to comply with the safety information
and instructions may result in, fire and / or severe injuries.
KEEP ALL THE SAFETY ADVICE AND INSTRUCTIONS
IN A SAFE PLACE FOR FUTURE REFERENCE!
AAA batteries
Safety
Please read all safety information and
General safety
information
DANGER OF LOSS
OF LIFE OR ACCIDENT TO INFANTS
AND CHILDREN! Never leave children
69 GB/MT
86663_aur_Funkwecker_Content_LB5.indd 69 21.01.13 13:26
Page 70

Safety
unsupervised with the packaging material. The packaging material represents a danger of suffocation.
Children frequently underestimate the dangers. Always
keep children away from the device. Do not allow the
device to be used as a toy.
This device is not intended to be used by persons (in-
cluding children) with restricted physical, sensory or
mental abilities or with insufficient experience and/or
knowledge, unless they are supervised by a person who
is responsible for their safety or they have received instruction on how to use the device from such a responsible person. Children should be supervised in order
to ensure that they do not play with the device.
DANGER TO LIFE! Batteries can be
swallowed, which may represent a danger to life. If a
battery has been swallowed, medical help is required
immediately.
Do not operate the device if it is damaged. Damaged
devices could put your life at risk.
Please note that damage arising from improper handling,
non-observance of the operating instructions or interference with the inside of the device by unauthorised
persons is excluded from the warranty.
70 GB/MT
86663_aur_Funkwecker_Content_LB5.indd 70 21.01.13 13:26
Page 71

Safety
Never take the device apart. Improper repairs may
place the user in considerable danger. Repairs should
only be carried out by specialist personnel.
Battery safety
instructions
-
-
Remove the batteries from the device if they have not
been used for a long period.
CAUTION! DANGER OF EXPLOSION!
The batteries must never be recharged!
Make sure you insert the batteries with the correct
polarity! This is indicated in the battery compartment.
,
If necessary clean the contacts on the batteries and
on the device before inserting them.
Only use batteries of the specified type. Otherwise
there is danger of explosion.
Remove exhausted batteries from the device immedi-
ately. There is an increased danger of leaks!
If you disregard the above instructions and advice,
your batteries may discharge beyond their minimum
71 GB/MT
86663_aur_Funkwecker_Content_LB5.indd 71 21.01.13 13:26
Page 72

Safety / Operation
voltage, thus increasing the chance of leakage. If the
batteries in your device have leaked, remove them im-
mediately to prevent damage to the device!
Batteries do not belong in household refuse!
Every consumer is obliged to dispose of batteries
properly in accordance with the regulations!
Keep batteries away from children. Do not throw
batteries into a fire. Never short-circuit them or take
them apart.
Do not let the fluid from a leaking battery come into
contact with your skin, eyes or mucous membranes.
Any parts of the body coming into contact with battery
acid should be rinsed off with copious amounts of
water and / or a doctor contacted if necessary!
Operation
Make sure that the device is standing safely on a
stable surface.
Do not place the device near to sources of interference
such as televisions, computers, thick walls, etc. These
may disrupt reception of the radio signal.
72 GB/MT
86663_aur_Funkwecker_Content_LB5.indd 72 21.01.13 13:26
Page 73

Operation
Do not use the clock in reinforced concrete buildings,
-
e. g. airports, high-rises, factories or basements. This
can seriously disrupt reception of the radio signal.
Do not start radio reception in a moving vehicle, e. g.
car or train. Reception of the radio signal by the device
can disrupt the vehicle electronics.
Do not expose the clock to temperatures below --20 °C
for any length of time.
Setting the radio-controlled alarm
clock into operation
Remove the protective foil before first use.
Open the battery compartment
clock.
Insert two AAA batteries.
Note: Make sure that the polarity is correct when
you insert the batteries. This is indicated in the battery
compartment.
Close the battery compartment.
20
on the back of the
73 GB/MT
86663_aur_Funkwecker_Content_LB5.indd 73 21.01.13 13:26
Page 74

Operation
R
e
o
a
T
As soon as the batteries are inserted, automatic reception
of the radio signal begins. The correct time and the date
are displayed after 3–10minutes. During reception, all
buttons are deactivated except the DOWN button
the SNOOZE / LIGHT button
19
. You can stop the reception
11
and
of the radio signal by pressing the DOWN button. To restart
the reception, press and hold down the DOWN button.
Note: Do not change the location of the projection radiocontrolled alarm clock during reception. This may disrupt
reception.
Radio Signal (DCF):
The DCF signal (time signal transmitter) consists of time
impulses, which are transmitted from one of the most
(
accurate clocks in the world, in the proximity of Frankfurt /
Main, Germany – it varies by 1 seconds in 1 million years.
Your radio-controlled alarm clock will receive the time signal under optimum conditions up to a distance of approx.
1,500 km from Frankfurt am Main, Germany. Reception
of the radio signal generally takes approx. 3–10 minutes.
74 GB/MT
86663_aur_Funkwecker_Content_LB5.indd 74 21.01.13 13:26
Page 75

Operation
Reception can be considerably impaired by obstacles
(e.g. concrete walls) or sources of interference (e.g. other
electrical devices). You may have to change the location
of the radio-controlled clock (e.g. near a window) if there
are problems with reception.
t
-
Using the 12 / 24 hour display
Press the UP button
13
to switch between the 12-hour
and the 24-hour format.
Note: AM stand for mornings, PM for afternoons in
the 12-hour format.
.
Display temperature in °C /°F
The current inside temperature
9
is indicated on the LCD.
Press the DOWN button
11
to switch between the
Celsius and Fahrenheit temperature scales.
75 GB/MT
86663_aur_Funkwecker_Content_LB5.indd 75 21.01.13 13:26
Page 76

Operation
E
N
T
F
Setting the time, time zone and
weekday manually
Press and hold down the MODE button
3seconds. The minute display
Press the UP or DOWN button
4
flashes.
11, 13
12
for approx.
to set the
desired time zone (–12 hours to + 12 hours).
Note: Should you be in a country in which the DCF
signal can be received but the time is different to your
current local time, you can use the time zone setting
to have the clock display your current local time. For
example, if you are in a country where the local time
is one hour behind Central European Time (CET), then
you should set the time zone to + 01. The time continues
to be controlled by DCF but the clock shows one hour
I
more.
Press the MODE button to confirm your setting.
Set the hours, minutes, the year, the day and the lan-
guage of the weekday in the same manner.
Note: The following languages are available:
GER = German
ENG = English
DAN = Danish
76 GB/MT
86663_aur_Funkwecker_Content_LB5.indd 76 21.01.13 13:26
Page 77

ESP = Spanish
NET = Dutch
ITA = Italian
Operation
.
FRA = French
Setting the alarm
The radio-controlled alarm clock is equipped with
two alarm functions. Press and hold down the
button
14
or the SET button
Alarm2. The hour indicator
10
to set Alarm1 or
17
of the alarm time
SET
flashes in the display.
Press the UP or DOWN button
Press the MODE button
The minute indicator
12
4
flashes in the display.
11, 13
to set the hours.
to confirm your setting.
Press the UP or DOWN button to set the minutes. Press
the MODE button to confirm your setting.
77 GB/MT
86663_aur_Funkwecker_Content_LB5.indd 77 21.01.13 13:26
Page 78

Operation
T
b
n
Activating / Deactivating the alarm
Press the SET button
14
or the SET button
10
to
activate the relevant alarm.
The alarm symbol or appears in the LC display.
Press the SET button or the SET button to deacti-
vate the alarm.
Using SNOOZE / LIGHT button
Press the SNOOZE /LIGHT button
signal is sounding to activate the snooze function.
The alarm signal is silenced and the displays or
and Zz flash. The alarm signal sounds again after
19
while the alarm
i
approx. 5 minutes.
Press any button apart from the SNOOZE- / LIGHT
button
19
to deactivate the snooze function.
Note: Press any button apart from the SNOOZE- /
LIGHT button to stop the alarm signal.
Note: The backlight illuminates when you press the
SNOOZE / LIGHT button.
78 GB/MT
86663_aur_Funkwecker_Content_LB5.indd 78 21.01.13 13:26
Page 79

Operation / Troubleshooting
Changing the batteries
The battery symbol
6
appears on the LCD when the
batteries are low. Make sure that you replace the batteries
in good time.
Open the battery compartment
20
on the back of the
clock.
Remove the used batteries.
Insert two AAA batteries.
Note: Make sure that the polarity is correct when
you insert the batteries. The correct polarity is shown
inside the battery compartment.
Close the battery compartment.
Note: When replacing the battery, the saved data
will be lost.
Troubleshooting
The device contains delicate electronic components.
This means that if it is placed near an object that
transmits radio signals, it could cause interference.
79 GB/MT
86663_aur_Funkwecker_Content_LB5.indd 79 21.01.13 13:26
Page 80

Troubleshooting / Cleaning and .../ Disposal
C
o
D
w
d
B
w
s
a
o
For example, this can be mobile phones, two-way
radios, CB radios, radio control systems / other remote
controls and microwave devices. If the display indicates
a problem, move such objects away from it.
Electrostatic discharges can lead to malfunctions. In
the case of such malfunctions remove the batteries
briefly and then insert them again.
Cleaning and care
Never use liquids or cleaning agents, as they may
damage the device.
Clean the outside of the device only with a soft, dry cloth.
Disposal
The packaging is made entirely of recyclable
materials, which you may dispose of at local
recycling facilities.
80 GB/MT
86663_aur_Funkwecker_Content_LB5.indd 80 21.01.13 13:26
l
f
Page 81

l
Disposal
Contact your local refuse disposal authority for more details
of how to dispose of your worn-out product.
In the interest of the environment, do not throw
out your product with your household refuse.
Take it to a suitable centre where it can be
disposed of properly. Information on collection
points and their opening hours can be obtained
from your local authority.
Defective or used batteries must be recycled in accordance
with Directive 2006 / 66 / EC. Return batteries and / or the
device via the recycling facilities provided.
.
Improper disposal of rechargeable
Pb
batteries can damage the environment!
Batteries may not be disposed of with the usual domestic
waste. They may contain toxic heavy metals and are
subject to hazardous waste treatment rules and regulations. The chemical symbols for heavy metals are as
follows: Cd = cadmium, Hg = mercury, Pb = lead. That is
81 GB/MT
86663_aur_Funkwecker_Content_LB5.indd 81 21.01.13 13:26
Page 82

Disposal / Information
E
S
B
F
R
E
why you should dispose of used batteries at a local collection point.
Information
Declaration of conformity
We, OWIM GmbH & Co. KG, Stiftsbergstraße 1,
D-74167 Neckarsulm, hereby declare under our sole responsibility that the product: Radio alarm clock, Model
No.: Z31408A/Z31408B/Z31408C/Z31408D, Version:
02/2013, to which this declaration refers, complies with
the standards /normative documents of 1999 / 5 / EC.
The complete declaration of conformity can be viewed at:
www.owim.com
EMC
I
82 GB/MT
86663_aur_Funkwecker_Content_LB5.indd 82 21.01.13 13:26
Page 83

Inhaltsverzeichnis
-
Einleitung
Bestimmungsgemäße Verwendung ............................Seite 84
Teilebeschreibung ........................................................Seite 85
Technische Daten.........................................................Seite 86
Lieferumfang ................................................................Seite 87
Sicherheit .................................................................Seite 87
Allgemeine Sicherheitshinweise ..................................Seite 88
Sicherheitshinweise zu Batterien .................................Seite 89
Bedienung ............................................................... Seite 91
Funkwecker in Betrieb nehmen ...................................Seite 92
12 / 24-Stundenanzeige verwenden ......................... Seite 93
Temperatur in °C / °F anzeigen.................................Seite 94
Zeit, Zeitzone und Sprache des Wochentages
manuell einstellen ........................................................Seite 94
Alarm einstellen ...........................................................Seite 96
:
Alarm aktivieren / deaktivieren ................................... Seite 96
SNOOZE- / LIGHT-Taste verwenden.......................... Seite 97
Batterien wechseln .......................................................Seite 98
Fehlerbehebung ................................................Seite 98
Reinigung und Pflege ...................................Seite 99
Entsorgung .............................................................Seite 99
Informationen
Konformitätserklärung .................................................Seite 101
83 DE/AT/CH
86663_aur_Funkwecker_Content_LB5.indd 83 21.01.13 13:26
Page 84

Einleitung
k
E
1
1
1
1
1
1
1
1
Funkwecker
Einleitung
Bewahren Sie diese Anleitung gut auf. Händigen
Sie alle Unterlagen bei Weitergabe des Gerätes
an Dritte ebenfalls mit aus.
Bestimmungsgemäße Verwendung
Das Gerät zeigt die Zeit im 12- / 24-Modus (in Stunden,
Minuten und Sekunden), den Wochentag, das Datum und
die Raumtemperatur an. Das Gerät
zwei
verschiedene Alarmzeiten. Das Gerät ist nur für den
verfügt weiter über
Betrieb in geschlossenen Räumen bei normaler Zimmertemperatur geeignet. Andere Verwendungen oder Veränderungen des Gerätes gelten als nicht bestimmungsgemäß
und können Verletzungsgefahren und /oder Beschädigungen
des Gerätes nach sich ziehen. Für aus bestimmungswidriger
Verwendung entstandene Schäden übernimmt der Hersteller
84 DE/AT/CH
86663_aur_Funkwecker_Content_LB5.indd 84 21.01.13 13:26
Page 85

Einleitung
keine Haftung. Das Gerät ist nicht für den gewerblichen
Einsatz bestimmt.
Teilebeschreibung
1
Alarm 1
2
ZZ-Symbol (SNOOZE)
3
Alarm 2
4
Minuten-Anzeige
5
Funk-Symbol
6
Batterie-Symbol
7
Sommerzeit-Symbol
8
Sekunden-Anzeige
9
Innentemperatur
10
SET-Taste (Alarm 2)
11
DOWN-Taste („abwärts“)
12
MODE-Taste („einstellen“)
13
UP-Taste („aufwärts“)
r
r
86663_aur_Funkwecker_Content_LB5.indd 85 21.01.13 13:26
14
SET-Taste (Alarm 1)
15
Wochentag-Anzeige
16
Datums-Anzeige
17
Stunden-Anzeige
85 DE/AT/CH
Page 86

Einleitung
1
2
1
A
h
s
B
A
18
AM- / PM-Symbol (12-Stunden-Format)
19
SNOOZE- / LIGHT-Taste
20
Batteriefach
Technische Daten
Batterietyp: 2 x 1,5 V AAA
Temperaturmessbereich: –9,9 °C - + 49,9 °C
14,2 °F - +121,8 °F
Hinweis: Bei einer gemessenen Temperatur von über
+ 49,9 °C wird die Anzeige „HH“ im Display angezeigt.
Bei einer gemessenen Temperatur von unter –9,9 °C wird
die Anzeige „LL“ im Display angezeigt.
Farbe:
Z31408A: hochkant stehendes schwarzes Gehäuse
Z31408B: hochkant stehendes silbernes Gehäuse
Z31408C: breites schwarzes Gehäuse
Z31408D: breites silbernes Gehäuse
86 DE/AT/CH
86663_aur_Funkwecker_Content_LB5.indd 86 21.01.13 13:26
Page 87

Lieferumfang
1 Funkwecker
Einleitung / Sicherheit
2 Batterien, 1,5 V
AAA
1 Bedienungsanleitung
Sicherheit
Lesen Sie alle Sicherheitshinweise und
Anweisungen. Versäumnisse bei der Einhaltung der Sicherheitshinweise und Anweisungen können Brand und / oder
schwere Verletzungen verursachen.
BEWAHREN SIE ALLE SICHERHEITSHINWEISE UND
ANWEISUNGEN FÜR DIE ZUKUNFT AUF!
87 DE/AT/CH
86663_aur_Funkwecker_Content_LB5.indd 87 21.01.13 13:26
Page 88

Sicherheit
Allgemeine
Sicherheitshinweise
LEBENS- UND UN-
FALLGEFAHR FÜR KLEINKINDER UND
KINDER! Lassen Sie Kinder niemals unbe-
aufsichtigt mit dem Verpackungsmaterial. Es besteht
Erstickungsgefahr durch Verpackungsmaterial. Kinder
unterschätzen häufig die Gefahren. Halten Sie Kinder
stets vom Gerät fern. Das Gerät ist kein Spielzeug.
Dieses Gerät ist nicht dafür bestimmt, durch Personen
(einschließlich Kinder) mit eingeschränkten physischen,
sensorischen oder geistigen Fähigkeiten oder mangels
Erfahrung und / oder mangels Wissen benutzt zu
werden, es sei denn, sie werden durch eine für ihre
Sicherheit zuständige Person beaufsichtigt oder erhielten von ihr Anweisungen, wie das Gerät zu benutzen
ist. Kinder sollten beaufsichtigt werden, um sicherzustellen, dass sie nicht mit dem Gerät spielen.
LEBENSGEFAHR! Batterien können
verschluckt werden, was lebensgefährlich sein kann.
Ist eine Batterie verschluckt worden, muss sofort medizinische Hilfe in Anspruch genommen werden.
88 DE/AT/CH
86663_aur_Funkwecker_Content_LB5.indd 88 21.01.13 13:26
Page 89

Sicherheit
Nehmen Sie das Gerät nicht in Betrieb, wenn es
beschädigt ist. Beschädigte Geräte bedeuten Lebensgefahr.
Beachten Sie, dass Beschädigungen durch unsach-
,
-
gemäße Handhabung, Nichtbeachtung der Bedienungsanleitung oder Eingriff durch nicht autorisierte
Personen von der Garantie ausgeschlossen sind.
Nehmen Sie das Gerät keinesfalls auseinander.
Durch unsachgemäße Reparaturen können erhebliche
Gefahren für den Benutzer entstehen. Lassen Sie
Reparaturen nur von Fachkräften durchführen.
Sicherheitshinweise
zu Batterien
-
Entfernen Sie die Batterien, wenn sie längere Zeit
nicht verwendet worden sind, aus dem Gerät.
VORSICHT! EXPLOSIONSGEFAHR!
Laden Sie Batterien niemals wieder auf!
Achten Sie beim Einlegen auf die richtige Polarität!
Diese wird im Batteriefach angezeigt.
89 DE/AT/CH
86663_aur_Funkwecker_Content_LB5.indd 89 21.01.13 13:26
Page 90

Sicherheit
Reinigen Sie Batterie- und Gerätekontakt vor dem
Einlegen falls erforderlich.
Verwenden Sie nur Batterien des angegebenen Typs.
Andernfalls besteht Explosionsgefahr.
Entfernen Sie die erschöpften Batterien umgehend
aus dem Gerät. Es besteht erhöhte Auslaufgefahr!
Bei Nichtbeachtung der vorher genannten Hinweise
können die Batterien über ihre Endspannung hinaus
entladen werden. Es besteht dann die Gefahr des Auslaufens. Falls die Batterien in Ihrem Gerät ausgelaufen
sein sollten, entnehmen Sie diese sofort, um Schäden
am Gerät vorzubeugen!
Batterien gehören nicht in den Hausmüll!
Jeder Verbraucher ist gesetzlich verpflichtet, Batterien
ordnungsgemäß zu entsorgen!
Halten Sie Batterien von Kindern fern, werfen Sie die
Batterien nicht ins Feuer, schließen Sie sie nicht kurz
und nehmen Sie sie nicht auseinander.
Vermeiden Sie den Kontakt mit Haut, Augen und
Schleimhäuten. Bei Kontakt mit Batteriesäure spülen
Sie die betroffene Stelle mit reichlich Wasser ab
und / oder suchen Sie einen Arzt auf!
90 DE/AT/CH
86663_aur_Funkwecker_Content_LB5.indd 90 21.01.13 13:26
Page 91

Bedienung
Bedienung
Achten Sie darauf, dass das Gerät auf einem stabilen
Untergrund sicher steht.
Stellen Sie das Gerät nicht in der Nähe von Stör-
quellen wie Fernseher, Computer, dicken Mauern etc.
auf. Der Empfang des Funksignals kann dadurch
vermindert werden.
-
Stellen Sie das Gerät nicht in Gebäuden aus Stahlbeton,
z. B. Flughäfen, Hochhäusern, Fabriken oder Kellern,
auf. Der Empfang des Funksignals kann stark beeinträchtigt werden.
Starten Sie den Empfang nicht in einem sich bewe-
genden Fahrzeug, z. B. Auto oder Zug. Der Empfang
des Funksignals kann die Elektronik der Fahrzeuge
stören.
Setzen Sie das Gerät nicht über einen längeren Zeit-
raum Temperaturen unter –20 °C aus.
91 DE/AT/CH
86663_aur_Funkwecker_Content_LB5.indd 91 21.01.13 13:26
Page 92

Bedienung
F
D
d
v
s
h
B
F
d
D
o
i
d
F
Funkwecker in Betrieb nehmen
Entfernen Sie vor dem ersten Gebrauch die Schutzfolie.
Öffnen Sie das Batteriefach
20
auf der Rückseite des
Geräts.
Legen Sie zwei Batterien (AAA) ein.
Hinweis: Achten Sie dabei auf die richtige Polarität.
Diese wird im Batteriefach angezeigt.
Schließen Sie das Batteriefach.
Sobald die Batterien eingelegt sind, startet der Funkwecker automatisch den Empfang des Funksignals. Nach
3–10Minuten werden die richtige Zeit und das Datum
angezeigt. Während des Empfangs sind alle Tasten außer
der DOWN-Taste
11
und der SNOOZE- / LIGHT-Taste
19
I
l
deaktiviert. Sie können den Empfang des Funksignals stoppen,
indem Sie die DOWN-Taste drücken. Um den Empfang
neu zu starten, drücken und halten Sie die DOWN-Taste
gedrückt.
Hinweis: Wechseln Sie während des Empfangs nicht den
Standort des Funkweckers. Andernfalls kann es zu Empfangsstörungen kommen.
92 DE/AT/CH
86663_aur_Funkwecker_Content_LB5.indd 92 21.01.13 13:26
Page 93

Bedienung
Funksignal (DCF):
Das DCF-Signal (Zeitsignalsender) besteht aus Zeitimpulsen,
.
die von einer der genauesten Uhren der Welt, in der Nähe
von Frankfurt / Main, Deutschland, abgegeben werden –
sie variiert um 1 Sekunde in 1 Million Jahren.
Ihr Funkwecker empfängt diese Signale unter optimalen
Bedingungen bis zu einer Distanz von ca. 1.500 km um
Frankfurt / Main. Der Empfang des Funksignals dauert in
der Regel ca. 3–10 Minuten.
Der Empfang kann durch Hindernisse (z. B. Betonwände)
oder Störquellen (z. B. andere elektrische Geräte) erheblich eingeschränkt werden. Verändern Sie gegebenenfalls
den Standort des Funkweckers (z. B. in die Nähe eines
,
Fensters), falls es zu Problemen beim Empfang kommt.
12 / 24-Stundenanzeige verwenden
-
Drücken Sie die UP-Taste
12-Stunden- und dem 24-Stundenformat hin- und herzuschalten.
13
, um zwischen dem
93 DE/AT/CH
86663_aur_Funkwecker_Content_LB5.indd 93 21.01.13 13:26
Page 94

Bedienung
H
G
E
D
E
N
T
F
Hinweis: AM steht im 12-Stundenformat für vormittags,
PM
für nachmittags.
Temperatur in °C / °F anzeigen
Die aktuelle Innentemperatur
gezeigt.
Drücken Sie die DOWN-Taste
Temperaturskalen Celsius und Fahrenheit hin- und herzuschalten.
9
wird im LC-Display an-
11
, um zwischen den
Zeit, Zeitzone und Sprache des
Wochentages manuell einstellen
Drücken und halten Sie die MODE-Taste
3Sekunden gedrückt. Die Minuten-Anzeige
Drücken Sie die UP- oder DOWN-Taste
die gewünschte Zeitzone einzustellen (–12 Stunden
bis + 12 Stunden).
94 DE/AT/CH
11, 13
12
für ca.
4
blinkt.
, um
I
86663_aur_Funkwecker_Content_LB5.indd 94 21.01.13 13:26
Page 95

Bedienung
,
Hinweis: Sollten Sie sich in einem Land befinden, in
dem zwar immer noch das DCF-Signal empfangen
wird, in dem aber die aktuelle Uhrzeit abweicht, können
Sie die Zeitzonen-Einstellung dazu benutzen, um die
Uhr auf die aktuelle Uhrzeit einzustellen.
Befinden Sie sich beispielsweise in einem Land, in dem
die Ortszeit eine Stunde vor der Mitteleuropäischen
Zeit (MEZ) ist, setzen Sie die Zeitzone auf +01. Die
Uhr ist nun immer noch DCF gesteuert, zeigt aber die
Uhrzeit eine Stunde mehr an.
Drücken Sie die MODE-Taste, um Ihre Eingabe zu bestätigen.
Stellen Sie die Stunden, Minuten, das Jahr, den Tag
und die Sprache des Wochentags auf die gleiche
Weise ein.
Hinweis: Folgende Sprachen stehen Ihnen zur Verfügung:
GER = Deutsch
ENG = Englisch
.
DAN = Dänisch
ESP = Spanisch
NET = Niederländisch
ITA = Italienisch
FRA = Französisch
95 DE/AT/CH
86663_aur_Funkwecker_Content_LB5.indd 95 21.01.13 13:26
Page 96

Bedienung
Alarm einstellen
Der Funkwecker verfügt über zwei Alarmfunktionen.
Drücken und halten Sie die
SET-Taste
10
gedrückt, um Alarm1 bzw. Alarm2
SET-Taste
einzustellen. Die Stunden-Anzeige
14
bzw. die
17
der Alarmzeit
blinkt im Display.
Drücken Sie die UP- oder DOWN-Taste
11, 13
, um
die Stunden einzustellen. Drücken Sie die MODETaste
Anzeige
12
, um Ihre Eingabe zu bestätigen. Die Minuten-
4
blinkt im Display.
Drücken Sie die UP- oder DOWN-Taste, um die Minuten
einzustellen. Drücken Sie die MODE-Taste, um Ihre
Eingabe zu bestätigen.
Alarm aktivieren / deaktivieren
Drücken Sie die SET-Taste
Taste
10
, um den betreffenden Alarm zu aktivieren.
Das Alarmsymbol oder erscheint auf dem
LC-Display.
96 DE/AT/CH
86663_aur_Funkwecker_Content_LB5.indd 96 21.01.13 13:26
14
oder die SET-
Page 97

Bedienung
Drücken Sie die SET-Taste oder die SET-Taste,
um den betreffenden Alarm zu deaktivieren.
SNOOZE- / LIGHT-Taste verwenden
Drücken Sie während des Alarmsignals die SNOOZE- /
LIGHT-Taste
19
, um die Schlummerfunktion zu aktivieren.
Das Alarmsignal verstummt und im Display blinken
-
oder
und Zz. Das Alarmsignal ertönt nach ca. 5
Minuten erneut.
Drücken Sie jede beliebige Taste, außer der SNOOZE- /
LIGHT-Taste
19
, um die Schlummerfunktion auszu-
schalten.
Hinweis: Drücken Sie eine beliebige Taste außer
der SNOOZE- / LIGHT-Taste, um das Alarmsignal zu
stoppen.
Hinweis: Die Hintergrundbeleuchtung leuchtet,
wenn Sie die SNOOZE- / LIGHT-Taste drücken.
97 DE/AT/CH
86663_aur_Funkwecker_Content_LB5.indd 97 21.01.13 13:26
Page 98

Bedienung / Fehlerbehebung
F
Batterien wechseln
Das Batterie-Symbol
6
erscheint im LC-Display,
wenn die Batterien schwach sind. Achten Sie darauf, die
Batterien frühzeitig zu wechseln.
Öffnen Sie das Batteriefach
20
auf der Rückseite des
Geräts.
Entnehmen Sie die verbrauchten Batterien.
Legen Sie zwei Batterien (AAA) ein.
Hinweis: Achten Sie dabei auf die richtige Polarität.
Diese wird im Batteriefach
angezeigt.
Schließen Sie das Batteriefach.
Hinweis: Beim Batteriewechsel gehen die gespei-
cherten Daten verloren.
Fehlerbehebung
Das Gerät enthält empfindliche elektronische Bauteile.
Daher ist es möglich, dass es durch Funkübertragungsgeräte in unmittelbarer Nähe gestört wird. Dies können
z. B. Mobiltelefone, Funksprechgeräte, CB-Funkgeräte,
98 DE/AT/CH
86663_aur_Funkwecker_Content_LB5.indd 98 21.01.13 13:26
Page 99

Fehlerbehebung / Reinigung ... / Entsorgung
Funkfernsteuerungen / andere Fern bedienungen und
Mikrowellengeräte sein. Treten Fehlanzeigen im Display
auf, entfernen Sie solche Geräte aus der Umgebung
des Gerätes.
Elektrostatische Entladungen können zu Funktions-
störungen führen. Entfernen Sie bei solchen Funktionsstörungen kurzzeitig die Batterien und setzen Sie sie
erneut ein.
,
.
-
Reinigung und Pflege
Verwenden Sie in keinem Fall Flüssigkeiten und keine
Reinigungsmittel, da diese das Gerät beschädigen.
Reinigen Sie das Gerät nur äußerlich mit einem
weichen trockenen Tuch.
Entsorgung
Die Verpackung besteht aus umweltfreundlichen
Materialien, die Sie über die örtlichen Recyclingstellen entsorgen können.
99 DE/AT/CH
86663_aur_Funkwecker_Content_LB5.indd 99 21.01.13 13:26
Page 100

Entsorgung
s
b
W
D
d
Z
a
n
D
w
E
Möglichkeiten zur Entsorgung des ausgedienten Produkts
erfahren Sie bei Ihrer Gemeinde oder Stadtverwaltung.
Werfen Sie Ihr Produkt, wenn es ausgedient
hat, im Interesse des Umweltschutzes nicht in
den Hausmüll, sondern führen Sie es einer fachgerechten Entsorgung zu. Über Sammelstellen
und deren Öffnungszeiten können Sie sich bei
Ihrer zuständigen Verwaltung informieren.
Defekte oder verbrauchte Batterien müssen gemäß Richtlinie 2006 / 66 / EC recycelt werden. Geben Sie Batterien
und / oder das Gerät über die angebotenen Sammeleinrichtungen zurück.
Umweltschäden durch falsche
Pb
Batterien dürfen nicht über den Hausmüll entsorgt werden.
Sie können giftige Schwermetalle enthalten und unterliegen
der Sondermüllbehandlung. Die chemischen Symbole der
Schwermetalle sind wie folgt: Cd = Cadmium, Hg = Queck-
Entsorgung der Batterien!
100 DE/AT/CH
86663_aur_Funkwecker_Content_LB5.indd 100 21.01.13 13:26
 Loading...